Если установщик Windows 11, а возможно и какая-то программа или игра (такое тоже возможно) сообщает о том, что его не устраивает состояние безопасной загрузки и её необходимо включить — сделать это сравнительно легко, но возможны нюансы.
В этой инструкции подробно о способах включить безопасную загрузку на вашем компьютере или ноутбуке, при условии, что это возможно. Обратите внимание, если задача — установка Windows 11, существуют возможности запуска установки и без включенной безопасной загрузки (Secure Boot), например — создание загрузочной флешки в Rufus с отключением проверки совместимости при чистой установке, или обновление с обходом требований для установки.
Проверка состояния безопасной загрузки, особенности работы после включения
Прежде чем начать, о том, где вы можете проверить текущее состояние безопасной загрузки в Windows 11 или Windows 10:
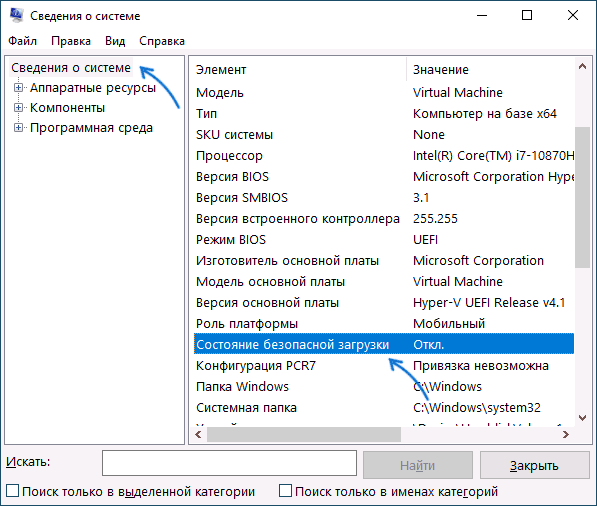
- Нажмите правой кнопкой мыши по кнопке «Пуск», выберите пункт «Выполнить», введите msinfo32 и нажмите Enter. В разделе «Сведения о системе» вы увидите пункт «Состояние безопасной загрузки» с её текущим статусом.
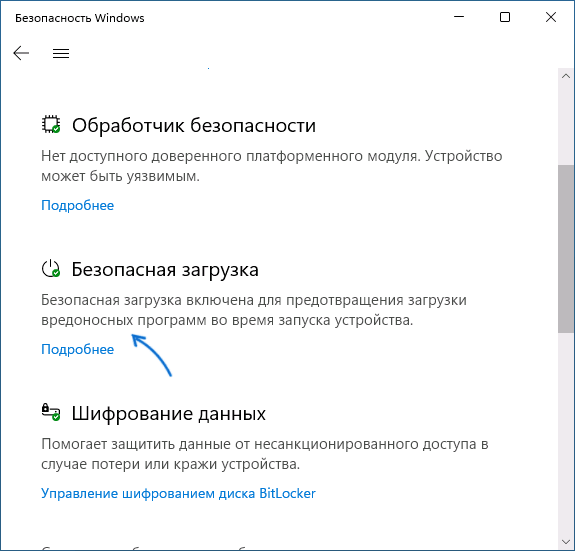
- Можно зайти в окно «Безопасность Windows», например, с помощью значка в области уведомлений и открыть раздел «Безопасность устройства». Если вы наблюдаете там пункт «Безопасная загрузка» с зеленой отметкой, она включена. Иначе — нет.
Ещё один важный момент: загрузка с включенной безопасной загрузкой возможна только для систем, установленных в UEFI-режиме на GPT диск.
Если, к примеру, у вас Windows 10 и установлена в Legacy-режиме на диск MBR, после включения Secure Boot она перестанет загружаться. Возможные варианты действий: конвертировать диск в GPT с помощью mbr2gpt.exe и включить UEFI-загрузку, либо использовать вариант с чистой установкой с флешки и обходом требований Windows 11, как было указано в начале статьи.
Включение безопасной загрузки Secure Boot в БИОС/UEFI
Само включение безопасной загрузки или Secure Boot выполняется не в Windows 11/10, а в БИОС/UEFI вашего компьютера или ноутбука. Для того, чтобы включить её, необходимо:
- Зайти в БИОС при включении/перезагрузке устройства. На ноутбуках для этого обычно используется клавиша F2 (или сочетание Fn+F2), которую необходимо ритмично нажимать сразу после появления заставки производителя (но бывают и другие варианты клавиши), на ПК как правило используется клавиша Delete. Более подробно: Как зайти в БИОС/UEFI на компьютере или ноутбуке.
- Найти раздел БИОС, на котором доступна опция включения (установка в Enabled) функции Secure Boot. Учитывайте, что на очень старых компьютерах такой настройки может и не быть. Как правило, она располагается где-то в разделе Security, Boot, System Configuration, иногда — Advanced Settings. Несколько примеров расположения будут приведены далее.
- Сменить состояние Secure Boot на Enabled (если ранее выполнялась очистка ключей Secure Boot, восстановить их), сохранить настройки БИОС/UEFI (обычно выполняется клавишей F10 или на вкладке Exit) и перезагрузиться обратно в систему.
Примеры расположения опции для включения безопасной загрузки (Secure Boot)
Ниже — несколько примеров, где можно найти опцию включения безопасной загрузки на разных материнских платах и ноутбуках. У вас может отличаться, но логика везде одна и та же.
Ещё раз отмечу: включить безопасную загрузку можно только в случае, если у вас включен режим загрузки UEFI, а режим Legacy/CSM отключен, иначе опция будет недоступна. В некоторых вариантах БИОС переключение в режим загрузки UEFI выполняется путем выбора типа операционной системы (OS Type) между Windows 11/10/8 и «Other OS» (нужно выбрать Windows).
ASUS
На разных версиях материнских плат и ноутбуков включение Secure Boot реализовано слегка по-разному. Обычно пункт «Secure Boot» можно найти на вкладке «Boot» или «Security». При этом для OS Type может потребоваться выставить Windows UEFI Mode (параметр может и отсутствовать).
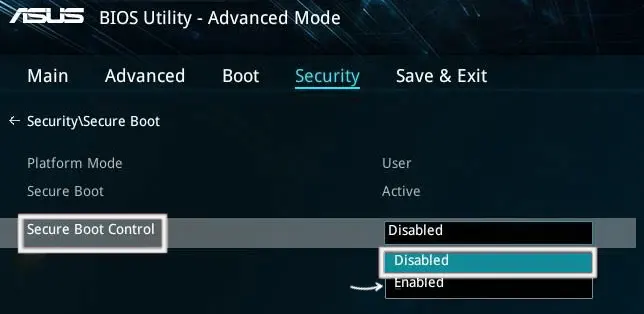
Также, для доступности пункта настройки безопасной загрузки в БИОС может потребоваться перейти в Advanced Mode, обычно — по клавише F7.
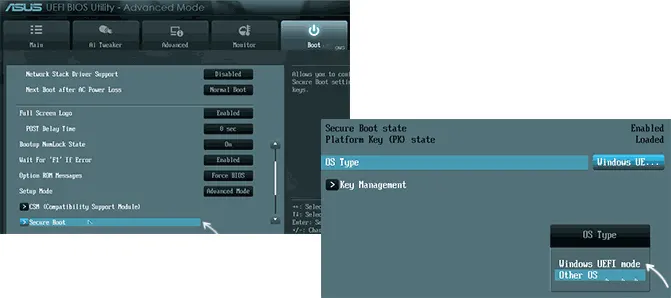
В некоторых случаях может потребоваться восстановление ключей безопасной загрузки, обычно выполняется следующим образом: в Advanced Mode в BIOS на вкладке Boot или в Secure Boot — Key Management выбираем Load Default PK и подтверждаем загрузку ключей по умолчанию.
AsRock
Настройка для включения безопасной загрузки на материнских платах AsRock обычно находится в разделе «Security».

Зайдя в раздел необходимо будет установить значение Secure Boot в Enabled, а если выбор недоступен, включить стандартный Secure Boot Mode и установить ключи по умолчанию (Install default Secure Boot keys).

Acer
Как правило, опция включения Secure Boot на ноутбуках Acer находится либо в разделе Advanced — System Configuration, либо в Boot или Authentication.
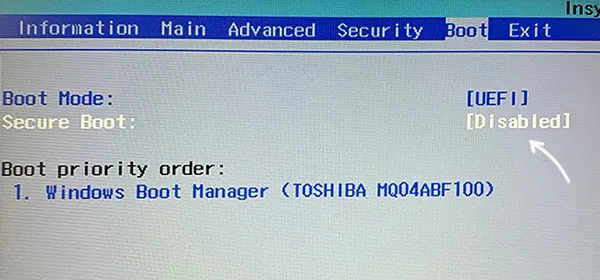
Также помните, о том, что должен быть включен режим загрузки UEFI, а не Legacy/CSM для возможности изменения состояния безопасной загрузки на Enabled.
Lenovo
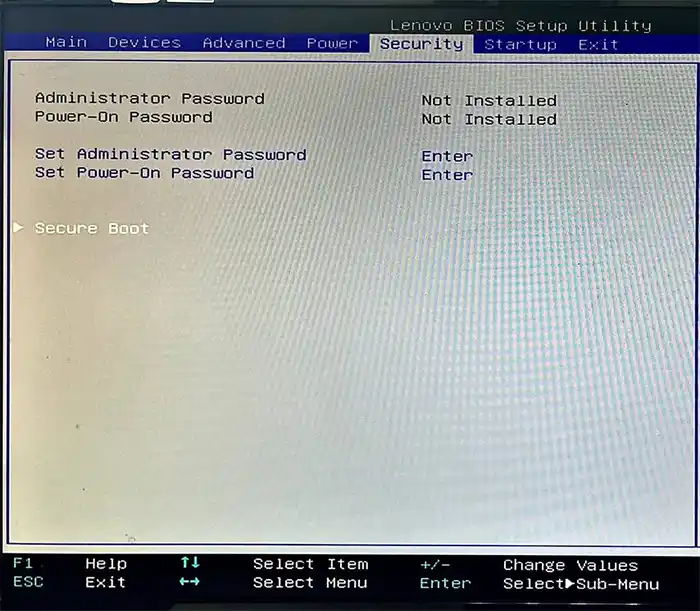
ПК и ноутбуки Lenovo имеют разные варианты интерфейса БИОС, но обычно нужная опция находится на вкладке Security, как на фото ниже:

Ещё один пример с ноутбука Lenovo:
Gigabyte
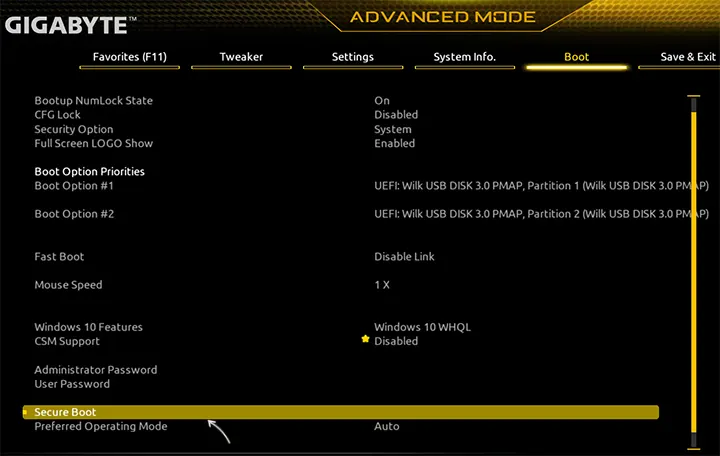
Варианты отключения Secure Boot на материнских платах и ноутбуках Gigabyte могут отличаться, обычно порядок действий следующий:
- На вкладке Boot или BIOS отключить CSM Support, и выбрать тип операционной системы или установить пункт Windows 8/10 Features в, соответственно, Windows 8/10, а не Other OS.
- После этого должен появиться пункт Secure Boot, в который необходимо зайти, чтобы включить безопасную загрузку.
Несколько дополнительных мест расположения опции включения Secure Boot (устанавливаем в Enabled) на старых Dell, Gigabyte, HP:

Также, если в вашем интерфейсе БИОС предусмотрен поиск, можно использовать его:

В случае, если вы не нашли способа включить безопасную загрузку на вашей материнской плате, либо её не удается перевести в Enabled, укажите её марку и модель в комментариях, я постараюсь подсказать, где именно требуется включать этот параметр. Кстати, часто достаточно просто сбросить настройки БИОС (Load Defaults на вкладке Exit), чтобы включить безопасную загрузку, так как на большинстве современных материнских плат она по умолчанию включена.
Safe Mode is a fundamental feature in Windows 11 that helps users troubleshoot and resolve various issues affecting their systems. However, encountering a situation where Safe Mode fails to function as expected can be quite perplexing. This comprehensive guide is designed to assist you in understanding and addressing the issue of Safe Mode not working in Windows 11.
We’ll delve into the potential reasons behind this problem and provide step-by-step solutions to help you restore Safe Mode’s functionality. By following these methods, you can overcome this challenge and ensure that your system’s diagnostic capabilities remain accessible.
Why My PC Won’t Start in Safe Mode
The inability to start Windows 11 in Safe Mode or exiting out of it can arise from a range of factors. Here are some key reasons behind this issue:
Corrupted System Files: When crucial system files required for Safe Mode are damaged or missing, the mode may fail to initiate properly.
Driver Conflicts: Incompatible or malfunctioning drivers can prevent Safe Mode from functioning as intended.
Malware or Virus Infections: Malicious software can interfere with the initiation of Safe Mode, leading to issues.
Hardware Problems: Faulty hardware components, such as RAM or storage, can hinder the ability to enter Safe Mode.
Boot Configuration Errors: Errors within the boot configuration can disrupt the initiation of Safe Mode.
Fix Safe Mode Not Working in Windows 11
Encountering problems with Safe Mode not working requires a systematic approach to diagnose and rectify the issue. Let’s explore the methods to address this problem and restore Safe Mode functionality.
1. Apply all the Possible Methods to Boot into Safe Mode
When Safe Mode malfunctions, it’s essential to exhaust various methods to ensure you can access this diagnostic mode. There are various ways to boot into Safe Mode on Windows 11:
- Using Start Menu
- Using Settings App
- Using System Configuration
- Using Command Prompt
- From the Windows 11 Sign-In Screen
- From Windows 11 Recovery Drive
- By Forceful Recovery Mode
- Using Windows 11 Installation Device
Ensure to follow all these methods before moving on to troubleshoot the issue.
2. Run the SFC Command
The System File Checker (SFC) command can scan and repair corrupted system files, potentially resolving Safe Mode issues. Here is how to execute the SFC Command:
1. Search for the “Command Prompt,” right-click on its icon, and select Run as Administrator to launch Command Prompt with administrative privileges.
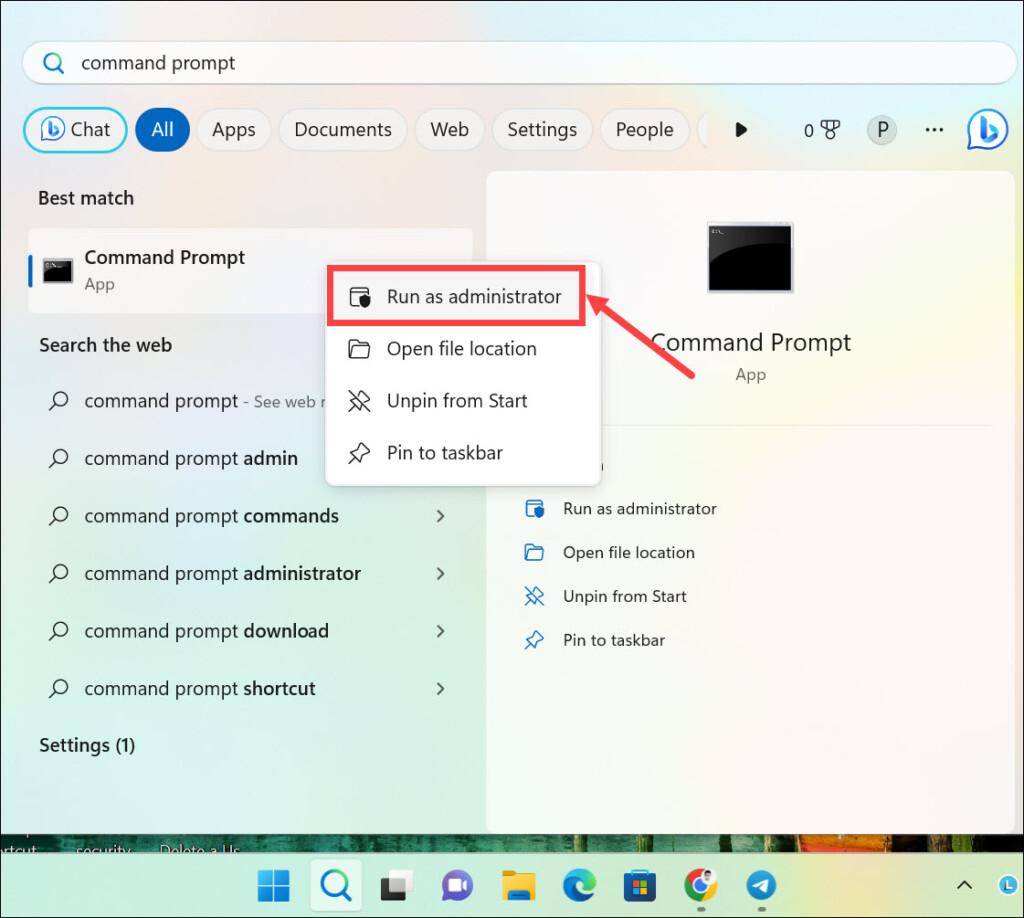
2. On the command line window, type sfc /scannow and press Enter.

3. Allow the scan to complete; this might take some time.
4. After the scan is completed successfully, restart your computer and check if Safe Mode is functional.
3. Run the DISM Command
The Deployment Image Servicing and Management (DISM) command can repair the Windows image, resolving issues that affect Safe Mode. It can be effective in fixing Safe Mode issues. Here is how to run the DISM command using Command Prompt:
1. Open Command Prompt as an administrator by following the procedure mentioned in the previous method.
2. On the command line window, type dism /online /cleanup-image /restorehealth and press Enter.
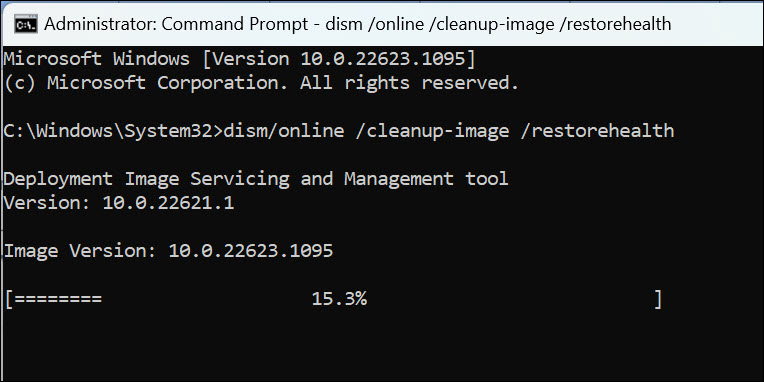
3. Let the process complete.
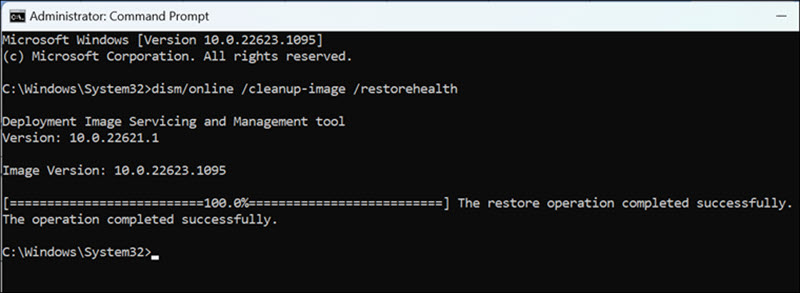
4. After the process finishes, restart your computer and attempt to access Safe Mode.
4. Perform Windows 11 System Restore
Restoring your system to a previous state can help if Safe Mode stopped working after recent changes. System Restore allows you to revert your system to a point where Safe Mode worked.
To perform System Restore on Windows 11, follow these steps:
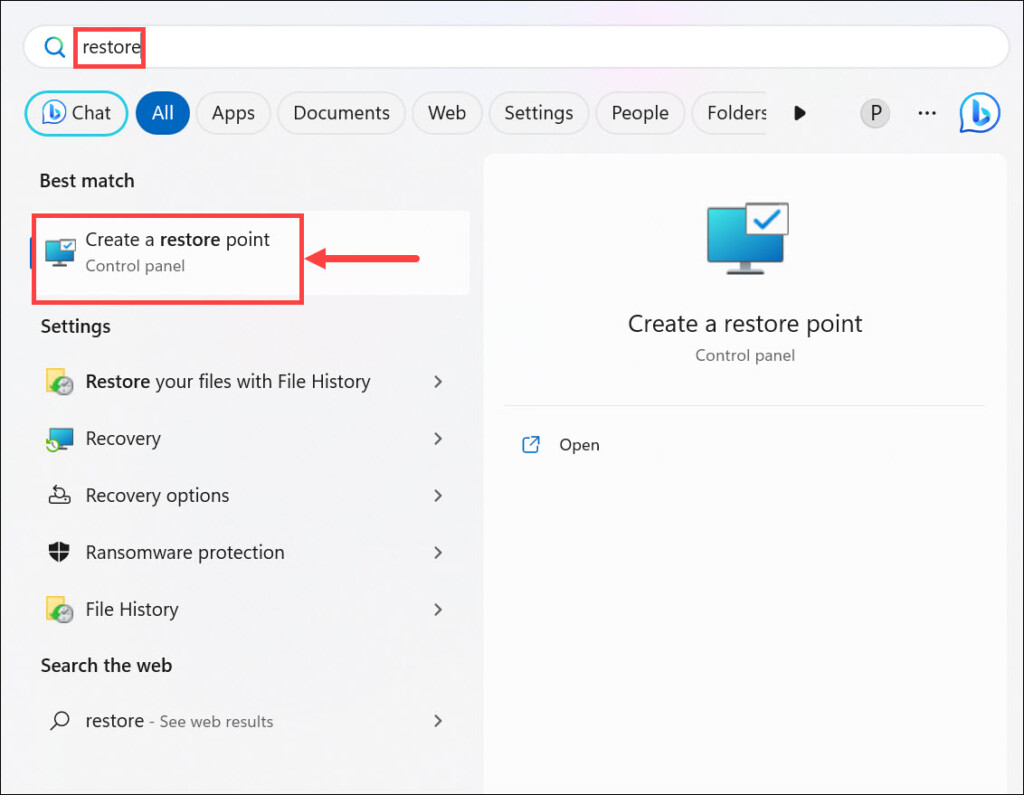
1. Press Windows + S, type “Restore,” and select the Create a restore point option from the list of results.
2. Switch to the System Protection tab, and click the System Restore button.
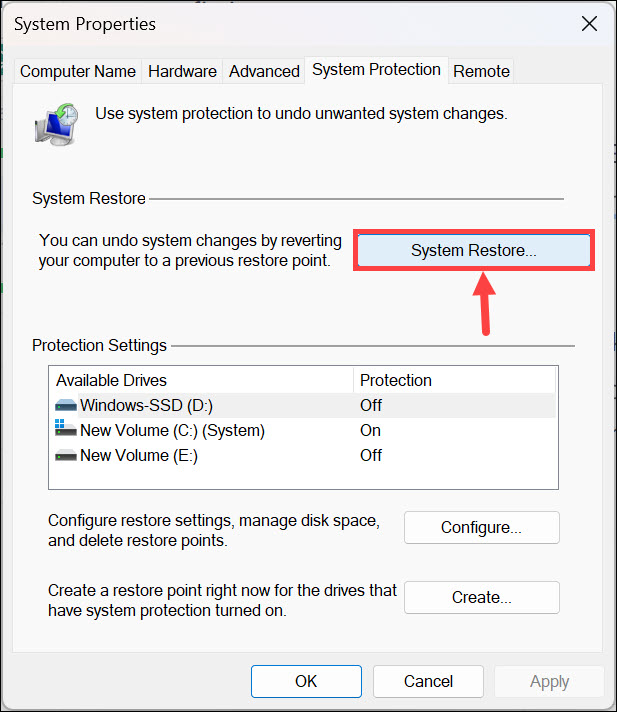
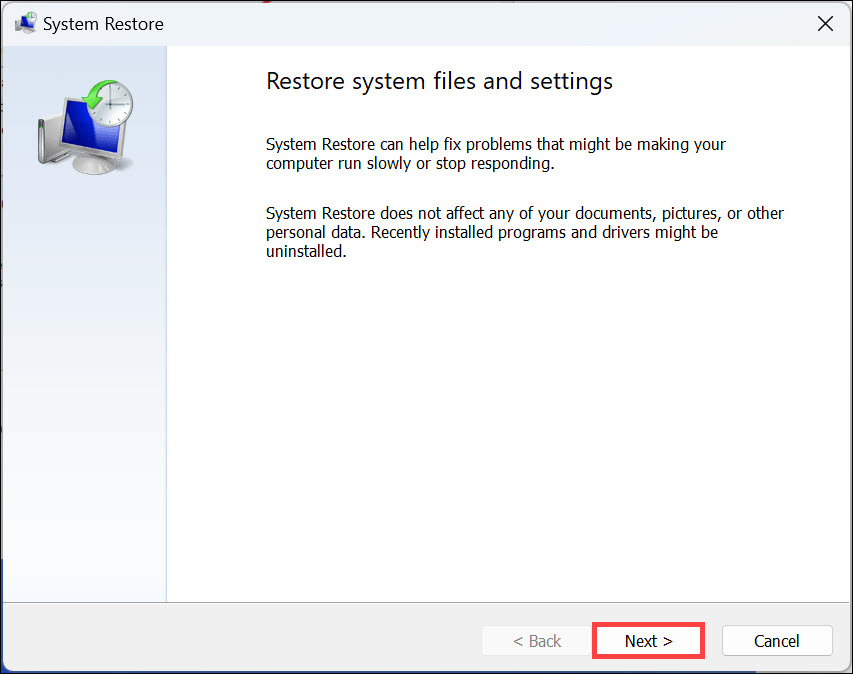
3. Under the “System Restore” window, click Next.
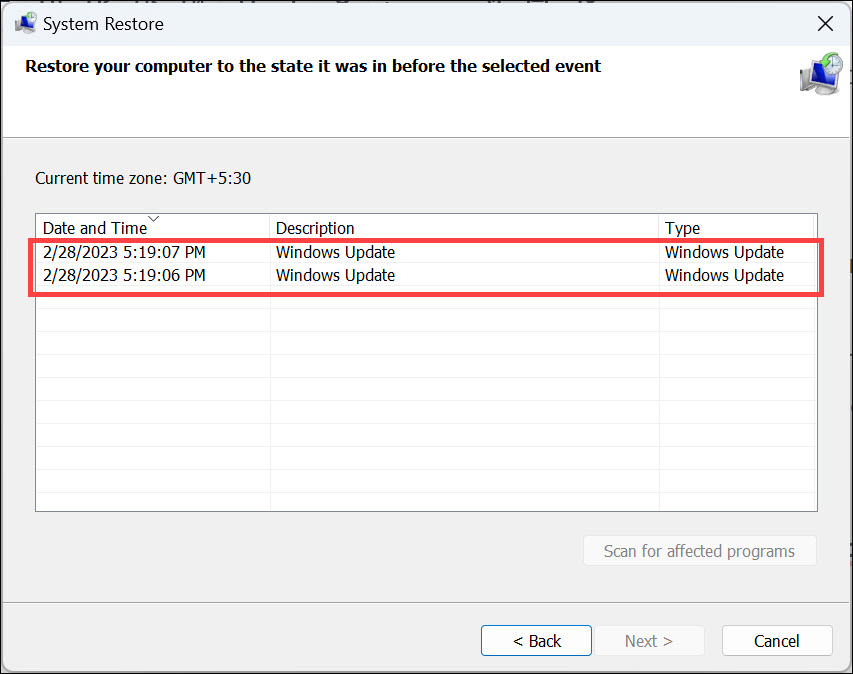
4. Select an appropriate system restore point from the list where Safe Mode was probably working fine and click Next.
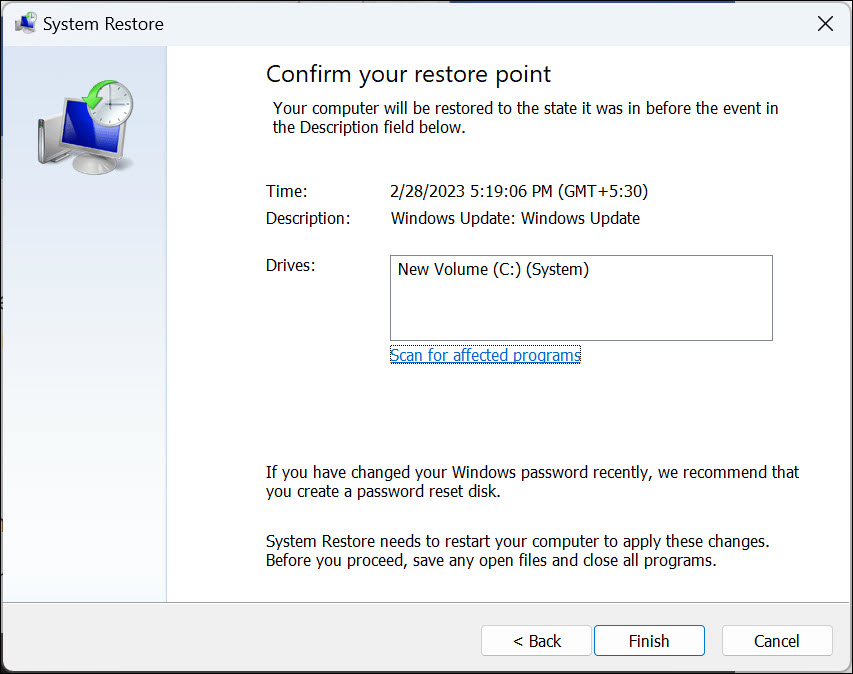
5. Finally, click Finish to restore the system to its previous state.
5. Clear CMOS
CMOS stands for “Complementary Metal-Oxide-Semiconductor.” The CMOS chip on a computer motherboard is responsible for storing essential configuration settings that are required for the system to boot and operate correctly. These settings include information about hardware components, system preferences, date and time settings, and other system parameters.
CMOS memory is powered by a small battery (CMOS battery) even when the computer is turned off, ensuring that the settings are retained even when the main power source is disconnected. Resetting the CMOS settings can resolve hardware-related issues affecting Safe Mode. Here are the steps for that:
1. Power off your computer and unplug it from the power source.
2. Open your computer case to access the motherboard.
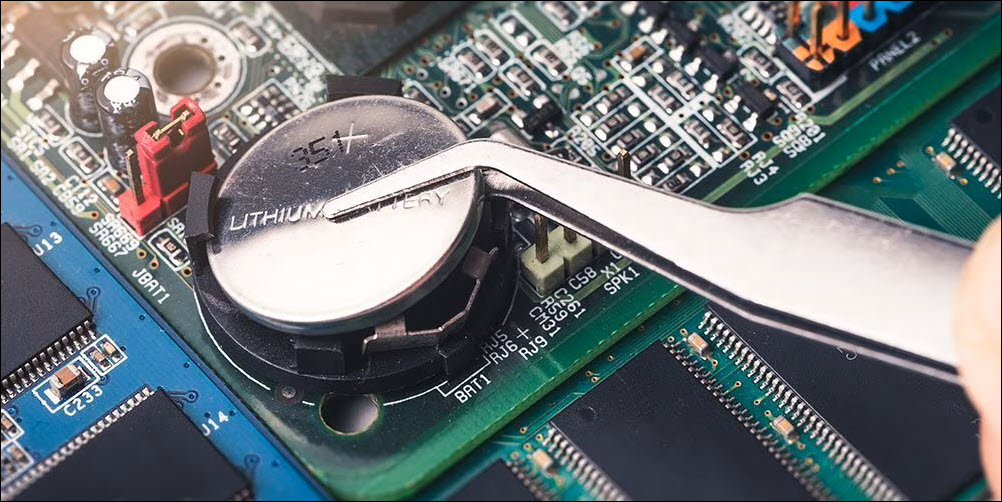
3. Locate the CMOS battery, typically a coin-cell battery, on the motherboard.
4. Remove the battery and wait for a few minutes before reinserting it.
5. Reassemble the computer case, plug it in, and power it on.
6. Run Antimalware Scan
Running a thorough antimalware scan can identify and remove any malicious software affecting Safe Mode. Follow these steps to run Windows Defender and scan for malware:
1. Launch Windows 11 Settings from the Start Menu.
2. Navigate to the Privacy & security tab on the left pane and choose Windows Security on the right.
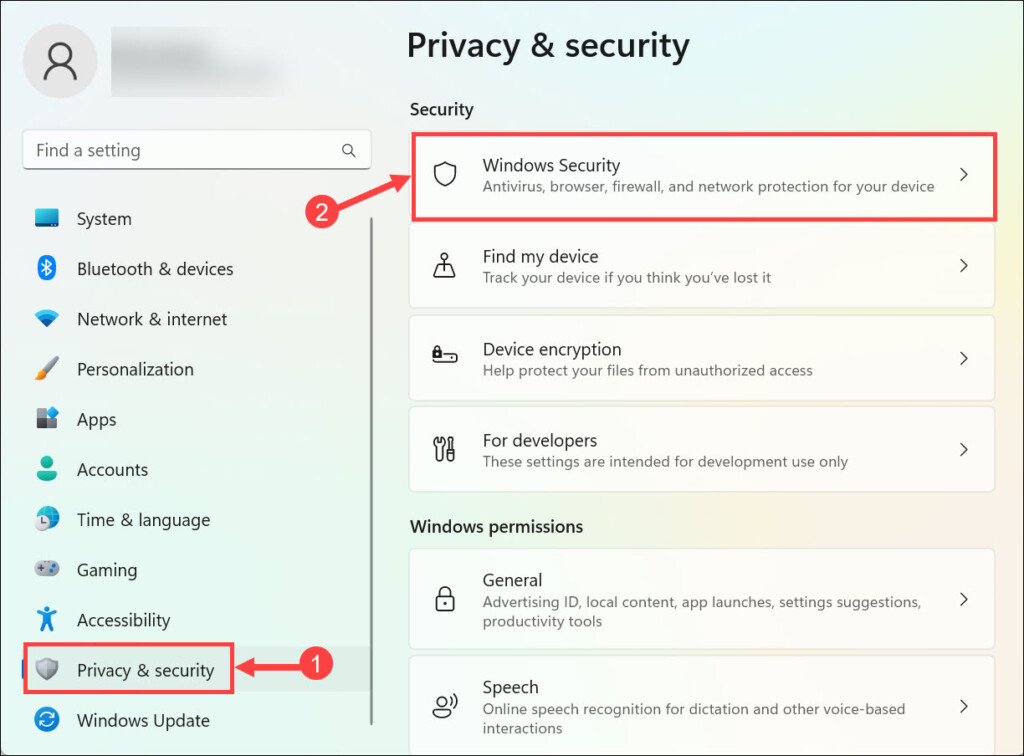
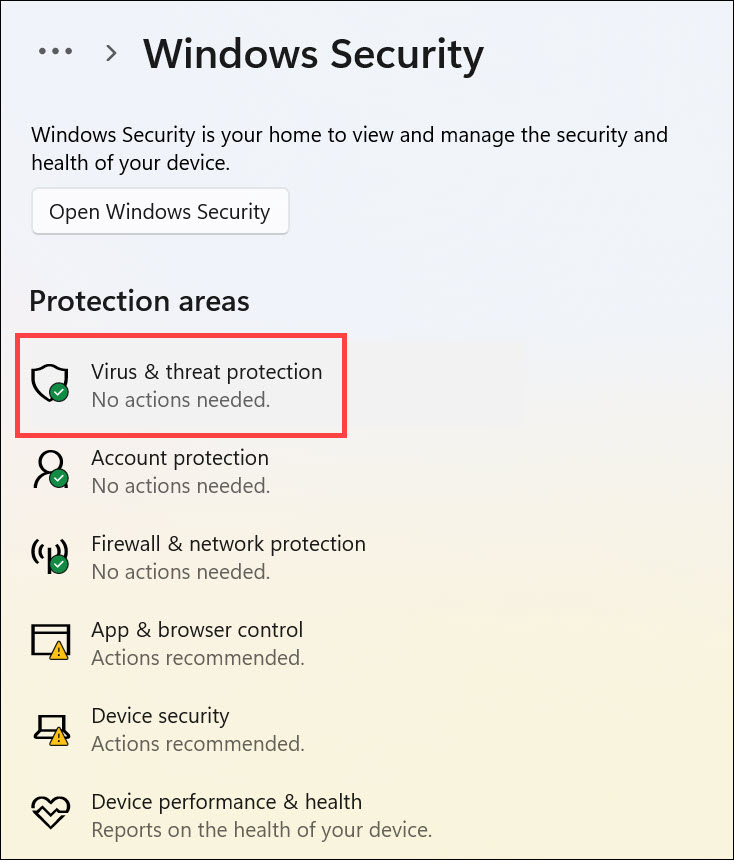
3. Next, click the Virus & threat protection below the “Protection areas” heading.
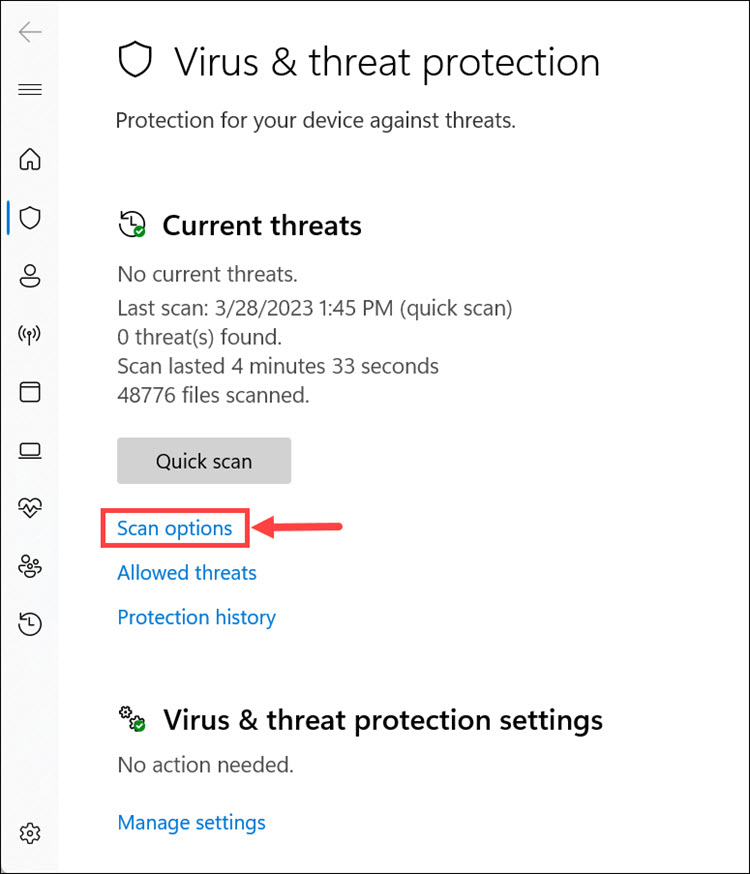
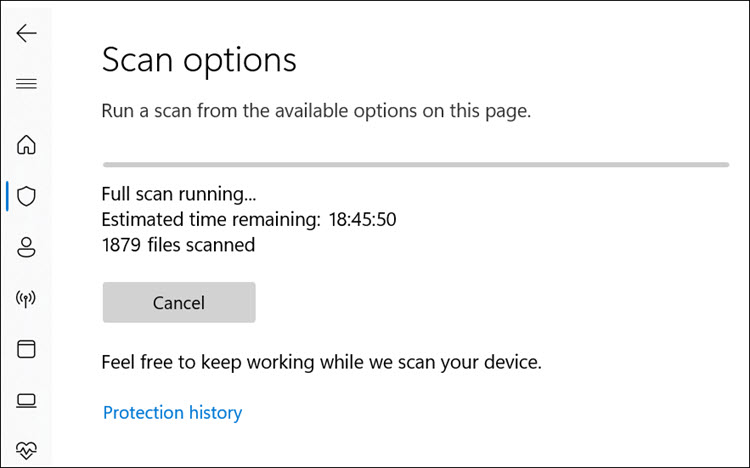
4. Click the Scan options to launch the scanning options menu.
5. From the menu, choose Full scan and click Scan now.
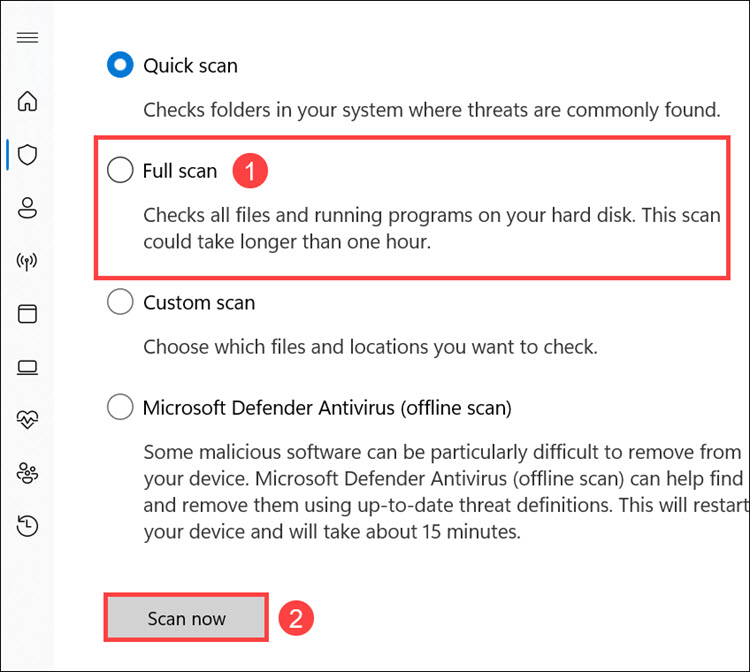
6. The Windows Defender full scan will begin.
7. Reset Windows 11
If other methods fail, resetting Windows 11 can restore the operating system to its default state, potentially fixing Safe Mode issues. To reset Windows 11, follow these steps:
1. On your system, click the Start button on the taskbar, and select Settings from the Start Menu.
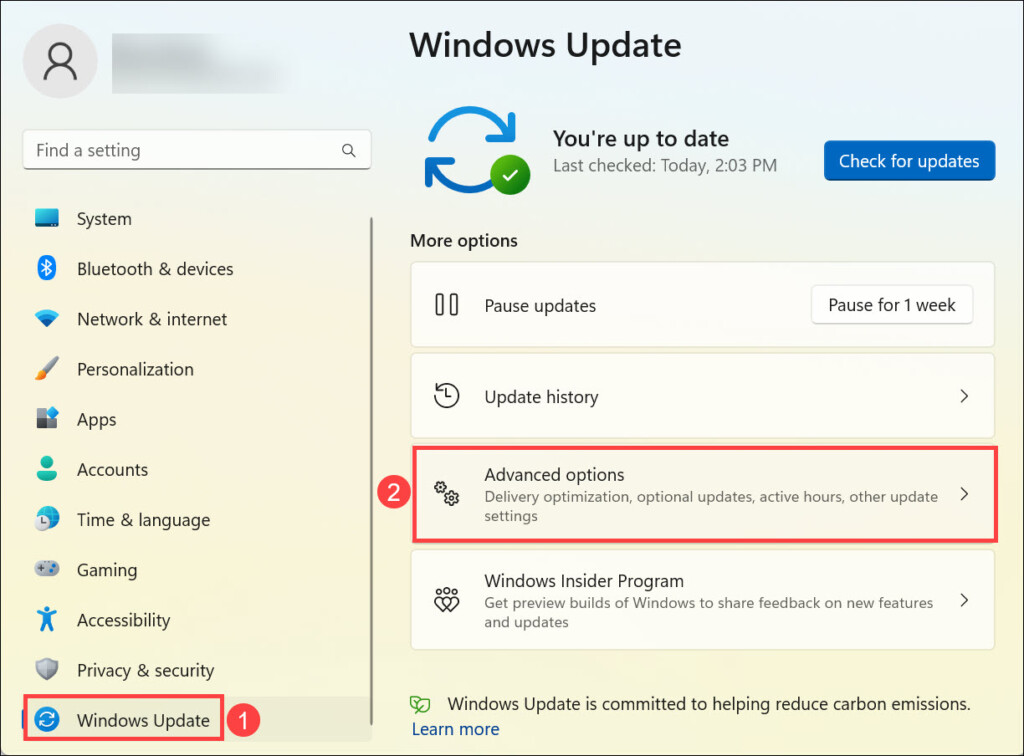
2. Switch to the Windows Update tab on the left pane and choose Advanced options on the right.
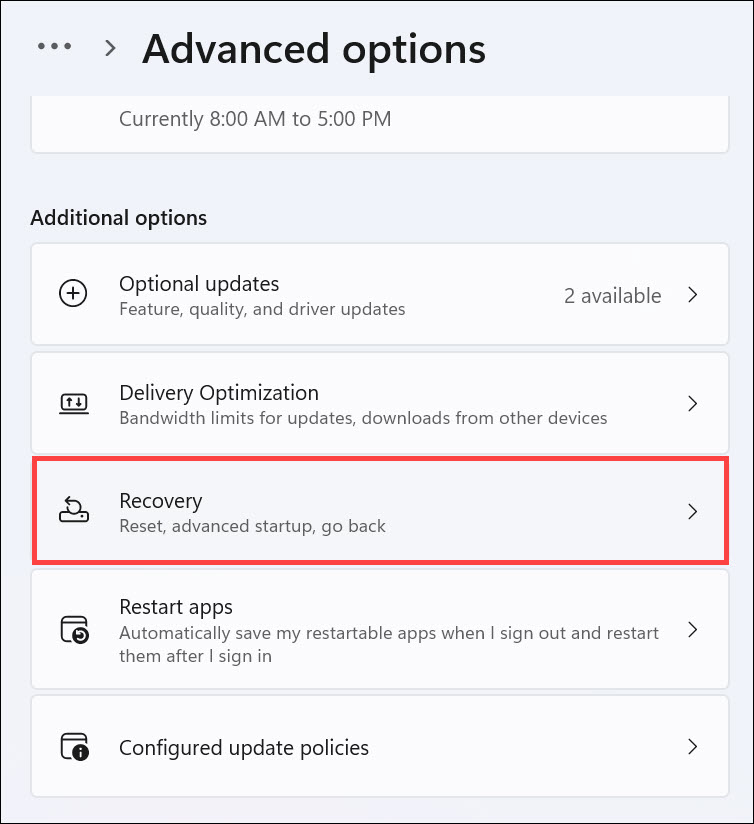
3. Under the “Additional options” heading, click the Recovery option.
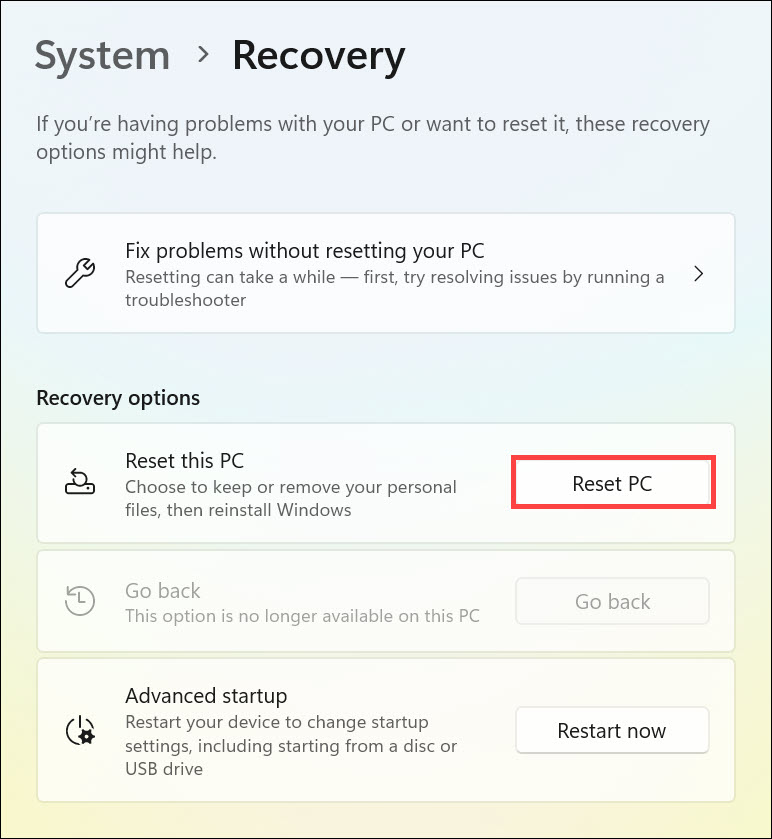
4. Now, click the Reset PC button under the “Recovery options”.
5. Select the Keep my files or Remove everything option as per your preference.
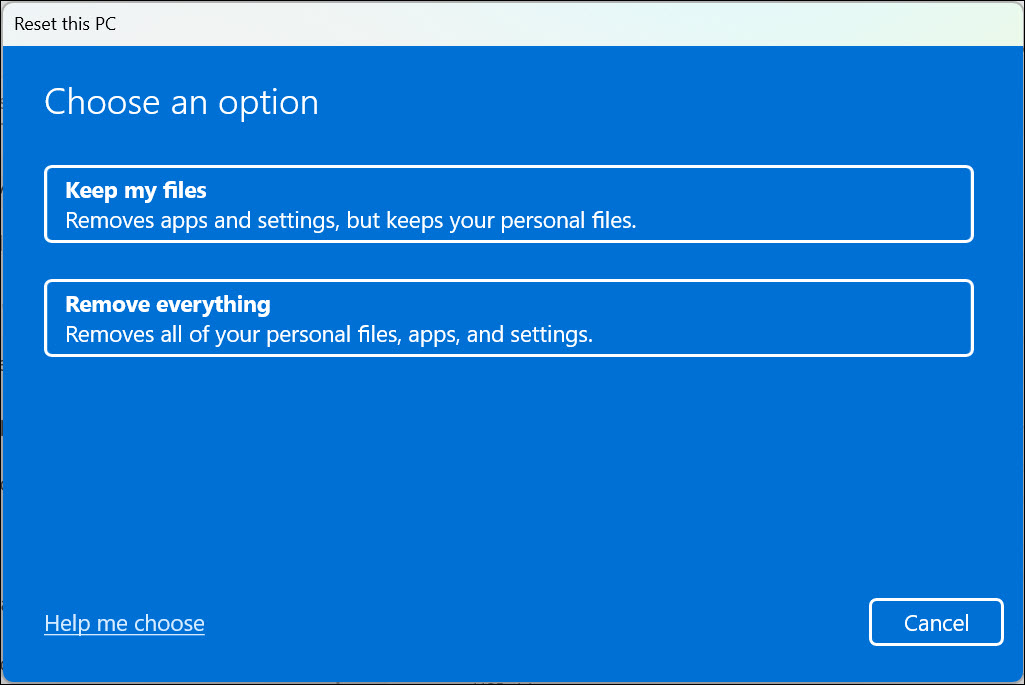
6. The system reset process will begin.
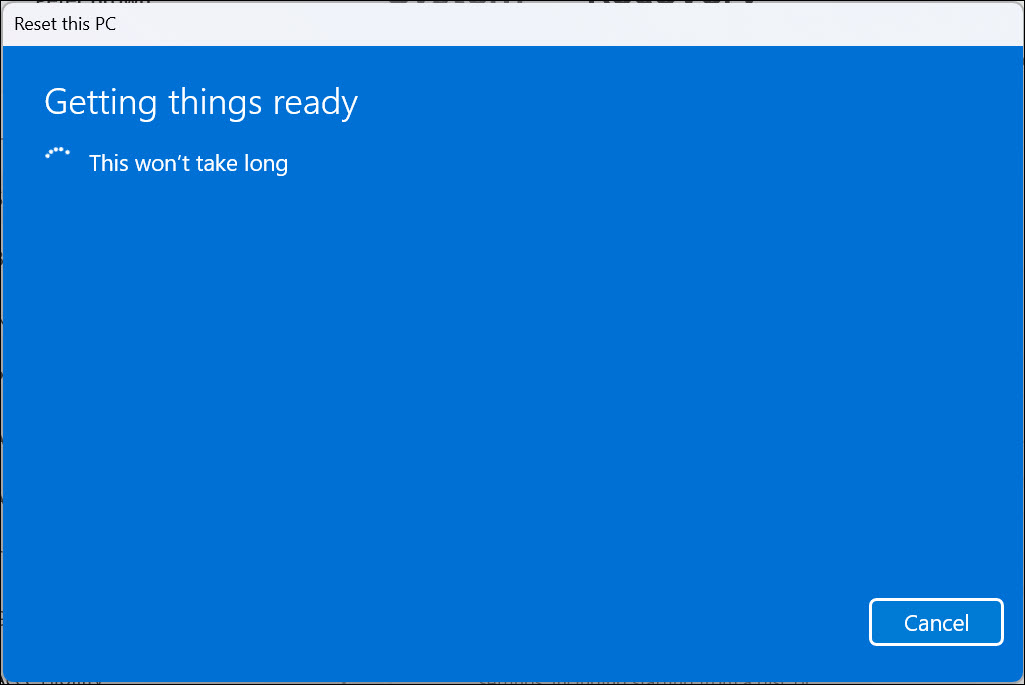
7. Select the source of resetting the PC. You can either choose Cloud download or Local reinstall.
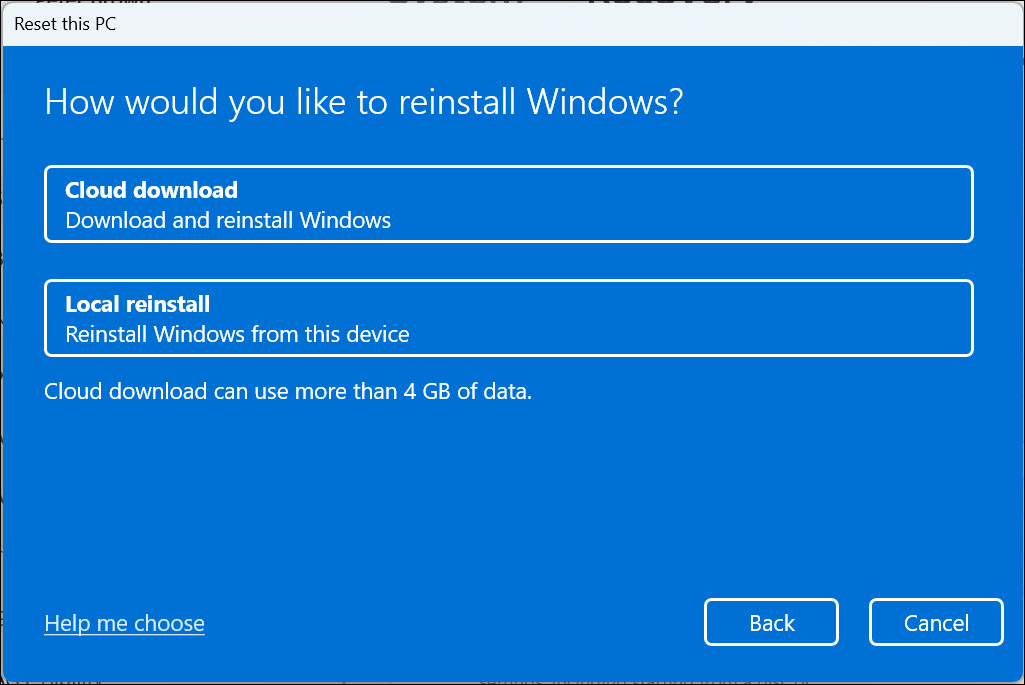
8. Follow the on-screen instructions to successfully reset Windows 11.
FAQs
Can I exit Safe Mode if it’s not working properly?
Exiting Safe Mode can be challenging if it’s not working properly. Try the methods mentioned in this guide to fix the issue before attempting to exit Safe Mode.
Will resetting Windows 11 delete my files?
No, resetting Windows 11 with the “Keep my files” option will preserve your personal files. However, it’s always a good practice to back up important data before proceeding.
Is clearing CMOS risky?
Clearing CMOS involves minor risks, but when done carefully, it can help resolve hardware-related issues. Refer to your motherboard’s manual and follow proper safety measures.
Fix the Safe Mode Issues Easily
There you have it – a comprehensive guide to conquering the Safe Mode not working glitch in Windows 11. By understanding the underlying causes, using the diverse methods at your disposal, and taking a patient and methodical approach, you’ll steer your system back to smoother waters.
Troubleshooting doesn’t have to be a head-scratching ordeal; with the right knowledge and techniques, you’re equipped to tackle any challenge that comes your way. So, bid adieu to Safe Mode troubles and stride confidently into the world of system repair.
Все способы:
- Способ 1: Активация модуля TPM
- Способ 2: Смена в BIOS режима на UEFI
- Способ 3: Проверка поддержки современного режима ожидания
- Способ 4: Восстановление системы
- Способ 5: Чистая установка ОС с преобразованием типа раздела диска
- Вопросы и ответы: 0
Способ 1: Активация модуля TPM
Для использования безопасной загрузки устройство должно соответствовать аппаратным требованиям, которые обеспечивают безопасность компьютера или ноутбука. Одним из основных условий является наличие модуля TPM 2.0, или доверенного платформенного модуля, обеспечивающего безопасное создание и хранение криптографических ключей. Для начала проверьте, поддерживает ли его ваше устройство, а также посмотрите, активен ли модуль в данный момент. Разберем эти действия по порядку ниже:
- Запустите встроенное средство «Безопасность Windows», введя соответствующий запрос в строку системного поиска.
- Выберите вкладку «Безопасность устройства» и справа нажмите на пункт «Сведения об обработчике безопасности».
- Отобразится новое окно, где следует обратить внимание на строчку «Версия спецификации».
- Если ваше устройство поддерживает модуль TPM 2.0, проверьте, работает ли он. Для этого сначала вызовите диалоговое окно «Выполнить», одновременно нажав на клавиши «Win + R», затем пропишите команду
tpm.mscи нажмите на клавишу «Enter». - Вы увидите оснастку, где в блоке «Состояние» можно посмотреть, включен ли доверенный платформенный модуль.


Если в окне с информацией о TPM 2.0 отображается уведомление, что совместимый модуль не найден, значит, его нужно включить. Делается это через BIOS:
- Зайдите в BIOS вашего компьютера. Алгоритм действий для разных материнских плат ПК и моделей ноутбуков разный, поэтому обратитесь к нашим отдельным руководствам, где разобраны наиболее распространенные варианты.
Подробнее: Как попасть в BIOS на ноутбуке / компьютере
- Перейдите на вкладку «Security» (здесь располагаются настройки безопасности). В окне отыщите опцию, связанную с TPM, – как правило, это «TPM Device». Включите ее, выбрав значение «Available».
- Также следует активировать еще один параметр, который может называться по-разному: «TPM State», «Trusted Platform Module», «Security Chip», «fTPM».
- Переключитесь на вкладку «Exit» и выберите пункт «Save Changes and Exit», чтобы выйти из BIOS, сохранив настройки.
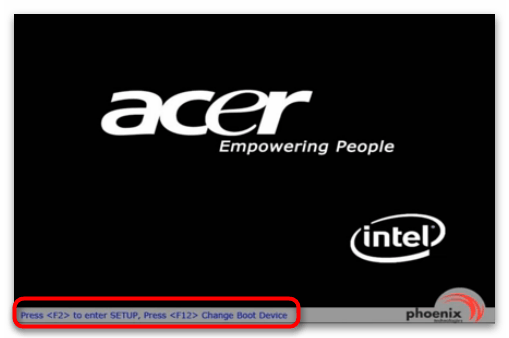
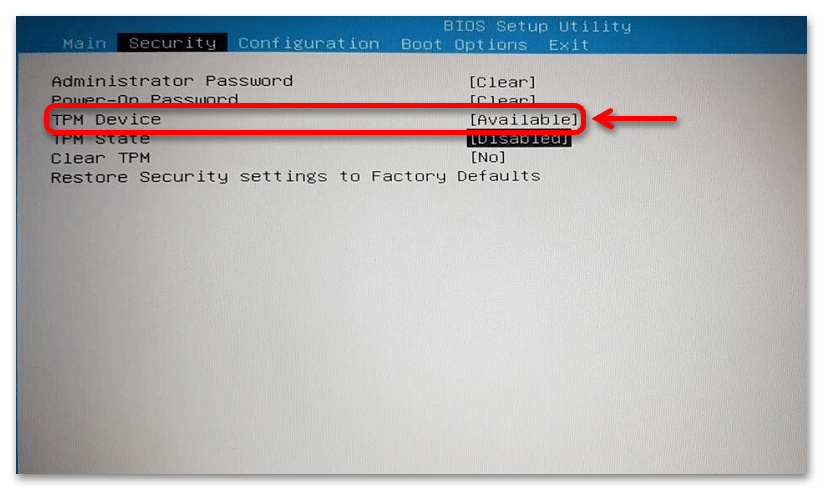
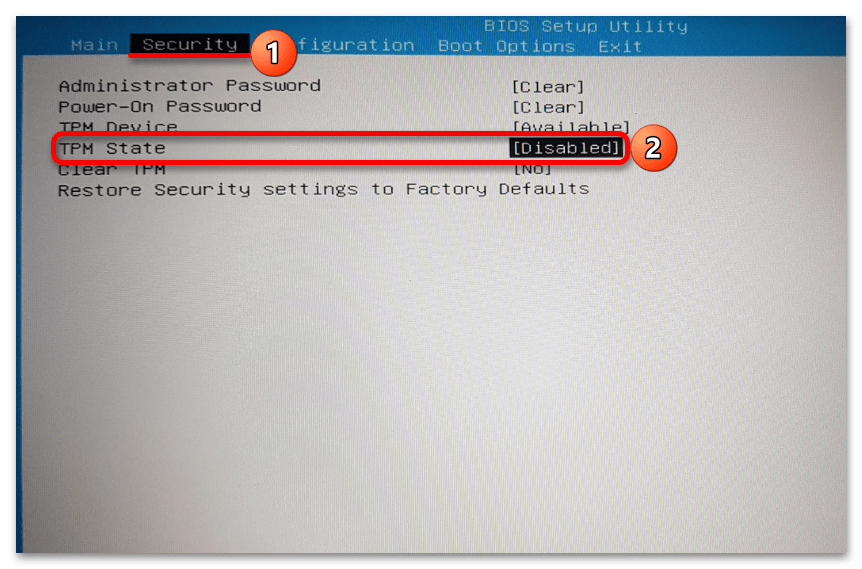

После выхода система загрузится в обычном режиме – проверьте, решилась ли проблема с поддержкой безопасной загрузки.
Способ 2: Смена в BIOS режима на UEFI
Если у вас современное устройство, то почти наверняка оно должно поддерживать UEFI – расширяемый интерфейс, который используется в качестве посредника между встроенным ПО и операционной системой. Нередко проблема с поддержкой безопасной загрузки в Windows 11 связана с тем, что в BIOS выбран не тот режим. Для исправления ситуации попытайтесь сменить Legacy на UEFI, о чем более детально мы писали ранее в отдельном руководстве.
Подробнее: Включение режима UEFI в BIOS

Способ 3: Проверка поддержки современного режима ожидания
Также причиной рассматриваемой проблемы может быть выключенный современный режим ожидания или вовсе его отсутствие. Такой режим представляет собой новый метод управления электропитания, который заменил классический режим пониженного энергопотребления на новых моделях ноутбуков. Узнайте о наличии поддержки режима на вашем ПК и активируйте его при необходимости.
- Запустите консоль «Терминал» от имени администратора. В Windows 11 для этого достаточно щелкнуть правой кнопкой мыши по кнопке «Пуск» и выбрать пункт «Терминал (Администратор)».
- Вызовите дополнительное меню, из которого выберите вариант «Windows PowerShell».
- Используйте команду
powercfg /а, чтобы посмотреть сведения о параметрах питания. Изучите данные – если «S0 для пониженного энергопотребления» отмечен, как поддерживающийся системой, значит, ваш на ПК доступен современный режим ожидания.
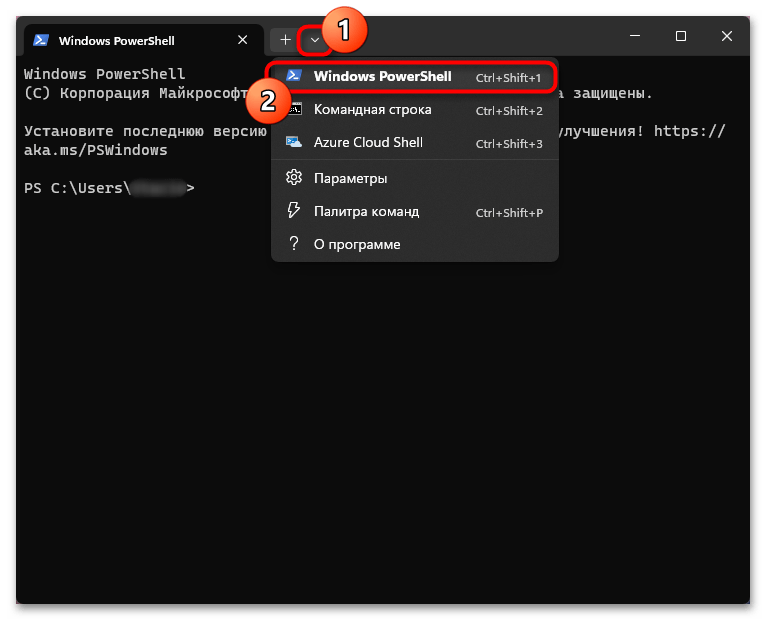
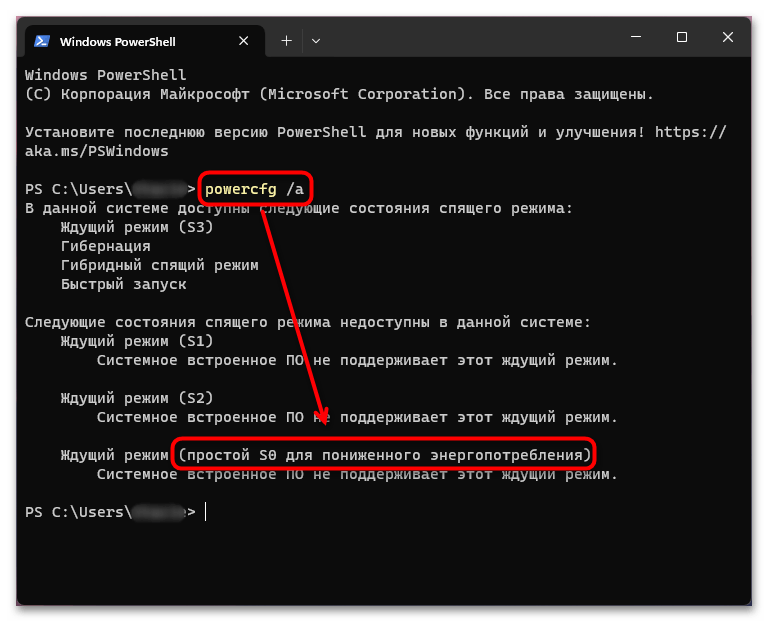
Как правило, такая функция встречается лишь у современных лэптопов, и в нашем отдельном руководстве описаны способы включения и настройки электропитания в Windows 11.
Подробнее: Настройка электропитания в Windows 11
Способ 4: Восстановление системы
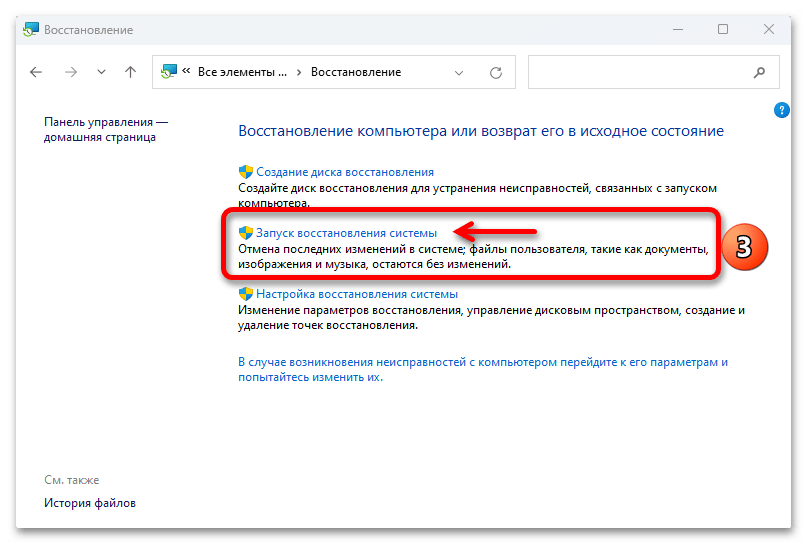
В случае если ранее проблем с поддержкой безопасной загрузки не было замечено, тогда есть вероятность, что это случилось в результате каких-либо системных ошибок или конфликта программного обеспечения. При наличии активной функции автоматического создания точек восстановления попробуйте откатиться до предыдущего состояния операционной системы. Чаще всего появившиеся в ходе использования ОС неисправности удается решить именно таким образом. Переходите по ссылке ниже, чтобы узнать, как правильно провести процедуру по восстановлению Windows.
Подробнее: Восстановление системы Windows 11 с помощью точек восстановления
Способ 5: Чистая установка ОС с преобразованием типа раздела диска
Мы уже писали в статье, на которую дана ссылка в Способе 2, о том, что для смены режима в BIOS на UEFI требуется новый стиль раздела диска (GPT). Тем, у кого используется устаревшая версия MBR, сменить режим в БИОС не получится, и также будет появляться ошибка, сообщающая об отсутствии поддержки состояния безопасной загрузки.
К сожалению, исправить такую ситуацию поможет лишь преобразование стиля раздела диска с MBR на более современный GPT. Поскольку том будет конвертироваться, его придется отформатировать, а это приводит к удалению с него всех данных, приложений и настроек. Как правило, смена режима происходит на этапе установки операционной системы с помощью консольных команд или встроенных возможностей инсталлятора.
То есть придется переустановить операционную систему с изменением MBR на GPT, что может быть нежелательным для многих пользователей. Однако порой только этот вариант помогает исправить ошибку с безопасной загрузкой.
Подробнее: Преобразование MBR в GPT при установке Windows 11

Наша группа в TelegramПолезные советы и помощь
Some of the most common causes for Windows 11 upgrade failure are incompatible hardware, most likely CPU — or firmware — Unified Extensible Firmware Interface (UEFI), Secure Boot or Trusted Platform Module (TPM).
As a desktop administrator, you need to know what UEFI is and understand the importance of Secure Boot and TPM. This will help you support Windows 11 desktops better, understand why these components cause Windows 11 installation to fail and learn workarounds to install Windows 11.
Windows 11 and Secure Boot requirements
For important context, you should keep Windows 11 requirements in mind, including but not limited to TPM and UEFI requirements.
You can use the PC Health Check tool included in Windows 10 to determine Windows 11 compatibility for existing devices. Failure to install Windows 11 is probably due to incompatibility with system requirements, which include the following:
- approved CPU
- TPM 2.0 enabled
- 4 GB of RAM
- 64 GB of storage or hard disk
- UEFI firmware
- internet connectivity
- Windows 10 version 2004 or later
Some of these requirements are very straightforward, such as internet connectivity and the specified version of Windows 10, but the requirements for UEFI and TPM come with more questions.
What’s the difference between BIOS and UEFI
The Windows desktop BIOS provides a low-level ability for OSes and applications to communicate with hardware such as the CPU, disk drives and network adapters. BIOS provides hardware initialization during boot and was created with the first IBM compatible PCs in the 1970s. While BIOS was originally stored in ROM chips, it eventually moved to flash memory to enable updates and features required for new hardware.
Pressing F1, F2 or F12 — depending on the manufacturer — will bring up a management program that administrators still refer to as «The BIOS.» This will happen before Windows starts up. The BIOS program lets users configure hardware by enabling certain boot features, virtualization, security features, hard drive testing and more (see Figure 1).
BIOS only has 1 MB executable space to start devices such as hard disks, USB drives, displays, ports and other controllers. New hardware devices are beyond the scope of the original BIOS design, making booting slow and inefficient. In addition, BIOS allowed any software with a bootloader to boot up the PC. Any skilled engineer could write this so it could take over the PC.
While these limitations were known for decades, it took until 2007 for OEMs to agree to use UEFI as a replacement for BIOS. While Microsoft supported the specification as early as Windows 8, it wasn’t required until Windows 11, even though peripherals such as disk drives might require UEFI.
UEFI has several significant features, including the following:
- UEFI stores code in non-volatile memory, which could be RAM, a file on a hard drive or even a network share. Note that the EFI folder on a Windows PC, located in the \Windows\Boot\EFI directory structure, contains .efi and .dll files, among others required by the hardware.
- UEFI supports the Global Partition Table, which supports up to an 18 exabyte hard disk for 64-bit systems. BIOS, on the other hand, only supports disk size up to 2.2 TB, which is also a function of a 32-bit system. Windows now only runs on 64-bit systems to take advantage of UEFI and larger capacity storage devices and has a practical limit of 16 TB disks.
- UEFI contains a feature called Secure Boot. Secure Boot limits a PC to boot only a specific OS.
What are Secure Boot and the Trusted Platform Module used for?
Secure Boot and TPM are frequently used interchangeably, especially when viewing diagnostic tools and BIOS menu settings. TPM is the hardware or firmware enablement of Secure Boot features.
What is Secure Boot
Secure Boot is a security standard supported by UEFI which, through firmware enablement, an OEM or an administrator can configure to boot a trusted OS. It first became available as a feature in UEFI in 2016, about the time of Windows 8. Thus, all PCs built since then most likely support Secure Boot.
This limits the OS a PC can boot and prevents rogue boot loaders from booting to an unapproved or malicious OS to take over the machine. It also effectively lets an organization restrict PCs to only boot a desired OS. For example, one organization may restrict some PCs to running Linux and others to Windows based on applications used. Microsoft enforces Secure Boot on Windows 11 machines to enable this security feature.
To determine if a Windows installation has Secure Boot enabled, open the MSInfo32.exe or enter System Information in the Windows search bar. Look for Secure Boot State and note the status (see Figure 2).
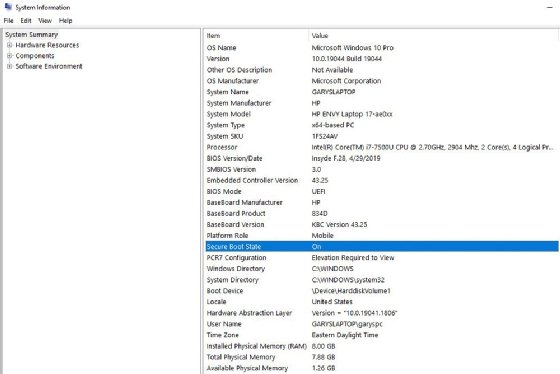
The status may be as follows:
- Unsupported. This means Secure Boot is unsupported on the PC, probably due to the PC being too old.
- On. Secure Boot is supported and enabled.
- Off. Secure Boot is supported but not enabled.
Secure Boot is enabled or disabled within the BIOS program. Depending on the OEM, this may be called Secure Boot or TPM. Consider this example on an HP Envy laptop (see Figure 3).
What is Trusted Platform Module
TPM is a chip — or a function built into more modern CPU chips and graphics cards — installed in the motherboards of computers to provide cryptographic services. The UEFI makes Secure Boot through TPM possible. The TPM performs functions such as managing, storing and creating the cryptographic keys that generate device signatures.
The PC checks these signatures during boot to validate that the devices, any drives and even OS software are allowed. If not, TPM prevents them from loading. This is done using public and private encryption keys stored in the hardware, and the process protects PCs from malware because an attacker can’t modify those keys.
TPM 2.0 is the latest version of this technology and a requirement for Windows 11. You can verify its presence on any Windows PC by opening TPM.msc to see if it’s enabled (see Figure 4).
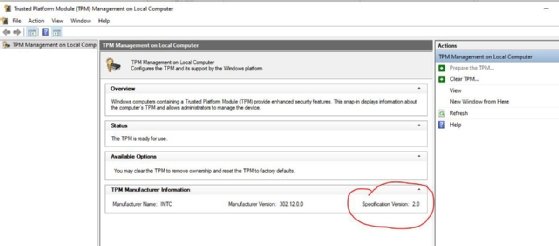
If the tool shows TPM 1.2, it won’t pass Windows 11 requirements for installation. If the tool doesn’t open, then TPM isn’t enabled.
To enable TPM, boot the machine into the BIOS tool, navigate to the TPM option and ensure the field is enabled. This is typically under the Security settings but can be called different things by different OEMs, so look carefully and don’t be afraid to research this topic.
Tricking Windows 11 into installing on an old, unsupported machine
The internet is full of well-meaning hackers who show how to install Windows 11 on an older machine. However, some of these methods are extremely unreliable because the Windows 11 OS will run via a method that Microsoft doesn’t endorse or support.
Microsoft provides the ability to install Windows 11 outside the Windows Upgrade utility. You can even perform an install from Media using the Windows 11 file. However, these methods still depend on conforming to system requirements and could present continuity and security risks.
Should you bypass Windows 11 install requirements?
Bypassing the requirements isn’t a big risk if you’re only an enthusiast who enjoys getting an old device to load Windows when it isn’t supposed to. However, this can have significant consequences if you’re a desktop administrator for an enterprise or small business for the following reasons.
- Disabling secure boot in the UEFI reverts the system to the old BIOS, putting the system at risk for a malware attack.
- Ignoring Windows 11 updates and running old OS versions eliminates the Secure Boot requirement needed to run specific hardware and might leave your fleet of PCs open to malware attacks.
- Manipulating the installation, such as editing dynamic link libraries, creates significant challenges for anyone attempting to provide support for those PCs. Making these changes and supporting these hacked PCs isn’t practical, even if it works. And eliminating the security protection provided by Secure Boot will result in additional security challenges.
- Adding TPM chips or updated CPUs to motherboards that don’t have them might not work. This requires special skills and isn’t practical to do on a large amount of PCs.
- Even if you can trick Windows 11 to run on a machine that doesn’t meet system requirements, it might not provide the expected performance.
Windows 11 has important enterprise features, and you would be better off committing time and budget to install it sooner through supported means rather than bypassing the requirements. With Windows 10 mainstream end of life set for October 2025, that’s plenty of time to refresh desktop hardware within a typical PC lifecycle before migrating to Windows 11.
Secure Boot is an important security feature designed to prevent malicious software from loading when your PC starts up (boots). Most modern PCs are capable of Secure Boot, but in some instances, there may be settings that cause the PC to appear to not be capable of Secure Boot. These settings can be changed in the PC firmware. Firmware, often called BIOS (Basic Input/Output System), is the software that starts up before Windows when you first turn on your PC.
Note: This article is intended for users who are not able to upgrade to Windows 11 because their PC is not currently Secure Boot capable. If you are unfamiliar with this level of technical detail, we recommend that you consult your PC manufacturer’s support information for more instructions specific to your device.
How to enable Secure Boot on my PC
To access these settings, you can consult your PC manufacturer’s documentation or follow these instructions:
-
Go to Settings > Update & Security > Recovery and select Restart now under Advanced startup.
-
On the next screen, select Troubleshoot > Advanced options > UEFI Firmware Settings > Restart to make changes.
To change these settings, you will need to switch the PC boot mode from one enabled as “Legacy” BIOS (also known as “CSM” Mode) to UEFI/BIOS (Unified Extensible Firmware Interface). In some cases, there are options to enable both UEFI and Legacy/CSM. If so, you will need to choose for UEFI to be the first or only option. If you are unsure how to make any necessary changes to enable the UEFI/BIOS, we recommend that you check your PC manufacturer’s support information on their website. Here are a few links to information from some PC manufacturers to help get you started:
Dell | Lenovo | HP
While the requirement to upgrade a Windows 10 device to Windows 11 is only that the PC be Secure Boot capable by having UEFI/BIOS enabled, you may also consider enabling or turning Secure Boot on for better security.
Related articles
Windows 11 System Requirements
Ways to install Windows 11
Windows help & learning
Need more help?
Want more options?
Explore subscription benefits, browse training courses, learn how to secure your device, and more.

