
На экране входа в Windows (welcome screen, экран приветствия) по-умолчанию отображается учетная запись последнего пользователя, который выполнял вход на этот компьютер и список всех локальных пользователей. В Windows есть несколько настроек, которые позволяют показать или скрыть имена пользователей на экране входа, или даже вывести список всех локальных или активных доменных пользователей компьютера (сервера).
Содержание:
- Как скрыть имя последнего пользователя на экране приветствия Windows?
- Показать список локальных пользователей на экране входа в Windows
- Вывести список доменных пользователей на экране входа в Windows
- Как скрыть определенного пользователя на экране входа?
Как скрыть имя последнего пользователя на экране приветствия Windows?
Конечным пользователям удобно, когда на экране входа в Windows отображается имя учетной записи и его не нужно набирать вручную. В целях безопасности на публичных компьютерах (в небезопасных локациях) вы можете запретить показывать имя последнего пользователя на экране входа Windows через GPO.
- Откройте редактор доменных GPO
(gpmc.msc
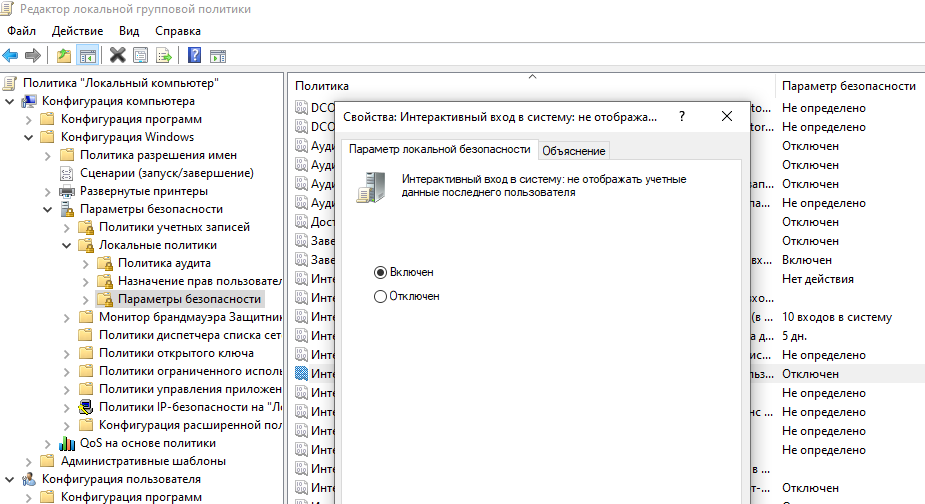
) или локальных политик (gpedit.msc) и перейдите в раздел Конфигурация компьютера -> Конфигурация Windows -> Параметры безопасности -> Локальные политики -> Параметры безопасности (Computer Configuration -> Windows Settings -> Security Settings -> Local Policies -> Security Options); - Включите политику “Интерактивный вход в систему: Не отображать учетные данные последнего пользователя” (Interactive logon: Don’t display last signed-in). По умолчанию эта политика отключена;

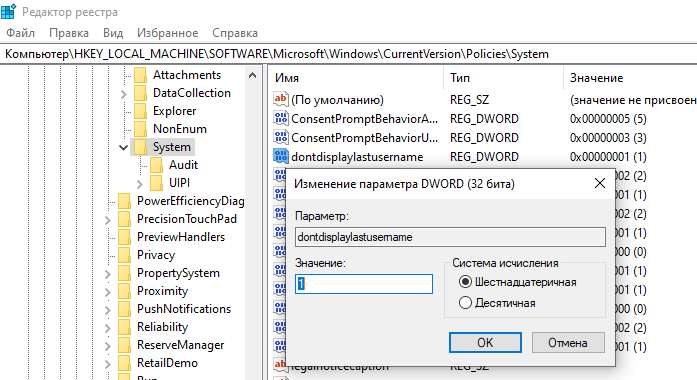
Вы можете скрыть имя последнего пользователя на экране входа через реестр. Для этого в ветке HKEY_LOCAL_MACHINE\SOFTWARE\Microsoft\Windows\CurrentVersion\Policies\System создайте параметр dontdisplaylastusername типа DWORD и значением 1.

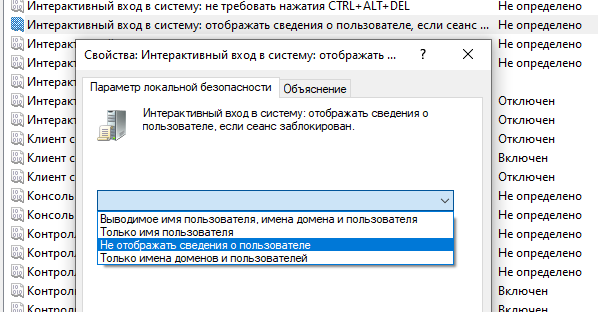
- Чтобы скрыть имя пользователя на экране блокировки (когда компьютер блокируется нажатием Win+L или через GPO блокировки экрана), включите в этом же разделе GPO нужно включить политику “Интерактивный вход в систему: отображать сведения о пользователе, если сеанс заблокирован” (Interactive logon: Display user information when the session is locked) и выбрать значение “Не отображать сведения о пользователе” (Do not display user information).

Этой политике соответствует параметр реестра DontDisplayLockedUserId в той же ветке со значением 3.
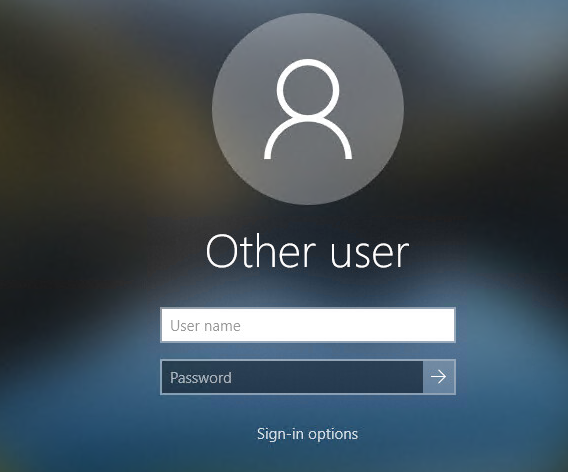
Теперь вместо имени последнего пользователя, на экране входа в компьютер и на экране блокировки Windows, отображаются пустые поля для ввода имени пользователя и пароля.
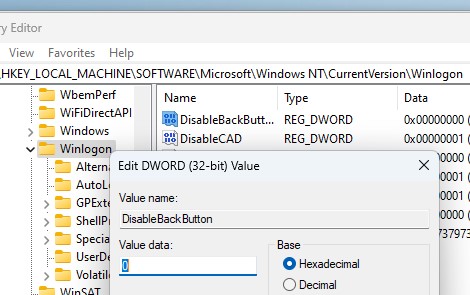
С помощью параметра DisableBackButton реестра можно скрыть список пользователей на экране блокировки:
reg add "HKLM\SOFTWARE\Microsoft\Windows NT\CurrentVersion\Winlogon" /t REG_DWORD /f /d 0 /v DisableBackButton
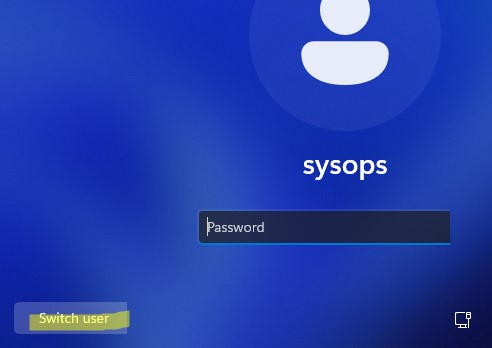
Теперь для разблокировки экрана пользователю нужно просто набрать пароль, а чтобы отобразить список всех пользователей, нужно сначала нажать кнопку Switch User на экране блокировки.
Показать список локальных пользователей на экране входа в Windows
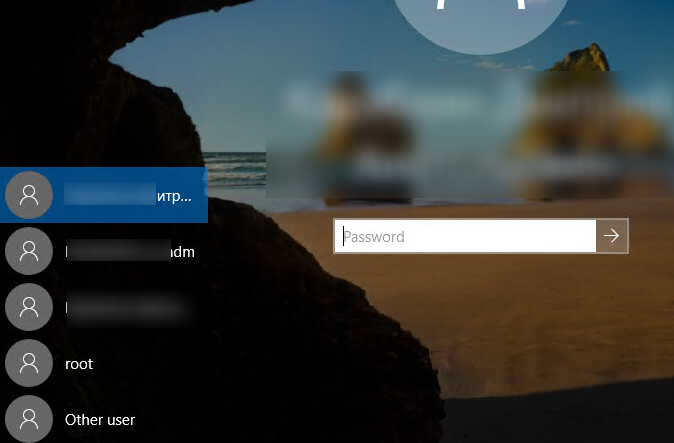
По умолчанию современные версии Windows (проверено на Windows 11 23H2 и Windows 10 22H2) всегда показывают список включенных локальных пользователей в левом нижнем углу (это работает только на компьютерах, не включенных в домен Active Directory). Скрытые (см ниже) и отключенные учетные записи пользователи здесь не отображаются.
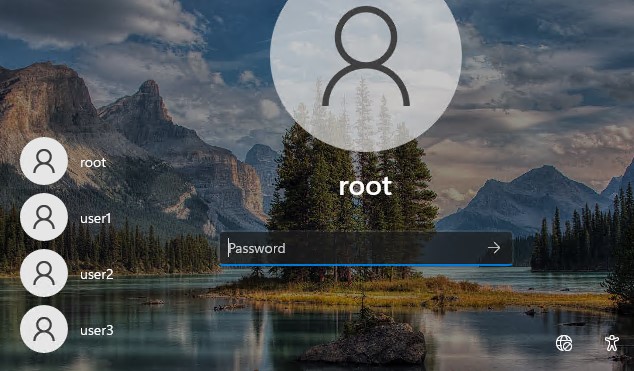
Чтобы войти на компьютере, пользователю достаточно щелкнуть по нужной учетной записи и ввести пароль.
Если список локальных пользователей не отображается на экране входа Windows, проверьте настройки следующих параметров в редакторе локальной GPO
gpedit.msc
:
- Interactive Logon: Don’t display last signed-in =
Disabled
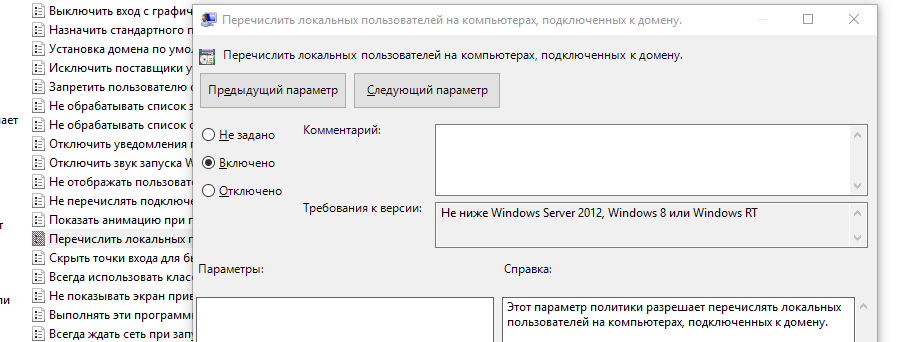
(Computer Configuration -> Windows Settings -> Security Settings -> Local Policies -> Security Options); - Enumerate local users on domain-joined computers (Перечислить локальных пользователей на компьютерах, подключенных к домену) =
Enabled
(Computer Configuration -> Administrative Templates -> System -> Logon /Конфигурация компьютера -> Административные шаблоны -> Вход в систему) – политика позволяет вывести список локальных пользователей на доменных компьютерах.
Перезагрузите компьютер, чтобы применить новые настройки групповых политик.
Вывести список доменных пользователей на экране входа в Windows
Если одним компьютером пользуется несколько пользователей, вы можете отобразить на экране приветствия список пользователей с активными сессиями. Активная сессия подразумевает, что пользователь выполнил вход на компьютер. Это может быть общий компьютер (работает в режиме переключения пользователей), касса, киоск, хосты Windows Server с ролью RDS (или его аналоги с поддержкой мультсессий на десктопных версия Windows).
Проверьте, что в разделе GPO Computer Configuration -> Windows Settings -> Security Settings -> Local Policies -> Security Options отключены политики:
- Interactive logon: Don’t display last signed-in: Disabled
- Interactive logon: Don’t display username at sign in: Disabled
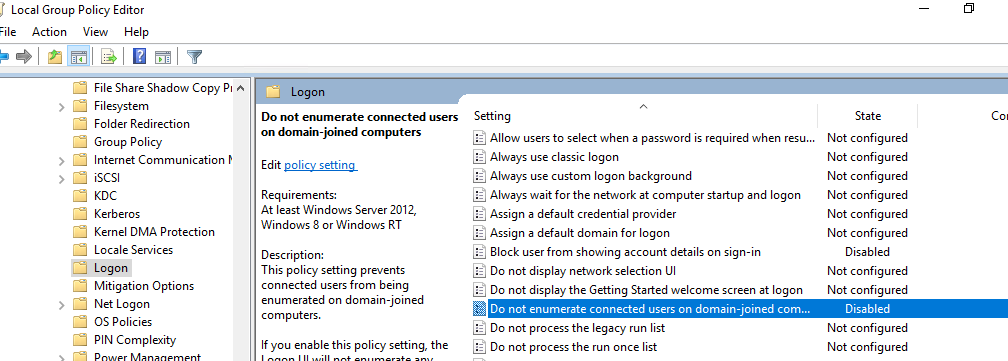
Затем отключите политики в разделе Computer Configuration -> Administrative Templates -> System -> Logon:
- Block user from showing account details on sign-in: Disabled
- Do not enumerate connected users on domain-joined computer: Disabled
На доменном компьютере вы можете проверить результирующие настройки этих параметров GPO с помощью текущие
rsop.msc
или gpresult.
После этого на экране приветствия будет отображаться список пользователей, которые выполнили вход в систему. Здесь будут отображаться как активные сессии, так и сессии пользователей со статусом disconnected (например, по RDP таймауту).
Как скрыть определенного пользователя на экране входа?
На экране входа в Windows всегда отображаются пользователи, которые входят в одну из следующих локальных групп: Администраторы, Пользователи, Опытные пользователи, Гости.
Можно скрыть определенных пользователей в списке на экране входа в систему через реестр. Для этого нужно создать ветку реестра
HKLM\SOFTWARE\Microsoft\Windows NT\CurrentVersion\Winlogon\SpecialAccounts\UserList
. Для каждого пользователя, которого вы хотите скрыть нужно создать DWORD параметр с именем пользователя и значением 0.
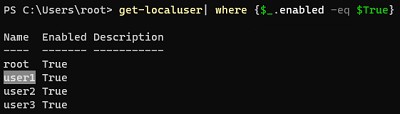
Список локальных пользователей можно вывести в PowerShell или cmd:
Net user
Или:
Get-LocalUser | where {$_.enabled –eq $true}
Чтобы скрыть определенного пользователя на экране входа Windows (например, user1), выполните команду:
reg add "HKLM\SOFTWARE\Microsoft\Windows NT\CurrentVersion\Winlogon\SpecialAccounts\UserList" /t REG_DWORD /f /d 0 /v user1
Если нужно опять показать пользователя на экране входа, нужно удалить это параметр реестра или изменить его значение на 1.
Если на компьютере включен аккаунт встроенного администратора Windows, и это не единственный аккаунт с правами локального администратора на компьютере (!!!), вы можете скрыть и его:
reg add "HKLM\SOFTWARE\Microsoft\Windows NT\CurrentVersion\Winlogon\SpecialAccounts\UserList" /t REG_DWORD /f /d 0 /v administrator
Если вы хотите скрыть всех пользователи, кроме последнего вошедшего, настройте следующие параметры GPO в разделе Computer Configuration -> Administrative Templates -> System -> Logon:
- Enumerate local users on domain—joined computers =
Disabled
(Computer Configuration -> Administrative Templates -> System -> Logon /Конфигурация компьютера -> Административные шаблоны -> Вход в систему) – политика позволяет вывести список локальных пользователей на доменных компьютерах - Do not enumerate connected users on domain-joined computer =
Enabled
If your Windows computer has more than one user account, then you will probably see the “Switch User” option in the Start menu. This option lets you quickly change your user account when needed. In a situation where you have one account set up for work and another for home, this option is a seemingly convenient way to switch between them instantly.
That said, there have been reports that the “Switch User” option has been missing for some Windows users, even when they have multiple accounts on their system. Some have even reported that the option is only visible when all accounts are explicitly logged out.
That shouldn’t be the case. In this article, we show you how to fix this error on a Windows computer without having to repair or reinstall your operating system.
Table of Contents
Why the Switch User Option is Missing?
There can be several reasons for the “Switch User” option to be missing in the start menu. Here are the most common reasons:
- You only have one account enabled on your computer.
- Your domain administrator has disabled the option.
- The “Switch User” option is disabled from the Group Policy or the Windows Registry.
- A Windows update has disabled the option.
Whatever the reason, you can always fix it and get the “Switch User” option back and instantly switch to another user account.
Restore Missing “Switch User” Option
Create Another User Account
This is not a proper solution, but a workaround to get the “Switch User” option in the Start menu or the Alt + F4 shutdown menu. You may not see the “Switch User” option in either of these menus if there is no user account to switch to.
There are multiple ways to create a new user account on a Windows PC. You can create an administrative account, enable the built-in Administrator account, or create a standard account. You can create an account from the Settings app, the Local Users and Groups console, and the Computer Management console.
Here, we show you how to create a local, standard account from the Settings app:
-
Go to the following:
Settings app >> Accounts >> Other users
-
Click “Add account.”

Create a new user account from the Settings app -
From the popup, click “I don’t have this person’s sign-in information.”

Don’t have the sign-in information -
Now click “Add a user without a Microsoft account.”
Create a local account from Settings app -
Next, enter a name for the user account, set a password, set up recovery questions and answers, and click Next.
Enter the details for the account


The new account will now be created. Now, you should be able to see the name of the new account in the Start menu or the “Switch user” option in the Alt + F4 shutdown menu.
As we mentioned earlier; this is not a solution, but a simple workaround. If you already have multiple accounts set up and still can’t see the “Switch user” option, then implement the following fixes given below.
Enable Fast User Switching from Group Policy
The “Switch User” option may be disabled from the Group Policy. If your computer is part of an organization/domain, then this solution won’t help you. Instead, proceed to make the changes at a registry level, shared in the next section of this post.
However, if your system administrator has disabled it explicitly for your computer while it is not part of a domain, then you can try and re-enable the “Switch user” option from Group Policy. Here is how:
-
Open the Group Policy Editor by typing in “gpedit.msc” in the Run Command box.

Open the Group Policy Editor -
Now navigate to the following path from the left pane:
Computer Configuration >> Administrative Templates >> System >> Logon
-
Double-click the Group Policy “Hide entry points for Fast User Switching” on the right.

Open policy for Fast User Switching -
Select “Disabled” and then click Apply and Ok.

Enable entry points to switch users using Group Policy -
Now run the following cmdlet in an elevated Command Prompt to enforce the new policies:
GPUpdate /Force
Enforce Group Policy


This should bring back the “Switch User” option. If this doesn’t work, you can use the steps in the next section to enable the option directly from Windows Registry.
Enable “Switch User” Option from Windows Registry
If none of the solutions above have worked for you, you can try out this method to restore the “Switch user” option from the Windows Registry.
You can download and run the batch file to instantly make the necessary changes to the Windows Registry, or perform the steps below manually.
Enable Fast User Switching (unknown, 316 hits)
To use the .bat file, download it and extract the contents. Then, run the .bat file as an administrator.
Alternatively, you can perform the steps yourself using these steps:
Note: Misconfiguration of critical values in the system’s registry could be fatal for your operating system. Therefore, we insist that you create a system restore point or a complete system image backup before proceeding forward with the process.
You can also use our top selection of disk imaging and backup software so you never lose your data or operating system again.
-
Open the Registry Editor by typing in “regedit” in the Run Command box.
Open the Registry Editor -
Paste the following in the navigation bar and hit Enter for quick navigation:
Computer\HKEY_CURRENT_USER\Software\Microsoft\Windows\CurrentVersion\Policies

Navigate to the Policies Key -
Right-click the Policies key, expand New, and then click Key from the context menu. Name this key “System“.
Create the System key under Policies -
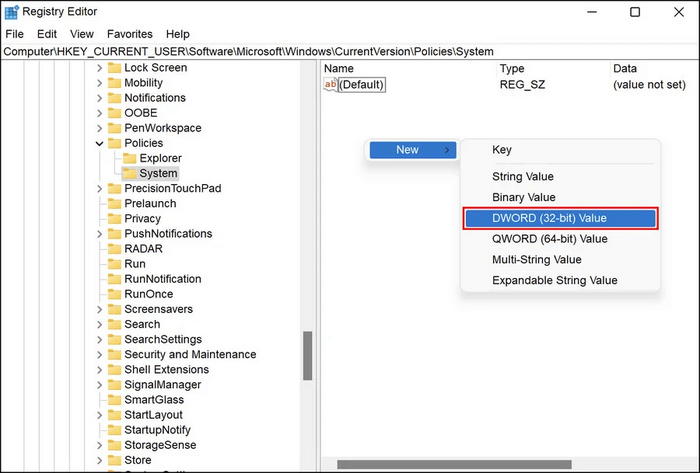
Right-click the System key, expand New, and then click DWORD (32-bit) Value from the context menu. Name this DWORD “HideFastUserSwitching“.
Create the HideFastUserSwitching DWORD -
Double-click the DWORD “HideFastUserSwitching” and set its Value Data to “0“.
Enable Fast User Switching from Windows Registry -
Now restart the computer for the changes to take effect.


Once the computer restarts, and you have more than one user account on the computer, then the “Switch User” option should be visible in the Start menu as well as the Alt + F4 shutdown menu.
Conclusion
The “Switch User” option isn’t mandatory for you to be able to sign into a different user account. However, it is a convenient option to have. This way, you do not have to sign out of your current account and close all the apps, and instantly sign into another account.
If you have multiple users created and activated on your Windows PC, enable the “Switch User” option today and easily change your working profiles.
You can find various hands-on features in Windows OS regarding utility, and «Switch User» also comes under this bucket. It helps share the same PC among multiple users by creating multiple user accounts. It allows different persons to log in through their accounts, enabling the accessibility of apps or files. It also curbs any intrusion or interference with apps or personal information of other users working on PCs.
Sometimes, you need help seamlessly using this feature on your PC. For example, it requires you to fix the «Switch User» option missing in Windows 10/11 to enable you to use this option again. Instead, we suggest the three most effective solutions to solve your issue instantly and provide multiple login facilities.
What Does the «Switch User» Option Missing in Windows 10/11 Mean?
Sometimes, you create multiple user accounts for a separate login utility to provide freedom of working on apps and files. But one day, you try to switch your user account only to find that there is no existence for other users.
So, when the «Switch User» option goes missing in Windows 10/11, you can no longer switch to that particular account or to the files or apps you saved, particularly for that account. So, it is quite a common issue; you can fix the «Switch User» option missing in Windows 10/11 without seeking professional help.
- Solution 1: Enabling the Option of Fast User Switching
- Solution 2: Configuration of Windows Group Policy
- Solution 3: Enabling the Account for Built-in Administrator
Solution 1: Enabling the Option of Fast User Switching
Sometimes, you may have to fix the «Switch User» option missing in Windows 10/11. The issue occurs because of the misconfiguration of specific settings on your PC. To counter this problem, you have to make changes related to administrative levels that enable the option of fast user switching using the Windows Registry. It is recommended to take a registry backup before proceeding with the steps. Also, ensure you enter as an administrator on your PC to access the Registry.
Useful Steps:
Step 1: Start by tapping the Windows and R keys to open Run.
Step 2: Move ahead by typing «regedit» in the given space and tap «Enter.»
Step 3: Tap on the «Yes» option as soon as a prompt for User Account Control appears.
Step 4: As soon as you are in the Registry Editor, reach the location as:
HKEY_CURRENT_USER\Software\Microsoft\Windows\CurrentVersion\Policies\System
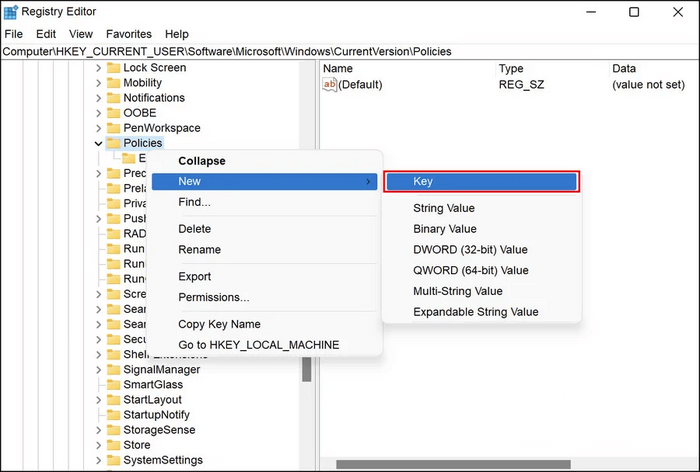
Step 5: If you cannot get the «System key,» right-tap on the ‘Policy key,’ then choose the «New» and «Key» options.
Step 6: Go ahead by renaming the key as «System.»
Step 7: Then, by choosing «System Key,» go to the right pane.
Step 8: Then make a right tap anywhere in the right pane and move ahead by choosing «New» and then the ‘DWORD (32-bit) Value’ option.
Step 9: Now give a new name to the key as: «HidefastUserSwitching.»
Step 10: Tap twice on «HidefastUserSwitching» and then move ahead by typing «0» in Value data.
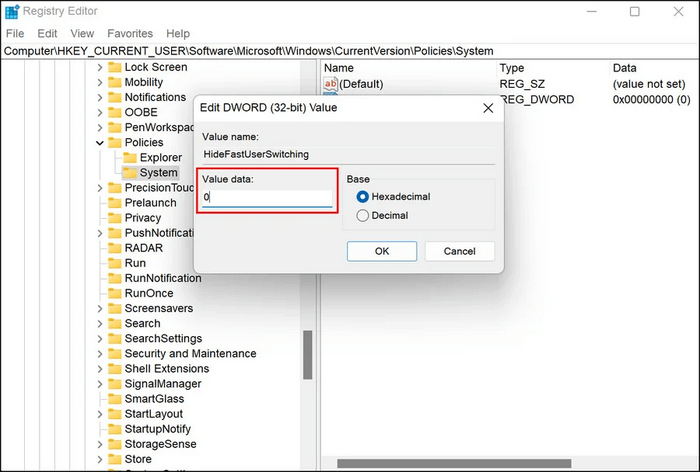
Step 11: Tap the «OK» option to save the changes.
Step 12: As a final step, exit the Registry Editor, then finish by restarting your PC.
Solution 2: Configuration of Windows Group Policy
Windows Group Policy encompasses all the OS controlling the working environment of user accounts. It also provides management in a centralized way wherein operations can be handled while applying security settings. For example, you can configure Windows Group Policy to fix the «Switch User» option missing in the Windows issue.
Useful Steps:
Step 1: Press Winkey + R (that will open the Run window), type ‘gpedit.msc’ and press enter
Step 2: You will see a window for Local Group Policy on the next screen. After that, you have to follow the path;
Computer Configuration -> Administrative Templates -> System -> Logon
Step 3: Now double-tap the «Hide Entry Points for Fast User Switch» option and open it.
Step 4: Select «Disabled» to turn on the option.
Step 5: Tap on «Apply» and then on the «OK» option.
Step 6: Now exit from the Local Group Editor Policy window, then verify if you can fix the «Switch User» option missing in Windows 10/11.
If you had no luck with this one, try the following option and fix the issue.
Solution 3: Enabling the Account for Built-in Administrator
Sometimes, to fix the «Switch User» option missing in Windows 10/11, you can troubleshoot using the current user account. For this, you must run DISM and SFC utilities using the menu for recovery. Then, run them using the Command prompt, wherein you can know about potential issues by scanning the PC. However, if it does not work for you, enabling an account for the built-in administrator in Windows is recommended, and creating a new user account is recommended.
Useful Steps:
Step 1: Start by opening the screen for signing in and then pressing and holding the «Shift key.» Then restart your PC.
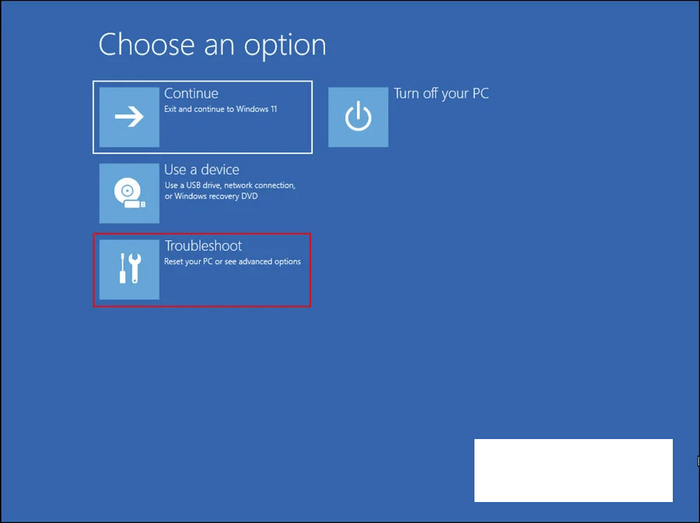
Step 2: You will find that Windows has started booting into the «Recovery menu.» From the list of available options, choose «Troubleshoot.»
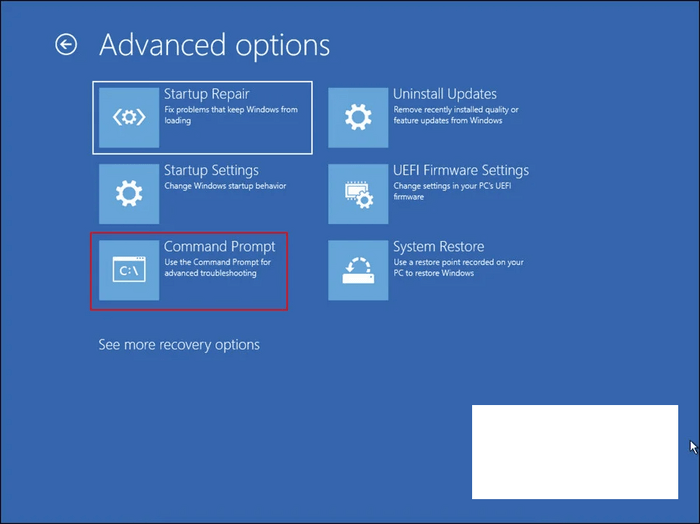
Step 3: Make your way toward «Advanced Options» and then «Command Prompt.»
Step 4: Once you find the Command prompt launching, Type the given command and tap on «Enter» to execute it.
net user administrator /active: yes
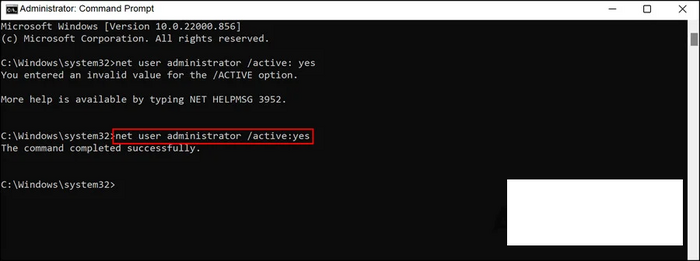
Step 5: As soon as your command gets executed, you must restart your PC. Then, make a login by making use of the built-in administrator account.
Step 6: Now press the «Win + I» keys to open Windows settings.
Step 7: Refer to the left pane and choose the «Accounts» option.

Step 8: Tap on the «Family and Other Users» option.
Step 9: From the section of other users, tap on the «Add Account» option. It will be associated with the «Add other user» option.
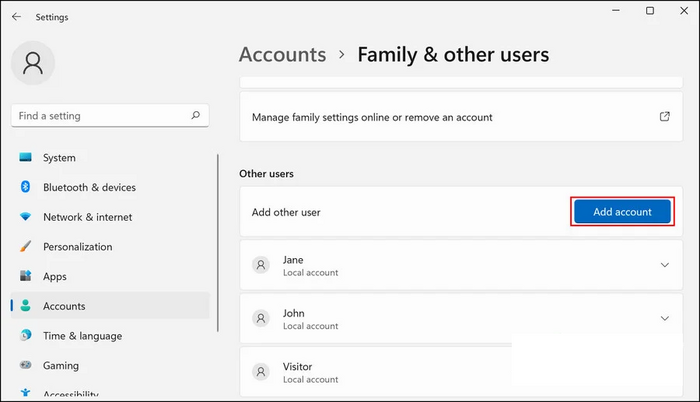
Step 10: Now you can see a dialog wherein you have to tap on the «I don’t have this person’s sign-in information» option.
Step 11: Then, tap the hyperlink stating the «Add a user without a Microsoft account» option. Make an entry for all the fields that are required.
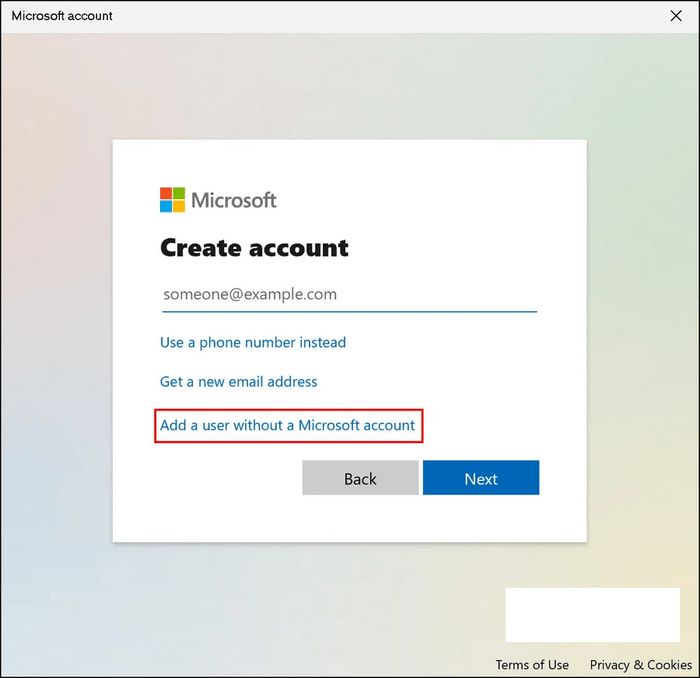
Step 12: There will be some instructions on the screen that you need to follow.
Step 13: As soon as your new user account gets created, make a login and see if the issue got fixed.
Conclusion
The Switch User option in Windows is advantageous when multiple users work on different niches. It provides privacy and safety for their work. However, sometimes the Switch User option disappears or gets removed, hampers the labor saved by that user. But by using specific methods, you can fix this issue. We hope by using our above-initiated methods, you will be able to fix the «Switch User» option missing in the Windows problem seamlessly.
|
|
|
0 / 0 / 0 Регистрация: 19.08.2018 Сообщений: 21 |
|
Не отображается выбор пользователя на стартовом экране25.06.2020, 16:26. Показов 19406. Ответов 28 Добрый день! Куда еще поковать? Кто что посоветует? p.s. переустановить возможности нет Спасибо!
0 |
|
15903 / 7926 / 755 Регистрация: 03.01.2012 Сообщений: 32,863 |
|
|
25.06.2020, 16:35 |
|
|
Я думаю, надо посмотреть что делается в реестре в ветке HKEY_LOCAL_MACHINE\Software\Microsoft\Wi ndowsNT\CurrentVersion\Winlogon
0 |
|
0 / 0 / 0 Регистрация: 19.08.2018 Сообщений: 21 |
|
|
26.06.2020, 00:17 [ТС] |
|
|
Хватит? или добавить раскрытие подветок? Миниатюры
0 |
|
15903 / 7926 / 755 Регистрация: 03.01.2012 Сообщений: 32,863 |
|
|
26.06.2020, 10:47 |
|
|
folex22, Теперь гляньте в ветке HKEY_LOCAL_MACHINE\Software\Microsoft\Wi ndowsNT\CurrentVersion\ProfileList\S-1-5-21-4078115716-3917966119-1049069023-1001 значение параметра ProfileImagePath. Должно быть что-то типа C:\Users\IGOR, но подозреваю, что это два разных пользователя и один из них, вероятно, уже не существует. Попробуйте поменять значения параметров DefaultUserName и AutoLogonSID так, чтобы они ссылались на одного и того же, причём существующего, пользователя (предварительно забэкапьте ветку, которую будете править)
0 |
|
0 / 0 / 0 Регистрация: 19.08.2018 Сообщений: 21 |
|
|
27.06.2020, 13:16 [ТС] |
|
|
Вот, прописан путь, как Вы и предполагали. Создал еще одну учетку user и спокойно захожу с нее через терминал, но при перезагрузке на экране приветствия так же пусто. Миниатюры
0 |
|
0 / 0 / 0 Регистрация: 19.08.2018 Сообщений: 21 |
|
|
27.06.2020, 13:18 [ТС] |
|
|
Такое ощущение, что либо какой-то файл битый (хотя dism и sfc ошибок не выявили), либо где-то ограничение в локальных политиках стоит (хотя есть копия реестра полугодовалой давности и все равно не пускает).
0 |
|
15903 / 7926 / 755 Регистрация: 03.01.2012 Сообщений: 32,863 |
|
|
27.06.2020, 13:26 |
|
|
folex22, А кто у вас там выше (с SID, который заканчивается группой цифр 1000)? Эта учётка существует?
0 |
|
0 / 0 / 0 Регистрация: 19.08.2018 Сообщений: 21 |
|
|
27.06.2020, 15:45 [ТС] |
|
|
C:\Users\defaultuser0
0 |
|
15903 / 7926 / 755 Регистрация: 03.01.2012 Сообщений: 32,863 |
|
|
27.06.2020, 16:48 |
|
|
Странно. Ветка дефолтного юзера — по-моему — в профиль лист не входит. Может, какое-то нововведение десятки?
0 |
|
0 / 0 / 0 Регистрация: 19.08.2018 Сообщений: 21 |
|
|
27.06.2020, 16:54 [ТС] |
|
|
Кстати, ошибся насчет реестра старого: он от начала июня. Тот, что полугодовой давности — не стартует комп, ссылаясь на ошибки sys файлов. Я ж чистил систему от всякой заразы, включая касперского. Так что, вероятно все же что-то с реестром. Быть может где-то в локальных политиках ограничение какое-то стоит… хотя я пересмотрел и визуально ничего не нашел. Добавлено через 1 минуту
0 |
|
15903 / 7926 / 755 Регистрация: 03.01.2012 Сообщений: 32,863 |
|
|
27.06.2020, 17:01 |
|
|
folex22, По идее, дефолтный юзер имеет свою собственную ветку — её кустом является файл c:\windows\system32\config\default.
0 |
|
0 / 0 / 0 Регистрация: 19.08.2018 Сообщений: 21 |
|
|
27.06.2020, 17:09 [ТС] |
|
|
Да. Миниатюры
0 |
|
0 / 0 / 0 Регистрация: 19.08.2018 Сообщений: 21 |
|
|
27.06.2020, 17:16 [ТС] |
|
|
Просто, мне кажется, что отсутствие выбора пользователей не связано с наличием или отсутствием куста какого-то пользователя. Это глобальная предустановка системы, которая потом уже может запросить того или иного пользователя и одобрить его логон. Но, возможно, я и не прав….. Добавлено через 4 минуты Кликните здесь для просмотра всего текста
0 |
|
15903 / 7926 / 755 Регистрация: 03.01.2012 Сообщений: 32,863 |
|
|
27.06.2020, 17:40 |
|
|
folex22, У вас на проблемной систме когда-то был автоматический вход в систему? (Иначе откуда в винлогоне параметры AutoAdminLogon и DefaultUserName). Такое впечатление, что этот автоматический вход пытались отключить, но недоотключили. Попробуйте поставить значение AutoAdminLogon = 1 и — не перзагружаясь! — = 0
0 |
|
Заблокирован |
|
|
27.06.2020, 17:43 |
|
|
Вы не туда ушли товарищи, хотя как посмотреть. На мой взгляд нужно вызвать командой
0 |
|
27.06.2020, 20:00 |
|
|
Не по теме: ха ха ха, молодца абизянка, ато разумничался, дай дай
0 |
|
0 / 0 / 0 Регистрация: 19.08.2018 Сообщений: 21 |
|
|
27.06.2020, 21:12 [ТС] |
|
|
Сообщение от gecata folex22, У вас на проблемной систме когда-то был автоматический вход в систему? (Иначе откуда в винлогоне параметры AutoAdminLogon и DefaultUserName). Такое впечатление, что этот автоматический вход пытались отключить, но недоотключили. Попробуйте поставить значение AutoAdminLogon = 1 и — не перзагружаясь! — = 0 Сделал. Без результатов. То, что на скрине во вложении тоже не помогает — пробовал раньше. Миниатюры
0 |
|
0 / 0 / 0 Регистрация: 19.08.2018 Сообщений: 21 |
|
|
27.06.2020, 21:46 [ТС] |
|
|
И вот такая ошибка появилась: Кликните здесь для просмотра всего текста Имя журнала: Application Подробности: Xml события: Подробности: Миниатюры
0 |
|
15903 / 7926 / 755 Регистрация: 03.01.2012 Сообщений: 32,863 |
|
|
28.06.2020, 10:30 |
|
|
folex22, А если зайти не в безопасном режиме, а в обычном, но с базовым видео?
0 |
|
0 / 0 / 0 Регистрация: 19.08.2018 Сообщений: 21 |
|
|
28.06.2020, 10:44 [ТС] |
|
|
Тоже самое. То есть попробовать идентифицировать — проблема с какими-то системными файлами или с реестром. Добавлено через 1 минуту
0 |
|
raxper Эксперт 30234 / 6612 / 1498 Регистрация: 28.12.2010 Сообщений: 21,154 Блог |
28.06.2020, 10:44 |
|
Помогаю со студенческими работами здесь Написать программу, которая спрашивает ФИО пользователя, выделяет из него имя пользователя, и формирует на экране Строка не отображается на экране #include… Не отображается изображение на экране Не отображается на экране сообщение MsgBox MsgBox("Сообщение", MsgBoxStyle.Critical,… Как узнать отображается ли на экране компонент Искать еще темы с ответами Или воспользуйтесь поиском по форуму: 20 |
|
Новые блоги и статьи
Все статьи Все блоги / |
||||
|
Распределенное обучение с TensorFlow и Python
AI_Generated 05.05.2025 В машинном обучении размер имеет значение. С ростом сложности моделей и объема данных одиночный процессор или даже мощная видеокарта уже не справляются с задачей обучения за разумное время. Когда. . . |
CRUD API на C# и GraphQL
stackOverflow 05.05.2025 В бэкенд-разработке постоянно возникают новые технологии, призванные решить актуальные проблемы и упростить жизнь программистам. Одной из таких технологий стал GraphQL — язык запросов для API,. . . |
Распознавание голоса и речи на C#
UnmanagedCoder 05.05.2025 Интеграция голосового управления в приложения на C# стала намного доступнее благодаря развитию специализированных библиотек и API. При этом многие разработчики до сих пор считают голосовое управление. . . |
Реализация своих итераторов в C++
NullReferenced 05.05.2025 Итераторы в C++ — это абстракция, которая связывает весь экосистему Стандартной Библиотеки Шаблонов (STL) в единое целое, позволяя алгоритмам работать с разнородными структурами данных без знания их. . . |
Разработка собственного фреймворка для тестирования в C#
UnmanagedCoder 04.05.2025 C# довольно богат готовыми решениями – NUnit, xUnit, MSTest уже давно стали своеобразными динозаврами индустрии. Однако, как и любой динозавр, они не всегда могут протиснуться в узкие коридоры. . . |
|
Распределенная трассировка в Java с помощью OpenTelemetry
Javaican 04.05.2025 Микросервисная архитектура стала краеугольным камнем современной разработки, но вместе с ней пришла и головная боль, знакомая многим — отслеживание прохождения запросов через лабиринт взаимосвязанных. . . |
Шаблоны обнаружения сервисов в Kubernetes
Mr. Docker 04.05.2025 Современные Kubernetes-инфраструктуры сталкиваются с серьёзными вызовами. Развертывание в нескольких регионах и облаках одновременно, необходимость обеспечения низкой задержки для глобально. . . |
Создаем SPA на C# и Blazor
stackOverflow 04.05.2025 Мир веб-разработки за последние десять лет претерпел коллосальные изменения. Переход от традиционных многостраничных сайтов к одностраничным приложениям (Single Page Applications, SPA) — это. . . |
Реализация шаблонов проектирования GoF на C++
NullReferenced 04.05.2025 «Банда четырёх» (Gang of Four или GoF) — Эрих Гамма, Ричард Хелм, Ральф Джонсон и Джон Влиссидес — в 1994 году сформировали канон шаблонов, который выдержал проверку временем. И хотя C++ претерпел. . . |
C# и сети: Сокеты, gRPC и SignalR
UnmanagedCoder 04.05.2025 Сетевые технологии не стоят на месте, а вместе с ними эволюционируют и инструменты разработки. В . NET появилось множество решений — от низкоуровневых сокетов, позволяющих управлять каждым байтом. . . |
Наверх
Download Windows Speedup Tool to fix errors and make PC run faster
When we access the login screen of Windows 10, the name and pictures of all the available user accounts are visible on the bottom-left section of the login screen. We can click on any user account and enter login details to access that account. However, many users have faced this problem that such Switch User option is missing from Windows 11/10 login screen because of which other user accounts are not visible there. If you are also facing this problem, then this post might help you with two built-in features of Windows 11/10.

You can show the Switch User interface on the login screen of Windows 11/10 using these two features:
- Local Group Policy Editor
- Registry Editor.
Let’s check both options.
Can’t switch Users in Windows 11/10
1] Local Group Policy Editor
This feature is present in Enterprise and Pro editions of Windows 10. If you are using Home edition, then you need to install Local Group Policy Editor to Windows 10 Home edition so that you can use it.
After that, follow these steps:
- Open Local Group Policy Editor
- Access Logon folder
- Access Hide entry points for Fast User Switching setting
- Use Not Configured option
- Press OK.
At first, open the Run Command box using Win+R hotkey, type gpedit.msc, and use the Enter key to open the Local Group Policy Editor window.
In that window, access the Logon folder. Its path is:
Computer Configuration > Administrative Templates > System > Logon

Now in the right-hand section, scroll down and access Hide entry points for the Fast User Switching setting by double-clicking on it.
This will open a new window for that setting. In that window, select the Not Configured option, and press the OK button.

Access the login screen of Windows 11/10 and all user accounts should be visible now.
2] Registry Editor
First of all, backup Registry Editor before trying this option. After that, use these steps:
- Open Registry Editor
- Access the System key
- Create
HideFastUserSwitchingDWORD value - Set its value data to 0
- Press the OK button.
In the very first step, open Registry Editor by typing regedit in the Windows 10 Search box and then press Enter key. There are many other ways to open Registry Editor.
After opening Registry Editor, access the System Registry key. Here is its path:
HKEY_LOCAL_MACHINE\SOFTWARE\Microsoft\Windows\CurrentVersion\Policies\System

Under this key, you will see a lot of DWORD values. Now you need to create a new DWORD (32-bit) value and set its name to HideFastUserSwitching. If that DWORD value is already present, then no need to create it.

Double-click on the HideFastUserSwitching value and a window will pop up. There, put 0 in the Value data box (as visible in the above screenshot), and press the OK button.
Alternatively, you can also simply delete the HideFastUserSwitching value. After that, when you will access the login screen of Windows 11/10, the Switch User accounts option will be visible there.
Related: Hide specific user accounts from Windows login screen.
Even after using the above two options, User account names not displaying on Windows login screen, then you can show them using Command Prompt or Local Users and Groups window. Or else, you can use other different ways to switch users on Windows.
Hope something will help.
Laxman has done Bachelor’s in Computer Science, followed by an MBA. Writing about Windows OS and the free software and services that are available for the Windows operating system is what excites him.