
Windows Security is the only preinstalled defense software that comes with Windows 11 and Windows 10. It is because of this software that the average Windows user does not need another paid security software. Therefore, such systems must have the Windows Security app working seamlessly.
However, users have reported on different occasions that their “Windows Security” app, especially the “Security at a glance” home page is not working as it should. Precisely, it is blank and no information is being displayed.
This sort of incident has been reported by users who had upgraded to Windows 11 and existing Windows 10 users. In short, there is no known pattern.
If you are reading this post, you are likely facing the same issue. In this article, we discuss the many possible ways to fix the issue and get your Windows Security up and working again, so that your PC is secure.
Table of Contents
Why is Windows Security Blank
There can be different reasons for the Windows security application to appear blank.
The number one reason that we found common amongst end users was using third-party antivirus software. When using another antivirus software, the Windows Security app automatically stops functioning and performing scans. This makes some pages inside the app appear blank.
Another reason for the empty Windows Security pages is because of corruption in the system files or the app itself, hindering the app’s ability to perform normally. Since corruption can occur at several different levels inside the Windows OS, we have listed several solutions below to fix this.
Let us now continue to the possible solutions to make sure that your computer is safe again.
Fix Blank Windows Security Page
We have listed the solutions to fix the Windows Security application chronologically. Perform these solutions in the order given.
Restart Computer
The first thing you ought to do is to start the computer.
The easier method would be to simply restart the dependent services for Windows Security. However, after doing some research, we found that the service “Security Center” cannot be restarted, neither from the Services console, the Command Prompt, nor the Windows Registry editor.
Therefore, we suggest that you restart the computer in an attempt to fix the issue.
If rebooting the PC didn’t work for you, then we suggest that you proceed with the following solutions.
Repair/Reset Windows Security
Just like all other UWP apps, Windows Security is also an app. Like all others, it can be repaired or reset, if needed.
We suggest that you perform the following steps in an attempt to repair the app. If repairing it doesn’t work, try resetting it.
-
Navigate to the following:
Settings app >> Apps >> Installed apps
-
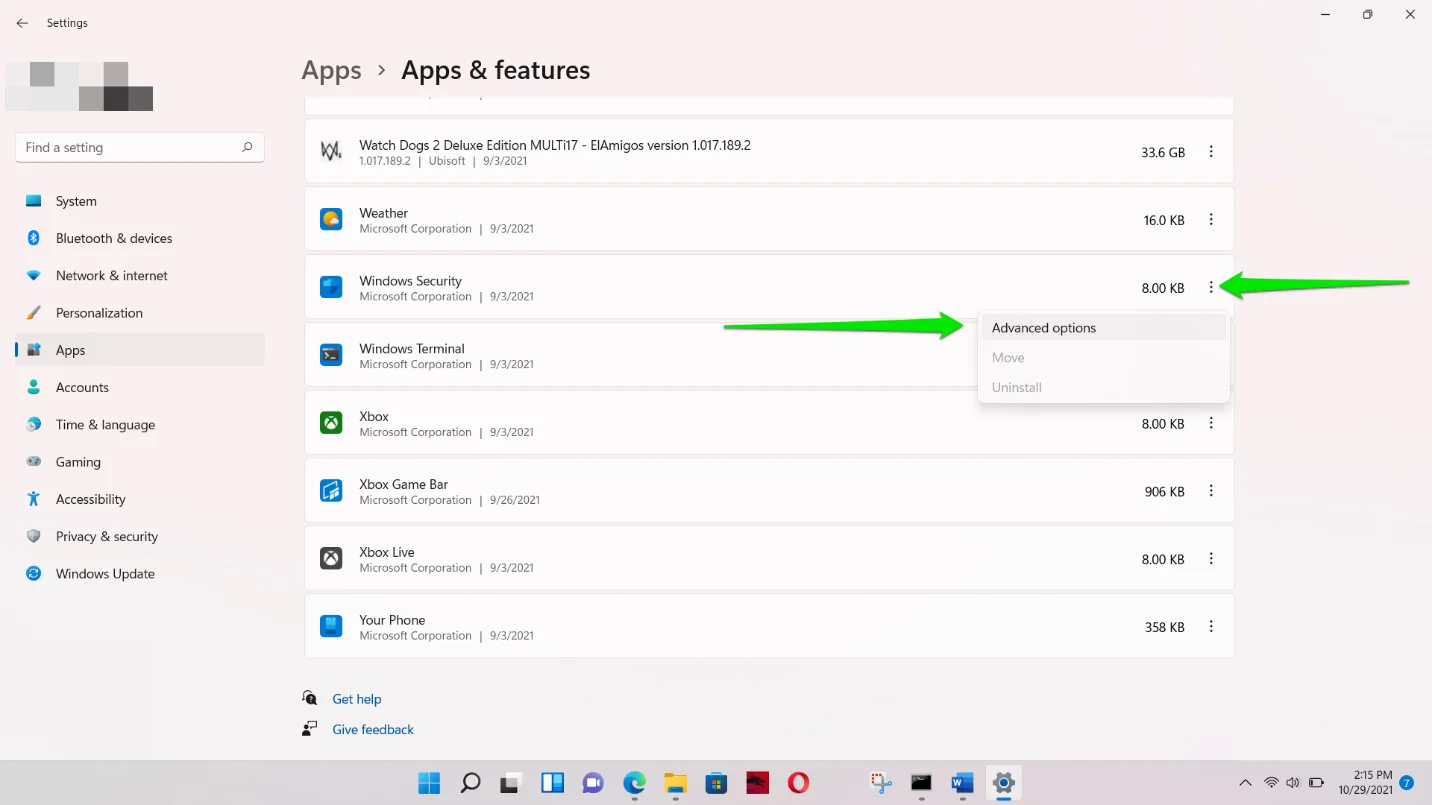
Search for “Windows Security.”

Search for Windows Security -
Click on the 3 dots in front of the app and then click “Advanced options.”
Open advanced app options -
Scroll down and click “Repair.”
Repair Windows Security Windows will now repair the app.


Now check to see if you can view the Windows Security pages which appeared blank earlier. If the issue persists, navigate to the same Settings page, open advanced Windows Security options, and click “Reset.”

Now, check again once the app has been reset.
Uninstall Third-Party Antivirus
As we mentioned earlier, the Windows Security application may appear blank on some pages when another antivirus is installed on the computer. In this case, you must uninstall this antivirus for Windows Security to work normally again.
You can remove any third-party antivirus software from the Programs and Features applet by typing in “appwiz.cpl” in the Run Command box, or from Settings app >> Apps >> Installed Apps.
Alternatively, you can also use the dedicated antivirus removal tool to uninstall all traces of the software.
Fix Corrupted Files with DISM and SFC
Deployment Image Servicing and Management (DISM) and System File Checker (SFC) are built-in tools in Windows that can scan and repair system files. Use the following steps to run the DISM and SFC scans in an attempt to repair any corrupted system files that may be affecting the Windows Security app:
-
Launch an elevated Command Prompt.
-
Execute the following commands one after the other:
DISM.exe /Online /Cleanup-image /Checkhealth DISM.exe /Online /Cleanup-image /Scanhealth DISM.exe /Online /Cleanup-image /Restorehealth -
Then run the SFC scan using this cmdlet:
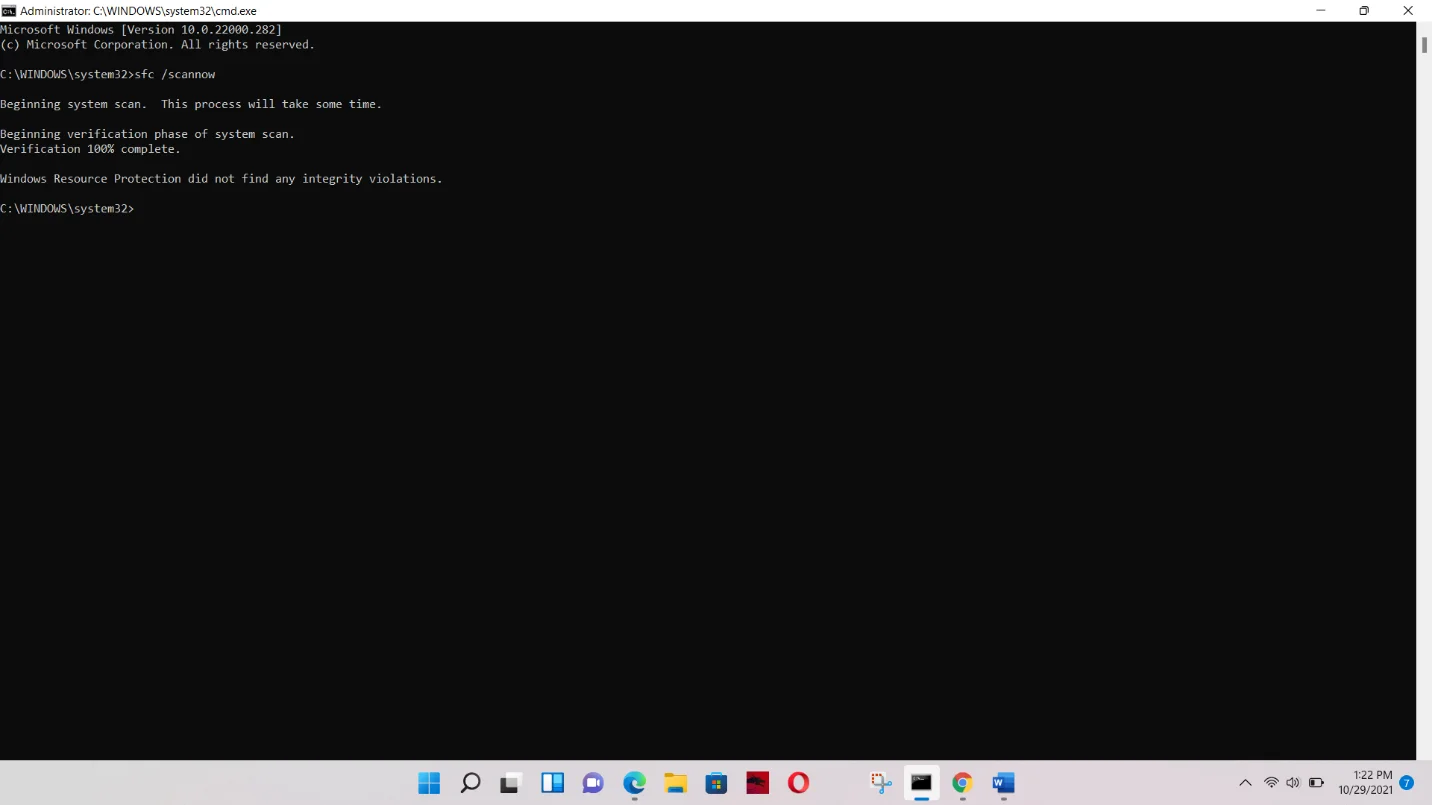
SFC /ScanNow
Execute DISM and SFC cmdlets to repair system files

Once the scans have run successfully, check to see if the problem has gone away.
Install Pending Windows Updates
Windows updates also include system files that are overwritten on the existing files. Therefore, it may also replace any corrupted system files with new, fresh ones.
Perform the following steps to check and install any available Windows updates:
-
Navigate to:
Settings app >> Windows Update
-
Click “Check for updates.”

Check for pending updates The app will now begin searching the web for updates.
-
If any update(s) is available, download and install it.
-
Once the update(s) is installed, restart the computer.

Register System Files
Unregistered system files can cause the respective services to not be able to run. You can register Dynamic Link Libraries (DLLs) using the “regsvr32” command line tool.
Perform the following steps to register the crucial files for Windows Security in an attempt to bring back the empty pages:
-
Launch an elevated Command Prompt.
-
Run the following cmdlets one after the other:
regsvr32 jscript
regsvr32 vbscript
Register system files -
Restart the computer.

Once the computer restarts, check to see whether you are now able to see the empty Windows Security pages.
Manipulate Windows Registry
If no solution has worked for you thus far, try manually changing the Windows Registry to your favor and fix the issue using these steps:
Note: Misconfiguration of critical values in the system’s registry could be fatal for your operating system. Therefore, we insist that you create a system restore point before proceeding forward with the process.
You can also use our top selection of disk imaging and backup software so you never lose your data or operating system again.
-
Open the Registry Editor by typing in “regedit” in the Run Command box.
Open the Registry editor -
Paste the following in the navigation bar for quick navigation:
Computer\HKEY_LOCAL_MACHINE\SYSTEM\CurrentControlSet\Services\SecurityHealthService

Quick navigation in the Registry Editor -
Double-click the “Start” DWORD.
Open the DWORD value -
Change the Value Data to either “1” or “2.”
Change the Value Data -
Restart the computer for the changes to take effect.


Reinstall the Windows Security App
If changing the Windows Registry had no effect either, then you can try factory resetting the Windows Security app – as if it were freshly installed. Here’s how to do it:
-
Open an elevated PowerShell instance.
-
Run the following cmdlet:
Get-AppxPackage Microsoft.SecHealthUI -AllUsers | Reset-AppxPackage
Factory-reset the Windows Security app

Now check the Windows Security application to see if the issue has been resolved.
If it hasn’t, then you can also try a similar, yet more aggressive approach below.
Redeploy all Applications
The following steps redeploy all Windows applications from scratch.
-
Open an elevated PowerShell instance.
-
Run the following cmdlet to allow runnings scripts:
Set-ExecutionPolicy Unrestricted
Allow script execution -
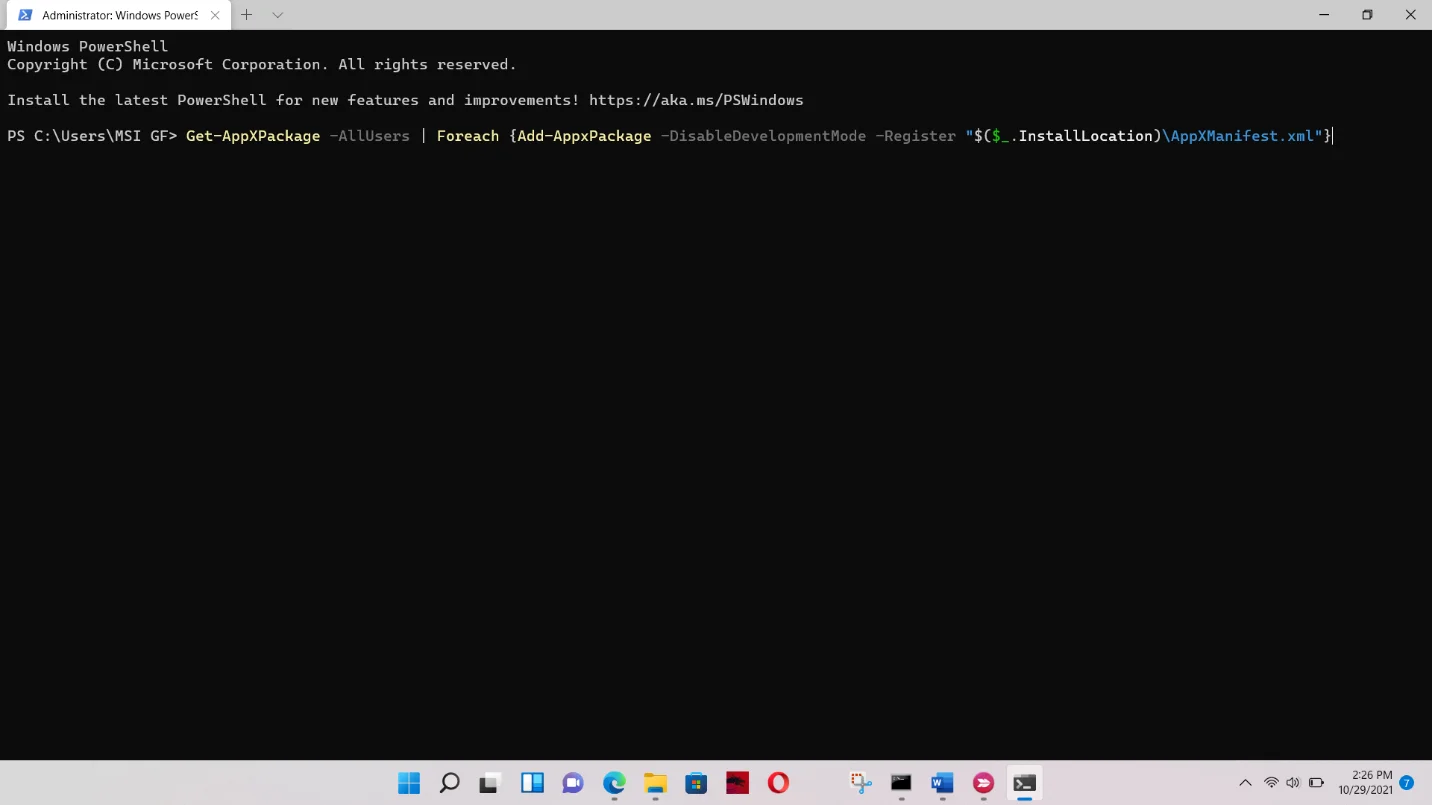
Now run the following cmdlet to redeploy all apps:
Get-AppXPackage -AllUsers | Foreach {Add-AppxPackage -DisableDevelopmentMode -Register "$($_.InstallLocation)\AppXManifest.xml"}
Redeploy all Windows app This step can take a few minutes to redeploy all apps.
Additionally, ignore any errors you see as they will be prompting you to close the apps/services to redeploy certain apps. That won’t be necessary.


Once the command has been executed completely, check to see if you encounter the same error with Windows Security.
If this hasn’t worked either, then the only possible workaround would be to reset your computer.
Reset Windows
Resetting the computer brings all configurations back to their factory default settings and values. If the solutions discussed above did not work for you, then you must now reset your PC.
Note that this will retain all your personal data.
Follow these sites to reset your PC:
-
Navigate to the following:
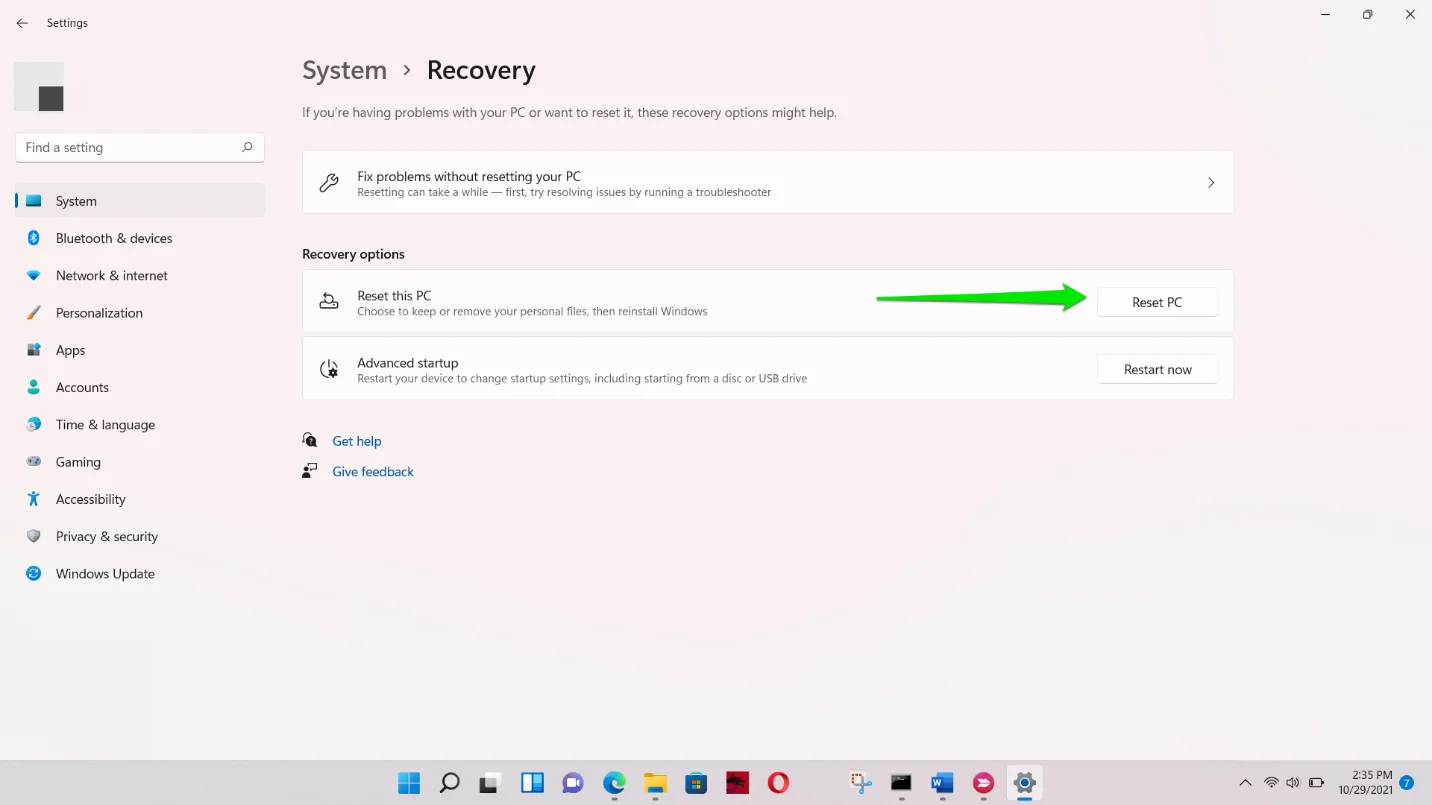
Settings app >> System >> Recovery
-
Click “Reset PC” in front of Reset this PC.
Reset computer The reset wizard will now open.
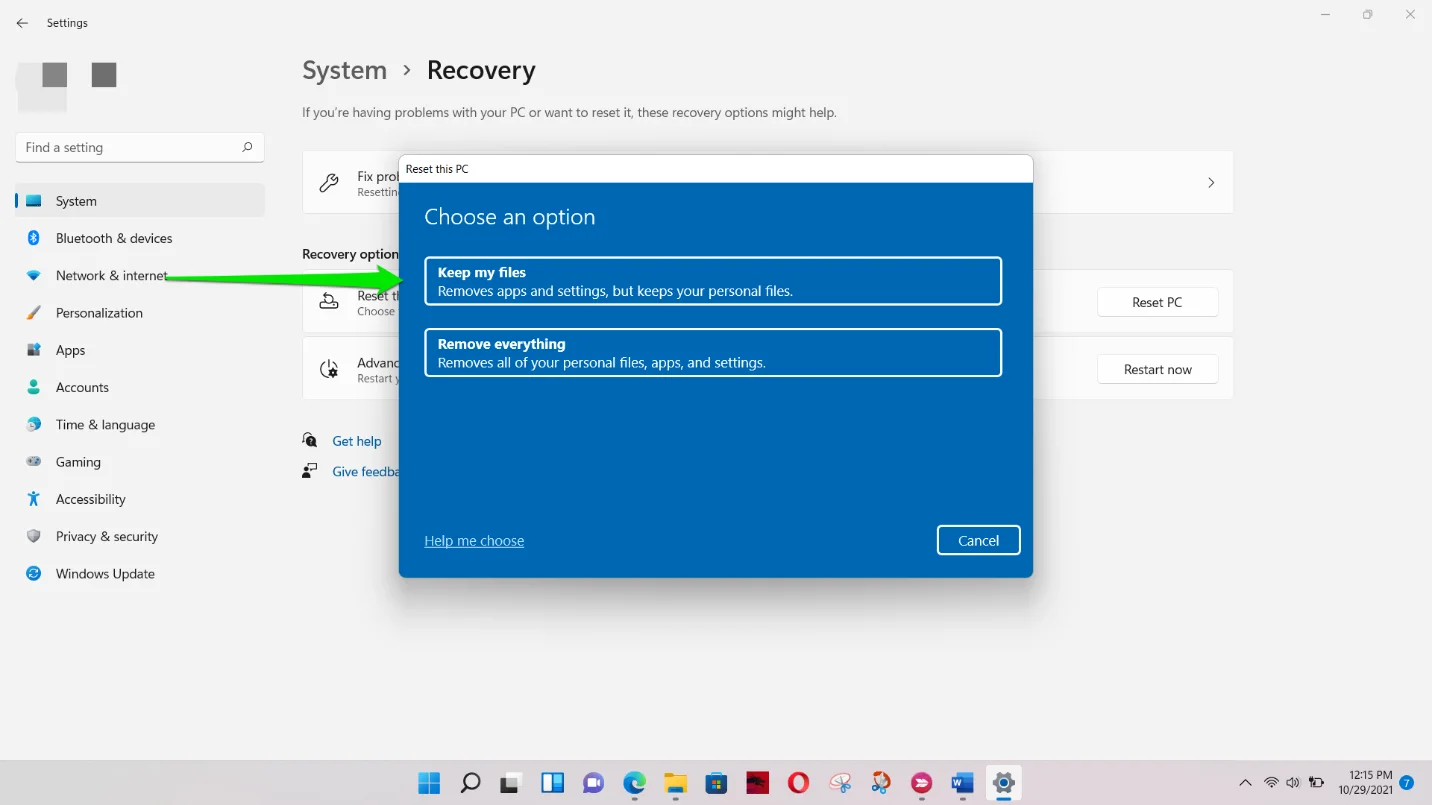
-
Click “Keep my files.”
Keep files while resetting Windows -
Select “Local reinstall.”
Perform local reinstallation -
Click Next.
Proceed -
Click Reset.
Click Reset


The complete reset process can take a while, depending on your computer’s specs. Please allow it ample time to complete and do not power off or restart your PC during the process.
Once the computer is reset, it will be reverted to factory settings, with the exception of your personal data on board.
Now, check the Windows Security application and see if the blank pages have now been restored.
If the issue remains, then the only solution now is to perform a clean Windows installation.
Conclusion
To conclude, we must do whatever it takes to restore the Windows Security application to its functional state, as it is the primary firewall between your data and the outside internet. With Windows Security out of the way, and no other protection software installed, your PC and the data on it will be vulnerable to attacks.
That said, this article lists all the possible methods to fix the missing Windows Security pages that many users experience out of the blue. We hope that at least one of the given solutions worked for you.
Windows Security offers built-in protection for Windows systems to keep your computer and files secure at no extra cost. However, at times when you try to open the app, it shows a blank screen.
Windows Defender is usually affected due to the presence of another antivirus in your PC. Here we discuss a few troubleshooting steps to help you resolve this issue in Windows 10 quickly.
Why Is Windows Security Showing a Blank Screen?
As mentioned earlier, Windows Security is usually affected if you have a third-party antivirus installed on your PC. And when you uninstall an antivirus, it is important to use its removal tool to fully complete the job.
Disabled or missing Windows Defender Antivirus Service in Services can also trigger this problem. In such instances, you may have to perform a Repair Upgrade to fix the issue. System file corruption is another common cause for this issue and may require you to perform an upgrade, reset, or clean install to resolve the issue.
If you experience this issue, here is how to troubleshoot and fix the problem for good.
1. Restart Windows Security Center Service
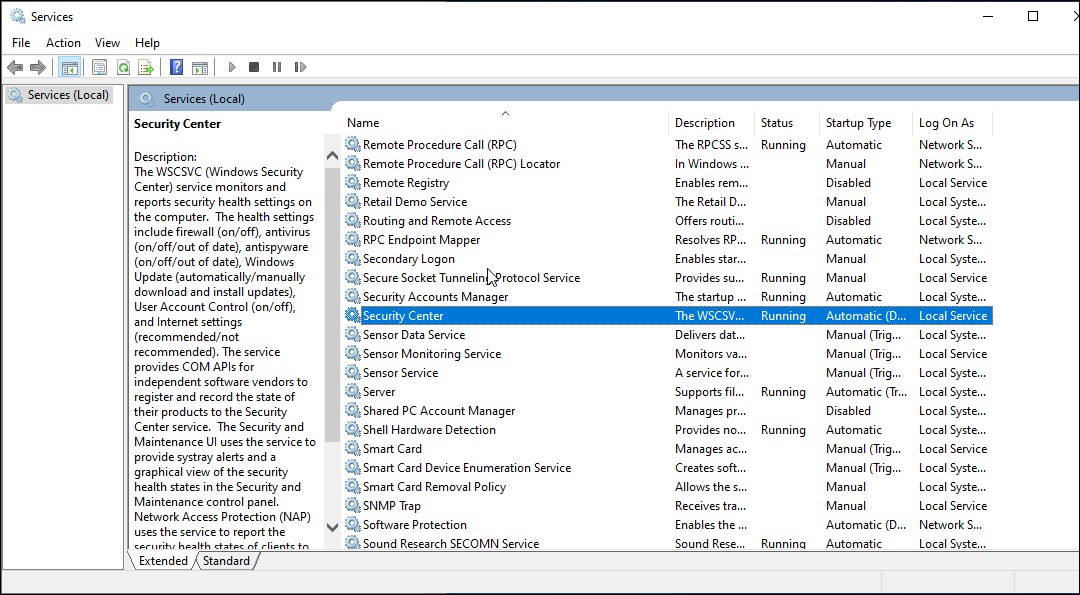
The Windows Security Center service is an essential aspect of the OS. It detects and notifies the users about the pending updates and security issues such as disabled antivirus, etc. If the service is closed or set to run manually, try restarting it to see if that helps.
To restart Windows Security Center Service:
- Press Win + R to open Run.
- Type services.msc and click OK.
- In the Services window, scroll down and locate the Security Center service.
- Check the status of the service. If it is not running, right-click and select Restart.
- Close Services and check for any improvements.
2. Check for Pending Windows Updates
If a bug or glitch is causing Windows Security to malfunction, check if a fix is available in the Windows Updates.
To check and download Windows updates:
- Go to Start > Settings > Windows Updates.
- Click on Check for updates
- Next, download and install all the pending updates.
- Restart your PC and check if the issue is resolved.
3. Check with your Administrator
If you are using a work computer, the administrator may have blocked access to some Windows 10 settings. Verify the Group Policy and Registry entries to find and fix any issues with Windows Security.
If available, try performing an in-place upgrade to the latest available version. A Windows 10 to 11 upgrade will reinstall the OS without removing your apps and files.
4. Run the System File Checker Tool
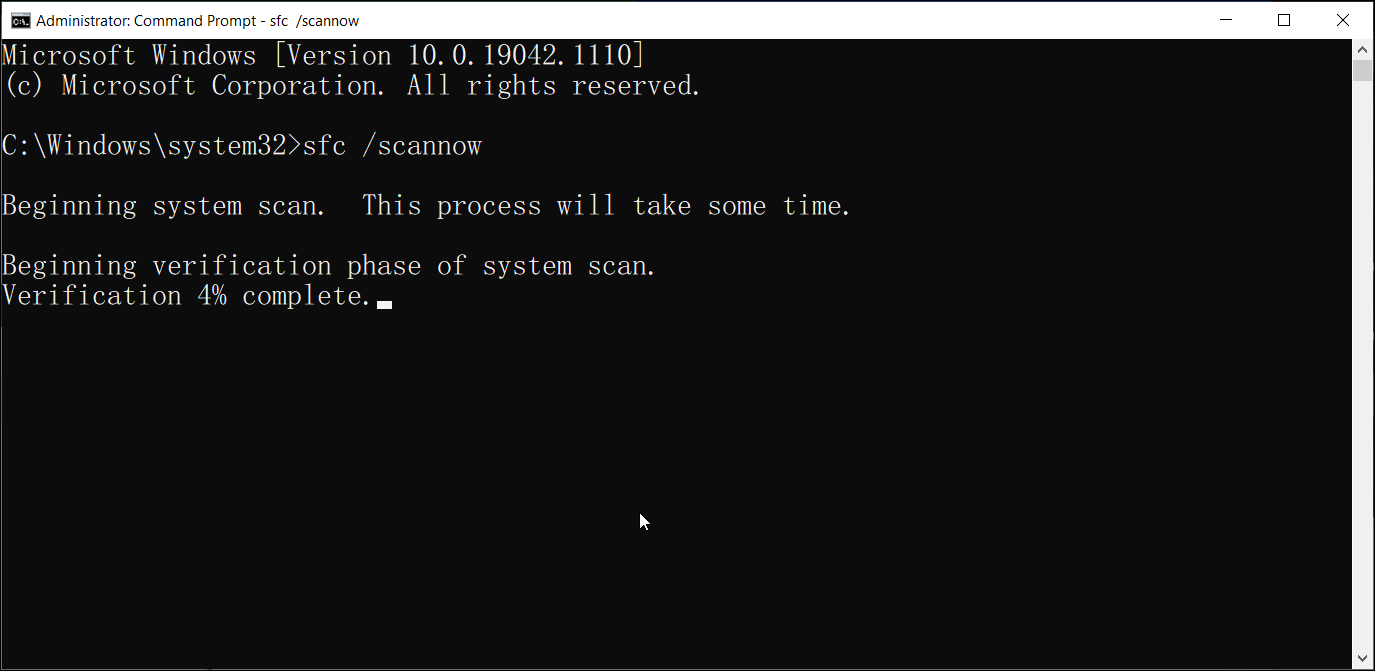
Corrupt system files can cause one or more features to stop working in Windows 10. The System File Checker tool deployed with the sfc /scannow command will scan all protected system files and replace corrupted ones with a fresh cached copy.
To run System File Checker tool:
- Type cmd in the Windows search bar.
- Right-click on the Command Prompt option and select Run as administrator.
-
In the Command Prompt window, type the following command and hit enter:
sfc /scannow - The verification process may take some time, so wait till it is 100% complete.
After the process is complete, you will receive one of the following messages:
- Windows Resource Protection did not find any integrity violations—This means the System File Checker did not find any issues with your system files.
- Windows Resource Protection found corrupted files and successfully repaired them.
- Windows Resource Protection found corrupted files but was unable to fix some of them.
- Windows Resource Protection could not perform the requested potation—In this stance, run the System File Checker in Safe Mode to resolve this error.
If the error is found and fixed, reboot the computer and check if the Windows Security blank screen issue is resolved.
4. Check for the Presence of Third-Party Antivirus
By design, Windows Security will be disabled in the presence of a third-party antivirus. Though, it will not affect the Window Defender functionalities.
Some antivirus software like Malwarebytes allows you to turn off the protection and exit the app. If not, you may have to uninstall your antivirus to see if that helps.
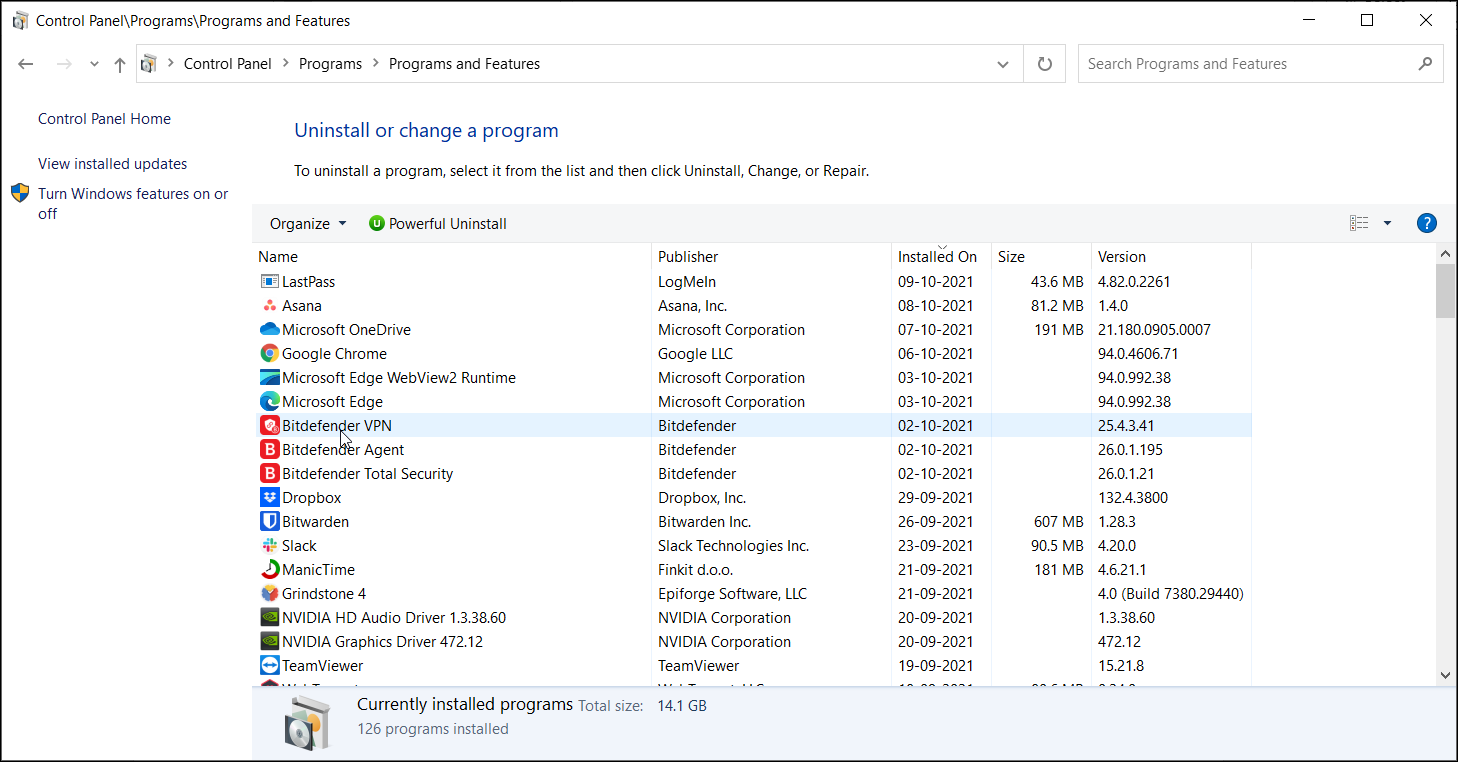
To check if you have a third-party antivirus installed:
- Press Win + R to open Run.,
- Type appwiz.cpl and click OK to open the Control Panel.
- Go through the installed apps and look for any third-party antivirus installed.
Most antivirus companies offer a removal tool to completely remove the software from the user’s computer. Head over to your antivirus company’s official website and download the tool. Run the installer and follow on-screen instructions to delete your antivirus software.
As a last resort, perform a reset to reinstall Windows 10 without affecting your personal files and folders. However, this will remove all the third-party apps installed on your computer, so make sure to create a backup before resetting your PC.
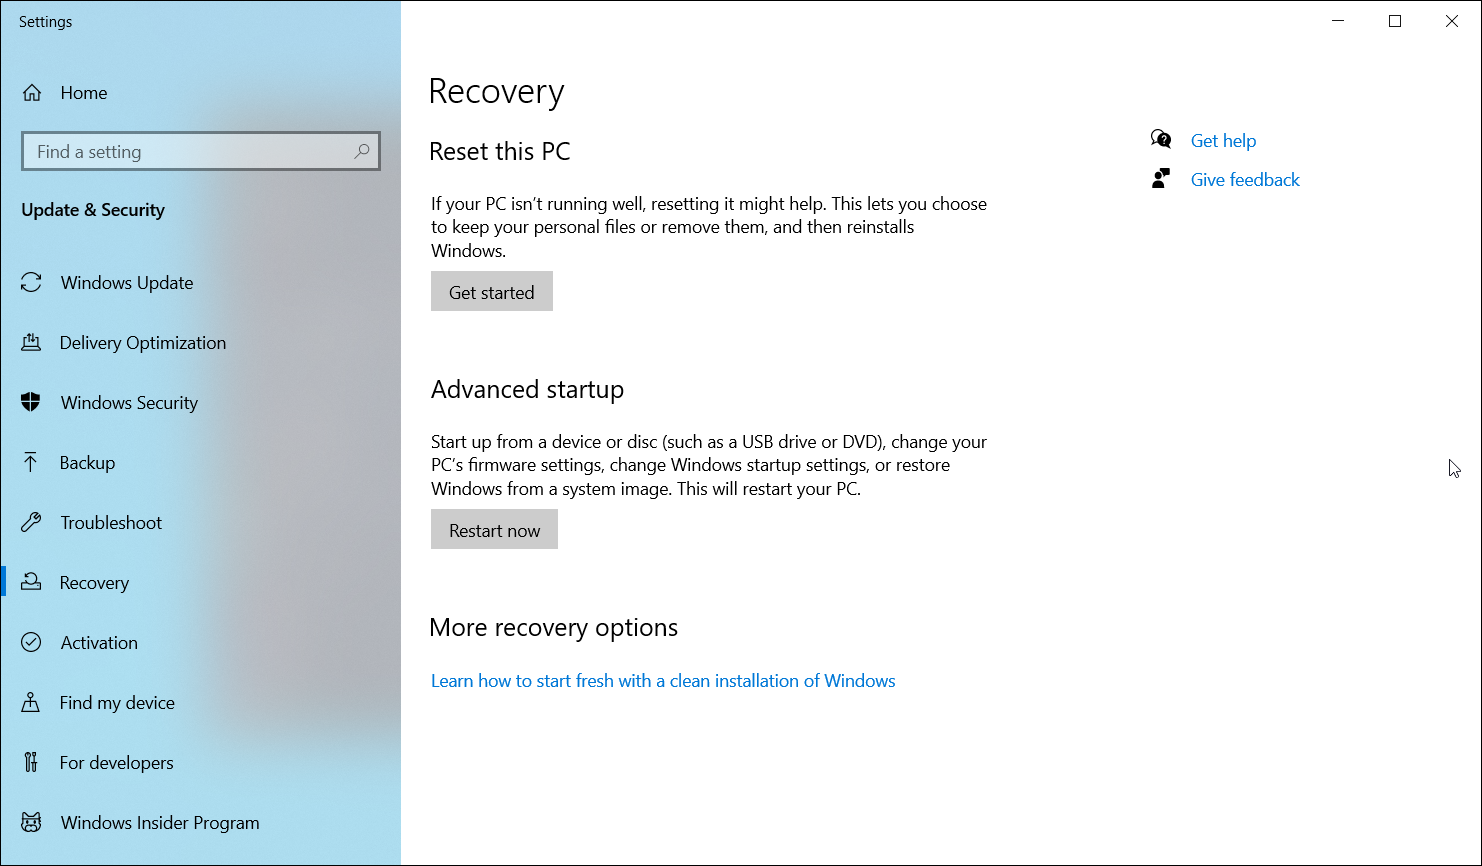
To reset your PC:
- Go to Start and open Settings.
- Open Update & Security.
- Open the Recovery tab from the left pane.
- Scroll down to the Advanced startup section and click on Restart Now.
- Windows will not boot into the Windows Recovery Environment.
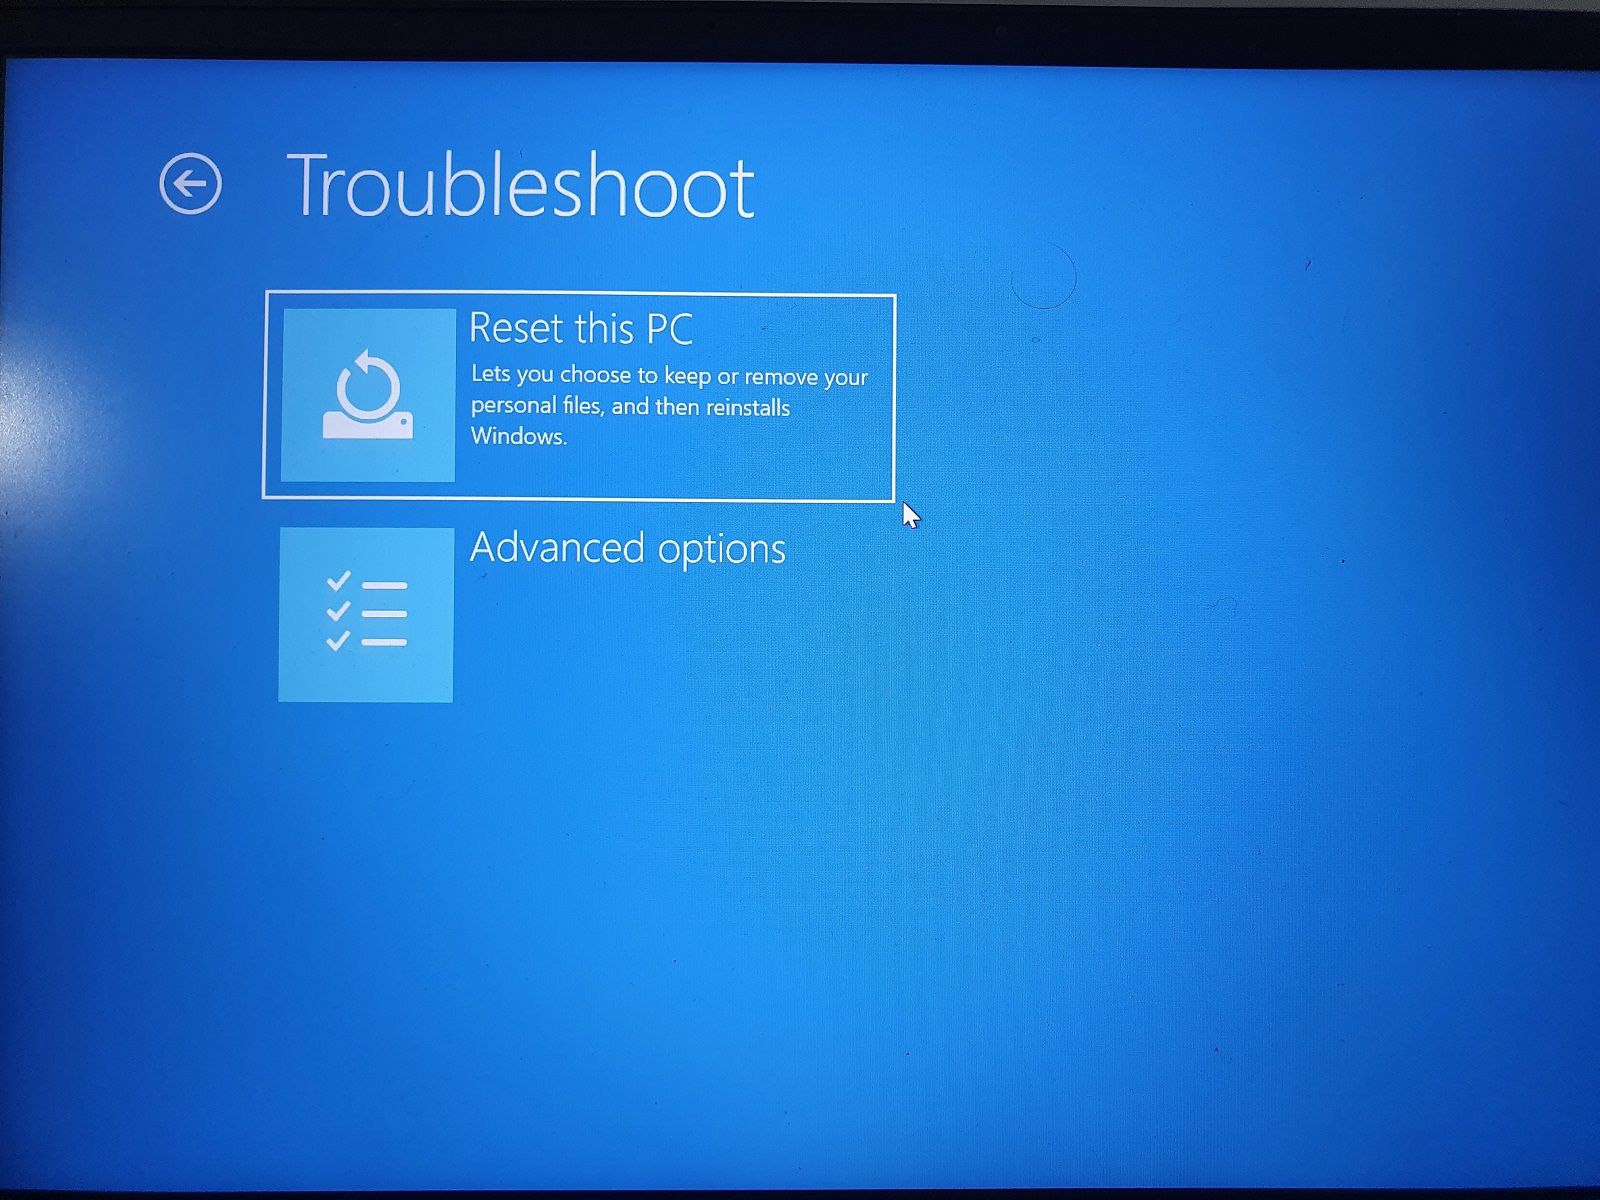
-
Select Troubleshoot and then click on Reset this PC.

- Under Reset this PC, click on Keep My files. This option will reinstall Windows 10 while keeping your personal files. However, it will remove third-party apps and settings.
- Once your PC restarts, select the user account and enter the password associated with your Microsoft account.
- Click Continue to proceed.
- In the How would you like to reinstall Windows? screen, select one of the following: Cloud Download: Requires a fast internet connection and can use up to 4GB of data to download required Windows files. Local reinstall: This allows you to reinstall Windows from your existing device. Select this option if you don’t have a stable internet connection.
- Read the description displayed on the screen and click the Reset button to confirm the action.
The reset process may take a few minutes to a few hours to complete. Leave your computer connected to a power source during the resetting process.
In most cases, resetting the PC to factory default should fix Windows Security showing blank screen problems in Windows 10 and Windows 11 systems. If not, you will have to clean install Windows 10/11 with a bootable drive.
Fixing Windows Security Showing Blank Screen in Windows 10
Windows Security showing blank screen issues can occur due to file corruption and is usually resolved with a repair install or upgrade to the latest version of the Windows OS. Before that, try to troubleshoot by restarting essential Windows Defender services, and checking for third-party antivirus interference.
If resetting or reinstalling Windows 10 is not an option, consider using a dedicated third-party antivirus solution for your system as a Windows Defender alternative.
Table of contents
- Why is the Windows 11 Security or Defender App Empty?
- Fix 1: Update the operating system
- Fix 2: Repair and reset the Windows security app
- Fix 3: Reinstall the security app via Windows Terminal (Admin)
- Fix 4: Redeploy every native Windows app
- Fix 5: Repair broken Windows files
- Fix 6: Reset Windows 11
- Fix 7: Upgrade your system using Microsoft’s Official Windows 11 installer
- Conclusion
One of the issues rocking Windows 11 PCs is the empty Windows Security interface. As it turns out, some people are left with unprotected systems when they upgrade to Windows 11.
When going through the Settings app, the Windows Security option doesn’t respond.
Once you try to open the app directly from the Start menu, its interface is blank.
Also, when going to the Services app and attempting to Start the Windows Security Service, you’ll see the following message:
“The Windows Security Service service on local computer started and stopped. Some services stop automatically if they are not in use by other services or programs.”
That means the service is broken.
Why is the Windows 11 Security or Defender App Empty?
If you’re seeing this problem, you might have installed one of the early unstable releases. As we mentioned, the preview builds are experimental versions of the OS, and it’s common to see such issues.
That said, if you installed more recent builds, then something must have gone wrong during installation.
This article will show you how to fix the empty Windows 11 Security app.
Fix 1: Update the operating system
Windows 11 has come a long way since its first release in the Windows Insider Program’s Dev Channel. As you know, Microsoft releases these builds to find and fix errors and bugs.
Each preview version came with new features that were accompanied by glitches.
Moreover, every subsequent version was designed to eliminate those glitches and introduce new features.
Since the official release has started rolling out, it’s wise you stay up to date. That said, if you’re still in the Insider program, you’ll continue receiving preview builds.
However, the problem might have been resolved in newer builds.
If you’re still using the preview build, you’ll likely get the latest preview version depending on your channel.
However, if you installed the official release, then you’ll be receiving the latest stable build.
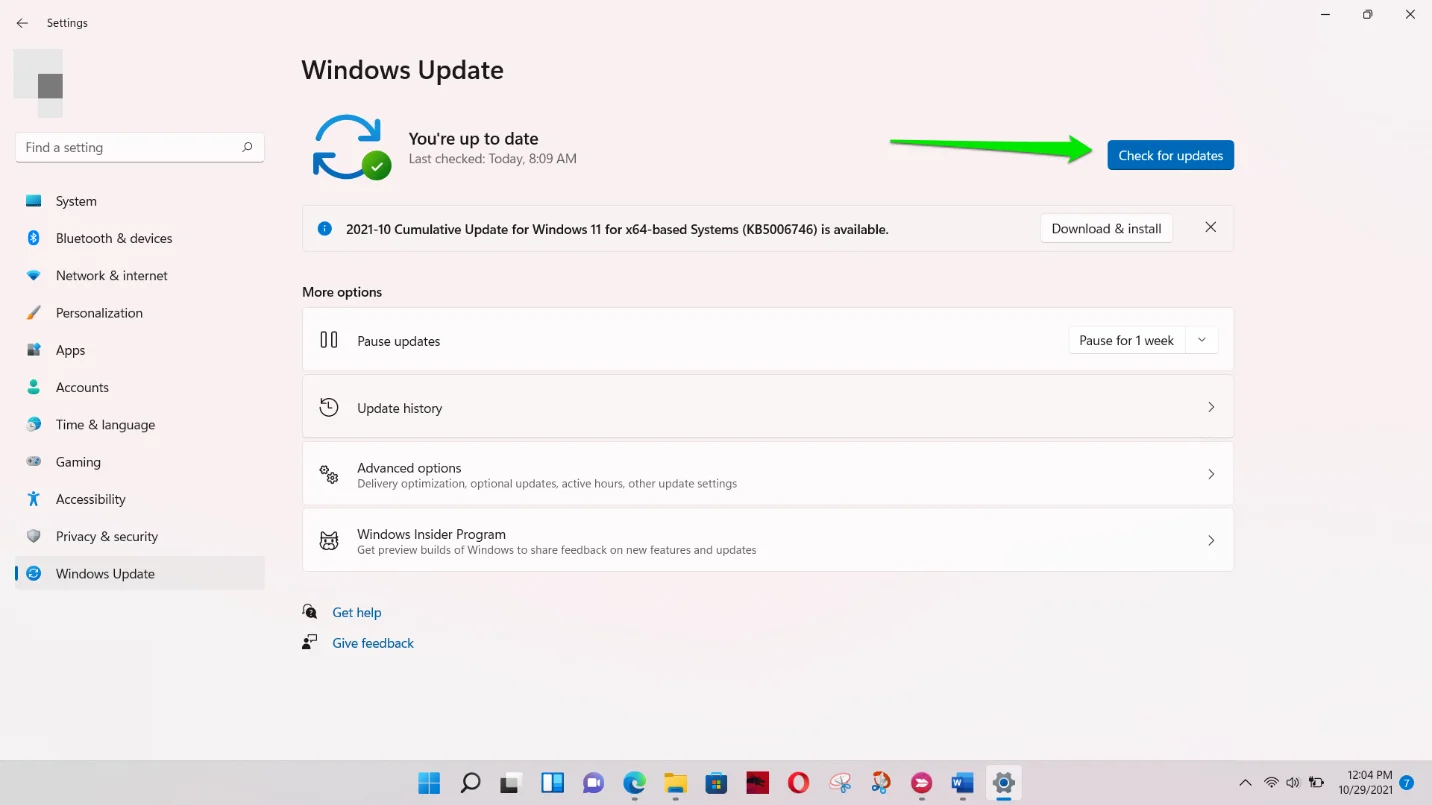
So, head to the Windows Update interface. Start the Settings application using the Windows + I hotkey and click on Windows Update. Then, click on the Check for Update button.
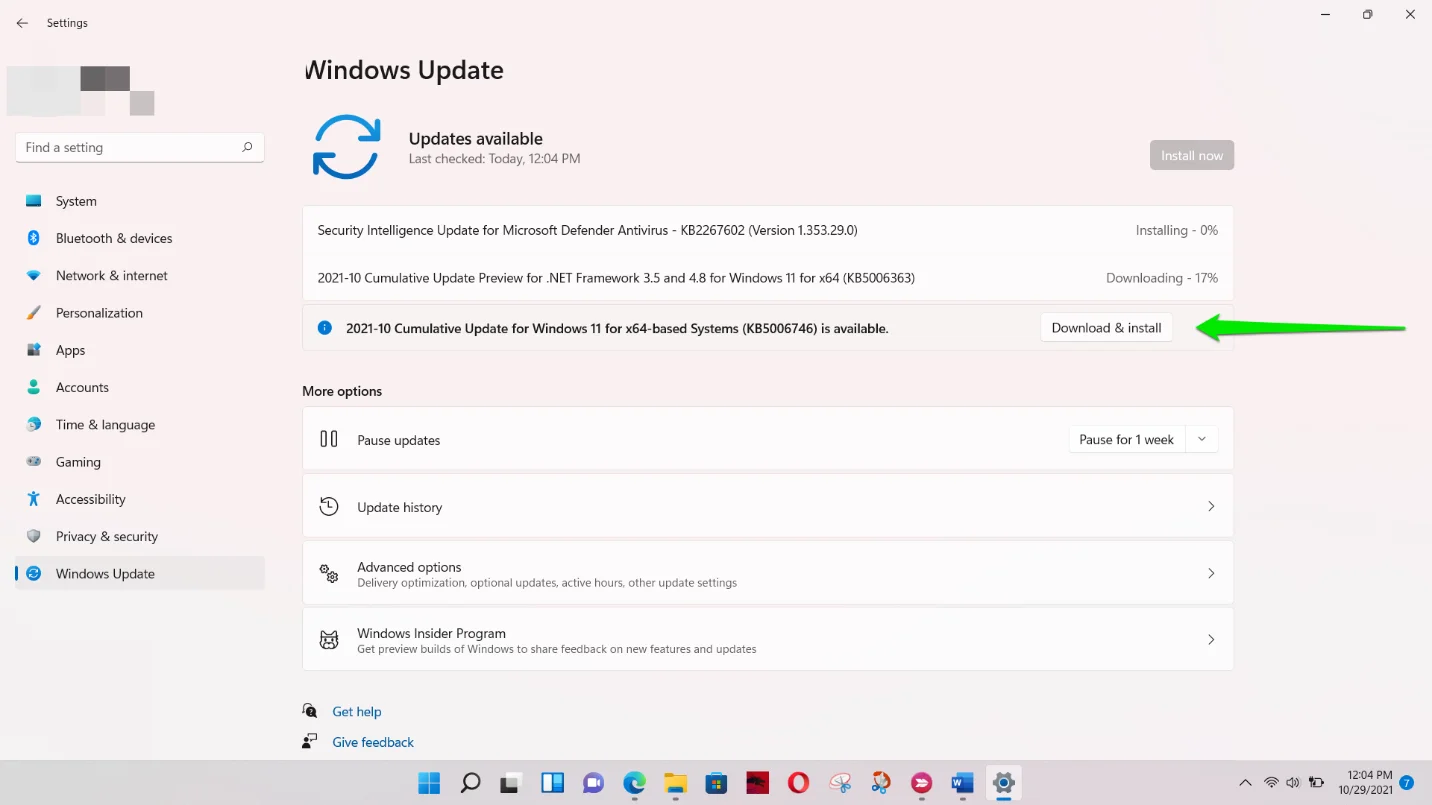
If you have a cumulative release update, click on the Download & Install button to start the update process.
You’ll have to Restart your computer to complete the process once the downloads are complete.
PRO TIP
For maintaining optimal system performance and keeping your PC free from clutter, try Auslogics BoostSpeed. This tool can clean up junk files, manage startup items, and optimize system settings to ensure your computer runs smoothly with the latest Windows updates.
Fix 2: Repair and reset the Windows security app
The next possible solution is repairing and resetting the Windows Defender app. You can easily do this via the Settings application. Follow these steps:
- Firstly, launch the Settings application. To do that, open the Start menu and select the gear icon. It would be easier to tap the
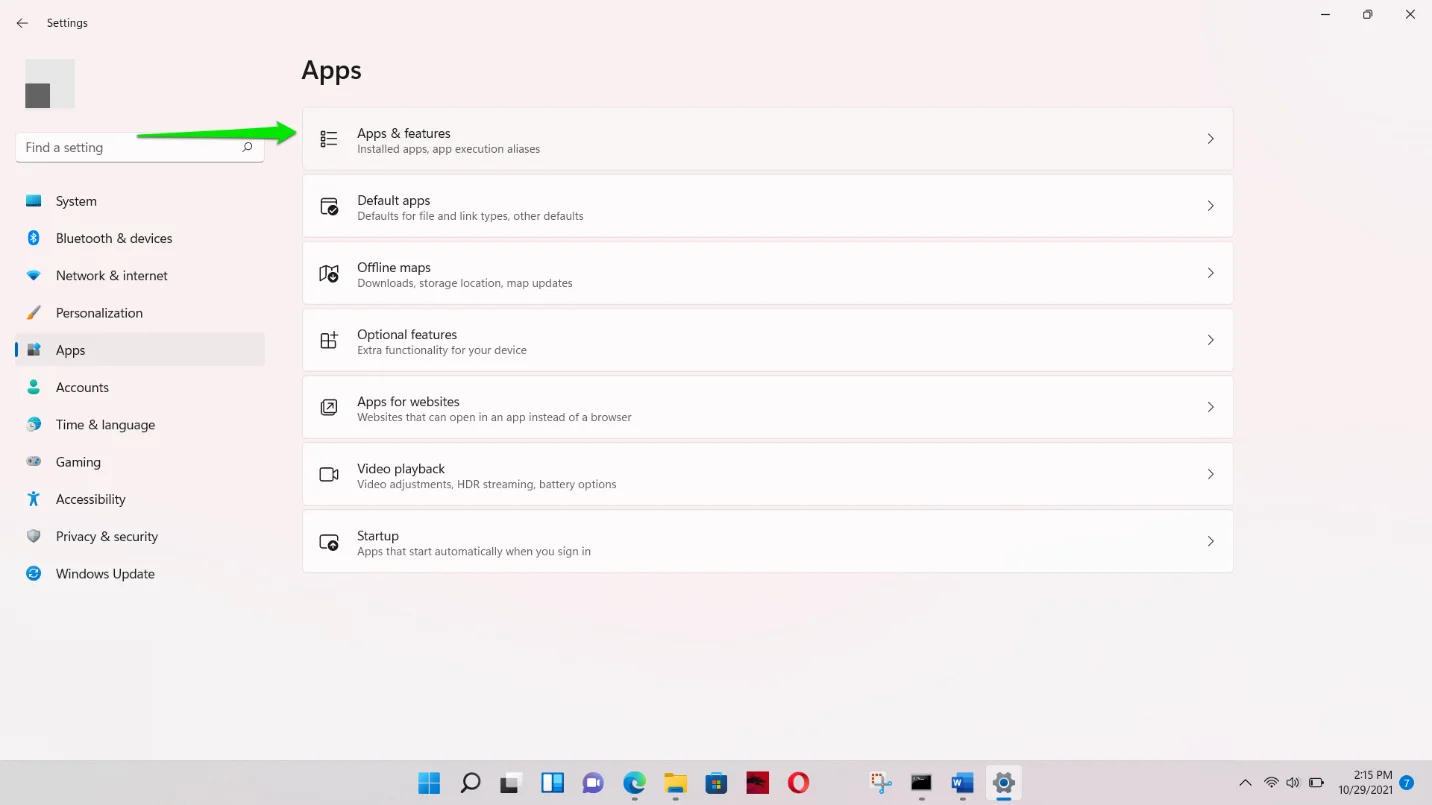
Windows + Icombination, though. - After the Settings application flies out, click on Apps on the left side.
- Next, go to the main window and click on the Apps & Features section.
- On getting to the Apps & Features interface, use the search box to find the Windows Security app or scroll down.
- Click on the three dots to the right of Windows Security and select Advanced Options.
- Scroll down to the Reset section when you see the Apps > Apps & Features > Windows Security interface.
- Click on Repair. Doing this will prompt windows to search for problematic Windows Security files and replace them.
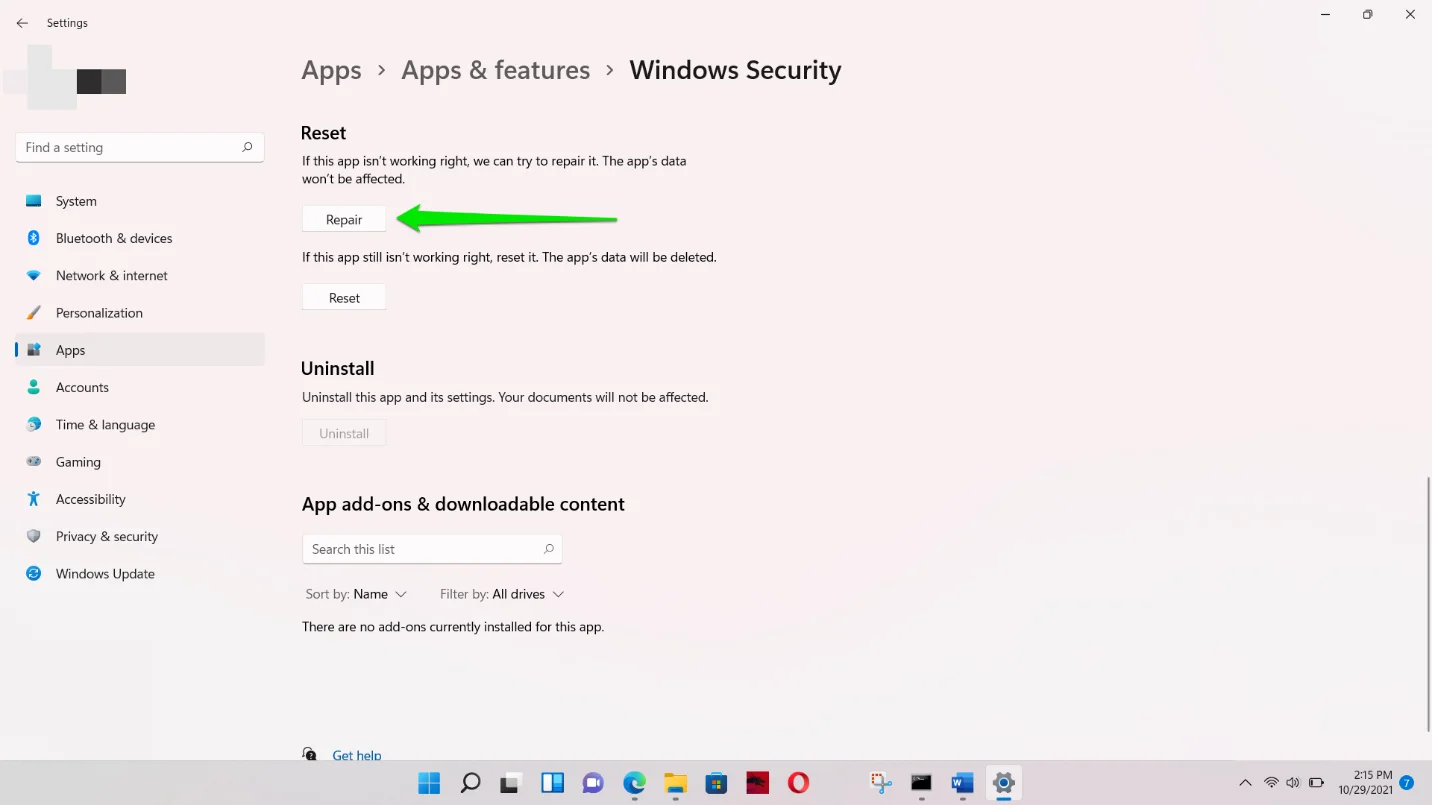
- If repairing the program doesn’t work, click on the Reset button. Then, click on Reset again in the confirmation dialog.
Note
Note that the app’s data, such as your saved preferences (exclusions and scheduled scans) and sign-in details, will be wiped out.
- Restart your computer after the process is complete and check for the blank screen on Windows Security again.
Fix 3: Reinstall the security app via Windows Terminal (Admin)
If the problem persists after repairing and resetting the app, your next course of action should be reinstalling it via Windows Terminal (Admin).
The command will remove every instance of Windows Security and reinstall it.
This particular fix mainly helped correct a problem that came with a Windows Insider Preview build. The issue has been resolved in subsequent updates.
So, if you’re still running the preview build, you don’t have to apply this fix. Instead, head to Windows Update and install the latest official version of Windows 11.
However, if you want to fix the problem for now, here are the steps you should follow:
Follow these steps:
- Right-click on your Start button or go to your keyboard and press the
Windows + Xkey combination. - Select Windows Terminal (Admin) in the Power User menu that flies out on top of the Start button.
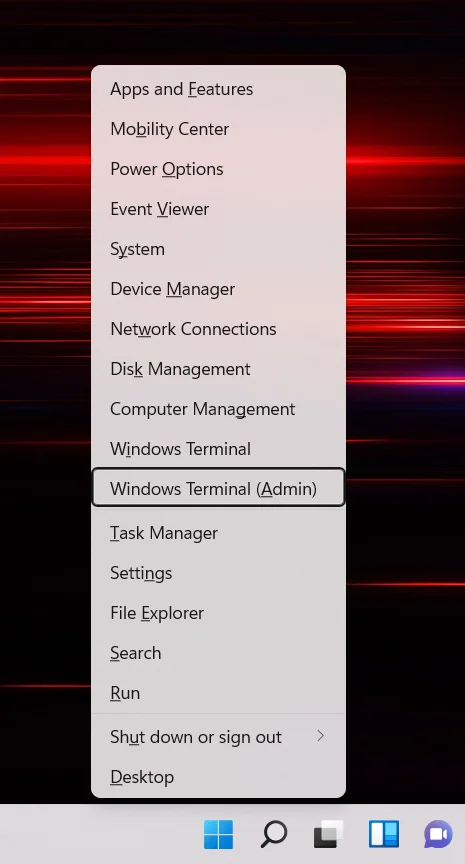
- Now, select Yes in the User Account Control pop-up.
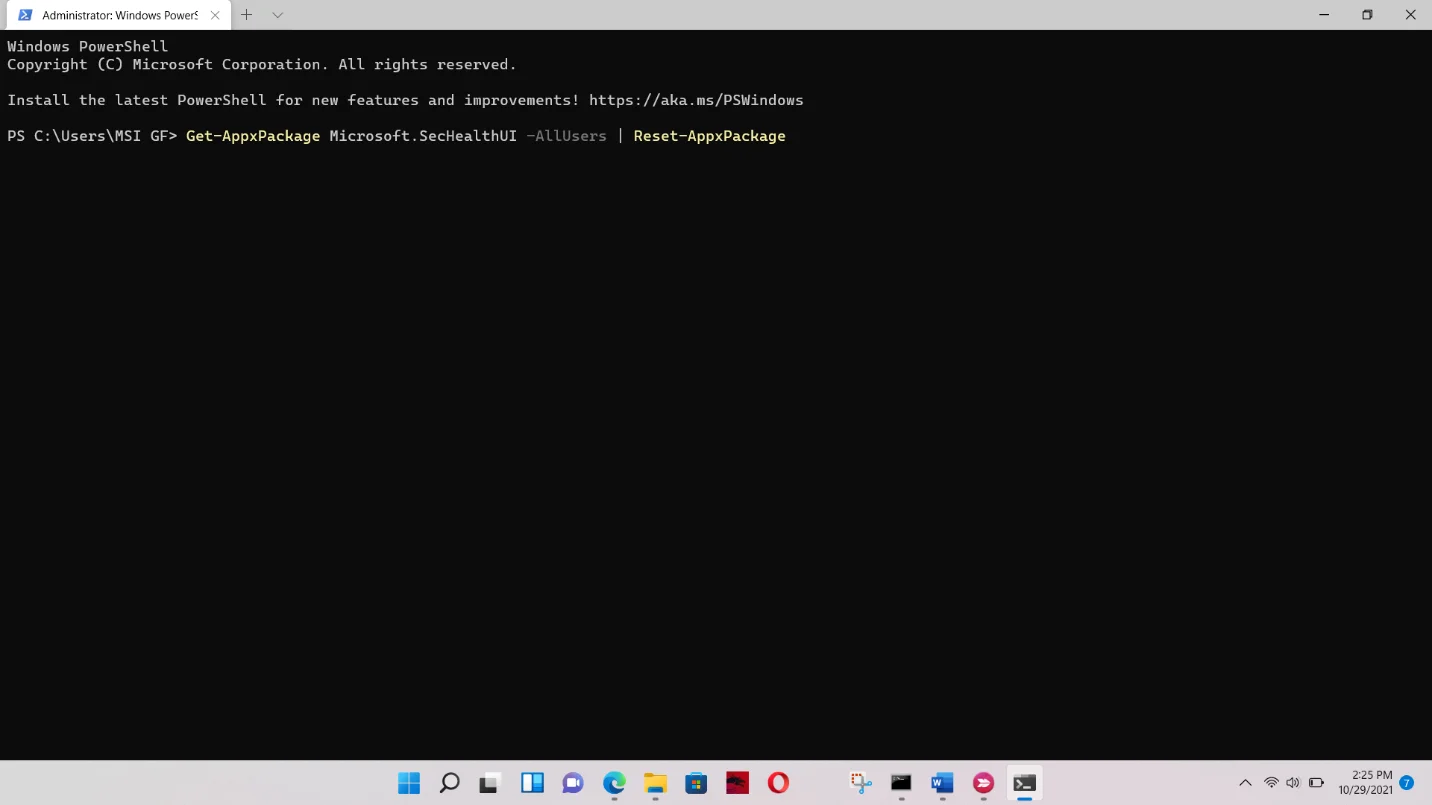
- After Windows Terminal (Admin) appears, type the following and press the Enter key:
Get-AppxPackage Microsoft.SecHealthUI -AllUsers | Reset-AppxPackage
Related: Most Useful Powershell Commands: Cheat Sheet with Examples
Fix 4: Redeploy every native Windows app
The next method is reinstalling all your native Windows applications. Some of these programs’ files may have been corrupted during your upgrade to Windows 11.
So, head to the admin version of Windows Terminal again. This time, type the following codes and hit the Enter button on your keyboard after typing each line:
Set-ExecutionPolicy Unrestricted

Get-AppXPackage -AllUsers | Foreach {Add-AppxPackage -DisableDevelopmentMode -Register "$($_.InstallLocation)\AppXManifest.xml"}
Related: CMD Navigation: How to Change Directory in CMD (Command Prompt)
Fix 5: Repair broken Windows files
Some Windows system files may have also been affected during the upgrade. Repairing these files should resolve the problem in this case.
Running the System File Checker (SFC) is a great option here. It’s a command-line program that deals with system file integrity violations.
It scans protected Windows files and automatically replaces those that are missing or damaged.
Microsoft recommends that you run the Deployment Image Servicing and Management (DISM) tool before running SFC.
Both programs work hand in hand. DISM uses the Windows Update client to download the replacement files to be used by SFC.
You’ll have to launch Command Prompt as an administrator to get the privilege required to run these tools correctly.
Here are the steps you’ll be following to apply this fix:
- Launch the Run window. Press
Windows + Ror right-click the Start button and choose Run from the Power User menu. - After the Run window opens, type CMD.
- Next, press
Shift + Ctrl + Enteron your keyboard to open the Command Prompt as an administrator. - Select Yes in the User Account Control confirmation window.
- Once the Command Prompt window appears, type the following code and press the Enter button on your keyboard:
DISM.exe /Online /Cleanup-image /Restorehealth

As we mentioned, DISM uses the Windows Update client to download repair files. The System File Checker then uses these files to fix integrity violations.
In some cases, the DISM tool may fail to initiate the client and fetch the files. This could be because you’re not connected to the Internet, or the Windows Update service has encountered a problem.
There’s a workaround. You can use a Windows installation DVD or the Windows 11 ISO you used for the upgrade as your repair source. Since you’re on Windows 11, it would be best to go for the latter.
Now, mount the ISO file (double-click it or right-click and select Mount) as a virtual DVD. Then, enter the following code:
DISM.exe /Online /Cleanup-Image /RestoreHealth /Source:X:\FileSource\Windows /LimitAccess
When entering the code, make sure you replace the Source:X:\FileSource\Windows part of the command with the path to the ISO file’s Sources folder.
The ISO file should appear on This PC after mounting it.
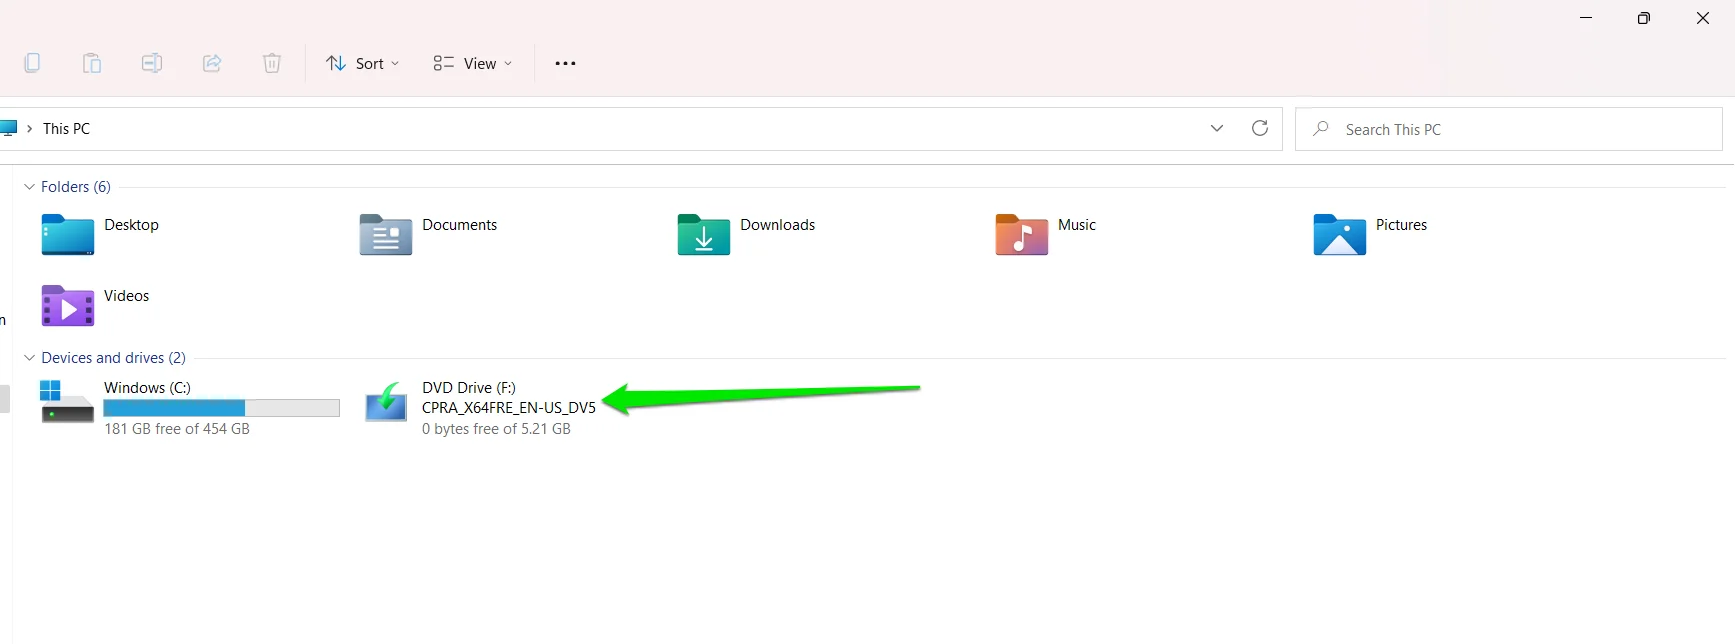
Since it’s mounted as drive F on my computer, the code should look like this in my case:
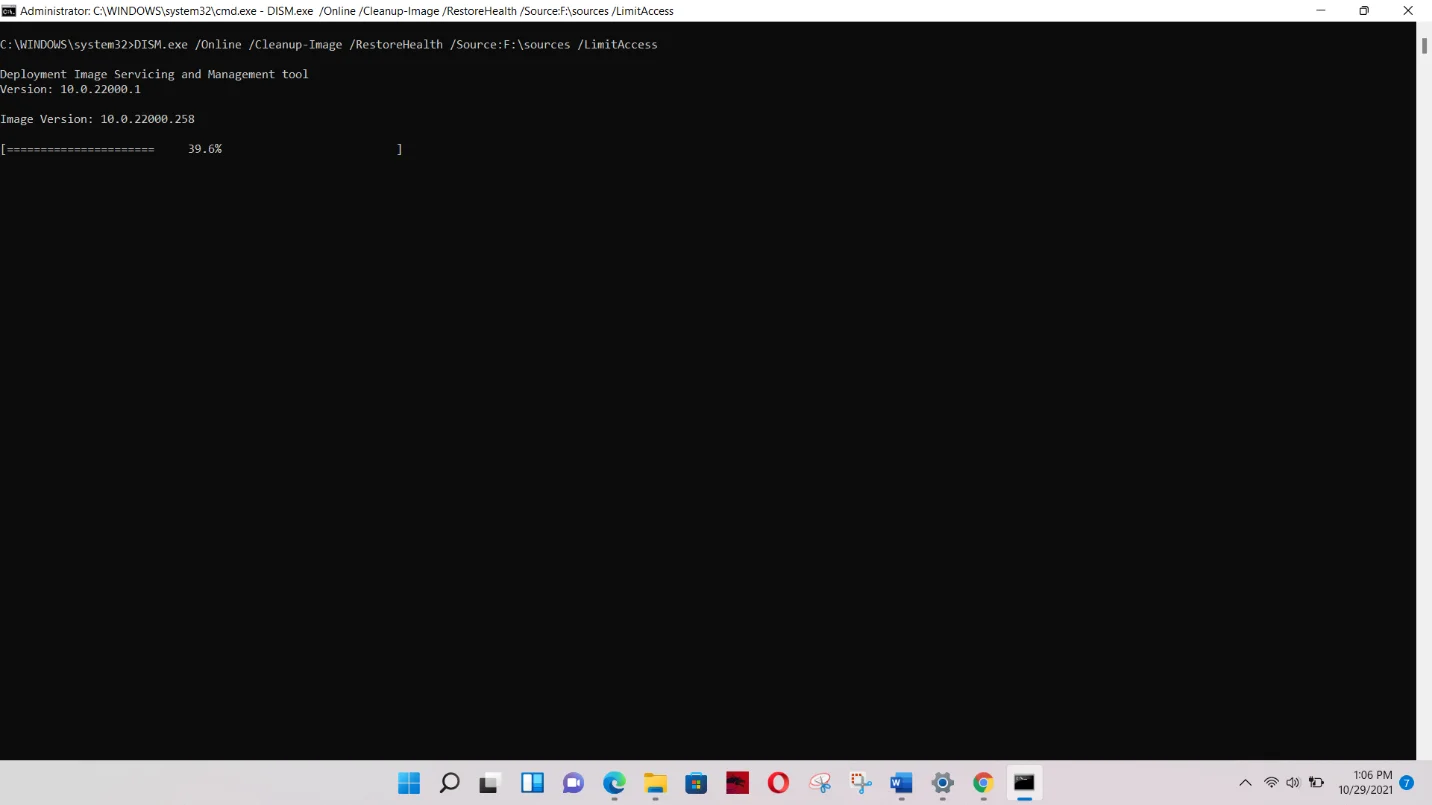
DISM.exe /Online /Cleanup-Image /RestoreHealth /Source: F:\sources /LimitAccess
You can also enter only F: as the source.
After the tool completes the process, type the following code on the next line and hit Enter:
sfc /scannow
It may tell you that a repair is pending, and you have to reboot your PC. This is likely due to the DISM process you just ran. Restart your computer as instructed.
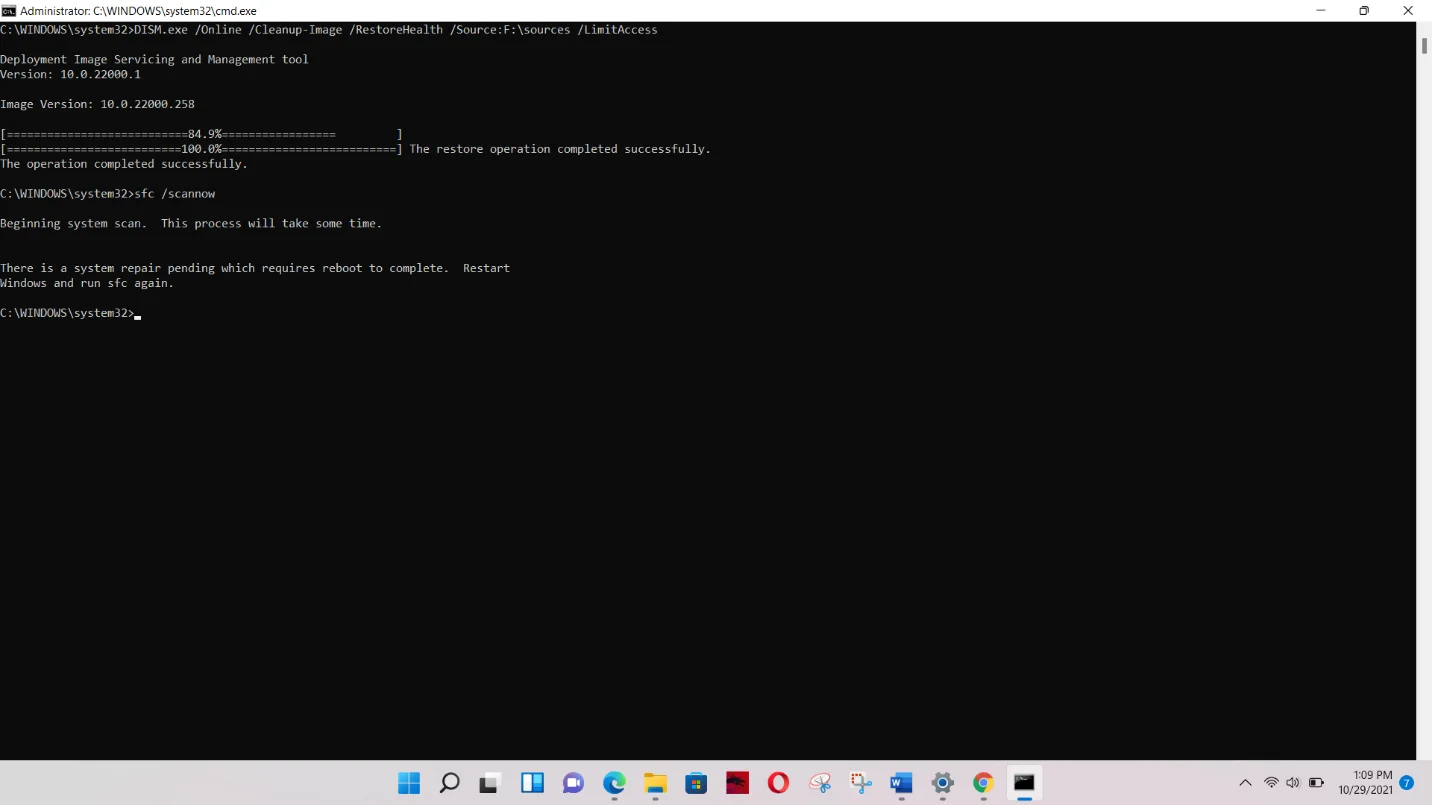
After your PC reboots, rerun the command. It should tell you that the process will take some time.
The tool will show you the following message if it does not find corrupt files:
“Windows Resource Protection did not find any integrity violations.”
If it finds and replaces corrupt files, you’ll see the following message instead:
“Windows Resource Protection found corrupt files and successfully repaired them.”
Fix 6: Reset Windows 11
If none of the above methods worked, then you have to reset the operating system. Using the reset function, you’re essentially reinstalling the operating system as a whole.
This way, files and system components that were botched during the first installation can be reinstalled. This method worked for most people.
Before you start, however, you should understand a few things:
- You have to back up your files if you haven’t already. Even if you choose to keep your files, it would be best to stay on the safe side.
- If you’ve installed apps after your upgrade or you chose the option to keep your third-party programs when you installed Windows 11, they’ll be uninstalled during the process. Only apps that came with your PC will be retained.
- If you haven’t already, update the operating system before performing the reset. You can also allow Windows to install updates before resetting your PC.
- Remember to follow the steps to a tee.
Now, down to business:
- Firstly, launch the Settings application. Open the Start menu and select the gear icon. It would be easier to tap the
Windows + Icombination, though. - After the Settings application flies out, go to the left side of the window and click on Windows Update.
- Click on Advanced Options under the Windows Update interface.

- Scroll down and select Recovery on the Advanced Options page.
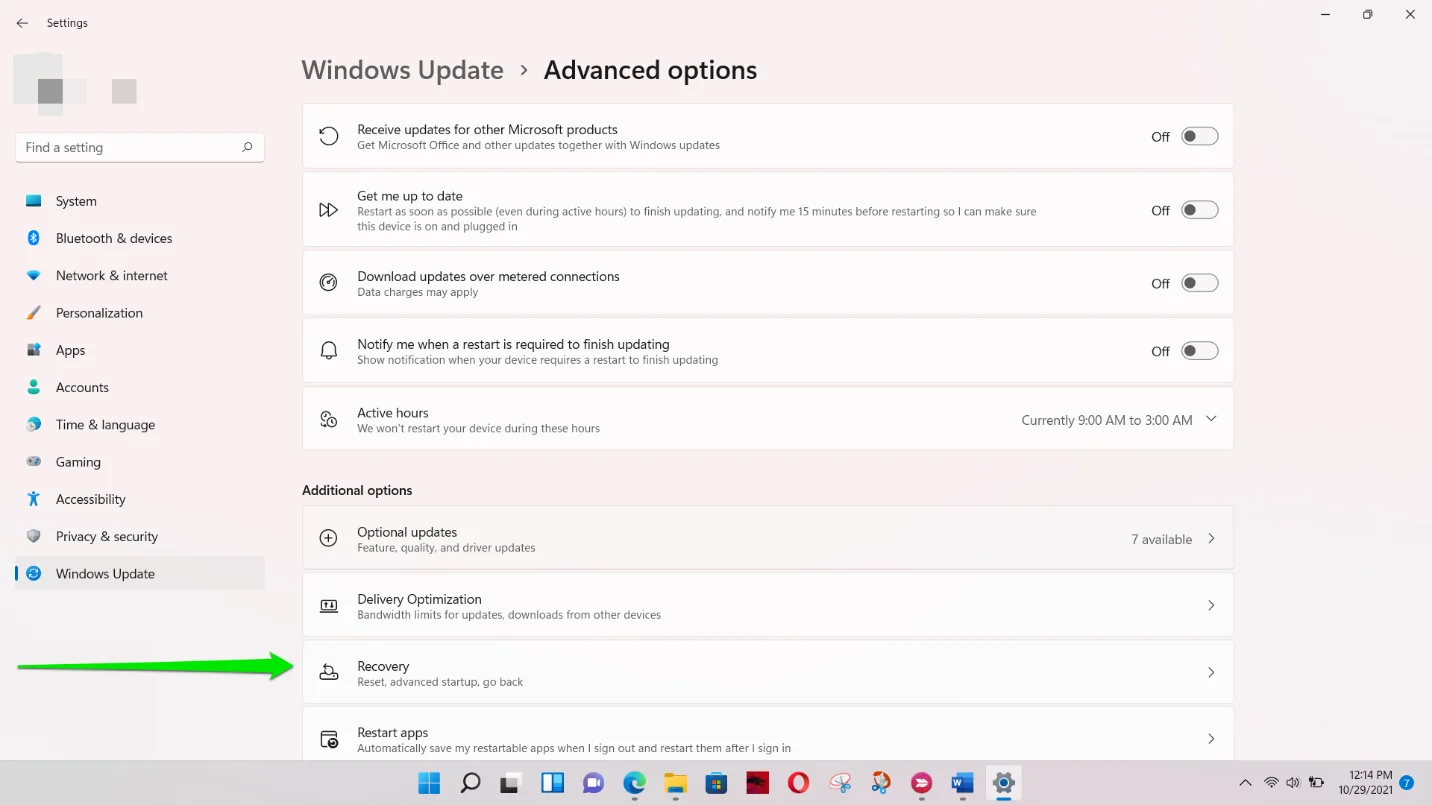
- Select Reset next to Reset PC.
- Select the Keep My Files option.
Also Read: How to Download and Install Windows 11: The Most Up-to-Date Information
Fix 7: Upgrade your system using Microsoft’s Official Windows 11 installer
You can also upgrade your computer using the latest official Windows release. Microsoft started a phased rollout on October 5th. This means the OS is available to the public, not just Insider.
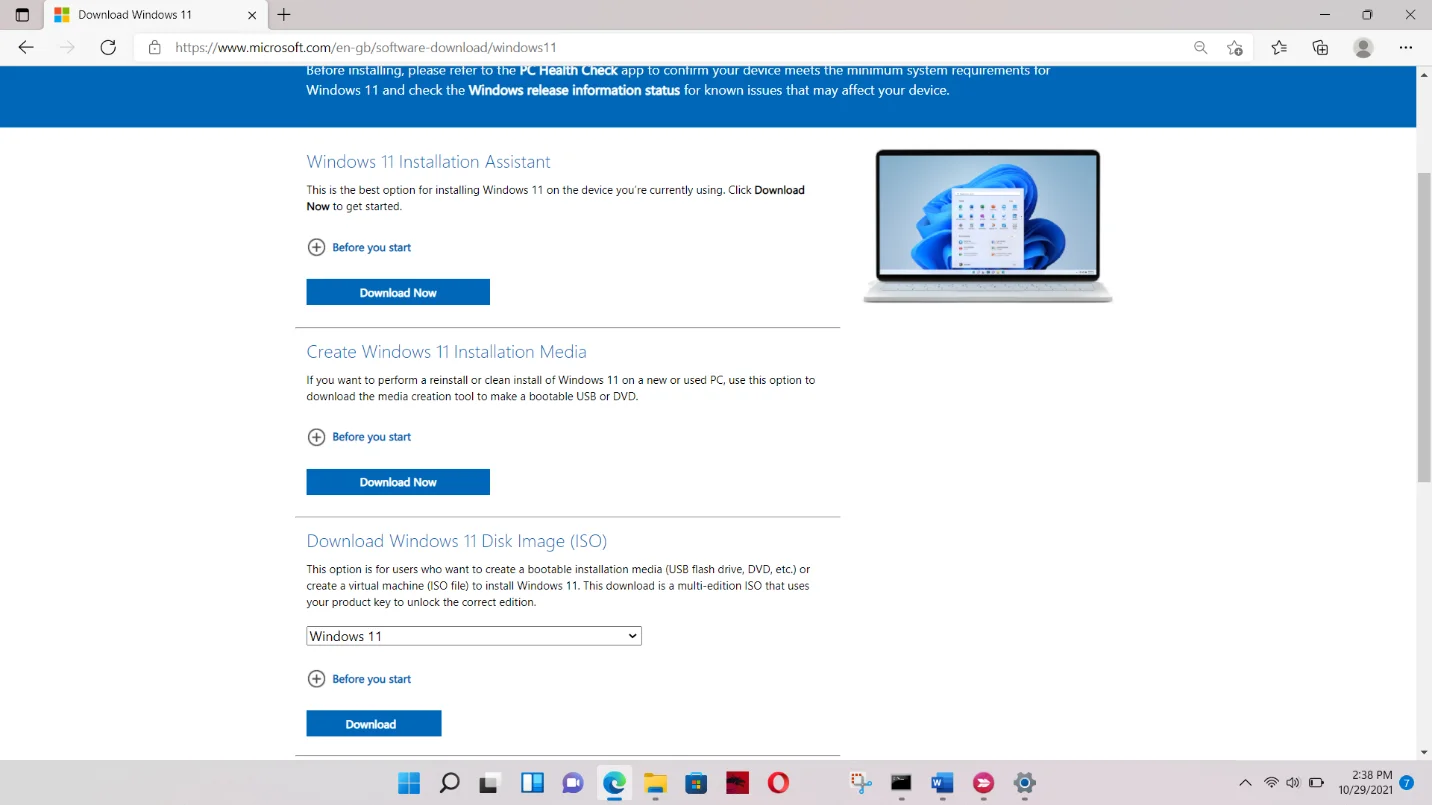
So, head to the site, download the ISO file, mount it, and run the setup.
Download Auslogics BoostSpeed
Your one-stop PC maintenance and optimization tool, this program will clean, speed up, repair and tweak your system to ensure maximum speed and efficiency.
Conclusion
That’s how to fix empty Windows 11 or Defender app. To prevent future bugs and frustrating PC issues, you can download and install Auslogics BoostSpeed on your Windows 11 PC.
The program catches potentially problematic temp and junk files and removes them before they cause errors. It also takes care of leftover registry keys that can break specific system processes.
Windows Security is your Windows built-in defense against malware, viruses, and hackers. Quite like other apps, it sometimes can act up. For instance, many users have complained that they see a blank or black screen when launched. In this post, we’ll discuss the issue in greater detail and have a look at ways you can fix the issue.
Why Is Windows Security Showing A Black Screen?
There are multiple reasons why you are seeing a blank or black screen when launching Windows Security. We’ll quickly enlist some of the reasons below. You can click on the links and directly jump to the section where we have discussed and enlisted the steps for the problem in that link-
- A third-party Antivirus is interfering with Windows Security. If you are looking for an alternative, here are some options.
- Corrupt system files.
- Reset or Repair Windows Security.
- Pending Windows Update
- Windows Defender Antivirus service is disabled. Enabling it may help.
Best Ways To Fix Windows Security Black/ Blank Screen Issue in Windows 11/10
Solution No. 1 – Restart Your Computer

If Windows Security is showing a blank or black screen chances are there are bugs and glitches in your system. Before you try any advanced measures to fix the issue, simply restart your computer once and then check if the issue persists or not.
Solution No. 2 – Run SFC Scan
Corrupt system files are often the root cause of Windows-related issues and if you are seeing a black or blank screen when trying to start Windows Security, it could be that there are corrupt system files. A simple Command Prompt command can help fix the issue –
- In the Windows search bar, type cmd and click on Run as administrator.

- When the Command Prompt opens type sfc /scannow and press Enter.

- Once the process is complete, restart the computer and check if the issue is fixed or not.
Solution No. 3 – Restart Windows Security Center Service
The service is responsible for detecting and notifying you of any security issues and pending updates. It can also help you out in case your Windows Security service is disabled. To check it, here are the steps –
- Open the Run dialog box by pressing Windows + R.
- When the dialog box opens, type services.msc and press Enter.

- In the window that opens next, scroll down and locate Security Center.
- Check its status. In case it is not running, right-click on it and click on Restart.

Solution No. 4 – Reset or Repair The App
In case Windows Security is malfunctioning, Windows offers a way in which you can either terminate the app and its related processes or repair or reset it. Here are the steps to do that both in Windows 10 and Windows 11 –
In Windows 11 –
- Open Settings by pressing Windows + I key combination.
- Click on Apps from the left-hand pane.
- From the right, click on Installed Apps.
- Scroll down and locate the Windows Security app.
- Click on the three horizontal dots and select Advanced options.
- Again scroll down and click on the Repair button. Check if you are still seeing the black screen while using Windows Security or not.
- In case you are still seeing the black or blank screen, click on the Reset button.
If you are a Windows 10 user and want Reset or Repair the Windows Security app, check out this post.
Solution No. 5 – Update Windows
Microsoft regularly releases updates by the way of which it introduces new features and resolves any impending bugs and glitches. Quite likely a malfunctioning Windows Security app can get back on track with one such update. Here is how you can check for and update Windows 10. Up update Windows 11 –
- Right-click on the Windows button and select Settings.
- Scroll down the left-hand pane and click on Windows Update.

- Click on Check for updates. If there are any pending updates, click on Download & Install and follow the on-screen instructions.

Never Let Threats Catch You Off Guard
You must take prompt action whenever there are discrepancies in your Windows Security app so that malicious threats can’t bank upon them. We hope that once you have tried the steps mentioned above, you will no more see a blank or black screen when launching Windows Defender. Do let us know which of the above solutions helped you. For more such content, keep reading WeTheGeek. You can also find us on Facebook, Pinterest, YouTube, Instagram, and Twitter.