
Table of contents
- Why is a computer not showing a 5GHz Wi-Fi connection?
- Do your devices support 5GHz Wi-Fi?
- How to Force Windows to Use 5GHz Wi-Fi
- Solution 1: Run the Network Adapter troubleshooter
- Solution 2: Change the band settings
- Solution 3: Prevent your operating system from shutting down the network adapter
- Solution 4: Reset your network adapters
- Solution 5: Fix network adapter driver problems
- Update your drivers automatically
- Solution 6: Get rid of recent Windows updates
- Solution 7: Perform a system restore
- Solution 8: Reset your PC
- Conclusion
These days, the Internet has become necessary for doing just about anything on a computer. So, failing to connect to a Wi-Fi network has got to be one of the most harrowing experiences.
Your computer’s network adapter connects to a Wi-Fi network over a frequency band that it supports. The connection will fail if the wireless device is broadcasting on an unsupported frequency.
However, that’s not always the case. Your computer can still fail to connect to the network even if its adapter supports the Wi-Fi frequency.
There are two Wi-Fi radio bands: 5GHz and 2.4GHz which most modern computers support.
5GHz is the newer Wi-Fi version that maximizes short-range connection to boost speed. Meanwhile, the 2.4Ghz version provides coverage at a longer range.
However, it doesn’t offer the same performance and speed that comes with the 5GHz band.
You’re probably reading this article because your Windows 10 or Windows 11 system can’t seem to detect a 5GHz Wi-Fi connection.
We’ll deal with this issue and show you how to get Windows 10 to recognize a 5GHz Wi-Fi network.
Also, if you’re asking questions like, “Why is the Wi-Fi not showing up in Windows 11?” and “Why doesn’t Windows 11 recognize a 5ghz Wi-Fi?” this article is for you.
Why is a computer not showing a 5GHz Wi-Fi connection?
As we mentioned, your network adapter has to support the Wi-Fi version of the wireless device. So, the simple cause of the issue is unsupported Wi-Fi.
However, things are not always simple.
Other issues, such as wrong settings and configurations and driver problems, could also trigger the problem.
What’s more, if your router is configured to not support 5GHz, your Windows 10 or Windows 11 computer won’t detect it over the 5GHz spectrum.
The 5GHz frequency only tends to short-range needs. So, another reason that your system might not recognize the network is that it’s far away from the Wi-Fi router.
PRO TIP
For optimal network adapter performance and support for necessary Wi-Fi standards, consider using Auslogics Driver Updater. This tool scans your system for outdated or incompatible drivers, ensuring that all your hardware, including your network adapter, runs with the most recent and stable drivers.
With up-to-date drivers, you can significantly reduce connectivity issues and improve the overall speed and reliability of your internet connection.
Do your devices support 5GHz Wi-Fi?
Before you start working on making your computer recognize a 5GHz Wi-Fi, you have to confirm that your network adapter and router support the band.
You can do that for your system by going through Command Prompt. Follow these steps:
- Launch the Run dialog box by tapping the
Windows + Rkeyboard buttons together. - After the Run dialog window appears, type “CMD” (no quotes) and press the CTRL, Shift, and Enter keys together to launch Command Prompt as an administrator.
- Select Yes once you see the User Account Control pop-up.
- After the Command Prompt opens in admin mode, type
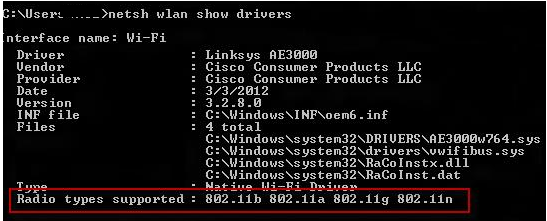
netsh wlan show driversand tap Enter. - You’ll now see your network adapter’s Wi-Fi version and drivers.
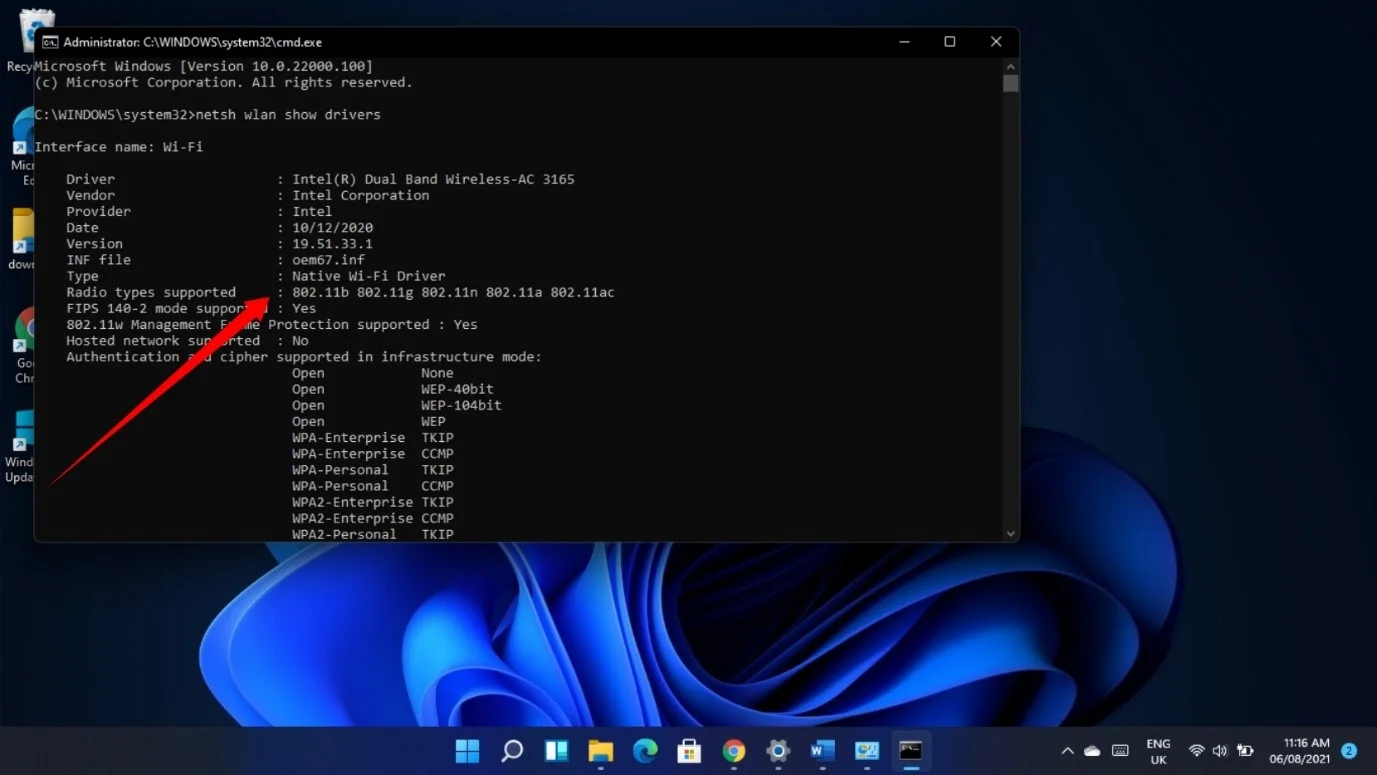
If you only see 802.11g and 802.11b in the “Radio types supported” section, your adapter only supports 2.4Ghz
802.11a 802.11g 802.11n means your adapter supports 2.4GHz and 5GHz.
In some cases, you’ll also see the 802.11ac and 802.11ax radio types. They also support 5GHz.
You can also check if your computer supports 5GHz by going through the network adapter’s Properties dialog. Here’s how:
- In the taskbar, right-click on the Start button or tap
Windows logo + X. - After the Power User menu appears, select Device Manager.
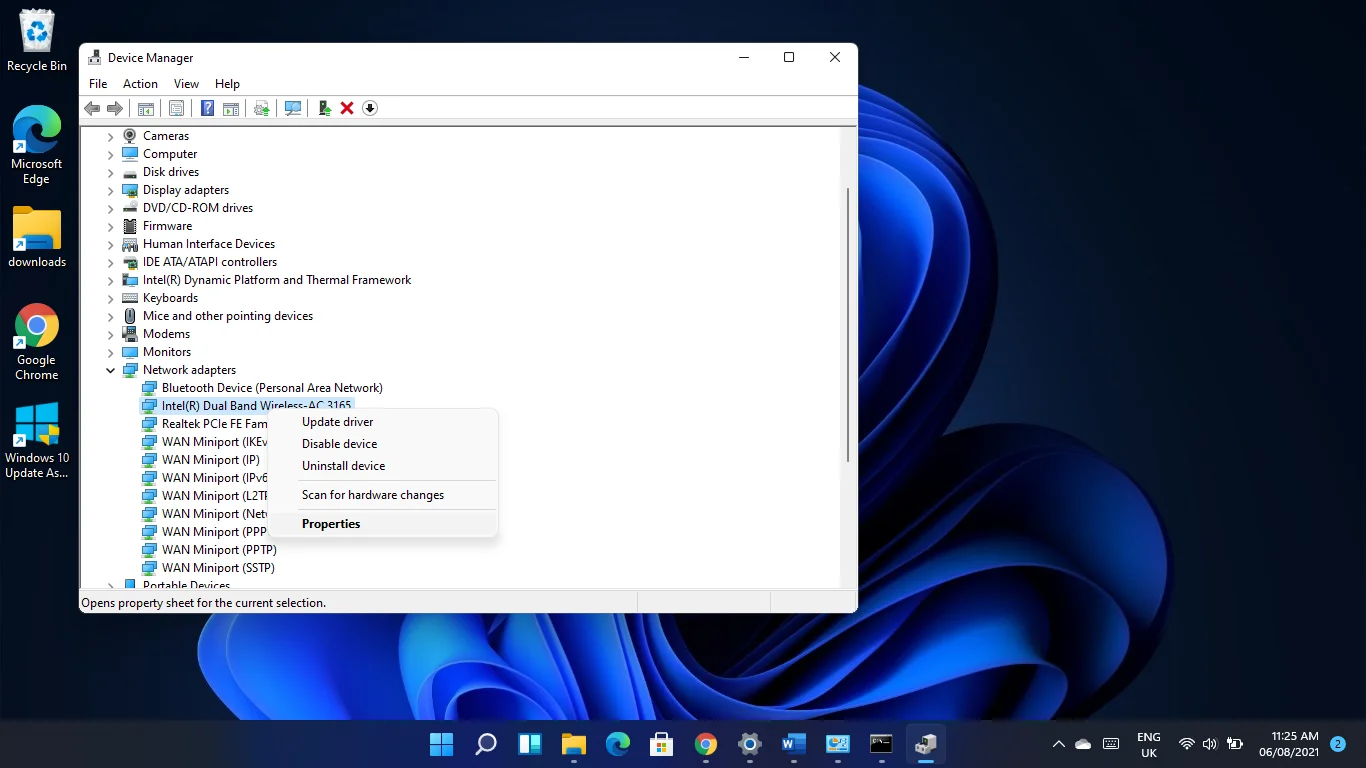
- When the Device Manager shows up, expand the Network Adapters category. Click on the arrow beside Network Adapters.
- Next, right-click on your wireless adapter and select Properties.
Note
If you see “Dual Band” anywhere in the wireless adapter description, it supports 5GHz and 2.4GHz.
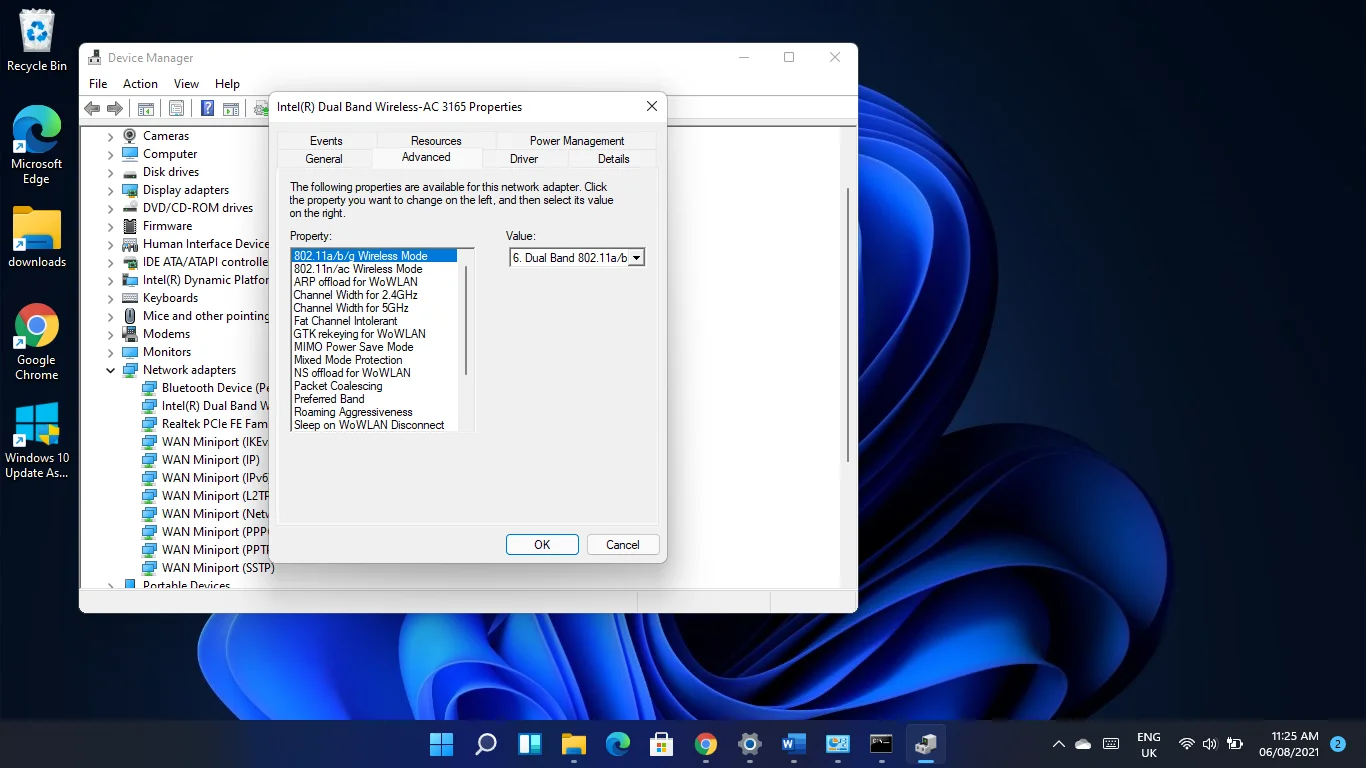
- After the Properties dialog window shows up, head to the Advanced tab.
- If you see 80211n (or 80211n/ac) Wireless Mode or 802.11a/b/g Wireless Mode, then your computer supports the band.
If your computer doesn’t have support for 5GHz, you’ll have to either upgrade your network adapter or go for a 5GHz-supported external USB Wi-Fi adapter.
However, if your PC supports 5GHz, you have to check your router to confirm if it supports the band.
The information you need should be in your router’s manual or the device’s box.
You can also check for details about the router on the manufacturer’s website to confirm if it supports 5GHz.
How to Force Windows to Use 5GHz Wi-Fi
If your router and network adapter support 5GHz, the steps below will show you how to fix the problem preventing your computer from recognizing the network.
Follow the guides one after the other as they’ve been arranged from simple to complex.
Before you start, however, you should power cycle your devices.
Your computer, network adapter, or router, could be stuck. Restarting your system and router will allow both devices to reinitialize their configurations and regain functionality.
Turn off your router and shut down your computer, then unplug both machines from their power sources. Plug them back in and restart after a couple of minutes.
Head to the first fix below if power cycling your devices doesn’t do the trick.
Solution 1: Run the Network Adapter troubleshooter
The Network Adapter troubleshooter is Windows’ built-in tool responsible for finding and resolving issues related to the device.
It can detect app conflicts and common bugs that are preventing the adapter from running correctly.
If the troubleshooter can’t fix the problem, it will display info that you can use to resolve the issue manually.
Follow these steps to run the Network Adapter troubleshooter:
- Tap the
Windows + Ikeyboard shortcut to start the Settings app. - If you’re on Windows 10, click on Update & Security and select Troubleshoot on the left side of the window that follows.
- If you’re running Windows 11, scroll down under System and click on Troubleshoot.
- Click on Other Troubleshooters (Windows 11) or Additional Troubleshooters (Windows 10).
- Next, scroll down, click on Network Adapter, and select Run the Troubleshooter if you’re on Windows 10. You’ll only have to click on Run next to Network Adapter on Windows 11.
- The troubleshooter will now check for problems and attempt to fix them.
Related: Windows Update Troubleshooter: Easily Fixing Windows Update Issues
Solution 2: Change the band settings
The problem could be related to how your adapter is configured. For example, the device may be programmed to search for only 2.4GHz connections, causing it not to recognize 5GHz connections.
You can put things back in order by applying the correct settings in the adapter’s Properties dialog window.
Follow these steps:
- Right-click on the Start button in the taskbar or tap
Windows logo + X. - After the Power User menu appears, select Device Manager.
- When the Device Manager shows up, expand the Network Adapters category. Click on the arrow beside Network Adapters.
- Next, right-click on your wireless adapter and select Properties.
- Go to the Advanced tab when you see the Properties dialog window.
- Now, select 802.11n under Properties and select Enabled in the Value drop-down menu on the right.
Note
If you use a dual-band adapter, you’ll probably see 802.11n/ac, in which case you can choose between 802.11ac and 802.11n under Value.
- Select 802.11a/b/g and choose the Dual Band option in the Value drop-down menu if that doesn’t work.
- Another setting that can work is choosing Preferred Band under Property and selecting Prefer 5GHz band under Value.
Click on the OK button after making each change.
Solution 3: Prevent your operating system from shutting down the network adapter
Windows could be turning off the network adapter to save power. You’re likely experiencing this issue if you can’t see any network connection. You can easily prevent this from happening by making changes in the device’s Properties dialog.
Here’s how:
- Right-click on the Start button in the taskbar or tap
Windows logo + X. - After the Power User menu appears, select Device Manager.
- When the Device Manager shows up, expand the Network Adapters category. Click on the arrow beside Network Adapters.
- Next, right-click on your wireless adapter and select Properties.
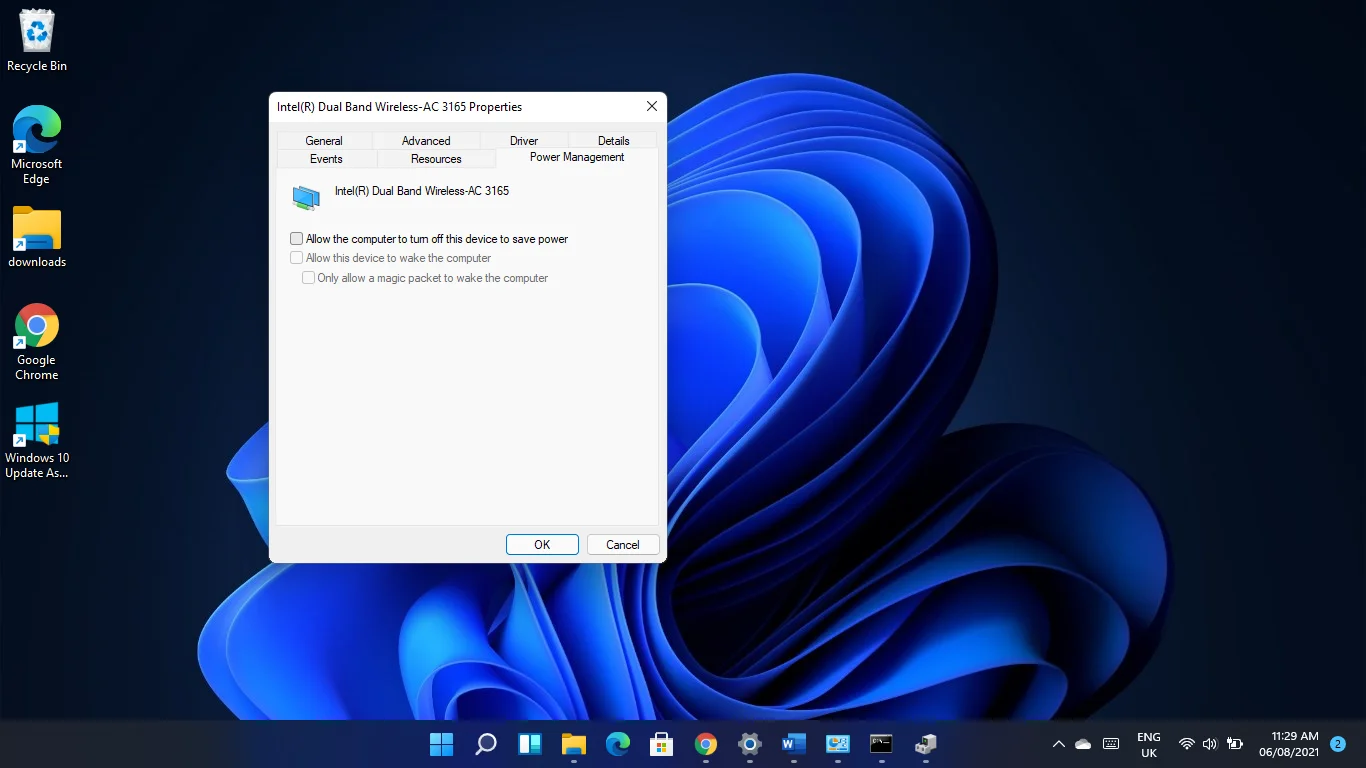
- Go to the Power Management tab when you see the Properties dialog window.
- Uncheck the box beside Allow the computer to turn off this device to save power.
- Click on the OK button.
Solution 4: Reset your network adapters
Resetting your network adapters will return all your network settings to default and clear out the configurations you’ve applied.
This means your Wi-Fi passwords, proxy settings, VPN applications, and other settings will be cleared.
Before you start, you should write down your passwords and other configurations if you’ve forgotten them.
Now, follow these steps to reset the adapters in Windows 10:
- Tap
Windows key + Ito launch Settings. - After the Settings app opens, click on Network & Internet.
- Click on Advanced Network Settings.
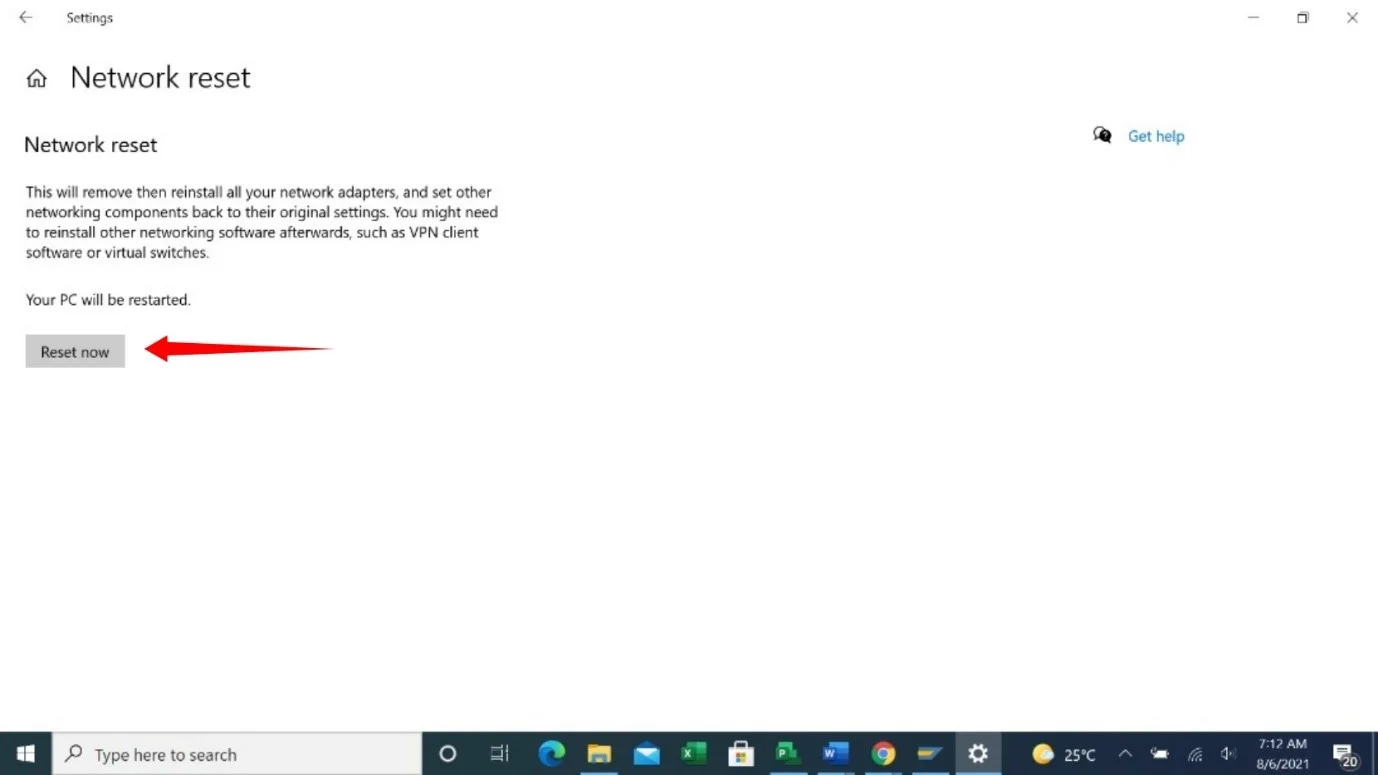
- Next, click on Network Reset.

- You’ll see a prompt, warning you about the implications of resetting your network.
- Click on Reset Now.
To reset your network on Windows 11:
- Start the Settings app by pressing the
Windows key + Ishortcut. - Head to the left pane of the Settings window and click on Network & Internet.
- Click on Advanced Network Settings.
- After Advanced Network Settings opens, go to the Other section and click on Network Reset.
- Click on Reset Now once you see the confirmation page.
- Click in the dialog that pops up.
Solution 5: Fix network adapter driver problems
If resetting the network adapter doesn’t do the trick, your network drivers could be the cause of the problem.
Outdated and corrupt drivers cause all sorts of device problems, and it’s no different for the network adapter drivers.
First, you should roll back to your previous driver if you started experiencing the problem after installing an update. Here’s how to do that:
- Right-click on the Start button in the taskbar or tap
Windows logo + X. - After the Power User menu appears, select Device Manager.
- When the Device Manager shows up, expand the Network Adapters category. Click on the arrow beside Network Adapters.
- Next, right-click on your wireless adapter and select Properties.
- Once you see the Properties dialog window, go to the Driver tab.
- Now, click on the Roll Back Driver button.
Note
If the Roll Back Driver button is greyed out, you can check the driver version, then go to the adapter’s manufacturer’s website to find and download the previous version.
If rolling back the driver doesn’t fix the problem, update it. To do that, you have to uninstall the current driver as it could be corrupt. Follow these steps:
- Right-click on the Start button in the taskbar or tap
Windows logo + X. - After the Power User menu appears, select Device Manager.
- When the Device Manager shows up, expand the Network Adapters category. Click on the arrow beside Network Adapters.
- Next, right-click on your wireless adapter and select Uninstall Device.
- Check the box beside Delete the software for this device and click on Uninstall.
- Once your operating system completes the process, restart your computer.
After removing the old driver, head to your network adapter’s manufacturer’s website to download your device’s latest driver version and install it.
Ensure you get the correct driver for your device model and operating system’s 64 or 32-bit architecture.
To avoid anything going wrong, you’d also have to update your Bluetooth, USB, sound, and other device drivers.
If updating these drivers one after the other sounds stressful, head to the following guide to find out how to do it automatically.
Update your drivers automatically
It’s recommended that you update your device drivers regularly to avoid issues like the Wi-Fi problem. However, the process can be tedious, and it’s easy to forget to update your devices.
Things will be a lot less complicated if you have a third-party application such as Auslogics Driver Updater. The tool helps to check for outdated and faulty drivers and updates them automatically.
This way, you won’t have to deal with driver-related problems. In addition, the program can download multiple driver updates at once. So, whatever driver it detects as faulty or outdated, it will fetch the official update for any device and install it.
Here’s how to use it:
- Go to Auslogics Driver Updater’s download page and click on the Download Now button.
- Run the installation package after your browser completes the download.
- Click on Run in the warning dialog, then click on Yes in the User Account Control dialog.
- After the setup window appears, select a language and install location.
- After that, you can choose to allow the program to run at startup and send anonymous crash reports to its developers.
- Click on the Click to install button once you’re done.
- The tool will start checking for outdated and corrupt drivers after the installation is complete.
- You’ll see a list of those drivers once it finishes the scan.
- Click on the update button to download and install the updated version of each driver.
Download Auslogics Driver Updater
Prevent hardware errors and ensure problem-free device operation with this advanced tool that detects outdated drivers and safely gets them updated.
Related: Auslogics Driver Updater: Update Your Drivers in One Click!
Solution 6: Get rid of recent Windows updates
If the problem started occurring after you updated your Windows 10 PC, the update could be responsible. Uninstalling it should resolve the issue for good.
Follow these steps to uninstall the update:
- Tap
Windows key + Ito launch Settings. - After the Settings app opens, click on Update & Security.
- Once you see the Update & Security page, click on View Update History.
- After the View Update History window shows up, go to the Update History section and expand the different categories to check the last update you installed.
- Now, go to the top of the window and click on Uninstall Updates.
- Once the Uninstall an update window appears, click on the update you want to remove and select Uninstall.
- Click on Yes in the confirmation dialog.
- Restart your computer after Windows uninstalls the update.
Also Read: How to Fix Windows Update Error 80004002?
Solution 7: Perform a system restore
The System Restore wizard allows you to restore your computer to a previous working state. If you could connect to the network before, a recent change you made must have messed things up.
You can undo that by restoring your computer to the date you last successfully connected to the network.
Here’s how to restore your operating system:
- Open the search window using the
Windows key + Skeyboard shortcut. - After the search box shows up, type System restore and click on Create a Restore Point in the search results.
- Click on System Restore once you see the System Properties window.
- Once the System Restore wizard shows up, select the Recommended Restore option if it falls on your desired date, click on Next, and click on Finish.
- Select the Choose a different restore point option and click Next if the Recommended Restore date isn’t what you want. Select a restore point and click on the Next button. Click on Finish.
Solution 8: Reset your PC
If none of the solutions we’ve shown you worked, then you should consider resetting your operating system.
This should be your last resort. However, if you believe you missed anything, we recommend going back and applying all the fixes again before resetting your computer.
You can save your files, but you’ll lose your third-party apps and settings.
If you’re ready to reset your computer, follow these steps:
- Launch the Settings application by pressing
Windows + I. - Click on Update & Security on the app’s home page.
- Go to the left pane of the next window and click on Restore.
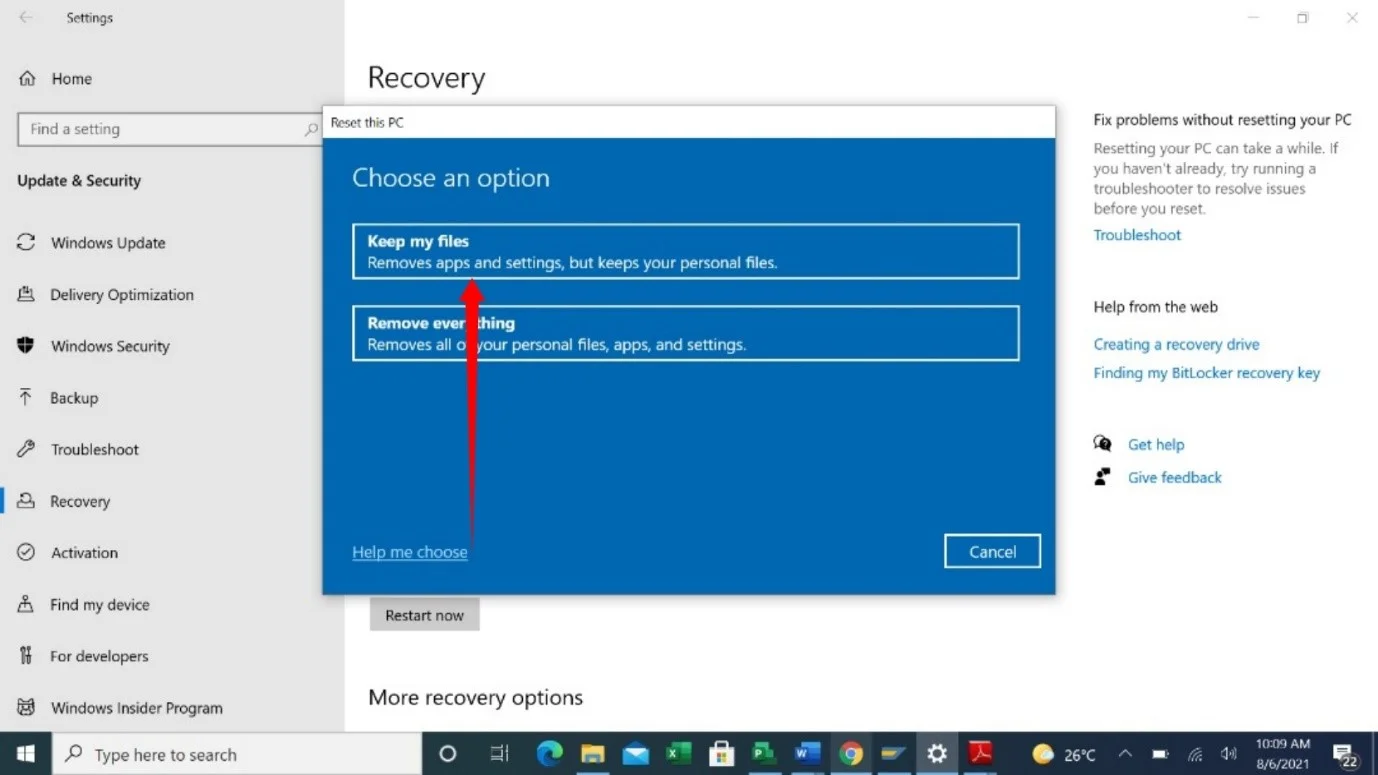
- Head to the right side of the window and select Get Started under Reset this PC.

- Select the Keep My Files option once the setup window shows up.
- Next, click on Local Install.
- Select Next.
- Finally, click on Reset
Conclusion
If resetting your computer doesn’t resolve the problem, your network adapter might be faulty. You can either change it or use an external USB Wi-Fi device.
Некоторые пользователи жалуются, что у них Windows 10 не видит 5 Ггц Wi-Fi: компьютеру удается засечь лишь диапазон 2.4 Ггц, но не тот самый, желаемый 5 Ггц. Происходить это может по разным причинам — сегодня мы расскажем вам, что вызывает такую проблему и как с ней бороться.
Кратко о 2.4 Ггц и 5 Ггц диапазонах
Главное отличие между двумя диапазонами — это дальность сигнала (зона покрытия) и пропускная способность (скорость сетевого подключения). Диапазон в 2.4 Ггц предоставляет своему пользователю неплохую зону покрытия, но вот действительно высокими скоростями он похвастаться не может.
Диапазон в 5 Ггц, в свою очередь, покрывает несколько меньшую территорию (для такой частоты преграды — серьезная проблема), но выдает потрясающую скорость, которая 2.4 Ггц даже и не снилась.
Кроме того, не стоит забывать, что скорость беспроводного подключения, независимо от диапазона, может варьироваться из-за наличия других устройств в этом же диапазоне. Многие беспроводные гаджеты на сегодняшний день работают именно в 2.4 Ггц, тем самым мешая друг другу. На 5 Ггц работает значительно меньшее количество устройств — радио пространство практически свободно.
Что делать, если Windows 10 не видит 5 Ггц Wi-Fi
Подобная проблема может быть вызвана двумя причинами.
- Неполадки с драйвером Wi-Fi адаптера.
- Ваше устройство не умеет работать с диапазоном 5 Ггц.
Обновление драйвера Wi-Fi адаптера производится следующим образом:
- нажмите ПКМ на Пуск и выберите «Диспетчер устройств»;
- раскройте раздел «Сетевые адаптеры»;
- дважды кликните ЛКМ на свой Wi-Fi адаптер;
- перейдите во вкладку «Драйвер»;
- кликните на кнопку «Обновить драйвер»;
- далее выберите опцию «Автоматический поиск обновленных драйверов»;
- следуйте инструкциям на экране.
Проверить, поддерживает ли ваше устройство 5 Ггц, можно вот так:
- нажмите ПКМ на Пуск;
- выберите из списка «Командная строка (администратор)»;
- впишите команду netsh wlan show drivers и нажмите Enter.
Перед вами откроется небольшой список с различной информацией о Wi-Fi адаптере. Найдите строчку «Поддерживаемые типы радиомодулей». Если у вас тут указаны стандарты 802.11n, 802.11g и 802.11b, то это значит, что ваш компьютер поддерживает только диапазон в 2.4 Ггц. Если же 802.11a, 802.11g и 802.11n — есть поддержка как 2.4 Ггц, так и 5 Ггц.
Если же Wi-Fi адаптер имеет и актуальный рабочий драйвер, и поддержку диапазона в 5 Ггц, то дело может заключаться в Wi-Fi маршрутизаторе. Попробуйте зайти в настройки Wi-Fi и изменить канал и ширину канала для 5 Ггц-режима. Обязательно не забудьте сохранить внесенные изменения!
Сейчас на рынке предлагается большой выбор двухдиапазонных Wi-Fi роутеров, которые могут транслировать Wi-Fi сеть на частотах 2.4 ГГц и 5 ГГц. Однако далеко не все устройства могут видеть и подключаться к Wi-Fi сети, работающей на частоте 5 GHz. Разберемся со случаем, когда устройство с Windows 10 не видит такую сеть.
Содержание:
- Преимущества использования Wi-Fi сети с частотой 5 GHz
- Как узнать, поддерживает ли ваше устройство сети Wi-Fi 5 ГГц
- Windows 10 перестает видеть 5 ГГЦ Wi-Fi после обновления
- Если адаптер не поддерживает сеть 5 ГГЦ
Преимущества использования Wi-Fi сети с частотой 5 GHz
В чем основные преимущества Wi-Fi сети, работающей на частоте 5 GHz? Эта частота менее загружена и количество шумов/помех на ней будет меньше (это преимущество особо актуально для жителей многоэтажек, когда на частоте 2,4 Ггц работает огромное количество соседских роутеров, телефонов и микроволновок). Также при работе на этой частоте можно достигнуть более высокой пропускной способности и поддерживаются 23 отдельных каналов передачи (против трех каналов у 2,4 ГГц сети). Недостаток – меньшая зона покрытия в сравнении с частотой 2,4.
Как узнать, поддерживает ли ваше устройство сети Wi-Fi 5 ГГц
Поддерживает ли ваш компьютер, ноутбук или планшет работу с Wi-Fi сетями на частоте 5 ГГц или нет зависит от модели беспроводного адаптера, установленного в нем. Можно найти вашу модель адаптера на сайте производителя и ознакомится с его характеристиками (часто в названии таких адаптеров указна фраза Dual Band). Но есть способ проще.
Проверить поддержку различных беспроводных стандартнов драйвером Wi-Fi адаптера в Windows можно следующим образом:
- Запустите командную строку с правами администратора
- Выполните команду:
netsh wlan show drivers - Посмотрите, что указано в разделе Radio types supported
Это список беспроводных стандартно, которые поддерживаются данный драйвером.
Адаптеры с поддержкой стандартов 802.11a, 802.11h, 802.11j и 802.11n могут работать как на частоте 5 ГГц, так и на 2.4 ГГц.
Примечание. Один нюанс касательно стандарта 802.11n. В нем определена поддержка стандарта 5 ГГц, но работать в двух диапазонах умеют далеко не все сетевые адаптеры (дело в том, что есть два стандартна 802.11n от 2006 года и 802.11n Dual Band от 2009).
Стандарт 802.11ac означает, что устройство может работать только на частоте 5 ГГц.
Примеры.
- Допустим в списке поддерживаемых стандартов указана поддержка 802.11b и 802.11g, это значит данный драйвер поддерживает только Wi-Fi сети на частоте 2.4 ГГц.
- Если указано, что адаптер поддерживает 802.11a, 802.11g и 802.11n, значит поддерживаются оба частотных диапазона.
Таким образом, если в списке поддерживаемых стандартов нет строк, указывающих на наличие поддержки нового диапазона, стоит проверить на сайте производителя сетевой карты, поддерживает ли она новые стандарты. В некоторых случаях для корректной работы на частоте 5 ГГц достаточно установить последнюю версию драйверу, скачанную с сайта производителя.
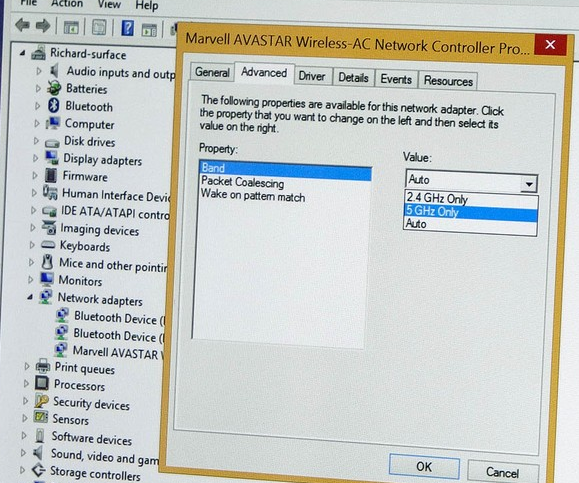
В том случае, если указано, что драйвер поддерживает 802.11ac/802.11n, но Windows не видит Wi-Fi сеть, работающую на частоте 5 ГГц, откройте свойства драйвера беспроводного интерфейса и в его настройках проверьте не выбран ли вручную только один диапазон.
К примеру, на Surface Pro 3 с адаптером Marvell AVASTAR Wireless-AC Network Controller, видно, что на вкладке Advanced в свойстве Band можно выбрать в каком режиме должен работать адаптер (Auto/2.4 GHz Only/ 5 GHz Only). Измените режим на Авто.
Windows 10 перестает видеть 5 ГГЦ Wi-Fi после обновления
Некоторые пользователю жалуются, что после выполнения апгрейда Windows 10, система перестает видеть Wi-Fi сети с частотой 5 ГГц. Как правило проблема решается путем ручного скачивания и установки последней версии драйвера для вашего беспроводного адаптера с сайта производителя. Автоматическое обновление драйверов при этом желательно отключить.
Если адаптер не поддерживает сеть 5 ГГЦ
Если ваш сетевой адаптер не поддерживает работу с Wi-Fi сетями на частоте 5 ГГц, просто используйте обычную сеть 2.4 ГГц. Если уж очень хочется работать на новой частоте, можно приобрести внешний USB Wi-Fi адаптер с поддержкой частоты 5 ГГц (выше мы описали требования к стандартам 802.11, которым должно соответствовать устройство).
Если вы читаете эту статью, то вероятнее всего тоже столкнулись с такой проблемой, что ваш компьютер не хочет подключаться к WiFi сети с частотой 5G. Вроде роутер работает исправно, другие устройства без проблем подключаются к этой сети, а комп не хочет. Выдаёт ошибку «Не удаётся подключиться к этой сети» или вовсе не видит нужную сеть.
Лично я очень долго пытался решить эту проблему, в общей сложности несколько лет) Но 2.4ГГц работали, поэтому не сильно старался найти решение. Перечитал много статей, пересмотрел кучу видео, но ничего не помогало. Причём сбивало с толку, что при покупке ноутбука — 5G сеть работала исправно. Но спустя какое-то время отказалась к ней подключаться или просто переставал её видеть. Хотя умный телевизор, ТВ приставка, мобильный телефон подключались исправно к этой сети. А значит роутер был рабочий и проблема заключалась в Windows. Долго грешил на глюки в работе windows 10, пришёл к выводу что проблема возникала после их обновления. В общем я ушёл от темы, встретив знакомого сисадмина, спросил его насчёт нашей проблемы. Тот сказал проверить настройки роутера и действительно, его рекомендация решила мою проблему.
Как подключить ноутбук к Wi-Fi сети 5G.
- Вам изначально нужно подключиться к домашней сети. Например, через сеть 2.4 ГГц или через интернет провод к роутеру.
- Вам нужно зайти в настройки роутера. Для этого открыть браузер и перейти по адресу 192.168.0.1 или 192.168.1.1 Разные могут быть варианты, всегда точный адрес есть на дне вашего роутера. Например, мой роутер доступен по адресу 192.168.1.254
- Далее нужно авторизоваться. Чаще всего стандартные данные для входа Логин admin и Пароль admin. Но может быть и другие, точные данные указаны на дне роутера.
- Далее вам нужно перейти в настройки WiFi сети. Тут каждый роутер индивидуальный, точный путь подсказать сложно. Нужно искать название Wi-Fi.
В нём будет настройки названия, пароля сетей 2.4 и 5. Вам нужно перейти в настройки 5ГГц и найти пункт Канал. По умолчанию он стоит на Авто. Замените значение на цифру не выше 52. Сохраняйте и дайте минуту роутеру на сохранение новых параметров. Пробуйте подключаться. У меня всё заработало. Надеюсь и у вас! Пишите в комментарии, кому помогла данная настройка.
Рекомендуем прочесть