
Are you annoyed by the lack of “Next/Previous” arrows in the Photos app on your Windows 11 or 10? You’re not by yourself but several consumers have experienced this frequent issue, especially after upgrading their operating systems. The missing arrows can make browsing through photos a tedious task and you can see images quickly and easily. While it may appear to be a complex problem to address, there are various solutions. One probable explanation to resolve the ‘No Next Previous Arrows in Windows 11 Photo’ problem is that the folder you’re trying to access needs to be shown in the Photos app’s Folders section.
This missing arrow in Microsoft Photos app might occur because of an incorrect option enabled in File Explorer options. Furthermore, the existence of unwanted invaders such as PUPs or malicious apps is also a reason for this. Talking about solutions, in some scenarios, repair tools have also helped users to address the concerned problems. Don’t worry; we’ll walk you through the various ways to restore the missing arrows and improve your photo browsing experience. See: Fix: ‘The Wait Operation Timed Out’ Error in Photos App Windows 10. Just stay tuned to this blog!
No Next Previous Arrows in Windows 11 Photo
Here is how to fix No Next Previous Arrows in Windows 11 Photo:
Modify File Explorer Options Search
By default, Windows finds System files and folders when searching your data and this takes a longer time and larger amount of resources as well. This option may prevent the next and previous options from showing on Photos app. So modify this setting as:
- Click on Start.
- Type Folder options and press Enter.
- When File Explorer Options Window appears go to Search Tab.
- Check the box saying: “Don’t use the index when searching in file folders for system files (searches might take longer)”.
- Click on Apply and OK.
Remove Properties and Personal Information from images
- Go to the Picture folder synced to the Photos app (It may be different on your computer).
- Select all the images and right click.
- Choose Properties.
- Click on the Details tab.
- Then click on the Remove Properties and Personal Information link.
- Check the option – Remove the following properties from this file.
- Click on the OK button.
Restart the application then reset
Then troubleshoot the issue with restarting Photos app to resolve missing Next/Previous arrows? The Windows application occasionally suffers momentary problem that cause these arrows to vanish.
If the problem still persists close the program and reset its state which can typically nail minor package-related issues.
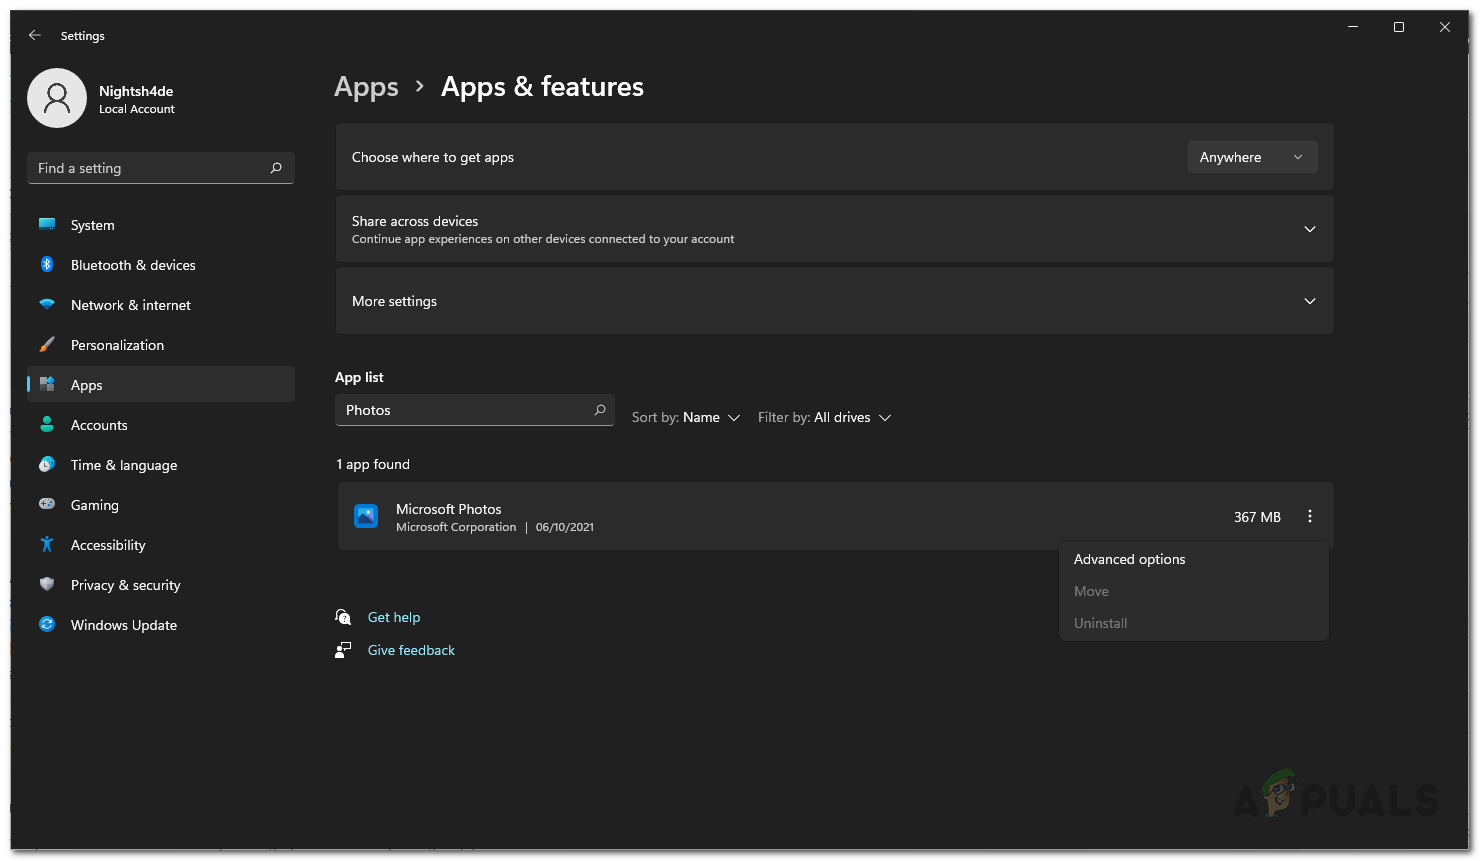
- Press the Windows and I keys.
- In the Settings menu, click on Apps.
- Select Installed apps.
- Find the Microsoft Photos in the list.
- Click on 3 dots icon (ellipsis) and select Advanced Options.
- Choose the Reset option.
- Confirm the popup.
Use the Troubleshooter
When dealing with the “No Next Previous Arrows in Windows 11 Photo” issue, relying on the Windows built-in fix-it tool, otherwise known as the ‘Windows Troubleshooter’ may be a decent option. Here’s a step-by-step guide:
- Open Settings (Winkey+I).
- Go to the right side and scroll down.
- Select Troubleshoot.
- Click on Other troubleshooters.
- Move down to Windows Store Apps and click on Run.
- If you don’t find the tool, download Windows Store app troubleshooter and run it.
Select a Different Application to Open Photos
Choosing a new program may help to remedy the issue of No Next Previous Arrows in Windows 11 Photo. To improve your browsing experience and resolve this, follow:
- Right-click on the picture you want to browse.
- Hover on Open with and choose Paint.
- If the picture opens in Paint normally, there may be an issue with the Photos app.
Install the Windows Update
Unable to find the correct way to resolve this photos app error? Try updating your operating system, we believe it might do the trick!
Whenever you update your device, it usually comes with bug fixes, performance improvements, and compatibility enhancements. These updates can help fix any issues that might be causing problems with Windows.
- Right-click on the Start button and select Settings. Alternatively, you can press the Windows key and I together to open the Settings window.
- Go to Windows Update.
- On the right side, select Check for updates.
- Install any pending OS updates.
Uninstall and Reinstall the Photos App
It may appear contradictory, but removing and reinstalling the built-in application may wonderfully fix the problem of no next/previous arrows in the Photos. Here’s how to accomplish it:
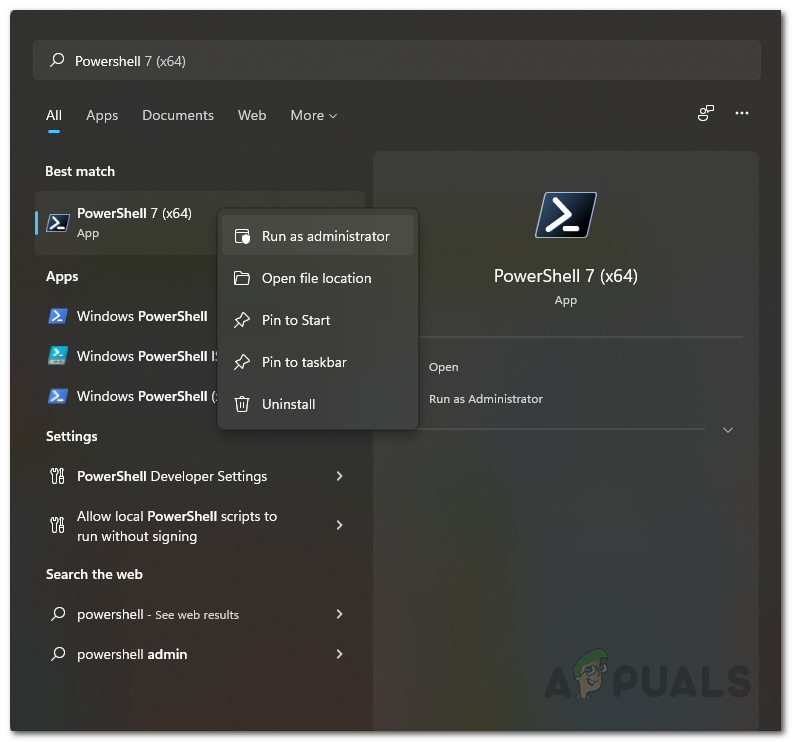
- Open Start menu, and search for Windows PowerShell.
- Choose Run as administrator.
- Select Yes on User account control prompt.
- Type the following command to uninstall the Photos app:
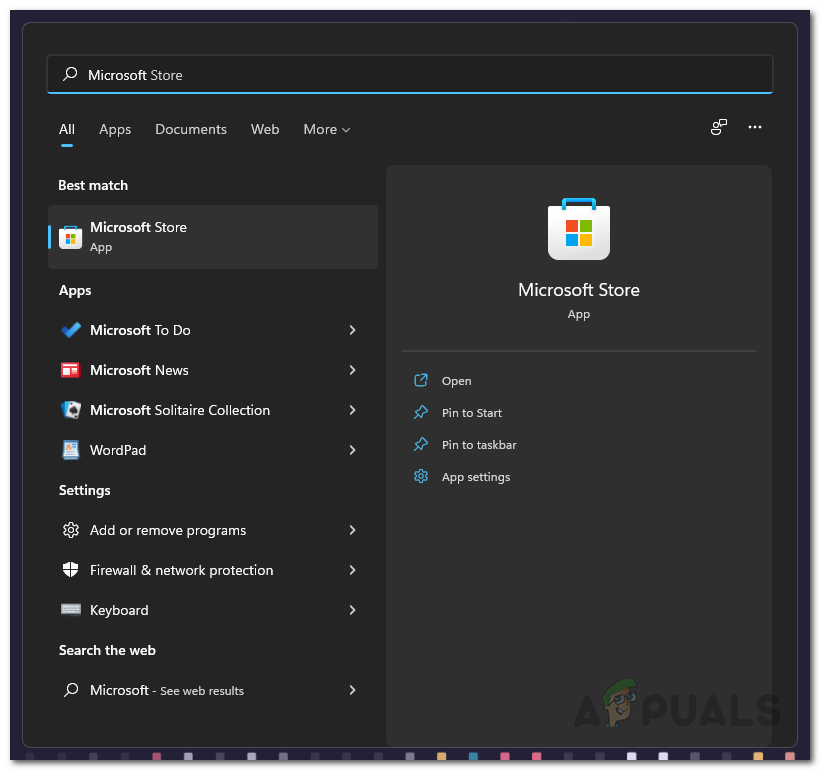
get-appxpackage Microsoft.Windows.Photos | remove-appxpackage- Then go to Microsoft Store.
- Type Photos in the Search bar.
- Select “Microsoft Photos” from the dropdown result.
- Click on Get.
- Wait a little time and then open the app.
How to uninstall and reinstall Photos app in Windows 11 or 10
Reset Microsoft Store Cache
To resolve this Microsoft Photos app mistake you might want to clear the corrupted cache data as it might be causing various performance issues, including the disappearance of these essential navigation icons.
Head to these steps to resolve the problem and restore the functionality of the Photos app:
- Click on Start.
- Type cmd.exe.
- Select Run as administrator.
- Click on Yes on the UAC prompt.
- Type wsreset.exe and press Enter.
- Wait for the command to execute.
- Microsoft Store will open automatically.
- Launch the app and see if No Next Previous Arrows in Windows 11 Photo appears.
Remove the recently installed Windows Update
Sometimes, buggy Windows Updates might affect Microsoft Photos and remove the next and previous arrows. Although Microsoft does not acknowledge this as a known issue despite we should wait for a resolution from the company that can correct get back the arrows.
Until then, remove the recently installed Windows update to get rid of the Photos app issue.
- Press Winkey and I.
- Select Windows Update.
- Go to the right and click on “Update history”.
- On the Next Settings page, scroll down to the lower section and click Uninstall updates.
- Find the recently installed one and click on Uninstall.
- Confirm the popup and let the computer reboot and remove the update.
Temporarily Disable Firewall
Sometimes firewall can pose a severe hindrance and lead to No Next Previous Arrows in Windows 11 Photo.
By disabling this protection tool, you can enable the Photos app to make the necessary connections and access essential resources without being blocked. However, remember to re-enable the firewall after testing to keep your system secure.
- Click on Search and type control.
- Press Enter to open Control Panel.
- Then, click on Windows Defender Firewall.
- From the left panel, select – “Turn Windows Defender Firewall on or off”.
- On Customize Settings for each type of network window, check the options Turn off Windows Defender Firewall in both Private network settings and Public network settings.
- Click on OK to save the changes.
Finally, we hope with these 10 ways you might be able to resolve or fix No Next Previous Arrows in Windows 11 Photo.
Methods:
Modify File Explorer Options Search
Remove Properties and Personal Information from images
Restart the application then reset
Use the Troubleshooter
Select a Different Application to Open Photos
Install the Windows Update
Uninstall and Reinstall the Photos App
Reset Microsoft Store Cache
Remove the recently installed Windows Update
Temporarily Disable Firewall
That’s all!!
In general, the Microsoft Photos App is known to work without any problems. However, it can sometimes stop working and is also known to disappear from the computer.
If the Photos App is missing, it is most likely that you have accidentally deleted the app from your computer. This issue can be easily fixed by reinstalling the App from Windows Store.
Microsoft Photos App Missing or Not Working
If the Microsoft Photos App is not working on your Windows 11/10 computer, you should be able to fix the problem using the following steps.
1. Restart the Computer
The problem could simply be due to a stuck app or process preventing the Photos App from working properly. This can be fixed by restarting the computer.
Advertisement
Shut-down the computer > After 60 seconds, restart the computer and see if you are able to use the Photos App.
2. Use Windows Store App Troubleshooter
If Photos App is not working, you can try the built-in Windows troubleshooter to help you fix the problem.
1. Open Settings > go to System > Troubleshoot > click on Other troubleshooters.

2. On the next screen, scroll down and click on the Run button located next to Windows Store Apps.

3. Allow the troubleshooter to find and fix problems with the Photos App.
4. Repair or Reset Photos App
Windows operating system provides the option to Repair and Reset te Photos App, if it is not working properly.
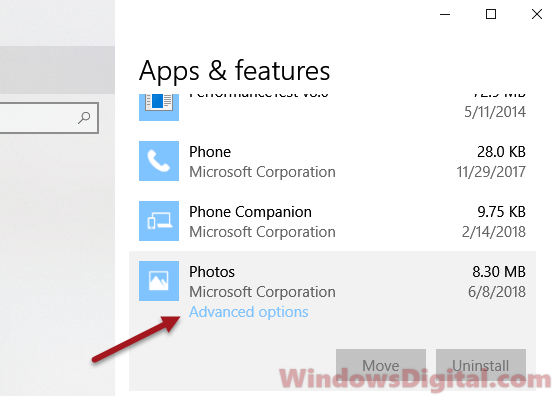
1. Go to Settings > Apps > Apps & Features.
2. Click on 3-dots Icon located next to Microsoft Photos and select Advanced options.

3. On the next screen, select the Repair option.
Advertisement

After this, check if Microsoft Photos is working properly on your computer. If it is not working, try the Reset option.
5. Re-register the Photos App
1. Type PowerShell in the search bar, right-click on Windows PowerShell app and select Run as an administrator option.

2. In the PowerShell window, type the following command and press the Enter key:
Get-AppxPackage -allusers Microsoft.Windows.Photos | Foreach {Add-AppxPackage -DisableDevelopmentMode -Register “$($_.InstallLocation)\AppXManifest.xml”}
After the command is executed, restart the computer and you should find the Photos App working properly.
Many users have reported that they are not able to view photos or videos in the latest iteration of the Windows operating system. As it turns out, upon trying to open a photo or a video, the blue circle appears with the circle which means the processor is processing the request made. However, the picture does not open at all and nothing happens no matter how long the users wait. This can be usually correlated with something wrong with the Windows Photos app that is supposed to open your pictures on the operating system. In this article, we will show you how to resolve this problem via a few different methods so just follow through.

As it turns out, Windows 11 is a relatively new operating system that comes with different features that might have you excited. Most of the Windows apps have received a visual overhaul just like the Windows Photos app. In some cases, while upgrading to the operating system, the process may damage some of the default apps that come pre-installed due to which you can run into various issues. In addition to that, the problem in question can also be sometimes caused by corrupted system files due to which the Windows Photos app fails to open up and you are not able to view any photos or videos. Regardless of the cause, however, you can easily resolve the problem by scanning your system files or repairing the application in question. With that said, let us get started without further ado and show you how to fix the issue in question.
Change Default Application
The first thing that you should do when the operating system is not opening any photos is to check the default application for opening images. As it turns out, Windows uses a default application for different file types that are used to open the files whenever you wish to open them. If a default application is not selected, you will be asked to choose a default application. However, that is something that can easily miss your eye as it is not a separate window and goes away the moment you click somewhere else.
If this case is applicable, you will have to first check the default application for opening photos on your computer to make sure that Windows Photos is selected. To do this, follow the instructions below:
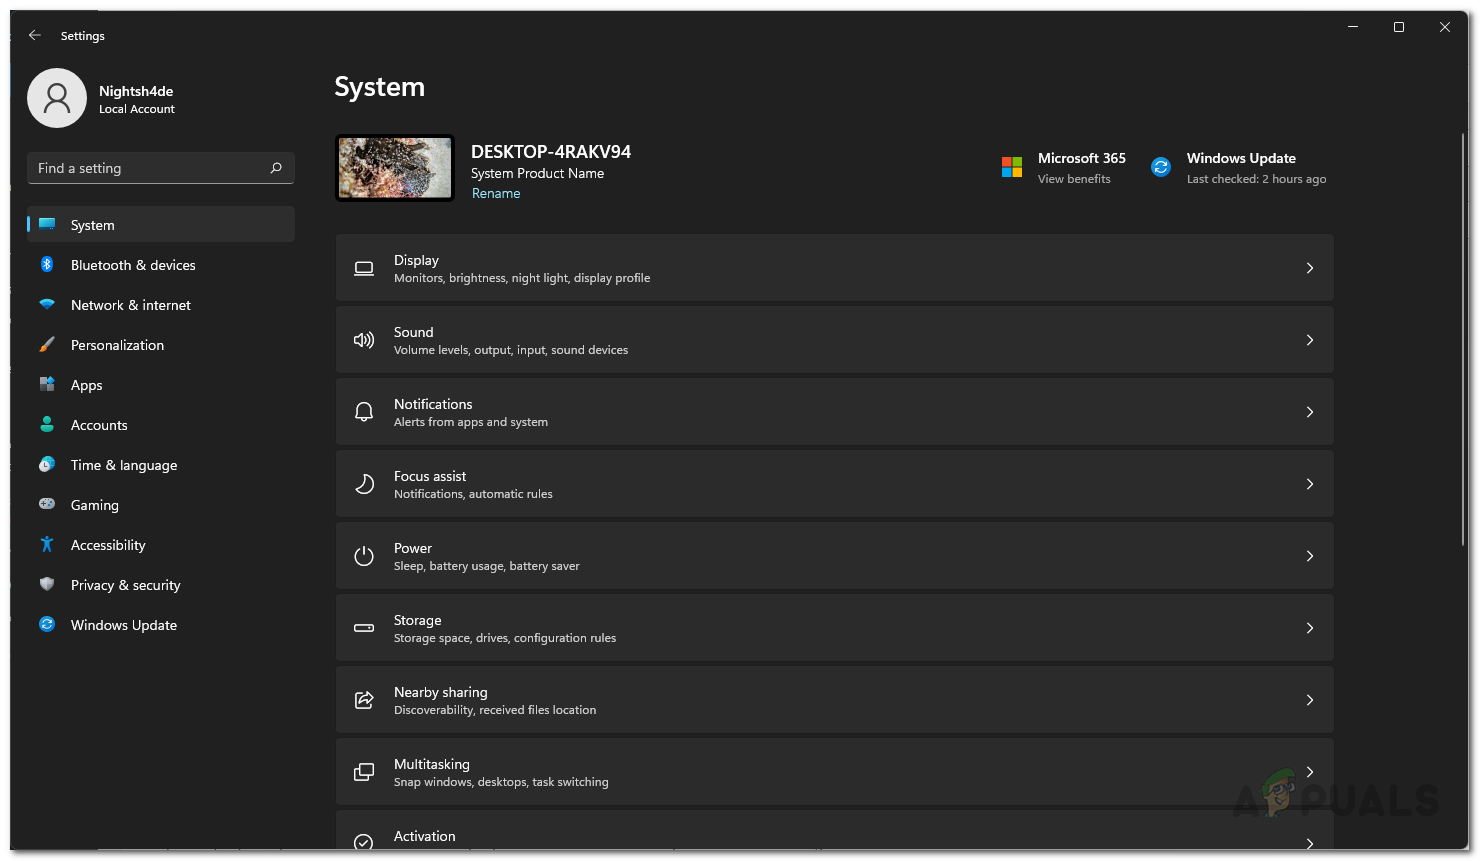
- First of all, press the Windows key + I on your keyboard to open the Windows Settings window.
- On the Settings window, click the Apps option on the left-hand side.

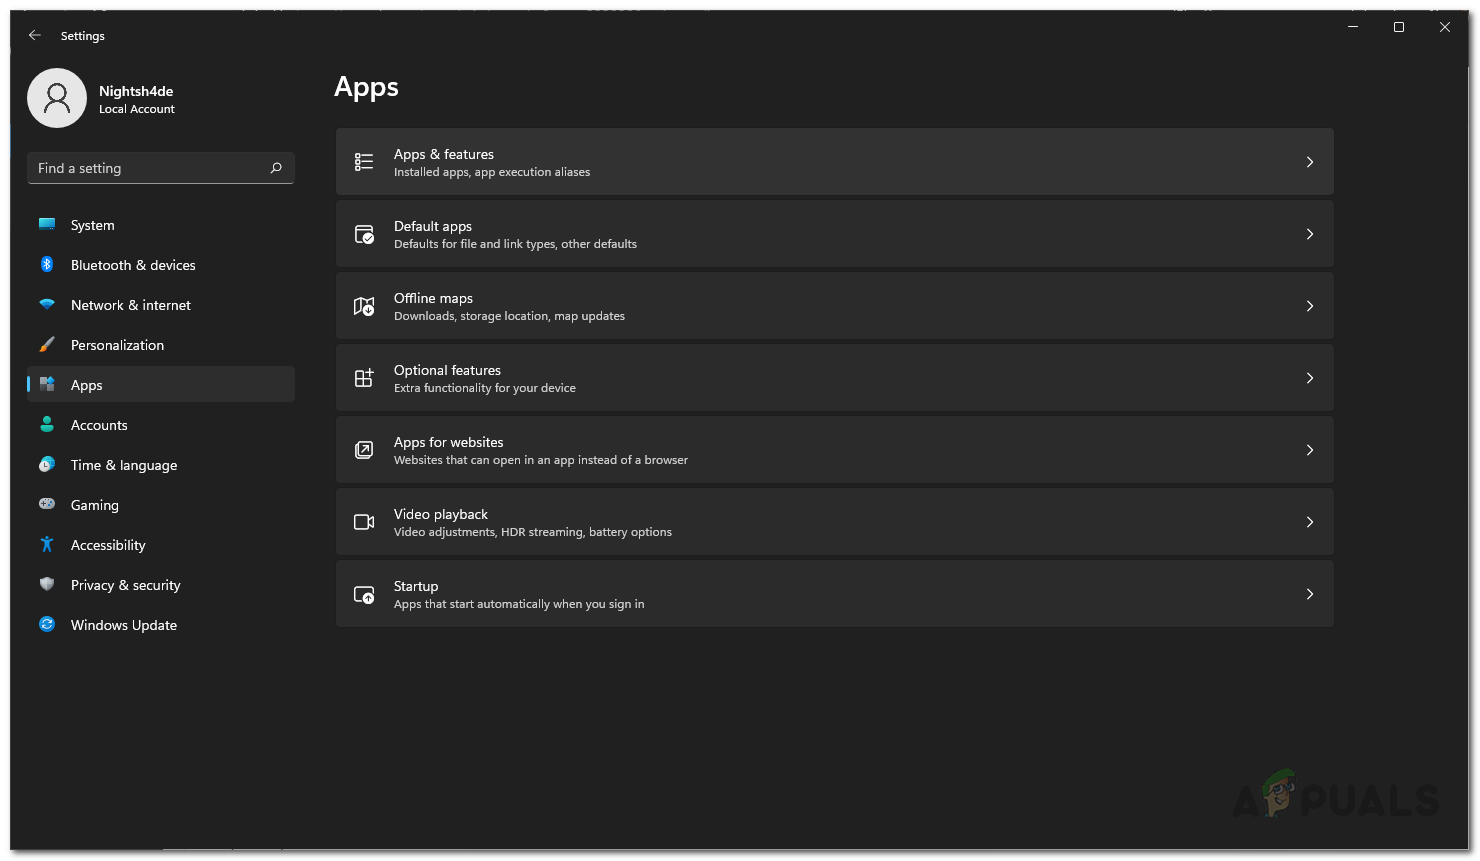
Windows Settings - There, click on the Default apps option provided.
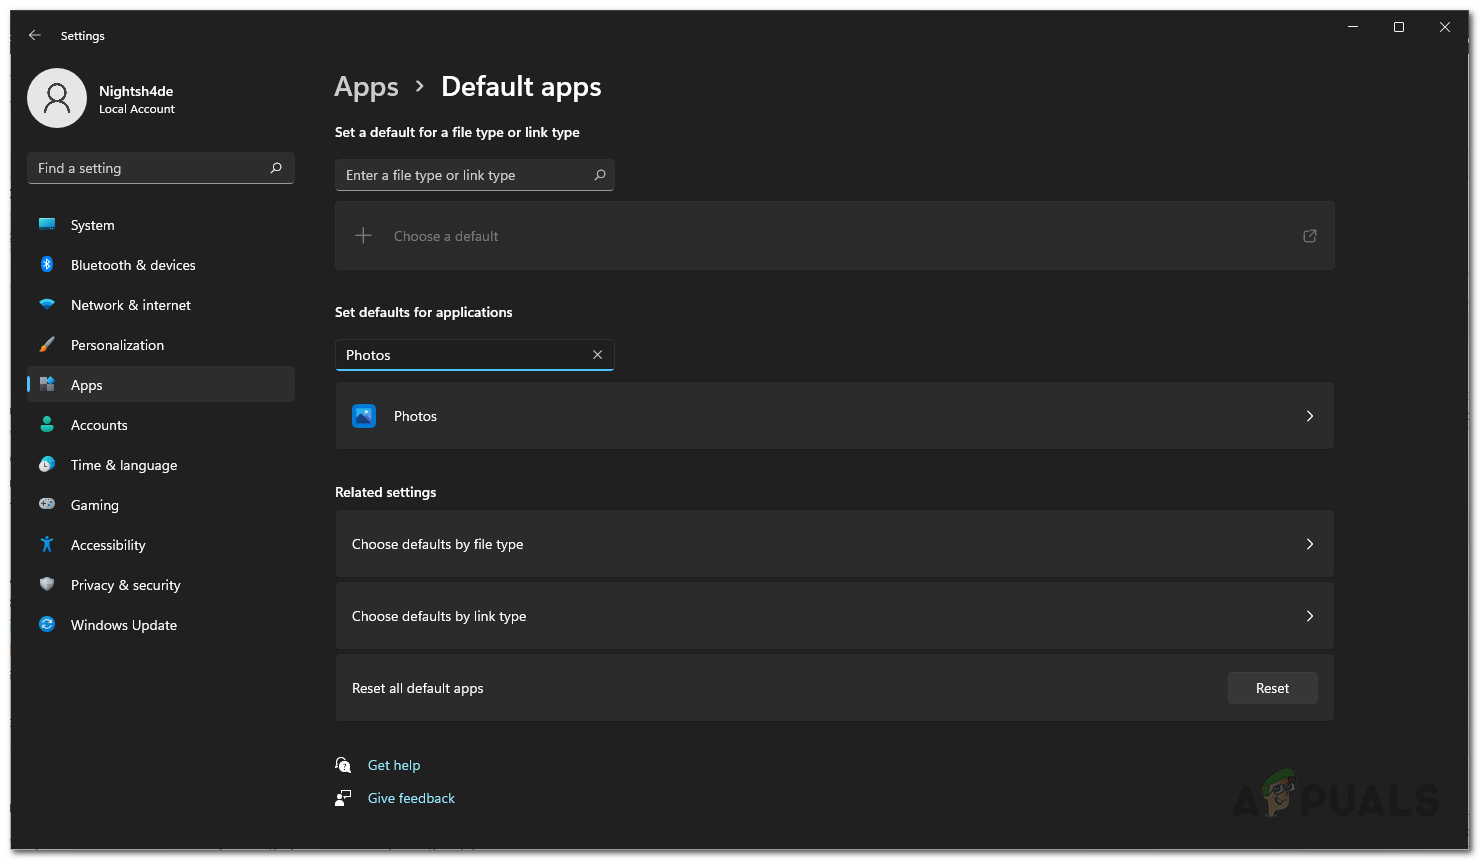
Apps Settings - Now, from the list of the applications given, search for the Photos app via the search bar. Then, click on it.
- On the next page, you will be shown what file types are opened with the Photos app.
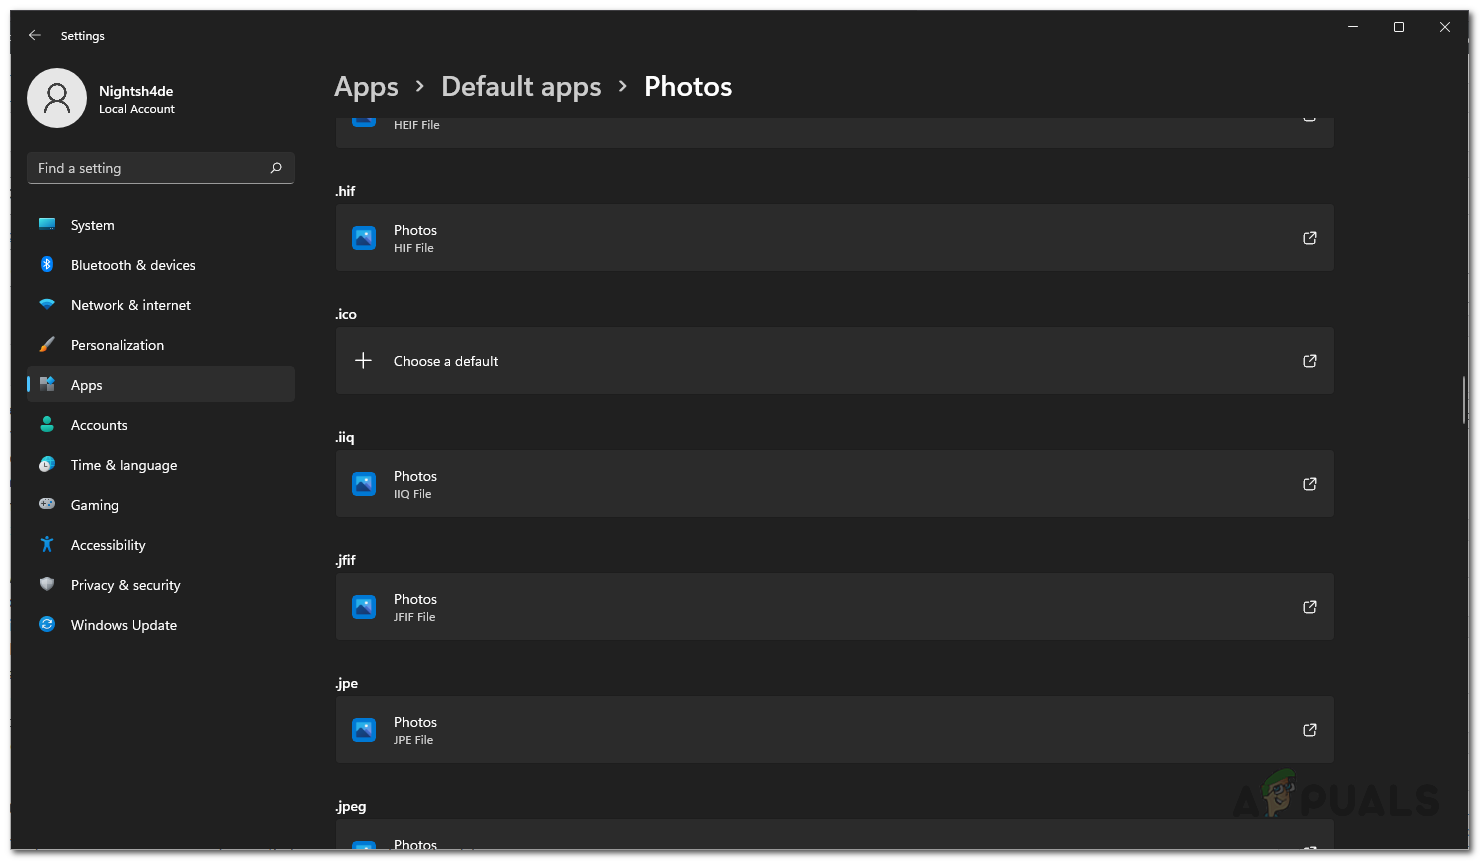
Searching for Photos - Look for the extension of the image that you are trying to open and make sure Photos is selected.
- If it isn’t, click the Choose a default option and then select the Photos app.
Microsoft Photos Default File Types - Once you have done that, see if the problem persists.
Run SFC Scan
As it turns out, one of the reasons that you are not able to open up photos or videos on your computer could be due to system corruption. If you have corrupted system files, then it is only natural that the operating system won’t work as intended. As such, you will have to repair the damaged files on your computer.
If this case is applicable, you can repair the damaged files by running an SFC scan on your system. SFC or System File Checker is a built-in Windows utility that compares your files with a compressed version to see if there are any corruptions. In case any damage is found, the utility fixes it for you. To do this, follow the instructions given down below:
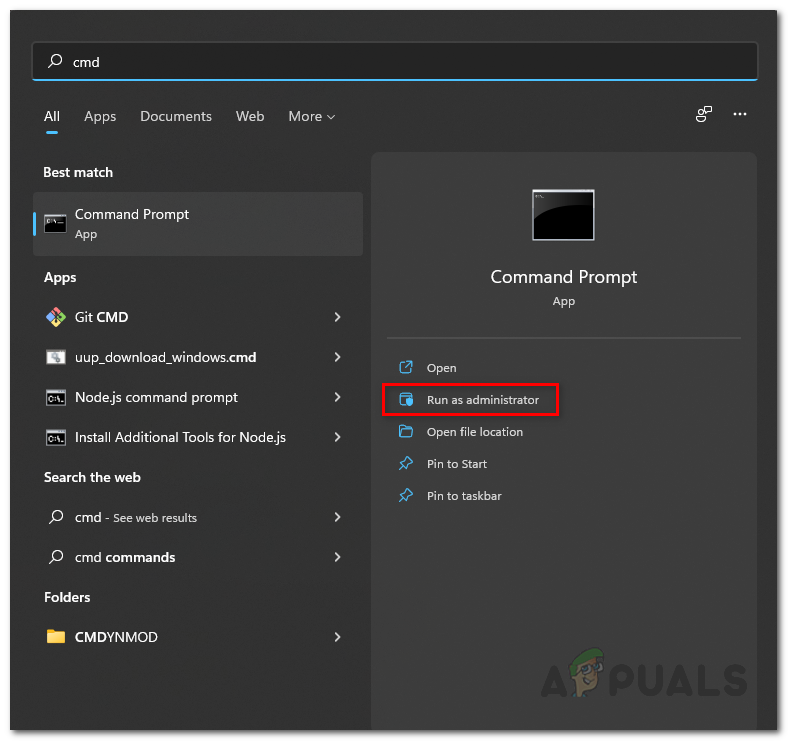
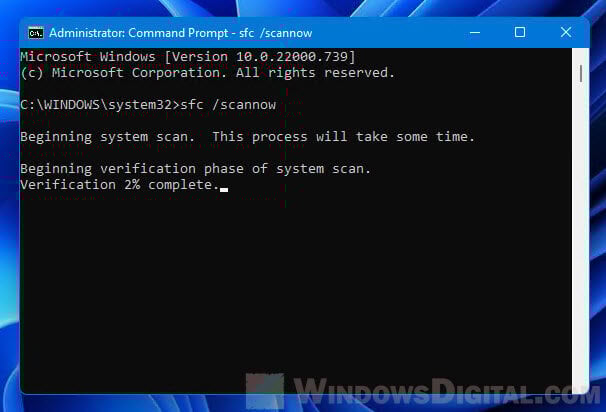
- To start, open an elevated command prompt window. To do that, search for cmd in the Start Menu and then right-click on it. From the drop-down menu, click the Run as administrator option.

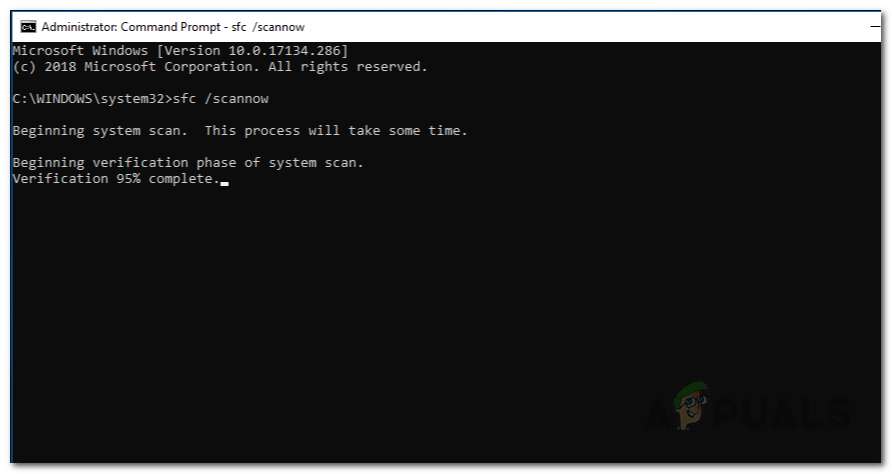
Opening up Command Prompt as an Admin - Once the command prompt window is open, type in the following command to start the scan:
sfc /scannow

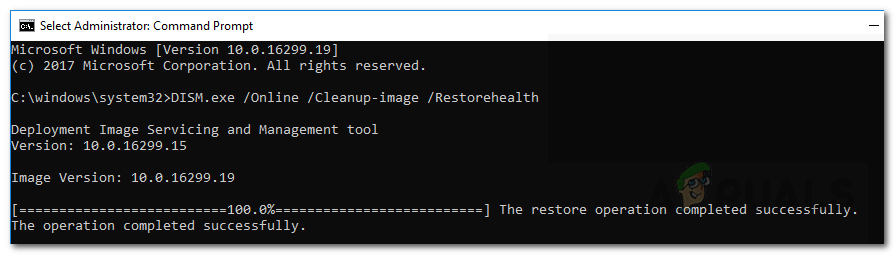
Running SFC Scan - After the scan has been completed, run the following command to repair any corruption in the image:
Dism /Online /Cleanup-Image /RestoreHealth

Restoring Image Health - Once that is done as well, try to open up a photo again to see if that resolves the issue.
Reset Photos App
In some cases, the problem that you are facing may be caused due to an issue with the Windows Photos app. Photos is the default application that is used to open any image files on your computer. Therefore, if the app is running into an issue, it won’t be able to work properly.
In such a scenario, to resolve the issue, you can try to reset the app which will delete all of its data on your computer. This does not mean that any of your images will be deleted so rest assured. Follow the instructions down below to do this:
- First of all, open the Windows Settings app by pressing Windows key + I.
- Then, on the left-hand side, click on the Apps option.
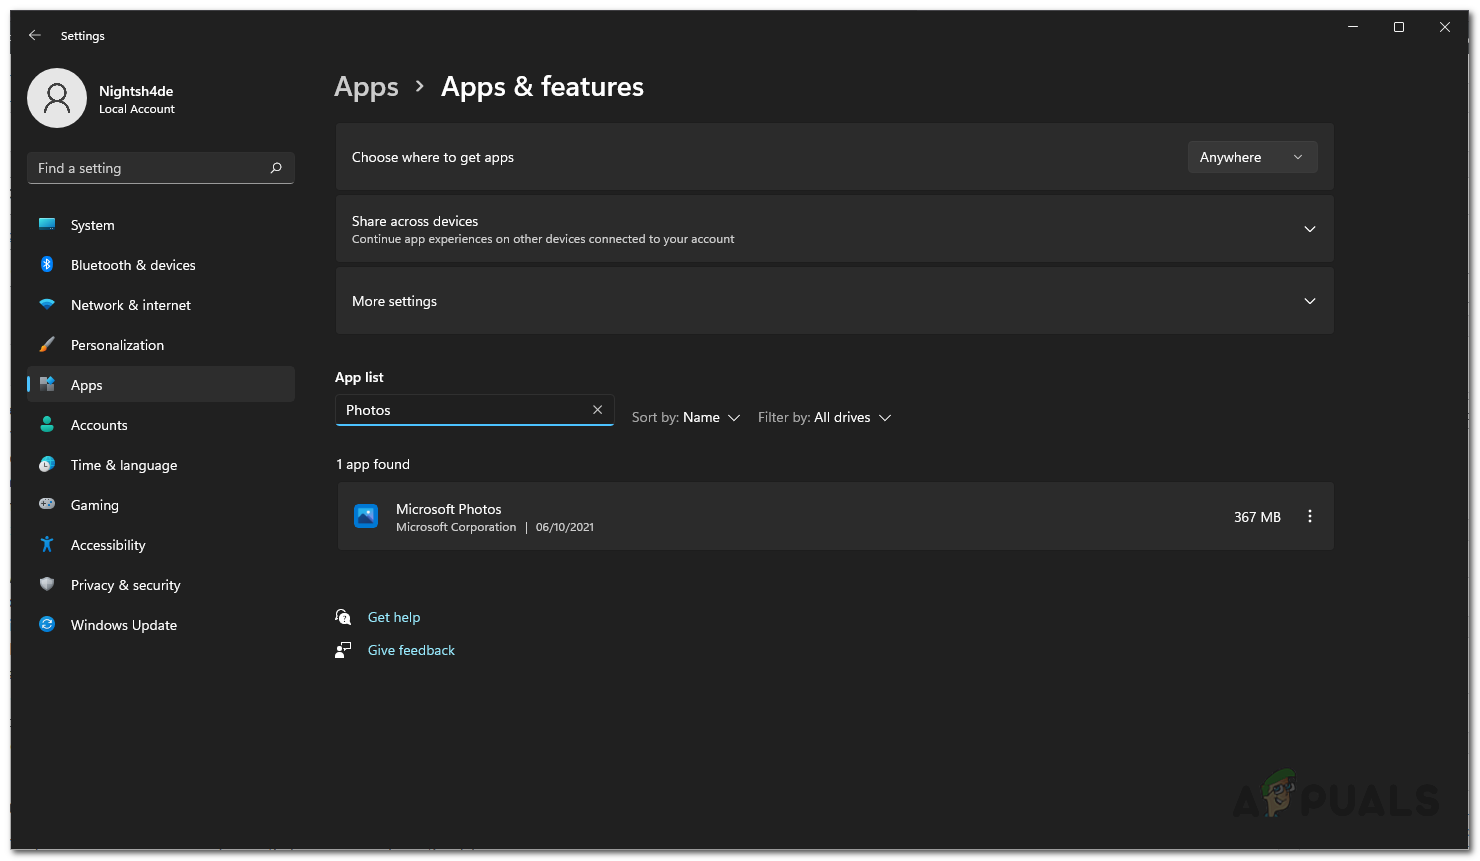
Windows Settings - After that, on the Apps screen, click on the Apps and features option.
Apps Settings - There, search for the Photos app via the search bar provided.
Searching for Microsoft Photos - Next to the Microsoft Photos application, click on the three dots and choose Advanced options from the drop-down menu.
Opening up Microsoft Photos Advanced Options - Once you have done that, click on the Reset option to reset the application.
Microsoft Photos Advanced Options - After that is done, try opening an image to see if the issue persists.
- In case it does, click on the Repair button to let Windows repair the application.
- Once done, see if the problem has been resolved.
Reinstall Photos App
Finally, if none of the methods have worked for you then it is very likely that the problem is being caused by the installation files of the app. In such a scenario, what you can do is simply uninstall the application from your computer and then reinstall it using the Microsoft Store.
To uninstall the application, you will have to use Powershell to uninstall the application as the option for uninstalling Photos is greyed out in the Settings app. To do this, follow the instructions down below:
- First of all, open up the Start Menu and search for Powershell. Right-click on the result and choose Run as an administrator from the drop-down menu.

Opening Powershell as an Admin - Then, in the Powershell window, copy and paste the following command to uninstall the Photos app:
get-appxpackage *Microsoft.Windows.Photos* | remove-appxpackage
- Once you have done that, open up the Microsoft Store app by searching for it in the Start Menu.

Opening up Microsoft Store - Search for Microsoft Photos and then install it.
- After that, try opening an image to see if the issue is still there.
Kamil Anwar
Kamil is a certified MCITP, CCNA (W), CCNA (S) and a former British Computer Society Member with over 9 years of experience Configuring, Deploying and Managing Switches, Firewalls and Domain Controllers also an old-school still active on FreeNode.
The Photos app is a default tool in Windows 10 and Windows 11 that lets you view your local photos (and videos as well), but sometimes it might not work as expected and might even crash in some occasions. Users often face problems like the app failing to open, crashing unexpectedly, or displaying high-quality images as blurry.
In this guide, we’ll show you several fixes you can try to resolve these issues with the Photos app in Windows.
Also see: How to Hide Photos on Windows 11 Photos App
How to fix Windows Photos app not working issue
First, try to check for updates in the Windows Update section of the Settings app or update the Photos app from the Microsoft Store. If your system is up to date and the app still isn’t working, here are some steps you can try to get it running again.
Restart the Photos app process
If simply closing the Photos app doesn’t fix the issue, its background process might still be running. Follow the steps below to fully restart the Photos app.
- Click on the Start menu and select Settings (the gear icon on the left) or press Win+i on your keyboard.
- In the Settings app, select Apps, then Apps & features from the left pane.
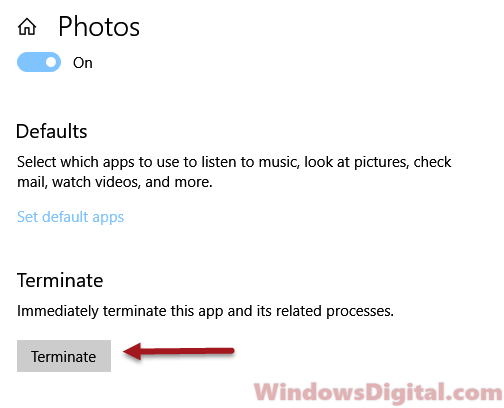
- Scroll down the list of apps until you see the Photos app. Select it and click on the Advanced options link.

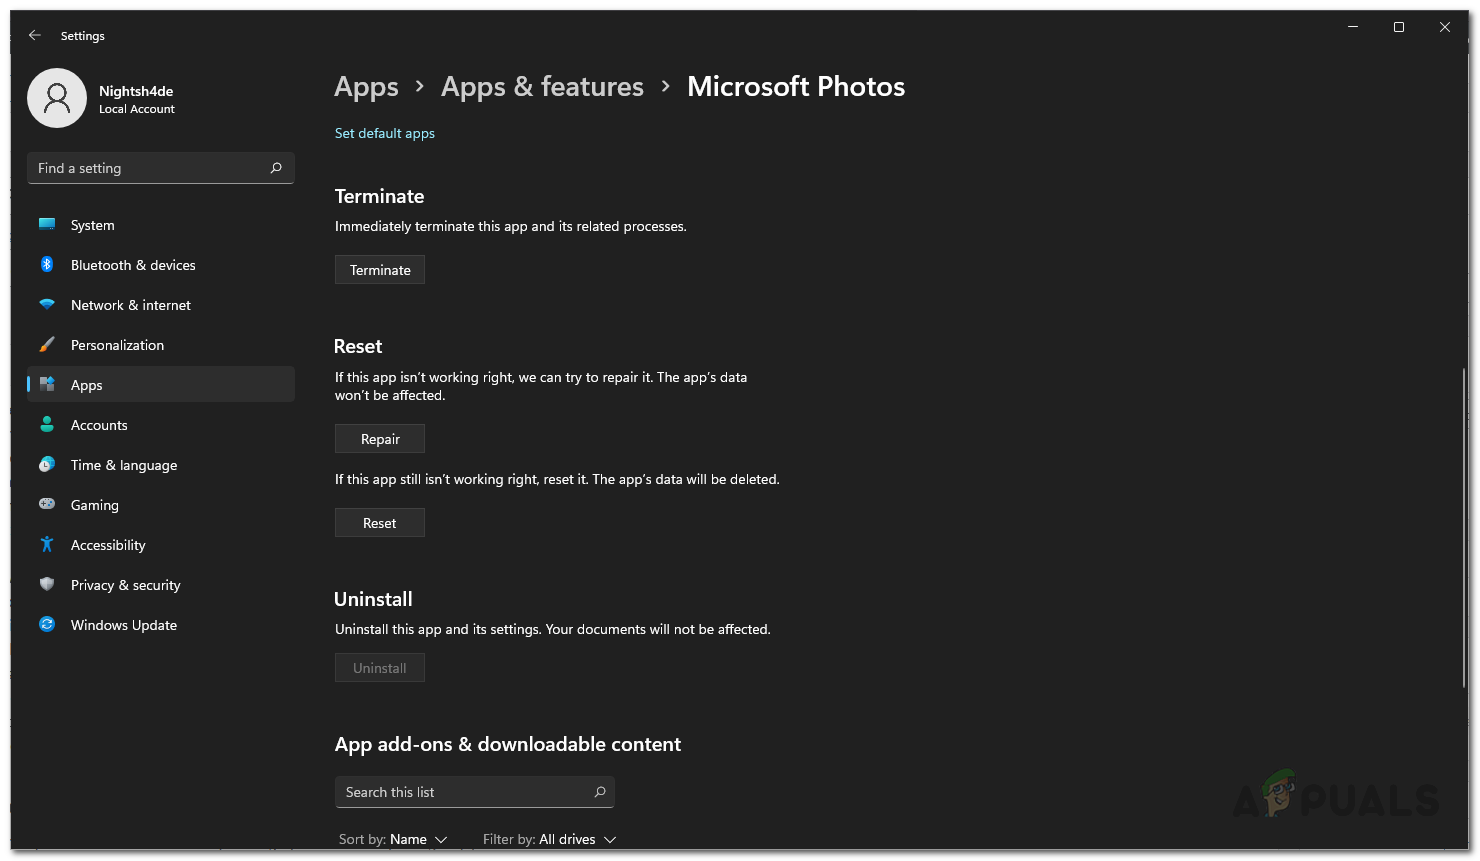
- In the Photos app settings, look for Terminate and click on the Terminate button. Note that the button may not turn gray after clicking it.

- After terminating the process, retry opening the Photos app and see if it works.
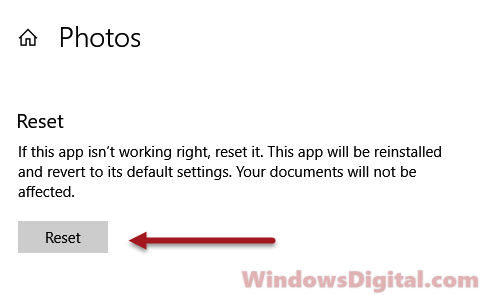
Reset the Photos app
If restarting the background process doesn’t help, resetting the app might do the trick. This can fix most issues with the Windows 10 and Windows 11 Photos app.
- Go back to the Photos app settings as outlined above – Settings > Apps > Apps & features > Photos app > Advanced options.
- Scroll down and look for Reset. Click on the Reset button.

- Restart your computer and try opening the Photos app again. Verify if your issue is resolved. If not, try the next solution.
Reinstall the Photos app
If resetting doesn’t work, reinstalling the app might be necessary. Since there’s no exe installer for the Photos app, you’ll need to use Windows PowerShell to do this.
- Click on the Start menu and search for Windows PowerShell. Right-click it and select Run as administrator.
- In the Windows PowerShell, enter the following command:
Get-AppxPackage Microsoft.Windows.Photos

- Look for and copy the entire line of PackageFullName. When you have it copied, enter the following command with the copied Package Full Name:
remove-AppxPackage Microsoft.Windows.Photos_2018.18041.15530.0_x64__8wekyb3d8bbwe
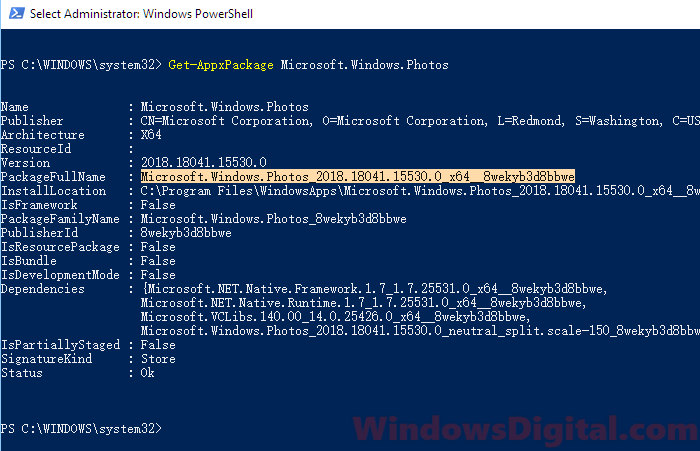
Note that the package full name shown here is just an example. You may have a different version of the Photos app’s package full name. Be sure to copy your version of it. Entering this command will uninstall the entire Photos app. To install it again, go to the Microsoft Store and search for Microsoft Photos. Click on Get or Install to install the Photos app again.
Do a System File Check
A System File Check (SFC) is a built-in tool in Windows that scans your system files for problems and fixes them. This can help sort out issues with the Photos app that might be caused by corrupted files.
- Click on the Start menu and search for Command Prompt. Right-click it and select Run as administrator.
- In the Command Prompt, enter the following command:
sfc /scannow
- Wait for the scan to complete. This may take some time.

- After the scan is complete, the SFC utility will show you a short message telling you whether it found any issues and whether it was able to repair them. If it was not able to repair some of the files, you may need to consider resetting or reinstalling Windows.
Use the Windows store apps troubleshooter
Windows comes with a special tool to help fix problems with apps you got from the Microsoft Store. You can use this tool from the Troubleshoot area in the Settings app. It finds and fixes problems by itself.

Check for app permissions
If the Photos app isn’t working right, it could also be because it can’t access your files. To fix this, go to Settings > Privacy > App permissions. Make sure the Photos app can get to your pictures and other important folders.
Check for conflicts with other software
Other programs on your computer can sometimes mess with the Photos app. If you recently added new software, try turning it off for a bit and see if the Photos app starts working better.
Download Windows Speedup Tool to fix errors and make PC run faster
The built-in Windows Photo Viewer offers a great way to view your photographs and images, especially when you use its Slide Show feature. In Windows, if you find that your Windows Photo Viewer slide show is not working as you want it to, with only a part of the photograph being displayed, then you may try this solution. This problem could occur if DPI virtualization is being used.
To resolve this issue, save all your files and work first. Once you have done that, right-click on the Windows desktop and select Screen Resolution. The Screen Resolution Control Panel applet will open. Here, click on Make text and other items larger or smaller.
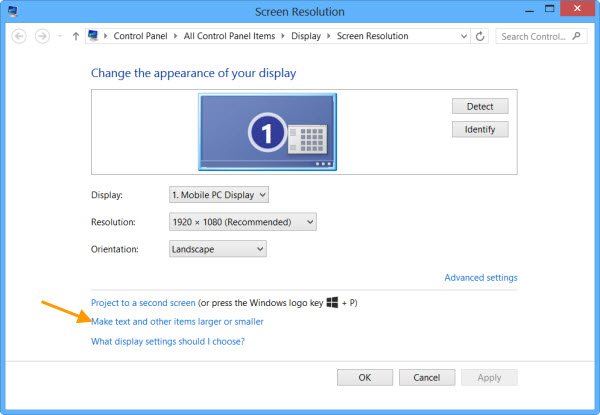
Now, in the Custom Sizing Options dialog box, click on Custom sizing options. In the settings box that opens, select the Use Windows XP style scaling check box. Click OK.
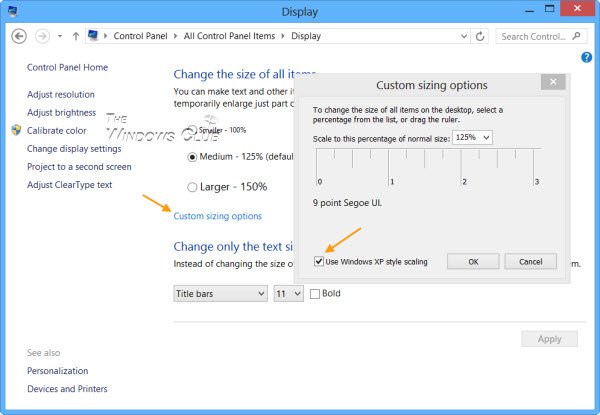
You will be asked to save your work and sign out. Click on Sign out now. Restart your Windows computer and sign back in. The issue should have been resolved.
I hope this helps.
Read: Windows Photo Viewer applies Yellow Tint & Background to images.
Anand Khanse is the Admin of TheWindowsClub.com, a 10-year Microsoft MVP (2006-16) & a Windows Insider MVP (2016-2022). Please read the entire post & the comments first, create a System Restore Point before making any changes to your system & be careful about any 3rd-party offers while installing freeware.