
Quick Tips
- Ensure that you haven’t inadvertently disabled thumbnail previews on Windows.
- Clearing the existing thumbnail data is an effective way to fix this issue.
- If you can’t see thumbnails for a specific file type on Windows, it might be because of the default app set for that file type.
Basic Fixes
- Restart Windows Explorer: Temporary issues with Windows Explorer can cause such problems. In most cases, you can fix the issue by restarting the Windows Explorer process.
- Run the SFC scan: Corrupted or damaged system files can also cause such anomalies. Running the SFC (System File Checker) scan can help you find and repair any problematic system files causing the issue.
Fix 1: Ensure Thumbnails Are Enabled
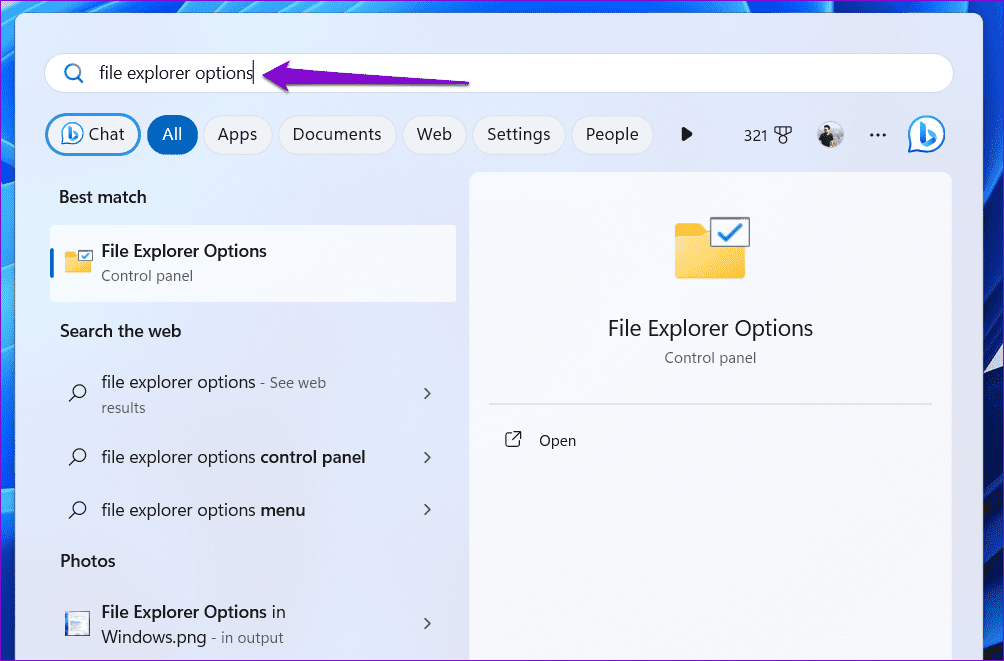
Step 1: Press the Windows key + S to open the search menu. Type file explorer options in the box and press Enter.
Step 2: Switch to the View tab and uncheck the Always show icons, never thumbnails box. Then, click Apply, followed by OK.

Fix 2: Clear Thumbnail Data
Step 1: Press the Windows key + I to open the Settings app and head to System > Storage.

Step 2: Click on Temporary files.

Step 3: Select Thumbnails and uncheck all the other boxes. Then, click the Remove files button at the top.

Fix 3: Uninstall and Reinstall Microsoft OneDrive
At times, Windows 11 may not display thumbnails for pictures, videos, and folders backed up to OneDrive. Several users on a Microsoft Community post reported fixing the issue almost instantly by uninstalling Microsoft OneDrive and installing it back. You can also give this a shot.
Step 1: Press the Windows key + R to open the Run dialog box. Type appwiz.cpl and press Enter.
Step 2: Select Microsoft OneDrive on the list and click Uninstall.
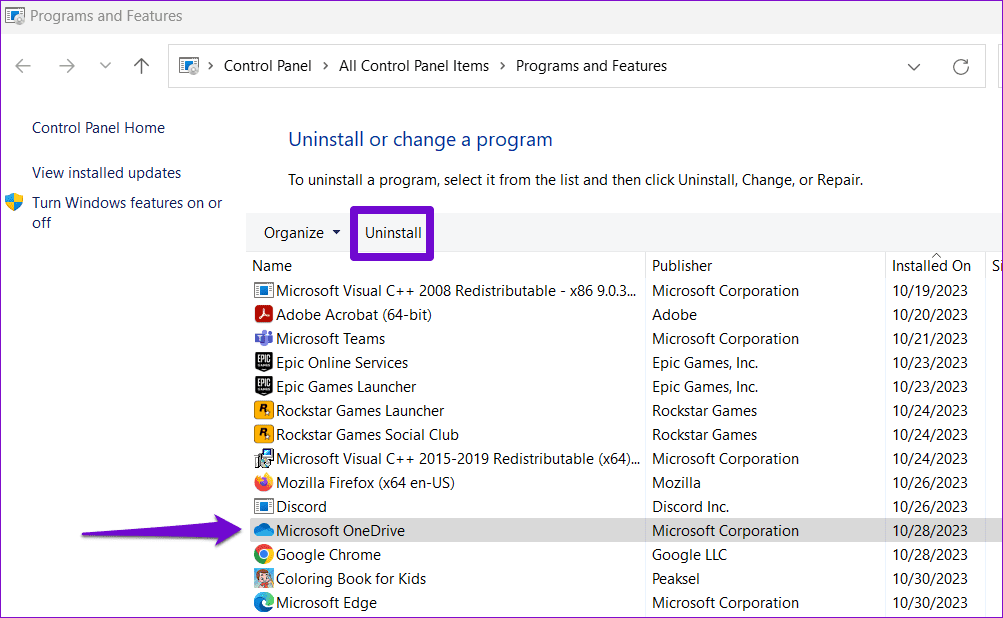
Follow the on-screen prompts to finish removing OneDrive from your PC. After that, use the following link to download and install Microsoft OneDrive again.
Fix 4: Change the Default App Type
Step 1: Right-click on the problematic file type, go to Open with, and select Choose another app.

Step 2: Select an appropriate app from the list and tick the Always use this app to open files checkbox. Then, click OK to save changes.

Fix 5: Modify Advanced System Settings
Step 1: Press the Windows key + S to access the search menu. Type view advanced system settings in the box and press Enter.

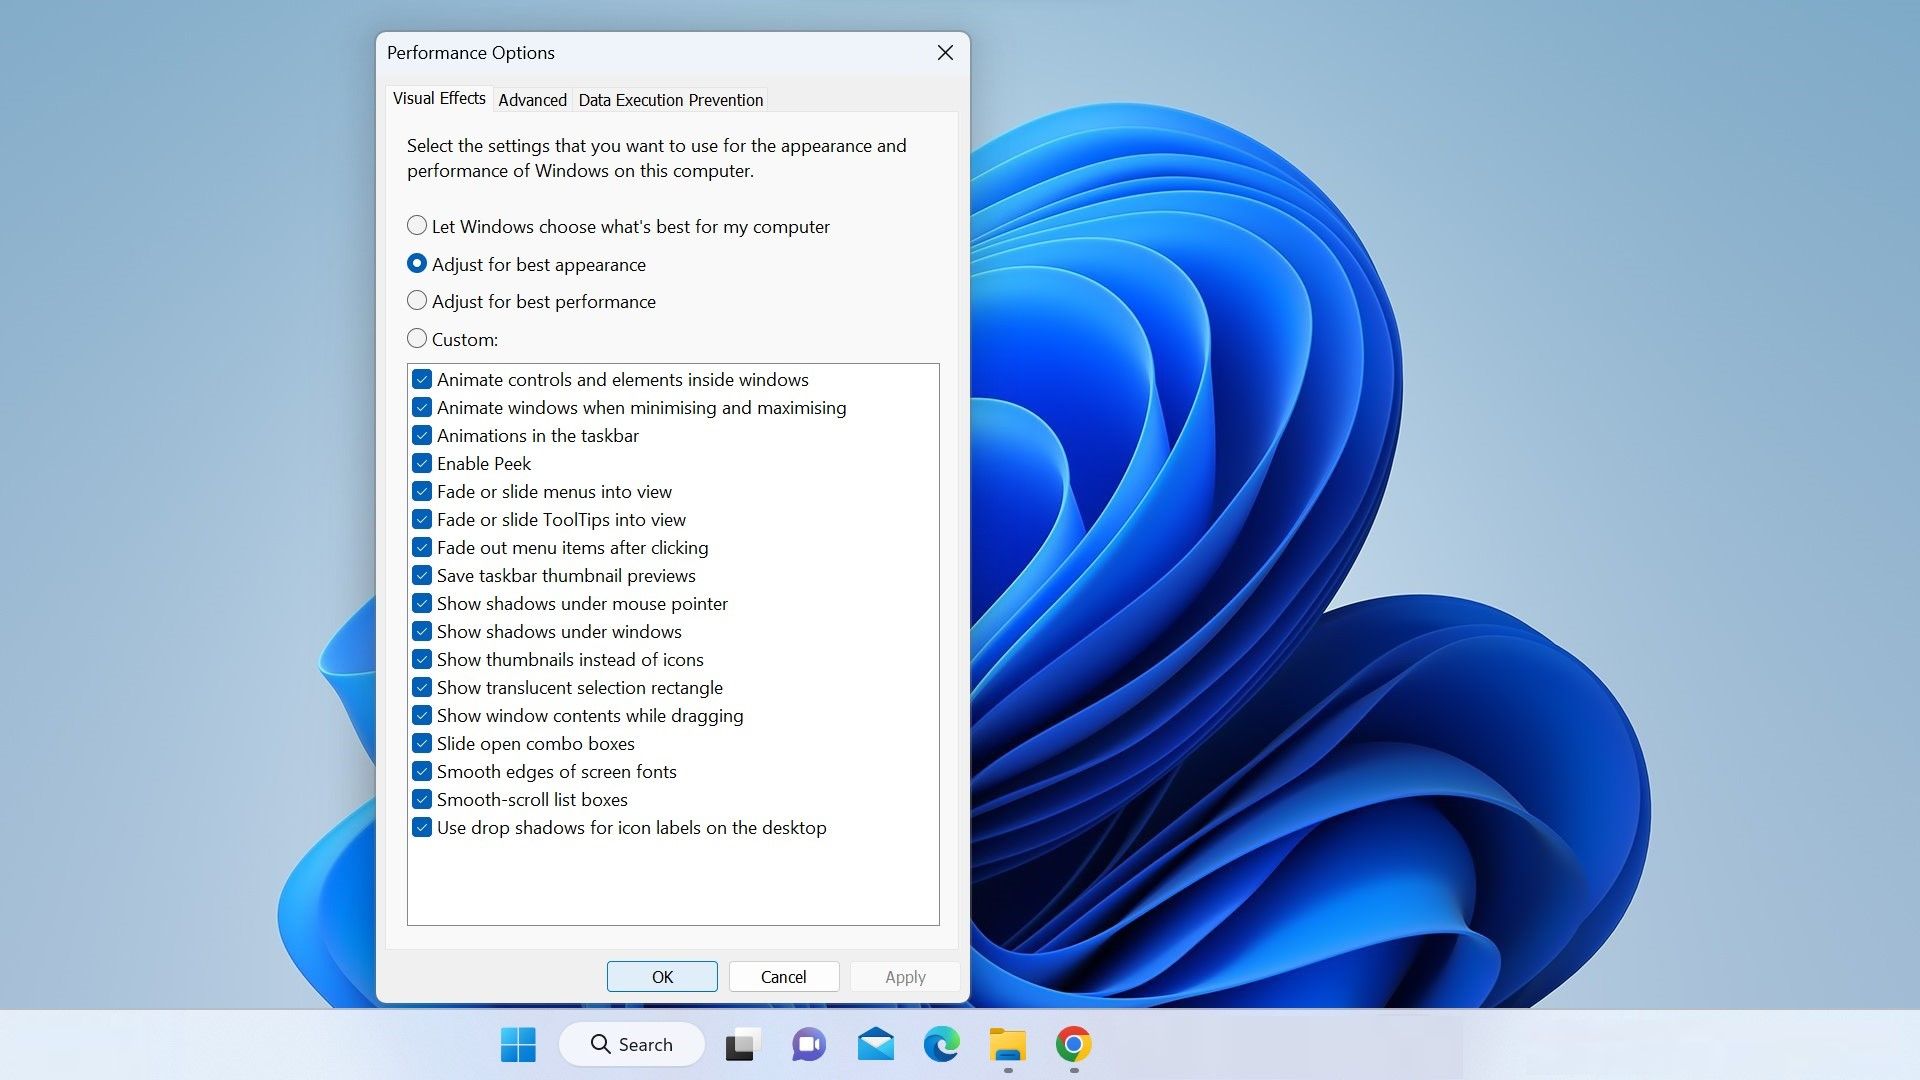
Step 2: In the System Properties window, switch to the Advanced tab and click the Settings button under Performance.

Step 3: Select the Custom option and check the boxes for Save taskbar thumbnail previews and Show thumbnails instead of icons. Then, hit Apply.

Fix 6: Restore File Explorer Options
Step 1: Press the Windows key + S to open the search menu. Type file explorer options in the box and press Enter.
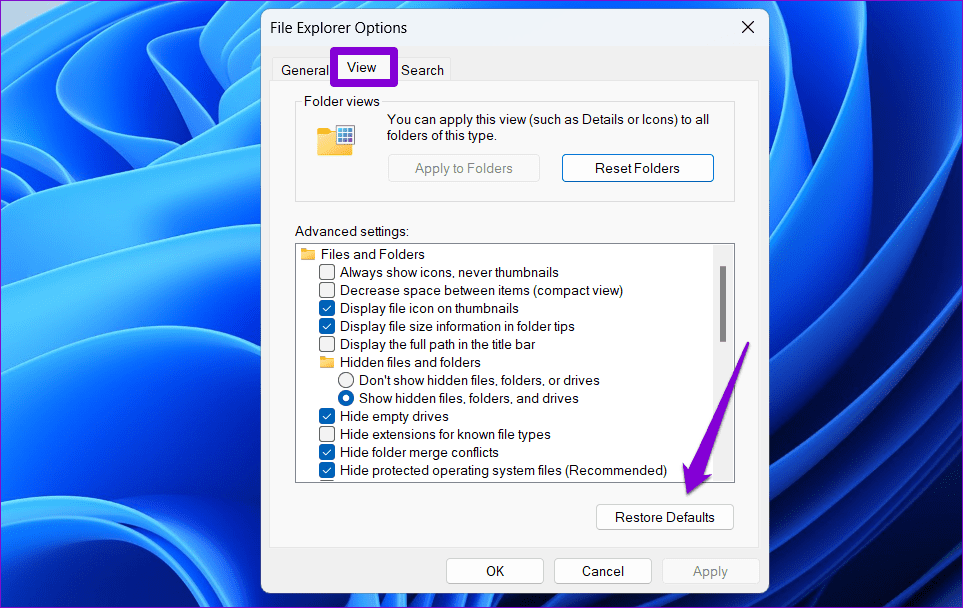
Step 2: Switch to the View tab and click the Restore Defaults button.
Was this helpful?
Thanks for your feedback!
The article above may contain affiliate links which help support Guiding Tech. The content remains unbiased and authentic and will never affect our editorial integrity.
Is your Windows device not showing thumbnails for your files? This issue usually occurs when you accidentally turn off thumbnails and instruct your device to always display icons. Other potential causes include making the icon size too small, changing the view style, running out of disk space, issues with File Explorer, and interference caused by third-party apps and the thumbnail cache.
If you don’t see thumbnails on Windows 11, don’t worry. We will cover possible solutions and checks that you can apply to restore thumbnails.
1. Allow Thumbnails to Load Properly
Thumbnails don’t require a lot of processing power to load. However, if you open a folder with thousands of files, thumbnails may take some time to load. If you open a file from that folder before the thumbnails have rendered correctly, it could affect other files in the folder whose thumbnails have not yet loaded.
Because of that, if thumbnails fail to load in a folder containing many files or if you’ve opened files in the middle of the thumbnail loading process, which could have affected thumbnails for some files, you should close that folder and reopen it. This time, wait until the thumbnails load successfully.
2. Ensure Thumbnails Are Enabled
Windows lets users permanently disable thumbnails and replace them with icons. This is sometimes the default setting in some Windows devices. If you have recently reset the File Explorer settings to default or suspect the thumbnails might be disabled, follow these steps to enable them:
- Open File Explorer.
-
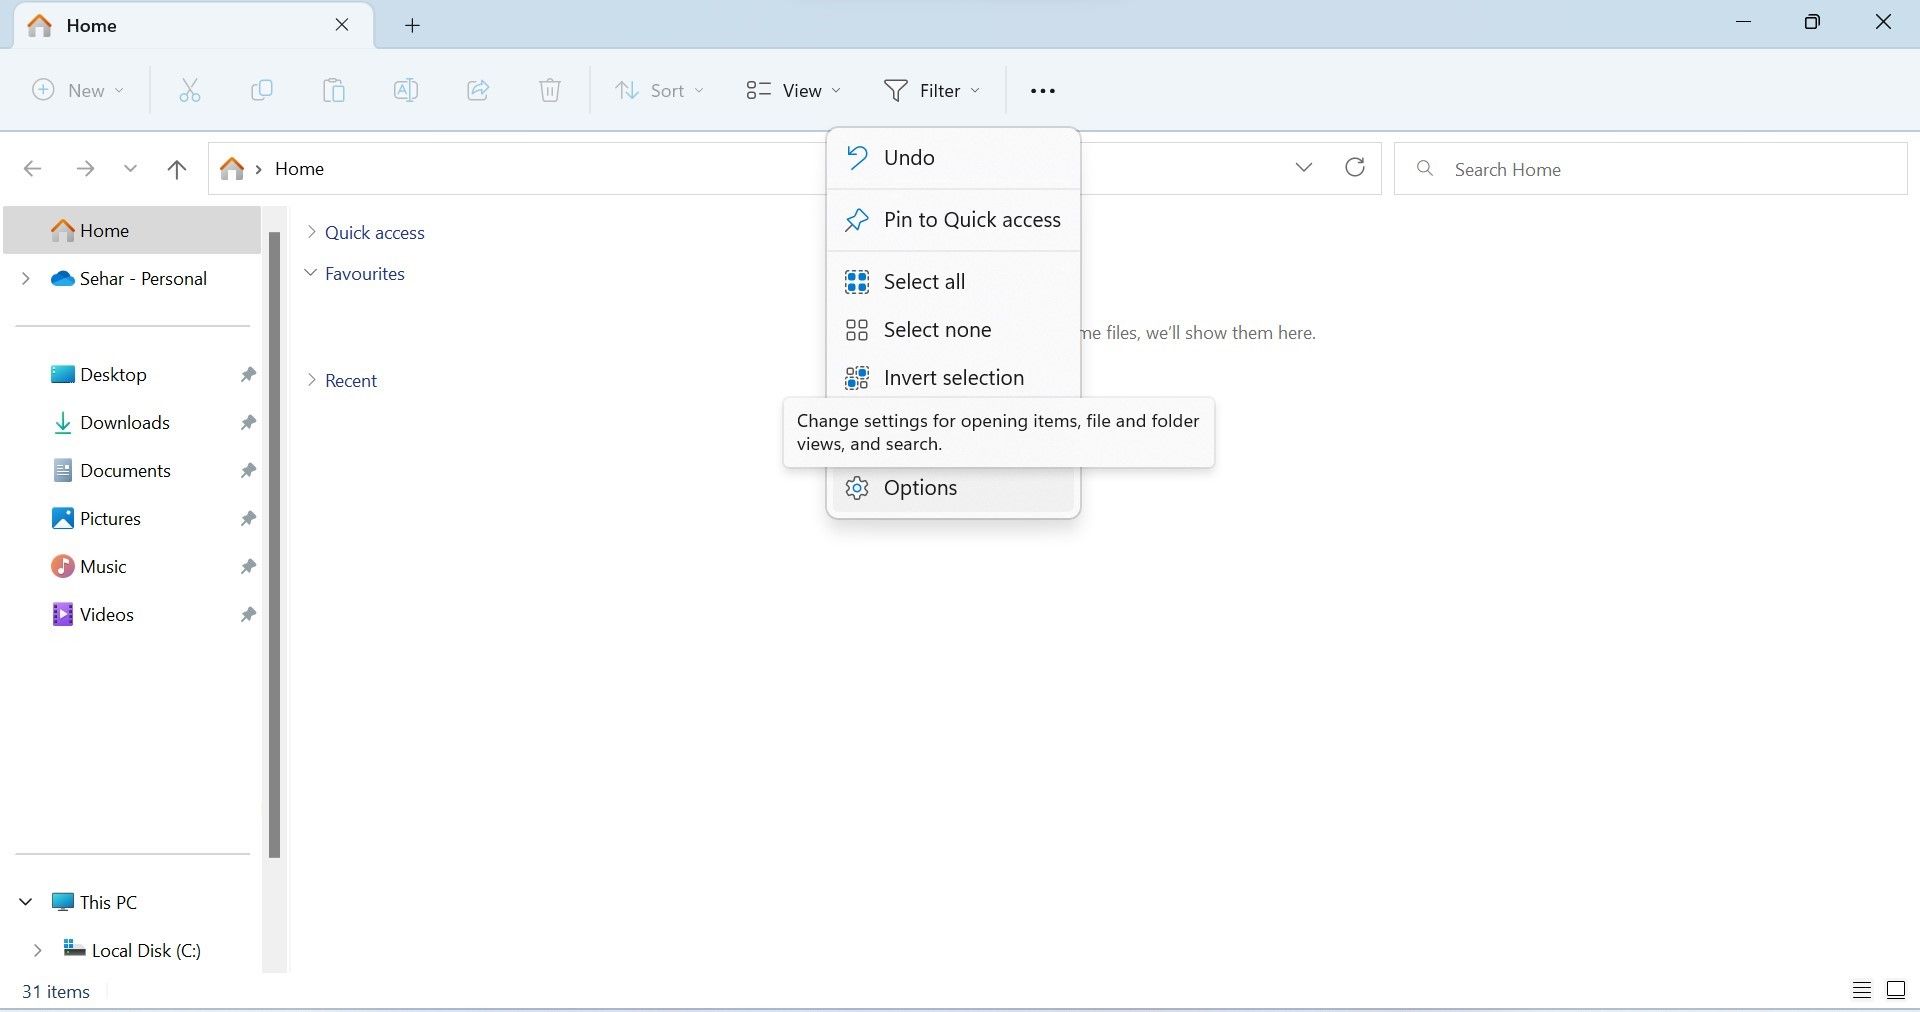
Click on three horizontal dots at the right end of the ribbon tabs and then choose Options from the menu.

- In the Folder Options window, uncheck the box beside Always show icons, never thumbnails (if it’s checked).
-
Click Apply and hit Ok.

3. Change Icon Size and View Style
If thumbnails are enabled in the Folder Options settings, check the icon size and view style of your files and folders. When the icon size is set to small or if you change the view style to lists or details, Windows does not show thumbnails.
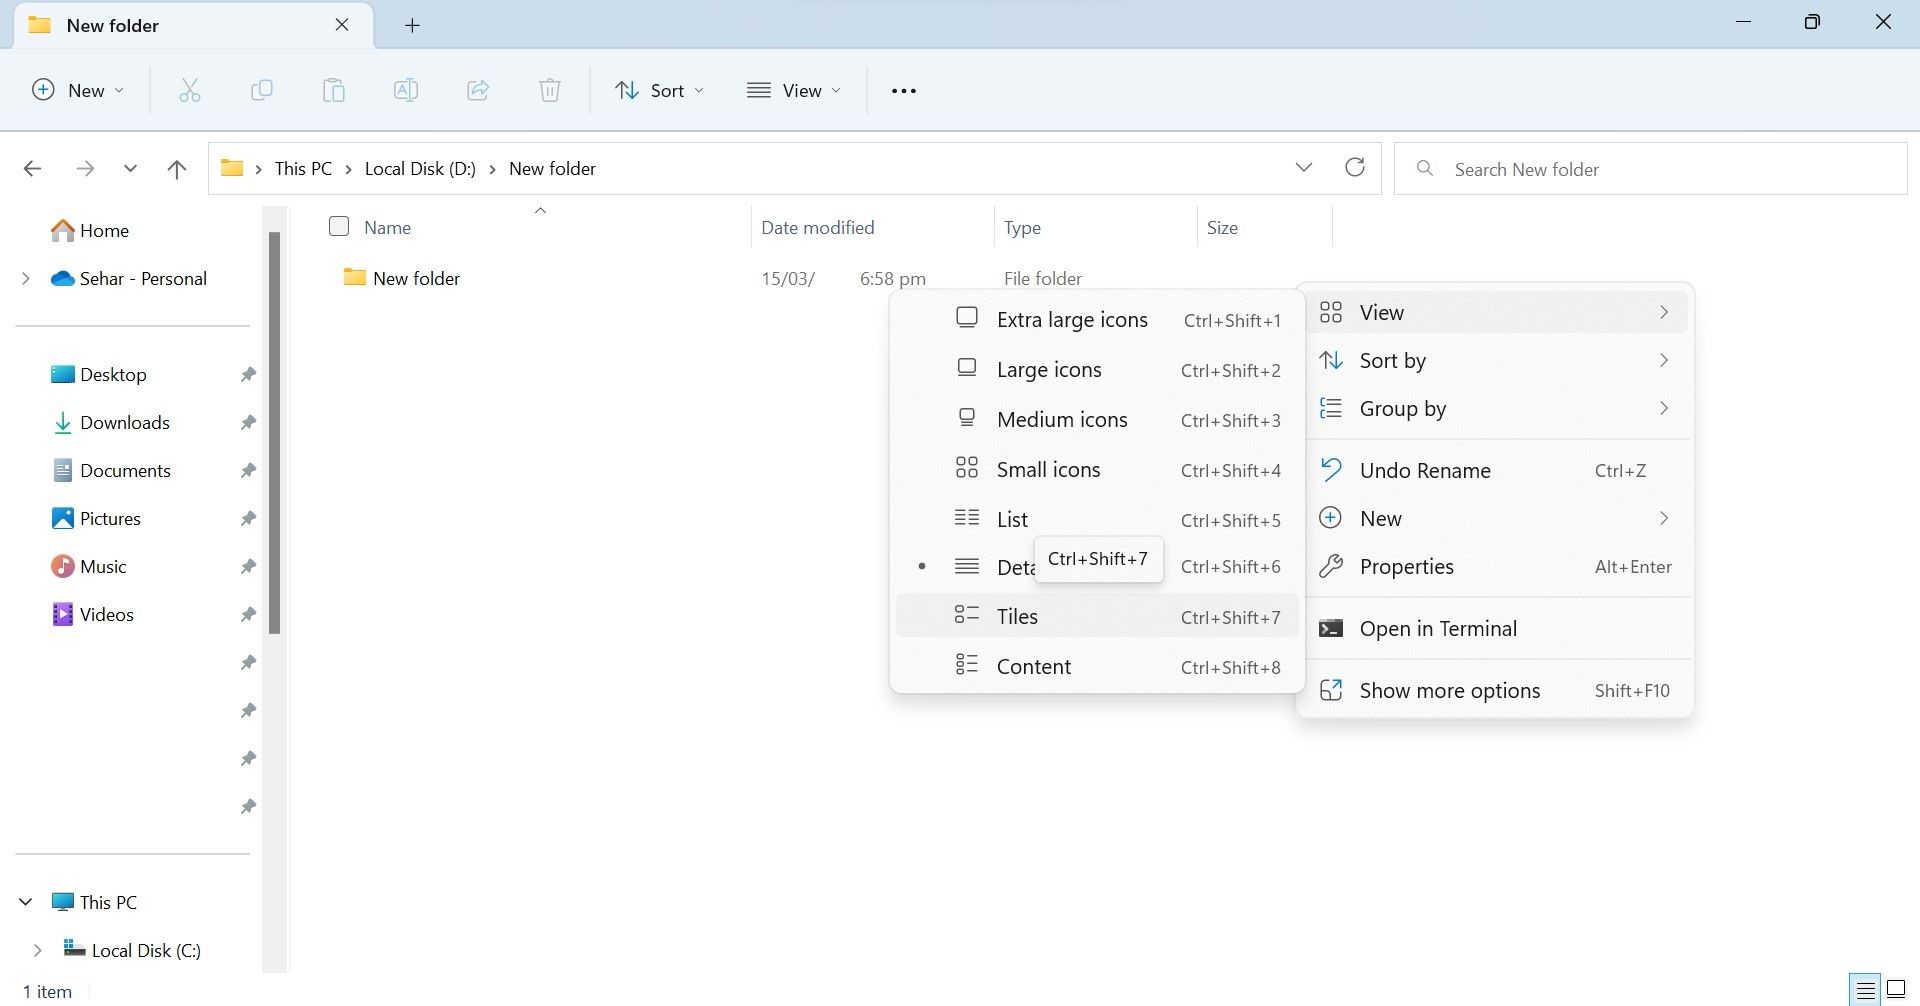
To change the icon size, right-click in the folder where thumbnails aren’t showing up, navigate to View, and select any size other than Small icons.
If changing the icon size doesn’t make a difference, change the view style by right-clicking in the same folder, navigating to View, and selecting Tiles or Content.
4. Check for Files or Format Specific Issues
There are some file types and image file formats for which Windows does not display thumbnails by default. For instance, Windows doesn’t show thumbnails for files in the Photoshop Document (PSD) format, a format used for images created with Adobe Photoshop, which is a graphics design and image editing software.
If you are unable to see thumbnails of files in a specific format, check whether Windows can display thumbnail previews for files in that format or not. You can explore that on the official website of the software you use to create these files. If the website says that Windows OS cannot display thumbnail previews for this software’s files, there isn’t much you can do.
Sometimes, users have to manually enable thumbnail previews in the software settings. Check if the software you use offers such a feature, and if it does, enable it, and you’ll begin to see thumbnails for that software’s files. However, if the software does not offer this feature, you will have to use third-party file managers to see thumbnails for its files.
5. Close Interfering Apps
Using third-party apps lets users preview thumbnails for file formats that Windows don’t natively support. However, these third-party apps can interfere with the basic functionality of Windows’ features, causing many of them to stop working.
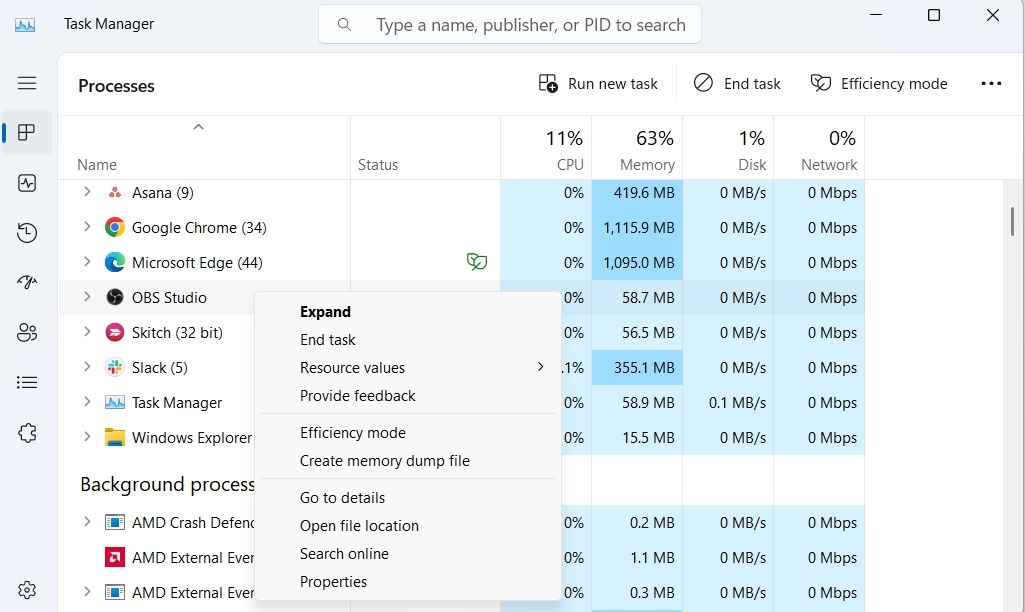
If you have started experiencing thumbnail issues after installing such an app, you should disable it. Closing the app alone will not be enough; you will also have to close its associated background processes from the Task Manager.
To close such an app and all associated processes, right-click the Start button and open Task Manager. Look for processes that seem to be relevant to that app. When you find them, right-click on each of them and click End task.
6. Rebuild the Thumbnail Cache
By using the thumbnail cache, Windows displays thumbnail images of files so that you can visually identify them. If cache files become corrupted, thumbnails can get affected. Clearing the thumbnail cache instructs Windows to rebuild the cache, which usually resolves thumbnail issues.
So, if you haven’t cleared it yet, clear the thumbnail cache and restart your device so Windows can rebuild it.
7. Restart File Explorer
Restarting File Explorer is usually enough to fix most issues with icons, navigation panes, ribbons, tabs, and everything related. If you have not restarted File Explorer yet, you should; it may help you resolve the thumbnail issue. To restart File Explorer, open Task Manager, locate the File Explorer (or Windows Explorer) process, right-click on it, and click Restart.
8. Enable Thumbnail Preview From Visual Effects
Visual effects help you customize the appearance of your device’s display and optimize it to get the best performance. You can also choose to have Windows adjust the visual effects based on your preference.
If you opt to have Windows optimize the visual effects for the best performance, it may disable some of these effects. If it disables thumbnail previews from these visual effects, you won’t see them. To ensure that’s not the case, follow these steps:
-
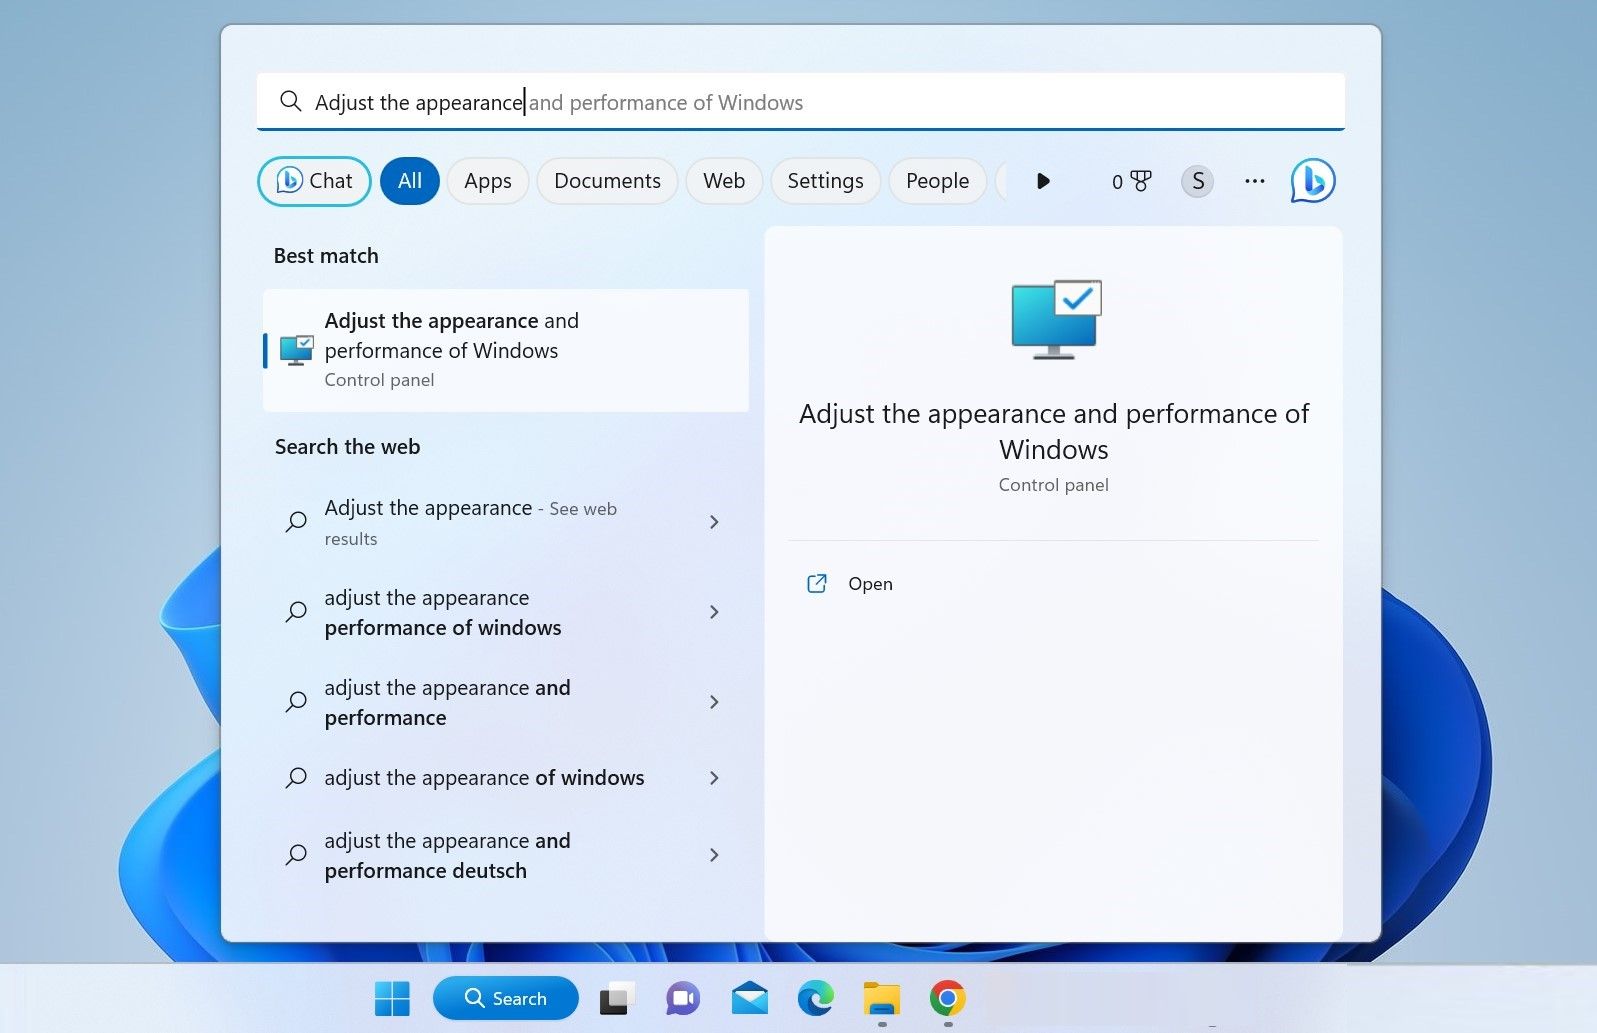
In Windows Search, type «Adjust the appearance» and click on Adjust the appearance and performance of Windows.

- Check the circle beside Adjust for best appearance in the Performance Options window.
-
Then, ensure the box beside Show thumbnails instead of icons is checked.

9. Apply Generic Windows 11 Fixes
Hopefully, one of the fixes listed above will resolve your issue, but if they don’t, try these:
- Ensure that the drive where you are experiencing this issue has enough free storage space. Consider freeing up the storage space if it’s running low.
- Change the default app in Windows 11 for files that don’t have thumbnails.
- Install any pending Windows updates.
Quickly Find Relevant Files Using Thumbnails on Windows 11
When a folder contains hundreds of images without proper names, finding the desired ones without seeing thumbnails can be difficult. Hopefully, the above fixes will resolve the issue and restore thumbnails, making finding files more manageable. If you still have trouble viewing thumbnails, try any File Explorer alternatives for better file management.
Did Windows 11 folder thumbnails not showing or have a question on mind, how to enable Thumbnail Previews in File Explorer in Windows 11? After Upgrade Windows 11 number of users report, the folder is not previewing the thumbnail of images inside, have to open each folder to see what’s inside. Some others report, picture thumbnails not showing Windows 11. Here in this article, we look at the reason why picture thumbnails not showing on Windows 11 and how to fix this problem.
Contents
- 1 Why is the thumbnail preview not showing?
- 1.1 Install windows update
- 1.2 Enable Thumbnail Previews in File Explorer
- 1.3 Change the default App type
- 1.4 Scan for Corrupt System Files
- 1.5 Reset Folder on Windows 11
- 1.6 Clear the Thumbnail Cache
- 1.7 Retrieve Thumbnail Images Freshly
Why is the thumbnail preview not showing?
A thumbnail is a small image representation of a larger image. Sometimes Windows stop showing thumbnail previews for different reasons, it could be due to some corrupt system files. The thumbnail cache may have become full with temporary files which act like junk and hide the preview or the option is disabled for thumbnail preview. Apart from all these reasons, it may be some random bug hide the thumbnail preview for pictures or folders and that requires a fix.
Quick fix: Restart Windows 11 PC refreshes the OS and clear temporary glitches that may present on your device and prevent display thumbnail preview. After your computer restarts visit the folder in which your images are present. Check if the thumbnail view of the image file is showing or not.
Install windows update
Microsoft regularly releases Windows updates with security improvements and various bug fixes. And may the latest Windows update be bundled with a fix for this problem of thumbnail preview not showing on Windows 11. Let’s check if there is any pending software update that you missed out on.
To check for an update,
- Press Windows + I to get to the settings page.
- Then on the left-hand panel click on Windows Update.
- Next, click on Check for Updates.
- If Pending windows updates are there, click on the option Download Now to get the update installed on your computer.
- Once done, you need to restart your PC to apply them
If it was a bug in the system not making the thumbnail to be visible, then it should be fixed now. Check your image files.
Enable Thumbnail Previews in File Explorer
There is an option to enable thumbnail view of images on your computer. Let’s check if this option is enabled or not.
- Press Windows key + S, type file explorer options and select the first result,
- When the file explorer options dialog box opens, move to the view tab,
- Here Look at the option Always Show Icon, Never Thumbnails.
- If it has been check-marked, then click and uncheck the option so that the thumbnail is visible.
- Click apply and check the image thumbnail will be visible for sure.
Change the default App type
If you notice thumbnail preview for a few file types only, in such case you need to change the default app type following the steps below.
- First navigate to the file which the thumbnail is not showing, Right-click on it and select open from the context menu,
- Now, click on Choose another app option and choose a different application and tick the box next to Always use this app to open files.
- Tap OK and the changes will be saved.
Scan for Corrupt System Files
There are chances due to some reason system file is corrupted and as a result, thumbnail preview not showing for images on Windows 11. In such cases, run DISM and SFC commands that repair the system image and look for and replace corrupted system files with the correct ones.
- Press Windows key + S type cmd, now right-click on the command prompt and select run as administrator,
- First, run the DISM command DISM /Online /Cleanup-Image /RestoreHealth
- Let the scanning process complete 100%, it may take a few minutes to hours,
- Next, run the command sfc /scannow this will scan your computer for corrupted system files if found the utility automatically replaces them with the correct one.
- Wait for the process to finish. The system will search for possible corrupt files and fix them automatically,
Running DISM and SFC commands will fix the corrupt files by replacing them with proper files from Microsoft’s web servers
Reset Folder on Windows 11
If there are any unusual changes to file explorer or you have installed any third-party app related to file explorer that may have affected the files on your computer. And that led to the thumbnails not showing the photos. Let’s reset the folders in File Explorer and make the settings default.
- Press Windows key + S, type file explorer options then select the first result,
- Once the File Explorer Options dialog box opens, click on the View tab
- Next, click on the Reset folders option then Restore defaults
- Now reboot your PC and check if the Windows 11 folder thumbnails not showing issue is resolved.
Clear the Thumbnail Cache
Still need help, let’s clear the thumbnail cache to remove the temporary data accumulated over time. To do so,
- Open command prompt as administrator,
- First, run the command taskkill /f /im explorer.exe
- Next run the command del /f /s /q /a %LocalAppData%\Microsoft\Windows\Explorer\thumbcache_*.db
- The above command will delete the existing thumbnail and icon cache.
- Again, run command explorer.exe to restart the File Explorer
Reboot your PC and check Now, you should be able to see the thumbnail of the photos.
Retrieve Thumbnail Images Freshly
Also, you can use the Disk Cleanup tool to remove the existing thumbnails and regenerate the thumbnail images freshly. It’s quite easy to do.
- Press Windows key + S, type disk cleanup and press enter key,
- Select drive C: and then click ok to start the disk cleanup process,
- Under the Files to Delete section, checkmark the box beside Thumbnails.
- Click OK to proceed.
So, that’s it. Use any of the above troubleshooting methods and you will be able to view the thumbnail image preview of all photos on your computer.
Also read:
- 3 Tips to Get the Most Out of Your Thumbnails
- Fix Windows Explorer has Stopped Working on Windows 10
- Windows 11 File Explorer Not Working? Apply these 7 solutions
- Fix windows explorer stopped working, Keeps Restarting and Crashing
- Solved: Windows Explorer Keep Crashing Or Stopped working
Thumbnails play a crucial role in recognizing an image or video beforehand playing it. Almost all users prefer using thumbnails over displaying images as icons. So, when thumbnail previews stop showing or not displaying, it is quite worrisome to all. In this post, we will look into the reasons behind this problem along with eight potential fixes.
Thumbnails appear blank mostly when there are some internal issues within the File Explorer settings. Configuring folder view options or restoring Explorer to its default resolves this issue. In rare cases, where you transfer images from an iPhone to Windows, the thumbnail previews also fail. This is primarily because of the fact Windows doesn’t support the HEIC file format. Download and install the right codec and this problem will be resolved on your computer.
Though there is a lesser possibility of this, this could also be the work of infected files and folders (malware attack). Run your default antivirus and get rid of this possibility first.
Thumbnail Previews Not showing, what causes this?
Thumbnails give a fair idea of what an image or video is really about. When a picture is not showing its thumbnail, this could be because of the following reasons –
- Relevant codecs are not installed in Windows.
- File Explorer has corrupted somehow.
- The default photo viewing application is corrupt or outdated.
- Issues within the folder containing the images.
There could be a few other reasons as well which we have explained while outlining the right fixes to this problem.
Fix the Thumbnail Preview Not Showing in Windows 11
If thumbnail previews are not appearing inside Windows 11, attempt the below fixes and get this problem resolved.
1. Install the Supporting Codecs
Windows 11 doesn’t support certain file formats of images like HEIC photos taken from iPhone. This is because the supporting codecs are not installed on Windows by default. Right-click on an image and select Properties. Check what’s written next to “Type of file”. If this file format is not supported on Windows 11, you need to download and install the relevant codecs.
To view HEIC photos in Windows, you need to install HEIC Image Extensions from Microsoft Store. Similarly, if you can see video previews, get the supporting codecs of that particular video format.
2. Check Folder View Options
You face this problem mostly when viewing photos or videos inside File Explorer. Well, there’s a way by which you can check and modify Folder View Options. Follow the below instructions and make Thumbnails appear on your Windows 11 PC –
- Press Win + S and type “File Explorer options” in the search bar.
- Click on the top result to enter the “File Explorer options” window.
- Go to the View tab, and uncheck the box – “Always show icons, never thumbnails“.
- Click Apply and then OK to confirm the recent changes.
Go back to the folder where thumbnail previews were not appearing. You must be able to see the thumbnails now on your Windows 11 PC.
3. Restore File Explorer to its default settings
If you are still not seeing the thumbnail previews inside a folder, reset File Explorer to its default settings. Restoring the default settings on Windows Explorer will get rid of any internal glitches or issues. And, thus you can preview images or videos correctly on your Windows PC. Here’s how to perform this task –
- In the Search window, type “File Explorer Options”.
- Click on the well-matching result.
- When it launches, go to the View tab, and click Restore defaults. See the Snapshot below –
- Click Apply > OK to confirm this action of yours.
Now, check if can see images or video thumbnails inside your folder.
4. Change the default App opening Photos
“Photos” is the default application in Windows 11 to view any images, pictures, or screenshots saved on your PC. When this system app gets corrupted somehow, this may also stop previewing images or videos inside a folder. Change this default app to something like “Paint” or an app downloaded from the Microsoft Store, and you will find thumbnails showing again.
To change the default photo viewing application on Windows 11, do the following –
- Right-click on any image and choose the option – “Open with“.
- Select Paint or any other app downloaded from the Microsoft Store.
- If an application that you would like to make the default app is not appearing in the context menu, select Choose another app.
- You will see a few more apps that can open images.
- Select your preferred application, and tick the box – “Always use this app to open .png files“.
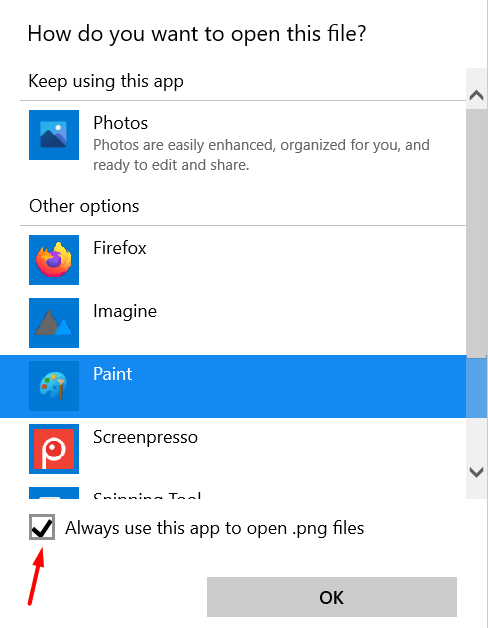
- Finally, click OK to confirm the recent changes on your computer.
- From now onward, whenever you double-click on an image, the image will open in the chosen application.
Note: Doing this will only change the default image viewing app for pictures bearing .png file format. All other images that vary in file extension will continue to open with the default app i.e. “Photos”. If you want all images open in your preferred app, you need to repeat the above process for all image file formats like JPEG, JPG, etc.
5. Get rid of the Thumbnail Cache
Thumbnails may also stop appearing inside a folder when the thumbnail cache grows in size and reaches its maximum permissible limit. Even in cases where it isn’t that huge, getting thumbnails of a huge database can sometimes be tricky and hence the problem arises.
Delete the stored thumbnail cache on your computer, and you will all other images and videos’ thumbnails showing just fine. Here’s how to get rid of the stored thumbnail cache on Windows 11 –
- Press Win + I to launch the Settings app.
- Go to System > Storage and click on Temporary Files.
- Tick the box left of “Thumbnails”, and hit Remove files.

- The system will take some time to delete the stored thumbnails, depending on how big is the stored cache.
After you see the thumbnails revert to 0 MB in size, restart your PC. From the next logon, the system will generate the thumbnails automatically.
Where does Windows store the thumbnail cache?
Starting from Windows Vista, Windows keeps all the thumbnail image data at a specific location. It is because of this cache, you see thumbnails of images regardless of which folder you open. Keeping things this way, your operating system indeed works a little faster.
6. Restart Windows Explorer
The “thumbnails not showing” issue might also appear when the file explorer has been corrupted somehow. Since you can never be sure of that, force-restart Windows Explorer and check if the thumbnails start appearing next. Here’s how to perform this task –
- Use Ctrl + Shift + Esc to launch Task Manager.
- Click More Details, if the task manager doesn’t open fully.
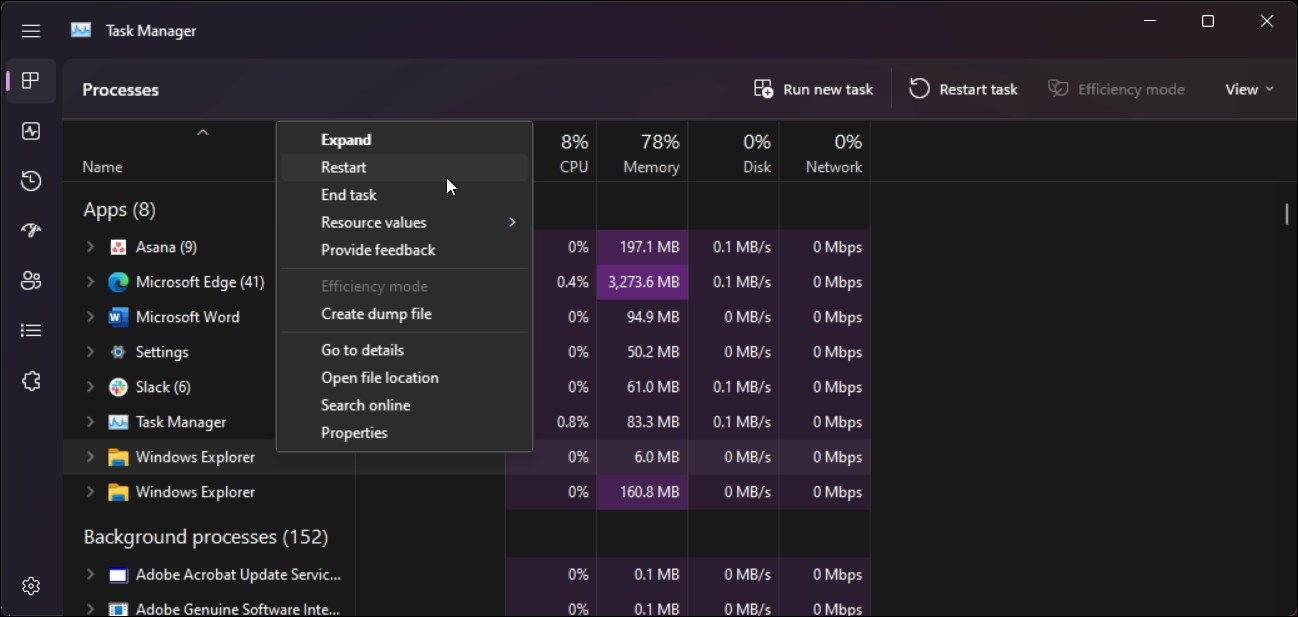
- Go to the Processes tab and scroll down to Windows Explorer.
- If File Explorer is running, you will find it under Apps, otherwise the same will appear under Windows processes (at the end).
- Right-click on Windows Explorer and select the Restart button.
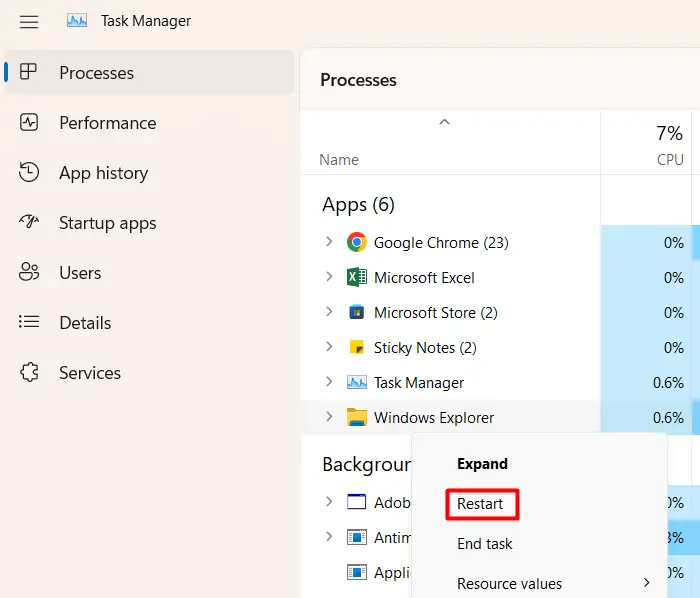
- File Explorer is associated with the taskbar and a few other processes. So, while it is restarting, you won’t be able to do anything on your PC. Wait for a few seconds, and you will get back the Windows Explorer.
- Close the task manager window and check if you can now see the image or video thumbnails on your PC.
In case you are still not seeing any thumbnails, follow the next set of solutions discussed below.
7. Update the Graphics Drivers
If you haven’t updated the graphics drivers for a long time, this may cause unwarranted issues like Thumbnail previews not showing. Update the graphics drivers on your PC by following the below steps and check if the problem resolves this way.
- Press Win + X, and choose Device Manager.
- When Device Manager opens up, click the “>” icon left of Display adapters.
- Right-click on the graphic driver present inside and select Update device.

- Click “Search automatically for drivers online” and wait for some time.
- These days, it is very rare to get driver updates this way. In most cases, you will be asked to visit Windows Update and check for updates again.
- Click on the available prompt and you will be redirected to Windows Update.
- Wait for a few minutes while the system is checking for driver updates online.
- If the system does get any graphic driver updates, you will see a link to optional updates.
- Click on this link, tick all the checkboxes, and hit Download & Install.

After the optional updates are installed, restart your PC. When Windows 11 reloads, check if the image thumbnails start appearing inside your folder.
8. Perform a Full Scan using Windows Security
The presence of viruses or malware inside your system might also result in non-displaying thumbnails. Since this problem has not yet been resolved, perform a full scan on your Windows PC using the default antivirus. If you are using some third-party antivirus, you may use that as well.
In the event of your antivirus finding some trojan files or other viruses, you should also run the System File Checker tool. This is an in-built tool on Windows developed to automatically scan and repair missing or damaged system files on your PC. Here’s how to initiate an SFC scan –
- Right-click on the Windows icon and select Windows Terminal (Admin).
- When the UAC window prompts, hit Yes to authorize opening the terminal.
- Type the following inside the terminal and press Enter –
sfc /scannow
- Wait for the next 10-15 minutes as the scanning/repairing process takes around this much time.
- Once it is over, run the DISM command as provided below –
DISM /Online /Cleanup-Image /RestoreHealth

- The DISM command will check and resolve any corruption inside the system image.
- After you run both these tools successfully, restart your PC.
Sign back into your device and check if the thumbnails are appearing as they normally do. I hope the images and video thumbnails are back to normal after applying the above fixes. The thumbnail gives a fair idea of what an image or a video is really about, so it is worth solving this problem on a Windows PC.
Одним из самых разочаровывающих изменений в Windows 11 стал отказ от иконок папок в «Проводнике», отображающих превью содержимого в них. Вероятно, Microsoft отказалась от этой полезной опции в угоду новому дизайнерскому стилю. Как бы там ни было, энтузиаст разработал собственную утилиту Windows Thumbnail Generator с открытым исходным кодом, которая исправляют эту проблему.
- В тему: Всё о Windows 11 — секреты, инструкции, лайфхаки и полезные статьи
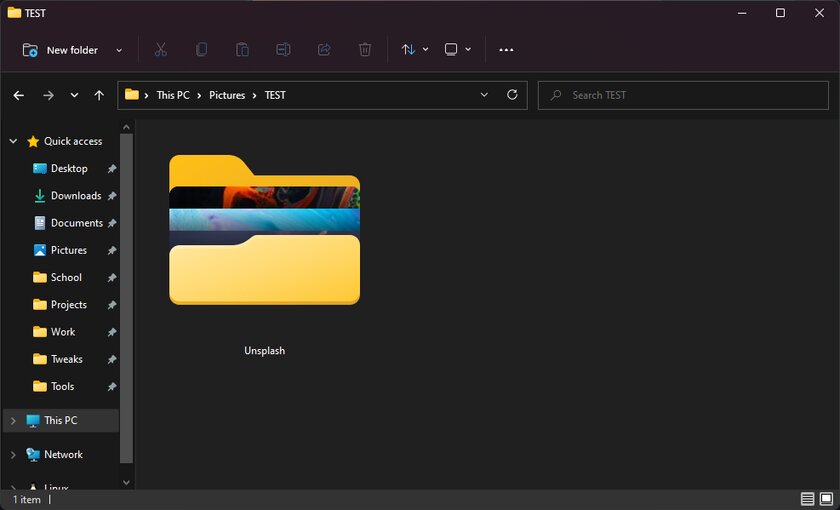
Написанная на C# программа использует ImageMagick (библиотека Magick.NET) для генерирования ярлыков с миниатюрами файлов, находящихся в папке. На данный момент утилита ограничена только мультимедийными форматами (JPG, PNG, MP4, MOV и прочими), поскольку другие типы файлов (документы, таблицы и подобные) имеют вертикальное отображение — оно не подходит под текущую реализацию.

Windows Thumbnail Generator работает крайне просто: пользователю нужно лишь открыть утилиту, выбрать нужную папку, указать порядок (обычный или обратный) и нажать на «Старт». Программа автоматически сгенерирует ярлык папки с миниатюрами и заменит исходную иконку на новую. Разработчик отметил, что изначально он создал эту утилиту для себя, но решил поделиться со всеми — он рассчитывает только на конструктивную критику.