
Все способы:
- Способ 1: Проверка служб
- Способ 2: Переустановка драйверов
- Способ 3: Проверка на вирусы
- Способ 4: Магазин Виндовс
- Вопросы и ответы: 9
Для корректной работы видеокарты необходимо не только установить драйвера, но и произвести соответствующие настройки. Делается это зачастую в специальных панелях управления, однако случается и так, что последние пропадают из системы. В данной статье мы расскажем о том, что делать при исчезновении элемента «Панель управления NVIDIA» с компьютера или ноутбука, работающего под управлением Windows 10.
Рассматриваемая проблема в подавляющем большинстве случаев возникает по двум причинам – из-за ошибок в работе программного обеспечения NVIDIA или же в результате системного сбоя.
Способ 1: Проверка служб
Для корректной работы всех компонентов NVIDIA, и панели управления в том числе, необходимы специальные службы. Они должны быть активными, однако из-за системных ошибок иногда отключаются. Для их повторного включения необходимо сделать следующее:
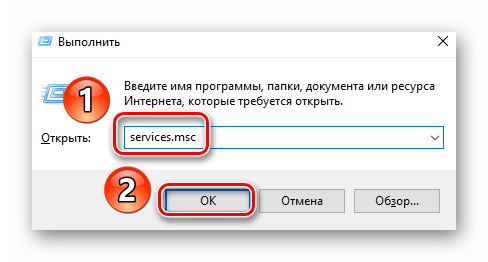
- Используйте комбинацию клавиш «Windows» + «R». Появится окно оснастки «Выполнить». В него введите сочетание
services.msc, после чего нажмите «Enter» на клавиатуре или кнопку «OK» в этом же окне.
Читайте также: Запуск оснастки «Службы» в ОС Windows 10
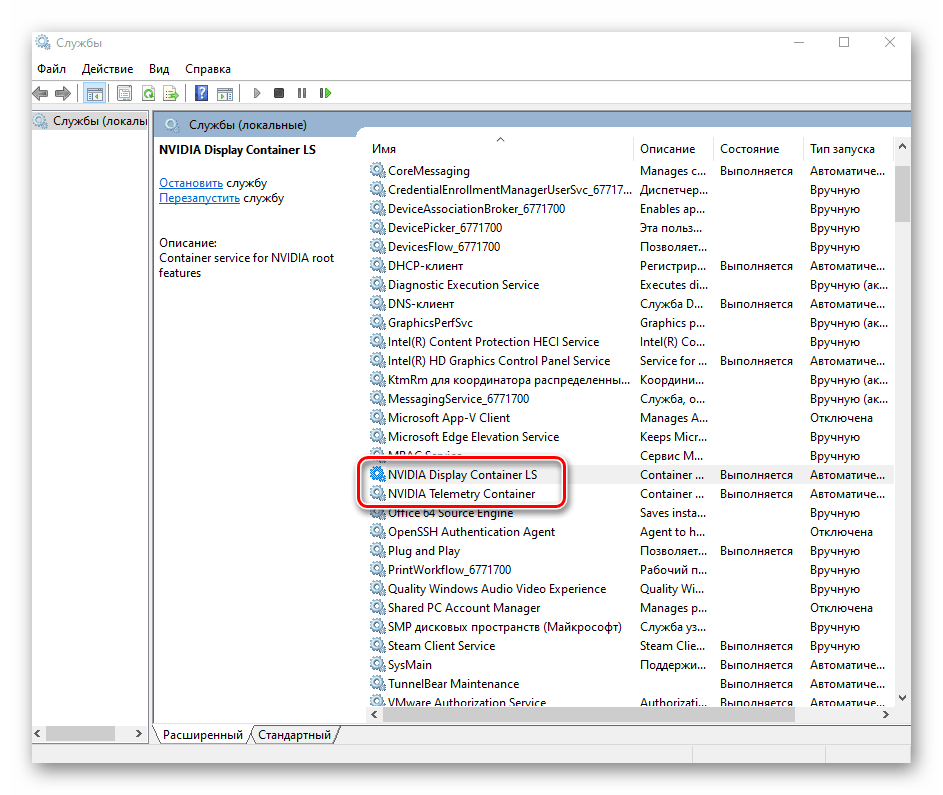
- В открывшемся окне найдите все строки в графе «Имя», которые начинаются со слова «NVIDIA». У вас может быть от одного до четырех пунктов в списке в зависимости от версии установленного драйвера и дополнительных компонентов NVIDIA. Кликните на первом из пунктов два раза левой кнопкой мышки.
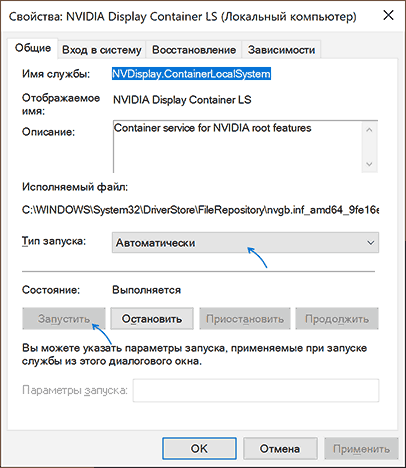
- На следующем этапе следует обратить внимание на состояние службы. Если в нижней части напротив строки стоит значение «Остановлена», нажмите кнопку «Запустить» немного ниже, а затем «OK» для применения изменений.
- Далее выполните аналогичные действия с другими службами NVIDIA. По завершении всех операций обязательно перезагрузите компьютер/ноутбук и проверьте, решилась ли проблема.

Способ 2: Переустановка драйверов
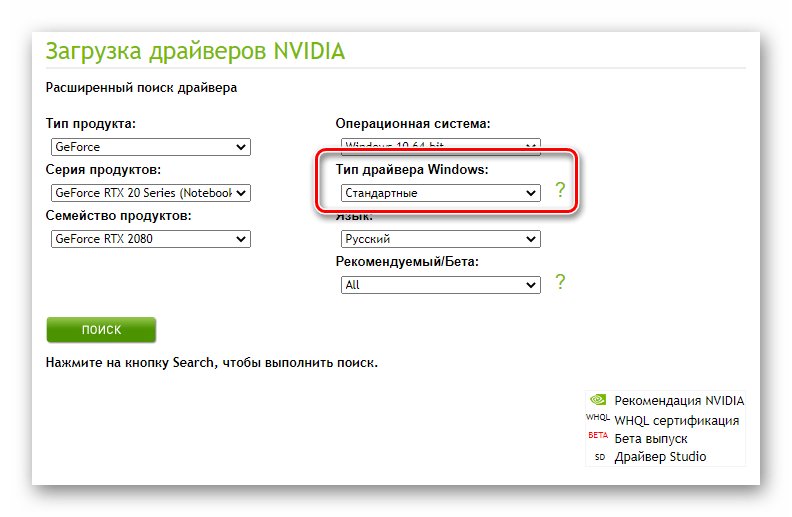
По умолчанию доступ к «Панели управления NVIDIA» появляется после установки соответствующих драйверов. Если по каким-то причинам данная панель пропала, стоит попробовать удалить ПО, а затем повторно его инсталлировать. О том, как это правильно сделать, мы писали ранее в отдельном руководстве. Главное, при загрузке новых драйверов выбирайте стандартное ПО, а не DCH.
Подробнее: Переустановка драйверов видеокарт NVIDIA
Способ 3: Проверка на вирусы
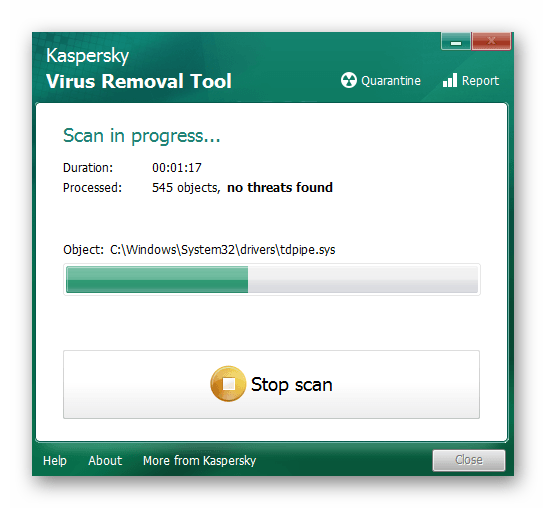
Вредоносное программное обеспечение способно вызвать множество ошибок и проблем, в том числе и отключать «Панель управления NVIDIA». Именно поэтому стоит в подобных ситуациях проверить систему на наличие вирусов, тем более, что для этого совсем не обязательно инсталлировать полноценные антивирусы, так как существуют портативные аналоги, которые хорошо справляются с поставленными задачами. О таких решениях мы рассказывали в одном из опубликованных ранее руководств, с которым вы можете ознакомиться по ссылке ниже.
Подробнее: Проверка системы на наличие вредоносного ПО без антивируса
Способ 4: Магазин Виндовс
Данный способ можно отнести к решениям, к которым стоит прибегнуть в самых крайних ситуациях. Если ни один из вышеперечисленных методов не сработал, попробуйте запустить «Панель управления NVIDIA» непосредственно из встроенного приложения «Microsoft Store», откуда ее тоже можно установить. Для этого сделайте следующее:
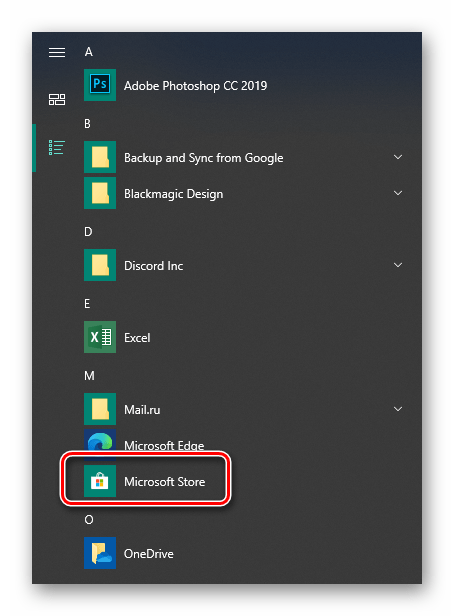
- Нажмите кнопку «Пуск» и выберите в появившемся меню из списка приложений программу «Microsoft Store».
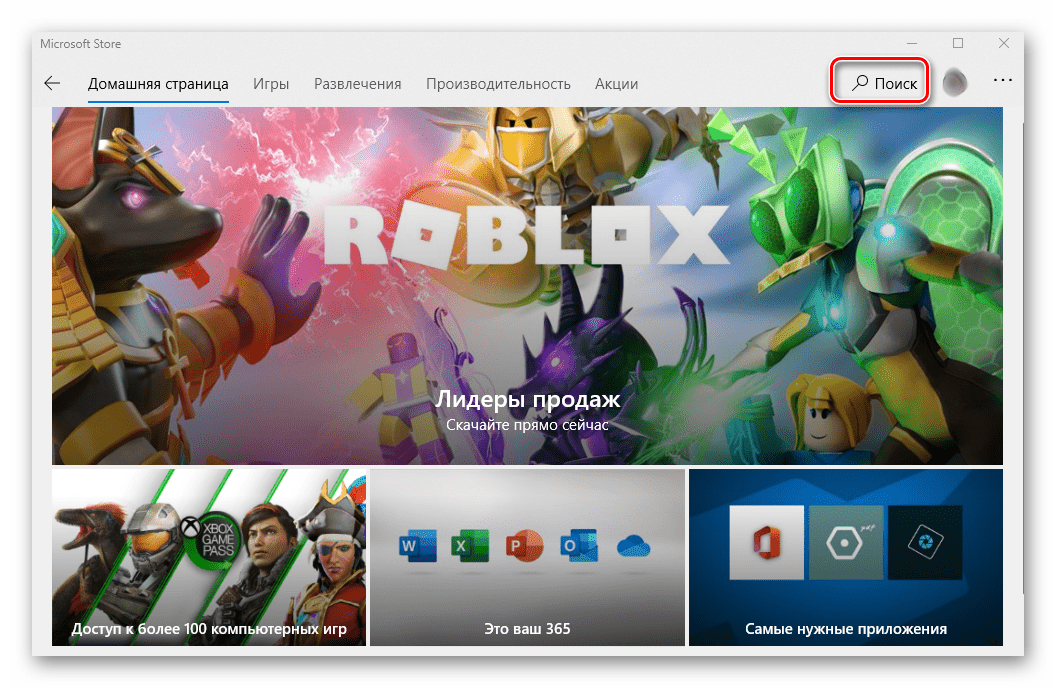
- Далее кликните по иконке поиска в правом верхнем углу и введите в появившуюся строку запрос
nvidia, после чего используйте «Enter» на клавиатуре. - На самом первом месте среди всех результатов поиска вы увидите нужное приложение. Кликните по нему один раз ЛКМ.
- Если в дальнейшем данное приложение не понадобится, вы всегда сможете его удалить.

В следующем окне нажмите кнопку «Получить». В результате программа автоматически начнет загружаться на компьютер. По завершении операции вместо данной надписи появится кнопка «Открыть» — нажмите ее для запуска «Панели управления NVIDIA».

Таким образом, вы узнали об основных методах возвращения «Панели управления NVIDIA» в ОС Windows 10. В качестве заключения хотелось бы напомнить, что в некоторых ситуациях данный элемент может не пропасть, а попросту перестать открываться. Решение этой проблемы мы описывали в отдельном руководстве.
Подробнее: Неполадки в работе Панели управления Nvidia
Наша группа в TelegramПолезные советы и помощь
You want to open your NVIDIA control panel as usual, but this time it’s not successful. It just doesn’t function. You can’t open it now. You must be annoyed and frustrated.
But don’t be worried. We’ve found the answer to this nagging problem.
How do I fix NVIDIA control panel not working or not opening?
Here’re the 3 top effective methods to fix this problem. Work your way down the list until you can open your NVIDIA control panel.
Method 1: Update your NVIDIA display driver
Method 2: Restart your NVIDIA Display Driver service
Method 3: Restart your NVIDIA Control Panel process
Method 1: Update your NVIDIA display driver
It’s very likely your NVIDIA display driver is old or corrupted that makes your control panel not working or not opening. You probably can solve it through updating your NVIDIA display driver.
There are two ways you can get the right NVIDIA display driver: manually or automatically.
Manual driver update – You can update your NVIDIA display driver manually by going to the official NVIDIA website, and searching for the most recent correct driver. Be sure to choose only driver that are compatible with your variant of Windows 10.
Automatic driver update – If you don’t have the time, patience or computer skills to update your NVIDIA display driver manually, you can, instead, do it automatically with Driver Easy. Driver Easy will automatically recognize your system and find the correct driver for your NVIDIA graphics card and your variant of Windows 10, and it will download and install them correctly:
1) Download and install Driver Easy.
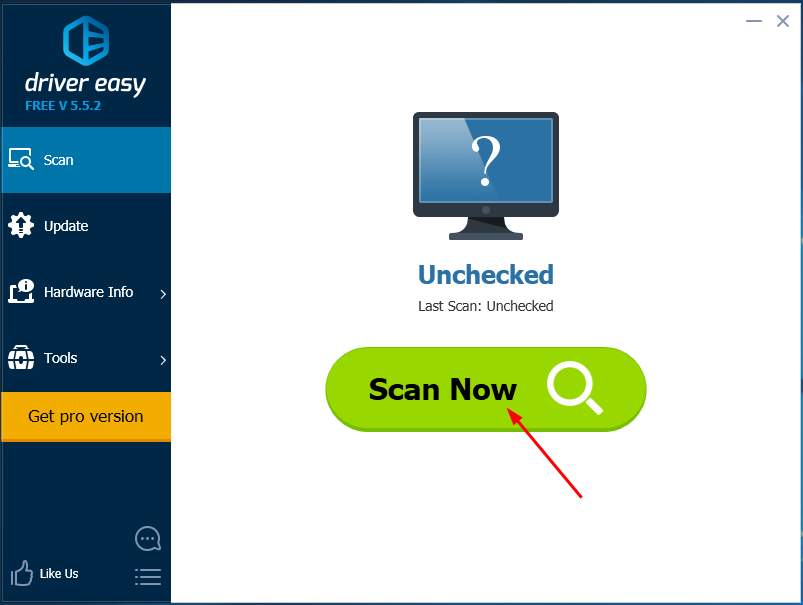
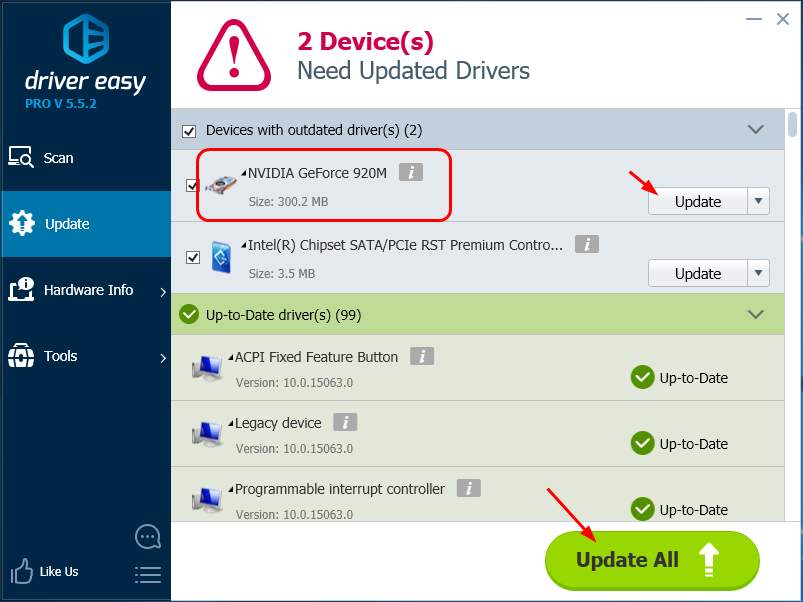
2) Run Driver Easy and click Scan Now. Driver Easy will then scan your computer and detect any problem drivers. You NVIDIA driver is no exception.
3) With Free version: Click the Update button next to a flagged NVIDIA driver to automatically download and install the correct version of this driver.
With Pro version: Click Update All to automatically download and install the correct version of all the drivers that are missing or out of date on your system. (and you get full support and a 30-day money back guarantee)
After updating your driver, please reboot your Windows 10 to make the new driver take effect. Then see if you can open your NVIDIA control panel.
Method 2: Restart your NVIDIA Display Driver service
If the NVIDIA Display Driver service stuck, you cannot open your NVIDIA control panel either.
Follow these to restart your NVIDIA Display Driver service:
1) On your keyboard, press the Windows logo key and R (at the same time) to invoke the Run box.
2) Type services.msc and click OK.
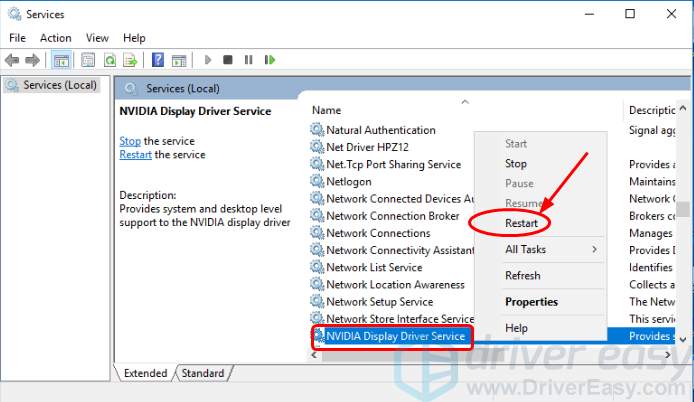
3) Find and right-click on the NVIDIA Display Driver service. Then select Restart. If there’s no Restart option, click Start instead.
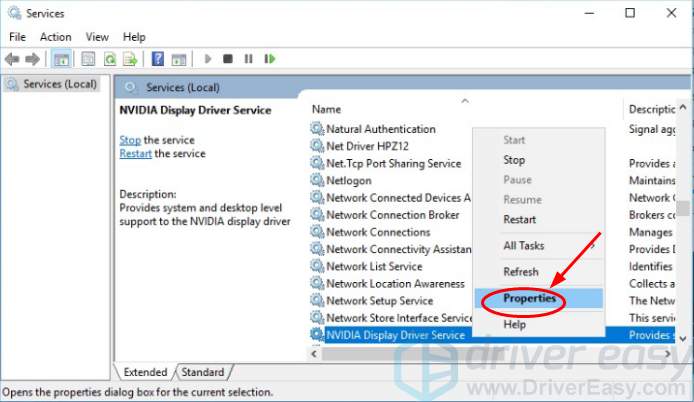
4) Right-click on the NVIDIA Display Driver service again and this time choose Properties.
5) Set the Startup type to be Automatic.
6) Now open your NVIDIA Control Panel to see if successfully.
Method 3: Restart your NVIDIA Control Panel process
Sometimes, a simple restart for the NVIDIA Control process can easily solve your problem.
Follow these:
1) On your keyboard, press Ctrl + Shift + Esc at the same time to open the Task Manager window.
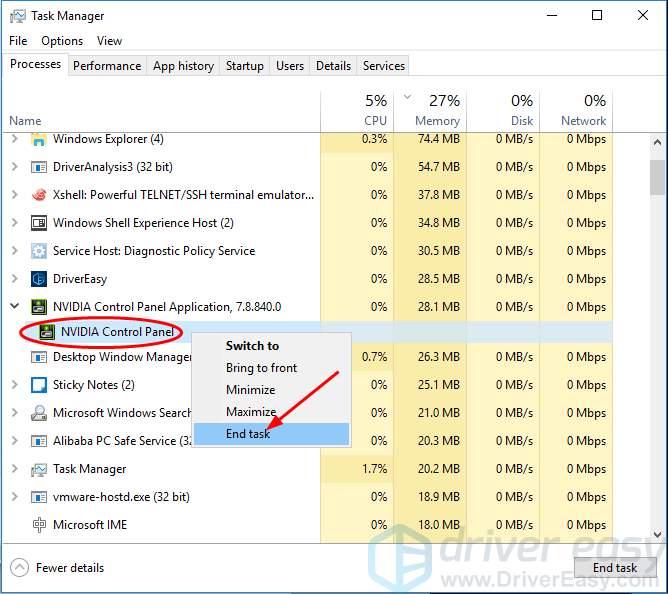
2) Expand the NVIDIA Control Panel section, then right-click on NVIDIA Control Panel and select End task.
3) Now open your NVIDIA Control Panel to see if successfully.
59
59 people found this helpful
Available in other languages
Startet Ihre NVIDIA Systemsteuerung nicht mehr? Keine Sorge. In diesem Artikel erfahren Sie 5 Methoden, um Ihre NVIDIA Systemsteuerung wiederherzustellen.
Be it for an avid gamer or a graphics designer, the NVIDIA graphics card always holds a special place. Generally, NVIDIA GPU is added to your system to experience high performance and powerful graphics. And, NVIDIA Control Panel app enables you to control and access the settings, properties, and functioning of the graphics card. But what happens when you are unable to open or even find the NVIDIA control panel? It leaves you worried. This article will guide you to fix the NVIDIA control panel missing Windows 10 or 11.

Table of Contents
This GPU application was developed and launched by NVIDIA corporation, a leading tech product manufacturer in the world. Yet, issues may arise due to reasons listed below:
- outdated, corrupt, or incompatible driver
- recent Windows 10 update not compatible with the NVIDIA Driver.
- NVIDIA Control Panel corrupt.
Method 1: Roll Back Windows Update
The eye to updating your Windows 10 operating system is an appreciative effort. But sometimes it is possible that your graphics driver might not be compatible with the latest release or upgraded version of Windows. Thus, revert your latest windows update from your system to resolve the NVIDIA control panel missing Windows 10 issue.
1. Press the Windows + I keys to launch Settings.
2. Select Update & Security.

3. Select Recovery from the left pane.
4. Click on Get started button.

5. Follow the on-screen instruction and your Windows will roll back to the previous version.
Method 2: Unhide NVIDIA Control Panel
Unknowingly sometimes if you hide the NVIDIA Control Panel, it goes missing. Rarely, it is also possible that your Windows 10 or a third-party application hide the icon. Thus, it might look like it’s missing. Perform the steps given below and unhide the NVIDIA Control Panel.
1. Press Windows key, type control panel and click on Open.

2. Here, set View by as Large icons, then select NVIDIA Control Panel from the list of items.
3. Select the Desktop menu present at the top.

4. Under the Desktop menu, ensure Add Desktop Context Menu and Show Notification Tray Icon options are enabled. If not, check to mark it.
5. Finally, close the NVIDIA Control Panel application and try opening it via Desktop or system tray.
Also Read: Fix NVIDIA Control Panel Not Opening
Method 3: Restart NVIDIA Services
Various services are running constantly in the background to make other apps run smoothly. Therefore, restart all the NIVIDIA-related services to make its control panel appear again. Here is how to do it and resolve the NVIDIA control panel display settings missing issue.
1. Press the Windows + R keys together to launch the Run dialog box.

2. Type services.msc and press Enter key to open the Services window.

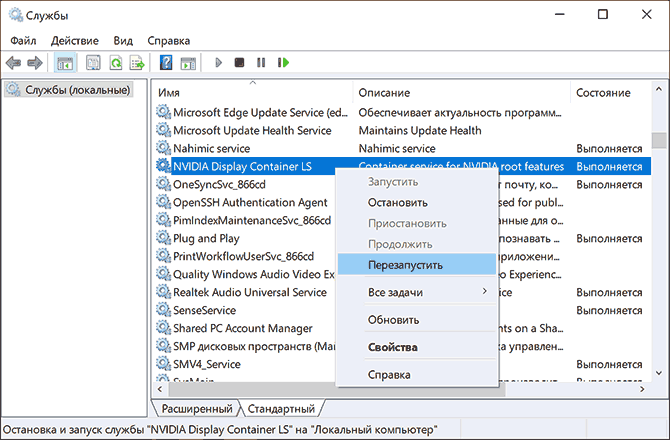
3. On the Services windows, locate services that start with the name NVIDIA. Right-click each such service and select Restart from the context menu.

4. If the service is not running, then right-click it once again and click on Start.

5. Repeat steps 3 and 4 for restarting the following services as well:
- NVIDIA LocalSystem Container
- NVIDIA NetworkService Container
- NVIDIA Telemetry Container

Check if this method brings back the NVIDIA Control Panel app. If not, don’t lose hope yet. Try the next solution to rectify the NVIDIA control panel missing Windows 10 problem.
Method 4: Update NVIDIA Graphics Driver
The graphic driver is an essential feature of any online game or computer itself. The GPU manufacturers often release updates and features. Also, to avoid any kind of technical problems like flickering screen, improper display working, screen on/off, and so forth, it is necessary to update the graphic driver as they are responsible for the efficiency and performance of the computer. So, update the graphic driver and see if this update works out. Read our guide on 4 ways to update graphic drivers in Windows 10.

Also Read: How to Disable or Uninstall NVIDIA GeForce Experience
Method 5: Manually Open NVIDIA Control Panel
You can force the NVIDIA Control Panel to appear by launching it manually. To do so, follow the steps given below.
1. Press the Windows + E keys simultaneously to launch File Explorer.

2. Navigate to the following location path.
C:\Program Files\NVIDIA Corporation
Note: The location may vary as per your installation.

3. Double-click and open the Control Panel Client folder. Locate and right-click the nvcplui.exe file. Then, select Run as administrator from the context menu.
Check if the NVIDIA Control Panel missing Windows 10 is found again.
Method 6: Do Not Overclock GPU
Overclocking GPU removes the limitation of the graphics card and enables it to carry out above its safety limit. Thus, this process may cause an error sometimes. Therefore, it is necessary not to cross the limit. This is because going forward the limitation might stop the functioning of your graphics card. And this overclocked GPU could be the reason behind the missing NVIDIA Control Panel. Though the direct cause is not found, many users disclosed that reducing GPU overclock enabled the NVIDIA Control Panel to be visible again.
Also Read: What is NVIDIA Virtual Audio Device Wave Extensible?
Method 7: Modify Compatibility Settings
If the error repeats often even after rectifying it, then NVIDIA Support provided us with a permanent solution. Follow the steps given below to modify compatibility settings and fix NVIDIA control panel display settings missing issue.
1. Press the Windows + E keys together to open File Explorer.

2. Navigate to the following location.
C:\Program Files\NVIDIA Corporation\Display.NvContainer

3. On the Display.NvContainer folder, locate the file Display.NvContainer. Right-click on it and select Copy from the context menu.
4. Press Windows + R keys together to launch the Run dialog box.

5. Type shell:startup and hit Enter key to launch the Startup folder.

6. On the folder, press Ctrl + V keys simultaneously to paste the copied folder.
7. Then, right-click the copied Display.NvContainer folder and select Properties from the context menu.
8. On the Properties window, go to the Compatibility tab. Now, check the Run this program as administrator box under the Settings section. Select Apply and then click OK to save the changes made.

Check if the NVIDIA control panel display settings missing in your Windows 10 are fixed.
Method 8: Reinstall NVIDIA Graphics Driver
None of the above solutions worked out? Do not worry. You have one final method to work out. It is to try and reinstall the NVIDIA Control Panel application. Here is how to uninstall and reinstall the application.
1. Hit the Windows key, type device manager, and click on Open.

2. Double-click on Display adapters to expand the driver.

3. Here, right-click the NVIDIA graphics driver or adapter and select Uninstall device in the context menu.

4. Follow the on-screen instructions to uninstall the driver and restart the PC.
5. Go to the NVIDIA drivers download page and fill up the NVIDIA adapter model details and select Search.

6. On the new page, click Download to download the installation wizard.

7. Once downloaded, run the setup file and install the driver on your system.
8. Finally, reboot your PC and see if you can find NVIDIA Control Panel on the desktop or system tray.
Also Read: How to Disable or Uninstall NVIDIA GeForce Experience
How to Check if NVIDIA chip is Installed on your Windows PC
1. Press the Ctrl + Shift + Esc keys together to open Task Manager.
2. On the Task Manager window, switch to the Performance tab and select GPU 0 or GPU 1 on the left pane.

3. On the right pane of GPU, see the graphics card model name present at the top right corner of the page. If it starts with NVIDIA, then the NVIDIA Control Panel should be available on your computer.

Pro Tip: How to Install NVIDIA Control Panel App
To install NVIDIA Control App from Microsoft Store, implement the steps given below:
1. Go to the NVIDIA Control Panel Microsoft store page.
Note: Ensure all the system requirements are met.

2. Select the Get button to install the application.

Recommended: Fix NVIDIA Container High CPU Usage on Windows 10
We hope this guide was helpful and you were able to fix NVIDIA control panel missing in Windows 10. Let us know which method worked the best. Please feel free to reach out to us for any queries or suggestions via the comment section given below. Also, let us know what you want to learn next.
Среди частых проблем на компьютерах и ноутбуках с видеокартами GeForce — ситуация, когда панель управления NVIDIA не открывается. Происходить это может по-разному: вообще никакой реакции на попытку открыть, открывается и сразу закрывается, пишет «Настройки дисплея NVIDIA недоступны. Используемый дисплей не подключен к ГП NVIDIA».
В этой инструкции подробно о том, что делать, если не получается запустить панель управления NVIDIA в Windows 11 и Windows 10 в разных ситуациях, возможных причинах проблемы и способах исправить ситуацию. На близкую тему: Доступ запрещен в панели управления NVIDIA, Что делать, если нет вкладки Дисплей в панели управления NVIDIA.
Простые способы исправить запуск панели управления NVIDIA
Проблемы с открытием панели управления NVIDIA могут быть вызваны разными причинами, но в большинстве случаев исправить ситуацию сравнительно просто. Сначала — быстрые и наиболее часто срабатывающие способы решения проблемы:
- Проверьте, запускается ли панель управления NVIDIA сразу после перезагрузки Windows 11 или Windows 10 (используем именно пункт «Перезагрузка», а не завершение работы с последующим включением). Если в этом случае всё работает исправно, попробуйте отключить быстрый запуск.
- Загляните в диспетчер задач (правый клик по кнопке «Пуск» — «Диспетчер задач»). Если в диспетчере задач на вкладке «Подробности» висит процесс nvcplui.exe, выберите его и нажмите «Снять задачу», потом попробуйте запустить панель управления NVIDIA снова.

- Нажмите клавиши Win+R на клавиатуре (Win — клавиша с эмблемой Windows), введите services.msc и нажмите Enter. В открывшемся списке служб обратите внимание на службы, имена которых начинаются с «NVIDIA». Убедитесь, что эти службы не отключены. Иначе — двойной клик по службе, устанавливаем «Тип запуска» в «Автоматически», применяем настройки и нажимаем кнопку «Запустить».

- Если службы уже запущены, попробуйте их перезапустить, особенно — NVIDIA Display Container LS (но лучше — все имеющиеся): правый клик по имени службы — перезапустить. Этот способ (перезапуск службы) часто помогает, если панель управления NVIDIA перестает открываться при входе под другим пользователем.

- Если на вашем ПК, а особенно на ноутбуке также присутствует интегрированное видео, например, Intel HD — скачайте и установите драйверы и на него: в диспетчере устройств не должно быть никаких видеокарт «Базовый видеоадаптер Майкрософт».

Как правило, один из указанных способов срабатывает, но не во всех случаях: бывает, что все службы NVIDIA исправно работают, Панель управления NVIDIA всё также сразу закрывается или не открывается вовсе.
Исправление или переустановка NVIDIA Control Panel
Причиной того, что запуск панели управления NVIDIA не выполняются могут быть ошибки соответствующего приложения. Их можно попробовать исправить, для этого:
- Зайдите в Параметры — Приложения — Установленные приложения (в Windows 11) или Параметры — Приложения — Приложения и возможности (в Windows 10). Найдите NVIDIA Control Panel в списке.
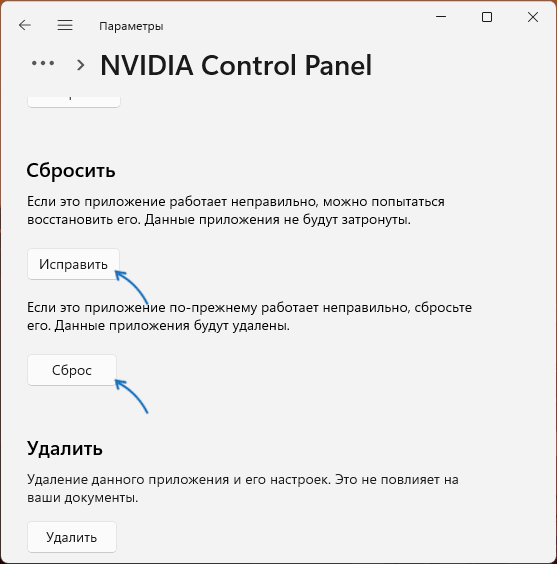
- Нажмите по трем точкам справа от имени приложения (в Windows 11) или по имени приложения (в Windows 10) и выберите пункт «Дополнительные параметры».

- Используйте кнопку «Исправить», а если она не поможет — «Сброс» для сброса приложения.

- Проверьте, запускается ли панель управления NVIDIA теперь.

Если описанные шаги не помогли, попробуйте вручную переустановить приложение, причем установку следует выполнять на системный раздел диска:
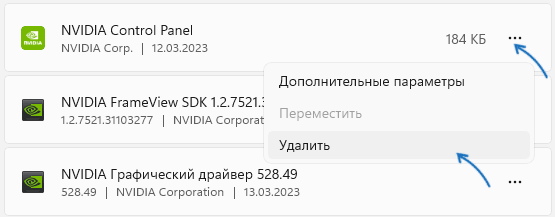
- Зайдите в список установленных приложений в Параметрах Windows (как было описано выше) и удалите NVIDIA Control Panel.

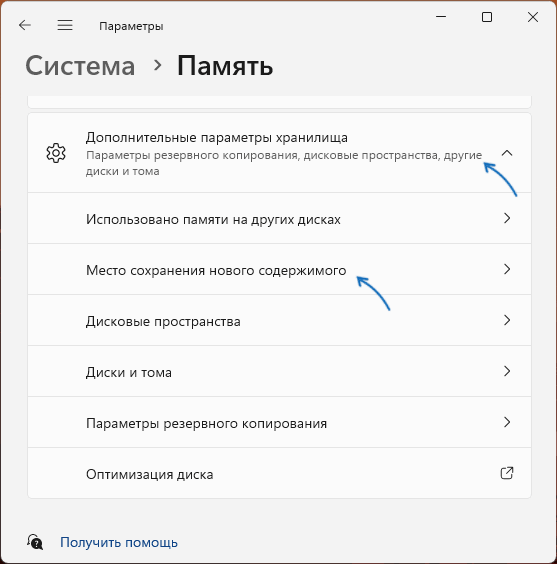
- Перейдите в Параметры — Система — Память и перейдите в пункт «Место сохранения нового содержимого» в дополнительных параметрах хранилища.
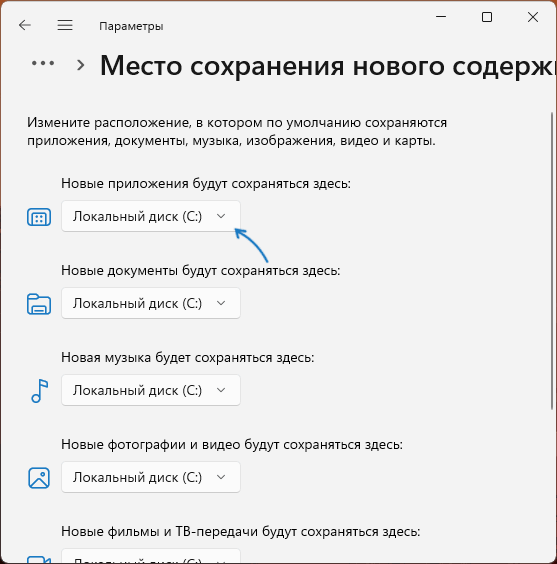
- Убедитесь, что новые приложения сохраняются на диск C:, если это не так — измените место сохранения (есть сообщения, что установка на другие разделы может приводить к рассматриваемой проблеме при запуске).
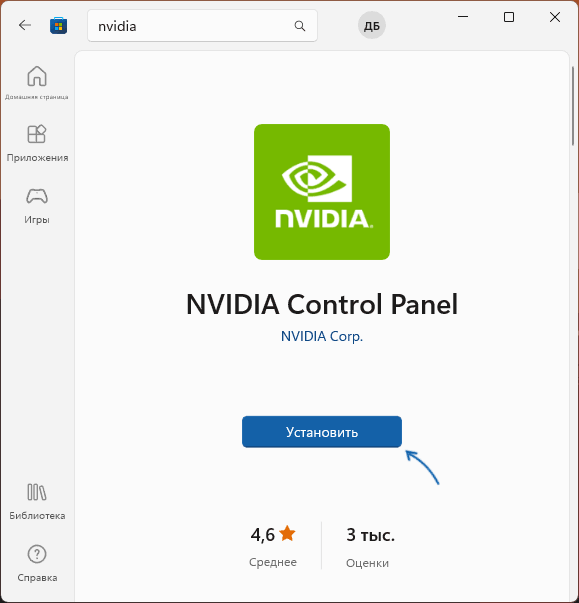
- Зайдите в Microsoft Store, выполните поиск по слову «NVIDIA» и установите NVIDIA Control Panel. Если у вас отсутствует Microsoft Store, вы можете установить его.

Проверьте, была ли решена проблема: с большой вероятностью теперь всё будет работать исправно.
Чистая установка драйвера NVIDIA
Следующий вариант — попробовать полностью переустановить драйверы NVIDIA с официального сайта, выполнив их чистую установку. Шаги будут следующими:
- Зайдите на официальную страницу загрузки драйверов NVIDIA и выберите драйвер для вашей видеокарты в версии Windows, скачайте его к себе на компьютер.
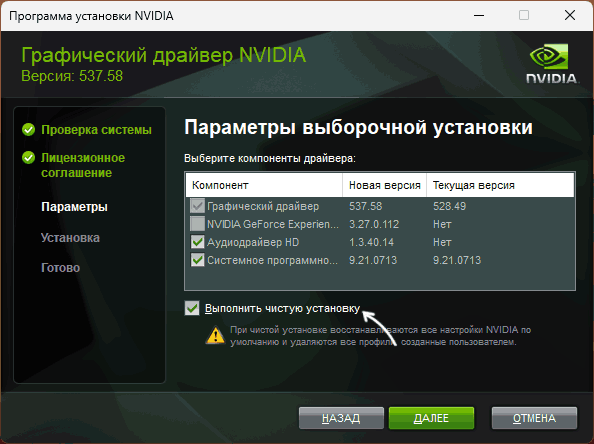
- Запустите скачанный файл установщика и, после выбора: установить только драйвер NVIDIA или графический драйвер и GeForce Experience, отметьте пункт «Выборочная установка».

- Отметьте пункт «Выполнить чистую установку» и нажмите «Далее».
- Дождитесь завершения установки.

После установки драйвера и перезагрузки компьютера проверьте, выполняется ли запуск панели управления NVIDIA.
В случае, если проблемы с запуском сохраняются, следует учесть следующие нюансы, а также попробовать некоторые модификации ранее описанных способов:
- Панель управления NVIDIA может не запускаться при использовании нескольких мониторов, особенно если для организации их работы используется стороннее ПО. Если у вас также несколько мониторов, проверьте, будет ли выполняться запуск, если выключить компьютер, отключить все мониторы кроме одного, снова включить компьютер.
- Драйверы USB-мониторов (например, для работы планшета в качестве второго монитора), инструменты наподобие DisplayLink (при наличии можно найти в «Программы и компоненты») также могут приводить к проблеме.
- Если до недавнего времени всё работало исправно, попробуйте использовать точки восстановления системы на дату, когда проблемы не наблюдались.
- Некоторые отзывы сообщают о том, что при рассматриваемой проблеме помогло удаление сторонних антивирусов, отмечая, что причиной были AVG и Avast.
- В случае, если проблема возникла на ноутбуке можно попробовать такой вариант: скачать с сайта производителя ноутбука драйверы для интегрированной и дискретной видеокарты (даже если они далеко не новые и предназначены для предыдущей версии системы), скачать DDU (Display Driver Uninstaller), отключиться от Интернета (чтобы Windows не успела установить драйверы сама), удалить имеющиеся драйверы с помощью DDU, установить драйверы, ранее скачанные с официального сайта. После проверки работоспособности панели управления NVIDIA можно обновить драйверы NVIDIA.
Надеюсь, один из предложенных методов исправить проблему сработает в вашем случае. Если же остаются вопросы или у вас есть собственные способы — оставляйте их в комментариях ниже.
The NVIDIA Control Panel is a quick way to alter or tweak graphics settings to make games look better. When you install the Nvidia graphics driver, it automatically installs the NVIDIA Control Panel on your Windows 10 PC. You can easily open it from the desktop or the context menu, But sometimes you might experience, It just doesn’t function, NVIDIA control panel is not opening up on Windows 10. The reason may various a faulty graphics card driver, Buggy Windows update, Missing or incorrect Registry entries or some random error. But updating or reinstalling the NVIDIA GeForce driver worked for most people.
Well, If you notice, the NVIDIA control panel does not launch or respond on Windows 10 Here how to fix the problem.
Contents
- 1 NVIDIA Control Panel Won’t Open
- 1.1 Restart NVIDIA Display Container process
- 1.2 Restart the NVIDIA Display Driver service
- 1.3 Update NVIDIA Graphics Card Driver
- 1.4 Reinstall Nvidia GeForce Experience
NVIDIA Control Panel Won’t Open
Before applying any recommended solution, it’s best to restart your computer first. This action refreshes the operating system and removes any corrupt temporary data that causing the NVIDIA control panel not opening on Windows 10 computer.
Sometimes Security software or third party Antivirus is the common reason for many applications not opening. Try to disable the antivirus for a while and check now if you can open the NVIDIA panel.
Restart NVIDIA Display Container process
- Press Ctrl + Shift + Esc key simultaneously on your keyboard to launch the Task Manager
- under the process tab, locate the NVIDIA Display Container process, right-click on it and then select End Task. Do the same with other NVIDIA processes as well.
- Now try to open it from the desktop or the context menu check if the Nvidia control panel won’t open issue still occurs or not.
Restart the NVIDIA Display Driver service
Again, if the NVIDIA Display Driver service is stuck or not started for unexpected reasons, you cannot open the NVIDIA control panel. Follow the steps below to check or restart your NVIDIA Display Driver service.
- On your keyboard, press the Windows logo key + R type services.msc and click OK.
- This will open the windows service console, scroll down and locate the NVIDIA Display Container LS service.
- Check the NVIDIA Display Container LS service status, if its running, Right-click on it select restart,
- If the service is not started, right-click on NVIDIA Display Container LS service and choose Properties.
- Make sure to set the Startup type to be Automatic and start the service next to service status.
- Click apply and ok to save changes, do the same with NVIDIA LocalSystem Container service and open your NVIDIA Control Panel to see if successful.
Update NVIDIA Graphics Card Driver
Again if you have a corrupted or older NVIDIA graphics driver installed on your computer, that makes your control panel not work or not open. And you must check that the NVIDIA display driver is updated to fix the issue of the NVIDIA control panel not opening on windows 10.
- Right-click on Windows 10 start menu select device manager, and display all installed device driver list,
- Also, you can open the device manager using devmgmt.msc as well,
- Locate and expand the Display adapters, right-click on NVIDIA,
- In the Device Manager, expand the Display adapters, then right-click on your NVIDIA GeForce driver select update driver,
- Click on Search automatically for drivers and follow on-screen instructions to allow download updated drivers from the Microsoft server (if available any)
- Once done, reboot your PC and try to open the NVIDIA control panel to check whether the problem is resolved or not.
Reinstall Nvidia GeForce Experience
Still having problems opening the NVIDIA control panel, it’s not responding. Try reinstall the NVIDIA driver with the latest version.
Uninstall NVIDIA driver
Let’s first remove the older NVIDIA graphics driver from the device manager,
- Press the Windows key + X simultaneously to select the device manager,
- This will display all installed device driver list, locate and expand display adapters,
- Right-click on NVIDIA Geforce select uninstall the device,
- Checkmark on Delete the driver software for this device and click uninstall when prompt for confirmation.
- Now press Windows key + R, type appwiz.cpl and click ok,
- This will open the programs and features window, Here uninstall all drivers related to NVIDIA and reboot your PC.
Also, you can use DDU or Display Driver Uninstaller to remove NVIDIA drivers completely before reinstalling them.
Install NVIDIA Graphics driver
- Now visit NVIDIA official site and download the latest NVIDIA Graphics driver for your computer and install it.
- Once done, reboot your PC and try to open the NVIDIA control panel to check the problem is resolved.
Also, several windows users report, and install the latest NET Framework and VC++ Redistributable help them fix the NVIDIA control panel Won’t Open problem.
Download latest .NET Framework
Download latest VC++ Redistributable
In addition, run the system file checker utility that helps restore missing, corrupted system files with the correct one. And fix NVIDIA Control Panel won’t open problem if the Windows system file corruption causing the issue.
Did these solutions help fix the Nvidia control panel missing or not responding problem on windows 10? Let us know on the comments below.
Also read:
- 3 different ways to Uninstall a Problematic Windows Update on Windows 10
- How To Update, Re-install, Roll Back Device Drivers in Windows 10
- How To fix Devices and Printers not Loading on Windows 10 Version 2004
- Solved: Windows Installer not working properly in Windows 10