
This article offers 11 possible solutions for you!This article delivered by MiniTool focuses on solving the network PCs not displaying in Windows 11 problem. It provides altogether 11 methods for users to choose from. No matter what case you are in, you will probably find one way that suits you.
About Windows 11 Workgroup Not Showing All Computers on the Network
A network is a group of devices connected to the same workgroup or domain at the office or home that can share the Internet, files/folders, hardware (e.g. printer), etc. This is usually called a private network. On the contrary, there is a public network whose devices can’t see or communicate with each other. The public network should mostly be used on public networks like coffee shops or airports with public Wi-Fi hotspots.
You can find computers or other devices connected to the same network router or switch. Yet, sometimes, it may show you a message saying “File sharing is turned off. Some network computers and devices might not be visible. Click to change…”. Why and how to solve the problem? Let’s see.
How to Fix Windows 11 Workgroup Not Showing All Computers on the Network?
The following solutions will help you handle not all network devices show up problem.
#1 Enable Private Network in Windows 11
Just as mentioned above, only devices within the private network will be discovered. So, to make all the network computers show up, first of all, make sure your private network is enabled. If not, just do it as below.
- Navigate to Windows 11 Settings > Network & internet.
- If you are using the wired Ethernet, click Ethernet and select Private. If you are using Wi-Fi, click Wi-fi and choose Private. Of course, you can set up both network connections to private.
- You may need to restart the computer to make the changes take effect.

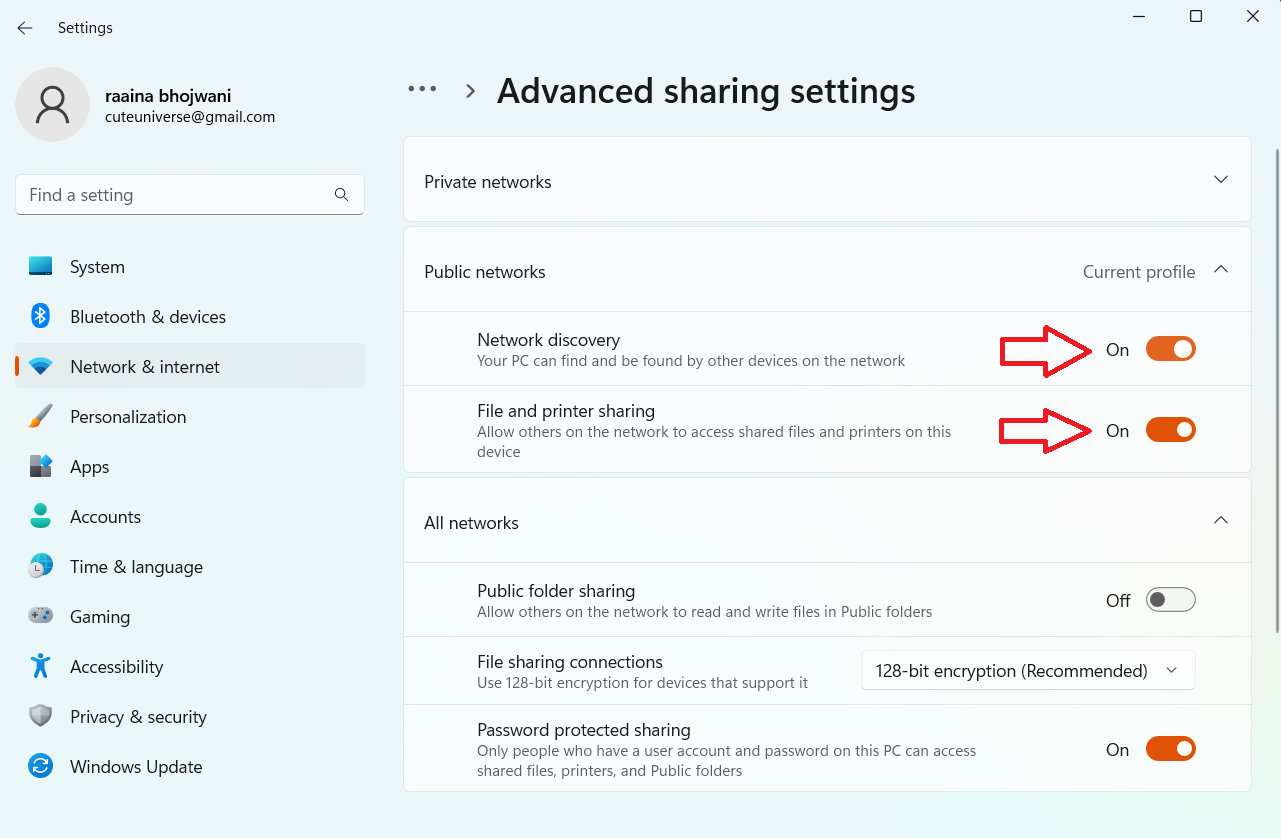
#2 Enable File Sharing and Network Discovery in Windows 11
To view other machines, network discovery and file sharing must be enabled. If one of them is not, you will suffer Windows 11 workgroup not showing all computers on the network issue.
- Open Control Panel, view its items by icon (either large icon or small icon), and select Network and Sharing Center.
- Choose Change advanced sharing settings in the left panel.
- Then, expand Private (current profile) and select Turn on network discovery and Turn on file and printer sharing options respectively.
- Finally, click the Save changes
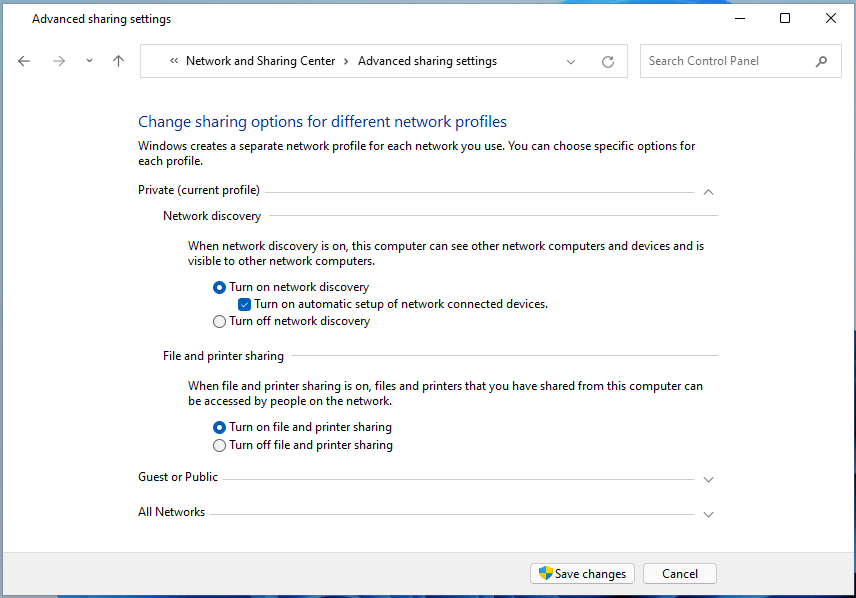
You may also need to enable file sharing and disable password protection sharing for All Networks.
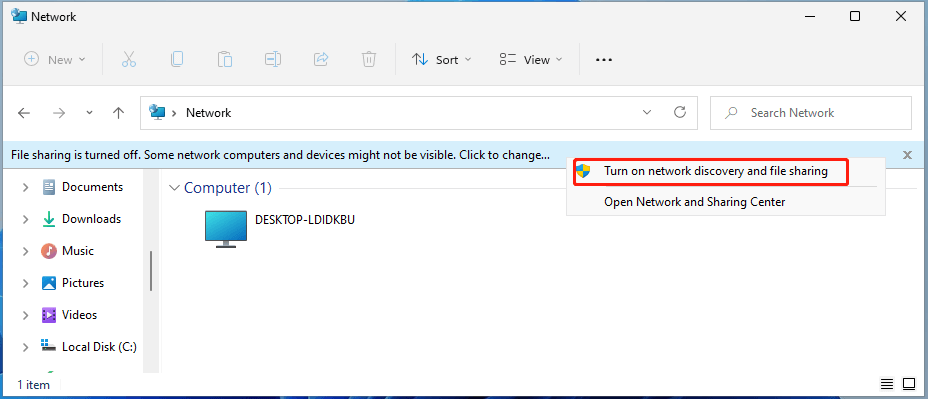
You can directly turn on file sharing and network discovery by clicking the error message “File sharing is turned off. Some network computers and devices might not be visible. Click to change…” when you go to Network in Windows File Explorer and select Turn on network discovery and file sharing.
#3 Enable Network Discovery and File Sharing by Command Line
You can also rely on commands to turn on file sharing and network discovery. Just open a command prompt (CMD) as administrator and input the following command into it one by one and press Enter after entering each command.
netsh advfirewall firewall set rule group=”File and Printer Sharing” new enable=Yes
netsh advfirewall firewall set rule group=”Network Discovery” new enable=Yes
To turn on network discovery through PowerShell, the command order is as below.
Get-NetFirewallRule -DisplayGroup “Network Discovery” -Enabled True -Action Allow -Direction Inbound
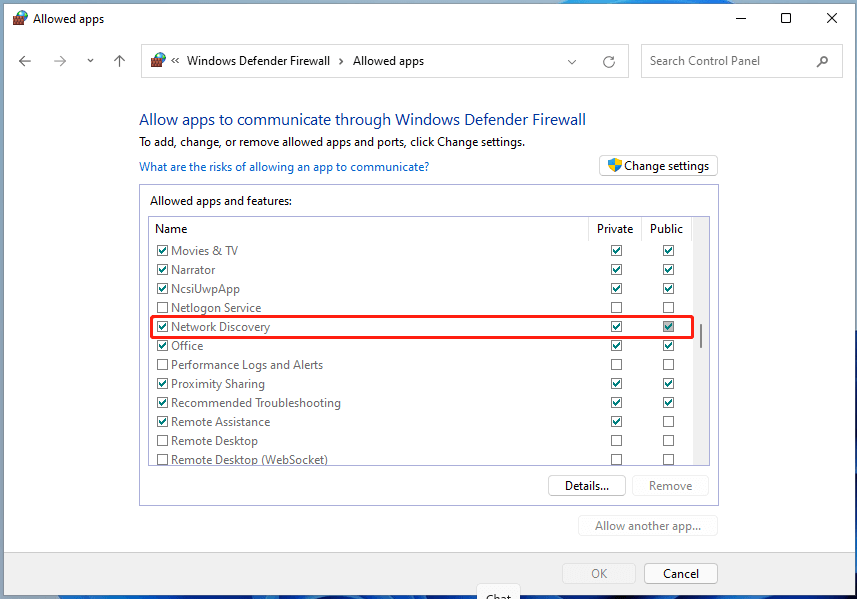
#4 Enable Network Discovery Within Windows 11 Defender Firewall
- Just move to Control Panel > All Control Panel Items > Windows Defender Firewall.
- Choose Allow an app or feature through Windows Defender Firewall in the left menu.
- On the new page, scroll down the Allowed apps and features list to see whether the Network Discovery option is checked or not. If not, click the Change settings button above and tick the Network Discovery
- Save changes and exit.
#5 Re-add Unshown Computers to Workgroup
For some situations, Widows PCs may not appear in the network environment due to incorrect workgroup settings. If this is true, just re-add those computers to the workgroup will fix the issue.
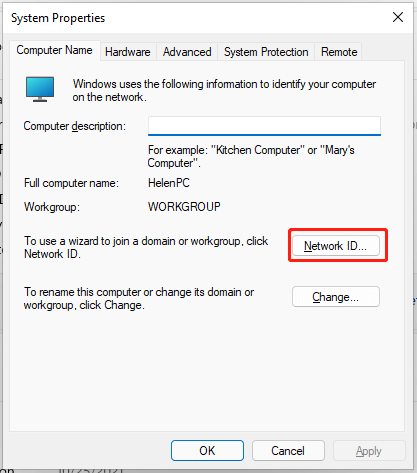
1. Move to Settings > System > About.
2. Click the Advanced system settings option behind the Related links.
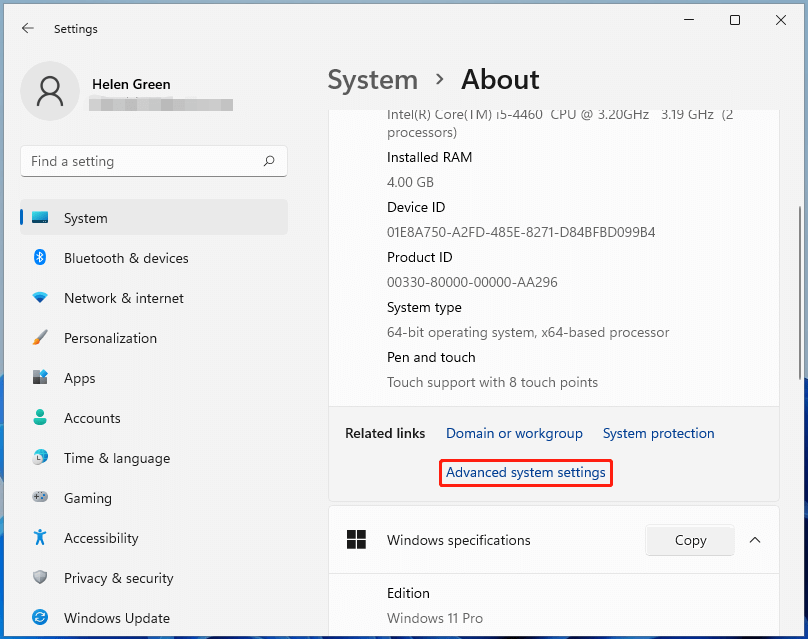
3. In the new pop-up System Properties window, go to the Computer Name tab, and select Network ID.
4. In the Join a Domain or Workgroup popup, choose This computer is part of a business network; I use it to connect to other computers at work and click Next.
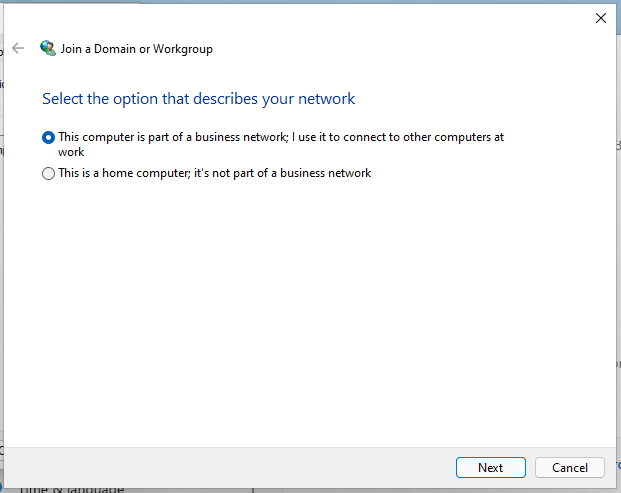
5. Select My computer uses a network without a domain and click Next.
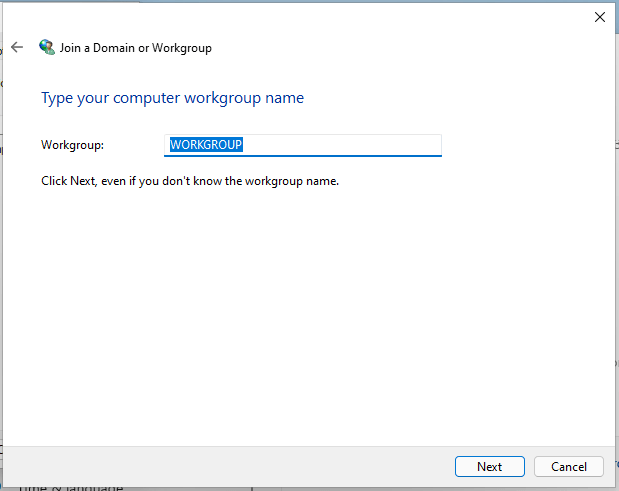
6. Input your workgroup name and continue to Finish the process.
When all steps are done, just restart your machine.
#6 Make Computers Available to be Discovered
If none of the above methods work for you. You can try this one.
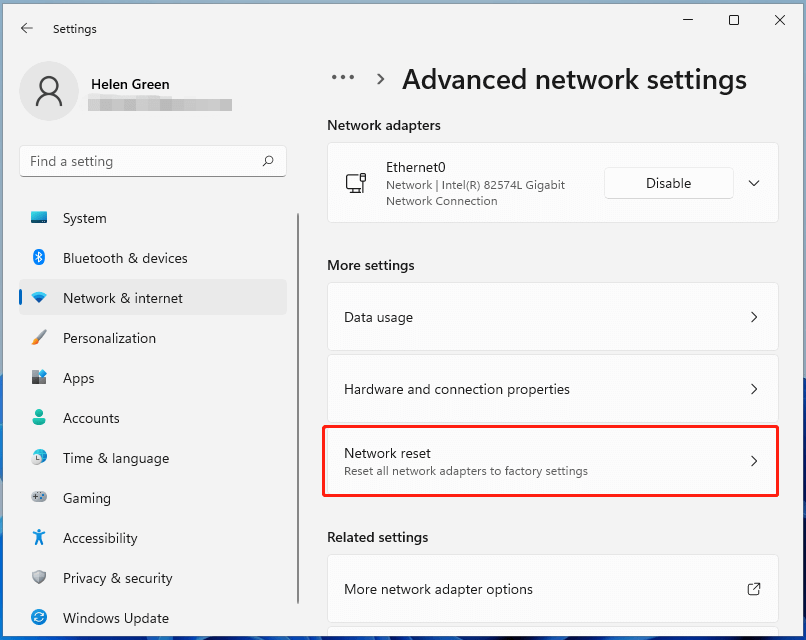
- Navigate to Settings > Network & internet > Advanced network settings.
- Select Homegroup in the right section.
- Click Change network location and then select Yes in the dialog box “Do you want to allow your PC to be discoverable by other PCs and devices on this network? We recommend allowing this on your home and work network, but not public ones”.
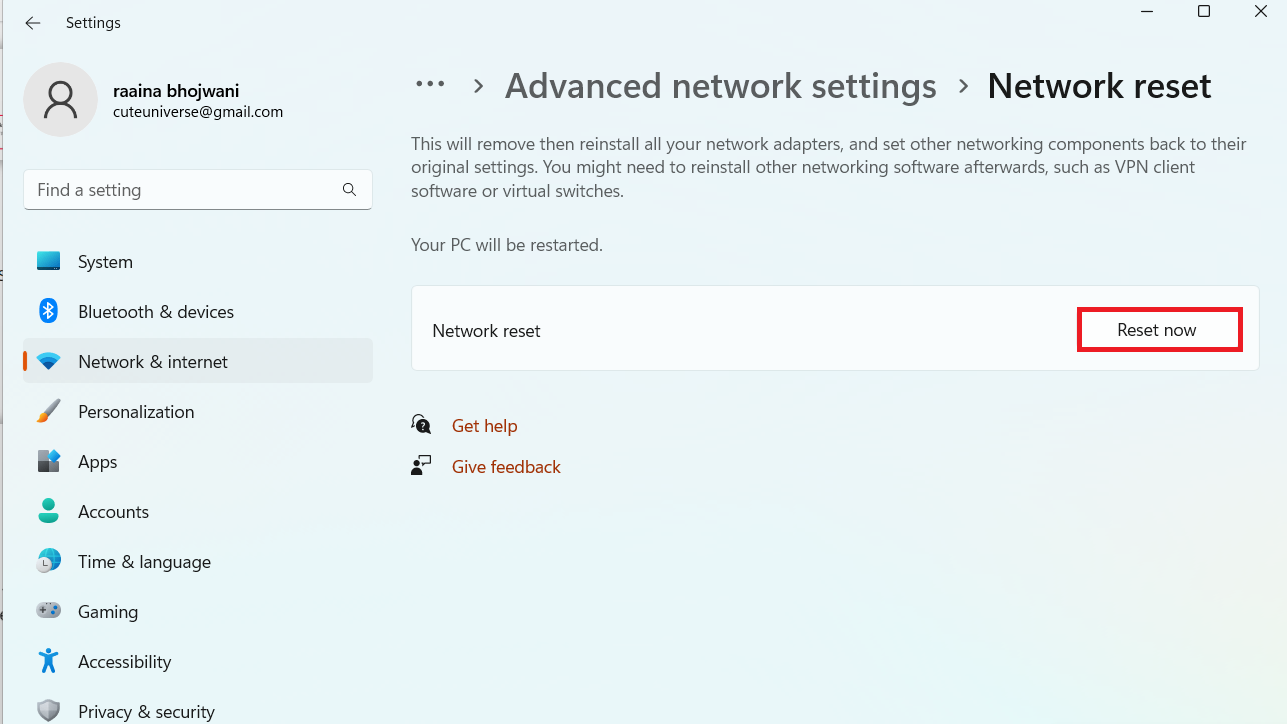
#7 Reset Network / Renew IP / Flush DNS
If the Windows 11 workgroup still not shows all computers on the network, just go to Settings > Network & internet > Advanced network settings and click on the Network reset option.
Or, you can reset network settings and firewall rules using the following commands.
netsh int ip reset reset.txt
netsh winsock reset
netsh advfirewall reset
To renew IP and flush DNS, use these commands:
ipconfig /release
ipconfig /renew
ipconfig /flushdns
Then, just reboot your PC.
#8 Update/Reinstall Network Drivers
Sometimes, you need to update or reinstall your network drivers to deal with the Windows 11 workgroup not showing all computers on the network problem.
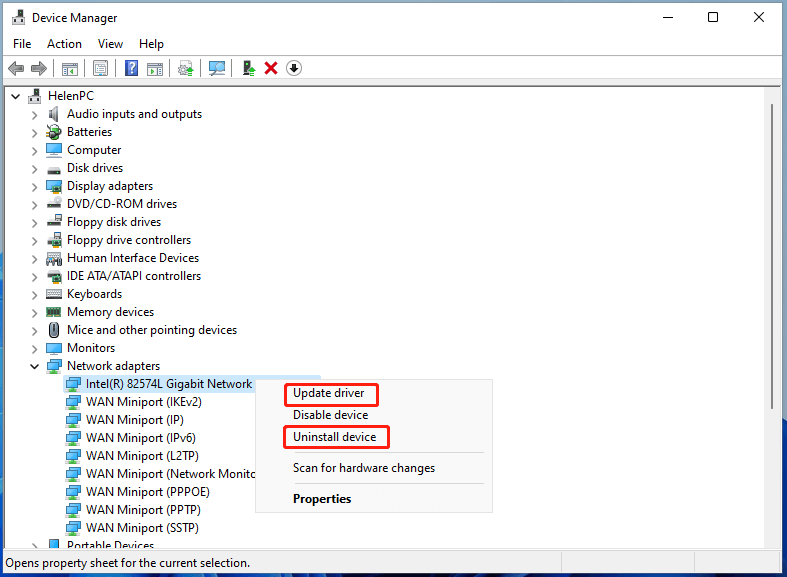
- Open Device Manager and unfold the Network adapters.
- Click on the target item and select Update driver or Uninstall device.
- If you choose Uninstall device in step 2, you need to restart your machine to let Windows automatically install the latest network drivers. This will also reset old protocol settings for the network.
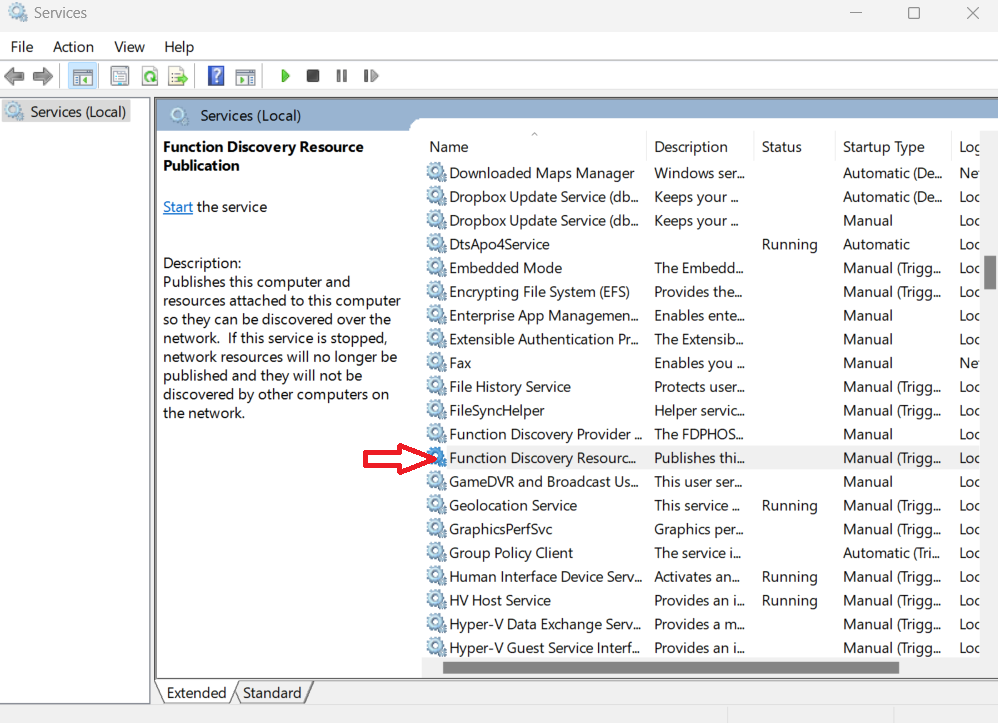
#9 Make Sure Some Special Services are Running
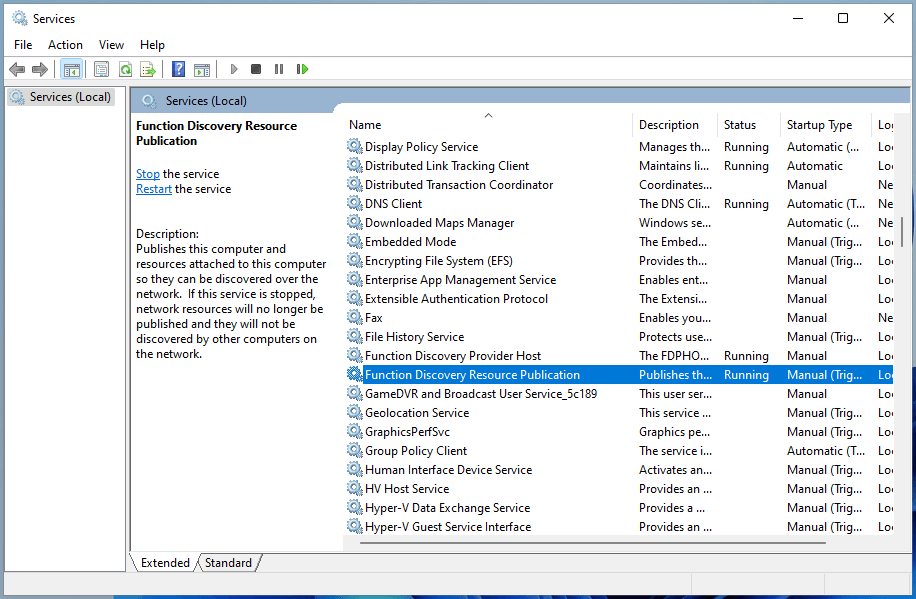
Ensure the following services are running, which is necessary for displaying network computers. Just open Windows 11 services console and check the below items.
- FdPHost (Function Discovery Provider Host): Responsible for other PCs discovering on the network.
- FDResPub (Function Discovery Resource Publication): Enables other computers to detect your device on the network.
- Dnscache (DNS client)
- SSDPSrv (SSDP discovery)
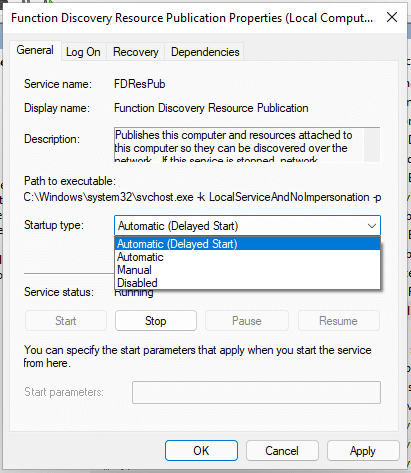
- Upnphost (UPnP device host)
Also, you may need to set fdPHost and FDResPub services to automatically startup. Just right-click the target service and select Properties. In its Properties window and under the General tab, select Automatic (Delayed Start) as the Startup type.
You can change the startup type of service fdPHost and FDResPub to automatic using this PowerShell command: get-Service fdPHost,FDResPub|Set-Service -startuptype automatic -passthru|Start-Service
Moreover, delete the trigger for FDResPub using sc triggerinfo FDResPub delete command.
#10 Enable Remote Desktop
Generally, do as the below guide.
- Go to Settings > System > About > Advanced system settings.
- Choose Remote in the new popup.
- Select Allow remote connections to this computer and click Apply > OK.
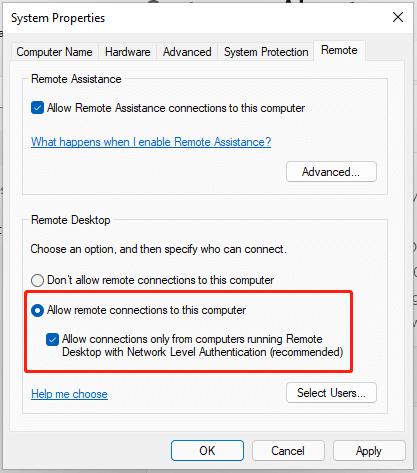
Restart the computer.
#11 Other Possible Solutions
Many other ways may also help you to solve the Windows 11 workgroup not showing all computers on the network problem like simply restarting your computer, upgrading Windows 11 to the newest version, directly accessing the shared items by typing the IP address, troubleshooting network adapter, turning on SMB 1.0/CIFS file sharing support, and so on.
Windows 11 Assistant Software Recommended
The new and powerful Windows 11 will bring you many benefits. At the same time, it will also bring you some unexpected damages such as data loss. Thus, it is strongly recommended that you back up your crucial files before or after upgrading to Win11 with a robust and reliable program like MiniTool ShadowMaker, which will assist you to protect your increasing data automatically on schedules!
MiniTool ShadowMaker TrialClick to Download100%Clean & Safe
Windows 11 is the latest operating system released by Microsoft, featuring a sleek design and a range of new features. However, despite its advancements, some users have reported encountering an issue where Windows 11 can’t see other computers on network. This article will explore the possible causes behind this issue and provide practical solutions to help you resolve it. Whether you’re a home user or in a professional environment, understanding how to fix Windows 11’s inability to see other computers on the network is crucial for maintaining seamless connectivity and productivity.
Page Contents
Fix 1: Reset the network from Command Prompt
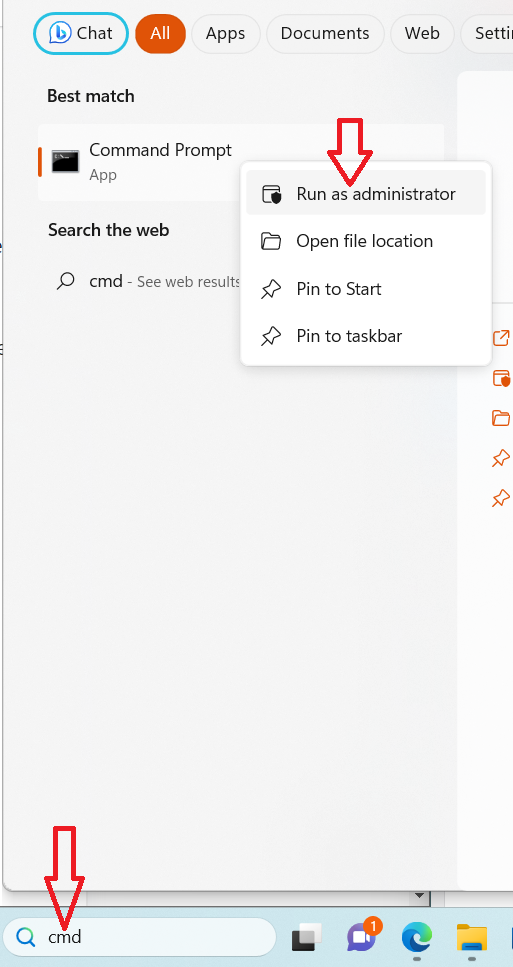
Type cmd in the Search bar and then open Command Prompt as an administrator by right-clicking on it. Click on Run as administrator.
Next type below commands and press Enter.
netsh int ip reset reset.txt netsh winsock reset netsh advfirewall reset
Now, reboot your computer.
Fix 2: Change the settings of all network profile
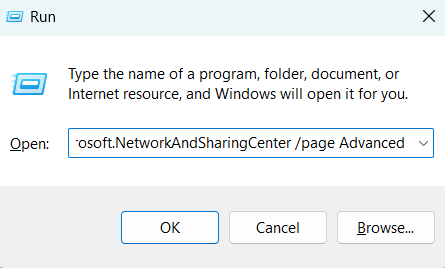
Open Run by pressing Win + R keys.
Then type the below command and press Enter key.
control.exe /name Microsoft.NetworkAndSharingCenter /page Advanced
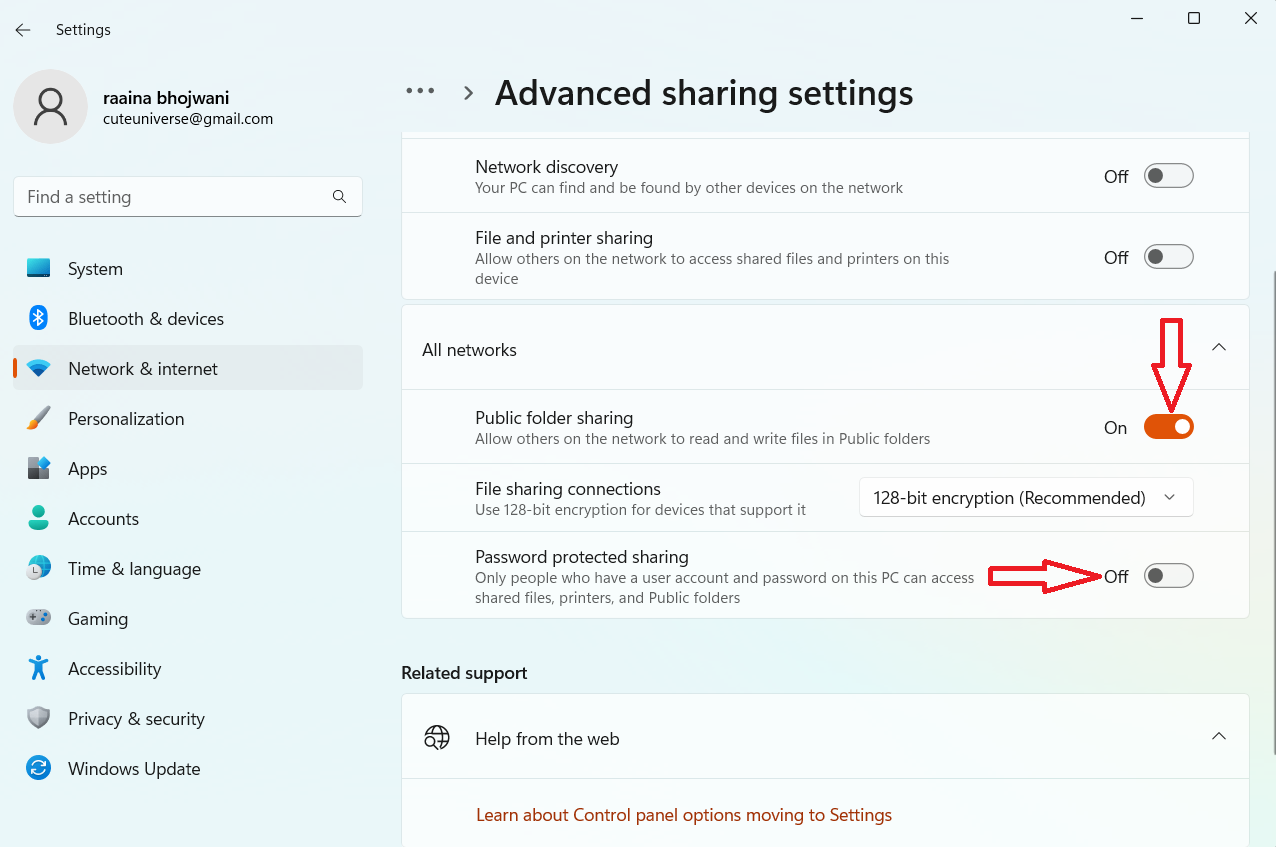
Next turn On the Public folder-sharing option and turn Off Password protected sharing option.
Then close the Settings window and restart your computer.
Fix 3: Join a network from System Properties
Open Run by pressing Win + r keys. Then copy-paste the below command and press Enter.
system.cpl SystemProperties
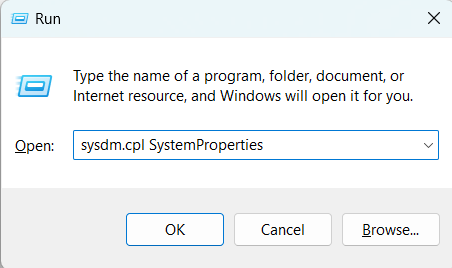
Now choose the tab Computer Name and click on the Network ID button.
Then choose This computer is part of a business network: I use it to connect to another computer at work. Then click Next.
Next, write the name of the workgroup in the Workgroup bar and click Next.
Then restart your computer.
Fix 4: Change the Startup type of FDRS to fix Windows 11 can’t see other computers on the network issue
Open Services by searching it on the Search bar.
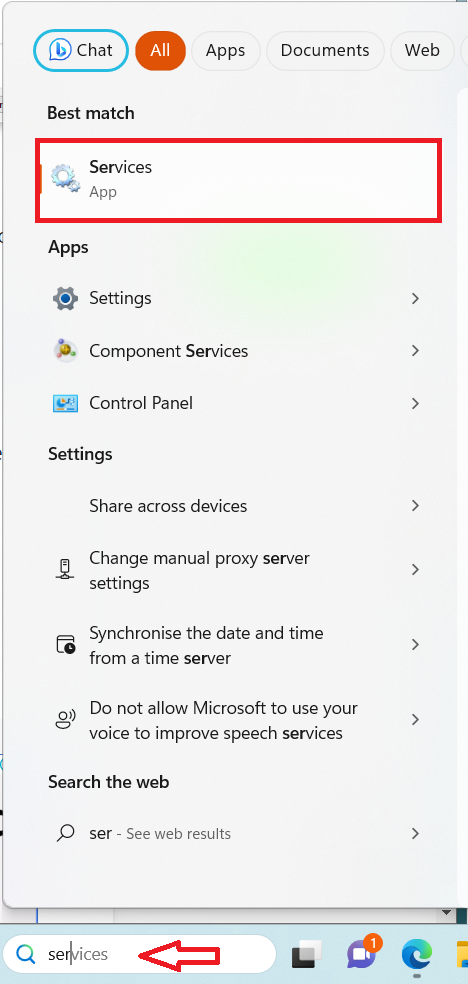
Then double-click on Function Discovery Resource Publication.
Now in Startup type select Automatic (Delayed Start). Then click Apply > OK.
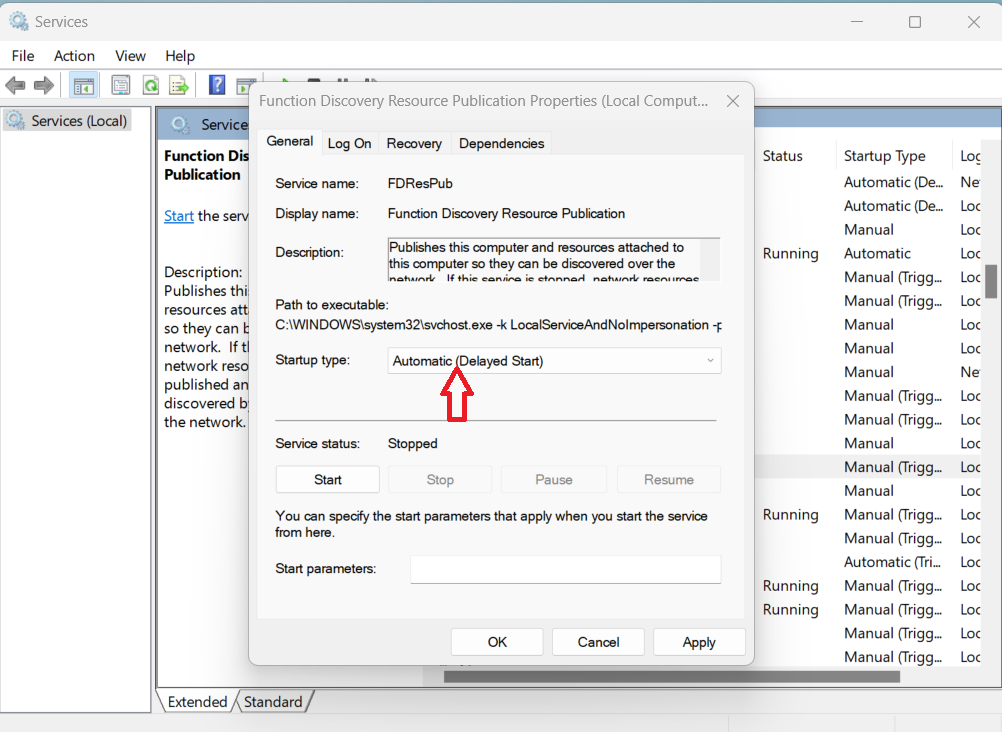
Close the Services window and restart your computer.
Fix 5: Change Private Network profile to fix Windows 11 can’t see other computers on network issue
Open Run and copy-past the following command control.exe /name Microsoft.NetworkAndSharingCenter and hit Enter.
Next, click on Change advanced sharing settings.
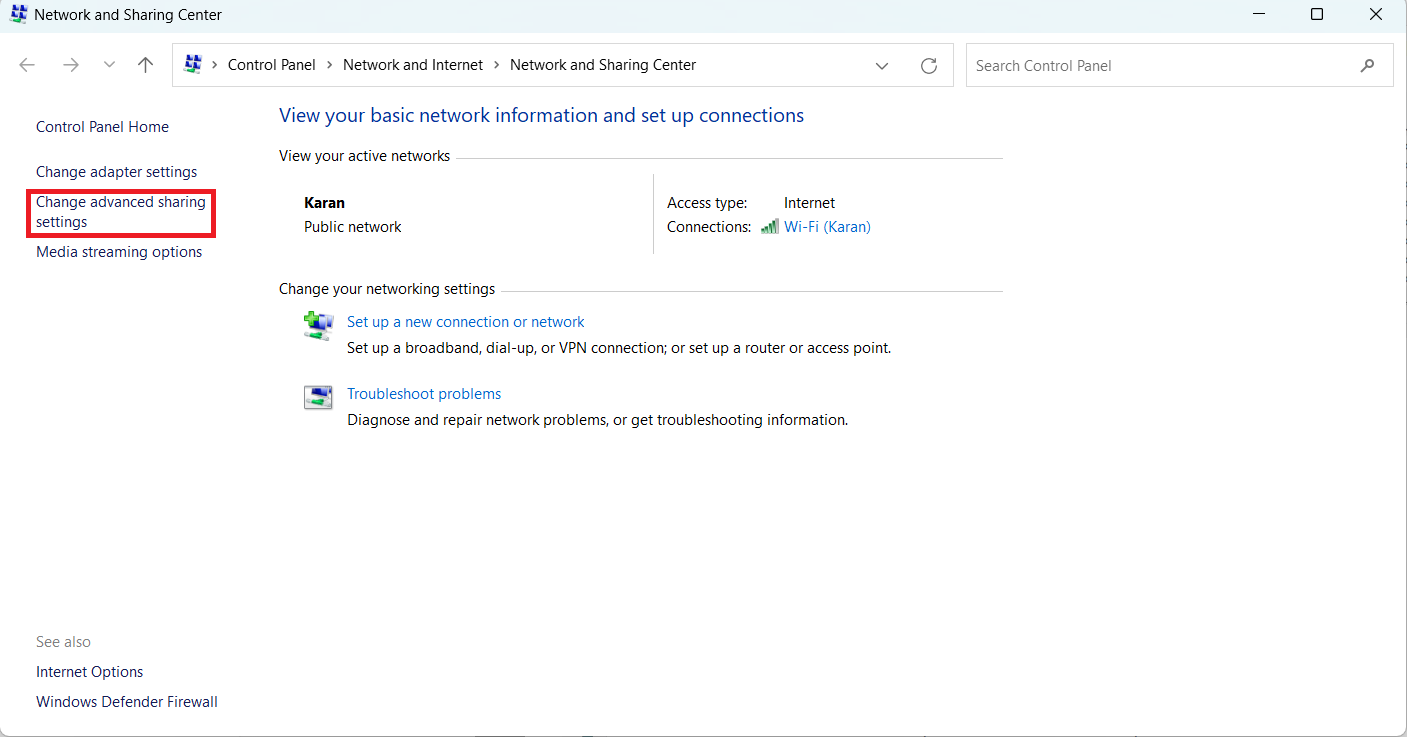
Now turn On Network discovery and File and printer sharing options.
Close this window and restart your computer.
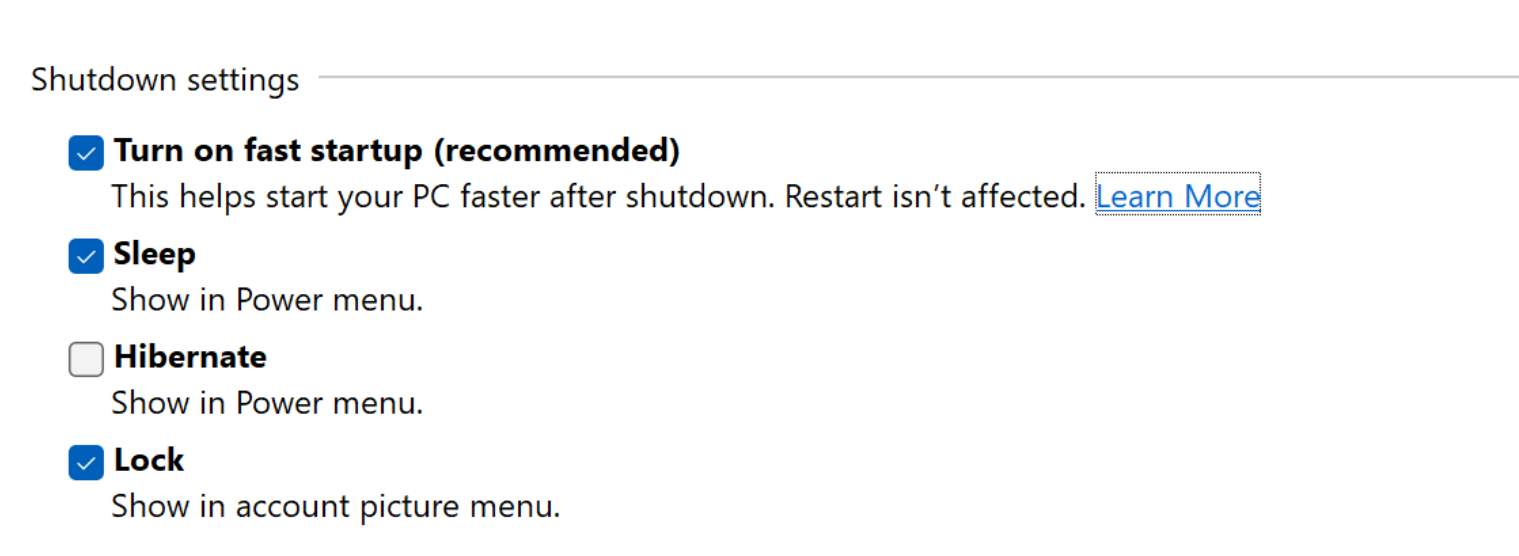
Fix 6: Disable Fast startup
Open Settings by pressing Win + I keys.
Then navigate to System > Power & Sleep and then click on Additional Power settings.
Now select Choose what the power button does.
Next, click on Change settings that are currently unavailable.
Now uncheck Turn on fast startup (recommended).
Fix 7: Reset the network on your computer
Open Settings and click on Network and Internet > Advanced network settings.
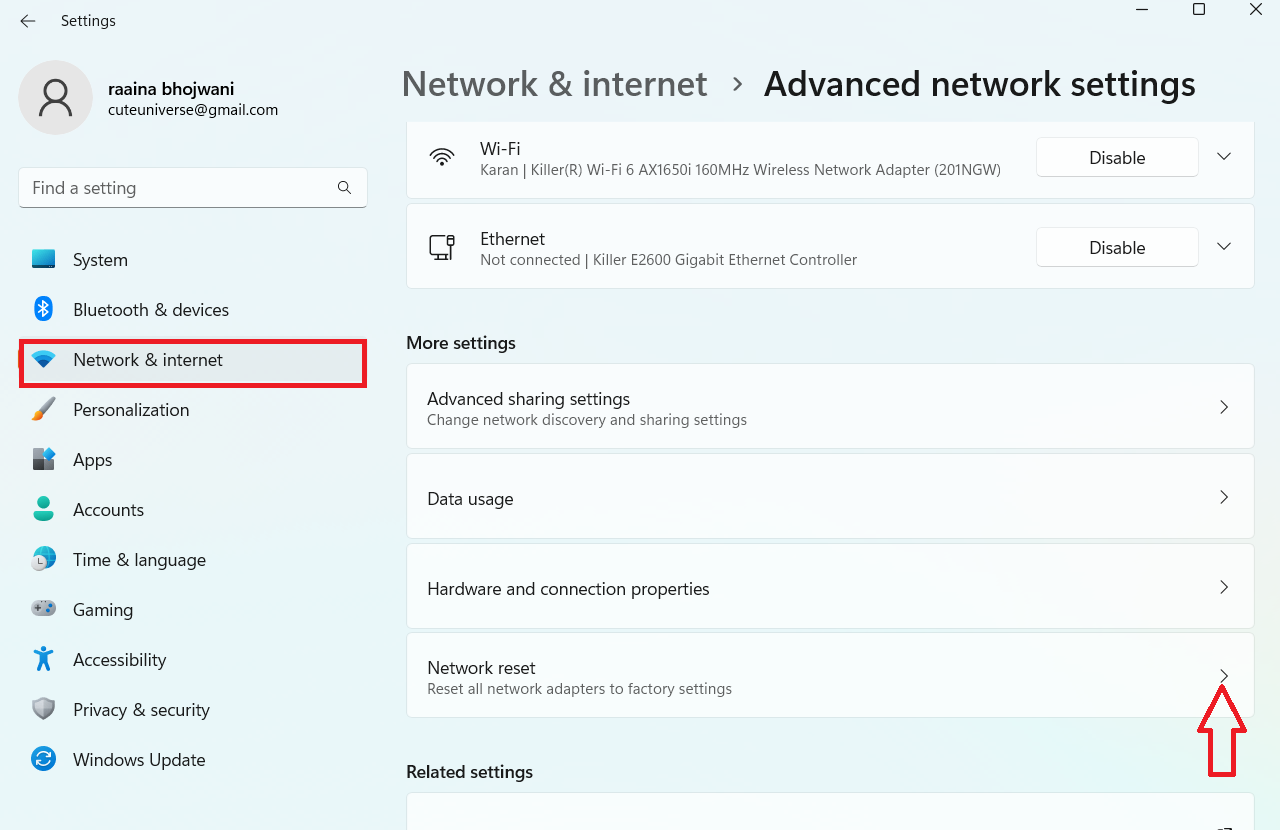
Next, click on Network reset > Reset now.
Fix 8: Turn on Network discovery with Command Prompt
Open Command Prompt and type following command:
netsh advfirewall firewall set rule group="Network Discovery" new enable=Yes

Press Enter.
That’s it!
RELATED ARTICLES
79721
Пытаетесь настроить локальную сеть, но Windows 11 не видит другие компьютеры или сетевые папки? Это одна из самых частых проблем. В этой статье я расскажу о решениях, которые помогут это исправить. После чего ваш компьютер или ноутбук сможет обнаруживать и заходить на другие компьютеры и папки в локальной сети.
В проводнике Windows 11 есть вкладка Сеть, где после включения сетевого обнаружения и общего доступа к папкам должны отображаться эти самые компьютеры и папки, которые находятся в локальной сети. Но что делать, если вы на всех компьютерах включили сетевое обнаружение, открыли общий доступ к папкам, а Windows 11 не обнаруживает эти сетевые компьютеры и папки. В разделе Сеть их нет.
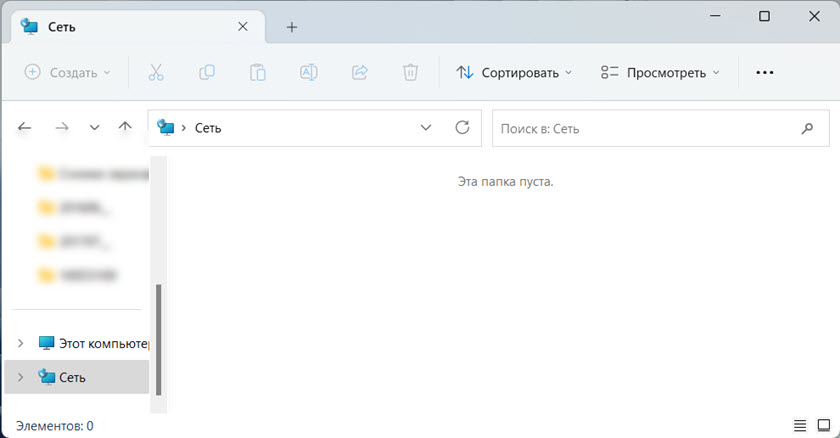
Часто там отображается вкладка Сетевая инфраструктура, где находится роутер, или данный компьютер. Но другие компьютеры недоступны. Так же может быть проблема с доступом к дискам и флешкам (которые подключены к роутеру), или к другим сетевым накопителям.
Бывает, что сетевые папки и компьютеры отображаются, но при попытке открыть их появляется ошибка 0x80070035 «Не найден сетевой путь» и Windows 11 не может получить к ним доступ.
Не работает сетевое обнаружение в Windows 11: как исправить?
У меня есть опыт в решении этой проблемы в предыдущих версиях Windows и в самой Windows 11. Исходя из этого опыта я хочу выделить основные причины:
- Неправильные настройки сетевого обнаружения. Например, для неактивного профиля сети. Или настройка только на одном компьютере. Настраивать сетевое обнаружение нужно на всех компьютерах, которые будут участвовать в сети.
- Блокировка со стороны антивирусов или брандмауэров.
- Сбой после обновления Windows 11.
- Устройства находятся не в одной локальной сети. Например, второй компьютер подключен через другую точку доступа, но они не находятся в одной подсети, так как на этой точке доступа не отключен DHCP-сервер. Или на роутере включена функция изоляции устройств в локальной сети (обычно она по умолчанию всегда включена для гостевых Wi-Fi сетей).
- Проблема с протоколом SMB. Дело в том, что Windows 11, как и Windows 10 по умолчанию поддерживает только более новые и современные протоколы SMB 2 и SMB 3. Но если в сети есть компьютеры, например на Windows 7, который используют устаревший протокол SMB 1, или роутер (к которому подключен диск или флешка) использует этот протокол, то Windows 11 не сможет их обнаружить.
- Неправильные настройки рабочей группы.
- Проблемы с сетевыми настройками, остановка нужных служб, протокол IPv6.
Проверка параметров общего доступа
На всех компьютерах, которые будут участвовать в локальной сети, нужно задать параметры общего доступа. Включить сетевое обнаружение и открыть общий доступ к файлам и принтерам.
Как это сделать в Windows 11 я показывал в отдельной статье: настройка локальной сети в Windows 11. Как открыть общий доступ к папке в Windows 11.
В Параметрах, в разделе Сеть и Интернет – Дополнительные сетевые параметры – Дополнительные параметры общего доступа для активного сетевого профиля нужно включить Сетевое обнаружение и Общий доступ к файлам и принтерам.
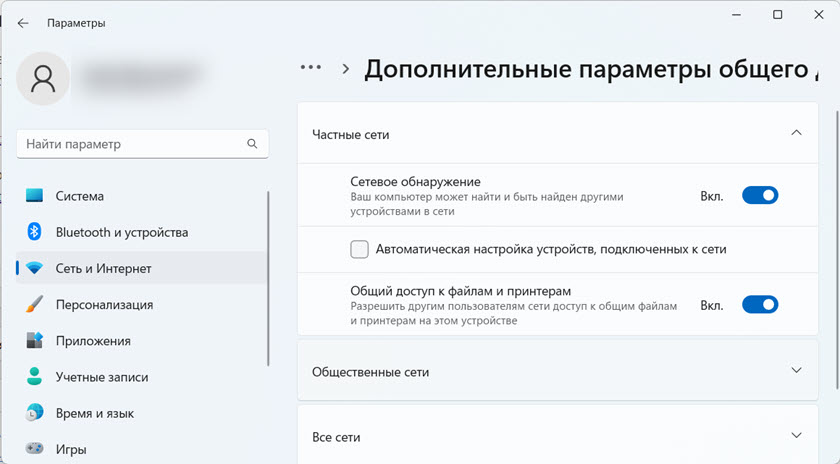
И обычно еще отключают Общий доступ с парольной защитой (на вкладке Все сети).
Все эти настройки нужно задать на всех компьютерах, которые должны обнаруживать и быть обнаружены в локальной сети. В вашей сети так же могут быть компьютеры на Windows 10, или Windows 7. В таком случае вам пригодятся эти инструкции:
- Как настроить локальную сеть в Windows 10
- Настройка локальной сети через Wi-Fi роутер между компьютерами на Windows 7
Если у вас проблема с обнаружением сетевого накопителя, который подключен к роутеру, тогда нужно проверить параметры общего доступа на самом роутере. Как это сделать, я показывал в этой статье: не отображаются общие папки, сетевые компьютеры, флешки, диски на вкладке «Сеть» проводника Windows.
Если Windows 11 перестала обнаруживать сетевые компьютеры после обновления
Есть очень простое, но рабочее решение. Думаю, его можно применить в любом случае, не только когда проблема возникла после обновления.
- Зайдите в Дополнительные параметры общего доступа и отключите Сетевое обнаружение и Общий доступ к файлам и принтерам для всех сетевых профилей. Я показывал эти настройки выше.
- Перезагрузите свой компьютер или ноутбук.
- Снова откройте настройки общего доступа и включите Сетевое обнаружение и Общий доступ к файлам и принтерам для текущего сетевого профиля. Так же отключите Общий доступ с парольной защитой на вкладке Все сети.
- Перезагрузите компьютер еще раз.
Есть отзывы, что это так же решает проблему, когда Windows 11 не видит компьютеры с Windows 10 или Windows 7 в разделе Сеть.
Включение протокола SMB 1 в Windows 11
В предыдущей версии Windows это решение помогло очень многим. В Windows 11 это так же работает.
Протокол SMB в Windows отвечает за доступ к сетевым компьютерам, накопителям, папкам. Так как SMB 1 это устаревшая версия протокола, то в Windows 11 он отключен. Но если устройства в сети используют именно этот протокол, то Windows 11 не сможет их обнаружить.
Нужно либо включить SMB 1 в Windows 11, либо включить SMB 2 на том устройстве, которое не обнаруживается в сети. Но в большинстве случаев это сделать невозможно.
Поэтому, включаем SMB 1 в Windows 11. Но без особой необходимости не рекомендую это делать, так как протокол уже устаревший и не очень безопасный.
- Нажмите сочетание клавиш Win + R, введите (или просто скопируйте и вставьте) команду appwiz.cpl и нажмите Ok.
- Откроется окно Программы и компоненты. Нажмите на пункт Включение или отключение компонентов Windows.
- Нужно включить компонент «Поддержка общего доступа к файлам SMB 1.0/CIFS». Поставьте возле него галочку и нажмите Ok.

- Windows 11 установит данный компонент и предложит перезагрузить компьютер. Перезагрузите.

Отключение антивируса и брандмауэра
Просто остановите работу антивируса и брандмауэра на некоторое время. Отключать их нужно на всех компьютерах, которые вы хотите объединить в сеть. Если после отключения защиты компьютеры смогут обнаружить друг друга, то нужно будет добавить это подключение в исключения антивируса или брандмауэра.
Так же рекомендую для проверки отключить встроенный брандмауэр в Windows 11.
Проверка рабочей группы
Чтобы компьютеры могли обнаруживать друг друга, они должны находиться в одной рабочей группе. Проверить рабочую группу, и при необходимости сменить ее очень просто.
- Чтобы открыть окно Свойства системы нажмите сочетание клавиш Win + R, введите команду sysdm.cpl и нажмите Ok.
- Нажмите на кнопку Изменить. Там вы сможете посмотреть или сменить рабочую группу.

Напомню, что рабочая группа должна быть одинаковая на всех компьютерах в локальной сети.

Включаем небезопасные гостевые входы (для Windows 11 версии 24H2)
Обновление: этим решением поделился Павел в комментариях. И его решение уже собрало несколько положительных отзывов. Поэтому, я решил добавить его в статью. Суть решения в том, чтобы включить небезопасные гостевые входы.
- Нажмите сочетание клавиш Win + R, введите команду gpedit.msc и нажмите «Ok».
- Откройте раздел Конфигурация компьютера – Административные шаблоны – Сеть – Рабочая станция Lanman. И если у вас на английском: Computer Configuration – Administrative templates – Network – Lanman Workstation.
- Найдите там и включите политику «Включить небезопасные гостевые входы» (Enable insecure guest logons).

Нажмите «Применить» и «Ok». Закройте окно редактора локальной групповой политики.

Другие решения проблемы с сетевым обнаружением в Windows 11
- Сделайте сброс настроек сети.
- Попробуйте отключить IPv6.
- Если на компьютере установлен VPN, попробуйте его отключить или полностью удалить.
- Убедитесь, что все компьютеры подключены к одной сети (к одному роутеру). Если подключение по Wi-Fi, то это должна быть не гостевая сеть. Так же желательно проверить, не включена ли изоляция устройств (клиентов) в настройках роутера.
- Еще раз проверьте настройки сетевого обнаружения на всех компьютерах.
Жду ваши вопросы, дополнения и замечания в комментариях.
,
If you running Windows 11 version 24H2 and you don’t «see» all the computers on your network, then this guide will help you to fix the problem.
Symptom: After installing Windows 11 24H2, network-connected computers, even the «host» computer, do not appear in File Explorer > Network (aka «Network Explorer»). As a result, users cannot access shared files and printers from other computers on the network.
The symptom of «network computers not shown» in «Network Explorer» is an old problem that first appeared in Windows 10, and in a previous tutorial we showed how to fix it.
But, since this problem is still not fixed by Microsoft and it exists even in Windows 11 24H2, in this guide we will show you how to deal with it, because most of the old methods in our old tutorial no longer work.
How to FIX: Windows 11 24H2 Not Showing All Network Computers.
Below you will find instructions on how to force Windows 11 24H2 to show all computers on the network according to the type of network profile you’re using: Private or Public.
- Private: This network profile should be selected when connecting to a trusted and secure network. When you choose the ‘Private’ network profile, your computer is discoverable to other devices on the network, and you can use your computer to share files and printers.
- Public: This network profile should be selected when connecting to public or insecure networks outside your home or workplace (eg networks in hotels, airports, coffee shops, etc.). When you choose the ‘Public’ network profile, by default, your computer is hidden from other devices on the network, and the File and print sharing is disabled.
Step 1. Set the Same Network Profile on all network PCs.
To be able to «see» all computers connected to the same network, you must first set them all to the same type of network profile (Private or Public). To do that:
1. Right-click on the Wi-FI icon (Wireless connection) or the Ethernet icon (Cable connection) in the taskbar to Open Network & Internet Properties.*
* Note: If you don’t see the network icon, navigate to Start > Settings > Network & Internet.

2. In the «Network and Internet Settings» section, under ‘Properties’, you will see the currently defined network profile (Public or Private). To change it, just click on ‘Properties’ and…

3. …set your preferred Network profile type (Public or Private)*. When, done, proceed to next step.
* Recommendation: If the network you are connecting to is trusted, select the network profile «Private«, otherwise, in untrusted networks, select the «Public» network profile.

Step 2. Change Advanced Sharing Settings.
Now, according the selected network profile, follow the instructions in the corresponding section below to change the sharing settings on all PCs on your network.
- PRIVATE.
- PUBLIC.
1. Change Sharing Settings in PRIVATE networks.
If you are using a «Private» network profile type, do the following on any network computer that you want to be discoverable and visible on the network.*
1. Navigate to Network & internet options and then click Advanced network settings and then open the Advanced Sharing settings.

2. In Advanced sharing settings, do the following:
a. Under Private networks: Turn ON the Network Discovery and the File and Print sharing.
b. Under Public networks: Turn OFF the Network Discovery and the File and Print sharing.
c. Under All networks:
- Turn Off the Public folder sharing if you don’t want other users from the network to read/write files in ‘Public folders’ on this PC.
- Turn ON the Password protected sharing), if you want to require users to provide a username and a password on this PC to access its files.*
* Note: If the computer always remains on a trusted private network, you can set the «Password protected sharing» to «OFF«, in order to allow other users on that network to access its files, printers, and public folders without requiring a username and a password (although this is not recommended). If you do this, and you cannot access the shared items from other PCs, follow the instructions in this tutorial to force Windows 11 to allow insecure logins.
* Recommendation: To keep your computer secure when sharing files/folders on it, it is recommended to set a password for your account and create different accounts and passwords for each user on the network who will have access to the files you share. (this will also help you to set different permissions for each user in the shared folders/files).

3. After making the above changes, check if you can «see» all the computers in the network in File Explorer > Network. If not, proceed to step-3 below.
2. Change Sharing Settings in PUBLIC networks.
If you are using a «Public» network profile type, do the following on any network computer that you want to be discoverable and visible on the network.
1. Navigate to Network & internet options, then click Advanced network settings and then open the Advanced sharing settings.

2. In Advanced sharing settings, do the following:
a. Under Public networks: Turn On the Network Discovery and the File and Print sharing.
b. Under All networks:
- Turn OFF the Public folder sharing to prevent other users from the network to read/write files in ‘Public folders’ on this PC.
- Turn ON the Password protected sharing, to require users to provide a username & password on this PC to access its files.*
* Recommendations:
1. To keep your computer secure when sharing files/folders on it, it is recommended to set a password for your account and create different accounts and passwords for each user on the network who will have access to the files you share. (this will also help you to set different permissions for each user in the shared folders/files). If you do this, and you cannot access the shared items from other PCs, follow the instructions in this tutorial to force Windows 11 to allow insecure logins.
2. When sharing files on a laptop that you use outside the office, never connect (via Wi-Fi or cable) to untrusted public networks (e.g. on hotels, airports, etc.), and if you must connect to the internet, do so via your mobile (hotspot).
If you still can’t do this and need to connect to a PUBLIC untrusted network (either via Wi-Fi or Ethernet), turn OFF the Network Discovery & the File and print sharing in both ‘Private’ and ‘Public’ network profiles.

3. After modifying the sharing settings, check if the networked computers appear in File Explorer > Network, and if not, proceed to the next step.
Step 3. Set the «FDPHOST» & «FDResPub» services to start Automatically.
The Function Discovery Resource Publication (FDResPub) and the Function Discovery Provider Host (fdPHost) are Windows services that helps make your computer discoverable on a network but are started manually by default. To force these services to start automatically:
1. Open «Windows Services» on any PC you made the above changes. To open Services:
-
-
Press the Windows + R keys to open the Run command box.
-
Type services.msc and click OK.
-

2a. Double-click on Function Discovery Provider Host service to open its properties.

2b. Change the Startup type to Automatic and click OK.

3a. Then open the Function Discovery Resource Publication service’s properties.

3b. Change the Startup type from Manual to Automatic and click OK.

4. Close Services and restart the computer.

5. At this point, you should normally be able to «see» the computer you made the above changes to, from other computers in their Network Explorer.
Additional Help/Info
1. By default the ‘FDResPub’ service is triggered to run only when a «PRIVATE» network profile is selected and not for «PUBLIC» profiles. So, if you still don’t «see» a computer on the Network and you’re using a «PUBLIC» network profile, go ahead and remove the «PRIVATE PROFILE» trigger from the ‘FDResPub’ service on that computer. To do this:
* Note: This solution usually applies when using a «PUBLIC» network profile, but you can even try it on a «PRIVATE» profile.
1. Open Command Prompt as Administrator and type the following command:
- sc triggerinfo FDResPub delete

2. Restart the PC and check if the Network Explorer, shows all the network computers. *
* Note: If you want to verify that the deleted trigger makes the computer «invisible» to the network, you can restore the trigger with the command below.
- sc triggerinfo FDResPub start/strcustom/fbcfac3f-8460-419f-8e48-1f0b49cdb85e/PROFILE_CHANGED_TO_PRIVATE

2. After following the above instructions, you will find that although you see all the other computers in Network, your own computer does not appear.
This is another bug, that comes from Windows 10, and the only solution to bypass this issue is to restart the Function Discovery Resource Publication (FDResPub) service. However, keep in mind that this approach works temporarily because after several minutes your computer’s name will disappear again from its own Network Explorer.
Other solutions to fix the problem are to create a batch file to restart the FDResPub service whenever you want or to create a scheduling task to automatically restart the FDResPub service every 1 minute via the Task Scheduler. If you want to do this, read the instructions in this tutorial: FIX: Windows 10/11 does not show the name of your computer in your Network Explorer.
That’s it! Which solution worked for you?
Let me know if this guide has helped you by leaving your comment about your experience. Please like and share this guide to help others.
If this article was useful for you, please consider supporting us by making a donation. Even $1 can a make a huge difference for us in our effort to continue to help others while keeping this site free:
- Author
- Recent Posts
Konstantinos is the founder and administrator of Wintips.org. Since 1995 he works and provides IT support as a computer and network expert to individuals and large companies. He is specialized in solving problems related to Windows or other Microsoft products (Windows Server, Office, Microsoft 365, etc.).
Введение: Неприятный Сюрприз
Привет, друзья! Недавно я столкнулся с неприятной проблемой: мой ПК под управлением ОС Windows 11 внезапно перестал видеть локальную сеть. Это очень огорчило меня, особенно когда нужно работать с файлами на других компьютерах. Решение оказалось не таким уж сложным, и я хочу поделиться им с вами.
Первые Шаги: Проверяем Основные Моменты
Первое, что я сделал, – это проверил, все ли в порядке с моим Wi-Fi и интернет-соединением. Иногда проблема может быть в самом соединении, а не в Windows. Но у меня всё было в порядке.
Шаг 2: Перезагрузка и Обновления
Затем я перезагрузил компьютер – классический способ решения многих проблем. После этого проверил, нет пришли ли новые обновления Windows. Обновления могут исправить многие баги и проблемы.
Шаг 3: Проверка Настроек Сети
После перезагрузки я занялся настройками сети. В настройках Windows я нашёл раздел «Сеть и Интернет» и посмотрел, все ли в порядке с настройками адаптера. Иногда сбой в этих настройках может привести к проблемам с обнаружением сети.
Шаг 4: Обновление Драйверов Сетевого Адаптера
Ещё одна потенциальная причина проблемы – устаревшие драйверы сетевого адаптера. Я зашёл в «Диспетчер устройств», нашёл свой сетевой адаптер и посмотрел, есть ли новые драйверы. Обновлённые драйвера ведь могут решить множество проблем.
Шаг 5: Проверка Служб Windows
Если предыдущие шаги не помогли, я проверил службы Windows. Некоторые службы, такие как «Функции обнаружения сети», должны быть включены для корректной работы сети. Я убедился, что эти службы запущены.
Шаг 6: Отключение Брандмауэра и Антивируса
Иногда брандмауэр или антивирус могут блокировать соединение с локальной сетью. Я временно отключил их, чтобы проверить, не это ли причина проблемы.
Заключение: Всё Работает!
После проделанных шагов моя проблема была решена. Локальная сеть снова стала видна, и я смог продолжить свою работу. Надеюсь, мои советы помогут вам, если вы столкнётесь с подобной проблемой. Удачи в решении технических задач!