
Это сообщение об ошибке указывает на то, что загрузочный сектор поврежден или отсутствует.
Решение
Воспользуйтесь приведенными ниже способами, чтобы устранить ошибки запуска Windows.
Примечание. Чтобы выполнить приведенные ниже действия, требуется установочный диск Windows 8.1, Windows 8, Windows 7 или Windows Vista. Если его нет, обратитесь к изготовителю компьютера или в службу поддержки Майкрософт с просьбой предоставить установочный диск. Если у вас нет установочного диска, но при этом на компьютере предустановлено средство восстановления при загрузке, воспользуйтесь способом 4.
Способ 1. Запуск средства восстановления при загрузке в среде восстановления Windows (WinRE)
Чтобы выполнить восстановление при загрузке в среде восстановления Windows (WinRE), сделайте следующее:
-
Вставьте установочный диск Windows в дисковод и запустите компьютер.
-
После появления сообщения Press any key to boot from CD or DVD (Нажмите любую клавишу для загрузки с компакт-диска или DVD-диска), выполните требуемое.
Если компьютер не обнаружит носитель автоматически-
При перезагрузке найдите на экране инструкции, в которых объясняется, как прервать загрузку в обычном режиме и войти в программу настройки BIOS. Чтобы начать настройку BIOS, для большинства компьютеров можно нажать клавиши F2, F10, ESC или DEL.
-
В окне программы настройки BIOS Setup Utility найдите вкладку Boot Order (Порядок загрузки), Boot Options (Параметры загрузки) или Boot (Загрузка). Следуя инструкциям на экране, воспользуйтесь клавишами со стрелками, чтобы открыть вкладку Boot Order (Порядок загрузки), а затем нажмите клавишу ВВОД.
-
В списке загрузки найдите обозначение компакт-диска, DVD-диска или USB-устройства флэш-памяти (CD, DVD или USB flash drive соответственно). Возможно, носитель определен как Removable Device (Съемное устройство). Следуя инструкциям на экране, воспользуйтесь клавишами со стрелками, чтобы поднять обозначение диска в списке загрузки и сделать его первым. Нажмите клавишу ВВОД. Теперь последовательность загрузки с компакт-диска, DVD-диска или USB-устройства флэш-памяти изменена.
-
Нажмите клавишу F10, чтобы сохранить изменения и выйти из программы настройки BIOS Setup Utility. Выберите команду Yes (Да) в окне подтверждения. Компьютер будет перезагружен.
-
-
Выберите язык, время и денежные единицы, а также способ ввода и клавиатуру, затем нажмите кнопку Далее.
-
Выберите пункт Восстановить компьютер.
-
При появлении диалогового окна Параметры восстановления системы выберите диск с установочными файлами Windows и нажмите кнопку Далее.
-
В окне Параметры восстановления системы выберите пункт Восстановление системы.
-
Укажите операционную систему, которую требуется восстановить, и нажмите кнопку Далее.
-
В диалоговом окне Параметры восстановления системы выберите пункт Восстановление при загрузке.
Способ 2. Перестроение данных конфигурации загрузки в среде восстановления Windows (WinRE)
Для перестроения данных конфигурации загрузки в среде восстановления Windows (WinRE) выполните следующие действия
-
Вставьте установочный диск Windows в дисковод и запустите компьютер.
-
После появления сообщения Press any key to boot from CD or DVD (Нажмите любую клавишу для загрузки с компакт-диска или DVD-диска), выполните требуемое.
Если компьютер не обнаружит носитель автоматически-
При перезагрузке найдите на экране инструкции, в которых объясняется, как прервать загрузку в обычном режиме и войти в программу настройки BIOS. Чтобы начать настройку BIOS, для большинства компьютеров можно нажать клавиши F2, F10, ESC или DEL.
-
В окне программы настройки BIOS Setup Utility найдите вкладку Boot Order (Порядок загрузки), Boot Options (Параметры загрузки) или Boot (Загрузка). Следуя инструкциям на экране, воспользуйтесь клавишами со стрелками, чтобы открыть вкладку Boot Order (Порядок загрузки), а затем нажмите клавишу ВВОД.
-
В списке загрузки найдите обозначение компакт-диска, DVD-диска или USB-устройства флэш-памяти (CD, DVD или USB flash drive соответственно). Возможно, носитель определен как Removable Device (Съемное устройство). Следуя инструкциям на экране, воспользуйтесь клавишами со стрелками, чтобы поднять обозначение диска в списке загрузки и сделать его первым. Нажмите клавишу ВВОД. Теперь последовательность загрузки с компакт-диска, DVD-диска или USB-устройства флэш-памяти изменена.
-
Нажмите клавишу F10, чтобы сохранить изменения и выйти из программы настройки BIOS Setup Utility. Выберите команду Yes (Да) в окне подтверждения. Компьютер будет перезагружен. Пусть компьютер загрузится в обычном режиме. Проверка займет несколько минут. За это время удалится вредоносная программа, которой, возможно, заражен компьютер.
-
-
Выберите язык, время и денежную единицу, способ ввода данных (с клавиатуры или другой), а затем нажмите кнопку Далее.
-
Выберите пункт Восстановить компьютер.
-
Укажите операционную систему, которую требуется восстановить, и нажмите кнопку Далее.
-
В диалоговом окне Параметры восстановления системы выберите пункт Командная строка.
-
Введите Bootrec /RebuildBcd и нажмите клавишу ВВОД.
Подробнее о том, как использовать Bootrec.exe, см. в статье Как использовать средство Bootrec.exe в среде восстановления Windows для устранения неполадок при запуске Windows.
Способ 3. Запуск восстановления системы в среде восстановления Windows (WinRE)
Важно! Для этого способа на компьютере должно быть включено восстановление системы.
Чтобы выполнить восстановление системы в среде восстановления Windows (WinRE), сделайте следующее:
-
Вставьте установочный диск Windows в дисковод и запустите компьютер.
-
После появления сообщения Press any key to boot from CD or DVD (Нажмите любую клавишу для загрузки с компакт-диска или DVD-диска), выполните требуемое.
Если компьютер не обнаружит носитель автоматически-
При перезагрузке найдите на экране инструкции, в которых объясняется, как прервать загрузку в обычном режиме и войти в программу настройки BIOS. Чтобы начать настройку BIOS, для большинства компьютеров можно нажать клавиши F2, F10, ESC или DEL.
-
В окне программы настройки BIOS Setup Utility найдите вкладку Boot Order (Порядок загрузки), Boot Options (Параметры загрузки) или Boot (Загрузка). Следуя инструкциям на экране, воспользуйтесь клавишами со стрелками, чтобы открыть вкладку Boot Order (Порядок загрузки), а затем нажмите клавишу ВВОД.
-
В списке загрузки найдите обозначение компакт-диска, DVD-диска или USB-устройства флэш-памяти (CD, DVD или USB flash drive соответственно). Возможно, носитель определен как Removable Device (Съемное устройство). Следуя инструкциям на экране, воспользуйтесь клавишами со стрелками, чтобы поднять обозначение диска в списке загрузки и сделать его первым. Нажмите клавишу ВВОД. Теперь последовательность загрузки с компакт-диска, DVD-диска или USB-устройства флэш-памяти изменена.
-
Нажмите клавишу F10, чтобы сохранить изменения и выйти из программы настройки BIOS Setup Utility. Выберите Да в окне подтверждения.
-
-
Выберите язык, время и валюту, а также способ ввода и клавиатуру, затем нажмите кнопку Далее.
-
Выберите пункт Восстановить компьютер.
-
При появлении диалогового окна Параметры восстановления системы выберите диск с установочными файлами Windows и нажмите кнопку Далее.
-
В диалоговом окне Параметры восстановления системы выберите пункт Восстановление системы.
-
Следуйте указаниям мастера восстановления системы и выберите подходящую точку восстановления.
-
Нажмите кнопку Готово, чтобы восстановить систему.
Дополнительные сведения о восстановлении системы см. в разделе Восстановление системы: часто задаваемые вопросы.
Способ 4. Использование средства восстановления при загрузке, если оно уже установлено на компьютере
Важно! Этот способ работает, только если на компьютере заранее установлено средство восстановления при загрузке.
Если у вас нет установочного диска Windows, но при этом на компьютере заранее установлено средство восстановления при загрузке, выполните следующие действия, чтобы восстановить загрузочные файлы.
-
Извлеките из компьютера все дискеты, компакт-диски и DVD-диски, а затем перезагрузите компьютер, нажав кнопку питания.
-
Если на компьютере установлена только одна операционная система, при перезагрузке компьютера нажмите и удерживайте клавишу F8. Клавишу F8 необходимо нажать до появления эмблемы Windows. В случае появления эмблемы Windows необходимо повторить перезагрузку после вывода приглашения войти в систему Windows.
-
Если на компьютере установлено несколько операционных систем, с помощью клавиш со стрелками выберите операционную систему, которую необходимо восстановить, а затем нажмите и удерживайте клавишу F8.
-
-
На экране Дополнительные варианты загрузки выберите с помощью клавиш со стрелками пункт Устранение неполадок компьютера и нажмите клавишу ВВОД. (Если пункт Восстановление системы отсутствует, то средства восстановления не установлены на компьютере или отключены администратором сети.)
-
Выберите раскладку клавиатуры и нажмите кнопку Далее.
-
Выберите имя пользователя, введите пароль и нажмите кнопку OK.
-
В меню Параметры восстановления системы выберите пункт Восстановление при загрузке. Средство восстановления при загрузке может предлагать вам выбор вариантов устранения проблемы и перезагружать компьютер в процессе восстановления.
-
Home
-
News
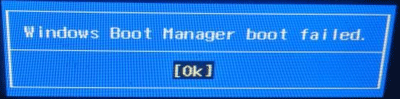
- Windows Boot Manager Failed To Start In Windows 10
By Sarah |
Last Updated
The Windows boot manager is actually a piece of small software that helps you load your system. It is part of the volume boot record, which is responsible for the boot process. If any problems are found on the Windows boot manager, you won’t be able to access your system or disk data. In this case, you need to find solutions to fix the error.
Windows boot manager, also called BOOTMGR, is located in the root directory and responsible for starting a system & interacting with users. The BOOTMGR configuration data is located in the Boot Configuration Data (BCD) store, which is a database similar to registry; it is used in new Windows system to replace the boot.ini file used in some old Windows like Windows XP.
Stay Calm When Windows Boot Manager Failed
When you find the Windows boot manager failed, please don’t panic. You should try the methods that will be introduced in the next part to fix the Windows boot manager error. To prevent the possible data loss resulted from the boot failure, you should go to the home page to get reliable data recovery software and backup program.
Error: Inaccessible Boot Device, How To Fix It Yourself?
Windows Boot Manager Failed to Start
The error message Windows Boot Manager boot failed sometimes appear on your computer screen during startup process. The most possible cause of this error is a damaged or corrupted Master Boot Record. You can press F8 to boot into Windows Recovery Menu or perform a System Restore to fix the Boot Manager failure.
Definitely, you are not able to enter your system when Windows Boot Manager is failed. You’ll probably see the following errors on the screen:
- 0xc00000f
- 0xc00000e
- 0xc00000d
- 0xc00000e9
- …
What are the possible causes for a failed Windows boot manager?
- The file integrity is damaged.
- The HDD data cable is not working.
- The BCD file is missed or corrupted due to disk write errors, power outages or boot sector viruses. (How to recover files lost by virus attack?)
In fact, the root reason is a corrupted Master Boot Record (MBR). What’s more important is how to fix when you find Windows boot manager not working.
How to Fix Windows Boot Manager Boot Failed
This part will show you how to fix Windows boot manager in Windows 10.
Solution 1: Make Use of Bootrec.exe Tool
- Restart your system and press F8 to see the Windows Recovery Menu.
- Select Troubleshoot.
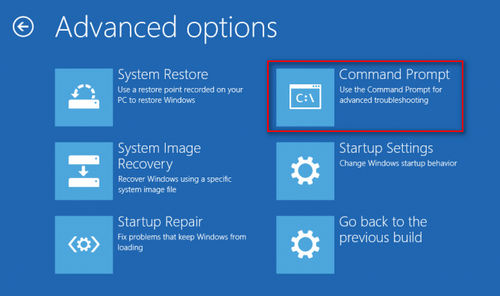
- Select Advanced options.
- Select Command Prompt. (How to recover files using CMD?)
- Type bootrec /RebuildBcd command and press Enter.
- Type bootrec /fixMbr and press Enter.
- Type bootrec /fixboot and press Enter.
- Type bootsect /nt60 SYS (or bootsect /nt60 ALL) and press Enter.
- Wait for the commands to complete.
You can also use the Rebuild MBR function in the bootable version of MiniTool Partition Wizard to try to fix the Windows boot manager error caused by damaged MBR.
Solution 2: Perform a System Restore
- Restart your computer and boot from the Windows installation disk.
- Choose to change language & other settings in Windows Setup or not; then, click Next.
- Click Repair your computer.
- Select Troubleshoot > Advanced options > System Restore.
- Choose the target operating system.
- Click Next in the System Restore wizard.
- Select the proper restore point and click Next.
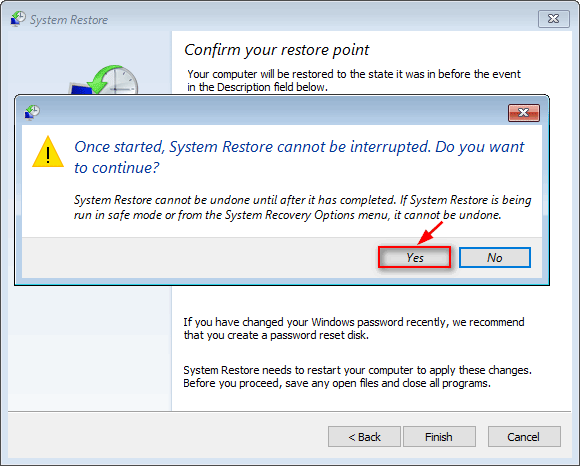
- Confirm your selection and click Finish.
- Click Yes in the prompt window to confirm system restore.
- Wait for the restore to complete.
- Restart your PC.
In addition, you can also try to fix Windows boot manager failed to start by removing newly installed hardware & external devices and then reboot.
Verdict
The Windows boot manager file is very essential for the PC startup, so it is protected by the system (hidden and read-only). It is actually located in the root directory of the active partition. In most PCs, it has a System Reserved label. When it is damaged, you won’t be able to boot into the system. You must follow the solutions given above to try to troubleshoot Windows boot manager failed issue.
About The Author
Position: Columnist
Sarah has been working as an editor at MiniTool since she graduated from university. Sarah aims at helping users with their computer problems such as disk errors and data loss. She feels a sense of accomplishment to see that users get their issues fixed relying on her articles. Besides, she likes to make friends and listen to music after work.
Updated on Apr 28, 2025
Key takeaways:
- Difficulty booting the operating system may be due to the loss of the Windows Boot Manager, causing it not to appear in the BIOS.
- Follow our guide to configure BIOS settings and restore Windows Boot Manager visibility. Your computer can boot smoothly with the Windows Boot Manager in the BIOS!
We occasionally face unexpected challenges. One such issue that can leave users scratching is the «Windows Boot Manager not showing in BIOS.» This mysterious situation can disrupt the boot process and cause frustration. However, in this passage, EaseUS will shed light on the background of this issue and provide users with actionable steps to restore Windows Boot Manager visibility in their BIOS settings. So, stay with us and follow this guide thoroughly!
Let’s fix the frustrating issue of Windows Boot Manager not appearing in your BIOS; eight solutions are available:
- Solution 1. Use the Windows Boot Repair Tool
- Solution 2. Delete External Devices
- Solution 3. Reboot the Power Cord
- Solution 4. Change Boot Order in BIOS
- Solution 5. Create a New Boot Sector
- Solution 6. Rebuild Windows BCD
- Solution 7. Replace A Hard Disk
- Solution 8. Enable the Boot Menu via CMD
Of these, solution 1 is a comprehensive solution. It solves most of the startup problems. We recommend you try it first if you don’t know the cause.
Solution 1. Use the Windows Boot Repair Tool
Our first solution is EaseUS WinRescure, a powerful utility known for its best solutions and performance in managing and repairing various aspects of your computer’s storage. When it comes to boot-related issues, this tool truly shines.
EaseUS WinRescure offers uncountable useful features, but here are some of its critical features related to boot repair:
- Repair Boot-Related Problems: Whether you’re encountering blue screen errors or black screen issues during boot-up, it can help you get your system back on track.
- Repair BCD Errors: It can fix Boot Configuration Data (BCD) errors, a common culprit behind boot problems.
- Fix System Partition Errors: If your system partition has errors or inconsistencies, this tool can effectively rectify them.
To resolve the Windows Boot Manager not showing in BIOS issue quickly, we strongly recommend you use this comprehensive tool. Download the EaseUS WinRescure and restore your BIOS settings to optimal functionality.
Step 1. Connect the USB drive/external drive to a working computer, open EaseUS WinRescuer, and click «Create Bootable Media.»
Step 2. Select EaseUS Boot Toolkits and other components you need. Then, click «Next.»

Step 3. Select your movable device and click «Go» to create an image on your USB drive/external drive. You can also burn the Windows ISO file to the storage media.
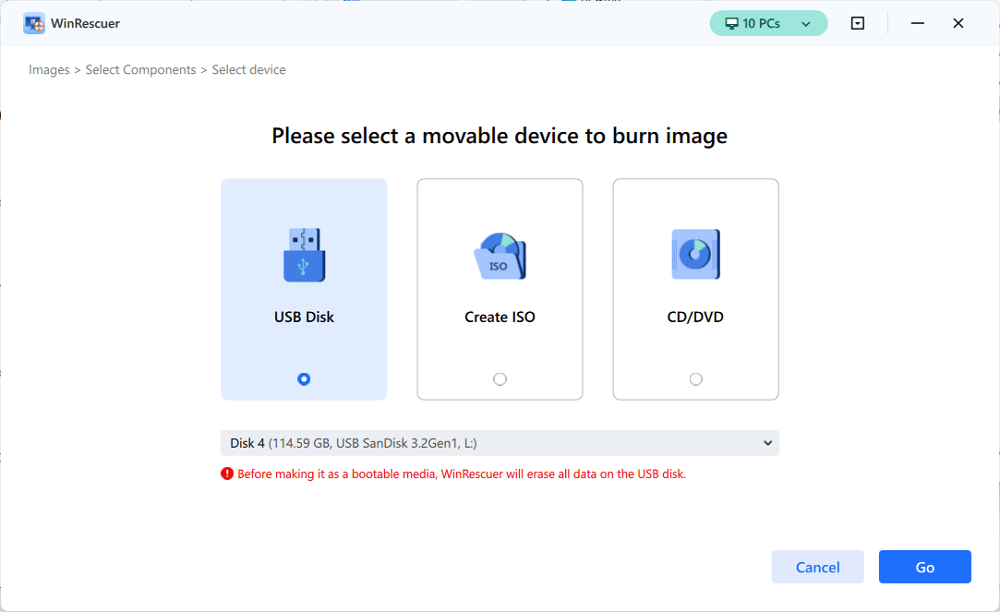
Step 4. Confirm the warning message and then wait for the creation process to complete.
Step 5. Connect the created bootable drive to the faulty computer and reboot it by pressing and holding «F2″/»Del» to enter the BIOS. Then, set the WinPE bootable drive as the boot disk and press «F10» to exit.

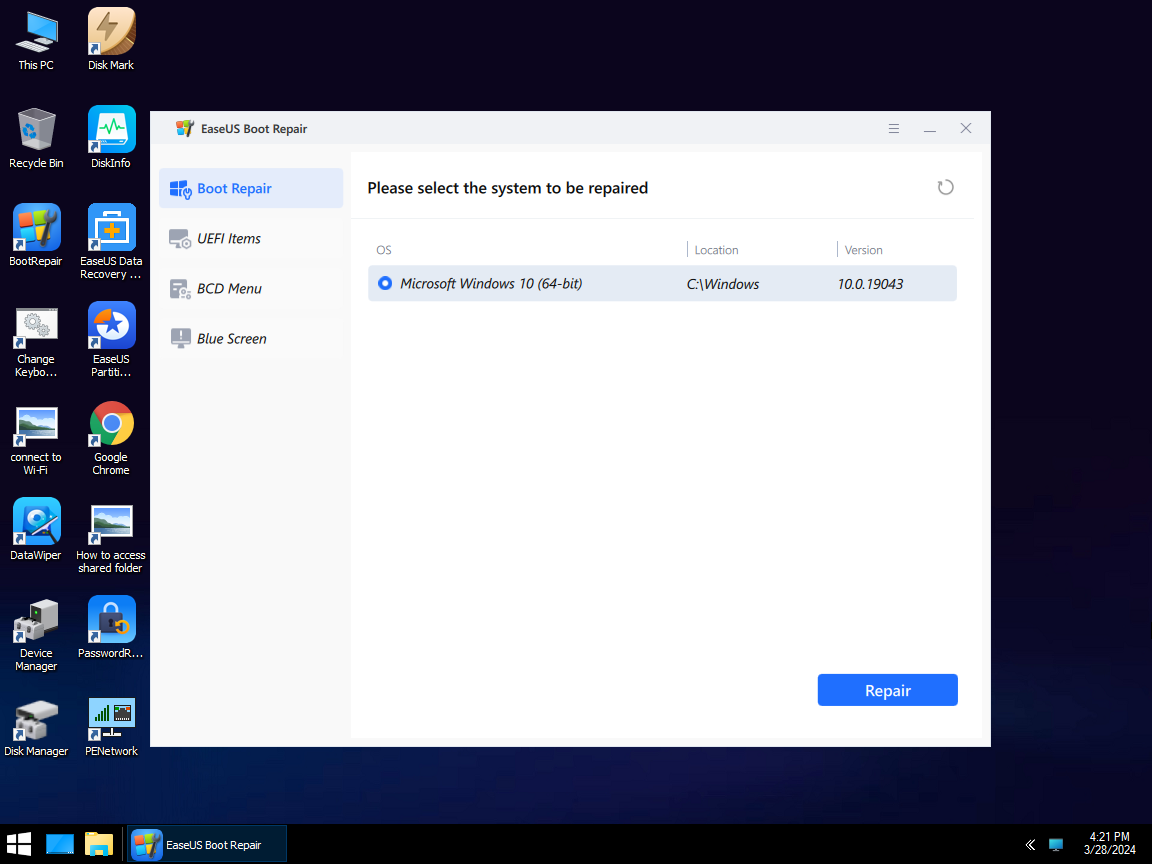
Step 6. Then, the computer will enter WinPE desktop. Open BootRepair, select the system you want to repair, and click «Repair.»
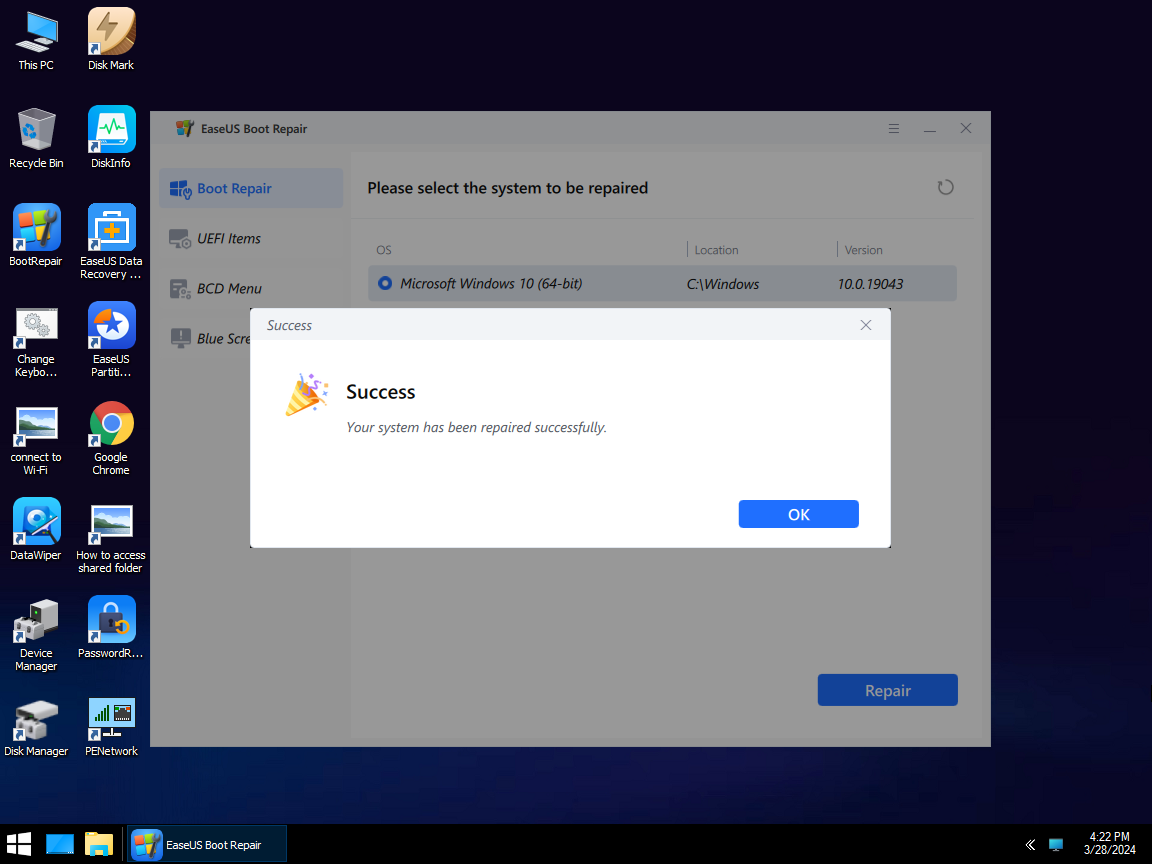
Step 7. Wait a moment, and you will receive an alert that the system has been successfully repaired. Click «OK» to complete the boot repair process.
Solution 2. Delete External Devices
Sometimes, external devices such as USB flash drives or external hard drives cause this issue where the Windows boot manager is not showing in BIOS. Because when your PC starts, it might detect these devices as bootable. So, you need to remove all external devices.
Follow the steps:
Step 1. Detach/remove external hard drives and USB devices from your PC.
Step 2. Then, restart the PC and check if the problem is fixed.
If this error still exists, try to carefully unplug the main USB cables connected to the PC motherboard. This step will disconnect the troublesome USB device or follow another method from this guide.
Further reading: Boot drive not showing up in BIOS
Solution 3. Reboot the Power Cord
When the hard drive is not detected, it becomes impossible to access the boot manager. If your computer fails and doesn’t recognize the hard drive, it may be due to improperly connected power and data cables. Consequently, this can lead to a «missing boot manager» error.
Follow the steps to fix it:
Step 1. Carefully open your computer case to access its internal components.
Step 2. Identify the hard drive and locate the power and data cables.
Step 3. Restart the system by disconnecting and then reconnecting these power and data cables. This action can resolve potential power or data connection issues.
Step 4. After adjusting the cables, turn on your computer and see if the issue is solved.
Note: Take these actions carefully because a little mistake can cause physical damage to your PC/laptop.
Share this article and let more users know how to fix the current error.
Solution 4. Change Boot Order in BIOS
Different computers may have differing BIOS configurations, but the process for modifying the boot sequence is generally consistent. Here are the steps:
Step 1. Access the BIOS menu during startup, typically by pressing the F2 or Delete key.
Step 2. Locate the «Boot» or «Boot Sequence» settings inside the BIOS.
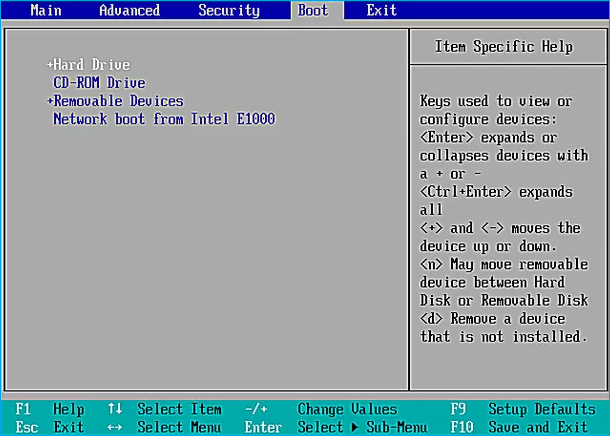
Step 3. You’ll find a list of bootable devices and their current order in these settings. Rearrange this sequence to match your desired method for Windows installation. For instance, if you’re using a flash drive, set it as the primary boot device.
Step 4. Save the changes and restart your computer.
These steps will resolve the issue and give you access to the Boot Manager as needed.
Other problems related to the boot error:
Solution 5. Create a New Boot Sector
A «missing boot manager» error may be due to partition corruption or boot damage, particularly within the Windows partition. Several factors could contribute to these issues, including an old hard drive, virus infections, or malware attacks. To fix this, we suggest you create a new boot sector with the following steps:
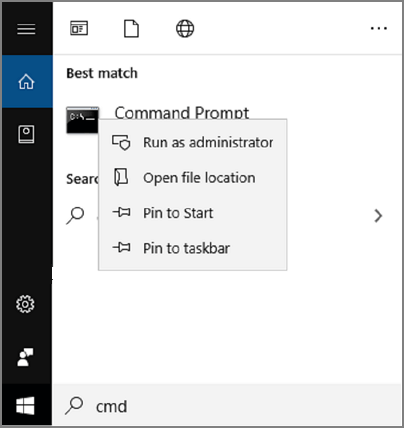
Step 1. Start by accessing the start menu and searching for «Command Prompt.»
Step 2. To enable developer configurations, right-click the Command Prompt option and select «Run as administrator.»
Step 3. Type «bootrec /fixboot» into the Command Prompt and hit Enter to execute it.
Step 4. After running the command, a message will be shown: «Operation completed successfully.»
Step 5. Now, restart your PC using the «Ctrl + Alt + Del» keys, and choose the restart option.
Note: Before restarting, all removable devices, such as USB drives or external hard drives, should be disconnected/unplugged from your system.
Solution 6. Rebuild Windows BCD
In the event of corruption or misconfiguration of your Boot Configuration Data (BCD), rebuilding it to resolve the «Windows boot manager is not showing in BIOS» error becomes necessary. The Boot Configuration Data is the crucial gateway to accessing the boot manager. Without it, access to the manager or even the visibility of its options is hidden.
Follow the steps:
Step 1. Search for «Change Advanced Startup Options» in the taskbar’s search field. Click on it to open it after it shows in the search results.
Step 2. In the advanced startup option, click «Restart now». This action will redirect you to the advanced options menu.
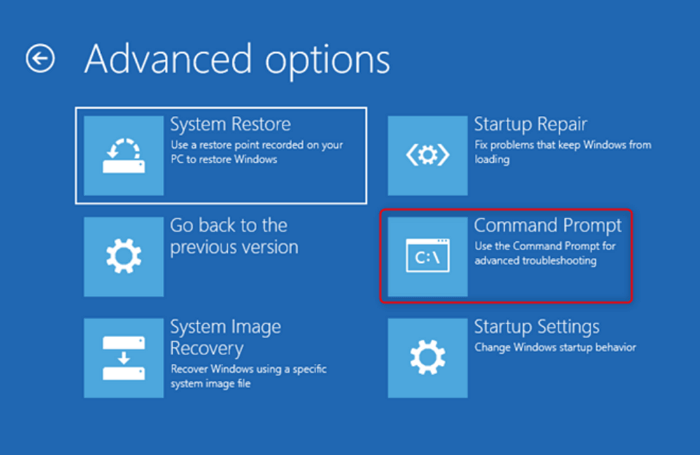
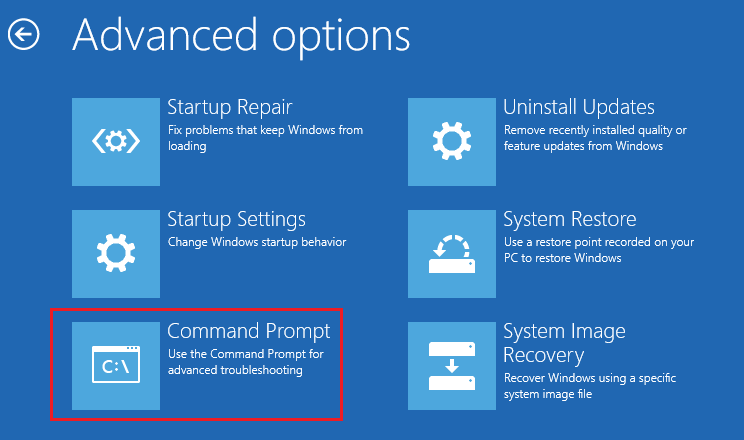
Step 3. Choose «Troubleshoot,» and then choose «Advanced Options.»
Step 4. Choose «Command prompt» from the subsequent menu and wait for the Command Prompt to open.
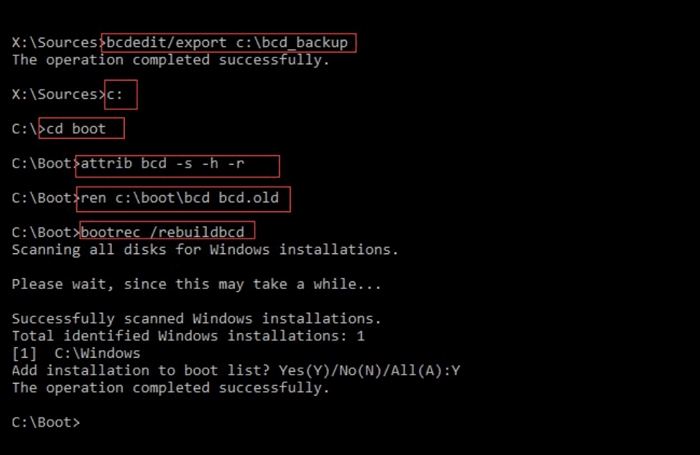
Step 5. In the Command Prompt, type «bootrec/rebuildbcd» and press the «Enter» button. Wait a few moments. Once you see a successful installation message, you must adjust the attribute files in the next step.
Step 6. In the same Command Prompt, type «attrib c:\boot\bcd -h -r -s» and press Enter to remove the read-only and hidden files from the Windows bcd. Enter another command «ren c:\boot\bcd bcd.old,» and it will rename the stored bcd. Now, you should have access to rebuild the BCD file.
Step 7. Type «bootrec /rebuildbcd» and press the Enter button. It asks you to add a boot to the list; here, you must type «Y» and hit Enter. Wait a few moments and let the «Operation successful» message appear on the screen.
Step 8. Finally, restart your PC/laptop to see the optimistic results and whether the issue is solved.
This solution is a litter complicated. You can try EaseUS WinRescure for a quick and easy way. This solution also simplifies the process of rebuilding MBR.
Solution 7. Replace A Hard Disk
Sometimes, old and outdated hard drives of your PC/laptop cause this issue, and in the results, Windows boot manager doesn’t appear in BIOS. So, if you find your hard drive is old and doesn’t work properly, it’s better to change the hard drive and purchase a new one. A computer technician can do this to replace hard drives because it requires technical experience and expertise.
If you are using Dell laptop, you can refer to this tutorial:
Solution 8. Enable the Boot Menu via CMD
The boot menu is vital in managing BIOS and other critical computer functions. Conversely, the boot manager typically remains hidden on the startup flash screen, as it’s usually turned off by default. However, you can quickly activate it using straightforward Command Prompt commands.
Follow these steps:
Step 1. Search for «Command Prompt» in the search bar of the taskbar.
Step 2. Open the Command Prompt by selecting «Run as administrator» from the context menu when right-click it.
Step 3. Type the following commands and hit enter in the Command Prompt.
- bcdedit /set {bootmgr} display bootmenu yes
- bcdedit /set {bootmgr} timeout 30.
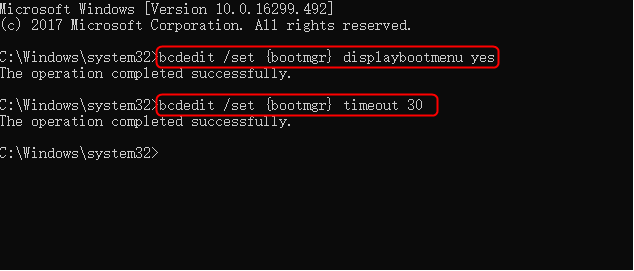
Step 4. When the «Operation successful» message will appear on the screen. It means the command is executed successfully.
As a final step, we encourage you to share this guide with others who might face the same issue and seek the best practical solutions. Sharing knowledge can empower others to overcome similar challenges and enhance their computing experience.
Why Is Windows Boot Manager Not Showing in BIOS?
Several reasons/factors cause the «Windows Boot Manager not showing in BIOS» error. Learning and finding the reasons to fix this issue accordingly with the most appropriate solution is essential.
Here are the common reasons:
- Outdated BIOS: An outdated BIOS can cause compatibility issues with modern operating systems.
- Boot Configuration Error: Misconfigured boot settings can prevent the boot manager from displaying.
- Corrupted Boot Configuration Data: If the boot configuration data is corrupted, it can disrupt the boot manager’s visibility.
- Damaged Hard Disk: Physical damage to the hard disk can lead to boot problems.
- Hard Disk Sector Corruption: Corruption in specific hard disk sectors can impact the boot process.
- Hardware Connection Failure: Loose or faulty hardware connections can result in the boot manager not showing.
To resolve this issue, we recommend exploring the solutions in this guide.
Conclusion
In this tutorial article, we’ve explored why the «Windows Boot Manager is not showing in BIOS» error occurs and provide practical solutions to tackle it. The goal of this guide has been to empower you to recover control over your computer’s boot process.
For a comprehensive solution, we highly recommend using EaseUS WinRescure, a powerful tool with advanced features designed to manage boot-related problems and ensure a smoother computing experience. Don’t let boot issues hold you back; take action today to restore your system’s functionality and efficiency.
FAQs About Windows Boot Manager Not Showing in BIOS
If you have more questions or need further clarification on the topic of Windows Boot Manager not showing in BIOS, you can find answers to commonly asked questions below:
1. Why is my bootable USB not showing in BIOS?
This issue can happen for various reasons, such as incorrect BIOS settings, problems with the USB drive, or a bootable USB incompatible with the computer’s BIOS.
2. How do I enable Boot Manager in BIOS?
Enabling the Boot Manager in BIOS involves adjusting boot sequence settings. This article provides step-by-step instructions to assist you in quickly enabling it.
3. Is Windows Boot Manager the same as UEFI?
Windows Boot Manager and UEFI (Unified Extensible Firmware Interface) are related but not the same. UEFI is a modern firmware interface that manages the boot process, while Windows Boot Manager is a component within UEFI that handles the booting of Windows operating systems.
-
Home
-
News
- [Solved] Windows Boot Manager Not Showing in BIOS
By Vega | Follow |
Last Updated
Lots of users encounter the Windows Boot Manager not showing in BIOS error. Are you also troubled by the error? In this post, MiniTool Partition Wizard provides a full guide for this error.
Sometimes, some users encounter a confusing problem: Windows Boot Manager not showing in BIOS. It will prevent the computer from booting properly.
Why is Windows Boot Manager not showing in BIOS? It may be caused by various reasons like outdated BIOS, bad boot configuration, corrupted boot configuration data, corrupted hard drives, corrupted hard drive sectors, and failed hardware connections.
Well, how to fix the Windows Boot Manager missing from BIOS issue? Please keep reading. Before performing the complex solutions below, you should first try removing all external devices and restarting all power and data cables.
Solution 1. Change the Boot Order in BIOS
Different computers may have different BIOS settings, but they usually share similar boot options. To modify the boot sequence, access the BIOS menu by pressing the F2 or Delete key during boot. Once in the BIOS, navigate to Boot or Boot Sequence settings. Then modify the boot order to set the correct drive as the first boot device.
Save them and proceed to restart the computer. Then check if you can see the Boot Manager.
Solution 2. Create a New Boot Sector
The no Windows Boot Manager in BIOS error may occur if there is corruption or boot corruption in the partition, especially the Windows partition. Such problems can be attributed to a variety of factors, including an aging hard drive, virus infection, or malware attack. In this case, we recommend using the following method to create a new boot sector:
Step 1: Turn off your PC and then turn it on. Once the Windows logo appears on your screen, press and hold the Power button to turn off your PC again. Repeat this step until you enter the Recovery window.
Step 2: Once you get into the Windows Recovery Environment (Windows RE), select Advanced options.
Step 3: After that, go to Troubleshoot > Advanced options > Command Prompt.
Step 4: Once you enter the Command Prompt, type bootrec /fixboot and press Enter.
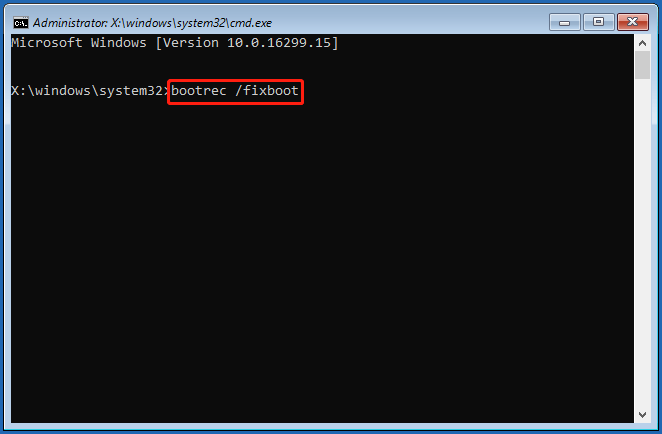
After executing the command, you will see the message “The operation completed successfully.” Now, restart your computer using the Ctrl + Alt + Del keys and select the restart option.
Solution 3. Rebuild BCD
If your boot configuration data (BCD) is corrupted or misconfigured, you must rebuild it to eliminate the “Windows Boot Manager not showing in BIOS” error.
Step 1: Enter the Command Prompt in Windows RE following solution 2.
Step 2: Type bootrec/rebuildbcd and press Enter.
Step 3: Type attrib c:\boot\bcd -h -r -s and press Enter. It will remove read-only and hidden files from Windows BCD. Now type another command ren c:\boot\bcd bcd.old to rename the stored BCD.
Step 4: Now type bootrec /rebuildbcd again and press Enter. This time it will ask to add the boot to the list. Type Y and press Enter. Wait a few seconds until the “Operation Successful” message appears on the screen.
Solution 4. Check the Hard Disk for Bad Sectors
As mentioned above, corruption in the specific hard disk sectors can also impact the boot process. So, you should check the hard disk for bad sectors. To do that, you can take advantage of a powerful disk manager – MiniTool Partition Wizard. It can help you check bad sectors.
MiniTool Partition Wizard DemoClick to Download100%Clean & Safe
Step 1: Boot the PC from the created bootable USB flash drive.
Step 2: In the main interface of MiniTool Partition Wizard, select the target disk and click on Surface Test from the left panel.
Step 3: Click on the Start Now button. After that, this tool will scan the whole drive immediately and show you the test result.
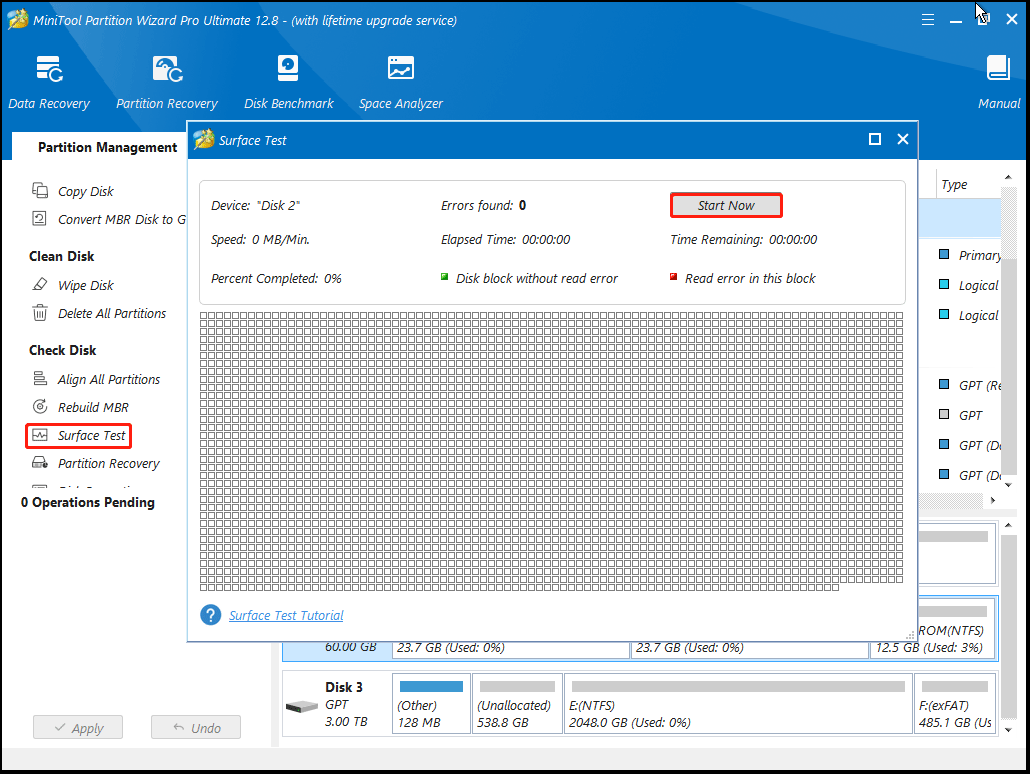
Step 4: When the hard drive error test process is completed, the bad sectors on the hard drive will be marked with red color. In this case, you can either use this bad sector repair guide or consider replacing it with a new one.
The startup manager is usually not visible because it is usually closed by default. However, you can easily enable it using the Command Prompt command. Just type bcdedit /set {bootmgr} display bootmenu yes in it and press Enter.
Windows Boot Manager not showing up in BIOS can be a frustrating problem. You can refer to the solutions above to solve it. If you have any other solutions, you can share them with us in the following comment zone.
About The Author
Position: Columnist
Vega joined MiniTool as an editor after graduation. She enjoys helping people with computer problems, including disk management, data recovery, and more. She is constantly expanding her knowledge in related fields. And she will continue to bring more easy-to-understand professional articles to help people solve various problems on the PC. In her daily life, Vega enjoys hanging out with friends, shopping online and listening to music. She is someone who knows how to enjoy life.
Windows Boot Manager is a program responsible for loading the OS files when you start your computer. Sometimes, when the boot manager fails to load some system files due to an error or damaged files, it shows an error stating that the Windows boot manager failed accompanied by an error code, i.e., 0xc000000f, 0xc000000e, or 0xc000000d. Each of these error codes demonstrates the cause of the error. This article will teach you how to tackle Windows boot manager windows failed to start errors in Windows 7/8/10/11.
Part 1: Overview of Windows Boot Manager
1. What is Windows Boot Manager?
Windows Boot Manager (BOOTMGR) is a small file located in System Reserved Partition or System/Boot sector. It contains the instructions to load the operating system when you start your computer. The data required to configure Windows Boot Manager is stored in Boot Configuration Data (BCD) file. When you turn your computer on, the first code that executes is the BIOS which reads MBR from the boot device and transfers the control to the boot code there. The Windows Boot Manager then reads the boot codes from BCD and makes them available to the loader to show the Boot menu to the user.
2.What causes Windows Boot Manager Windows Failed to Start?
Various reasons cause the system errors in Windows, so it is difficult to find the real culprit behind the boot manager Failure: Windows failed to start issue. However, here are some known reasons.
- Missing or corrupt BCD file
- Damaged or corrupt MBR
- Compromised file integrity
- Damaged HDD cable
- Forceful Shutdown while some crucial data was being written to the boot sector or an update, was being installed
- Some critical hardware or software is missing
3.What will Happens When Windows Boot Manager Windows Failed to Start?
When the boot manager fails, and Windows do not load normally, you will see a pop-up message on the screen stating that Windows Boot Manager boot failed upon startup. In such a situation, you will be unable to use your system or access the disk data.
4.Most Common Problems during the Boot Loader Phase
As stated earlier, many factors can cause Windows Boot manager to fail. However, you can easily identify the cause of the issue with the help of the error codes. If you see a black screen with a blinking cursor, it shows that the boot manager failed on the Windows Boot Loader phase. This happens due to any one of the following error codes during the Windows Boot Loader phase.
- Corrupted boot file or MBR
- Corrupted or missing boot sector
- Corrupt BCD
- Bootmgr is missing Windows 10
If you are facing issues with starting up your computer and you want to fix Windows boot manager, follow the methods given below:
Part 2: One-stop Solution to Fix Windows Boot Manager Windows Failed to Start Error
PassFab FixUWin is the ultimate solution to all the problems you might face with your Windows system. This amazing tool scans your computer and looks for the damaged files, or whatever reason is causing the error. It then repairs your computer automatically by replacing the damaged files. It can resolve any blue/black screen errors, system crashing, stuck on boot loop and other problems. Here is how you can fix Windows 10 bootloader with PassFab FixUWin:
Part 3: Other Solutions to Fix Windows Boot Manager Windows Failed to Start Error
1. Update BIOS or UEFI Settings
If you use a new processor with old BIOS and UEFI settings, your boot manager will eventually fail to load upon startup. You should update the BIOS or UEFI settings by visiting the manufacturer’s website. To do so, reinstall the old processor, go to the manufacturer’s website, and install updates by following the on-screen instructions.
Note: Be cautious while performing the BIOS or UEFI update, as a tiny mistake can cause a significant loss. It is recommended to back up your data before updating such settings.
2. Use Bootrec.exe Tool to Rebuild MBR
Bootrec.exe is a built-in tool in Windows 10 that is used to update Master Boot Record (MBR), partition boot sector code, and Boot Configuration Data (BCD). You can use it for Windows boot manager repair as follows:
- Boot Windows 10 and press the F8 key when you see the Windows logo.
- Navigate through Troubleshoot -> Advanced Options -> Automatic Repair and open Command Prompt.
- Type bootrec /rebuildbcd and press Enter.
- Type bootrec /fixMbr and hit Enter.
- Type bootrec /fixboot, press Enter.
- Type bootsect /nt60 SYS or bootsect /nt60 ALL and press Enter key.
3. Perform Automatic Repair
Performing Windows Automatic Repair can be used for Windows 10 bootloader repair. However, you will need a Windows Installation Media to work through this method. Once you get the Installation Media, proceed by following these steps:
4. Perform System Restore
If you encounter a Windows bootmgr error after installing an update or making changes to your system, you can perform a system restore to revert to the previous version. However, this method only applies if you create a restore point after making changes to the system. Here is how to perform a system restore using Windows Installation media:
5. Restore Windows Boot Manager
When nothing else works, the only option you are left with is restoring Windows Boot Manager to its default settings as follows.
- Open Command Prompt by navigating Advanced Options -> Troubleshoot -> Advanced Options -> Command Prompt.
- Now type BCDEdit /? Default and press Enter.
6. Replace Bootmgr File
Another option to fix the Windows boot manager is replacing the Bootmgr file from the C drive with System Reserved Partition. Usually, the System Reserved Partition does not have any drive letter, so to identify it, first assign it a letter by running the following command in Windows PowerShell:
Get-Partition -DiskNumber 0 -PartitionNumber 1|Set-Partition -NewDriveLetter P
Now open the Command Prompt and follow the following steps:
- Change the directory to system reserved partition.
- Now, type attrib -r -s -h and hit Enter.
- Type ren bootmgr bootmgr.old and press Enter.
- Change the directory to C, type attrib -r -s -h and press Enter.
- Lastly, run copy C:\bootmgr P:\ command and restart your computer.
7. Manually Restore System Hive
If you have tried all the methods given above and still the boot manager fails upon startup, you can try manually restoring the system hive as follows:
- Open the Command Prompt using Advanced options via Windows Installation Media.
- Go to the CONFIG directory by typing CD /D C:\WINDOWS\SYSTEM32\CONFIG and pressing Enter.
- Type the following commands one by one and press Enter after typing each:
- REN DEFAULT DEFAULT.OLD
- REN SAM SAM.OLD
- REN SECURITY SECURITY.OLD
- REN SOFTWARE SOFTWARE.OLD
- REN SYSTEM SYSTEM.OLD
- Now run the following commands step-by-step:
- copy C:\Windows\System32\config\RegBack\DEFAULT C:\Windows\System32\config\
- copy C:\Windows\System32\config\RegBack\SYSTEM C:\Windows\System32\config\
- copy C:\Windows\System32\config\RegBack\SOFTWARE C:\Windows\System32\config\
- copy C:\Windows\System32\config\RegBack\SECURITY C:\Windows\System32\config\
- copy C:\Windows\System32\config\RegBack\SAM C:\Windows\System32\config\
Once the commands have run successfully, restart your computer, and you will not see the Windows Boot Manager Windows Failed to start error.
Conclusion
When you see the Windows boot manager Windows failed to start error on the screen upon startup, you might panic. But wait! We have gathered some tested and proven ways to fix Windows boot manager. The best yet most recommended method proposed in this article is using the PassFab FixUWin Windows repair tool.