
Quick Links
-
Restart Notepad and Your PC
-
Use an Alternative Method to Open Notepad
-
Remove Conflicting Applications
-
Set Notepad as the Default Text Editor
-
Repair or Reset the Notepad App
Summary
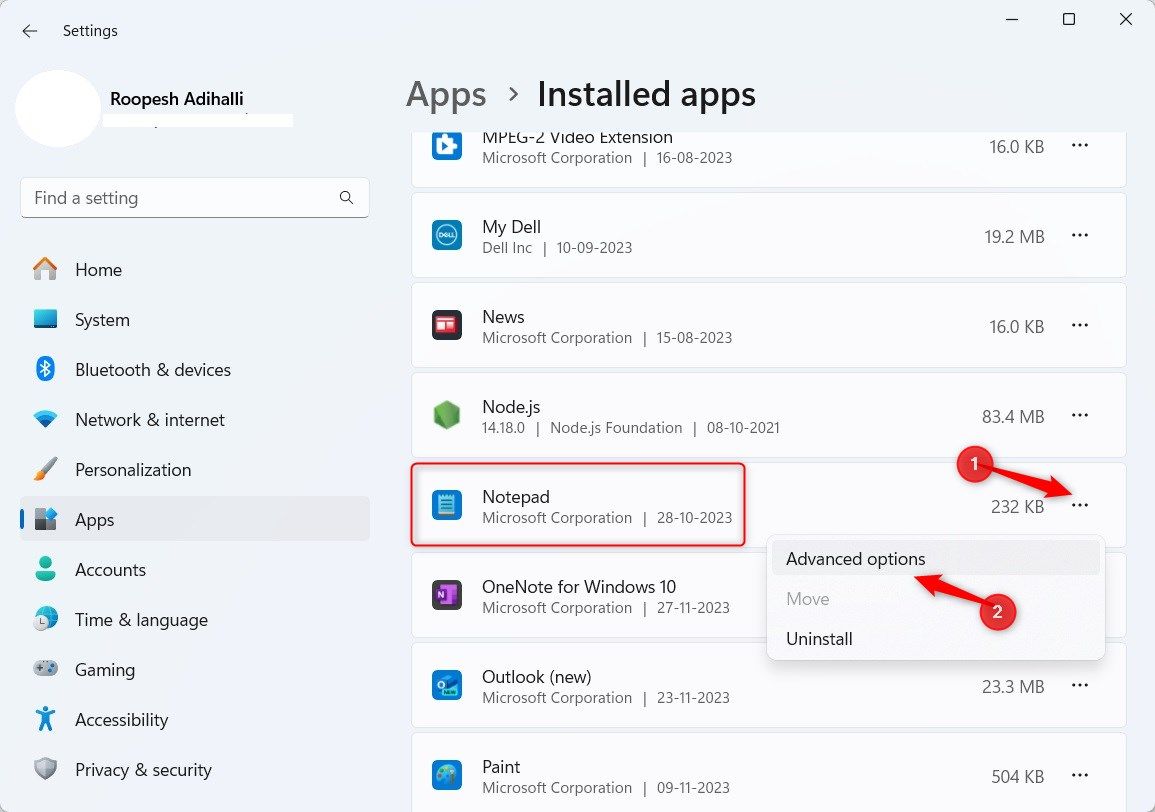
- Press Win+i to open Settings and go to Apps > Installed Apps. Find Notepad, click the ellipsis, and select «Advanced Options.» From the next screen, click «Repair.»
- Try alternative methods to open Notepad, like accessing it through the Start menu, Run command, or File Explorer.
- Use Task Manager to close unnecessary programs and uninstall any third-party text editors, as these may cause conflict.
While Notepad is a lightweight and generally bug-free application, sometimes it refuses to open on Windows 11. If this is happening to you, here are all the fixes you should try.
1. Restart Notepad and Your PC
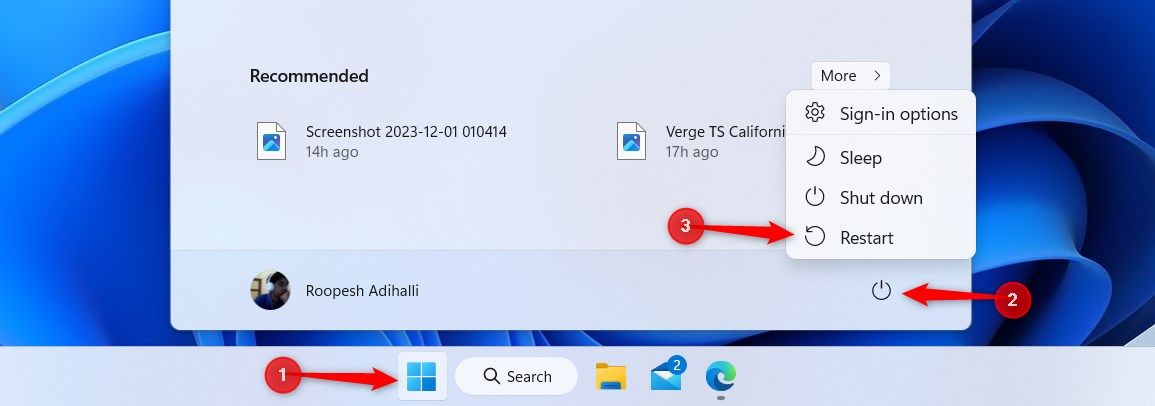
The first thing to do is restart Notepad. Close any open Notepad sessions, then re-open the application. If this fails, restart your Windows computer via Start > Power button > Restart.
2. Use an Alternative Method to Open Notepad
There are plenty of ways to open Notepad in Windows, so try an alternative method if your usual way isn’t working. For example, you could access it through the Start menu, use a Run command, or open in File Explorer.
3. Remove Conflicting Applications
Conflicting applications can cause Notepad to not open, so you should close anything that isn’t essential. To do this, right-click the taskbar and select «Task Manager.» Select a program to close, click «End Task», and repeat as necessary.
Also, if you have downloaded any third-party text editors, uninstall them. To do this, pres Win+i to open Settings, then select Apps > Installed Apps. Select the ellipsis next to an app and click «Uninstall.»
4. Set Notepad as the Default Text Editor
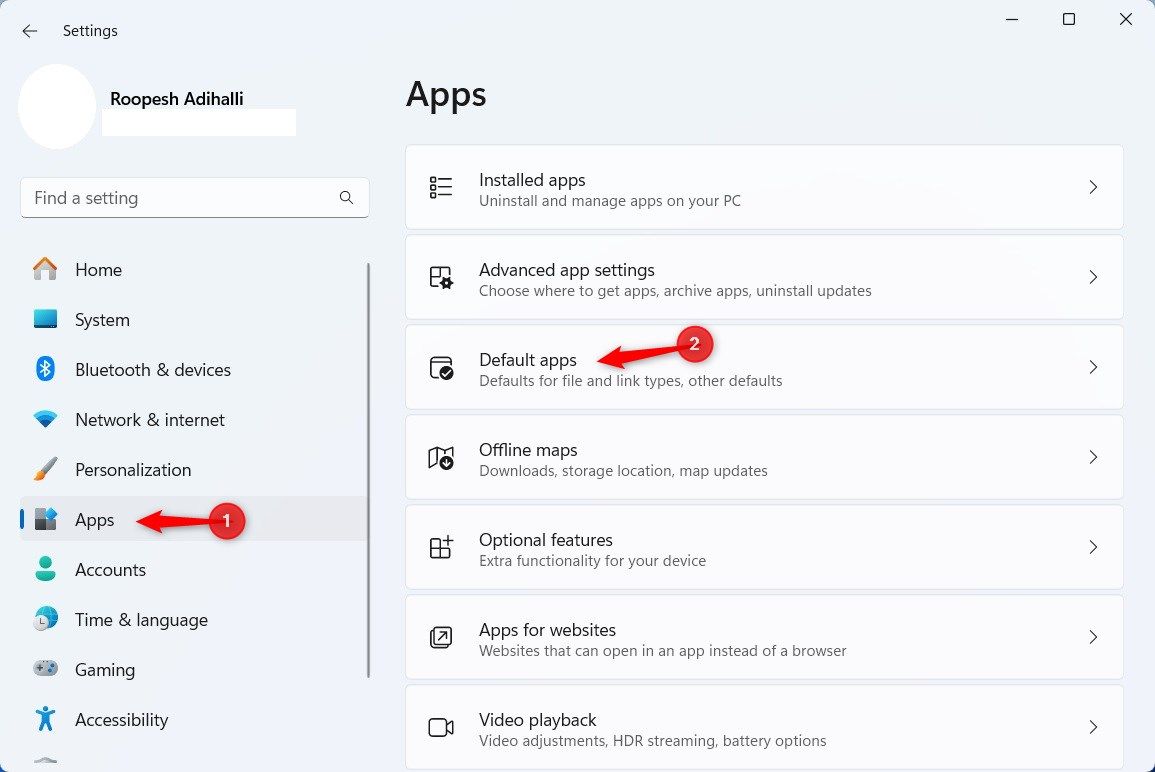
If you don’t have Notepad set as the default text editor, text files will open in another application. To set Notepad as the default, press Win+i to open Settings and select Apps > Default Apps.
Within the field beneath «Set a default for a file type or link type», enter the file type you wish to adjust, like .TXT. Click the displayed default app.
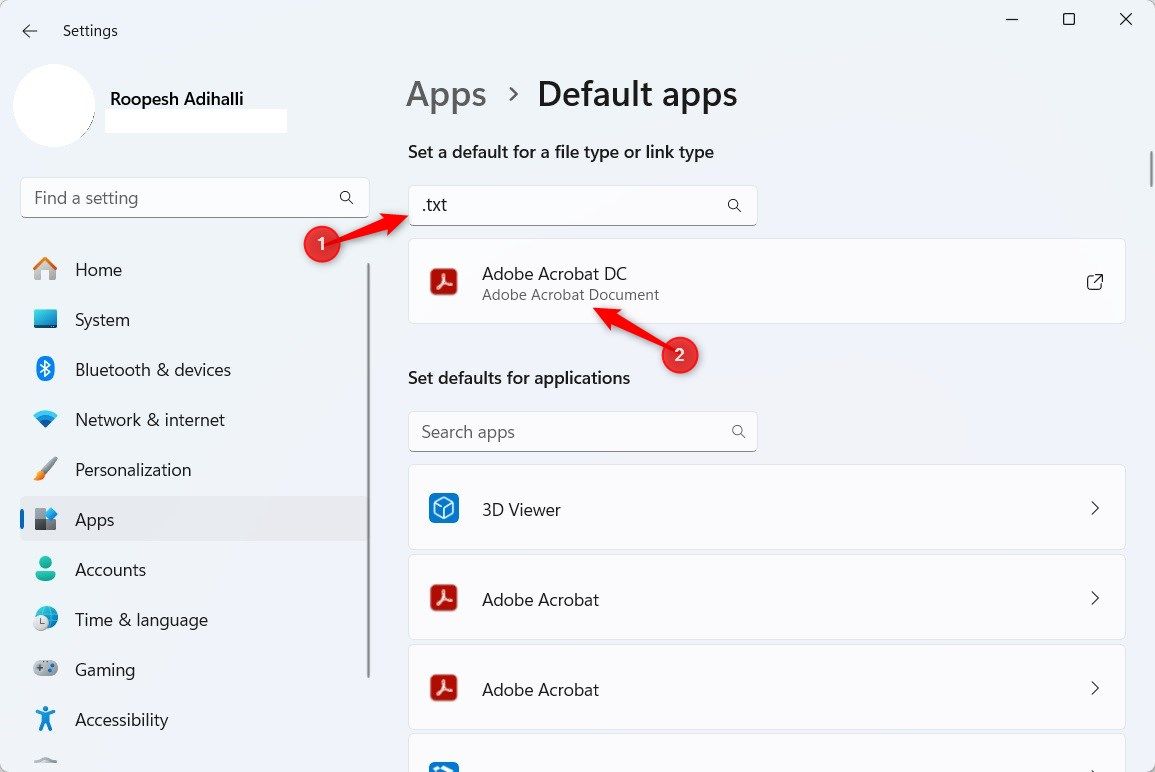
Select Notepad and click «Set Default.»

5. Repair or Reset the Notepad App
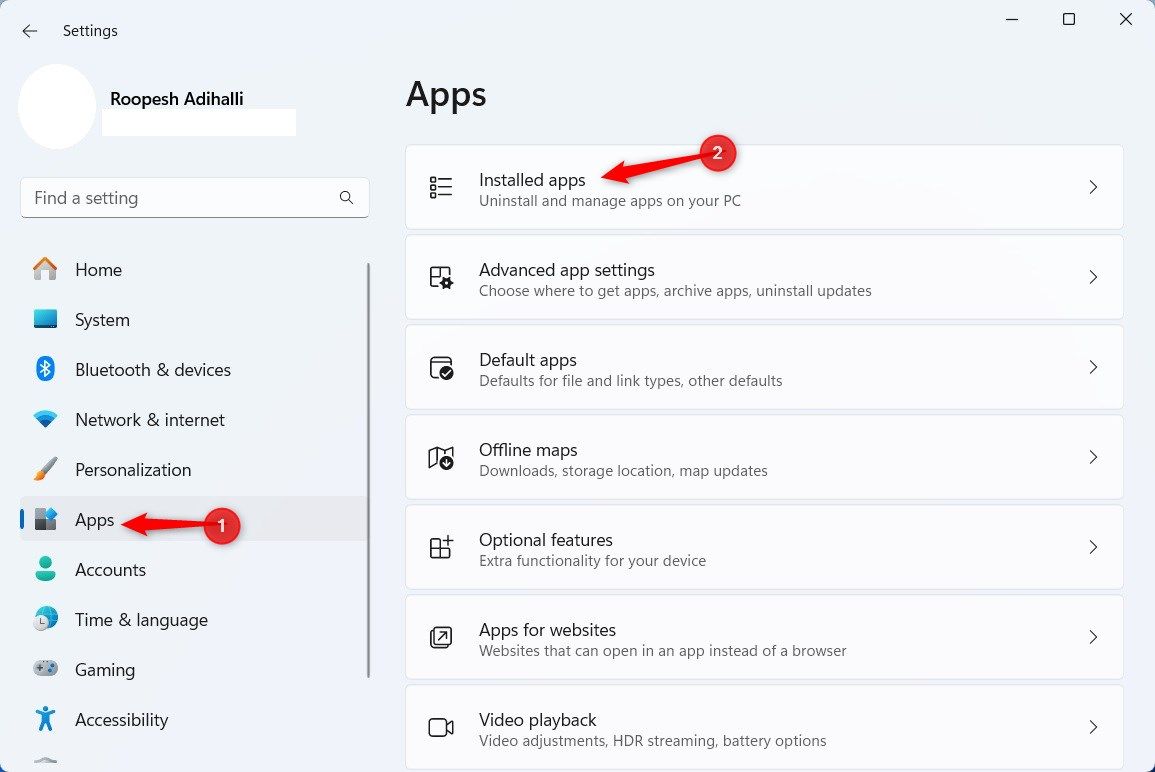
An easy fix for Notepad not opening is to use Windows 11’s app repair and reset functionalities. Press Win+i to open Settings and go to Apps > Installed Apps.
Locate Notepad, click the ellipsis, and select «Advanced Options».
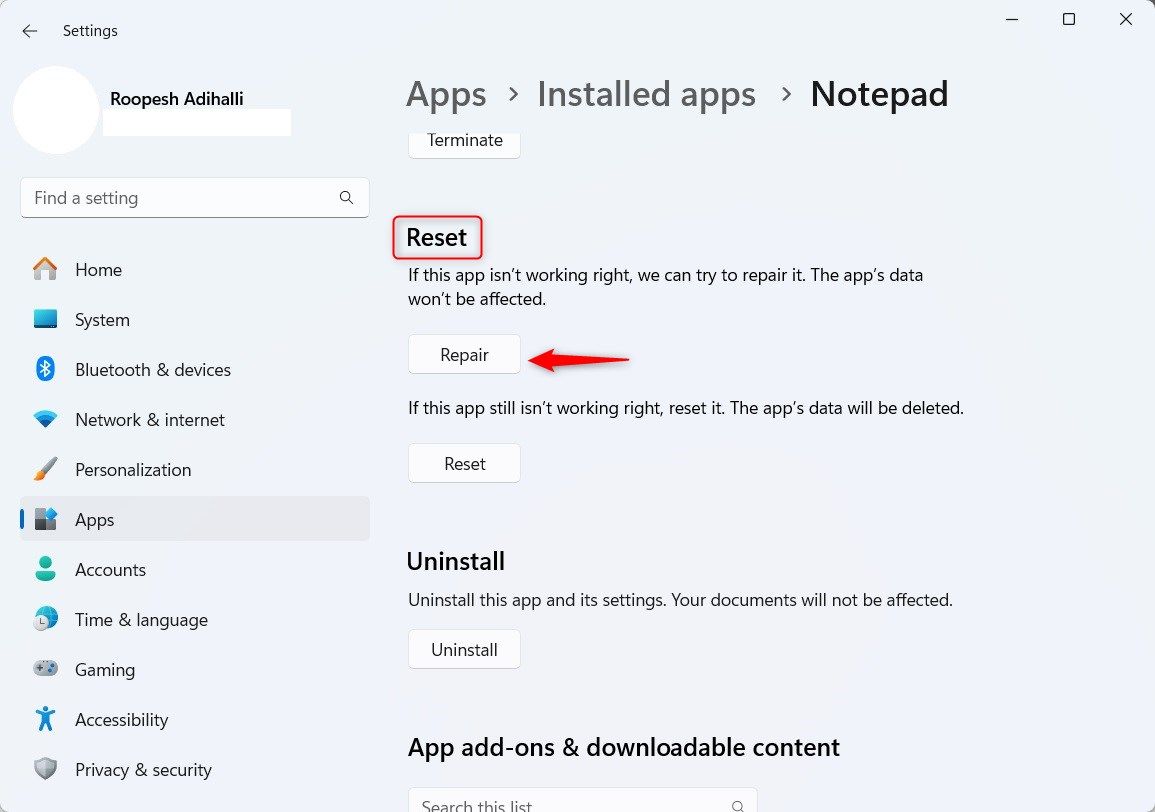
Scroll down to the Reset section and click «Repair.» This initiates a repair for Notepad, with a progress bar indicating the progress.
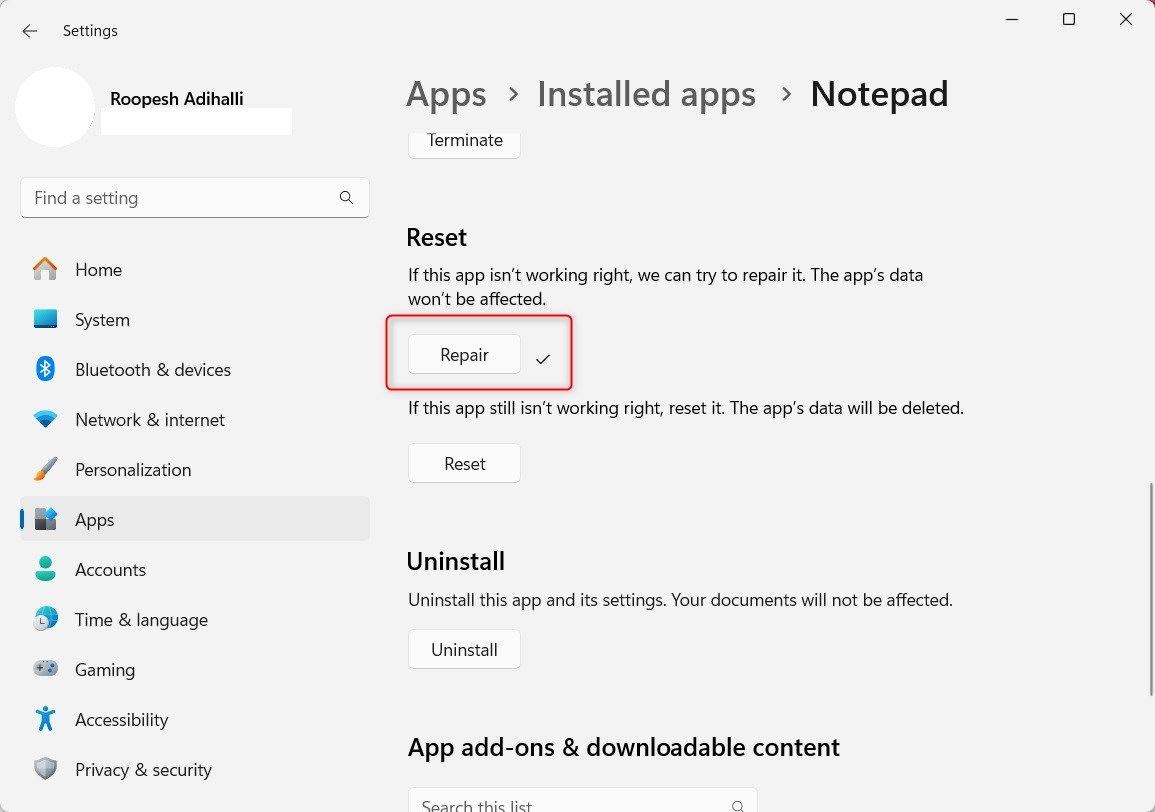
Once the repair is completed, a checkmark appears next to the Repair button.
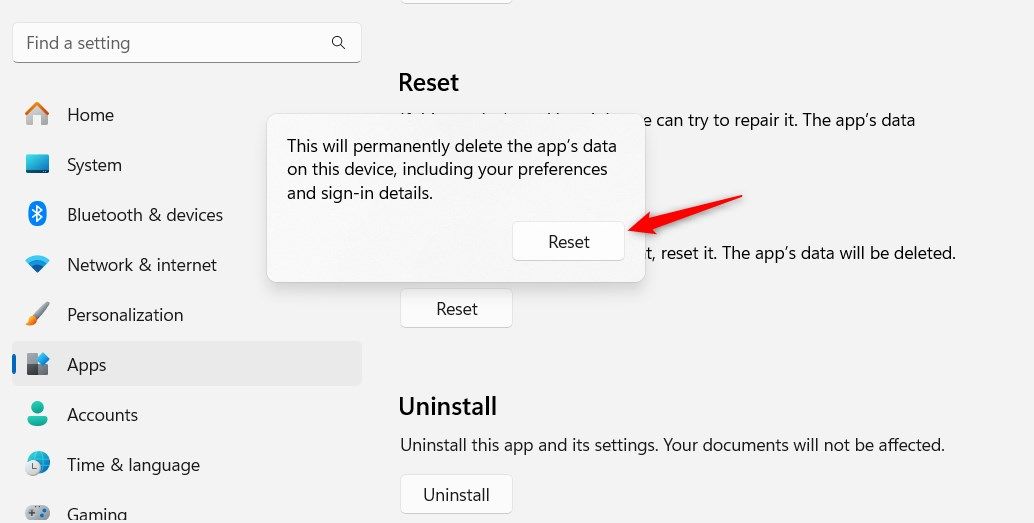
Try to open Notepad now. If you are still facing issues, return to the same screen, but this time select «Reset.»
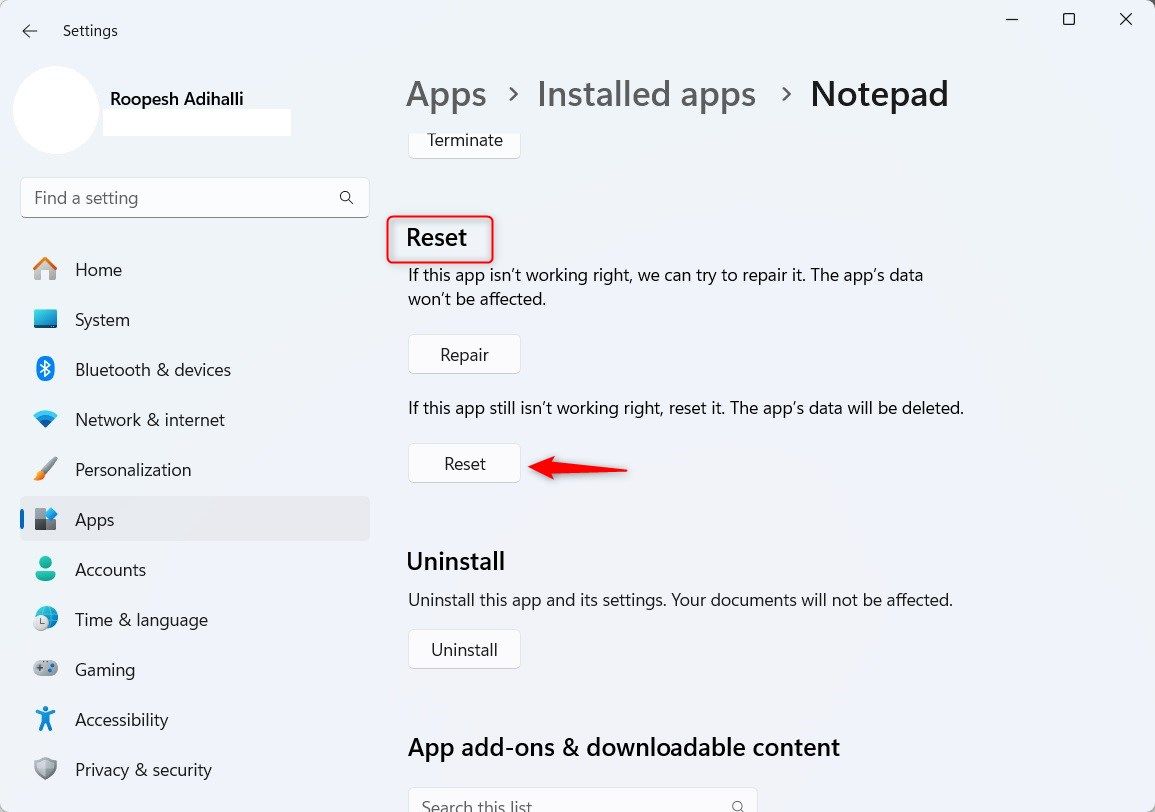
A pop-up warns you about the action, as it permanently deletes the data from the app. Click «Reset» in the pop-up message to confirm.
Now, hopefully Notepad is back to its default state and error-free.
6. Reinstall Notepad
If repair and reset actions fail to help you with opening Notepad, try reinstalling the app. First, you need to uninstall Notepad from your computer.
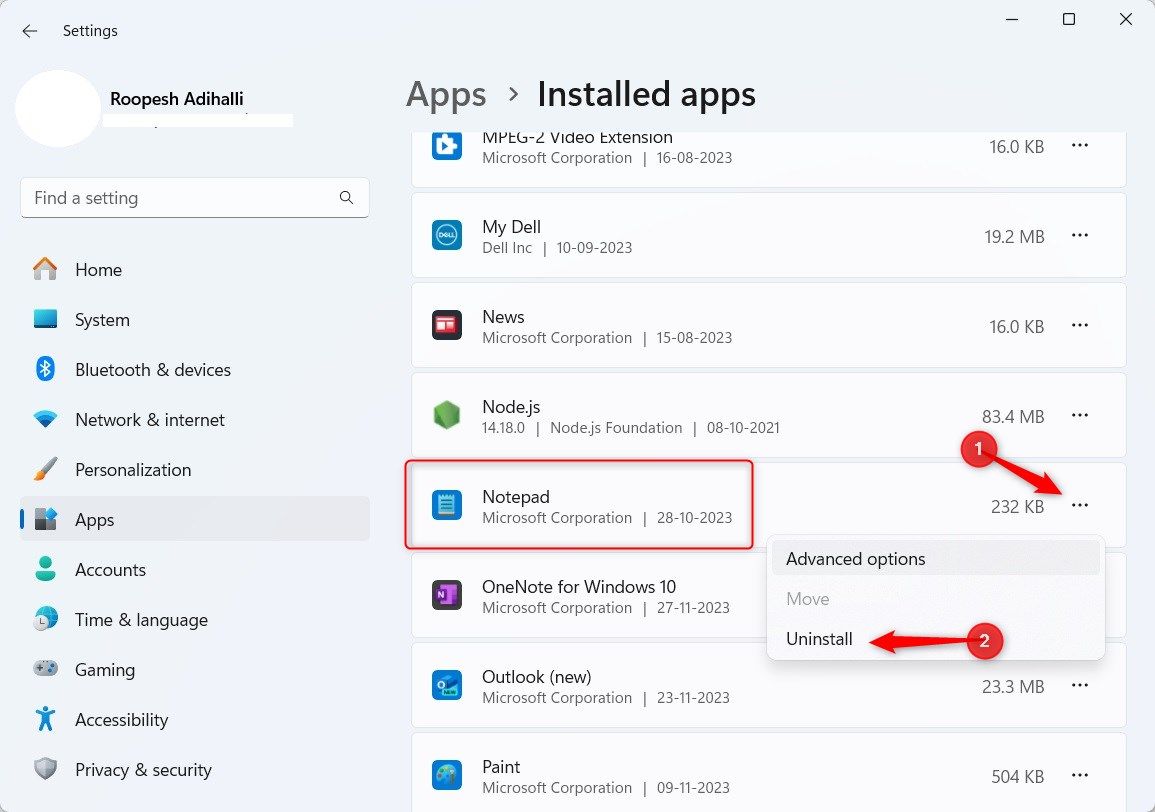
Press Win+i to open Settings and go to Apps > Installed Apps. Select the ellipsis next to Notepad and click «Uninstall.»
A pop-message warns you about deleting the app data and related information if the app is uninstalled. Once again, click «Uninstall.»

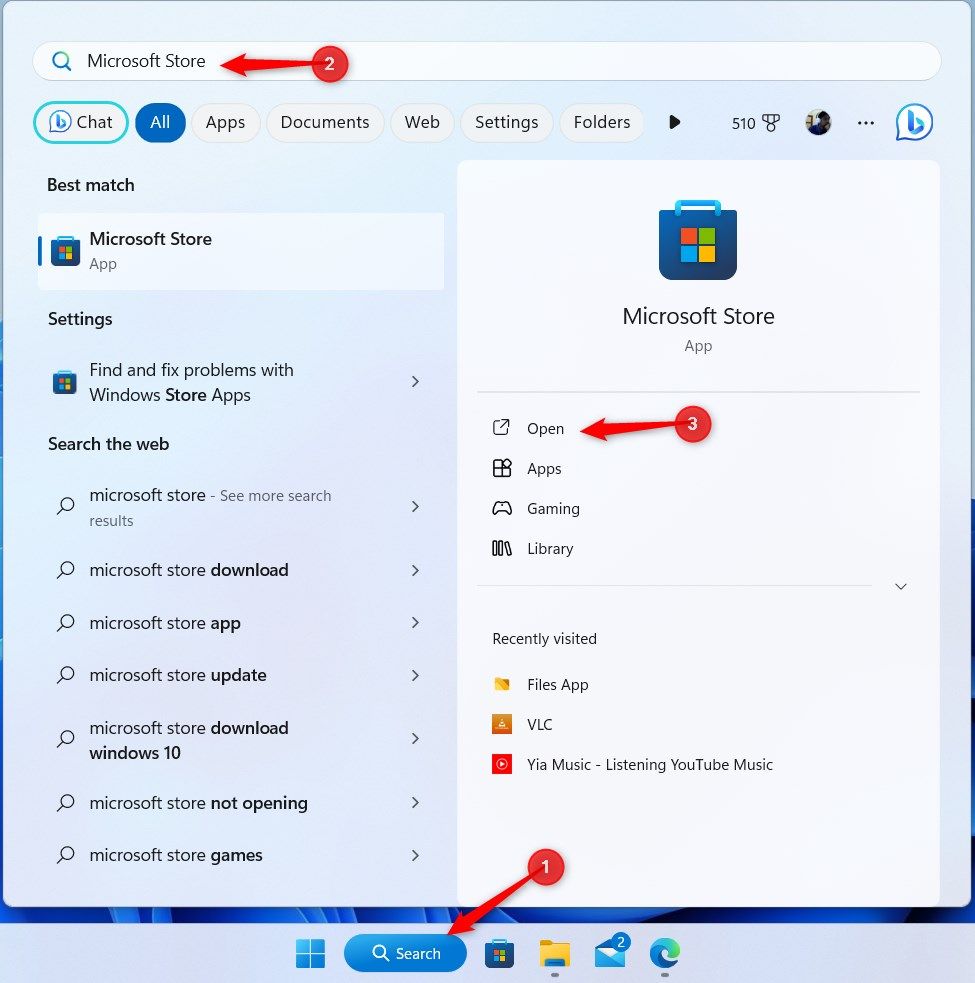
Next, reinstall Notepad on your computer using the Microsoft Store. Find and open the Store through the Start search.
In the Microsoft Store, type «Notepad» in the search bar, and select the «Windows Notepad» result.
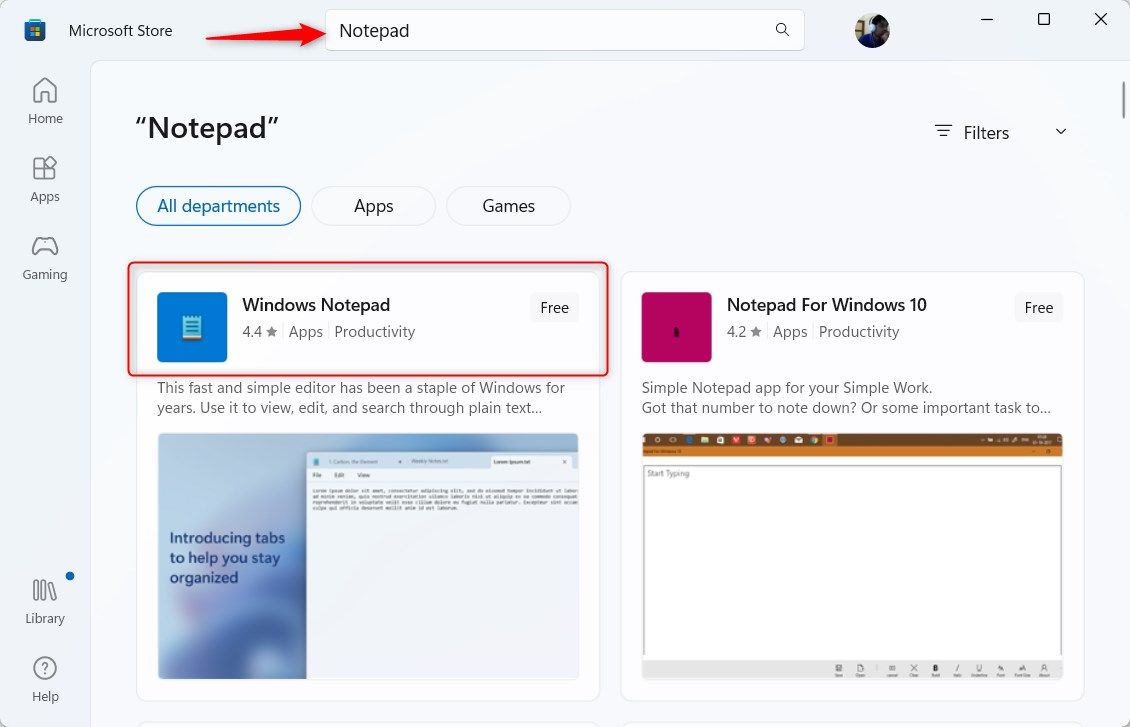
Click «Get» in the top-right to install the app.

The download should take only a few moments. Once done, try opening Notepad.
7. Run SFC and DISM Scans
Corrupted system files hinder the operation of Windows in many ways. If Notepad is not opening, run an SFC and DISM scan. These repair corrupted, missing, or broken files.
Search the Start menu for «Command Prompt» and select «Run As Administrator.»
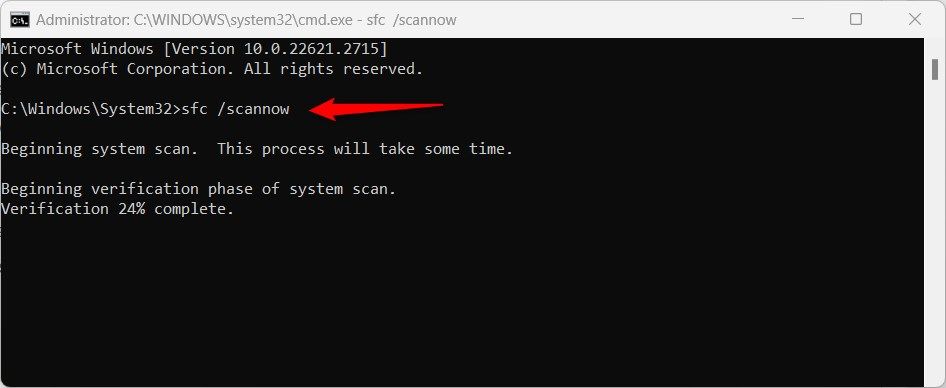
Within Command Prompt, type the following command and press Enter:
sfc /scannow
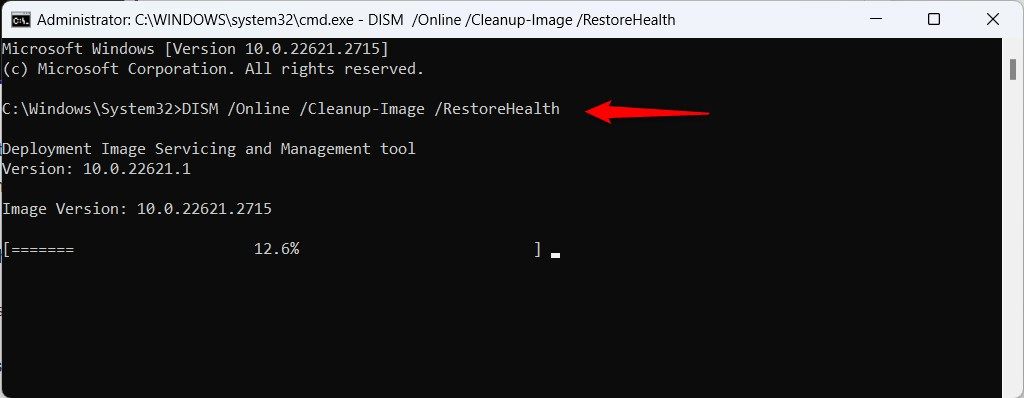
Once completed, run DISM. Type the following command, followed by the Enter key:
DISM /Online /Cleanup-Image /RestoreHealth
Close Command Prompt once the process is completed, and check if you can successfully open Notepad.
8. Perform a Clean Boot
Background services can interfere with Windows processes, causing Notepad to not open. To resolve this issue, perform a clean boot of Windows, which only runs crucial apps and services.
Once done, see if Notepad opens as usual. If it does, it likely means that an interfering service or third-party app is to blame. Boot your computer as normal, then disable your non-essential startup services and programs in turn to identify the culprit.
9. Use Another User Account
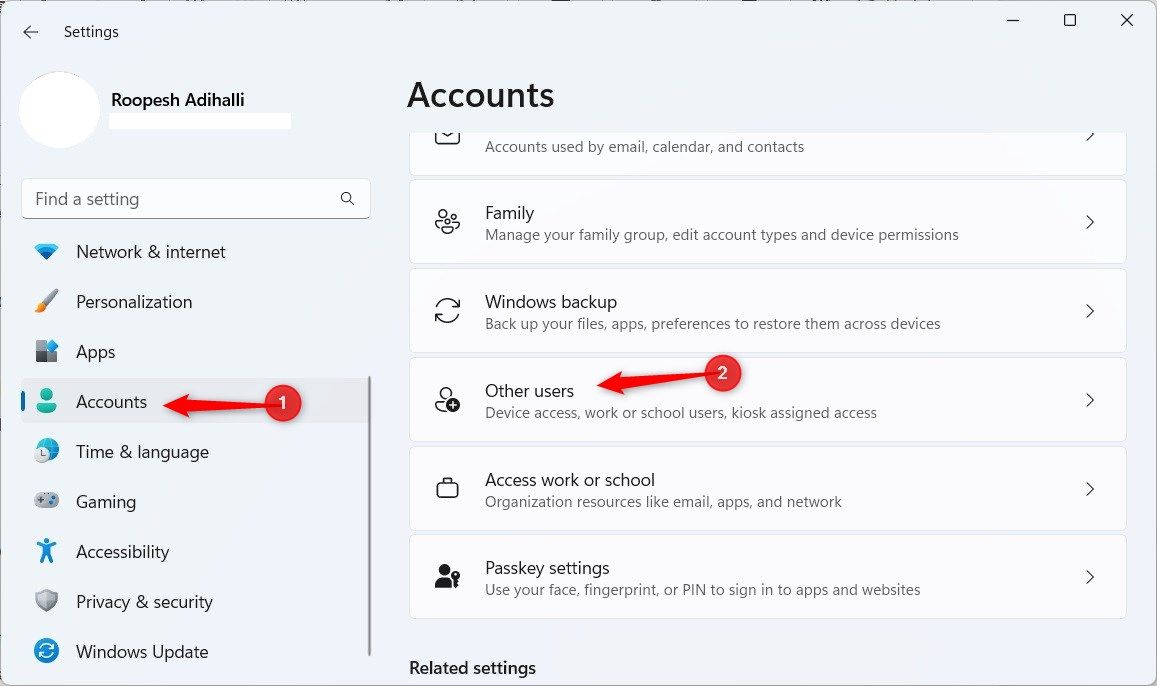
Notepad may be failing for your account only, so consider switching to another user account. If you don’t have one, it’s easy to create a new account. Press Win+i to open Settings, go to Accounts > Other Users, and select «Add Account.»
10. Use Notepad Alternatives
If Notepad is still not opening, it might be time to try a different text editor. There are plenty of great Notepad alternatives, including Sublime Text, Vim, and Notepad++.
Despite its age, Notepad remains an excellent tool for note-taking. Microsoft has been consistently updating Notepad for Windows 11 with many useful features to aid productivity, such as automatic file save and the addition of tabs.
Readers help support Windows Report. We may get a commission if you buy through our links.
Read our disclosure page to find out how can you help Windows Report sustain the editorial team. Read more
When Microsoft Word is not opening, it’s most likely because of corrupt or missing files. Issues with Windows updates, interfering antivirus software and an outadte app can also be at fault.
No matter the exact cause for your particular case, with the steps below you’ll be able to fix it.
What can I do if Microsoft Word does not open on Windows 11?
1. Reboot your PC in Safe Mode
- On the sign-in screen, press the Shift key while holding the Power button.
- Press and hold the Shift key to prompt the Advanced Recovery Options page.
- Click on Troubleshoot, then select the Advanced options.

- Click on Startup Settings and select the Restart option.

- Press F4 to Enable Safe Mode.


Wait until your computer reboots in safe mode. This will fix startup errors that may impact the activity of apps like Microsoft Word.
You can check other ways of rebooting Windows in Safe Mode in a few steps.
2. End the task for Microsoft Word
- Right-click Windows Start and select Task Manager.

- Navigate through and select the Microsoft Word client from the PC, then click on the End task button from the drop-down.

- Click OK to confirm that you want to end the task for the Microsoft Word app on your computer.
- Restart your PC and check if you can launch Microsoft Word successfully.


The above steps can also work for ending tasks for other apps that may conflict with your Word running on your PC.
You can also access the Task Manager by other means. Hence, read how to open Task Manager via shortcuts on your PC.
- D3dx11_42.dll Not Found: How to Fix it
- Windows 11 Shutdown After Inactivity: 4 Ways to Stop it
- Windows Shuts Down Instead of Restarting: 4 Ways to Fix it
- Error no Ace Condition 804 (0x324): Fix it With 4 Steps
3. Repair corrupt Word files
- Click the Start button and type Microsoft Word into the search box, and launch the app.

- Click on File and select Open on the left side of the screen. Scroll down and select Browse.

- Navigate through and check for corrupted Word files on the PC.
- Click on the file, tap the arrow pointing down beside the Open button, and select the Open and Repair option to allow Microsoft Word to fix the corrupt file impeding its performance.


However, you can read about the best tool for fixing corrupt documents in Microsoft Word.
You can also repair Word files by using a specialized such as Stellar Repair for Word. This software is specially designed to repair any issues that may corrupt your files. Using this tool will ensure you don’t lose anything from your file, including hyperlinks, comments, fonts, bookmarks, and many more.
Stellar Repair For Word
Quickly repair your broken Word files without losing anything inside with this powerful tool.
4. Temporarily disable Windows Defender Firewall
- Click Start on the taskbar, type Windows Security in the search box, and press Enter.
- Select the Virus & threat protection option from the search results, then click Manage settings.

- Toggle off the Real-time protection option to disable Windows Defender Antivirus.


Disabling the Windows Defender Firewall will fix any interference with Microsoft Word. Learn how to fix the Windows Defender Firewall if it can’t change settings on Windows 11.
5. Update Windows
- Click Start on your taskbar and select the Windows Settings app.
- Click on Windows Update and select the Check for updates option.


If there are any updates available, Windows will search for and install them. Windows update will fix bugs affecting your PC and blocking the Microsoft Word app from opening.
Check our article for a guide on how to fix Windows not connecting to update services on your PC.
6. Repair or reinstall Microsoft Office
- Press the Start button, type Control Panel in the search box, and launch it.

- Click on Programs and select Programs and Features.

- Then find Microsoft Office from the installed apps, click the three dots at the front, and select Repair from the options, then OK.
- Click on Repair in the new prompt for confirmation. (If you’re unable to fix the issue after repairing the Microsoft Office app on your computer, proceed to the steps below)
- Repeat steps 1-4, click three dots at the front of Microsoft Office, select Uninstall from the options, and then OK.

- Restart your computer and install the latest Microsoft Office version available for Windows.


Uninstalling Microsoft Office will fix issues affecting problems affecting Word and other services under it. Also, it’ll help update Microsoft Office to the latest build. Besides, a reinstall will do just as well when Word is not responding in Windows 10.
After installing the app, check how to fix Microsoft Word not activated error per adventure it appears.
Does Windows 11 affect Microsoft Office?
Your Microsoft Office won’t be affected after upgrading to Windows 11 and should continue to run fine. You may notice a change in performance depending on your PC’s ability to run the latest iteration, but it shouldn’t significantly affect Office.
Though remember, Microsoft has ended support for Office 2013 on Windows 11. So it will not receive any updates, and you might face compatibility issues with this version.
You may be interested in how to remove watermarks in Microsoft Word in a few steps. Also, you can read about fixing errors Word experiences when opening a file on your PC.
Also, if the Read out loud feature is not working in Word, this guide will help you fix it quickly. In case you want to add a code block on Microsoft Word, read this guide for detailed steps.
Don’t forget to let us know which solution worked for you by using the comments area below.
Henderson Jayden Harper
Windows Software Expert
Passionate about technology, Crypto, software, Windows, and everything computer-related, he spends most of his time developing new skills and learning more about the tech world.
He also enjoys gaming, writing, walking his dog, and reading and learning about new cultures. He also enjoys spending private time connecting with nature.
-
Home
-
News
- What To Do When Notepad Is Not Working On Your Windows 11
By Sarah |
Last Updated
Windows Notepad has long been a popular text editor favored by users. Microsoft redesigned Notepad in Windows 11 to improve user experience, instead of discarding this app. However, some users complained that they came across the Notepad not working in Windows 11. This MiniTool post offers effective solutions to this issue.
Windows Notepad is a famous text editor designed by Microsoft for its products; it’s mainly used to create and modify pure text documents. People love to use Notepad since it was released in 1983. The good news is that Microsoft redesigned Notepad in the new Windows 11 system; many changes and improvements (including Windows 11 Notepad dark mode) are added to Notepad to improve the overall user experience.
This page discusses more on the changes in the new & redesigned Windows 11 Notepad:
However, more and more Windows users raised the same problem: Notepad not working in Windows 11. Users care about how to fix Windows 11 Notepad not working whatever the cause is.
Tip: Before you taking any actions to fix Notepad not working, you should take good care of your data. Back them up or copy important files & save them to a different place. Besides, you need to prepare a professional data recovery tool that can help you get back lost data in time when necessary.
MiniTool Power Data Recovery TrialClick to Download100%Clean & Safe
Let’s talk about troubleshooting Notepad not working in Windows 11 from 2 aspects.
How to Fix Notepad Missing Windows 11
The Notepad app is supposed to be preinstalled in Windows 11, but some users said they can’t find it after installing the new system on PC.
- They search for Notepad in the Start menu, but get no search result.
- They open the File Explorer and navigate to C:\Windows\notepad, but can’t find the notepad.exe file.
The possible causes of Windows 11 Notepad missing include: Windows Update bugs, corrupted system files, sudden system shutdown while Notepad is opening, virus or malware infection, and more.
Solved: Windows 11 File Explorer Is Not Responding/Crashing.
Reinstall Notepad Windows 11
You need to reinstall the Notepad app when you find it’s missing from your computer. Here’s how to reinstall Notepad on Windows 11:
- Find Microsoft Store on your PC and open it.
- Search for Windows Notepad.
- Click Get and then Install.
- Wait for the installation to complete.
You can also visit the official Microsoft Store website; then, search for Windows Notepad, download the app by looking at the on-screen instructions, and install it properly on Windows 11.

Run DISM Command
You can try to fix Notepad missing by removing Notepad completely and adding it again to Windows 11.
- Press Windows + S.
- Type Command Prompt.
- Right click on it and select Run as administrator.
- Copy & paste this command: DISM /Online /Remove-Capability /CapabilityName:Microsoft.Windows.Notepad~~~~0.0.1.0. Then, press Enter.
- Copy & paste this command: DISM /Online /add-Capability /CapabilityName:Microsoft.Windows.Notepad~~~~0.0.1.0. Then, press Enter.
How to Fix Notepad Not Opening Windows 11
There are a few practical fixes for Notepad not opening.
Deal with Software Conflicts
If you have installed new software recently before the Notepad not opening issue occurs, software conflict may be the cause. You should follow this guide to troubleshoot it.
- Start a clean boot on Windows 11.
- Enable the applications one by one to find the possible cause of Notepad not opening.
- Disable or uninstall the application that is causing the issue.
Run SFC Scan
Run System File Checker is very useful if the notepad.exe file is corrupted.
- Open Command Prompt.
- Type sfc /scannow and press Enter.
- Just wait.
Set Notepad as the Default Text Editor
- Open Settings.
- Select Apps.
- Click Default apps.
- Search for Notepad.
- Browse the file types and select the type you want to open with Notepad.
- Select Notepad when it asks you “How do you want to open * files from now on”.
- Click OK.
Enable Background Apps
- Press Windows + I.
- Select Apps.
- Click Apps & features.
- Find Notepad and click on the three-dots button.
- Select Advanced options.
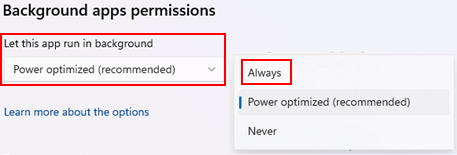
- Go to the Background apps permissions section.
- Select Always from the drop-down menu of Let this app run in background.
Repeat this process to let other apps in the list run in the background. Then, try to open Notepad again.
Reset Notepad
Resetting Notepad to default settings also works in solving Notepad related issues.
- Open Run.
- Type regedit and press Enter.
- Go to HKEY_CURRENT_USER\Software\Microsoft\Notepad.
- Find Notepad in the left pane.
- Right click on it and select Delete.
4 Ways To Recover Notepad File On Win 10 Quickly.
About The Author
Position: Columnist
Sarah has been working as an editor at MiniTool since she graduated from university. Sarah aims at helping users with their computer problems such as disk errors and data loss. She feels a sense of accomplishment to see that users get their issues fixed relying on her articles. Besides, she likes to make friends and listen to music after work.
Microsoft Word — один из самых популярных текстовых редакторов. Как и любое другое приложение, он может однажды перестать работать по ряду причин. В этом материале мы рассмотрим основные и расскажем о способах решения проблем.
Основные причины
Текстовый редактор Word может перестать запускаться или не открывать документы по самым разным поводам. Чаще всего причины всех проблем кроются в следующем:
- в поврежденных файлах;
- в конфликте надстроек;
- в несовместимых драйверах и обновлениях;
- в не активированной программе;
- в отсутствии прав администратора.
Рассмотрим разные способы решения описанных трудностей.
Запуск с правами администратора
Проблема отсутствия прав администратора у пользователя на Windows 10 и 11 решается схожим образом:
- В меню «Пуск» найдите ярлык программы и щелкните по нему правой кнопкой мыши;
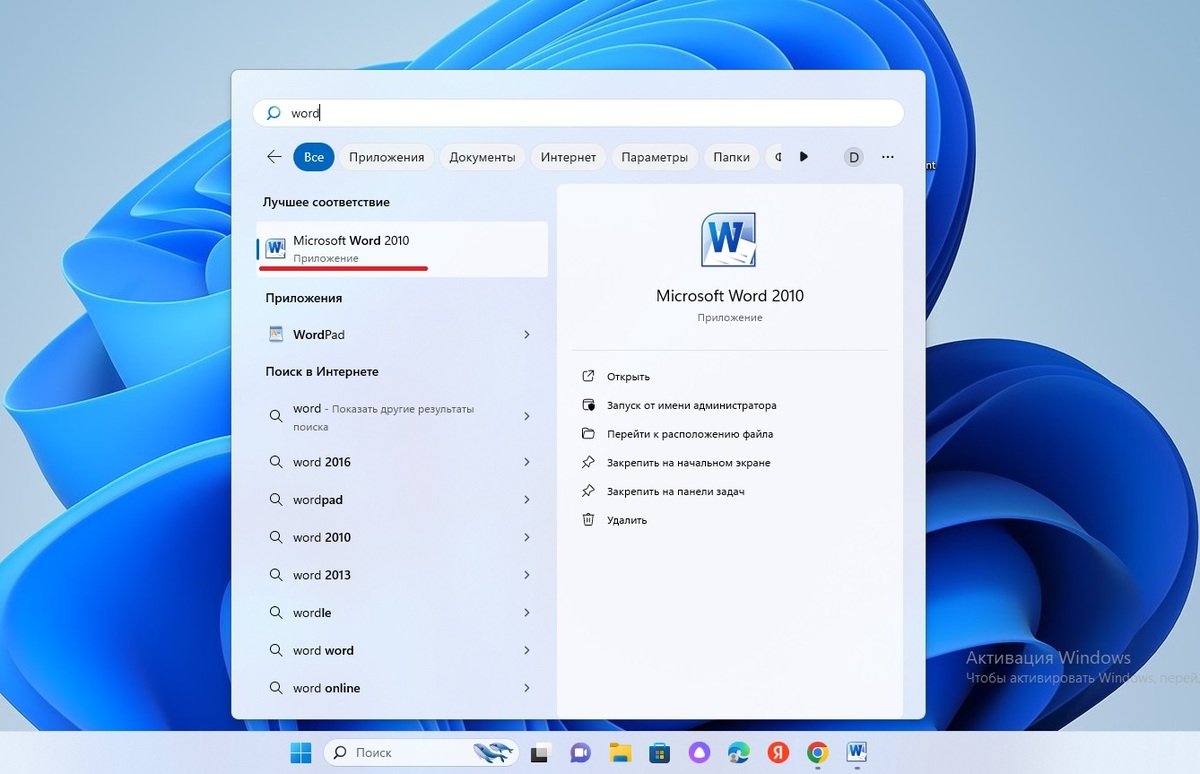
Источник: скриншот CQ / Запуск Word с правами администратора
- Из открывшихся вариантов выберите «Запуск от имени администратора».
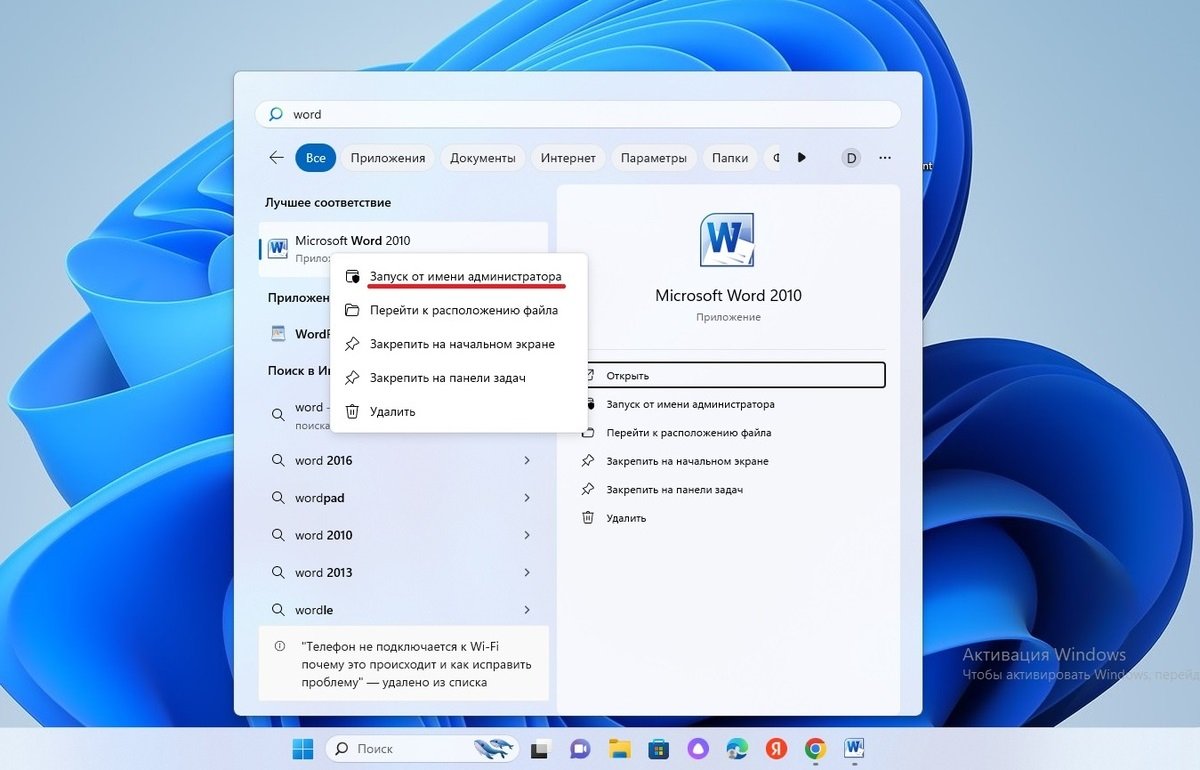
Источник: скриншот CQ / Запуск Word с правами администратора
А для того, чтобы каждый раз при работе с документами не повторять данные действия, нужно внести изменения в свойства ярлыка. Порядок действий следующий:
- Точно также найдите ярлык приложения в «Пуск» и кликните по нему правой кнопкой мыши;
Источник: скриншот CQ / Запуск Word с правами администратора
- Среди открывшихся вариантов выберите «Перейти к расположению файла»;

Источник: скриншот CQ / Запуск Word с правами администратора
- На значке Word нажмите правую кнопку мыши и «Свойства»;
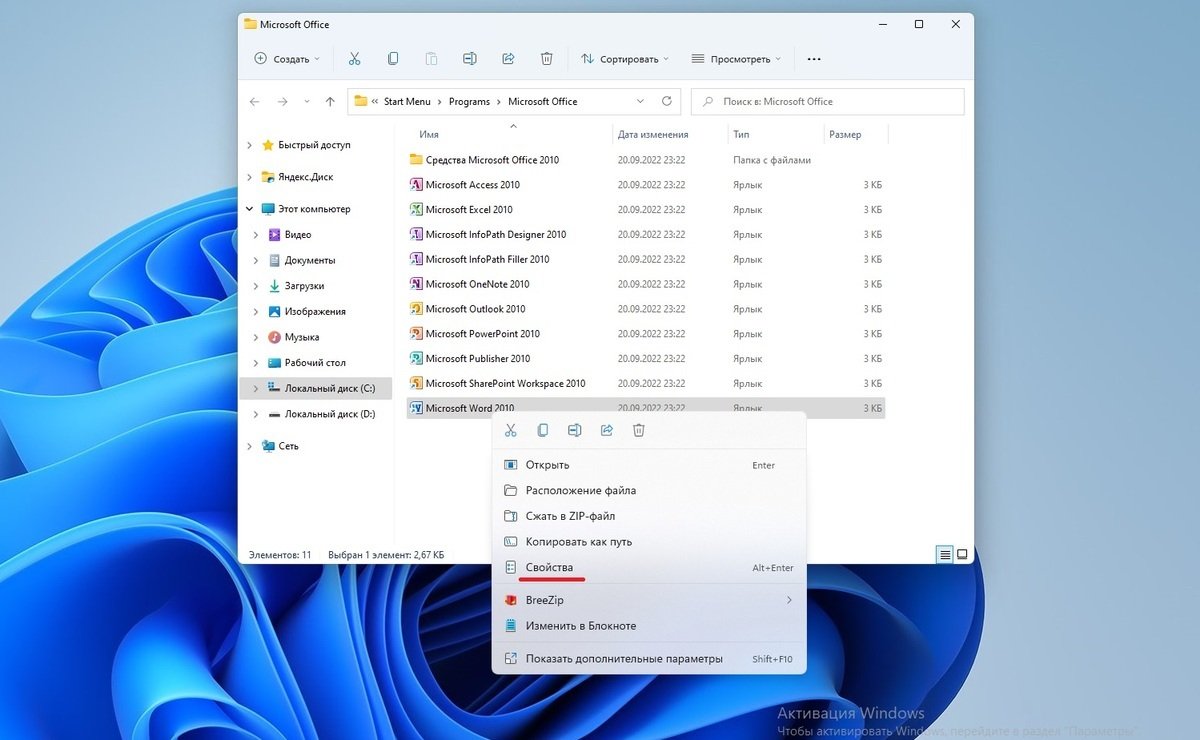
Источник: скриншот CQ / Запуск Word с правами администратора
- Во вкладке «Ярлык» кликните на кнопке «Дополнительно»;
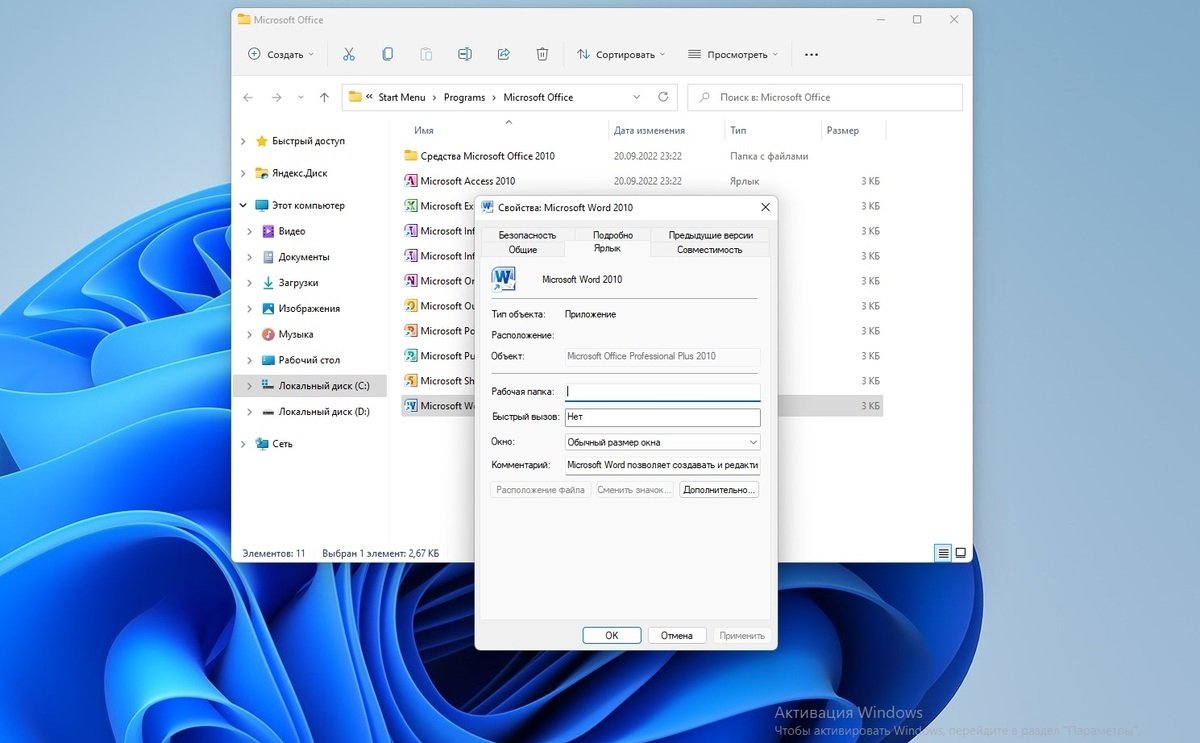
Источник: скриншот CQ / Запуск Word с правами администратора
- В открывшемся окне поставьте галочку напротив «Запуск от имени администратора», а затем подтвердите и сохраните внесенные изменения.
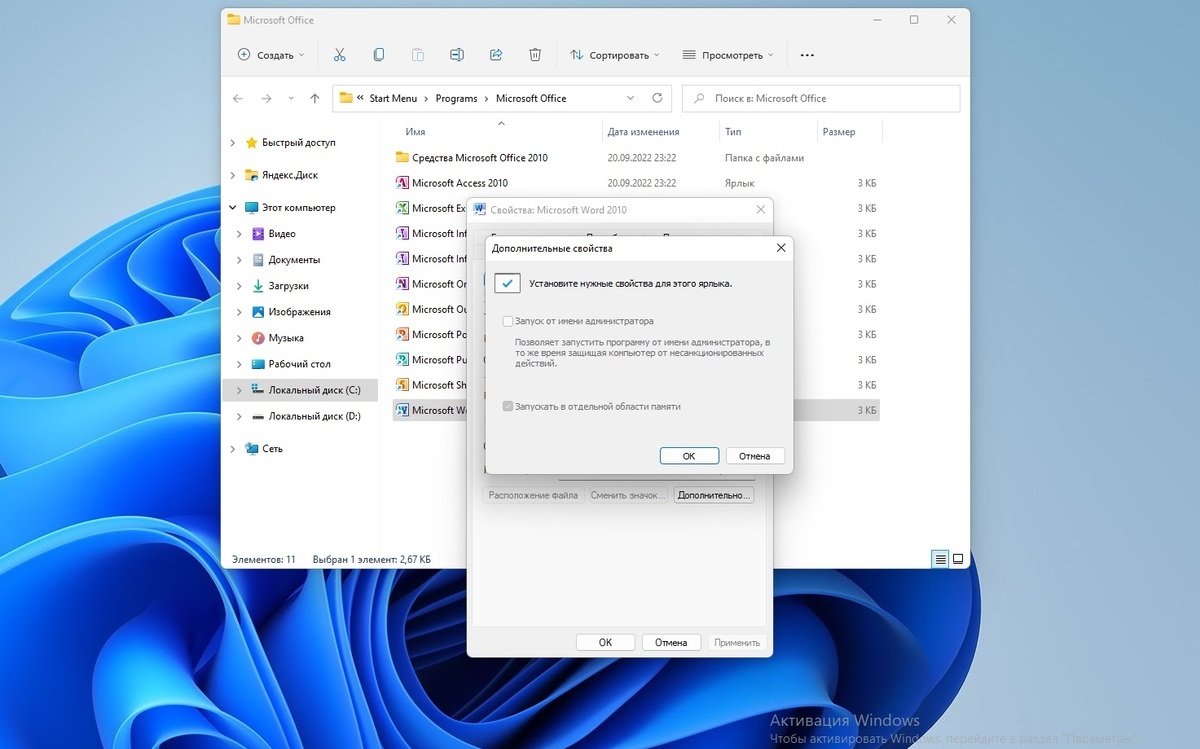
Источник: скриншот CQ / Запуск Word с правами администратора
После этого программа всегда будет запускаться с правами администратора.
Восстановление поврежденных файлов
На работоспособность Word влияют повреждения, изменения или удаления отдельных компонентов Microsoft Office, причем вне зависимости от версии программы. Для исправления ошибки требуется восстановить офисный пакет, для чего нужно:
- Кликнуть правую кнопку мыши на «Пуск» и выбрать пункт «Приложения и возможности»;
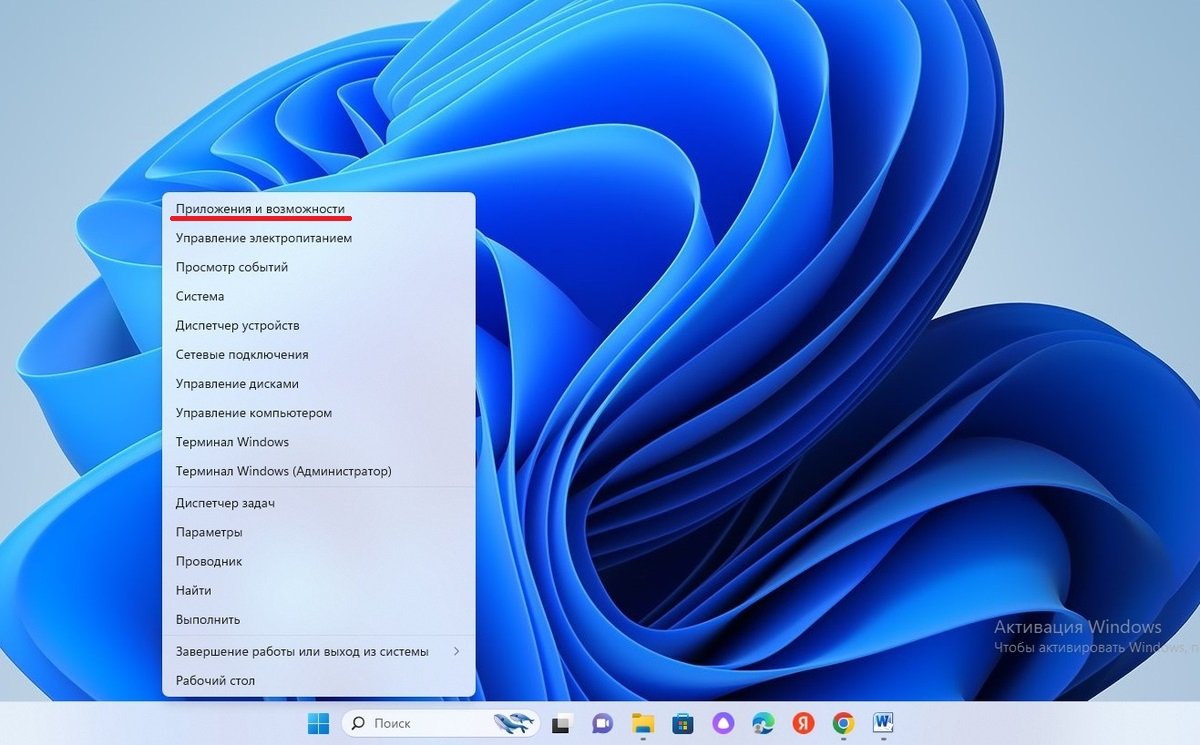
Источник: скриншот CQ / Восстановление поврежденных файлов
- В списке установленных на компьютере программ найти Microsoft Office и нажать «Изменить»;
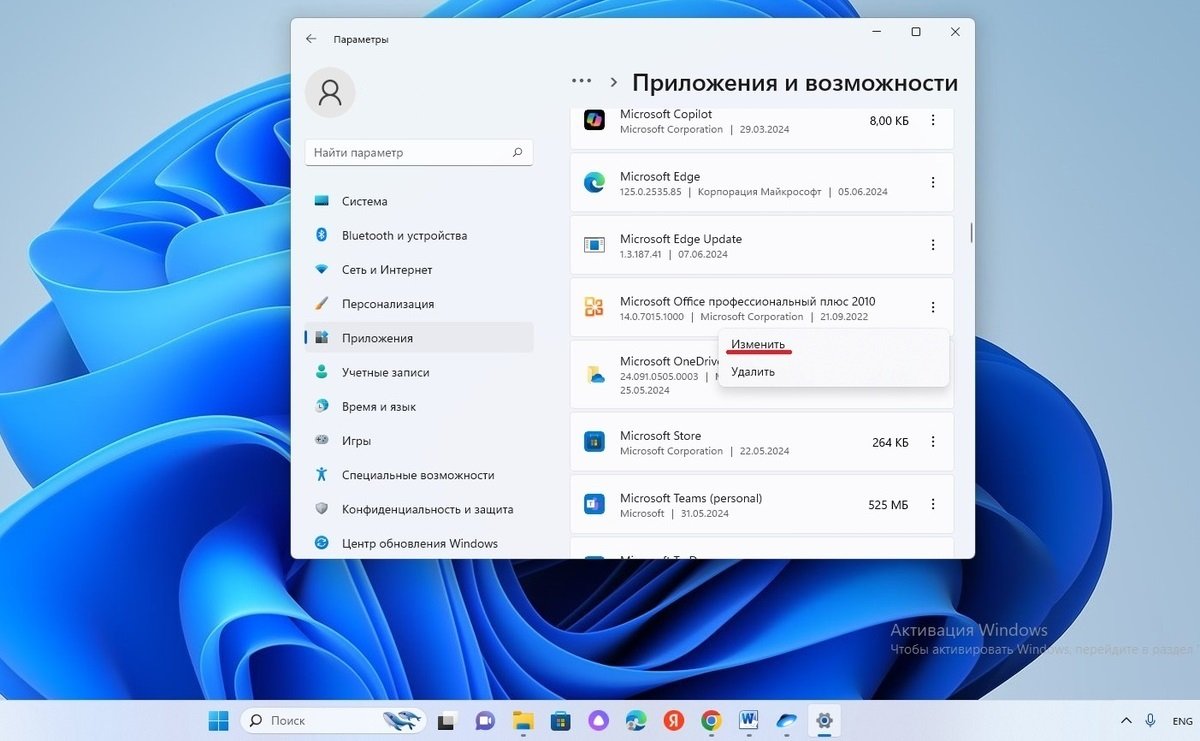
Источник: скриншот CQ / Восстановление поврежденных файлов
- Выбрать удобный вариант восстановления и нажать «Восстановить».
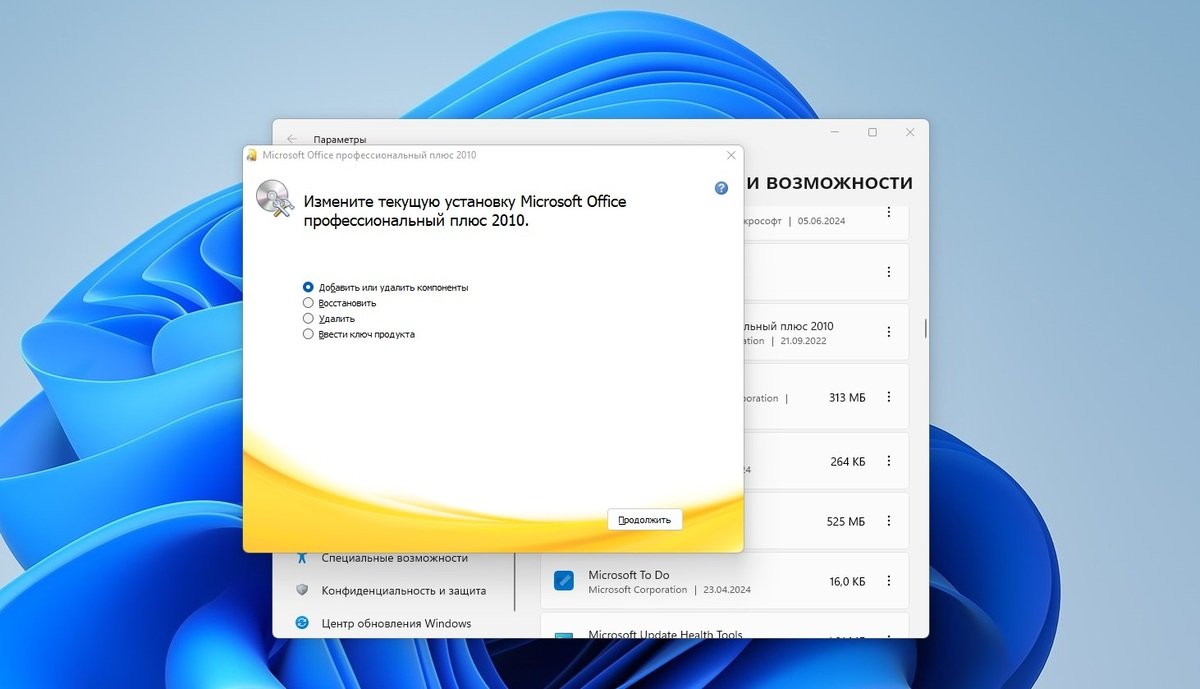
Источник: скриншот CQ / Восстановление поврежденных файлов
Данная операция позволяет восстановить файлы офисного пакета, что решает большинство проблем с запуском приложения.
Microsoft постоянно выпускает различные обновления, в том числе и для приложений Office. Однако из-за конфликта версий может случиться сбой в работе. Это «лечится» установкой свежих обновлений. Для этого на Windows 11:
- В меню «Пуск» откройте «Параметры» и нажмите Центр обновления Windows;
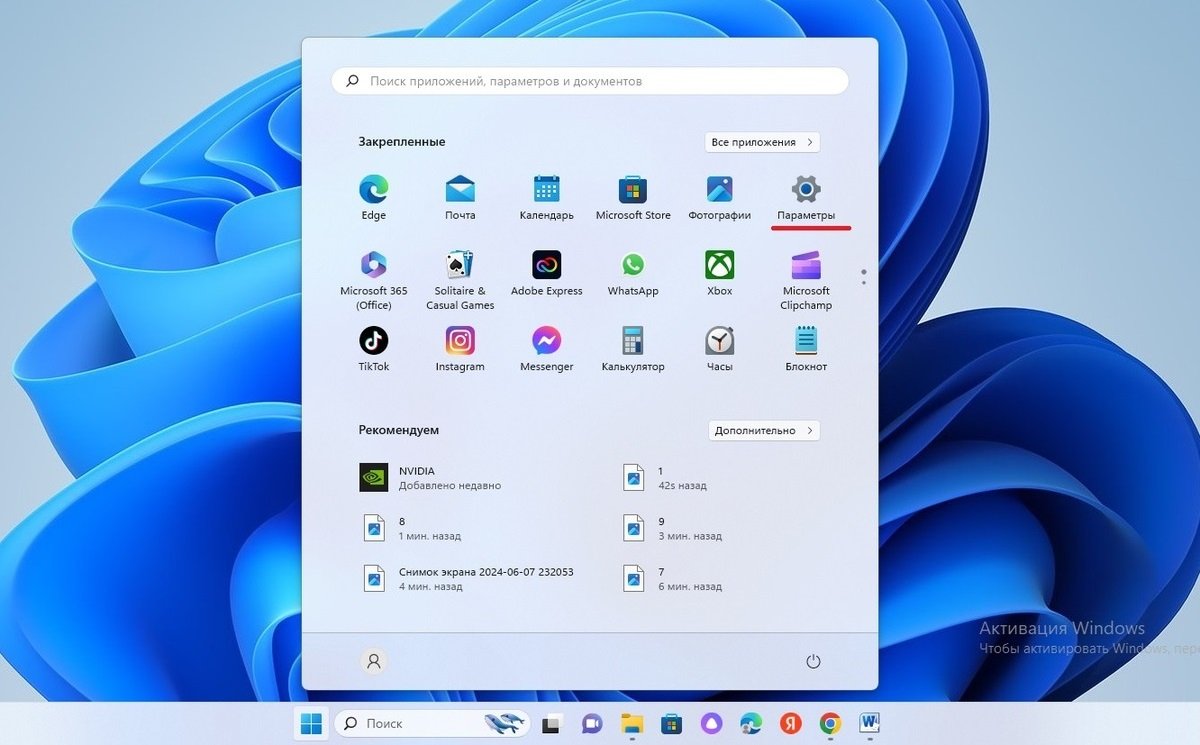
Источник: скриншот CQ / Установка обновлений Windows 11
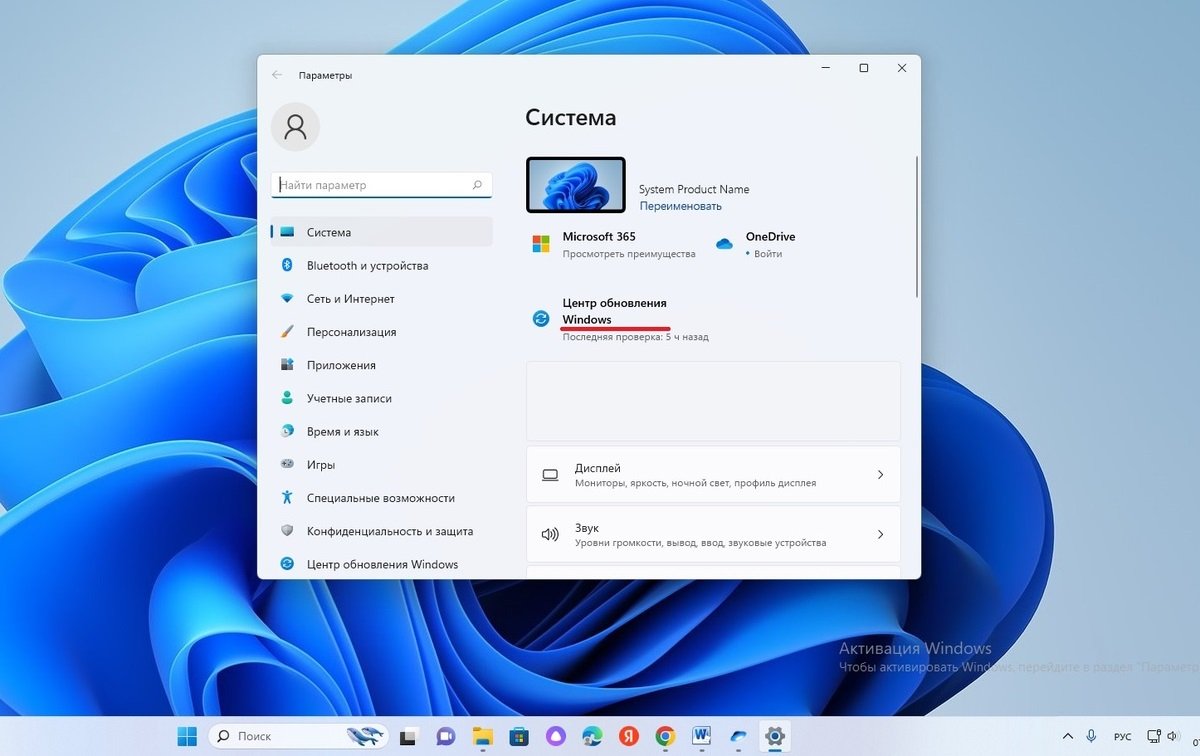
Источник: скриншот CQ / Установка обновлений Windows 11
- Нажмите «Проверить наличие обновлений» и если обнаружатся свежие обновления, то нажмите «Установить».

Источник: скриншот CQ / Установка обновлений Windows 11
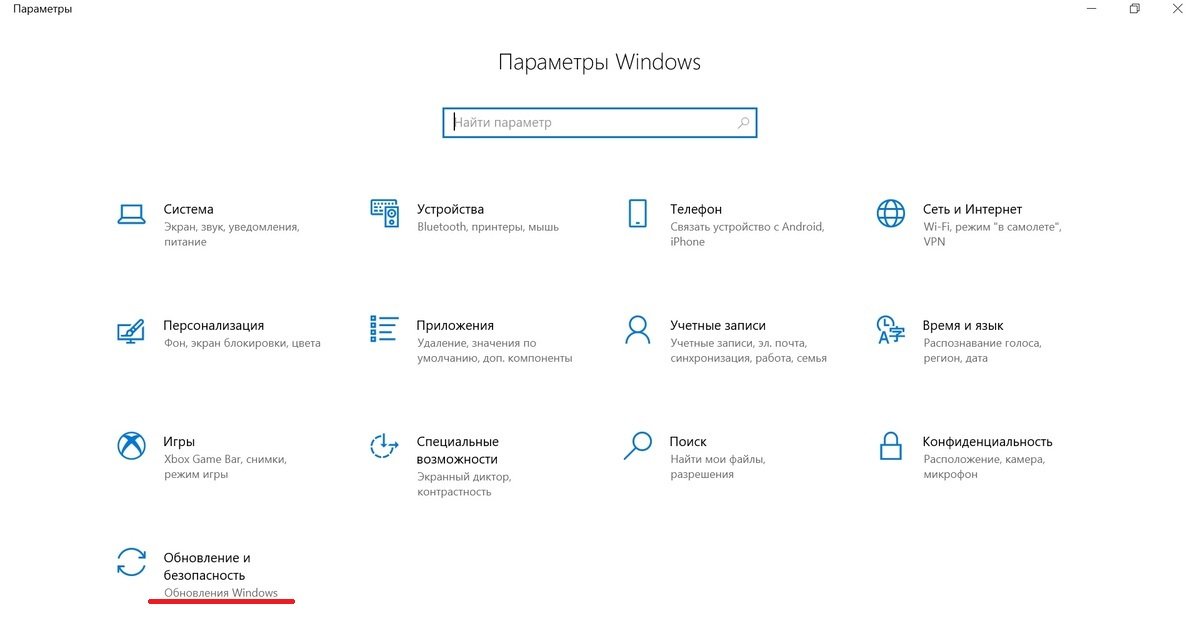
На Windows 10 это проходит следующим образом:
- В меню «Пуск» откройте сначала «Параметры», а затем «Обновление и безопасность»;
Источник: скриншот CQ / Установка обновлений Windows 10
- Оттуда перейдите в «Центр обновления Windows» и кликните мышкой на «Проверьте наличие обновлений».
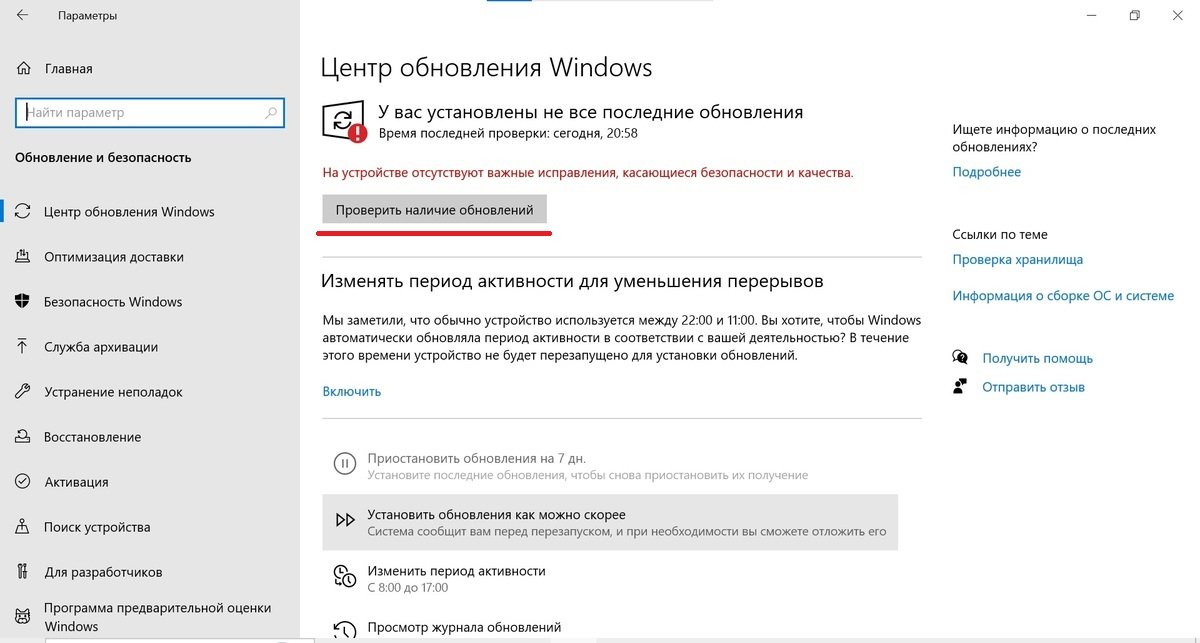
Источник: скриншот CQ / Установка обновлений Windows 10
Система автоматически установит на компьютер драйвера последней версии.
Хотя иногда может потребоваться обратная операция. Для этого перейдите в «Центр обновления Windows» и откройте «Журнал обновлений». Найдите проблемные обновления и удалите их. После этого подтвердите изменения и перезагрузите компьютер.

Источник: скриншот CQ / Удаление обновлений Windows
Отключение надстроек Word
Текстовый редактор может работать весьма нестабильно из-за разных надстроек, добавленных при установке других программ. Пусть они расширяют функционал, но взамен снижают уровень стабильности работы Word. Чтобы их отключить необходимо:
- В Word открыть меню «Файл» и выбрать команду «Параметры»;
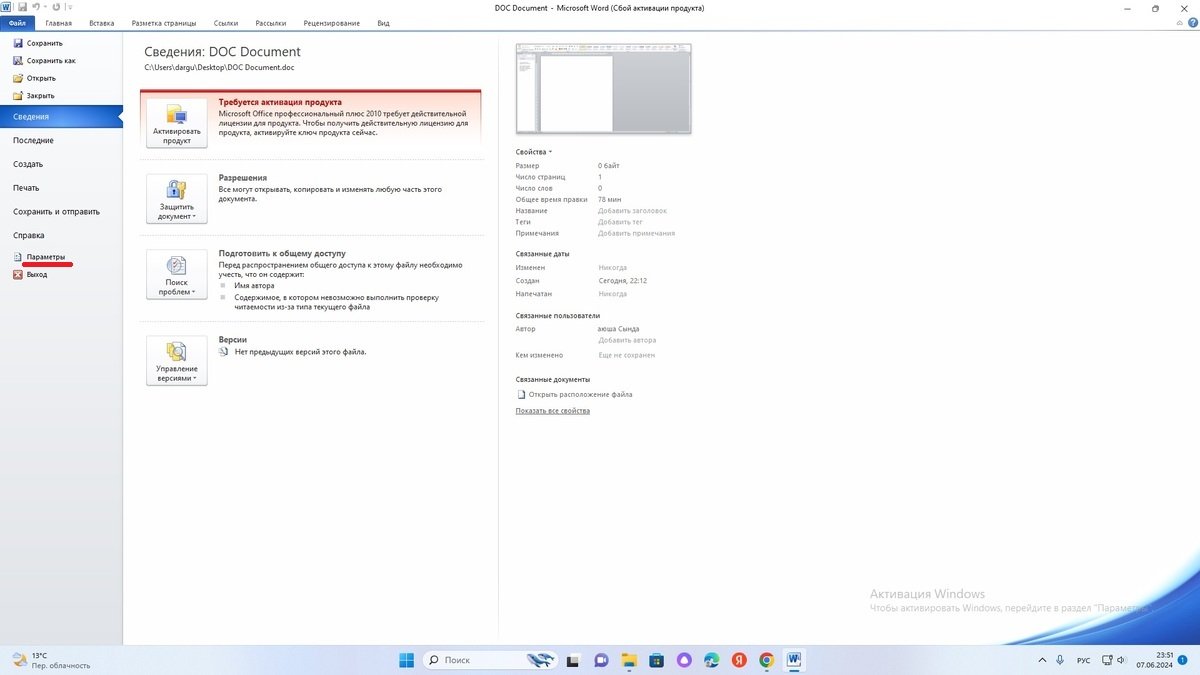
Источник: скриншот CQ / Отключение надстроек
- Кликнуть в левом столбце на вкладку «Надстройки», а справа в окне «Управление» выбрать «Надстройки COM» и нажать на кнопку «Перейти»;
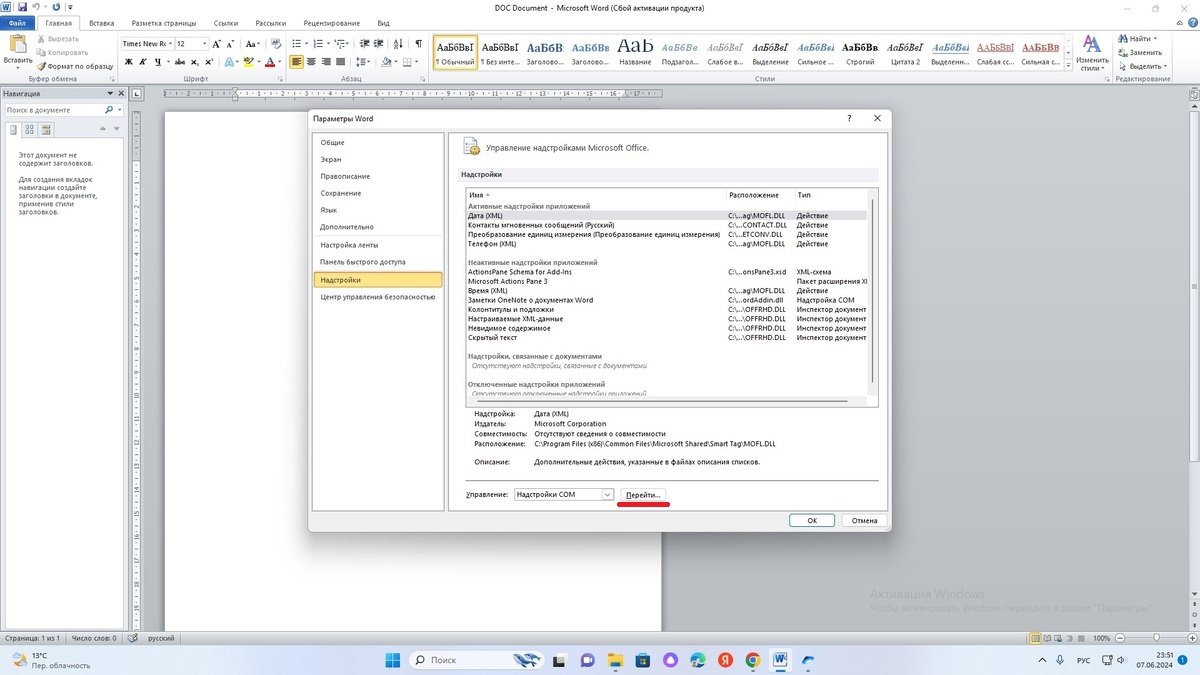
Источник: скриншот CQ / Отключение надстроек
- Снимите галочки с конфликтующих элементов и отключите их.
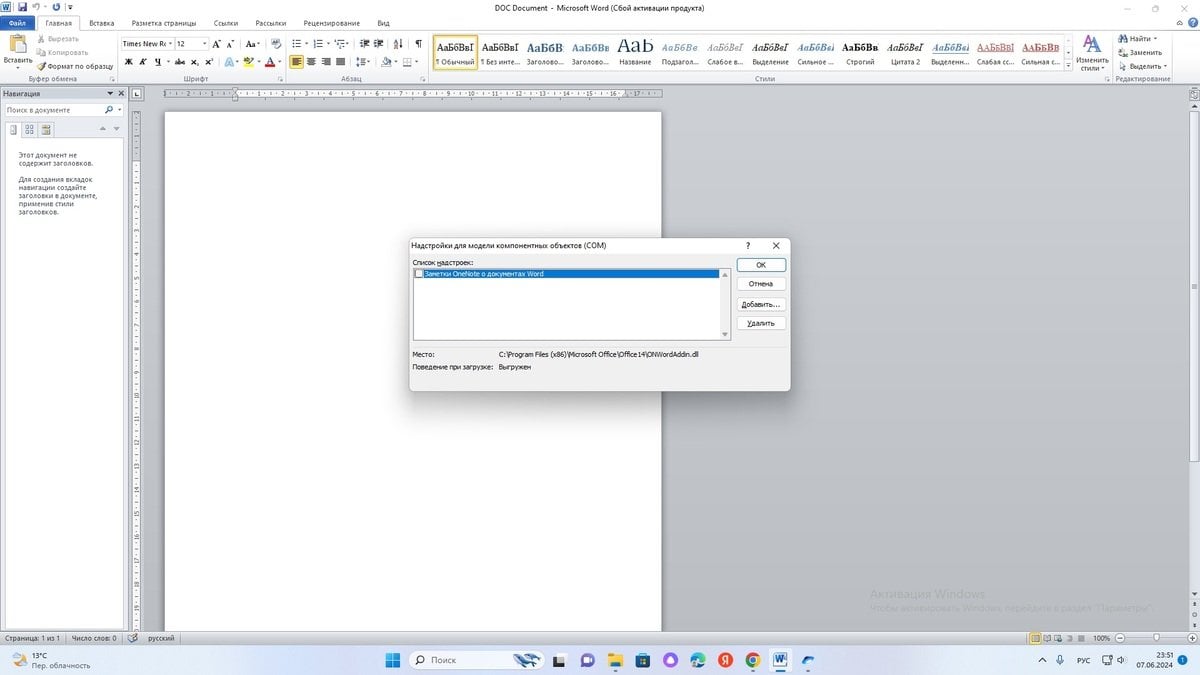
Источник: скриншот CQ / Отключение надстроек
Запуск Word через «Диспетчер задач»
Если при запуске Word ничего не произошло, то комбинацией клавиш Ctrl+Alt+Delete откройте «Диспетчер задач» и посмотрите, открыто ли приложение WINWORD.EXE. Если процесс идет, то по какой-то причине Windows «думает», что программа уже работает.
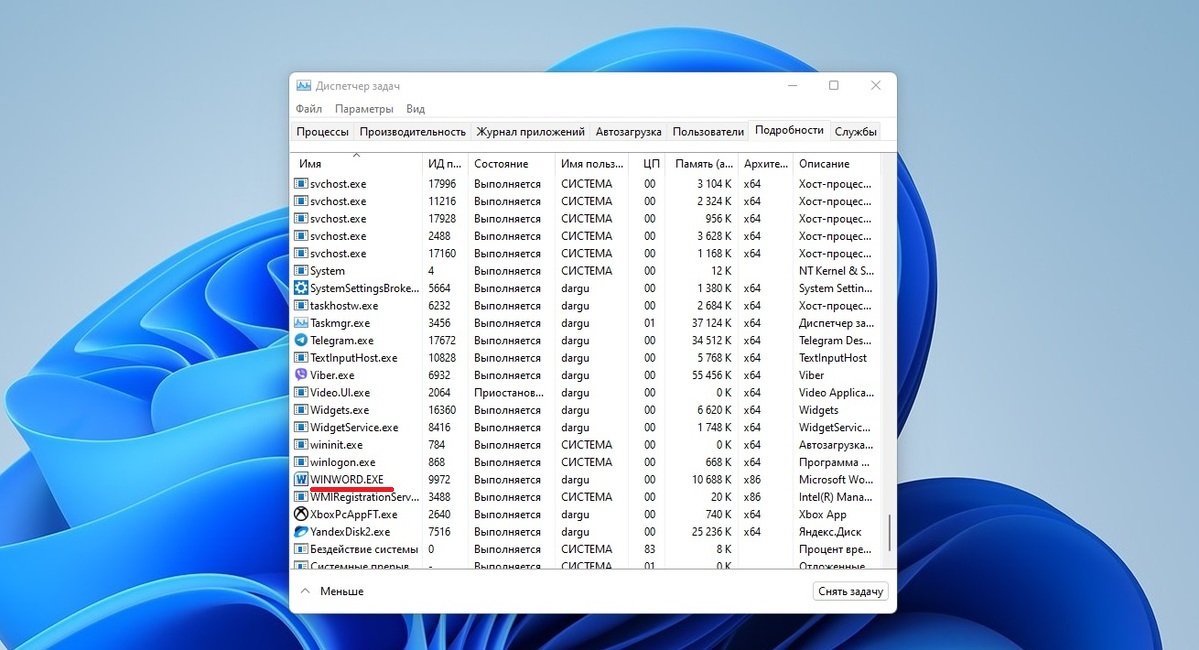
Источник: скриншот CQ / Проверка в Диспетчере задач
В этом случае попробуйте снять задачу и повторно открыть текстовый редактор. Если снова ничего не случилось, то на рабочем столе создайте новый документ, щелкните на нем правой кнопкой мыши и нажмите «Изменить».
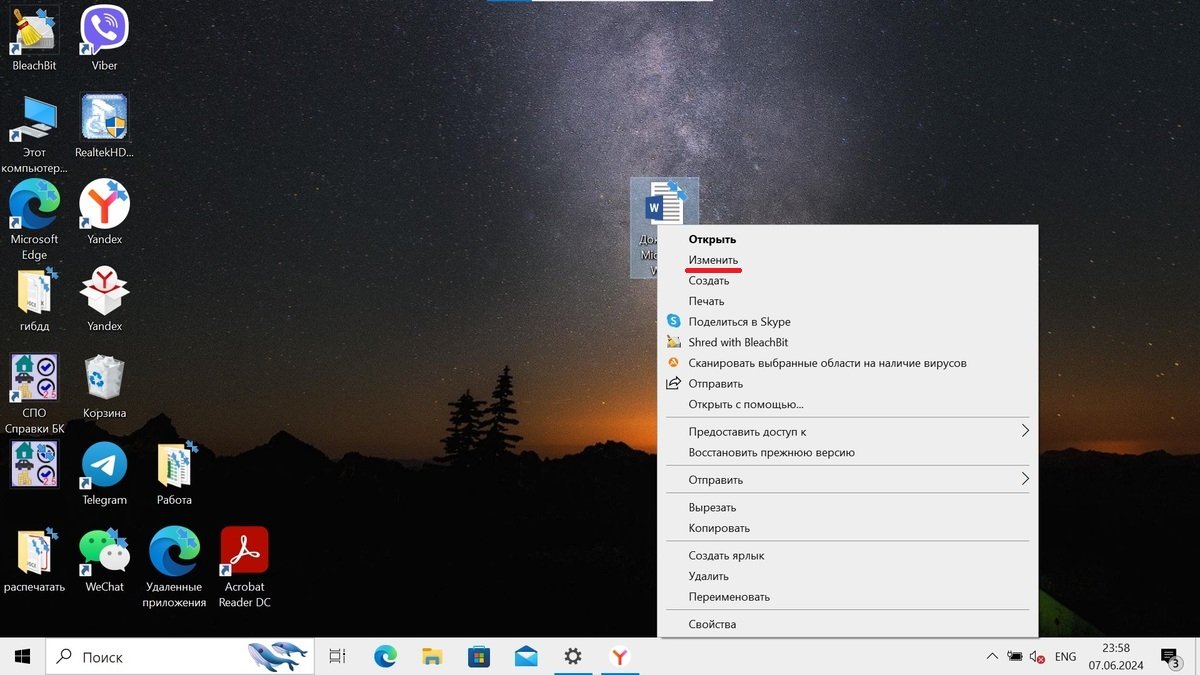
Источник: скриншот CQ / Запуск через «Изменить»
Запуск Word в безопасном режиме
Данный способ не всегда срабатывает как надо, поэтому к нему стоит прибегать в крайнем случае. Для запуска безопасного режима нужно:
- Комбинацией клавиш Win+R открыть окно «Выполнить»;
- Ввести команду winword /safe и нажать «ОК».
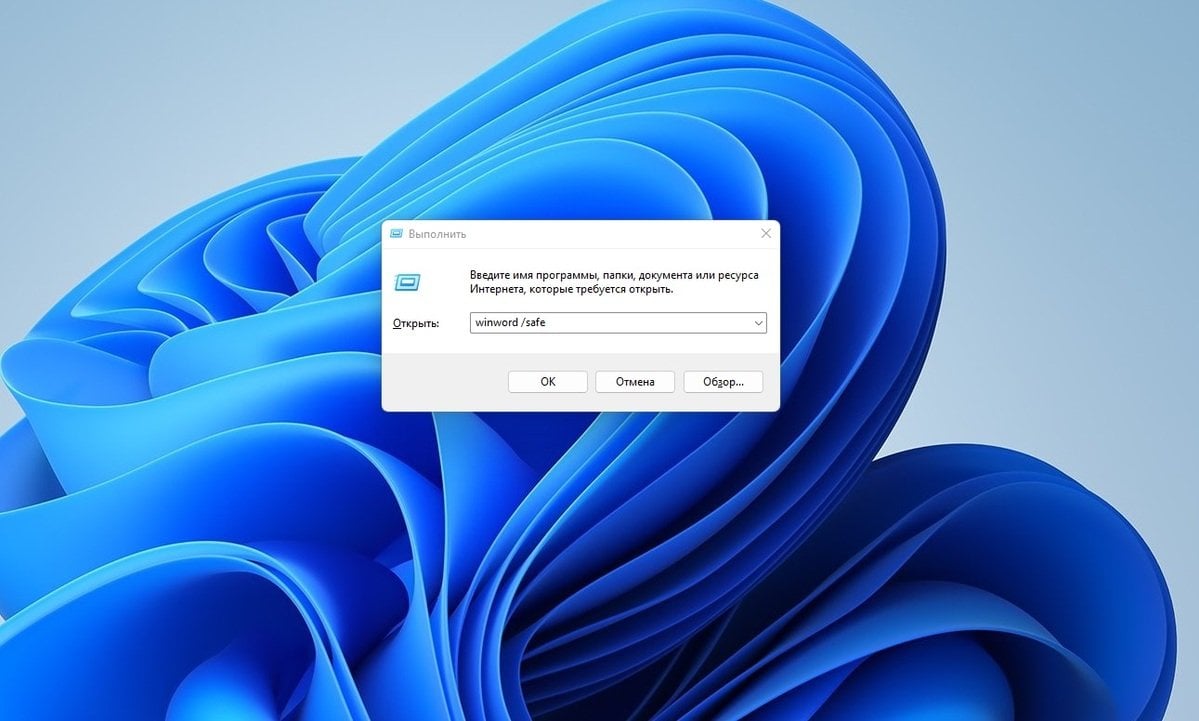
Источник: скриншот CQ / Запуск в безопасном режиме
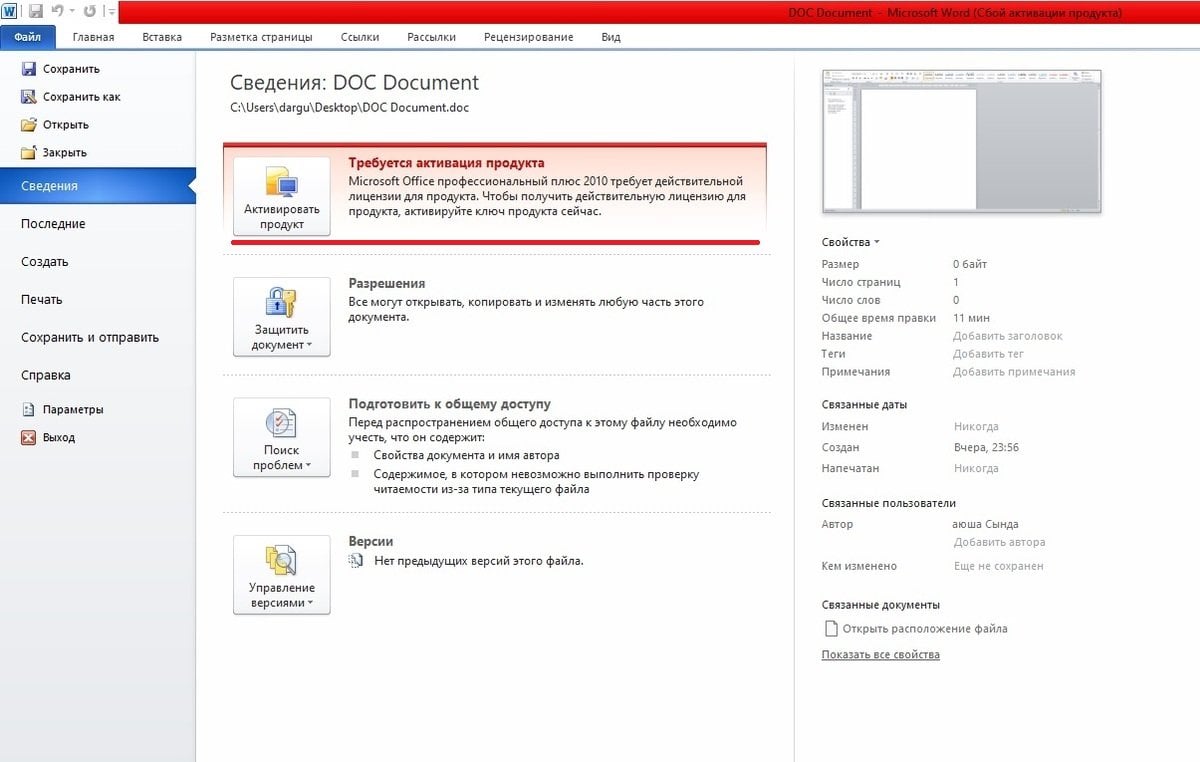
Активация Office
После установки офисных приложений пользователям дают тридцать дней бесплатного пробного периода. И если по окончании срока не активировать программу, то она либо перестанет работать, либо сильно урежет функционал. Чтобы и дальше работать без головной боли, то купите лицензию на официальном сайте Microsoft или на сторонних площадках и активируйте продукт.
Источник: скриншот CQ / Активация Office

Источник: скриншот CQ / Активация Office
Переустановка Word
Порой проблема оказывается настолько сложной, что решается только радикальным образом, а именно удалением Word с компьютера и его повторной установкой.
Утилита от разработчиков
При появлении сообщения «Прекращена работа программы Microsoft Word» можно использовать специальную утилиту «Средство простого исправления». Для этого:
- Скачайте специальную утилиту с официального сайта;
- Запустите и установите скачанный файл, а потом следуйте инструкциям.

Источник: скриншот CQ / Утилита «Средство простого исправления»
После этого приложение проведет полную диагностику и самостоятельно исправит найденные ошибки.
Заглавное фото: https://www.jotform.com/
Время на прочтение4 мин
Количество просмотров5.5K
Журналисты Windows Latest рассказали, как восстановить классическую версию «Блокнота» в Windows 11 24H2 без функций искусственного интеллекта с помощью нескольких настроек.

Шаг 1. Проверьте, установлен ли на ПК классический «Блокнот».
Для этого нужно открыть приложение «Параметры», нажать «Система» и прокрутить экран вниз, чтобы найти «Дополнительные функции».

В поле поиска потребуется ввести «Блокнот».

Если приложение не установлено, то требуется нажать «Просмотр функций» в меню «Добавить дополнительную функцию» вверху. После этого можно найти «Блокнот» и установить его.
Шаг 2. Удалите связь notepad.exe с новым «Блокнотом».
Чтобы убедиться, что notepad.exe перенаправляется на старый «Блокнот», нужно внести изменения в псевдонимы выполнения приложений. Для этого потребуется:
-
щёлкнуть меню «Приложения» в «Параметрах»;
-
открыть «Дополнительные параметры приложения» и нажать «Псевдонимы выполнения приложений»;


-
прокрутить страницу вниз до Store Notepad и выключить переключатель.

Теперь старый «Блокнот» стал приложением по умолчанию для notepad.exe. Чтобы проверить это, можно открыть диалоговое окно «Выполнить», нажав клавиши Windows + R. Затем нужно ввести «notepad».

Шаг 3. Добавьте ассоциацию файла .txt к устаревшему «Блокноту».
Для этого потребуется:
-
открыть диалоговое окно «Выполнить» (Win + R), ввести «regedit» и нажать Enter;

-
нажать «Да», когда появится всплывающее окно с вопросом, стоит ли разрешить этому приложению вносить изменения в раздел;
-
скопировать путь «HKEY_LOCAL_MACHINE\SOFTWARE\Classes\txtfilelegacy» и вставить его в адресную строку. Нажать Enter, и слева появится папка «txtfilelegacy»;


-
щёлкнуть правой кнопкой мыши по папке; в опции «New» выбрать «Key»;

-
назвать новый ключ «Shell». Он содержит команды, связанные с типом файла .txt;

-
кликнуть правой кнопкой мыши «Shell», навести указатель мыши на опцию «New» и выбрать «Key»;

-
назвать его «Open». Цель этого ключа — указать действие, которое следует выполнить при открытии файла типа .txt;

-
чтобы задать команду для выполнения при открытии файла .txt, нужно щёлкнуть правой кнопкой мыши ключ «Open», выбрать «New», затем «Key». Переименовать ключ в «Command»;

-
дважды кликнуть значок с (по умолчанию) на панели ключей «Command»;
-
появится всплывающее меню. В текстовой области под «Значение:» нужно вставить следующее: «c:\windows\system32\notepad.exe». Затем добавить пробел и ввести «%1», как показано на изображении ниже. Нажать «ОК»;

-
значение по умолчанию для клавиши Command установлено на «c:\windows\system32\notepad.exe %1». Таким образом, ПК теперь будет открывать устаревший «Блокнот» (notepad.exe) с выбранным файлом («%1») в качестве параметра при открытии файла .txt.
Шаг 4. Сделайте классический «Блокнот» приложением по умолчанию для открытия файлов .txt.
Для этого потребуется:
-
создать случайный текстовый документ в «Блокноте» и сохранить его. Это можно сделать как в старой, так и в новой версии;
-
закрыть приложение. Щёлкнуть правой кнопкой мыши по текстовому файлу. Выбрать «Открыть с помощью» и нажать «Выбрать другое приложение»;

-
появится меню, предлагающее выбрать между старой и новой версиями «Блокнота». При выборе старой потребуется нажать «Всегда».

Теперь, если дважды кликнуть по файлу .txt, то он будет открываться в классическом «Блокноте». Но даже в этом случае нужно будет искать приложение в командной строке.
Шаг 5. Создайте ярлык в меню «Пуск» для старого «Блокнота».
Для этого:
-
кликаем правой кнопкой мыши по обоям рабочего стола, выбираем «Создать» и нажимаем «Ярлык»;

-
вставляем «файл C:\Windows\System32\notepad.exe» в поле пути. Нажимаем «Далее». Называем ярлык «Блокнот» и нажимаем «Ввод»;

-
нажимаем Win + R, вводим «shell:Common Start Menu». Нажимаем «Ввод»;

-
появится «Проводник» с папкой под названием «Программы». Нужно открыть её по двойному клику;

-
возвращаемся к ярлыку, который создан для «Блокнота». Вырезаем его и вставляем в папку «Программы». Нажимаем «Продолжить»;

-
открываем меню «Пуск», прокручиваем его вниз, до старого «Блокнота». Он получит метку «Новый» внизу.

Теперь можно использовать как новый, так и старый Notepad. Однако текстовые файлы будут открываться непосредственно в старой версии.

Как вернуть новый «Блокнот»?
Тем, кто захочет пересмотреть установку «Блокнота», может потребоваться восстановить версию по умолчанию в Windows 11.
Для этого нужно:
-
перейти в «Проводник» и вставить в адресную строку следующий путь: «C:\ProgramData\Microsoft\Windows\Start Menu\Programs». Это откроет папку «Программы», в которую скопировали старый ярлык «Блокнота». Его нужно удалить;

-
нажать Win + R, ввести regedit и нажать Enter. В адресной строке редактора реестра вставить путь: «HKEY_LOCAL_MACHINE\SOFTWARE\Classes\txtfilelegacy». Затем удалить подраздел «Open»;
-
открыть приложение «Параметры» и перейти в раздел «Приложения». Выбрать «Дополнительные параметры приложения» и открыть «Псевдонимы выполнения приложений». Включить переключатель «Блокнот».
Между тем Microsoft выпустила обновление для «Блокнота» с поддержкой функции Rewrite во всех регионах. Это опция, которая использует ChatGPT для перефразирования контента, настройки тона и изменения длины текстов. Функция Rewrite работает только при наличии подписки на Microsoft 365 Personal и Family.