
Issue: Hi, I was trying to edit Local Security Policy in the Group Policy Editor, but I the entry is simply missing. What is causing it? I am using Windows 10.
Solved Answer
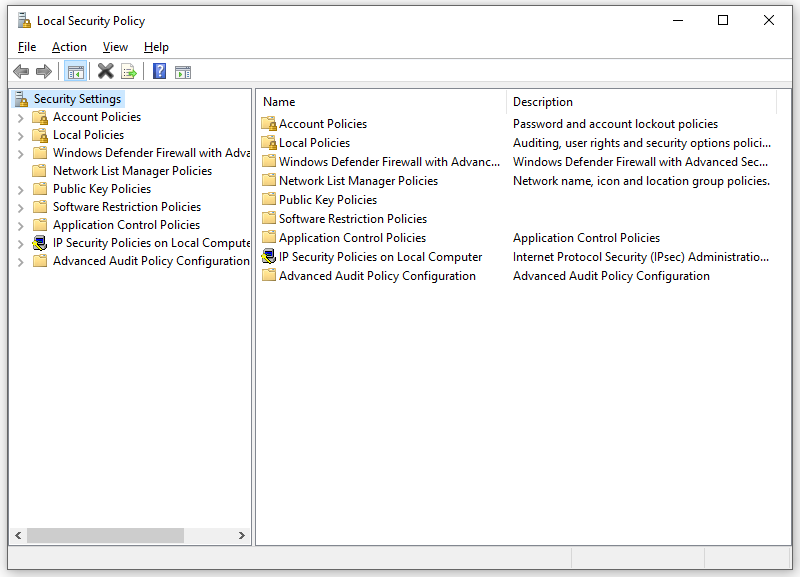
Policies in Windows are an essential feature used to manage various settings, configurations, and rules that define how a computer or network operates. They are commonly utilized to manage security, restrict access to resources, and customize user interfaces.
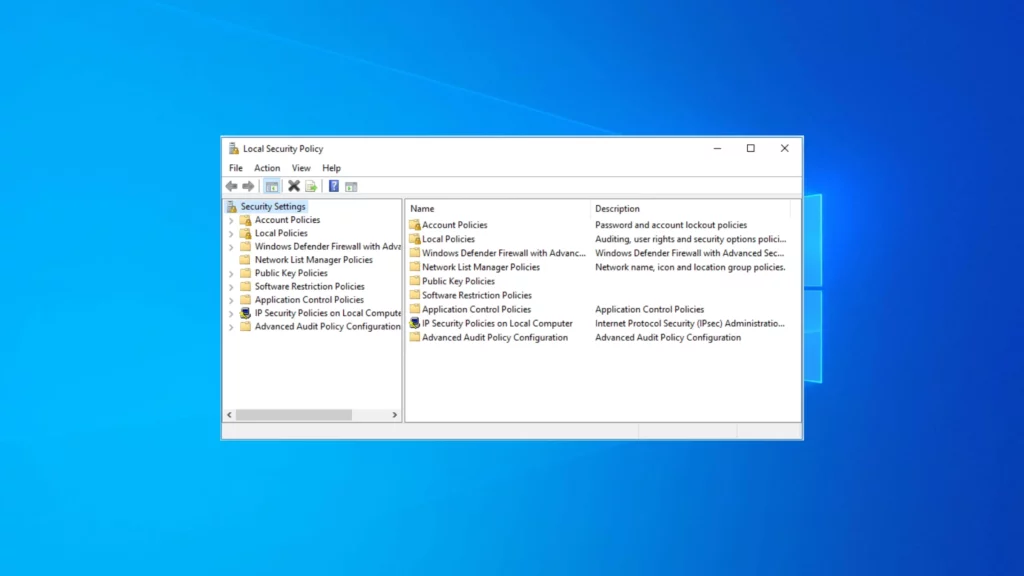
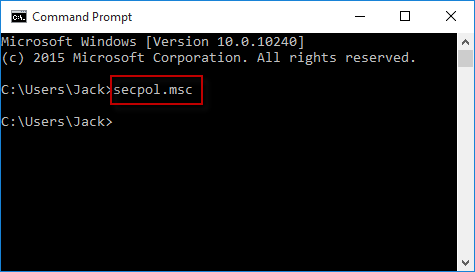
The Local Security Policy (secpol.msc) is a critical management console that allows an administrator to configure and set security policies on the host computer. These policies enable administrators to set password requirements, manage user permissions and privileges, and control access to resources.
However, the Local Security Policy Manager may be missing on your PC if you are using a Windows Home edition operating system. This is because the Group Policy Editor, which contains the Local Security Policy settings, is an advanced Windows feature that is only available in Windows 10/11 Pro, Education, and Enterprise editions.
Additionally, Local Security Policy may not be enabled on your PC, which means you will need to activate it manually using different methods such as PowerShell commands or downloading a gpedit.msc script.
To resolve the Local Security Policy missing error on your Windows, you will need to install or enable secpol.msc using the command prompt or a script. When you enable gpedit.msc, you activate the Group Policy, which consequently enables Local Security Policy.

It’s important to note that if you are experiencing regular problems with Windows, you should consider using a PC repair tool FortectMac Washing Machine X9. These tools can help resolve common issues with the operating system and optimize its performance. Below you will find detailed instructions on how to deal with the issue where Local Security Policy is missing in Windows.
Before you proceed
Before proceeding, we recommend creating a system restore point:
- Type Create a restore point in Windows search and press Enter.
- Click Configure.
- Select Turn on system protection and adjust the usage size.
- Click Apply and OK.

- Now, click the Create button.
- Name your restore point and click Create.
- Windows will notify you once the restore point creation is finished.

Fix 1. Run commands in Command Prompt
Fix it now!
Fix it now!
To repair damaged system, you will have a 24hr Free Trial and the ability to purchase the licensed version of the Fortect Mac Washing Machine X9.
If you are using Windows Home Edition, you won’t have access to the Group Policy. Luckily, there are a few commands you can run on elevated Command Prompt to resolve this:
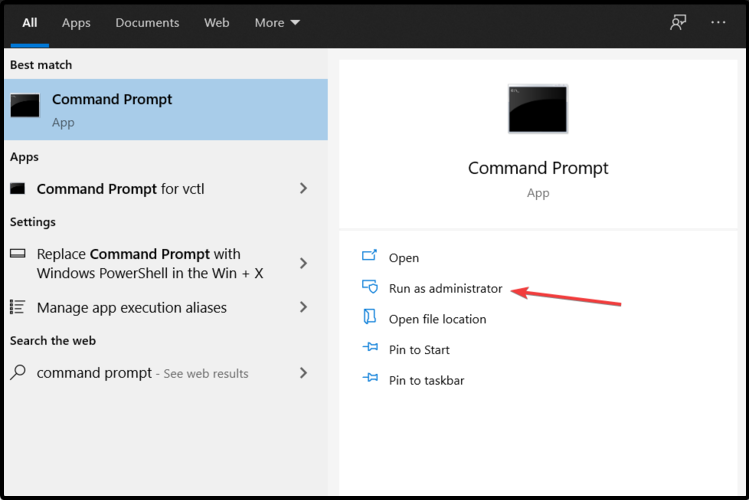
- Type cmd in Windows search.
- Right-click on Command Prompt and select Run as administrator.
- The User Account Control window will show up and ask whether you want to allow changes – click Yes.
- In the new window, copy and paste the following command, then press Enter:
FOR %F IN (“%SystemRoot%\servicing\Packages\Microsoft-Windows-GroupPolicy-ClientTools-Package~*.mum”) DO ( DISM /Online /NoRestart /Add-Package:”%F” )

- Once it is executed, use another command:
FOR %F IN (“%SystemRoot%\servicing\Packages\Microsoft-Windows-GroupPolicy-ClientExtensions-Package~*.mum”) DO ( DISM /Online /NoRestart /Add-Package:”%F” ) - Press Enter and close down Command Prompt.
Fix 2. Use a script
If you want a quicker way of adding the Group Policy Editor, this one is for you:
- Download the BAT file.
- Right-click on on gpedit-enabler.bat and select Extract.
- Once extracted, right-click on the file and pick Run as administrator.
- A Command Prompt window will open and install Group Policy for you.
- In the end, you will be asked to press any key – do it and then restart your PC.

Fix 3. Upgrade Windows
Fix it now!
Fix it now!
To repair damaged system, you will have a 24hr Free Trial and the ability to purchase the licensed version of the Fortect Mac Washing Machine X9.
An alternative method to fix Local Security Policy missing in Windows is to upgrade to Windows Pro, albeit this will not be free. It is noteworthy that you will get many other benefits from using Pro, including access to RDP, BitLocker, Hyper-V, and more advanced features. They make it easier to manage system settings, access your computer remotely, secure your data, test different operating systems, and set up a kiosk mode.
- Click on Start and pick Settings.
- Go to Update & Security and select Activation on the left.
- Under Upgrade your edition of Windows, click Open Store.
- Now all you need to do is buy the Pro version of Windows.

Repair your Errors automatically
ugetfix.com team is trying to do its best to help users find the best solutions for eliminating their errors. If you don’t want to struggle with manual repair techniques, please use the automatic software. All recommended products have been tested and approved by our professionals. Tools that you can use to fix your error are listed bellow:
do it now!
Download Fix
Happiness
Guarantee
do it now!
Download Fix
Happiness
Guarantee
Compatible with Microsoft Windows
Compatible with OS X
Still having problems?
If you failed to fix your error using FortectMac Washing Machine X9, reach our support team for help. Please, let us know all details that you think we should know about your problem.
Fortect will diagnose your damaged PC. It will scan all System Files that have been damaged by security threats. Mac Washing Machine X9 will diagnose your damaged computer. It will scan all System Files and Registry Keys that have been damaged by security threats. To repair damaged system, you will have a 24hr Free Trial and the ability to purchase the licensed version of the Fortect malware removal tool. To repair damaged system, you have to purchase the licensed version of Mac Washing Machine X9 malware removal tool.
Access geo-restricted video content with a VPN
Private Internet Access is a VPN that can prevent your Internet Service Provider, the government, and third-parties from tracking your online and allow you to stay completely anonymous. The software provides dedicated servers for torrenting and streaming, ensuring optimal performance and not slowing you down. You can also bypass geo-restrictions and view such services as Netflix, BBC, Disney+, and other popular streaming services without limitations, regardless of where you are.
Don’t pay ransomware authors – use alternative data recovery options
Malware attacks, particularly ransomware, are by far the biggest danger to your pictures, videos, work, or school files. Since cybercriminals use a robust encryption algorithm to lock data, it can no longer be used until a ransom in bitcoin is paid. Instead of paying hackers, you should first try to use alternative recovery methods that could help you to retrieve at least some portion of the lost data. Otherwise, you could also lose your money, along with the files. One of the best tools that could restore at least some of the encrypted files – Data Recovery Pro.
-
Home
-
News
- How to Fix Local Security Policy Missing on Windows 10/11?
How to Fix Local Security Policy Missing on Windows 10/11?
By Aurelie | Follow |
Last Updated
Some Windows users might notice that they can’t find Local Security Policy after inputting secpol.msc in the Run dialog. What’s wrong with it? Don’t worry, you are not alone! In this guide from MiniTool Software, we will offer you some feasible solutions.
Local Security Policy (secpol.msc), a collection of settings under the Local Group Policy console, is used for configuring security settings on the host computer. Usually, you can launch this tool by entering secpol.msc in the Run box.
However, if you are running on Windows 10 Home Edition, you might receive the following error message while trying to launch Local Security Policy:
Windows cannot find secpol.msc. Make sure you typed the name correctly, and then try again.
This error message indicates that your operating system is missing Local Security Policy Manager or this utility is not enabled. How to fix Local Security Policy missing on your Windows device? On the one hand, you can install it using Command Prompt. On the other hand, it is a good option to upgrade your OS to Windows 10/11 Pro or Enterprise because Local Group Policy is not available on Windows 10/11 Home Edition.
Tips:
Before taking any further measures, you had better create a restore point and back up anything important. If something goes wrong in the troubleshooting process, you can restore your computer to an earlier state and recover your data easily. To do so, you can try MiniTool ShadowMaker, this PC backup software allows you to back up important data and the Windows system with ease. Give it a whirl now!
MiniTool ShadowMaker TrialClick to Download100%Clean & Safe
How to Fix Local Security Policy Missing on Windows 10/11?
Fix 1: Install Local Security Policy via Command Prompt
If you are using Windows Home Edition, you won’t have access to Local Group Policy Editor. In this case, you can install it via an elevated Command Prompt. Follow these steps:
Step 1. Press Win + S to evoke the search bar.
Step 2. Type cmd to locate Command Prompt and select Run as administrator.
Step 3. In the command window, run the following commands and don’t forget to hit Enter.
FOR %F IN (“%SystemRoot%\servicing\Packages\Microsoft-Windows-GroupPolicy-ClientTools-Package~*.mum”) DO ( DISM /Online /NoRestart /Add-Package:”%F” )
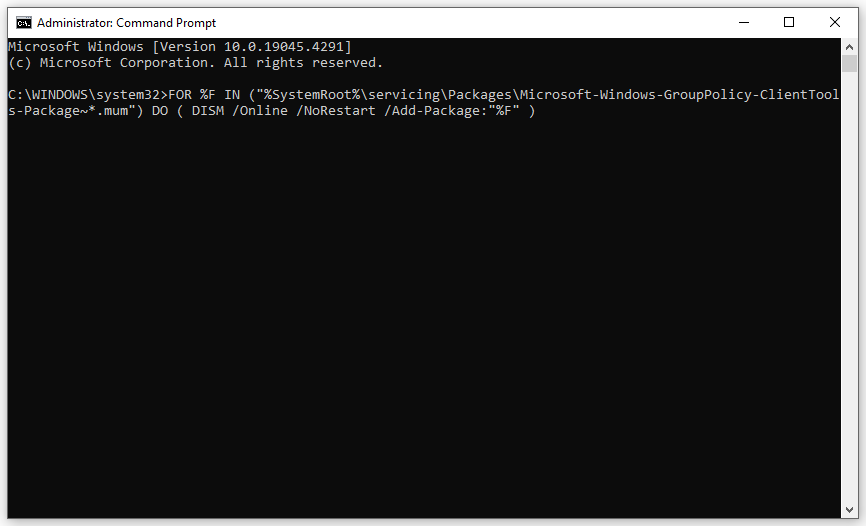
Step 4. After the process is done, enter another command:
FOR %F IN (“%SystemRoot%\servicing\Packages\Microsoft-Windows-GroupPolicy-ClientExtensions-Package~*.mum”) DO ( DISM /Online /NoRestart /Add-Package:”%F” )
Step 5. After the process completes, quit Command Prompt restart your computer.
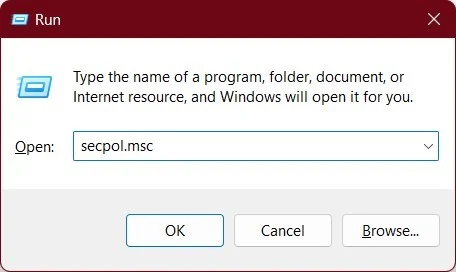
Step 6. Press Win + R to open the Run box.
Step 7. Type gpedit.msc and hit Enter. Now, Local Security Policy Manager missing might be gone.
Fix 2: Upgrade Your Edition of Windows
As mentioned in the beginning, Local Group Policy Editor is not available on Windows 10 Home Edition. Therefore, to fix Local Security Policy missing, the most effective way is to upgrade your Windows Home to Pro. Follow these steps:
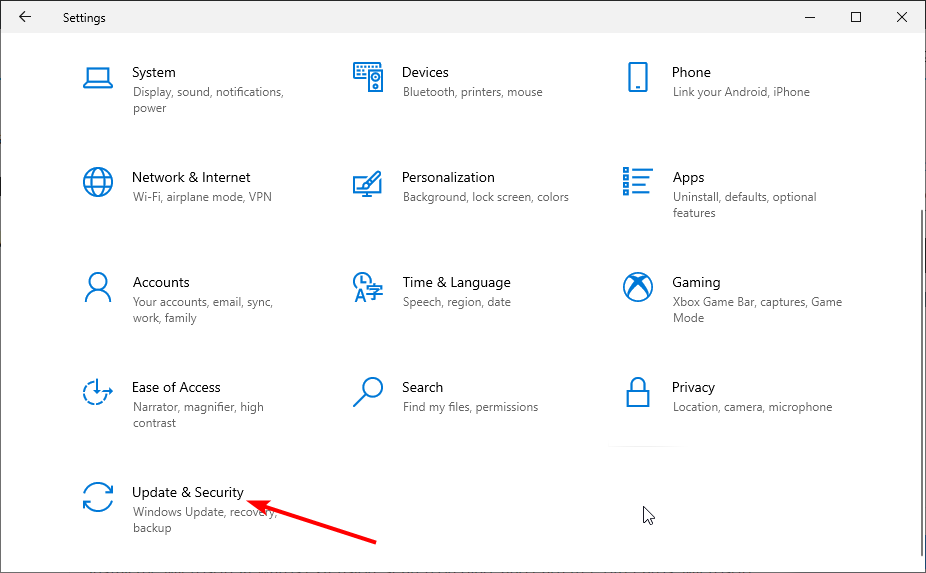
Step 1. Open Windows Settings and select Update & Security.
Step 2. In the Activation tab, click on Change product key.
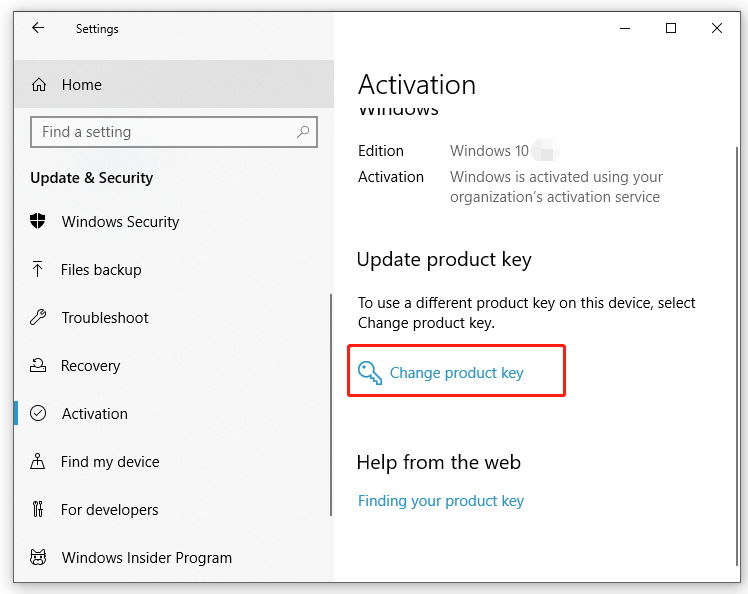
Step 3. Input the 25-character product key of Windows 10 Pro.
Step 4. Click on Next to start the upgrading process. After completion, it won’t require other steps because Windows Pro Edition comes with Local Group Policy Editor.
Final Words
This post illustrates how to solve Local Security Policy missing in 2 ways. At the same time, don’t forget to create a restore point and back up important items with MiniTool ShadowMaker to prevent any potential errors or data loss. Hope either of the solution can work for you!
About The Author
Position: Columnist
Aurelie is a passionate soul who always enjoys researching & writing articles and solutions to help others. Her posts mainly cover topics related to games, data backup & recovery, file sync and so on. Apart from writing, her primary interests include reading novels and poems, travelling and listening to country music.
Windows 10 Home edition is the simplest basic version available. It, too, lacks a Local Security Policy Manager, as does the Group Policy Editor (secpol.msc). Users cannot control the many security rules that have been applied to their system without this, and they are vulnerable to certain risks if the necessary checks are not in place.
It would be ridiculous to pay for a new version of Windows just to have this capability. As a result, we’ve devised a method for installing the Local Security Policy manager on a Windows 10 Home edition PC.
You can configure security policies for machines or groups of computers on your network using the Local Security Policy console. Nonetheless, several user complaints confirm the absence of the Local Security Policy on their Windows 10 PC.
This could be an issue, particularly in Windows Home editions. In this post, we will teach you how to add the Local Security Policy in Windows 10 and how to open it in various ways. Now, let us get started.
Recommended Post:- How to Enable TLS 1.0 and 1.1 on Windows 11
What is SecPol.msc in Windows 10?
The Local Security Policy Manager is used to monitor and administer the host computer’s various security parameters. This covers regulations such as password management for a user’s account. For example, what should be the minimum length requirement, and should special characters be included? The Security Manager also manages User Account Control, which helps to prevent unauthorized and unverified changes to the system.
The SecPol, among many other useful security issues, allows its users to configure how other users act on the PC and what capabilities they may have. The Local Security Policy Manager can be accessed by a user account with administrative credentials.
Why is there no Local Security Policy in Windows 10?
When you try to open the Local Security Policy in Windows 10, you will receive the error Windows 10 cannot find secpol.msc. This is because your PC is running the Home edition of Windows 10.
Because it is a more advanced function of the Group Policy Editor that allows administrators to administer or manage various security aspects of host machines, Microsoft did not include it in the Home editions of Windows 10 or 11.
Only Windows 10 Enterprise, Pro, and Education editions have the Local Security Policy module, and sometimes the whole Group Policy Editor. You must manually enable Local Security Policy in Windows 10 Home edition if you want to use it.
How to enable Local Security Policy in Windows 10?
In the following section of the article, let us have a look at the steps which you need to follow and enable Local Security Policy in Windows 10. Don’t worry they are simple and easy to follow. Let us look at them.
Solution 1: Execute some commands
- Step 1: To open the Start menu, press the Win key.
- Step 2: Run Command Prompt as an administrator.
- Step 3: Type the following commands one at a time, pressing Enter after each one.
FOR %F IN (“%SystemRoot%\servicing\Packages\Microsoft-Windows-GroupPolicy-ClientTools-Package~*.mum”) DO ( DISM /Online /NoRestart /Add-Package:”%F” )
FOR %F IN (“%SystemRoot%\servicing\Packages\Microsoft-Windows-GroupPolicy-ClientExtensions-Package~*.mum”) DO ( DISM /Online /NoRestart /Add-Package:”%F” ) - Step 4: Restart your computer.
Solution 2: Make use of a script
- Step 1: Access the internet and download the SecPol script.
- Step 2: Right-click the downloaded file and select Extract.
- Step 3: Check to see if you are connected to the internet.
- Step 4: Go to the gpedit-enabler.bat file and right-click it.
- Step 5: Choose the option to run as administrator.
- Step 6: A command prompt will open, and the necessary files will be installed on your computer instantly.
- Step 7: When the command prompt displays the message “Press any key to continue,” press any key to quit CMD.
- Step 8: Restart your computer.
Solution 3: Upgrade to Windows 10 Professional
- Step 1: Hit the Win+I keys to bring up the Settings menu.
- Step 2: Go to Update and Security.
- Step 3: On the left pane, select Activation.
- Step 4: Click on the Go to Store button.
- Step 5: Buy the Windows 10 Pro edition.
- Step 6: After the system has been upgraded, you will have native access to Group Policy Editor.
Method 1: Make use of the Run dialogue.
- Step 1: Hit the Win+R keys to launch the Run dialogue.
- Step 2: Enter secpol.msc into the command prompt.
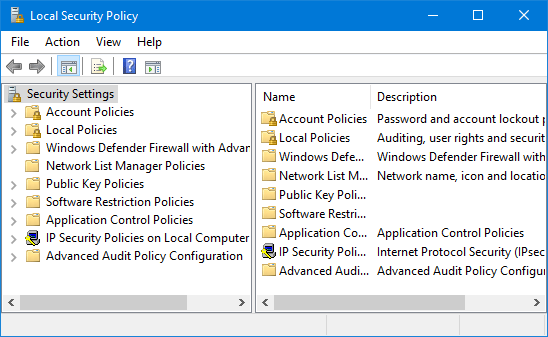
- Step 3: The Local Security Policy window will appear.
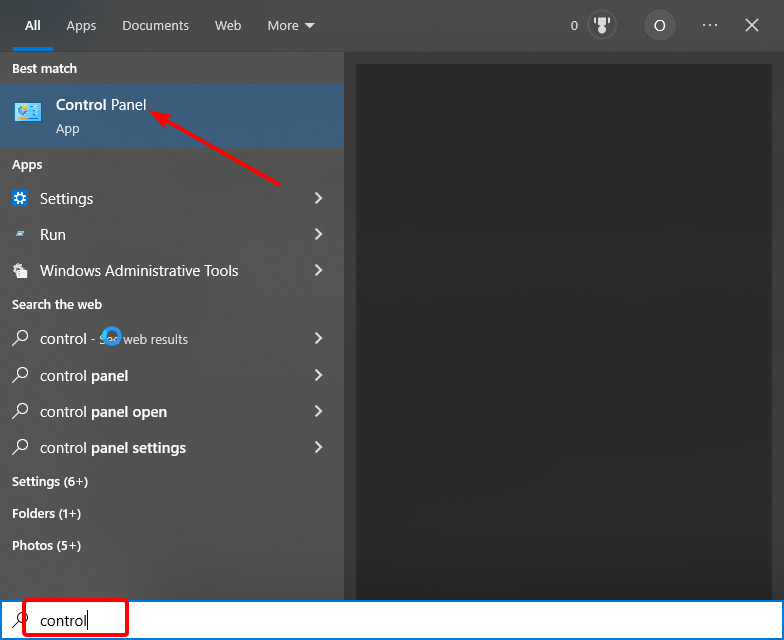
Method 2: Make use of the Control Panel.
- Step 1: To open the Start menu, press the Win key.
- Step 2: Launch the Control Panel.
- Step 3: Change the View by option to Tiny Icons.
- Step 4: Choose Windows Tools.
- Step 5: Choose the Local Security Policy option.
Method 3: Make use of Command Prompt
- Step 1: To open the Start menu, press the Win key.
- Step 2: Run Command Prompt as an administrator.
- Step 3: Input the command shown below.
secpol

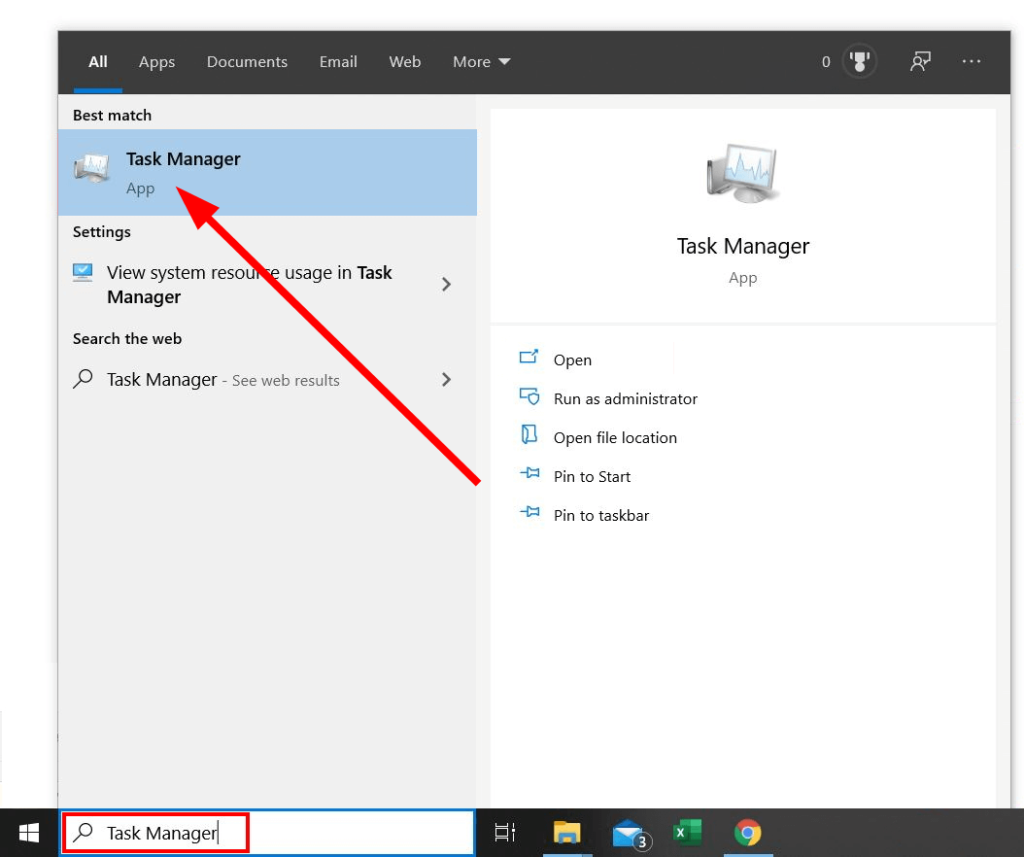
Method 4: Make use of Task Manager
- Step 1: To open the Start menu, press the Win key.
- Step 2: Open Task Manager by typing it in.
- Step 3: Choose File.
- Step 4: Choose Run new task.
- Step 5: In the Create new task window, type secpol.msc.
Method 5: Make use of File Explorer
- Step 1: Open File Explorer by pressing the Win + E keys together.
- Step 2: In the address bar, type secpol.msc and hit Enter.
- Step 3: The Local Security Policy window will appear.
Conclusion
By strengthening the security rules and regulations, you may protect your computer from the outside world as well as other people who use it. Also, it can prevent unauthorized users from making changes to your computer.
These are the several methods for accessing Local Security Policy on your Windows 10 PC. Please keep in mind that you will only be able to view the Local Security Policy if you have created it via the procedures described above.
- Blog>
- Windows 10>
- 5 Ways to Open Local Security Policy in Windows 10
Local Security Policy is a built-in desktop app in Windows 10. Sometimes you need to use it to make some security settings for the user accounts on your computer. If you have no idea how to open Local Security Policy in Windows 10, check out this post.
Notes: The Windows 10 Home edition does not come with Local Security Policy. The five ways below apply on Windows 10 Enterprise/Pro/Education. Make sure you are signed in to Windows 10 with an admin account or you have administrative privileges.
Method 1: through Search
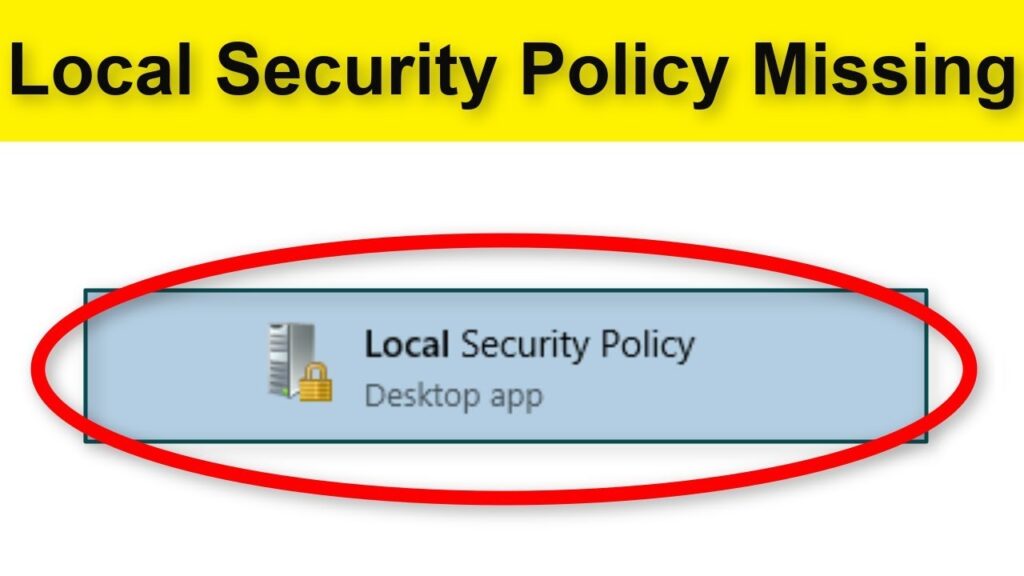
Start typing “local security policy” (without quotation marks) in the Search box on the left side of the Windows 10 taskbar. When the Local Security Policy (Desktop app) shows in the search results list, click on it to open it.
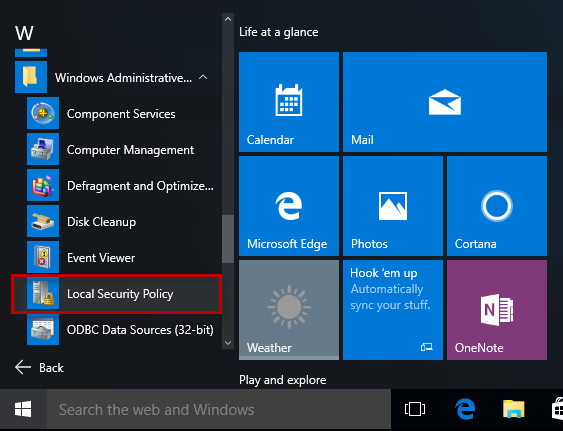
Method 2: from Start menu
Bring up the Windows 10 Start menu, and then click All apps > Windows Administrative Tools > Local Security Policy.
Method 3: via Run dialog
Open the Run dialog box using Win + R key, type secpol.msc in the field and click OK. Then the Local Security Policy will open.
Method 4: through Local Group Policy
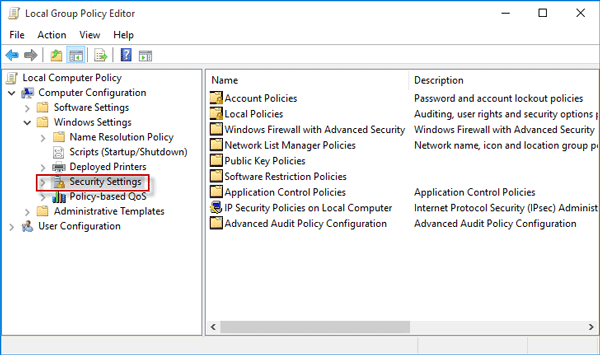
Open the Local Group Policy Editor, and then go to Computer Configuration > Windows Settings > Security Settings.
Method 5: with Command Prompt or Windows PowerShell
Step 1: Open a Command Prompt window or open a Windows PowerShell window.
Step 2: Type in secpol (or secpol.msc) and press the Enter key. Then the Local Security Policy will open.
Windows 10 Home edition is the most basic out of all that are available. Like the Group Policy Editor, it also lacks a Local Security Policy Manager (secpol.msc). Without this, users cannot manage the various security policies applied to their system and are exposed to certain threats without the required checks in place.
It would be absurd to pay for a new edition of Windows to have this feature. Therefore, we have come up with a way by which you can install the Local Security Policy manager on your system running Windows 10 Home edition.
What is SecPol.msc
 1")
The Local Security Policy Manager is used to manage and administer different security parameters of the host computer. This includes policies like managing a user’s account password. For instance, what should be the minimum length requirement, should it include special characters. The Security Manager also includes administration of the User Account Control (UAC) that aids in preventing unauthorized and unconfirmed changes to the system itself.
Amongst many other useful security concerns, the SecPol allows its users to customize how other users behave on the PC and what privileges they may have. A user account with administrative privileges can access the Local Security Policy Manager.
How to enable SecPol.msc in Windows 10 Home
It is important to understand that Local Security Policy management is a subsection of Group Policy management. All SecPol.msc settings can be found in the Security Settings of the Group Policy Editor.
 2")
Comparing this image with the one above of the Local Security Policy manager, you can see that both are the same. Hence, installing the Group Policy Editor will automatically install the SecPol as well.
Here is how you can install the Local Security Policy manager in Windows 10 Home edition.
- Download SecPol.msc script on your Windows 10 Home PC.
GPEdit Enabler for Windows 10 Home Edition (393 bytes, 280,455 hits)
- Now right-click the batch file and click Run as administrator from the Context Menu.
- The file will run in the Command Prompt as in the image below. Please wait while the process is complete.
 5")
- Once installed, go to Run –> secpol.msc. This will open the local security policy manager for you. You may also access the Local Security Policy through the Control Panel at the following location:
Control Panel -> System and Security -> Administrative Tools -> Local Security Policy
 5")
You have now installed both the Group Policy Editor as well as the Security Policy manager on your Windows 10 Home edition.
Closing words
Having the SecPol enables you to secure your computer from the outside world, as well as from other people that use your PC by tightening the security protocols and requirements. Moreover, it can also prohibit unauthorized users from making changes to your computer.