
При работе программ, игр, а также при процедурах обновления системы, установки драйверов и подобных вещах Windows 10 создаются временные файлы, при этом они не всегда и не все удаляются автоматически. В этой инструкции для начинающих пошагово о том, как удалить временные файлы в Windows 10 встроенными средствами системы. Также в конце статьи информация о том, где в системе хранятся временные файлы и видео с демонстрацией всего описанного в статье. Обновление 2017: В Windows 10 Creators Update появилась автоматическая очистка диска от временных файлов.
Отмечу, что описываемые ниже способы позволяют удалить лишь те временные файлы, которые система смогла определить как таковые, однако в некоторых случаях на компьютере могут быть и другие ненужные данные, подлежащие очистке (см. Как узнать чем занято место на диске). Преимущество описанных вариантов в том, что они полностью безопасны для ОС, но если нужны более действенные методы, можете ознакомиться со статьей Как очистить диск от ненужных файлов.
Удаление временных файлов с помощью опции «Хранилище» в Windows 10
В Windows 10 появился новый инструмент для анализа содержимого дисков компьютера или ноутбука, а также их очистки от ненужных файлов. Найти его можно, зайдя в «Параметры» (через меню Пуск или нажав клавиши Win+I) — «Система» — «Хранилище».
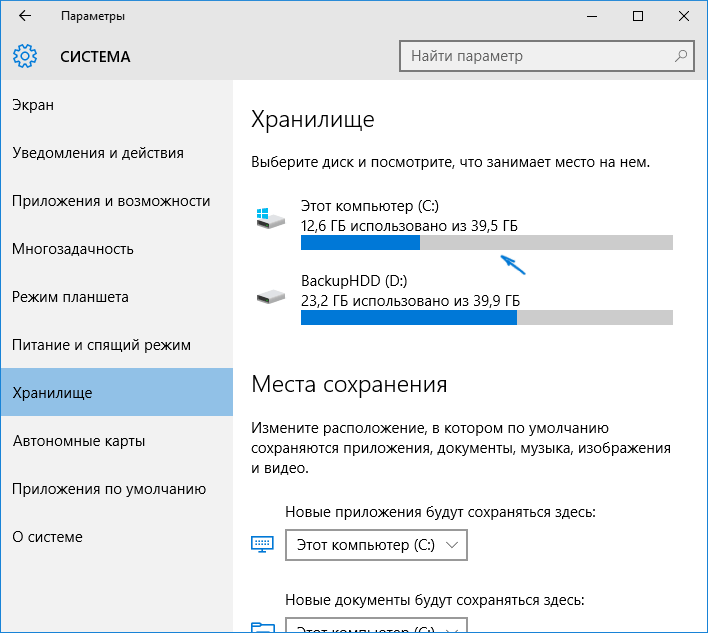
В этом разделе будут отображаться подключенные к компьютеру жесткие диски или, вернее, разделы на них. При выборе любого из дисков, вы сможете изучить, чем занято место на нем. Для примера выберем системный диск C (так как именно на нем в большинстве случаев и располагаются временные файлы).
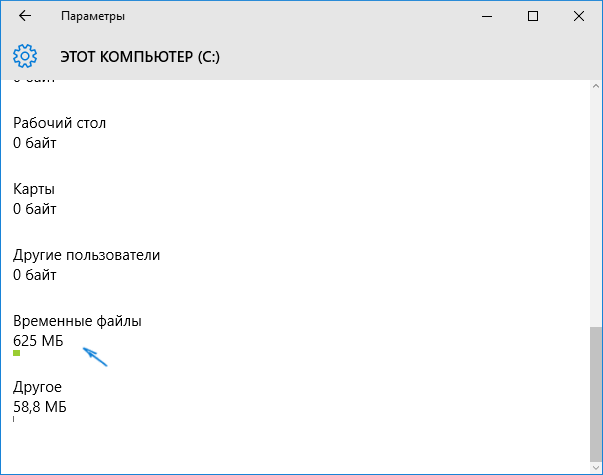
Если пролистать список с элементами, хранящимися на диске, до конца, вы увидите пункт «Временные файлы» с указанием занимаемого места на диске. Нажмите по этому пункту.
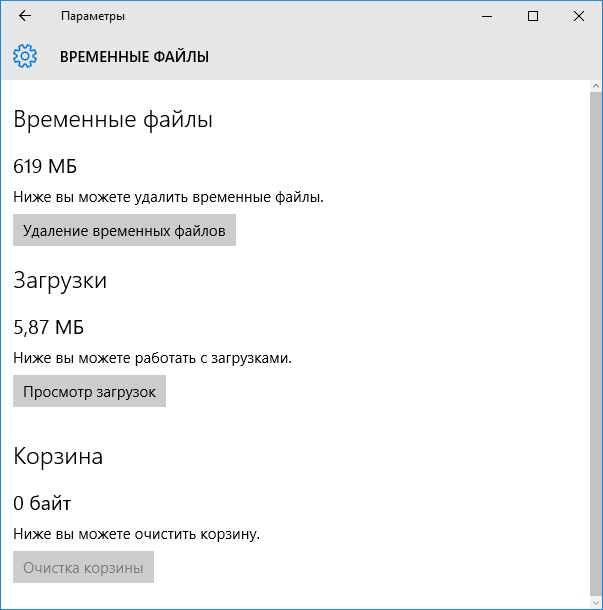
В следующем окне вы можете отдельно удалить временные файлы, изучить и очистить содержимое папки «Загрузки», узнать, сколько места занимает корзина и очистить ее.
В моем случае, на почти идеально чистой Windows 10 нашлось 600 с лишним мегабайт временных файлов. Нажимаем «Очистить» и подтверждаем удаление временных файлов. Начнется процесс удаления (который никак не демонстрируется, а просто написано «Мы удаляем временные файлы») и через короткое время они исчезнут с жесткого диска компьютера (при этом держать окно очистки открытым необязательно).
Использование утилиты очистки диска для удаления временных файлов
В Windows 10 также имеется встроенная программа «Очистка диска» (которая присутствует и в предыдущих версиях ОС). Она может удалить и те временные файлы, которые доступны при очистке с помощью предыдущего способа и некоторые дополнительные.
Для ее запуска можно использовать поиск или нажать клавиши Win+R на клавиатуре и ввести cleanmgr в окно «Выполнить».
После запуска программы, выберите диск, который нужно очистить, а затем элементы, которые нужно удалить. Среди временных файлов здесь представлены «Временные файлы Интернета» и просто «Временные файлы» (те же, что удалялись предыдущим способом). Кстати, вы также безопасно можете удалить и компонент RetailDemo Offline Content (это материалы, для демонстрации Windows 10 в магазинах).
Для начала процесса удаления нажмите «Ок» и дождитесь завершения процесса очистки диска от временных файлов.
Удаление временных файлов Windows 10 — видео
Ну и видео инструкция, в котором все шаги, связанные с удалением временных файлов из системы показаны и рассказаны.
Где в Windows 10 хранятся временные файлы
Если вы хотите удалить временные файлы вручную, то найти их можно в следующих типичных расположениях (но могут быть и дополнительные, используемые некоторыми программами):
- C:\Windows\Temp\
- C:\ Users\ Имя_пользователя\ AppData\ Local\ Temp (папка AppData по умолчанию скрыта. Как показать скрытые папки Windows 10.)
С учетом того, что данная инструкция предназначена для начинающих, думаю, достаточно. Удалив содержимое указанных папок вы, почти гарантированно, ничего не повредите в Windows 10. Возможно, вам также пригодится статья: Лучшие программы для очистки компьютера. Если же остались какие-то вопросы или непонимание, спрашивайте в комментариях, постараюсь ответить.
Readers help support Windows Report. We may get a commission if you buy through our links.
Read our disclosure page to find out how can you help Windows Report sustain the editorial team. Read more
Temporary files are generated when users create a new file, and their role is to temporarily retain the information until the file users are working on is saved.
Why are temporary files taking up space? Temporary files should be deleted from time to time. Otherwise, they unnecessarily load your computer’s drive, reducing your system’s overall performance.
However, there are situations when users cannot delete temporary files.
This is quite a complicated situation because temporary files can sometimes use hundreds of gigabytes of your computer’s memory.
Here’s how users describe this issue:
here you can see in this snapshot that there is 5.49GB temporary files. but I’m unable to delete them I had tried this serval times but its not performing any deletion operation. it shows that we are cleaning up your temporary files come back in a bit to check out result. but no result I got.
kindly help me to solve this issue. my c driver is getting full day by day.
Users tried various methods to clean temporary files: ranging from running the Disk CleanupWizard to performing clean boots and drive error searches, but nothing worked.
If you’re having trouble deleting temporary files on your Windows 10 computer, follow the below steps to solve this problem.
Why some temp files cannot be deleted?
There are multiple reasons why the TMP files or the temporary files don’t get deleted automatically. Here are some of the common causes:
- Your PC did not shut down properly.
- Some programs use files stored in the Temp folder, not allowing deletion of all files.
- The account you are logged in with does not have the necessary permissions to clear the temporary folder.
You can try turning on the option under the Storage Sense settings that says Keep Windows running smoothly by automatically cleaning up temporary system and app files option.

Temporary files can take a lot of space on your PC, and according to users, sometimes you might have issues removing these files. Speaking of issues, these are some problems that users reported:
- Can’t delete temporary Internet files Windows 10 – If you’re unable to delete temporary Internet files, you might be able to do that using the DiskCleanup tool.
- Disk Cleanup won’t delete/not deleting temporary Internet files – If Disk Cleanup is not deleting files, you might be able to fix the problem by using a third-party application.
- Unable to delete temporary files Windows 10, 7, 11 – Temporary files not deleting – Issues while removing temporary files can appear, but if you encounter any issues, you might be able to solve the problem by using one of our solutions.
- Word temporary files not deleting – You can opt to use a third-party software solution that we have listed below, in order to end this issue as quickly as possible.
- Temp files not deleting automatically – You can use Command Prompt to delete the files manually in case they won’t delete automatically.
What happens if you delete temporary files?
Deleting temporary files is a fantastic method to reclaim storage space, but it’s also likely that doing so can assist boost the performance of your computer if it’s operating a little bit slower.
If achieving that is your objective and removing the temporary files didn’t help, you should try clearing the cache on your computer.
Without further ado, let’s just jump right in!
How do I force delete temporary files?
1. Delete the files manually
- Press Windows + R.
- Type %temp% and click OK.
- Press Ctrl + A to select all files.
- Click Delete.
- Press Windows + R.
- Type prefetch and click OK.
- Select all and click Delete.
When using the delete option, you can also press Shift+Del, instead of a regular delete, to permanently delete files and not just send them to the recycle bin.
This issue related to temporary files has been plaguing users for more than a year, yet Microsoft hasn’t rolled out any official fixes to solve this problem, as users will remark:
This forum is a year old now with many followers all with the same problem and no one from Microsoft has stepped forward with a solution that actually works. So I do not believe you when you say “We will be glad to assist you.”
If I am wrong and Microsoft is working on solving this problem, then enlighten me regarding what is being done and I will gladly stand cotterted.
2. Use a third-party software
According to users, if you can’t delete temporary files on Windows 10/11, you might want to try using specialized repair software.
If you are unfamiliar, these tools can help you scan your PC and remove unnecessary files that take up space for no reason. Thanks to this kind of software you can quickly free up space and remove temporary files.
3. Use Command Prompt
According to users, if you can’t delete temporary files, you might be able to do so by using Command Prompt. To do that, you need to follow these steps:
- Press Win + X to open the Windows menu.
- Now choose Command Prompt (Admin) or PowerShell (Admin) from the list.
- When Command Prompt opens, enter
del /q/f/s %TEMP%*and press Enter to run this command.

Once the command is executed, all your temporary files should be deleted, and the problem will be resolved.
This is a quick and relatively simple solution, and if you don’t want to delete your temporary files manually, be sure to try this solution.
4. Install the latest updates
According to users, sometimes, the inability to remove temporary files is caused by a bug in your system.
Bugs can interfere with your system and prevent you from performing certain operations. Therefore you must keep your system up to date.
By default, Windows 10 automatically installs the missing updates, but sometimes you might miss an update or two. However, you can always check for updates manually by doing the following:
- Open the Settings app by pressing Windows + I.
- When the Settings app opens, go to the Update & Security section.

- Now click the Check for updates button.


Windows 10 will check for available updates. Updates will be downloaded automatically in the background if any updates are available. As for the updates, they will be installed as soon as you restart your PC.
Once your PC is up to date, the problem should be resolved, and you’ll be able to remove temporary files without any issues.
5. Delete the contents of the SoftwareDistribution directory
Several users reported that they could not delete temporary files due to the SoftwareDistribution directory. This folder holds Windows Update files, which can sometimes prevent you from deleting specific files.
However, you can quickly solve this issue by deleting the contents of this directory. To do that, just follow these steps:
- Make sure that Windows Update isn’t downloading any updates. To do that, check for available updates. If no updates are available, you can proceed to the next step.
- Press Windows + R and enter
%WINDIR%SoftwareDistributionDownload. - Press Enter or click OK
- Select all files inside the Download directory and delete them.
After doing that, you should be able to remove temporary files without any issues.
- Deleted files come back on Windows 10/11 [Technician Fix]
- Disk Cleanup not working/crashing on Windows 10 [Fixed]
- 5+ best memory cleaner software for Windows 10/11
- Recovery drive is full on Windows 10/11 [Quick Fix]
6. Uninstall Skype and Spotify
According to users, sometimes third-party applications such as Skype and Spotify can interfere with your system and cause problems with temporary files.
According to users, the issue started appearing after the update when these two applications were installed automatically.
However, you can fix the problem simply by removing these apps. To do that, just follow these steps:
- Open the Settings app
- Go to the Apps section.

- A list of installed applications will appear.
- Select Skype on the list and click Uninstall.


Now follow the instructions on the screen to remove the application. Next, repeat the same steps for the Spotify app. This is a strange problem, but several users solved it by removing these two apps, so feel free to try it out.
7. Remove the temporary files from Safe Mode
If you’re having problems with temporary files, you might want to try removing them from Safe Mode. To access Safe Mode, do the following:
- Open the Start Menu.
- Click the Power button, press and hold the Shift key and choose Restart from the menu.
- Choose Troubleshoot.
- Select Advanced options.
- Click on Startup Settings.
- Press the Restart button.
- Once your PC restarts, you’ll be presented with options. Select any version of Safe Mode by pressing the corresponding key.
Once you enter Safe Mode, you should be able to remove temporary files without any issues.
Why does my computer keep making temporary files?
The computer makes temporary files to load all your settings for your PC or a program faster. Temporary files are a program’s settings files that remember your selection for a specific program.
So, using these files, your PC can load programs and other system tasks much more efficiently and faster.
Let us say an editing tool when you use any program; then your PC will store a temporary file for your created work. Temporary files are created as a part of the internal process of the program or in situations when the program cannot allocate enough memory for the tasks.
Why can’t I delete temp files on Windows 11?
If you want to delete temporary files in Windows 11, you need to use the built-in tools, or if you’re an experienced user, you can do that manually.
If a file is open in another program, that might prevent you from deleting it, so you need to find the application using it and turn it off.
If you need administrator permission to delete folder message, it means you don’t have the necessary privileges, so try switching to administrative account and try again. And if you keep getting the temp folder access is denied, see how to bypass this restriction.
Most of the temporary files are deleted automatically once the task is complete. However, there are temporary files that continue to stay on your PC for future use. It is safe to delete temporary files, though.
Not being able to remove temporary files can be a big problem sometimes, but you should be able to fix it with one of our solutions.
Madalina Dinita
Networking & Security Specialist
Madalina has been a Windows fan ever since she got her hands on her first Windows XP computer.
She is interested in all things technology, especially emerging technologies — AI and DNA computing in particular.
Prior to joining the WindowsReport team, she worked in the corporate world for a number of years.
Вопрос: Как удалить временные файлы из Windows 10?
“Моя система сильно зависает из-за временных файлов, занимающих ценное место на моем диске. Я хочу удалить их, чтобы освободить место на моем ПК с Windows. Кто-нибудь может сказать мне, как удалить эти временные файлы? И каков наилучший способ убедиться, что я делаю это безопасно и эффективно?”
Временные файлы, также называемые temp или foo-файлами, — это файлы, которые ваша операционная система или программа создает для ускорения и бесперебойной работы вашего компьютера. Временные файлы Windows могут доставлять неудобства, так как чаще всего компьютеры не удаляют их автоматически, и со временем они могут накапливаться, занимая место на вашем диске и иногда приводя к замедлению работы системы и сбоям. Знание того, как удалить временные файлы в Windows 10/11, повысит производительность вашего компьютера, гарантируя его бесперебойную работу. В этой статье мы кратко объясним, где хранятся временные файлы. Мы также обсудим пять лучших способов удаления временных файлов ручными и автоматическими методами.
- Часть 1: Где хранятся Временные файлы?
- Часть 2: Как удалить временные файлы в Windows 10/11?
- Способ 1: Удалите временные файлы в Windows 10/11 с помощью Run
- Способ 2: Удалите временные файлы в Windows 10/11 из настроек
- Способ 3: Автоматическое удаление временных файлов Windows 10/11 путем активации Storage Sense
- Способ 4: Удалите временные файлы в Windows 10/11 с помощью очистки диска
- Способ 5: Используйте командную строку для удаления временных файлов Windows 10/11
- Бонусный совет: Как восстановить удаленные временные файлы в Windows 10/11
- Часто задаваемые вопросы о временных файлах в Windows 10/11
Часть 1: Где хранятся Временные файлы?
Прежде чем мы перейдем к методам удаления временных файлов, давайте сначала разберемся с вопросом – где хранятся временные файлы Windows 10/11?
Временные файлы можно найти расположенными в разных папках в зависимости от того, что их создало. Те, которые создает ОС Windows, обычно хранятся в папке “%system%\Windows\Temp” — вероятно, именно там хранится большинство временных файлов на вашем компьютере. В то время как другие, которые создают “Пользователи”, сохраняются в папке их профиля пользователя “%userprofile%\AppData\Local\Temp.”
Чтобы получить доступ к этим файлам и удалить их, вы можете легко воспользоваться поиском Windows, который мы объясним далее в следующих разделах.
Когда необходимые временные файлы не удаляются регулярно, они превращаются в ненужные файлы, которые накапливаются и замедляют работу вашего компьютера. Чтобы повысить производительность вашей системы, ниже мы перечислили пять способов безопасного удаления временных файлов Windows 10/11. Проверьте их:
Способ 1: Удалите временные файлы в Windows 10/11 с помощью Run
Первый способ удалить временные файлы Windows 10 вручную и полностью — это использовать встроенное в систему средство запуска. Вот как удалить временные файлы в Windows 10 с помощью команды Выполнить:
- Нажмите клавиши Win + R вместе, чтобы открыть диалоговое окно “Выполнить”.
-
Введите %temp% и нажмите “ОК”. Это откроет временную папку.
- Выберите конкретные ненужные папки и временные файлы или выделите все элементы, одновременно нажав клавиши Ctrl + A.
-
Нажмите клавишу “Удалить” и выберите “Да” при появлении запроса. Если в окне использования появится папка, просто нажмите Пропустить, чтобы продолжить удаление выбранных временных файлов.
Удаленные временные файлы отправятся в корзину. Если вы хотите удалить их безвозвратно, перейдите в корзину и очистите ее.
Способ 2: Удалите временные файлы в Windows 10/11 из настроек
Другой способ вручную удалить временные файлы из Windows — это перейти к хранилищу через настройки. Вот как удалить временные файлы в Windows 10/11 из настроек:
-
Откройте настройки Windows 10, нажав клавиши Win + I , и перейдите в раздел «Система».
- Выберите “Хранилище” на левой панели.
-
В разделе “Локальный диск” (C:) выберите «Временные файлы». Если вы не можете увидеть этот параметр, возможно, они скрыты. Итак, выберите “Показать больше категорий”.
-
Вы увидите список временных файлов, которые вы можете удалить. Выберите все временные файлы, которые вы хотите удалить, и нажмите “Удалить файлы”.
Теперь ваш ПК с Windows начнет удалять выбранные временные файлы.
Способ 3: Автоматическое удаление временных файлов Windows 10/11 путем активации Storage Sense
Если вы не хотите удалять временные файлы Windows 10 вручную, вы можете использовать функцию Storage Sense, чтобы удалять их автоматически и с заданной периодичностью. Вот как автоматически удалить временные файлы в Windows 10, активировав Storage Sense:
- Нажмите клавиши Win + I, чтобы открыть настройки.
- Перейдите в раздел «Система» > «Хранилище(Storage)».
-
В разделе Хранилище нажмите на “Настроить Storage Sense или запустите его сейчас”.
-
Включите функцию Storage Sense. Затем установите флажок рядом с опцией “Удалить временные файлы, которые не используются моими приложениями”.
Примечание: Вы также можете запланировать очистку диска и указать, хотите ли вы удалять временные файлы из корзины и папки загрузок по мере необходимости.
- После настройки параметров очистки по требованию нажмите “Очистить сейчас” внизу, Storage Sense начнет освобождать место, удаляя большинство временных файлов, которые оставались в корзине более 30 дней.
Способ 4: Удалите временные файлы в Windows 10/11 с помощью очистки диска
Если на диске не хватает места, вы также можете воспользоваться встроенной утилитой Windows — Очистка диска для сканирования и удаления временных файлов, которые больше не нужны. Давайте посмотрим, как очистить временные файлы в Windows 10 с помощью очистки диска:
-
Нажмите клавиши Win+ E, чтобы запустить “Проводник файлов”. Затем выберите “Этот компьютер”.
-
Щелкните правой кнопкой мыши на жестком диске и затем выберите “Свойства”.
-
На вкладке “Общие” нажмите «Очистка диска».
-
В разделе Файлы для удаления выберите файлы или папки, которые вы хотите удалить. В качестве альтернативы вы можете выбрать “Очистить системные файлы”, очистка диска подсчитает, сколько места система может безопасно освободить.
-
Нажмите “ОК”. Дождитесь окончания уборки, и все будет в порядке.
Способ 5: Используйте командную строку для удаления временных файлов Windows 10/11
Вы также можете использовать командную строку Windows для удаления временных файлов из вашей Windows. Вот как удалить временные файлы в Windows 10 с помощью CMD:
- Нажмите клавиши Win + S и введите “CMD” в появившейся строке поиска.
-
В списке результатов щелкните правой кнопкой мыши командную строку и выберите опцию Запуск от имени администратора.
-
Появятся окна командной строки. Введите команду “del /q/f/s %TEMP%\*” и затем нажмите Enter.
- Как только команда будет запущена, вы увидите строки кода, которые указывают на то, что временные файлы были удалены из папки Temp.
Бонусный совет: Как восстановить удаленные временные файлы в Windows 10/11
Иногда при удалении ненужных временных файлов пользователи могут также удалить некоторые временные файлы, которые необходимы приложениям. Если это случилось с вами, вы можете легко восстановить их с помощью стороннего программного обеспечения, такого как Tenorshare 4DDiG Windows Data Recovery. Это универсальное решение для восстановления удаленных, потерянных, скрытых и поврежденных файлов с внешних и внутренних устройств хранения. Вот что еще предлагает 4DDiG:
- Восстанавливает более 1000 типов файлов, включая фотографии, аудио, видео и документы.
- Восстанавливает данные с жестких дисков, USB-накопителей, корзины, SD-карт и цифровых камер.
- Восстанавливает удаленные данные с потерянных разделов, при сбоях системы и вирусных атаках.
- Удобный для пользователя и простой в навигации интерфейс.
- Поддерживает все старые и новые версии ОС Windows.
Вот как вы можете использовать 4DDiG для восстановления ваших удаленных временных файлов:
- Выберите локальный диск
- Просканируйте локальный диск
- Предварительный просмотр и восстановление удаленных временных файлов
Скачайте и установите инструмент 4DDiG на свой компьютер. Запустите инструмент и выберите диск, с которого вы удалили временные файлы.
Нажмите кнопку “Начать». Инструмент будет искать случайно удаленные файлы. Вы также можете указать тип целевого файла в правом верхнем углу.
Как только сканирование начнется, вы можете приостановить или остановите его, чтобы просмотреть нужные файлы. Нажмите “Восстановить” после того, как вы определили свои целевые временные файлы.
Сохраните восстановленные временные файлы в безопасном месте на вашем компьютере, и вы готовы к работе.
Часто задаваемые вопросы о временных файлах в Windows 10/11
Вопрос 1: Почему я должен удалять временные файлы?
Со временем временные файлы занимают место на диске и могут привести к системным ошибкам и зависанию. Таким образом, необходимо удалить избыточные временные файлы, чтобы избежать различных проблем, вызванных поврежденными или зараженными файлами, хранящимися на вашем компьютере, и повысить производительность системы.
Вопрос 2: Безопасно ли удалять временные файлы?
Да, удалять ненужные временные файлы совершенно безопасно. Временные файлы создаются для хранения временной информации, чтобы задача могла быть выполнена плавно во время ее выполнения. И их не нужно постоянно хранить на вашем компьютере. Но имейте в виду, что не удаляйте их, когда они запущены, потому что это может привести к программным ошибкам.
Вопрос 3: Когда вам нужно удалить временные файлы?
Когда у вас заканчивается место для хранения, самое время удалить все или некоторые временные файлы, чтобы освободить место для других файлов и данных и ускорить работу вашего компьютера.
Вывод
Надеемся, мы ответили на ваш запрос “Как удалить временные файлы в Windows 10”, используя пять проверенных методов. Временные файлы необходимо удалить, поскольку они замедляют работу системы, а также занимают много места на диске. Удаление их поможет вам повысить производительность вашей системы.
Однако, если вы случайно удалили какие-то важные данные вместе с временными файлами, вы можете легко восстановить их с помощью программного обеспечения для восстановления данных Tenorshare 4DDiG. Это ваш незаменимый инструмент и лучший вариант для восстановления случайно удаленных файлов со всех видов устройств хранения. Восстановите ваши файлы прямо сейчас всего за три клика!
Tenorshare 4DDiG Data Recovery
4DDiG — это ваш непревзойденный выбор для восстановления всех потерянных данных на компьютере Windows / Mac после различных сценариев потери, таких как удаление, форматирование, RAW и т.д. с более высокой вероятностью успеха.
Скачать Бесплатно
Скачать Бесплатно
Купить Сейчас
Купить Сейчас
Download Article
Free up disk space & speed up your PC by deleting temporary files
Download Article
- Using Disk Cleanup
- Using Storage Settings
- Using the Command Prompt
- Using the Run Dialog
- FAQ
- Video
|
|
|
|
|
Windows 10 creates temporary files while you use certain apps to speed up certain processes. However, your PC can create hundreds of temporary files in a day, which takes up hard drive space and can even slow down your computer. This wikiHow will show you how to clear temporary files from your Windows 10 PC and answer some common questions about temporary files on Windows.
Quick Steps
- Search «Disk Cleanup» in the Windows search bar.
- Open the Disk Cleanup app,
- Select the drive you want to clean and click Ok.
- Check «Temporary Files» and Temporary Internet Files.»
- Click Ok.
- Click Delete Files.
-

The easiest way to clean up temporary files on your Windows 10 or 11 computer is to use the Disk Cleanup app. Use the following steps to open it:[1]
- Press the Windows key and type disk cleanup.
- Click Disk Cleanup in the search results.
-
The drive you use the most will have the most temporary files. In most cases, this will be the «C:» drive.
- If you aren’t given the option to select a disk, you probably only have one disk drive on your computer.
Advertisement
-
Suggested boxes to delete are selected by default. Ensure the boxes next to «Temporary Internet Files» and «Temporary Files» are checked, then click OK.[2]
- You’ll see how much space they will free up below the right side of the columns.
-
This confirms that you want to delete the files permanently. The files will be promptly removed from your computer.
- For more tips on speeding up your device, check out our guides on how to speed up a slow Windows computer for free and fix common issues slowing down your computer.


Advertisement
-
You can click the Start icon and then the gear to open Settings.
-
To get there, click System, and then click Storage.[3]
-
It usually has a Windows logo over the drive icon and might be called “This PC” or «OS C:».
-
The number here represents how much space the temporary files are taking up. The next page shows you all the files that are considered temporary files, including files in the Downloads folder, files in the Recycle Bin, and thumbnails.[4]
-
Ensure the boxes next to «Temporary Files» and «Temporary Internet Files» are selected.
-
It’s at the top of the page above the checkboxes.[5]
-
This confirms you want to remove the files and starts deleting them. You’ll see a progress bar of the deletion process.
-
While you’re in the Storage Settings menu, make sure the toggle switch next to «Storage Sense» is on if you want to clean out your temporary files automatically when your disk space is low. It will also empty the Recycle Bin automatically.[6]
- If you click Storage Sense in the Settings menu, you can set how often you want your computer to delete your temporary files and empty the Recycle Bin automatically. By default, it will only delete your temporary files when your storage space is low and empty the Recycle Bin once every 30 days.


Advertisement
-
The Command Prompt is the Windows command-line Interface that allows you to perform Windows operations using text commands. You can easily clear temp files with a quick Command Prompt command. To get started:[7]
- Click the WIndows Start button.
- Type CMD.
- Click Command Prompt.
-
This command will delete all your temporary files.


Advertisement
-

This is the most involved method of clearing your temporary files, as you’ll be clearing the files manually.
-
You’ll be directed to the folder that contains all the temporary files.
-
To do so, press Ctrl + A to select all files at once. This will highlight all the folders.
-
This will move all the temporary files to the Recycle Bin.
- If you need to free up storage space, empty the Recycle Bin. To do so, right-click the Recycle Bin on your desktop and click Empty Recycle Bin.
- If Storage Sense is turned on, Windows will empty the Recycle Bin automatically every 30 days.
- All those files are moved into the Recycle Bin and can be restored if needed. To restore the files, open the Recycle Bin and click Restore all items at the top.
- For more Windows file management, check out our guide on finding hidden files and folders.


Advertisement
-
Temporary files are files that programs use to store temporary information. This allows the programs to run more efficiently and saves your progress as you work. For example, when you open a Microsoft Word document, Windows creates a temporary copy of the file every few minutes so you don’t lose anything important if you forget to save your document.
-
No, it is completely safe to delete your temporary files in Windows. You may lose your history and need to log in again, but Windows and your applications will not be harmed by deleting your temporary files.
-

Deleting temporary files can help you free up hard drive space on your computer and help your computer run faster and more efficiently, especially if you are low on disk space.
-
Not necessarily. Temporary files can help speed up tasks by storing temporary data. They can also save your data in the event of a crash. Temporary files only become junk files if they are sitting on your computer, taking up space, and not being used.


Advertisement
Ask a Question
200 characters left
Include your email address to get a message when this question is answered.
Submit
Advertisement
Video
Thanks for submitting a tip for review!
About This Article
Article SummaryX
1. Open Disk Cleanup.
2. Click to check the boxes next to Temporary Internet Files and Temporary Files.
3. Click OK.
Did this summary help you?
Thanks to all authors for creating a page that has been read 346,911 times.