
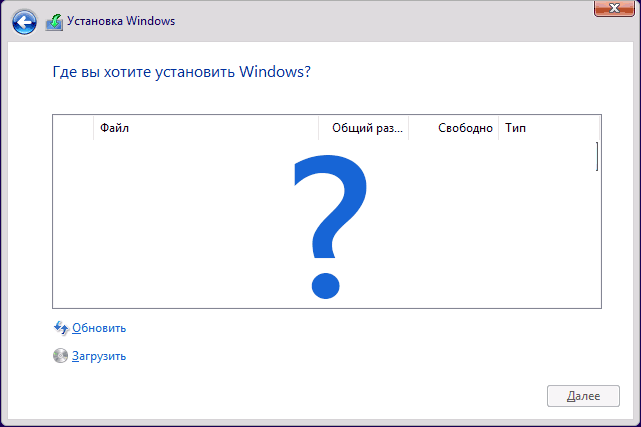
При установке Windows на компьютере или ноутбуке, дойдя до этапа выбора раздела для установки, некоторые пользователи могут столкнуться с проблемой, когда в списке отсутствуют жесткие диски или SSD.
В этой инструкции рассмотрим, как действовать, если при установке Windows 11, Windows 10 или другой версии ОС программа установки не распознает жесткий диск или SSD, хотя в BIOS/UEFI они отображаются. В большинстве случаев, если диск виден в BIOS, но не отображается в установщике Windows 11/10, это связано с тем, что для работы диска в текущей конфигурации необходим дополнительный драйвер.
Приобрести Windows 11 / 10 можно у нас в каталоге с моментальной доставкой на Вашу электронную почту:
Windows 11 — 1690 ₽
Windows 10 — 1490 ₽
Отсюда вытекают два возможных решения проблемы: установка подходящего драйвера или изменение конфигурации работы дисков в BIOS/UEFI.
Вариант 1. Отключение контроллера VMD
Сначала рассмотрим изменение конфигурации, так как это быстрый и актуальный для современных ноутбуков и ПК способ решения проблемы:
1. Зайдите в BIOS/UEFI вашего устройства. Обычно это можно сделать с помощью клавиши F2 на ноутбуках или клавиши Del на настольных компьютерах. Если ваш BIOS поддерживает переключение в Advanced Mode, активируйте его (информация о том, как это сделать, обычно отображается на экране).
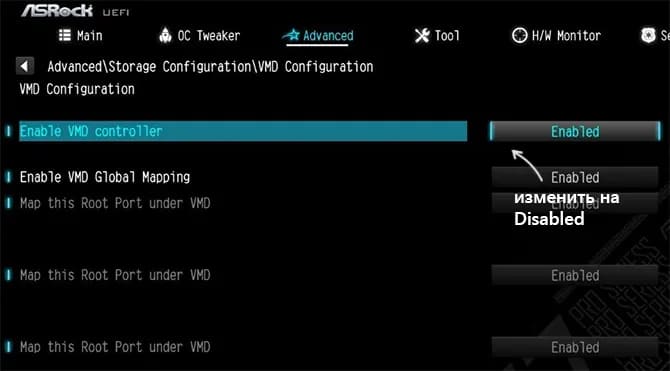
2. Найдите раздел для отключения контроллера VMD. Он, как правило, расположен на вкладке Advanced, иногда в подразделах, например: System Agent Configuration — VMD Setup Menu, Storage Configuration — VMD Configuration и других.
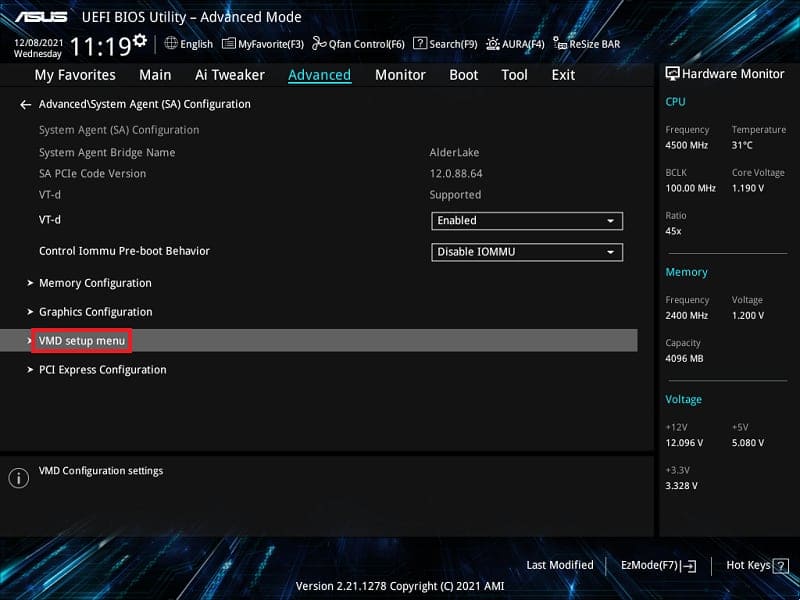
3. Установите значение параметра «Enable VMD Controller» в Disabled и сохраните настройки BIOS (обычно клавиша F10).
После отключения контроллера VMD в BIOS, при следующей загрузке с установочной флешки диски и разделы должны быть видны. Этот метод подходит для тех устройств, где не требуется использование контроллера VMD или технологии Intel Rapid Storage (включая кэширующие SSD, Intel Optane, RAID-массивы).
Вариант 2. Установка драйвера Intel RST
Второй способ — ручная установка драйвера Intel Rapid Storage Technology (Intel RST, IRST) во время установки Windows, что позволит сделать диски видимыми. Следуйте этим шагам:
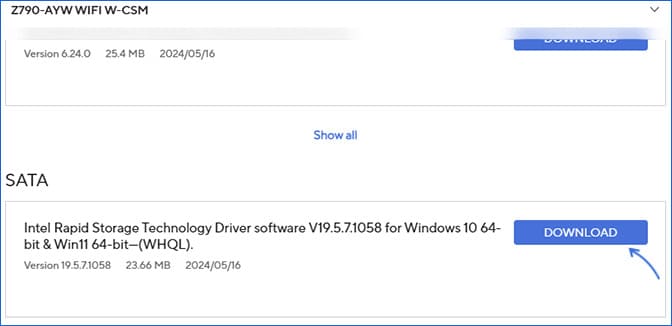
1. Скачайте драйвер Intel RST, лучше всего с официального сайта производителя вашей материнской платы или ноутбука, специально для вашей модели. Обычно драйвер доступен в разделе «Поддержка» (Support) для вашего устройства.
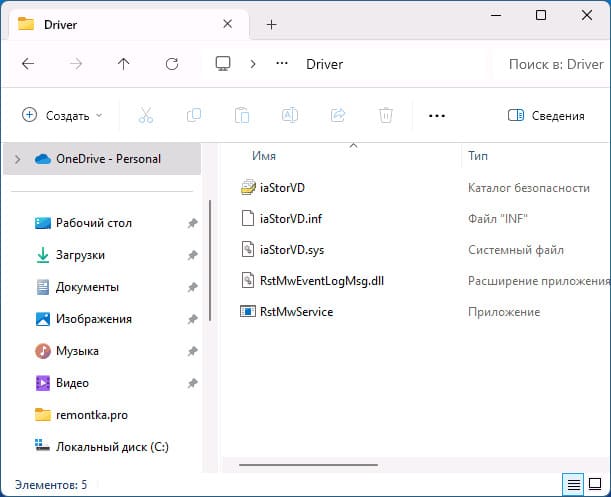
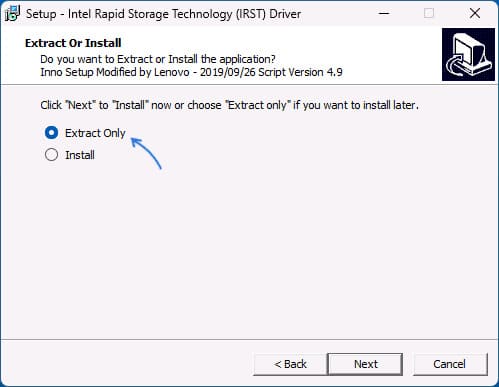
2. Загруженный файл может быть ZIP-архивом, содержащим файлы .inf, .sys (иногда во вложенной папке) и другие. В таком случае просто распакуйте архив и сохраните файлы в отдельную папку на той же флешке, с которой вы устанавливаете Windows. Если файл драйвера представлен в виде установщика, распакуйте его, выбрав пункт «Extract Only» (только распаковать), и сохраните распакованные файлы на установочной флешке.
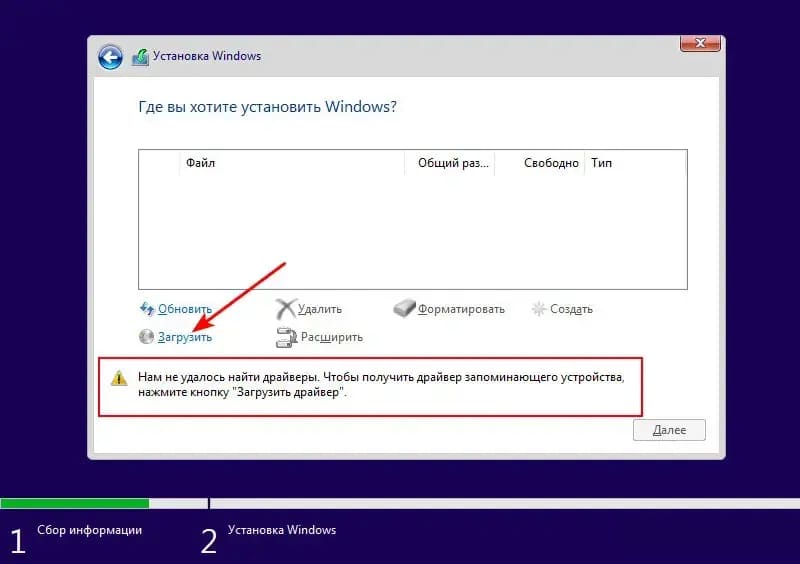
3. Перезагрузитесь с установочной флешки Windows. На этапе выбора разделов нажмите на ссылку «Загрузить» внизу слева.
4. Затем на кнопку «Обзор» и укажите путь к папке с драйверами IRST.

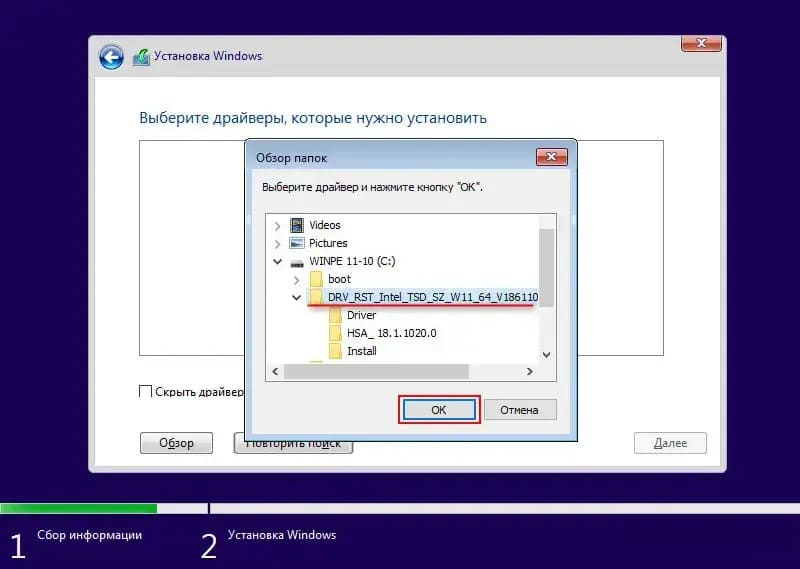
5. Если вы указали правильный подписанный драйвер, он отобразится в окошке установщика. Жмём «Далее».
После успешной установки драйвера диски должны стать видны в списке выбора разделов, и установка Windows сможет продолжиться.

Учтите, что все описанные методы сработают только в том случае, если HDD или SSD правильно подключен, исправно работает и отображается в BIOS/UEFI вашего устройства, а проблема возникает только на этапе выбора раздела при установке Windows 11/10 или другой версии ОС.
Лицензионный ключ активации Windows 11 от
При установке Windows на компьютере или ноутбуке, дойдя до этапа выбора раздела диска для установки, некоторые пользователи могут столкнуться с тем, что в списке они отсутствуют.
В этой инструкции подробно о том, что делать, если при установке Windows 11, Windows 10 или других версий ОС программа установки не видит жесткий диск или SSD, либо разделы на нём несмотря на то, что в БИОС/UEFI они отображаются.
Почему ПК или ноутбук не видит диск при установке и как это исправить
В большинстве случаев, при условии, что диск виден в БИОС, проблема с его отсутствием в программе установки Windows 11/10 вызвана тем, что для работы диска при текущей конфигурации требуется драйвер.
Отсюда следуют варианты решения проблема — установка соответствующего драйвера, либо изменение конфигурации работы дисков в БИОС/UEFI.
Отключение контроллера VMD
Сначала об изменении конфигурации, поскольку это быстрый и актуальный для современных ноутбуков и ПК способ, позволяющий решить проблему:
- Зайдите в БИОС/UEFI вашего устройства: обычно это клавиша F2 на ноутбуке, либо Del на настольном компьютере, переключите режим БИОС в Advanced Mode (если такое переключение предусмотрено, клавиша, которую требуется нажать, будет указана где-то на экране).
- Найдите раздел для отключения контроллера VMD в БИОС, обычно он располагается на вкладке Advanced, иногда в подразделах, например: System Agent Configuration — VMD Setup Menu, Storage Configuration — VMD Configuration и других.
- Установите значение параметра «Enable VMD Controller» в Disabled, сохраните настройки БИОС (обычно клавиша F10).


При следующей загрузки с установочной флешки диски и разделы на них должны быть видны. Этот метод подойдёт для тех устройств, где не требуется использование контроллера VMD или Intel Rapid Storage Technology — без отдельных кэширующих SSD, Intel Optane, RAID массивов.
Установка драйвера Intel RST
Вторая возможность — ручная установка драйвера Intel Rapid Storage Technology (Intel RST, IRST) на этапе установки Windows, что сделает диски видимыми. Необходимые шаги:
- Скачайте драйвер Intel RST, лучше всего — с официального сайта производителя вашей материнской платы или ноутбука, именно для вашей модели (искать следует в разделе «Поддержка» или «Support» для вашей модели устройства.

- Скачанный файл может представлять собой ZIP-архив, содержащий файлы .inf, .sys (иногда — во вложенной папке) и другие. В этом случае просто распакуйте его и сохраните в какую-либо папку на той же флешке, с которой устанавливается Windows.

- Если файл драйвера является установщиком (или установщиком, находящимся в архиве), запустите установщик на компьютере, где Windows присутствует, выберите пункт «Extract Only» (распаковать) при установке и распакуйте в какую-либо папку на вашей установочной флешке.

- Перезагрузитесь с установочной флешки Windows и, на этапе выбора разделов нажмите по ссылке «Загрузить» слева внизу, затем кнопку «Обзор» и укажите путь к папке, где были сохранены файлы драйвера IRST на 2-м или 3-м шаге.
- После успешной установки драйвера диски должны стать видны в списке выбора разделов и установку можно будет продолжить.


Учитывайте, что всё описанное сработает лишь в случае, если диск HDD или SSD подключен правильно, исправно работает и виден в БИОС/UEFI вашего устройства, а проблема возникает лишь на этапе выбора раздела при установке Windows 11/10 или другой версии системы.
In this post, MiniTool Partition Wizard introduces 6 solutions to “hard disk not detected during Windows installation”. If you are bothered by the same problem, you can try them one by one to solve it.
Hard Disk Not Detected During Windows Installation: An Overview
Note: This post just focuses on Windows rather than any other operating system like Mac OS X and Linux, since Windows is the most widely used computer operating system all over the world.
There’s not much you can do about a computer without an operating system. Fortunately, new laptops are always pre-installed with OS by manufacturers, and even if there is no system on your laptop or desktop, you can install one in easy steps. Of course, you are also allowed to install a second or third system on the computer which has OS already.
But no matter how the operating system is installed or who installed it, after running it for a long time, you may need to make a reinstallation since it is the only or best solution to some issues, for example:
- Reinstalling system is the most effective solution when operating system runs slow.
- Reinstalling system is a good way to clear viruses that cannot be killed by anti-virus software.
- Reinstalling system can help enhance system security and stability.
- Reinstallation is the best choice when operating system crashes or system files are damaged or lost.
Click to tweet
Both installing and reinstalling require an installation disc which could be CD, DVD, or USB flash drive, and operations are nearly the same, approximately including these steps: boot from installation disc, choose language and other preferences, accept license terms, choose installation type, and mark a place to install Windows. Then Windows will be installed automatically.
Of course, if you are using system built-in functions, like Windows 8’s “Remove everything and reinstall Windows”, and Windows 10’s “Reset this PC”, to reinstall system, operations might be a little bit different.
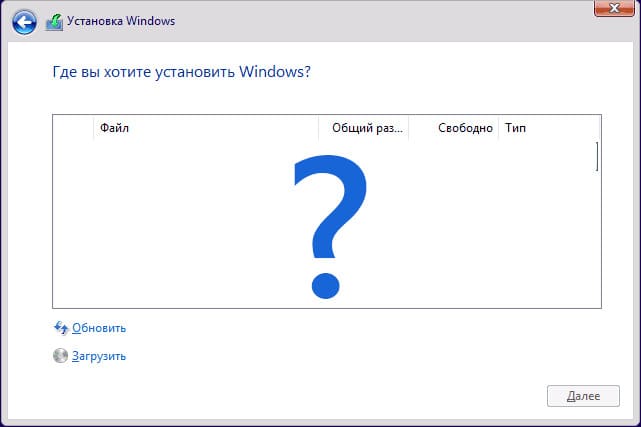
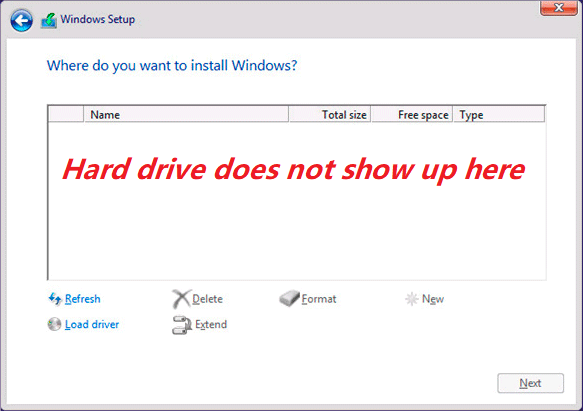
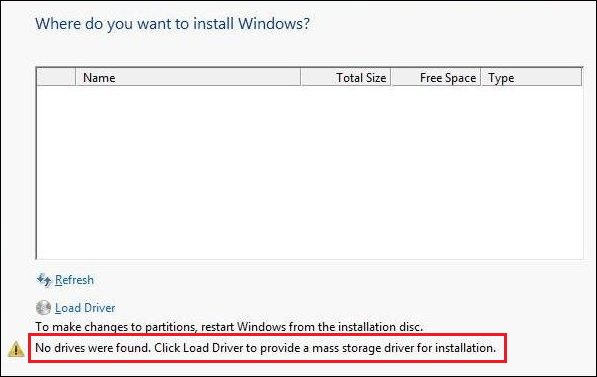
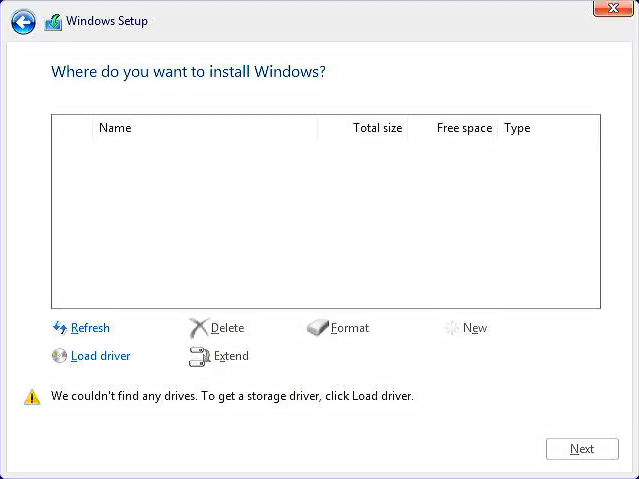
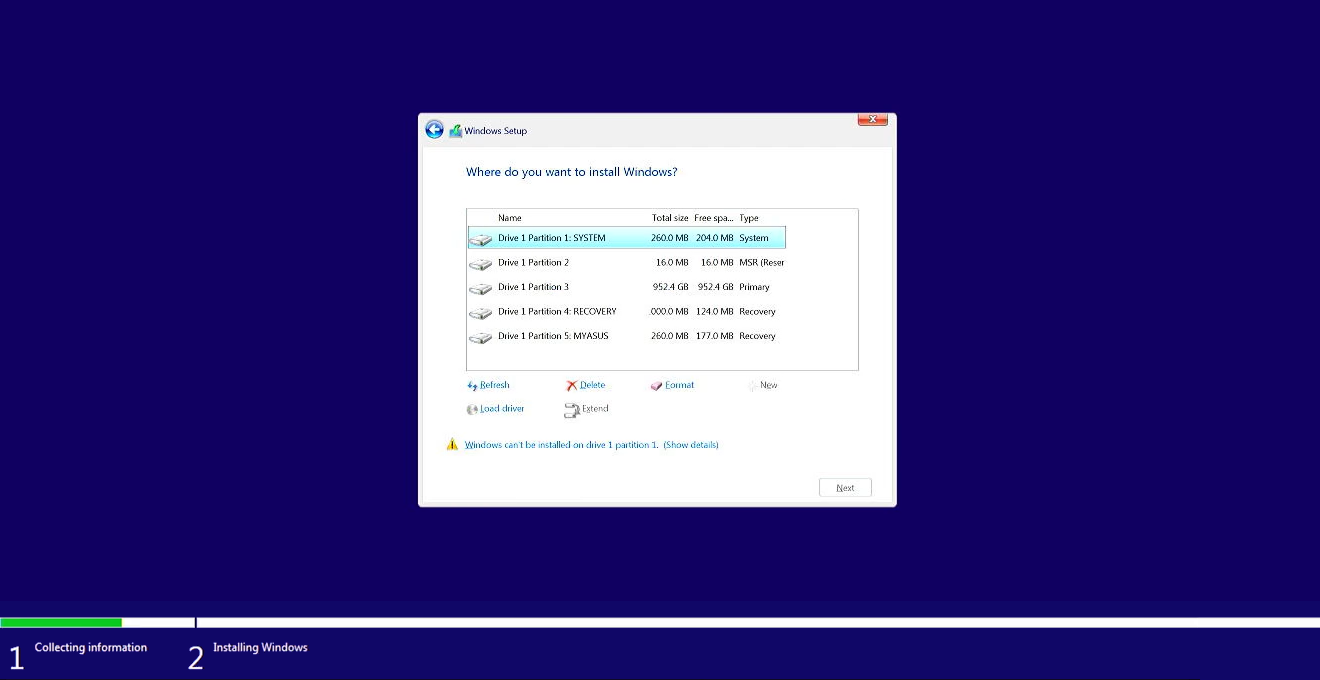
Nevertheless, during Windows installation or reinstallation, users may encounter the situation where Hard Disk is Not Detected in the “Where do you want to install Windows” screen even if the disk has been connected with motherboard. Sometimes there is no error message showing up:
Or sometimes you’ll receive error messages, like:
Error 1. We couldn’t find any drives. To get a storage driver, click Load driver.

Error 2. No drives were found. Click Load Driver to provide a mass storage driver for installation.
Definitely, if there is no hard disk for users to select on this screen, they will fail to install or reinstall Windows. And if they want to continue to install, making the hard disk detected is badly needed. Next, we are going to introduce 6 solutions for this issue, and maybe one of them can make your hard disk visible.
Hard Disk Not Detected During Windows Installation: Here Are 9 Solutions
Tip: This error could be caused by lots of factors so that it is not easy for most people to find the exact one. Naturally, it is not easy to pick out an effective solution in a short time, and users may need to try some or all of our solutions one by one.
Solution 1. Check Whether the Hard Disk Is Recognized by BIOS
If there is no error message shown, we suggest trying this method at first. Of course, even if error messages are given, you can also try this solution prior to doing any operation. Please start the computer, press a specified key for several times to enter BIOS, and then look for your hard drive. If it is missing or invisible from BIOS (shown as None or Not detected), here are 4 possible reasons as well as countermeasures:
- The channel for this hard drive is forbidden in BIOS, which happens especially after you add a second hard drive to the system. To fix this issue, we need to turn it on or enable it.
- Data cable or power cable of the drive is damaged or isn’t plugged firmly. Try connecting both cables again or change other cables.
- BIOS is out of date and can’t recognize your hard disk. Try updating BIOS or the driver of BIOS to the latest version.
- The hard drive may be physically damaged. Download a disk testing tool to test the drive. If it is not detected by the tool or errors are found, you may need to contact your hard disk provider.
After you are doing these attempts, the hard disk might be detected by BIOS, and then you can go on installing Windows. But if the disk is still invisible, you may need to contact your hard disk manufacturer for help.
Actually, in most situations, the hard disk is visible in BIOS and only Windows Install can’t detect it. At this time, you need to try the following solutions.
Before making attempts below, we highly suggest creating a backup for this disk if it saves important files. If it is a brand new disk, please skip this step.
How to Backup Data
If you have a running Windows, make use of MiniTool Partition Wizard to backup data. However, if no Windows is available, MiniTool Partition Wizard Bootable CD is required. MiniTool Partition Wizard Bootable CD is a bootable partition manager that helps you clone disk/partition, recover lost partition, extend C drive or any other drives, align partitions of SSD, as well as do many other partitioning operations without bringing data loss. However, you need to know that this is a paid feature in MiniTool Partition Wizard, so you need to purchase one to get the bootable CD.
MiniTool Partition Wizard DemoClick to Download100%Clean & Safe
Tip: If you are going to use Partition Wizard Boot Disk, you’ll need to burn the downloaded iso file to CD, DVD, or USB flash drive. View the post How to Build Bootable Partition Manager to create a boot disk.
Then, you can refer to the post Copy Disk to get detailed steps to clone a hard disk.
Once a backup has been created, you can try any of the following solutions without worrying about data loss.
Solution 2. Update or Install Storage Controller Driver
Though Windows Install can’t find the hard disk, it is always showing you error messages and corresponding solutions, like “We couldn’t find any drives. To get a storage driver, click Load driver” or “No drives were found. Click Load Driver to provide a mass storage driver for installation”. In this case, you can load the driver as the error message prompts.
Tip: A driver is software that allows your computer to communicate with hardware or devices. Without a correct driver, the hardware or device that you want to use won’t work properly. Similarly, a storage controller driver is software that controls how the hard drive interacts with the rest of the PC. Without a correct storage controller driver, your hard drive can’t work normally.
To load a storage controller driver when the operating system is unbootable or there is no system, please follow operations below:
- Find the type of storage controller (could be IDE, SCSI, SATA, and so on) your computer uses by checking the documentation coming with the computer or directly going to the manufacturer’s website.
- Download the latest driver for your computer’s storage controller to a USB flash drive, CD, or other removable devices. You may need to unzip the downloaded file before copying it to a removable device.
- Start installing or reinstalling Windows again, and on the “Where do you want to install Windows?” screen, please click Load Driver.
- Insert the removable media that contains the driver into the computer, and click OK. After that, Windows will search for the driver on all available devices, and then list all available drivers.
- Select the driver that matches your hard drive and click Nextto continue.
To update a storage controller driver when there is a running operating system, please take the following steps:
Right click Computer icon on the desktop, choose Manage, and click on Device Manager. Then, find the storage controller whose driver isn’t installed correctly (always the one with a yellow exclamation mark), right click it and choose Upgrade Driver Software (the specific name may be different in different versions of Windows). After that, there are 2 choices: Search automatically for updated driver software and Browse my computer for driver software:
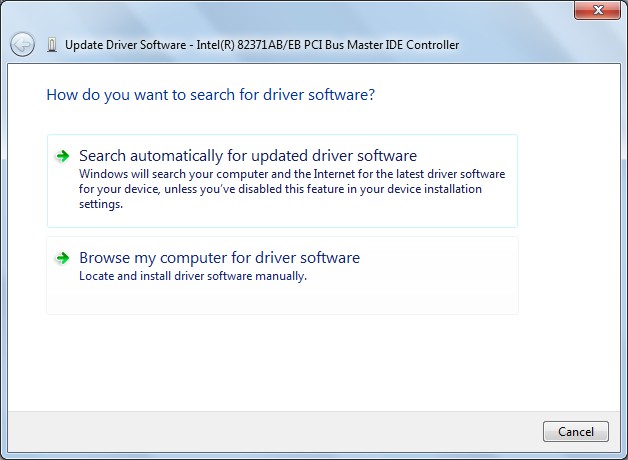
Just choose the desired one in accordance with your actual demands, and then update the driver by following instructions.
Tip: If you choose the second one, please download the correct driver to your computer in advance.
Click to tweet
Once a correct storage controller driver is loaded or updated, you can try installing or reinstalling Windows again. But if this method also failed to make the hard disk detected, cleaning the hard disk is highly recommended, because this solution has been proved to be useful for lots of users.
Solution 3. Clean Disk with MiniTool Partition Wizard or Diskpart
If you have backed up important files by following instructions in the How to Backup Data part, now you can use either MiniTool Partition Wizard or Diskpart to clean disk without worrying about data loss.
Use MiniTool Partition Wizard
Firstly, buy MiniTool Partition Wizard to unlock the Bootable Media Builder feature which enables you to create a Bootable CD.
MiniTool Partition Wizard DemoClick to Download100%Clean & Safe
Then, burn the iso file to CD/DVD or USB flash drive. As to how to burning, you can go back to the beginning of the post to get.
Next, boot the computer from MiniTool Partition Wizard Boot Disk, and use its “Delete All Partitions” feature to clean the target disk.
Of course, you can also choose to clean the disk using Diskpart.
Use Diskpart
In the Install now interface, please tap on “Shift + F10” combination keys to call out Command Prompt, then type Diskpart, and next select the target hard disk to clean. Here we choose to clean Disk 2 by typing the following commands (each type ends with pressing on Enter key):
- Diskpart
- List disk
- Select disk 2
- Clean (using Clean command in diskpart will delete all partitions on the selected disk)
- Exit (exit from Diskpart)
- Exit (exit from Command Prompt)
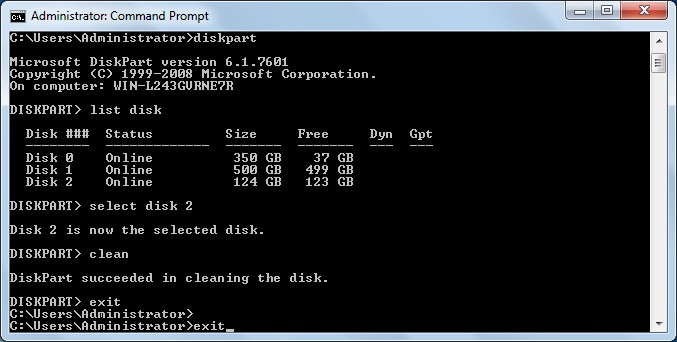
After that, the hard disk should be detected.
Nevertheless, if Windows Install also can’t find the hard disk after cleaning, try wiping the hard disk.
Solution 4. Wipe Hard Disk with MiniTool Partition Wizard
If you have tried the methods above, most probably MiniTool Partition Wizard has been installed or Partition Wizard Boot Disk has been created. If not, download or buy Partition Wizard now.
MiniTool Partition Wizard FreeClick to Download100%Clean & Safe
Once a backup has been made, please launch MiniTool Partition Wizard or start the computer via Partition Wizard Boot Disk.
Then, follow these steps:
- Select the hard disk which should be wiped and choose the “Wipe Disk” feature from the left side.
- Choose an appropriate wiping method. There are 3 methods in total, but here we highly suggest choosing the first one since it requires the least time.
- Click “Apply” button to make all changes performed. It may cost some time, so please wait patiently.
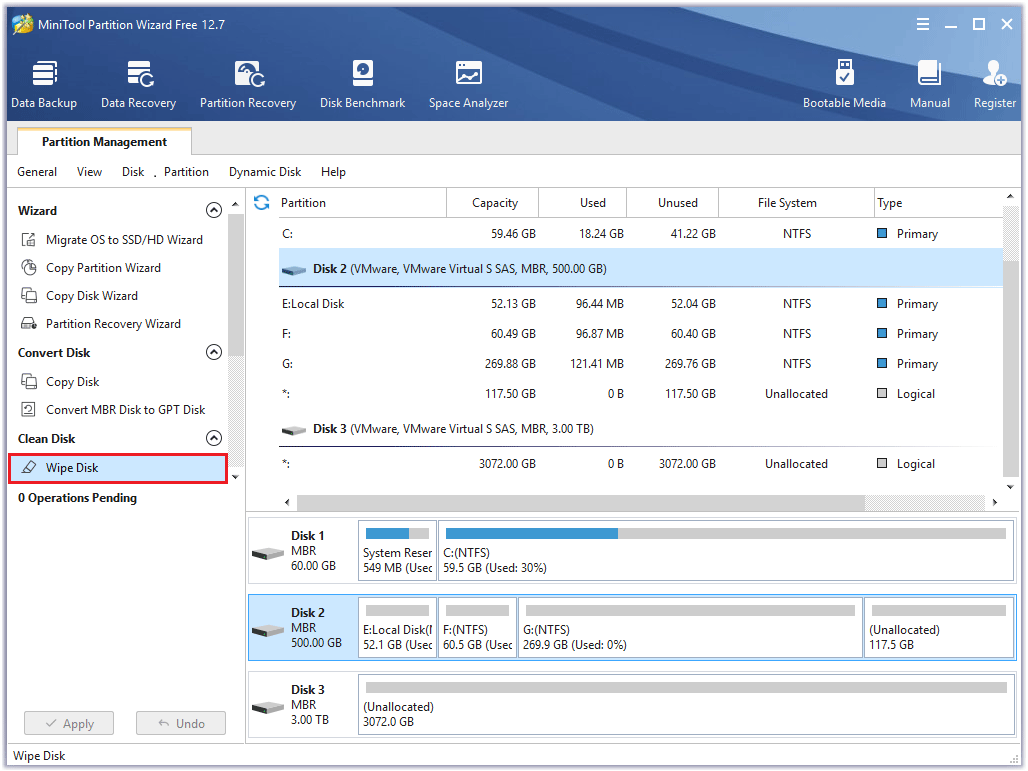
Once Partition Wizard shows it applied the change successfully, you can close the program, shut down the computer, and try installing or reinstalling Windows again. However, if Windows Install still can’t find your hard disk after disk wiping, try changing disk controller mode.
Solution 5. Change Disk Controller Mode from IDE to AHCI
Tip: This method is just proved to be useful for a small part of users, so most probably it doesn’t work for your situation. In addition, this solution is recommended if you are installing Windows on an SSD, because AHCI plays an important role in enhancing SSD performance.
If the hard disk is not detected during installing Windows on an existing system, you can try changing disk controller mode from IDE to AHCI to fix the error. Detailed steps are as follows (take Windows 7 for example):
Step 1: Click the Start button, type regedit.exe, and run this program as administrator.
Step 2: Navigate to HKEY_LOCAL_MACHINE → SYSTEM → CurrentControlSet → Services → msahci, and look for a work “Start” in the right-side pane. Then, double click Start and set its value to 0.
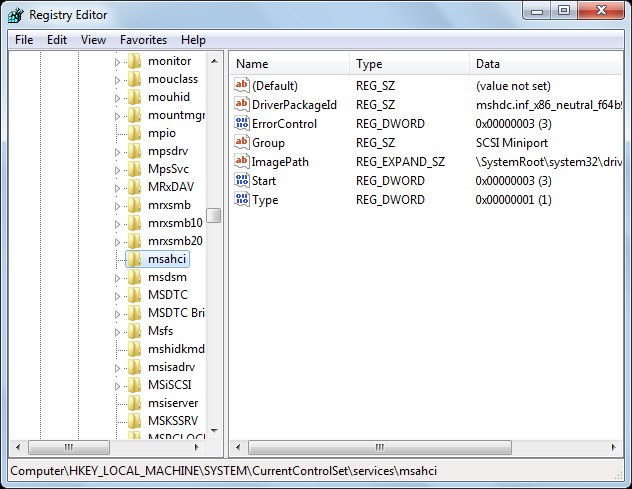
Step 3: Go to HKEY_LOCAL_MACHINE → SYSTEM → CurrentControlSet → Services → pciide, and look for “Start”. Then, change its value to 0, too.
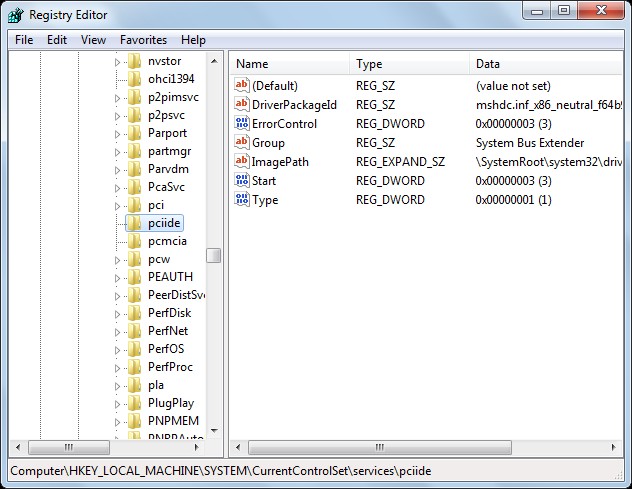
Step 4: Close regedit.exe, shut down your computer, and enter BIOS before Windows is loaded.
Step 5: Change IDE mode to AHCI. Then, save the change and restart the computer.
When Windows starts, it will detect the BIOS change and load a new disk driver. And then you can run Windows setup program to see whether the error has been fixed. If the hard disk is still invisible after you change the disk controller mode, wiping the hard disk might work.
Tip: If you want to change IDE to AHCI when there is no Windows available, just make the change in BIOS since you are unable to enter regedit.exe.
Actually, apart from these 5 solutions, we find the sixth one from Microsoft’s website. That is to update the driver for the chipset, which made the hard disk detected in a few cases.
Solution 6. Update the Driver for Your PC’s Chipset
A chipset is a set of electronic components in an integrated circuit that manages the data flow between the processor, memory, and peripherals. It controls communications between the processor and external devices. Computers that use certain types of chipsets and have Advanced Format hard disk drives installed might receive such installation errors. To fix these problems, try installing the latest drivers for your computer’s chipset from the chipset manufacturer.
Recently, we found three other solutions that may also help you fix the “Windows 10 not detecting hard drive but BIOS does” issue. You can also have a try.
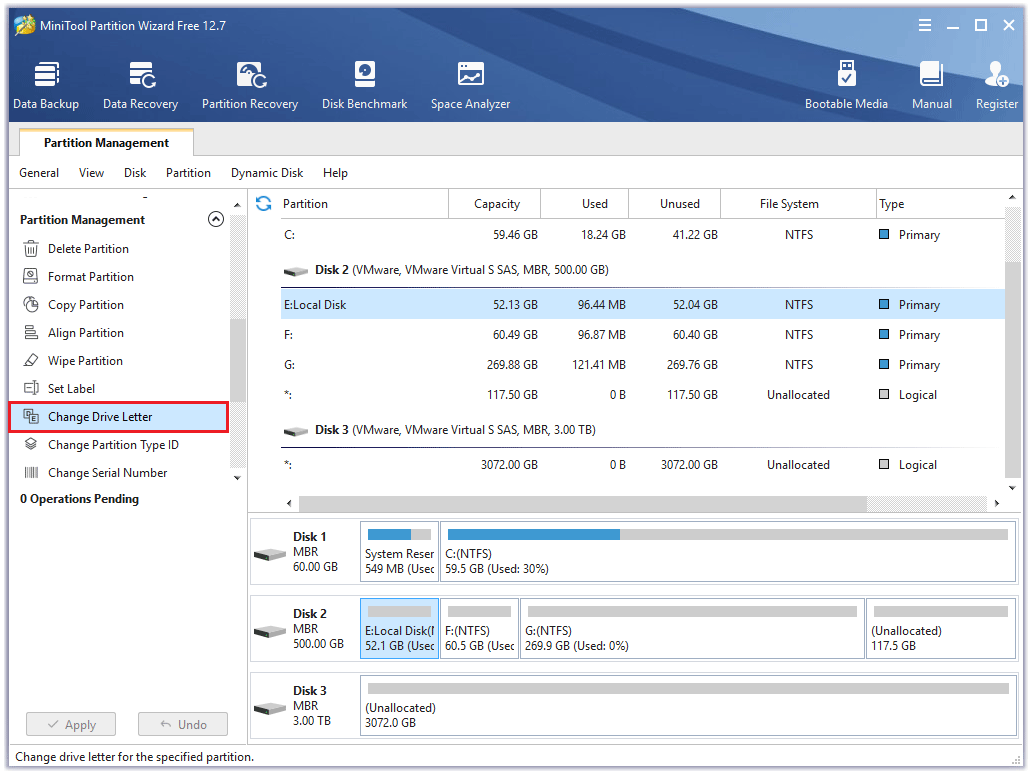
Solution 7. Change Drive Letter and Path
If the hard drive doesn’t have its own drive letter, you may also encounter the “Windows 10 not detecting hard drive but BIOS does” issue. In this case, you just need to assign a drive letter to it or change its drive letter. To do that, you can use MiniTool Partition Wizard’s Change Drive Letter feature. Here’s the way:
- Select the hard disk, and then select Change Drive Letter from the left panel.
- Click the down arrow to choose the New Drive Letter.
- Then click OK.
- Click Apply and Yes to execute the changes.
Solution 8. Format the Hard Drive to a Compatible File System
You may also encounter the “Windows 10 not detecting hard drive but BIOS does” issue if you have formatted the hard drive as Ext 4 or another incompatible file system before.
In this situation, you can use MiniTool Partition Wizard’s Format Partition feature to format it to a compatible file system. Here’s the guide:
- Select the hard disk, and then select Format Partition from the left panel.
- Click the down arrow next to File System and select a compatible file system.
- Then click OK.
- Next, click Apply and Yes to execute the changes.

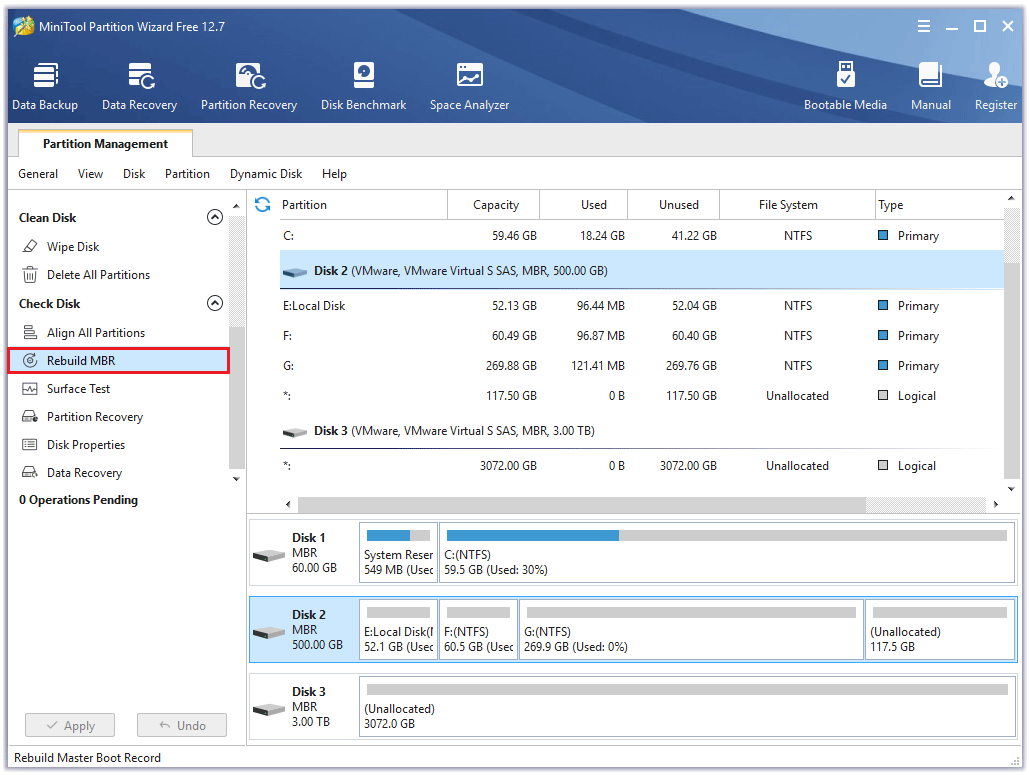
Solution 9. Rebuild MBR
If the MBR of your hard drive is corrupt, you may encounter the “Windows 10 not detecting hard drive but BIOS does” issue too. In this case, you can use MiniTool Partition Wizard’s Rebuild MBR feature to fix it. Here are the detailed steps:
- Select the corrupted disk.
- Select Rebuild MBR from the left panel.
- Then click Apply to execute this operation.
Further Reading:
If your data hard drive is marked as “not initialized”, you may encounter the “Windows 10 not detecting hard drive but BIOS does” issue too. In this case, you just need to initial it. To do so, simply follow these steps:
- Open Disk Management.
- Right-click the hard drive and select “Initialize Disk”.
- Then select the partition style (GPT or MBR).
- Next, click OK. Then the hard drive will display as having unallocated space.
- Right-click it and select New Simple Volume.
- Follow the on-screen instructions to partition the hard drive.
- Once done, check if the hard drive can be detected by Windows.
Now all solutions to “hard disk not detected during Windows installation” have been introduced, and you can try one or some of them when you are having the same problem. Should you have any problem, just feel free to leave it in Comments.
FAQ
[Windows 11/10] Устранение неполадок — Как решить проблему отсутствия дисков при установке систем Windows
Применимо для продуктов: Ноутбук, Настольный компьютер, Моноблочный компьютер, Игровая консоль, Мини-компьютер
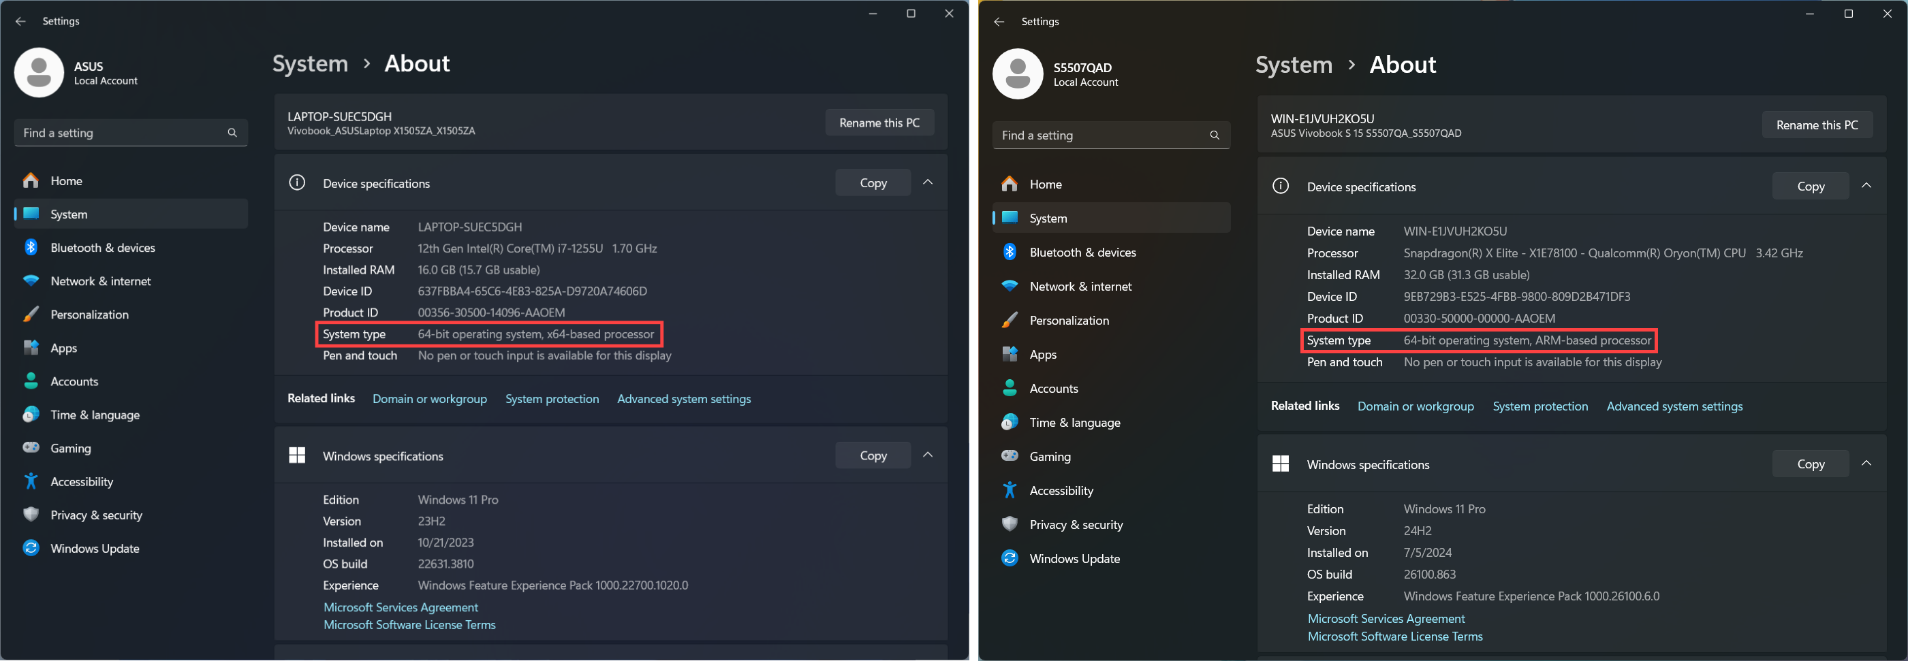
Примечание: Следующий метод переустановки Windows применим исключительно к устройствам с архитектурой x86/x64. Для устройств с архитектурой ARM (например, с платформой процессоров Qualcomm®) Вы можете обратиться к этой статье по переустановке операционной системы: Облачное восстановление в MyASUS в среде восстановления WinRE — Введение.
Примечание: Как определить архитектуру Вашего устройства.
Перейдите ПУСК > Параметры > Система > О программе. Здесь Вы можете просмотреть архитектуру Вашего устройства в разделе «Тип системы» (на изображении слева показана архитектура x64, а на изображении справа показана архитектура ARM).
В этой статье представлено руководство по устранению неполадок, как решить проблему невозможности найти накопитель устройства во время установки Windows 11/10. Решение заключается в загрузке соответствующего драйвера во время процесса установки.
Для получения более подробных инструкций Вы также можете нажать на ссылку на видео ASUS на YouTube ниже, чтобы узнать больше о том, как исправить ошибку «не удается найти диски» при установке Windows 11/10:
https://www.youtube.com/watch?v=HuCY0ChsqAM
Для платформы Intel CPU Вам необходимо вручную установить драйвер Intel Rapid Storage Technology (IRST) во время процесса установки Windows. Вы также можете обратиться к документу Intel How to Configure RAID or Intel Optane Memory with Intel RST on an Intel VMD Capable Platform.
Примечание: Для моделей, оснащенных платформой Intel Lunar Lake CPU, ручная установка драйверов IRST не поддерживается. Используйте Windows 11 24H2 или более позднюю версию, и затем Вы сможете установить операционную систему обычным образом.
Примечание: следующие изображения являются справочными и могут отличаться в зависимости от разных версий.
Метод 1: Ручная установка драйвера Intel Rapid Storage Technology (Intel RST)Загрузите и извлеките драйвер Intel Rapid Storage Technology (IRST)
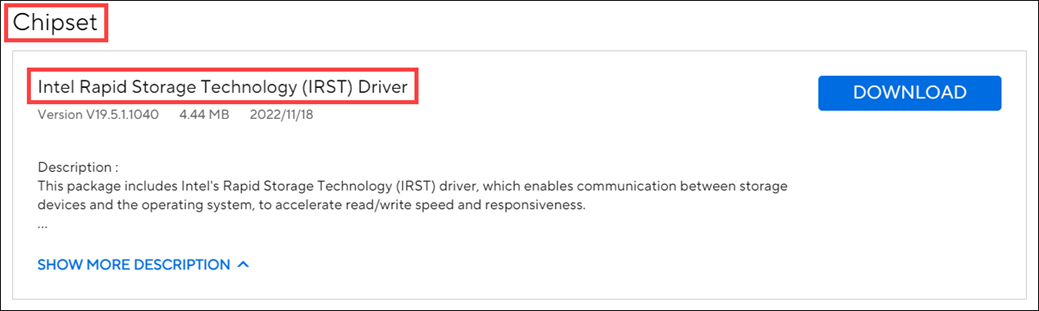
- Пожалуйста, обратитесь к этой статье: Как искать и загружать драйверы. После этого посетите страницу поддержки Вашей модели устройства и загрузите драйвер Intel Rapid Storage Technology (IRST) из категории «Набор микросхем».
Примечание: в следующих шагах в качестве примера используется версия V19.5.1.1040, а изображения приведены только для справки. Вам следует загрузить последнюю версию для Вашей модели устройства.
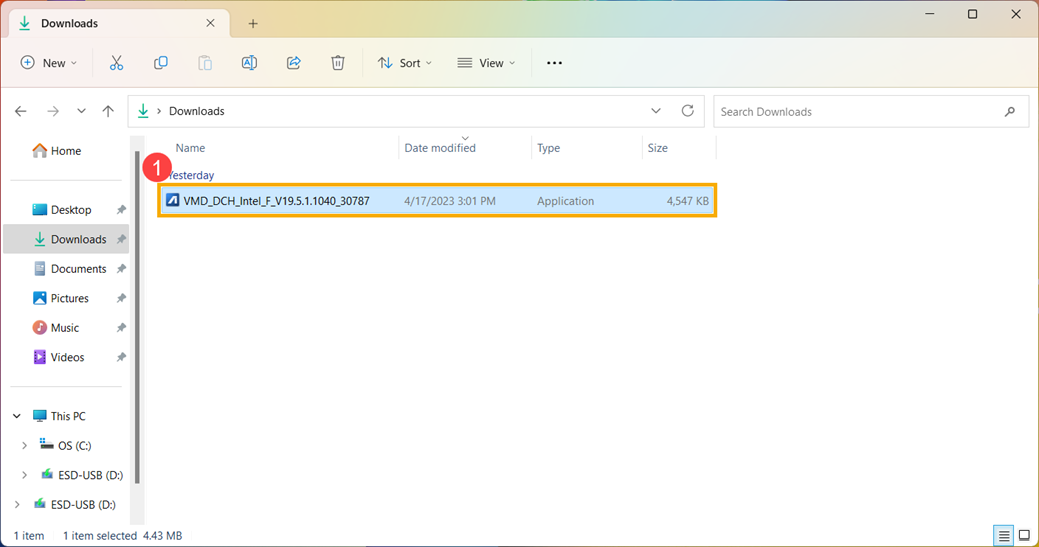
- После завершения загрузки дважды щелкните загруженный файл [VMD_DCH_Intel_F_V19.5.1.1040_30787] ①.
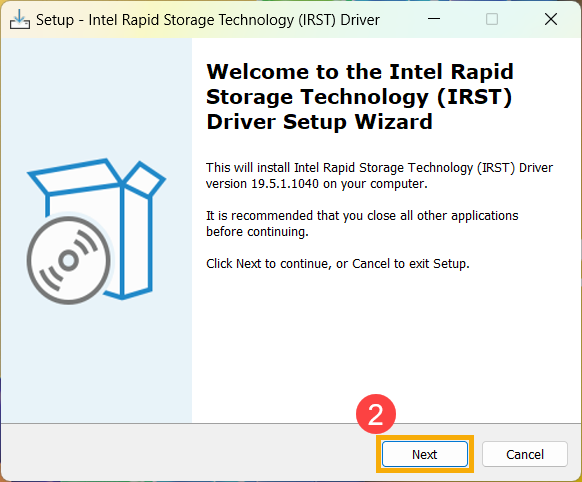
- Когда откроется мастер настройки IRST, нажмите [Далее] ②.
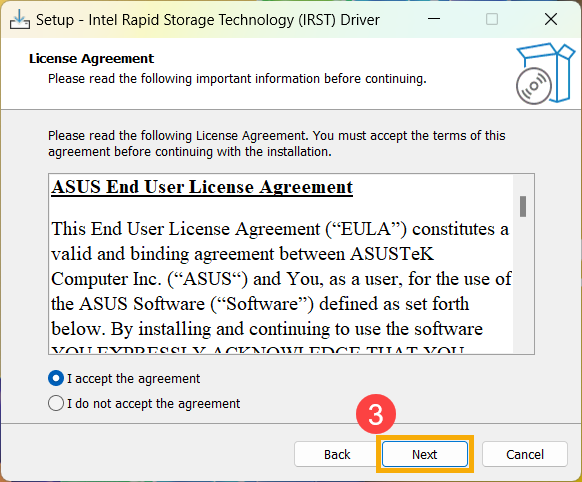
- Прочитайте и примите лицензионное соглашение на программное обеспечение Asus, а затем нажмите [Далее] ③.
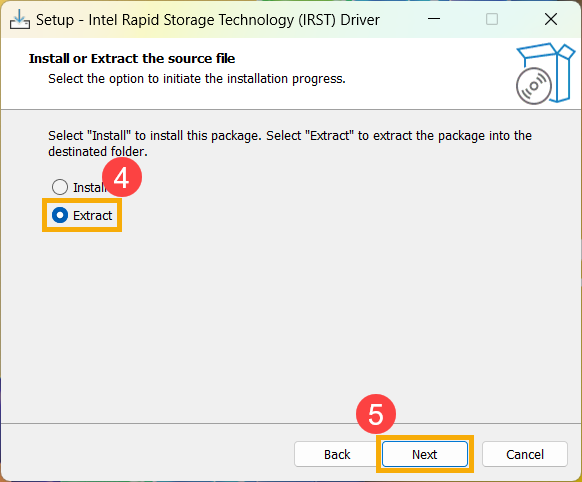
- Выберите [Извлечь] ④, а затем нажмите [Далее] ⑤.
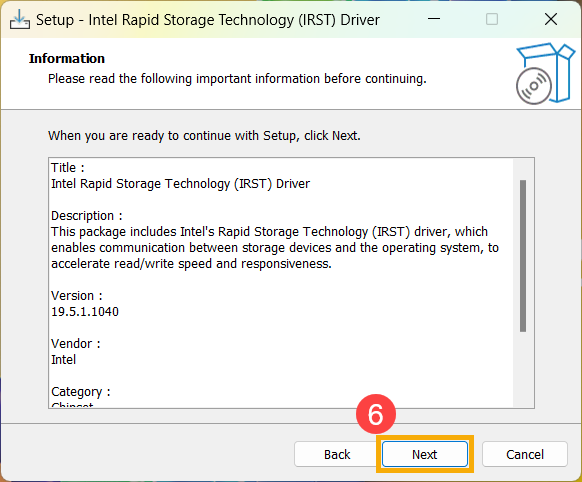
- Прочитайте важную информацию и нажмите [Далее] ⑥.
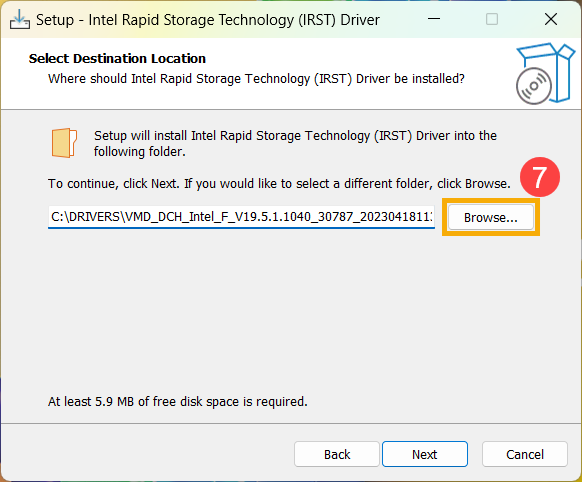
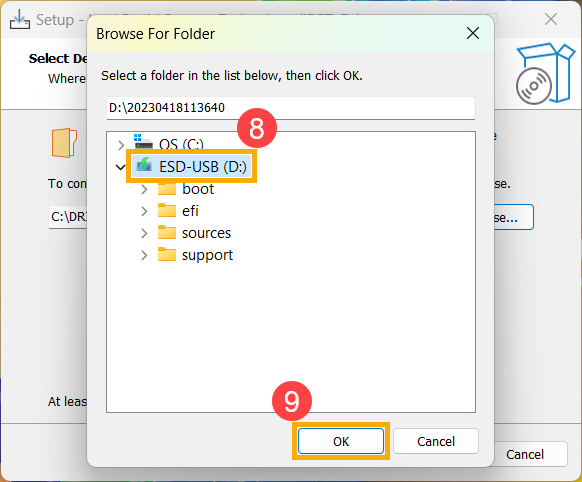
- При выборе папки назначения подключите USB флеш-накопитель к устройству и нажмите [Обзор] ⑦.
Примечание: Если Ваш установочный носитель Windows 11/10 также использует USB флеш-накопитель, Вы можете извлечь пакет на тот же флеш-накопитель.
- Выберите корневой каталог USB-накопителя ⑧ и нажмите [OK] ⑨.
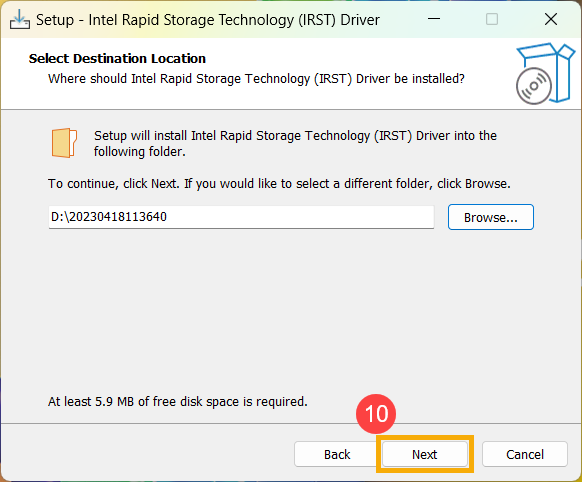
- После выбора папки назначения нажмите [Далее] ⑩.
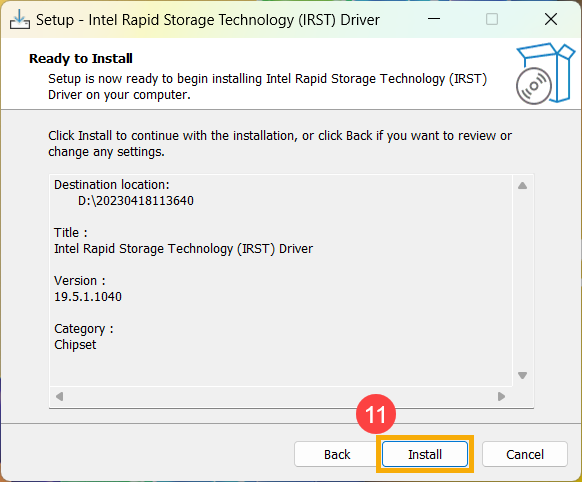
- Нажмите [Установить] ⑪, и драйвер IRST будет извлечен на USB-накопитель.
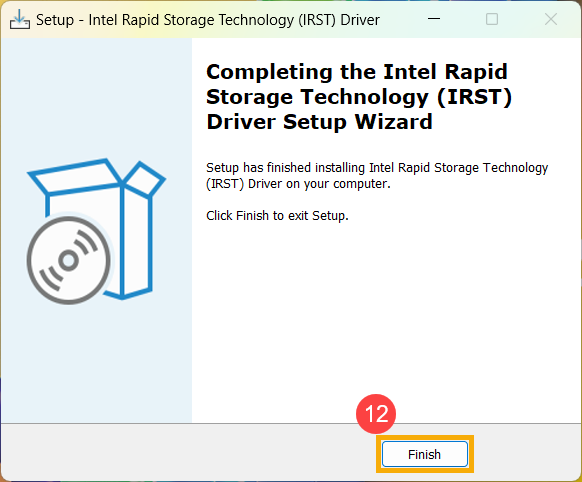
- После завершения извлечения нажмите [Готово] ⑫, чтобы закрыть программу установки.
- Перейдите к следующему разделу «Установка драйвера Intel Rapid Storage Technology (IRST)» .
Установите драйвер Intel Rapid Storage Technology (IRST)
- Подключите USB флеш-накопитель, содержащий установочный носитель Windows 11/10 и извлеченный драйвер Intel Rapid Storage Technology (IRST) (VMD_DCH_Intel_F_V19.5.1.1040_30787), к устройству. (Если Вы устанавливаете с помощью компакт-диска Windows 11/10, вставьте компакт-диск вместе с USB флеш-накопителем, упомянутым выше.)
Примечание: номера версий и изображения ниже приведены только для справки. Пожалуйста, загрузите последнюю версию со страницы поддержки для Вашей модели устройства при выполнении фактической операции. - Продолжайте процесс установки Windows 11/10 снова. Если Вам нужно узнать, как установить Windows 11/10 с помощью установочного носителя, обратитесь к этой статье: Как использовать установочный носитель для установки Windows 11/10.
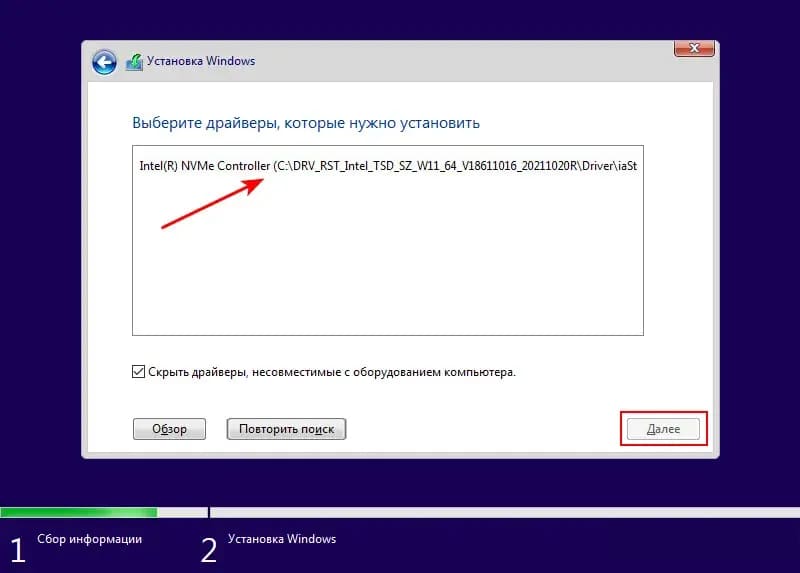
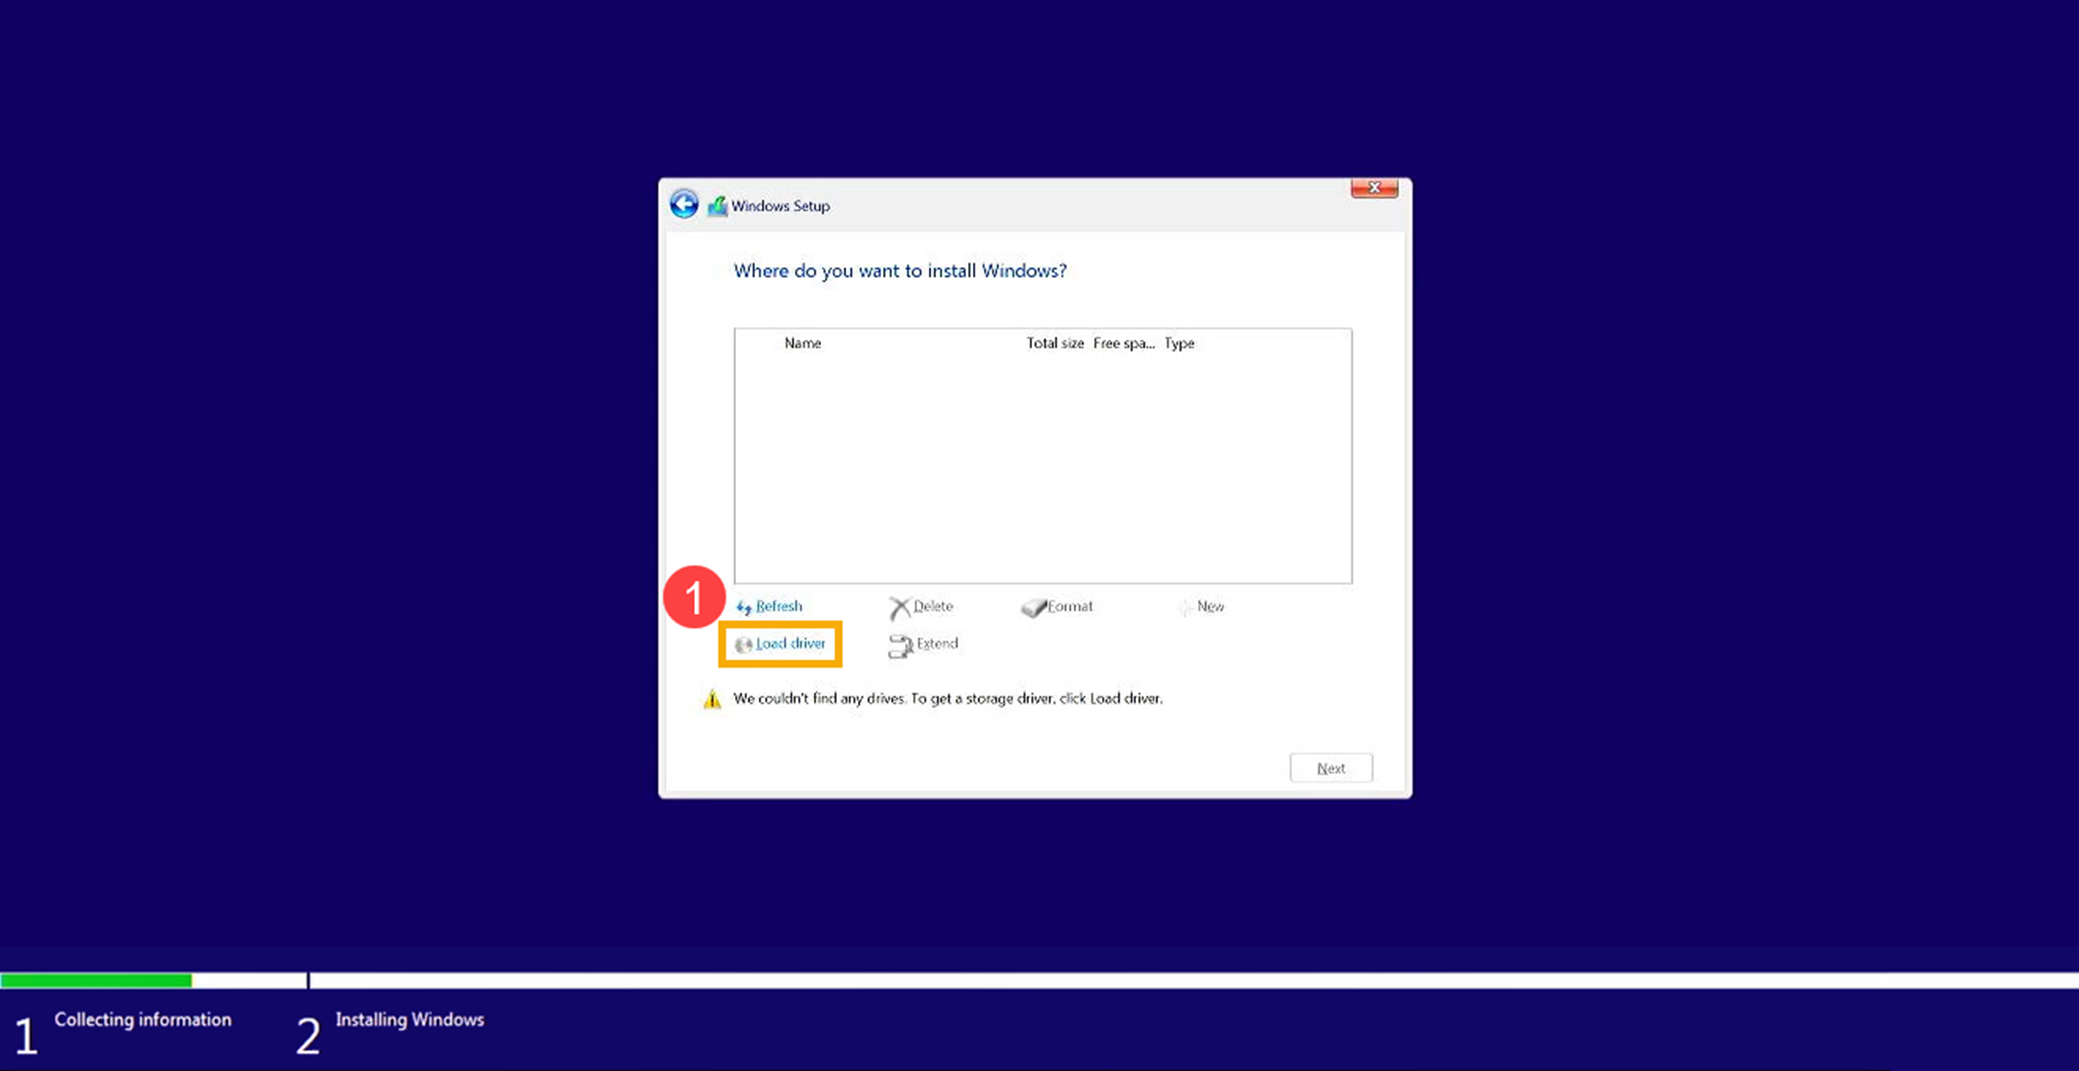
- Если Вы видите экран «Куда Вы хотите установить Windows» и Windows не может найти ни одного накопителя, нажмите [Загрузить драйвер] ①.
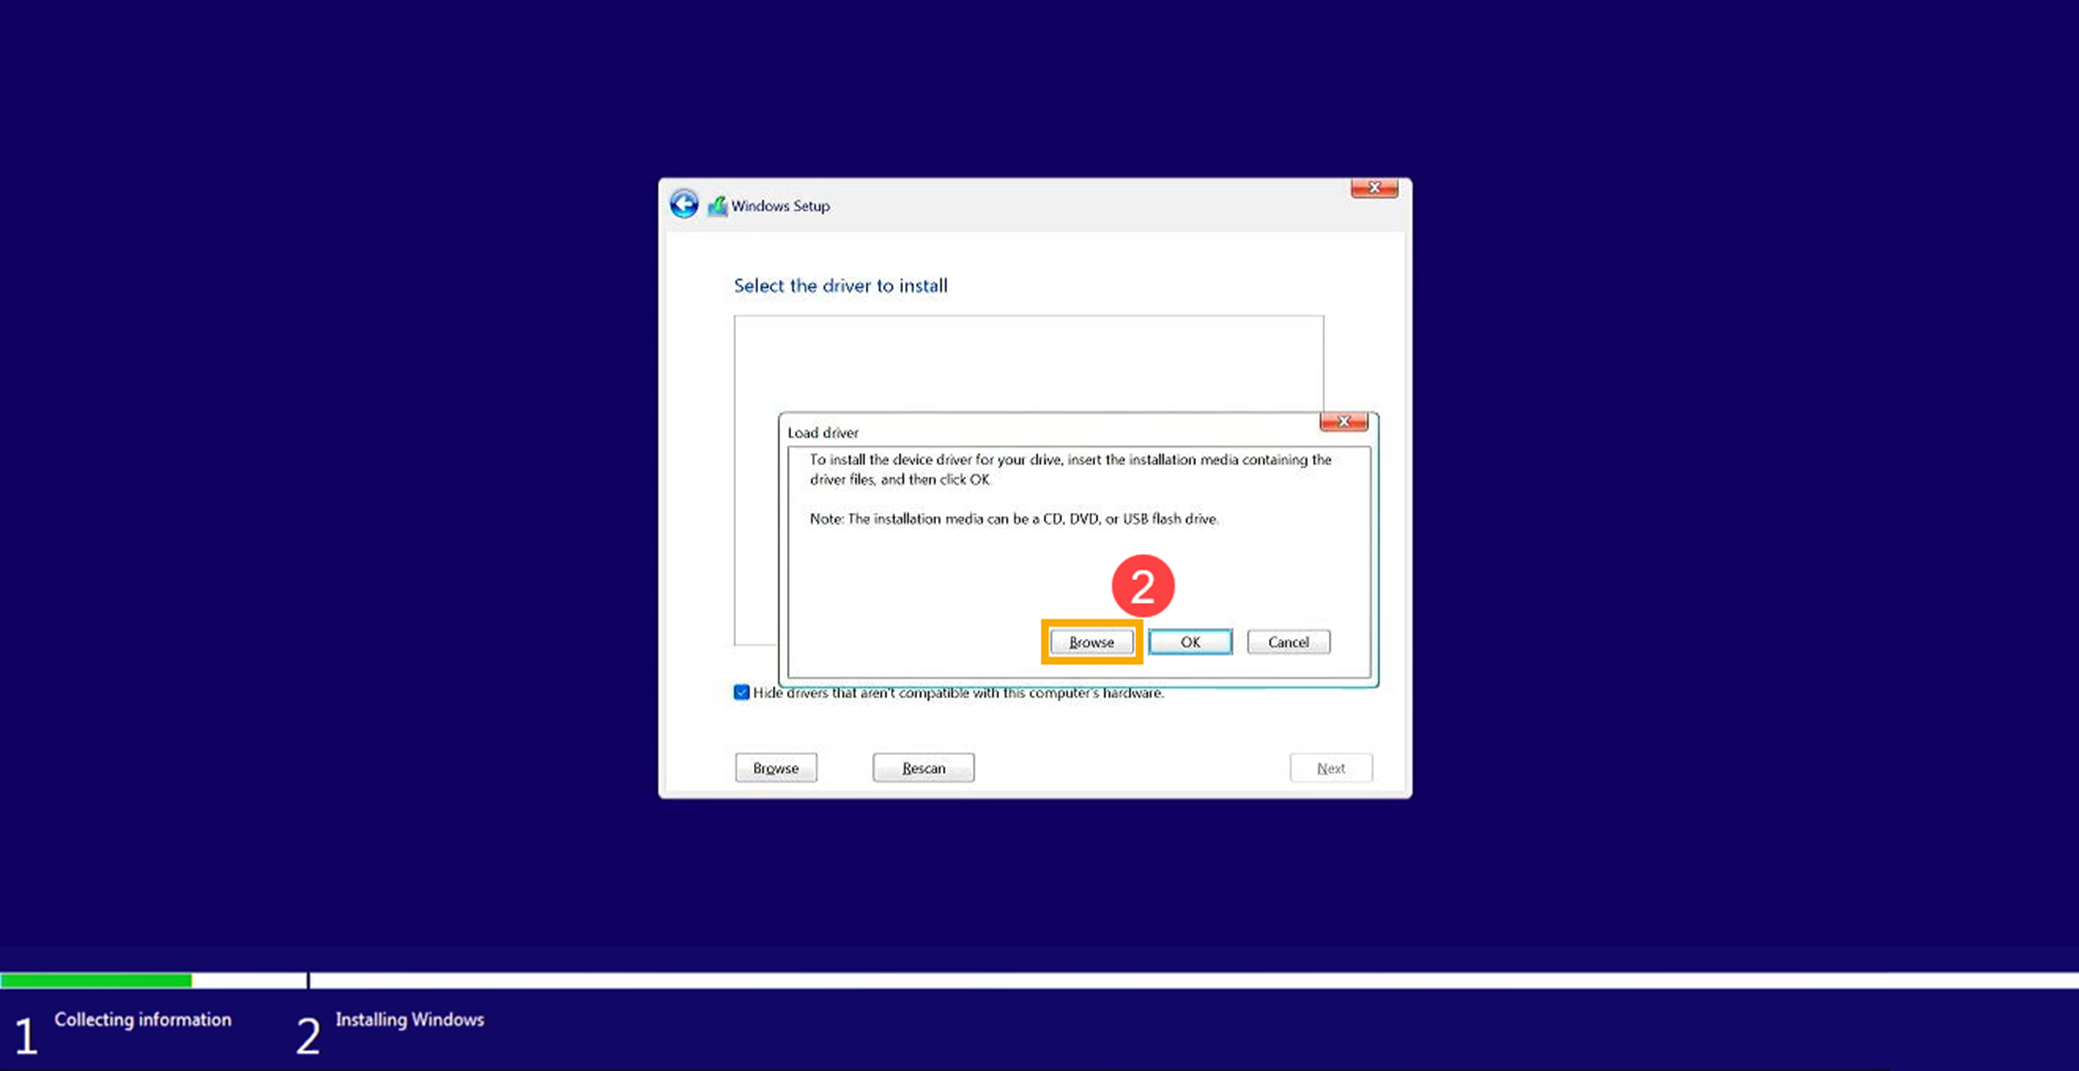
- Выберите [Обзор] ② .
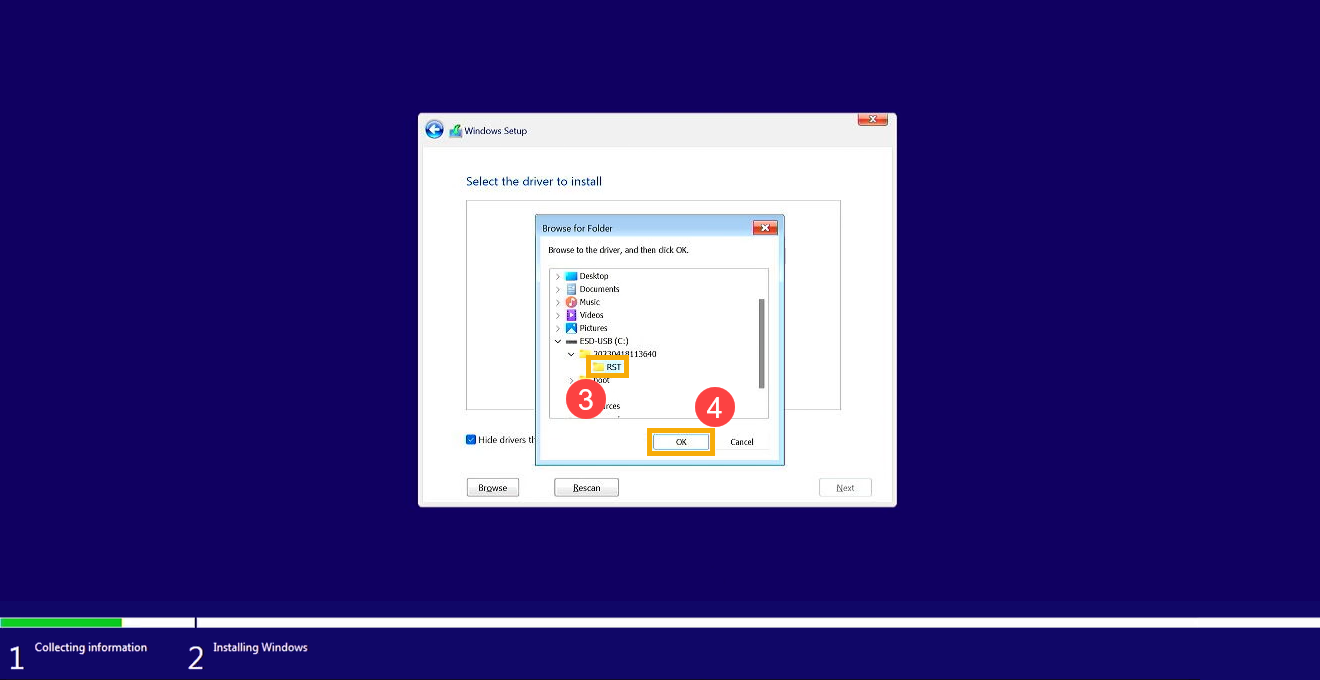
- Найдите папку, в которую Вы ранее извлекли драйвер IRST, выберите папку [RST] ③, а затем нажмите [OK] ④.
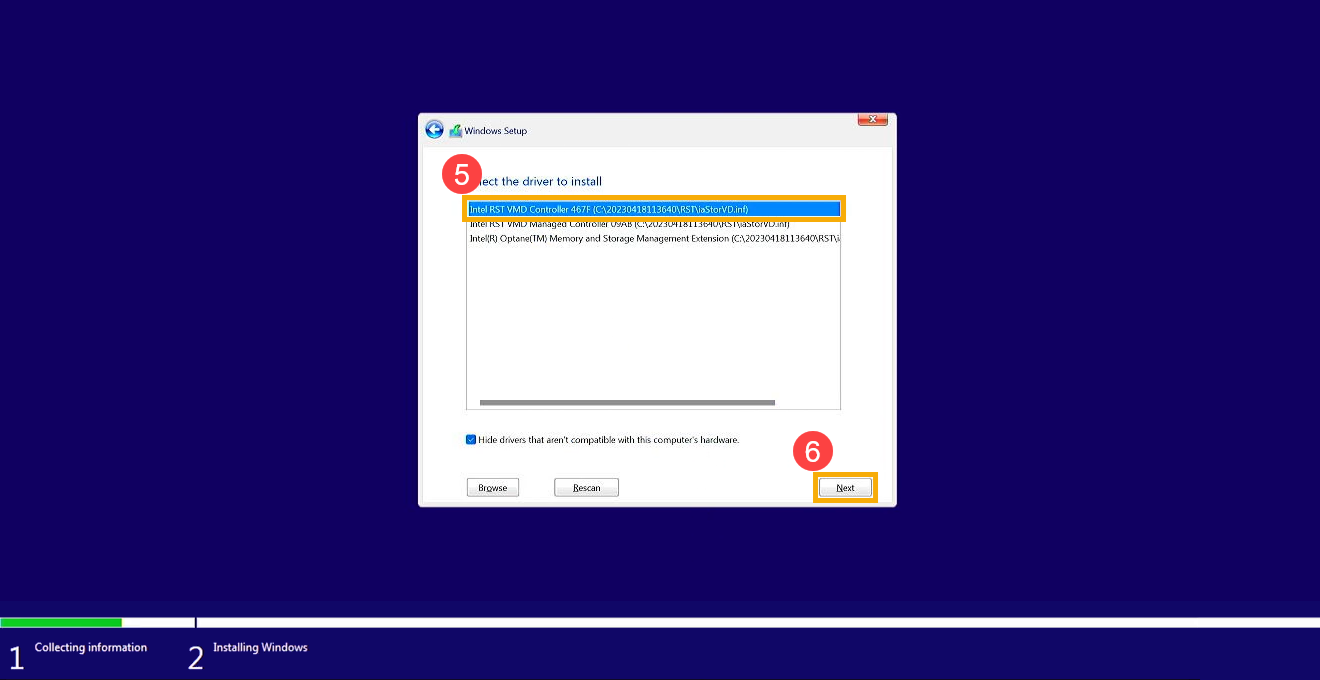
- Выберите [Контроллер Intel RST VMD] ⑤ , а затем нажмите [Далее] ⑥ , чтобы начать установку драйвера.
- После завершения установки драйвера накопитель устройства будет отображаться нормально.
Если Вы по-прежнему не можете найти накопитель во время установки Windows, рассмотрите возможность обращения к этому разделу: Отключение технологии Intel Volume Management Device (VMD), чтобы продолжить установку Windows.
Метод 2: Отключение технологии Intel Volume Management Device (Intel VMD)
Примечание: Отключение технологии VMD приведет к тому, что Ваше устройство не сможет использовать RAID-массив.
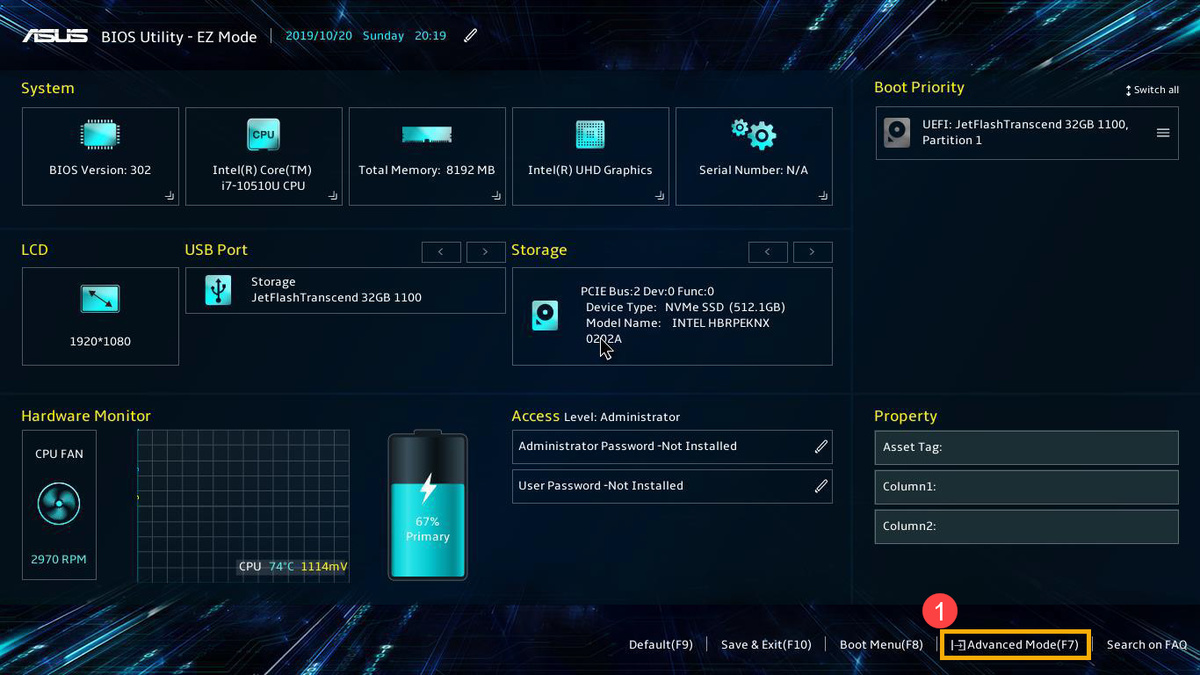
- Во-первых, устройство должно войти в конфигурацию BIOS.
Пока устройство еще не включено, нажмите и удерживайте кнопку F2 на клавиатуре, а затем нажмите кнопку питания, чтобы войти в конфигурацию BIOS. Здесь Вы можете узнать больше о том, как войти в конфигурацию BIOS.
Примечание: для игровых портативных устройств необходимо нажать и удерживать клавишу громкости (-), а затем нажать кнопку питания, чтобы включить устройство. - После входа в экран настройки BIOS следуйте инструкциям в зависимости от интерфейса BIOS Вашего устройства:
Примечание: экраны BIOS могут немного отличаться в зависимости от модели.
Как отключить технологию VMD в интерфейсе UEFI
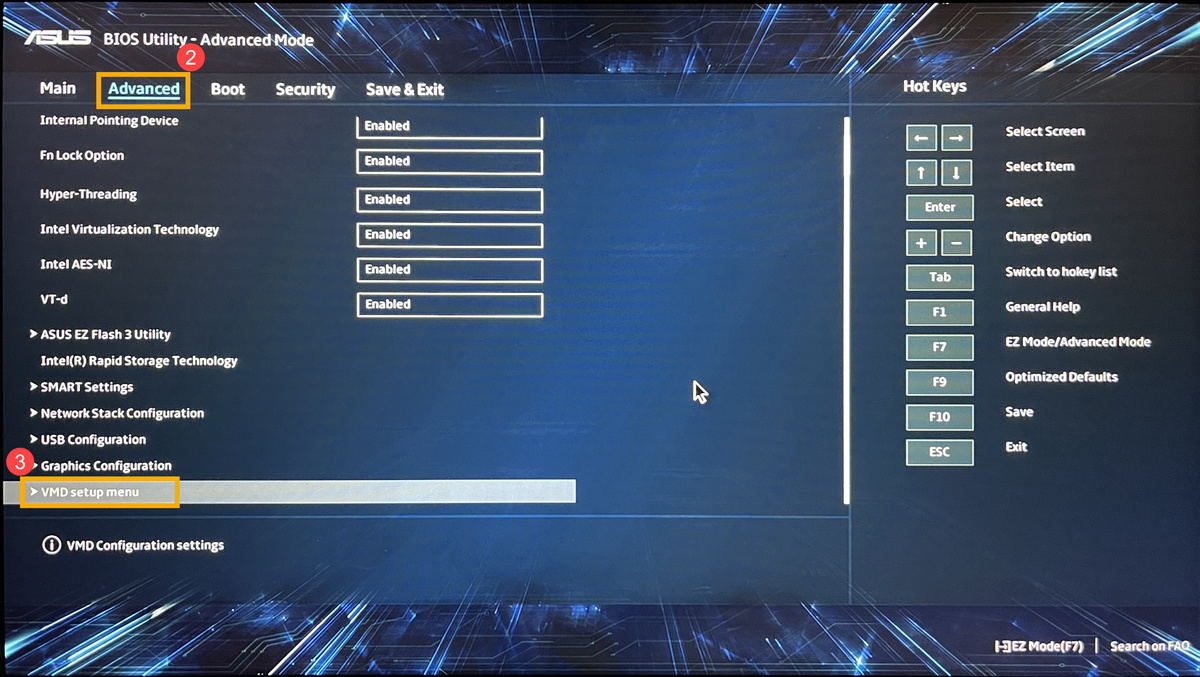
- После входа в конфигурацию BIOS нажмите горячую клавишу [F7] или используйте курсор, чтобы щелкнуть [Расширенный режим] ①, который отобразится на экране.
- Перейдите на экран [Дополнительно] ②, а затем выберите [Меню настройки VMD] ③.
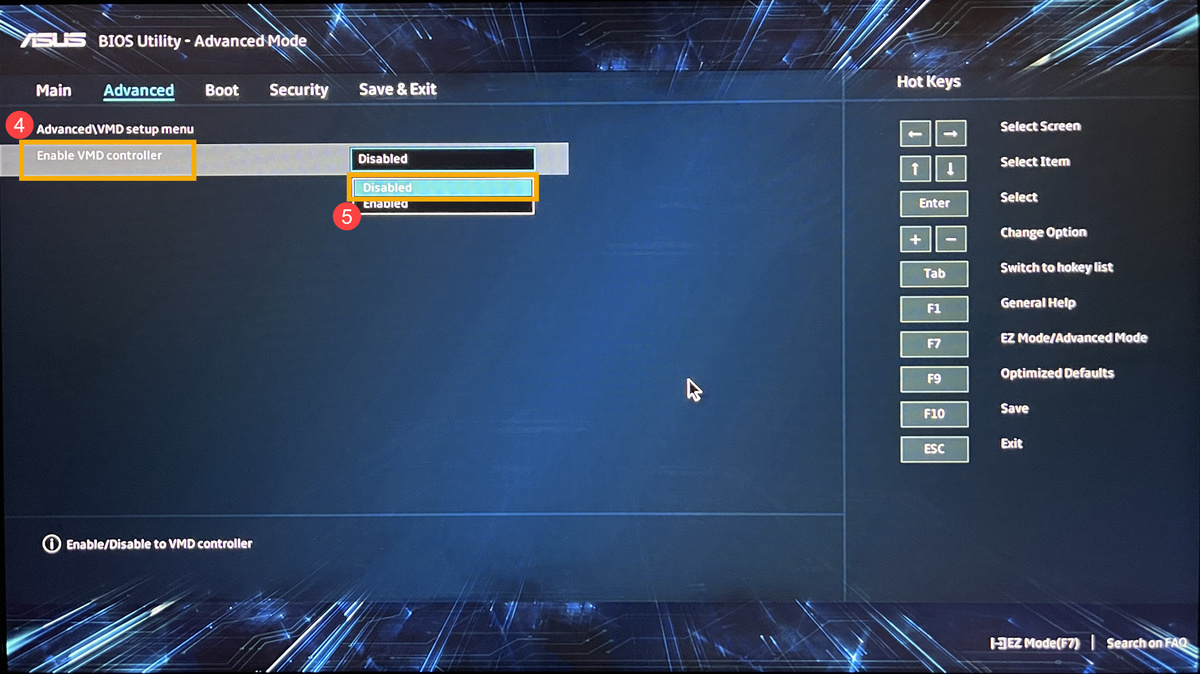
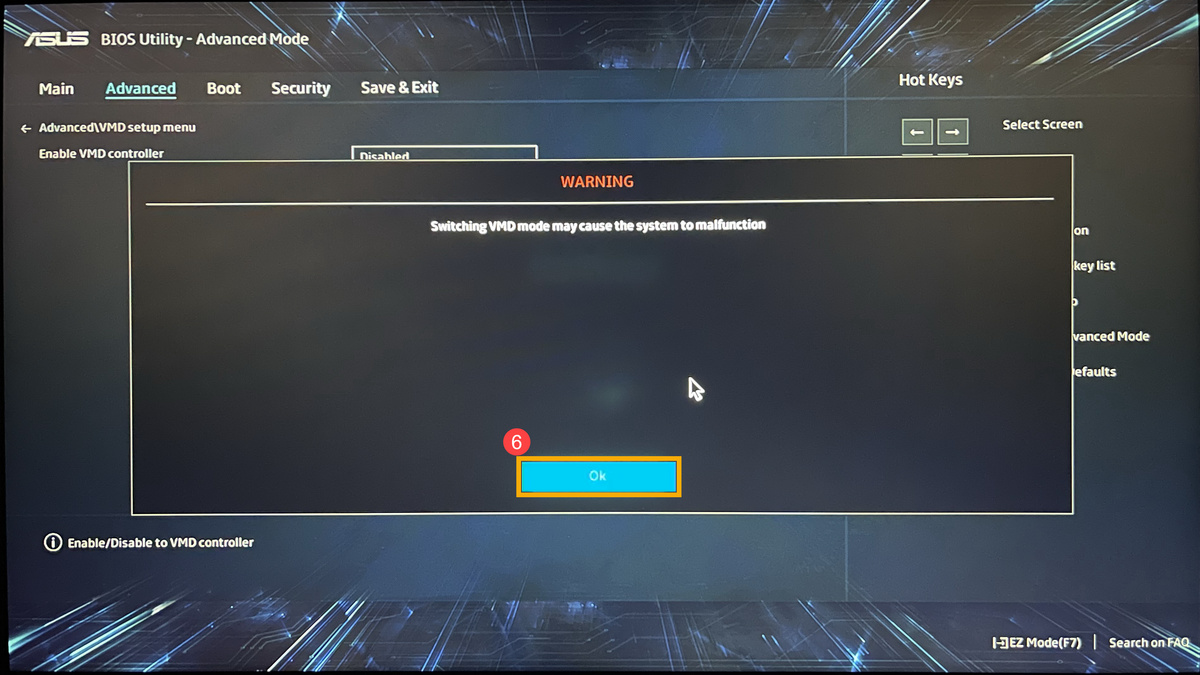
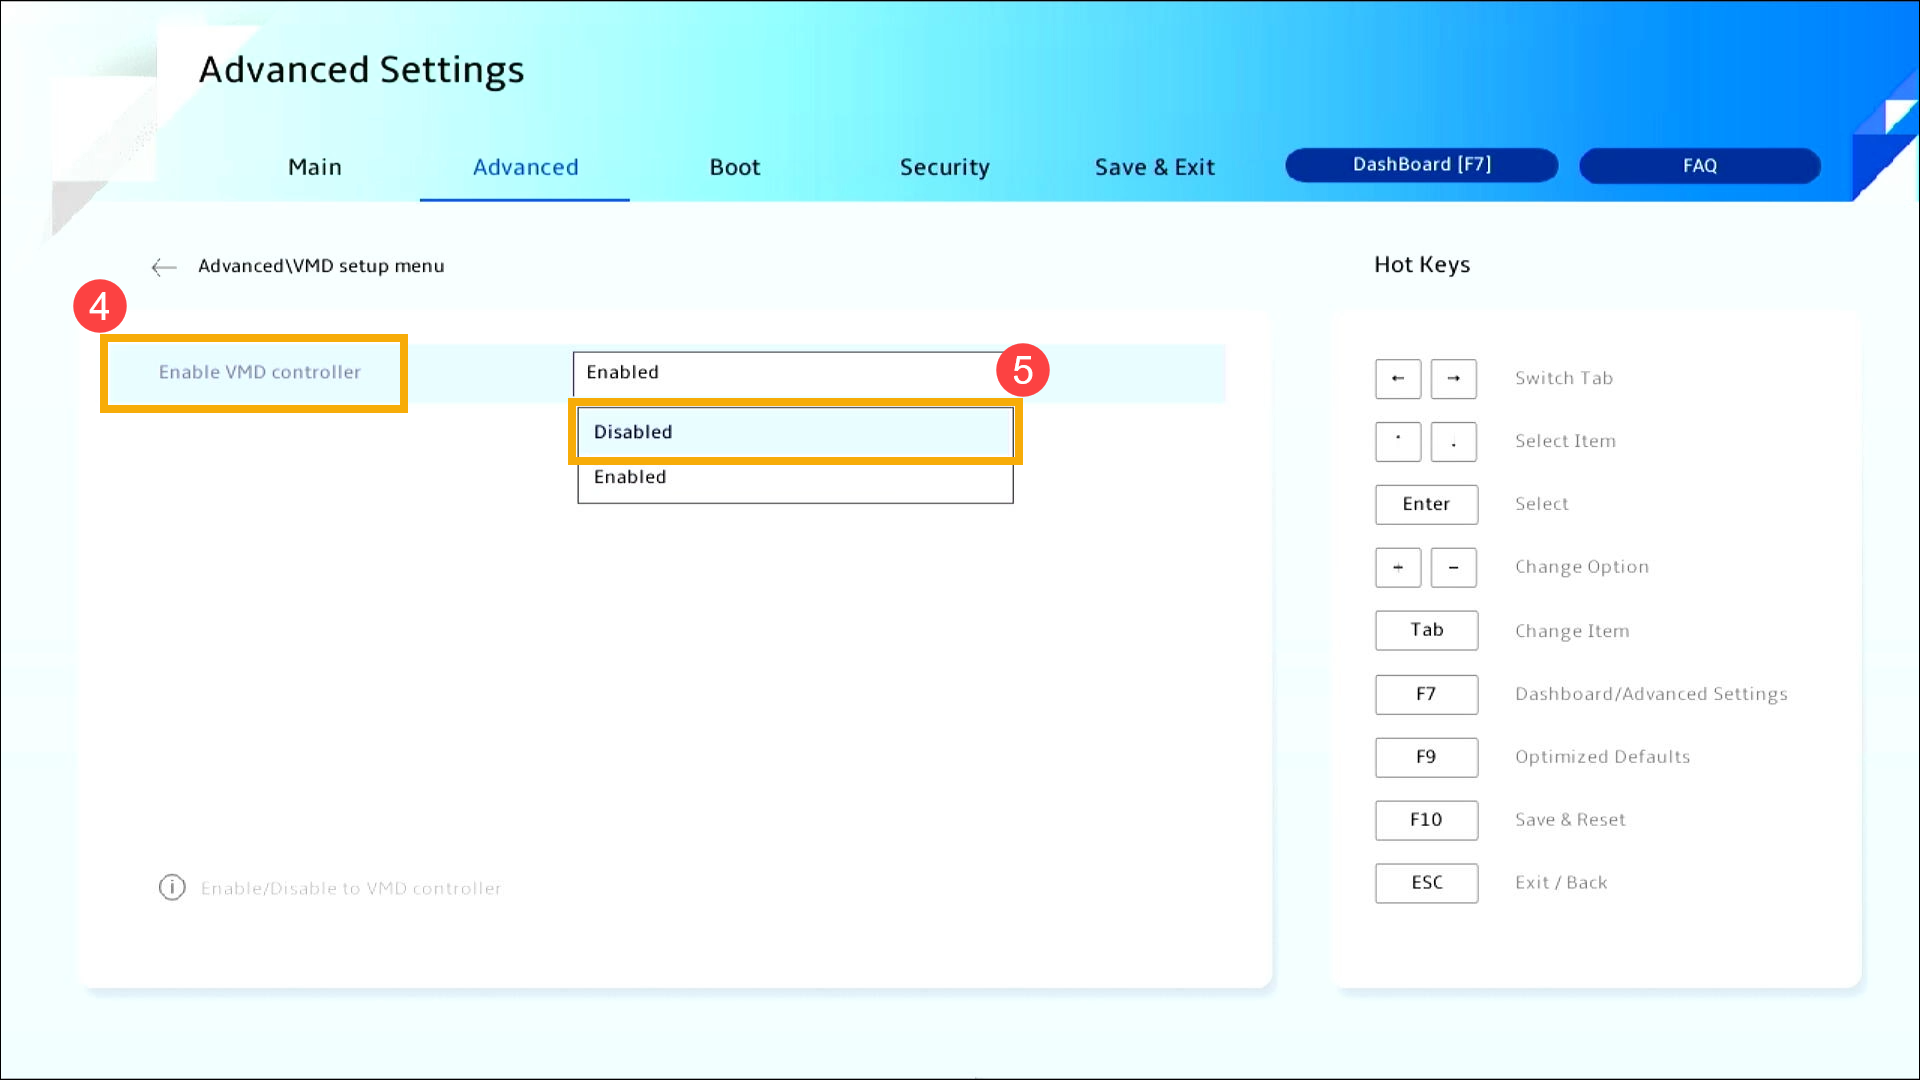
- Выберите [Включить контроллер VMD] ④, а затем выберите [Отключено] ⑤.
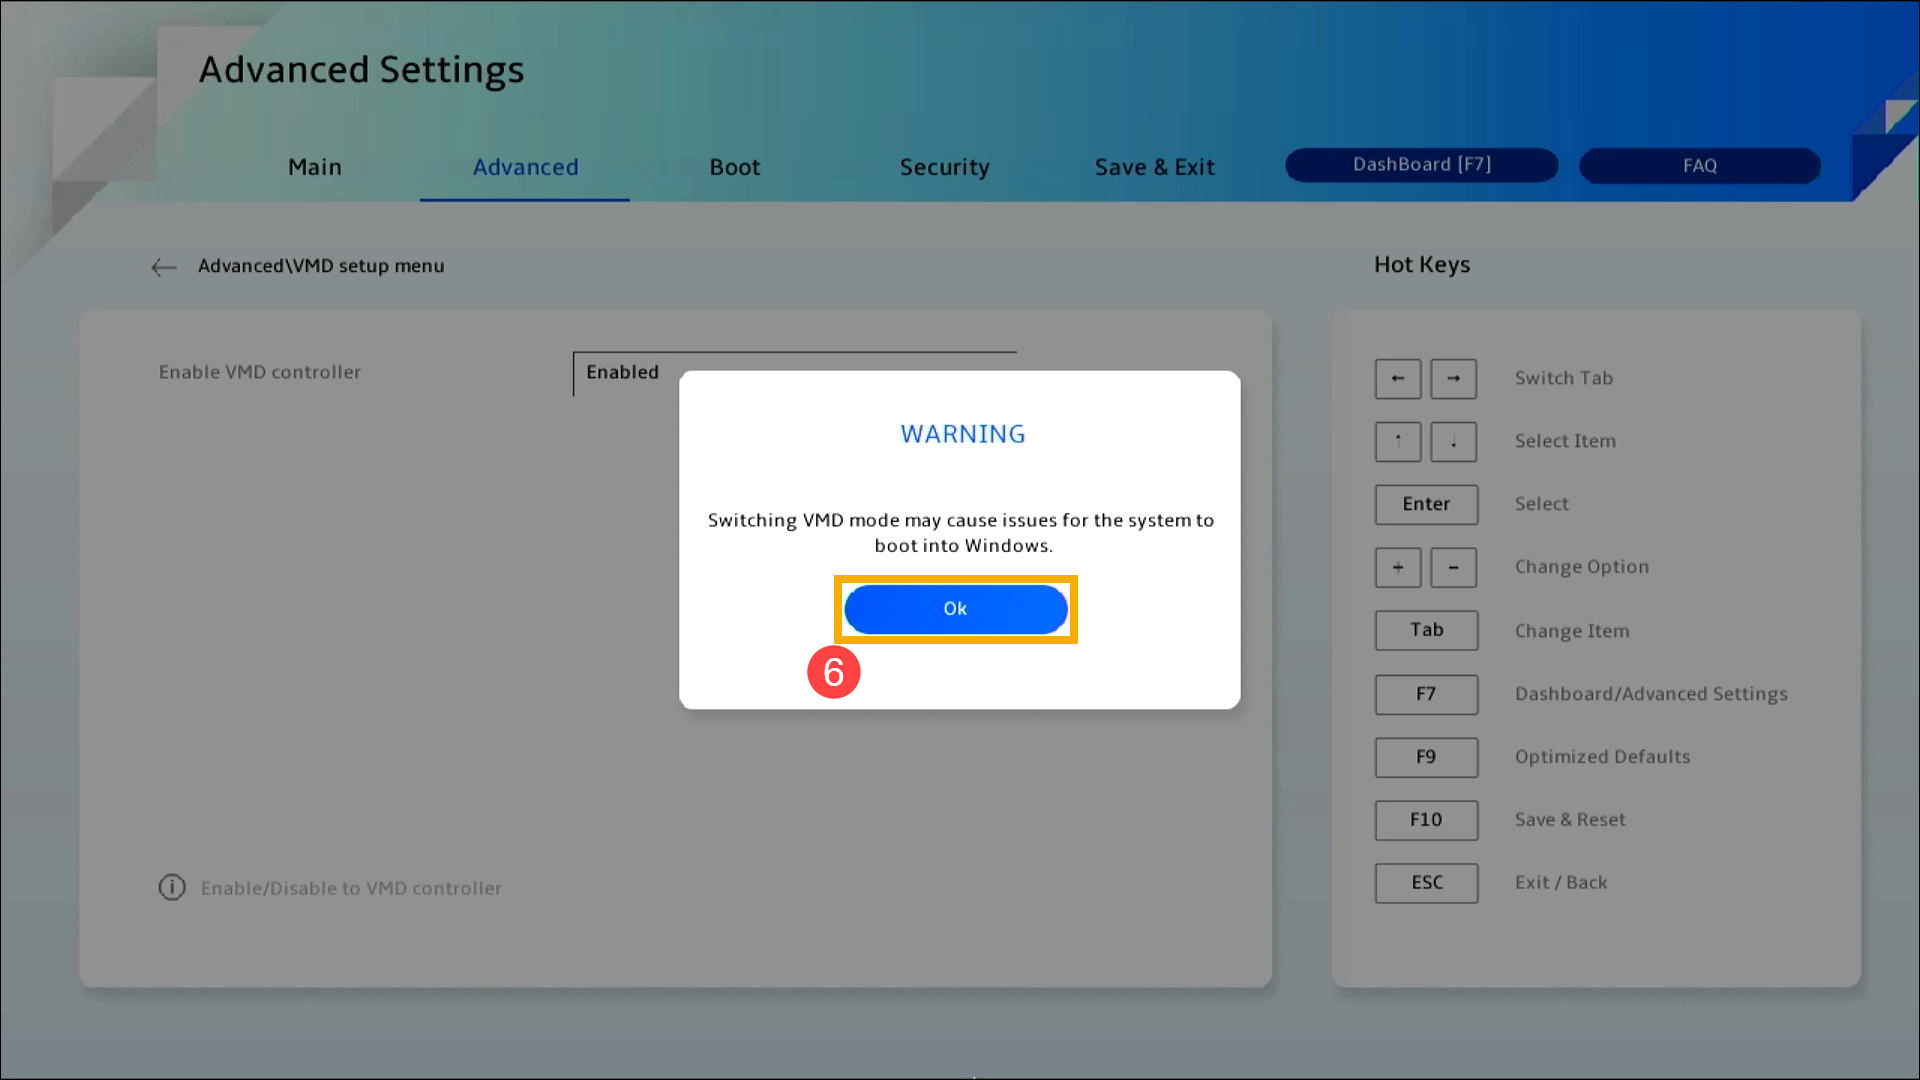
- Нажмите [ОК] ⑥, чтобы отключить технологию Intel Volume Management Device (VMD).
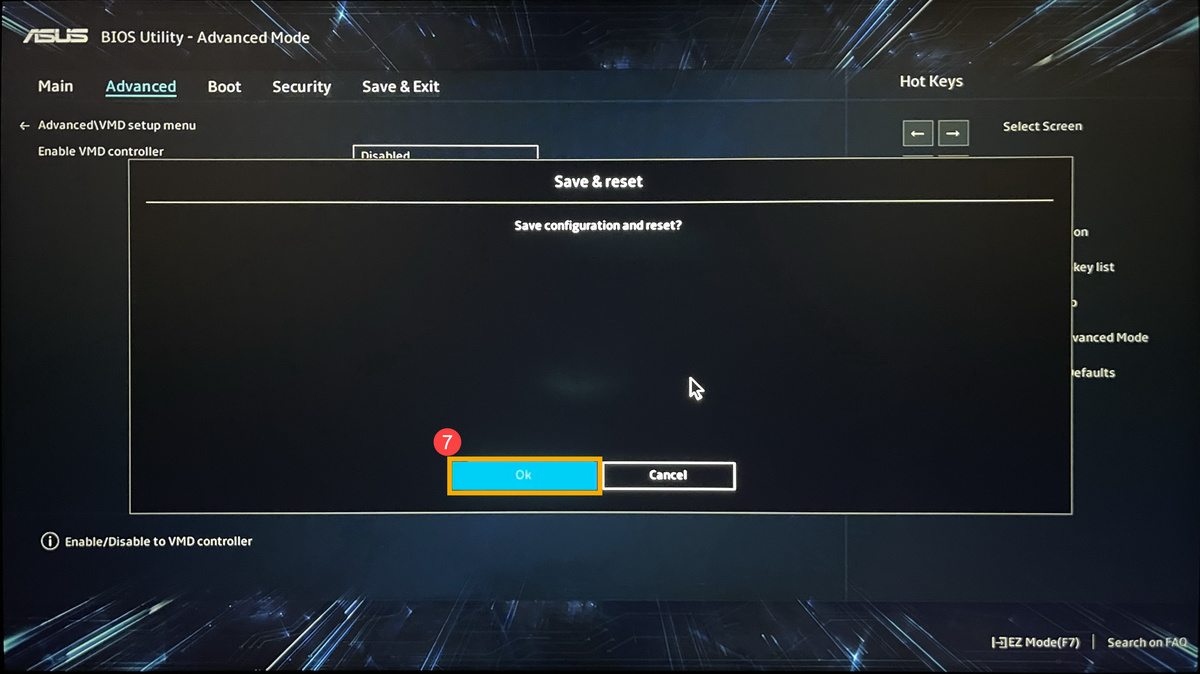
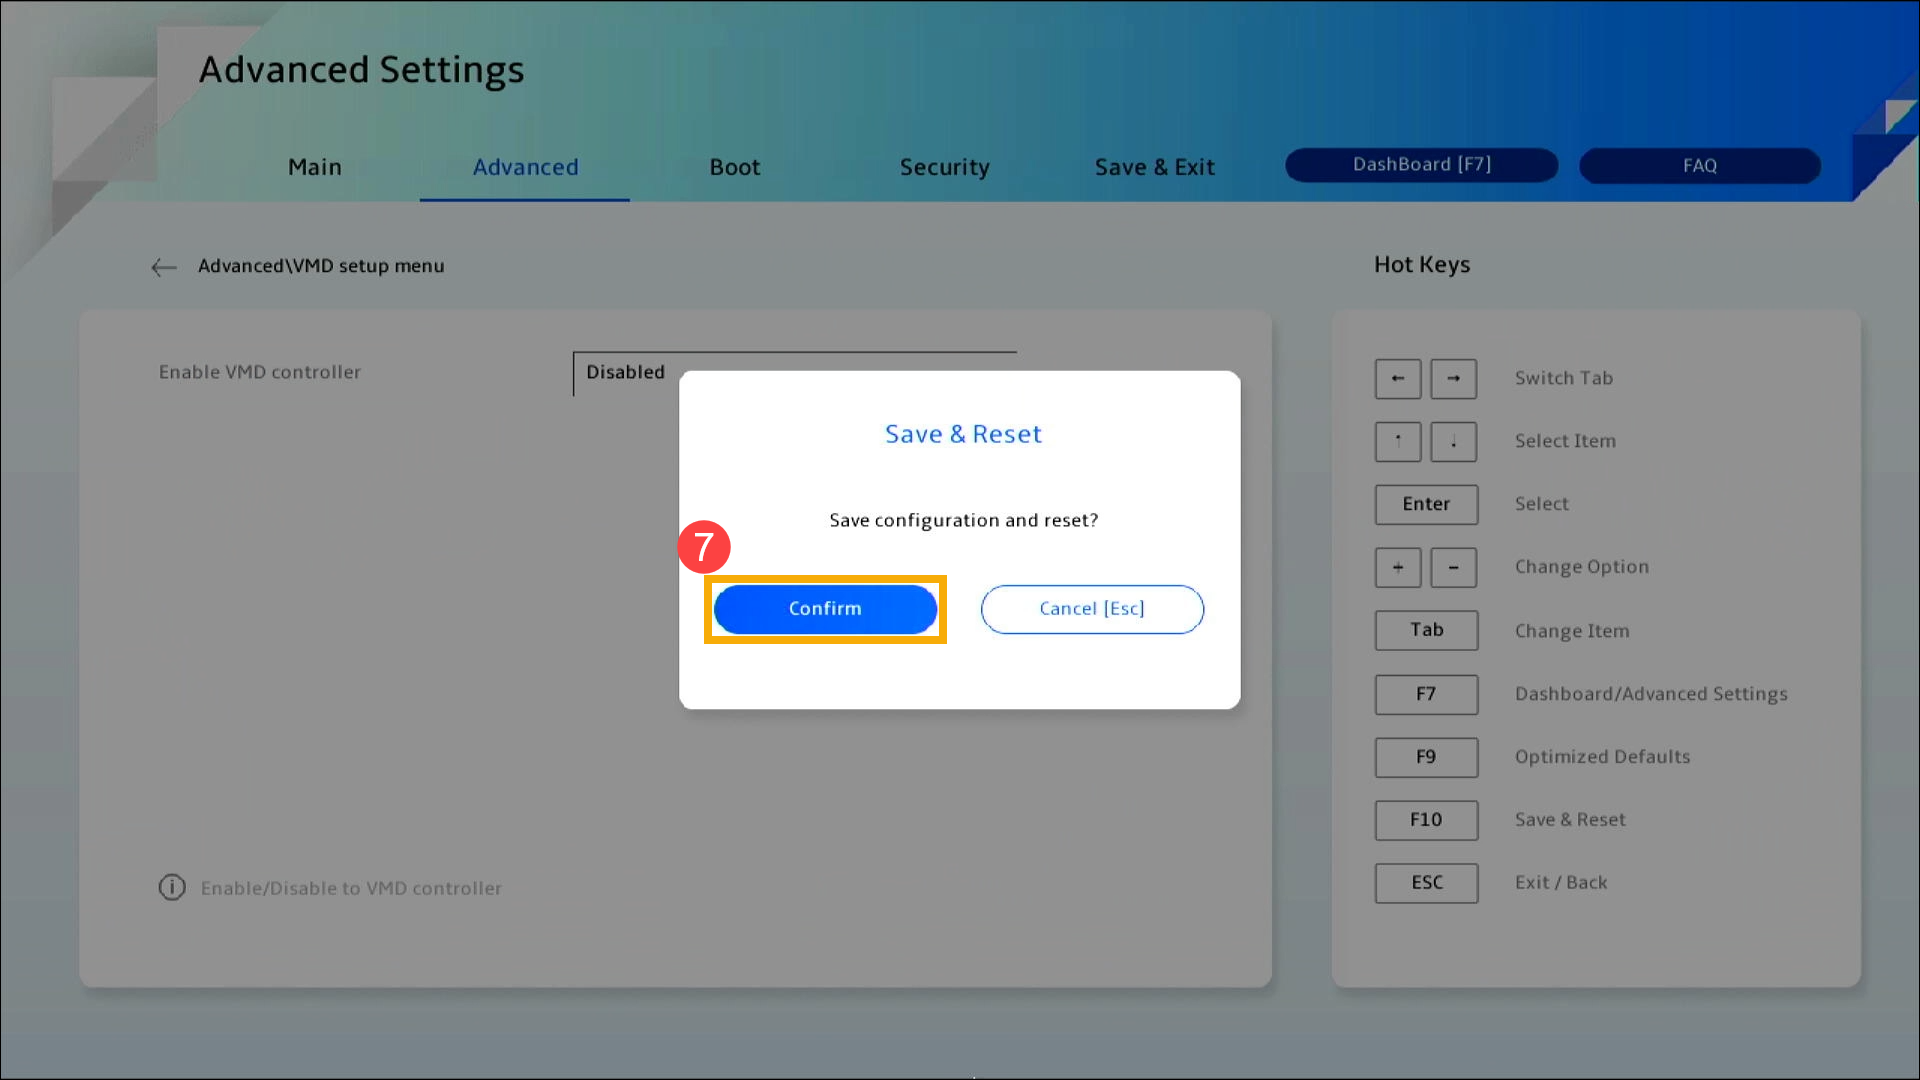
- Сохранить и выйти из настройки. Нажмите горячую клавишу [F10] и выберите [Ok] ⑦, устройство перезагрузится. После этого Вы сможете найти диски на этом устройстве при установке Windows 11/10. Здесь Вы можете узнать больше о том, как использовать установочный носитель для установки Windows 11/10.
Примечание: Вы также можете перейти на страницу «Сохранить и выйти» и выбрать опцию «Сохранить изменения и выйти».
Как отключить технологию VMD в MyASUS в интерфейсе UEFI
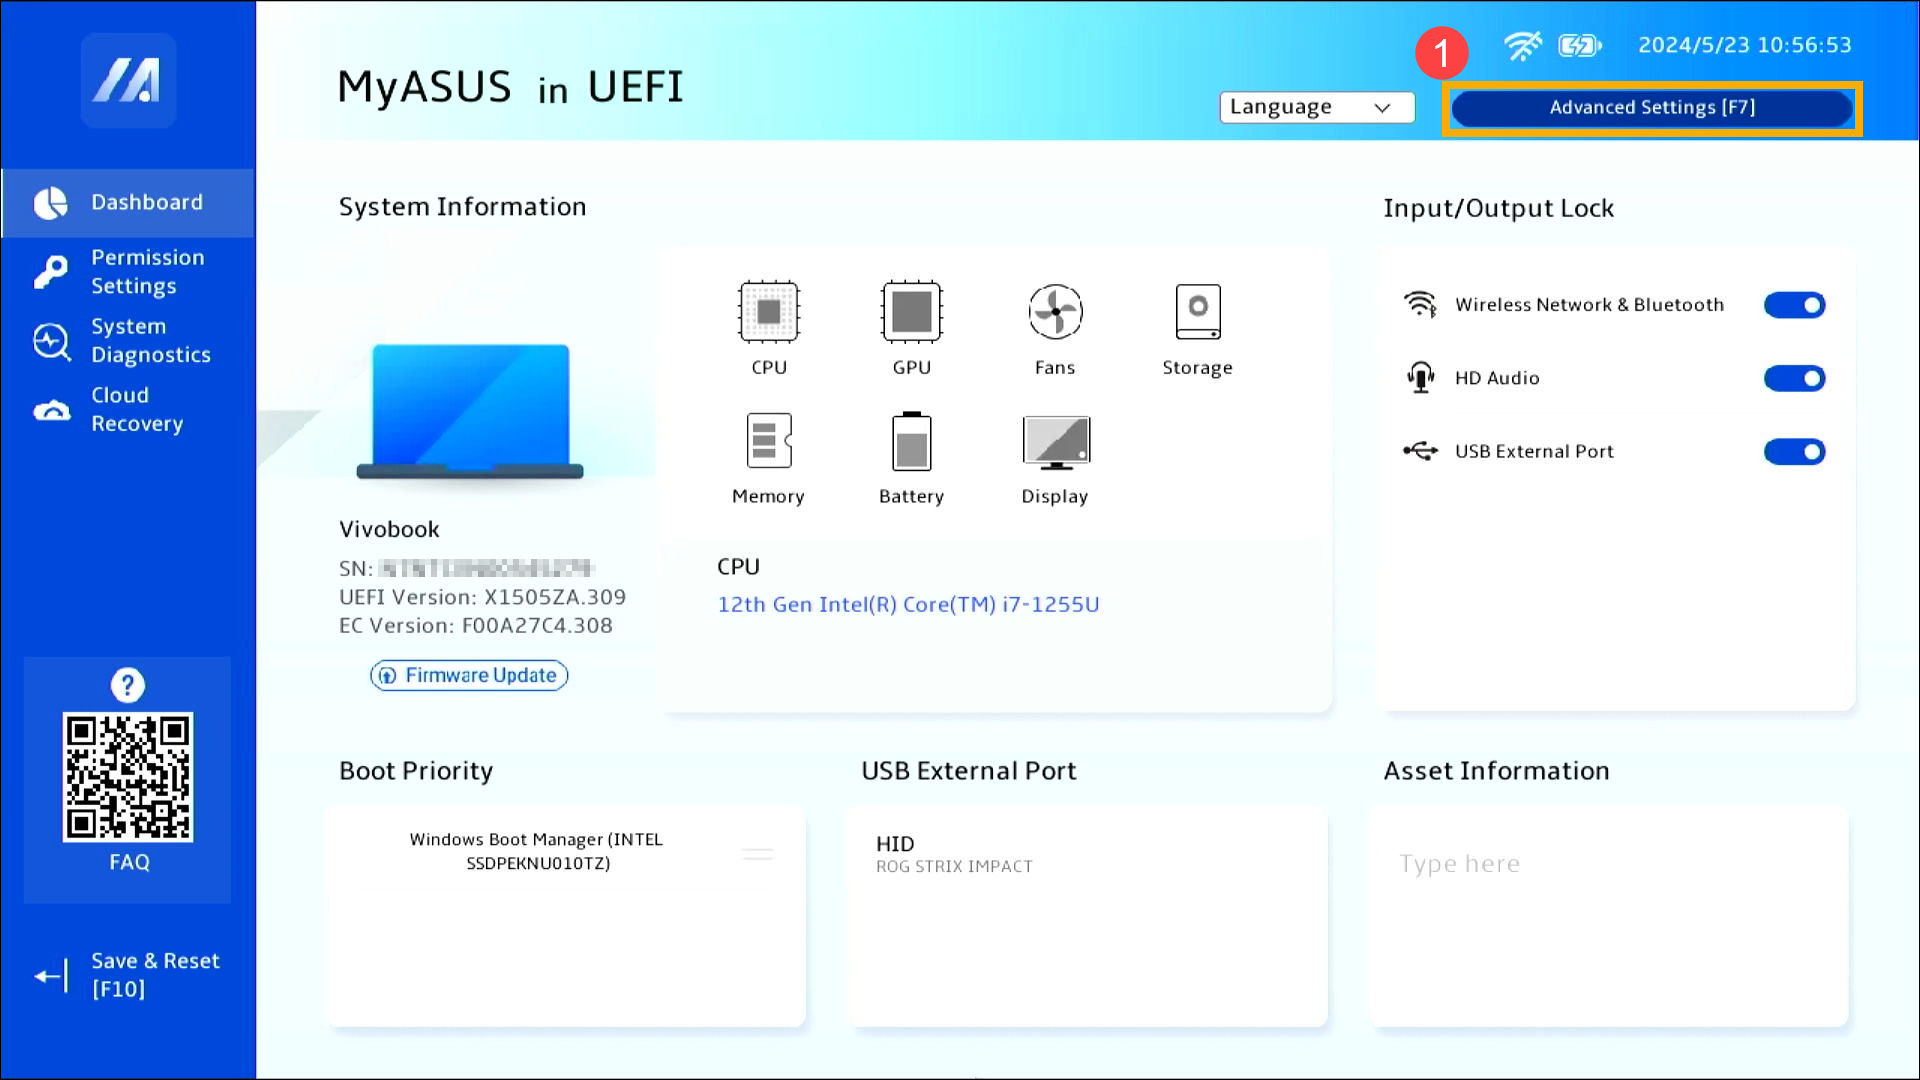
- После входа в конфигурацию BIOS нажмите горячую клавишу [F7] или используйте курсор, чтобы щелкнуть [Дополнительные параметры] ①, которые отобразятся на экране.
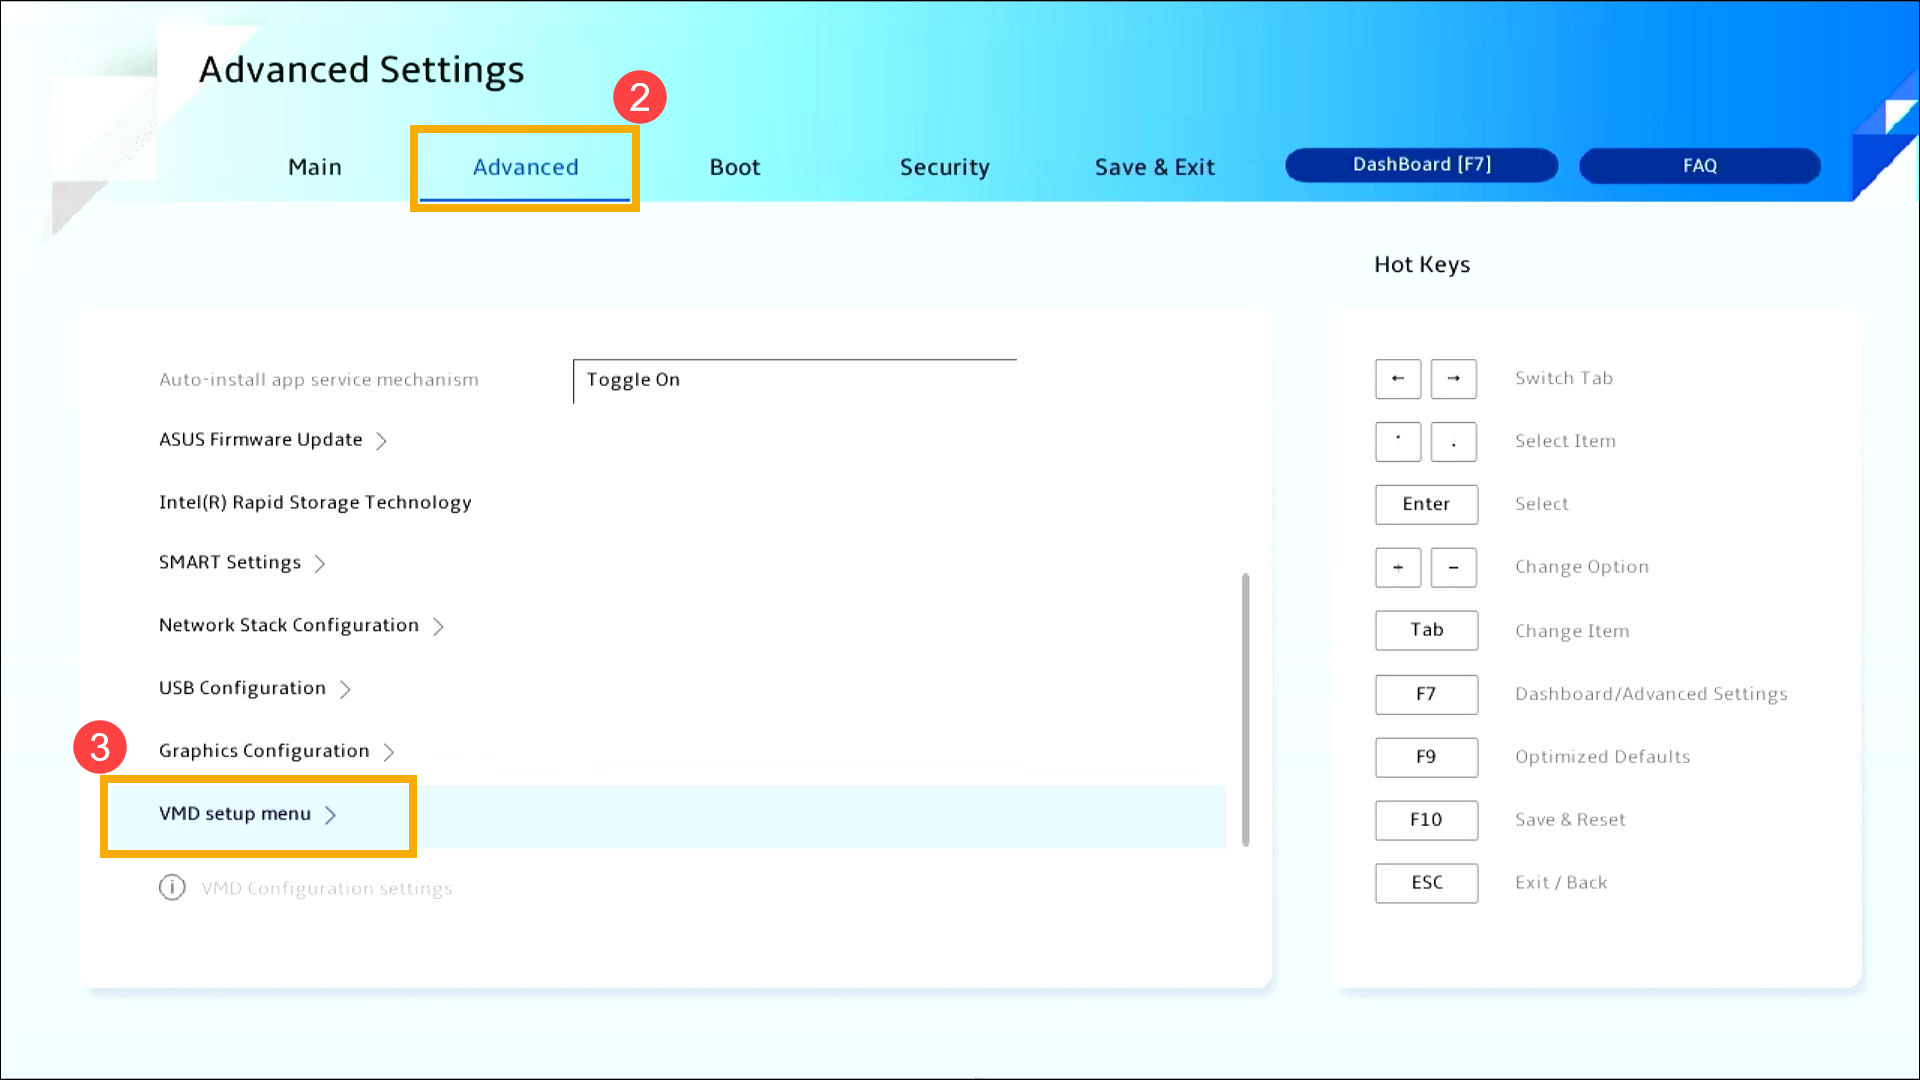
- Перейдите на экран [Дополнительно] ②, а затем выберите [Меню настройки VMD] ③.
- Выберите [Включить контроллер VMD] ④, а затем выберите [Отключено] ⑤.
- Нажмите [ОК] ⑥, чтобы отключить технологию Intel Volume Management Device (VMD).
- Сохранить и выйти из настройки. Нажмите горячую клавишу [F10] и выберите [Подтвердить] ⑦, устройство перезагрузится. После этого Вы сможете найти диски на этом устройстве при установке Windows 11/10. Здесь Вы можете узнать больше о том, как использовать установочный носитель для установки Windows 11/10.
Примечание: Вы также можете перейти на страницу «Сохранить и выйти» и выбрать опцию «Сохранить изменения и выйти».
Если вышеизложенные решения и информация не помогли решить Вашу проблему, обратитесь в центр обслуживания клиентов ASUS для получения дополнительной информации.
Эта информация была полезной?
Yes
No
- Приведенная выше информация может быть частично или полностью процитирована с внешних веб-сайтов или источников. Пожалуйста, обратитесь к информации на основе источника, который мы отметили. Пожалуйста, свяжитесь напрямую или спросите у источников, если есть какие-либо дополнительные вопросы, и обратите внимание, что ASUS не имеет отношения к данному контенту / услуге и не несет ответственности за него.
- Эта информация может не подходить для всех продуктов из той же категории / серии. Некоторые снимки экрана и операции могут отличаться от версий программного обеспечения.
- ASUS предоставляет вышеуказанную информацию только для справки. Если у вас есть какие-либо вопросы о содержании, пожалуйста, свяжитесь напрямую с поставщиком вышеуказанного продукта. Обратите внимание, что ASUS не несет ответственности за контент или услуги, предоставляемые вышеуказанным поставщиком продукта.