

Что за папка WindowsApps в Windows 10
Приложения, которые вы устанавливаете из магазина Windows Store, хранятся в отдельной папке с именем WindowsApps на системном разделе вашего компьютера. Не важно по каким причинам вы хотите получить к ней доступ, но просто так войти туда не получится. Поэтому нужна инструкция как открыть папку WindowsApps на Windows 10.
Как получить доступ к папке WindowsApps
Чтобы открыть папку WindowsApps в Windows 10 выполните следующие шаги:
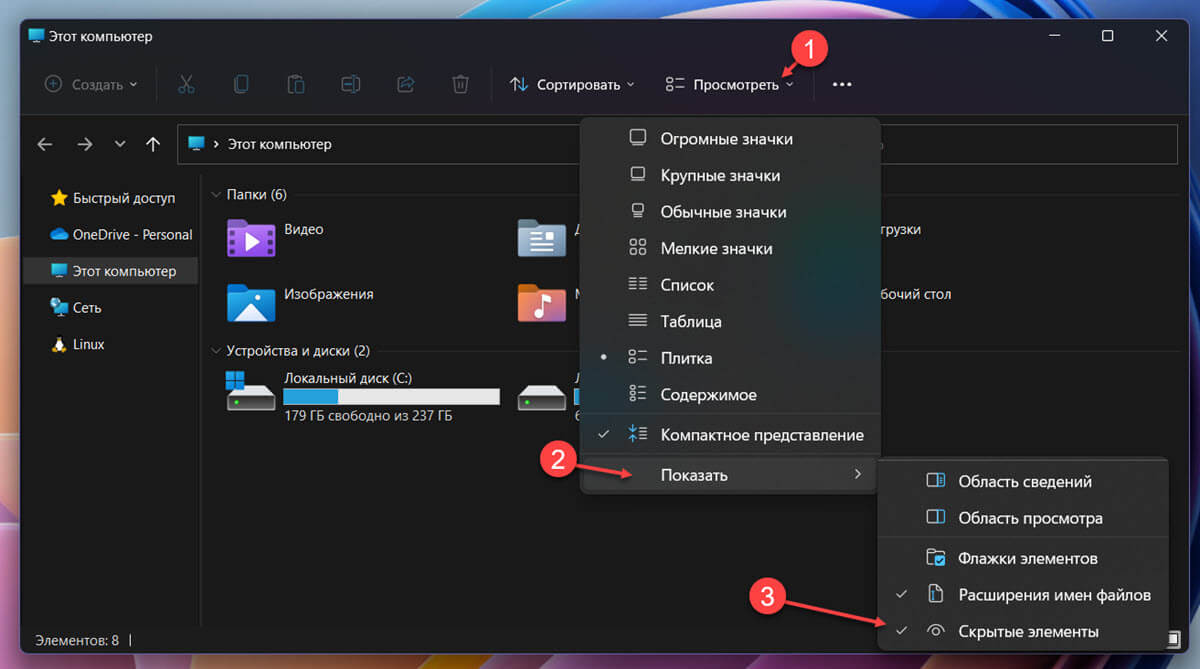
- Для начала вам надо включить отображение скрытых файлов и папок, поскольку по умолчанию WindowsApps скрыта.
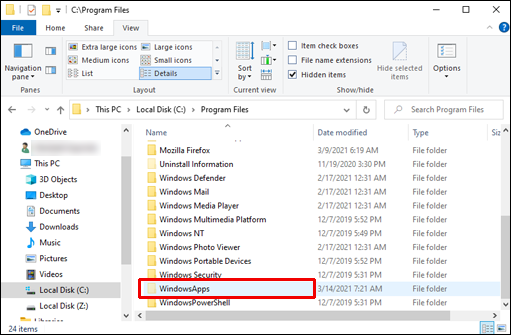
- Откройте ваш системный диск и на вкладке проводника Вид отметьте галочкой Скрытые объекты.

- Перейдите в папку Program Files – WindowsApps. Это и есть нужная вам директория. Правда открыть ее обычным способом не получится. Система сообщит, что не хватает прав и все равно откажется открывать папку, даже если вы нажмете Продолжить с правами администратора. Это значит, что вам необходимо получить полный доступ к папке WindowsApps.
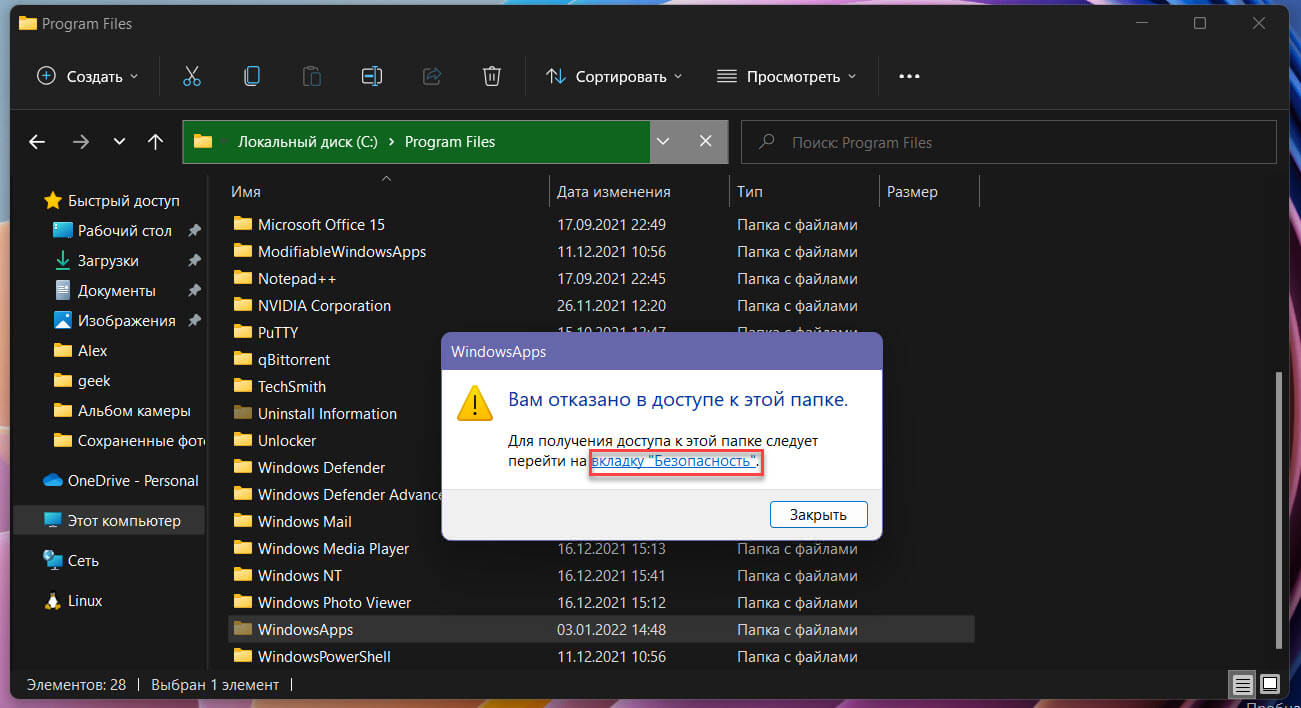
- На окне ошибки будет расположена ссылка на вкладку Безопасность. Кликните на нее, и вы попадете в раздел свойств безопасности папки WindowsApps.
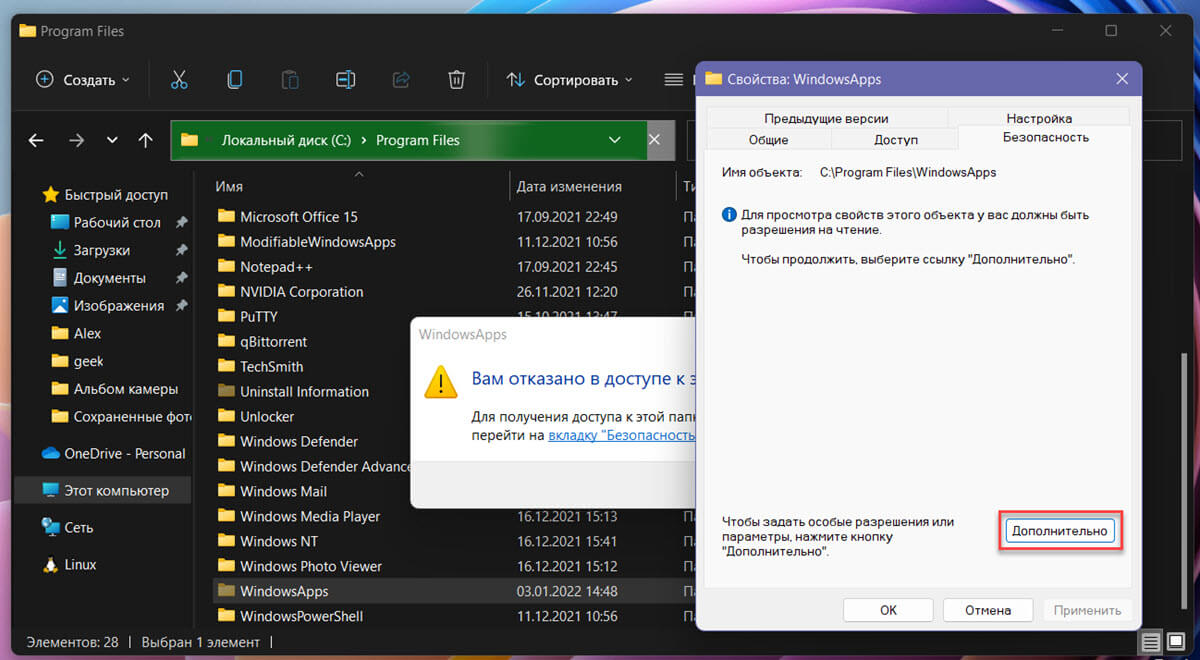
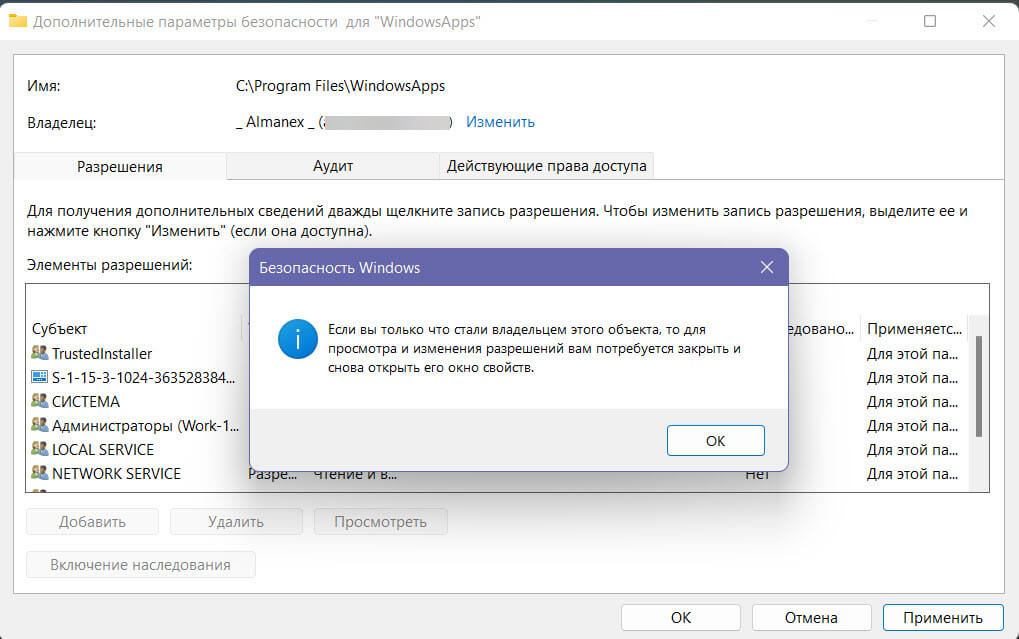
- Нажмите Дополнительно. Система откроет интерфейс управления дополнительными параметрами безопасности для выбранной вами папки.
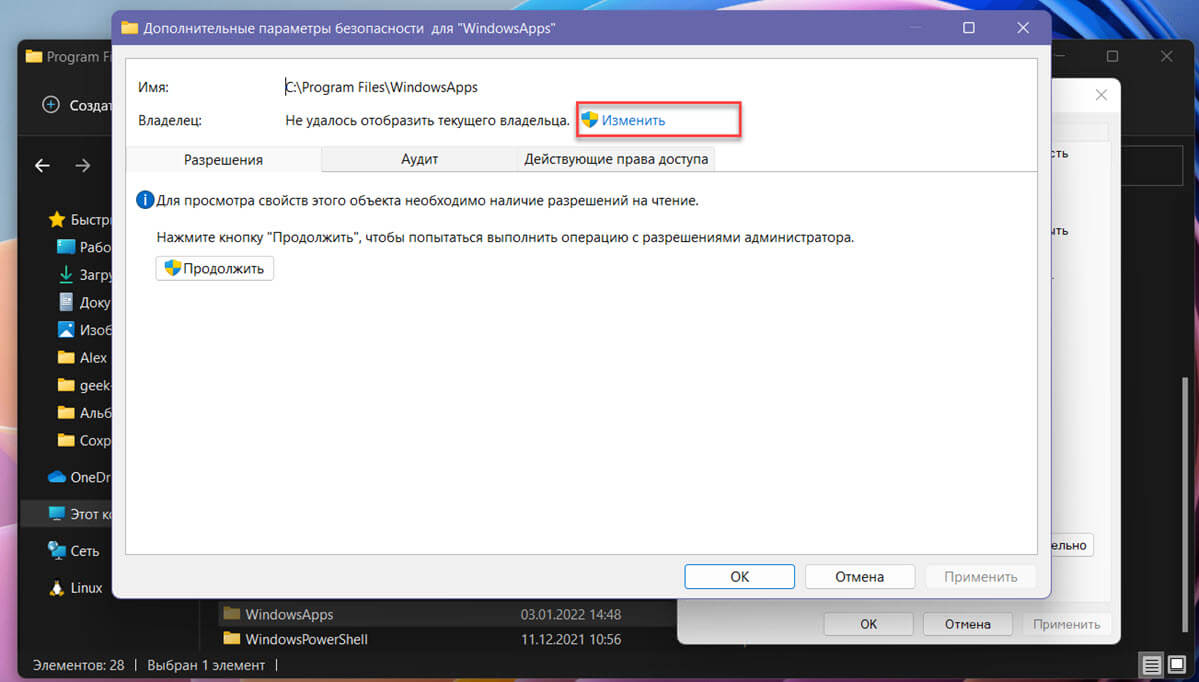
- Надо найти параметр Владелец и нажать Изменить.

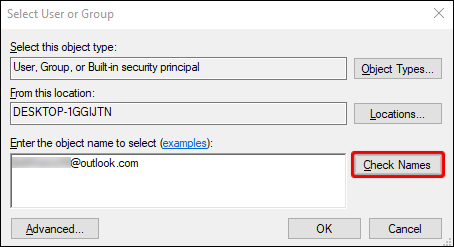
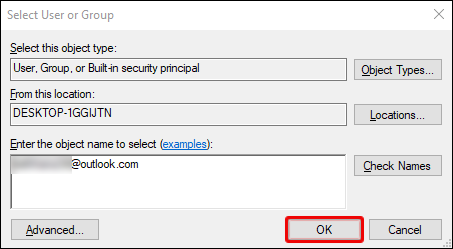
- На следующем окне вам надо прописать свою учетную запись в группу пользователей, которые будут иметь доступ к WindowsApps. Введите электронную почту своей учетной записи, которая используется вами. После этого нажмите Проверить имена в правой части окна. Система проверит совпадения. Если все верно, имя пользователя будет отображаться рядом с электронной почтой подчеркнутым текстом. Нажмите ок.

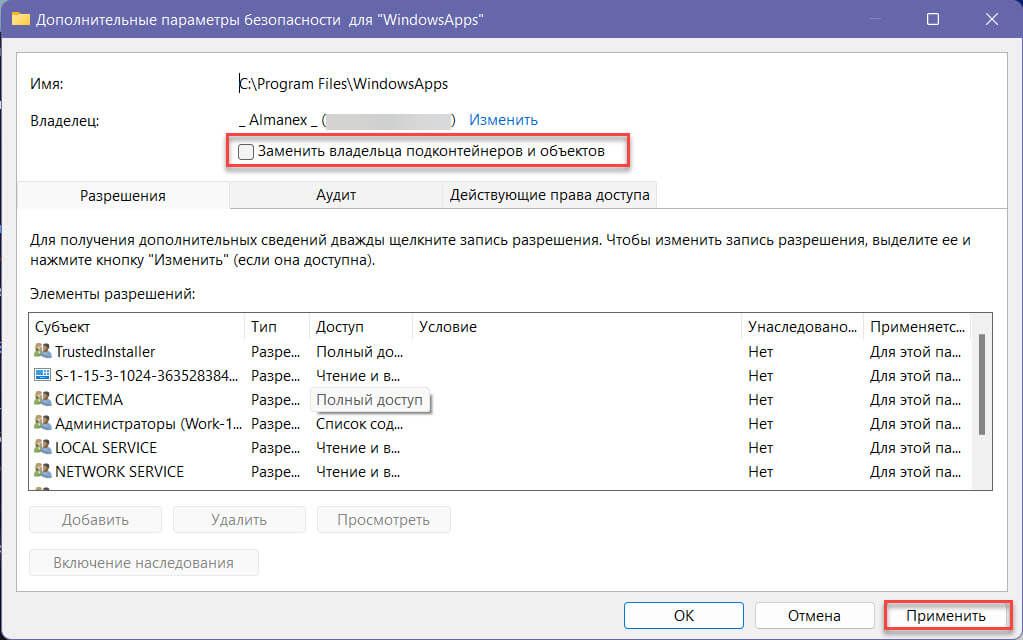
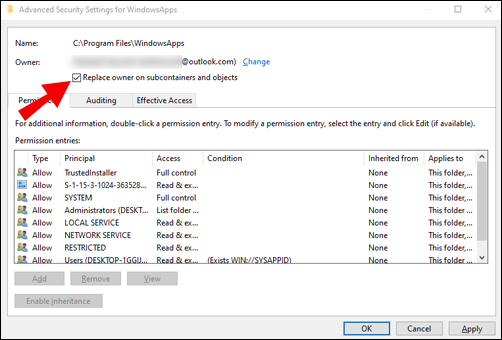
- Далее отметьте галочкой пункт Заменить владельца подконтейнеров и объектов. Нажмите ок. Теперь система изменит атрибуты всех вложенных в папку WindowsApps файлов. Это может занять некоторое время. Все зависит от количества установленных приложений.
- По завершению процедуры вы можете закрыть все окна и снова попробовать пробиться в папку WindowsApps. Система снова должна отобразить ошибку доступа, только в этот раз нажатие Продолжить с правами администратора наконец пустит вас внутрь.


Далее вы можете делать все что пожелаете со всеми файлами приложений для Windows 10. Не забывайте, что увлекаться особо не стоит, дабы не повредить свои данные или приложения.
Удалить папку WindowsApp
Как мы говорили выше, WindowsApps необходима для хранения приложений из магазина Windows Store. Также в ней располагаются и системные приложения. Мы не рекомендуем удалять эту папку, так как вы можете получить нерабочие меню пуск, поиск и различные компоненты системы. Если вы все же удалили папку WindowsApps, не сделали ее резервную копию и хотите ее восстановить, вам придется переустановить Windows 10 полностью.
Вам нужен доступ к файлам приложения, установленного из магазина Microsoft Store? Вот краткое руководство, которое поможет вам в этом процессе.
Приложения Microsoft Store работают как любое другое приложение в вашей системе. Однако при установке они хранятся в отдельной директории. По умолчанию место установки приложений Microsoft Store не отображается.
Приложения, загруженные из Microsoft Store, сохраняются на диске, где установлена Windows в каталоге «Program Files» папка «WindowsApps». Эта папка по умолчанию скрыта, но, при желании, можно легко получить доступ к ее содержимому.
Обычному пользователю может показаться, что включение отображения скрытой папки может нанести вред системным файлам, но это не так; многие папки скрыты, потому что содержат техническую информацию, которая не нужна обычному пользователю, либо содержат отчеты о сбоях или другие диагностические данные, которые опять же не очень полезны если вы не продвинутый пользователь.
Как в Windows 11 открыть папку «WindowsApps» и стать ее владельцем
Шаг 1: Чтобы отобразить папку «WindowsApps», содержащую установочные файлы приложений Microsoft Store, откройте «Этот компьютер», в проводнике Windows, вы можете использовать сочетание клавиш Win E.
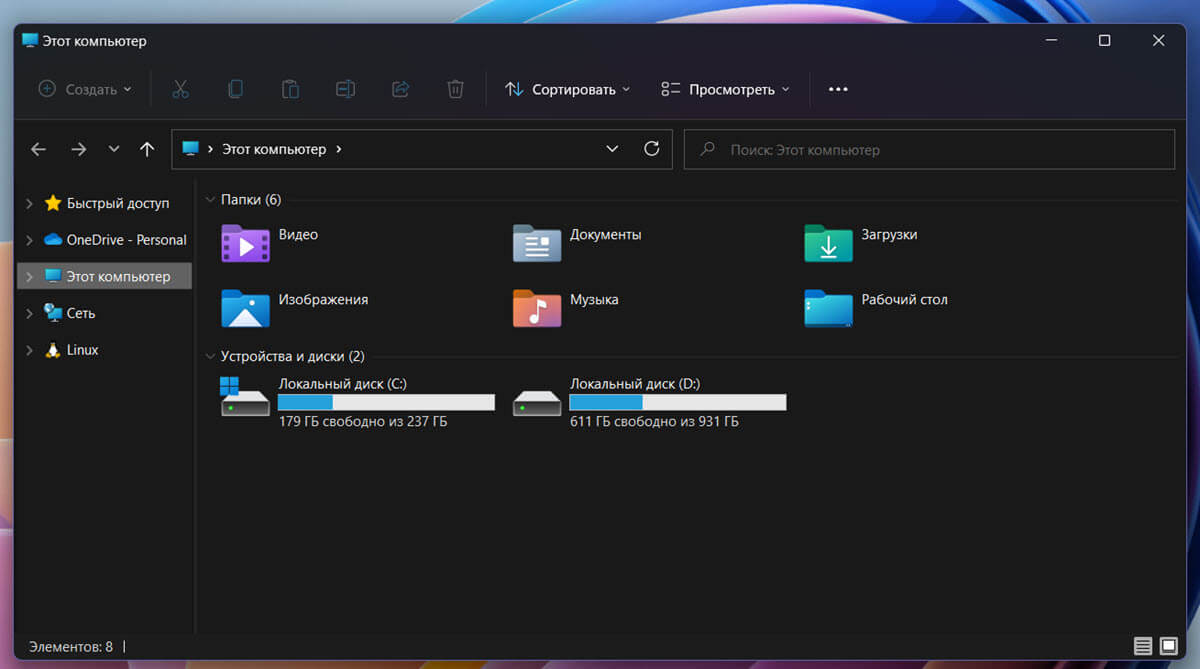
Шаг 2: Затем дважды кликните диск, на котором установлена Windows 11, чтобы открыть его.
Шаг 3: В следующем окне, найдите в списке папку «Program Files» и дважды кликните по ней, чтобы открыть.
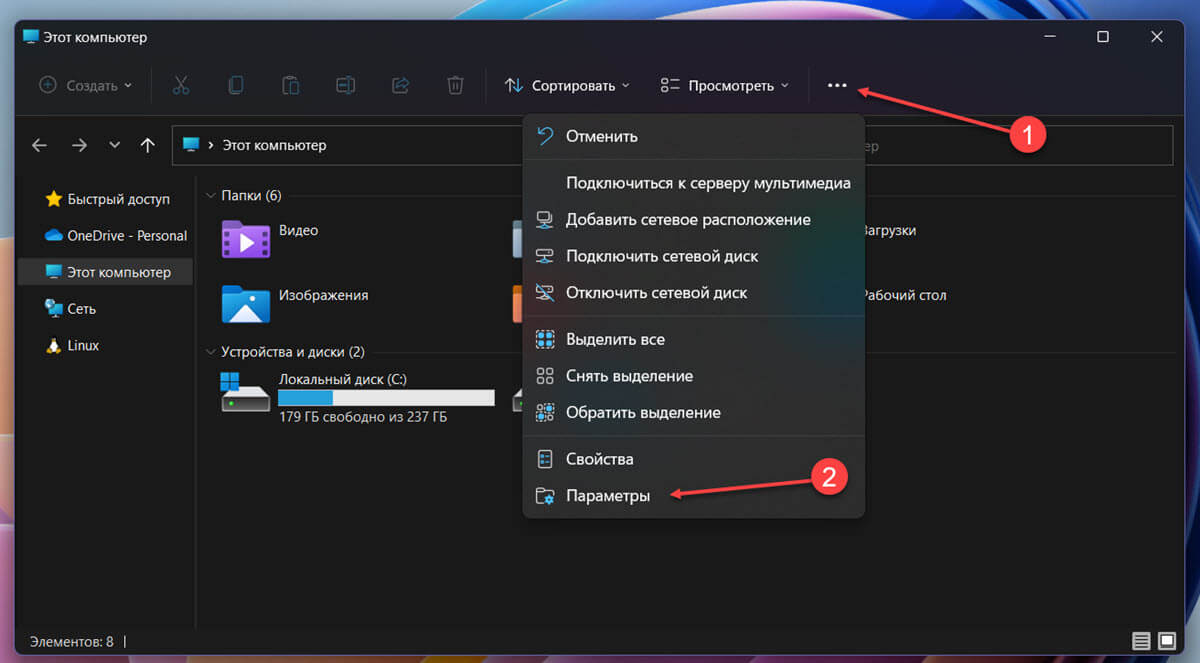
Шаг 4: После этого в меню окна проводника нажмите значок с многоточием (три горизонтальные точки). Затем в контекстном меню выберите опцию «Параметры». На вашем экране откроется отдельное окно.
Шаг 5: В отдельно открывшемся окне перейдите на вкладку «Вид» и найдите параметр «Скрытые файлы и папки» в разделе «Дополнительные параметры:». Затем установите флажок перед строкой «Показывать скрытые файлы, папки и диски».
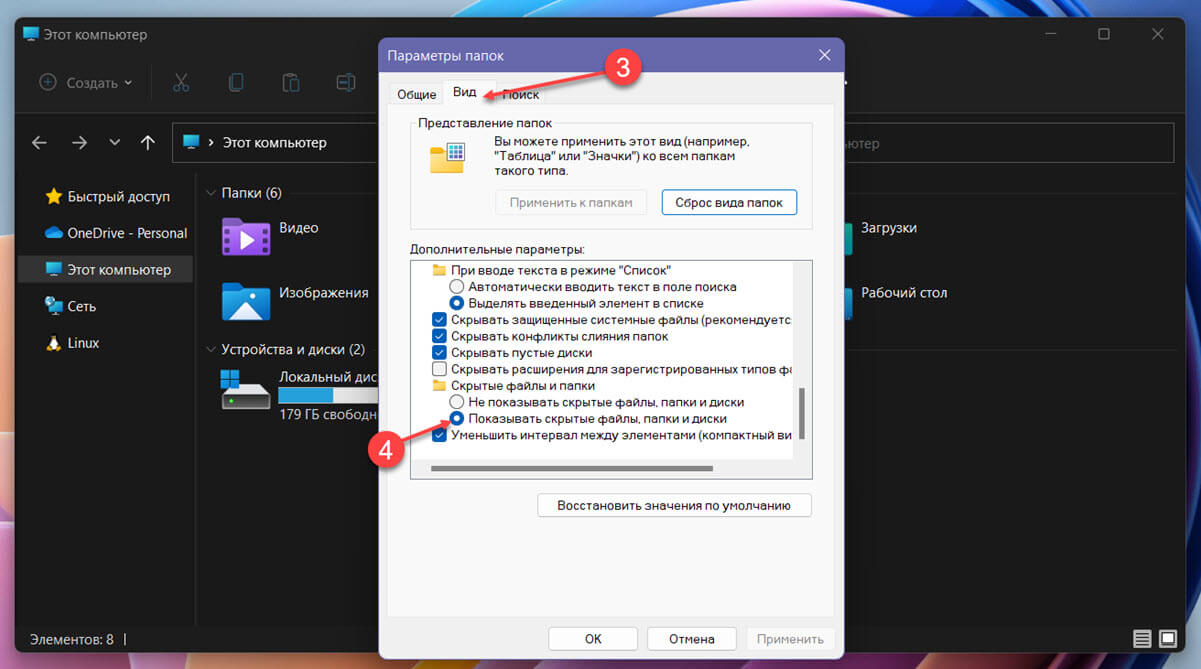
Шаг 6: Нажмите кнопку «Применить», чтобы сохранить изменения, а затем нажмите кнопку «ОК», чтобы закрыть окно.
Примечание: В качестве альтернативы есть более простой способ показать скрытые папки. В меню проводника выберите опцию «Просмотреть». Затем наведите в контекстном меню указатель мыши на опцию «Показать» и нажмите на опцию «Скрытые элементы».
Шаг 7: После этого найдите папку «WindowsApps» и дважды кликните по ней, чтобы продолжить.
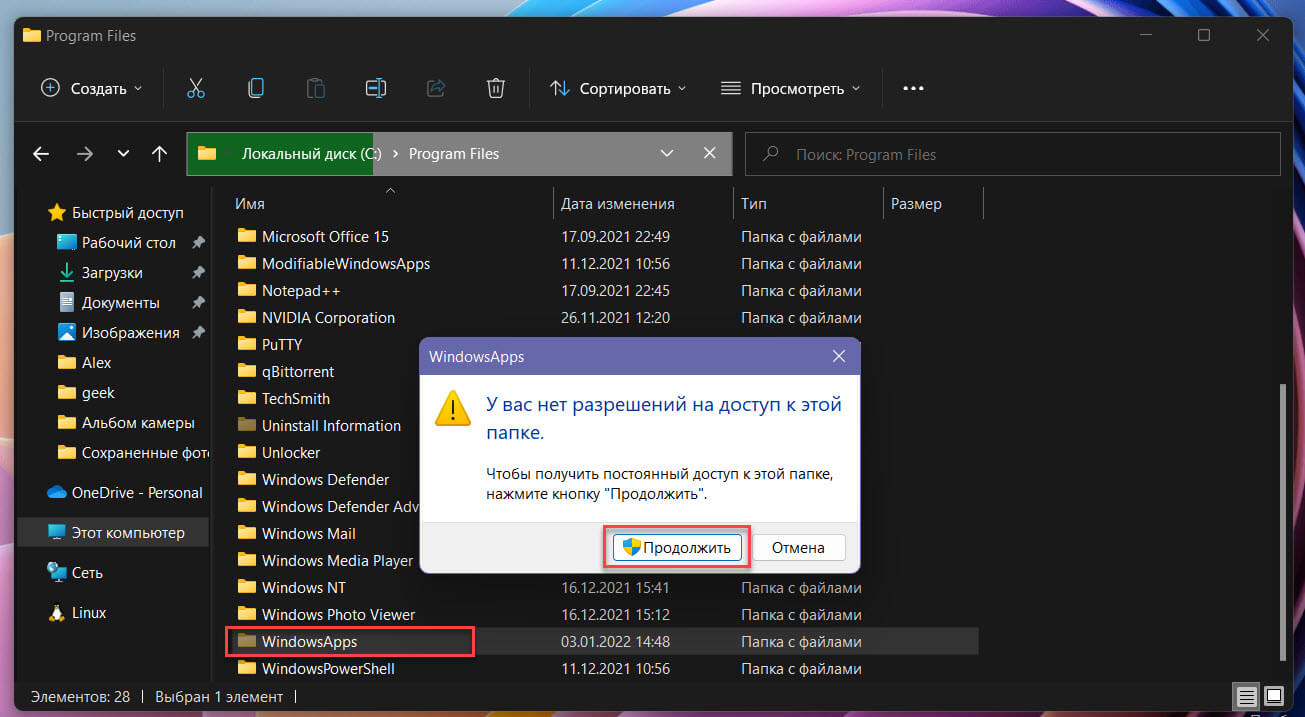
Шаг 8: На вашем экране появится сообщение о том, что у вас нет разрешения на доступ к папке. Нажмите в приглашении кнопку «Продолжить».
Шаг 9: Снова появляется уведомление о том, что вам отказано в доступе; нажмите ссылку (вкладку «Безопасность»), чтобы продолжить. На вашем экране откроется отдельное окно.
Шаг 10: После этого в окне «Свойства WindowsApps» нажмите кнопку «Дополнительно», чтобы настроить разрешения для доступа к папке. Это снова откроет отдельное окно на вашем экране.
Шаг 11: Затем в «Расширенных настройках безопасности» нажмите кнопку «Изменить» рядом с меткой «Владелец». Откроется окно «Выбор пользователь или группа».
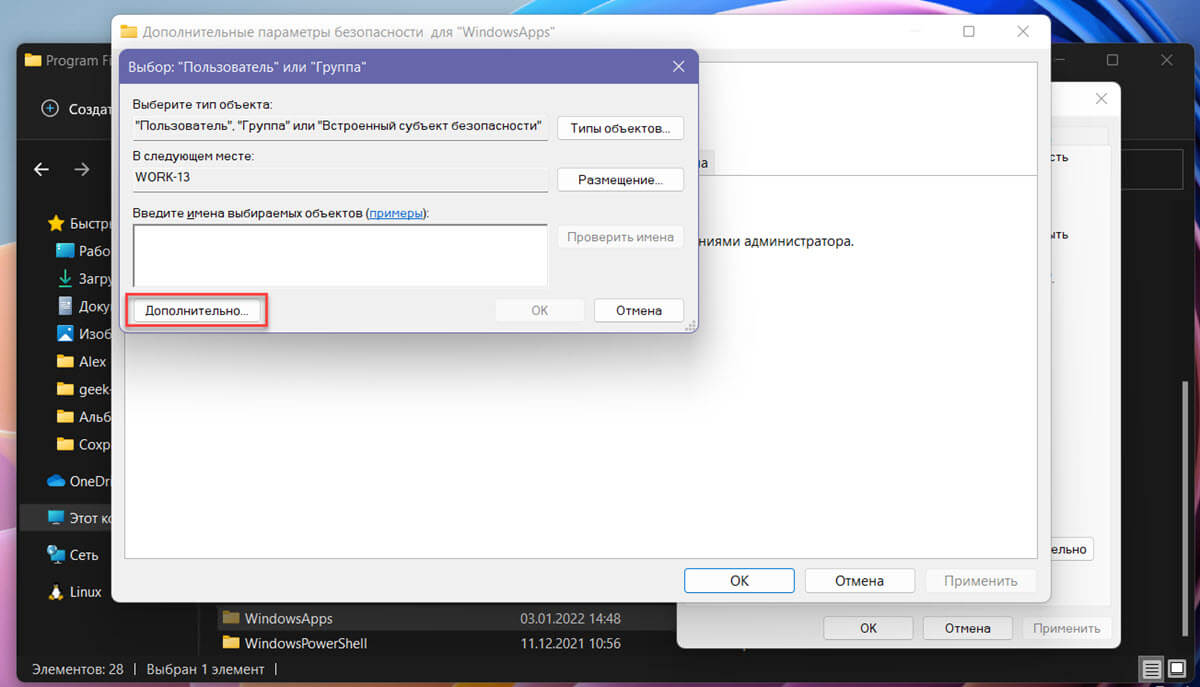
Шаг 12: В окне «Выбор пользователь или группа» нажмите кнопку «Дополнительно…» в нижнем левом углу окна. Это действие снова вызовет отдельное окно.
Шаг 13: Теперь в отдельно открытом окне нажмите кнопку «Поиск», чтобы продолжить. Это заполнит список в разделе «Результаты поиска» ниже.
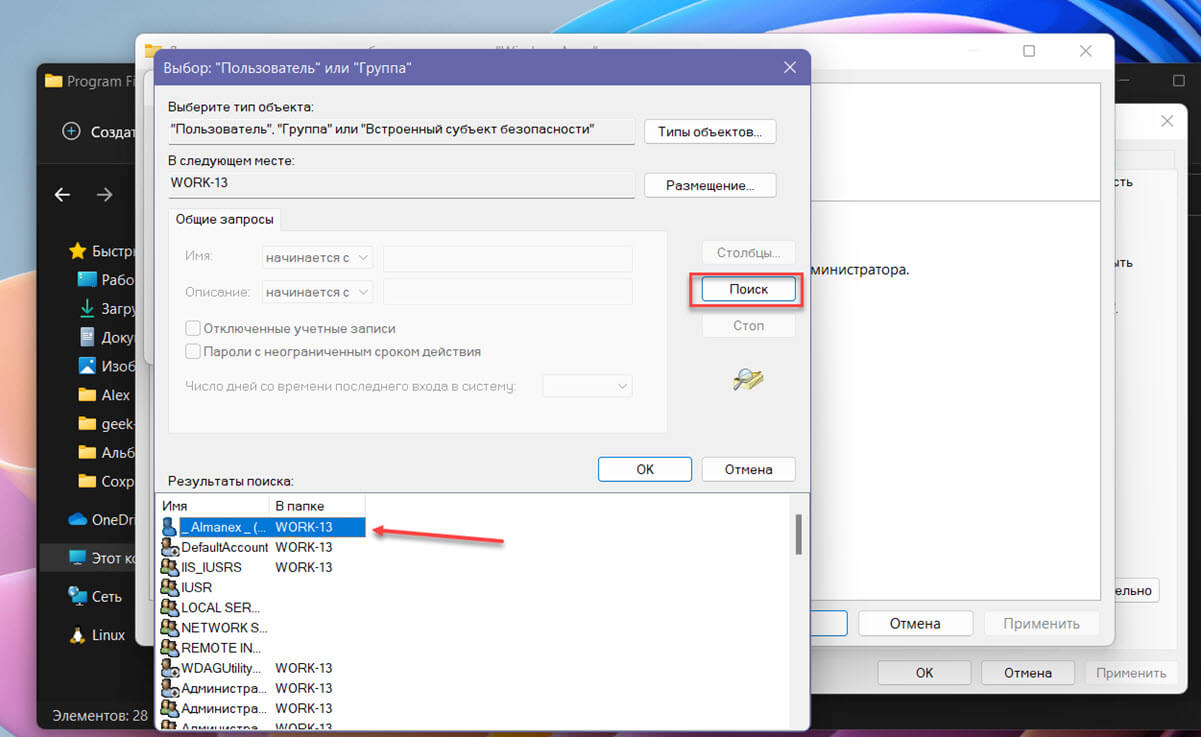
Шаг 14: После этого выберите свое имя пользователя / имя учетной записи из списка и нажмите кнопку «ОК», чтобы выбрать пользователя и закрыть окно.
Шаг 15: Затем в разделе «Выбор пользователь или группа» еще раз нажмите кнопку «ОК», чтобы сменить владельца папки «WindowsApps» и закрыть окно.

Шаг 16: Теперь в окне «Дополнительные параметры безопасности» для WindowsApps вы сможете подтвердить смену владельца папки. При необходимости установите флажок для опции «Заменить владельца подконтейнеров и объектов». Нажмите кнопку «Применить», чтобы сохранить изменения, и нажмите кнопку «ОК», чтобы закрыть окно.
Вы увидите уведомление о том что вы стали владельцем этого объекта.
Шаг 17: Все, Вы справились, дважды кликните папку «WindowsApps», и она откроется как обычная папка.
Рекомендуем:
- Как восстановить владельца TrustedInstaller в Windows 11 \ 10
- Как получить полный доступ к конкретной записи реестра для редактирования или удаления
,
By default Windows use the «C:\Program Files\WindowsApps» folder, to store all the installation files of all modern installed apps. The «WindowsApps» folder is hidden and by default it is not accessible to users and whenever you try to view its contents, you get a message that says «You don’t currently have permission to access this folder«.
On the other hand, it is good to know that all settings and data for every installed Store app are saved under this location on your computer: «%USERPROFILE%\AppData\Local\Packages\PackageFullName\». The «AppData» folder is also hidden and you have to enable the Hidden File View to see its contents.
Summary:
- All Windows Store Apps (are stored at the following location on your computer:
- %ProgramFiles%\WindowsApps (usually: C:\Program Files\WindowsApps).
- All Windows Store Apps Data files, for each user, are stored at this location:
- %USERPROFILE%\AppData\Local\Packages (usually: C:\Users\%UserName%\AppData\Local\Packages\
This tutorial contains detailed instructions on how to access the «WindowsApps» folder in order to be able to explore or modify its contents.
How to Gain Access in «C:\Program Files\WindowsApps» folder.
Step 1. Enable Hidden Files View
The «C:\Program Files\WindowsApps\» folder is hidden, so you first have to enable the hidden files view. To do that:
1. Right click on the Start button and navigate to Control Panel.
2. Set the View by to: Small icons.

3. Open File Explorer Options (Folder Options in Windows 8 &7).

3. At View tab, check the Show hidden files, folders and drives setting and hit OK.
Step 2. Backup the current permissions of WindowsApps folder.
Before you continue to change the default permissions to «WindowsApps» folder, first proceed to backup the current default permissions of the folder, in case something goes wrong.
To backup the current permissions of «C:\Program Files\WindowsApps\».
1. Right-click on the Start button and choose Command Prompt (Admin).
2. At command prompt window, type (copy-paste) the following command:
- icacls «%ProgramFiles%\WindowsApps» /save WindowsApps.acl
* The above command will save all current permissions of «C:\ProgramsFiles\WindowsApps» folder to a file named «WindowsApps.acl» that will be stored under the C:\Windows\System32\ folder.
* Note: If something goes wrong after changing permissions (step-3), you can always restore the default permissions by giving this command in command prompt (admin) window:
- icacls «%ProgramFiles%» /restore WindowsApps.acl
Step 3. Gain Access to «C:\Program Files\WindowsApps\».
This step contains two (2) parts. At the first part you can find detailed instructions on how to get «Read Only» access rights to «WindowsApps» folder (e.g. in case that you just want to view its contents) and at the second part you can find instructions on how to get «Full Access» rights to the «WindowsApps» folder (e.g. in case that you want to modify or delete its contents).
Part 1. How to gain Read Only Access to WindowsApps folder.
Part 2. How to gain Full Access to WindowsApps folder.
Part 1.How to gain Read Only Access rights to ‘C:\Program Files\WindowsApps’ folder.
1. Open Windows Explorer and double click to open the «C:\Program Files» folder.
2. Then double click at WindowsApps folder and click Continue.
3. At the following window, click the security tab link.
4. Select the Security tab and click Advanced.
5. Click the Change link, at Owner line.

6. If you ‘re logged with an administrator account, type your account username (e.g. «Admin») to the ‘Enter the object name to select’ box or type «Administrators» and click OK.

7. Check the «Replace owner on subcontainers and objects» checkbox and click OK again to close security settings.

8. Now try to access the WindowsApps folder again, but this time click Continue when prompted and you ‘re done!
Part 2.How to gain Full Access rights to ‘C:\Program Files\WindowsApps’ folder.
1. Right-click on the Start button and choose Command Prompt (Admin).
2. At command prompt window type the following command & hit Enter.
- takeown /F «%ProgramFiles%\WindowsApps»
* Note: The above command will assign the ownership of the folder «C:\ProgramFiles\WindowsApps» to the current logged on user.
3. Next give this command:
- takeown /F «%ProgramFiles%\WindowsApps» /r /d y
* Note: The above command will assign the ownership of the «C:\ProgramFiles\WindowsApps» sub folders and files to the current logged on user.
4. Next give this command:
- icacls «%ProgramFiles%\WindowsApps» /grant Administrators:F
*Note: The above command will assign Full Control permissions to the folder «C:\ProgramFiles\WindowsApps» for all Administrators users.
5. Next give this command:
- icacls «%ProgramFiles%\WindowsApps» /grant Administrators:F /t
*Note: The above command will assign Full Control permissions to the folder «C:\ProgramFiles\WindowsApps» and its sub folders and files to all Administrators users.
6. Finally assign the ownership of «WindowsApps» folder, back to the TrustedInstaller account, which is the Default owner of the folder.
- icacls «%ProgramFiles%\WindowsApps» /setowner «NT Service\TrustedInstaller»
7. From now on you should have full access rights to the «WindowsApps» folder!
That’s it! Let me know if this guide has helped you by leaving your comment about your experience. Please like and share this guide to help others.
If this article was useful for you, please consider supporting us by making a donation. Even $1 can a make a huge difference for us in our effort to continue to help others while keeping this site free:
- Author
- Recent Posts
Konstantinos is the founder and administrator of Wintips.org. Since 1995 he works and provides IT support as a computer and network expert to individuals and large companies. He is specialized in solving problems related to Windows or other Microsoft products (Windows Server, Office, Microsoft 365, etc.).
You need to access the WindowsApps folder if you wish to take a backup of your Windows Apps or clear some space from the computer hard disk drive (HDD).
The Microsoft Windows operating system comes with some restricted and hidden folders that usually contain files that help run Windows 11 or 10 smoothly. Disturbing these files could result in system errors or complete Windows OS malfunction.
Some of these folders are Program Data, System32, AppData, WindowsApps, etc. Among these folders, WindowsApps is of particular interest since this drive use ups a lot of disk storage when you do not restrict app installations from Windows Store.
Let’s learn more about the WindowsApps folder, its purpose, and how to access the WindowsApps folder should you need to take backup or clear some disk space.
What Is the WindowsApps Folder?
The WindowsApps folder is available in Program Files of your Windows 10 or 11 OS installation directory and stores app files for Windows Apps. Since Windows 8 OS, Microsoft introduced a set of apps that function differently than conventional software.
In the past, Microsoft called these apps Metro-style apps, Windows Store apps, Universal Windows Platform (UWP) apps, and now simply Windows apps. Windows 10 or 11 OS stores Windows Apps and other UWP apps like Your Phone in the WindowsApps folder.

The folder is a highly secure location within your Windows OS installation directory and is protected by multiple layers of security. First of all, you will not see the folder unless you unhide it.
Secondly, normal user and system administrator user accounts do not have the necessary files access rights to access the folder or check its size, subfolders, files, etc. Microsoft reserved the necessary rights for the TrustedInstaller user account, which is a system account.
TrustedInstaller controls write and read access of the WindowsApps folder so that Windows Apps can smoothly function without any intervention from the user.
What Is the Purpose of the WindowsApps Folder?
WindowsApps folder is the safe house for all Windows apps that you install or come with the factory version of your Windows 10 or 11 OS copy. Here are the use cases of this folder:
Stores UWP Packages
Like the Program Files and Program Files (x86) for usual Windows PC software, WindowsApps is the default file location for all Windows apps or UWP packages. However, the subfolder naming convention is different than the Program Files.
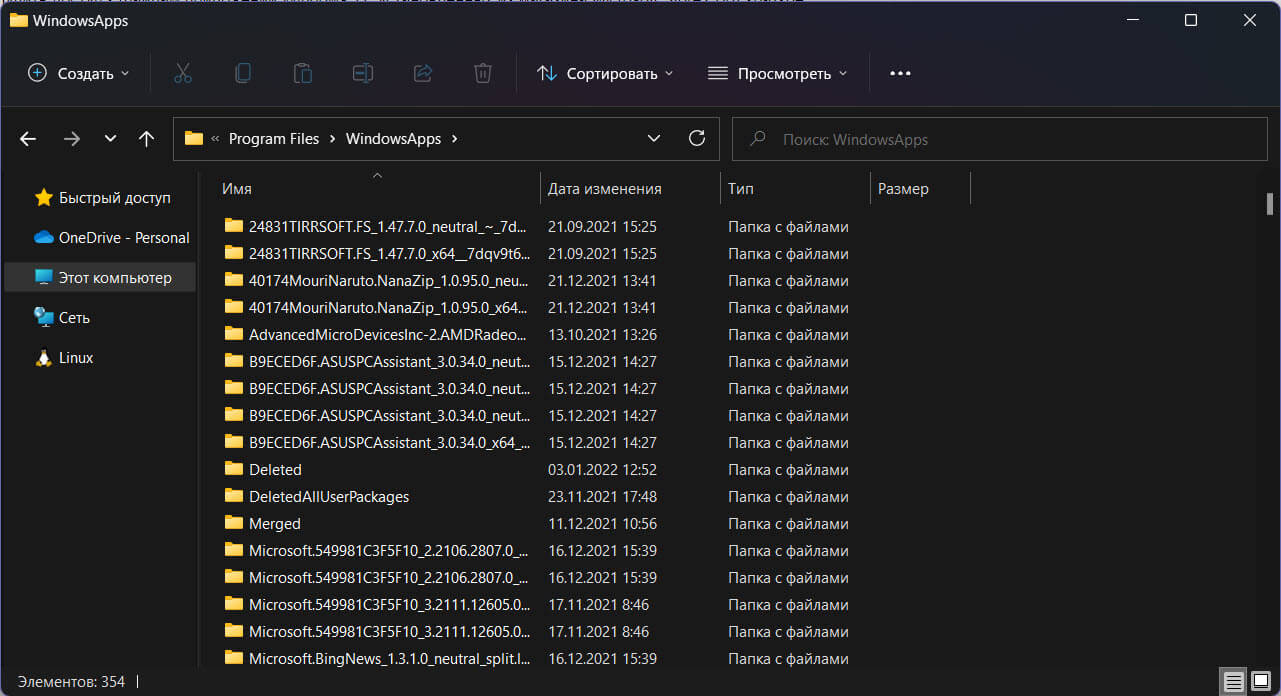
For example, the Windows apps Netflix will have multiple folders with the following naming: app name, version number, CPU architecture (x64), and the Microsoft Store ID. More than one folder exists to differentiate the same app with different CPU architectures.
Works as Windows Apps Sandbox
Conventional Windows software like a data recovery tool or computer troubleshooter has the power to override system values and make visible changes in the Windows OS ecosystem. That’s why Windows features like User Account Control (UAC), user account rights, and Windows Security exists to keep them in check.

However, Windows apps can not make huge changes in the operating system. Microsoft achieved this by keeping these apps sandboxed inside the WindowsApps folder. These apps cannot themselves access computer hardware or data and need permissions in all the steps.
User Convenience
Most Windows apps do not come with executable files like the traditional software. Instead, they are a combination of automatic command prompt scripts and Java programs. Users may find it challenging to run such apps.
Also, users may make irreversible changes to these system files unknowingly if they can access the Windows apps files. Therefore, Microsoft Windows shows you app icons in the Start Menu and hides all the back-end data for safety and convenience.
How to Access WindowsApps Folder
There are multiple ways to access the WindowsApps folder. The steps are identical for both Windows 10 and Windows 11 operating systems.
Using the Task Manager Program
Accessing the WindowsApps folder for a specific app from the Task Manager program is the simplest way. It also takes less effort. However, you must run the target UWP (Universal Windows Platform) or Windows app in the background to access its folder. Here are the quick steps that you can follow on your Windows 11 pr 10 PCs:
Step #1: Run the UWP app or Windows app for which you want to access the WindowsApps folder. In this tutorial, it is the WhatsApp app. You can try this or try others like Netflix, Instagram, Skype, etc.
Step #2: To launch the Task Manager program, you can press this shortcut key: Ctrl+Shift+Esc. Alternatively, you can find the Task Manager folder by searching the Search Bar.

Step #3: Look for the app’s process in the Task Manager by scrolling the list or sorting it according to their names.
Step #4: Click on the drop-down arrow beside the app’s name to expand its processes. If there is no drop-down arrow, move on to the next step.

Step #5: Right-click on the app’s icon and select Open file location from the context menu that follows.
Step #6: Windows Explorer will take you to the sandboxed WindowsApps subfolder for the target app. In this case, the WhatsApp app.

Accessing the WindowsApps folder through the Task Manager gives you viewing permission. For example, you can go through all the files and folders of the UWP app and check their size. This step is good if you want to take a backup of the app’s files and folders.
The process does not let you delete or move files from the WindowsApps folder. To gain write and delete access, you need to follow any of the below-mentioned steps.
Using Windows File Explorer
The most practical and user-friendly way of gaining access into the WindowsApps folder is through the Windows File Explorer program. This process gives you a full read and write access to this folder. Thus, you can make any kind of change that you want.
This process is also reversible, should you need to restrict the access to the WindowsApps folder after making the changes you need. The File Explorer-based method has two phases. In the first phase, you need to unhide the WindowsApps folder.
In the second phase, you need to gain exclusive read and write rights of the folder by changing folder ownership. By default, Microsoft assigned the read and write permission to the TrustedInstaller user account of your Windows 10/11 computer. Without further ado, let’s unhide and take control of the folder of interest:
Step #1: Click on the File Explorer of the Taskbar to access This PC window.
Step #2: On the top ribbon, select View.
Step #3: You will see Options in the View menu. Click on that.
Step #4: Now, click on the Change folder and search options to open the Folder Options window.

Step #5: You will see three tabs in the Folder Options window. Select the one in the middle, the View tab.
Step #6: The View tab has two sections: Folder Views and Advanced Settings.
Step #7: In the Advanced Settings section, select the Show hidden files, folders, and drives option.

Step #8: Now, click the Apply button to save the changes.
Step #9: If you go to the Program Files folder in the Windows 11 installation directory, you should now find the WindowsApps folder in the unhidden state.

The WindowsApps folder is now visible. But, you can not access it yet. You need to manually take ownership of the folder to get read and write access.
For ownership changing purposes, you need a user account with administrative rights. If you are a non-admin user of your computer, you need to log out from that account. Then login again using the administrator account.

Once you are done switching the Windows user account, you can go ahead with the following steps for ownership transfer of the WindowsApps folder:
#1. Right-click on the WindowsApps folder and click on Properties.
#2. While on the Properties screen, click on the Security tab to reveal Advanced options. Click on Advanced.

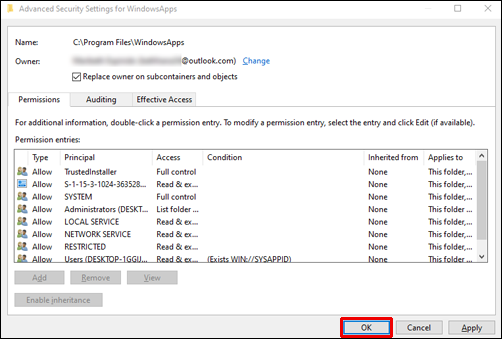
#3. In the Advanced Security Settings for WindowsApps screen, click on Change.

#4. You will see the Select User or Group screen.
#5. In the Object Name field, enter the name of the user account of your PC that has administrative rights.
#6. You can simply write down the name of the user account in small letters. The system will automatically recognize it. However, you need to type the correct user name.
#7. Now, click on Check Names to populate the full user account address.

#8. Click Ok to apply the changes.
#9. You will now see your user account name in the Advanced Security Settings for WindowsApps window.
#10. Beneath your user account name, you will see a checkmark filed for Replace owner on sub containers and objects. Checkmark that box.

#11. Now click on Apply button and hit Ok to initiate the ownership change process.
#12. Once the process finishes, click Ok on the notification that follows.

#13. Refresh your PC and try to access the WindowsApps folder again from Program Files by double-clicking on it.

#14. You will get full access to the folder with read and write permissions.
You can now move or delete files from the WindowsApps folder if you have taken ownership of the WindowsApps folder using the process mentioned above. However, practice caution when making any changes in the subfolders. Because if you delete vital app files, the respective Windows app may not function anymore.
This step is particularly useful when you need to clean up disk space. If you have stopped using certain Windows apps or have uninstalled them, you can delete their back-end files from the WindowsApps folder to save disk space.
Using Windows Powershell
The Windows File Explorer-based ownership change process for the WIndowsApps folder is somewhat tricky. You need to follow the steps correctly, or you will waste valuable time.
There is an easy and automated process that you can also try by using Windows Powershell. It is a robust configuration and task automation program for Windows. All Windows operating system versions since Windows 7 come with this program.

Therefore, you can apply this process to take ownership of the target folder on both Windows 10 and Windows 11 computers. You also do not need to unhide hidden files, folders, and drives.
In situations where you can not take the risk of unhiding Windows system files, the Powershell-based method is a perfect choice. Here are the steps to execute a Powershell command that assigns the necessary permissions to you to access and change the WindowsApps folder:
Step #1: Click on the magnifying glass of your Windows 11 Search.
Step #2: Type in Powershell and wait for the app to come up.
Step #3: You will see the Windows Powershell app on the right side of the search console.

Step #4: The app will show options like Open, Run as administrator, Open file location, etc.
Step #4: Click on Run as administrator to open the program.

Step #6: Once the program is up and running, execute the following command. You can copy the below command and paste it as is in Powershell and hit Enter.
takeown /f “C:\Program Files\WindowsApps” /rStep #7: The Powershell command takeown restores file or folder ownership to the system administrator. Advanced users utilize this command to facilitate ownership transfer for batch files.
Step #8: After the takeown syntax, you need to use /f parameter to specify the file, folder, or directory name.
Step #9: The closing /r parameter tells Powershell to transfer ownership of all the files and subdirectories to the administrator.

Step #10: Powershell will take some time to transfer the ownership of the WindowsApps folder and its content to your administrator user account.
Step #11: A flashing cursor will show up when the process is complete.
The access you gain by executing the above process is similar to that of the Windows File Explorer-based method. You have just automated the process and eliminated unhiding of system files. Now you can backup, clear some space, or make changes in the Windows apps back-end files.
Final Words
Now that you have an in-depth understanding of the WindowsApps folder, you can make changes in your Windows 10 or 11 OS responsibly. Before deleting any files from this folder, it is necessary that you know the folder inside out so that you do not make any fatal mistake that could damage the entire operating system.
Should you face any Windows 10 issues and need some automatic tools to resolve those problems, you can check out these 7 repair tools to solve Windows 10 problems.
If you’re a long-time Windows user, you’re probably well aware of each file type’s default location. The core files belong to the “Windows” folder, user data to the “Users” folder, programs to the “Program Files,” and so on.
But where does Windows keep the Microsoft Store apps folder? If you’ve been asking yourself the same question, this article will provide the answers you need. We’re going to crack the code when it comes to accessing your Windows App folder on Windows 10.
Most of the time, downloading an app from the Microsoft Store doesn’t require searching for its directory to set everything up. However, you might run into some issues that need troubleshooting. By default, all apps you download from the Microsoft Store will be located in the WindowsApps folder.
The trouble begins when you start looking for this folder. The first thing you should know is that it’s hidden by default. And there’s a valid reason behind this. The WindowsApps folder contains some of the core Windows 10 components.
By hiding it, Windows tries to prevent users from making unwanted changes. Other than your Microsoft Store apps, you’ll find some other core Windows Universal apps in here. Long story short, security-wise, it makes sense to restrict the WindowsApps folder.
For this reason, accessing it takes a bit of time and effort. But don’t worry. We’ve put together a detailed guide to help you reach this folder in the fastest way possible.
The whole procedure will consist of two main parts: making the folder visible and taking ownership of it.
Using Windows File Explorer to Access the WindowsApps Folder
Using the Windows File Explorer is the most straightforward method to access the WindowsApps folder. We’ll start by making the folder visible since we already mentioned that Windows hides it by default:
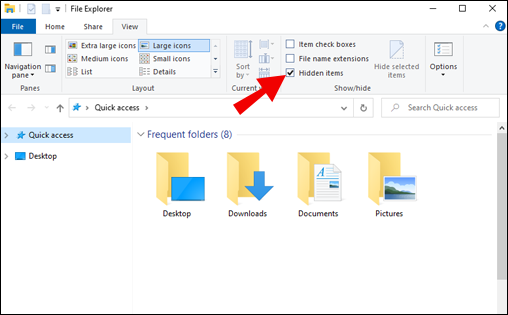
- In the File Explorer, click on “View” >“Hidden Items.” This will now allow us to move forward and locate the folder.

- Go to the “Program Files” folder and find the WindowsApps folder in the directory list.

- Right-click on it and choose “Properties” from the options menu.

- Move over to the “Security” tab in the newly opened “Properties” window.
- Click on the “Advanced” button in the bottom right-hand corner window.
- When you get to the “Advanced Security Settings for WindowsApps,” click on the “Change” option next to the “Owner” information.

- A new box called “Select User or Group” will pop up. Type your Windows username in the white writing box and click on the “Check Names” button. If you have a Microsoft account, insert your email address instead.

- Click “OK.”

- Now you’ll see your username under the ownership section. Tick the box next to “Replace owner on subcontainers and objects” under the owner’s name.

- Click “OK” to apply the changes.
- You will now be able to open and edit your WindowsApps folder, as well as all its sub-folders and files. Just double-click on the folder to open it.


Troubleshooting Microsoft Store Apps on Windows 10
Maybe you want to uninstall specific apps from the WindowsApps folder. Although possible, we don’t recommend doing this. Yes, you can safely uninstall apps downloaded from the Microsoft Store in the WindowsApps folder.
But this folder will contain some core Windows apps such as yourphone.exe that you shouldn’t remove. Unless you’re absolutely sure about what you’re doing, we recommend troubleshooting your apps from the Microsoft Store.
Alternatively, you can try the solutions Microsoft offers on their website for app troubleshooting:
- Make sure the latest version of Windows is running.
- Make sure your app can run on Windows 10.
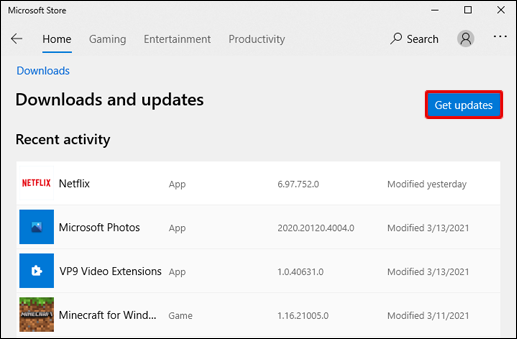
- Check if there is an update available for your Microsoft Store: Click on the Start button and choose the “Microsoft Store” app. Go to “See more > Downloads and updates > Get updates.
- Reset your app.
- Reinstall your app.
- Run Window’s troubleshooter. Click on the Start button and open “Settings.” Head over to Update & Security > Troubleshoot > Windows Store apps > Run the troubleshooter.
Understanding the WindowsApps Folder Structure
There’s a difference in structure between the Program Files folder and the WindowsApps folder. While folders in the Program Files are structured simply by their app names, a Microsoft Store apps folder has a different naming structure. Typically, it follows the pattern of name, version number, architecture, and Microsoft Store publisher ID.
Also, you might notice that some apps have two folders. The only difference between them is that some have a “neutral” while others have a “neutral_split.scale” architecture. Usually, this points to some common data files that stayed the same, regardless of their architecture.
If you’re looking for the core files inside the WindowsApps folder, you’ll find them in the main folder (it will have “x64” in its name).
Feel free to have a look around the WindowsApps folder yourself and gain more insight into how your apps work.
Additional FAQs
Here are some more questions to help you get the most out of this topic.
How to Access AppData Folder?
Just like the WindowsApps folder, your AppData folder might be hidden. To access this folder, you’ll have to enable viewing hidden folders in File Explorer. Just follow the steps below:
1. Open File Explorer.
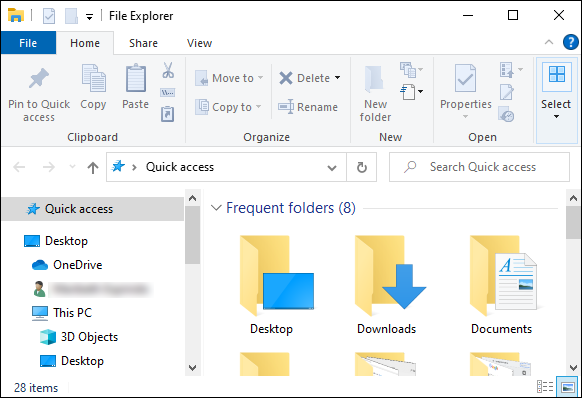
2. In the “View” section, select the “Hidden files” option.
You’ll now be able to find your AppData folder in your system directory. For example, if your username is Mark, you can find the folder under C:\Users\Mark\AppData. You can either paste this address in your File Explorer address bar and replace it with your username or navigate to its location manually.
How Do I Restore My WindowsApps Folder?
In case you can’t see your WindowsApps folder, you’ll have to enable viewing hidden folders. This folder is always there, but it might not always be visible. To restore your folder, follow these steps:
1. Open your File Explorer.
2. From the top menu, select View > Hidden files.
3. Go to the “Program Files” and look for the “WindowsApps” folder.
The folder will now be visible.
Where Are Windows 10 App Files Located?
Windows 10 Apps folder is located under the “C:” directory, in the “Program Files”: C:/Program Files/WindowsApps.
Why Can’t I Access WindowsApps Folder?
If you can’t access your WindowsApps folder, it’s because the folder is hidden. To make the folder visible, here’s what you need to do:
1. Open your File Explorer.
2. From the top menu, select View > Hidden files.
3. Go to the “Program Files” and look for the “WindowsApps” folder. It will now be there.
Follow the steps from the “How to Access the Windows Apps Folder” section (starting from Step 2) if you still don’t have access to your WindowsApps folder.
Navigating to the WindowsApp Folder
As you’ve learned from this article, the WindowsApps folder is sandboxed primarily for your Windows apps’ safety. That’s why gaining access to it and troubleshooting an app from there requires a bit more effort.
To prevent any unwanted actions, we recommend troubleshooting your Microsoft Store apps the recommended way rather than through the WindowsApps folder. Only apply the steps from this guide if you have no other options left.
Have you ever had to access the WindowsApps folder? Share your experiences in the comments section below.