
Обновления Windows предоставляют последние функции и улучшения безопасности, которые помогают поддерживать компьютер в актуальном состоянии и более безопасном. Перед началом установки Windows проверяет, имеется ли на устройстве достаточно места для процесса установки, а также для новых возможностей и улучшений системы безопасности.
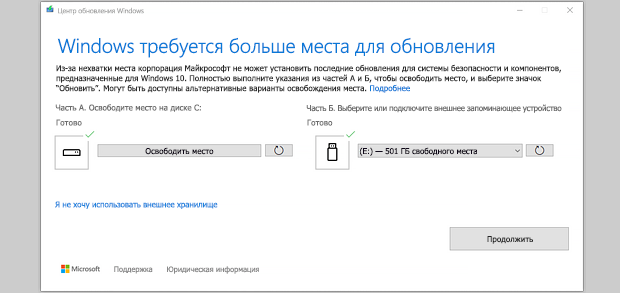
Если на внутреннем диске недостаточно свободного места, появится сообщение о том, что Windows требуется больше места.
Windows требуется место для обновления
Мы не можем установить последние функции Windows и улучшения безопасности на вашем компьютере из-за нехватки места на диске.
Советы по освобождению места на диске.
Расширение пространства с помощью внешнего хранилища
Вы можете временно увеличить место на диске, используя внешнее запоминающее устройство, такое как USB-накопитель, SD-карта или внешний жесткий диск.
Вот что для этого понадобится:
-
внешнее запоминающее устройство с объемом памяти не менее 10 ГБ свободного пространства, в зависимости от того, сколько места вам нужно;
-
подключение к Интернету.
Вот как это сделать.
-
Выберите Пуск > Параметры > Центр обновления Windows .
Примечание: В Windows 10 доступ к клиентский компонент Центра обновления Windows можно получить из раздела Параметры > Обновление & безопасности.
-
Если у вас недостаточно свободного места на диске для установки обновлений, на вкладке клиентский компонент Центра обновления Windows должен появиться параметр «Устранение проблем«. Если это так, выберите Исправить проблемы. Откроется средство, позволяющее обновить компьютер с помощью внешнего запоминающего устройства.
-
Обязательно создайте резервные копии важных файлов, хранящихся на внешнем запоминающем устройстве, прежде чем использовать его для обновления.
-
Подключите внешнее запоминающее устройство и выберите его в раскрывающемся меню.
-
Нажмите Далее и следуйте инструкциям для установки обновления.
-
После завершения установки можно безопасно отсоединить внешнее запоминающее устройство.
Если даже после выбора внешнего хранилища у вас недостаточно свободного места на внутреннем диске, вам может быть предложено освободить больше места.
Если вы не хотите использовать внешнее хранилище, выберите Я не хочу использовать внешнее хранилище.
Вопросы и ответы
Следующие вопросы связаны с недостатком места на диске и Центром обновления Windows. Дополнительные сведения о Центре обновления Windows.
Если на диске не хватает свободного места для установки обновления, появится всплывающее уведомление о том, что для установки обновления требуется дополнительное место на диске.
Если вы выберете пункт Устранить проблемы, вы получите уведомление о том, сколько места требуется дополнительно. Кроме того, вы будете уведомлены о том, что можно использовать внешнее запоминающее устройство, чтобы не высвобождать такой объем пространства на системном диске.
Общий объем свободного места на диске, необходимый устройству для завершения обновления, может быть разным. Как правило, для обновления компонентов требуется не менее 6-11 ГБ свободного пространства, для исправлений — не менее 2-3 ГБ. Сведения о разнице между обновлением компонентов и исправлением.
Дисковое пространство необходимо для скачивания обновления и новых версий любых дополнительных компонентов и языков, установленных на данный момент, и для применения обновления. Дополнительное место временно требуется для поддержки удаления обновления (обычно в течение 10 дней). После завершения обновления это пространство можно высвободить.
Для этого нажмите кнопку «Пуск > Параметры > Система > Хранилище > Рекомендации по очистке». После выбора удаляемых элементов нажмите кнопку Очистить для этого раздела. Открыть параметры хранилища
Обновление сжато для уменьшения размера загрузки.
Примечание: Для устройств с зарезервированным хранилищем для обновления сначала используется это зарезервированное хранилище, а затем другое дисковое пространство. Дополнительные сведения см. в статье Как работает зарезервированное хранилище в Windows.
Пространство, необходимое для завершения обновления компонентов, зависит от двух факторов: варианта обновления и размера дополнительного содержимого и других обновлений, которые применяются к вашему компьютеру при установке обновления компонентов.
Примечание: Для устройств с зарезервированным хранилищем для обновления сначала используется это зарезервированное хранилище, а затем другое дисковое пространство. Дополнительные сведения см. в статье Как работает зарезервированное хранилище в Windows.
Windows использует три разных варианта обновления компонентов в зависимости от объема свободного места на диске в настоящее время.
-
Для компьютеров с большим количеством свободного места на диске
Во время использования компьютера Windows автоматически пытается выполнить большую часть процесса обновления в фоновом режиме. Это значительно сокращает время, в течение которого ваш компьютер будет вне сети (или недоступный для использования) в процессе обновления, хотя для завершения обновления может временно использоваться больше места на диске. Подробнее о наших усилиях по сокращению времени вне сети в процессе обновления (в настоящее время только на английском языке).
-
Для компьютеров с ограниченным свободным пространством, но достаточным для автоматического завершения обновления
Windows автоматически оптимизирует процесс, чтобы уменьшить объем свободного места на диске, необходимый для установки обновления. В результате время автономной установки увеличивается.
-
Для компьютеров, на которых недостаточно места для автоматической установки обновления
Windows предложит освободить место на диске или использовать внешнее хранилище для временного расширения хранилища на компьютере. Если вы используете внешнее запоминающее устройство, Windows не потребуется много места на системном диске, так как система будет временно использовать внешнее устройство.
Для каждого из этих вариантов обновления общий объем необходимого свободного места на диске будет зависеть от дополнительного содержимого и других обновлений, которые применяются к компьютеру. Например:
-
Дополнительные возможности. Многие необязательные компоненты, доступные для Windows, устанавливаются системой предварительно или по требованию либо устанавливаются пользователем вручную. Чтобы узнать, какие компоненты установлены на компьютере, нажмите кнопку «Пуск > Параметры > Приложения > Дополнительные компоненты».Открыть параметры «Необязательные компоненты»
Размер этих компонентов составляет от менее 1 МБ до почти 2 ГБ для портала Windows Mixed Reality. Чтобы уменьшить объем пространства, необходимого для установки обновления компонентов на компьютере, удалите необязательные компоненты, которые вы не используете. -
Установленные языки. Операционная система Windows переведена на многие языки. Хотя многие пользователи одновременно используют только один язык, некоторые переключаются между двумя и более языками. Чтобы узнать, какие языки установлены на компьютере, выберите Параметры запуска > > время & язык > язык & регионе . Открыть языковые параметры
Во время каждого обновления все языковые ресурсы и любые связанные данные о вводе с клавиатуры, преобразовании текста в речь, преобразовании речи в текст и распознавании рукописного ввода необходимо обновить. Размер контента для каждого языка может составлять от 175 МБ до более 300 МБ. Вы можете уменьшить объем пространства, необходимого для установки обновления компонентов на компьютере, удалив языки, которые вы не используете. -
Обновления драйверов. Изготовители оборудования и другие партнеры по оборудованию иногда публикуют новые графические, сетевые, аудиодрайверы и другие драйверы вместе с новым обновлением операционной системы. Их размер может существенно различаться в зависимости от компьютера и от того, какие именно драйверы обновляются.
-
Исправления ОС. Во время обновления компонентов Windows пытается скачать и автоматически установить последние исправления, чтобы ваш компьютер был полностью обновлен. Вскоре после выпуска обновления компонентов размер исправления для этого обновления может составлять всего нескольких сотен мегабайт, однако по мере реализации дополнительных исправлений и обновлений системы безопасности размер исправления может увеличиться до 1 ГБ и более. Если на компьютере не хватает места на диске, вы можете скачать и установить исправление после завершения обновления компонентов.
Наконец, Центр обновления Windows временно отключает hiberfile.sys, pagefile.sys и другие системные файлы и использует пространство, которое обычно занимают эти файлы, для применения обновления компонентов. Все файлы, которые отключаются для установки обновления, будут автоматически включены после завершения обновления. Так как размер этих файлов зависит от того, как вы используете компьютер, и от объема оперативной памяти вашего компьютера, объем свободного места на диске для выполнения обновления может отличаться, даже если на двух разных компьютерах используется одинаковый образ операционной системы.
Сочетание варианта обновления и компонентов означает, что для завершения обновления может потребоваться различный объем свободного места на диске. Вот несколько примеров обновления компьютеров до Windows 10 версии 1803.
|
Оптимизировано для сокращения времени вне сети |
Оптимизировано для уменьшения занимаемого места на диске |
Оптимизировано для уменьшения занимаемого места на диске с помощью внешнего хранилища |
|
|---|---|---|---|
|
Минимальный объем необязательных компонентов, языков и обновлений |
20 ГБ |
5,5 ГБ и более |
4,5 ГБ и более |
|
Множество необязательных компонентов, языков и обновлений |
20 ГБ и более |
13,75 ГБ и более |
7 ГБ и более |
Windows 11 требуется 64-разрядный процессор.
При выборе оборудования для хранения данных, которое будет использоваться в вашем устройстве, обращайте внимание не только на размер хранилища. Часто скорость хранилища важнее его размера. Устройства с медленным хранилищем, например жесткие диски, часто значительно медленнее устройств SSD и eMMC.
Вам не нужно удалять все данные с жесткого диска для обновления устройства, но вам потребуется освободить достаточно места для завершения обновления.
Updated on Apr 28, 2025
Are you excited about the Windows 11 free upgrade from Windows 10? But, unfortunately, you end up getting the following error messages every time you try to update your device on Windows 11. All those errors are related to one issue — Windows 11 update not enough disk space.
- «Windows needs more space.»
- «Can’t install due to low disk space.»
- «Get more space with external storage.»
- «There is not enough free space on the partition (C:)».
- «We can’t tell if your PC has enough space to continue installing Windows 11», etc.
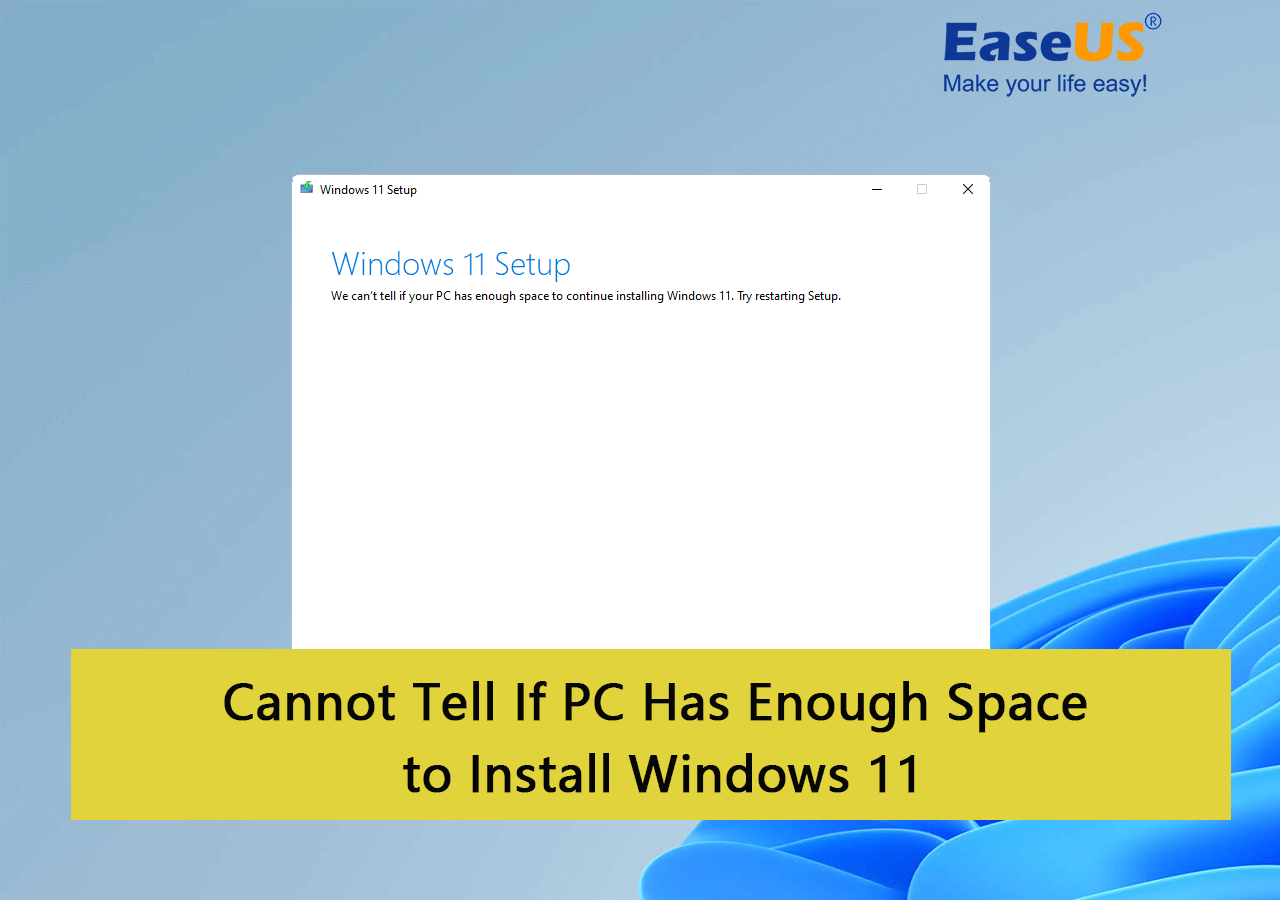
Why «We Can’t Tell If Your PC Has Enough Space to Continue Installing Windows 11» Error Rises?
Once your PC didn’t reach these requirements, you’ll highly possible to get one of the listed errors here while trying to install Windwos 11:
Among these errors, Windows doesn’t have enough space to install Windows 11 is one of the top concerned issue. Since Windows 10 and Windows 11 are programmed to coexist, your device requires sufficient free space to support both operating systems’ tools and processes.
To get rid off this issue and install Windows 11 on your computer successfully, here, you have two simple solutions:
- One is to free up space on your device; The other one is to get more space from other drives.
- Then, add the free space to extend the system C drive.
The following part will give 5 ways to fix this error, and you can help more users by clicking the buttons below.
Here, we collected 5 efficient methods that works efficiently to assist you get rid of ‘We can’t tell if your PC has enough space to continue installing Windows 11’ error. And ,you can follow each one of them to free up space so as to get sufficient space to accomplish the Widnows 11 installation:
| Workable Solutions | Step-by-step Troubleshooting |
|---|---|
| Fix 1. Delete the Windows.old folder | Go to the Startup menu search box > Type Cleanup > Click Disk Cleanup…Full steps |
| Fix 2. Remove junk and useless large files | Install EaseUS CleanGenius on your PC, navigate to «Cleanup» and click «Scan»….Full steps |
| Fix 3. Transfer Free Space to C Drive | Right-click on the D: partition with enough free space and select «Allocate Space»…Full steps |
| Fix 4. Resize C Drive Space | Right-click on the System C: drive and select «Resize/Move»…Full steps |
These methods also work efficiently to fix the similar issue of «We can’t tell if your PC has enough space» to install Windows 10 on older computers.
So, let’s now check out 5 easy ways to implement both these solutions and become an early Windows 11 user.
Solution 1. Delete the Windows.old folder
The easiest way to free up space in C drive so as to fix ‘We can’t tell if your PC has enough spae to istall Windows 11’ error is to delete the Windows.old folder. This folder is automatically created when you upgrade from one Microsoft OS version to another, starting with Windows Vista. Windows.old folder contains all the data from your previous Windows version that you can use to restore your old versions or files.
You can find the Windows.old folder in the C: drive of your system storage. However, it is a great feature, but this folder can easily consume 20 GB or more space on your hard disk, depending on your previous Windows installation size.
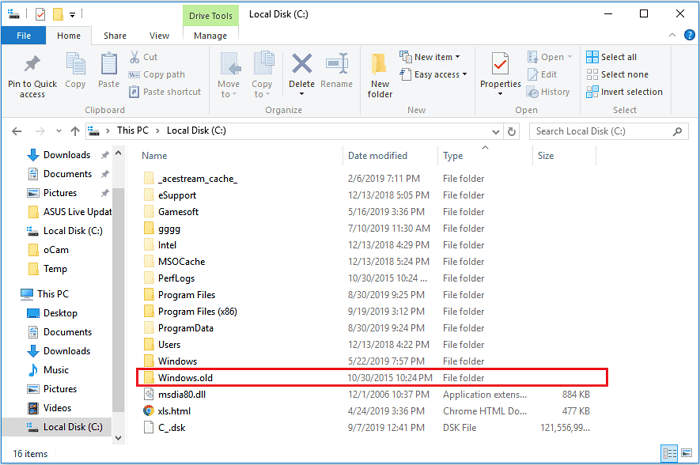
Here if your Windows.old folder contains data from your Windows older versions or you no longer require old files, it’s better to delete the Windows.old folder and free up space for Windows 11 update.
To delete the Windows.old folder, follow the below steps:
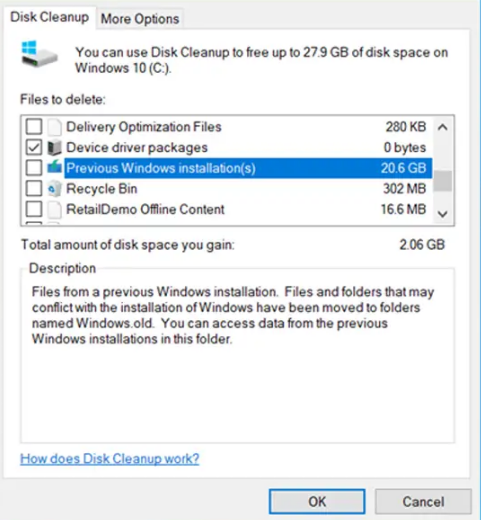
Step 1. Go to the Startup menu search box > Type Cleanup > Click Disk Cleanup.
Step 2. Next, select drive C: and click «OK.» You have to wait while your drive gets scanned.and then click Clean up system files.
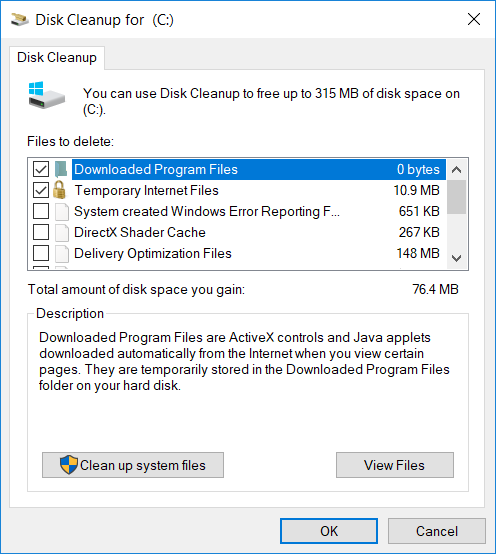
Step 3. Select C: drive again when prompted and press OK.
Step 4. Now, just select the «Previous Windows installation» checkbox from the files to delete the list and click «OK.»
This method also can significantly assist you fix ‘Low Disk Space’ error.
However, if you delete the Windows.old folder from File Explorer, it can produce an error message. You can easily avoid this error message by using the PC cleanup tool to scan and remove the Windows.old folder (discussed in solution 2).
It doesn’t matter if you can’t delete the Windows.old folder, follow this guide here and you’ll learn why and how to remove it successfully:
Solved: Can’t Remove Windows.old Folder in Windows 11/10
Although Windows.old folder is accessible but it requires administrator permission from the System to make changes to this folder. Without the permission, you can’t directly delete Windows.old from C: drive. Follow and learn how to remove it.
Solution 2. Remove Junk and Useless Large Files
Your computer produces numerous junk files daily to perform different tasks like opening a document or an image. When these junk files remain on your device, clogging it up and consuming a large space. This could also be a reason that prevents you installing Windows 11 successfully.
To fix this issue, you need a PC clean tool so as to finding and removing junk and useless large files fast and efficiently.
Using the PC cleaner tool like EaseUS CleanGenius, you can easily detect and delete junk files, useless files, and rarely used files. The tool can also remove browser plugins, free up RAM, startup optimization, and so much more.
Step 1. Download and install EaseUS Partition Master Suite on your PC. Click to download PC Cleaner on panel.
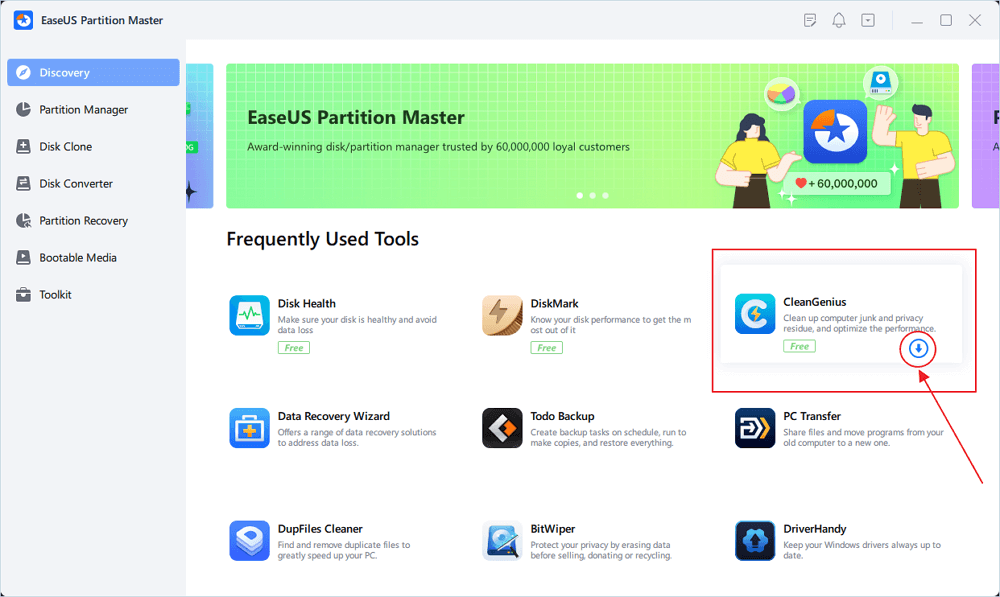
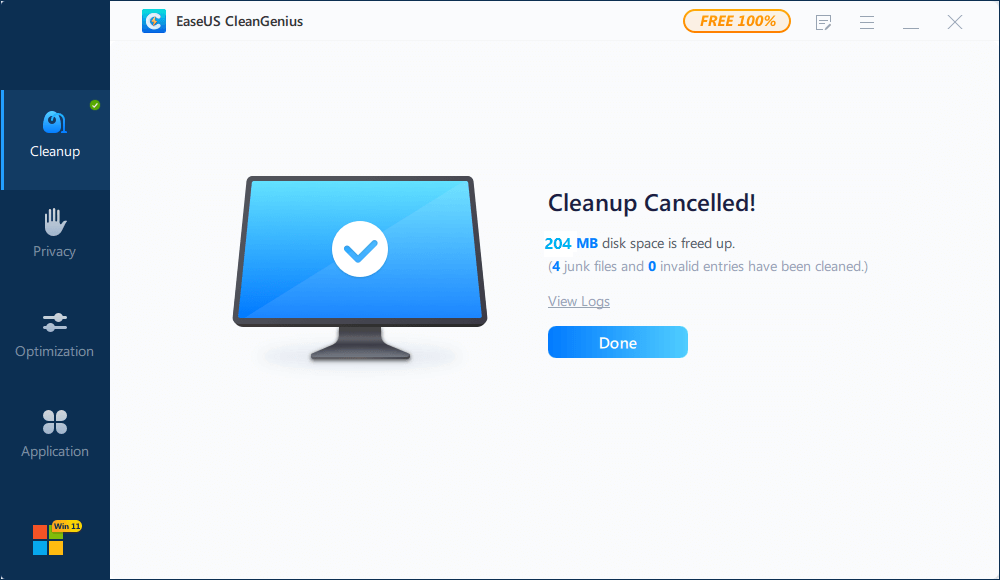
Step 2. Install EaseUS CleanGenius on your PC. To begin with, navigate to «Cleanup» and click «Scan.»
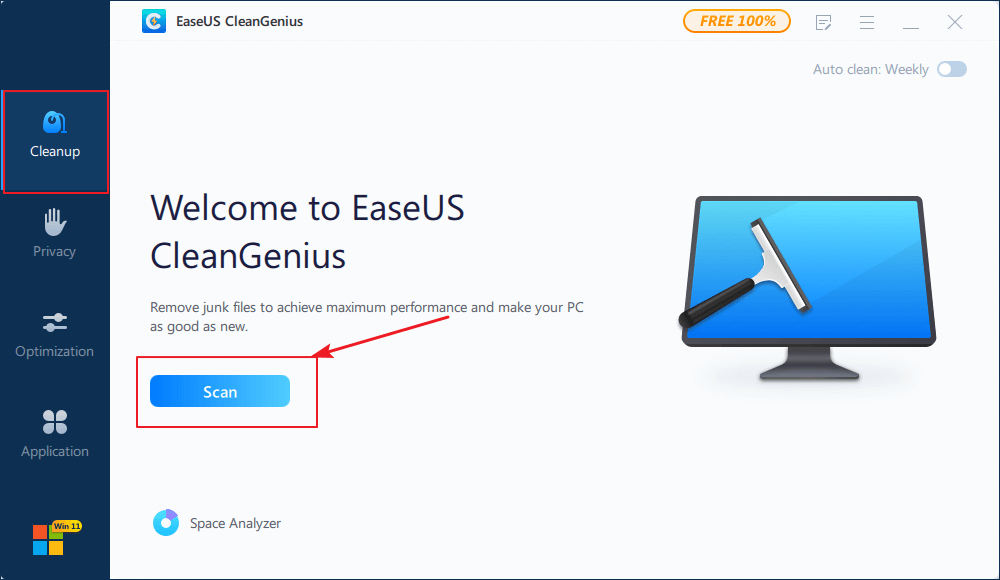
Step 3. EaseUS CleanGenius will start immediately to scan all the useless files, select system junk files and invalid entries, and click «Clean» over all your PC.
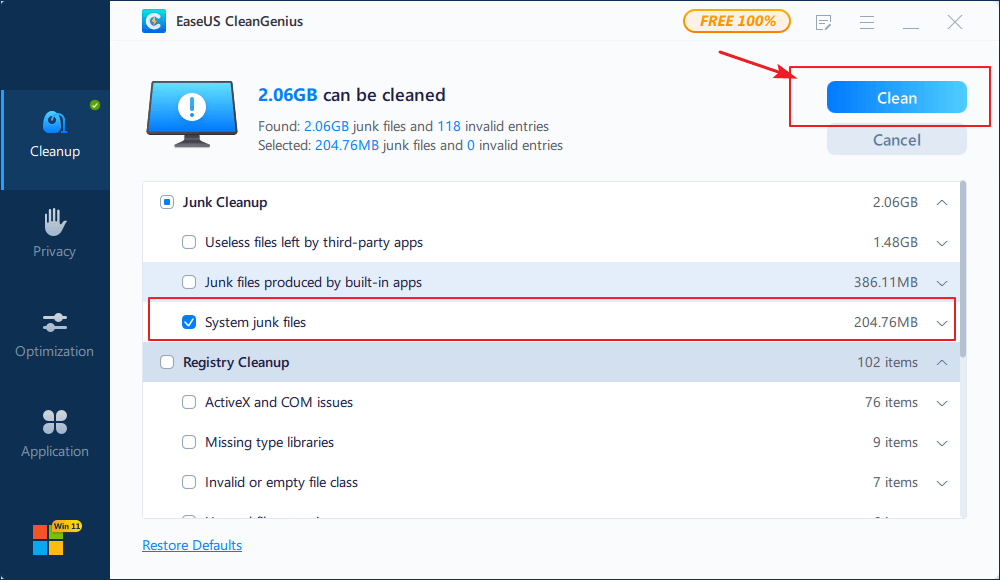
Step 4. Once completed, you can see clearly how many MBs or GBs of data are cleaned. Click «Done» to finish the process.
Moving forward, the next three solutions revolve around the disk and partition space management. So, once again, you require a tool to manage your drivers’ space. There you can use another member of the EaseUS family — EaseUS Partition Master.
EaseUS Partition Master is an easy-to-use disk partitioning software used by over 60,000,000 global users. This tool can increase C drive space on your device so you can seamlessly get Windows 11 updates. Additionally, it can resize, format, delete, wipe, or convert disk, migrate OS without reinstalling OS, etc.
So, let’s manage your disk space better as the coming three solutions!
Solution 3. Transfer Free Space to C Drive
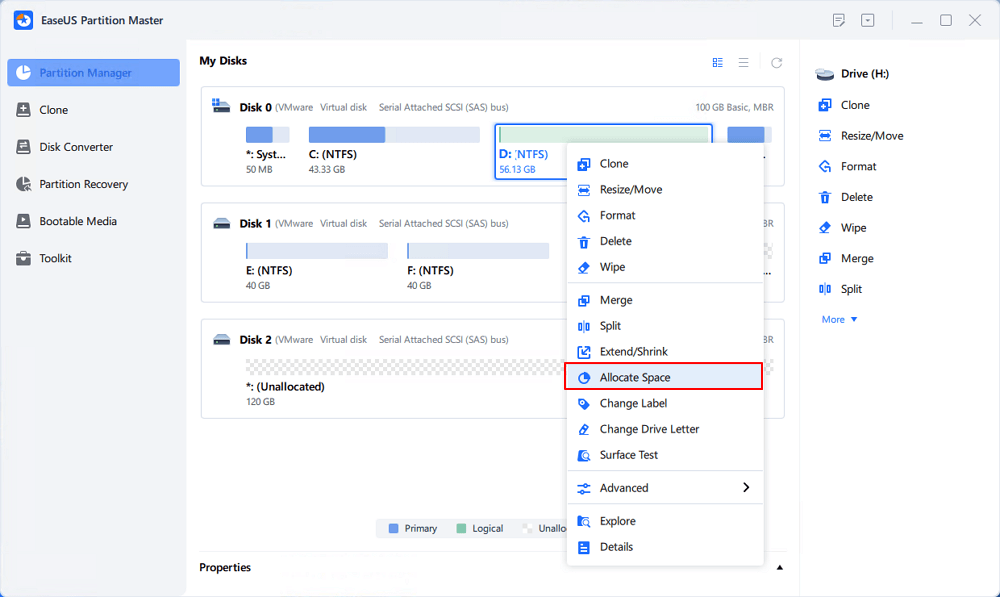
If you have more free space on your D, E, F, or G drivers on your hard disk, you can easily reallocate their space to C: drive. For this, you simply have to use the «Allocate Space» feature on EaseUS Partition Master.
Using this feature, you can free up unallocated and allocated space for C drive and install your Windows 11 setup.
Step 1. Right-click on the D: partition with enough free space and select «Allocate Space».
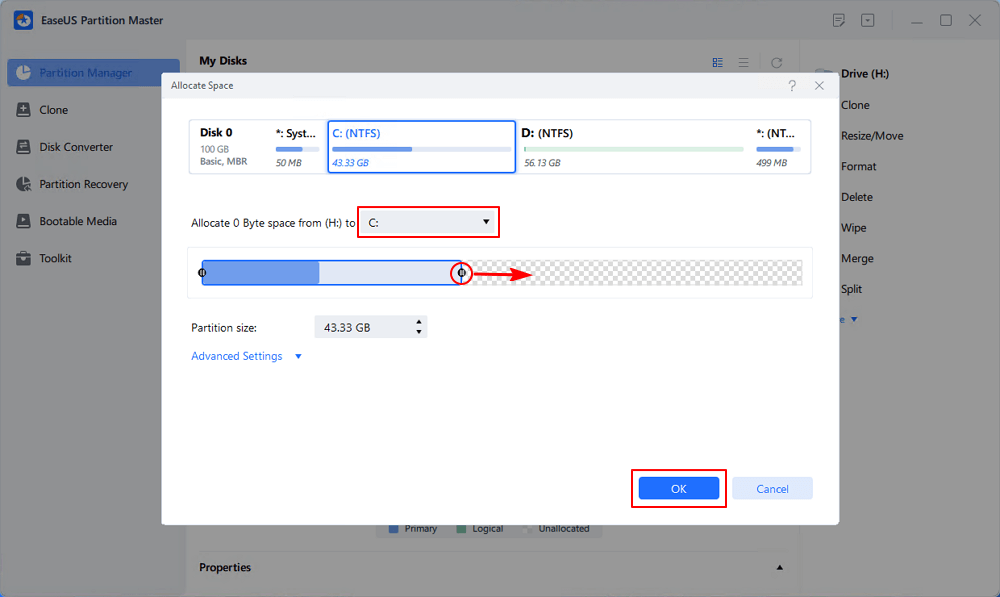
Step 2. Select the target partition — C: drive and drag the partition panel rightward to add the free space from D: drive to C: drive. Then click «OK» to confirm.
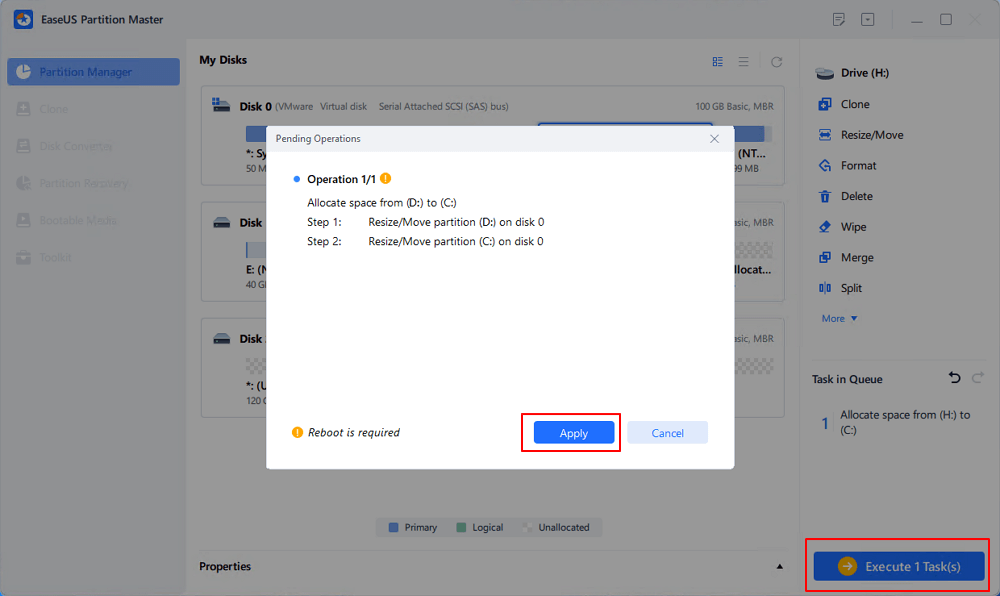
Step 3. Click the «Execute Task» button and click «Apply» to start the process of moving free space from D: drive to C: drive.
Solution 4. Resize C Drive Space
If your system disk has no unallocated space, you can use it in your favor to expand your C drive space. To do so, you have the EaseUS Partition Master «Resize/move» feature at your disposal.
You just have to right-click on a partition excluding the C: drive and click on the «Resize/move» feature. Then, by simply dragging the left panel of the partition to shrink and leaving unallocated space for the C: drive, you can get enough space for Windows 11.
Extend System C drive with unallocated space
- 1. Right-click on the System C: drive and select «Resize/Move».
- 2. Drag the system partition end into the unallocated space so to add it to the C: drive. And click «OK».
- 3. Click «Execute Task» and «Apply» to execute the operations and extend the C drive.
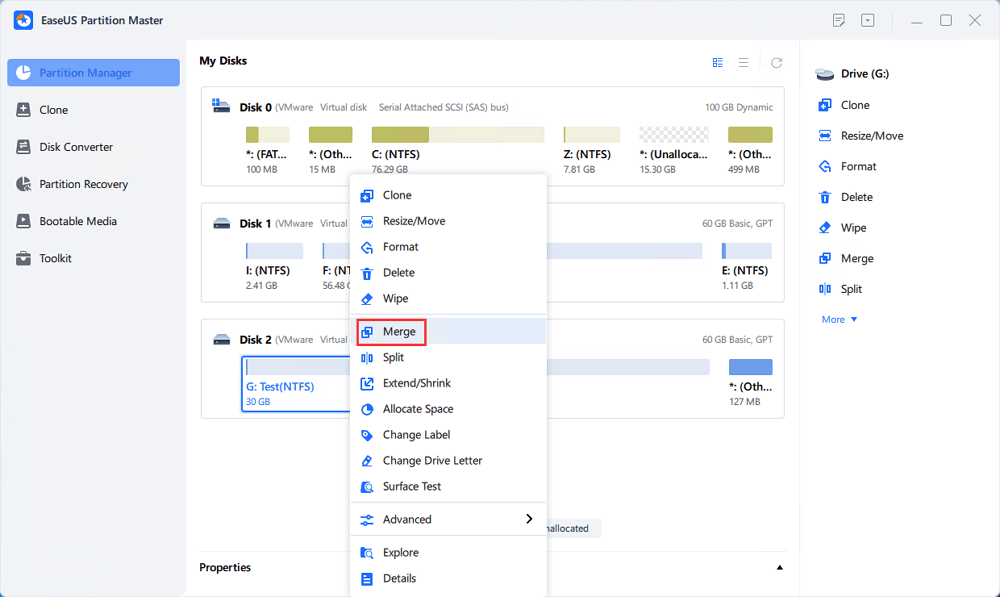
Solution 5. Merge C Drive with Any Other Drive
If you have several partitions on your hard drive and many of your drivers have adequate free space while the C: drive barely has any space left. In this case, you can merge the drives with large free space to the C drive and create a bigger C drive to absorb all Windows 11 updates.
This drive merger process might look massive right now. But once you install the EaseUS Partition Manager, this process will automatically become simpler.
Step 1: Select the target partition
Right-click on the partition which you want to add space to and keep, and select «Merge».
Step 2: Select a neighbor partition to merge
Select one partition next to the former selected partition to merge.
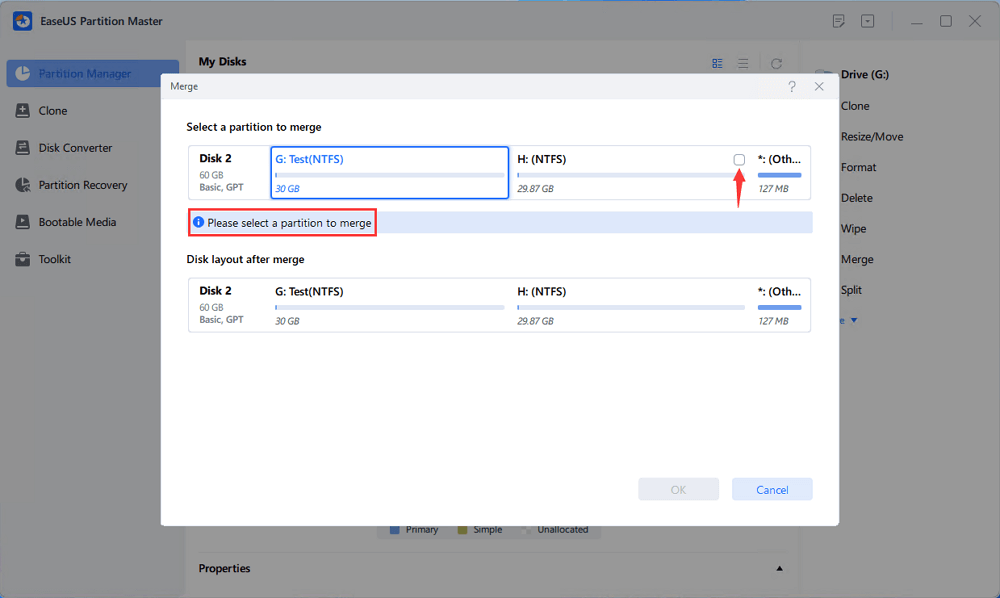
And click «OK» to continue.
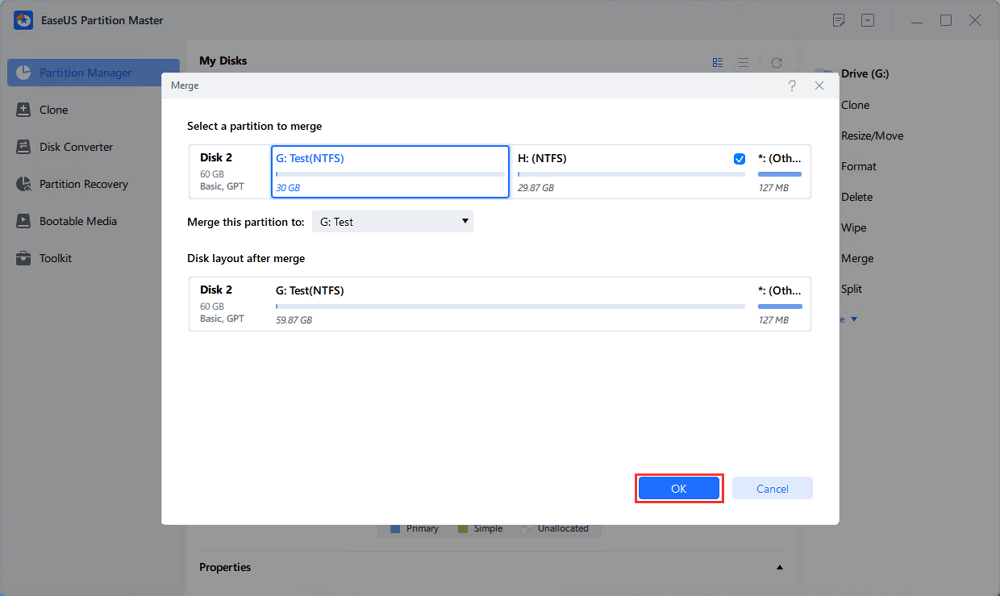
Step 3: Execute operation to merge partitions
1. Click the «Execute Task» button at the top and then click «Apply».
2. The program will merge space and add files from the second partition to the first partition.
To Windows Beginners
It doesn’t matter when you come across Windows updates or installation errors on your PC. EaseUS experts are here to help with roundup solutions to install the latest Windows operating system on your PC.
EaseUS experts are available to provide you with 1-on-1 manual services (24*7) and help fix different Windows configuration issues. Our experts will offer you FREE evaluation services and efficiently diagnose and resolve Windows update errors, Windows installation, or daily OS issues using their decades of experience.
- 1. Fix Windows update errors, such as update failure, unable to upgrade Windows, etc.
- 2. Serve to download and install the latest Windows operating system on PC with success.
- 3. Provide fixes for daily Windows system errors with drivers, permission, account settings, etc., issues.
Final Thoughts on «We Can’t Tell If Your PC Has Enough Space to Install Windows 11» Error
So, here you go, Microsoft users, you are all set to install Windows 11 on your device. It doesn’t matter when the error message of ‘we can’t tell if your PC has enough space to continue installing Windows 11’ pops up.
It’s just a matter of getting the sufficient free space on your hard disk that you can easily get by—
- Deleting the Windows.old folder
- Removing junk files
- Transferring free space to C drive
- Resizing C drive
- Merging C drive with other drivers
To perform all these partition solutions, you can install the EaseUS Partition Master today and manage partition resizing, shrinking, merging, transferring like many other features with ease. Once you have tried Windows 11, don’t forget to share your experience here.
FAQs About We Can’t Tell If PC Has Enough Space to Install Windows 11
If you are having other related questions about not nough space to install Windows 11, or you can’t install Windows 11 successfully, follow the listed questions and find answers below:
1. How do you fix we can’t tell if your PC has enough space?
Here is a list of 6 quick tips that you may follow to fix ‘We can’t tell if your PC has enough space’ error:
- Run Disk Cleanup
- Delete the Windows.old folder
- Clean and remove junk files & useless large files
- Extend C drive with unallocated space or disk free space
- Migrate OS to a new and larger disk
- Transfer files to external hard drive
2. How much space do you need for Windows 11 install?
According to Windows 11 system requirements, it requires for 64GB or bigger storage capacity to install Windows 11.
3. Do I have enough space for Windows 11?
To confirm if your PC has enough space, or at least 64GB free space for Windows 11 update or installation, you can open Disk Management, and chekc the left free space in the system C drive.
If yes, you have enough space to install Windows 11. If not, you can extend the system C drive so as to get enough space to install Windows 11.
Although your computer may meet the minimum hard drive requirements to install Windows 11, the setup may still get stuck because there is not enough space to process the upgrade. If this is your case, you can use a pair of USB flash drives to circumvent this problem.
Windows 11, like its predecessor, has «reserved storage» to reserve part of the drive space to prevent issues during an update. However, the device still needs some additional space to process the upgrade, so you will need workarounds to continue with the setup.
In this how-to guide, I’ll explain how to install Windows 11 on devices with limited disk space. These instructions apply to upgrading to a newer version of Windows 11 or when you want to upgrade from Windows 10 to 11.
Recent updates
These instructions have been updates to ensure that they are still accurate.
How to install Windows 11 on PCs with low storage capacity
If you have a laptop or other device with limited storage capacity, you can still upgrade to Windows 11. You will only need to go through some additional steps with different components.
Hardware requirements
As part of the preparation process, you will need the following:
- Another computer to create a bootable drive.
- Two empty USB flash drives, each with at least 16GB in size.
- Two free USB ports on the computer.
- If the device has a Micro-USB or Type-C port, you must have a USB adapter to convert the port to a standard USB connector for the flash drive (unless you have a USB-C flash drive).
- If there is only one free USB port, you will also need a USB hub with at least two ports.
Windows 11 USB flash drive creation
To create a Windows 11 installation media, connect a USB flash drive to the secondary computer, and use these steps:
- Open Windows 11 download page.
- Under the «Create Windows 11 Installation Media» section, click the Download now button to save the file on the device.

- Double-click the MediaCreationTool.exe file to launch the tool.
- Click the Accept button to agree to the terms.
- Click the Next button.
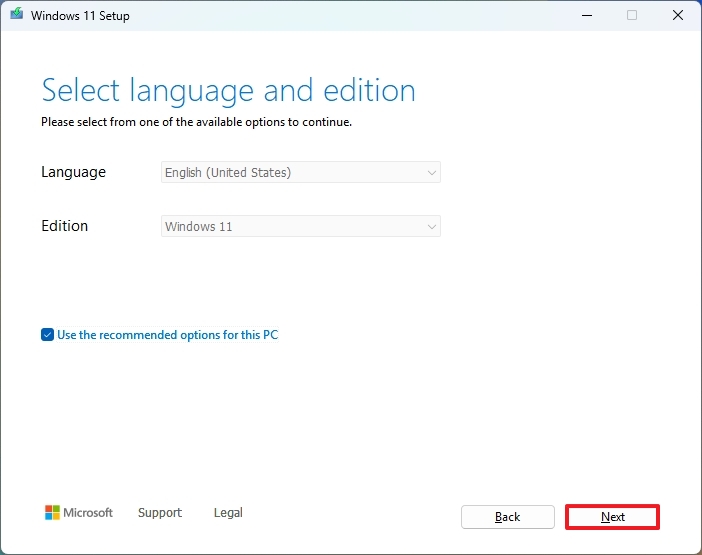
- Select the «USB flash drive» option.
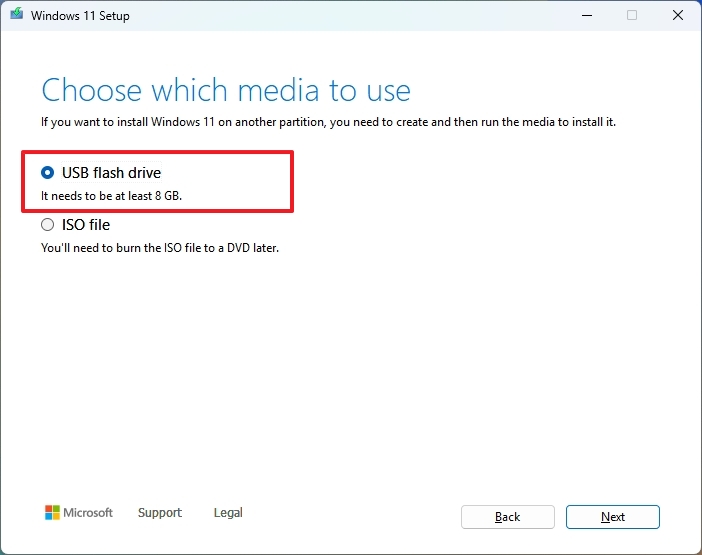
- Click the Next button
- Select the USB flash drive.
- Quick tip: If the device is not on the list, click the «Refresh drive list» option to make it available.
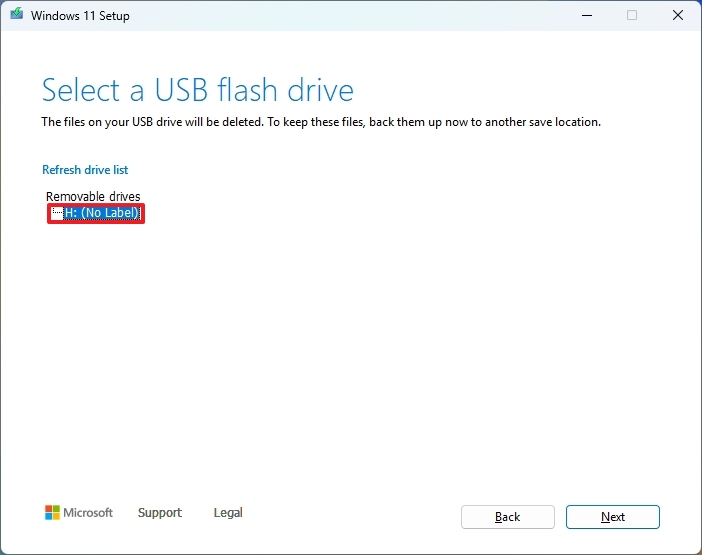
- Click the Next button.
- Click the Finish button.
Once you complete the steps, the tool will download the files to create a bootable media to install the operating system on a computer with limited capacity.
All the latest news, reviews, and guides for Windows and Xbox diehards.
Windows 11 installation process
To install the initial release of Windows 11 on a computer with limited storage, use these steps:
- Connect the USB converter cable or the USB hub to the computer to be upgraded (if applicable).
- Connect the Windows 11 USB flash drive and the other empty USB flash drive.
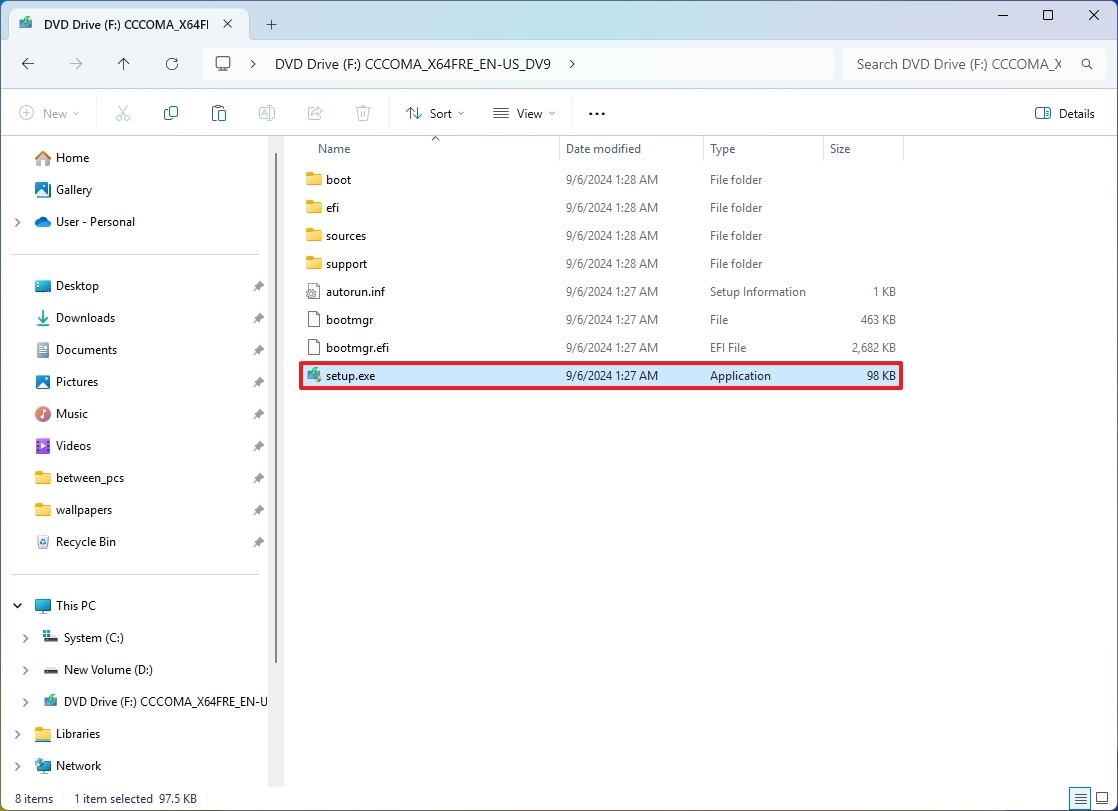
- Open File Explorer.
- Quick tip: You can quickly open File Explorer from Start or using the «Windows key + E» keyboard shortcut.
- Select the This PC tab from the left pane.
- Under the «Devices and drives» section, double-click the USB flash drive with the Windows 11 files.
- Double-click the setup.exe file to launch the Windows 11 setup.
- Click the Accept button (if applicable).
- Click the Next button.
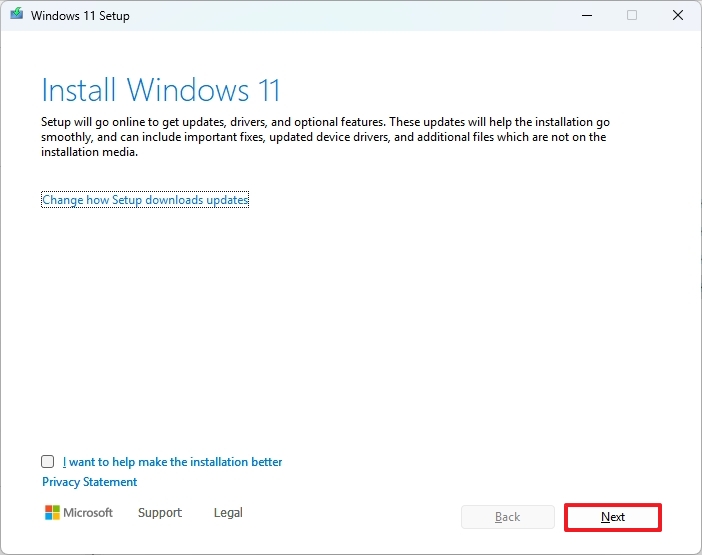
- Click the Accept button for the «Applicable notices and license terms» page.
- Check the option to keep your files and apps (if applicable).
- Click the Next button.
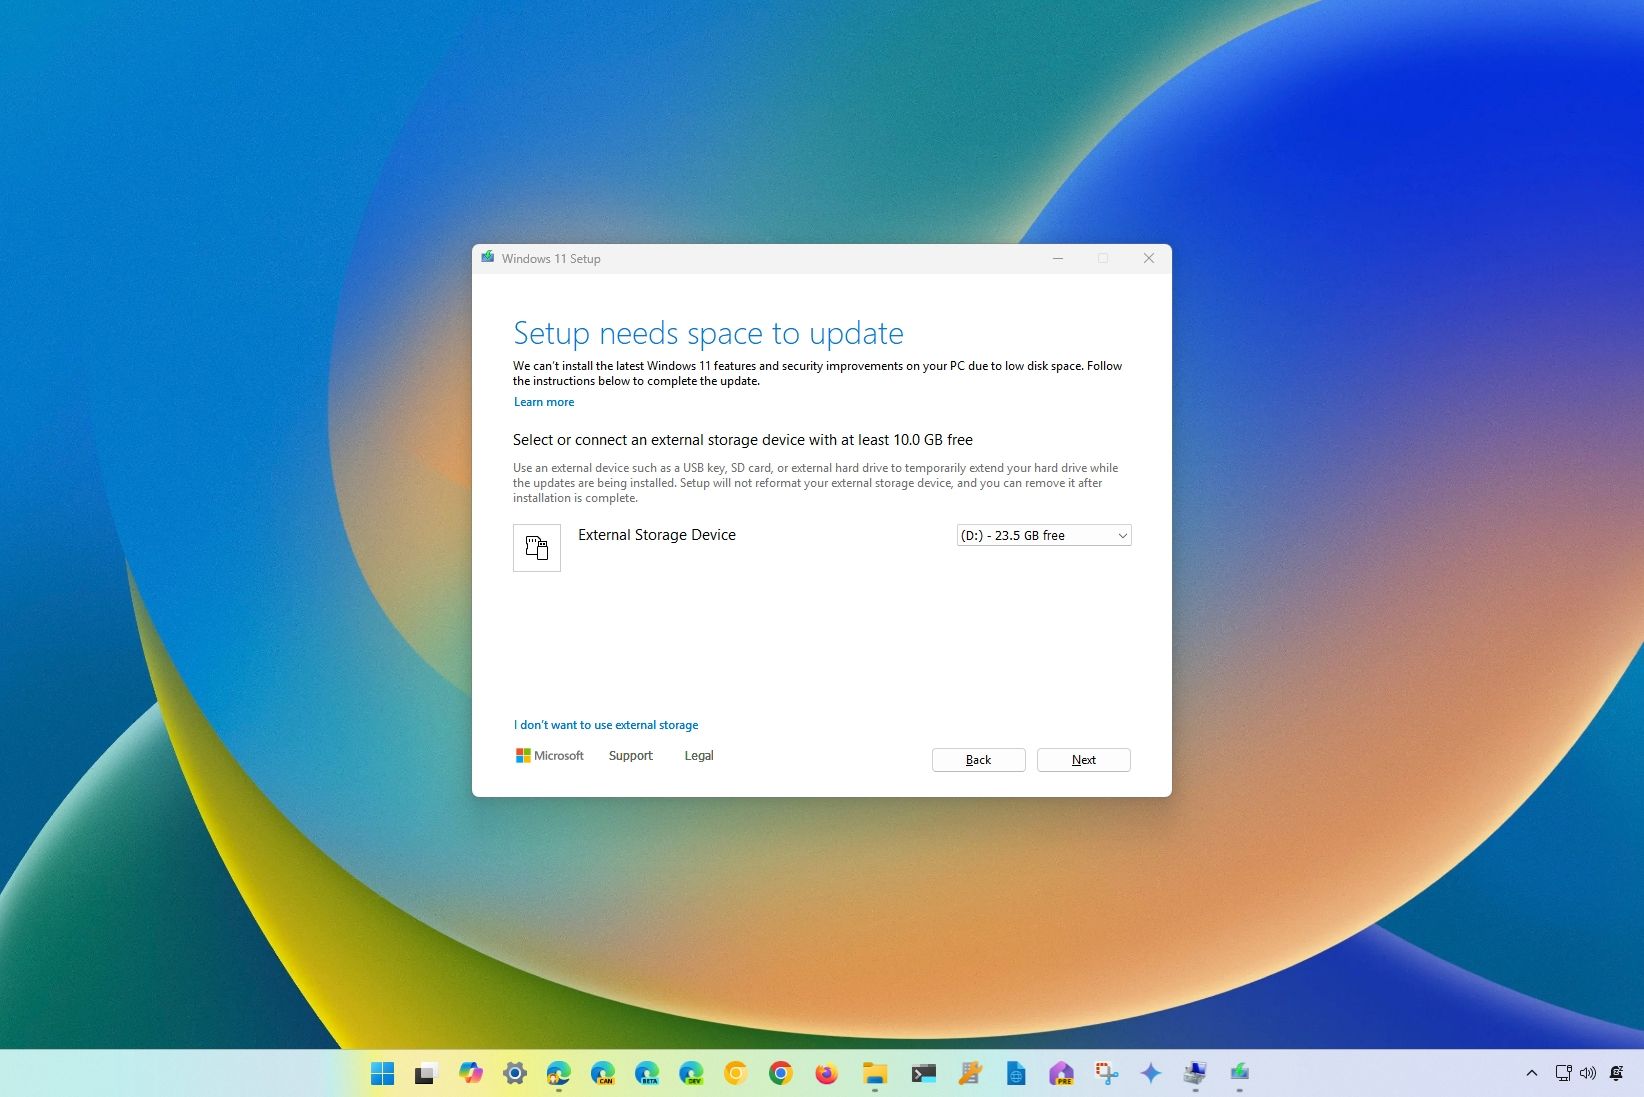
- Under the «Setup needs space to update» section, use the «External Storage Device» drop-down menu and select the empty USB flash drive.
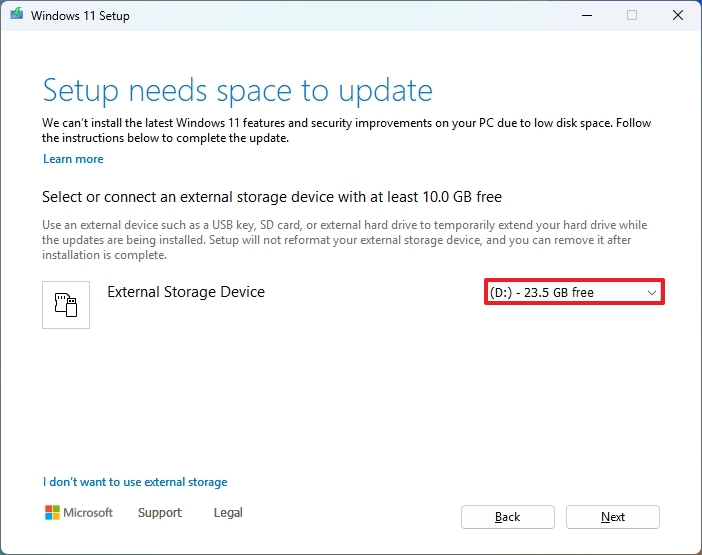
- Quick note: While you can use an external drive as temporary storage for the installation, the computer’s internal hard drive may still require some minimum free space to proceed with the upgrade. If you have to free up even more space, use these instructions or use the «Compact OS» command-line tool (see below).
- Click the Next button.
- Click the Install button.
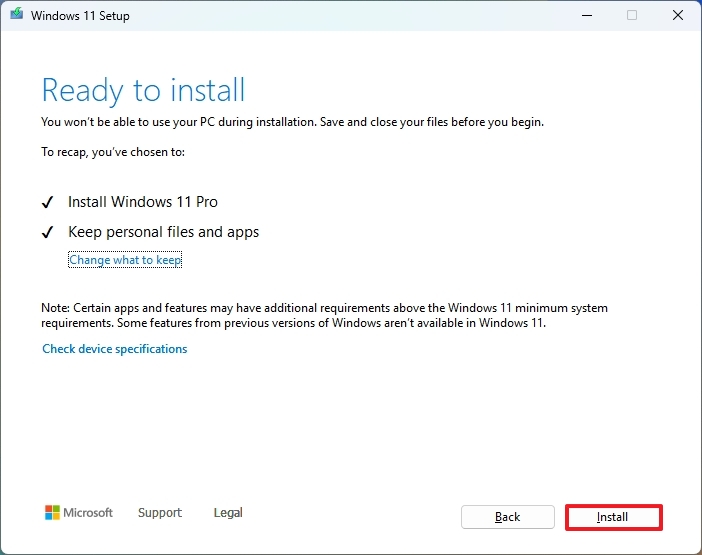
- Continue with the on-screen instructions to complete the installation process (if applicable).
After you complete the steps, the setup will proceed with the upgrade to the latest version of the operating system.
Shrink current setup (optional)
Alternatively, you can also use «Compact OS,» a command-line tool designed to compress and reduce the footprint of the Windows setup and applications.
Warning: This is a friendly reminder that modifying system files is risky and can cause irreversible damage to your installation if you do not do it correctly. Before proceeding, it is recommended that you make a temporary full backup of your PC.
To shrink the size of the current installation of Windows, use these steps:
- Open Start.
- Search for Command Prompt, right-click the top result, and select the Run as administrator option.
- Type the following command to compress the installation of Windows 10 and press Enter: compact.exe /compactOS:always
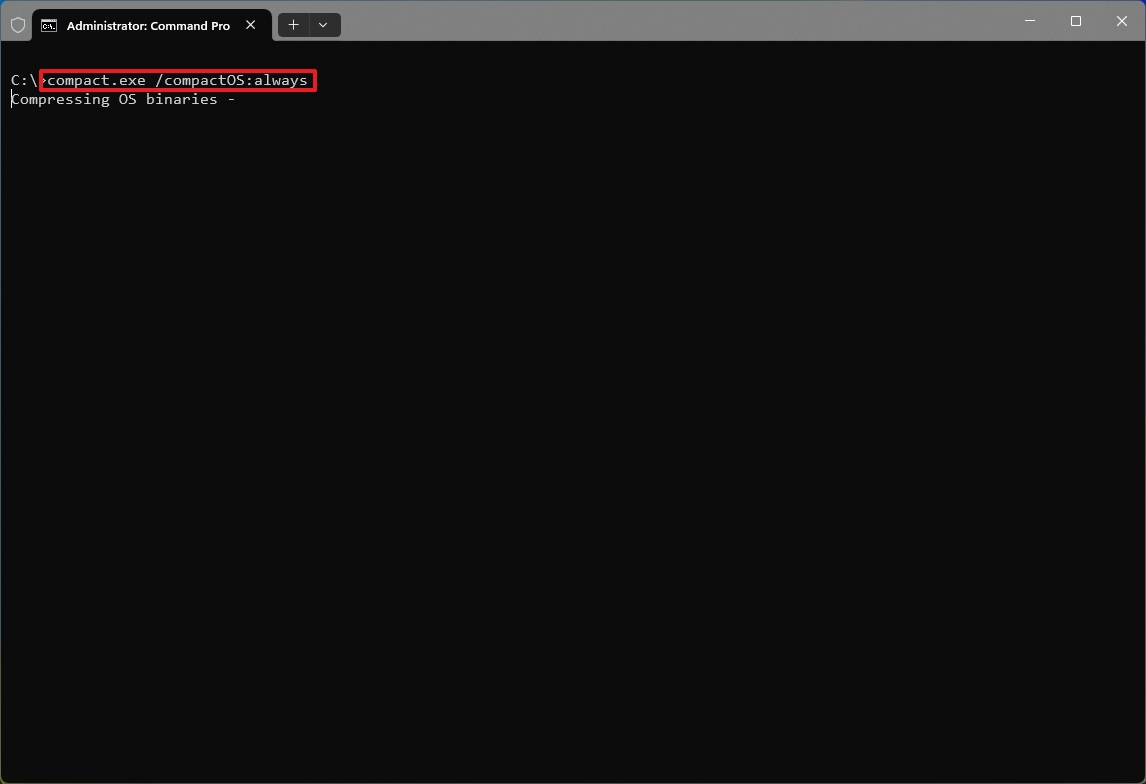
After you complete the steps, the installation footprint will be reduced, giving you around 2GB of extra storage that may help you continue with the setup.
You can always revert the changes after the upgrade using the same instructions, but in step 3, use the «compact.exe /compactOS:never» command.
More resources
For more helpful articles, coverage, and answers to common questions about Windows 10 and Windows 11, visit the following resources:
- Windows 10 on Windows Central — All you need to know
- Windows 11 on Windows Central — All you need to know
Mauro Huculak has been a Windows How-To Expert contributor for WindowsCentral.com for nearly a decade and has over 15 years of experience writing comprehensive guides. He also has an IT background and has achieved different professional certifications from Microsoft, Cisco, VMware, and CompTIA. He has been recognized as a Microsoft MVP for many years.
Много Windows 10 пользователи столкнулись с проблемой, что диск С запускается Недостаточно места на диске после обновления до Windows 11. Если Windows 11 предварительно установлен на вашем ноутбуке/настольном компьютере/планшете, вы когда-нибудь столкнетесь с той же проблемой. Многие жалуются, что в папке недостаточно свободного места. Windows 11 после установки обновлений. В этом случае диск C меняется на красный в проводнике. Это раздражает, когда на диске C заканчивается свободное место, потому что компьютер становится намного медленнее, зависает или даже выходит из строя. В этой статье представлены 2 наиболее эффективных метода исправления проблемы с малым количеством места на диске C в Windows 11.
Содержание:
- Почему на диске C мало места в Windows 11 после обновления
- Как исправить Windows 11 проблема с нехваткой места на диске
Почему на диске C мало места в Windows 11 после обновления
Перед обновлением до Windows 11, большинство Windows 10 компьютеры работают давно. На диск C уже сохранено большое количество файлов. Если вы по умолчанию устанавливали все программы в системный раздел, C диск заполнен быстро. Он станет полным, даже если вы создали его размером до 100 ГБ.
При обновлении до Windows 11, есть дополнительные файлы, сохраненные на диске C. В целом он занимает от 5 до 10 ГБ свободного места. Когда вы получаете «мало места для хранения«Предупреждение в Windows 11 компьютер, вам лучше решить эту проблему как можно быстрее. В противном случае система будет работать медленнее, компьютер зависнет или даже выйдет из строя.
Как исправить Windows 11 проблема с нехваткой места на диске
Независимо от того, на диске C недостаточно места после обновления до Windows 11 или в предустановленном Windows 11 компьютер, вы можете решить эту проблему быстро и легко. В Интернете есть много методов, но немногие могут помочь. Конечно, вы можете попробовать их все, но это действительно не нужно, за исключением методов ниже.
Метод 1 — удалить ненужные файлы с диска C
Когда на системном диске C: недостаточно места на диске Windows 11 ноутбук/рабочий стол/планшет, первое, что вы должны сделать, это очистка диска удалить мусор и ненужные файлы. Если вы просто обновитесь с Windows 10 и никогда не очищайте диск C раньше, вы можете освободить более 10 ГБ свободного места. К освободить место на диске в Windows 11, есть встроенный инструмент очистки диска. Он прост в использовании и работает быстро. Самое главное, он может безопасно удалить большинство ненужных файлов. Вам не нужно беспокоиться о повреждении системы.
Как исправить Windows 11 мало места на диске C путем очистки диска:
- Press Windows и R вместе на клавиатуре наберите cleanmgr и нажмите Enter.
- C: диск выбран по умолчанию, просто нажмите OK для продолжения.
- Установите флажок напротив файлов, которые вы хотите удалить. Если вы не знакомы с ними, щелкните по нему и прочтите соответствующее описание внизу.
- Подтвердите удаление во всплывающем окне.
- Повторите с шага 1 и нажмите Очистить системные файлы на этапе 3.
Способ 2 — переместить свободное место с другого раздела
Второй и самый важный шаг — это добавление места на диск C из другого раздела. Некоторые люди пытались очистить диск раньше, но Windows 11 Оповещение о низком количестве места на диске всплывает снова через короткое время. Потому что новые мусорные файлы постоянно сохраняются на диске C. Если вы не можете получить более 20 ГБ свободного места, конечно, диск C вскоре снова заполнится.
В программное обеспечение безопасного раздела, вы можете сжать раздел на диске, чтобы освободить свободное место, а затем добавить к диску C. Таким образом, операционная система, программы и все остальное (кроме размера раздела) остаются такими же, как и прежде. Чтобы выполнить эту задачу, NIUBI Partition Editor имеет бесплатное издание для Windows 11/10/8/7/Vista/XP пользователи домашних компьютеров.
Он имеет виртуальный режим, Cancel-at-well и технологию 1-Second Rollback для защиты системы и данных. Если вы все еще беспокоитесь о безопасности данных, вы можете клонировать раздел диска заранее с помощью этого бесплатного инструмента для разделов.
Как исправить недостаток места на диске C в Windows 11 перемещая свободное пространство:
- Скачать NIUBI в бесплатной версии щелкните правой кнопкой мыши соседний раздел D (или E) и выберите опцию «Изменить размер/Переместить том», перетащите левая граница вправо во всплывающем окне. Тогда слева будет создано нераспределенное пространство.
- Щелкните правой кнопкой мыши диск C: и снова запустите «Изменить размер / перемещение тома», перетащите правая граница вправо, чтобы объединить это нераспределенное пространство.
- Нажмите Применить в левом верхнем углу, чтобы вступить в силу.
- Если в соседнем разделе недостаточно свободного места, вы можете сжать несмежный раздел на том же диске.
- Если на том же диске нет другого раздела или недостаточно свободного места, вы можете клонировать диск на больший и расширить диск C с дополнительным дисковым пространством.
Как переместить свободное место на диск C из другого раздела:

Как добавить больше места на диск C с диском большего размера:
Помимо сокращения и расширения раздела, это бесплатное программное обеспечение для раздела помогает перемещать, объединять, копировать, конвертировать, дефрагментировать, скрывать, стирать разделы и многое другое. Это 100% чистота без какой-либо связанной рекламы или плагинов.
Скачать
Способ 3 — переместить программы и файлы с диска C (необязательно)
Многие устанавливают программы на диск C с настройками по умолчанию, это плохая привычка. Чем больше программ вы установили, тем меньше свободного места остается на диске C. Кроме того, некоторые программы выводят большие файлы в установочном каталоге. Лучше устанавливать на отдельный раздел, например D, не выкидывайте все на системный раздел C. Есть ли какие-нибудь методы, если вы установили программы на диск C? В Windows 11 компьютер, вы можете перемещать программы (установлено из магазина) в другой раздел без переустановки. Следуйте инструкциям ниже:
- Press Windows + R ключи, вставьте команду мс-настройка: appsfeatures и нажмите Enter.
- Нажмите на приложение или игру.
- Нажмите Двигаемся .
- Выберите новое местоположение из выпадающего списка.
- Нажмите Двигаемся .
- Повторите шаг 2, чтобы переместить другие элементы.
Для программ, установленных традиционным методом, измените выходной путь по умолчанию на другой раздел. Программы для видео, проектов и игр будут выводить большие файлы. Кроме того, вам лучше также изменить путь загрузки интернет-браузера на другой раздел. К файлам в исходной папке загрузки вы можете удалить их или переместить в новую папку. Наконец, беги Windows встроенная утилита очистки диска ежемесячно для удаления новых сгенерированных ненужных файлов. После этого вы можете исправить нехватку места на диске C в Windows 11 комп полностью.
Microsoft’s Major AI update 2024, Windows 11 version 24H2 available for download. It’s a free update for existing Windows 11 users, and compatible Windows 10 devices running version 2004 and later. Existing Windows 11 users can download and install Windows 11 2024 update (Version 24H2) by heading to Settings > Windows Update and clicking Check for updates. For Windows 10 users, if your device meets minimum system requirements, can get install Windows 11 2024 update via Windows update. Overall it’s like installing regular Windows update but its size in huge may take longer time. However, at times you may experience Windows 11 Version 24H2 failed to install on Windows 10 device. Some users report Windows 11 Version 24H2 Update Not Installing, is stuck download hours. This post explores the common reason behind Windows 11 Update Errors: Why it Fails & How to Fix it.
Contents
- 1 Windows 11 24H2 update failed to install
- 1.1 Check System Requirements
- 1.2 Check Internet connection
- 1.3 Free Up Disk Space
- 1.4 Check TPM 2.0 and secure boot Enabled
- 1.5 Run Windows Update Troubleshooter
- 1.6 Reset Windows update components
- 1.7 Repair Corrupt Files using SFC and DISM
- 1.8 Use Windows 11 Installation Assistant
There can be many reasons you may not be able to install the latest Windows Updates on your computer. Slow internet connection to Insufficient disk space, third-party software conflict, corrupt system files or security software blocking are common.
- Windows 11 has specific hardware requirements. If your computer doesn’t meet these requirements, the upgrade will fail.
- Windows 11 often requires a TPM 2.0 chip. If your system lacks this or it’s not enabled, the upgrade may fail.
- If your system doesn’t have enough free space, the upgrade may fail. Windows 11 requires a certain amount of free disk space to install.
- If the installation files are corrupted or incomplete, it can lead to a failed upgrade.
- A stable internet connection is crucial during the upgrade process. If there are network problems, the installation might fail.
- Antivirus or security software can sometimes interfere with the installation process. Temporarily disabling such software before the upgrade can help.
- If you’re using third-party disk encryption software, it can cause problems during the upgrade process.
Check System Requirements
The first thing you need to verify and ensure that your system meets the minimum requirements for Windows 11. It is crucial for a successful Windows 11 upgrade. Windows 11 introduces new features and requires specific hardware capabilities that may not be present in older systems.
Here are Microsoft’s official recommended minimum system requirements for installing Windows 11 on a PC. Also ensure Your device must be running Windows 10, version 2004 or later, to Windows 11 upgrade.
| Processor | 1 gigahertz (GHz) or faster with 2 or more cores on a compatible 64-bit processor or System on a Chip (SoC). |
| RAM | 4 Gigabytes (GB). |
| Storage | 64 GB or larger storage device Note: See below under “More information on storage space to keep Windows 11 up-to-date” for more details. |
| System firmware | UEFI, Secure Boot capable. Check here for information on how your PC might be able to meet this requirement. |
| TPM | Trusted Platform Module (TPM) version 2.0. Check here for instructions on how your PC might be enabled to meet this requirement. |
| Graphics card | Compatible with DirectX 12 or later with WDDM 2.0 driver. |
| Display | High definition (720p) display that is greater than 9” diagonally, 8 bits per color channel. |
| Internet connection and Microsoft account | Windows 11 Pro for personal use and Windows 11 Home require internet connectivity and a Microsoft account during the initial device set-up. |
Also, you can downlaod and run the Microsoft PC Health Check app from Microsoft to ensure your Device is compatible with the latest Windows 11 version 24H2.
Check Internet connection
A stable and working internet connection is essential for downloading and installing Windows 11 24H2 update. If your internet connection is unstable or not functioning properly, it can lead to incomplete downloads or interrupted installations, causing the upgrade to fail.
A stable and working internet connection is essential for downloading and installing updates.
You can run a ping command to measure the latency of your internet connection.
- Press Windows key + R, type ping www.google.com -t and press Enter.
- This sends a series of test packets to a server (in this case, Google’s server) and checks if you receive responses.
- If successful, it indicates that your internet connection is functioning.
Ensure that both your modem and router (if applicable) are powered on and have their indicator lights showing normal operation. If you suspect an issue with your router, try restart it. This can often resolve temporary connectivity problems.
- You can Power cycle your modem and router by unplugging them,
- Waiting for about 30 seconds, and then plugging them back in.
- Allow them to fully restart before attempting to connect again.
Also, it’s recommended to disconnect from a VPN before attempting a major system operation like a Windows 11 upgrade. This is because a VPN can sometimes interfere with the download and installation process by routing traffic through different servers or locations, potentially causing errors.
If you’re using Wi-Fi, take your laptop closer to Router, For a wired connection, ensure that the Ethernet cable is securely plugged in at both ends.
Also, you can visit fast.com or speedtest.net to check your internet speed.
Free Up Disk Space
The Windows 11 installation process requires a certain amount of space to accommodate the new operating system files. If your system drive is nearing full capacity, it can lead to installation failures or performance issues after the upgrade. Cleaning up unnecessary files and applications frees up space, allowing for a smoother upgrade experience.
Ensuring you have enough free disk space on your system drive is crucial for the upgrade process.
- Use the built-in Disk Cleanup tool to remove unnecessary files, such as temporary files, old downloads, and system-generated cache.
- Go to “Settings” > “Apps” and review the list of installed programs. Uninstall any applications you no longer use or need.
- Manually review your files and delete any large or unused files, such as old videos, documents, or applications.
- Consider moving large media files (like videos, photos, and music) to an external hard drive or cloud storage.
Check TPM 2.0 and secure boot Enabled
Enabling TPM 2.0 (Trusted Platform Module) and Secure Boot are important steps in preparing your system for a potential upgrade to Windows 11. Here’s how you can enable these features on Windows 10:
To Check if Your System Already Has TPM
Press Windows key + R to open the Run dialog box, type tpm.msc, and press Enter. If TPM is already present, you can skip to the next step.
Enable TPM in BIOS/UEFI:
- Restart your computer and enter the BIOS or UEFI settings. This is usually done by pressing a key like F2, F10, F12, DEL, or ESC during startup. Refer to your computer’s manual for specific instructions.
- Navigate to the Security or Advanced settings menu, and look for an option related to TPM or Security Chip.
- Enable it and save changes before exiting the BIOS.
To Enable Secure Boot
- Restart your computer and enter the BIOS or UEFI settings using the same method as above.
- In the BIOS/UEFI settings, look for an option related to Secure Boot. It may be found under the Security or Boot sections.
- Set the Secure Boot option to “Enabled” or “Enabled with UEFI only”. This ensures that only signed and trusted bootloaders and drivers are loaded during startup.
- Save the changes you made to the BIOS/UEFI settings and exit. Your computer will restart.
Run Windows Update Troubleshooter
The Windows Update Troubleshooter is a built-in tool designed to identify and resolve common update-related issues. It scans for problems that may be preventing Windows updates from being installed correctly. Running this troubleshooter can help diagnose and fix issues related to Windows update components, services, and settings. And this help successful upgrade to Windows 11.
The Windows Update Troubleshooter can identify and resolve common update-related issues.
To run Windows Update Troubleshooter
- Press Windows + I to open Settings.
- Click Update & Security then troubleshoot
- Now click on the additional troubleshooter link (Refer to the image below)
- locate Windows Update and click Run the Troubleshooter
The Windows update troubleshooter will run and attempt to identify if any problems exist that prevent your computer from downloading and installing Windows Updates. After completing, the process Restart Windows and again manually Check for Updates.
Reset Windows update components
This process involves deleting temporary files that Windows uses to store update files. These files can sometimes become corrupted or incomplete, leading to issues during the upgrade process. By clearing the update cache, you’re essentially starting with a fresh set of update files, which can help resolve any problems associated with the existing cache.
- Press Win + R to open the Run dialog box and type services.msc.
- Find the “Windows Update” service, right-click, and select “Stop”. This will temporarily halt the Windows Update service
- Now press Windows key + E to open File Explorer and navigate to C:\Windows\SoftwareDistribution.
- Open the download folder and delete all files and folders within it. This is where Windows stores update files.
- Restart the “Windows Update” service by right-clicking it and selecting “Start”. This will initiate the service again.
Now open Windows 10 settings using Windows key + I, navigate to Windows update then hit check for updates. Click download and install next to windows 11 ready notification.
Repair Corrupt Files using SFC and DISM
Corrupt system files are another common reason why Windows 11 version 24H2 fails to install. You can use the System File Checker (SFC) and Deployment Image Service and Management Tool (DISM) tools for repairing the Windows operating system.
- Open the command prompt as administrator,
- Run DISM command DISM.exe /Online /Cleanup-image /Restorehealth
- And after that run sfc/scannow to run the system file checker utility,
- Restart windows after complete the scanning process.
SFC scans and repairs corrupted or missing system files, ensuring the integrity of the operating system. DISM, on the other hand, is used to repair the Windows image itself, which includes system files and components.
Running both of these tools can help resolve any underlying issues within the Windows environment, potentially enabling a successful upgrade.
Use Windows 11 Installation Assistant
The Windows Installation Assistant is a dedicated tool provided by Microsoft to assist users in upgrading to Windows 11. It automates many of the compatibility checks and guides users through the upgrade process. If all the above methods fail to fix the problem, download and run the Windows 11 Installation Assistant from the Microsoft website.
This tool is designed to make the upgrade experience more user-friendly and to help identify and address potential issues that may prevent a successful upgrade.
- Visit the official Microsoft website to get the Windows 11 Installation Assistant. Click on the “Download now” button to start the download process.
- If a User Account Control notification appears, click on “Yes” to allow the tool to make changes to your system.
- Read through the Microsoft software license terms and then click on “Accept and install” to proceed with the Windows 11 upgrade.
- The Installation Assistant will now start downloading Windows 11. This process may take some time, and you can continue to use your PC while it downloads.
Once the download is complete, click on “Restart now” to begin the installation of Windows 11.
Note: Make sure your laptop is connected to the AC adapter during this process, and avoid forcing a shutdown to prevent any potential issues.
After the computer restarts and you’re back at the desktop, it means the Windows 11 installation process is finished.
Also read:
- Fix Windows 10 WiFi keeps disconnecting (5 working solutions)
- Solved: Unknown Hard Error on Windows 10 /11 (5 Working Solutions)
- Fix Apps missing after Windows 10 version 22H2 upgrade
- Solved: Windows 10 BSOD kmode_exception_not_handled overclock
- How to Fix Devices and Printers not Loading on Windows 10