
Многие функции из предыдущей версии Windows перекочевали и в одиннадцатую версию, куда входит и приложение «Ножницы» для создания скриншотов. Некоторые пользователи сталкиваются с проблемами в его работе и не могут сделать снимок экрана.
Я постараюсь разобраться в этой проблеме, представив вашему вниманию все известные методы ее решения.
Перед просмотром следующих рекомендаций убедитесь в том, что скриншоты действительно не создаются. Обычно они сохраняются в папке C:\Users\\Pictures\Screenshots (Снимки экрана). Перейдите в папку и убедитесь в отсутствии изображений в ней.
Способ 1: Использование другой комбинации клавиш
В первую очередь хочется обратить внимание на ситуацию, когда скриншоты не сохраняются исключительно при использовании горячих клавиш для их создания, куда входит PrtSc (Print Screen). Скорее всего, под упомянутую клавишу записано какое-то функциональное действие. Если после нажатия на нее ничего не происходит, рекомендую попробовать комбинацию Fn + PrtSc или Win + PrtSc.
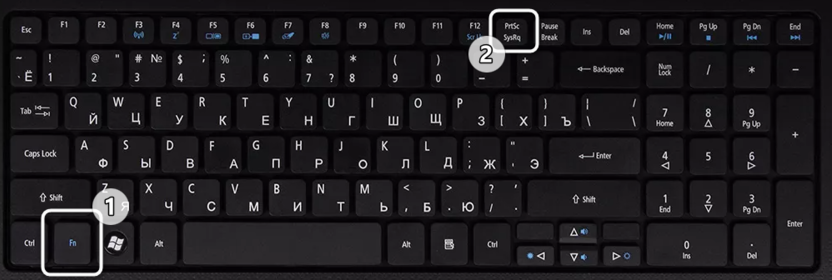
Еще есть сочетание Alt + PrtSc, которое должно создать снимок исключительно активного окна, игнорируя все остальное содержимое. Попробуйте разные варианты и убедитесь в том, что один из них сработал. Если это не так, переходите к следующим методам.
Комьюнити теперь в Телеграм
Подпишитесь и будьте в курсе последних IT-новостей
Подписаться
Способ 2: Проверка установленного времени
Неправильное время, установленное в операционной системе, может сказываться на работе различных системных приложений, в том числе и «Ножниц». Конечно, случается такое редко, но все же стоит проверить текущее время и сравнить его с тем, которое выдаст Гугл или Яндекс при соответствующем запросе.
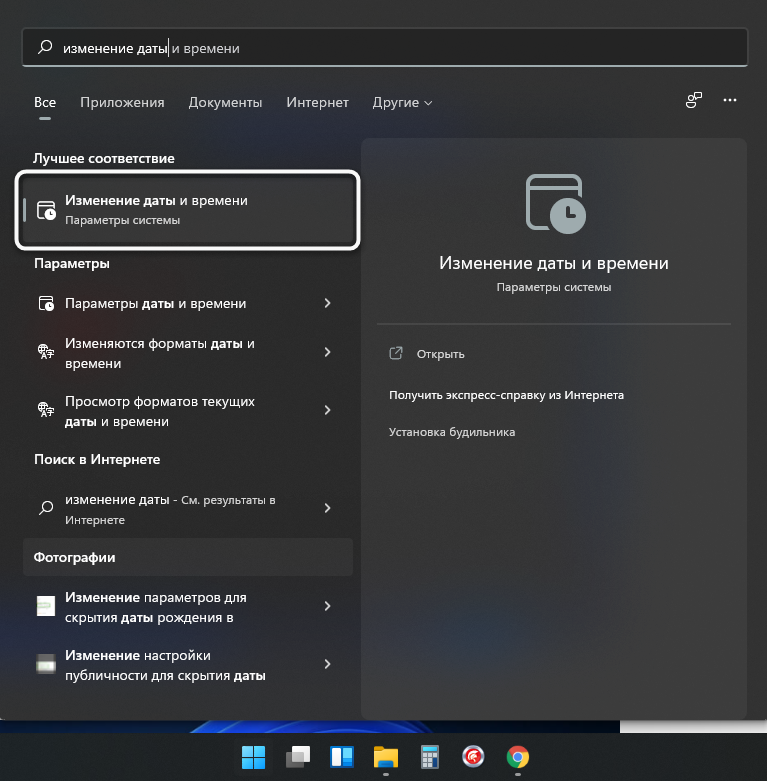
Если что, вы всегда можете открыть параметр «Изменение даты и времени» через «Пуск», чтобы включить автоматическую синхронизацию или установить правильное значение самостоятельно. Внесенные изменения провоцируют сброс в настройках «Ножниц», что и позволит нормализовать работу приложения, если ошибки действительно возникали из-за времени.
Способ 3: Перезапуск приложения
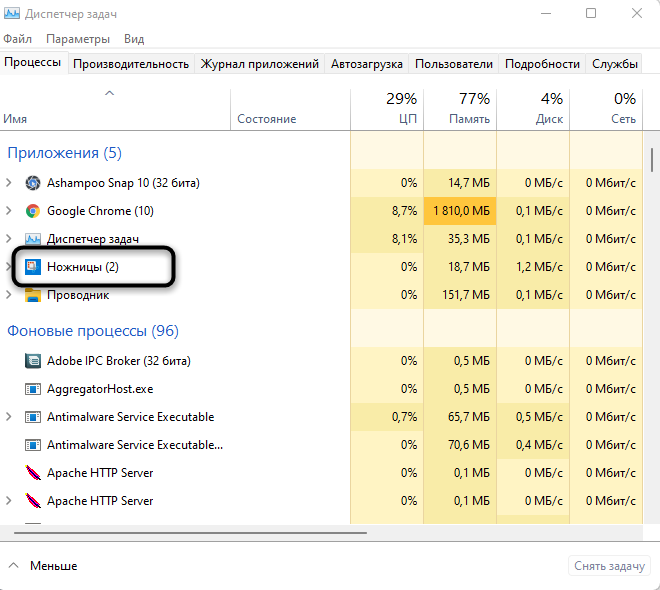
Может показаться, что это предложение звучит банально, но я веду речь именно о перезапуске. Для этого понадобится завершить процесс, что проще всего сделать через «Диспетчер задач».
-
В Windows 11 для открытия «Диспетчера задач» все еще можно использовать горячие клавиши, а также есть другой вариант: нажмите ПКМ по «Пуск» и выберите «Диспетчер задач» из появившегося списка.
-
Найдите задачу «Ножницы» и снимите ее, выбрав соответствующий пункт в контекстном меню.

-
Отыщите «Ножницы» через «Проводник» и запустите его. Проверьте, создаются ли скриншоты теперь.

Способ 4: Настройка фоновой работы приложения
Иногда «Ножницы» не отвечают на запросы пользователя по причине некорректного функционирования в фоновом режиме. Вам необходимо сделать так, чтобы приложение всегда было активным, выполнив следующую настройку:
-
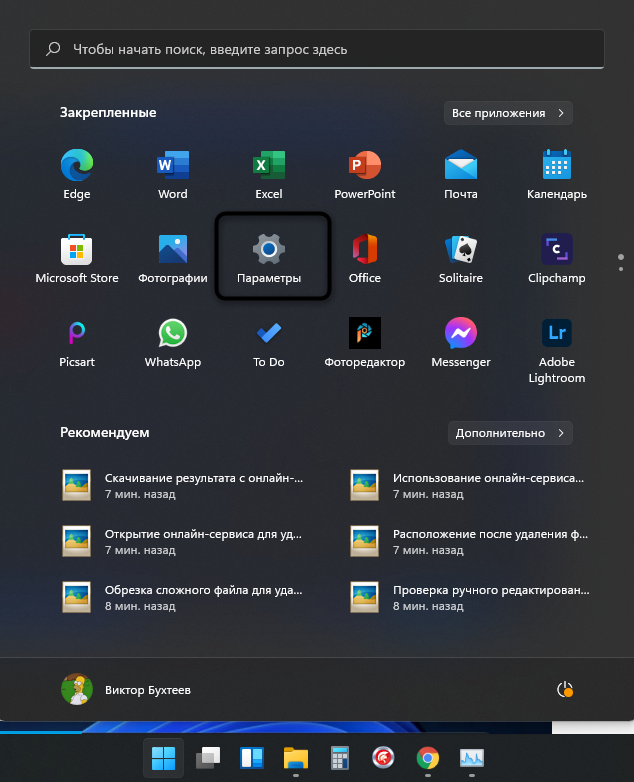
Откройте «Пуск» и нажмите по значку «Параметры».
-
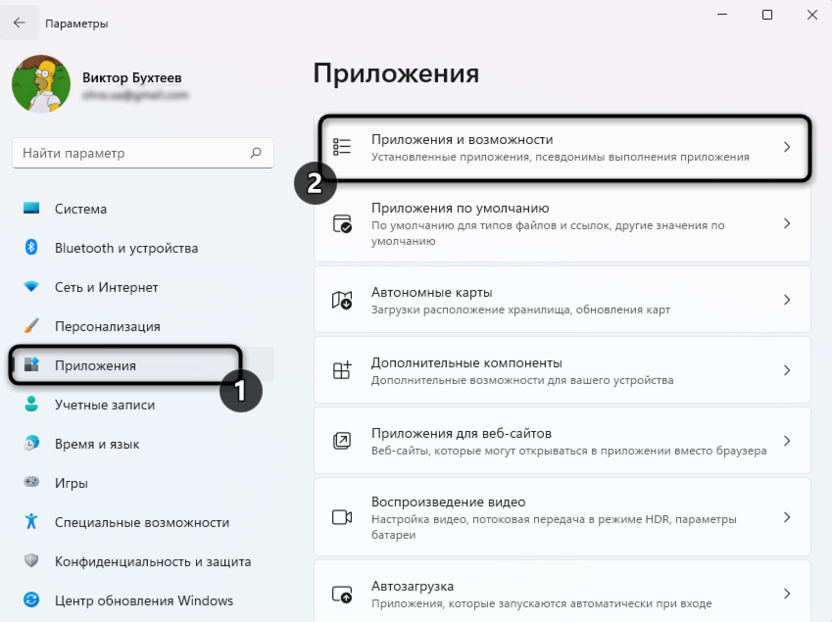
На панели слева выберите пункт «Приложения» и щелкните по первой строке «Приложения и возможности».
-
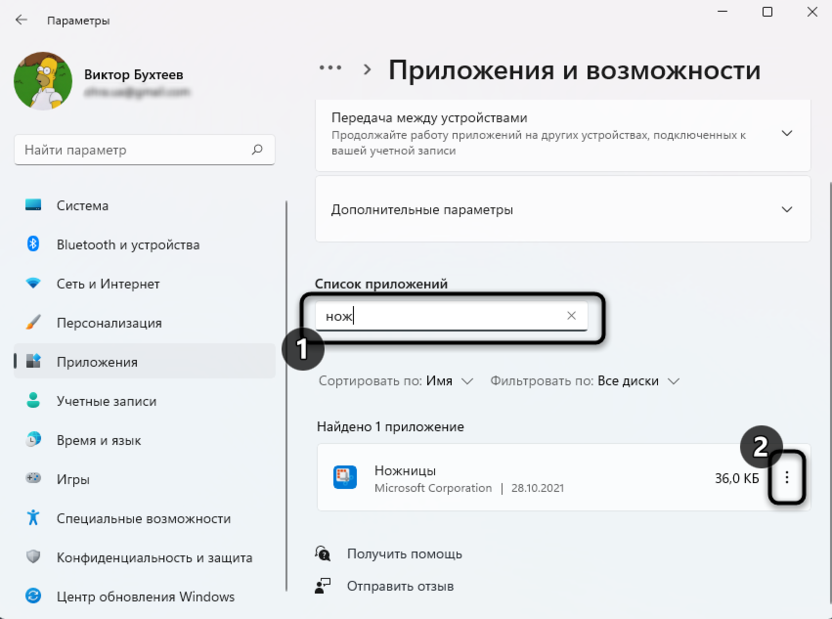
Обязательно используйте поиск для нахождения «Ножниц» и нажмите по трем точкам в поле справа.
-
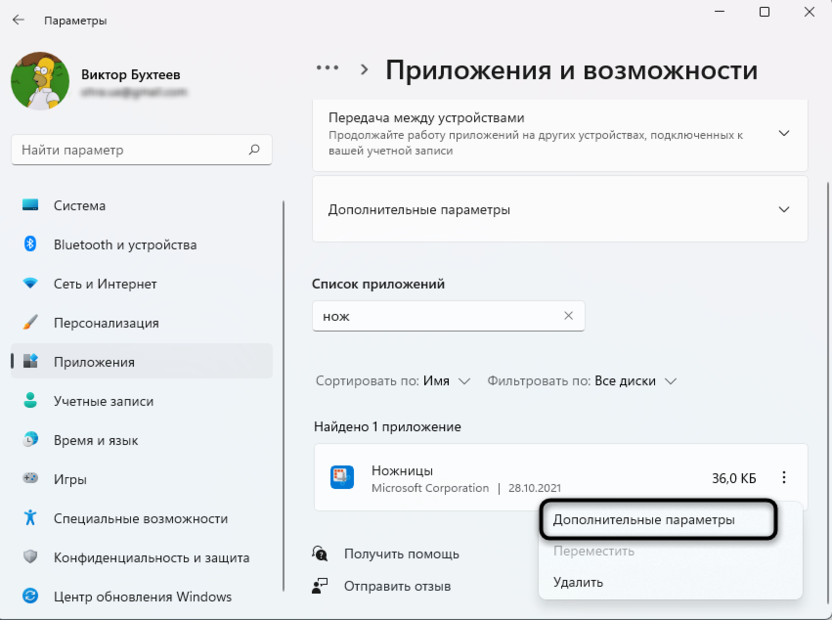
Из появившегося списка выберите «Дополнительные параметры».
-
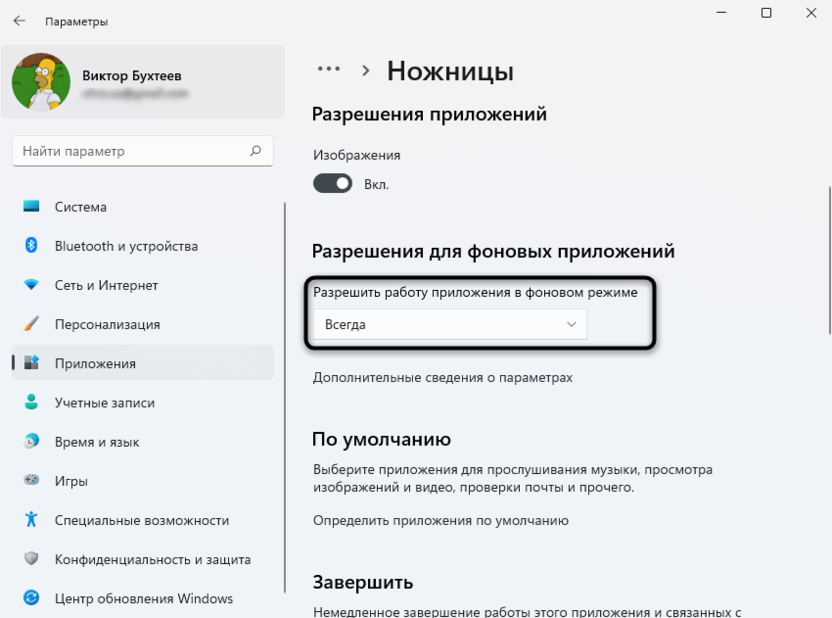
Разрешите работу приложения в фоновом режиме, указав вариант «Всегда». После этого можете перезапустить ПК и попробовать сделать снимок экрана.
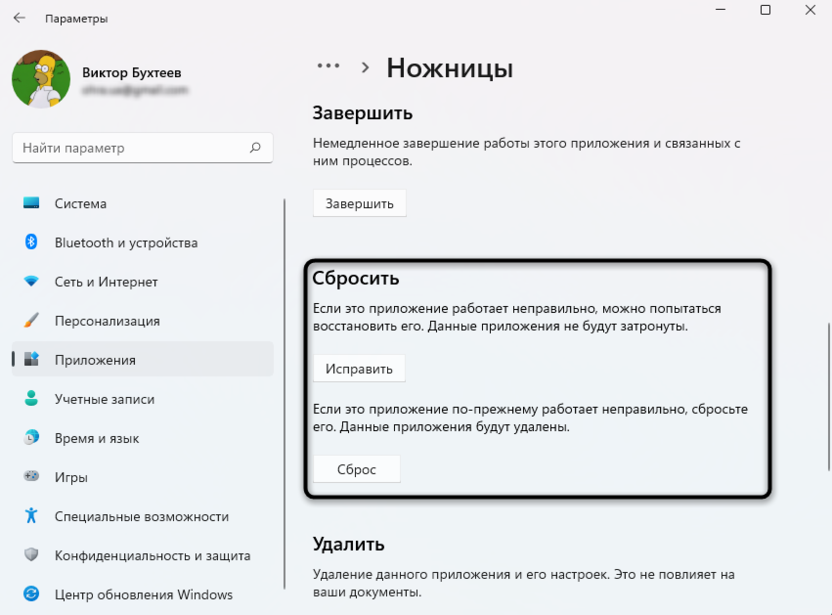
Способ 5: Исправление и сброс приложения
В Windows 11 есть интересные опции для приложений, позволяющие сбрасывать их или исправлять в автоматическом режиме. Возможно, это поможет решить вашу проблему, если она кроется в некорректном функционировании «Ножницы». Для этого откройте тот же раздел с параметрами так, как это было показано выше, или отыщите «Ножницы» через «Пуск» и в меню справа выберите «Параметры приложения».
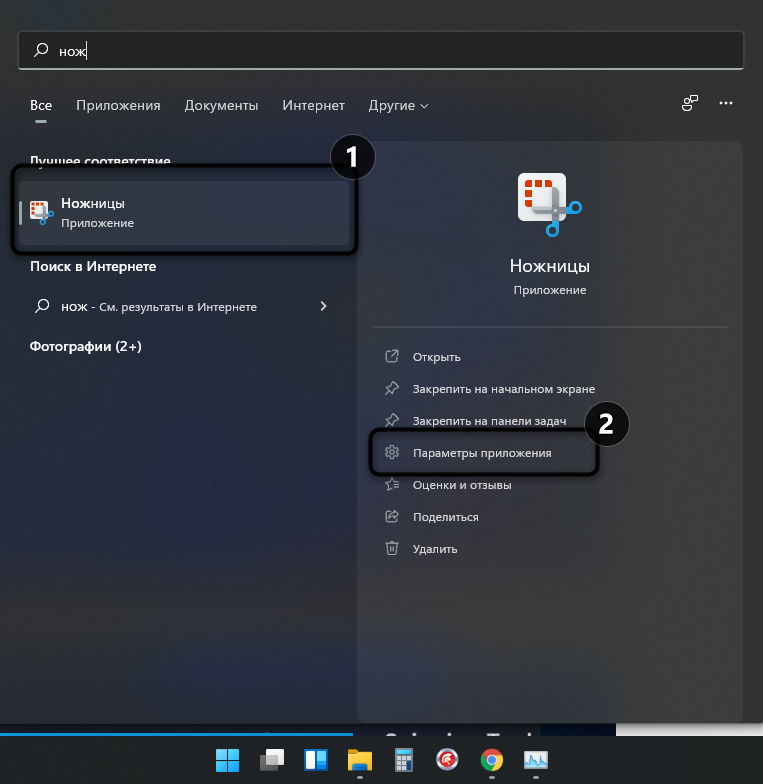
Сначала нажмите кнопку «Исправить», а если это не поможет, используйте «Сброс». После выполнения таких манипуляций программа возвращается к стандартным настройкам, а все данные удаляются – это позволяет восстановить ее работоспособность.
Скорее всего, хотя бы один из перечисленных выше вариантов окажется полезным. Если нет, откройте «Командую строку» и запустите сканирование целостности системных файлов с помощью sfc /scannow. Это займет некоторое время; в случае нахождения ошибок вы будете уведомлены об их исправлении.
Calvince SoftwareKeep
Is the print screen not working on Windows 11? This guide gives you comprehensive solutions to fix the print screen not working issue on Windows 11.
Is the print screen not working on Windows 11? This guide gives you comprehensive solutions to fix the print screen not working issue on Windows 11.

Your print screen not working Windows 11 (prt sc not working) when you want to capture your screen? You would be very frustrated. But don’t panic. You can easily fix this problem and print your screen.
Print screen (prt sc key) is an essential function for many Windows users, allowing them to quickly capture screenshots of their screen.
Some users have reported that the print screen is not working on Windows 11, which can be frustrating.
This article will discuss the common reasons for this issue and provide solutions to help you fix it.
Why is Print Screen Not Working on Windows 11?
There are several reasons why print screen may not work on Windows 11. Some of the most common causes include:
- Keyboard settings: Your keyboard settings may have changed, causing the print screen function to stop working.
- Drivers: Outdated or missing drivers can also cause the print screen function to stop working.
- Windows updates: Windows updates can sometimes interfere with the print screen function.
- Software conflict: Other software installed on your computer can interfere with the print screen function, causing it to stop working.
9 Ways Fix Print Screen Not Working on Windows 11
Here are some of the most effective solutions for fixing the print screen not working issue on Windows 11.
Try these fixes for Windows 11 print screen not working:
- Update your keyboard driver
- Check your keyboard settings (Check if the print screen key is enabled)
- Try Different Keyboard Shortcuts
- Window key + Prtsc key
- FN key + prtsc key
- Windows Key + Shift + S to open Snipping Tool
- Windows Key + G
- Disable all background running programs
- Run keyboard troubleshooter
- Use the snipping tool
- Check third party screenshot software
- Restart your computer
- Update your Windows operating system
How to fix print screen not working Windows 11
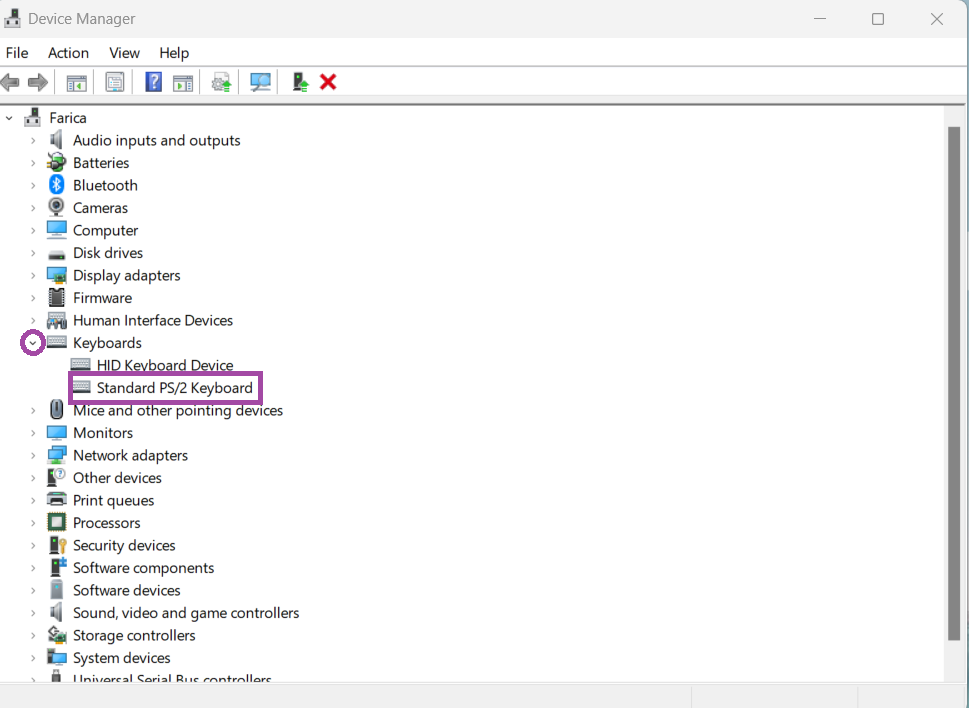
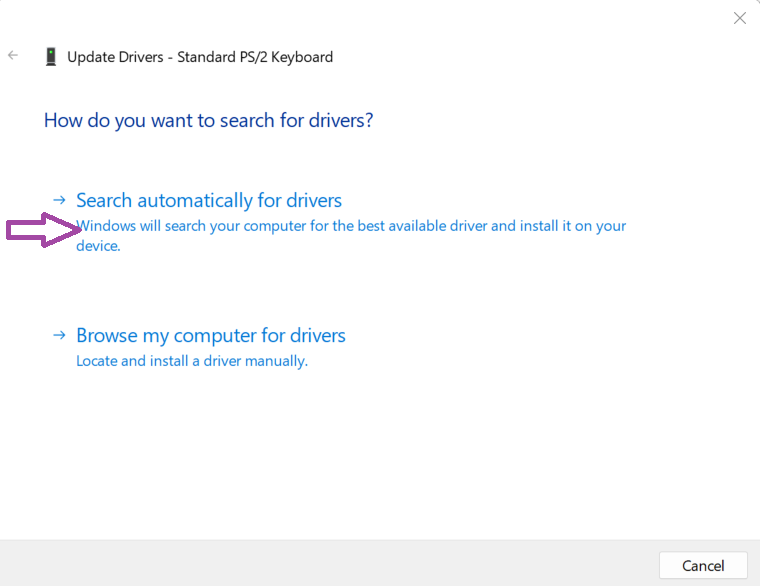
#1. Update Your keyboard drivers and other drivers
If your keyboard drivers are outdated or missing, they can cause the print screen function to stop working. Updating your drivers can fix the issue.
To update your drivers:
- Press Windows+ X to open Windows Quick Menu.
-
From the list, select Device Manager.
- Find your keyboard in the list of devices > and expand it by clicking on the arrow next to it.
-
Right-click on Standard PS/2 Keyboard and choose Update Driver.
- Select “Search automatically for updated driver software” to allow Windows 11 to look for the newest driver on your local computer or online.
- If it finds an update, follow any on-screen instructions.
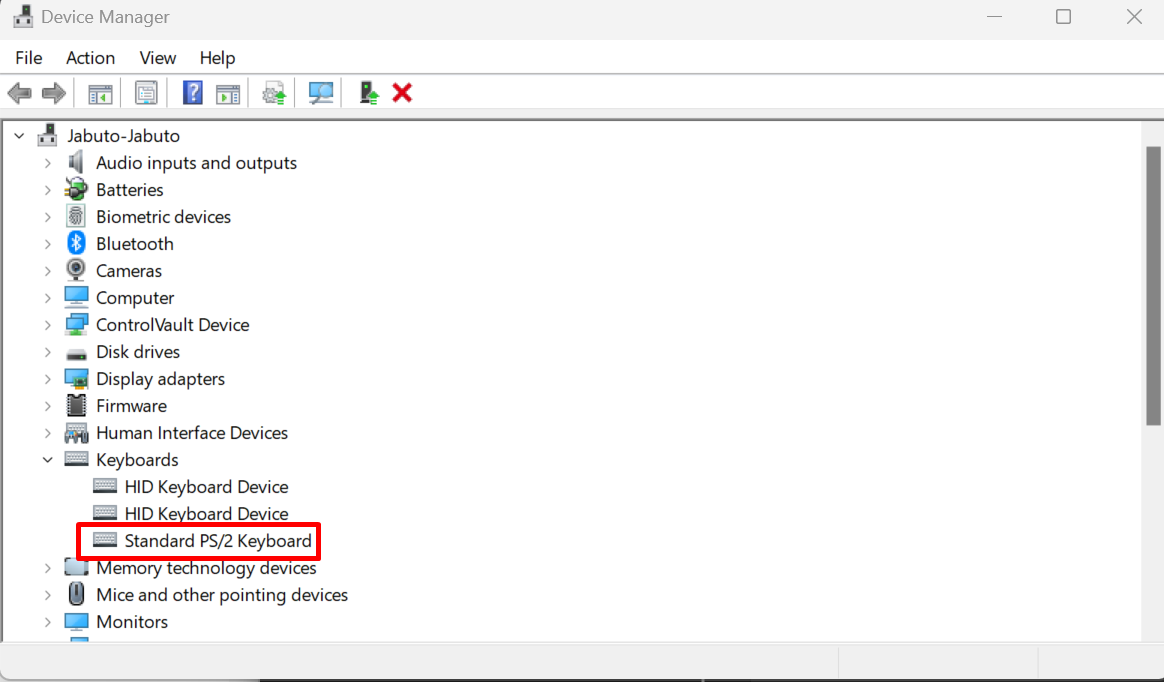
Once done, check if your Print Screen key is working.
You can immediately see if the method was successful by checking if a new screenshot is added to the “C:\Users\user\Pictures\Screenshots” folder.
#2. Check that print screen key is enabled (prt sc key enabled)
You need to check your keyboard settings and make sure that print screen is enabled. To use the key, ensure the print screen key is not disabled or mapped to another function.
To check your keyboard settings:
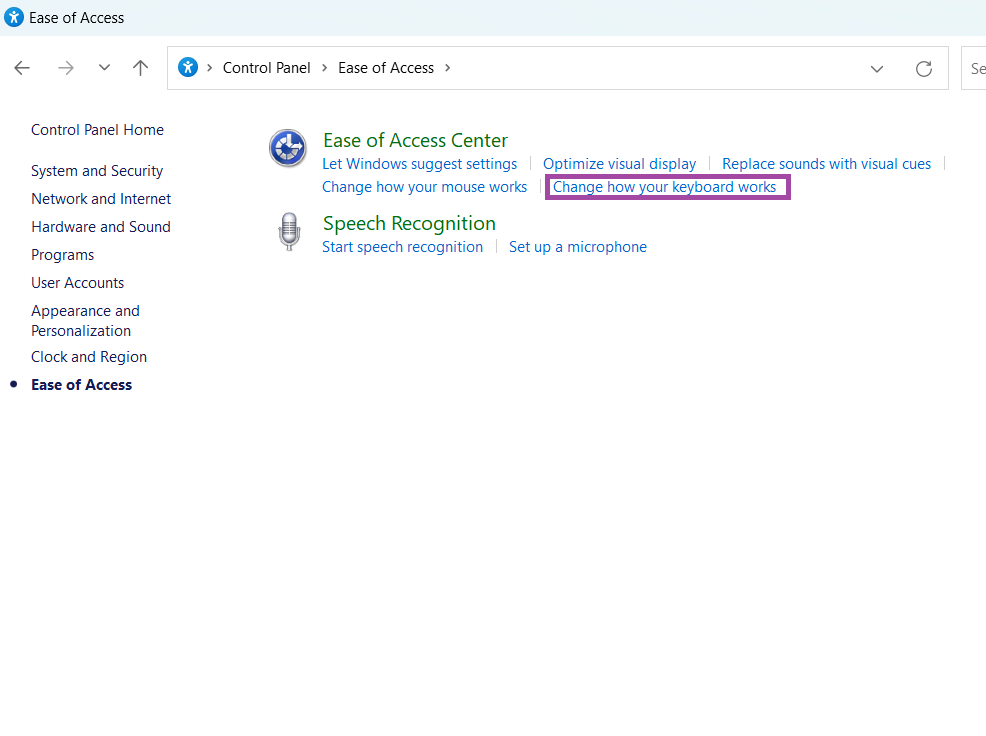
- Open the Control Panel (Press Wins Key + R, then type control)
- Click on the «Ease of Access» option.
- Click on the «Keyboard» option. (It may be written as ‘change how your keyboard works.’).
- Got to Keyboard settings.
- Make sure the «Print Screen» key is not disabled or mapped to another function.
Another way is to press the F Mode key or F Lock key (when there is such keys on your keyboard) and then check if Print Screen works. If not, skip this fix. That key may prevent you from using the print screen key.
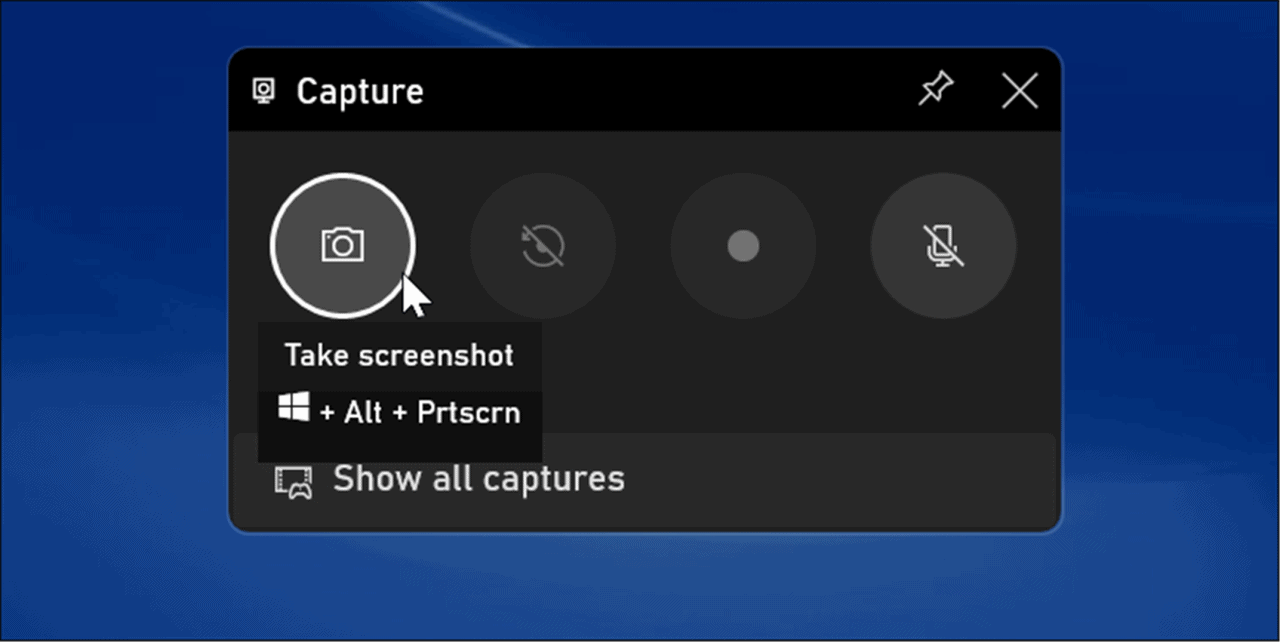
#3. Try Different Keyboard Shortcuts
If prtsc or print screen key isn’t working on Windows 11, you can try a few keyboard shortcuts to take a screenshot. Don’t panic before you try the following shortcuts first:
- Try Windows Key+ PrtScn to take a shot and save it to a file.
- Try Alt+ PrtScn to take a shot of an active window.
- Try fn+ PrtScn to take the screenshot (or launch a third-party app like Lightshot)
- Try Windows Key+ Shift+ S to launch the Snipping Tool for screenshots.
These will automatically save the screenshot to your Pictures folder.
If, after the shortcuts, the prt sc key still isn’t working, there’s a last alternative.
Another workaround is the Xbox Game Bar through the keyboard shortcut of Windows Key+ G to launch the Xbox Game Bar. Once it’s open, click the Widgets button > Capture and click the camera icon to take your shot. See if that works.
#4. Stop background running programs
If other software installed on your computer is interfering with the print screen function, you may need to disable it. To disable the software, follow these steps:
- Right click on Windows start.
- Open the Task Manager.
- Find the software that is interfering with the print screen function.
- Right-click on the software and select «End Task.»
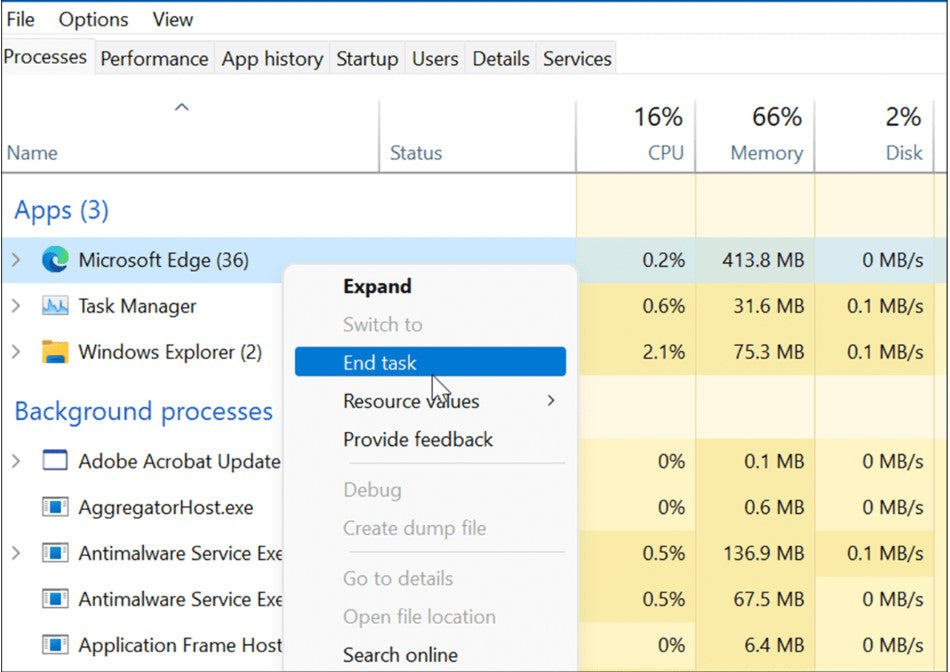
Since some programs like OneDrive, Dropbox, Snipping tool can take over the Print Screen key, disable all the running programs on your PC then try to print screen again to see if it works.
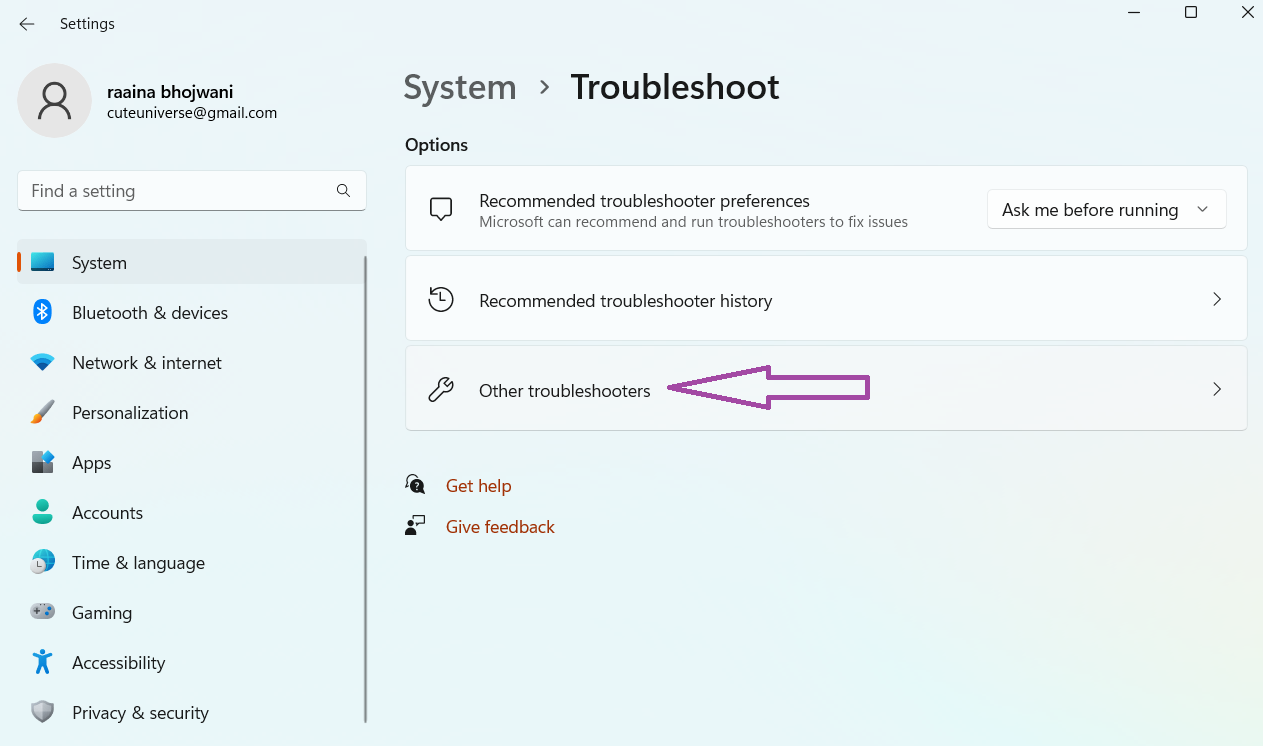
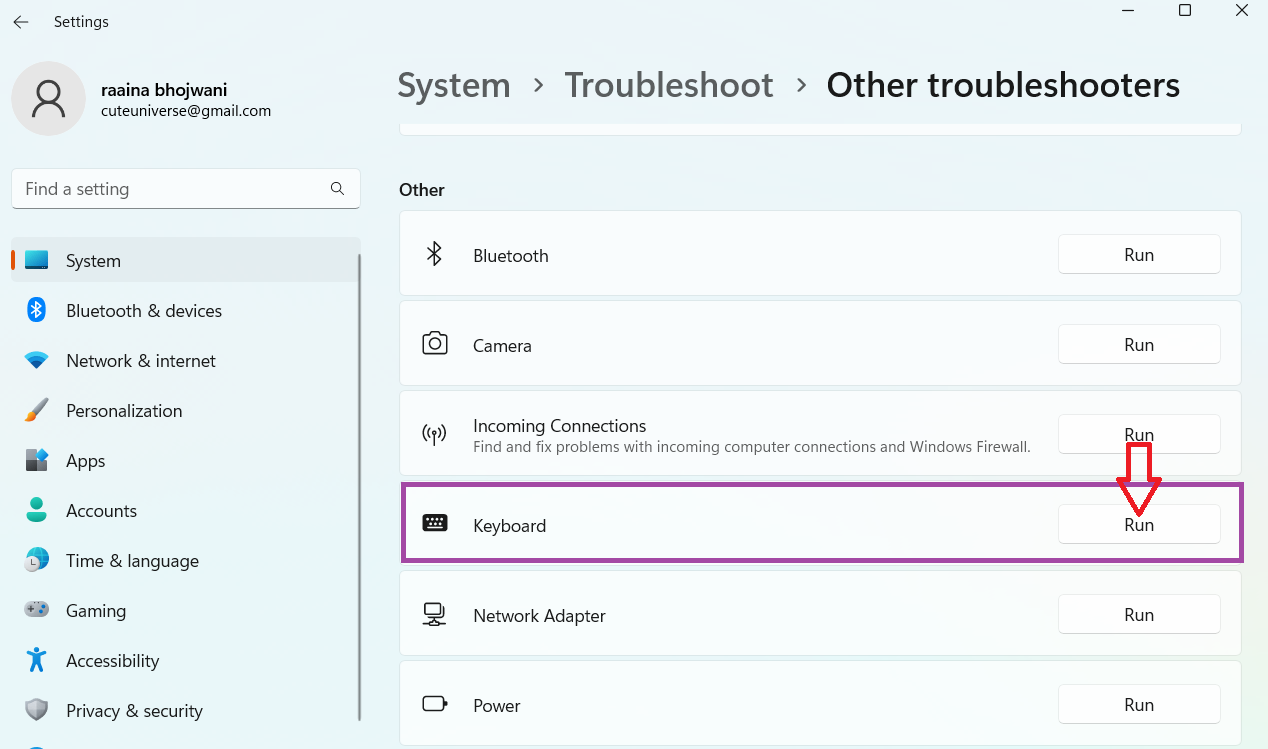
#5. Run keyboard troubleshooter
If your print screen isn’t working and you’re unsure whether or not your keyboard is the problem, run the keyboard troubleshooter on Windows 11 to confirm. This will test your keyboard and determine whether or not there is a problem with it. If it’s the problem, the troubleshooter will try to find a solution.
To run the keyboard troubleshooter on Windows 11, use the below steps :
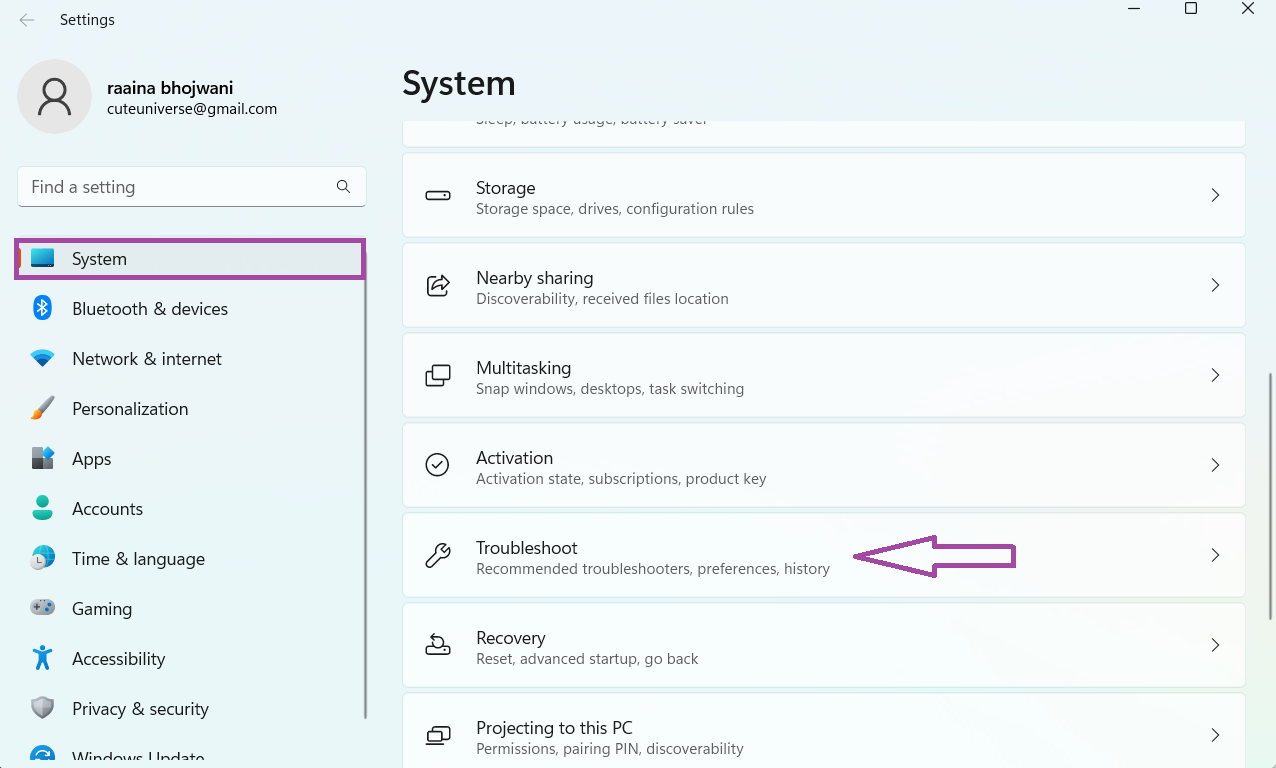
- Click the Start button to open the Settings app (or press Windows key + I).
- In Windows Settings opens, navigate to System > Troubleshoot
- Now, open the Other troubleshooters option.
- Scroll down the list to find Keyboard, then click the Run button next.
- When the troubleshooting starts, it will attempt to find and repair any potential issues – follow the on-screen wizard if a problem is detected.
#6. Use the Snipping Tool
If the print screen function is not working, you can use the Snipping Tool to take screenshots on Windows 11. The Snipping Tool is a built-in utility that allows you to take screenshots on Windows.
To use the Snipping Tool:
- Click the Windows button and type Snipping tool.
- Open the snipping tool app.
- Click on the «New» button.
- Select the area of the screen that you want to capture.
- Save the screenshot to your desired location.
#7. Check third party screenshot software
If your print screen key isn’t working, a third-party screen capture app may be your place to troubleshoot. Specialist screen recording apps like Screenpresso, Lightshot, Snagit, etc. can manipulate your computer’s settings and block the print screen key from working.
Each software app varies, but the best place to go is to the app’s settings or preferences.
Look for the hotkeys assigned to take a shot. For example, if Print Screen is set to the default, you can change it to a different key.
#8. Restart your computer
If all the solutions fail to work, maybe you need to reboot your computer to see if there’s a fix. rebooting the system will restart all the PC functions, inducing the keyboard function. So, restart your computer and see if the print screen key will work again.
#9. Update your operating system
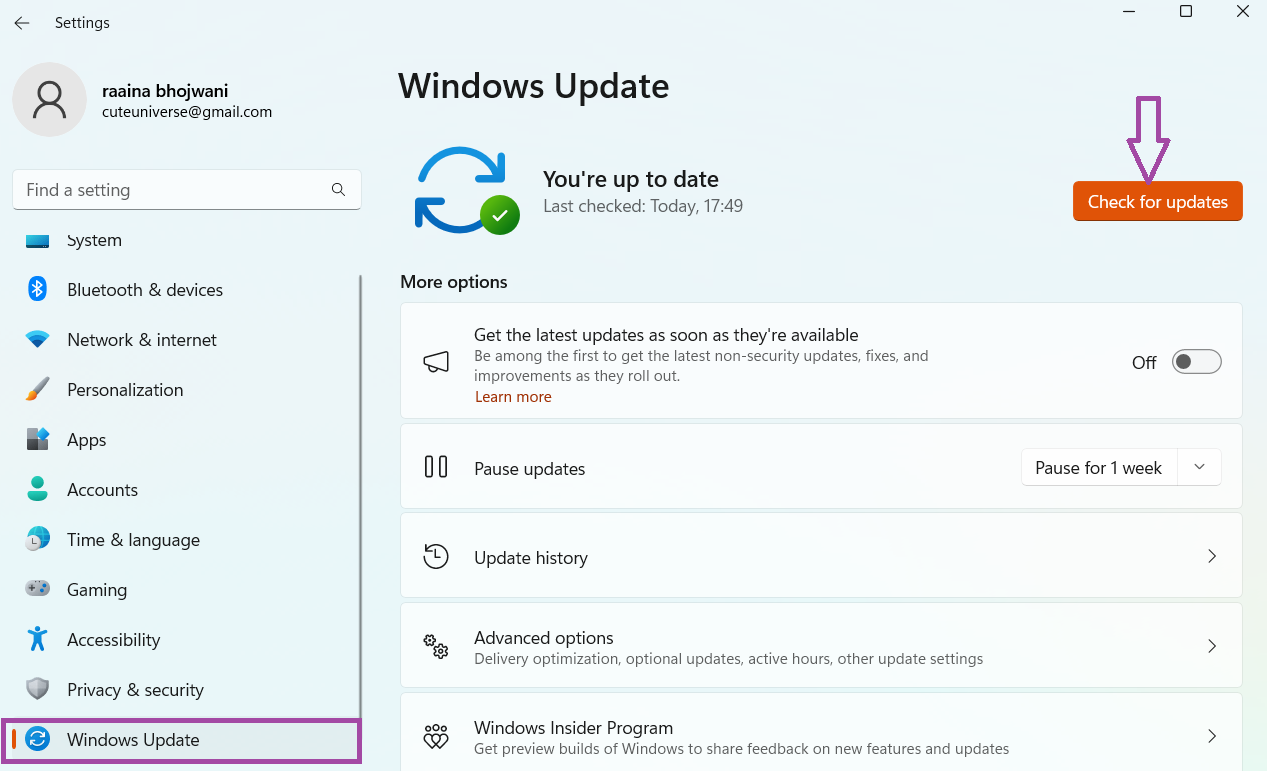
Check if your operating system is up-to-date. An older version operating system or one that’s not updated can affect the functions of the entire PC system. To check the OS update:
- Click Windows+ I together to open Settings.
- On the left pane, scroll down to Windows Update and clicks on it.
- On the right pane, If your Windows s up to date, it will show you the message “You’re up to date.”
- If not, click “Check for Updates”
Just to make sure you’re Windows is up to date, click on “Check for updates” even when it says you’re up to date.
Conclusion
If print screen is not working on Windows 11, these solutions should help you fix the issue.
Whether you need to check your keyboard settings, update your drivers, use the Snipping Tool, use the Windows + Print Screen key combination, or disable other software, there are options available to help you capture screenshots on Windows 11.
Thanks for reading  Please share this article with your socials. Someone else may benefit too
Клавиша Print Screen (PrtSc) в Windows 10 и Windows 11 используется для создания скриншотов экрана или активного окна. При нажатии PrtSc или Alt+PrtSc снимок копируется в буфер обмена и может быть вставлен в любое приложение (например, Paint или Word) с помощью Ctrl+V. Сочетание Win+PrtSc автоматически сохраняет скриншот в папку %UserProfile%\Pictures\Screenshots. Однако пользователи иногда сталкиваются с проблемой, когда Print Screen не работает, и скриншоты не создаются.
Проблема может быть вызвана отключением клавиши в реестре, конфликтами с функциональными клавишами на ноутбуках, настройками пути сохранения или программными ограничениями. В этой статье расскажем про все способы устранения неполадок с Print Screen и альтернативные методы создания скриншотов в Windows.
Приобрести оригинальные ключи активации Windows всегда можно у нас в каталоге от 1099 ₽
Проверка альтернативных сочетаний клавиш
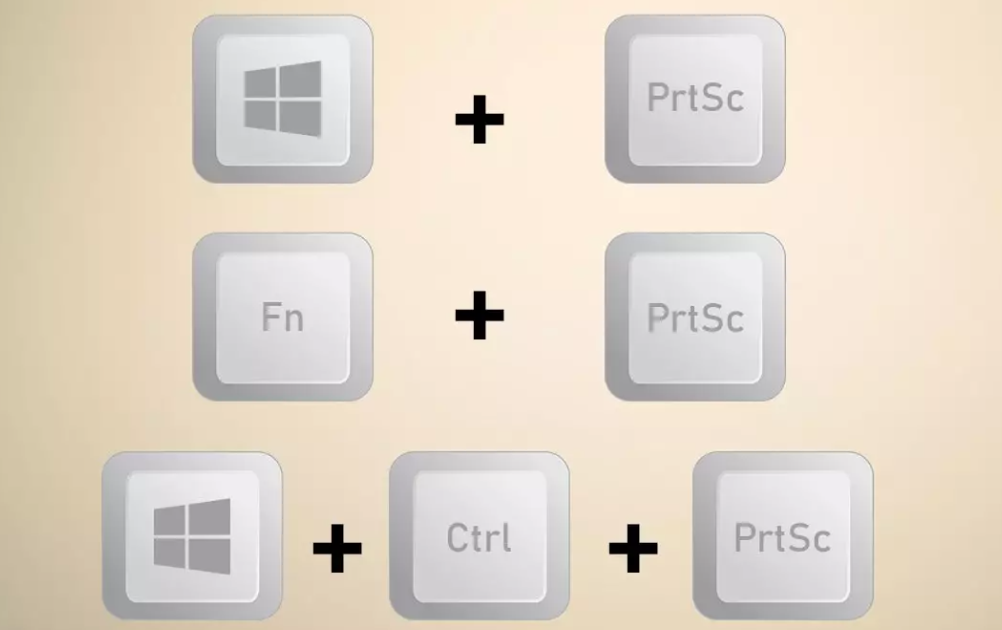
Если Print Screen не работает, попробуйте другие комбинации клавиш для создания скриншотов:
1. Ctrl+PrtSc — копирует скриншот всего экрана в буфер обмена.
2. Alt+PrtSc — копирует скриншот активного окна в буфер обмена.
3. Win+PrtSc — сохраняет скриншот экрана в %UserProfile%\Pictures\Screenshots.
4. Win+Ctrl+PrtSc — аналогично Win+PrtSc, сохраняет скриншот в папку.
5. Win+Shift+S — открывает инструмент Фрагмент и набросок (Snip & Sketch) в Windows 10 (версия 1809 и выше) или Ножницы (Snipping Tool) в более ранних версиях, позволяя выбрать область для скриншота.
Примечание для ноутбуков: На некоторых ноутбуках клавиша PrtSc работает только в сочетании с функциональной клавишей Fn. Попробуйте комбинации, такие как Fn+PrtSc, Fn+Alt+PrtSc или Win+Fn+PrtSc.
Способ 1: Проверка настроек сохранения скриншотов
Если при использовании Win+PrtSc скриншоты не сохраняются в папке %UserProfile%\Pictures\Screenshots, проверьте настройки реестра.
1. Откройте редактор реестра, выполнив команду
regedit.exe
2. Перейдите в раздел
HKEY_CURRENT_USER\Software\Microsoft\Windows\CurrentVersion\Explorer

3. Найдите параметр ScreenShotIndex (тип REG_DWORD).

– Убедитесь, что его значение равно 1.
– Если параметр отсутствует, создайте его:
– Щелкните правой кнопкой мыши по разделу Explorer, выберите Создать -> Параметр DWORD (32 бита) (New -> DWORD (32-bit) Value).

– Назовите параметр ScreenShotIndex и установите значение 1.
4. Перейдите в раздел
HKEY_CURRENT_USER\Software\Microsoft\Windows\CurrentVersion\Explorer\User Shell Folders

5. Найдите параметр с именем {B7BEDE81-DF94-4682-A7D8-57A52620B86F} (тип REG_EXPAND_SZ)
– Убедитесь, что его значение равно %USERPROFILE%\Pictures\Screenshots
– Если значение отличается, дважды щелкните по параметру и исправьте путь.

6. Закройте редактор реестра и перезагрузите компьютер.
Проверьте, сохраняются ли скриншоты после нажатия Win+PrtSc. Откройте папку Изображения -> Снимки экрана (Pictures -> Screenshots), чтобы убедиться, что файлы появляются.
Способ 2: Проверка блокировки клавиши Print Screen в реестре
Клавиша Print Screen может быть заблокирована настройками реестра, что часто происходит в корпоративных средах или из-за стороннего программного обеспечения.
1. Откройте редактор реестра, выполнив команду
regedit.exe
2. Перейдите в раздел
HKEY_LOCAL_MACHINE\SYSTEM\CurrentControlSet\Control\Keyboard Layout
3. Найдите параметр Scancode Map (тип REG_BINARY).
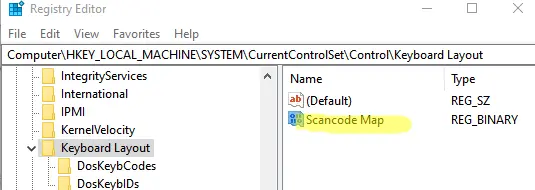
4. Если параметр существует и содержит значение, например:
00,00,00,00,00,00,00,00,04,00,00,00,00,00,2a,e0,00,00,37,e0,00,00,54,00,00,00,00,00
это указывает на блокировку клавиши PrtSc.
5. Удалите параметр Scancode Map:
– Щелкните по нему правой кнопкой мыши и выберите Удалить (Delete).
6. Закройте редактор реестра и перезагрузите компьютер.
После удаления параметра проверьте работу Print Screen с помощью комбинаций PrtSc, Alt+PrtSc или Win+PrtSc.
Способ 3: Проверка конфликтов с другими приложениями
Некоторые приложения, такие как OneDrive, Dropbox или сторонние утилиты для скриншотов, могут перехватывать клавишу Print Screen, вызывая ее неработоспособность.
1. Проверьте настройки сторонних приложений:
– В OneDrive:
– Щелкните по значку OneDrive в трее, выберите Настройки -> Резервное копирование (Settings -> Backup).

– Убедитесь, что опция Автоматически сохранять снимки экрана (Automatically save screenshots) отключена.

– В других приложениях для скриншотов (например, Snagit, Greenshot) проверьте горячие клавиши в их настройках.
2. Отключите фоновые приложения:
– Откройте диспетчер задач (Ctrl+Shift+Esc) или команда:
taskmgr.exe

– На вкладке Автозагрузка (Startup) отключите ненужные приложения, которые могут перехватывать клавиши.

3. Перезагрузите компьютер и проверьте работу Print Screen.
Способ 4: Использование альтернативных инструментов для скриншотов
Если восстановить работу Print Screen не удалось, используйте встроенные или сторонние инструменты для создания скриншотов.
Встроенные инструменты Windows
1. Фрагмент и набросок (Snip & Sketch) или Ножницы (Snipping Tool):
– Нажмите Win+Shift+S или выполните команду
snippingtool.exe

– Выберите область экрана для захвата.
– Скриншот сохраняется в буфер обмена или открывается для редактирования.

2. Игровая панель Xbox (Xbox Game Bar):
– Нажмите Win+G.
– Нажмите кнопку Сделать снимок экрана (Capture screenshot).
– Скриншоты сохраняются в %UserProfile%\Videos\Captures.

Сторонние утилиты
– Greenshot: Бесплатная программа с настраиваемыми горячими клавишами и функциями редактирования.
– Snagit: Профессиональный инструмент для захвата и аннотации скриншотов.
– Lightshot: Легкая утилита для быстрого создания и загрузки скриншотов.
Дополнительные рекомендации
– Проверьте физическое состояние клавиши PrtSc и клавиатуры: подключите другую клавиатуру, чтобы исключить аппаратные неисправности.
– Убедитесь, что драйверы клавиатуры обновлены:
1. Откройте диспетчер устройств (devmgmt.msc).

2. Найдите раздел Клавиатуры (Keyboards), щелкните правой кнопкой по устройству и выберите Обновить драйвер (Update driver).
– Проверьте наличие обновлений Windows, так как они могут исправлять ошибки ввода:
1. Перейдите в Параметры -> Обновление и безопасность -> Центр обновления Windows (Settings -> Update & Security -> Windows Update).
2. Установите все доступные обновления.

– Если вы работаете в корпоративной среде, обратитесь к администратору, так как Print Screen может быть заблокирован групповыми политиками (GPO):
1. Выполните, для просмотра примененных политик.
gpresult /r
– Для диагностики используйте журнал событий:
1. Откройте Просмотр событий (Event Viewer), выполнив
eventvwr.msc
2. Проверьте Журналы Windows -> Система (Windows Logs -> System) на наличие ошибок, связанных с клавиатурой или буфером обмена.
Эти шаги помогут восстановить работу клавиши Print Screen или предоставят альтернативные способы создания скриншотов в Windows 10 и Windows 11.
Windows 11 has brought in a myriad of features aimed at enhancing user experience, but it also comes with its set of challenges. One common issue users face is the Print Screen (Prt Sc) key not functioning correctly. This seemingly minor hiccup can become immensely frustrating, especially for those who rely on screenshots for work or personal projects. In this comprehensive guide, we will delve deep into the reasons why the Print Screen function might not be working in Windows 11, and we’ll offer various solutions to address this issue to get you back on track.
Understanding the Print Screen Functionality
Before diving into troubleshooting, it’s essential to understand what the Print Screen function does on Windows operating systems, including Windows 11. When you press the Print Screen key, the current screen’s image is captured and copied to the clipboard. You can then paste this image into an image editor, word processor, or any application that accepts images.
In Windows 11, Microsoft has introduced enhanced features that expand how screenshots can be taken:
- Print Screen: Captures the entire screen and copies it to the clipboard.
- Alt + Print Screen: Captures only the active window.
- Windows + Shift + S: Opens the Snipping Tool, allowing for more control over your screenshots.
Given these functionalities, when the Prt Sc key ceases to work, it can significantly hinder productivity.
Common Reasons Why Print Screen is Not Working on Windows 11
Understanding the underlying issues can help users remedy the situation quickly. Here are some common reasons why the Prt Sc key might not be functioning as it should:
1. Keyboard Shortcuts Disabled
Windows allows users to customize their keyboard shortcuts. It’s possible that the default shortcut for using the Print Screen functionality has been disabled or altered.
2. Conflicting Software
Certain applications, especially those that manage screenshots or provide overlays, can interfere with the Print Screen functionality. For instance, software like Discord, Snagit, or even games can take control of the keyboard, rendering the Prt Sc key ineffective.
3. Driver Issues
Outdated or corrupted keyboard drivers can cause malfunctions in keyboard functions, including the Print Screen. If the drivers haven’t been updated for a while, it is wise to check for any available updates.
4. Windows Update Problems
Occasionally, recent Windows updates can introduce bugs or issues that lead to functionality loss in certain keys. Keeping your system updated is important, but sometimes rollbacks may be necessary.
5. Hardware Failure
Lastly, it’s possible that the issue lies in the hardware itself. A malfunctioning keyboard or a specific key defect can prevent the Print Screen key from working.
How to Troubleshoot and Fix Print Screen Issues on Windows 11
Now that we have identified potential causes, let’s explore solutions to troubleshoot and resolve the Print Screen issue in Windows 11.
1. Check Keyboard Settings
The first step in addressing issues with the Print Screen key is to verify whether keyboard shortcuts have been modified.
Steps to Check Keyboard Shortcuts:
- Open the Settings app by pressing Windows + I.
- Navigate to the Ease of Access section.
- Click on Keyboard from the left pane.
- Ensure that options like “Use the PrtScn button to open screen snipping” are enabled.
If you discover any discrepancies, modify them accordingly.
2. Investigate Conflicting Applications
To identify if any applications are conflicting with the Print Screen functionality, consider booting your computer in Safe Mode to see if the print screen works there.
Boot into Safe Mode:
- Open Settings and go to System → Recovery.
- Click on Restart Now under Advanced Startup.
- Once your PC restarts, find and select Troubleshoot.
- Select Advanced options → Startup Settings → Restart.
- Press the F5 key for Safe Mode with Networking.
Once in Safe Mode, try using the Print Screen key. If it works, an application running in the background is likely the culprit, and you may need to disable or uninstall it.
3. Update Keyboard Drivers
If the keyboard drivers are outdated, you might need to update them to restore the Print Screen function.
How to Update Drivers:
- Right-click on the Start button and select Device Manager.
- Expand the Keyboards category.
- Right-click on your keyboard device, and select Update driver.
- Choose Search automatically for updated driver software.
If no updates are available, you can also try uninstalling the device, then restarting your PC. Windows will automatically reinstall the keyboard driver.
4. Adjust Windows Registry Settings
Sometimes, issues with the Print Screen key arise from registry settings. However, editing the registry can be risky, so proceed with caution and only if you’re comfortable doing so.
Accessing the Registry Editor:
- Press Windows + R to open the Run dialog.
- Type regedit and press Enter.
- Navigate to: HKEY_CURRENT_USER\Software\Microsoft\Windows\CurrentVersion\Explorer\Advanced
- Look for the DisablePrtScnHotkey entry and ensure it is set to 0. If it doesn’t exist, you can create a new DWORD (32-bit) value with that name and set it to 0.
After adjusting these settings, restart your computer and check if the Print Screen key works.
5. Use Alternative Screenshot Tools
If the issue persists despite your best efforts, consider utilizing built-in Windows tools or third-party applications that provide robust screenshot functionalities.
Built-in Tools:
- Snipping Tool: Activated using Windows + Shift + S.
- Snip & Sketch: This tool allows for simple editing of screenshots right after capturing.
Third-Party Applications:
Other options include applications like Lightshot or Greenshot, known for easy screenshot capture and editing features.
Preventing Future Print Screen Key Issues
While troubleshooting the Print Screen key issues in Windows 11 can be straightforward, preventing such occurrences in the future is essential. Here are some tips to keep in mind:
1. Keep Your System Updated
Regularly check for Windows updates, as Microsoft often releases patches that fix bugs and improve functionalities.
2. Monitor Installed Applications
Be vigilant about the applications you install and consider researching them beforehand. Avoid downloading applications that might interfere with system functions unless necessary.
Conclusion
Troubleshooting the Print Screen functionality in Windows 11 may initially seem daunting, but with the right approach, most issues can be resolved quickly. By understanding common causes and following a series of defined steps, users can remedy this problem effectively.
Don’t let a faulty Print Screen key slow you down—take the time to implement these solutions and keep your productivity flowing. With a little persistence, you’ll be back to capturing those screenshots in no time!
What are common reasons for the Print Screen key not working on Windows 11?
The Print Screen key may not work for several reasons, including software issues, settings, or hardware malfunctions. Sometimes, third-party applications can interfere with the Print Screen functionality, preventing screenshots from being captured. Additionally, system updates or changes in configuration may inadvertently disable the key’s functionality.
Another common reason is that the Print Screen key may be mapped to a different function or shortcut. Users may have inadvertently changed the key mappings through keyboard settings or customization software. Understanding these potential problems can help identify the specific issue affecting your Print Screen key.
How can I check if my Print Screen key is physically working?
To check if your Print Screen key is physically working, you can test it using a simple tool. Open a text editor such as Notepad and press the Print Screen key. If the key is working, you should see a screen capture saved to your clipboard. You can then paste it into the text editor using Ctrl + V to confirm that the key is functioning.
If pasting does not yield anything, you might also want to try using the Windows key + Print Screen combination. This shortcut saves a screenshot directly into your Pictures folder. If this works, it indicates that while the Print Screen key might have issues on its own, other combinations and functionalities are still operational.
How can I enable the Print Screen key in Windows 11 settings?
To enable the Print Screen key in Windows 11, you’ll want to access the system settings. Go to the Settings app and navigate to the Accessibility section. Under the Keyboard settings, ensure that the option for “Print Screen shortcut” is enabled. If it is disabled, toggle the setting to allow the Print Screen key to function properly.
Additionally, you may want to check if any other keyboard shortcuts or accessibility features are conflicting with the Print Screen key. Disabling conflicting features might restore the key’s functionality. After making changes, restart your computer to ensure all settings are applied effectively.
What if the Print Screen key still doesn’t work after checking settings?
If the Print Screen key still doesn’t work after verifying your settings, consider checking for software conflicts. Third-party applications, especially those related to screen capturing or keyboard management, can override default key functions. Temporarily disable or uninstall such applications to see if it resolves the issue.
In some cases, an outdated or corrupted keyboard driver may cause this problem. Head to Device Manager, locate the keyboard section, and check for driver updates. If updates are available, install them and restart your computer. This process can refresh the drivers and potentially fix any underlying issues linked to the Print Screen key.
Can I use alternative methods to take screenshots if my Print Screen key is not working?
Yes, there are several alternative methods to take screenshots on Windows 11. You can use the Snipping Tool, which is built into the operating system. Simply search for “Snipping Tool” in the Start menu and open it, from where you can select the area you wish to capture or choose from different snipping options such as rectangular, freeform, or full-screen.
Additionally, the Windows + Shift + S key combination brings up the snipping bar and allows you to select a specific area of your screen for capturing. Screenshots taken with this method are copied to your clipboard, and you can paste them into applications or save them directly from the Snipping Tool. These alternatives can help you capture your screen without relying on the Print Screen key.
What should I do if my keyboard is damaged?
If you suspect your keyboard is damaged, you can start by connecting a different keyboard to your computer to see if the Print Screen function works. This simple test can help determine whether the problem lies within your original keyboard or if it’s a software issue. If the new keyboard captures screenshots successfully, your original keyboard may need repair or replacement.
In cases where you can’t immediately replace or repair your keyboard, consider using an external keyboard or an on-screen keyboard feature. The on-screen keyboard, accessible through the Ease of Access settings, can substitute for the physical keyboard. This method allows you to click on the Print Screen key using your mouse, providing a workaround until you can address the hardware issue.
Are there any specific keyboard shortcuts for taking screenshots on Windows 11?
Windows 11 includes several keyboard shortcuts for taking screenshots. The most commonly used combination is Windows + Print Screen, which captures the entire screen and saves the screenshot directly to your Pictures folder. Another frequent option is Alt + Print Screen, which captures only the active window and also saves it to the clipboard.
Additionally, you can use the Windows + Shift + S shortcut to open the Snipping Tool interface, which allows you to select and capture specific areas of the screen. These shortcuts provide versatile options for taking screenshots, ensuring that users can still capture images even if the Print Screen key is unresponsive.
How can I troubleshoot additional problems with my Windows 11 screenshots?
If you’re encountering additional problems with screenshots in Windows 11, begin by ensuring that your system is fully updated. Check for any pending Windows updates as they may include patches and fixes that enhance the operating system’s performance. Updating your system can also resolve compatibility issues between applications and system functions.
Moreover, if screenshots fail to save or are not displaying correctly, examine your clipboard. Sometimes, clipboard-related issues may prevent screenshots from being captured or pasted effectively. Restarting your computer can refresh the clipboard and resolve temporary glitches. If problems persist, consider reviewing any recent software installations or changes to identify potential conflicts affecting screenshot functionality.
The PrtSc (Print Screen) function in Windows 11 is a handy tool that allows you to capture a screenshot of your computer’s display. However, there may be instances when the PrtSc key stops working, making it difficult to take screenshots. This can be frustrating, especially if you rely on this function for your work or personal use. Fortunately, there are several troubleshooting steps you can take to fix the issue. From restarting your computer to updating your drivers, and checking for third-party software conflicts, there are multiple ways to resolve the PrtSc not working problem in Windows 11. In this article, we will explore some of the most effective methods to help you get the PrtSc function working again.
Page Contents
FIX 1: Run the keyboard troubleshooter
- Open Settings by clicking Windows + I keys together.
- Then in the Settings Window, click on System then click on Troubleshoot.
- Then click on the Other troubleshooters option.
- Next, click on the Run button in the Keyboard section.
Now the troubleshooting will start and then follow the instructions on-screen if any issue has been detected.
Fix 2: If PrtSc or Print Screen not working in Windows then 11 Restart your computer
If the PrtSc (Print Screen) function is not working in Windows 11, one of the easiest solutions to try is to simply restart your computer. This may seem like a basic troubleshooting step, but it can often resolve minor software or system glitches that could be causing the issue. Restarting your computer can clear out any temporary files or settings that might be interfering with the PrtSc function. After the restart, try pressing the PrtSc key again to see if it’s working properly. If the issue persists, there are other fixes you can take to fix the problem.
Fix 3: Update your keyboard drivers and other drivers.
- Open Windows Quick Menu by pressing the Windows + X keys and then click on Device Manager.
- Then, click on the small Keyboards arrow to expand it and next right-click on Standard PS/2 Keyboard.
- Next, click on Update driver > then click on Search automatically for drivers and follow on-screen instructions.
Fix 4: Update your operating system
- Open Settings by pressing the Windows + I keys.
- Then click on Windows update.
- Next, click on Check for Updates.
Fix 5: Try different Keyboard shortcut keys if PrtSc or Print Screen not working in Windows 11.
- Press Win+ PrtSc to take a shot and save it to a file.
- Press Alt+ PrtSc to take a shot of an active window.
- Press fn+ PrtSc to take the screenshot.
- Press Win+ Shift+ S to launch the Snipping Tool for screenshots.
Fix 6: Check that the print screen key is enabled
- Open the Control panel by searching on the search bar of Windows.
- Then, click on the Ease of Access option.

- Then, click on Change how your keyboard works.
After that, click on Keyboard settings.
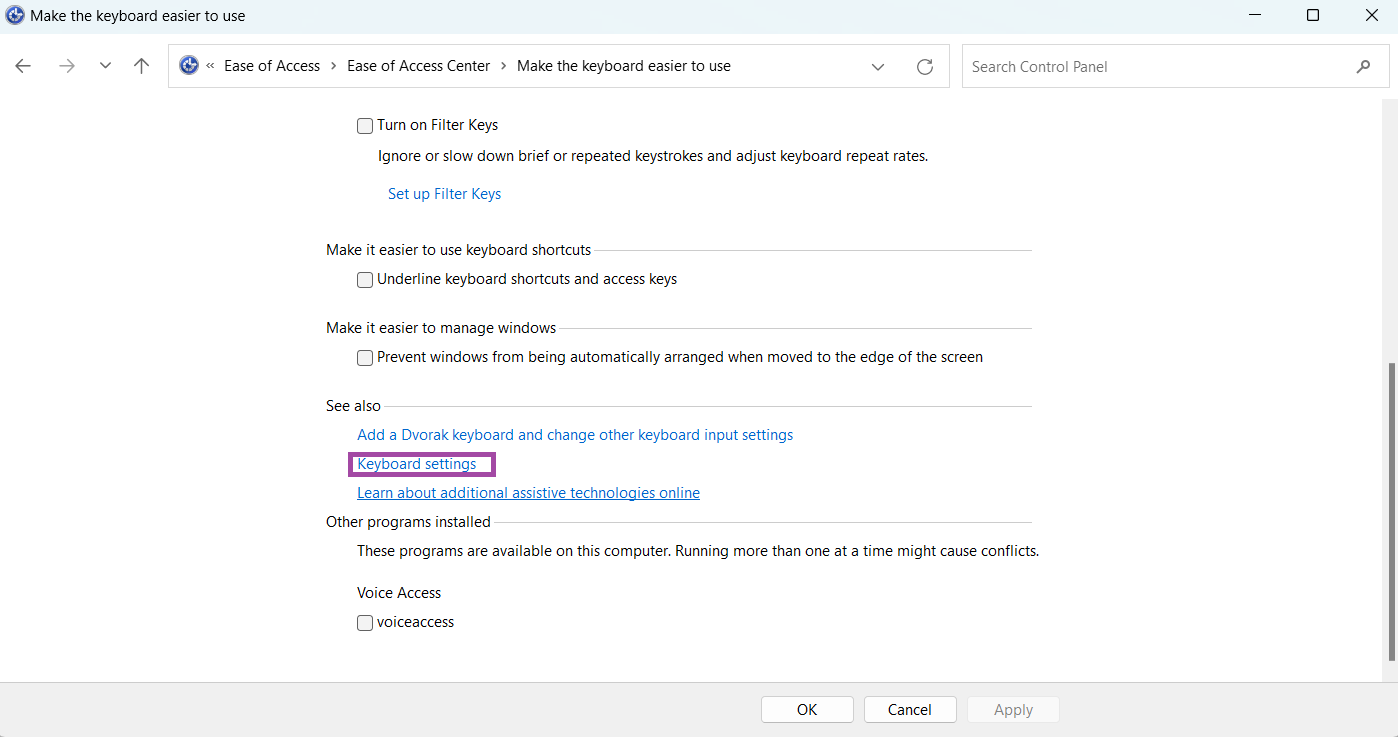
Then check whether the Print Screen key is not disabled.
Fix 7: Check third-party screenshot software
If the PrtSc (Print Screen) key is not working on your Windows 11 computer, it’s worth checking if any third-party screenshot software is causing the issue. Sometimes, such software can interfere with the default screenshot function of Windows, making it unresponsive. To check this, try disabling any third-party screenshot software you have installed and see if the PrtSc key starts working again. You can do this by opening the Task Manager and ending any processes related to the software or by uninstalling it from the Control Panel. If you find that a particular software was causing the issue, you may need to consider an alternative or contact the software developer for assistance.
Hope this helps!