
Frequently asked questions
1. How to add my IP camera?
The easiest way is automatically add all your cameras via «Scan Network» feature available in the app. After the cameras added, you need to specify cameras username and password.
To add camera manually go to «Manage Cameras», and press «Add IP camera, NVR/DVR». In «Camera Settings» you have to specify your camera vendor, model, hostname, port number, username, and password.
For advanced users we have an option to add any camera model by specifying camera requests manually.
2. My camera is not supported. Can you add support for it?
Please provide us a temporary access to your camera (see contacts). We will try to add it.
3. I cannot access my cams from mobile network, but they work with local WiFi connection. What are the required steps to enable broadcasting?
You need to setup port forwarding on your router.
Port forwarding forwards all traffic from your private camera to external network, e.g. from 192.168.0.3:8080 to your_external_ip:8080.
Read the router manual for how to do that or contact your system network administrator.
Enter your external IP address and port number in tinyCam Monitor when you’ve done.
You can also use a free step-by-step tutorial from portforward.com. Use canyouseeme.org to check if port forwarding done properly.
Usually DSL connections renew their IP addresses after 24 hours. Use DDNS service to get fixed domain name, e.g. free noip.com.
4. How can I connect to my webcam/USB camera?
You need to install on your PC either Netcam Studio (recommended), AbelCam or Yawcam software which support USB cams broadcasting.
For the vendor name select Windows in tinyCam Monitor’s Camera Settings.
For Mac computers we support AirBeam, EvoCam, RemoteSight (recommended, see video), SecuritySpy software.
For Linux we support Motion, MJPG-streamer, ZoneMinder.
For Android — IP Webcam (recommended), Cam’ON — Cloud IP Camera (recommended), FRITZ!App Cam, Camera WiFi LiveStream, Ocular IP Camera.
For iOS — AirBeam, IP Cam Pro, iPCamera — High-End Network Camera (recommended), Live-Reporter.
For Windows Phone — IP Camera (ShenYao China)
5. How can I view live video from another Android device camera?
For Android device we highly recommend to install any free apps IP Webcam or Cam’ON — Cloud IP Camera.
These apps allow using your Android device as an IP camera. Then you can use tinyCam Monitor on another Android device for monitoring video. Check this video.
P.S. You can also use tinyCam Monitor as an IP camera if you have Android 5.0 or later. Select «Add Android camera» in Manage Cameras and start internal web server in app drawer.
6. How can I monitor any webcam?
If you know the full stream request, create a new camera in tinyCam Monitor using vendor name «(Generic)». In the text field «JPEG/MJPEG/RTSP request» enter http://myweb.com/image.jpg or rtsp://myweb.com:554/request.sdp. You should be able to see live video on your Android device.
7. How to add more webcams?
To get more webcams please install free WorldScope Webcams for Android — official Webcams.travel app for accessing thousands cams database.
Start WorldScope app and search for cameras which have Streaming video capability.
tinyCam Monitor will be automatically used for live view, record and import webcams. See this video.
8. Does the app support push notification from cameras?
No, there is no easy way for 3d party apps (like tinyCam Monitor) to get push notifications from cameras. However you can use «Background Mode» to be notified when motion occured. Check this video.
9. What about privacy policy?
We respect your right to online privacy. tinyCam Monitor does not collect or send us or 3d parties any personal information.
The apps may collect anonymous usage statistics. That can be disabled in app settings.
Все способы:
- Включаем общий доступ
- Общий доступ к файлам и принтерам
- Общий доступ определенного принтера
- Вопросы и ответы: 11
В данном материале мы опишем, как произвести настройку принтера, чтобы он стал общедоступен в сети с персонального компьютера на Виндовс 7. Также будет рассмотрена возможность использования сетевых файлов.
Читайте также: Почему принтер не печатает документы в программе MS Word
Включаем общий доступ
В сети может иметься одно устройство, предназначенное для печати документов и различных цифровых подписей. Чтобы была возможность выполнять эту задачу посредством сети, необходимо сделать печатающее оборудование доступным для других юзеров, подключенных к сети.
Общий доступ к файлам и принтерам
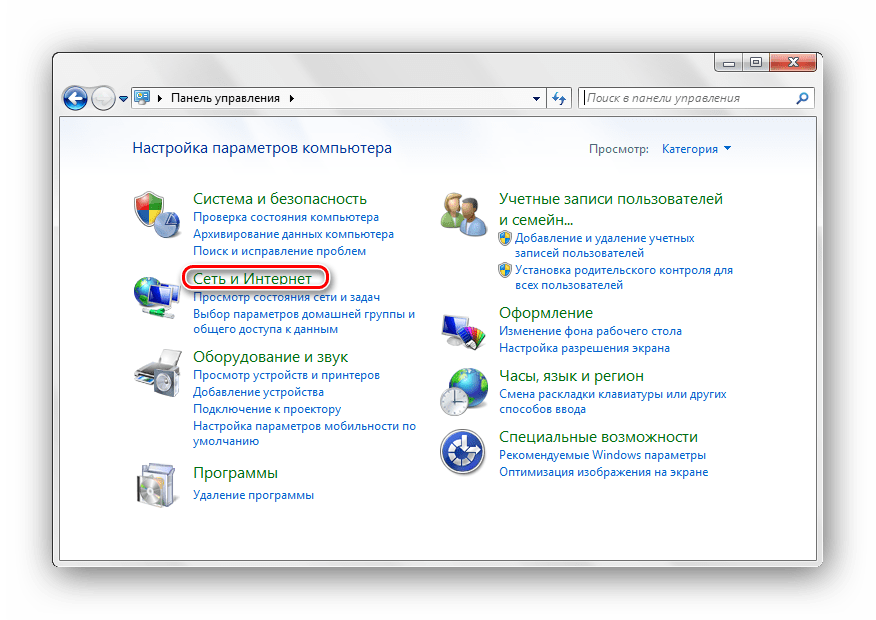
- Производим нажатие кнопке «Пуск» и переходим в раздел под названием «Панель управления».
- В появившемся окне совершаем переход в раздел, в котором доступно изменение параметров «Сети и интернета».
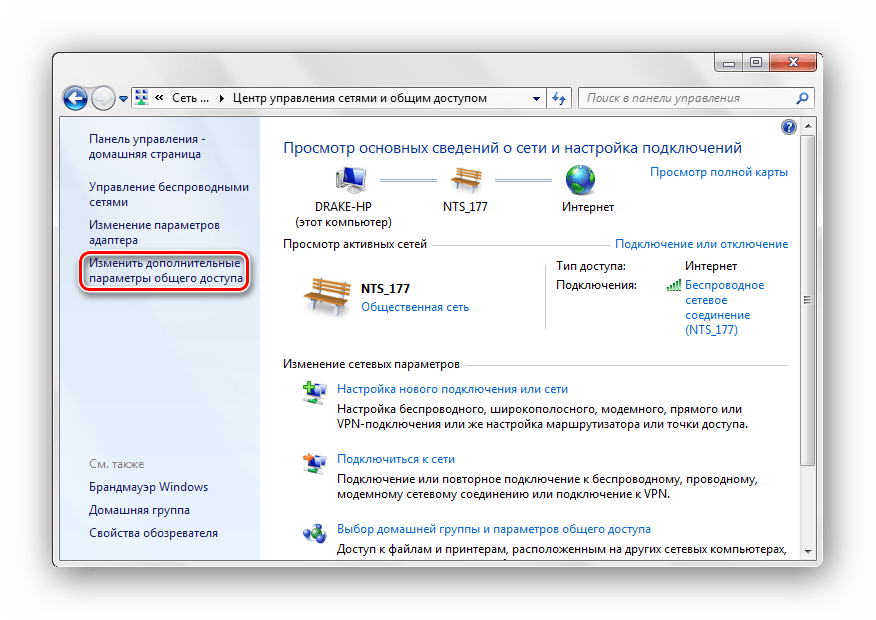
- Переходим к «Центру управления сетями и общим доступом».
- Жмём «Изменить дополнительные параметры общего доступа».
- Отмечаем подпункт, отвечающий за включения общедоступности к цифровым подписям и печатающим девайсам, производим сохранение проделанного изменения.


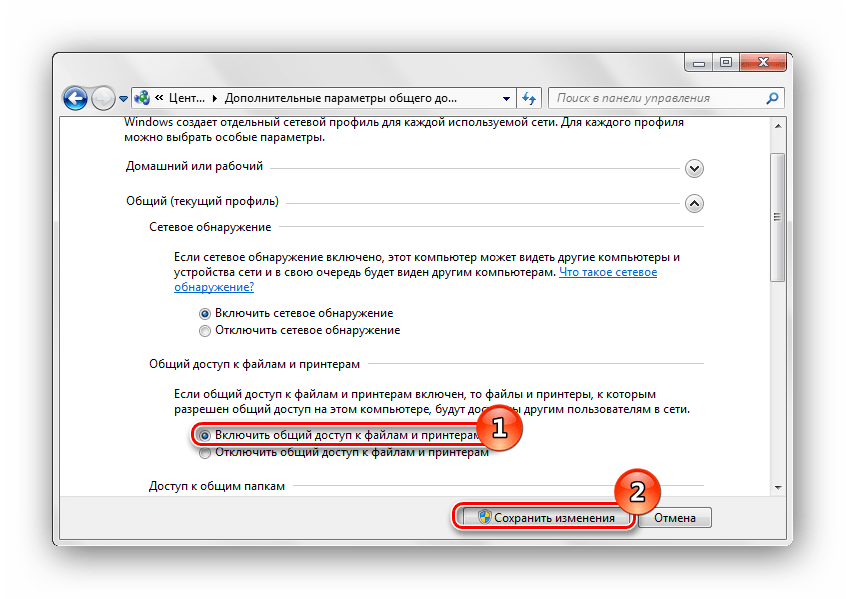
Проделав вышеописанный шаги, вы сделаете цифровые подписи и печатное оборудование общедоступными для юзеров, подключенных к сети. Следующим шагом произведём открытие доступа к конкретному печатному оборудованию.
Общий доступ определенного принтера
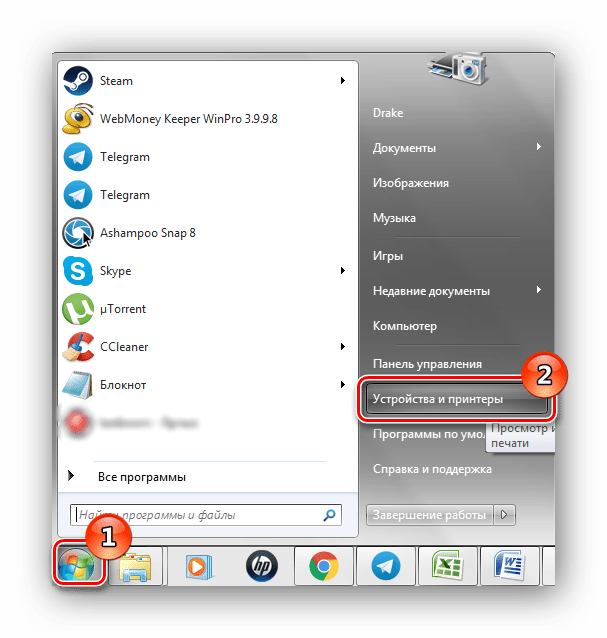
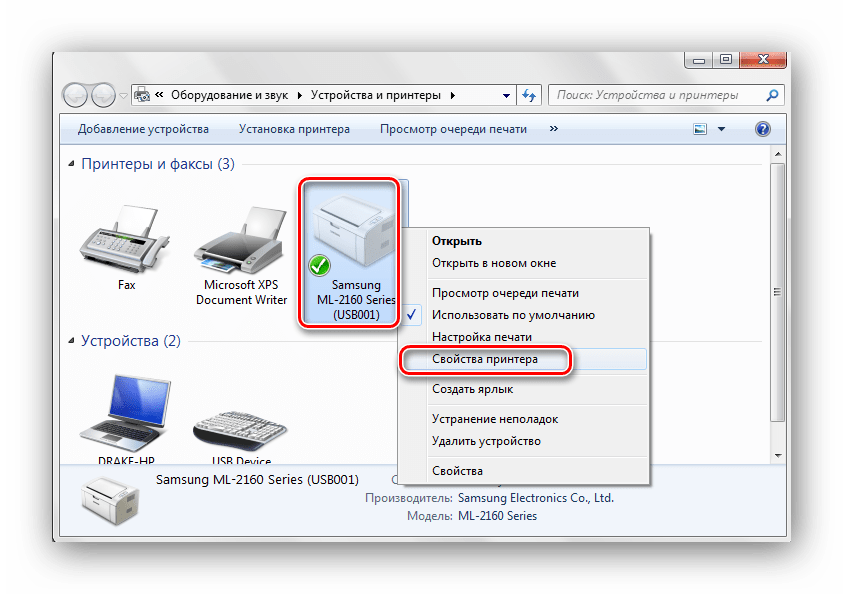
- Идём в «Пуск» и входим в «Устройства и принтеры».
- Останавливаем выбор на необходимом печатном оборудовании, идём в «Свойства принтера«.
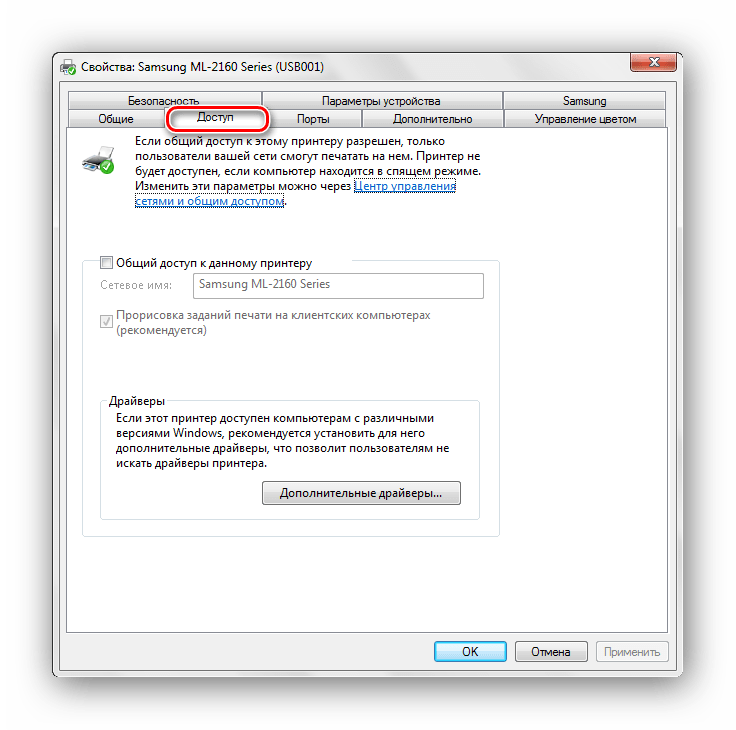
- Перемещаемся в «Доступ».
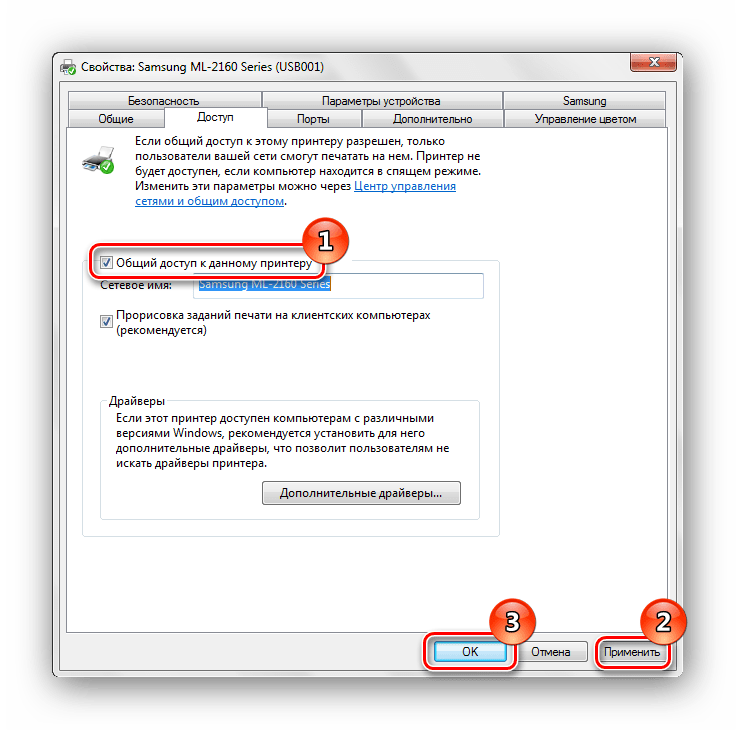
- Отмечаем «Общий доступ к данному принтеру», нажимаем «Применить» и далее «ОК».
- После проделанных шагов принтер стал отмечаться небольшой иконкой, обозначающей, что данное оборудование для печати доступно в сети.
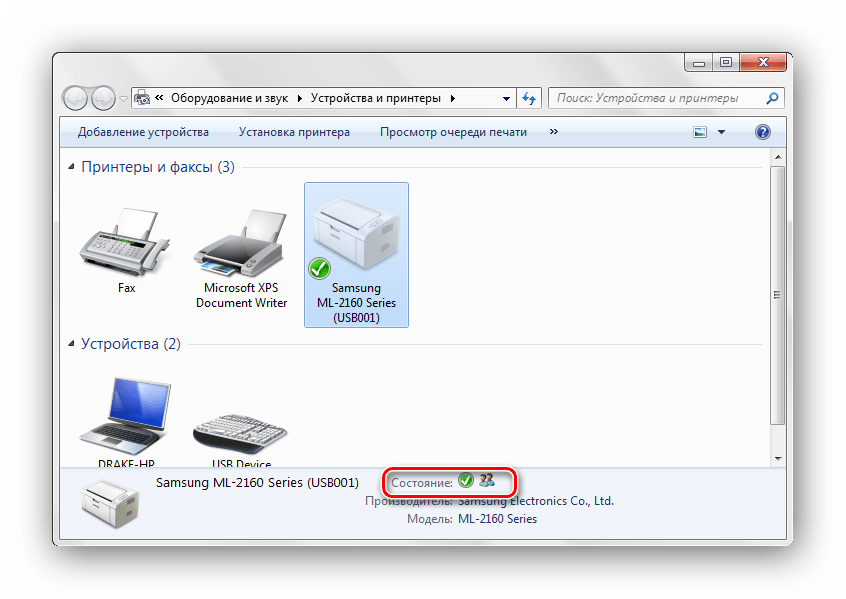
Вот и всё, выполнив такие простые шаги, Вы сможете включить общий доступ к принтеру в Виндовс 7. Не забывайте о безопасности вашей сети и пользуйтесь хорошим антивирусом. Также включайте брандмауэр.
Наша группа в TelegramПолезные советы и помощь
The tinyCam Monitor app is one of the best software when it comes to managing and monitoring your IP camera at home or office. It has all the tools that you needed for a monitoring system app. The IP camera is not the only device it can connect but the video encoders and DVRs as well. Connecting your camera devices to this application can be quickly done since it supports LAN scanning that will automatically detect the camera within the network. Since it is one of the most popular apps for monitoring CCTV, it is no wonder that some people would want to download and use the tinyCam Monitor for PC.
If you are one of them, continue reading to find out the steps on how to do it. But before we tell you about that, learn more about the details of this app.
Features Of The tinyCam Monitor For PC
Compatible With Many IP Camera
Compare to other IP camera controller software, the tinyCam Monitor supports products such as Foscam, Amcrest, Dahua, Hikvision, FDT, Huisun, Sricam Reolink, ONVIF, Wyze Cam, CamHi, and many more.
Supports Different Codecs
If you have a Foscam or Amcrest camera, it can support the H.264 codec. The MP4/H264/H265 is also supported on different cams such as Hikvision, Reolink, Dahua, FDT, and many more.
Has A P2P Support
You can use the P2P technology on some camera models with 17 – 20 characters UID.
PTZ Compatible
If your camera allows moving physically, you can use the Pan, Tilt, and Zoom options to move and change the direction of view of the camera.
Secure Connectivity
It supports the SSL or secure socket layer, which is a requirement for HTTPS to enable the secured and encrypted connection between your device and the tinyCam Monitor app.
Two Way Audio Supported
If you have a camera that has a mic and speakers on it, you can use the two-way audio feature to listen and talk directly to your camera.
Add An Unlimited Amount Of Camera
Do you have a 5, 10, or even 50 IP camera installed in your home or office? You don’t have to worry about it. You can manage all of them, using only this application.
Supports 24/7 Video Recording
When you purchased the Pro version, it gives you the option to save the video files on your cloud storage directly on Google Drive, Microsoft OneDrive, or DropBox. It also has tinyCam Cloud features that let you rent cloud storage from their servers.
Smart AI
The tinyCam Monitor app can automatically detect the face of the person captured on your camera. It can also detect motion, and when it detects it, this app will notify you instantly.
Why Choose The tinyCam Monitor App?

With its popularity, it is becoming one of the trendiest applications for monitoring a camera remotely. Lots of people tried and tested this app and appreciate its features, leaving it a high rate and stars on the Google Play Store.
This causes the number of installs to reach ten million plus downloads from the Play Store. It has both free and paid version, and the good thing about the free one is, that most of the function that you needed is available on it.
Pros And Cons Of tinyCam Monitor
Even if you consider all of the features that we mentioned above, there are also many pros along with some of their cons.
Pros
- It allows you to connect to your IP camera easily with minimal effort.
- The interface of the tinyCam Monitor app is simple and easy to understand.
- The tinyCam app can efficiently use the CPU and GPU to ensure that it won’t slow down your smartphone or computer.
- It has a lot of features, even for the free version of this app.
Cons
- The free version has too many ads.
- Unlocking its full feature requires you to purchase this software.
Also, Read: How To Download Google Classroom On PC?
If you have already done your research, you will find out that the tinyCam Monitor for Windows & Mac does not exist as of now. The only software that you’ll find is the one for the Android Operating System.
However, this does not mean that you cannot download and install the tinyCam Monitor app on your PC. There’s a way to install it but not directly, and you’ll need another program to achieve this.
This program is an emulator software. With the emulator program, you’ll be able to run almost any kind of Android exclusive app on your computer.
Before we get an emulator into your computer, you’ll have to consider seeing the minimum system requirements.
- Make sure that your computer has at least a dual-core processor or better. If you still use an old computer, just make sure that it can run at at least 1.5 GHz of speed.
- The RAM is also a significant part of your computer. Ensure that you have a 4 GB memory or better to maximize the compatibility of the emulator.
- You also need to consider checking your hard drive space. Be sure to have a 10 GB of free space so you won’t run out of breathable space on your computer.
- Get the latest DirectX and OpenGL into your computer by installing or updating your latest graphics card driver.
- To ensure that you won’t get a random error, you also need to get the .Net framework and C++ Redistributable from its website of Microsoft. Since it is from Microsoft, you are not required to install the following software if you use a macOS.
- Lastly, consider enabling the Virtualization Technology to enhance the emulator performance. Although it is optional, allowing it from your BIOS will surely increase the speed of the tinyCam Monitor app emulation.
Download tinyCam Monitor for PC (Windows & Mac)
The android emulator program is available online and can be downloaded for free. The best emulator that we can recommend is the BlueStacks emulator.
Upon testing it, this emulator can perfectly emulate the tinyCam Monitor app on the Windows computer without any issue. To install it, follow the method below.
- Read the information on how to get the BlueStacks by checking our guide here.
- Once you have the installer, start the installation by executing the setup file of BlueStacks on your PC.
- Accept the terms and conditions to comply with their requirements and then click the button for the installation.
- The BlueStacks will now begin installing it on your computer which usually lasts for 10 to 20 minutes. Also, ensure that you are connected to stable internet.
- After you completed the installation, check the shortcut of BlueStacks on your desktop and open it. If you cannot find this app, click the search on your desktop and type the BlueStacks.
- When you open the BlueStacks emulator for the first time, it will require you to enter the details of your account on Play Store, so do it to start setting up your account.
- Now, open the Play Store and start searching for the “tinyCam Monitor” and click the download button.
- After the installation, your desktop will have the shortcut icon of this app, double click it to start using the tinyCam Monitor on your PC.
- Now, start registering your camera to start monitoring it from your PC.
FAQs
I want the executable installer of tinyCam Monitor on my Windows computer, not an emulator!
Unfortunately, the available app of the tinyCam can be found only on Android devices. Thus, there’s no other way to run it without using an android emulator. However, if the developers have released software dedicated to Windows & Mac, we will update this guide.
Can I really trust the appzforpc website?
We, from appzforpc, only created a guide for everyone to run this software using popular emulators like BlueStacks or Nox Player. These emulators are very safe, and you can trust them. We do not recommend other emulators because some were bundled with unwanted programs.
If you still have any doubts, you can try scanning the installer of BlueStacks or Nox on the virustotal website or just give up running the tinyCam Monitor on a computer.
Conclusion
The tinyCam Monitor app is a wonderful software that has every option needed for monitoring an IP camera or accessing your DVR/NVR online. With its powerful features, some wanted to use it on their computer, and thus, you can use an emulator to run the tinyCam Monitor for PC (Windows & Mac), like the way you use it on smartphones or tablets.
You Might Also Like: Download Soundcore App For PC – Windows 11, 10, 8, 7, Mac
Free download tinyCam Monitor FREE — IP camera viewer for PC Windows or MAC from BrowserCam. Tiny Solutions LLC published tinyCam Monitor FREE — IP camera viewer for Android operating system(os) mobile devices. However if you ever wanted to run tinyCam Monitor FREE — IP camera viewer on Windows PC or MAC you can do so using Android emulator. At the end of this article you will find our how-to steps which you can follow to install and run tinyCam Monitor FREE — IP camera viewer on PC or MAC.
If you have any sort of camera that you use around your property for remote surveillance then, you’ll love how the tinyCam Monitor works. There are some useful ways to use the tinyCam Monitor to the best. You can connect the tinyCam Monitor app to any network possible. You can connect it to a private network, public network, or an IP camera. The tinyCam Monitor is a free to use app for all remote surveillance systems.
Easy Setup
You can easily set up any camera to the tinyCam Monitor app. You can choose to connect the smartphone with the cameras. This way, you can stay connected to watch all the live feeds of all the videos without any problems. It also has a LAN scanner that allows you to detect any cameras automatically.
Different Layouts
The app also has an extremely friendly user-interface that supports over 17 different layout options. You can use an unlimited number or cameras and have them displayed using different layouts. You can also pan, tilt, or zoom provided that your camera is a PTZ enabled device. You can also use the sequence mode to automatically switch cameras when there’s any movement.
When you have 2 or more cameras in one room or area, you can group all of them by tags so that you can easily identify and switch to that group.
Two-way Intercom Feature
You can also use the two-way intercom feature when you’re on the tinyCam Monitor to ensure that there aren’t any issues and also stay communicated without having to open the door. The two-way intercom is a great way to talk to someone, especially a deliveryman or a mailman when you’re not at home.
The tinyCam Monitor makes it very easy to import your videos to a Cloud or a form of local storage. This way, you don’t have to worry about any kind of pressure or problems when you want to play those videos again.
When you’re concerned about the safety of your family, the best thing you can always do is take care of them. You can do this by providing them with the right sort or security and safety especially through a surveillance system. If you want your family to be safe, use the tinyCam Monitor.
Let’s find out the prerequisites to install tinyCam Monitor FREE — IP camera viewer on Windows PC or MAC without much delay.
Select an Android emulator: There are many free and paid Android emulators available for PC and MAC, few of the popular ones are Bluestacks, Andy OS, Nox, MeMu and there are more you can find from Google.
Compatibility: Before downloading them take a look at the minimum system requirements to install the emulator on your PC.
For example, BlueStacks requires OS: Windows 10, Windows 8.1, Windows 8, Windows 7, Windows Vista SP2, Windows XP SP3 (32-bit only), Mac OS Sierra(10.12), High Sierra (10.13) and Mojave(10.14), 2-4GB of RAM, 4GB of disk space for storing Android apps/games, updated graphics drivers.
Finally, download and install the emulator which will work well with your PC’s hardware/software.

How to Download and Install tinyCam Monitor FREE — IP camera viewer for PC or MAC:
- Open the emulator software from the start menu or desktop shortcut in your PC.
- You will be asked to login into Google account to be able to install apps from Google Play.
- Once you are logged in, you will be able to search for tinyCam Monitor FREE — IP camera viewer and clicking on the ‘Install’ button should install the app inside the emulator.
- In case tinyCam Monitor FREE — IP camera viewer is not found in Google Play, you can download tinyCam Monitor FREE — IP camera viewer APK file and double clicking on the APK should open the emulator to install the app automatically.
- You will see the tinyCam Monitor FREE — IP camera viewer icon inside the emulator, double clicking on it should run tinyCam Monitor FREE — IP camera viewer on PC or MAC with a big screen.
Follow above steps regardless of which emulator you have installed.

В Windows есть возможность использовать общий сетевой принтер и общие сетевые папки.
Возникают случаи, когда необходимо распечатать документ через принтер, подключенный к компьютеру в локальной сети, но при настройке доступа к нему появляется ряд проблем. Рассмотрим пример стандартной рабочей сети с подключенным через роутер компьютером бухгалтера и присоединенным к нему принтером LaserJet 1200, а так же с рабочей станцией, подключенной в тот же самый роутер. Оба компьютера находятся под управлением операционной системой Windows 7.
Открытие общего доступа
Первая трудность, с которой сталкивается пользователь, это отсутствие доступа к удаленному компьютеру в локальной сети, в данном случае, к компьютеру бухгалтера, к которому подключен принтер по USB кабелю. Все потому, что по умолчанию в настройках Windows 7, отключено сетевое обнаружение. Это нужно для безопасности.
Чтобы его включить, необходимо выполнить следующее: сядьте за машину, к которой подключен через USB принтер (для удобства пусть она будет называться в примере «buh», а рабочая машина, с которой нужно удаленно подключиться к принтеру – «user1»).
Нажмите кнопку «Windows» (Пуск), расположенную слева в нижней части рабочего стола, откроется меню, в котором вы должны выбрать пункт «Панель управления». Далее найдите в списке ярлык с надписью «Центр управления сетями и общим доступом». В открывшемся окне, с левой стороны, у вас должен быть пункт «Изменить дополнительные параметры общего доступа», нажмите.
Внесите следующие изменения:
- «Включить сетевое обнаружение», включите эту галочку, чтоб ваш компьютер был виден другим пользователям локальной сети.
- «Включить общий доступ к файлам и принтерам», это основной параметр, за которым вы, собственно, сюда и зашли, включайте.
- «Включить общий доступ, чтоб сетевые пользователи могли читать и записывать файлы в общих папках». Эта функция вам может пригодиться для обмена файлами по сети, если открыть доступ на компьютере «buh» к папке, то можно будет с компьютера «user1» добавлять в нее файлы и оперировать с ними.
- «Отключить общий доступ с парольной защитой». Эту галочку вы ставите, если в вашей локальной сети нет посторонних компьютеров и нет угрозы утечки информации, в противном случае, этот пункт не затрагивайте, но при каждом включении компьютера придется проходить авторизацию на удаленной машине.
Далее нажимайте кнопку «Сохранить изменения» и заканчивайте на этом работу с данным окном.

Если компьютеры находятся в разных рабочих группах, это может усложнить задачу их доступа друг к другу. Обе машины должны состоять в одной и той же рабочей группе, например «WORKGROUP», как показано на рисунке ниже. Для этого необходимо нажать на кнопку «Изменить» и написать имя группы.

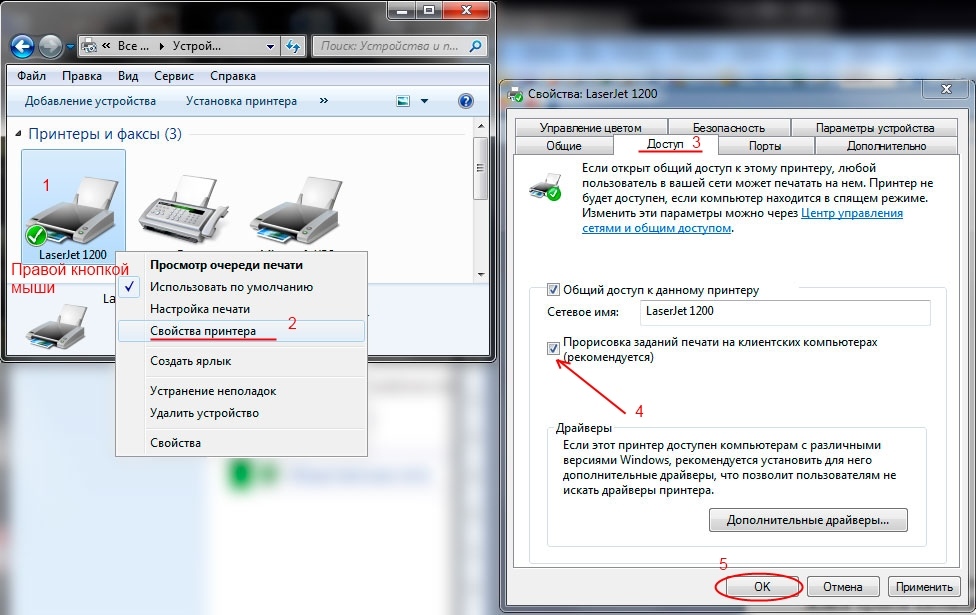
Снова нажмите на кнопку «Windows» в левой нижней части рабочего стола. В открывшемся меню выберите пункт «Панель управления». Откроется окно, в котором необходимо найти пункт «Устройства и принтеры». Откроется окно с устройствами. Нажмите правой кнопкой мыши на принтер LaserJet 1200 и выберите «Свойства принтера». Перейдите на закладку «Доступ» и поставьте галочку «Общий доступ к данному принтеру»». Нажмите «Применить» и «ОК». Теперь все готово для подключения.
Подключение сетевого принтера на другом компьютере в локальной сети
Если Вы умеете пользоваться командной строкой (иначе пропустите этот и следующий абзац): садитесь за компьютер user1, попробуйте сделать команду ping до машины бухгалтера. Откройте все то же меню, нажатием на кнопку «Windows», выберите пункт «Выполнить» (или нажмите Win+R). Откроется окно со строкой для ввода текста. Напишите в нем команду: cmd. В открывшемся окне введите команду «ping buh» (без кавычек).
Если получены ответы и 0 потерь, то можно начинать подключение, в противном случае, если нет ответов, то варианта три: либо брандмауэр блокирует входящие подключения, либо антивирус, либо проблема с кабелем или сетевыми адаптерами. В первом случае попробуйте просто перезагрузить компьютер buh, во втором необходимо настроить фаерволл антивируса, для разрешения входящих подключений. Брандмауэр же, должен автоматически открыть доступ на входящие подключения, если этого не произошло, то необходимо вручную настроить брандмауэр, разрешив пользователям входящие подключения. В случае проблем с адаптерами следует переустановить драйверы сетевых карт, а если это не помогло, то заменить карты. Кабель следует протестировать и в случае неисправности заменить.
Итак, ответы от компьютера buh получены.
- Нажимаем круглую кнопку в углу рабочего стола и выберите «Выполнить» (Win+R).
- Напишите команду \\buh (без кавычек) и нажмите кнопку «ОК».
Вам откроется бухгалтерский компьютер, где вы и уведите общедоступный принтер LaserJet 1200. Нажмите на него правой кнопкой мыши и выберите «Подключить».

Теперь все готово. Для проверки напечатайте пробную страницу. Для этого нажмите все ту же круглую кнопку в углу рабочего стола и выберите пункт «Панель управления», поищите в открывшемся списке «Устройства и принтеры». Зайдите в него, и там будет ваш сетевой принтер с наименованием «LaserJet 1200 на buh». Кликните по нему правой кнопкой мыши и нажмите «Свойства принтера». В открывшемся окне выберите «Пробная печать». На сетевом принтере должна появиться задача с печатью пробного листка.