
Mar. 15, 2023 / Updated by
Renata to
Windows 10
What is ndu.sys BSOD Error
The «ndu.sys» BSOD error is a Blue Screen of Death (BSOD) error that is typically caused by a problem with the Windows system file «ndu.sys». This file is associated with the Windows Driver Verifier, which is a tool used to test and verify the stability of drivers in the operating system.
When the «ndu.sys» file encounters an error, it can cause a BSOD error, which may prevent your computer from functioning properly. The error may occur due to several reasons, such as outdated or corrupted drivers, damaged system files, or malware infections.

To fix this error, you can try several troubleshooting steps, such as updating your drivers, running a virus scan, using System File Checker (SFC), or performing a clean boot. If these methods do not work, you may need to perform a system restore or reinstall Windows to resolve the issue.
Solution1. Update Drivers
Solution2. Run System Scan
Solution3. Check Hardware Issues
Solution4. Rename the Ndu.sys folder
Solution5. Use System Restore
Solution1. Update Drivers
As the above passage mentioned, ndu.sys errors was caused by drivers issue. Outdated or corrupt drivers can cause ndu.sys errors. You can update your drivers by downloading a third-party driver updater which can update all drivers at the same time, so that you do not need to update or check drivers one by one.
Download Driver Talent
For only one click, Driver Talent can scan your computer within seconds and show you all drivers statue in one list. You can not only to update network driver, but can also update all drivers together. In this way, Driver Talent can prevent your computer from outdated drivers issue. To click on the blue inverted triangle, Driver Talent provides different versions of drivers for downloading.

Solution2. Run System Scan
The System File Checker is a built-in Windows utility that scans for and repairs corrupted system files. If there are any issues with the ndu.sys error due to corrupted or missing system files, running the System File Checker can help resolve them.
To run the System File Checker, follow these steps:
Press the Windows key + X to open the Power User menu.
Click on «Windows PowerShell (Admin).»
Type the following command and press Enter: sfc /scannow
Wait for the command to complete and then restart your computer.
Solution3. Check Hardware Issues
Check for hardware issues: Sometimes hardware problems can cause ndu.sys errors. You can use Windows Memory Diagnostic to test your RAM or a utility like CrystalDiskInfo to check your hard drive for errors.

Solution4. Rename the Ndu.sys folder
It’s possible to resolve this occurring BSOD error by renaming the Ndu.sys file from your PC. You should check each of the steps below to do it accordingly.
1. Open the My Computer or This PC icon by double clicking on it or going to the Start menu and left-clicking.
2. Double-click to enter the C:/ partition or whichever partition you have installed your Windows 10 on.
3. Double-click on the Windows folder to open it.
4. Now search for the System32 file inside the Windows folder and double-click it to open.
5. Now go to the System32 folder, look for the drivers‘ folder, and double-click on it to open.
6. After you get to the drivers folder, you will have to look for the Ndu.sys file.
7. Roll back recent changes: If you recently installed new hardware or software, try uninstalling it or rolling back the driver to see if that resolves the issue.
8. Name the Ndu.sys as Ndu.sys11 or whichever name you wish but be sure to change the name and remember it. If you cannot change the file name, you must log in with your administrator account or change your permissions on this specific file to an administrator.

9. Open again the C: partition you have Windows 10 installed.
10. Double-click the Windows.old folder this time because this should be the old Windows operating system you upgraded from.
11. Open again the System32 folder you have in the Windows.old folder.
12. Search in the drivers folder for the Ndu.sys file.
13. Right-click on it and select the Copy option.
14. Now paste it into the drivers folder of the Windows 10 version.
15. Restart your computer.
16. Check if you still have the same BSOD with Ndu.sys error.
Solution5. Use System Restore
If you have a restore point from before the ndu.sys error occurred, you can use System Restore to revert your computer to that earlier state which may fix the ndu.sys error Blue Screen of Death issue.
1. To rollback Windows 10 to a previous version, you can follow these steps:
2. Open the Windows Start menu and click on the «Settings» gear icon.
3. In the Settings menu, click on «Update & Security.»
4. Click on «Recovery» in the left-hand menu.
5. Under «Go back to the previous version of Windows 10,» click on the «Get started» button.
6. Follow the on-screen instructions to complete the rollback process.
Recommended Download
|
ExplorerMax |
Driver Talent for Network Card | |||
| Smart and advanced file explorer tool for Windows platforms | Download & Install Network Drivers without Internet Connection | |||
|
30-day Free Trial |
Free Download |
The dreaded Blue Screen of Death (BSoD) is a sight no computer user wants to see. It signifies a critical error that has caused the operating system to crash, leaving users frustrated and potentially losing unsaved work. One particular BSoD error that users may encounter is the Ndu.sys BSoD. In this article, we will explore what Ndu.sys is, why it causes BSoD errors, and how to fix it.

Understanding Ndu.sys
Ndu.sys is a system file associated with the Windows Network Data Usage Monitoring Driver. It plays a crucial role in monitoring and managing network data usage on Windows systems. This driver is responsible for collecting data related to network usage, such as the amount of data transferred and the applications consuming network resources.
While Ndu.sys is an essential component of the Windows operating system, it can sometimes cause issues that lead to BSoD errors. These errors typically occur due to conflicts with other drivers, hardware issues, or corrupt system files.
Common Causes of Ndu.sys BSoD Errors
Several factors can contribute to Ndu.sys BSoD errors. Understanding these causes can help in diagnosing and resolving the issue effectively. Here are some common causes:
- Outdated or incompatible drivers: Incompatible or outdated drivers can conflict with Ndu.sys, leading to BSoD errors. It is crucial to keep all drivers up to date to avoid such conflicts.
- Hardware issues: Faulty hardware components, such as a malfunctioning network adapter, can trigger Ndu.sys BSoD errors. Checking the hardware for any issues and replacing faulty components can help resolve the problem.
- Corrupt system files: Corrupted system files can disrupt the functioning of Ndu.sys and cause BSoD errors. Running a system file checker scan can help identify and repair any corrupt files.
- Malware infections: Malware can infect system files, including Ndu.sys, and cause BSoD errors. Regularly scanning for viruses and malware using reliable security software like Malwarebytes Free is essential to prevent such infections.
How to Fix Ndu.sys BSoD Errors
Resolving Ndu.sys BSoD errors requires a systematic approach. Here are some effective methods to fix this issue:
1. Run the DISM and SFC scans
DISM (Deployment Image Servicing and Management) and SFC (System File Checker) are built-in Windows tools that can repair corrupted or missing system files and restore the health of your computer. Both DISM and SFC scans can be run from an elevated command prompt (with administrative privileges). Here are the steps to do so:
- To open the Command Prompt as an administrator in Windows, type “cmd” in the search bar and then right-click on the Command Prompt result and select “Run as administrator” as shown in the image below.

- To run a DISM scan, type the following command and press Enter:
dism /online /cleanup-image /restorehealth
This will check your Windows component store for corruption and automatically fix any problems it finds. This process may take several minutes or longer depending on your system
- To run an SFC scan, type in the Command Prompt the following command and press Enter:
sfc /scannow
This will scan all protected system files and replace any corrupted or missing ones with a cached copy. Wait for the scan to complete. It may take some time depending on your system configuration.
- After both scans are completed, you should restart your computer to apply any changes. Check to see if the issue is solved.


2. Check for faulty software.
If there is a specific program that is causing this issue, try uninstalling and then reinstalling it (eg. Microsoft DirectX, Microsoft Visual C++ Redistributable, NET Framework) to check if it will solve the problem.
Windows 11Windows 10Windows 8Windows 7
-
First, open Windows Settings by pressing Windows+I on your keyboard. You can also right-click your Start button and select “Settings” from the list.

-
When Settings opens, click “Apps” in the sidebar, then select “Apps & Features”.

-
In Apps & Features settings, scroll down to the app list and search for the program you want to uninstall. When you find the program, click the three dots button beside it and select “Uninstall” in the menu that appears.

-
In the next message box, confirm the uninstall process by clicking on Uninstall, then follow the prompts to uninstall the program.


- Press the Windows key + I on your keyboard to open the Settings app. You can also ope the Settings app by clicking the Start button on the taskbar, then select “Settings” (gear icon).

-
When the “Windows Settings” window opens, click on “Apps“. By default, it should open “Apps and Features” but if it doesn’t, select it from the list on the left.

-
In Apps & Features settings, scroll down to the app list and search for the program you want to uninstall. When you find the program, click on it and select “Uninstall” in the menu that appears.

-
In the next message box, confirm the uninstall process by clicking on Uninstall, then follow the prompts to uninstall the program.


-
Right-click on the Start button in the taskbar, then select “Programs and Features”. This will take you directly to your list of installed programs.

-
The “Programs and Features” screen will be displayed with a list of all the programs installed on your computer. Scroll through the list until you find the program, then click to highlight it, then click the “Uninstall” button.

- In the next message box, confirm the uninstall process by clicking on Yes, then follow the prompts to uninstall program.


3. Scan for your computer for malware
Malware can damage your system files and registry entries and cause various errors. We will now, download and run a scan with Malwarebytes to check if you’re device is clean.
Malwarebytes is one of the most popular and most used anti-malware software for Windows, and for good reasons. It is able to destroy many types of malware that other software tends to miss, without costing you absolutely nothing. When it comes to cleaning up an infected device, Malwarebytes has always been free and we recommend it as an essential tool in the fight against malware.
-
You can download Malwarebytes by clicking the link below.
-
When Malwarebytes has finished downloading, double-click on the MBSetup file to install Malwarebytes on your computer. In most cases, downloaded files are saved to the Downloads folder.

You may be presented with a User Account Control pop-up asking if you want to allow Malwarebytes to make changes to your device. If this happens, you should click “Yes” to continue with the Malwarebytes installation.

-
When the Malwarebytes installation begins, you will see the Malwarebytes setup wizard which will guide you through the installation process. The Malwarebytes installer will first ask you what type of computer are you installing this program on, click either Personal Computer or Work Computer.

On the next screen, click “Install” to install Malwarebytes on your computer.

When your Malwarebytes installation completes, the program opens the Welcome to Malwarebytes screen.
-
Malwarebytes is now installed on your computer, to start a scan click on the “Scan” button. Malwarebytes will automatically update the antivirus database and start scanning your computer for malicious programs.

-
Malwarebytes will now scan your computer for browser hijackers and other malicious programs. This process can take a few minutes, so we suggest you do something else and periodically check on the status of the scan to see when it is finished.

-
When the Malwarebytes scan is finished scanning it will show a screen that displays any malware, adware, or potentially unwanted programs that it has detected. To remove the malicious programs that Malwarebytes has found, click on the “Quarantine” button.

-
Malwarebytes will now remove all the malicious files and registry keys that it has found. To complete the malware removal process, Malwarebytes may ask you to restart your computer.


4. Check for updates
Make sure your operating system, drivers, and other software are up to date. If the errors started happening after an update, you can uninstall that specific update patch.
To check for Windows updates, follow the below steps:
- Press the Windows key + I to open the Settings menu. Click the “Windows Update” tab on the left side of the screen.
For Windows 10 users, the Windows Update menu can be found in Settings > Update & Security > Windows Update. - Click the “Check for updates” button. This will initiate a scan for updates. If any updates are available, they will be downloaded and installed automatically.

- If you want to check for updates for other software, you can do so by opening the software and looking for a “Check for updates” option in the menu. You can also check the software’s website for updates.

5. Disable any unnecessary startup programs
Startup programs are applications that automatically launch when you start your computer. While some of these programs may be necessary for your system to function properly, others may be unnecessary and can cause errors.
- Open the Task Manager by pressing the Ctrl + Shift + Esc keys on your keyboard simultaneously.

- In the Task Manager, go to the “Startup” tab and disable any programs that you do not need to start automatically when you turn on your computer.
Keep in mind that some startup programs may be essential to the functioning of your system, so be careful not to disable any important programs.


6. Run a memory test
A faulty RAM module can cause random crashes. Run a memory test to check for any issues with your RAM. To run a memory test, follow these steps:
- Press the Windows key + R to open the Run dialog.
- Type “mdsched.exe” into the Run dialog and press Enter. This will launch the Windows Memory Diagnostic tool.

- You will be asked whether you want to restart your PC and run the test immediately or schedule the test to run the next time you start your PC. Choose the option you prefer and click “OK”.

If you choose to run the test immediately, your PC will restart and the test will begin. The test will run automatically and may take several minutes to complete.
- If the test finds any errors, it will display a message indicating the type and location of the error. You may need to replace your RAM if the test finds any errors.
- If the test completes without finding any errors, it will display a message indicating that the test has completed successfully.


7.Check your hardware
Start by inspecting your computer’s hardware components for any signs of damage or failure. Ensure that all connections are secure and that there are no loose cables. If you suspect a faulty component, consider consulting a professional or replacing it if necessary.
Next, check your RAM, hard drive, graphics card, and any other hardware components using the Windows Device Manager.
-
To access the Device Manager, type “devmgmt.msc” into the search bar on the Start menu and select “Device Manager” from the list of results.

-
In the Device Manager, you can view a list of all the hardware devices connected to your computer and check for any errors or issues. If you see a yellow exclamation point next to a device, it may indicate a problem with that device. You can right-click on the device and select “Update driver” or “Troubleshoot” to try and fix any issues.


8. Try a system restore.
If you have a restore point saved, you can try using it to revert your system to a previous state. This may fix the issue if it was caused by a recent change. To do a system restore follow these steps:
- Press the Windows key + S to open the Search menu.
- Type “system restore” into the search bar and click the “Create a restore point” result.

- Click the “System Restore” button.

- In the System Restore window, click “Next.”

- Select a restore point from the list and click “Next.” A restore point is a saved state of your system that you can use to revert your system to a previous state. Make sure to select a restore point that was created before you started experiencing problems.
- Click “Finish” to begin the restore process. Your PC will restart and the restore process will begin. This may take several minutes to complete.

- When the restore is complete, your PC will restart again. You may need to adjust your settings and reinstall any software that was installed after the restore point was created.


9. Reset your PC
One of the most drastic solutions is to reset your PC to its default configuration. This can be considered the nuclear option for fixing errors because it will wipe out all the third-party software you installed on your computer. However, this option can also be effective if none of the other methods work for you.
Before you reset your PC, make sure you back up your important data and files. You can also choose to keep your personal files in the Reset this PC tool, but it is better to have a separate backup just in case something goes wrong.
To reset your PC, follow these steps:
- Open Settings by pressing Windows + I keys.
- Click on System and then on Recovery.

- Under Reset this PC section, click on Reset PC button.
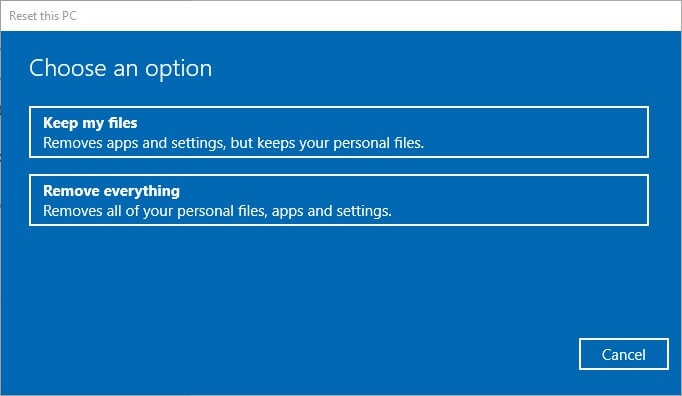
- Choose whether you want to keep your files or remove everything.
- Follow the on-screen instructions to complete the process.


After resetting your PC, you should be able to run your applications without getting any errors. However, keep in mind that this solution will also remove any custom settings and preferences you had on your computer. You will need to reinstall and configure your programs again after resetting.
Conclusion
Ndu.sys BSoD errors can be frustrating and disruptive, but with the right approach, they can be resolved effectively. Understanding the causes, such as outdated drivers, hardware issues, corrupt system files, and malware infections, is crucial in diagnosing and fixing the problem. By following the recommended steps, including updating drivers, checking hardware, running a system file checker scan, and scanning for malware using reliable software like Malwarebytes Free, users can overcome Ndu.sys BSoD errors and ensure a stable and reliable computing experience.
Here are 10 basic security tips to help you avoid malware and protect your device:
To avoid potential dangers on the internet, it’s important to follow these 10 basic safety rules. By doing so, you can protect yourself from many of the unpleasant surprises that can arise when using the web.
What is ‘ndu.sys BSOD’ error in Windows 10?
In this article, we are going to discuss on How to fix ndu.sys BSOD Windows 10. You will be guided with easy steps/methods to resolve the issue. Let’s starts the discussion.
‘ndu.sys BSOD error Windows 10’: It is common Windows Problem considered as Blue Screen of Death (BSOD) error. This error is appeared with message saying ‘Your PC ran into a problem and needs to restart. We’re just collecting some error info, and then we’ll restart for you’ along with some Windows Stop Codes like SYSTEM_SERVICE_EXCEPTION error and ndu.sys error. This BSOD error is usually appeared in the middle of your work on Windows computer or when you start/restart your Windows computer.
If you are not aware, ndu.sys is important part of Microsoft Windows and rarely causes the issue. The file ndu.sys is Windows Network Data Usage Monitoring Driver file and is located in ‘C:\Windows\System32\drivers’ folder and the process is known as Windows Network Data Usage Monitoring Driver. However, several users reported they faced ndu.sys BSOD error in Windows 10 computer possibly due to issue with ndu.sys file.
There could be several reasons behind the issue including outdated/corrupted network drivers, outdated Windows OS, issue with ndu.sys files, corruption in system files or registry, and other issues. It might possible you have accidently deleted the ndu.sys file from its original path or the file is moved to another path of computer. You can rename and replace ndu.sys file in order to fix. It is possible to fix the issue with our instructions. Let’s go for the solution.
How to fix ndu.sys BSOD Windows 10?
Method 1: Fix ‘ndu.sys BSOD’ error with ‘PC Repair Tool’
‘PC Repair Tool’ is easy & quick way to find and fix BSOD errors, DLL errors, EXE errors, problems with programs/applications, malware or viruses infections in computer, system files or registry issues, and other system issues with just few clicks.
Method 2: Run Blue Screen Troubleshooter
Windows built-in Blue Screen troubleshooter can resolve the issue.
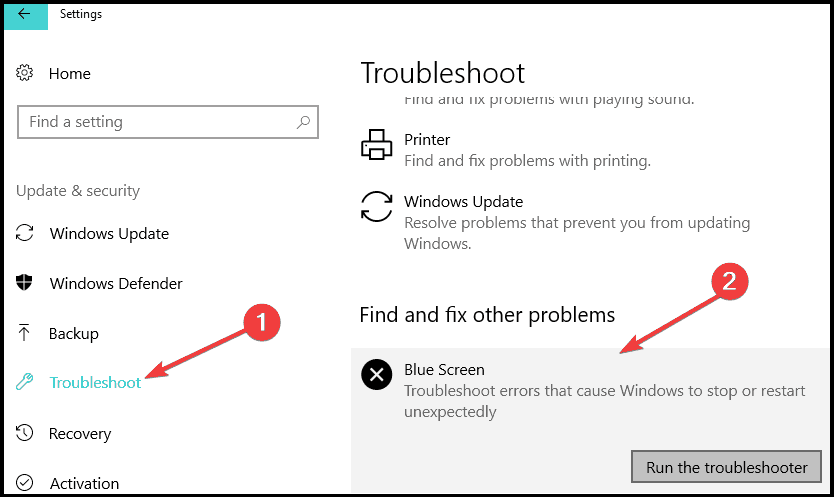
Step 1: Open ‘Settings’ app in Windows PC via Windows Search Box and go to ‘Update & Security > Troubleshoot > Additional Troubleshooters’
Step 2: Find and select ‘Blue Screen’ troubleshooter, and click ‘Run the troubleshooter’ and follow on-screen instructions to finish troubleshooting and once finished, check if the issue is resolved.
Method 3: Rename ndu.sys folder
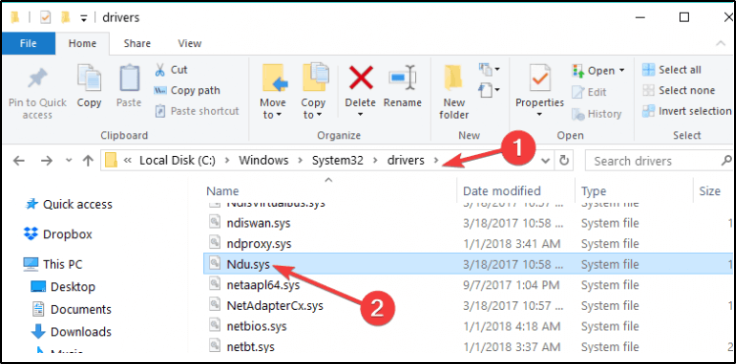
Step 1: Open ‘This PC’, ‘My Computer’ and go to ‘C: > System32’ folder
Step 2: Go to ‘Drivers’ folder and look for ndu.sys file, right-click it and select ‘Rename’ and rename it to ‘ndu.sys11’ and save the changes
Step 3: Once again the C: partition you have Windows 10 installed. Search for C: drive for Windows.old folder this time because this should be the old Windows OS you upgraded from
Step 4: Go to ‘System32’ folder and go to ‘Drivers’ folder, search for ndu.sys file, right-click on it and select ‘Copy’. Now, paste it in Drivers folder of Windows 10 version.
Step 5: Once done, restart your computer and check if the issue is resolved.
Method 4: Update Network Adapter Drivers
Updating network adapter drivers to latest version can resolve the issue. You can update all Windows drivers including network adapter drivers using Automatic Driver Update Tool. You can get this tool through button/link below.
Method 5: Update Windows OS
Updating Windows OS to latest version can resolve the issue.
Step 1: Open ‘Settings’ app and go to ‘Update & Security > Windows Update’ and click ‘Check for updates’ and click ‘Check for updates’ button
Step 2: Download and install all available updates in computer and once updated, restart your computer and check if the issue is resolved.
Method 6: Try a different internet connection
This issue can be occurred due to some issue with your internet connection. You should make sure internet connection is working fine and there is no issue with internet connection at all. You can try a different internet connection and check if the issue is resolved. Also, you can try a wired connection if you face the issue with wireless network connection, and check if it works.
Method 7: Reset Windows 10
If the issue is still persist, you can perform Windows 10 reset operation in computer in order to fix.
Step 1: Open ‘Settings’ app in Windows PC and go to ‘Update & Security > Recovery > Reset This PC’ and click ‘Get Started’
Step 2: Follow on-screen instructions to finish resetting process and once finished, restart your computer and check if the issue is resolved.
Method 8: Clean Windows 10 Install
If the issue is still persist, you can try to fix the issue by performing clean Windows 10 installation. To do s, you need to insert Bootable Windows 10 Installation Media USB into your computer and boot your computer with it, perform clean Windows installation in computer and once finished, check if it works for you.
Conclusion
I hope this post helped you on How to fix ndu.sys BSOD Windows 10 with easy steps/methods. You can read & follow our instructions to do so. That’s all. For any suggestions or queries, please write on comment box below.
Blue Screen of Death (BSOD) errors can be extremely frustrating for Windows users, especially when they occur unexpectedly and disrupt your work. One common BSOD error that Windows 10 users may encounter is the Ndu.sys error. This error is typically associated with network drivers and can cause your computer to crash and display the dreaded blue screen.
In this article, we will discuss what the Ndu.sys error is, what causes it, and how you can fix it on your Windows 10 system. We will provide step-by-step instructions on how to troubleshoot and resolve this issue, so you can get back to using your computer without any interruptions.
What is the Ndu.sys error?
The Ndu.sys error is a Blue Screen of Death (BSOD) error that is related to network drivers on Windows 10. The Ndu.sys file is a system file that is used to manage network data usage on your computer. When this file becomes corrupted or encounters an issue, it can cause your computer to crash and display the blue screen error.
The Ndu.sys error is usually accompanied by a stop code, such as “SYSTEM_THREAD_EXCEPTION_NOT_HANDLED” or “DRIVER_IRQL_NOT_LESS_OR_EQUAL”. These stop codes indicate that there is a problem with the network driver or the Ndu.sys file on your system.
What causes the Ndu.sys error?
There are several reasons why you may encounter the Ndu.sys error on your Windows 10 system. Some of the common causes include:
-
Corrupted or outdated network drivers: If the network drivers on your computer are outdated or corrupted, it can lead to the Ndu.sys error. It is important to keep your drivers up-to-date to prevent such errors from occurring.
-
Malware or virus infection: Malware or virus infections can also cause the Ndu.sys error on your system. These malicious programs can corrupt system files, including Ndu.sys, and cause your computer to crash.
-
Corrupted system files: In some cases, system files, including Ndu.sys, may become corrupted due to various reasons, such as improper shutdowns or hardware issues. This can lead to the Ndu.sys error on your computer.
-
Hardware issues: Faulty hardware components, such as a failing hard drive or RAM, can also cause the Ndu.sys error. It is important to check your hardware for any issues and replace any faulty components.
How to fix the Ndu.sys error on Windows 10?
Now that we have discussed what the Ndu.sys error is and what causes it, let’s move on to how you can fix this error on your Windows 10 system. Follow the steps below to troubleshoot and resolve the Ndu.sys error:
- Update network drivers:
The first step in fixing the Ndu.sys error is to update your network drivers. To do this, follow these steps:
a. Press the Windows key + X on your keyboard and select Device Manager from the menu.
b. In the Device Manager window, expand the Network adapters category.
c. Right-click on your network adapter and select Update driver.
d. Choose the option to search automatically for updated driver software.
e. Windows will search for and install the latest driver for your network adapter.
f. Restart your computer after the driver update is complete.
-
Run a malware scan:
To rule out malware or virus infections as the cause of the Ndu.sys error, it is important to run a full system scan using your preferred antivirus software. Make sure your antivirus software is up-to-date and perform a thorough scan of your system to detect and remove any malicious programs. -
Check for system file corruption:
To check for system file corruption and repair any issues, you can use the System File Checker (SFC) tool. Follow these steps to run the SFC tool:
a. Press the Windows key + X on your keyboard and select Command Prompt (Admin) from the menu.
b. In the Command Prompt window, type the command “sfc /scannow” and press Enter.
c. The SFC tool will scan your system for corrupted files and repair them automatically.
d. Restart your computer after the scan is complete.
- Perform a disk check:
To check for and repair any disk errors on your system, you can use the Check Disk (Chkdsk) utility. Follow these steps to run a disk check:
a. Press the Windows key + X on your keyboard and select Command Prompt (Admin) from the menu.
b. In the Command Prompt window, type the command “chkdsk /f” and press Enter.
c. Windows will ask if you want to schedule a disk check for the next restart. Type “Y” and press Enter.
d. Restart your computer to allow Chkdsk to scan and repair any disk errors.
- Update Windows:
Make sure that your Windows 10 system is up-to-date with the latest updates and patches. Microsoft regularly releases updates to fix bugs and issues, including BSOD errors like the Ndu.sys error. To update Windows, follow these steps:
a. Press the Windows key + I on your keyboard to open the Settings app.
b. Click on Update & Security.
c. Click on Check for updates and install any available updates.
d. Restart your computer after the updates are installed.
- Check for hardware issues:
If you have tried all the above steps and are still experiencing the Ndu.sys error, it is possible that there may be hardware issues causing the problem. Check your hardware components, such as the hard drive, RAM, and network adapter, for any issues. You can run hardware diagnostics tools or consult a professional technician to identify and fix any hardware problems.
Conclusion
The Ndu.sys error can be a frustrating issue to encounter on your Windows 10 system, but with the right troubleshooting steps, you can resolve this error and prevent it from occurring in the future. By updating network drivers, running malware scans, checking for system file corruption, performing disk checks, updating Windows, and checking for hardware issues, you can effectively fix the Ndu.sys error and ensure that your computer runs smoothly without any interruptions.
If you continue to experience the Ndu.sys error after trying these troubleshooting steps, it is recommended to seek further assistance from Microsoft support or a professional technician. Remember to back up your important data regularly to prevent any data loss in case of a system crash or hardware failure. By following the steps outlined in this article, you can effectively fix the Ndu.sys error on your Windows 10 system and continue using your computer without any disruptions.

Ndu.sys is a file system that is an important part of Windows and rarely causes problems. This file is a Windows Network Data Usage Monitoring Driver file, and it is located in the C:\Windows\System32\drivers folder, and the process is known as Windows Network Data Usage Monitoring Driver. If you experience the Ndu.sys blue screen error on your Windows 10 device, you can try the solutions provided in this article.
You may encounter this issue after successfully upgrading to the latest version of Windows 10.
Fix Ndu.sys BSOD Error
If you are faced with this SYSTEM_SERVICE_EXCEPTION error, you can try the solutions I recommend below in no particular order and see if they help you solve the problem.
Before proceeding to the repair method, you should know that if you can log in normally, then it’s okay. But if not, you will have to boot into Safe Mode, then enter the Advanced Startup Options screen or use the Installation Media to boot so you can run these instructions.
1. Using Blue Screen Troubleshooter Online
In some cases, this Online Blue Screen Troubleshooter from Microsoft will resolve the BSOD error. You can follow my guide to this method in my other article entitled how to use the Blue Screen Troubleshooter from Microsoft on Windows 10.
2. Update Network Card Drivers.
Ndu.sys is known as the Windows Network Data Usage Monitoring Driver. So, you may be experiencing this error due to out-of-date or corrupted network card drivers. In this case, you can update your drivers manually via Device Manager (Win + X, then click Device Manager), or you can get updated drivers in the Optional Updates section under Windows Update. You can also update your driver automatically, or you can download the latest version of the driver from your network card manufacturer’s website.
3. Rename and Replace File Ndu.sys
To do this, follow the steps below.
- Press Win + E keys to open File Explorer and navigate to the C:\Windows\System32\drivers folder.
- In this location, right-click on the Ndu.sys file and select Rename.


- Rename Ndu.sys to Ndu.sys1.
- If you cannot rename the file, make sure you are logged in with an administrator account or change the permissions you have on this particular file to an administrator.
- Next, open the C: partition where you installed Windows 10 and find the Windows.old folder. This folder contains the older version of Windows 10 that you upgraded.
- Locate and open the System32 folder, open the driver’s folder and locate the Ndu.sys file.
- Right-click on it and select the Copy option.
- Now go back to the C:\Windows\System32\drivers folder and paste the file you copied earlier in this folder.
- Then close File Explorer and restart your Windows 10 PC.
After booting, check to see if this BSOD error persists or not. If still, try the next solution.
4. Rollback to Previous Windows 10 Version
This solution requires you to revert to a previous version of Windows 10. You can read my article on the latest Windows 10 update issues and how to fix them in the repair section to perform this method.
5. Change Internet Connection Mode
This solution requires you to change your internet connection mode. So, if you are using wired connection mode (ethernet) to access the internet on your Windows 10 computer, you can switch to wireless connection mode (WiFi) or vice versa and see if the error persists.
6. Reset Windows 10
This solution requires that you reset Windows 10 and see if that helps. To do so, you can read my article on how to reset Windows 10 to factory default settings or factory reset Windows 10 using Cloud Option.
7. Clean Install Windows 10
At this point, if none of the solutions above have been successful in resolving this BSOD error, it is most likely due to some system malfunction that cannot be resolved conventionally. In this case, you can back up your files to an external USB drive. If you can’t boot to the desktop, use a Linux Live USB to back up your files, or read my article on how to quickly and easily back up data on a Windows PC that won’t boot, then do a clean install of Windows 10.
Hopefully, one of the methods above can help you fix the Ndu.sys blue screen error on your Windows 10. That’s it for this tutorial. Don’t forget to leave your comments below to share your experience in following this tutorial. Thank you.