
Все способы:
- Запуск окна «Выполнить» в Виндовс 10
- Способ 1: Поиск по системе
- Способ 2: «Проводник»
- Способ 3: «Пуск»
- Способ 4: Меню дополнительных действий
- Способ 5: «Командная строка»
- Способ 6: «Диспетчер задач»
- Способ 7: Комбинация клавиш
- Способ 8: Исполняемый файл
- Дополнительно: Закрепление оснастки для быстрого вызова
- Заключение
- Вопросы и ответы: 0
Благодаря оснастке «Выполнить» в ОС от Microsoft можно практически моментально запускать многие стандартные приложения и системные процессы посредством ввода специальных команд. Сегодня расскажем обо всех возможных вариантах ее вызова в Windows 10.
Запуск окна «Выполнить» в Виндовс 10
В предыдущих версиях Windows проще, да и быстрее всего вызвать окно быстрого запуска «Выполнить» можно было через меню «Пуск», но этот способ никогда не был единственным. Рассмотрим те из них, которые актуальны для десятой версии операционной системы, после чего вы сможете выбрать наиболее подходящий для себя или же пойти альтернативным путем.
Способ 1: Поиск по системе
Одним из новшеств Windows 10 стала функция поиска, вызвать которую можно как с панели задач, так и с помощью горячих клавиш. Использовать ее можно не только для быстрого нахождения файлов и папок, но и для запуска приложений и компонентов системы. К числу таковых относится и интересующая нас оснастка «Выполнить».
Воспользуйтесь иконкой поиска на панели задач или клавишами «WINDOWS+S» и начните вводить наименование искомого компонента – Выполнить. Как только увидите его в результатах выдачи, щелкните по этой строке левой кнопкой мышки (ЛКМ) для запуска.

Читайте также: Как искать файлы в Виндовс 10
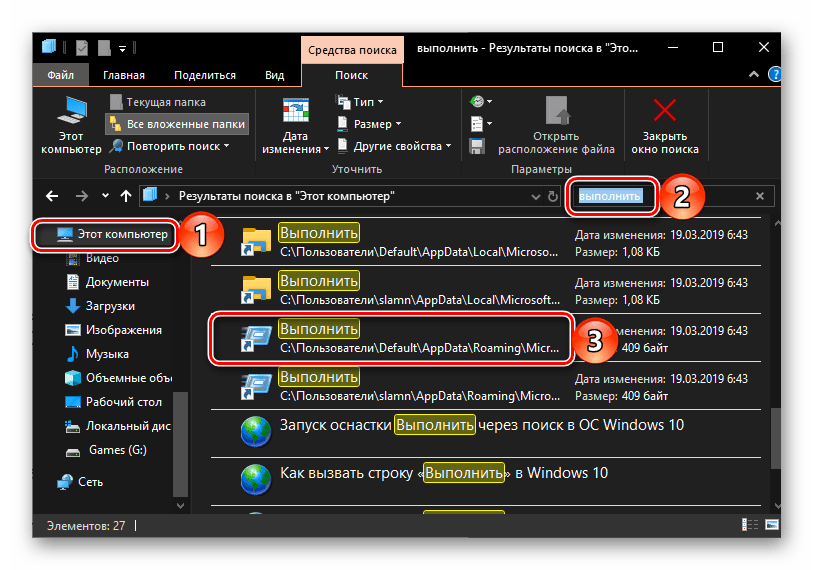
Способ 2: «Проводник»
Существует еще один завязанный на функции поиска метод вызова окна «Выполнить», правда, назвать его удобным точно нельзя. Искать в этом случае потребуется не в специально предназначенном для этого разделе операционной системы, а в интегрированном в нее файловом менеджере.
Предварительно вызвав «Проводник» (например, клавишами «WINDOWS+E»), перейдите на его боковой панели в раздел «Этот компьютер». Введите в поисковую строку выполнить, нажмите «ENTER» и дождитесь, пока будет найдена оснастка. Так как запрос может являться еще и частью имени файлов и папок на диске, результатов выдачи наверняка будет более одного, а потому просто найдите в нем ярлык приложения и запустите его нажатием ЛКМ.
Читайте также: Как открыть «Проводник» в Виндовс 10
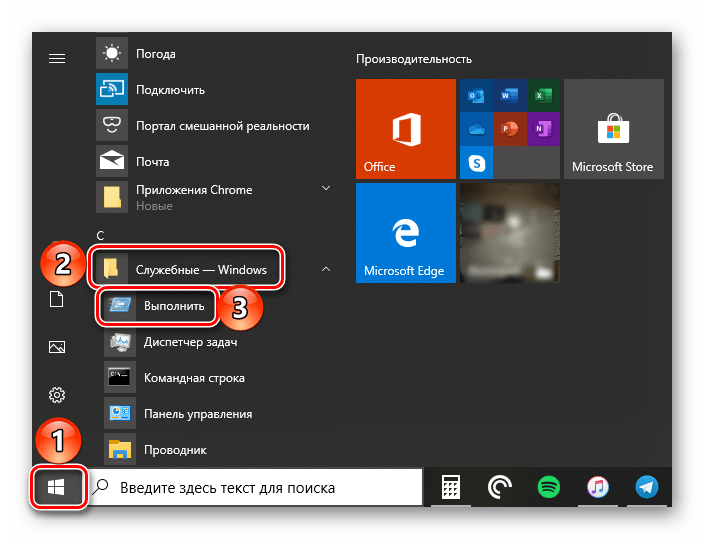
Способ 3: «Пуск»
Несмотря на то что внешний вид стартового меню «десятки» был полностью переработан, окно «Выполнить» из него никуда не делось. Правда, находится оно теперь далеко не на самом очевидном месте.
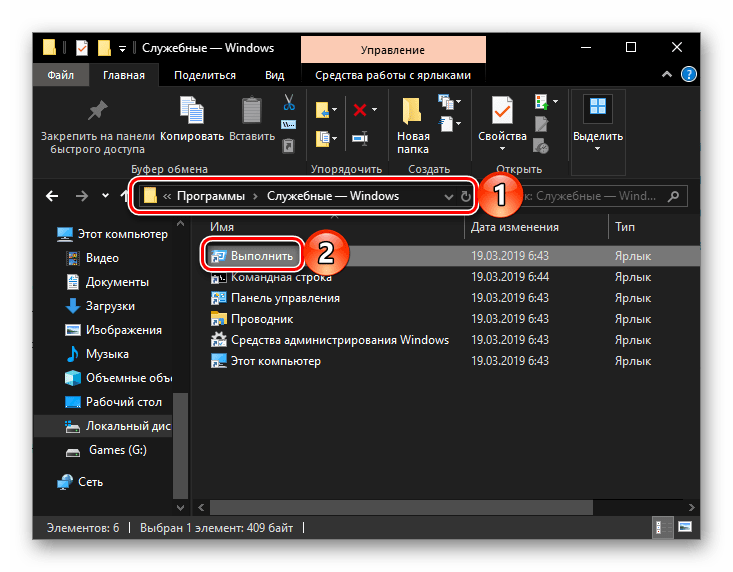
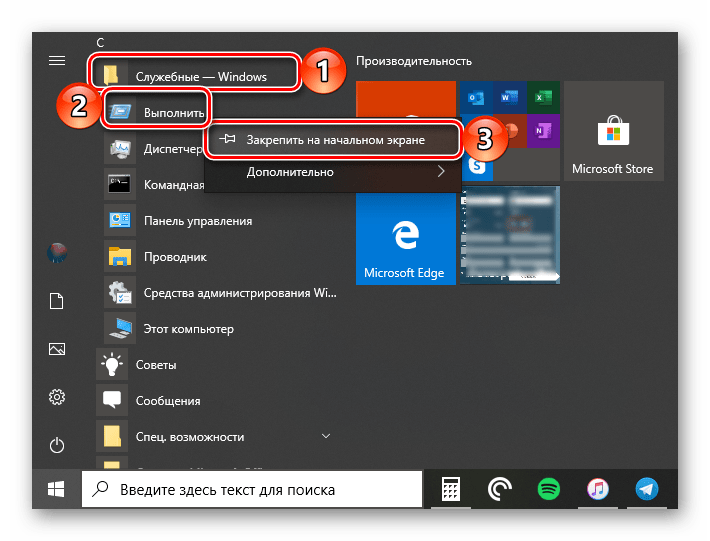
Вызовите «Пуск», нажав ЛКМ по его значку или воспользовавшись клавишей «WINDOWS» на клавиатуре, пролистайте список представленных в этом меню элементов практически в самый низ и кликните по папке «Служебные — Windows» для ее открытия. Запустите искомый компонент системы.
Способ 4: Меню дополнительных действий
Помимо более привлекательного, пусть и далеко не для всех удобного интерфейса, «Пуск» в Windows 10 обзавелся еще и меню дополнительных действий, с помощью которого можно буквально в два клика открывать наиболее необходимые компоненты системы. Просто нажмите по этому значку правой кнопкой мышки (ПКМ) или воспользуйтесь горячими клавишами «WINDOWS+X» и выберите в появившемся списке интересующий нас пункт.

Способ 5: «Командная строка»
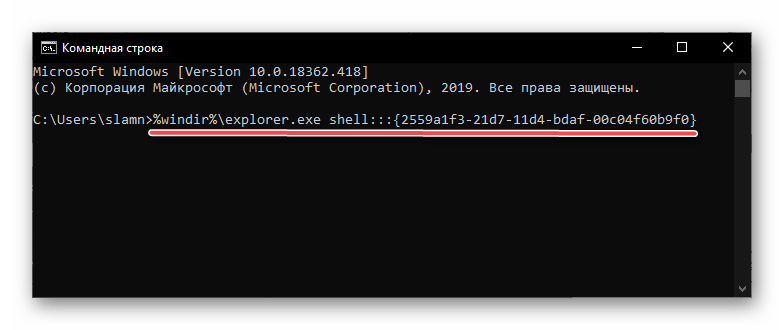
Многие пользователи предпочитают вызывать «Командную строку» через окно «Выполнить», но для решения нашей сегодняшней задачи можно пойти противоположным путем.
Любым удобным способом откройте консоль (например, через рассмотренное выше меню дополнительных действий кнопки «Пуск»), введите в нее указанную ниже команду и нажмите «ENTER», после чего незамедлительно будет запущена оснастка.
%windir%\explorer.exe shell:::{2559a1f3-21d7-11d4-bdaf-00c04f60b9f0}
Читайте также: Как открыть «Командную строку» в Виндовс 10
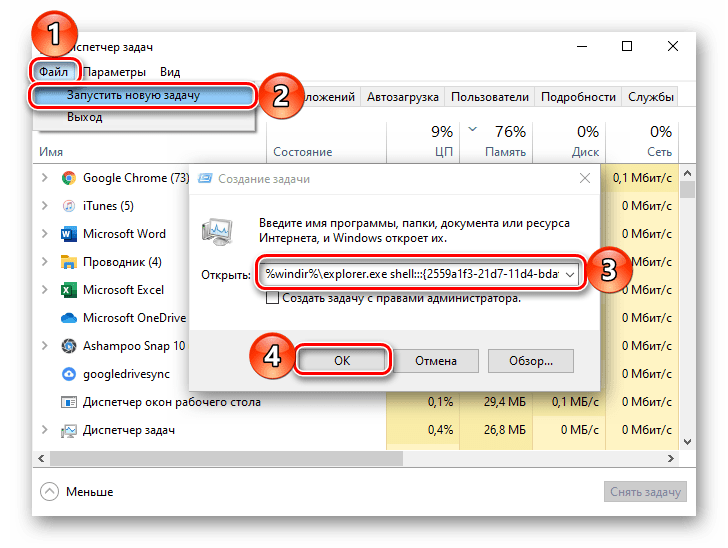
Способ 6: «Диспетчер задач»
Данный компонент Windows 10 можно использовать не только для оценки загруженности операционной системы и остановки программ и процессов, но и для их запуска. Сам же «Диспетчер задач» можно открыть с помощью клавиш «CTRL+SHIFT+ESC».
Откройте меню «Файл» и выберите пункт «Запустить новую задачу». В появившееся окошко, которое визуально очень напоминает «Выполнить», введите ту же команду, что в случае с рассмотренной выше «Командной строкой», после чего нажмите «ОК» или «ENTER».
%windir%\explorer.exe shell:::{2559a1f3-21d7-11d4-bdaf-00c04f60b9f0}
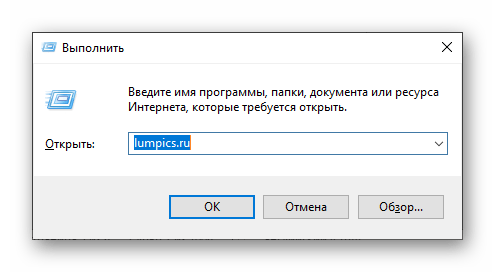
Способ 7: Комбинация клавиш
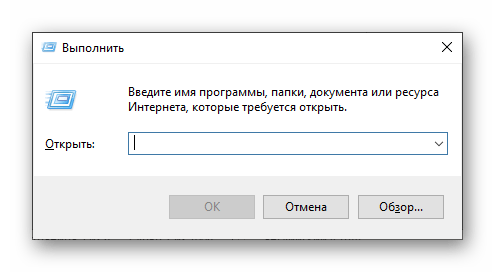
Каждый из рассмотренных выше методов запуска оснастки «Выполнить» требует от нас с вами минимум действий, но наиболее простой и удобный заключается в использовании горячих клавиш – просто нажмите «WINDOWS+R» и необходимое окошко сразу же появится перед вами.
Совет: Для запуска через оснастку «Выполнить» системных приложений с административными правами после ввода команды в его строку удерживайте клавиши «CTRL+SHIFT» и только после этого жмите «ОК» или «ENTER».
Читайте также: Как открыть «Командную строку» с правами администратора в Виндовс 10
Способ 8: Исполняемый файл
«Выполнить» хоть и является компонентом операционной системы, на деле ничем не отличается от обычного приложения. Следовательно, у него есть не только своя папка на диске, но и исполняемый файл, посредством которого осуществляется запуск. Располагается он по следующему адресу:
C:\Users\Username\AppData\Roaming\Microsoft\Windows\Start Menu\Programs\System Tools
Примечание: Вместо «Users» в пути к файлу может быть указано русскоязычное написание «Пользователи» (зависит от локализации операционной системы), а вместо «Username» необходимо вписать ваше имя пользователя.
Дополнительно: Закрепление оснастки для быстрого вызова
Если по каким-то причинам вы не считаете ни один из рассмотренных выше способов запуска «Выполнить» достаточно быстрым и удобным, но при этом необходимость в частом использовании оснастки имеется, можно и нужно закрепить ее на самом заметном месте. Таковых в Windows 10 как минимум три, и далее мы расскажем, как действовать в случае с каждым из них.
Панель задач
Для того чтобы закрепить ярлык запуска окна «Выполнить» на панели задач, сначала вызовите его любым из рассмотренных выше способов, затем кликните ПКМ по значку и выберите в появившемся контекстном меню соответствующий пункт. Далее вам останется лишь переместить ярлык в более удобное место, например, поближе к меню «Пуск».

Меню «Пуск»
Стартовое меню ОС Виндовс 10 позволяет закреплять приложения для быстрого запуска в виде плиток, что вполне можно сделать и с оснасткой «Выполнить». Для этого просто отыщите ее в «Пуске» (см. Способ 3), нажмите по ярлыку ПКМ и выберите пункт «Закрепить на начальном экране».
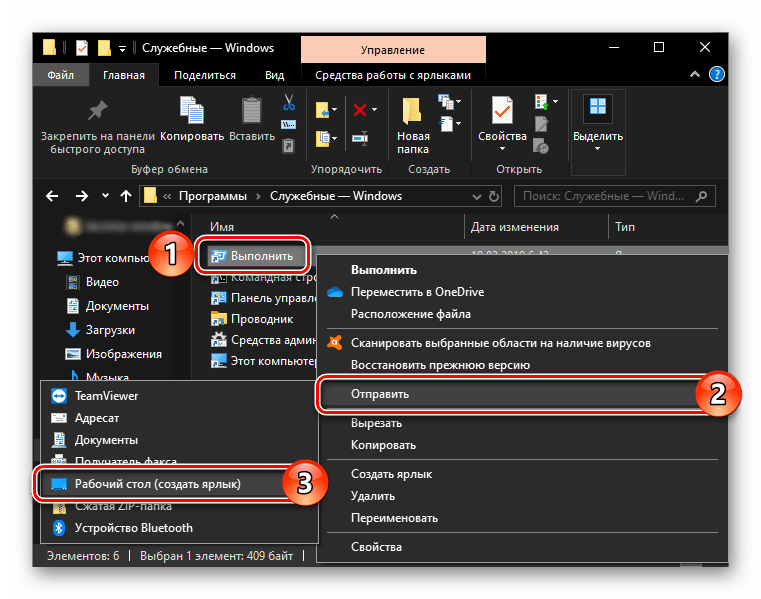
Рабочий стол
Если вы привыкли запускать программы с рабочего стола, разумным решением будет поместить на него и ярлык окна «Выполнить». Перейдите в папку, в которой располагается исполняемый файл рассматриваемого системного компонента (см. Способ 8), кликните ПКМ по его ярлыку, после чего последовательно воспользуйтесь пунктами контекстного меню «Отправить» — «Рабочий стол (создать ярлык)»
Заключение
Ознакомившись с этой статьей, вы узнали не только обо всех возможных способах запуска системной оснастки «Выполнить», но и о том, как закрепить или создать ее ярлык для еще более удобного и быстрого запуска.
Наша группа в TelegramПолезные советы и помощь
Некоторые начинающие пользователи, перейдя с предыдущих версий ОС на Windows 11/10 задают вопрос о том, как открыть диалоговое окно Выполнить — ранее они открывали его, используя соответствующий пункт в меню Пуск. В контексте темы может пригодиться: Полезные команды диалогового окна Выполнить.
В этой простой инструкции для начинающих способы открыть окно Выполнить в Windows 11 и Windows 10 самыми разными способами, выбирайте любой.
Контекстное меню кнопки Пуск
Первый и один из самых быстрых способов открыть окно «Выполнить» — использовать контекстное меню кнопки Пуск.
Способ работает и в Windows 11 и в Windows 10:
- Нажмите правой кнопкой мыши по кнопке «Пуск».
- Выберите пункт «Выполнить» в контекстном меню.


Для открытия этого же меню можно использовать сочетание клавиш Win+X, где Win — клавиша с эмблемой Windows на клавиатуре.
Сочетание клавиш на клавиатуре
Использование горячих клавиш — базовый способ, которым пользуются почти все и который исправно работает во всех актуальных версиях Windows.

Достаточно нажать клавиши Windows + R на клавиатуре, чтобы открылось окно «Выполнить». Здесь Windows — клавиша с соответствующей эмблемой в нижнем ряду на клавиатуре.
Использование поиска
Мой основной совет тем, кто не знает, как что-то найти или запустить в Windows 11 или Windows 10 — попробовать использовать поиск на панели задач.

Открыть нужное окно с его помощью также получится, достаточно начать набирать «Выполнить» в поле поиска.
Пункт в списке приложений меню Пуск
Вы можете найти пункт для запуска окна «Выполнить» в меню Пуск:
Диспетчер задач
Если вы откроете диспетчер задач (Как открыть диспетчер задач), из него тоже можно открыть необходимое окно с возможностью запуска от имени администратора.

Для этого необходимо в главном меню выбрать «Файл» — «Запустить новую задачу».
Ярлык для окна «Выполнить»
При желании вы можете создать ярлыка для открытия окна «Выполнить», оставить его на рабочем столе или закрепить на панели задач и использовать в любое время, когда он потребуется:
- Нажмите правой кнопкой мыши по пустому месту рабочего стола и выберите «Создать» — «Ярлык».
- В поле укажите расположение объекта введите строку:
explorer.exe shell:::{2559a1f3-21d7-11d4-bdaf-00c04f60b9f0}
- Нажмите «Далее», задайте имя ярлыка — готово.

В дальнейшем в свойствах ярлыка вы можете изменить и значок, оригинальный значок окна «Выполнить» находится в файле C:\Windows\System32\SHELL32.dll
Панель управления (только Windows 11)
Если открыть панель управления в Windows 11 и включить просмотр в виде значков, в списке элементов вы увидите «Инструменты Windows».

Внутри вы найдете различные системные утилиты Windows, в том числе и диалоговое окно «Выполнить».
Командная строка, PowerShell, Терминал Windows
Окно «Выполнить» можно запустить из командной строки или Windows PowerShell (и, соответственно, используя Терминал Windows). Достаточно открыть соответствующий инструмент, а затем использовать одну из команд:
- В командной строке —
explorer.exe shell:::{2559a1f3-21d7-11d4-bdaf-00c04f60b9f0} - В Windows PowerShell —
(New-Object -ComObject "Shell.Application").FileRun()
Надеюсь, предложенных способов будет достаточно.
The Command Prompt is one of the most powerful tools on your Windows system, offering quick access to run commands, perform tasks, and manage system settings. But what happens when your mouse is not working or you are facing any issue with your laptop touchpad? So, in that time, knowing how to open a command prompt with keyboard shortcuts.
Now, to learn these shortcuts, explore this guide. Here we will show you 7 easy methods to open the command prompt on Windows 11, 10, and 8.
How to Open Command Prompt in Windows using Keyboard Shortcuts
In terms of productivity, keyboard shortcuts are often minimized. While navigating through menus and clicking icons can get the activity executed, learning keyboard shortcuts can turbocharge your computing revel. With just a few keystrokes, you can execute commands, release programs, and navigate your device with excellent speed and precision.
7 Methods to Open Command Prompt in Windows
The conventional way to open a command prompt entails many steps, like establishing the start menu, then searching the command activate, and so forth. But with the help of shortcuts, you can without difficulty visit the command prompt and begin operating on it.
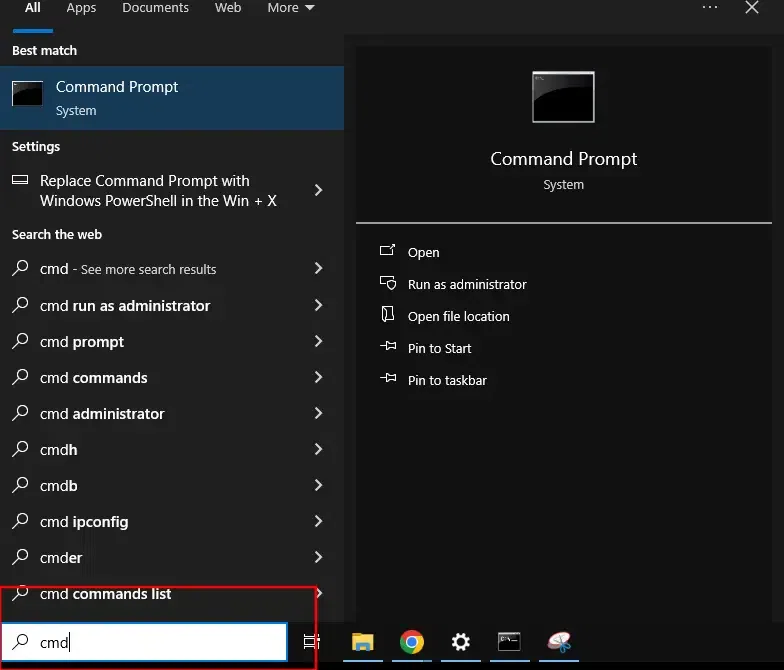
1. Using Windows Key (Windows 10 and 11)
Windows Search Bar allows user to find programs, including command prompt using few steps.
Step 1: Open the Windows icon and Type CMD.
- Press the Windows key from your keyboard
- Now type «CMD» or «Command Prompt»
- Hit ENTER to open Command Prompt
2. Using Run Dialog Box
You can also use the «run command» shortcut to launch cmd, below are the steps for the same:
Note: This method works across all versions of Windows, from Windows 7 to Windows 11.
Step 1: Press Windows + R to Open «Run Dialog»
- Press the Windows key + R on your keyboard to open the run command.
Step 2: Type «CMD» and hit «Enter»
A dialogue box will appear, type «cmd» or «Command Prompt» and press «Enter«.
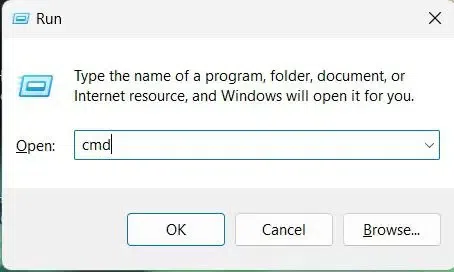
This will instantly open your system’s Command Prompt with keyboard only.
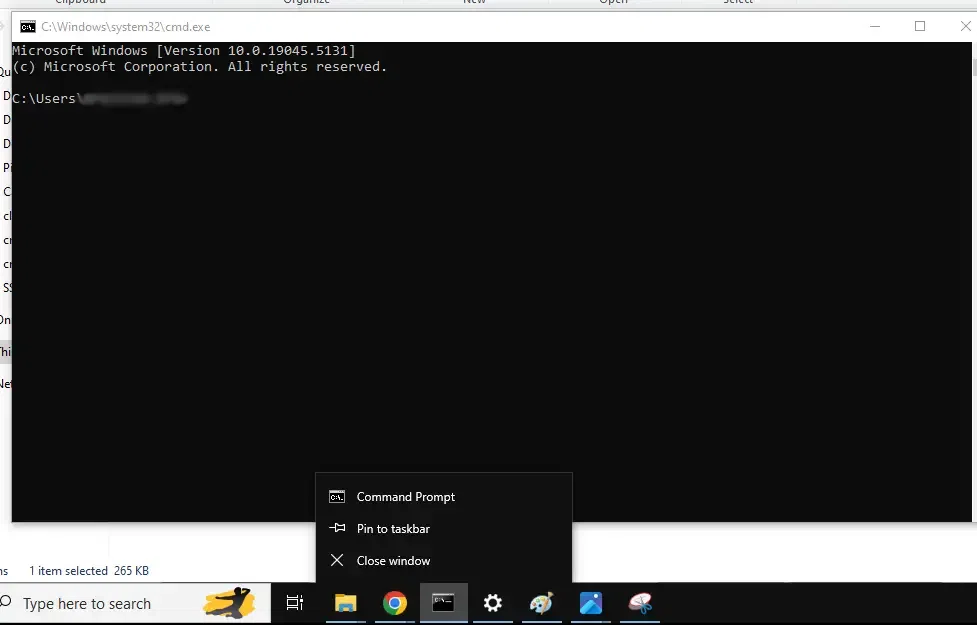
3. «Pin» to Taskbar
One of the most efficient method to open command prompt using keyboard shortcut in Windows is by pinning it to Taskbar. Let’s learn quick steps to do so:
Step 1: Open Command Prompt
First of all, open cmd with the help of any given method.
Step 2: Make a «Right-click» on the icon
Now, right-click on the CMD icon in the taskbar (in the bottom) and select Pin to Taskbar
Note: From now on, you can open Command Prompt by pressing Windows key + [number] (the number corresponds to the position of the CMD icon on the Taskbar).
4. How to open command prompt using the «Context Menu»
The ‘Context Menu» is suitable for Windows 10 and 11 and by using this method, you can directly open the command prompt from any folder in Windows 10 and 11.
Step 1: Open File Explorer
Click on the Windows button or go to Start Menu and type «File Explorer» and click to open it.
Hold down Shift and right-click anywhere in the File Explorer window (in the white space or within a folder) and go to Context Menu and select «Open Command Windows here»
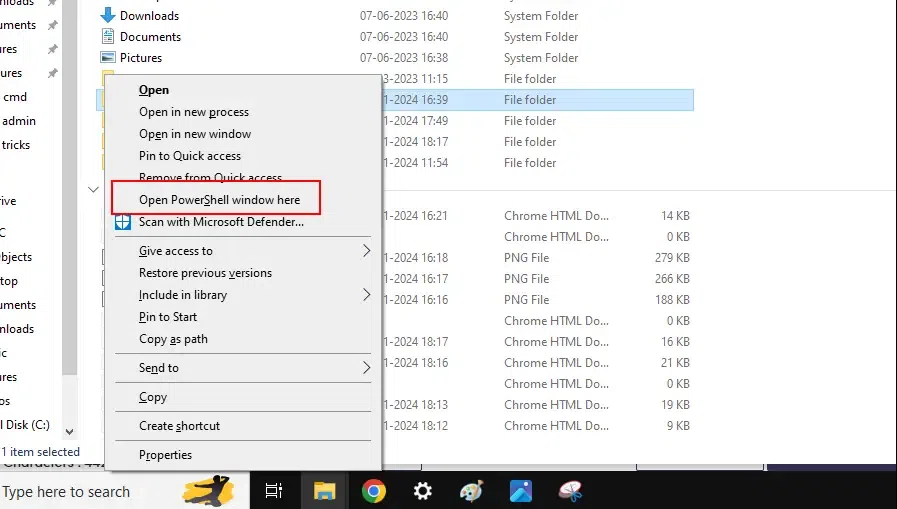
Note: In some versions, this option might show as Open PowerShell window here instead.
5. Custom Shortcut for all Versions
If you wish to create any specific keystroke toopen command prompt in your Windows PC, then you can create a custom shortcut using the following methods.
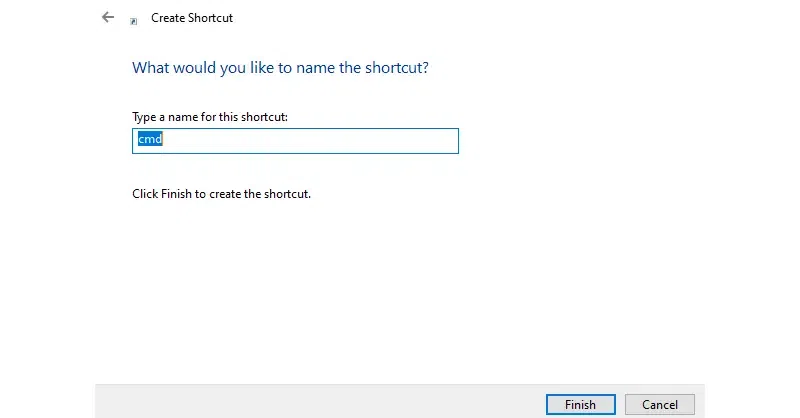
Step 1: Create a Shortcut
Go to «Desktop» and create a Shortcut first.
Step 2: Create Location Point for cmd.exe
Now, type cmd.exe as the location of the shortcut and name it as «CMD».
Step 3: Click on the «Shortcut key» field
Once you create the shortcut, make a right-click and choose Properties, and click on the «Shortcut Key» field and press your desired keystroke combination. Now, click «Apply > OK» to save it.
6. Use Windows + X to open CMD
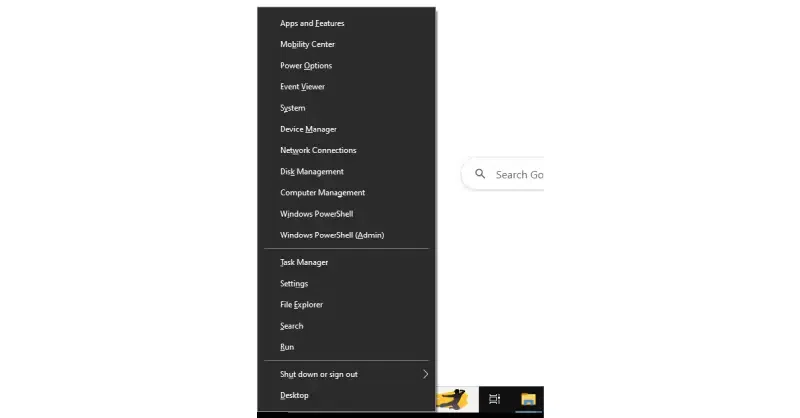
The Windows + X menu provides quick access to system tools, including the Command Prompt in Administrator mode.
Press Windows key + X to open the Quick Access menu.
In Windows 8, 10, or 11, you will see options to open either Command Prompt or Command Prompt (Admin).
Step 2: Select CMD (Admin)
Select Command Prompt or Command Prompt (Admin) to open it immediately. Please keep this in mind that the newer versions of Windows will display PowerShell, but you can still switch it back to CMD through settings.
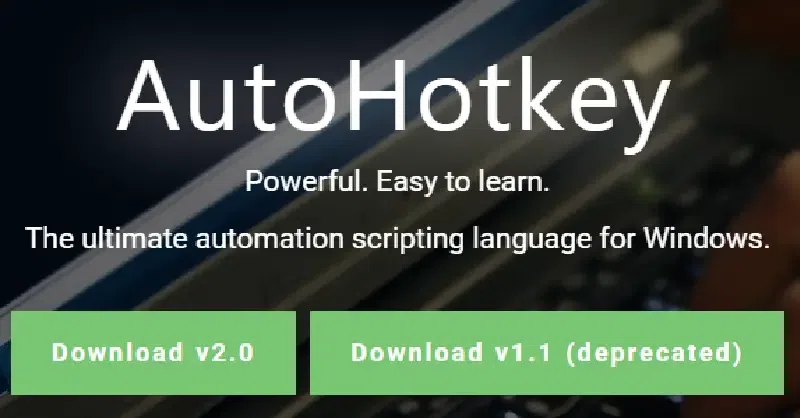
In older versions of Windows, such as Windows 7, you can use third-party tools like AutoHotkey to create custom keyboard shortcuts for opening the Command Prompt.
Step 1: Download and install AutoHotkey.
Open Chrome Browser in Windows and go to AutoHotkey Official website.
Step 2: Create and Run Script
Create a new script with the following command:
#C::Run, cmd.exeThis will allow you to open CMD by pressing Windows key + C.
Conclusion
The Command Prompt is an invaluable tool for Windows users, and knowing how to quickly open it can make a big difference in productivity. Whether you’re using Windows 7, 8, 10, or 11, there are several ways to access CMD through keyboard shortcuts. From the classic Windows + R to customizing your own shortcut, you have multiple methods to choose from.
Also Read
- Most Useful CMD Commands in Windows
- Create a New Maven Project From Command Prompt
- How to Create a File in CMD
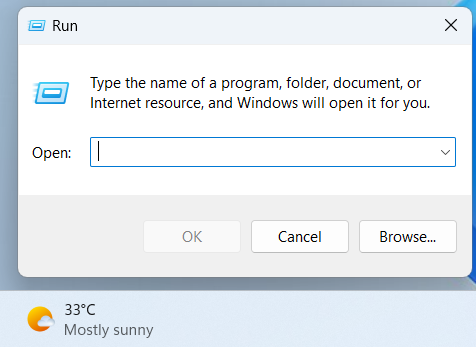
The Run command window allows you to start programs, open files and folders, and access internet resources in all Windows versions. Type a path, a quick command, or environment variable into Windows’ Run, and then click OK or press Enter, and you execute a Run command. Although the Run shortcut is not as easy to find in modern Windows versions, the tool still exists and is as useful as ever. Here are all the ways to open Run in Windows 10 and Windows 11:
1. Use the shortcut keys for Run: Windows + R
The quickest way to access the Run command window is to use this keyboard shortcut: Windows + R. Simply hold down the Windows key and press R on your keyboard.
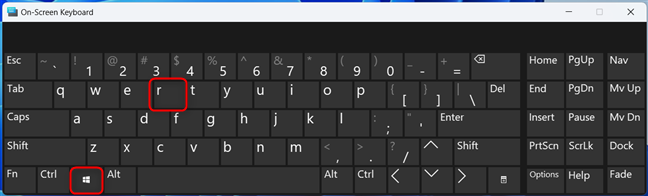
The Run keyboard shortcut
On top of being very easy to remember, this method works in all versions of Windows, from the dated Windows 7 to the newer Windows 10 and the latest Windows 11. The Run window is immediately displayed in the lower-left corner of the desktop.
The Run window is displayed in the bottom-left corner
2. How to open Run from CMD (or Windows Terminal)
Start the Command Prompt on your Windows computer or open a Command Prompt tab in Windows Terminal, and then run this command:
explorer.exe Shell:::{2559a1f3-21d7-11d4-bdaf-00c04f60b9f0}
The moment you press Enter, you see the Run command window pop up on your screen.
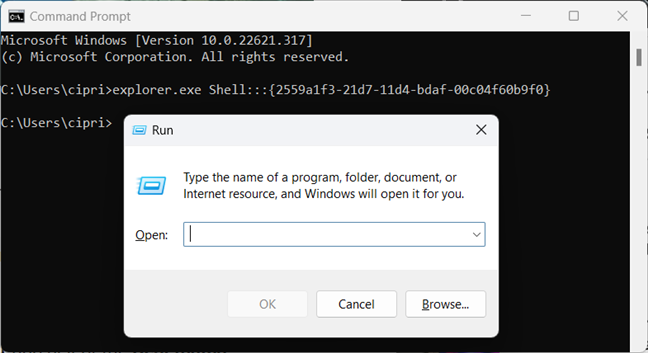
Open Run from CMD
IMPORTANT: This method doesn’t work in PowerShell. Using it there opens File Explorer instead of the Run window.
3. How to start Run from PowerShell (or Windows Terminal)
You can also start PowerShell or open Windows Terminal and run this command:
(New-Object -ComObject «Shell.Application»).FileRun()
Feel free to copy and paste it for faster execution.
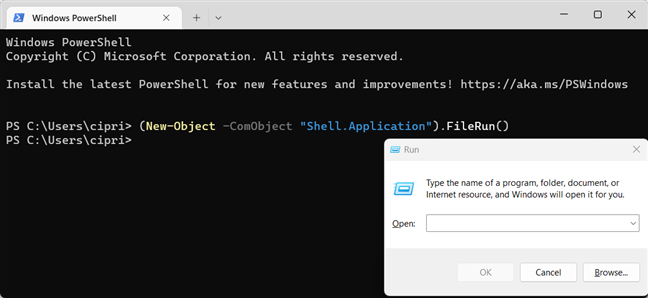
Open Run from PowerShell
Pressing Enter on your keyboard immediately opens the Run command window.
4. How to open Run from the WinX quick access menu
Windows 10 and Windows 11 have a hidden menu called WinX or the Power User/Quick Access menu, which includes a shortcut for the Run command window. To open Run from this menu, do the following: right-click (or press and hold) the Windows logo on the taskbar. In the menu that opens, choose Run.
Open Run from the WinX menu
If you’re a fan of keyboard shortcuts, you can also press Windows + X, followed by R, to achieve the same result. But that’s still slower than pressing Windows + R, isn’t it?
5. Open Windows Run using Search
Search is always a great tool when you want to find and open just about anything in Windows. If you’re using Windows 10, type the word run inside the Search bar and then press Enter or click or tap the Run search result.
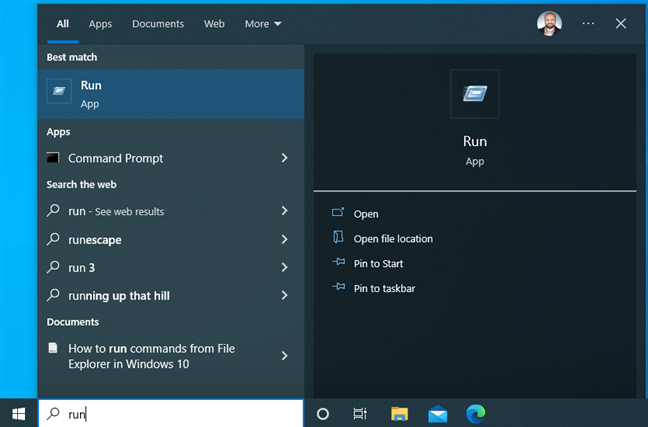
Search for Run in Windows 10
If you’re using Windows 11, click or tap the Search icon on the taskbar and type the word run. Then, click or tap the Run search result.
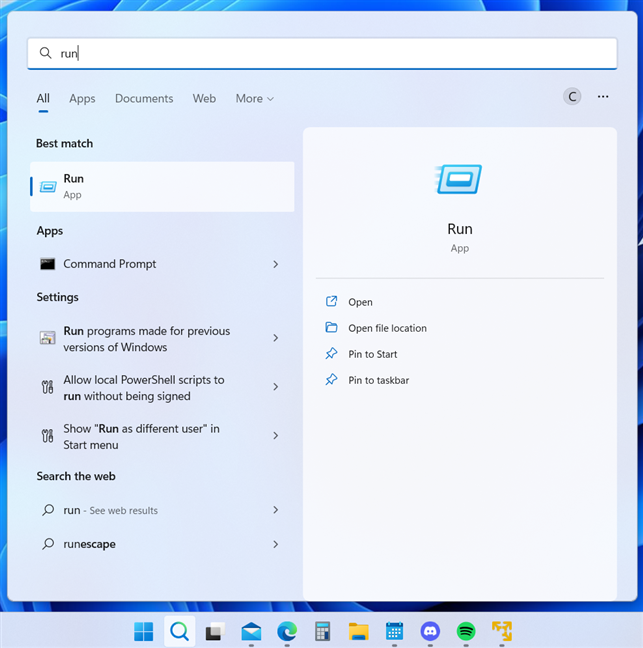
Search for Run in Windows 11
TIP: Here’s how to use Search in Windows 11.
6. Open the Run command window from the Start Menu
The Start Menu is a reliable way to access features on your Windows computer or device, including the Run window. In Windows 10, access the Start Menu by clicking or tapping on the Windows logo in the lower-left corner of your desktop or by pressing the Windows key on your keyboard. Then, scroll down the list of apps to the letter W, open the Windows System folder, and click or tap Run.
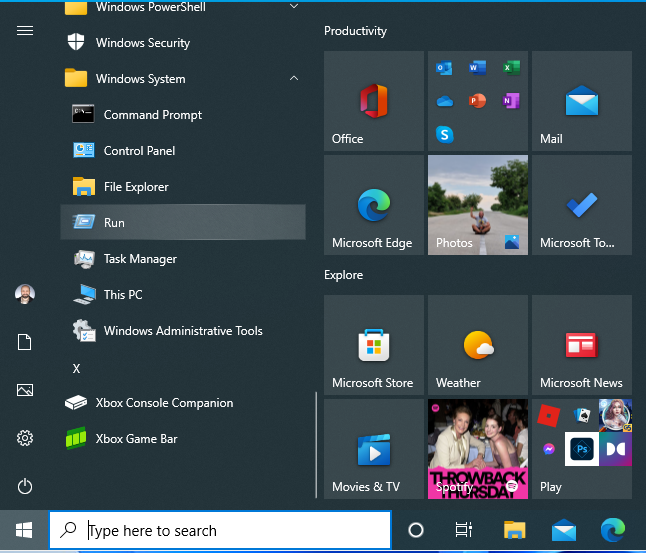
The Run shortcut in the Windows 10 Start Menu
In Windows 11, things are a little different: first, click or tap the Windows icon on the taskbar to open the Start Menu or press the Windows key on your keyboard. Next, click or tap All apps, and scroll down to Windows Tools. Click or tap on this shortcut.
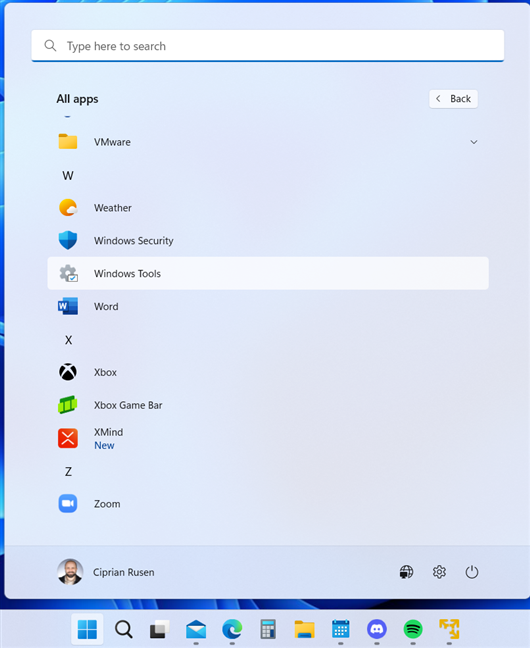
In Windows 11, go to Start > All Apps > Windows Tools
This opens the Windows Tools window, where you can see lots of shortcuts. Scroll until you find Run, and then double-click or double-tap on it.
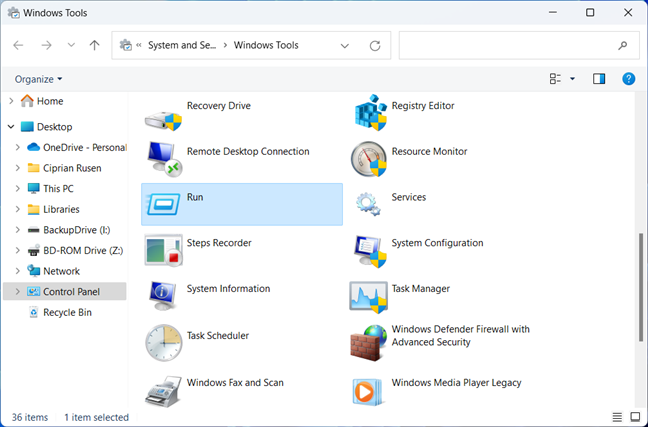
The Run shortcut in Windows 11
7. Create a Run shortcut on the desktop
You can also create a Run shortcut and place it on the desktop or elsewhere. First, right-click or press-and-hold on an empty space on your desktop, and choose New > Shortcut.
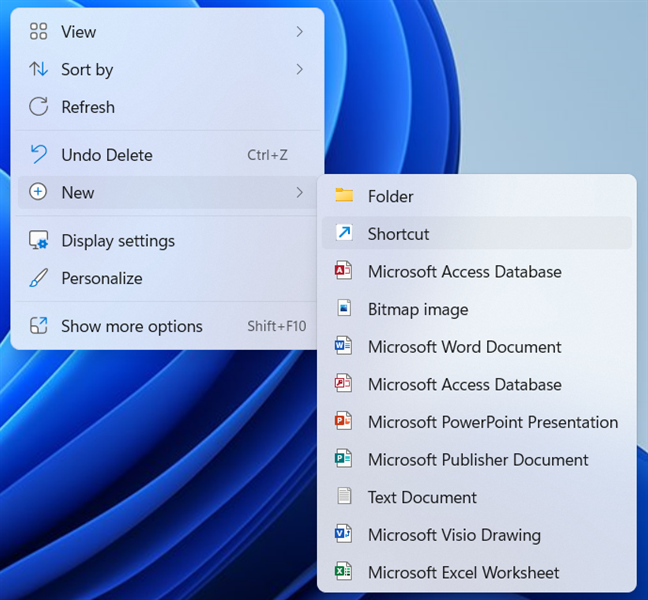
Right-click on the desktop and choose choose New > Shortcut
In the Create Shortcut wizard, copy and paste this command as the location:
explorer.exe Shell:::{2559a1f3-21d7-11d4-bdaf-00c04f60b9f0}
Then, press Next and name your shortcut Run.
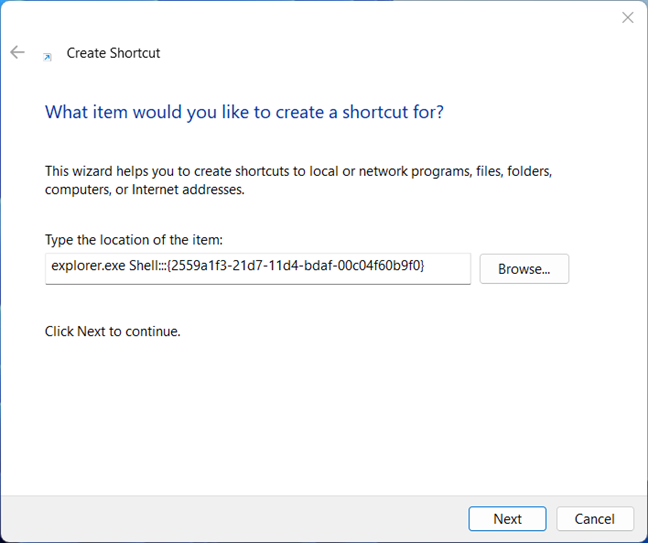
Enter the Run command in Create Shortcut
The shortcut is created on the Windows desktop, but you are free to move it somewhere else. Double-click or double-tap on it to open the Run window.
The Run shortcut in Windows 11
TIP: For more information, here’s how to create shortcuts for files, folders, apps, and web pages in Windows.
8. Open the Run window from File Explorer
If you’re using File Explorer to browse your files and folders, you can open Run from its address bar at the top. Simply copy and paste this command into it, and then press Enter:
explorer.exe Shell:::{2559a1f3-21d7-11d4-bdaf-00c04f60b9f0}
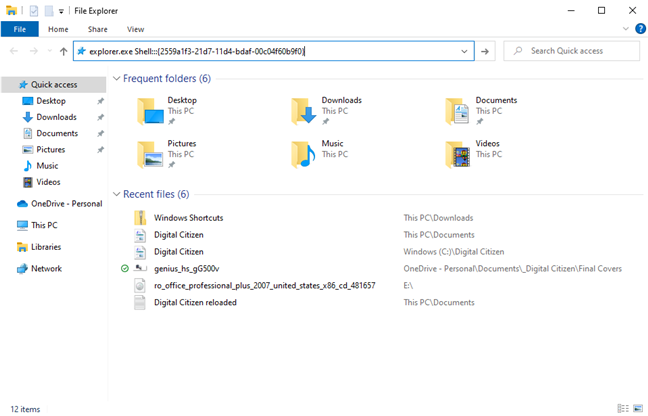
Enter the Run command in File Explorer’s address bar
The Run command window is then shown in the bottom-left corner of your screen.
How do you use the Run window?
Microsoft introduced the Run command window in Windows 95, and it’s been with us ever since. Some people use Run pretty often, but many don’t realize its potential and usefulness yet. Hopefully, Microsoft won’t retire it completely in a later Windows 11 update. We’ll see what happens. Meanwhile, comment below and tell us how you use the Run window: what are your favorite Run commands?