
A firewall is a software or hardware that checks information from the Internet or a network. Depending on your firewall settings, it blocks or allows it to pass through to your computer. A firewall can help prevent hackers or malicious software from gaining access to your Windows 11/10 computer through a network or the Internet. A firewall can also help stop your computer from sending malicious software to other computers.
You can customize most settings of your Windows Firewall through the left pane of the Firewall applet in Control Panel.
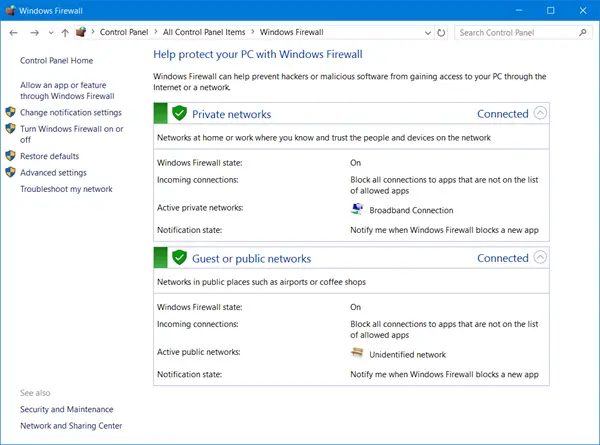
1] Turn on or off Windows Firewall
This setting is selected by default. When Windows Firewall is On, most programs are blocked from communicating through the firewall.
To turn off Windows Firewall, open Control Panel and click on the Windows Firewall applet. Here, clicking on the Turn Firewall On or Off setting in Control Panel will enable or disable the Windows Firewall on your computer.
2] Block all incoming firewall connections, including those in the list of allowed programs
This setting blocks all unsolicited attempts to connect to your computer. Use this setting when you need maximum protection for your computer, such as when you connect to a public network in a hotel or airport, or when a computer worm is spreading over the Internet. With this setting, you are not notified when Windows Firewall blocks programs, and programs in the list of allowed programs are ignored. When you block all incoming connections, you can still view most web pages, send and receive an e-mail, and send and receive instant messages.
Read: Unable to change Windows Firewall settings
3] Turn off Windows Firewall
Avoid using this setting unless you have another firewall running on your computer. Turning off Windows Firewall might make your computer more vulnerable to damage from hackers and malicious software. Clicking on the Turn Firewall On or Off will let you enable or disable the Windows Firewall on your computer.
Read: Windows Firewall has blocked some features of this app.
4] Block or Allow Programs through the Windows Firewall
By default, most programs are blocked by Windows Firewall to help make your computer more secure. To work properly, some programs might require you to allow them to communicate through the firewall. Here’s how to do that:
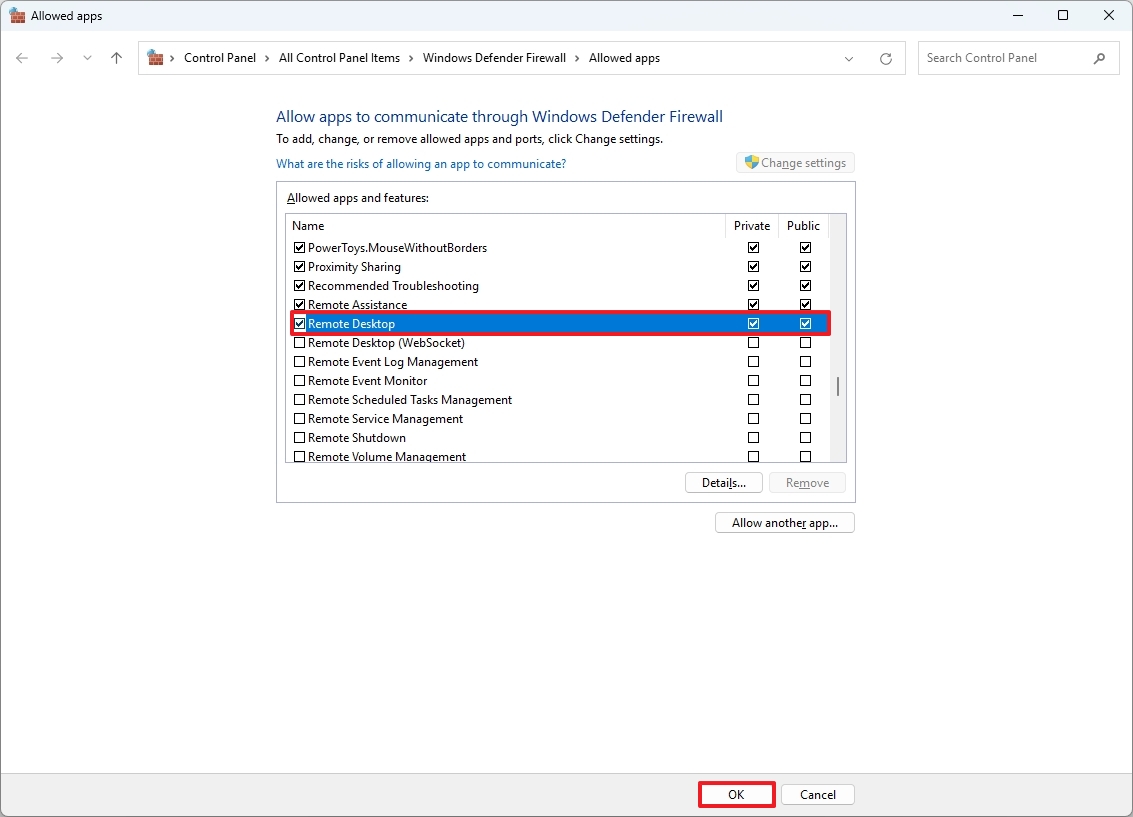
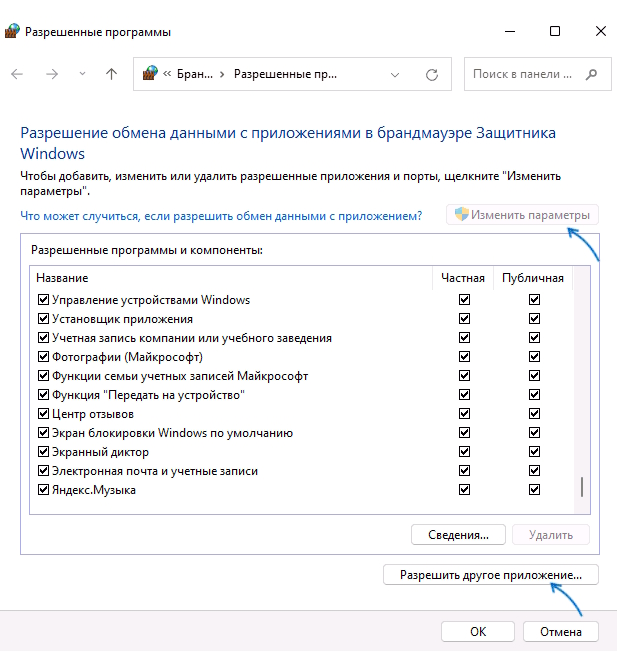
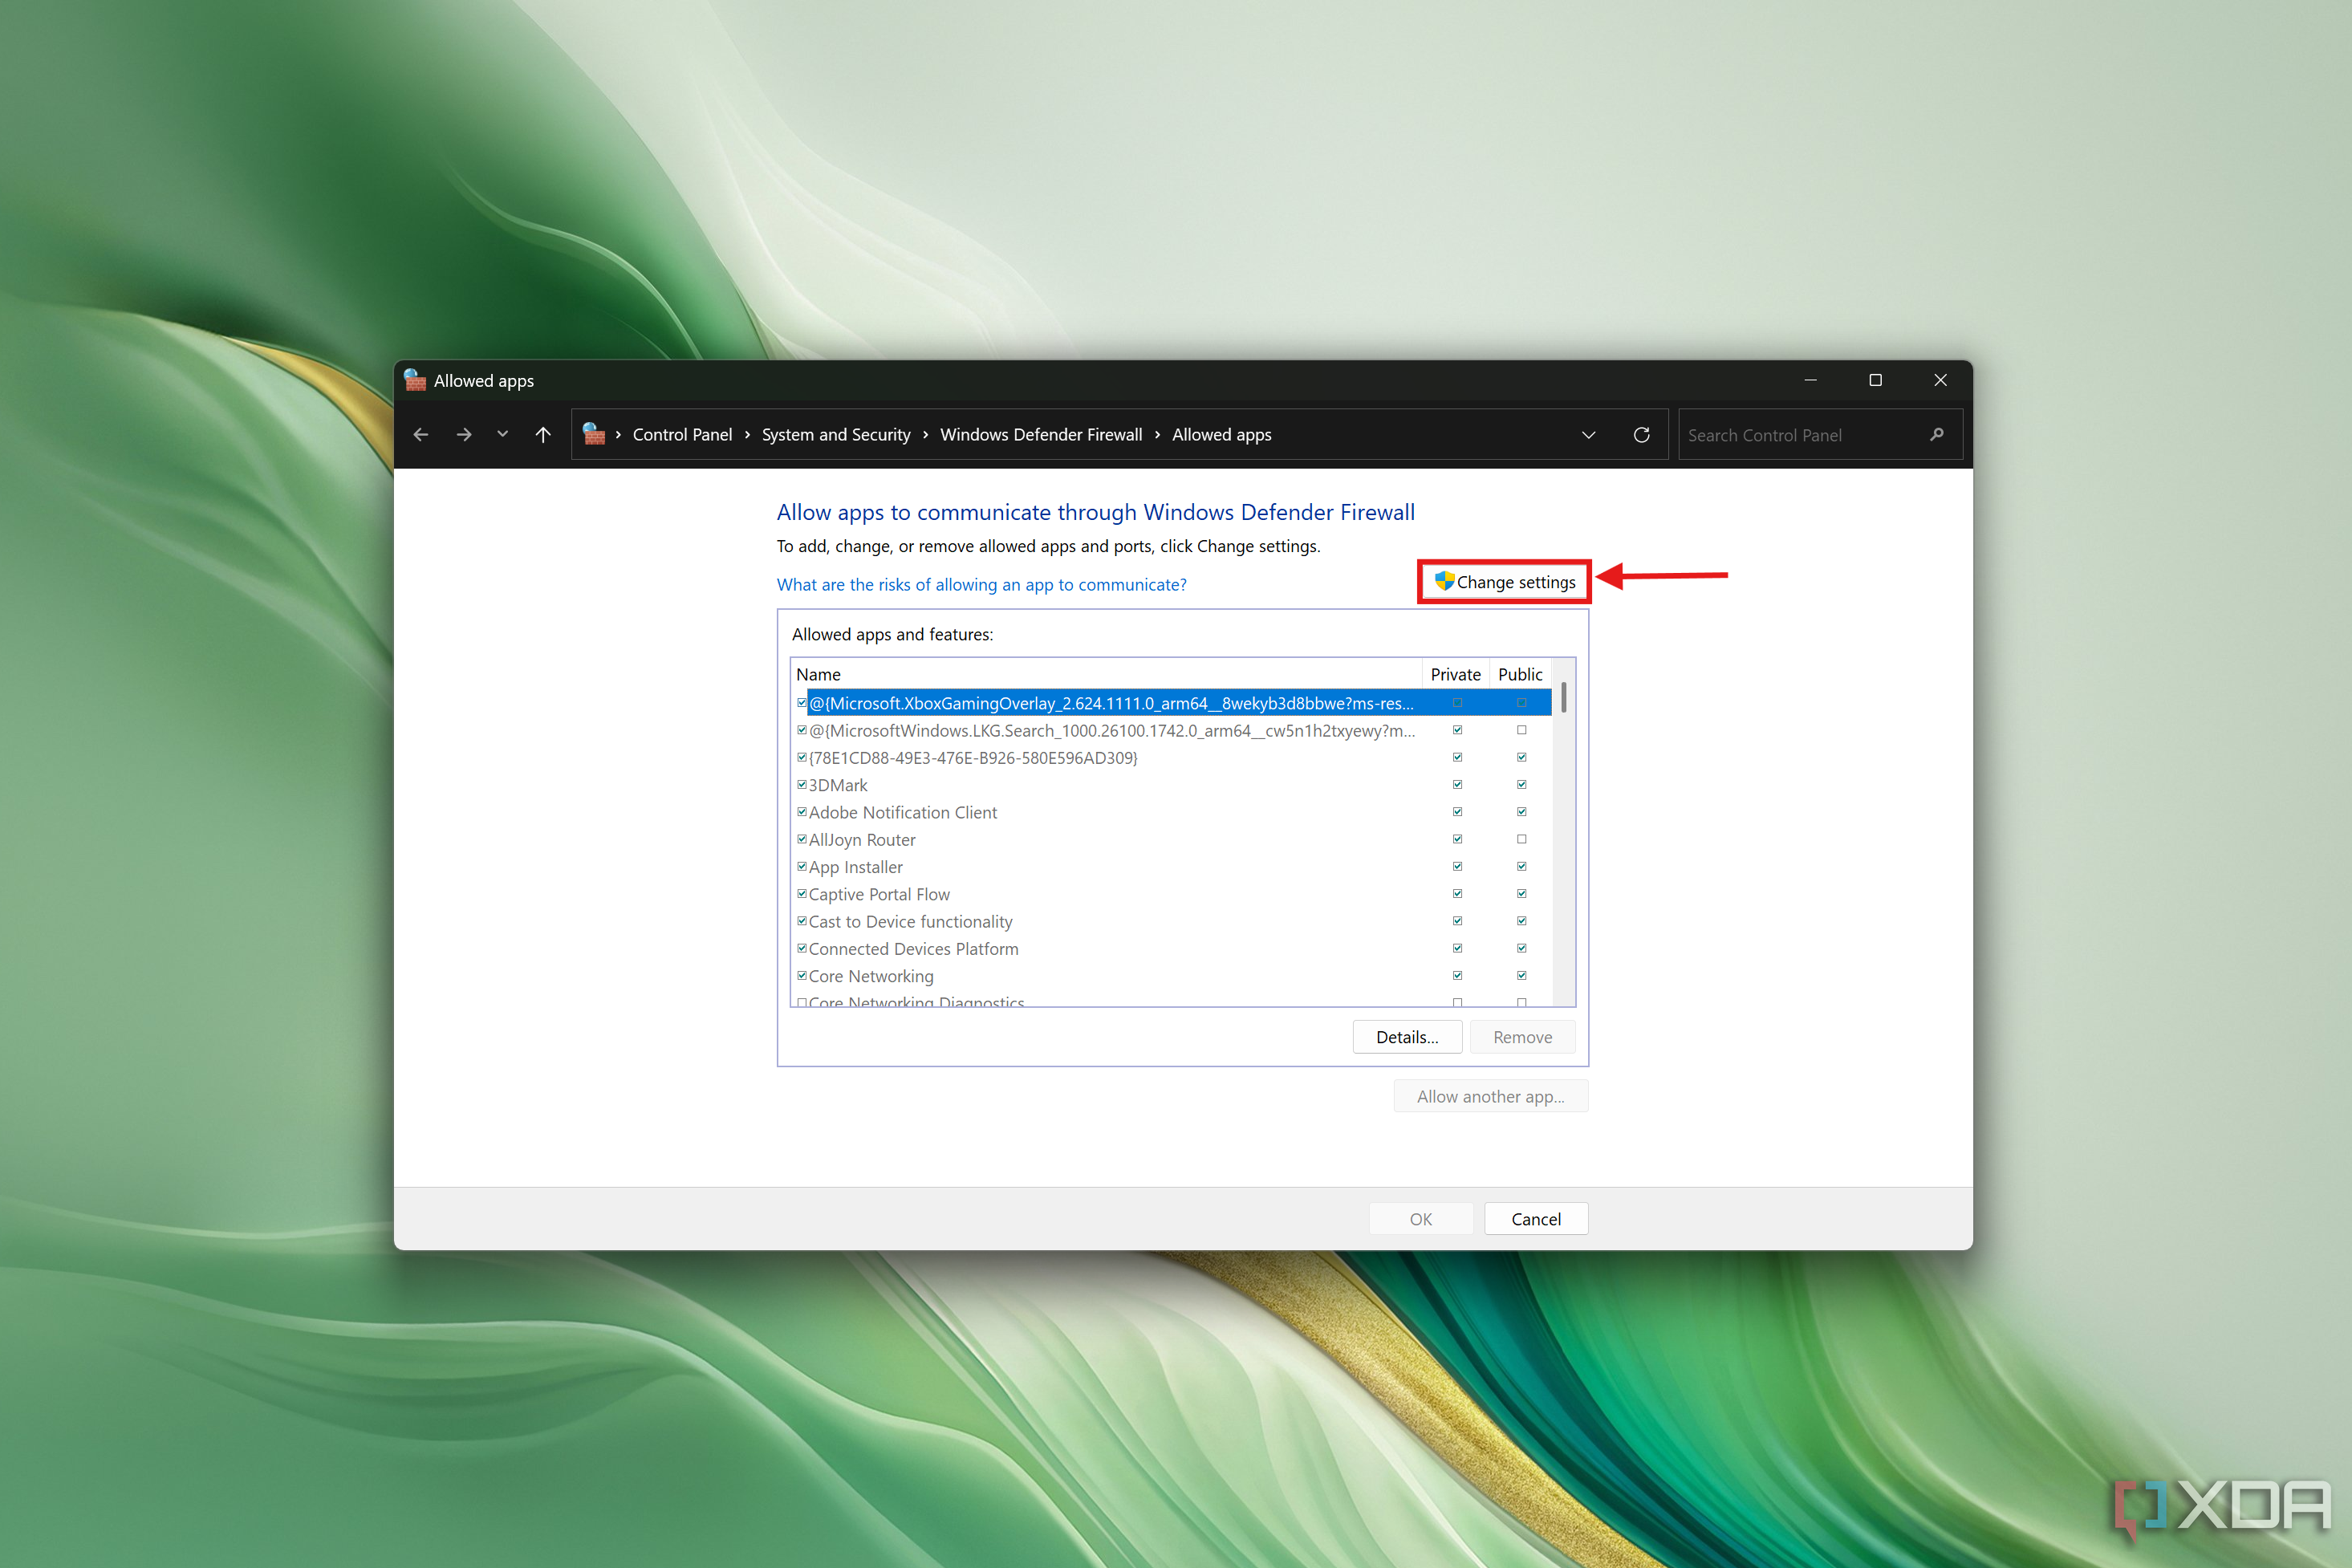
Click Allow an app or feature through Windows Firewall. If you are prompted for an administrator password or confirmation, type the password or provide confirmation.
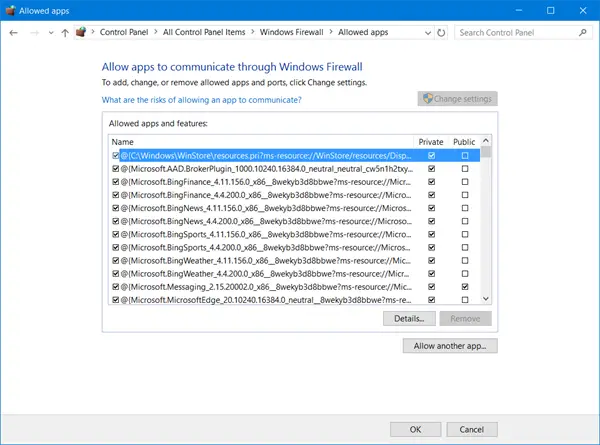
Select the check box next to the program you want to allow, select the network location types you want to allow communication on, and then click OK.
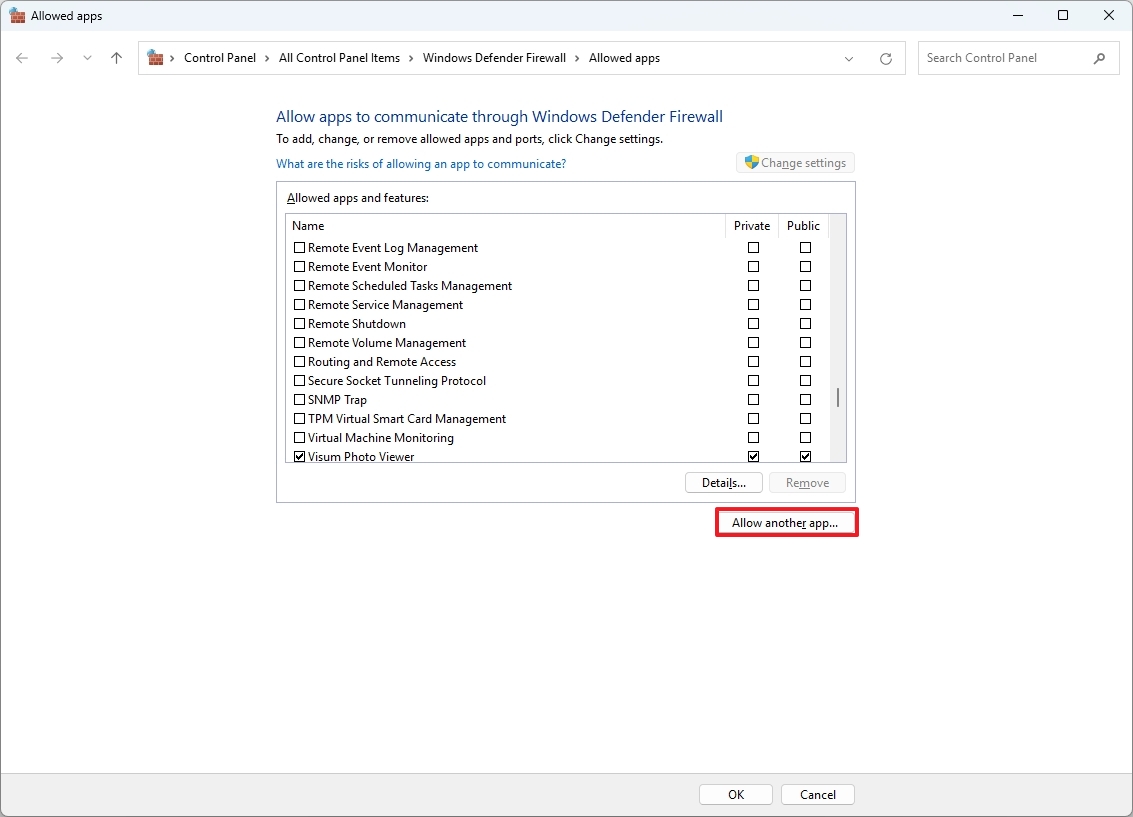
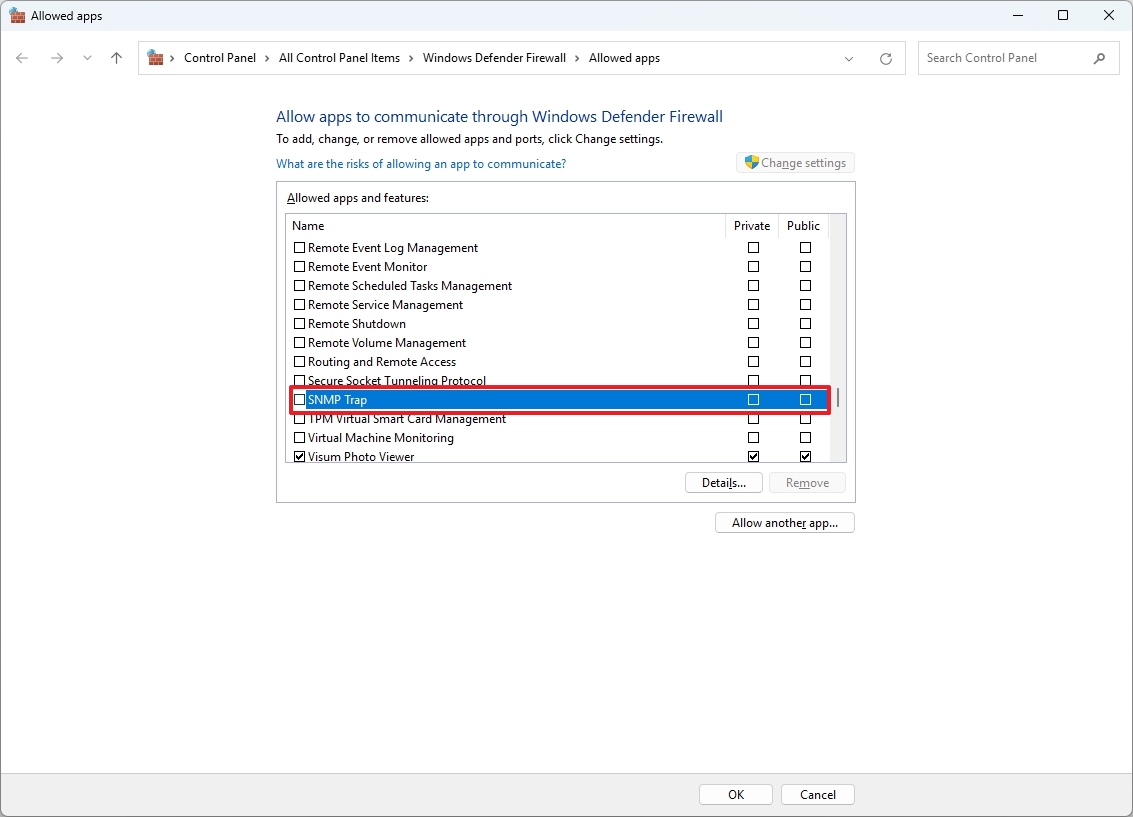
If you want to allow a program to communicate through the firewall, you can add it to the list of allowed programs. For example, you might not be able to send photos in an instant message until you add the instant messaging program to the list of allowed programs. To add or remove a program to the list, click on the Allow an app or feature through Windows Firewall link to open the following panel, where you will be able to get more details about allowed programs and allow another app to communicate through the firewall.
Read: Block Active Attacks using Shields Up mode in Windows Firewall
5. How to open a port in Windows Firewall
You can also block or open a Port in Windows Firewall. Suppose the Windows firewall is blocking a program and you want to allow that program to communicate through the firewall. In that case, you can usually do that by selecting the program from the list of allowed programs (also called the exceptions list) in the Windows firewall. To learn how to do this, see Allow a program to communicate through Windows Firewall.
However, you might need to open a port if the program isn’t listed. For example, to play a multiplayer game with friends online, you might need to open a port for the game so that the firewall allows the game information to reach your computer. A port always stays open, so be sure to close ports you don’t need anymore.
Click to open Windows Firewall. In the left pane, click Advanced settings.

In the Windows Firewall with Advanced Security dialog box, in the left pane, click Inbound Rules, and then, in the right pane, click New Rule.

Next, follow the instructions on your screen to its logical conclusion.
Also read: How to manage Windows Firewall Rules with PowerShell
Manage Windows Firewall
Windows 11/10 allows you to access the advanced settings, including the configuration of filtering for outbound connections, through its Control Panel. Windows gives you three choices-
- Public network,
- Home network
- Work network.
By default the Windows 11/10 firewall blocks connections to programs that are not on the list of allowed programs. With all network types, it now allows you to configure the settings for each network type separately. This is what is referred to as Multiple Active Firewall Profiles.
Most would just prefer to have the Windows firewall set to its default and forget about it. The default settings are good enough. Those who want to fine-tune it can manage the Windows firewall in the following ways:
1) Windows Firewall Control Panel application.
This is the simplest one and good enough for routine tasks.

It is the simplest—and the least capable. But with it, you can complete routine tasks, such as allowing a program through it or blocking all incoming connections. This Technet link true will help you get started.
Read: Difference between Microsoft Defender, Windows Defender, Windows Security, Windows Defender Firewall
2) Windows Firewall – Advanced Security
Windows Firewall – Advanced Security is a snap-in and predefined console for Microsoft Management Console offers much more granular control over rules, exceptions, and profiles. You can access it through the Control panel app too.
3) The Netsh utility
The Netsh utility, in particular its Firewall and Advfirewall context, lets you make firewall settings from a Command Prompt window or a batch program.
Read: How to allow Pings (ICMP Echo requests) through Windows Firewall.
4) Group Policy Object Editor
This incorporates the Windows Firewall With Advanced Security snap-in under:
Computer Configuration\Windows Settings\ Security Settings\Windows Firewall With Advanced Security
In addition, Windows Firewall can be managed with a number of policies, which can be found in:
Computer Configuration \ Administrative Templates \ Network \ Network Connections \ Windows Firewall
Incidentally, nearly a total 0f over 3000 settings can be configured through Group Policy Editor (gpedit.msc). However, Group Security Policy is not included in Windows Home Edition.
You can also test your Firewall using these free online Firewall tests.
Theis freeware will help you manage the Windows Firewall better: Windows Firewall Control
See this post if you ever need to repair the Windows Firewall.
Applies ToWindows 11 Windows 10
Брандмауэр Windows помогает защитить устройство, фильтруя сетевой трафик и блокируя несанкционированный доступ. Он снижает риск угроз сетевой безопасности, ограничивая или разрешая трафик на основе различных свойств, таких как IP-адреса, порты или пути к программе.
Вы можете использовать приложение Безопасность Windows для просмотра состояния брандмауэра Windows и управления им. Вы можете включить или отключить брандмауэр, а также получить доступ к дополнительным параметрам для различных типов сетей, включая доменные (рабочие), частные (доверенные) и общедоступные (ненадежные) сети.
Частные и общедоступные сети
Можно указать, что определенная сеть, к которую подключается устройство, является частной или общедоступной. Ключевое различие заключается в том, разрешено ли другим устройствам в той же сети видеть ваше устройство и, возможно, подключаться к нему.
Ваша домашняя сеть может быть примером частной сети. Теоретически единственными устройствами в ней являются ваши устройства и устройства, принадлежащие вашей семье. Вы в порядке с другими устройствами, которые могут видеть ваши, потому что вы доверяете этим устройствам.
Однако Wi-Fi в вашем местном кафе является общедоступной сетью. Большинство других подключенных к нему устройств принадлежат незнакомым людям, и вы, вероятно, предпочитаете, чтобы они не могли видеть или подключаться к вашему устройству.
Как правило, вы будете иметь более строгие средства контроля безопасности в общедоступной сети, чем в частной сети, просто из-за уровня доверия к другим пользователям и устройствам в этой сети.
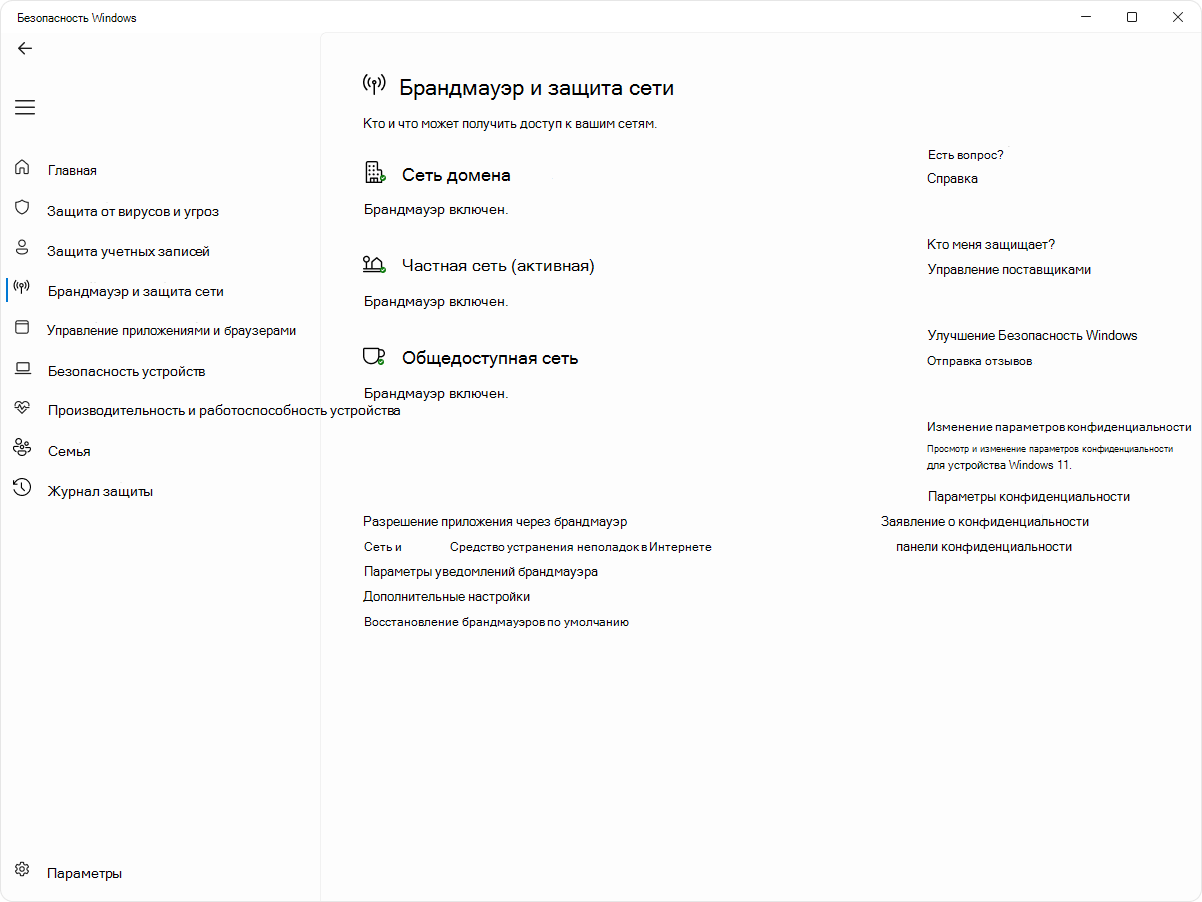
Настройка брандмауэра Windows в Безопасность Windows
-
В приложении «Безопасность Windows» на компьютере, выберите Брандмауэр & защиты сети или используйте следующий ярлык:
Брандмауэр & защиты сети
-
Безопасность Windows показывает, к какому типу сети вы подключены в данный момент. Как правило, устройство будет подключено только к одной сети за раз. Выберите профиль сети: Доменная сеть, Частная сеть или Общедоступная сеть
-
В разделеMicrosoft Defender Брандмауэр переключите параметр на Включено , чтобы включить брандмауэр Windows. Для выключения переключите этот параметр в положение Выкл. Отключение брандмауэра Windows может сделать ваше устройство более уязвимым для несанкционированного доступа. Если вам нужно использовать приложение, которое заблокировано, вы можете разрешить его через брандмауэр, а не выключать брандмауэр.
-
В разделе Входящие подключения установлен флажок Блокировать все входящие подключения, в том числе в списке разрешенных приложений. Установка этого флажка указывает брандмауэру Windows игнорировать список разрешенных приложений и блокировать все. Включение этого параметра повышает безопасность, но может привести к прекращению работы некоторых приложений.
Примечание: Если устройство управляется организацией, параметры политики могут препятствовать изменению конфигурации брандмауэра Windows. Для получения дополнительных сведений обратитесь к администратору.
Дополнительные параметры
Ниже приведен список дополнительных параметров, доступных на странице брандмауэра и защиты сети:
-
Разрешить приложению через брандмауэр
. Если брандмауэр блокирует нужное приложение, можно добавить исключение для этого приложения или открыть определенный порт. Дополнительные сведения об этом процессе (и о том, почему вы не захотите) см. в статье Риски, связанные с разрешением приложений через брандмауэр Windows. -
Средство устранения неполадок с сетью и Интернетом: Если у вас возникли общие проблемы с сетевым подключением, вы можете использовать это средство устранения неполадок, чтобы попытаться автоматически диагностировать и устранить их.
-
Параметры уведомлений брандмауэра: Хотите получать больше уведомлений, когда брандмауэр блокирует что-то? Меньше? Узнайте, как настроить уведомления
-
Дополнительные параметры: Откроется классический брандмауэр Защитника Windows, который позволяет создавать правила для входящего или исходящего трафика, правила безопасности подключения и просматривать журналы мониторинга брандмауэра. Большинство людей не хотят копаться в нем, что глубоко; неправильное добавление, изменение или удаление правил может привести к тому, что система станет более уязвимой или может привести к тому, что некоторые приложения не будут работать.
-
Восстановление брандмауэров по умолчанию . Если кто-то или что-то внес изменения в параметры брандмауэра Windows, что приводит к неправильной работе, вы просто в два щелчка от сброса параметров, как они были, когда вы впервые получили компьютер. Если ваша организация применила какие-либо политики для настройки брандмауэра, они будут применены повторно.
Нужна дополнительная помощь?
Нужны дополнительные параметры?
Изучите преимущества подписки, просмотрите учебные курсы, узнайте, как защитить свое устройство и т. д.
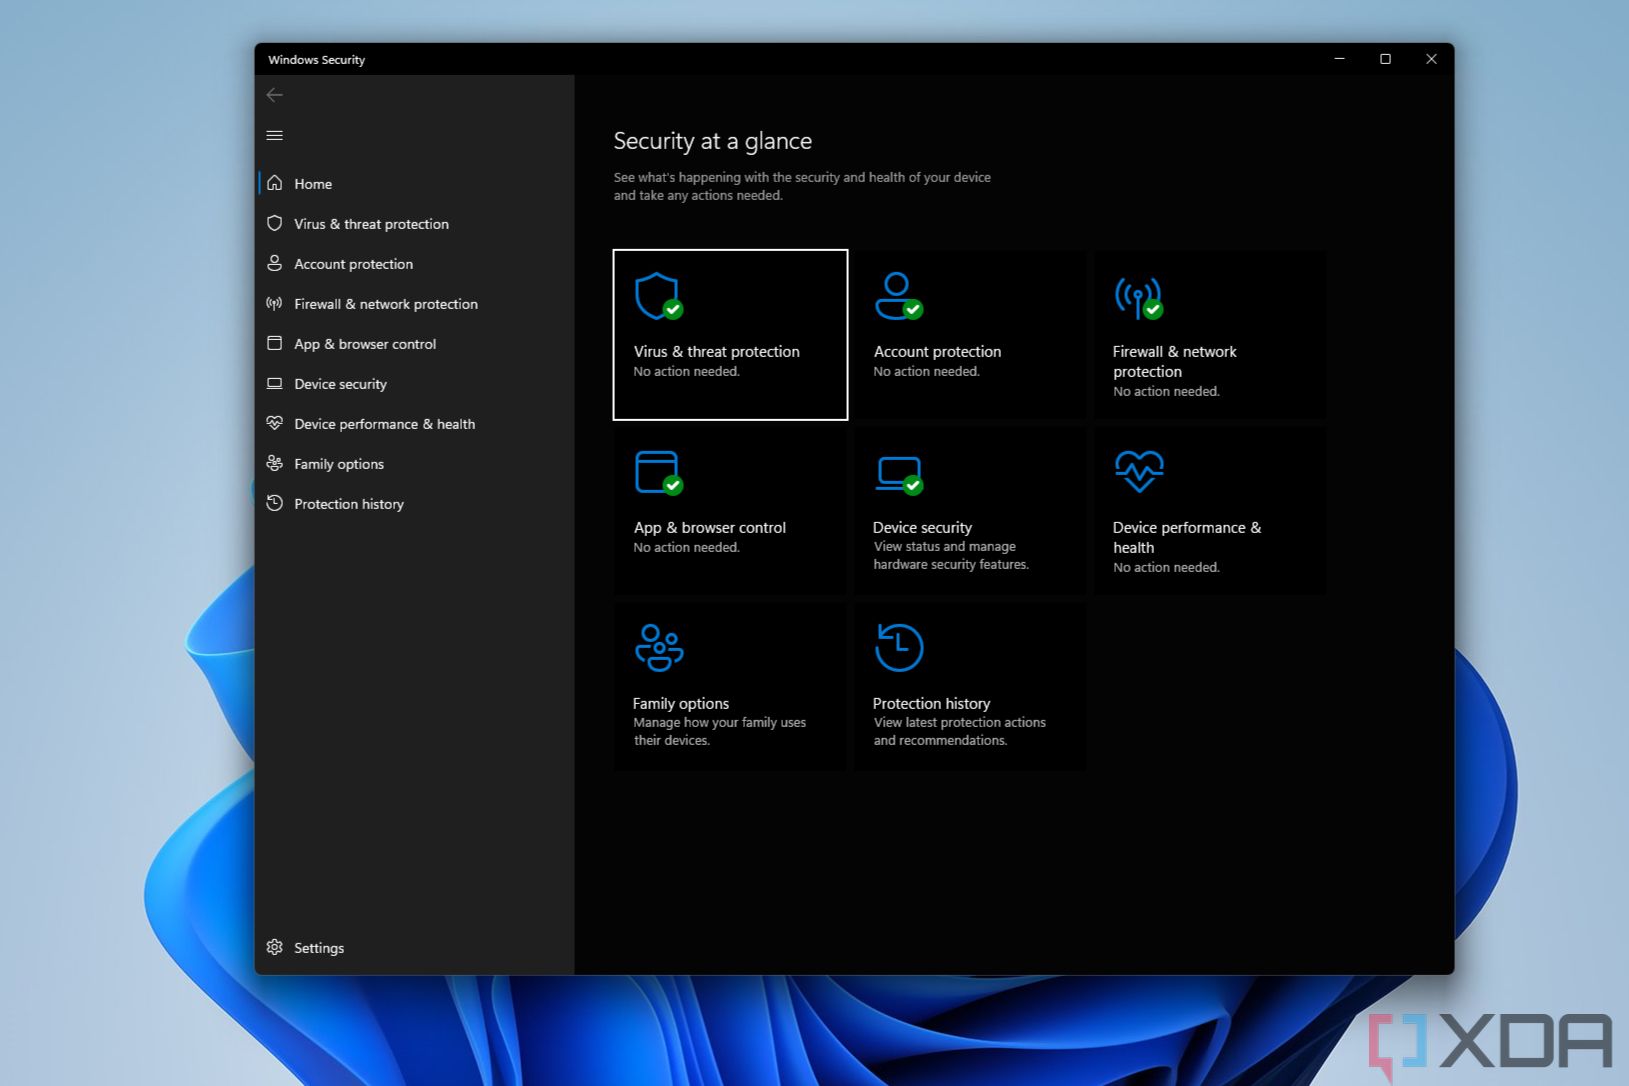
On Windows 11, the firewall, also known as Microsoft Defender Firewall, is a built-in security feature designed to protect your computer from unauthorized access over the internet or network. It acts as a barrier, monitoring incoming and outgoing network traffic and blocking potentially harmful connections.
This security feature is available through the Windows Security app, providing a user-friendly interface for managing settings and monitoring activity. For example, you can configure the firewall to allow or block specific apps from accessing the network, ensuring granular control over your system’s security. The firewall also offers different settings for different network types, allowing you to customize your computer’s security based on the network environment and more.
In this how-to guide, I’ll outline the steps to get started managing the default firewall settings on Windows 11.
How to manage the built-in firewall on Windows 11
On Windows 11, the Microsoft Defender Firewall comes enabled by default, and you can turn it off or on as needed, allow or block apps, customize notifications, and if you make a mistake, the system provides an option to restore the default settings.
Check firewall protection
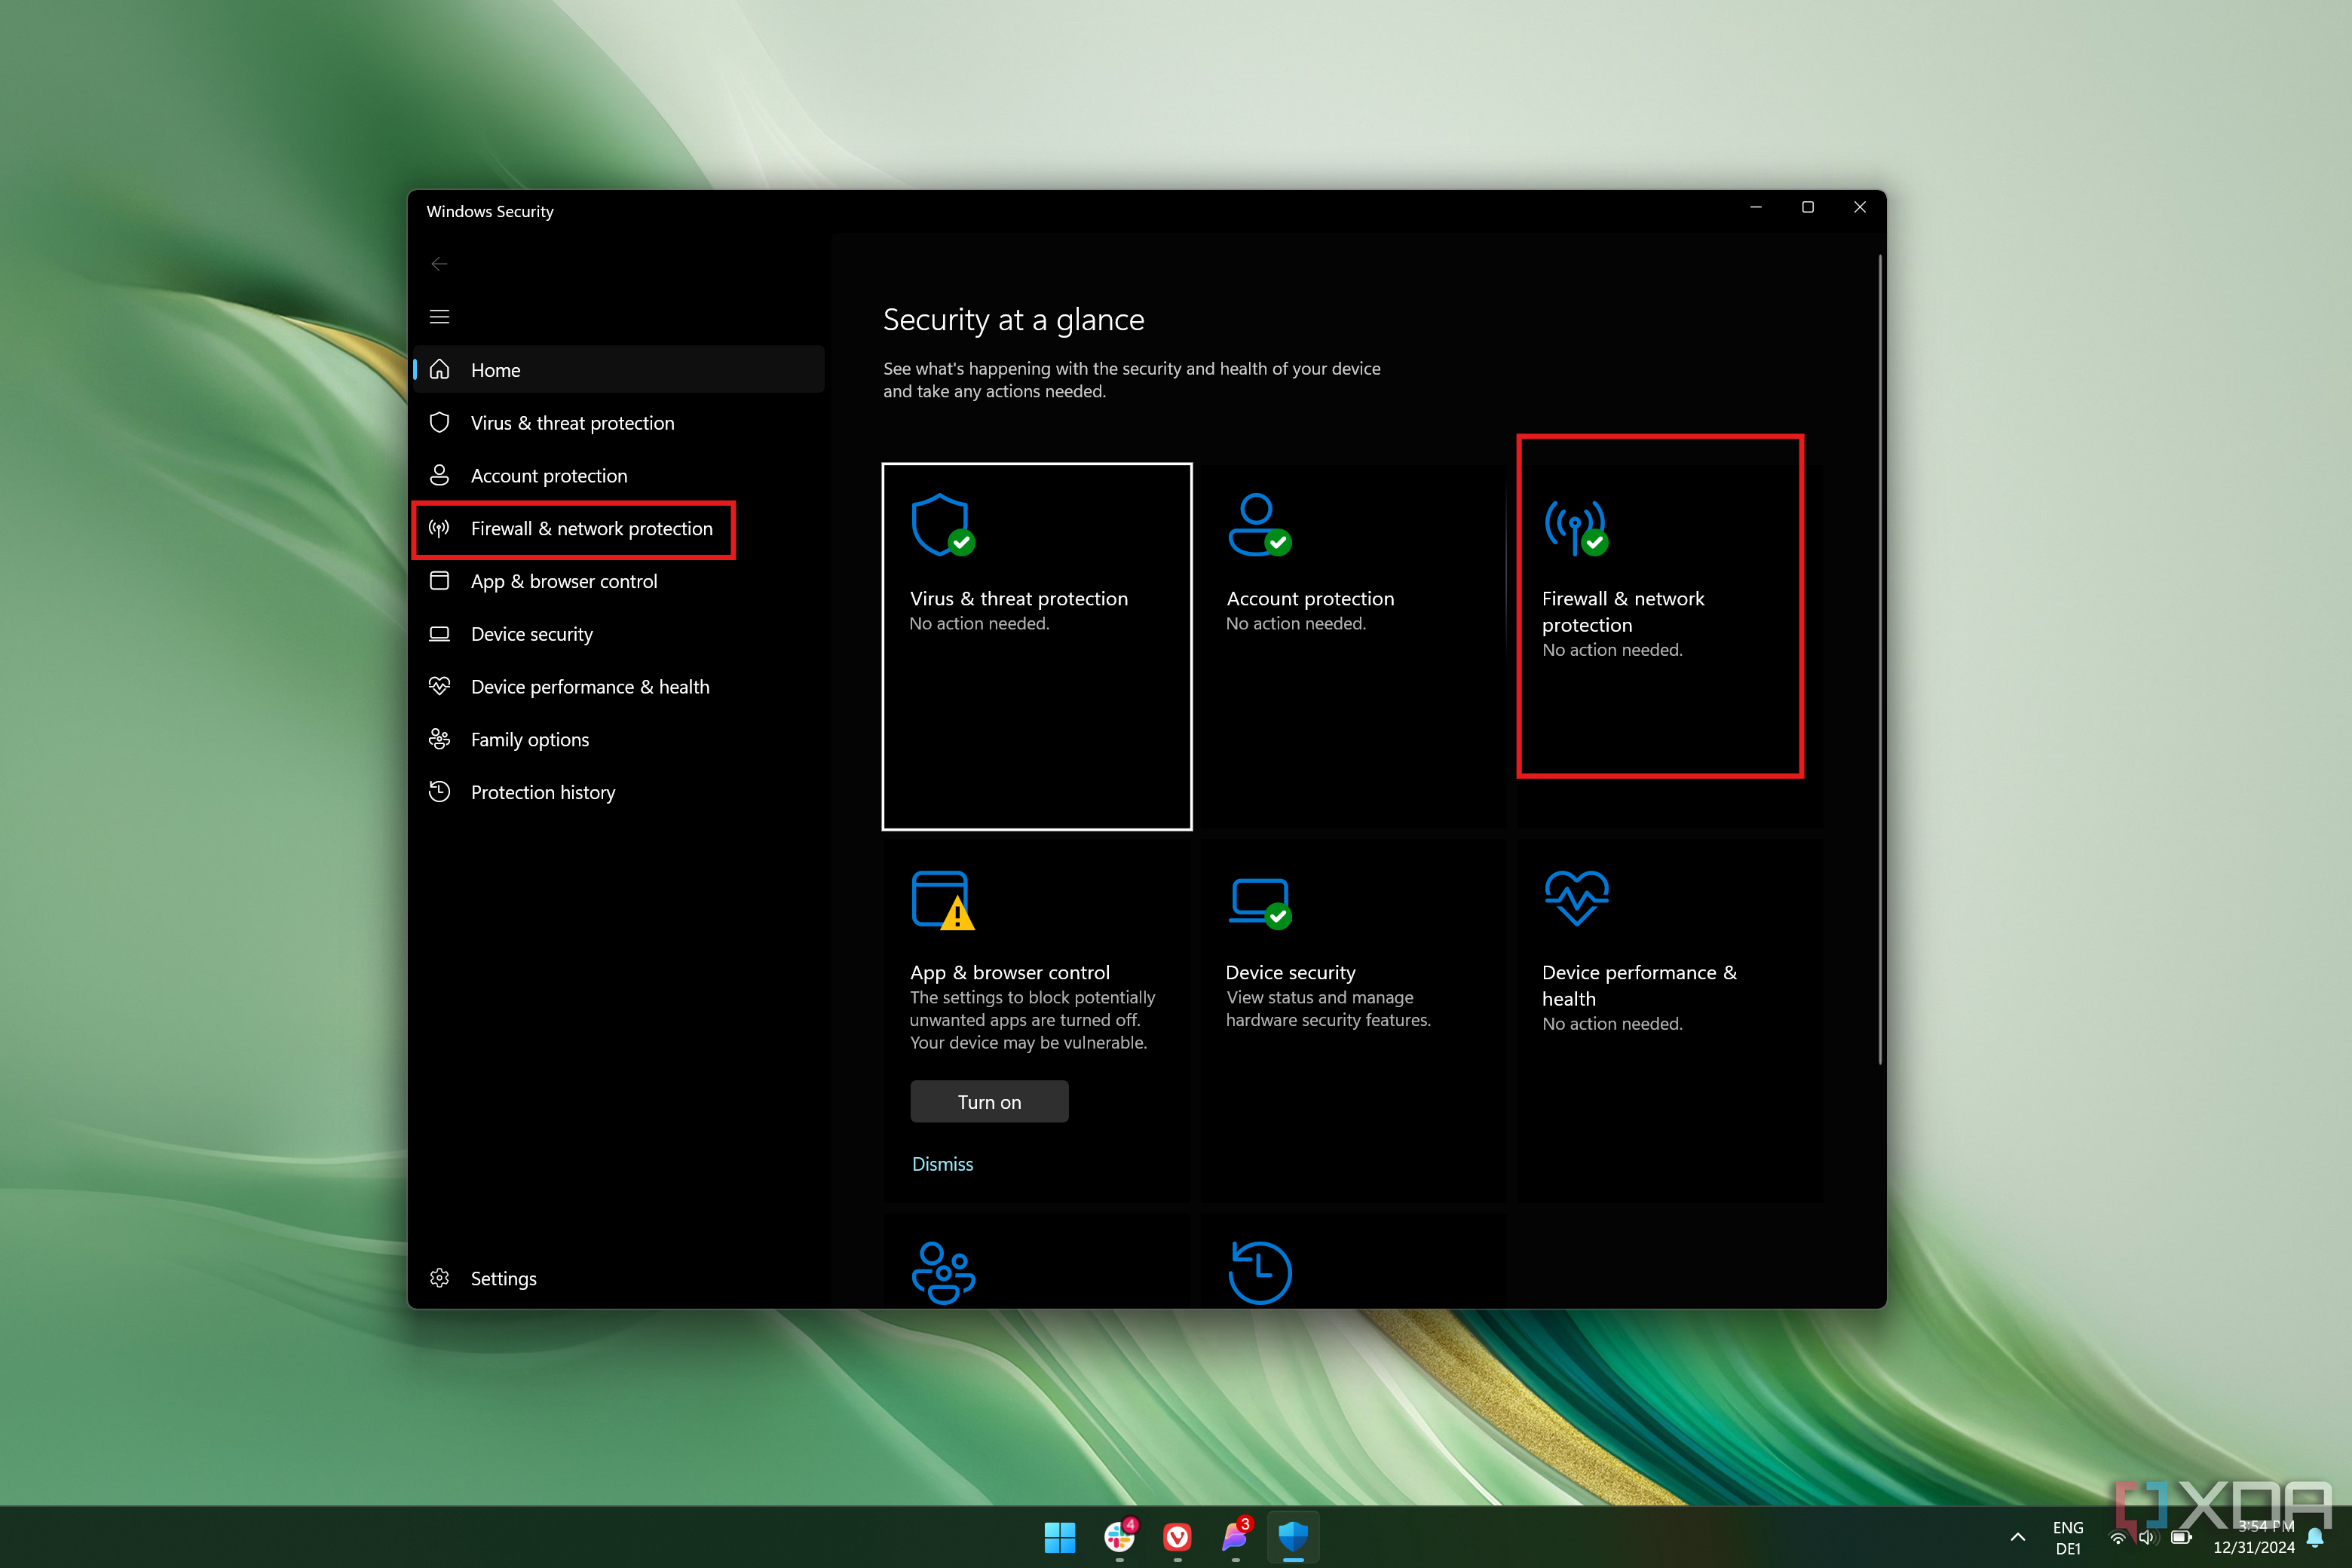
To check whether the firewall is on or off on your computer, use these steps:
- Open Start.
- Search for Windows Security and click the top result to open the app.
- Click on Firewall & network protection.
- Confirm the feature reads «Firewall is on» for Domain, Private, and Public networks.
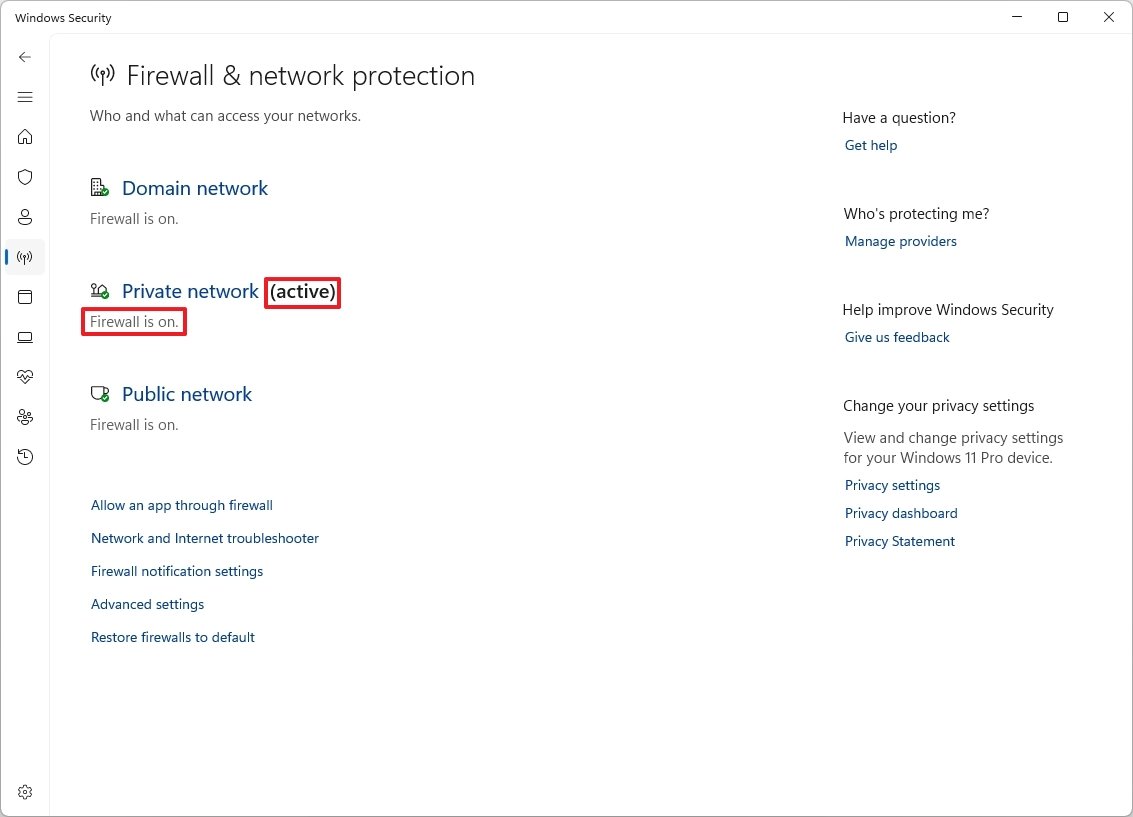
- Quick note: The networks set as «active» indicate the type of network the firewall is protecting.
The page also includes options to adjust firewall settings to allow apps through the firewall and advanced settings. However, these settings are links to change configurations from the Control Panel.
Enable or disable firewall
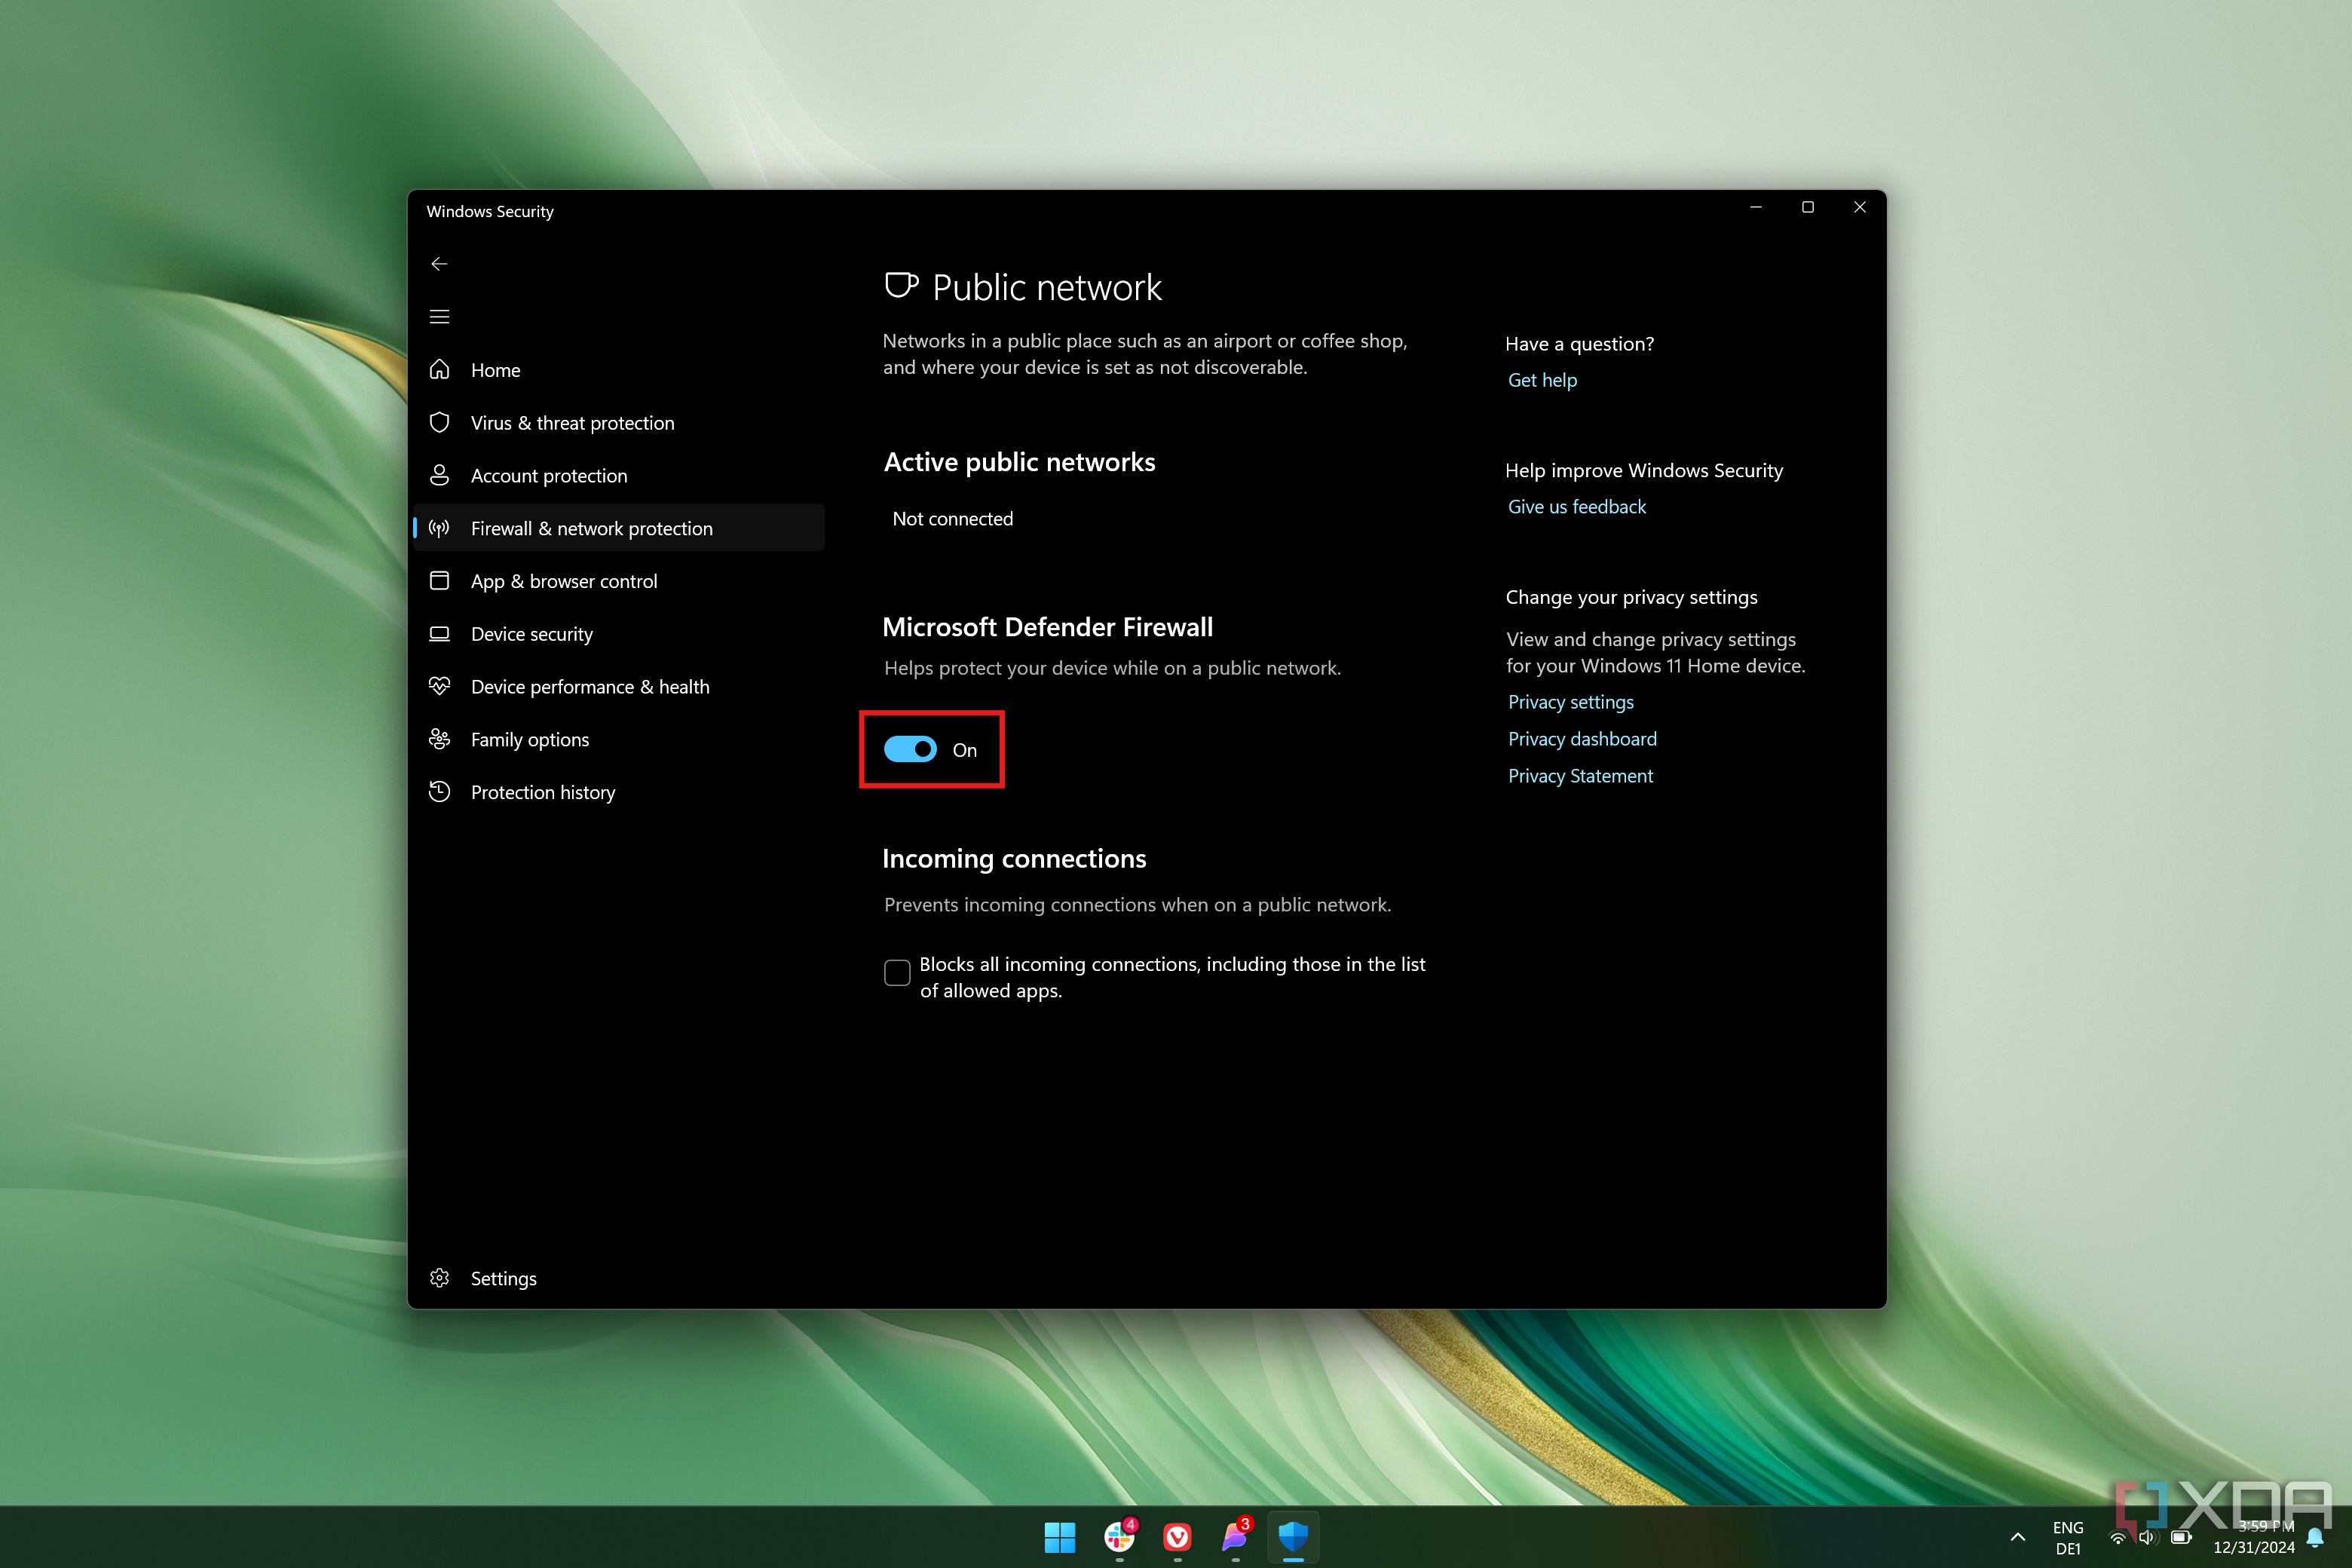
To enable or disable the Defender Firewall on Windows 11, use these steps:
All the latest news, reviews, and guides for Windows and Xbox diehards.
- Open Start.
- Search for Windows Security and click the top result to open the app.
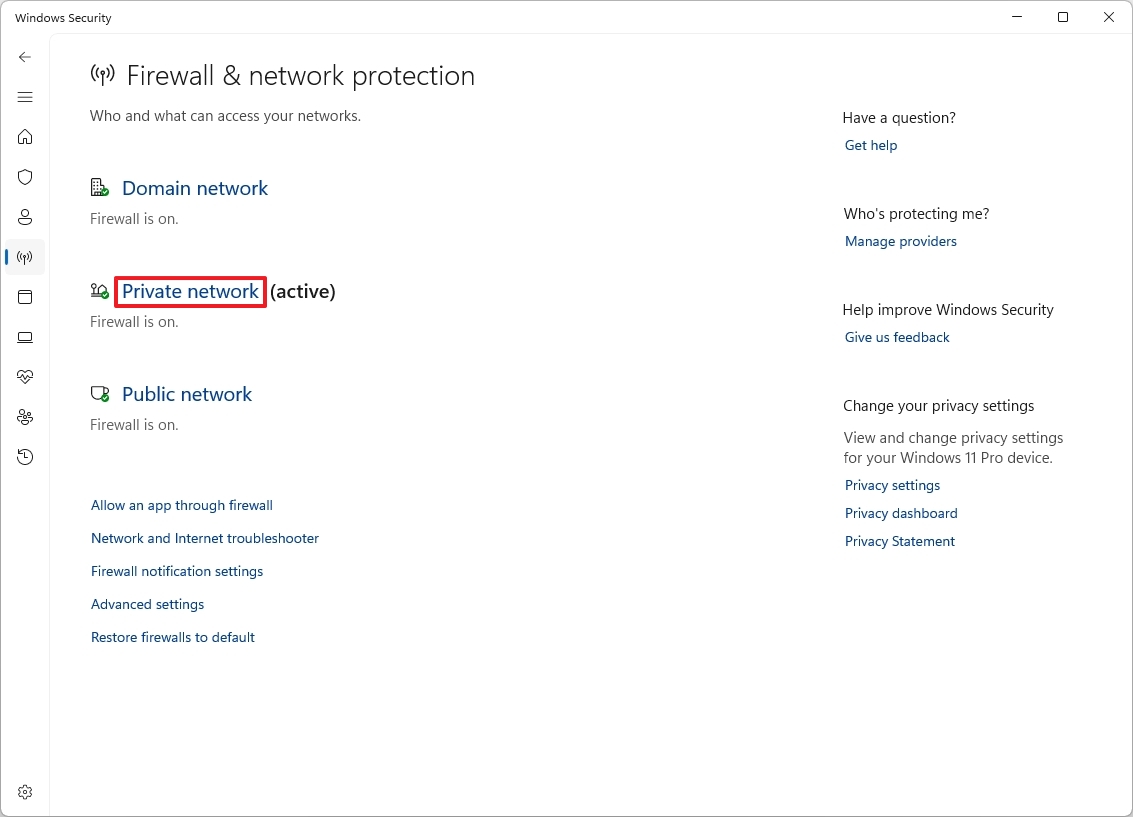
- Click the active firewall. For example, Private network.
- Turn the «Microsoft Defender Firewall» toggle switch on or off to enable or disable the security feature.
- (Optional) Check the «Blocks all incoming connections, including those in the list of allowed apps» option to block incoming connections
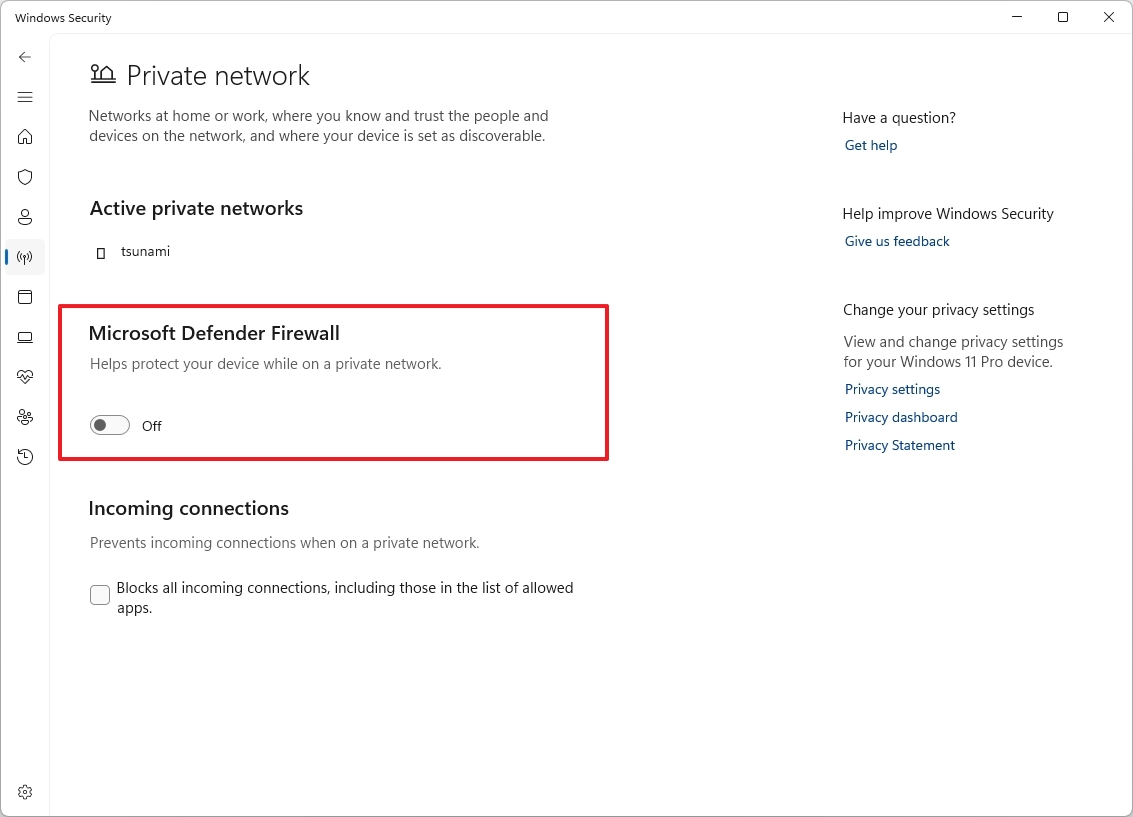
- Quick note: This option has been designed to turn off the firewall for a specific network type temporarily. Usually, you would use this option to troubleshoot connectivity problems.
Once you complete the steps, the firewall will turn on or off according to your configuration.
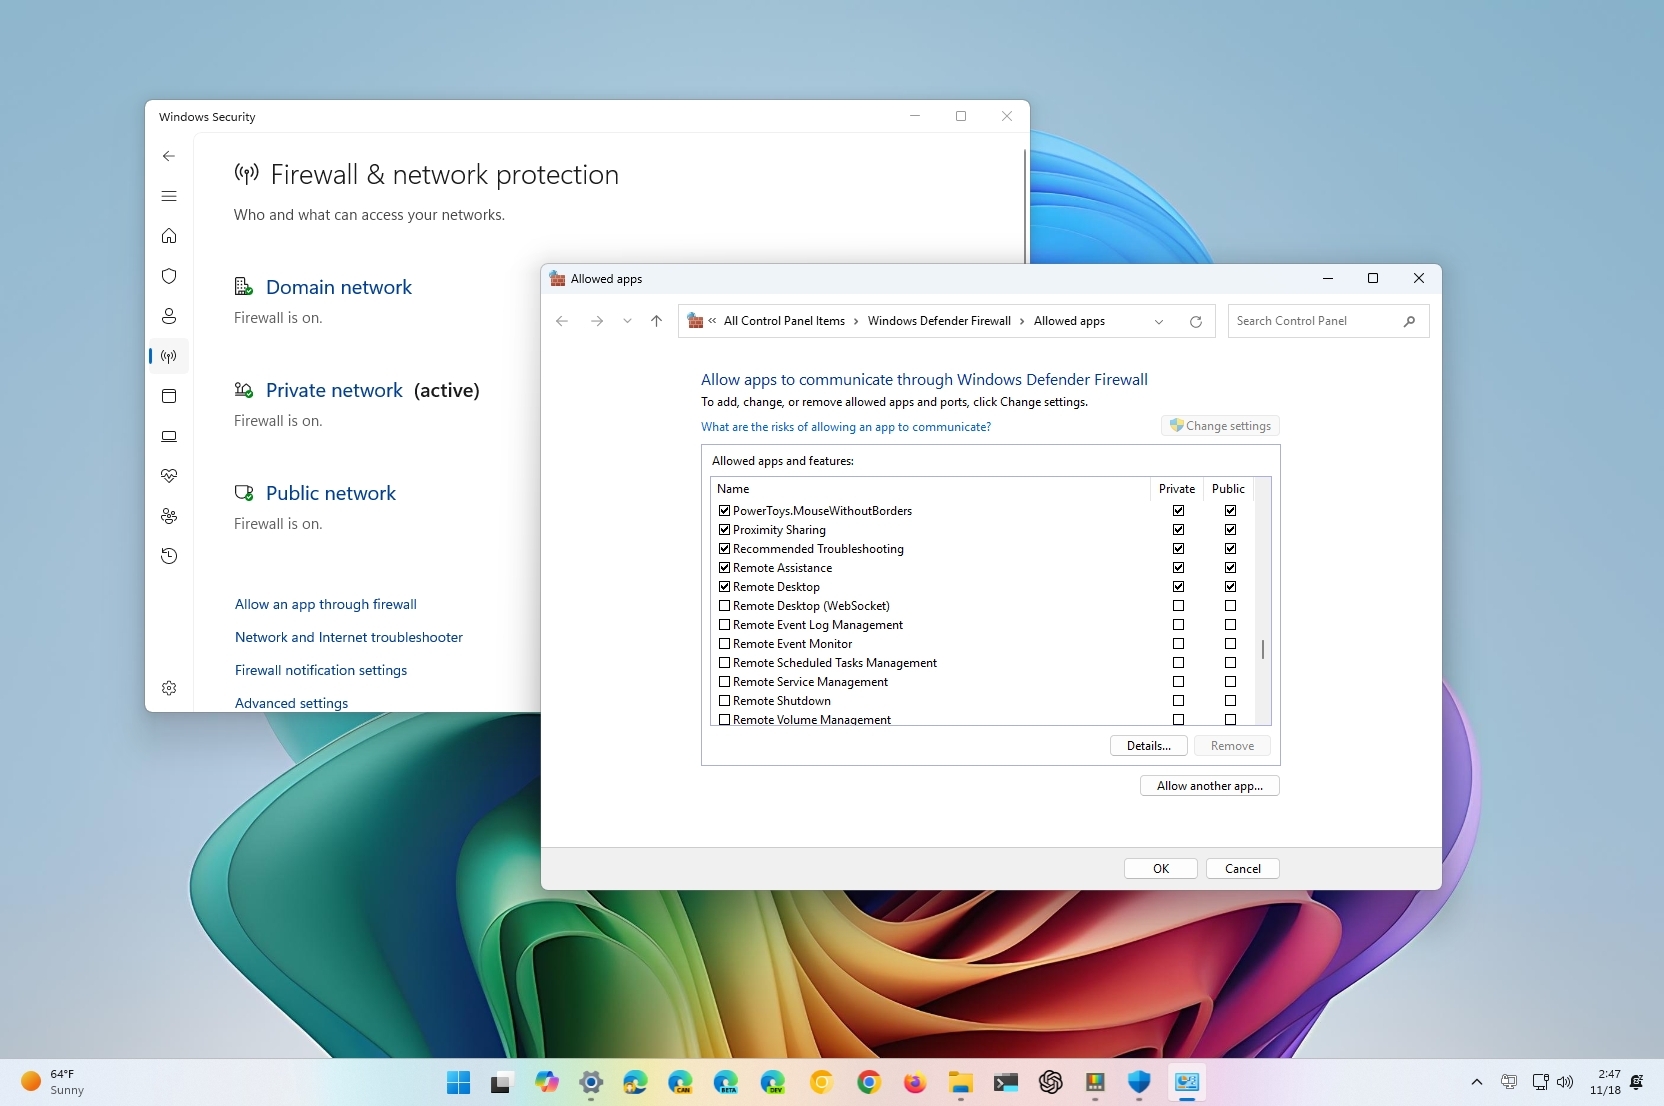
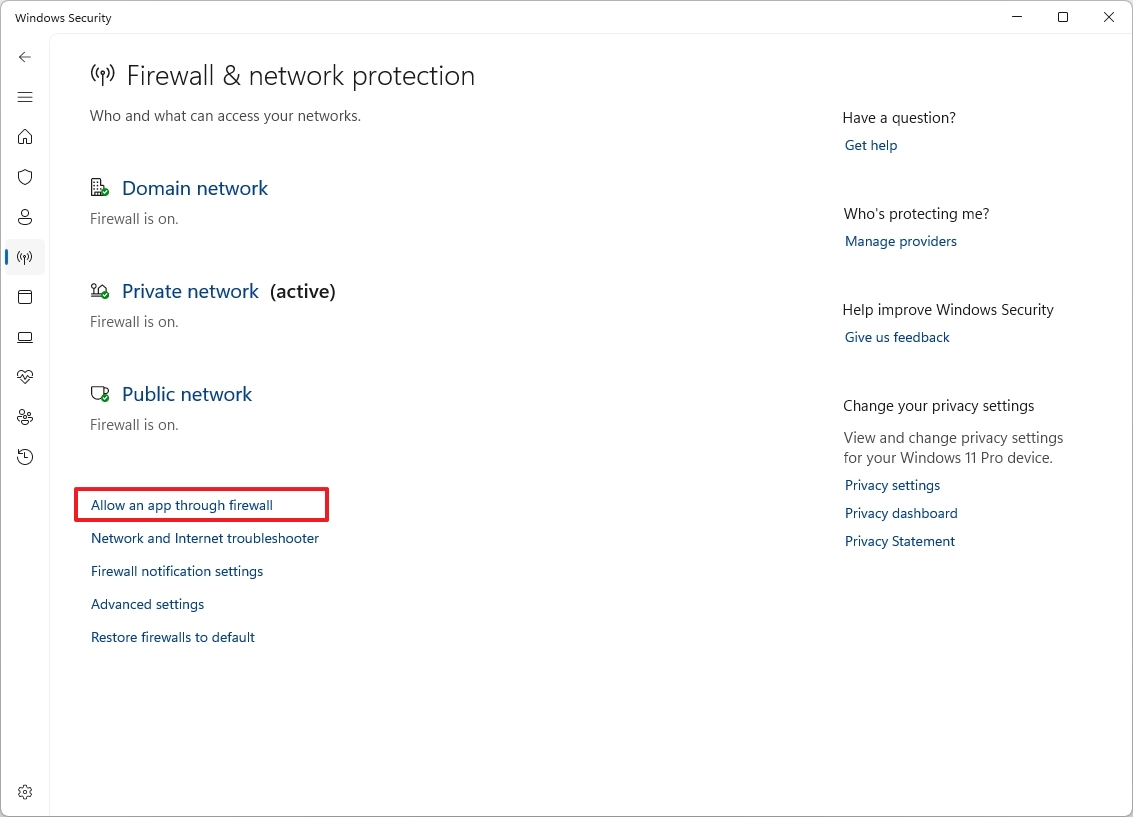
Allow an app access through firewall
To allow a specific app through the firewall, use these steps:
- Open Start.
- Search for Windows Security and click the top result to open the app.
- Click the «Allow an app through firewall» option.
- Click the Change settings button.
- (Option 1) Check the app or feature to allow through the firewall.
- Check the Private option.
- (Optional) Check the Public option if you will be connecting with the app or feature through a public network.
- (Option 1) Click the «Allow another app» button.
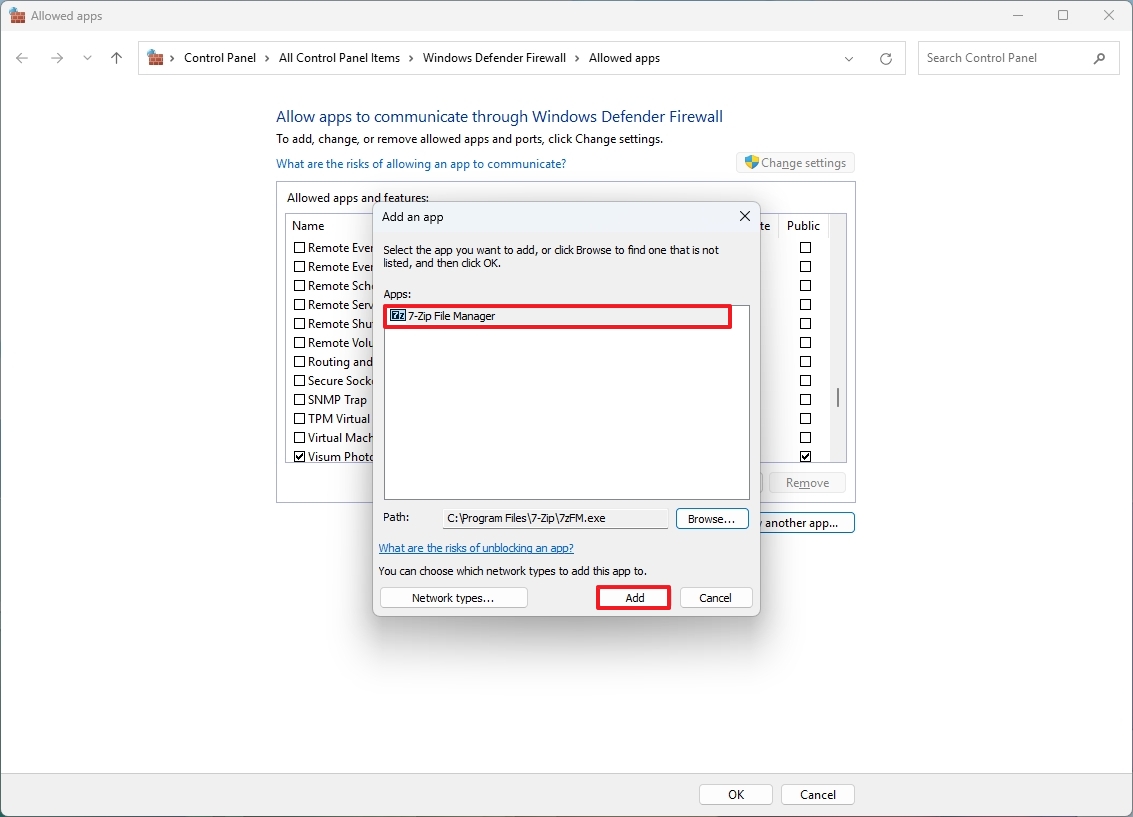
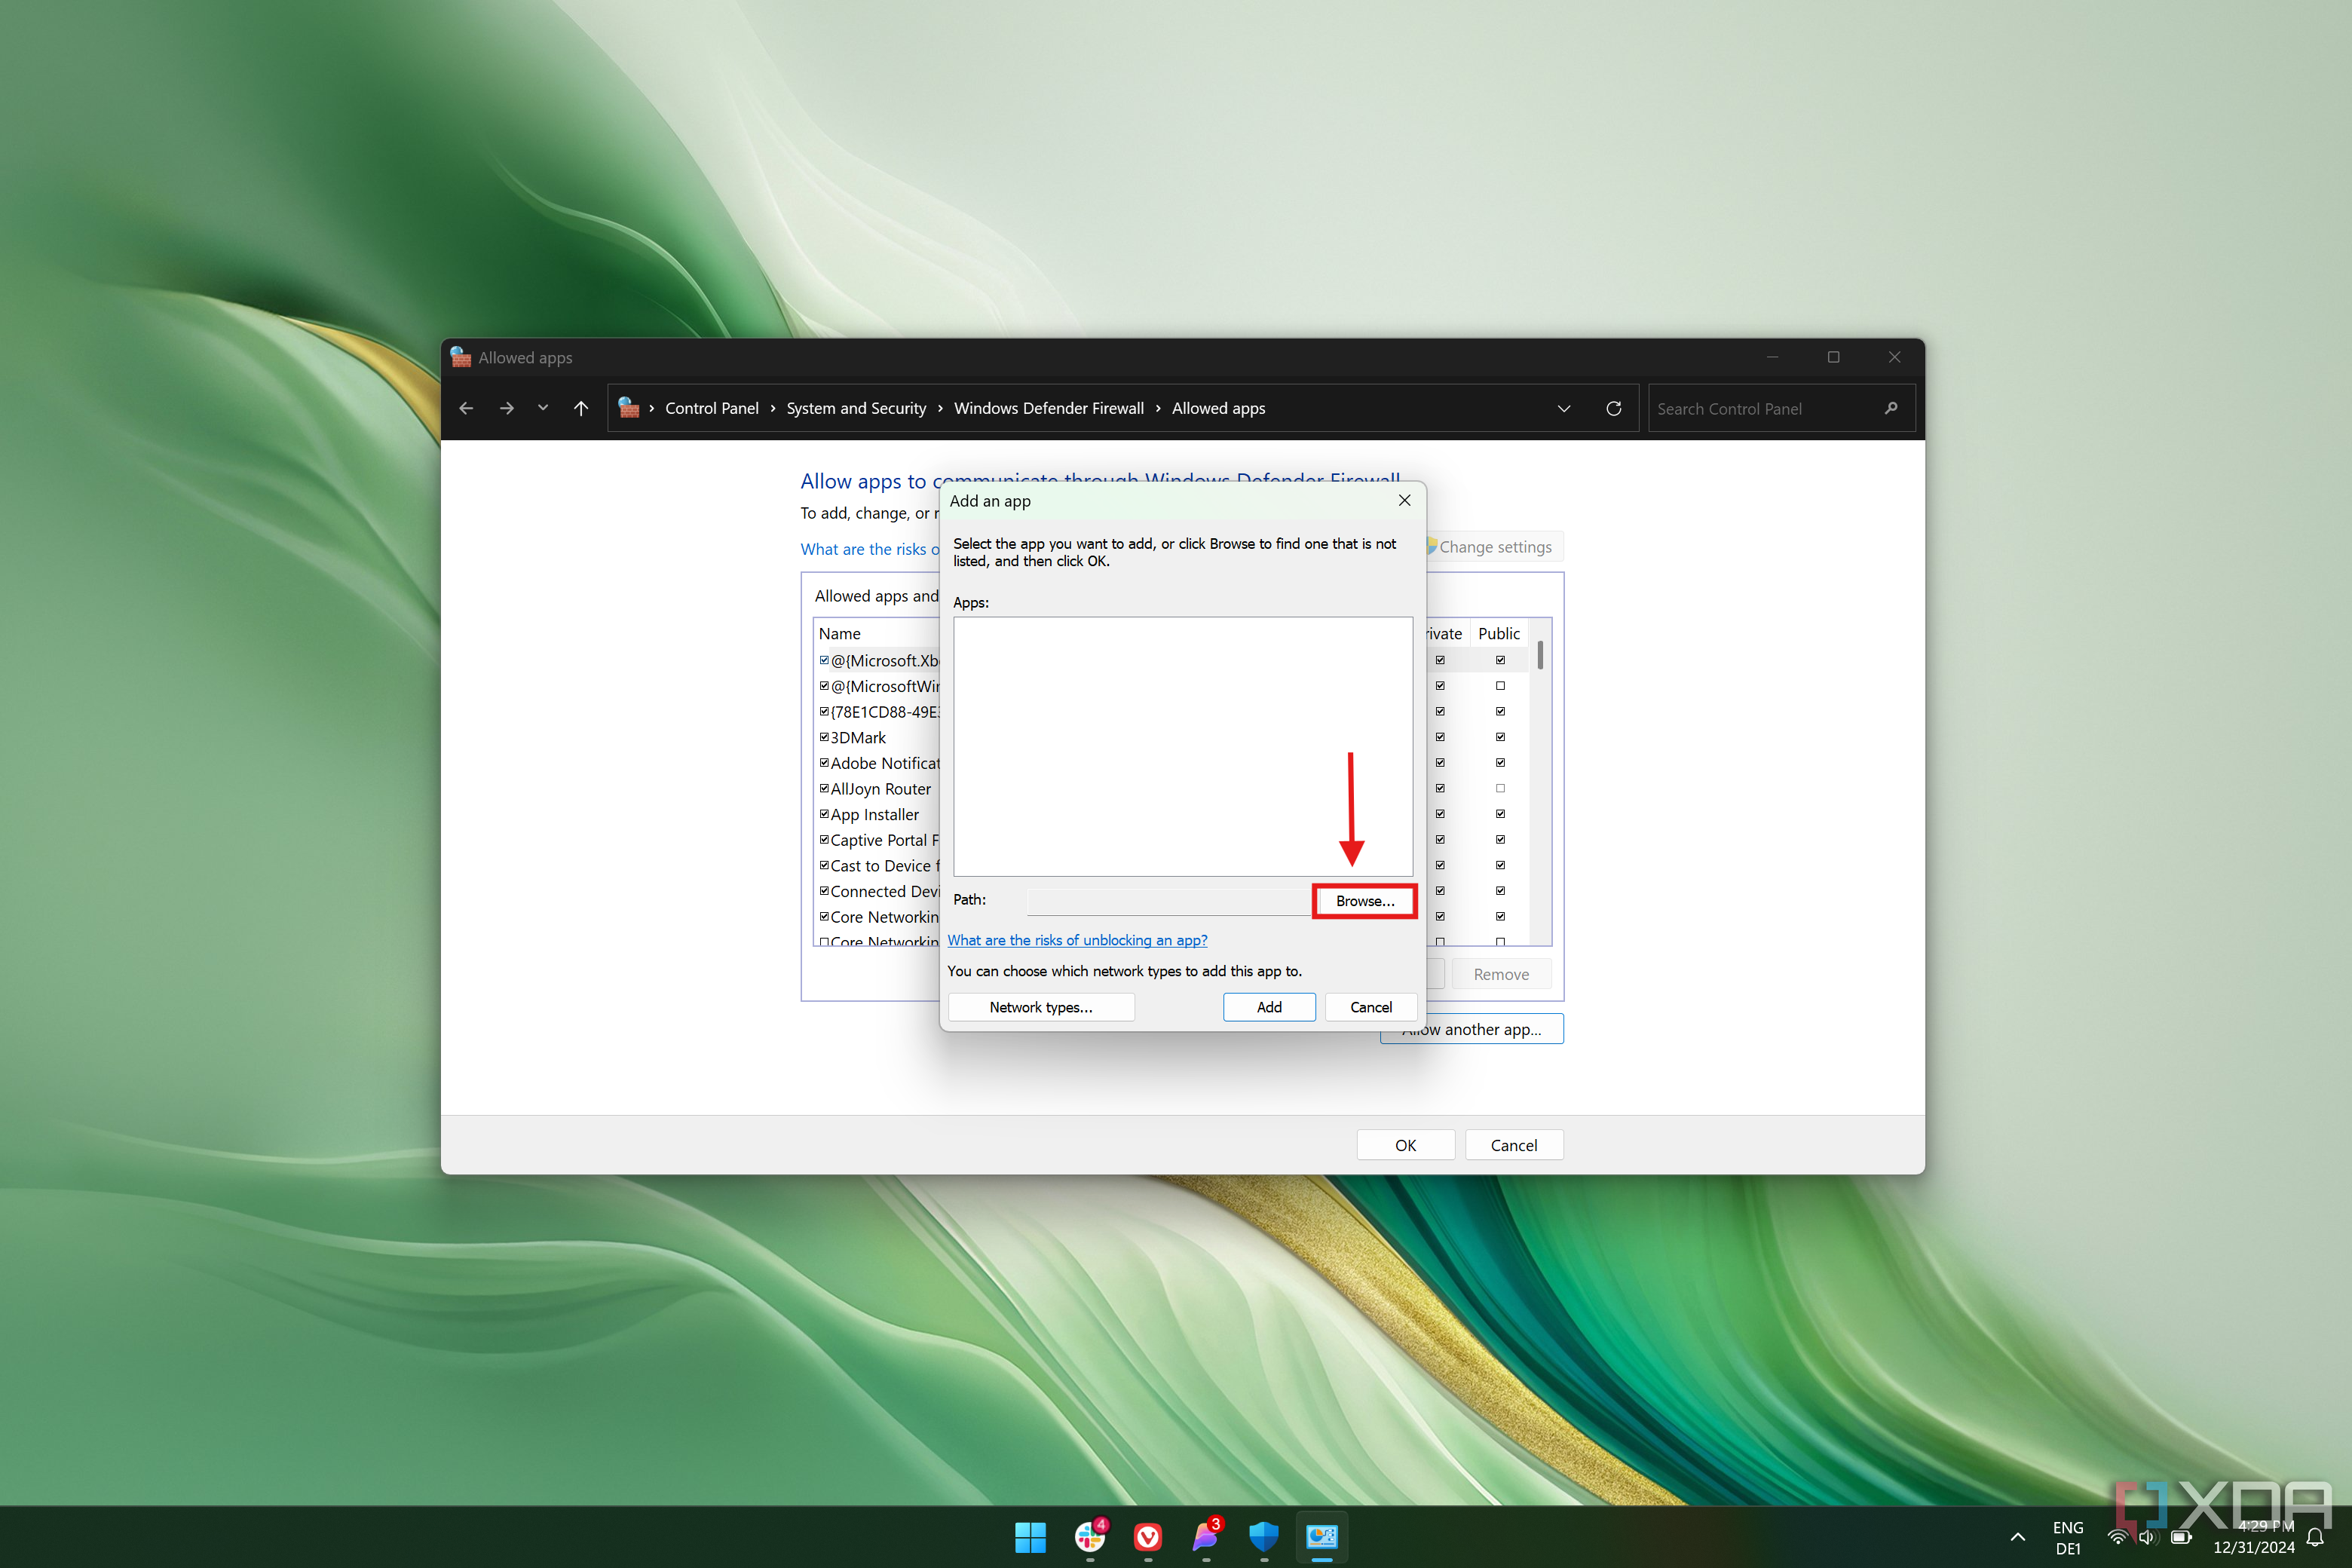
- Click the Browse button.
- Choose the app’s executable to allow through the firewall.
- Click the Open button.
- Click the Add button.
- Check the Private option.
- (Optional) Check the Public option if you will be connecting with the app or feature through a public network.
- Click the OK button.
After you complete the steps, the application will be allowed to send and receive traffic from the local network and internet.
Block an app access through firewall
To prevent an app from accessing the network or the internet, use these steps:
- Open Start.
- Search for Windows Security and click the top result to open the app.
- Click the «Allow an app through firewall» option.
- Click the Change settings button.
- Clear the check mark for the app to block, making sure that the Private and Public options are also unchecked.
- Click the OK button.
Once you complete the steps, the firewall will block the application through the firewall.
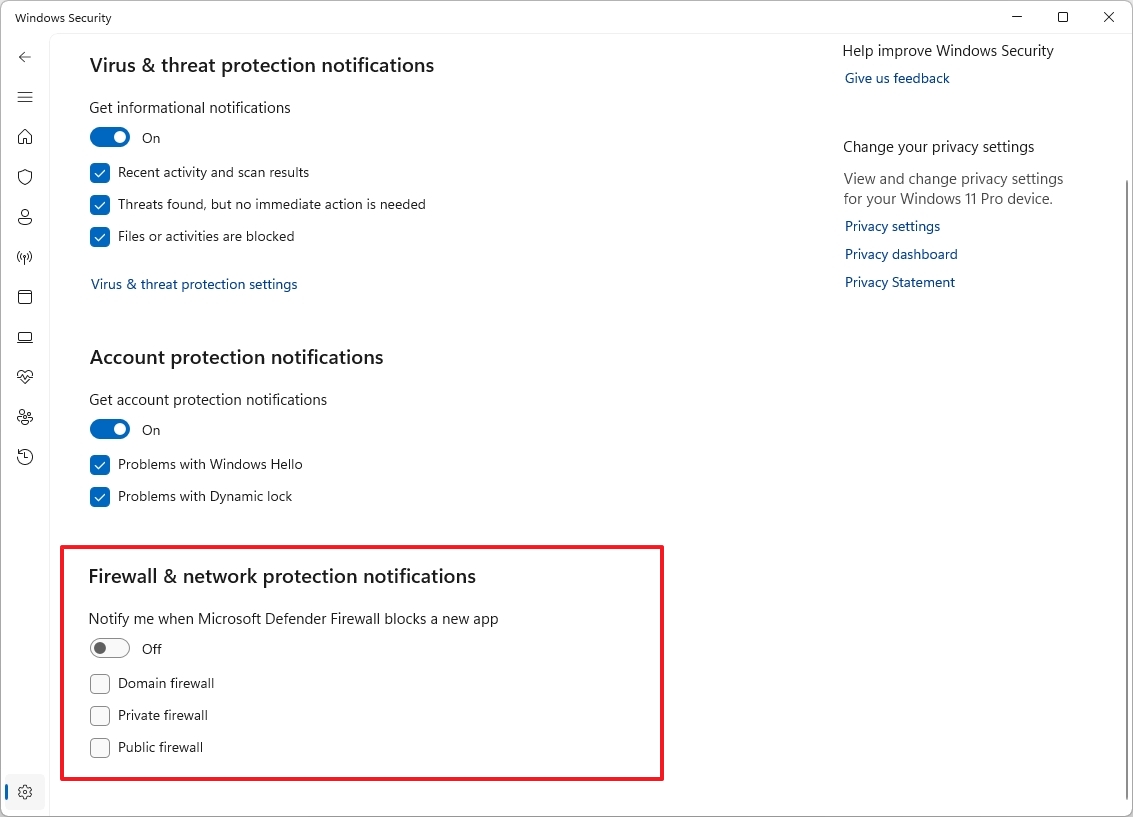
Customize firewall notifications
To customize the notifications for the Windows 11 firewall, use these steps:
- Open Start.
- Search for Windows Security and click the top result to open the app.
- Click the «Firewall notification settings» option.

- Click the Manage notifications option for the «Notifications» setting.
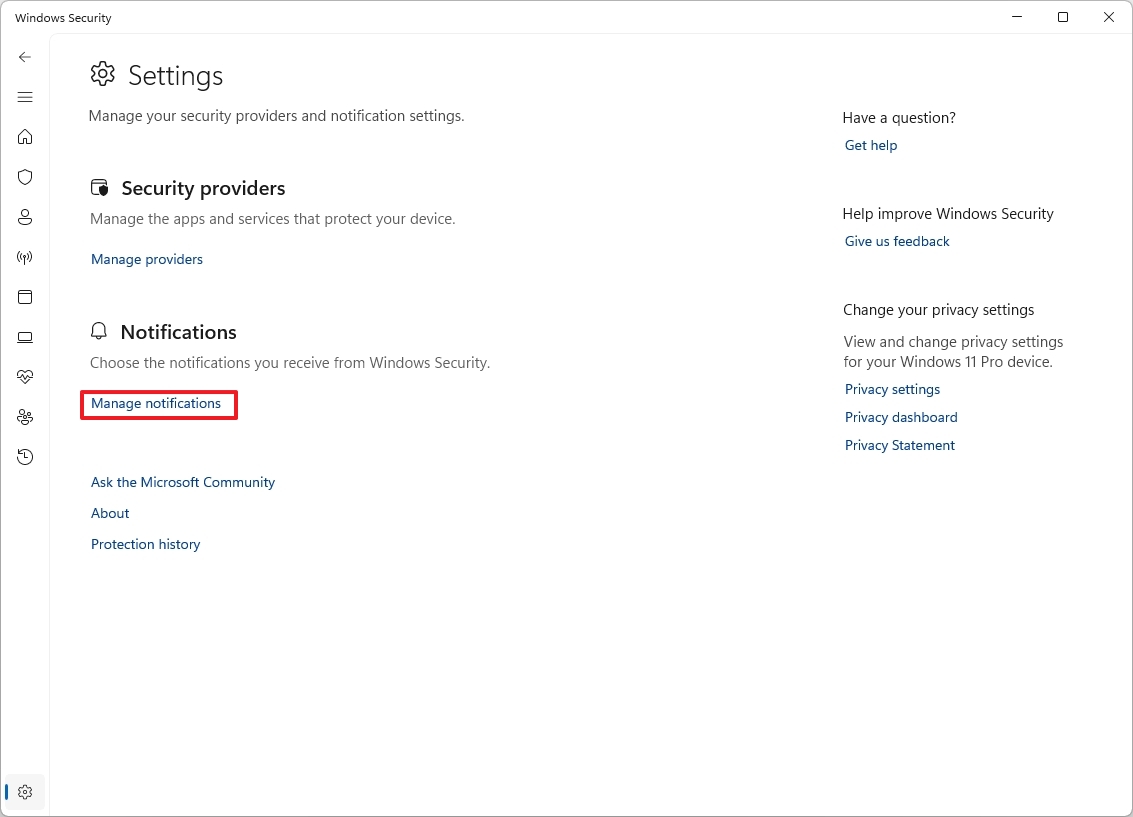
- (Option 1) Turn off the «Notify me when Microsoft Defender Firewall blocks a new app» toggle switch.
- (Option 2) Clear the type of notifications you want to turn off, including Domain, Private, and Public.
After you complete the steps, you will receive notifications according to your configuration.
Restore firewall default configuration
To restore the Microsoft Defender Antivirus feature default settings, use these steps:
- Open Start.
- Search for Windows Security and click the top result to open the app.
- Click the «Firewall notification settings» option.
- Click the «Restore firewalls to default» option.
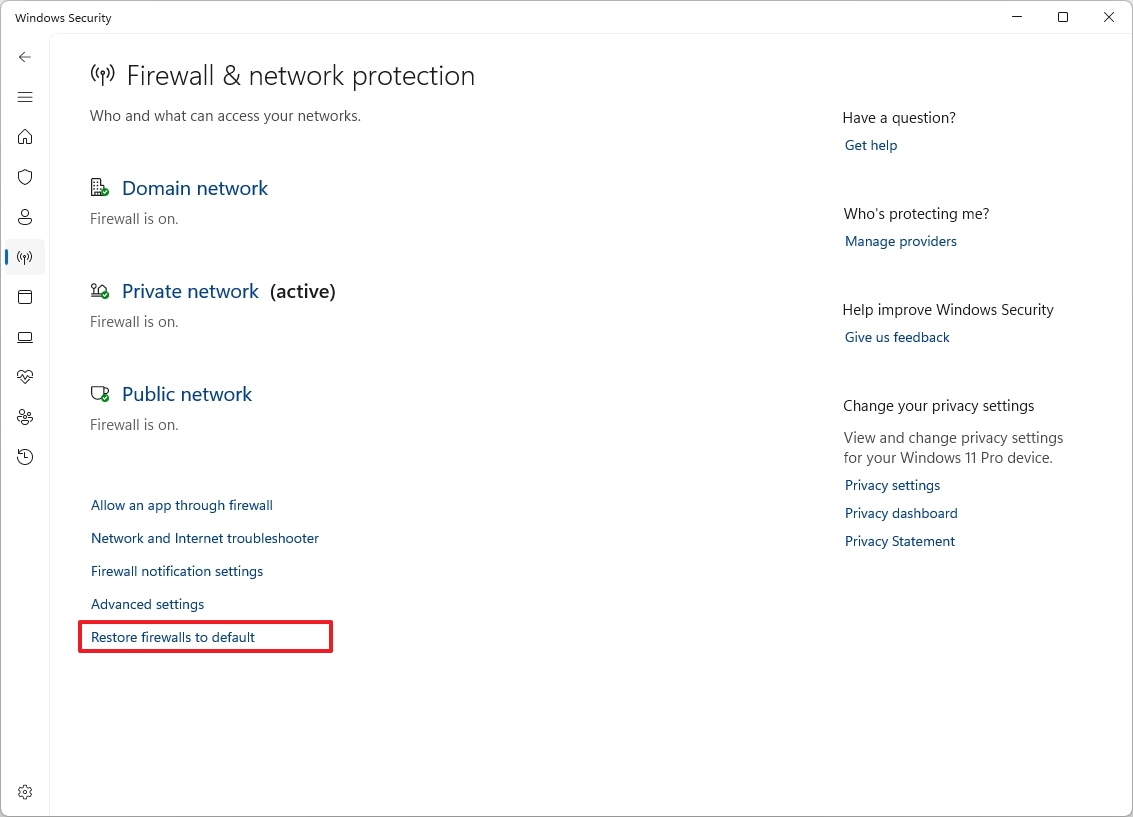
- Click the Restore defaults button.
Once you complete the steps, the security feature will reset the settings and apply the factory default configuration on Windows 11.
More resources
For more helpful articles, coverage, and answers to common questions about Windows 10 and Windows 11, visit the following resources:
- Windows 11 on Windows Central — All you need to know
- Windows 10 on Windows Central — All you need to know
Mauro Huculak has been a Windows How-To Expert contributor for WindowsCentral.com for nearly a decade and has over 15 years of experience writing comprehensive guides. He also has an IT background and has achieved different professional certifications from Microsoft, Cisco, VMware, and CompTIA. He has been recognized as a Microsoft MVP for many years.
Когда у пользователей возникают проблемы с подключением программ к интернету, часть из них выбирают полное отключение брандмауэра Windows, чтобы решить проблему. Стоит отметить, что такое решение не самое безопасное, если вы хотите обеспечить защиту компьютера. Вместо этого более предпочтительным вариантом будет добавление нужной программы в список исключений брандмауэра.

В нашей пошаговой инструкции описаны методы добавления исключений в брандмауэр Windows 10 или Windows 11, причем эти методы подходят и для более старых версий операционной системы.
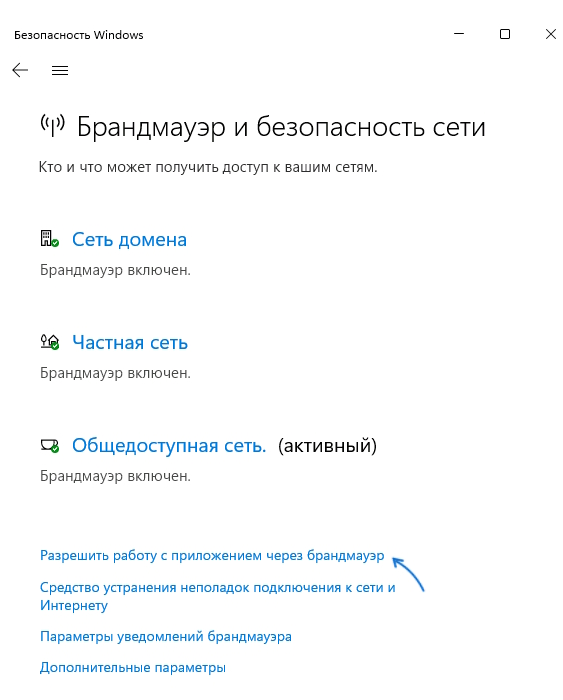
Добавление программы в исключения брандмауэра через Панель управления или окно «Безопасность Windows»
Способ 1 – через новый интерфейс управления брандмауэром Windows в разделе «Безопасность Windows» либо Панель управления.
Порядок действий следующий:
- Открываем окно «Безопасность Windows» через «Параметры» (для Windows 11 путь будет таким: Конфиденциальность и защита — Безопасность Windows — Открыть службу «Безопасность Windows») либо при помощи значка Microsoft Defender в области уведомлений
- Открываем пункт «Брандмауэр и безопасность сети».
- Под перечнем профилей сети жмем на кнопку «Разрешить работу с приложением через брандмауэр».

- Если вы хотите работать с Панелью управления, то вместо первых трех этапов, открываем Панель управления, потом пункт «Брандмауэр Защитника Windows» и жмем на ссылку «Разрешение взаимодействия с приложением или компонентом в брандмауэре защитника Windows».

- Откроется окно, где нужно будет выбрать «Изменить параметры» (это может сделать только пользователь с правами администратора).
- В том случае, когда необходимое приложение отсутствует, жмем кнопку «Разрешить другое приложение». Если оно есть – ставим отметку напротив необходимых сетей для того, чтобы позволить ему с ними работать.

- Нажимаем на кнопку «Обзор» и выбираем путь к необходимой программе.
- Нажимаем на кнопку «Типы сетей» и выбираем те сети, для которых дадим разрешение программе с ними работать.
- Жмем на кнопку «Добавить».
- После этого программа окажется в списке разрешенных в нашем брандмауэре и нужно будет только нажать на кнопку «Ок», чтобы применить настройки.

Добавление в исключения программы или порта в мониторе брандмауэра Защитник Windows в режиме повышенной безопасности
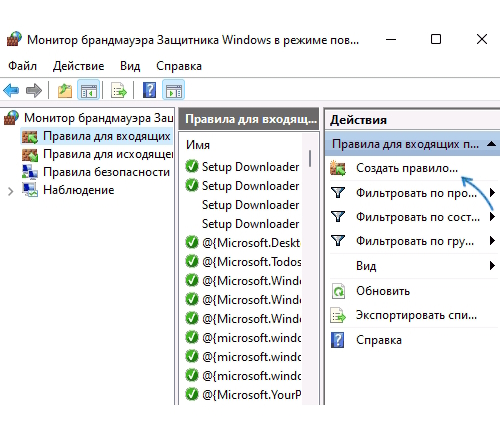
Добавить порты и программы в список исключений брандмауэра операционной системы Windows 10 или 11 также можно при помощи монитора брандмауэра, выбрав режим повышенной безопасности. Это делается следующим образом:
- Нажимаем комбинацию клавиш Win+R, пишем wf.msc, жмем на Enter или открываем через Панель управления пункт «Брандмауэр защитника Windows», после чего жмем в левой части панели на кнопку «Дополнительные параметры».
- В левой части панели надо выбрать «Правила для входящих подключений» либо «Правила для исходящих подключений» (иногда требуется настроить оба пункта).
- В правой части панели жмем на «Создать правило».

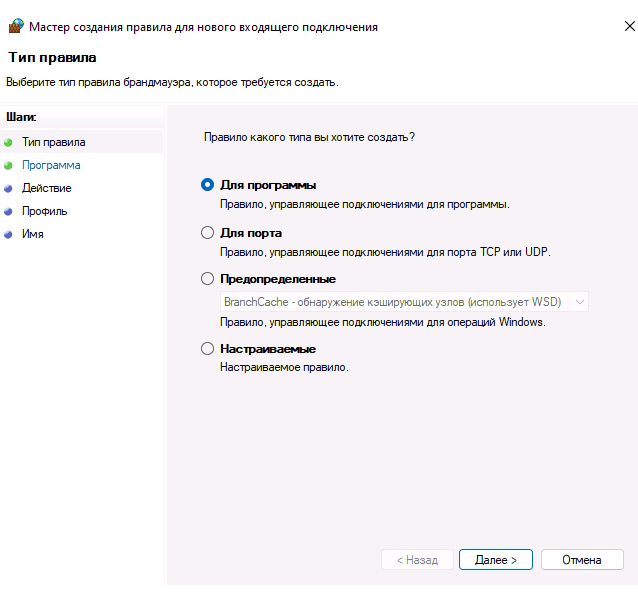
- Пишем, для кого создаем правило: программа или порт и жмем на кнопку «Далее».

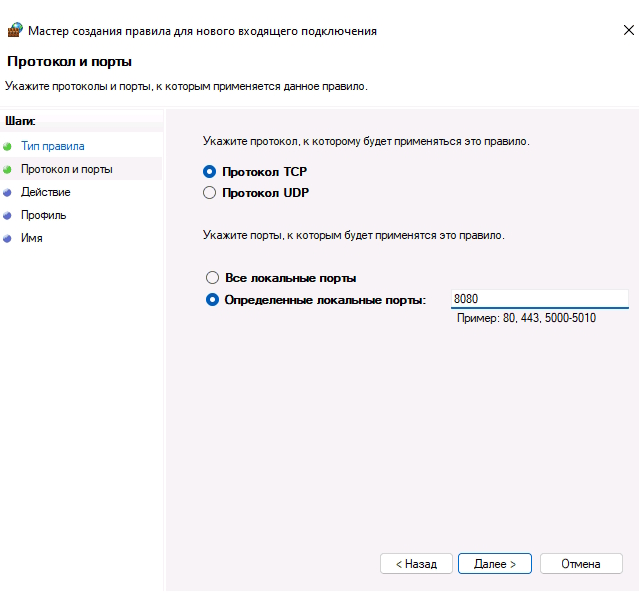
- Указываем номера портов и протокол или путь к выбранной программе. Жмем на кнопку «Далее».

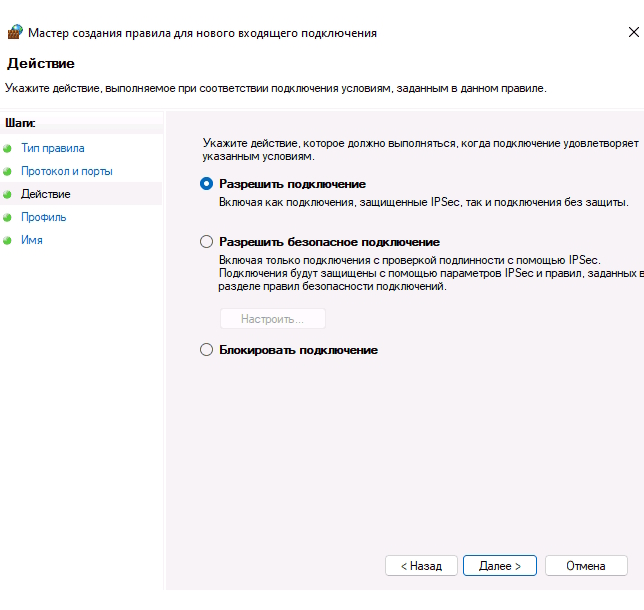
- Чтобы нужный порт или программа не блокировались, выбираем пункт «Разрешить подключение». Жмем на кнопку «Далее».

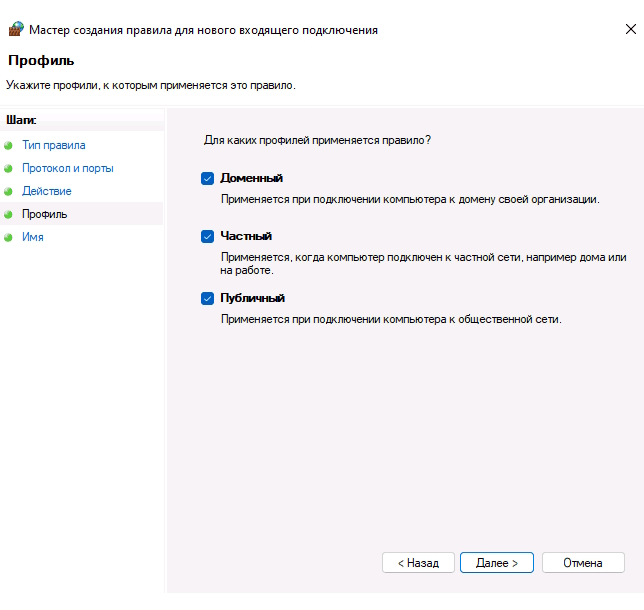
- Выбираем сетевые профили, для которых будет действовать правило.
- Пишем название и, если нужно, создаем описание правила. Жмем на кнопку «Готово».
Благодаря выполненным шагам перестанет блокироваться трафик для выбранной программы или порта. Если используется другой тип подключения, то может понадобиться создать еще одно правило (для исходящих вместо входящих, и наоборот).
Как добавить исключения брандмауэра при помощи командной строки
Если нужно открыть конкретный порт или разрешить доступ в сеть конкретной программе, можно применять определенные команды, вводя их в командной строке от имени администратора.
Для программы
1-я команда — разрешает входящие подключения, 2-я — исходящие, для любого сетевого профиля:
netsh advfirewall firewall add rule name=»Имя_правила» dir=in action=allow program=»путь_к_программе» enable=yes
netsh advfirewall firewall add rule name=»Имя_правила» dir=out action=allow program=»путь_к_программе» enable=yes
Для порта
1-я команда — разрешает входящие подключения, 2-я — исходящие.
netsh advfirewall firewall add rule name=»Имя_правила» dir=in action=allow protocol=TCP localport=номер_порта
netsh advfirewall firewall add rule name=»Имя_правила» dir=out action=allow protocol=TCP localport=номер_порта
Если вы хотите больше узнать о том, как добавлять правила брандмауэра при помощи командной строки, вы можете использовать следующую команду:
netsh advfirewall firewall add rule ?
Задать вопросы или поделиться опытом использования нашей инструкции вы можете ниже в комментариях.
As internet threats have evolved, Windows has consistently provided tools to help users stay safe online. One of the earliest examples is the Windows firewall (formally known today as the Microsoft Defender Firewall), which has been around for decades, and it provides essential protection against potentially dangerous network traffic.
Most of the time, you shouldn’t have to think about how to use the Windows firewall, but if you do need to change some settings, we’re here to help.
Related
10 Windows 11 security settings to keep your PC safe
Protect your PC by enabling these 10 essential Windows 11 security settings
What is the Windows firewall, and should you use it?
A firewall is a security layer that monitors network requests and controls what requests are allowed or blocked on the device. It’s possible for a firewall to be a hardware device, but most of the time, it’s a software solution, such as the case of the Windows Firewall.
The Windows firewall is responsible for managing which apps on your PC are allowed to communicate with other computers using network connections, and it’s been included in Windows since Windows XP Service Pack 2. On Windows 11, it’s included in the Windows Security app, alongside numerous other protections, and it’s enabled by default.
Related
Generally speaking, there should be no reason to change the default Windows Firewall settings, but you can if you want to, so let’s take a closer look.
How to or disable the Windows firewall
As we just mentioned, the Windows firewall is enabled by default on every Windows 11 PC, and it’s enabled for every network type. You can check the Windows firewall settings using the following steps:
- Open the Start menu and search for Windows Security. Open the first result. Alternatively, Windows Security usually has a system tray icon. Click the arrow icon near the bottom-right corner of the screen and double-click the Windows Security icon (the blue shield).
-
Select Firewall & network protection from either the side bar or the main section of the app.

-
You’ll see the current firewall status for three network types: Domain networks (used in some enterprise environments), Private networks, and Public networks. The current network profile in use will be labeled with (active), and the firewall status is shown below the header.
-
You can click on each of the network types to change the firewall settings for that network type. Under Microsoft Defender Firewall, you can set the toggle to On or Off depending on your needs. For example, if you want to turn the firewall off completely (you shouldn’t), you’d want to turn this off for every network type.
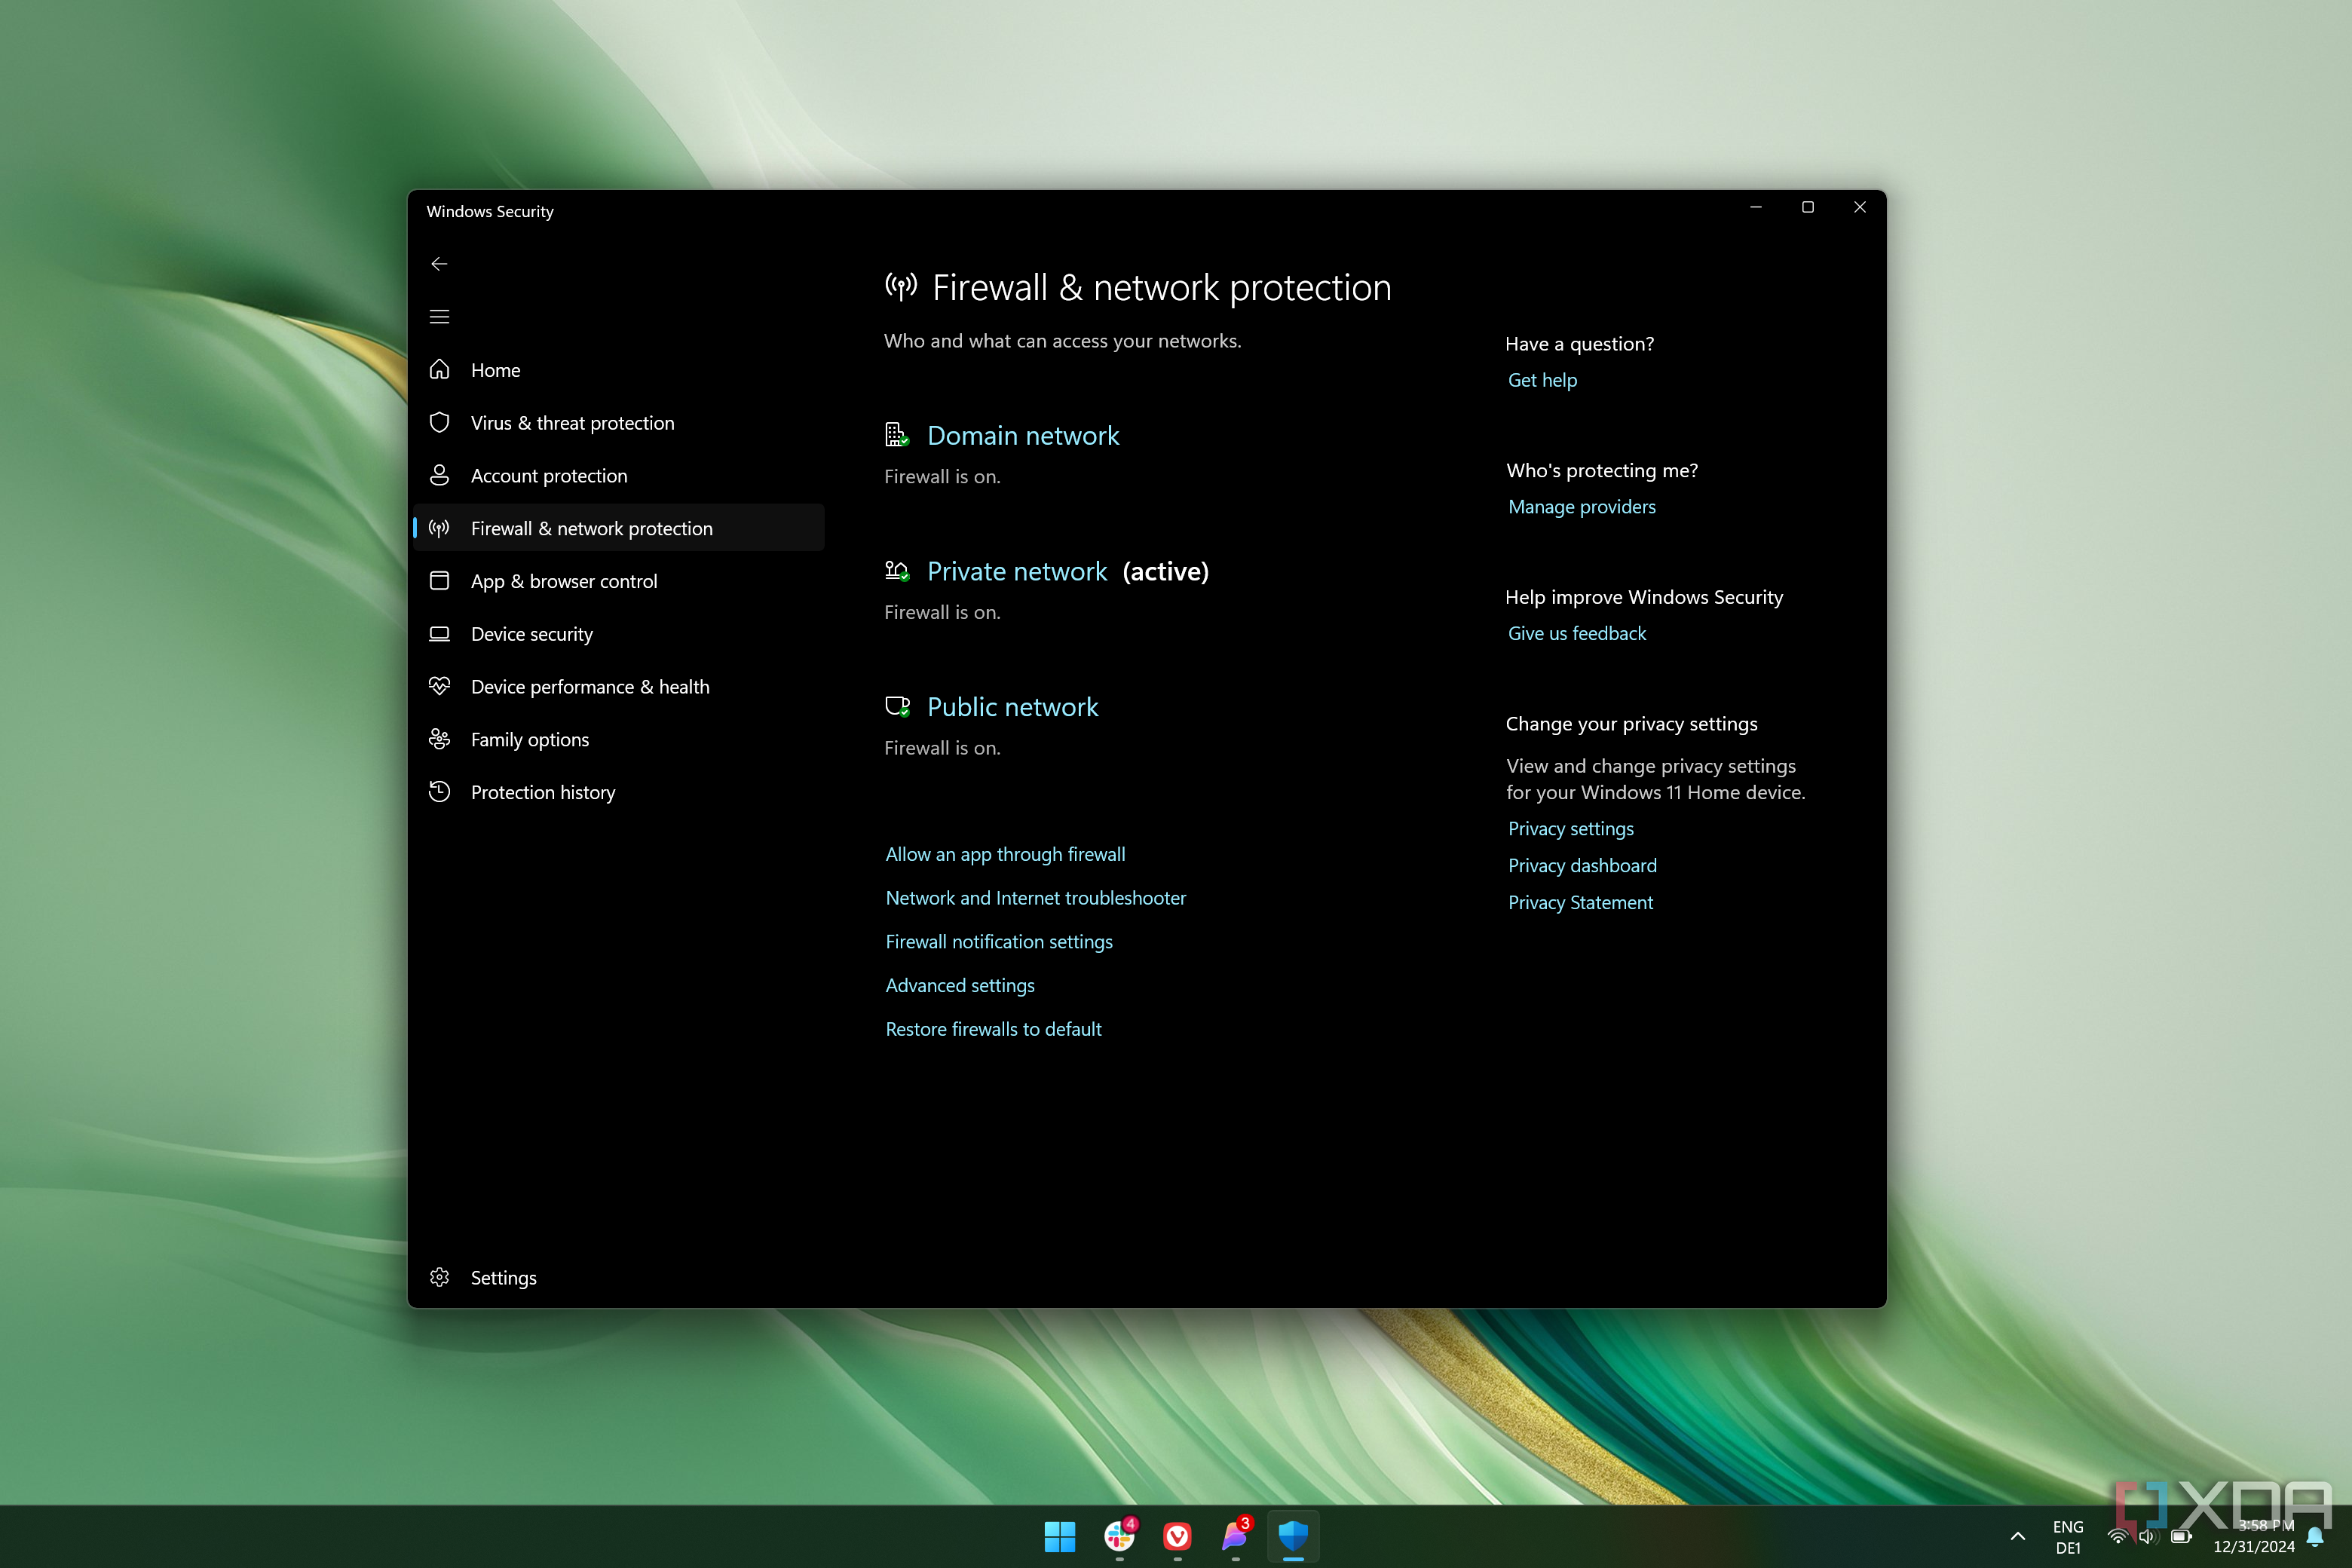
If you want to turn the firewall off only for specific types of networks, it’s important that you set the right type of network for the connection you’re currently using. You can change network types in the Settings app. Windows firewall settings can also be found in the classic Control Panel, if you prefer doing it that way.
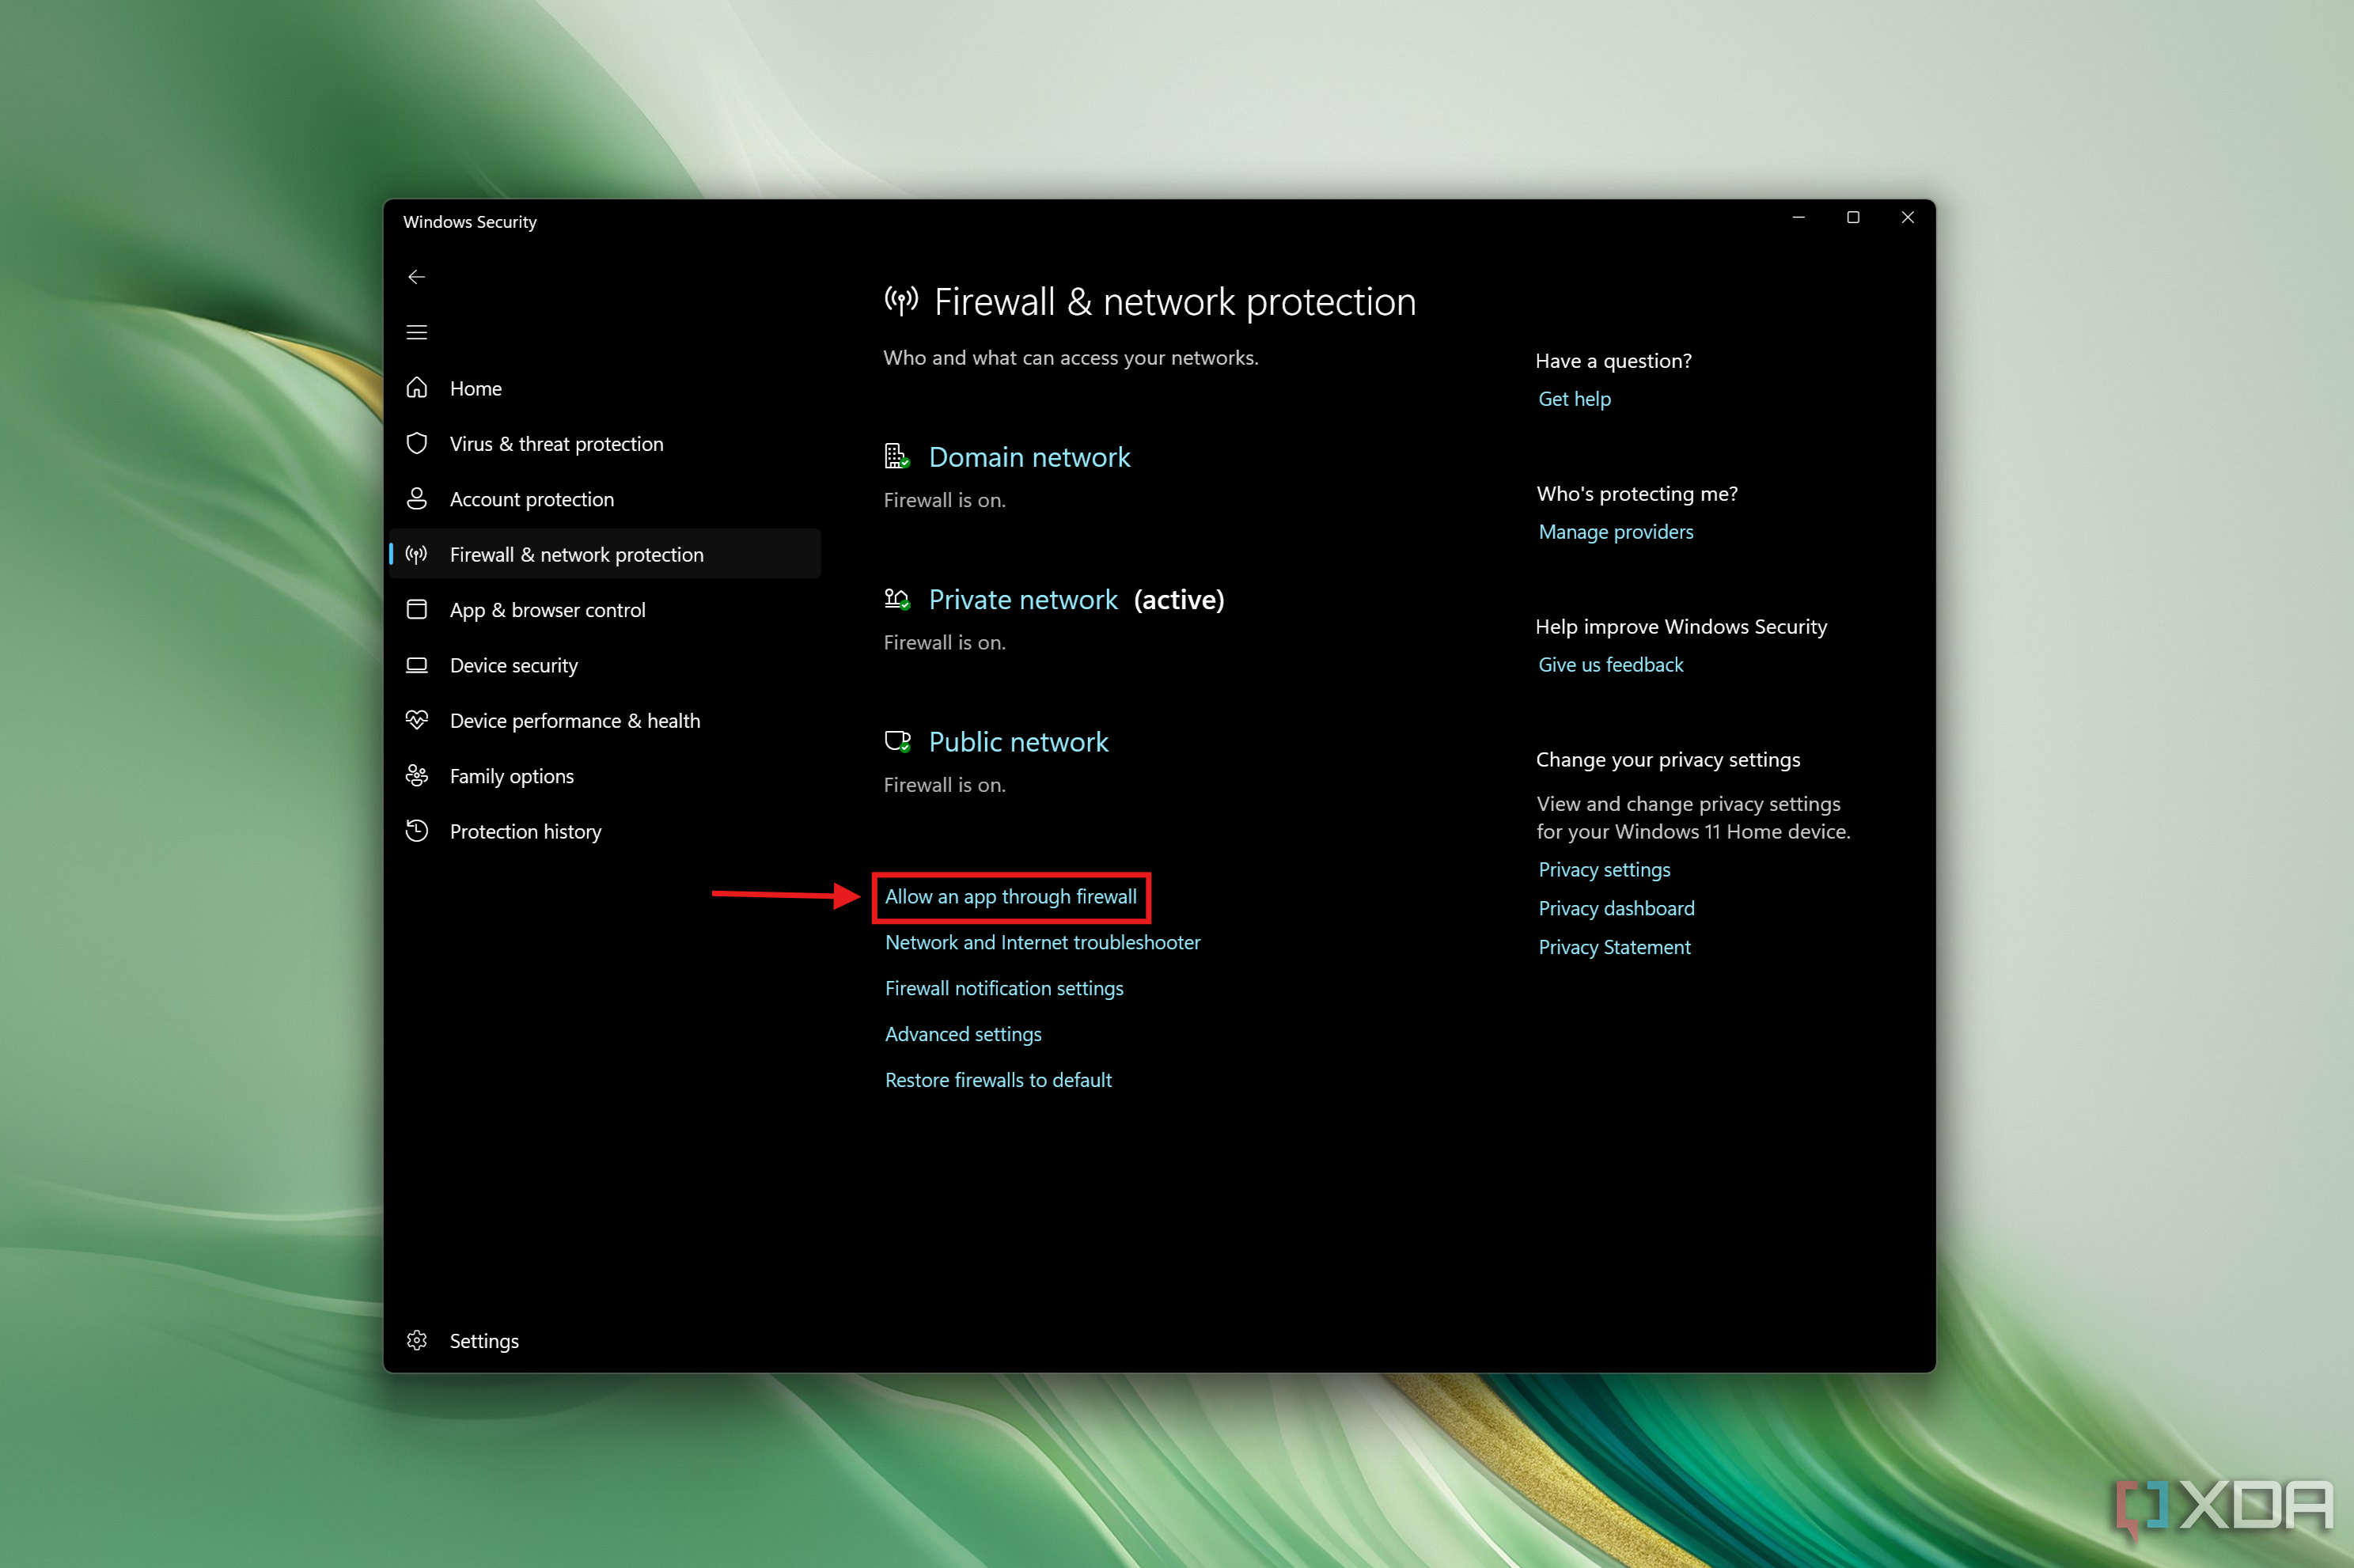
Allowing an app through the firewall (or blocking it)
In many cases, if an app needs to use network connection requests, you’ll see a pop-up for the Windows Firewall asking you to allow network communications for that app. After that, you should no longer need to give this permission to the same app again.
However, if you want to manually allow an app through the firewall, you can also do that. Just follow these steps:
- Open the Windows Security app.
- Click Firewall & network protection in the sidebar or the main pane.
-
Choose Allow an app through firewall.

-
You’ll see a list of allowed apps and features that can already pass through the firewall. Click Change settings (you’ll need administrator rights to proceed).

- To block an allowed app from communicating, click the checkbox to clear it under either Private or Public depending on the network type you want to configure.
-
To add a new app to the list, click Allow another app.

-
Click Browse to find the executable file you want to allow through the firewall.
- Click Network types to configure which types of networks the app can communicate on.
-
Check or clear the boxes for Public or Private depending on your desired settings, then click OK.

- Click Add to finalize adding the app to the allowed list.


Windows firewall advanced settings and custom rules
For the most part, the steps above are all anyone should need to do to set up their firewall to suit their needs. However, there are a few more settings you can customize if you need something more specific. In the Windows Security app, click Firewall & network protection and then Advanced settings, and you’ll see this window:
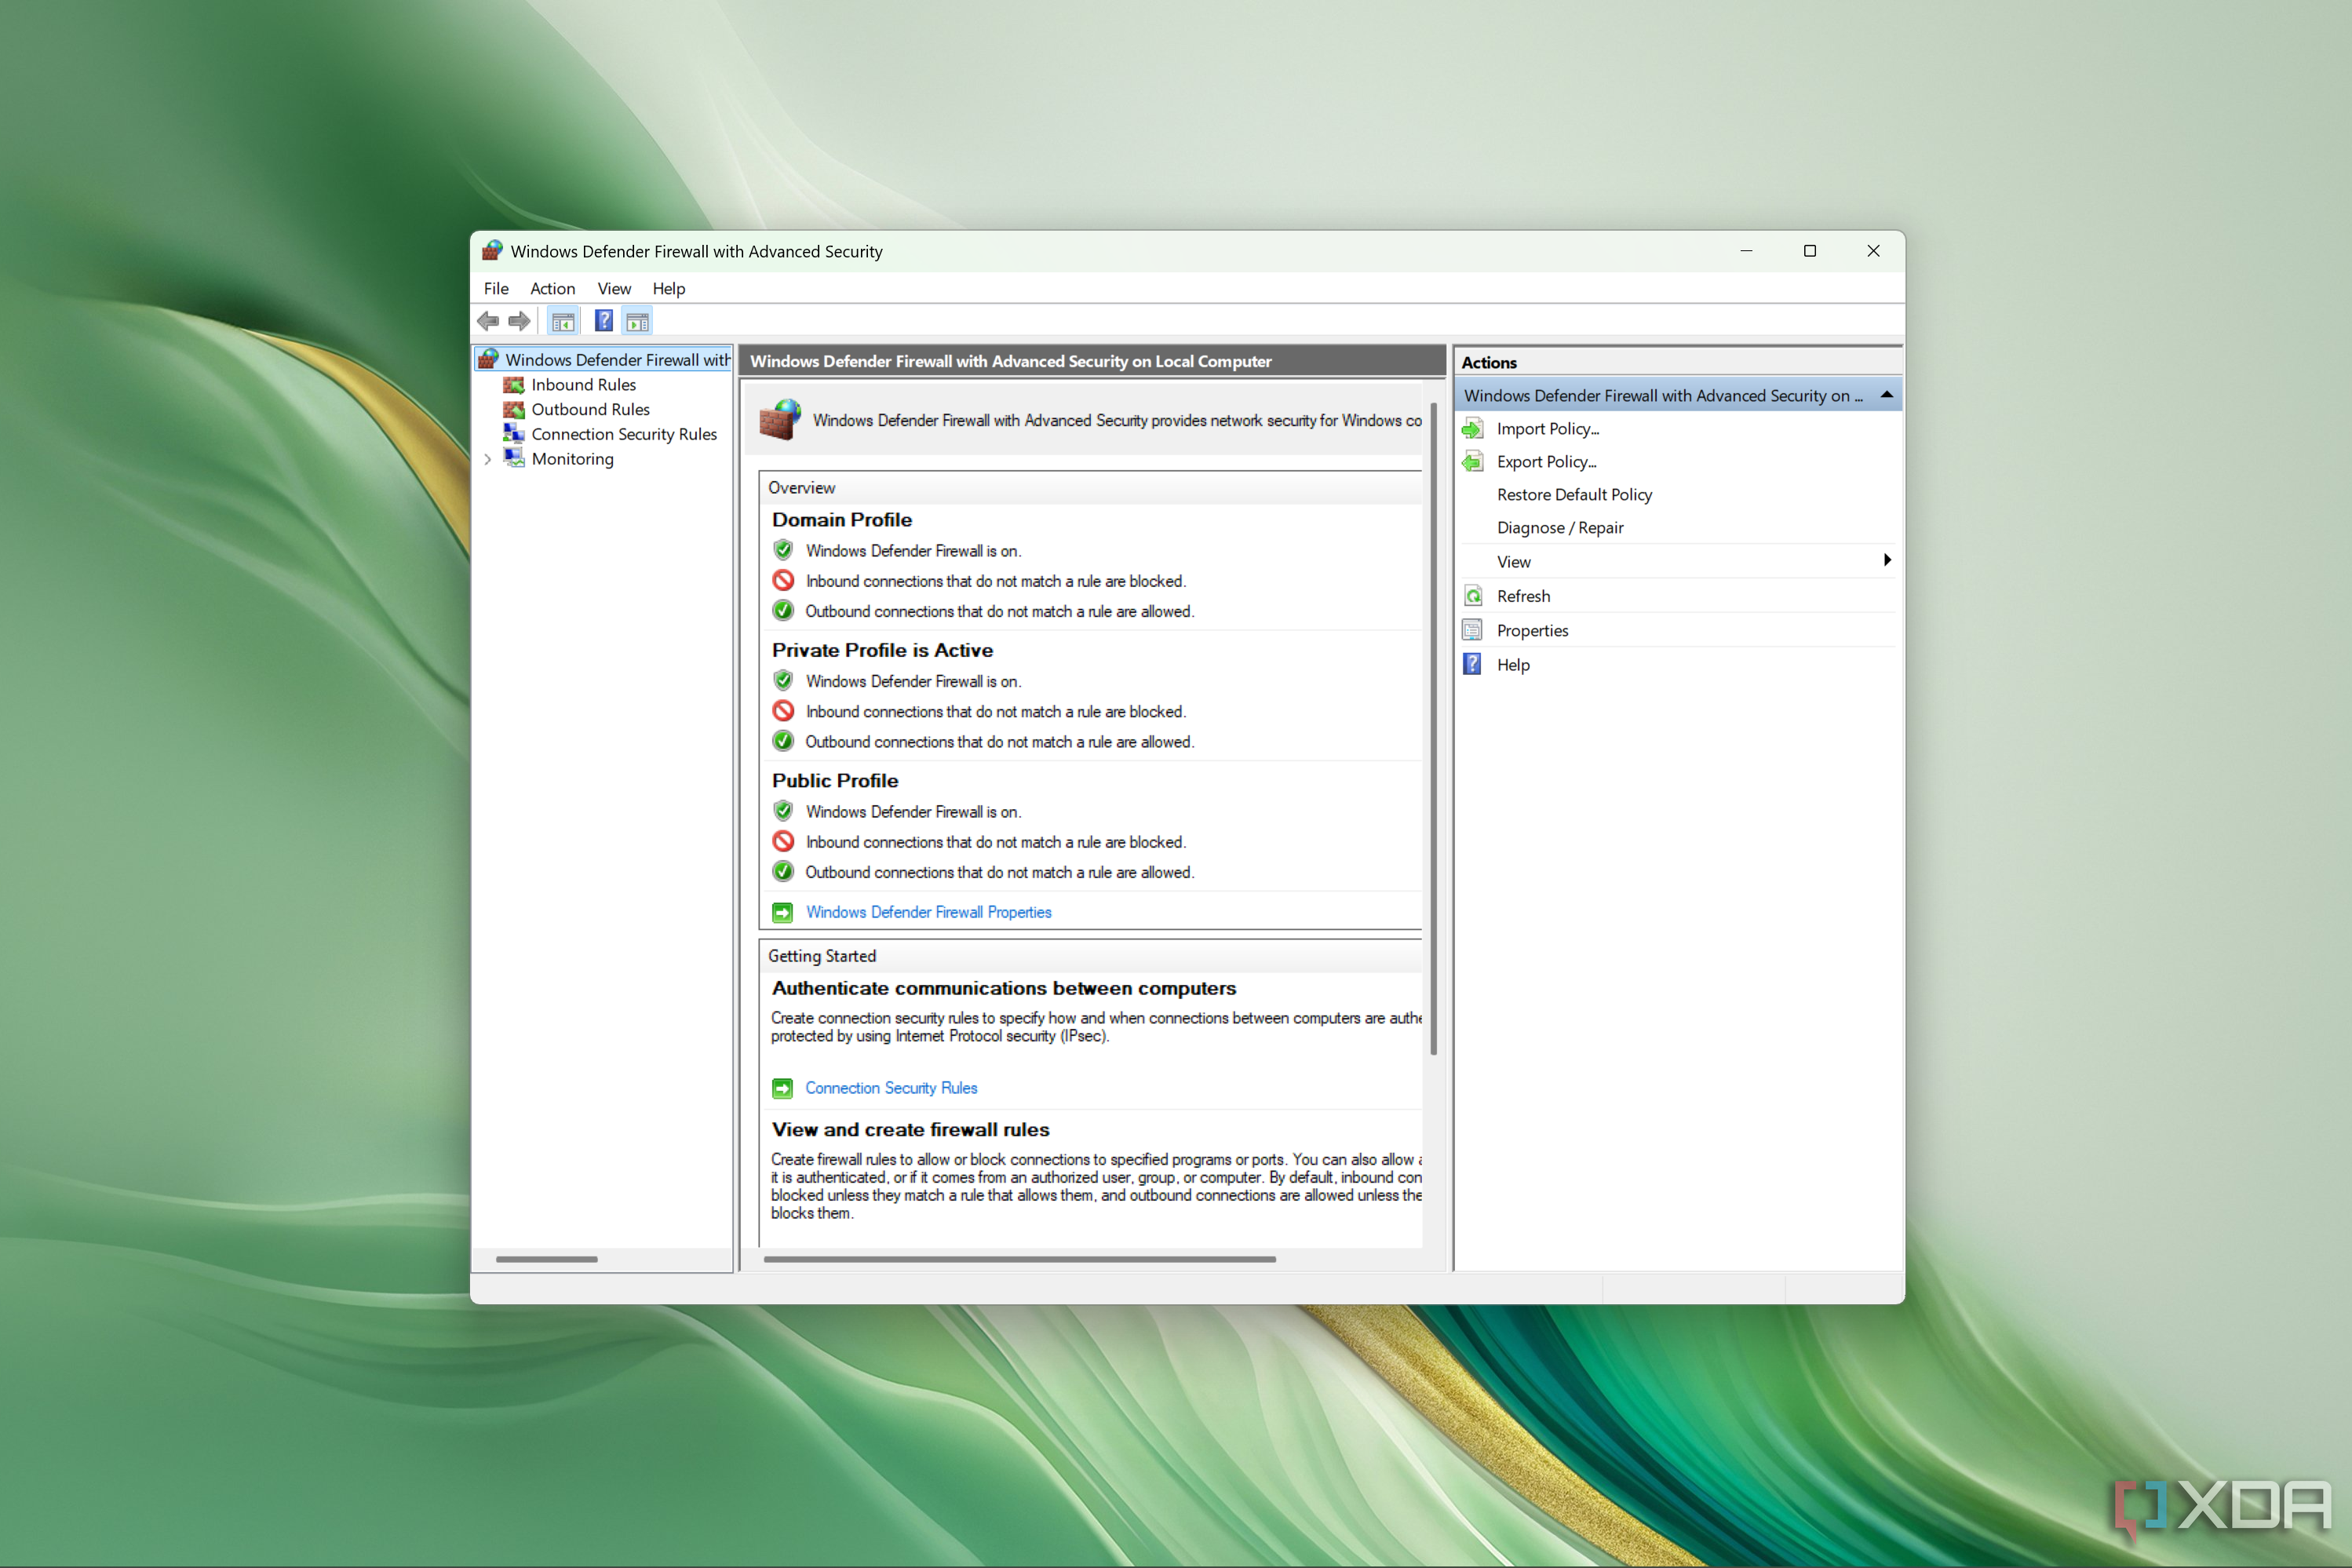
From here, you can do a few things:
Import or export policies
If you want to use the same Windows firewall policies across different PCs, exporting and importing policies can help. In the main view (Windows Defender Firewall with Advanced Security), you can click Import policy to copy existing Windows Firewall settings and override your current ones. Conversely, the Export policy button lets you export your current settings to share with other users.
Custom inbound and outbound rules

On the left-side pane of this window, you can see the Inbound Rules and Outbound Rules sections, which contain the apps and features that have been allowed through the Windows firewall. Here, you can click New Rule in the menu on the right-side of the window to allow specific communication requests.
Notably, the rules you create here can allow for communication over specific UDP or TCP ports, for example, which can be important for certain apps to function properly.
Connection security rules

Here, you can create and manage rules that ensure a secure connection for certain types of network communications. These are tools the vast majority of users won’t need, but they can be useful in very specific scenarios.
You probably shouldn’t touch most of these things
If you’re thinking about changing the Windows firewall settings just because, you probably shouldn’t. The feature is enabled by default and there’s nothing you should need to change for it to do its job properly. Only mess with these settings if you know exactly why you need to do it, and you’ll be totally fine.
Of course, the Windows firewall is only a small portion of the Windows Security suite, which includes the
Microsoft Defender
antivirus. If you’re looking to disable that, check out our guide below.
1:27
Related
How to disable Microsoft Defender in Windows 11
Microsoft Defender offers solid baseline protection against malware, but sometimes, you might want to disable it. Here’s how to do it.