
В этой статье:
-
Настройка яркости дисплея
-
Ночной свет
-
Управление цветным профилем
-
Использование HDR
Настройка яркости дисплея
Управление яркостью дисплея может значительно улучшить просмотр и сэкономить время работы батареи. Вы можете настроить яркость вручную или позволить компьютеру обрабатывать ее автоматически в зависимости от условий освещения или содержимого.
Важно: Ползунок Яркость может не отображаться на устройствах с внешним монитором. Чтобы изменить яркость внешнего монитора, используйте кнопки на нем.
Чтобы настроить яркость экрана, щелкните значок Сеть в правой части панели задач, а затем переместите ползунок Яркость , чтобы настроить яркость.
Кроме того, можно настроить яркость дисплея в разделе Параметры > системный > дисплей.
Важно: Ползунок Яркость может не отображаться на настольных компьютерах с внешним монитором. Чтобы изменить яркость внешнего монитора, используйте кнопки на нем.
На некоторых компьютерах Windows может автоматически регулировать яркость экрана в зависимости от текущих условий освещения. Чтобы узнать, поддерживает ли это ваш компьютер, выберите Параметры > системный > дисплей. Выберите Яркость, найдите поле Изменение яркости автоматически при изменении освещения проверка а затем выберите его, чтобы использовать эту функцию. Благодаря этой автоматической настройке текст на экране будет хорошо виден независимо от окружающих условий. Даже если вы используете его, вы все равно можете переместить ползунок Яркость, чтобы точно настроить уровень яркости для встроенного дисплея.
Примечание: На дисплеях HDR Windows оптимизирует автоматическую корректировку яркости в соответствии с тем, как воспринимает изменение яркости человеческий глаз. В результате регулировка яркости может занять больше времени на дисплеях HDR при изменении условий освещения.
Некоторые Windows 11 пк могут автоматически настраивать яркость и контрастность экрана в зависимости от содержимого, отображаемого на встроенном экране. Например, если вы смотрите видео с темной сценой, за которой следует более яркая сцена (например, с ярким солнечным днем), яркость и контрастность могут измениться. Это нормально.
Адаптивное управление яркостью содержимого обеспечивает идеальный уровень яркости и контрастности, одновременно экономя питание и обеспечивая более длительное время работы батареи. Если эти внезапные изменения яркости отвлекают вас или если вы работаете в приложениях для фото и видео, где точность цвета важна для вас, эти параметры можно настроить в соответствии с вашими потребностями между обеспечением соответствующей яркости и контрастности и экономией заряда батареи.
-
Нажмите кнопку Пуск и введите параметры. Выберите Параметры > Системный > Дисплей .
-
В разделе Параметры отображения выберите Яркость , а затем при необходимости задайте раскрывающийся список Изменить яркость на основе содержимого:
-
От: Адаптивное управление яркостью будет отключено, а яркость и контрастность экрана не будут регулироваться. Это может привести к более короткому сроку работы батареи.
-
Всегда:Адаптивное управление яркостью всегда будет работать независимо от того, подключено ли устройство к сети или от батареи.
-
Только от батареи: Адаптивное управление яркостью будет активировано только в том случае, если устройство работает от аккумулятора.
-
Ночной свет
Дисплей излучает синий свет, похожий на дневной. Однако ночью этот свет может мешать вам спать. Чтобы лучше засыпать, включите ночной свет для дисплея. В результате свет дисплея смягчится и не будет утомлять глаза.
Примечание: Ночной индикатор недоступен, если на устройстве используются определенные драйверы, например DisplayLink или Basic Display.
Щелкните значок Сеть в правой части панели задач. затем найдите Ночной свет в разделе Быстрые параметры и выберите его, чтобы включить или отключить его.
Кроме того, можно переключить параметр Ночной свет в разделе Параметры > системный > дисплей.
-
Нажмите кнопку Пуск , а затем введите параметры в поле поиска. Выберите Параметры > Система > Отображение > ночного света.
-
Переместите ползунок прочности, чтобы отрегулировать интенсивность уменьшения синего света.
-
Нажмите кнопку Пуск , а затем введите параметры в поле поиска. Выберите Параметры > Система > Отображение > ночного света.
-
Включите параметр Расписание ночного света. Затем выберите От заката до рассвета или Установить время и задайте время включения и отключения ночного света.
Управление цветным профилем
Параметры управления цветом Windows позволяют пользователям добавлять или удалять цветовые профили, задавать цветовые профили по умолчанию для подключенных дисплеев, а также получать доступ к калибровке дисплея и включать автоматическое управление цветом.
Творческие профессионалы и энтузиасты заботятся о полностью откалиброванных, точных цветах, потому что это помогает обеспечить согласованность цветов от начала до конца своих проектов. Автоматическое управление цветами в Windows обеспечивает управление цветом на уровне системы, чтобы цвета в приложениях Windows отображались точно и согласованно на поддерживаемых дисплеях независимо от того, управляются ли они цветом.
Автоматическое управление цветом также помогает новым и обновленным приложениям отображать больше цветов с большей точностью. Это обеспечивает дополнительную детализацию и меньшее число цветовых артефактов (например, в градиентах, тени и более темных сценах или рисунках). Благодаря автоматическому управлению цветом приложения могут использовать миллиарды цветов с точностью от 10 до 16 бит. Даже на дисплеях, поддерживающих только 8-разрядный цвет, автоматическое управление цветом помогает улучшить качество цвета с помощью различных методов, таких как дизеринг.
Включение автоматического управления цветом
-
Нажмите кнопку Пуск , а затем выберите Параметры > Системный > Дисплей > Профиль цвета.
-
Выберите дисплей в верхней части экрана, а затем проверка для следующего параметра: Автоматическое управление цветом для приложений.
-
Выберите Автоматически управлять цветом для приложений, чтобы включить его.
-
Перейдите в раздел Параметры > Системный > Дисплей > Профиль цвета.
-
На странице Параметры управления цветом выберите дисплей, для которого вы хотите управлять цветными профилями.
-
Добавьте новый цветной профиль, щелкнув Добавить профиль и найдите цветной профиль.
-
Перейдите в раздел Параметры > Системный > Дисплей > Профиль цвета.
-
На странице Параметры управления цветом выберите дисплей, для которого вы хотите управлять цветными профилями.
-
Разверните цветной профиль, который нужно удалить, и нажмите кнопку Удалить в нижней части экрана.
-
Перейдите в раздел Параметры > Системный > Дисплей > Профиль цвета.
-
На странице Параметры управления цветом выберите дисплей, для которого вы хотите управлять цветными профилями.
-
Задайте один из цветовых профилей по умолчанию, нажав кнопку Задать профиль.
-
Перейдите в раздел Параметры > Системный > Дисплей > Профиль цвета.
-
Выберите Calibrate display (Калибровка дисплея ) и следуйте инструкциям по калибровке дисплея. При этом будет создан новый цветовой профиль для дисплея, на котором расположен инструмент калибровки.
Использование HDR
Содержимое HDR в Windows обеспечивает лучшую яркость и цветовые возможности по сравнению с традиционным содержимым (иногда называемое стандартным динамическим диапазоном [SDR]). Традиционное содержимое обычно показывает детали в яркой части сцены или более темной части сцены, но не в обеих частях одновременно.
Дополнительные сведения о параметрах HDR в Windows см. в статье Что такое HDR в Windows?
The color settings in a Windows computer certainly matter a lot especially when it comes to printing pictures. Users who are found or edit photos for a living change their computer’s color settings in order to ensure that the printout looks like the actual colors. However, those settings might not be appropriate for computer display and you can really tell right away that there something’s not right in the display. You might also notice some weird tint which isn’t easy to get rid of. You can’t actually tell the difference at first, not until you look at some other computers and then wonder what’s wrong with yours so, in this guide, you will know how to restore the display color settings back to their default state on your Windows 10 PC.
Make sure to follow each one of the steps laid out below carefully to restore the default Display Color settings.
Step 1: Set the Color Management Settings to default.
- In the Start search box, type in “color management”. Once you see it in the search results, open it.
- Once you’ve pulled up the Color Management window, go to the Advanced tab. From there, make sure that every single option is set to default – from all the options in both the “Windows Color System” and “ICC rendering intent to WCS gamut mapping”.
Note: You also have the option to reset it for everyone by simply clicking on the “Change system defaults” button.
- Finally, you can also try to calibrate your display.
Step 2: Set the Graphics Properties to default.
After making changes in the Color Management settings, you need to also set the Graphics Properties to default.
- Start by right-clicking on any empty space on your desktop.
- Then select the Graphics properties from the context menu. From the Graphics properties window, you will see that most sections have to restore defaults.
Step 3: Try using Nvidia Color Settings for Desktop
The next thing you can try is using the Nvidia Color Settings if you have Nvidia graphics installed on your Windows 10 PC. Just the Control Panel to reset the color settings.
- From the system tray, launch the Nvidia control panel.
- Next, go to Display > adjust desktop color settings.
- From there, select the display and then select the Nvidia Settings.
- After that, change the options accordingly in order to get the correct combination though you can always leave them to default.
Do You Need Help with Your Device?
Our Team of Experts May Help
Troubleshoot.Tech Experts are There for You!
GET HELP
Troubleshoot.Tech experts work with all versions of Microsoft Windows including Windows 11, with Android, Mac, and more.
Share this article:
You might also like
What is Regsvr32 Error? — What Is It?
Regsvr32 is basically a command-line utility.
This command is used to register and unregister OLE controls for example the digital link library files and ActiveX controls in the Windows Registry. This command appears as the Regsvr32.exe file and is installed in the Microsoft Windows system file in the %systemroot%System32 folder.
The Regsvr32 command loads the library and tries to call the DllRegister Server and DllUnregister Server. In other words, it helps to register COM-based digital link library files to run different programs on your PC.
However, when the Regsvr32.exe file gets corrupt, you get the Regsvr32 to troubleshoot the error message on your computer screen. It can be displayed in various ways including the following:
“To register a module, you must provide a binary name.”
Error Causes
Generally, Regsvr32.exe becomes corrupt because either the load library, DllRegister Server or DllUnregister Server function fails. This indicates that the dll specified path was missing, incorrect, or couldn’t be found.
Here’s how the error messages are often displayed while registering a dll using Regsvr32.exe:
- “The command-flag «%1» is not valid. Please review the command usage and try again.”
If this error message is displayed, it typically means that you entered an invalid combination of command-line arguments or switches when calling upon the Regsvr32.exe application.
- “To register a module, you must provide a binary name.”
The cause of this error message is that you called the Regsvr32.exe function with no modules to register located in the command line arguments.
- “The module «%1» failed to load.nn Make sure the binary is stored at the specified path or debug it to check for problems with the binary or dependent .DLL files.nn%2.”
This Regsvr32 error message indicates that Windows had problems with loading the modules that you have identified in the command line.
Further Information and Manual Repair
Here are 2 recommended solutions to fix the Regsvr32 error on your PC:
-
Re-run the command
You must re-run the Regsvr32 command from an elevated command prompt. For this, go to the start menu and type Command Prompt in the search box.
Now right-click the Command Prompt and click the option that says Run as Administrator to run the command on your PC. If it prompts you to enter an administrator password, type the password and then click Allow to run the command.
-
Register a 32-bit Dll using a 32-bit version of Regsvr32 on a 64-bit version of Windows
This may sound tricky but it is even simpler than the first solution discussed above. To register a 32-bit DLL using a 32-bit version of Regsvr32 on a 64-bit version of Windows, open an elevated command prompt.
After it’s opened, if you see the 32-bit DLL is located in the following path: %systemroot%System32 folder, move it to %systemroot%SysWoW64 folder. Once you change paths, run this command: %systemroot%SysWoW64regsvr32 <full path of the DLL>
Try following these 2 recommended solutions to immediately fix and repair this error on your computer.
The solutions should eliminate the occurrence of error messages such as “To register a module, you must provide a binary name.” It is so easy and effective and you can do it on your own without calling over a professional.
Congratulations, you have just fixed the Regsvr32 Error in Windows 10 all by yourself. If you would like to read more helpful articles and tips about various software and hardware visit errortools.com daily.
Now that’s how you fix Regsvr32 Error in Windows 10 on a computer. On the other hand, if your computer is going through some system-related issues that have to get fixed, there is a one-click solution known as Restoro you could check out to resolve them. This program is a useful tool that could repair corrupted registries and optimize your PC’s overall performance. Aside from that, it also cleans out your computer for any junk or corrupted files that help you eliminate any unwanted files from your system. This is basically a solution that’s within your grasp with just a click. It’s easy to use as it is user-friendly. For a complete set of instructions in downloading and using it, refer to the steps below
Perform a full system scan using Restoro. To do so, follow the instructions below.
-
-
- Download and install Restoro from the official site.
- Once the installation process is completed, run Restoro to perform a full system scan.
- After the scan is completed click the “Start Repair” button.
-
Read More
Often when we connect to the internet were browsing indexed pages through some well-known search engine, usually Google. But beneath the so-called normal internet lurks deep and dark web. You might have heard of the deep web and dark web if you have some geeky friends and we are here to explain what exactly is the deep and dark web.
The first thing to know is that the deep and dark web is not the same thing and they coexist separately from one another, you could say that beneath the deep web lies the dark web, yet another layer of the internet.
So let us explore first the deep web. What is exactly a deep web?
Deep web, hidden web, or invisible web
as sometimes referenced are part of worldwide web not indexed by search engines, meaning that engines do not basically see and index content of deep web sites.
The content of the deep web is hidden behind HTTP forms and includes many very common uses such as webmail, online banking, private or otherwise restricted access social-media pages and profiles, some web forums that require registration for viewing content, and services that users must pay for, and which are protected by paywalls, such as video on demand and some online magazines and newspapers.
The content of the deep web can be located and accessed by a direct URL or IP address but may require a password or other security access to get past public website pages.
While it is not always possible to directly discover a specific web server’s content so that it may be indexed, a site potentially can be accessed indirectly (due to computer vulnerabilities).
To discover content on the web, search engines use web crawlers that follow hyperlinks through known protocol virtual port numbers. This technique is ideal for discovering content on the surface web but is often ineffective at finding deep web content. For example, these crawlers do not attempt to find dynamic pages that are the result of database queries due to the indeterminate number of queries that are possible. It has been noted that this can be (partially) overcome by providing links to query results, but this could unintentionally inflate the popularity of a member of the deep web.
Dark WEB
The dark web is the World Wide Web content that exists on darknets: overlay networks that use the Internet but require specific software, configurations, or authorization to access. Through the dark web, private computer networks can communicate and conduct business anonymously without divulging identifying information, such as a user’s location. The dark web forms a small part of the deep web, the part of the Web not indexed by web search engines, although sometimes the term deep web is mistakenly used to refer specifically to the dark web.
The darknets which constitute the dark web include small, friend-to-friend peer-to-peer networks, as well as large, popular networks such as Tor, Freenet, I2P, and Riffle operated by public organizations and individuals. Users of the dark web refer to the regular web as Clearnet due to its unencrypted nature. The Tor dark web or Onionland uses the traffic anonymization technique of onion routing under the network’s top-level domain suffix .onion.
Dark & Deep WEB difference
The dark web has often been conflated with the deep web, the parts of the web not indexed (searchable) by search engines. The dark web forms a small part of the deep web but requires custom software in order to access its content. This confusion dates back to at least 2009. Since then, especially in reporting on Silk Road, the two terms have often been conflated, despite recommendations that they should be distinguished.
Darknet websites are accessible only through networks such as Tor («The Onion Routing» project) and I2P («Invisible Internet Project»). Tor browser and Tor-accessible sites are widely used among darknet users and can be identified by the domain «.onion». While Tor focuses on providing anonymous access to the Internet, I2P specializes in allowing anonymous hosting of websites. Identities and locations of darknet users stay anonymous and cannot be tracked due to the layered encryption system. The darknet encryption technology routes users’ data through a large number of intermediate servers, which protects the users’ identity and guarantees anonymity. The transmitted information can be decrypted only by a subsequent node in the scheme, which leads to the exit node. The complicated system makes it almost impossible to reproduce the node path and decrypt the information layer by layer. Due to the high level of encryption, websites are not able to track the geolocation and IP of their users, and users are not able to get this information about the host. Thus, communication between darknet users is highly encrypted allowing users to talk, blog, and share files confidentially.
Darknet
The darknet is also used for illegal activity such as illegal trade, forums, and media exchange for pedophiles and terrorists. At the same time, traditional websites have created alternative accessibility for the Tor browser in an effort to connect with their users. ProPublica, for example, launched a new version of its website available exclusively to Tor users.
Read More
Have you been feeling anxious in the digital space? Feeling like you have a million eyes on you each time you visit a website? It can definitely make you uneasy. Luckily there’s an easy fix, and it’s called a VPN.
In this article we’ll take you through the basics of what a VPN does and some of the biggest benefits you can reap from buying one.
VPN: definition and how it works
VPN stands for Virtual Private Network, so its name already says a lot about what it does.
A VPN is specialized software that keeps your browsing private and secure. Essentially it hides your identity, preventing possible cyberattacks and data theft. This is especially important in cases of public network use, where you’re highly exposed to potential threats.
To be more specific, this software encrypts your Internet Protocol (IP) address by filtering it through a server hosted by the VPN provider first. That way, it prevents your Internet service provider, third parties and lurking online thieves from tracking the actual you.

Credit: FLY:D on Unsplash
Some providers, such as Surfshark VPN with its IP Rotator feature, even make it a habit to frequently change your IP address to further protect your identity. With most VPN providers, you can also appear to be in a completely different country, adding to your disguise.
There are tons of advantages you can look forward to if you decide to use a VPN. Take a look at some of the crucial ones.
Benefits of using a VPN
When choosing a VPN, you can find both free and paid options. We recommend you go with the paid ones, since they have stronger security, encryption and data protection, as well as more advanced features. Free VPNs come with limitations and risk of malicious attacks on the software itself.
You can choose to buy a singular VPN service or opt for antivirus software that has a VPN built in, for example Bitdefender’s Ultimate Security plan. That depends on what you use your computer for and how much.
When you pick one, here’s what it can do for you.
1. Access region-specific content
When we said you could change your location, we meant it. Say you’re using a streaming service and a show you desperately want to watch isn’t available in your country. You can use your VPN to make it look like you’re browsing from a country where it’s unlocked.
This option is also convenient for gamers who want to access maps, skins and other in-game items unavailable in their location.

Surfshark VPN (Credit: Dan Nelson on Unsplash)
In addition, you can use this powerful feature when you’re traveling to a region where some of your favorite content may not be accessible.
Do keep in mind that you need to read the Terms and Conditions (yeah, we know — who does that?) of your games and services before doing this, since you could end up getting a penalty. It’s also important to remember that there are entire countries that have strict regulations or even bans on VPNs, for example Belarus, Russia and China. So make sure to be very cautious with your VPN use, friends.
2. Browse like no one’s watching
VPNs shield your browsing habits from prying eyes on the web. Those can be malicious hackers or just third-party cookies tracking your every move to later bombard you with targeted ads. For example, Surfshark VPN features a Cookie blocker that blocks all cookie-related pop-ups and lets you browse in peace (and secret). It works even when the VPN is turned off, which is also pretty neat.
In addition, their CleanWeb 2.0 technology makes sure ads and especially malware don’t stand a chance at all, since they’re blocked before they can even load.
The inability of sites to track your browsing means they can’t collect and analyze any of your data. So, your personal information — or your company’s information in case that’s what you’re using your computer for — is entirely hidden and secure.
3. Save money
It’s well-known that the prices of certain items and services vary based on your location, browsing time, age and many other factors. This most commonly goes for airline tickets and hotel stays.
You can use your VPN to avoid high prices and surcharges. Clear all cookies, turn on your VPN and visit an online shopping site to check out their prices. Then compare your findings with the offers you see when your VPN is off, when you spend a long time on the site or have an active account with the company.
Sometimes this can really help you find the best deals and avoid breaking the bank. But again, check the Terms and Conditions before you purchase something using a VPN.
4. Secure your smart home
The more smart devices you have connected to your network, the more exposed you are to potential cyberattacks. Phones and computers are generally designed to be decently secure even without a VPN or antivirus, but smart home devices leave a lot to be desired in that regard.
Protecting your home network with a VPN software means all devices connected to it are secure, be it an air purifier or Alexa.

5. Prevent connection slowdown
Your ISP can intentionally slow down your internet speed based on how much data you’ve consumed (data throttling) or your activities online (bandwidth throttling).
But with a VPN, what kind of data you send and receive and how much is entirely hidden. Therefore, if your ISP can’t see you, they can’t control you and they can’t throttle down your speed.
The bottom line
You can never be too safe online. So definitely think about getting yourself a solid VPN to pump up your privacy and security as much as you can. And if you have any questions or need help choosing the perfect software for you, feel free to reach out to us.
Read More
In case you don’t know, new support has been added by Microsoft to Windows 10 that now allows users to turn off or on the Mobile Hotspot remotely. The Mobile Hotspot feature, known earlier as “Virtual Networks”, was first introduced with the initial release of Windows 10. With this new feature to remotely turn on or off the Mobile Hotspot in Windows 10, users can just use the Bluetooth on their mobile phones to turn off or on the Mobile Hotspot even when their Windows 10 computers are out of their reach.
To turn off or on the Mobile Hotspot feature in your Windows 10 computer remotely, there are two options you can try. First, you can do it using the Windows 10 settings app or using the Registry Editor. To get started, refer to the following options.
Option 1 – Turn off or on the Mobile Hotspot remotely via Windows 10 Settings app
- First, you need to open the Windows 10 Settings app and from there go to Network & Internet and then go to the Mobile Hotspot section.
- After that, scroll down to the “Turn on remotely” section.
- Once done, make sure that the toggle button is set to ON and that the Bluetooth of both devices is turned on and paired as well. This should enable the feature to turn on or off the mobile hotspot remotely.
Option 2 – Turn off or on the Mobile Hotspot remotely via Registry Editor
Before you get started with the second option, make sure that you create a System Restore point first. Once done, proceed to the following steps:
- Tap the Win + R keys to open the Run dialog box and type “Regedit” in the field and then hit Enter to open the Registry Editor.
- Next, navigate to this registry path: ComputerHKEY_LOCAL_MACHINESOFTWAREMicrosoftWcmSvcTethering
- From there, look for the DWORD named “RemoteStartupDisabled” and set its Value data to be “0”. This will enable the feature that will allow you to remotely turn on or off the mobile hotspot in your Windows 10 computer. To disable it, just set its Value data to “1”.
Read More
Fatal error C0000034 happens during the installation of the Windows update and if you are one of the unlucky users who sadly run into this, keep reading as we will provide solutions to this error and how to get around it.
Start from point 1 to the bottom and hopefully you will have your PC back into working order in no time.
-
Run Windows Update troubleshooter
Usually, a built-in Windows troubleshooter can solve issues painlessly and fast, my advice is to try this as the first option, it is a simple and clean solution worth trying and in 90% it solves the issue all by itself.
-
Do a clean boot
Using task manager, remove all nonessential applications and services from starting up, reboot your computer, and once it is cleanly booted try re-running the update process again, if the issue was running the application this time everything will work since the problematic application is not running.
-
Reset Windows update components to the default
This solution requires you to use the Reset Windows Update Agent Tool to reset Windows Update components to default or use this PowerShell script to reset Windows Update Client. You can also manually reset each Windows Update component to default and then re-run the update.
-
Disable firewall and antivirus
Altho not likely it is still a possibility that some firewalls and antivirus can detect windows updates as malicious software and cut them off. If everything else failed, disable the firewall and your PC protection and when it is fully disabled try updating.
-
Do automatic startup repair
This should be the last thing to do but if everything else failed, do it. Perform Windows 10 Startup Repair. Once the startup repair completes successfully, you can re-run the update. The update should install without errors.
Read More
Mail and Calendar not working with Cortana? As you know, Cortana was first launched way back in 2014 with an emphasis on its tight integration with both the Windows Mail and Calendar apps. This integration has been one of the highlighting features of this Personal Digital Assistant. However, there are some users who reported that the Calendar and Mail integration with Cortana is not working on their Windows 10 computers. This kind of problem could be due to several factors like the loose integration between the services, incompatible versions of the components, and many more.
According to the users who experienced the issue, the features affected are the syncing of calendar appointments, sending emails via Cortana, and so on. To fix this problem, there are several options you can try. You can try to restart Cortana’s processor run the Windows Store Apps troubleshooter. You could also try to relink your Microsoft account or reinstall the Mail and Calendar apps, as well as reinstall Cortana. For more details, follow the suggestions given below.
Option 1 – Restart Cortana’s process in the Task Manager
Restarting Cortana’s process in the Task Manager could also help you resolve the problem. Refer to the steps given below to do so.
- Tap the Ctrl + Alt + Del keys to open the Security options window.
- From there, look for the Task Manager in the given list and open it.
- Next, look for the process of Cortana and right-click on it, and then select the End Task option to end its process.
- After that, the Cortana process will restart by itself and re-initialize.
Option 2 – Run the Windows Store App troubleshooter
The Windows 10 Store Apps Troubleshooter will help you in fixing the Web Preview problem in Cortana. This is a great built-in tool from Microsoft that helps users fix any app issues. To use the Windows Store Apps Troubleshooter, follow the steps below.
- Tap Win + I keys again to open the Windows Settings panel.
- Go to Update & Security and then go to Troubleshoot.
- Under the Troubleshoot section, on your left-hand side, scroll down to find Window Store Apps.
- Then click on the Run the troubleshooter option and follow the on-screen instructions and then see if it fixes the problem.
Option 3 – Try to relink your Microsoft Account
You might also want to relink your account in Microsoft using the Windows 10 Settings app.
- Open the Windows 10 Settings app.
- Next, navigate to Accounts > Email & Accounts and from there, go to the section of Accounts used by Email, Calendar, and Contacts.
- After that, select your email account and select Manage.
- Once done, a new panel will come up where you have to click on the “Delete account from this device” link.
- Once you get a confirmation, select Delete and then relink the same account. This should resolve the problem.
Option 4 – Try to reinstall or update the Mail and Calendar apps
- Open Windows PowerShell as admin.
- Next, execute this command: Get-AppxPackage *windowscommunicationsapps* | Remove-AppxPackage
- Once done, restart your computer and go to the Microsoft Store page to get the latest updates for both Windows Mail and Calendar apps.
Option 5 – Try to reset Cortana via Settings
- Launch the Windows 10 Settings app and go to Apps > Apps & Features.
- Next, look for the entry of Cortana on the right-side panel and select it.
- After that, select the Advanced options and then select the Terminate button under the Terminate section.
- Once done, click on the Reset button under the Reset section.
- Restart your PC.
- After your computer boots, launch Cortana again and check.
Option 6 – Try to reinstall Cortana
If none of the options given above works, you must consider reinstalling Cortana.
- First, right-click on the Taskbar and select the Task Manager.
- Next, select File menu > Run new task and type “Powershell” in the field and then select the “Create this task with administrative privileges” option.
- Click on OK to open the PowerShell console.
- After that, type the following command and hit Enter to execute it:
Get-AppXPackage -Name Microsoft.Windows.Cortana | Foreach {Add-AppxPackage -DisableDevelopmentMode -Register «$($_.InstallLocation)AppXManifest.xml»}
- Restart your computer and check if the problem is now fixed.
Read More
If your Windows 10 computer slows down, the first thing you can do is to check the status of the resource usage in the Task Manager. In such cases, it shoots up to even 1000% which causes the system to either hang or freeze since some programs are using a major chunk of system resources. And this is the case with msrtn32.exe.
Msrtn32.exe is a malicious file that may try to steal your digital currency. It can get installed on your computer when you install a browser plugin or extension that can modify the default settings of browsers, the content of web pages, search results, as well as display tons of intrusive ads. So if you see msrtn32.exe under the Processes tab of the Task Manager
If you see msrtn32.exe under the Processes tab of your Task Manager, refer to the suggestions given below to get rid of it and restore your computer’s normal function.
Before you proceed, take note that this executable file is found in the following location:
C:/Program Files(x86)msrtn32
Option 1 – Delete the folder where msrtn32.exe is located
The first thing you can do is to go to C:/Program Files(x86)/msrtn32. From there, look for the malicious executable file and delete its folder. If you are not able to delete the folder, make sure that you’re logged in as administrator and then try again.
Option 2 – Try scanning your computer using Windows Defender
Since you are dealing with a malicious file, if you weren’t able to delete the folder where the file is located, you can scan your computer using the built-in Windows Defender program and then eliminate the malicious file. Follow the steps below to do so:
- Tap the Win + I keys to open Update & Security.
- Then click on the Windows Security option and open Windows Defender Security Center.
- Next, click on Virus & threat protection > Run a new advanced scan.
- Now make sure that Full Scan is selected from the menu and then click the Scan Now button to get started.
Read More
If you have set a static IP address manually in your Windows 10 computer and you encounter an error saying, “This operation failed as no adapter is in the state permissible for this operation”, then you won’t be able to connect to any network.
Many users have reported that they were unable to connect to any network after they set their IP addresses manually and all they see is a red cross symbol on the network icon located at the left-hand side of the taskbar. And upon trying to release the IP configuration and renew the address using Command Prompt or Windows PowerShell, they are getting the error instead. Users also noted that their internet connection is fine since they were able to connect to their Wi-Fi connection on their mobile devices. However, they find it hard to connect to the internet using their PCs. To fix this issue, here are some possible fixes you can check out. Make sure to follow each one of the instructions carefully.
Option 1 – Try to run the Internet Connections troubleshooter
As you were not able to connect to your internet connection using your PC, you can try to run the Internet Connections troubleshooter as it might resolve the problem. Refer to the following steps to run this troubleshooter:
- Tap the Win + I keys to open Settings.
- After opening Settings, go to Update and Security.
- Next, navigate to the Troubleshoot pane and select the Internet Connections section and click the Run Troubleshooter button to get started.
- Wait until the troubleshooter is finished doing its job and then try connecting to your network again.
Option 2 – Try to perform Network Reset
As pointed out, the “This operation failed as no adapter is in the state permissible for this operation” error occurs due to the static IP you’ve set. Thus, to fix it, you can try to perform a Network Reset. This will reset the entire network configuration including your IP address. To perform Network Reset, follow these steps:
- Tap the Win + I keys to open Settings.
- From there, go to the Network and Internet section.
- Next, scroll down and look for “Network Reset” under the status pane.
- After that, click on Network Reset and then on Reset now to start resetting the network configuration. Once done, check if it is able to fix the error or not.
Option 3 – Try to update or rollback or uninstall the Network drivers
You might also want to update, roll back, or disable your Network drivers to fix the “This operation failed as no adapter is in the state permissible for this operation” error.
- Tap the Win + R keys to launch the Run window and then type in the “MSC” command and hit Enter to open the Device Manager window.
- Under the Device Manager, you will see a list of drivers. From there, look for the Network Adapters and expand it.
- Then right-click on each one of the Network drivers and depending on your preference, you can either select “Update driver”, “Disable device” or “Uninstall device”.
- After that, restart your PC and see if it helped in fixing the netio.sys Blue Screen error.
Option 4 – Try to reset Winsock, TCP/IP & Flush DNS
You might also want to try resetting Winsock, TCP/IP, and flushing DNS might help you resolve errors. To do so, follow these steps:
- Right-click on the Start button and click on Command Prompt (administrator) so you can pull up an elevated Command Prompt.
- After that, execute each one of the commands listed below. And after you typed in one after the other, you have to hit Enter.
- netsh winsock reset – type in this command to reset Winsock
- netsh int ip reset resettcpip.txt – type in this command to reset TCP/IP
- ipconfig /flushdns – type in this command to flush the DNS cache
- Next, restart your PC and check if the problem’s fixed.
Option 5 – Temporarily disable Firewall and third-party antivirus
Firewall and antivirus programs are known to block files the instant it detects a threat to the system. However, there are some cases when it can also block a file even when it’s a safe one. Thus, your antivirus or firewall programs might be the reason why you can’t download anything on your Windows 10 computer. To isolate the issue, you need to temporarily disable both the Firewall and antivirus programs and then check if you can now download anything from the internet. Do not forget to enable them again as disabling them can leave your computer vulnerable to cyber threats.
Read More
QuickLook app is one of the best options to preview files without opening them in Windows 10. It works similar to the Quick Look feature of macOS. This Microsoft Store app has some really interesting features. It lets you preview images, documents, and media files. Also, just a hotkey is needed to preview the content of a file. There is no interface for the app. Only a preview window is visible.
You can also expand the preview window to full size. Apart from that, it lets you keep the preview window on top of the other opened applications. For image files, it also provides the EXIF data.
After installing this app, just select some file that you want to preview, and press the Spacebar key. That’s it! The preview window will open immediately to view the file content.
If you would like to read more helpful articles and tips about various software and hardware visit errortools.com daily.
Read More
As you know, the Windows 10 operating system, as well as other Windows versions, comes with the Windows Firewall. In Windows 10, the firewall allows users to install and run a third-party firewall. This kind of firewall works independently to block any suspicious activity on your computer. However, recently, some users reported that they are getting a notification on the Startup saying,
“Windows Firewall and <Third party firewall name> Firewall are both turned off; tap or click to see available options”.
This particular error could be caused by a lot of factors but when you manually check the firewall, you’ll find that there really is nothing wrong with both the Windows Firewall and the third party firewall. So if both the Windows Firewall and third-party firewalls like McAfee, Comodo, and many others are both turned off in Windows 10, then you need to do several things to resolve the problem – you need to check the supporting services that are required and uninstall and then reinstall the third party firewall on your computer. For more instructions, refer to the options provided below.
Option 1 – Try enabling all the supporting services for the firewall
The first thing you can do to resolve the error with the firewall is to check all of its supporting services by following these steps:
- Tap the Win + R keys to open the Run utility and type “services.msc” in the field and then hit Enter to open the Windows Services Manager.
- Next, look for the Windows Defender Firewall service among the given list of services.
- Once you found it, make sure that its Startup Type is set to Automatic and that the status of the service is Running. So if it’s not running, just click on the Start button.
- In addition, you also have to make sure that the following services’ status is set as follows:
- Xbox Live Networking Service: Manual
- Base Filtering Engine: Automatic
- Once done, start the firewall again and check if the error is now fixed or not.
Option 2 – Try to uninstall and reinstall the third-party firewall
It is possible that the firewall error might be due to an error with the compatibility of the installation in Windows 10 and the third-party firewall. Thus, the next thing you can do is to uninstall the third-party firewall and then reinstall it again. Once you have uninstalled the third-party firewall, you can download its latest version from its official website and install it again. This should fix the error with the firewall.
Read More
Copyright © 2023, ErrorTools. All Rights Reserved
Trademark: Microsoft Windows logos are registered trademarks of Microsoft. Disclaimer: ErrorTools.com is not affiliated with Microsoft, nor claims direct affiliation.
The information on this page is provided for information purposes only.
-
Home
-
News
- Full Guide – How to Reset Display Settings Windows 10
By Tina |
Last Updated
How to reset Display settings Windows 10? Have you ever encountered this error? This post from MiniTool will show you how to reset display settings Windows 10. Besides, you can visit MiniTool to find more Windows tips and solutions.
Once after updating Windows, you may find your desktop on Windows desktop is messing up. This would be an annoying thing. But, if your desktop is messing up, you can choose to reset display settings Windows 10.
However, there is no such button or keyboard shortcut to reset or revert to previous display settings in Windows 10. You have to set each setting manually.
So, in this post, we will show you how to reset display settings to default Windows 10.
How to Reset Display Settings Windows 10?
This post will show you how to reset display settings to default Windows 10.
How to Reset Display Settings Windows 10 – Themes
First of all, we will show you how to reset display settings Windows 10 – themes.
Now, here is the tutorial.
- Press the Windows and I keys together to open Windows Settings.
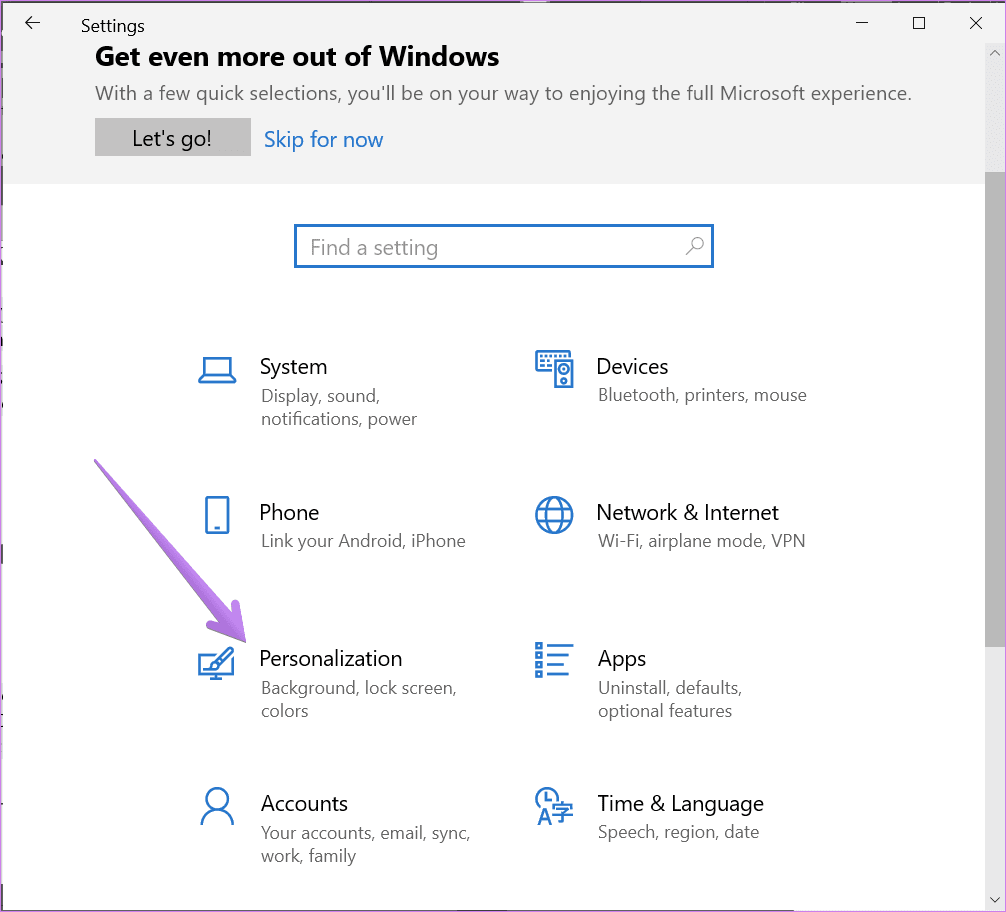
- Then click Personalization.
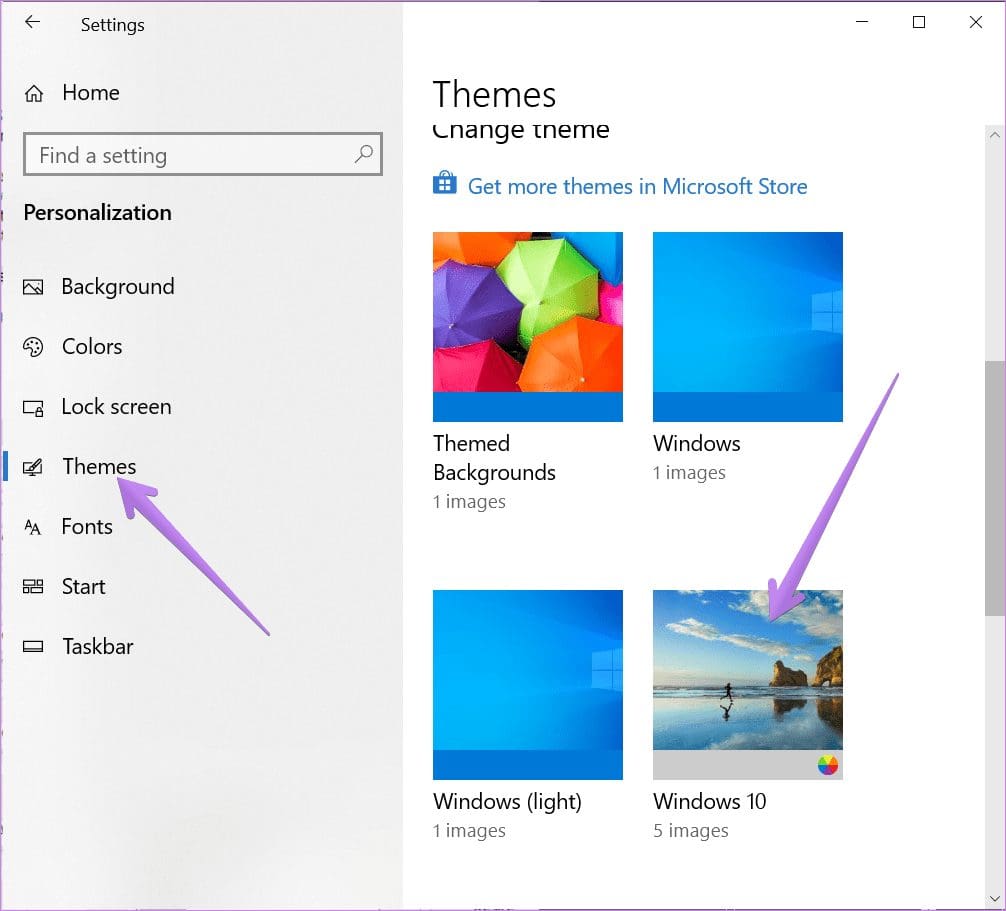
- In the Personalization window, go to the Themes tab.
- Then click on Windows 10 theme to apply it.

After that, you have reset the Themes in display settings Windows 10.
How to Reset Display Settings Windows 10 – Colors
In order to reset display settings Windows 10, you also need to change the colors of the display.
Now, here is the tutorial.
- Open Windows Settings.
- Choose Personalization > Colors.
- On the right pane, go to the Choose your color
- Then select Light or Dark to continue.
- If you want to use a different color for Apps and Taskbar, select Custom.
- Select the blue color under the Choose your accent color section if you want to use the default Windows 10 color.
After that, you have reset the display settings of Color to default Windows 10.
How to Reset Display Settings Windows 10 – Display Size
Here is the tutorial.
- Open Windows Settings.
- Go to System.
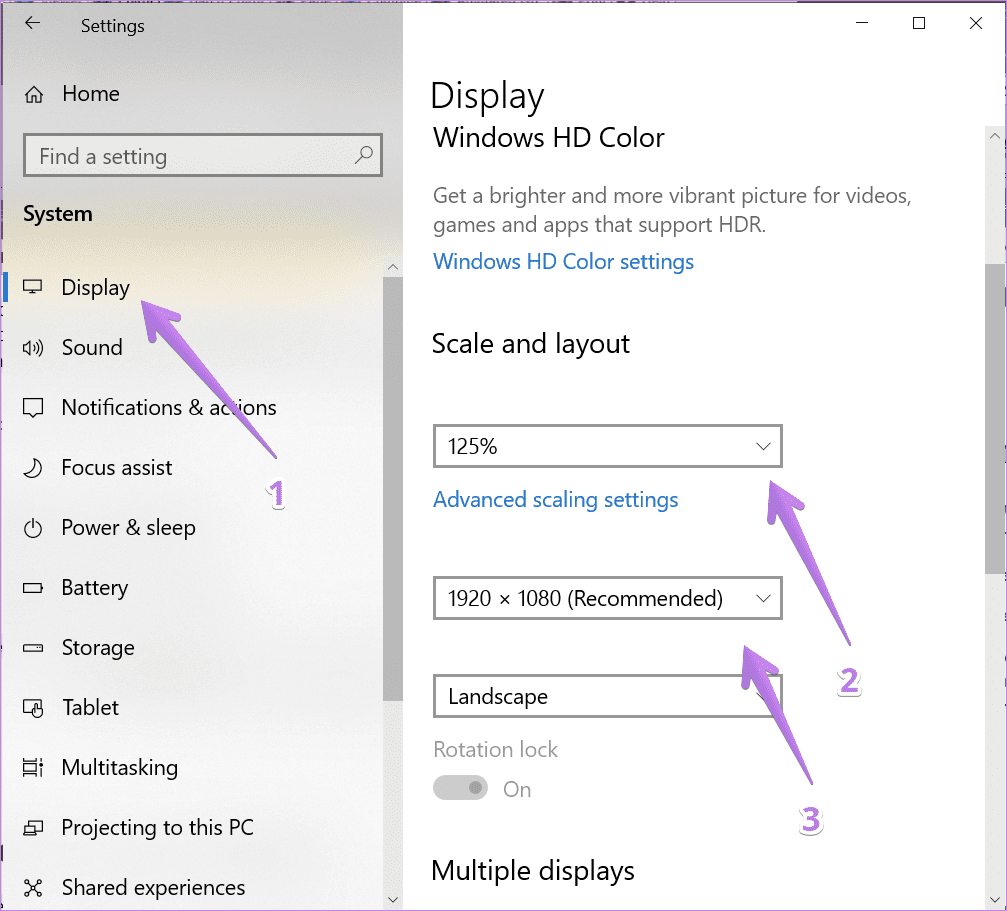
- Select Display, and select an appropriate scaling percentage under Scale and layout.
How to Reset Display Settings Windows 10 – Text Size
Here is the tutorial.
- Go to Windows Settings.
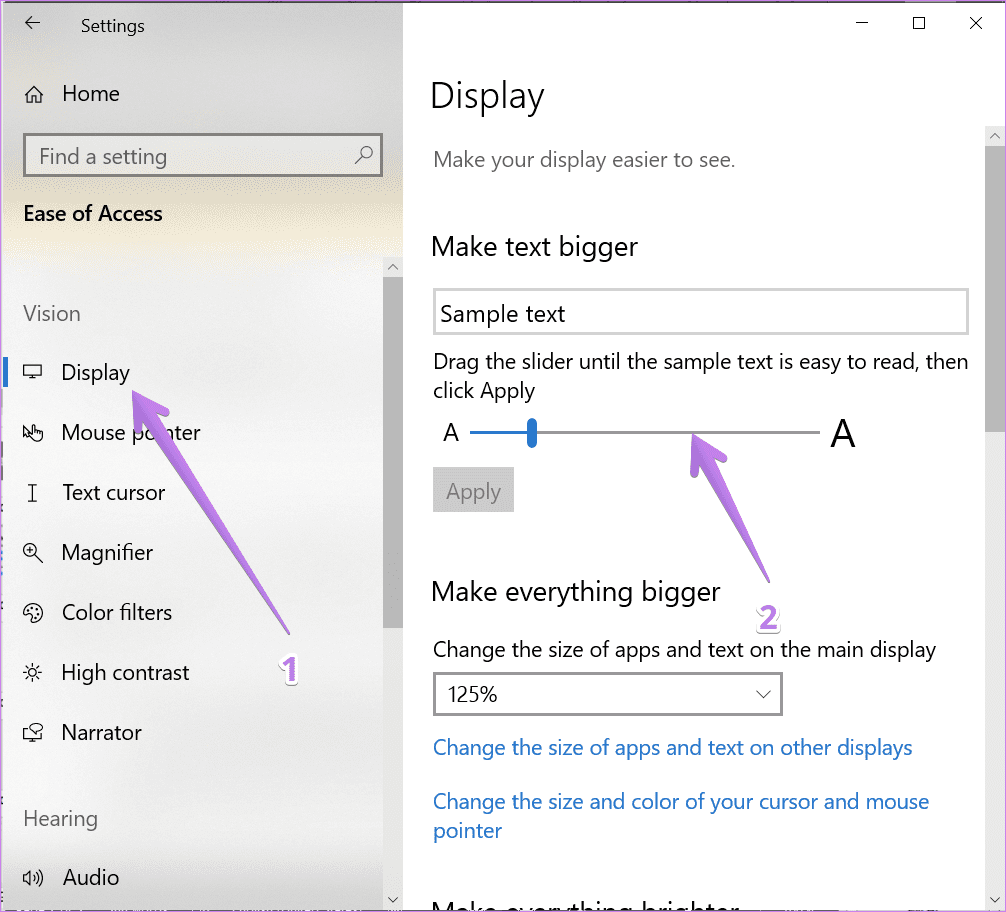
- Choose Ease of Access > Display.
- Adjust the slider to change the size of text Windows 10.
How to Reset Display Settings Windows 10 – Turn Off Custom Scaling
In order to reset display settings Windows 10, you can choose to turn off custom scaling.
Now, here is the tutorial.
- Open Windows Settings.
- Then choose System.
- Click Display from the sidebar, and then click Advanced Scaling settings.
- Clear previous settings and choose Apply.
After that, you have reset display settings Windows 10 successfully.
Apart from the above settings, to reset display settings Windows 10, you also need to do other settings, such as turning off Night Light, turning off Tablet Mode, turning off Magnifier, and so on.
To sum up, this post has shown how to reset display settings Windows 10. If you need to reset display settings to default Windows 10, you can try these solutions. If you have any better ideas to reset display settings Windows 10, you can share them in the comment zone.
About The Author
Position: Columnist
Tina is a technology enthusiast and joined MiniTool in 2018. As an editor of MiniTool, she is keeping on sharing computer tips and providing reliable solutions, especially specializing in Windows and files backup and restore. Besides, she is expanding her knowledge and skills in data recovery, disk space optimizations, etc. On her spare time, Tina likes to watch movies, go shopping or chat with friends and enjoy her life.
Often a software update might end up messing up your display settings on a Windows 10 PC. The typical reaction would be to look for a reset display settings button. However, there is no such button or keyboard shortcut to reset or revert to previous display settings in Windows 10. You will have to set each setting individually, as shown in this post.
It’s not always the software update that changes display settings. Sometimes, while fiddling around with settings or a child might have accidentally changed various display settings. One isn’t sure what setting has been actually changed. Here we have covered how to change most of the display settings on the Windows 10 computer to make things easier for you. Those range from colors, text size, contrast, etc.
Let’s get rolling.
Note: Most of the following steps require you to open Windows 10 Settings. You can open it from the Start Menu or Action Center. Alternatively, use the Windows key + I keyboard shortcut to open Settings.
How to Restore Default Windows 10 Theme
Many times, simply reverting to the default Windows 10 theme solves all the display woes. To do so, follow these steps:
Step 1: Open Settings on your PC. Go to Personalization.
Step 2: Inside Personalization, go to Themes. Scroll down in Themes, and click on Windows 10 theme to apply it.
How to Change Theme Color
You should also try changing the theme color on your PC. You can choose between light and dark or use a combination of both with the help of a Custom color setting.
To change Windows 10 colors, go to Settings > Personalization > Colors. Under the Choose your color drop-down box, select Light or Dark. If you want to use a different color for apps and taskbar, select Custom. Also, select the blue color under the Choose your accent color if you want to use the default Windows 10 color.

Tip: Check out 4 ways to fix if Windows 10 taskbar color doesn’t change.
How to Change App and Display Size
How the content is shown to you depends on the display and scaling settings. If you see a large or small text layout than usual, you should change scaling settings.
To do so, follow these steps:
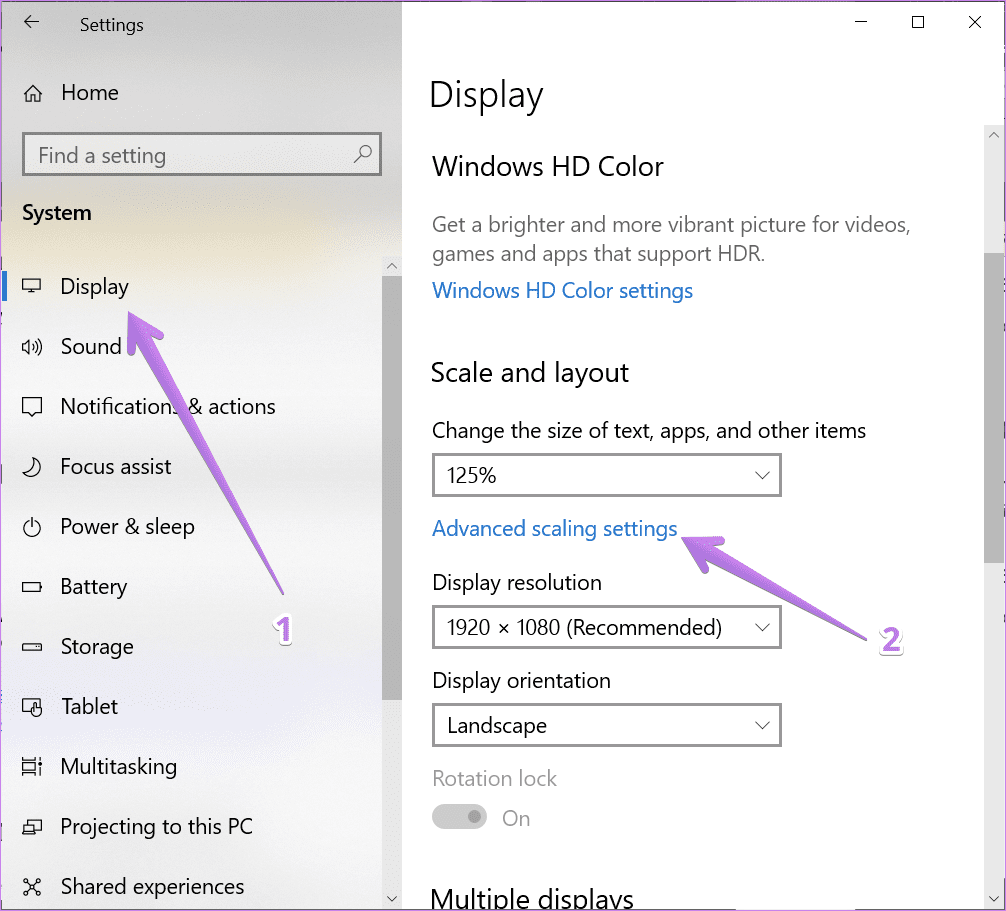
Step 1: Open Settings and go to System.
Step 2: Under Display (from the left sidebar), select an appropriate scaling percentage under Scale and layout. Do try all the available options and see which one suits you. You should also experiment with display resolution.
How to Change Text Size
Besides the above setting, you can change text size at another place in Windows 10. Go to Settings > Ease of Access > Display. Adjust the slider under Make text bigger.
How to Disable High Contrast Mode
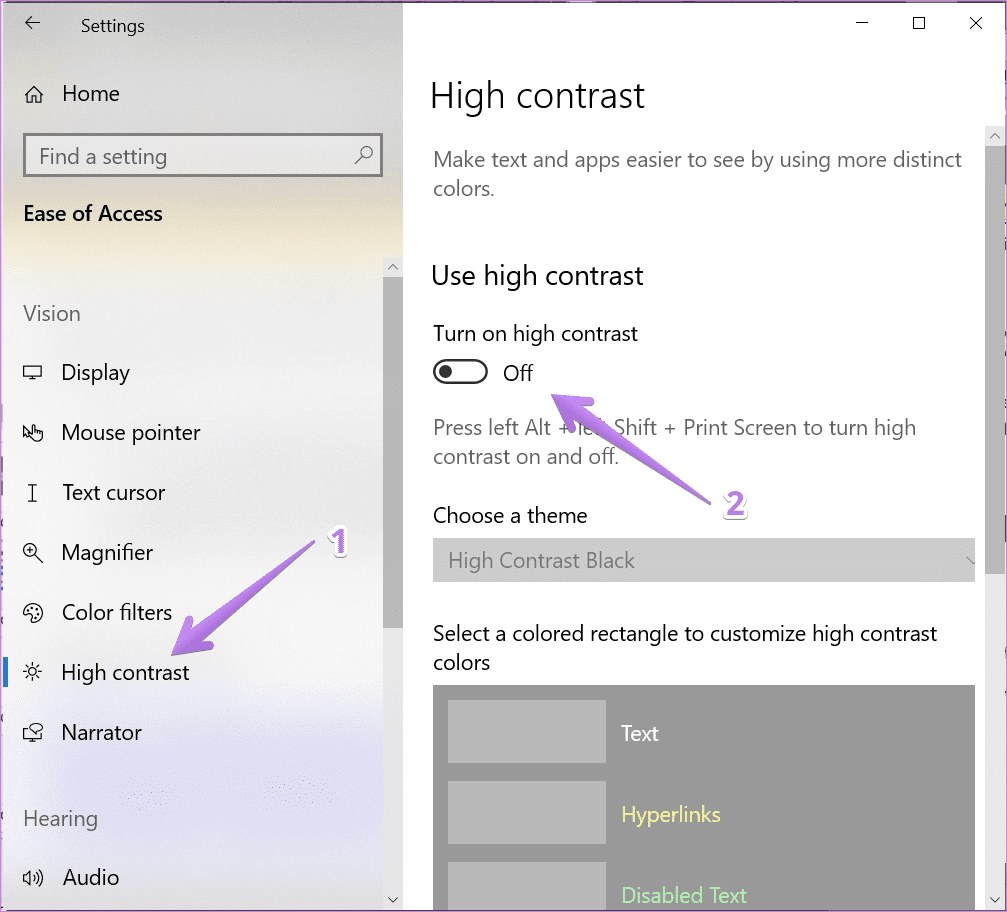
If you see distinct or dark colors on your Windows 10 PC, you might have accidentally enabled high contrast setting. So you need to turn it off, as shown below.
Step 1: Open Settings on your computer and go to Ease of Access.
Step 2: Click on High contrast. Turn off the toggle next to ‘Turn on high contrast.’
Tip: Check out 9 ways to fix the inverted colors issue on Windows 10.
How to Turn off Custom Scaling
If you are using custom scaling settings on your Windows 10 PC, then some text, apps, or other items might appear irregularly sized. You will need to disable custom scaling, as shown below.
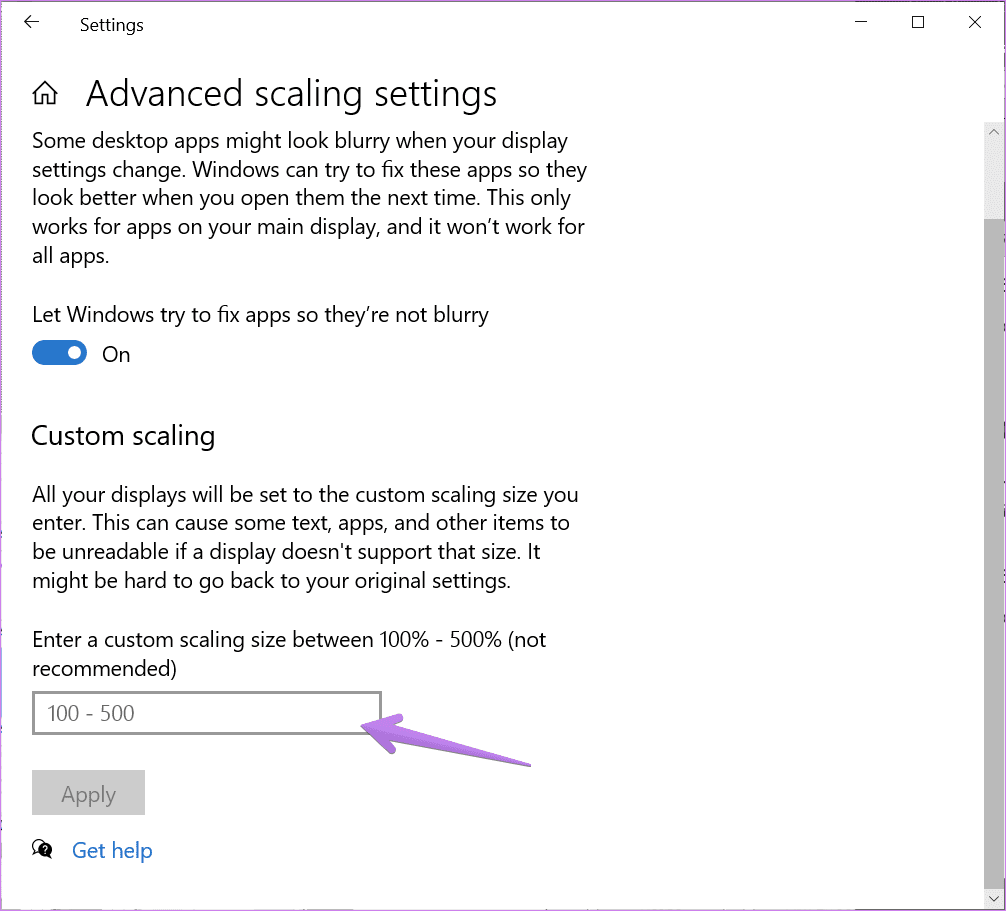
Step 1: Open Settings and go to System.
Step 2: Click on Display from the sidebar. Then click on Advanced Scaling settings.
Step 3: Remove any number added in the Custom scaling box and hit Apply.
How to Turn off Night Light
If you see an orange or reddish tint on your screen, that means the night light is activated on your computer. You can disable it in two ways.
Firstly, open Action Center from the taskbar. Click on the Night light option to disable it if it is enabled.
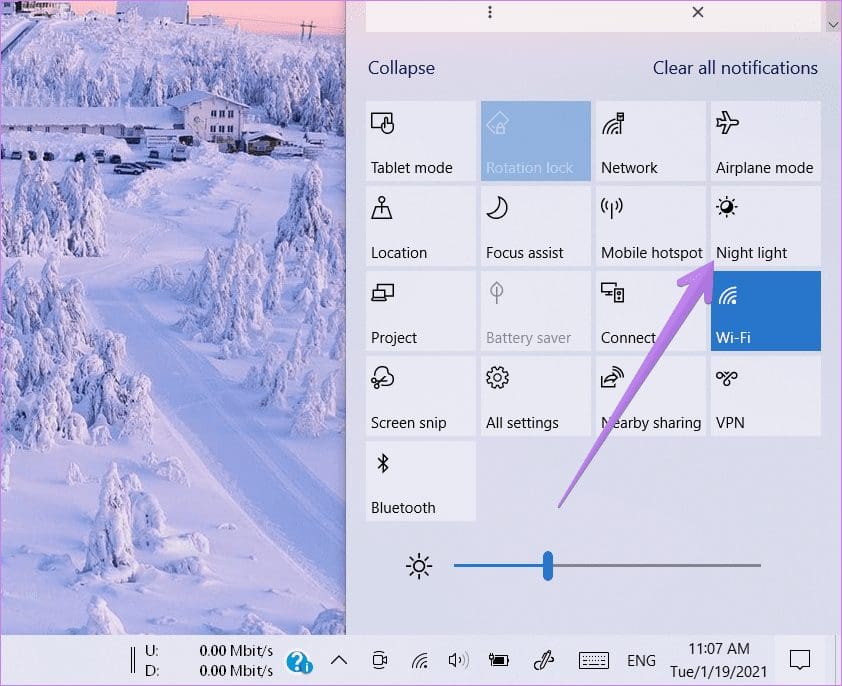
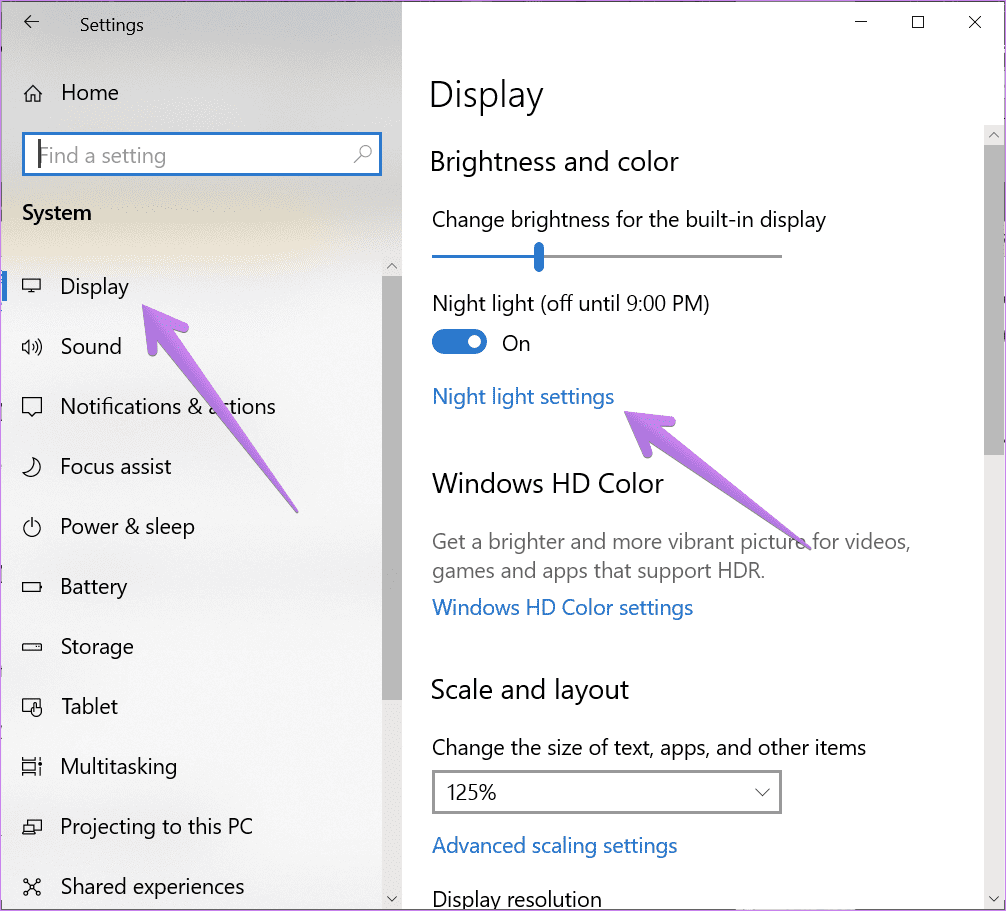
Alternatively, go to Settings > System > Display. Turn off the toggle next to Night light. Also, click on the Night light settings and disable Schedule night light.
Tip: Disable Color filters under Settings > Ease of access > Turn on color filters.
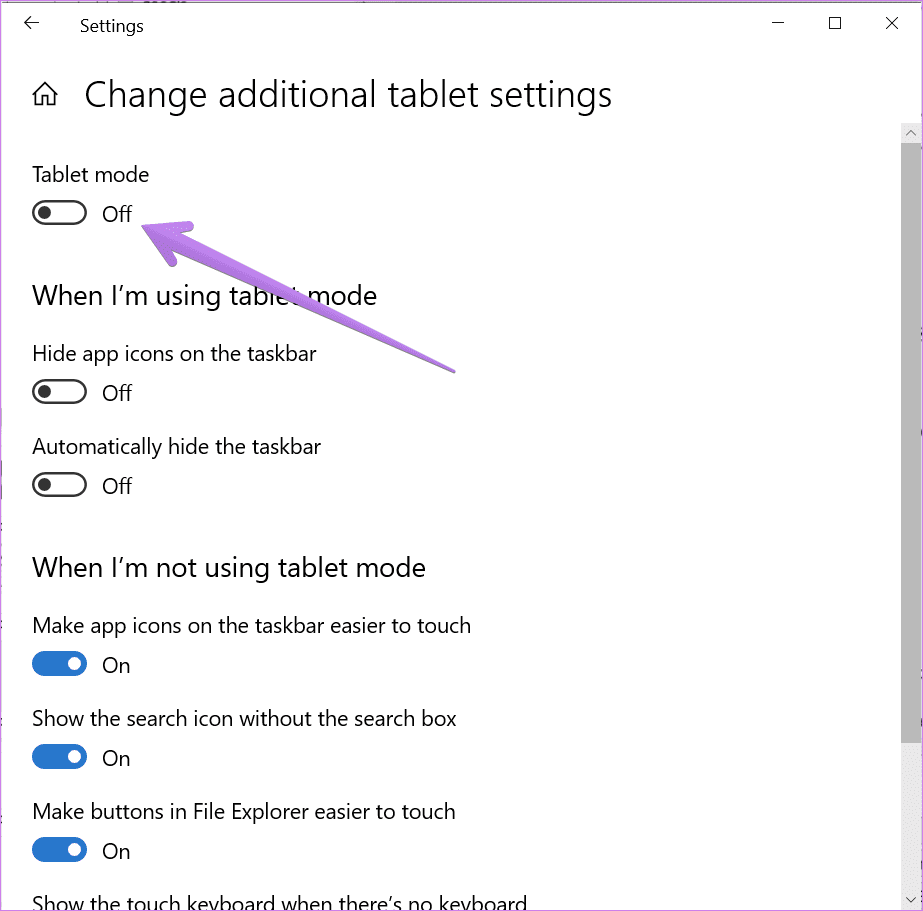
How to Turn off Tablet Mode
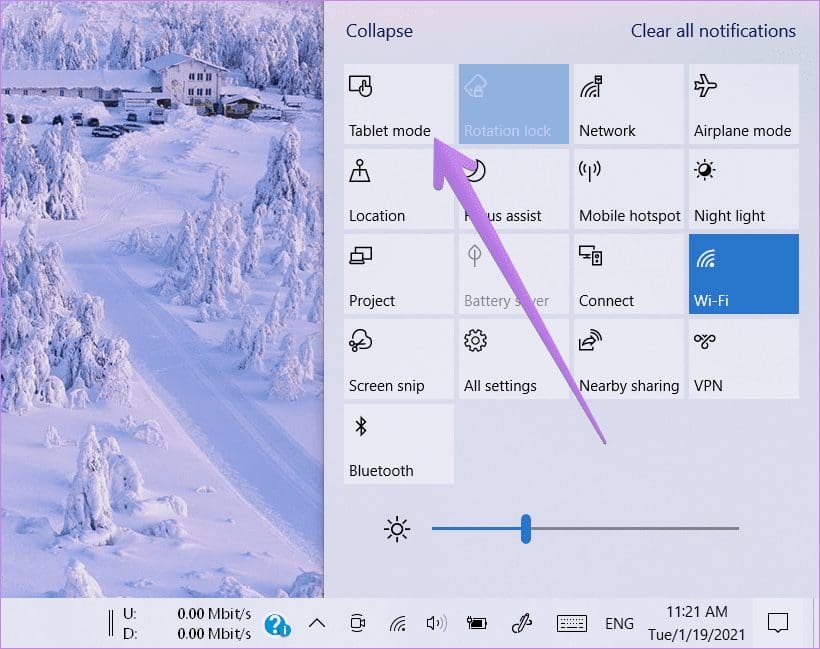
When Tablet mode is enabled, your computer is optimized for touch. So your apps will open in full-screen mode, including a full-screen Start Menu. You will notice changes in the taskbar and desktop icons too. If that is happening, you should disable Tablet mode.
For that, open Action Center and click on Tablet mode to disable it.
Alternatively, go to Settings > System > Tablet. Click on Change additional tablet settings.
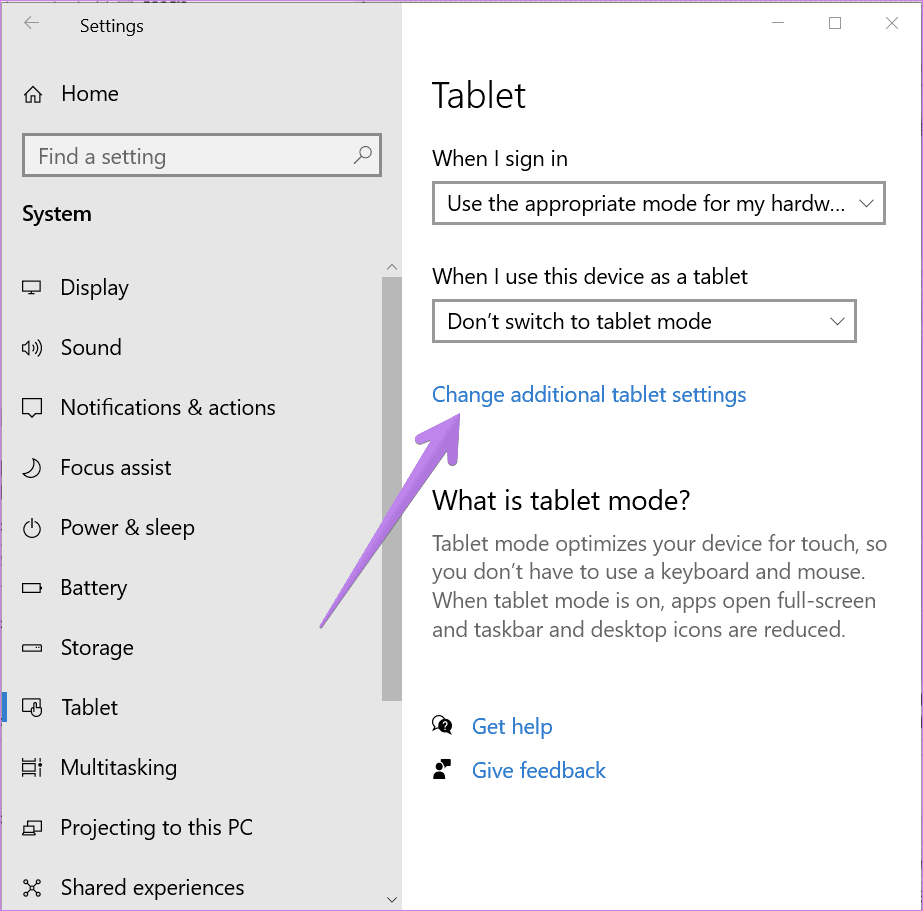
Turn off the toggle next to Tablet mode. Also, verify other settings related to Tablet mode and see if they are interfering with display settings.
Tip: If you decide on using Tablet mode, check out 15 tips and tricks to use Windows 10 in tablet mode.
How to Turn off Magnifier
When Magnifier is enabled, you will see everything as zoomed on your computer. To disable it, go to Settings > Ease of access > Magnifier. Disable the toggle next to Turn on Magnifier.

Use Multiple Display Settings
If you are using multiple monitors for your PC, you must set up dual monitors properly. Then you can use and customize each display separately. So do check if you are changing the above settings for the right display.
Was this helpful?
Thanks for your feedback!
The article above may contain affiliate links which help support Guiding Tech. The content remains unbiased and authentic and will never affect our editorial integrity.
Системные настройки управления цветом в Windows 7, 8, 10
В Windows 7, 8, 10 управление цветом для мониторов и принтеров осуществляется из единого центра настроек. Вы выбираете устройство и выбираете профиль для него. В остальном все работает аналогично Windows XP.
Откройте панель «Управление цветом» через Панель Управления:
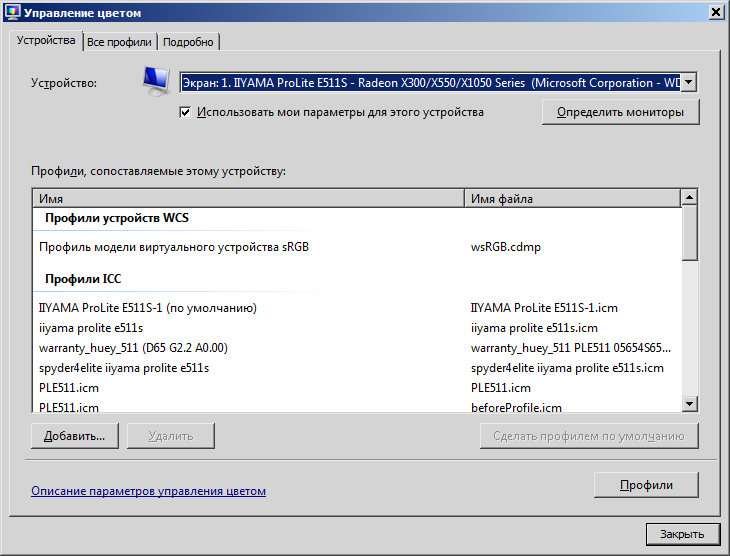
Выберите монитор из ниспадающего списка «Устройство» в верхней части панели.
Выберите профиль из списка и нажмите клавишу «Использовать по умолчанию». Предпочтительно использовать ICC профили.
Если Вы не можете найти профиль в списке, нажмите клавишу добавить и найдите его вручную
Обратите внимание, что в Windows 7 появилась возможность загрузки калибровочных кривых из профилей в LUT видеокарты средствами ОС, но по умолчанию она отключена. Активируется она следующим образом.
Выберите вкладку «Подробно»:
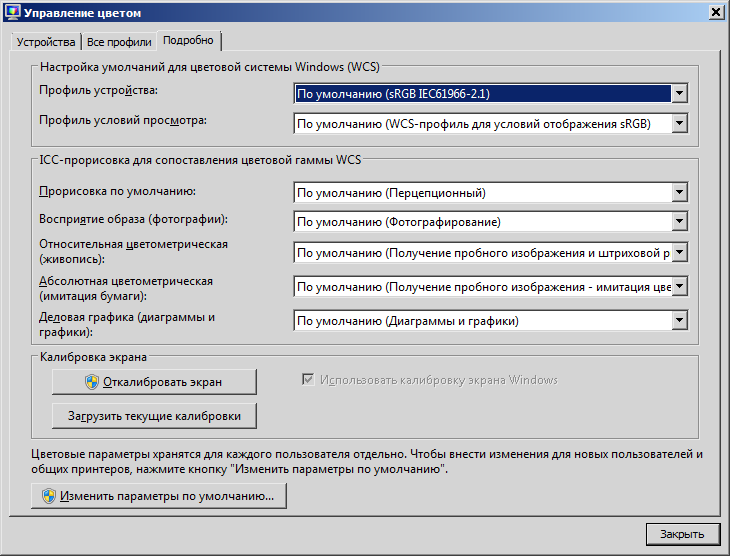
Выберите опцию «Изменить параметры по умолчанию» (для этого Вам потребуются права Администратора).
Установите галочку в чекбоксе «Использовать калибровку экрана Windows»

После этого Вы можете удалить все программные модули калибровочных программ из автозагрузки (если Вам не нужна их дополнительная функциональность).
Для профилей принтера всё настраивается аналогично.
Выберете опцию «ручной» из ниспадающего меню «Выбрать профиль»:

Обратите внимание, что большинство настроек управления цветом для Windows 7 требует прав администратора.