
Are you tired of being restricted from playing Minecraft due to firewall settings? Fear not, because there’s a way to allow Minecraft through the Windows 10 firewall and enjoy uninterrupted gameplay.
When it comes to allowing Minecraft through the firewall in Windows 10, there are a few key steps to follow. First, you need to open the Windows Security settings by typing «Windows Security» in the search bar and clicking on the corresponding result. From there, navigate to the Firewall & network protection section and click on «Allow an app through firewall.» Find Minecraft in the list and make sure all checkboxes are ticked for both private and public networks. Finally, click on «OK» to save the changes and voila, you can now enjoy Minecraft without firewall restrictions.
If you want to allow Minecraft through the firewall on Windows 10, follow these steps:
- Open the Control Panel and go to «System and Security.»
- Click on «Windows Defender Firewall.»
- Select «Allow an app or feature through Windows Defender Firewall.»
- Click «Change Settings» and then «Allow another app.»
- Locate and select the Minecraft executable file and click «Add.»

Why Allow Minecraft Through Firewall Windows 10?
Minecraft is a popular sandbox game that allows players to explore, build, and share their virtual world. However, when playing Minecraft on Windows 10, you may encounter issues with the game’s connectivity if it is blocked by the Windows Firewall. The Firewall acts as a security measure for your system, but it may sometimes prevent certain applications, including Minecraft, from accessing the internet.
Allowing Minecraft through the Windows Firewall ensures that the game can establish a stable connection with its servers and other players, enabling a seamless gaming experience. It also allows Minecraft to receive necessary updates and patches that improve performance and add new features. In this article, we will guide you step-by-step on how to allow Minecraft through the Firewall in Windows 10, ensuring smooth gameplay and uninterrupted enjoyment.
Step 1: Open Windows Security Settings
To allow Minecraft through the Firewall, we first need to access the Windows Security settings. Follow the steps below:
- Click on the «Start» button in the bottom left corner of your screen.
- From the Start menu, click on the «Settings» icon, which looks like a gear.
- In the Settings window, click on «Update & Security.»
- In the Update & Security window, click on «Windows Security» in the left-hand menu.
By following these steps, you will be able to access the Windows Security settings, which will allow you to configure the Firewall permissions for Minecraft.
Step 2: Open Firewall & Network Protection
Once you are in the Windows Security settings, proceed to open the Firewall & Network Protection options:
- In the Windows Security window, click on «Firewall & Network Protection.»
- Under the «Firewall & Network Protection» section, click on «Allow an app through firewall.»
This will open the Firewall settings where you can modify the access permissions for specific apps, including Minecraft.
Step 3: Allow Minecraft Through the Firewall
Now that you have accessed the Firewall settings, you can proceed to allow Minecraft through the Firewall:
- In the «Allowed apps» window, click on the «Change settings» button. You may need administrative privileges to make changes.
- Scroll through the list of apps until you find «Minecraft.»
- Make sure both the «Private» and «Public» checkboxes next to Minecraft are checked. This allows Minecraft to access the internet through both private and public networks.
- Click «OK» to save the changes and exit the Firewall settings. Minecraft is now allowed through the Firewall.
By following these steps, you have successfully allowed Minecraft through the Windows Firewall, ensuring that the game can connect to its servers and other players without any interruptions.
Troubleshooting: Additional Firewall Settings
If you are still facing connection issues even after allowing Minecraft through the Firewall, you can try the following additional troubleshooting steps:
Check Antivirus Software
Sometimes, antivirus software can also block Minecraft from accessing the internet. Make sure to check your antivirus settings and add Minecraft to the list of allowed apps or exceptions.
Disable Public Network Filtering
If you are using a public network, such as a Wi-Fi hotspot, the Firewall may have stricter settings. In the Firewall settings, try disabling the public network filtering temporarily to see if it resolves the connection issues.
Modify Advanced Firewall Settings
If you are comfortable with modifying advanced Firewall settings, you can try creating specific inbound and outbound rules for Minecraft. This allows you to have finer control over the Firewall permissions and ensure that Minecraft can communicate effectively.
Optimizing Minecraft for Firewall
Now that you have allowed Minecraft through the Firewall, you can also optimize the game’s performance for a better gaming experience:
Close Unnecessary Background Programs
Minecraft requires system resources to run smoothly. To optimize performance, close any unnecessary background programs that may be consuming memory or processing power.
Keep Your Game Updated
Regularly updating Minecraft ensures that you have the latest bug fixes, security patches, and new features. This enhances the overall performance and stability of the game.
Allocate Sufficient System Resources
In Minecraft, you can allocate more RAM to the game to improve its performance, especially when using resource-intensive mods or playing on large servers. To do this, navigate to the Minecraft Launcher, go to «Installations,» select your desired profile, click on «More Options,» and modify the allocated RAM.
In Conclusion
Allowing Minecraft through the Windows Firewall is essential for a seamless gaming experience. By following the steps outlined in this guide, you have successfully configured the Firewall permissions to enable Minecraft’s connectivity. Remember to regularly update the game and optimize your system resources for optimal performance. Now, you can dive into your Minecraft adventures without worrying about connection interruptions.

Allowing Minecraft Through Firewall in Windows 10
When playing Minecraft on Windows 10, you may encounter issues with the game’s connectivity due to the firewall settings. To ensure a smooth gaming experience, you need to allow Minecraft through the Windows 10 firewall. Here’s how you can do it:
Method 1: Using Windows Security App
- Open the Start menu and search for «Windows Security».
- Click on «Windows Security» to open the app.
- Go to «Firewall & network protection».
- Click on «Allow an app through firewall».
- Locate «Minecraft» in the list of allowed apps and make sure it has both «Private» and «Public» checkboxes ticked.
- Click «OK» to save the changes.
Method 2: Using Advanced Firewall Settings
- Open the Start menu and search for «Firewall & network protection».
- Click on «Firewall & network protection» to open the app.
- Click on «Advanced settings» on the right-hand side.
- In the new window, select «Inbound Rules».
- Click on «New Rule» from the right-hand side menu.
- Select «Program» and click «
Key Takeaways
- Allowing Minecraft through the Windows 10 firewall is essential for multiplayer gaming.
- Accessing the Windows 10 firewall settings can be done through the Control Panel.
- Adding an inbound rule for Minecraft in the firewall will enable the game to communicate through the network.
- Make sure to choose the correct version of Minecraft when setting up the firewall rule.
- Regularly updating Minecraft and the firewall settings is important for optimal performance and security.
Frequently Asked Questions
Here are some common questions and answers about allowing Minecraft through the Windows 10 firewall.
1. Why do I need to allow Minecraft through the firewall in Windows 10?
Allowing Minecraft through the Windows 10 firewall is necessary to ensure that the game can communicate with servers and other players over the internet. By allowing the game through the firewall, you allow the necessary network connections to be established, allowing for multiplayer gameplay and online features.
It’s important to note that the Windows 10 firewall acts as a security measure to protect your computer from unauthorized access, so it’s essential to only allow trusted applications like Minecraft through the firewall.
2. How do I allow Minecraft through the Windows 10 firewall?
To allow Minecraft through the Windows 10 firewall, follow these steps:
1. Open the Windows Security app by searching for it in the Windows start menu.
2. Click on «Firewall & network protection.»
3. Click on «Allow an app through firewall.»
4. Click on «Change settings.»
5. Scroll down until you find «Minecraft» in the list of allowed apps.
6. If Minecraft is not listed, click on «Allow another app» and locate the Minecraft executable file.
7. Select «Minecraft» and make sure both the «Private» and «Public» checkboxes are checked.
8. Click «OK» to save the changes.
3. Can I allow Minecraft through the firewall for a specific network?
Yes, you can allow Minecraft through the firewall for a specific network. Follow the steps mentioned in the previous answer, but instead of checking both the «Private» and «Public» checkboxes, only check the checkbox corresponding to the network you want to allow Minecraft on.
This is useful if you want to restrict Minecraft’s network access to a trusted network, such as your home network, while keeping it blocked on other networks, such as public Wi-Fi.
4. What if I’m still experiencing network issues with Minecraft after allowing it through the firewall?
If you’re still experiencing network issues with Minecraft after allowing it through the firewall, there could be other factors at play. Here are a few troubleshooting steps you can try:
1. Restart your computer and try launching Minecraft again.
2. Verify that your internet connection is stable by testing it with other online applications or websites.
3. Check if your router or modem has any settings that could be blocking Minecraft’s network connections. Consult your device’s user manual or contact your internet service provider for assistance.
4. Update to the latest version of Minecraft to ensure you have the most stable and bug-free experience.
If the issue persists, you may need to reach out to Minecraft support or consult a technical expert for further assistance.
5. Can I revert the changes and block Minecraft through the firewall again?
Yes, if you want to block Minecraft through the firewall again, you can revert the changes you made. Here’s how:
1. Open the Windows Security app again.
2. Click on «Firewall & network protection.»
3. Click on «Allow an app through firewall.»
4. Scroll down until you find «Minecraft» in the list of allowed apps.
5. Uncheck the checkboxes corresponding to the network profiles you previously selected.
To summarize, allowing Minecraft through the Windows 10 firewall is crucial to ensure smooth gameplay and prevent any connectivity issues. By following the step-by-step process outlined in this guide, you can easily configure the necessary firewall settings to grant Minecraft access.
Remember to open both the inbound and outbound ports for Minecraft, and create a specific rule to allow the game through the firewall. Additionally, periodically check your firewall settings to ensure they are up-to-date and compatible with the latest Minecraft version.
November 18, 2022
When your computer’s connected to the internet without a firewall, it’s like you’re leaving your front door wide open—anyone can walk right in. Think of your firewall as “Jeeves”, a steadfast doorman who decides who’s allowed in and who’s not. But sometimes Jeeves oversteps his bounds and denies someone entry. You need to give him an updated list of preferred guests so he doesn’t turn away those who are invited. In this guide, we’ll teach you how to allow Minecraft through your firewall, as well as other apps like Spotify, Roblox, and other games or apps.

Why does my firewall block games and apps? Playing games online can be risky. From predators who lurk on servers with kids’ games to hackers trying to overload servers with DDoS attacks. It’s no wonder your firewall tries to block online access sometimes. While many games that are made by well-known developers don’t run into firewall issues, it’s not uncommon for games from small developers to have problems based on the code by which they operate or known server issues. For example, Minecraft’s Java Edition is flagged by firewalls because of known security issues with Java code. It’s not the game itself but the code in the game. Other games like Roblox that include small games from independent developers on their servers might run into problems with malicious software.
Let’s walk through how to update your firewall to allow Spotify, Minecraft, and other games or apps onto your computer.

Microsoft Defender
Stay safer online with one easy-to-use app1
1Microsoft 365 Personal or Family subscription required; app available as separate download
Learn more
How to allow Minecraft through your firewall. There are a couple of ways that you can update your firewall setting to allow a game like Minecraft through your firewall. The first is the easiest because you’re simply responding to a prompt from your computer. It’s not unusual to get a notification from your security software that the firewall blocks a feature of an app. Take note when the notification pops up because it likely won’t include Minecraft in the name of the program. Rather, it’ll say that it’s blocking Java. If you have admin access, click “Allow access,” and you’ll be set to go.
If you bypassed the original notification because you thought it was for something else, you’ll need to take a few more steps to get into your antivirus software and update your settings. Update your firewall settings by accessing your system’s firewall in the security settings, which can be found in the Settings application. Once you’ve reached Settings, follow these steps:
- Scroll down and click “Update & Security.”
- Click “Windows Security” on the left-hand side of the window.
- Under the “Protection areas” list, click “Firewall & network protection.” This should open a new window.
- Below the main options that have icons, you’ll find a list of options that don’t have accompanying icons. Click “Allow an app through firewall.”
- You’ll see a long list of applications that are allowed and disallowed through your firewall. Select “Private” (for your private network only) for Java, and Minecraft will be allowed past the firewall.
- Click “Allow access” and input your admin password.

“Think of your firewall as “Jeeves”, a steadfast doorman who decides who’s allowed in and who’s not. But sometimes Jeeves oversteps his bounds.”
How to update your firewall to allow Spotify. Updating your firewall to allow Spotify requires a few more steps than for a video game, but you can still make the change and enjoy your music, podcasts, and audiobooks. Start by going into your firewall settings the same as you would for Minecraft, but you’ll want to specifically look for Spotify. Click “Allow access” and input your admin password to complete the process.
An alternate solution to allowing Spotify through your firewall is to change your proxy settings. Take the following steps:
- Open your Spotify settings.
- Click the Proxy type drop-down menu and select “No Proxy.”
- Save your changes and restart Spotify. You’ll likely have to log in again.
Your firewall is an important piece to keeping your computer safe from malware, but it can also be somewhat of a hassle by periodically overstepping. You can always override your firewall to allow apps and games that you’d like to have access to the internet through. Should you override your firewall’s default settings, make sure that you’re being extra careful with servers you join to play games and links you click on in ads.
Achieve the extraordinary with Microsoft 365
The powerful productivity apps and creativity tools in Microsoft 365 just got better. Work, play, and create better than ever before with the apps you love and Microsoft Copilot by your side.
Try for free
Topics in this article
Tags
More articles like this one

Package delivery scams: What they are and how to avoid them
Package delivery scams rely on getting you to share your personal information. Learn how to recognize delivery fraud.
Learn more

What is a brushing scam?
If you’ve received a parcel you didn’t order, you might be in a brushing scam. Learn how to protect your information.
Learn more

Apartment rental scams: What they are and how to avoid them
Looking for a new apartment? Avoid rental scams and keep yourself safe with these tips.
Learn more

CEO fraud: What it is and how to identify it
Identify and stop a CEO fraud attack with these tips. Learn how this scam, sometimes known as whale fishing, is aimed at company executives and how to master CEO fraud detection.
Learn more

Reimagine what’s possible with Microsoft 365
Maximize your creativity, productivity, and protection with AI in Microsoft 365.
Try for free
Hey there, Minecraft fans! We all know how much fun it is to dive into the world of blocks and create our own amazing adventures. But sometimes, we might encounter connection issues that stop us from enjoying the game with our friends. Don’t worry though; we’ve got your back!
In this article, you’ll learn how to allow Minecraft through your firewall so you can get rid of those pesky connection problems once and for all. Say goodbye to being left out when your buddies explore new lands or build epic structures. Get
ready to finally fix the issue and jump right back into the action.
Related: Fix Minecraft Clicking Throws Items Issue
What Does Firewall Got To Do With Minecraft?

You might be thinking, “What does a firewall have to do with Minecraft?” Well, firewalls are like security guards for your computer. They help protect it from hackers and other bad stuff you don’t want on your computer. But sometimes, they can also block things that you actually want to use – like Minecraft.
When you’re trying to play Minecraft, and there’s something wrong with the connection or it just won’t load properly, it could be because of your firewall is blocking the game. Firewalls work by checking all incoming and outgoing traffic on your computer (like when browsing the web or downloading files) and blocking anything suspicious or unknown.
Since firewalls aren’t familiar with every single program out there, including games like Minecraft, they might think that this traffic is potentially harmful and decide to block it.
Now that we know how important a role the firewall plays in our gaming experience, let’s figure out what needs to be done about it. Allowing Minecraft through the firewall means telling your computer’s security system
“Hey! This specific application is totally cool and safe.” That way, the firewall will stop interrupting your gameplay whenever it suspects some sort of danger.
So what should we do next? The good news is that letting Minecraft past your Firewall isn’t as complicated as it sounds. Once we look into changing some settings in our computers’ firewall settings section up ahead, getting back into our favorite pixelated world will be a breeze.
Firewall Settings
Let’s dive into allowing Minecraft through your Windows 10 firewall so you can have a smooth connection.
You might be having trouble joining servers or friends’ worlds, but don’t worry – we’ve got you covered. We’ll take you through the steps to ensure your computer allows Minecraft to use the internet without interruptions.
First off, let’s head over to your firewall settings:
- Press the “Windows” key and type “firewall” in the search bar.
- Click on “Allow an app or feature through Windows Defender Firewall.”
- This will open up a list of apps and features that are currently allowed (or not) through your computer’s firewall.
Now it’s time to find Minecraft on this list! Scroll down until you see “Minecraft Launcher” or something similar. If it’s already checked under both “Private” and “Public,” then congratulations, you’re all set! However, if they aren’t checked yet, here’s what to do:
- Click on the “Change settings” button near the window’s top right corner.
- Now you should be able to check those boxes next to Minecraft.
- Make sure both “Private” and “Public” are ticked for better connectivity!
Great job! By now, you should have successfully allowed Minecraft through your firewall, which means no more annoying connection issues when trying to join servers or play with friends online.
But sometimes, even after taking these steps, there might still be some problems with connecting properly. That’s why we will explore another way of ensuring a seamless gaming experience: port forwarding.
Also read: Minecraft Full-Screen Problem
Port Forwarding
Port forwarding is like opening a special door in your firewall just for Minecraft so that you and your buddies can play together without any hiccups.
First, open up your router’s settings page by typing its IP address into a web browser on your computer or device connected to the same network as the server.
You’ll need to log in with the username and password (you might want to ask your parents if they set it up). Once logged in, look for something called “Port Forwarding” or “Virtual Servers.” This is where all the magic happens!
Now let’s get down to business. In this magical place called port forwarding settings, create a new rule or virtual server entry specifically for Minecraft.
Type in a name like “Minecraft Server,” then enter the IP address of the machine running the server (usually found under ‘status’ or ‘network information’ within router settings), followed by entering “25565” for both start and end ports – this number never changes unless Mojang decides otherwise.
Set protocol type as TCP/UDP since both are used during gameplay. Save these fantastic adjustments made.
Your super-cool Minecraft world should be accessible now from outside your home network using its public IP address – which can be found easily through searching ‘what’s my IP’ online. It’s always good practice to test everything after making changes, so keep reading our next section about testing connections before celebrating too hard.
Test Connection

Now that you have allowed Minecraft through your firewall and set up port forwarding, it’s time to test if the connection issues are resolved. This is an important step because sometimes problems persist even after making changes. Don’t worry; testing the connection is easy and will help us figure out if we need to do any more troubleshooting.
Launch Minecraft on your computer or device to start testing the connection. Try joining a multiplayer server like you normally would, or ask a friend to join your game if you’re hosting one yourself.
Pay attention to whether the game loads quickly and without error messages. If everything seems smooth and connected well, then congratulations! You’ve successfully fixed the problem by allowing Minecraft through the firewall and setting up port forwarding.
However, if you notice that there are still issues with connecting to servers or having friends join your game, don’t get discouraged. It might mean another issue besides the firewall settings and port forwarding. We’ll need to investigate further to find a solution that works for you.
Before troubleshooting other potential causes of these pesky Minecraft connection issues, double-check all previous steps taken were done correctly.
Related: How To Find Spawn Point In Minecraft
Troubleshooting
One common reason that might be causing trouble is a slow or unstable internet connection. Make sure you have a strong Wi-Fi signal, or try using an Ethernet cable instead of wireless.
Restarting your modem and router could also help improve the connection speed. If nothing changes after trying these steps, it might be worth checking with your Internet Service Provider (ISP) for any ongoing network issues or maintenance in your area.
Another thing we need to check is if our game files are up-to-date and not corrupted in any way. You can easily repair or re-download missing files by launching the Minecraft launcher on your computer and clicking “Options” next to the play button.
From there, select “Force Update!” This will ensure all necessary files are updated, so everything should run smoothly again!
Don’t lose hope if you’ve gone through all these steps but still can’t connect properly! It’s time to roll up our sleeves and start troubleshooting even further.
Check whether other players are experiencing similar problems – maybe something bigger, like a server outage, is affecting everyone at once? Additionally, consider contacting Mojang Support for assistance; they may have insights on resolving your specific issue.
Conclusion
In conclusion, we can see that firewalls play a significant role in our Minecraft gaming experience. By adjusting the firewall settings and port forwarding, we can solve most connection issues and enjoy playing with friends.
Click “Windows Security” on the left-hand side of the window. Under the “Protection areas” list, click “Firewall & network protection.” This should open a new window. Below the main options that have icons, you’ll find a list of options that don’t have accompanying icons. Click “Allow an app through firewall.”
How do I allow Minecraft through my firewall?
Open “Systems and security” and then select “Windows Defender Firewall,” then “Allow an app or feature through Windows Defender Firewall” to turn Windows Defender on.
How do I allow a server through my firewall?
How to open a port on the firewall
- Click on Start then on Control Panel.
- Click on Windows Firewall and then click on Advanced Settings.
- Right click on Inbound Rules then on New Rule:
- Select Port and click on Next:
- Enter a specific local port (e.g. 8080) and click on Next:
- Click on Next:
- Name the rule and click on Finish:
How do I open port 25565 for Minecraft server?
To open port 25565, first log in to your router’s login page using your IP address. Find the port forwarding settings and create a new rule. Set the protocol to both TCP and UDP, specify the external and internal ports as 25565, and enter the local IP address of the device hosting the Minecraft server.
How do I allow access to my Minecraft server?
To allow remote access to your Minecraft server, you will need to set up port forwarding on your router. Port forwarding allows external connections to reach your server by forwarding traffic from a specific port on your router to the local IP address of your computer running the Minecraft server.
How To Allow Java Through Your Firewall for Minecraft Servers (Windows Defender)
How do I stop my firewall from blocking Minecraft?
Select Start, search for and select Windows Defender Firewall. Select Allow an app or feature through Windows Defender Firewall. Select Change Settings. Under Allow apps to communicate through Windows Defender Firewall, check the box next to Minecraft.
How do I add Minecraft to my firewall whitelist?
These can be added to a Service Group on your Firewall by going to Network > Firewall > Firewall Rules > Add Rule Above/Below.
- Name: Minecraft*
- Source IP Addresses: As required.
- Inbound Interfaces: As required.
- Destination IP Addresses: As required.
- Outbound Interfaces: As required.
How to allow port 25565 through firewall?
Check the Enabled option, give the forwarding rule a name, specify the local static IP address you’ve set previously, and enter the Minecraft server port. In this case, it’s 25565. Don’t forget to apply these configurations for both TCP and UDP ports. Once done, save your changes.
How do I allow Minecraft servers through firewall Windows 10?
Click “Windows Security” on the left-hand side of the window. Under the “Protection areas” list, click “Firewall & network protection.” This should open a new window. Below the main options that have icons, you’ll find a list of options that don’t have accompanying icons. Click “Allow an app through firewall.”
Why can’t I connect to a Minecraft server?
The problem could be caused by restrictions on your network. For example, your internet service provider or network administrator might be blocking Minecraft. To circumvent network restrictions, download a VPN.
How do I know if my firewall is blocking my Minecraft server?
To see if your firewall is blocking a website, app, or port on Windows, go to Windows Firewall > Advanced Settings and check your Outbound rules. On a Mac, click the Apple icon > System Settings > Network > Firewall > Options to check your firewall settings.
How do I unblock a server from my firewall?
Change Device Permissions
- Click the Windows button.
- Click Settings.
- Click Privacy & Security.
- Click Windows Security.
- Click Firewall & Network Protection.
- Select your profile.
- Scroll to Microsoft Defender Firewall.
- Switch the settings to off.1.
How do I allow an IP address through my firewall?
To Add IP Address in Windows Firewall
- Select the Advanced settings option from the sidebar menu.
- The Windows Firewall with Advanced Security panel will open. …
- Windows Firewall will open a new window New Inbound Rule Wizard. …
- A form will appear in the window. …
- Another window named IP Address will pop up.
What ports to open for Minecraft server?
The default Minecraft ports are:
- TCP Port: 25565.
- UDP Port: 19132.
How do you let bedrock through firewall in Minecraft?
Set Control Panel view by Large icons then click Windows Defender Firewall. Click Allow an app or feature through Windows Defender Firewall. Make sure the “javaw.exe” is checked. If not, click the Change settings button then check the “javaw.exe”.
Why does my Minecraft server say Connection refused?
Check server settings: If the server is running but you still cannot connect, check the server settings to ensure that it is configured to accept connections from your IP address. If the server is set to only allow connections from certain IP addresses, make sure that your IP address is on the list.
How do I run a Minecraft server in the background on Windows?
The easy way to run any job in the background is to put an & at the end of the line in the command shell when launching the process. e.g. This presume you know that you want to run this in the background when you launching it.
How do I host a public Minecraft server?
How to set up a Minecraft server
- Step 1: Install/Update Minecraft. …
- Step 2: Install/Update Java. …
- Step 3: Download Server .jar File. …
- Step 4: Create a Minecraft Server Folder. …
- Step 5: First-Time Startup. …
- Step 6: Restart the Server. …
- Step 7: Create an Automatic Script.
How do I join a Minecraft server hosted on my computer?
Log into Minecraft and click Multiplayer on the main menu, Click Add Server and enter the IP or web address of the server. Tip: If you don’t know the IP of a server, thousands of public servers can be located by doing a web search for something that suits your style of play.
How do I unblock a port in Minecraft?
Port forwarding to unblock Minecraft
- Connect the router to your computer with a cable.
- Type your router’s IP address into the browser’s URL bar.
- Login by typing in your username and password.
- Go to Advanced Settings and locate the section marked Port Forwarding.
- Add a new rule to open the Minecraft ports.
How do I know if port 25565 is open?
After completing port forwarding, go to www.portchecktool.com to check if port 25565 is open. If it is, you will see a “Success!” message. Further port forwarding assistance can be found in our General Port Forwarding Guide.
What is the command to whitelist a Minecraft server?
Managing the Whitelist
- To enable the whitelist, use /whitelist on.
- To disable the whitelist, use /whitelist off.
- To add a player to the whitelist, use /whitelist add playername.
- To remove a player from the whitelist, use /whitelist remove playername.
- To show all players on the whitelist, use /whitelist list.
What is the Minecraft whitelist command?
Whitelist is used to manage server whitelists. In Java Edition, server operators can always connect when the whitelist is active, even if their profiles do not appear in the whitelist. In Bedrock Edition, players must be whitelisted regardless of operator status.
Does Minecraft use TCP or UDP?
Minecraft servers use TCP (Transmission Control Protocol). TCP is a connection-oriented protocol that ensures that data is delivered reliably and in the correct order. This is important for Minecraft servers, as they need to ensure that players are able to interact with each other in a smooth and seamless way.
Minecraft is one of the most popular video games in the world. It is written in Java programming language and has been released in 2011. Currently, it is ported to various platforms, sold around 200 million copies, and has 126 million active users as of 2020.
In this article, we are going to setup the Minecraft server and discuss the question – “how to allow minecraft through firewall?” by forwarding traffic through a secure tunnel and as a result bypass a firewall or double NAT problems.
We all love to play Minecraft with friends and create crazy worlds together. To achieve this we should have a Minecraft server, but wait should we buy one in the cloud and spend a 100$ per year for this? We definitely have an old laptop or PC which can serve as great hardware for the Minecraft server. First of all, we are going to install the Minecraft server in our hardware, and then we are going to expose our server to our friends?
Setup Minecraft server
Setting up a multiplayer Minecraft server is quite an easy task. By following https://www.minecraft.net/en-us/download/server link you can find the latest version of the Minecraft server and download it to your computer. Before starting the server you should have Java installed on your computer. Nowadays Java comes with all operating systems by default, however, for Windows, you may be required to play with the PATH environmental variable – It is required to make sure that you can use java from the command line.
To start Minecraft server you should run the following command:
java -Xmx1024M -Xms1024M -jar server.jar nogui
The first run may seem exits with some warnings and errors:
[12:33:18] [main/ERROR]: Failed to load properties from file: server.properties
[12:33:18] [main/WARN]: Failed to load eula.txt
[12:33:18] [main/INFO]: You need to agree to the EULA in order to run the server. Go to eula.txt for more info.
However, it is ok! It justs created default configuration file for a server called “server.properties”, another file for end-user license agreement called “eula.txt” and informs us about accepting the license. To accept the license we should open “eula.txt” file and replace “eula=false” statement in the last row with “eula=true” then save the file and close.

Now is the time to run following command again:
java -Xmx1024M -Xms1024M -jar server.jar nogui
In case if you want to start the server with a user interface you can omit “nogui” argument from the command above. The user interface is not showing much, however, you can see memory usage status, players, logs, and chat.
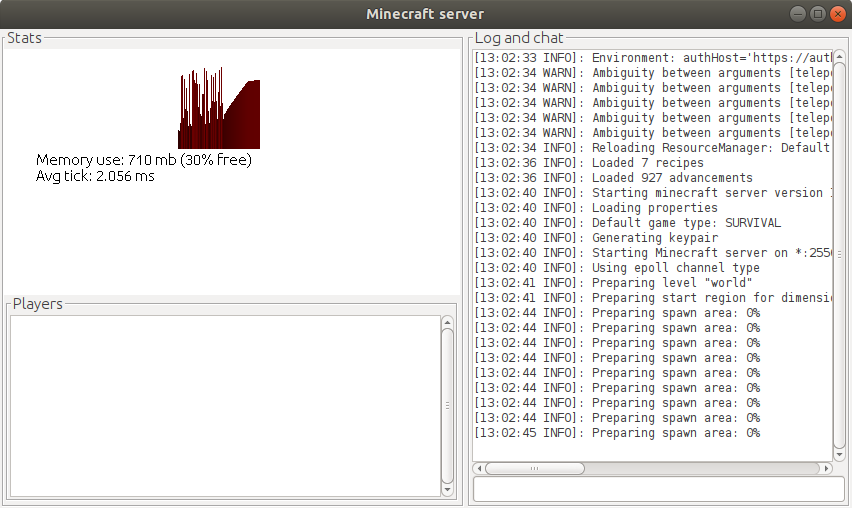
That’s it! We have a functioning Minecraft server installed, now let’s go to the part where we are going to answer the question of “how to allow Minecraft through firewall?”.
How to allow Minecraft through firewall?
By default, the Minecraft server is listening to 25565 port, however it can be verified or changed in the “server.properties” file (see the row “server-port=25565”). To allow our friends to join we should somehow expose this port to the internet to allow incoming TCP connections. We have many options to achieve this such as:
- 1. Tunneling
- 2. Port forwarding
- 3. VPN
Each of these options has their pros and cons. Here you can find a detailed comparison of different methods for exposing a local server. In this article, we are going to use tunneling for exposing the Minecraft server to the internet, since Tunnel In is aimed to create and manage network tunnels. This method is secure and with our platform it is easy to use and elegant way for exposing any local network service to the internet.
That is all you should do in your computer, the rest you should do from Tunnel In’s web portal i.e. it means after installing an agent all configuration can be done remotely.
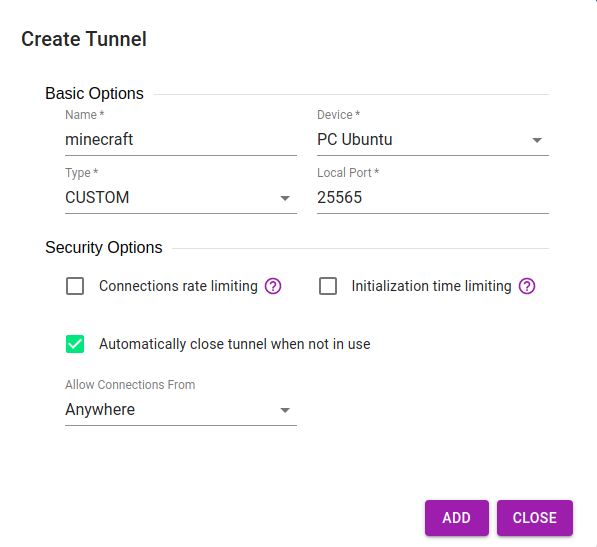
Now lets create a tunnel and expose local server to the internet. For that just go to the Tunnels tab and click on “+” button in the bottom right corner. Name the tunnel, select your device, select CUSTOM type for the tunnel, and enter the port number (by default it is 25565). Remove two checkboxes from Security Options (see picture below) and click on the “ADD” button.
The system will create and start the tunnel automatically. In the “Connection properties” column, you can see the URL pointing to your local Minecraft server. By clicking on the URL system will copy it to your clipboard. You can use this URL for connecting to your server from anywhere in the world. Send it to your friends and enjoy playing together!

Now when we know how to allow Minecraft through firewall lets speak a little about how to secure our server.
Tunnel security options
While you can use the Minecraft server with your friends it is time to speak about the security options of the tunnel. In the tunnel creation process, we saw the “Security Options” panel which provides a way to limit the connections to tunnel by IP address, time and connections count.
Here are a short descriptions of each option:
- 1. Connection rate limiting – At most 6 connections are allowed in any 30 seconds window. This is great to stop DDOS attacks on your server
- 2. Initialization time limiting – After starting the tunnel system gives 180 seconds to establish a connection to the tunnel, once that time expires the system will not accept new connections, however, the connections established within the first 180 seconds will keep working.
- 3. Automatically close tunnel when not in use – this is self-explanatory. This option will help you to automatically decrease the attack surface on your server. BTW this is one of the reasons we are against port forwarding.
- 4. Allow Connections From – this option supports 3 different things by now – Allow connections from anywhere, list of IP addresses to allow connection from and the last one is dynamically detecting IP address when you are starting tunnel and allow connection only from your IP address.