
Starting in Windows 10 build 21354, you can change Camera Brightness and Contrast.
Modern expensive webcams come with bundled software for adjusting different settings and parameters. These settings can improve image quality and adapt it to your environment for better video conference experience. Unfortunately, not everyone can afford a $200+ webcam.
Microsoft wants to provide an easy option to change different camera settings on a system level without additional software. Thus Windows 10 received a native webcam settings section. These settings allow you to change camera brightness, contrast, and other parameters depending on a device and its capabilities. Additionally, the updated camera settings page allows you to disable webcam in Windows 10, add a new one, or manage existing devices. It not only works with local devices but also supports IP cameras connected over the network.
Currently, a new camera settings page is available only in Windows 10 preview build 21354 and newer. We do not recommend installing pre-release software on your primary computer to avoid potential bugs and instabilities.
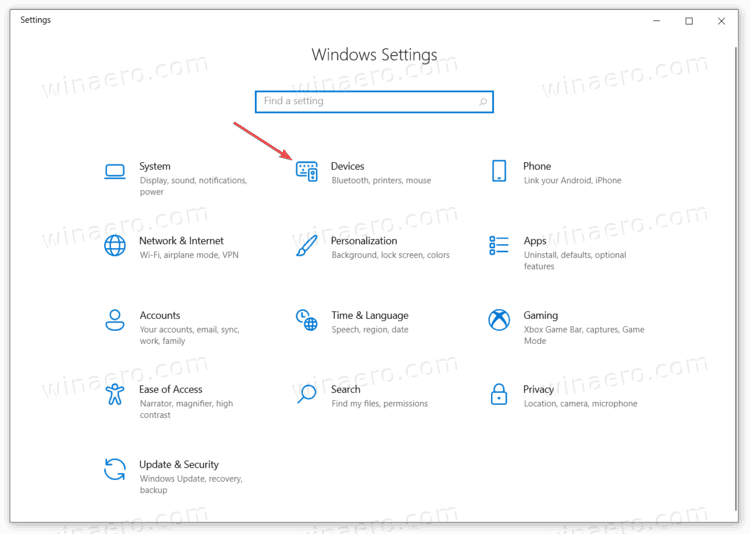
- Open Settings.
- Go to Devices, and click on Cameras in the left pane.

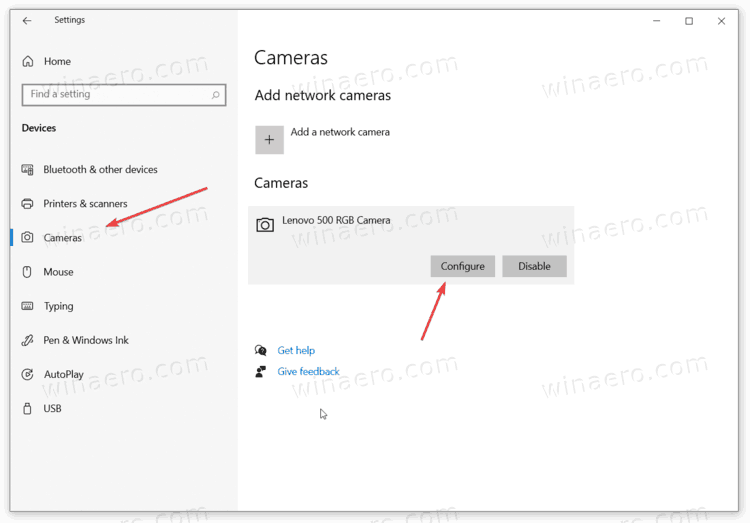
- Navigate to the Cameras section on the right and find the camera you want to adjust image parameters for.
- Click on it to select, and click on the Configure button.

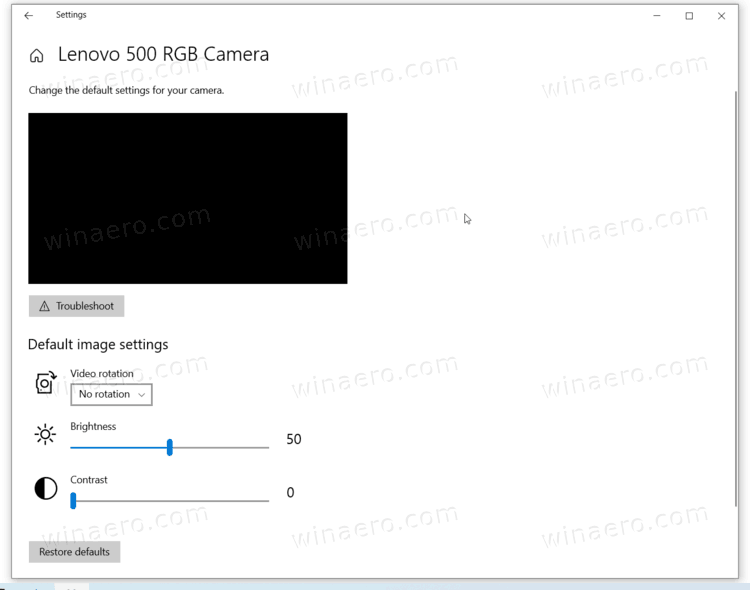
- On the next page, adjust all the available sliders for what you want. There are options to change brightness, contrast, and also rotation, high dynamic range, eye correction, etc.

- You can now close the Settings app if you want.
You are done.
It is worth mentioning that there is an image preview, so you can see how the settings you change affect image quality. Note that the list of available settings depends on what features your camera support. If there are no brightness or contrast sliders, then this means that your camera does not support adjusting these settings.
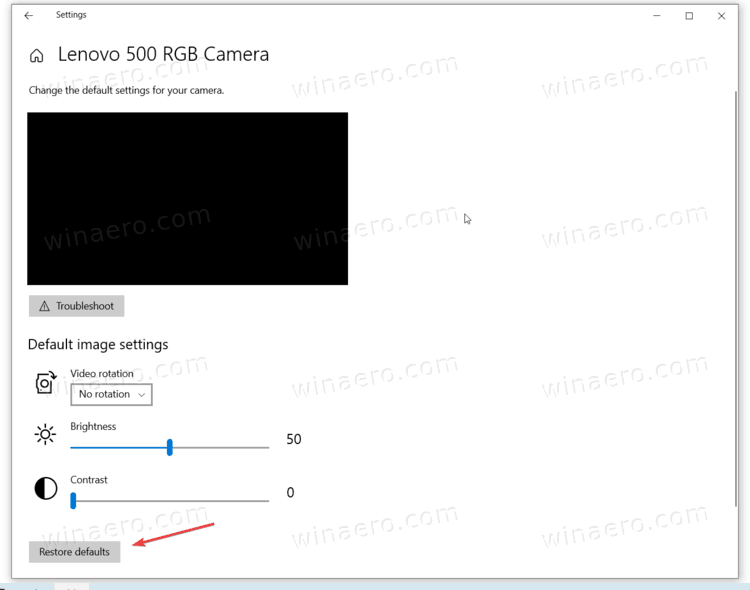
If you are not satisfied with the changes you have just made, Windows has an option to restore default camera settings with a single click.
Restore default Camera settings in Windows 10
- Open Windows 10 Settings.
- Go to Devices > Cameras.
- Find your camera in the Cameras list on the right. Click on it and select Configure.
- On the next page, click on the Restore defaults button.
You are done.
Tip: In case if you have issues with your webcam, click on the Troubleshoot button to run a built-in troubleshooter.
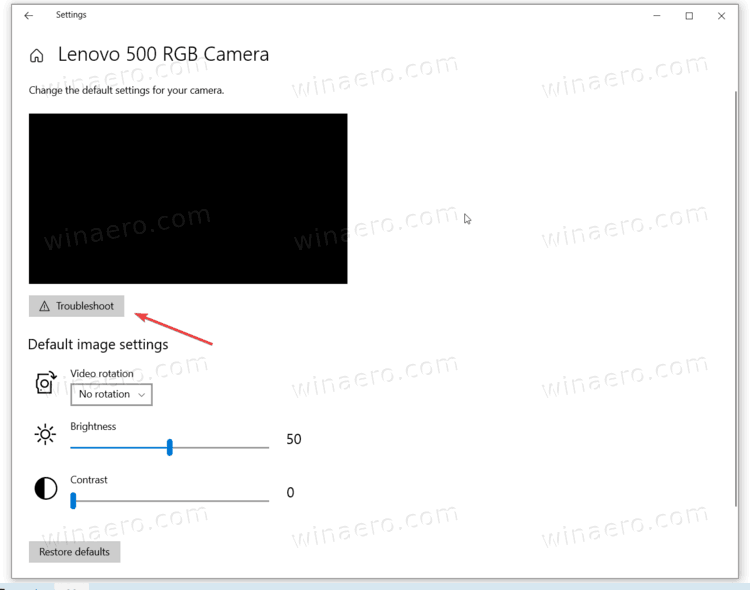
It will go through some basic checks to ensure the camera works and communicates with the operating system properly. You can also fix webcam problems in Windows 10 by heading to Windows Settings > Update and Security > Troubleshoot > Additional Troubleshooters > Camera.
That’s it.
Support us
Winaero greatly relies on your support. You can help the site keep bringing you interesting and useful content and software by using these options:
If you like this article, please share it using the buttons below. It won’t take a lot from you, but it will help us grow. Thanks for your support!
- Home
- Windows Tips
- Brightness contrast webcam
Webcams on laptops are not feature-rich. At the most, they have a good or high resolution but beyond that, they do not compare to an external webcam or to the camera on a modern, mid-range phone.
With webcams, both internal and external, there is no simple control panel for managing its settings. Windows 10 has a hidden settings panel for an integrated webcam but that is the extent of it.
Changing the brightness or contrast, and other settings of a webcam, whether it’s internal or external, isn’t easy on Windows 10. Accessing the hidden settings panel is complicated enough that most users may refrain from using it.
An easier way to manage the brightness and contrast for a webcam is to use an app called Webcam Settings.
Webcam Settings app
Webcam Settings is a free app and it gives users access to more or less the same settings that the hidden settings panel does. The only difference is that it is far easier to use than the settings panel Windows 10 has.
Manage webcam brightness and contrast
To change the brighntess, contrast, hue, saturation, sharpness, and more of the webcam, follow these steps.
- Download and run Webcam Settings.
- Open the Available webcams dropdown and select a webcam.
- Click Settings.
- In the panel that opens, use the various sliders to change the brightness, contrast, hue, sharpness, etc. of the camera.
- Click Ok to save the changes.
Note: the webcam preview in the screenshot is with exaggerated settings to highlight how the app works.
Using webcam with new settings
The new settings will be saved and apps that can use the webcam e.g. Skype, Zoom, Microsoft Teams, Chrome, etc will all use those same settings.
All you need to do is allow an app to connect to the webcam and it will pick up the new settings.
Resetting webcam
If you need to change the settings of the webcam back, Webcam Settings gives you a simple way to do so.
- Open the Webcam Settings app.
- Open the Available webcams dropdown and select your webcam.
- Click the Default button.
- Click Ok.
- The webcam will be reset to its default settings.
Conclusion
Users may not be able to change all the settings in Webcam Settings. This has to do with the physical limitations of the webcam they’re using. There is no guarantee that all the settings will be available on a high-quality or expensive webcam because the manufacturer may very well decide to lock access to it.

Fatima Wahab
Fatima has been writing for AddictiveTips for six years. She began as a junior writer and has been working as the Editor in Chief since 2014.
Fatima gets an adrenaline rush from figuring out how technology works, and how to manipulate it. A well-designed app, something that solves a common everyday problem and looks
Unlike smartphone cameras, PC cameras are primarily used for video calling. Smartphone users use phone cameras to capture photos, videos, video calling, and document scanning. PC users rarely capture pictures and videos.

If your Windows 10/11 computer has an in-built camera or you have attached an external webcam to it, you might want to change its default settings such as the brightness and contrast to improve the picture/video quality.
As you might have observed by now, the built-in Camera app lacks most of the settings that you find in a dedicated camera app camera manufacturer. It offers basic settings only.
That said, there are options to change the default brightness and contrast settings.
IMPORTANT: If you are using a dedicated camera, we recommend using the camera software offered by the camera manufacturer. For instance, Logitech offers its own software named Logitech Capture, which provides tens of settings to change the default camera settings.
Method 1 of 2
Step 1: On a Windows 10 PC, go to Windows 10 Settings > Devices > Cameras page. If you are on a Windows 11 PC, jump to Windows 11 Settings > Bluetooth & devices > Camera page.
If the Cameras page is missing, it is either because you are running a build older than 21354 or the camera driver is not installed.
Step 2: The Cameras page displays all connected cameras to your PC, including the built-in webcam. The built-in webcam will be detected as an integrated camera.
On Windows 10 PC, to change the camera settings, click on the camera’s entry and then click the Configure button. If you are on a Windows 11 powered machine, click on Integrated camera to see available settings.


Step 3: As you can see in the picture below, you can change the default brightness and contrast settings by moving their respective sliders. On Windows 11 PC, if you cannot see camera settings, please click on Basic Settings.


Method 2 of 2
Change photo/video quality via Camera app
The built-in Camera app in Windows 10/11 offers a few options to change the default settings. For instance, you can change the picture resolution (photo quality), video quality, and brightness via the app.
Step 1: Open the Camera app.
Step 2: If you would like to change the photo or video quality, click on the gear/settings icon located top left of the app. The photos and videos section offer options to change the picture and video quality.

NOTE: If you would like to change the brightness from within the Camera app, you need to enable the Pro mode (available under Camera Settings). Once you enable the Pro mode, an option to change the brightness will be shown within the app.

Directions here will help you to learn how to change Camera brightness on Windows 10. The camera is a built-in, moreover, user-friendly application of Windows 10 that allows you to capture images and notch up videos using webcam. Unlike a third-party advanced program, it comes up with basic features such as time-lapse and framing grade. In addition, the Camera app lets you change the brightness of image while taking photos. To have the benefit of this feature, you need to enable Pro mode first.
Though Camera app accomplishes the basic requirements of ours, it has some limitations. It doesn’t provide editing facilities but you need to take help of other programs such as Photos app.
Change Camera Brightness on Windows 10
Here is how to change Camera brightness on Windows 10 –
Step-1: Click the Start button and locate Camera from the appearing app list.
Step-2: Once found, click on the same to access it.
Step-3: When the Camera app becomes visible, click the gear icon located in the top left corner.
Step-4: Turn on the toggle button of Pro mode to view advanced controls for photos and videos.
Step-5: Click the back arrow icon located before Settings to head over the main interface.
Step-6: In the left side you will view two icons, click the second one named Brightness.
Step-7: A control bar will come into the view. Move the slider up or down to change Camera brightness on Windows 10.
See more posts on Camera app Windows 10 –
1] Everything You Can Do with Windows 10 Camera app
2] How to Reinstall Webcam Driver in Windows 10
3] Windows 10 – How to Show Slideshow Images from Camera Roll
4] How to Make a Picture Black and White in Photos App Windows 10
5] Fix: ‘We Cannot Find your Camera Error 0xC00DABE0 / 0xA00F4244’ in Windows 10
6] How to Disable Microphone for Individual Apps in Windows 10
7] Fix Camera App Recorded Video Displays Lines on Screen Windows 10
That’s all!!!

Windows 10 has an app called Camera that lets you use your webcam to record videos and take photos. You can use the Windows 10 Camera app to snap a quick headshot photo for use as an account photo on your computer, Facebook, video calls with Skype, post videos on YouTube, livestream on Facebook and complete a variety of other video-based activities. Windows 10 Camera app empowers you to change the brightness of images and videos.
Where are the camera brightness in Windows Camera app?
1- Click the Start button and locate Camera from the appearing app list.
2- When the Camera app becomes open, click the gear icon located in the top left corner.

3- Turn on the toggle button of Pro mode to view advanced controls for photos and videos.

4- Once you are in Pro mode, In the left side you will view two icons, click the second one named Brightness.
5- A control bar will come into the view.

With the mouse, move the slider upwards to brighten your photos and videos or move it downwards to darken them.
That’s all..
Recommended For You
How to change Apps Camera-Microphone permission On Windows