
Для начала что такое WMI (Windows Management Instrumentation)? Это технология, которая с помощью единого интерфейса позволяет управлять компонентами как локальной, так и удаленной операционной системы.
Данный материал рассчитан на тех, кто что-то слышал о WMI, но не знает с чего начать его «ковырять». А так же на тех, кто и не подозревал о существовании такого удобного инструмента.
Я не буду рассказывать о том, как работает, как устроена данная технология, если возникнет интерес — информацию всегда можно найти в MSDN. Моя цель — помочь обеспечить быстрый старт, для тех, кто хочет начать использовать данную технологию.
Что дает применение WMI на практике? Возможность изменять различные параметры операционной системы, управлять общими ресурсами, запрашивать информацию об установленных устройствах, запущенных процессах и т.д.
Кому может пригодиться WMI? Я думаю всем. Вы можете использовать возможности WMI не только из Ваших программ на C#, C++ и других языках программирования, но и создавать собственные скрипты, автоматизирующие процесс сбора информации, изменения конфигурации локальной или удаленной машины.
Для быстрого ознакомления с возможностями WMI можно скачать утилиту WMI Code Creator (размер 122 KB, в архиве сама утилита и исходник на C#) с сайта компании Microsoft. Данная утилита позволяет просматривать пространства имен WMI, классы каждого пространства имен, свойства и методы каждого класса. Плюс она генерирует C#, Visual Basic .NET, Visual Basic Script код.

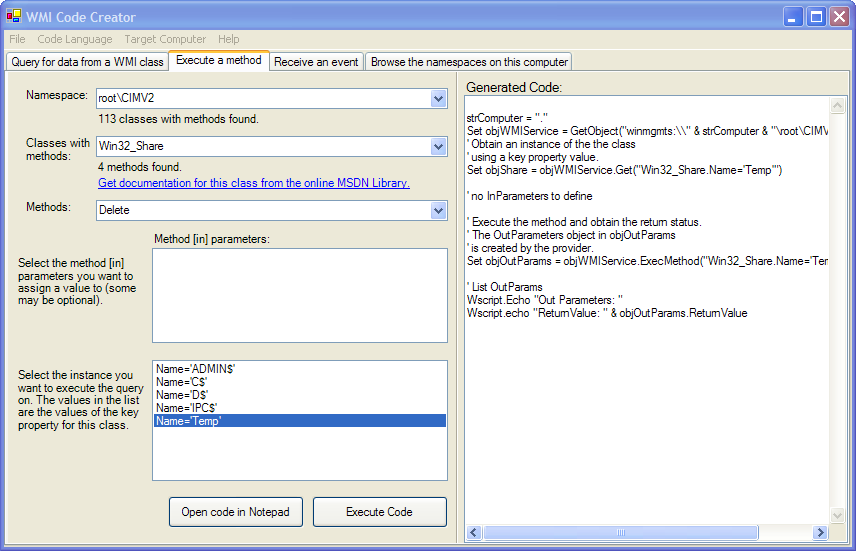
Чтобы долго не занудствовать я приведу пример получения информации об установленном процессоре. В списке Namespaces (пространство имен) выбираем root\CIMV2, в списке Classes (классы) выбираем Win32_Processor. В списке Results (в нем перечислены свойства класса) выбираем Name и нажимаем Execute Code. В появившемся окне видим название (или названия) установленного процессора.

Другой пример — выведем список расшаренных ресурсов. В этот раз выберем класс Win32_Share, в списке свойств выберем Name затем Execute Code. Получили список ресурсов.
Давайте теперь закроем доступ к какому-нибудь ресурсу, в моем случае это Temp. Переходим на закладку Execute a Method в списке классов выбираем все тот же Win32_Share, в списке Methods (методы класса) выбираем Delete, выбираем папку Temp, Execute Code, если все прошло успешно, то папка Temp более не числится в списке общих ресурсов.
Если Вам не хватает возможностей WMI — Вы всегда можете создать собственный класс. Пример создания такого класса уже публиковался на Хабре.
На этом все, желаю удачи в освоении и применении данной технологии.
Enabling Windows Management Instrumentation (WMI) on Windows 10 is essential for system management and monitoring. This guide will walk you through the steps to enable WMI, ensuring your system is ready for administrative tasks and monitoring tools. In a few simple steps, from opening the Services console to starting the WMI service, you’ll be all set.
WMI is a powerful feature in Windows that allows for system management and monitoring. By following these steps, you will ensure WMI is enabled and running on your Windows 10 system.
Step 1: Open the Services Console
To start, you need to access the Services console.
Press the Windows key + R to open the Run dialog box, type «services.msc,» and hit Enter. This will open the Services console where you can manage various Windows services.
Step 2: Locate Windows Management Instrumentation Service
Once in the Services console, you need to find the specific service.
Scroll through the list of services until you locate «Windows Management Instrumentation.» This service is crucial for WMI functionality, so it’s important to ensure it’s available and ready to be enabled.
Step 3: Start the WMI Service
Now, you need to enable the service.
Right-click «Windows Management Instrumentation» and select «Start» from the context menu. If the service is already running, you might see the option to «Restart» instead, which can also ensure it runs smoothly.
Step 4: Set Service to Automatic
To keep WMI running after every restart, set its startup type to automatic.
Right-click the «Windows Management Instrumentation» service again, select «Properties,» and in the «Startup type» dropdown, choose «Automatic.» Click «Apply» and then «OK.»
Step 5: Confirm WMI is Running
Finally, verify that the service is active.
Check the status column in the Services console; it should now show that the WMI service is running. This confirmation means WMI is enabled and operational on your system.
After completing these steps, your Windows 10 system will have WMI enabled, allowing for effective system management and monitoring tasks through various tools and scripts.
Tips for Enabling WMI Windows 10
- Check Dependencies: Ensure dependent services like «RPC» are also running.
- Restart the Computer: Sometimes a reboot is necessary for changes to take effect.
- Use Elevated Permissions: Make sure you have administrative privileges when enabling WMI.
- Manual Restart: If issues persist, manually restarting the service can help.
- WMI Troubleshooting Tool: Utilize built-in tools like «wbemtest» for advanced troubleshooting.
Frequently Asked Questions
What is WMI used for?
WMI is used for system management and monitoring tasks. It allows administrators to query information and perform actions on the system.
Why would I need to enable WMI?
Enabling WMI is essential for using various administrative and monitoring tools that rely on this service for data.
Can I disable WMI if I don’t need it?
Yes, but it’s not recommended as many system management tools and applications rely on WMI.
What should I do if WMI service fails to start?
Check for dependencies, ensure you have the right permissions, and try restarting your computer.
Is WMI available on all versions of Windows?
WMI is available on most Windows versions, including Windows 10, and is enabled by default on many systems.
Summary
- Open the Services console.
- Locate Windows Management Instrumentation service.
- Start the WMI service.
- Set service to automatic.
- Confirm WMI is running.
Conclusion
Enabling Windows Management Instrumentation (WMI) on Windows 10 is a straightforward process that greatly enhances your ability to manage and monitor your system. By following the steps outlined above, you’ve ensured that your system is ready for various administrative tasks and monitoring tools.
Beyond simply enabling WMI, understanding its importance and functionality can empower you in maintaining your system more effectively. It’s not just a background service; it’s a key player in system administration. If you encounter any issues, refer back to the tips and FAQs provided to troubleshoot and resolve common problems.
For further reading, Microsoft’s official documentation on WMI provides in-depth insights and advanced configurations. Make sure to keep your system updated and revisit the WMI settings periodically to ensure everything runs smoothly. Enabling WMI may seem like a small step, but it opens up a world of possibilities for managing your Windows 10 system.
Kermit Matthews is a freelance writer based in Philadelphia, Pennsylvania with more than a decade of experience writing technology guides. He has a Bachelor’s and Master’s degree in Computer Science and has spent much of his professional career in IT management.
He specializes in writing content about iPhones, Android devices, Microsoft Office, and many other popular applications and devices.
Read his full bio here.
Enabling Windows Management Instrumentation (WMI) on a Windows 10 computer is a straightforward process. You’ll begin by ensuring that the WMI service is running, which is crucial for many administrative tasks and applications. Through the Services application, you can locate and start the WMI service if needed. This process allows your computer to provide various system and network information as required. Once enabled, your system will be ready to support any software or script that depends on WMI for data.
Step-by-Step Tutorial on Enabling WMI Windows 10
To enable WMI on Windows 10, follow the steps below. This process will ensure that the WMI service is active and set to run automatically, so it’s always available when needed.
Step 1: Open the Services Application
First, open the Services application on your computer.
You can quickly access it by typing “services” into the Windows search bar and selecting the top result. This tool helps you manage various services running on your Windows 10 PC.
Step 2: Locate the Windows Management Instrumentation Service
Next, find the Windows Management Instrumentation service in the list.
The services are listed alphabetically, so scroll down to “W” to find it. This service is the backbone of WMI, making it essential for numerous system management tasks.
Step 3: Check the Service Status
Now, check the status of the WMI service.
If it’s running, you’re all set! If not, you’ll need to start it manually. Right-click the service and look at the options to see its current state.
Step 4: Start the Service
If necessary, start the WMI service.
To do this, right-click on the service and select “Start.” If the service is already running, you might see “Restart” instead.
Step 5: Set the Startup Type to Automatic
Finally, ensure that the startup type is set to automatic.
This step ensures that WMI starts every time you boot your computer. Right-click the service, select “Properties,” and set the startup type to “Automatic.”
Once you’ve completed these steps, WMI should be active and ready. Your system will now seamlessly support applications and scripts that require WMI to function.
Tips for Enabling WMI Windows 10
- Make sure you have administrator privileges before starting.
- Regularly check the status of WMI if you encounter issues with system management applications.
- Consider using the “Restart” option if WMI isn’t behaving as expected.
- Keep your system updated to ensure WMI functions correctly.
- Use Task Manager to see if WMI is consuming too many resources.
Frequently Asked Questions
What is WMI used for?
WMI is a set of specifications from Microsoft for consolidating the management of devices and applications in a network. It’s used for administrative scripts and applications to retrieve system information.
Can WMI be disabled?
Yes, but doing so might disrupt applications that rely on it for system data. Exercise caution and ensure you understand the consequences before disabling it.
How do I check if WMI is working correctly?
You can test WMI functionality using the WMI Tester (wbemtest). This tool helps you verify if WMI is returning the expected results.
Is WMI available in all versions of Windows 10?
Yes, WMI is a core component available across all versions of Windows 10, offering a consistent interface for management tasks.
What should I do if WMI fails to start?
Try restarting your computer. If that doesn’t work, check for Windows updates or consider using the “Repair WMI” tool found in some third-party applications.
Summary of Steps
- Open Services application.
- Locate WMI service.
- Check service status.
- Start service if needed.
- Set startup type to automatic.
Conclusion
Enabling WMI on Windows 10 is like unlocking a treasure chest of system capabilities. By ensuring that this service is up and running, you open up a world of possibilities for system management tasks and applications. Whether you’re a system administrator keeping tabs on your network or just a curious user trying to explore more of what your computer can do, having WMI enabled is a huge step forward.
Consider diving deeper into WMI scripting or exploring third-party tools that leverage WMI for even more advanced functionality. Consistently checking and maintaining this service can save you headaches down the road, especially when dealing with complex system tasks. If you’re interested in learning more about Windows management tools, Microsoft’s website offers extensive resources and documentation.
Remember, managing your computer’s services like WMI is essential for smooth operation and can dramatically improve your system’s efficiency. Happy computing!
Matt Jacobs has been working as an IT consultant for small businesses since receiving his Master’s degree in 2003. While he still does some consulting work, his primary focus now is on creating technology support content for SupportYourTech.com.
His work can be found on many websites and focuses on topics such as Microsoft Office, Apple devices, Android devices, Photoshop, and more.
WMI comes installed on all of Microsoft’s modern operating systems. What this page will describe is how to enable remote access to WMI.
The following steps should only take a minute or two of your time.
1. Enable remote WMI requests
This setting is usually all that needs to be changed to get WMI working. (Steps 2 and 3 are typically not needed, but they might be in some circumstances)
1. On the target server, go to Administrative Tools -> Computer Management.
2. Expand ‘Services and Applications’
3. Right click for Properties on ‘WMI Control’.
4. Select the Security tab
5. Press the Security button
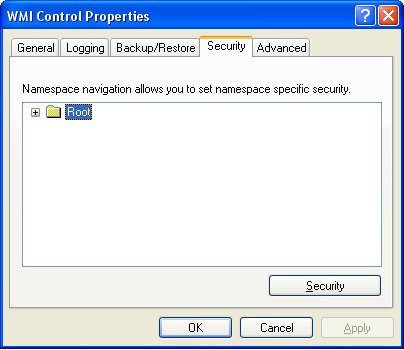
6. Add the monitoring user (if needed), and then be sure to check Remote Enable for the user/group that will be requesting WMI data.
At this point go back and see if this fixes the problem. It might take a couple of minutes for the reports to re-generate.
2. Allow WMI through Windows firewall
All users (including non-administrators) are able to query/read WMI data on the local computer.
For reading WMI data on a remote server, a connection needs to be made from your management computer (where our monitoring software is installed) to the
server that you’re monitoring (the target server). If the target server is running Windows Firewall (aka Internet
Connection Firewall) like what is shipped with Windows XP and Windows 2003, then you need to tell it to let remote WMI
requests through1. This can only be done at the command prompt. Run the following on the target computer if it is running a Windows firewall:
netsh firewall set service RemoteAdmin enable
3. Enable DCOM calls on the remote machine
If the account you are using to monitor the target server is NOT an administrator on the target server,
you need to enable the non-administrator to interact with DCOM by following the simple steps listed
here.
Follow the steps for:
- To grant DCOM remote launch and activation permissions for a user or group
- To grant DCOM remote access permissions
Further Investigation
If the above steps didn’t help, we recommend installing the WMI Administrative Tools from Microsoft. This includes a WMI browser that will let you connect to a remote machine and
browse through the WMI information. That will help to isolate any connectivity/rights issues in a more direct and simple environment. Once the WMI browser can access a remote machine,
our products should be able to as well.
WMI Administrative Tools:
http://www.microsoft.com/downloads/details.aspx?FamilyId=6430F853-1120-48DB-8CC5-F2ABDC3ED314&displaylang=en
Finally, UAC
From reports we’re receiving from the field, it appears UAC needs to be disabled for remote WMI queries to work. With UAC running, an administrator account actually
has two security tokens, a normal user token, and an administrator token (which is only activated when you pass the UAC prompt). Unfortunately, remote requests that
come in over the network get the normal user token for the administrator, and since there is no way to handle a UAC prompt remotely, the token can’t be elevated to
the true-administrator security token.
References
1. https://learn.microsoft.com/en-us/windows/win32/wmisdk/connecting-to-wmi-remotely-with-vbscript?redirectedfrom=MSDN
See «To Configure Connection 1». Our software doesn’t use or need Connection 2.
Other helpful pages
Connecting to WMI Remotely Starting with Windows Vista
Connecting to WMI on a Remote Computer
As you are probably already aware, Microsoft is soon going to be releasing the next version of Windows called… drum roll… Windows 10. Some of you might have already download the production by downloading the technical preview of Windows 10 as part of the Insider Preview. However, what you might not know is that the version number of Windows 10 is also taking a big leap forward from 6.3 to 10.0 (as you can see below).
Windows 8.1 Version Number
Windows 10 Version Number (Technical Preview 2)
Whenever Windows changes version number there is always applications compatibility issues. These have largely been mitigated for Windows 10 applications HOWEVER… WMI filter queries are affected by this change.
The example below might be familiar as it is a common way to apply a GPO to all Versions of WIndows after 7. It would also automatically work for Windows 8 and Windows 8.1 but it will fail for Windows 10.
select * from Win32_OperatingSystem where Version >= “6.1”
The problem stems from the comparison that WMI does as it treats the version as a string and not a number. This means that Version “10” is actually lower than “6.0” as 1 is lower that 6.
As you can see below in my example the same WMI filter as above is evaluating as False on my Windows 10 computer (called Win10).
So… To have a WMI filter that matches Windows 7 or later (including Windows 10) then you need to use the following WMI filter:
select * from Win32_OperatingSystem where Version like “10.%” or Version >=”6.1″
This will evaluate true for Windows 10 AND any version of Windows greater that Windows 7 (6.1) as the report below shows.

In this example I have added used the like operator with the % wildcard so it will match any preview build of Windows 10. This will not work if Microsoft release a version of the OS with 11 version number, but as Microsoft have now said that Windows is going to be a service its a safe bet that this will work for a long while to come.
Of course the final version of Windows 10 has not been released yet so this might still change. However if you are testing Windows 10 in your environment now and you are wondering why the WMI filters GPO’s are applying this is your you can get going today.
Note: The same is also true for Windows Server 2016 as it has the same OS version number.
Thanks to Michale Niehaus for his help with this article.