
В этой статье мы рассмотрим, как централизованно включить и настроить службу удаленного управления Windows Remote Management (WinRM) на компьютерах домена с помощью групповых политик. Напомню, что Windows Remote Management это реализация протокола WS-Management Protocol для удаленного управления клиентскими и серверными ОС Windows. WinRM позволяет удаленно управлять компьютерами через:
- Server Manager (Windows Server);
- PowerShell Remoting (PSSession);
- Windows Admin Center.
Как включить WinRM в Windows вручную?
Служба WinRM установлена во всех современных версиях Windows. В Windows Server она включена по умолчанию, и отключена в десктопных редакциях Windows 11/10/8.1). По умолчанию слушатель службы WinRM listener не принимает подключения. Чтобы проверить это, выполните на клиенте команду:
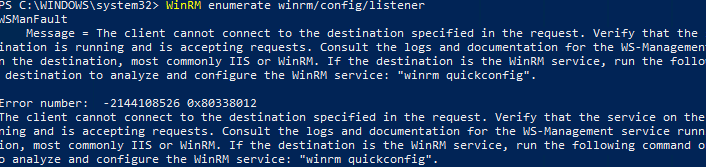
WinRM enumerate winrm/config/listener
Появится ошибка, которая говорит, что служба WinRM не настроена:
WSManFault Message = The client cannot connect to the destination specified in the request. Verify that the service on the destination is running and is accepting requests. Consult the logs and documentation for the WS-Management service running on the destination, most commonly IIS or WinRM. If the destination is the WinRM service, run the following command on the destination to analyze and configure the WinRM service: "winrm quickconfig".
Error number: -2144108526 0x80338012
Чтобы включить и настроить службу WinRM в Windows, достаточно выполнить команду:
winrm quickconfig
или
Enable-PSRemoting –Force
WinRM has been updated to receive requests.
WinRM service type changed successfully.
WinRM service started.
Данная команда изменит тип запуска службы WinRM на автоматический, задаст стандартные настройки WinRM и добавить исключения для WinRM портов (5985 и 5986) в список исключений Windows Defender Firewall.
Настройка WinRM с помощью групповых политик
Вы можете автоматически включить и настроить WinRM на компьютерах домена с помощью групповых политик Windows.
- Откройте консоль редактора Group Policy Management Console (gpmc.msc), выберите контейнер с компьютерами на которых вы хотите включить WinRM и создайте новую политику corpEnableWinRM;
- Откройте политику на редактирование;
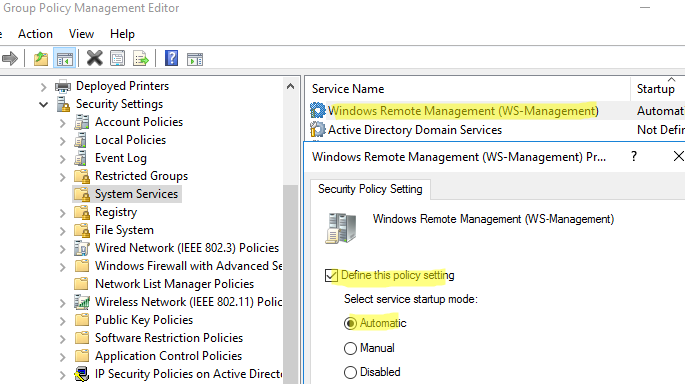
- Перейдите в раздел Computer Configuration -> Policies -> Windows Settings -> Security Settings -> System Services. Найдите службу Windows Remote Service (WS-Management) и настройте ее на автоматический запуск;

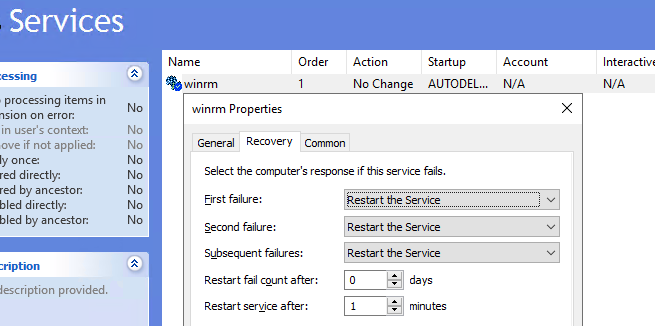
- Теперь перейдите в раздел Computer Policies -> Preferences -> Control Panel Settings -> Services и выберите New -> Service. Укажите имя службы WinRM и на вкладке Recovery задайте действие Restart the Service;
- Перейдите в раздел Computer Configuration -> Policies -> Administrative Templates -> Windows Components -> Windows Remote Management (WinRM) -> WinRM Service. Включите параметр Allow remote server management through WinRM. В поле фильтр IPv4/IPv6 можно указать IP адреса или подсети, на которых нужно слушать удаленные подключения через WinRM. Если вы хотите разрешать принимать WinRM подключения на всех IP адресах, оставьте здесь *;
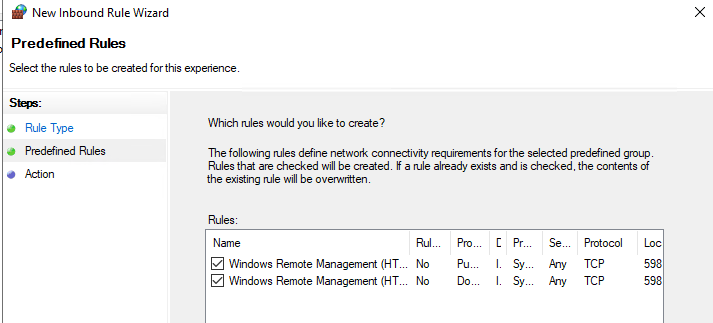
- Откройте в Windows Defender Firewall правила, разрешающие подключаться к WinRM по стандартным портам 5985 и 5986. Перейдите в Computer Configuration -> Policies -> Windows Settings -> Security Settings -> Windows Firewall with Advanced Security -> Windows Firewall with Advanced Security -> Inbound Rules. Выберите predefined rule Windows Remote Management;
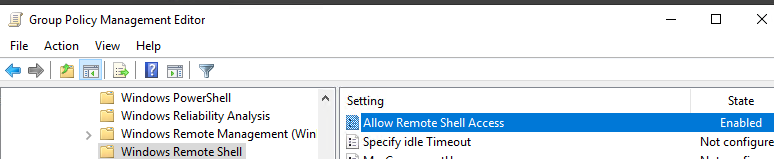
- Перейдите в раздел Computer Configuration -> Policies -> Windows Components -> Windows Remote Shell и включите параметр Allow Remote Shell Access.

Обновите настройки GPO на клиентах и проверьте, что служба WinRM настроилась автоматически. Для диагностики применения групповой политики на клиенте можно использовать утилиту gpresult.
Проверка настроек WinRM
Чтобы проверить, что настройки WinRM на компьютере заданы через групповые политики, выполните команду:
winrm e winrm/config/listener
Команда выведет текущие настройки WinRM листенера. Обратите внимание на строку
Listener [Source="GPO"]
. Она означает, что настройки получены через групповые политики.

Полную конфигурацию службы WinRM можно вывести с помощью команды:
winrm get winrm/config
Теперь нужно попробовать удаленно подключиться к компьютеру через WinRM. Запустите на удаленном компьютере консоль PowerShell с учетной записью с правами администратора на обоих компьютерах и выполните команду:
Test-WsMan YourCompName1
Если WinRM включен, появится такой ответ:
wsmid : http://schemas.dmtf.org/wbem/wsman/identity/1/wsmanidentity.xsd
ProtocolVersion : http://schemas.dmtf.org/wbem/wsman/1/wsman.xsd
ProductVendor : Microsoft Corporation
ProductVersion : OS: 0.0.0 SP: 0.0 Stack: 3.0

Проверить доступность порта 5985 на удаленном компьютере можно так:
Test-NetConnection -ComputerName YourCompName1 -Port 5985
Теперь можно попробовать выполнить интерактивное подключение к удаленному компьютеру через PSRemoting с помощью командлета Enter-PSSession:
Enter-PSSession CompNameHere1
В данном случае подключение было успешно установлено и перед вами открылась консоль удаленного сервера.
По аналогии через PSRemoting на удаленном компьютере команду можно выполнить произвольную команду с помощью Invoke-Command:
Invoke-Command -ComputerName YourCompName1 -ScriptBlock {ipconfig /all}
Если соединение работает, вы увидите на экране вывод команды
ipconfig
.
Также можно выполнить команду на удаленном хосте так:
winrs -r:wsk-w10BO1 dir
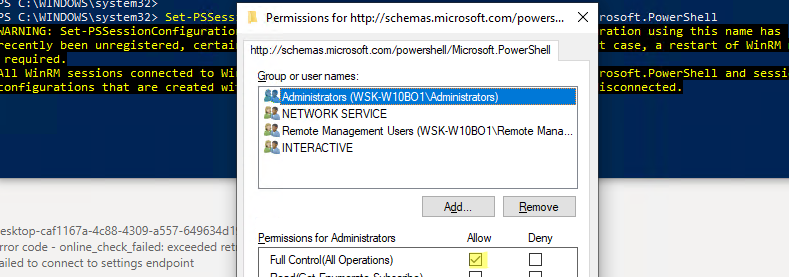
В некоторых случаях при подключении через PSSession может появится ошибка:
Enter-PSSession : Connecting to remote server wsk-w10BO1 failed with the following error message : Access is denied.
CategoryInfo : InvalidArgument: (wsk-w10BO1:String) [Enter-PSSession], PSRemotingTransportException FullyQualifiedErrorId : CreateRemoteRunspaceFailed
В этом случае проверьте настройки разрешения для подключения к WinRM на удаленном компьютере:
Set-PSSessionConfiguration -ShowSecurityDescriptorUI -Name Microsoft.PowerShell
Убедитесь, что ваша учетная запись входит в группу Administrators или Remote Management Users (см. статью об удаленном доступе через WinRM без прав администратора) и им предоставлены права FullControl. Также проверьте, нет ли Deny правил.
Для настройки WinRM и PSRemoting в рабочей группе (без домена AD) рекомендуем использовать эту инструкцию.
Включаем WinRM на Windows-хосте для дальнейшего управления через Ansible
Евгений Стороженко
В руки мне попалась удивительная организация. При наличии более 100 рабочих мест в ней до сих пор используется рабочая группа с именем, как ни парадоксально, WORKGROUP. При этом на сервере развернут корневой домен Active Directory, но рабочие места в него не введены и доступ к сетевым ресурсам соответственно осуществляется с локальными реквизитами. Больше учетных записей богу учетных записей!
Мне честно лениво продолжать управлять сетью такими инструментами. Поднимать доверенные отношения между FreeIPA и Active Directory тоже… И задач по управлению Windows-клиентами, которые не может решить Ansible, я не вижу… А потом спрос на DevOps-ов сейчас хороший, так что самое время создать себе трудностей для их героического решения.
Включаем службу WinRM на машине с Windows 10
Ansible управляется windows-клиентами через службу удаленного управления Windows — WinRM (Windows Remote Managment). По умолчанию она включена на серверных версиях ОС, а для включения на клиентах нужно её дополнительно включить.
Сделать это можно с помощью команды
winrm quickconfig
в моем случае сразу не заработало, получил сообщение, что нельзя чтобы сетевые соединения относились к общедоступным на машине на которой настраивается winrm.
C:\Users\kpa39l>winrm quickconfig
Служба WinRM не настроена на прием запросов на компьютере.
Необходимо внести следующие изменения:

Запустите службу WinRM.
Задайте для типа службы WinRM значение отложенного автозапуска.

Выполнить изменения [y/n]? y

Служба WinRM была обновлена для приема запросов.

Тип службы WinRM успешно изменен.
Служба WinRM запущена.
WSManFault
   Message
       ProviderFault
           WSManFault
               Message = Исключение брандмауэра WinRM не будет работать, поскольку одно из сетевых подключений, установленных для этого компьютера, является общим. Измените тип сетевого подключения либо на доменное, либо на частное и повторите попытку.

Код ошибки: -2144108183 0x80338169
Исключение брандмауэра WinRM не будет работать, поскольку одно из сетевых подключений, установленных для этого компьютера, является общим. Измените тип сетевого подключения либо на доменное, либо на частное и повторите попытку.

C:\Users\kpa39l>

Можно было бы конечно вручную добавить исключения для портов 5985 и 5986 для Брэндмауэра Windows (что firewall (англ.), что brandmauer (нем.) означает горящая стена или сетевой фильтр, я предпочитаю русскоязычные термины использовать). Но быстрее вбить две команды в консоль и выполнить требования безопасности. Чтобы вывести список сетевых подключений с указанием их типа используем команду PowerShell:
PS C:\Users\kpa39l> Get-NetConnectionProfile

Name            : Неопознанная сеть
InterfaceAlias  : Ethernet
InterfaceIndex  : 10
NetworkCategory : Public
IPv4Connectivity : Internet
IPv6Connectivity : NoTraffic
В строке NetworkCategory как раз и указывается тип профиля сети. Может быть Public, Private и DomainAuthenticated. Как понятно из сообщения нужно его изменить на Privat для моего случая. В домен-то я машины не включал. И теперь по индекс сетевого интерфейса InterfaceIndex, меняю тип сети на Private:
Set-NetConnectionProfile -InterfaceIndex 10 -NetworkCategory Private
При успешном исполнении команда никакой вывод не генерирует.
И теперь можно еще раз запустить команду включения WinRM, для разнообразия используя командлет PowerShell:
PS C:\Users\kpa39l> Enable-PSRemoting –Force
Служба WinRM уже настроена для приема запросов на этом компьютере.
Служба WinRM обновлена для удаленного управления.
Исключение брандмауэра WinRM включено.
Параметр LocalAccountTokenFilterPolicy настроен так, чтобы предоставлять административные права локальным пользователям удаленным образом.
Теперь и можно проверить настройки WinRM на настроенной машине:
PS C:\Users\kpa39l> winrm get winrm/config
Config
   MaxEnvelopeSizekb = 500
   MaxTimeoutms = 60000
   MaxBatchItems = 32000
   MaxProviderRequests = 4294967295
   Client
       NetworkDelayms = 5000
       URLPrefix = wsman
       AllowUnencrypted = false
       Auth
           Basic = true
           Digest = true
           Kerberos = true
           Negotiate = true
           Certificate = true
           CredSSP = false
       DefaultPorts
           HTTP = 5985
           HTTPS = 5986
       TrustedHosts
   Service
       RootSDDL = O:NSG:BAD:P(A;;GA;;;BA)(A;;GR;;;IU)S:P(AU;FA;GA;;;WD)(AU;SA;GXGW;;;WD)
       MaxConcurrentOperations = 4294967295
       MaxConcurrentOperationsPerUser = 1500
       EnumerationTimeoutms = 240000
       MaxConnections = 300
       MaxPacketRetrievalTimeSeconds = 120
       AllowUnencrypted = false
       Auth
           Basic = false
           Kerberos = true
           Negotiate = true
           Certificate = false
           CredSSP = false
           CbtHardeningLevel = Relaxed
       DefaultPorts
           HTTP = 5985
           HTTPS = 5986
       IPv4Filter = *
       IPv6Filter = *
       EnableCompatibilityHttpListener = false
       EnableCompatibilityHttpsListener = false
       CertificateThumbprint
       AllowRemoteAccess = true
   Winrs
       AllowRemoteShellAccess = true
       IdleTimeout = 7200000
       MaxConcurrentUsers = 2147483647
       MaxShellRunTime = 2147483647
       MaxProcessesPerShell = 2147483647
       MaxMemoryPerShellMB = 2147483647
       MaxShellsPerUser = 2147483647

PS C:\Users\kpa39l>
Проверять, что нужный порт открыт и к машине можно использовать PowerShell аналог ping:
Test-NetConnection -ComputerName ITHEAD -Port 5985
А теперь доступны ли службы WinRM.
PS C:\Users\kpa39l> Test-WsMan 192.168.150.80
wsmid          : http://schemas.dmtf.org/wbem/wsman/identity`/1/wsmanidentity.xsd
ProtocolVersion : http://schemas.dmtf.org/wbem/wsman/1/wsman.xsd
ProductVendor  : Microsoft Corporation
ProductVersion : OS: 0.0.0 SP: 0.0 Stack: 3.0
И теперь наконец-то подключаемся к управлению с помощью команды Enter-PSSession. А вот и нет, потому что права на доступ отсутствуют. Помнишь, что у нас-то домена нет? %) А как их настроить я напишу дальше.
Настраиваем доступ к машине с WinRM без Kerberos
Enabling Windows Remote Management (WinRM) on Windows 10 is a simple process that involves tweaking a few settings. This will allow you to manage and configure your Windows machine remotely. Here’s a quick overview: open a command prompt with administrative privileges, and run the command: winrm quickconfig. This will enable the WinRM service and set it up for basic remote management.
Let’s get into the nitty-gritty of enabling WinRM on your Windows 10 machine. Follow these steps to ensure your computer is set up for remote management.
Step 1: Open Command Prompt as Administrator
Press Win + X, then choose «Command Prompt (Admin)» from the menu.
Opening Command Prompt as an administrator ensures you have the necessary permissions to make system changes. This step is crucial because without admin privileges, the commands won’t work.
Step 2: Run the Command
Type winrm quickconfig and press Enter.
Running this command will check the WinRM service, and if it’s not already running, it will prompt you to start and configure it. Simply follow the prompts.
Step 3: Confirm Prompts
Type y and press Enter to confirm any prompts that appear.
You may be asked if you want to make changes to the firewall or start the WinRM service. Typing y and pressing Enter will confirm these actions and proceed with the setup.
Step 4: Verify the Configuration
Run winrm get winrm/config to verify the configuration.
This command will show you the current WinRM settings, helping you confirm that the service is correctly configured and running.
Step 5: Adjust Firewall Settings (If Necessary)
Open Windows Firewall settings and allow WinRM traffic through.
If you’re having trouble connecting remotely, you might need to manually adjust your firewall settings to allow WinRM traffic. This can be done through the Windows Firewall interface.
Step 6: Run a Test Connection
Test the connection using Test-WSMan in PowerShell.
Running this command will help you ensure that you can connect to the remote computer using WinRM. Replace “ with the actual name of your remote machine.
Once you’ve completed these steps, your Windows 10 machine will be ready for remote management. You can now use tools like PowerShell Remoting or other remote management tools to connect and manage your computer from anywhere.
Tips for Enabling WinRM on Windows 10
- Make sure your Windows is updated to the latest version for compatibility.
- If you encounter issues, check the Event Viewer for detailed error messages.
- Use strong passwords and secure your remote connections to protect your machine.
- Periodically review your WinRM settings to ensure they meet your security needs.
- Familiarize yourself with PowerShell commands for more advanced remote management capabilities.
Frequently Asked Questions
What is WinRM used for?
WinRM is used for remote management of Windows machines, allowing administrators to perform tasks from a remote location.
Is WinRM enabled by default on Windows 10?
No, WinRM is not enabled by default on Windows 10. You need to enable it manually using the steps outlined above.
Can I use WinRM on a home network?
Yes, you can use WinRM on a home network, but ensure your network is secure, as remote management opens up potential security risks.
Do I need PowerShell to use WinRM?
While PowerShell is commonly used with WinRM, you can use other management tools as well. However, PowerShell offers more advanced capabilities.
How do I disable WinRM?
To disable WinRM, open Command Prompt as an administrator and run the command winrm delete winrm/config.
Summary
- Open Command Prompt as Administrator.
- Run
winrm quickconfig. - Confirm prompts.
- Verify the configuration.
- Adjust firewall settings if necessary.
- Run a test connection.
Conclusion
Enabling WinRM on Windows 10 can open up a world of possibilities for remote management and troubleshooting. Whether you’re a seasoned IT professional or just someone looking to manage your home network more effectively, knowing how to enable and configure WinRM is an invaluable skill.
By following the steps laid out in this guide, you’ll find the process straightforward and easy to execute. Remember to keep security in mind as you configure your settings and to periodically review your configurations. If you’re interested in learning more, consider diving into advanced PowerShell commands or exploring other remote management tools that integrate with WinRM.
Feel free to drop any questions or experiences you have in the comments. Happy managing!
Matt Jacobs has been working as an IT consultant for small businesses since receiving his Master’s degree in 2003. While he still does some consulting work, his primary focus now is on creating technology support content for SupportYourTech.com.
His work can be found on many websites and focuses on topics such as Microsoft Office, Apple devices, Android devices, Photoshop, and more.
To catch all the potential issues,
I take two Windows 10 machines. WinRM was never set up on either.
All attempts and errors will be documented.
The server machine has Windows 10 Home on board.
Note that you cannot enable the built-in Administrator account on the Home edition.
There are even no “Local Users and Groups” in Computer Management.
The client laptop’s OS is Windows 10 Enterprise.
It’s the most powerful version of Windows.
But you don’t even need to enable WinRM service on it to use it as a client.
See: http://www.hurryupandwait.io/blog/understanding-and-troubleshooting-winrm-connection-and-authentication-a-thrill-seekers-guide-to-adventure
See: http://www.hurryupandwait.io/blog/safely-running-windows-automation-operations-that-typically-fail-over-winrm-or-powershell-remoting
See: https://powershell.one/
Configure Server Machine with winrm quickconfig
winrm quickconfig
WinRM is not set up to receive requests on this machine.
The following changes must be made:

Start the WinRM service.
Set the WinRM service type to delayed auto start.

Make these changes [y/n]? y

Error: One or more update steps could not be completed.

Could not change the WinRM service type: Access is denied.
Could not start the WinRM service: Access is denied.
WSManFault
    Message The client cannot connect to the destination specified in the request. Verify that the service on the destination is running and is accepting requests. Consult the logs and documentation for the WS-Management service running on the destination, most commonly IIS or WinRM. If the destination is the WinRM service, run the following command on the destination to analyze and configure the WinRM service: "winrm quickconfig".

Error number:  -2144108526 0x80338012
The client cannot connect to the destination specified in the request. Verify that the service on the destination is running and is accepting requests. Consult the logs and documentation for the WS-Management service running on the destination, most commonly IIS or WinRM. If the destination is the WinRM service, run the following command on the destination to analyze and configure the WinRM service: "winrm quickconfig".
Run cmd.exe as Administrator
Find “cmd” in Start Menu and Shift+Ctrl+Enter on it. Or Run as Administrator in the context menu.
winrm quickconfig
WinRM is not set up to receive requests on this machine.
The following changes must be made:

Start the WinRM service.
Set the WinRM service type to delayed auto start.

Make these changes [y/n]? y

WinRM has been updated to receive requests.

WinRM service type changed successfully.
WinRM service started.
WSManFault
    Message
        ProviderFault
            WSManFault
                Message WinRM firewall exception will not work since one of the network connection types on this machine is set to Public. Change the network connection type to either Domain or Private and try again.

Error number:  -2144108183 0x80338169
WinRM firewall exception will not work since one of the network connection types on this machine is set to Public. Change the network connection type to either Domain or Private and try again.
Make Adapters Public
You may also try running quickconfig with “-quiet”
(GUI images here)
Or in PowerShell:
Name             : ..........................
InterfaceAlias   : Wi-Fi
InterfaceIndex   : 3
NetworkCategory  : Private
IPv4Connectivity : Internet
IPv6Connectivity : NoTraffic

Name             : Local Area Connection 2
InterfaceAlias   : Local Area Connection
InterfaceIndex   : 17
NetworkCategory  : Public
IPv4Connectivity : LocalNetwork
IPv6Connectivity : NoTraffic
The following works only when PowerShell is running as administrator. (Same, search for “PowerShell” in the Start Menu and then Shift+Ctrl+Enter.)
Set-NetConnectionProfile -InterfaceIndex 3 -NetworkCategory Private
Set-NetConnectionProfile -InterfaceIndex 17 -NetworkCategory Private
It Works!
winrm quickconfig
WinRM service is already running on this machine.
WinRM is not set up to allow remote access to this machine for management.
The following changes must be made:

Enable the WinRM firewall exception.
Configure LocalAccountTokenFilterPolicy to grant administrative rights remotely to local users.

Make these changes [y/n]? y

WinRM has been updated for remote management.

WinRM firewall exception enabled.
Configured LocalAccountTokenFilterPolicy to grant administrative rights remotely to local users.
Works!
Check WinRM from Client Laptop
Check from another machine. 127.0.0.1 is never checked by the firewall on Windows.
The easiest way to me is to take another Windows laptop connected to the same local network and run some command.
Find out your IP address
ipconfig
Windows IP Configuration


Unknown adapter Local Area Connection:

   Connection-specific DNS Suffix  . :
   Link-local IPv6 Address . . . . . : fe80::4190:e313:1b60:7fb6%17
   IPv4 Address. . . . . . . . . . . : 10.8.0.10
   Subnet Mask . . . . . . . . . . . : 255.255.255.0
   Default Gateway . . . . . . . . . :

Ethernet adapter Ethernet 2:

   Media State . . . . . . . . . . . : Media disconnected
   Connection-specific DNS Suffix  . :

Wireless LAN adapter Local Area Connection* 9:

   Media State . . . . . . . . . . . : Media disconnected
   Connection-specific DNS Suffix  . :

Wireless LAN adapter Local Area Connection* 10:

   Media State . . . . . . . . . . . : Media disconnected
   Connection-specific DNS Suffix  . :

Wireless LAN adapter Wi-Fi:

   Connection-specific DNS Suffix  . :
   Link-local IPv6 Address . . . . . : fe80::d5cc:470c:4ad9:3dab%3
   IPv4 Address. . . . . . . . . . . : 192.168.1.138
   Subnet Mask . . . . . . . . . . . : 255.255.255.0
   Default Gateway . . . . . . . . . : 192.168.1.1

Ethernet adapter Bluetooth Network Connection:

   Media State . . . . . . . . . . . : Media disconnected
   Connection-specific DNS Suffix  . :
Try First Time
Let’s query WinRM client connection settings on your machine from the client laptop.
(We’ll soon alter them on the client laptop.)
winrm g winrm/config/client -r:192.168.1.138
WSManFault
    Message The WinRM client cannot process the request. If the authentication scheme is different from Kerberos, or if the client computer is not joined to a domain, then HTTPS transport must be used or the destination machine must be added to the TrustedHosts configuration setting. Use winrm.cmd to configure TrustedHosts. Note that computers in the TrustedHosts list might not be authenticated. You can get more information about that by running the following command: winrm help config.

Error number:  -2144108316 0x803380E4
The WinRM client cannot process the request. If the authentication scheme is different from Kerberos, or if the client computer is not joined to a domain, then HTTPS transport must be used or the destination machine must be added to the TrustedHosts configuration setting. Use winrm.cmd to configure TrustedHosts. Note that computers in the TrustedHosts list might not be authenticated. You can get more information about that by running the following command: winrm help config.
Set Trusted Hosts on Client Laptop in the Registry (Easy Way)
Open regedit.
Navigate to Computer\HKEY_LOCAL_MACHINE\SOFTWARE\Microsoft\Windows\CurrentVersion\WSMAN\Client.
Add trusted_hosts String value (REG_SZ) with value 192.168.1.138.
This don’t require setting up WinRM.
Set Trusted Hosts on Client Laptop with the winrm Command (Not Necessary)
Doing that in the registry is enough.
winrm g winrm/config/client
WSManFault
    Message The client cannot connect to the destination specified in the request. Verify that the service on the destination is running and is accepting requests. Consult the logs and documentation for the WS-Management service running on the destination, most commonly IIS or WinRM. If the destination is the WinRM service, run the following command on the destination to analyze and configure the WinRM service: "winrm quickconfig".

Error number:  -2144108526 0x80338012
The client cannot connect to the destination specified in the request. Verify that the service on the destination is running and is accepting requests. Consult the logs and documentation for the WS-Management service running on the destination, most commonly IIS or WinRM. If the destination is the WinRM service, run the following command on the destination to analyze and configure the WinRM service: "winrm quickconfig".
It doesn’t work because WinRM service is not running. winrm quickconfig helps:
winrm g winrm/config
WSManFault
    Message
        ProviderFault
            WSManFault
                Message Access is denied.

Error number:  -2147024891 0x80070005
Access is denied.
Even if you’re is in the BUILTIN\Administrators group,
you cannot access the whole config object
because UAC removes administrator privilegies from the security context.
You can access the client part though:
winrm g winrm/config/client
Client
    NetworkDelayms 5000
    URLPrefix wsman
    AllowUnencrypted false
    Auth
        Basic true
        Digest true
        Kerberos true
        Negotiate true
        Certificate true
        CredSSP false
    DefaultPorts
        HTTP 5985
        HTTPS 5986
    TrustedHosts  192.168.1.138
Authentication
This is what you see with the incorrect password:
winrm g winrm/config/client -r:192.168.1.138 -u:gsovetov -p:qwe
WSManFault
    Message Access is denied.
With the correct password:
winrm g winrm/config/client -r:192.168.1.138 -u:gsovetov -p:PaSsW0Rd
Client
    NetworkDelayms 5000
    URLPrefix wsman
    AllowUnencrypted false
    Auth
        Basic true
        Digest true
        Kerberos true
        Negotiate true
        Certificate true
        CredSSP false
    DefaultPorts
        HTTP 5985
        HTTPS 5986
    TrustedHosts
Windows uses local credentials to connect to the remote machine
if you don’t specify any:
winrm g winrm/config/client -r:192.168.1.138
Client
    NetworkDelayms 5000
    URLPrefix wsman
    AllowUnencrypted false
    Auth
        Basic true
        Digest true
        Kerberos true
        Negotiate true
        Certificate true
        CredSSP false
    DefaultPorts
        HTTP 5985
        HTTPS 5986
    TrustedHosts
Example: Get current time from the remote machine
Here you’ll see how to discover and explore WMI classes.
Some pages or websites may go unavailable in future.
That’s why I’ll tell you what to search for.
- Search for
windows wmi current timeon the internet. - You’ll find: https://docs.microsoft.com/en-us/windows/win32/wmisdk/wmi-tasks—dates-and-times.
- Look at the code. There’s
Win32_OperatingSystemWMI class. - Search for it on the internet
"Win32_OperatingSystem". Quotes tell the search engine not to interpret the name as several words. - You’ll find: https://docs.microsoft.com/en-us/windows/win32/cimwin32prov/win32-operatingsystem.
- There are various data about the OS. Including the current time. We’ll query it remotely.
A class is identified with its URL.
This class’ URL is http://schemas.microsoft.com/wbem/wsman/1/wmi/root/cimv2/Win32_OperatingSystem.
(Find it in the class’ documentation.)
Let’s query it.
winrm get http://schemas.microsoft.com/wbem/wsman/1/wmi/root/cimv2/Win32_OperatingSystem
Win32_OperatingSystem
    BootDevice \Device\HarddiskVolume1
    BuildNumber 19043
    ...
    LocalDateTime
        Datetime 2021-09-24T21:23:10.616+03:00
    ...
The winrm command supports namespace aliases.
An alias is replaced with its URL, which become the prefix of the full URL.
Refer to winrm help aliases.
All the following commands produce the same output:
winrm get http://schemas.microsoft.com/wbem/wsman/1/wmi/root/cimv2/Win32_OperatingSystem
winrm get winrm/wmi/root/cimv2/Win32_OperatingSystem
winrm get wsman/wmi/root/cimv2/Win32_OperatingSystem
winrm get wmi/root/cimv2/Win32_OperatingSystem
winrm get wmicimv2/Win32_OperatingSystem
get can be abbreviated as g.
The following commands produce the same output:
winrm get wmicimv2/Win32_OperatingSystem
winrm g wmicimv2/Win32_OperatingSystem
Querying objects
The OS object is special — it’s a singleton.
Most WMI classes may have multiple instances.
To list all of them, insted of get, use enumerate,
which can be contracted to enum or e.
The wanted object needs to be selected.
See more examples in winrm help get and winrm help enumerate.
Command that manipulated the config above used the winrm alias and queried the client config.
The following commands produce the same result:
winrm g winrm/config/client
winrm g http://schemas.microsoft.com/wbem/wsman/1/config/client
Reverse-engineering the protocol
Not for use in production!
WinRM is based on SOAP, which is based on HTTP(S).
Run it over HTTP and capture traffic with Wireshark, Network Monitor or Message Analyzer.
HTTP connections are called “unencrypted” in the WinRM terminology.
Allow unencrypted connections on the client and the server.
winrm get wmicimv2/Win32_OperatingSystem -r:192.168.1.138 -un
WSManFault
    Message The WinRM client cannot process the request. Unencrypted traffic is currently disabled in the client configuration. Change the client configuration and try the request again.

Error number:  -2144108322 0x803380DE
The WinRM client cannot process the request. Unencrypted traffic is currently disabled in the client configuration. Change the client configuration and try the request again.
HTTP (unencrypted) is not allowed on the client laptop.
Allow on the client in the registry
Key: HKLM\SOFTWARE\Microsoft\Windows\CurrentVersion\WSMAN\Client
Value name: allow_unencrypted
Value type: DWORD (boolean values are usually represented with this type)
Value data: 1
Allow on the client with the winrm command
winrm set winrm/config/client @{AllowUnencrypted="true"}
WSManFault
    Message Access is denied.

Error number:  -2147024891 0x80070005
Access is denied.
Administrative privilegies are required to modify the client config.
(Without the privilegies, you can only read it .)
Run cmd.exe as administrator and try again:
winrm set winrm/config/client @{AllowUnencrypted="true"}
Client
    NetworkDelayms 5000
    URLPrefix wsman
    AllowUnencrypted true
    Auth
        Basic true
        Digest true
        Kerberos true
        Negotiate true
        Certificate true
        CredSSP false
    DefaultPorts
        HTTP 5985
        HTTPS 5986
    TrustedHosts 192.168.1.138
Try again after unencrypted connections are allowed on the client side
winrm get wmicimv2/Win32_OperatingSystem -r:192.168.1.138 -un
WSManFault
    Message Access is denied.

Error number:  -2147024891 0x80070005
Access is denied.
Unencrypted connections seem to be prohibited on the server side too.
Allow unencrypted on the server side
winrm set winrm/config/service @{AllowUnencrypted="true"}
WSManFault
    Message
        ProviderFault
            WSManFault
                Message Access is denied.

Error number:  -2147024891 0x80070005
Access is denied.
winrm g winrm/config/service
WSManFault
    Message
        ProviderFault
            WSManFault
                Message Access is denied.

Error number:  -2147024891 0x80070005
Access is denied.
winrm g winrm/config
WSManFault
    Message
        ProviderFault
            WSManFault
                Message Access is denied.

Error number:  -2147024891 0x80070005
Access is denied.
You need administrator privilegies to modify the service config, to read the service config or the whole config.
winrm set winrm/config/service @{AllowUnencrypted="true"}
Service
    RootSDDL O:NSG:BAD:P(A;;GA;;;BA)(A;;GR;;;IU)S:P(AU;FA;GA;;;WD)(AU;SA;GXGW;;;WD)
    MaxConcurrentOperations 4294967295
    MaxConcurrentOperationsPerUser 1500
    EnumerationTimeoutms 240000
    MaxConnections 300
    MaxPacketRetrievalTimeSeconds 120
    AllowUnencrypted true
    Auth
        Basic false
        Kerberos true
        Negotiate true
        Certificate false
        CredSSP false
        CbtHardeningLevel Relaxed
    DefaultPorts
        HTTP 5985
        HTTPS 5986
    IPv4Filter *
    IPv6Filter *
    EnableCompatibilityHttpListener false
    EnableCompatibilityHttpsListener false
    CertificateThumbprint
    AllowRemoteAccess true
Try with unencrypted connect allowed on the server
winrm get wmicimv2/Win32_OperatingSystem -r:192.168.1.138 -un
Win32_OperatingSystem
    BootDevice \Device\HarddiskVolume1
    BuildNumber 19043
    ...
    WindowsDirectory C:\Windows
It works!
Authenticating other clients
Enable Basic authentication
You need administrator privilegies to modify the service config.
winrm set winrm/config/service/auth @{Basic="true"}
Disclaimer:
This will create a very basic unsecured/not encrypted connection. This should only be done in a test lab environment. This is being setup in a Non Domain/Work group setting.
There is no certificate or DNS infrastructure in place. The connections will be going over TCP 5985. This is the Default TCP Port for not encrypted WinRM connections.
Environment:
2 x Windows 10 Virtual Machines on the same subnet.
WinRM1

WinRM2

Prerequisites:
Set Network Category to Private:
All network adapters should be set to “Private” or “DomainAuthenticated”.
If even one network adapter is set to Public, the firewall rule will NOT be added.
Since we are in a workgroup setting, the adapters will be set to “Private”
To Check what the network adapters Network Category is set to, run the following PowerShell command.
Get-NetConnectionProfile | Select InterfaceAlias,NetworkCategory

As can be seen above by default this is set to Public.
If you try to enable WinRM using this powerShell command
Enable-PSRemoting –force
You will get similar error message to this
“Set-WSManQuickConfig : <f:WSManFault xmlns:f=”http://schemas.microsoft.com/wbem/wsman/1/wsmanfault” Code=”2150859113″ Machine=”localhost”><f:Message><f:ProviderFault
provider=”Config provider” path=”%systemroot%\system32\WsmSvc.dll”><f:WSManFault xmlns:f=”http://schemas.microsoft.com/wbem/wsman/1/wsmanfault” Code=”2150859113″
Machine=”WinRM1″><f:Message>WinRM firewall exception will not work since one of the network connection types on this machine is set to Public. Change the network
connection type to either Domain or Private and try again. </f:Message></f:WSManFault></f:ProviderFault></f:Message></f:WSManFault>
At line:116 char:17
+ Set-WSManQuickConfig -force
+ ~~~~~~~~~~~~~~~~~~~~~~~~~~~
+ CategoryInfo : InvalidOperation: (:) [Set-WSManQuickConfig], InvalidOperationException
+ FullyQualifiedErrorId : WsManError,Microsoft.WSMan.Management.SetWSManQuickConfigCommand”
No Firewall exceptions have been made because at least one network adapter has its Network category set to “Public”
How to Fix This:
A quick and insecure way to change all network adapters to “Private” can be done via the following powershell command.
Get-NetConnectionProfile | Set-NetConnectionProfile -NetworkCategory Private

Enabling WinRM:
On each Device run the following powershell command:
Enable-PSRemoting –force
This time you should see:
WinRM has been updated to receive requests.
WinRM service type changed successfully.
WinRM service started.
WinRM has been updated for remote management.
WinRM firewall exception enabled.
Configured LocalAccountTokenFilterPolicy to grant administrative rights remotely to local users.”

Check if WinRM is listening for Connections:
To check if the service is listening use the following PowerShell command
Get-NetTCPConnection | Where-Object -Property LocalPort -EQ 5985
You should see something like.
LocalAddress LocalPort RemoteAddress RemotePort State AppliedSetting OwningProcess
———— ——— ————- ———- —– ————– ————-
:: 5985 :: 0 Listen 4

At this stage we are still unable to establish a connection as the “Remote/Destination” device is not in our Local devices “TrustedHosts List”.
As we do not have DNS available IP Addresses will be used.
Attempting to establish a session from WinRM1/10.10.10.11 to WinRM2/10.10.10.12
If we try to establish a PSSession to the other Device we will get the following error.
$Session = New-PSSession -ComputerName 10.10.10.12
New-PSSession : [10.10.10.12] Connecting to remote server 10.10.10.12 failed with the following error message : The WinRM client cannot process the request. If the
authentication scheme is different from Kerberos, or if the client computer is not joined to a domain, then HTTPS transport must be used or the destination machine must
be added to the TrustedHosts configuration setting. Use winrm.cmd to configure TrustedHosts. Note that computers in the TrustedHosts list might not be authenticated.
You can get more information about that by running the following command: winrm help config. For more information, see the about_Remote_Troubleshooting Help topic.
At line:1 char:12
+ $Session = New-PSSession -ComputerName 10.10.10.12
+ ~~~~~~~~~~~~~~~~~~~~~~~~~~~~~~~~~~~~~~~
+ CategoryInfo : OpenError: (System.Manageme….RemoteRunspace:RemoteRunspace) [New-PSSession], PSRemotingTransportException
+ FullyQualifiedErrorId : ServerNotTrusted,PSSessionOpenFailed
”

Adding Trusted Hosts:
Run the following command to add the other Device into the TrustedHosts List.
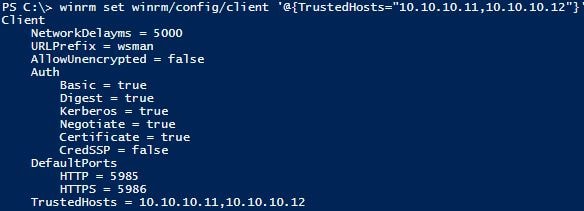
winrm set winrm/config/client '@{TrustedHosts="10.10.10.11,11.10.10.12"}'
Both servers have been added in the command above so that it is obvious how to add in multiple hosts
Making a connection:
Now lets attempt a connection from from WinRM1/10.10.10.11 to WinRM2/10.10.10.12
$Session = New-PSSession -ComputerName 10.10.10.12
It works!

Verify the connection:
PS C:\> Invoke-Command -Session $Session -ScriptBlock {hostname}
WinRM1
Inspect the port being used:
Get-NetTCPConnection | Where-Object -Property RemotePort -EQ 5985 | ft -AutoSize
LocalAddress LocalPort RemoteAddress RemotePort State AppliedSetting OwningProcess
———— ——— ————- ———- —– ————– ————-
10.10.10.11 1565 10.10.10.12 5985 Established Internet 3904
10.10.10.11 1563 10.10.10.12 5985 TimeWait 0
10.10.10.11 1558 10.10.10.12 5985 Established Internet 3904

The Script the Code:
Below is the essential commands needed to get WinRM up and running between the two Non Domain/Workgroup Windows 10 Devices
WinRM1 10.10.10.11
WinRM2 10.10.10.12
#Run this on both devices
#Set all network adapters to Private
Get-NetConnectionProfile | Set-NetConnectionProfile -NetworkCategory Private
#Enable PSRemoting
Enable-PSRemoting –force
#Add Trusted Hosts
winrm set winrm/config/client '@{TrustedHosts="10.10.10.11,11.10.10.12"}'