
В отличие от своих предшественников, Windows 10 не позволяет вам легко отключить автоматическое обновление Windows. Классическая панель обновления Windows, которая позволяет пользователям отключить автоматическое обновление, было исключено из Windows 10, и нет никакой возможности в настройках системы отключить автоматическое обновление.
Отключить автоматическое обновление в Windows 10 с помощью реестра.
Хорошей новостью является то, что можно изменить настройки по умолчанию Windows Update, с помощью редактирования реестра. Кроме того, все настройки обновления Windows которые есть в групповой политике имеются также в реестре.
Есть способ, чтобы полностью отключить автоматическое обновление (не проверять наличие обновлений), в Windows 10 с помощью реестра.
В этом руководстве, мы увидим, как отключить или настроить автоматическое обновление Windows, отредактировав реестр.
- Способ 1 — отключить автоматическое обновление
- Способ 2 — расширенные настройки -настроить автоматическое обновление
Способ 1 из 2 — Полностью отключить автоматическое обновление.
Важно: Мы рекомендуем Вам создать точку восстановления системы перед редактированием реестра в случае, если что-то пойдет не так!
Шаг 1: Win+R в строке наберем Regedit, нажимаем клавишу Enter
Шаг 2: В редакторе реестра перейдите к следующему разделу:
HKEY_LOCAL_MACHINE\SOFTWARE\Policies\Microsoft\Windows
Шаг 3: Кликните правой кнопкой мыши на разделе Windows (как показано на рисунке), выберете Создать/ Раздел.
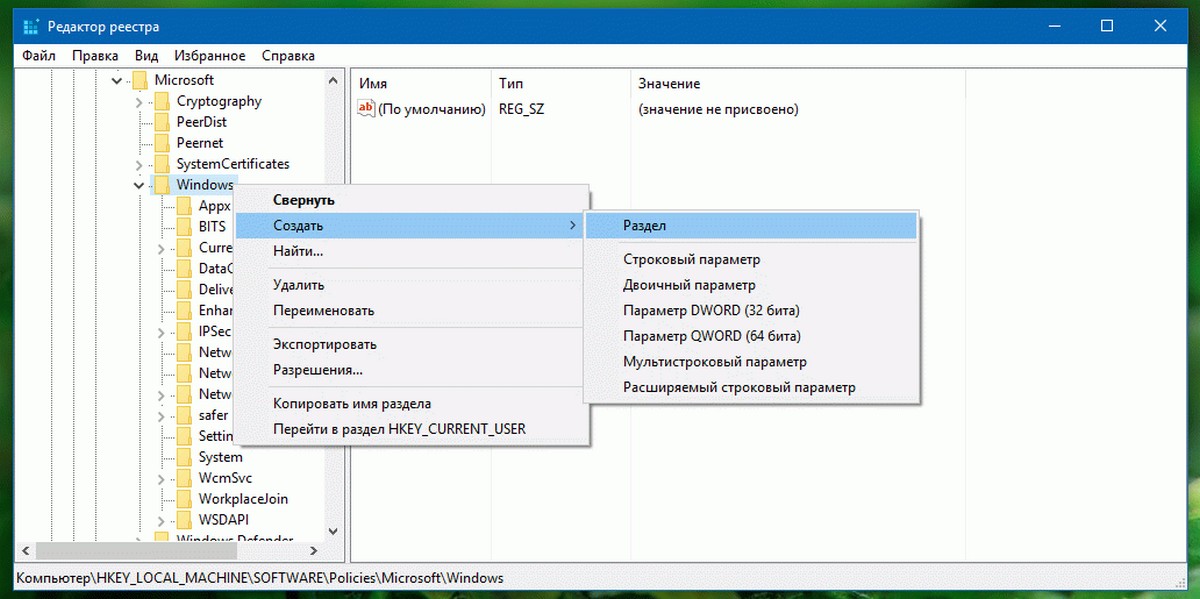
Введите имя как WindowsUpdate (без пробела). Обратите внимание, что после создания нового раздела, нажмите правой кнопкой мыши на нем, а затем выберите пункт — Переименовать, чтобы переименовать его в WindowsUpdate.
Шаг 4: Теперь, когда вы создали раздел WindowsUpdate, кликните правой кнопкой мыши на разделе WindowsUpdate, и выберите Создать \ Раздел и установите его имя как AU.
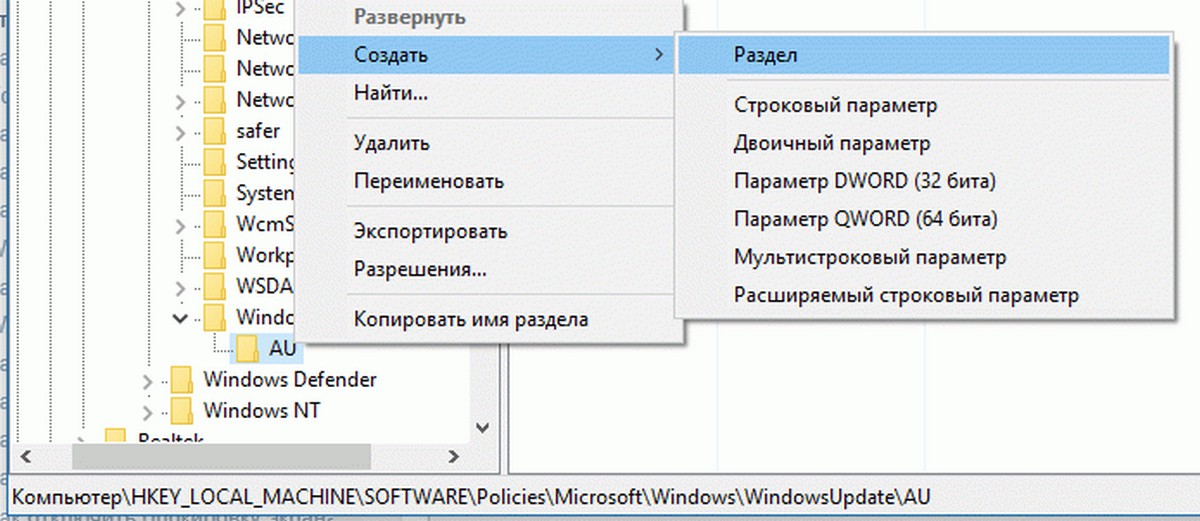
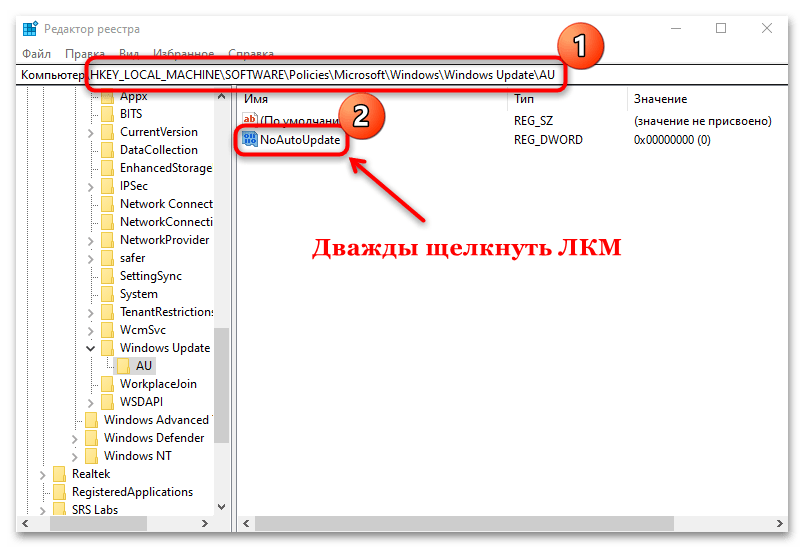
Шаг 5: С правой стороны нажмите на раздел AU, правой кнопкой мыши, в контекстном меню выберите Создать, Параметр DWORD (32 бита), с именем NoAutoUpdate.
Шаг 6: И, наконец, дважды кликните на NoAutoUpdate, и установите его значение: 1
0 — включить автоматическое обновление
1 — отключить автоматические обновления
При выключении автоматического обновления, Windows никогда не будет проверять наличие обновлений. Если вы перейдете в настройки Windows, вы увидите Никогда не проверять наличие обновлений.
Способ 2 из 2 — Расширенные настройки — обновления Windows 10.
Если вы не хотите, полностью отключить автоматическое обновление, но хотите контролировать, как будут установлены обновления, вы можете сделать это с помощью приведённых ниже шагов.
Шаг 1: Следуйте инструкциям указанным в 1 способе для создания WindowsUpdate и AU разделов по следующему пути:
HKEY_LOCAL_MACHINE\SOFTWARE\Policies\Microsoft\Windows
Шаг 2: Выберите раздел AU, в правой части редактора реестра, и создайте в нем новый параметр DWORD (32 бита) и назовите его AUOptions, установите для него одно из следующих значений:
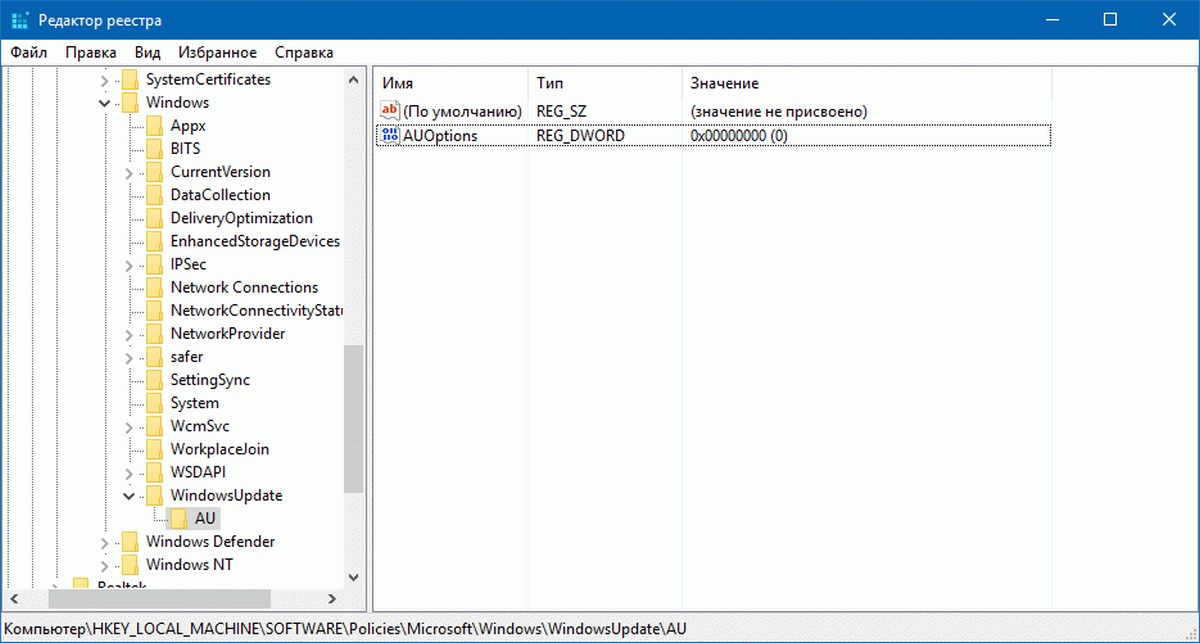
0 – Уведомление о загрузке и установке
3 – Автоматическая загрузка и уведомление об установке
4 — Автоматическая загрузка и установка по расписанию
5 — Разрешить локальному администратору выбирать параметры
Если вы хотите, чтобы Windows 10 всегда уведомляла вас о доступном обновлении, необходимо установить значение — 2.
ПРИМЕЧАНИЕ: Если вы используете 64-разрядную версию Windows, вам также необходимо выполнить эти шаги для следующего раздела реестра:
HKEY_LOCAL_MACHINE\SOFTWARE\Wow6432Node\Policies\Microsoft\Windows
Если вам лень возится с реестром Windows 10, я подготовил готовые reg файлы NoAutoUpdate.zip и AUOptions.zip
Readers help support Windows Report. We may get a commission if you buy through our links.
Read our disclosure page to find out how can you help Windows Report sustain the editorial team. Read more
XINSTALL BY CLICKING THE DOWNLOAD
FILE
Failure to install Windows updates can lead to various issues, so many users wonder how to enable Windows updates through the registry.
In a previous article, we explored the complexities of the Windows 11 update error, and as you know, such errors can occur if Windows Update isn’t enabled.
Therefore, keep reading to learn more about proper ways to enable this essential feature.
What is the registry key for disabling Windows Update?
To disable Windows Update through the registry, you need to modify the following key:
HKEY\LOCAL\MACHINE\SOFTWARE\Policies\Microsoft\Windows\WindowsUpdate\AU
Once you enter this key, you need to make changes to AUOptions DWORD to disable Windows Update through the registry.
How can I enable Windows Update in the registry?
Configuring Windows Updates by altering the registry
- On your home screen type in regedit in the search bar and Run as Administrator.

- Once the UAC appears, select Yes.
- Once the Registry has opened, Navigate the following path:
HKEY_LOCAL_MACHINE/SOFTWARE/Policies/Microsoft/Windows
- Now right-click on the Windows directory.
- Click on the New and select Key, and next create a new folder named Windows Update.
- Next right-click on the Windows Update. Choose New and then Key and create a new directory named AU.

- Again right-click on the AU directory.
- Next action is to click on the New and select DWORD.
- Now, define your key name as AUOptions and double-click on the AUOptions to edit the DWORD value.
- Kindly input a number between 2-5 as value data, and next click OK to save the setting.


An explanation of each number value is shown below:
- 2 – This setting will alert you before downloading and installing updates on your system.
- 3 – All the updates will download automatically and notify you before installation.
- 4 – This setting will automatically download and automatically set the time to install it.
- 5 – Allow access to the local system admin to choose the update status.
This is how you can enable Windows Update through the registry. As you can see, it’s not complicated, as long as you carefully follow our instructions.
- Windows 11 KB5055627 update makes File Explorer more fluid
- A few keyboard settings are moving from Control Panel to Settings app in Windows 11
- Microsoft finally launches the controversial Recall feature after a long delay
In case you encounter any other problems, we suggest referring to our extensive guide on Windows Update not working or loading. This guide offers similar remedies that can assist you in finding a solution to your issue.
We value your input and would love to hear your views. Kindly share your thoughts by leaving a comment below and giving us your perspective on the matter.
Loredana Harsana
Windows Software Expert
Loredana is a passionate writer with a keen interest in PC software and technology. She started off writing about mobile phones back when Samsung Galaxy S II was on top of the world and she fell in love with tech of all sorts.
Whenever she’s not at her work desk, you’ll find her enjoying refreshing tea flavors, spilling stories on paper, and listening to the radio.
How to Enable Windows Update in the Windows Registry. In this post, we introduce Windows updates, their importance and the types of Windows updates. We will then explain how to enable Windows Update via Windows Registry.
So, shall we start with How to Enable Windows Update in the Windows Registry.
What Is Windows Update?

All in all, Windows update is a free maintenance and support service for Microsoft Windows users. Once activated, it automatically searches for and installs updates on your personal computer. This way, there are no widespread exploits. Also, includes service packs, software patches, and updates for device drivers. Hence, Windows update allows users to obtain bug fixes and new features for their version of Windows. Additionally, it also protects your computer from getting errors, crashing and getting hacked from remote attackers.
Presently, Microsoft generally releases patches and other security on the second Tuesday of every month. This day is traditionally known as Patch Tuesday. Hence, Windows Updates determines the PC’s configuration and list down relevant downloads for your systems. In effect, you access the Windows Update control panel in the Start Menu. Using this control panel, you set Windows Update to automatically install updates. If you cannot access it, you check for new updates once a week.
What is Windows Update Used For?
Simultaneously, Windows Update is a service that was first introduced with Windows Vista, and it has been included in every version of Windows since then. Provides users with the option to install various updates and new features on their systems.
With the help of Windows Update, you can keep Microsoft Windows and multiple other Microsoft Programs updated. These updates include feature enhancements and security updates to protect Windows from malware and malicious attacks.
Specifically, you can even access the update history using Windows Update. It shows a complete update that has been installed on the computer through the Windows Update service.
Why Is It Important to Install Windows Update?
Surely, system administrators do not find the updating process pleasing. However, it is extremely important in the times we live in. Sometimes, the updates conducted every month constitute security updates. These updates look for any exploit from malware practices or hackers. On the other hand, some updates also address bugs and issues in Windows. Even though they are not essential for security vulnerabilities, they impact the stability of your Operating System. Sometimes, Windows Updates also comes with new features that patch some known issues. All these issues are addressed with the help of Windows Update.
If you have a virus on your computer and you don’t have the latest version of Windows Update installed then the virus will still be there after the update has been installed. Therefore, if you get a new version of Windows Update then all of your old viruses will be removed automatically.
If you do not install security updates, you can witness damaged software, loss of data, or identity theft. Every year, millions of dollars get damaged worldwide due to malware. When you do not install critical software or operating system updates, malware exploits loopholes that exist in every software ever developed. Vulnerabilities tend to get destroyed hours of them becoming publicly known. Therefore, once the security update is available, you need to plan to install the fix to protect your system from malware attacks.
In addition, you can also control and monitor the deployment of Microsoft Updates in a corporate environment with products like WSUS or System Centre Configuration Manager (SCCM).
Common Types of Updates
- Critical Updates – These updates are released to fix a specific problem that addresses a critical non security related bug.
- Security Updates – These updates fix product specific, security related vulnerabilities. These vulnerabilities are rated by their severity. It is rated in the Microsoft security bulletin as critical, important, moderate, or low.
- Monthly Rollups – Monthly Rollups are tested, a cumulative set of updates. They constitute both security and reliability updates packaged and distributed over Windows Update. It is identified as an ‘Important’ update on Windows Update.
- Service Packs – A service pack is a tested, collective set of all hotfixes, security updates, critical updates, and other updates. It also includes additional fixes for problems found internally since the product release.
- Testing – As discussed above, Microsoft releases the latest updates on the second Tuesday of every month. However, Windows computers contain several hardware and software configurations. It makes testing almost impossible. When Windows Update causes a problem, it is due to a software or driver that has issues with the update, not the update itself.
Therefore, it is essential to install security updates to protect your systems from malicious attacks. Moreover, it is crucial to install software updates to access new features and be on the safe side in terms of security loopholes discovered in outdated programs.
How to Enable Windows Update in the Windows Registry
The Windows Registry is a collection of databases of configuration settings for Microsoft Windows operating systems. It manages resources and stores configuration settings for applications on the Windows operating system. You also can configure automatic updates on the server computer and client computers with Microsoft Windows registry settings.
In this section, we will show you how to enable Windows Update in the Windows Registry settings. Follow the below steps to enable the Windows Update:
Step 1
First, log in to your Windows system and press the Winkey+R key to open the Run window as shown below:

Step 2
Type regedit and click on the OK button. You should see the Registry editor on the following screen:

Step 3
In the registry editor windows, navigate to the HKEY_LOCAL_MACHINE => SOFTWARE => Policies => Microsoft => Windows. You should see the following screen:

Step 4
Right click on the Windows directory. You should see the following screen:

Step 5
Click on the New => Key. Then, create a new folder named WindowsUpdate.
Step 6
Again right click on the WindowsUpdate => New => Key and create a new directory named AU. You should see the following screen:

Step 7
Right click on the AU directory. You should see the following screen:

Step 8
Following is to click on the New => DWORD. Then, define your key name as AUOptions.The following screen should appear:

Step 9
Now, double click on the AUOptions to edit the DWORD value. Then, you should see the following screen:

Step 10
Please type a number between 2 and 5 as value data in the above screen then click on the OK button to save the setting.
A brief explanation of each number value is shown below:
- 2 – This setting will notify you before downloading and installing any updates on your system.
- 3 – All updates will download automatically and notify you before installation.
- 4 – This setting will automatically download and automatically set the time to install it.
- 5 – Allow access to the local system admin to select the update status
Thank you for reading How to Enable Windows Update in the Windows Registry. We shall conclude.
How to Enable Windows Update in the Windows Registry Conclusion
In this post, you learn about Windows updates and how to enable them via the Windows registry setting. Now, you don’t need to download and install Windows updates manually. Install all updates automatically as per your requirements via the Windows registry setting. Manually inspecting, authorizing, and installing updates takes a lot of time and effort. I hope this guide assists you with automation of updates in your Windows system and save a lot of time.
Take a look at more Windows content in our article blog over here.
Все способы:
- Способ 1: «Службы»
- Способ 2: «Командная строка»
- Способ 3: «Редактор реестра»
- Способ 4: «Редактор локальной групповой политики»
- Способ 5: «Диспетчер задач»
- Способ 6: Сторонний софт
- Возобновление обновлений
- Вопросы и ответы: 2
Способ 1: «Службы»
Если автоматические обновления отключены, то можно вручную их активировать, перезапустив соответствующую службу:
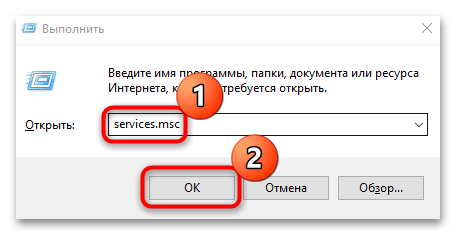
- Откройте приложение «Службы». Для этого одновременным нажатием на клавиши «Win + R» вызовите диалоговое окно «Выполнить» и пропишите команду
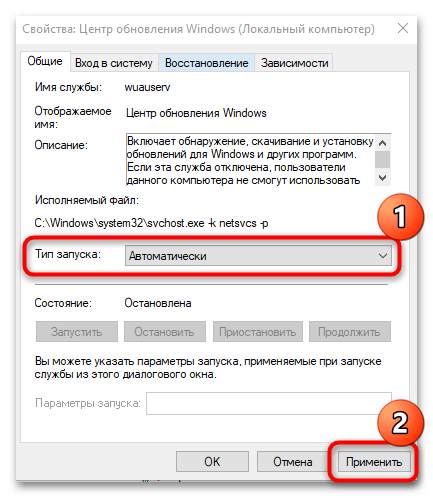
services.msc. - В списке служб найдите «Центр обновления Windows» и дважды щелкните левой кнопкой мыши по названию. Если необходимо, можно нажать на вкладку «Имя» и упорядочить службы по алфавиту, чтобы было проще отыскать строку по имени.
- В новом окошке в меню «Тип запуска» выберите пункт «Автоматически». Нажмите на кнопку «Применить».
- Если служба выключена, то кликните по кнопке «Запустить», затем по «ОК».
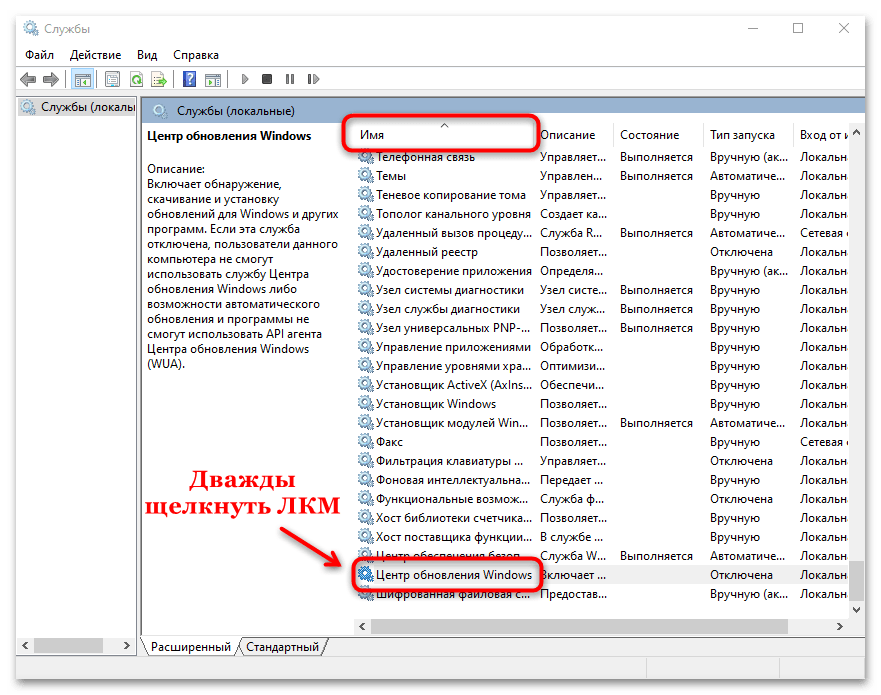

Служба автоматического поиска и установки обновлений для операционной системы, программных компонентов и продуктов компании теперь активирована.
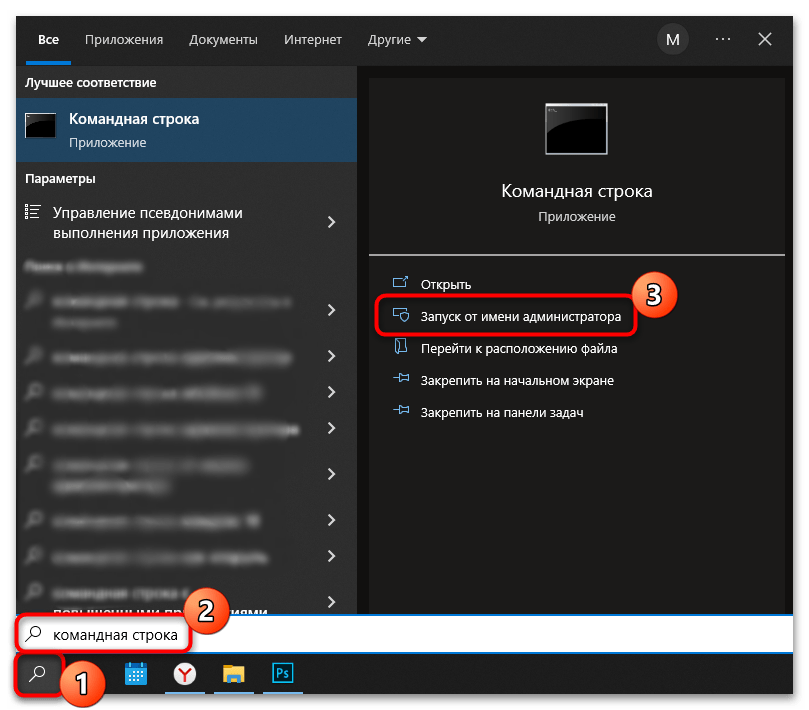
Способ 2: «Командная строка»
Включить автообновление в Виндовс 10 можно с помощью специальной команды, введенной в интерфейсе консоли «Командная строка», которая запущена с расширенными правами:
- Откройте средство, введя соответствующий запрос в системной строке поиска. В результате запросов выберите пункт «Запуск от имени администратора».
- В интерфейсе терминала вставьте команду
net start wuauserv, затем нажмите на клавишу «Enter».
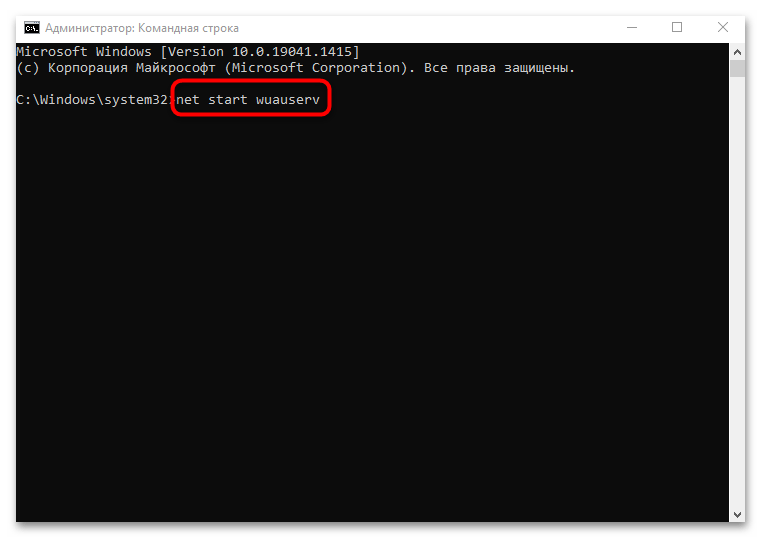
В окне консоли отобразится уведомление, что служба успешно активировалась, и она будет действовать в автоматическом режиме.
Способ 3: «Редактор реестра»
Еще один метод активации служб автоматического обновления Windows 10 – это внесение изменений в системный реестр. Следует отметить, что невнимательно выполненные действия могут привести к нарушению работоспособности системы, поэтому можно создать контрольную точку для восстановления состояния, если что-то пошло не так после редактирования.
Читайте также: Инструкция по созданию точки восстановления Windows 10
- Откройте приложение «Редактор реестра». Быстрее всего оно запускается через вызов приложения «Выполнить» (клавиши Win + R) и команду
regedit. - Разверните ветки:
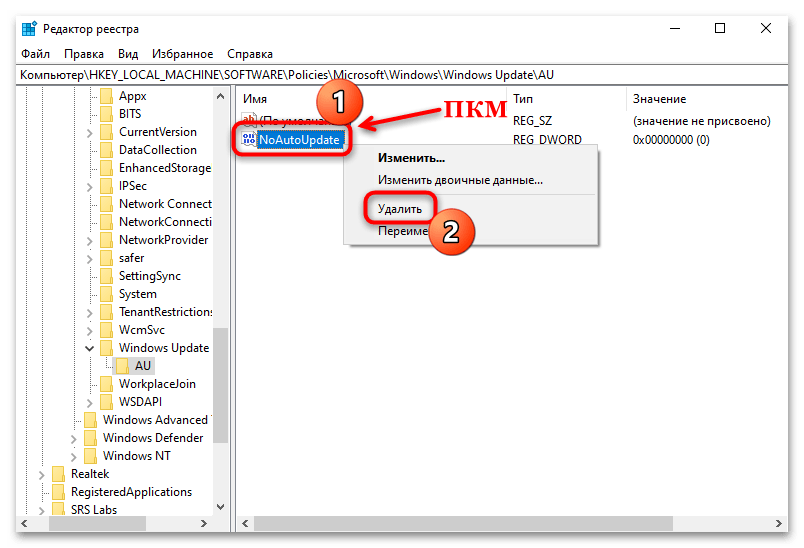
HKEY_LOCAL_MACHINE\SOFTWARE\Policies\Microsoft\Windows\WindowsUpdate\AU. В каталоге «AU» отыщите параметр «NoAutoUpdate» и дважды кликните по нему, чтобы перейти в окно с настройкой. - В поле «Значение» введите «0» и щелкните по кнопке «ОК».
Также можно полностью удалить параметр, кликнув по нему правой кнопкой мыши и выбрав соответствующий пункт.
Способ 4: «Редактор локальной групповой политики»
Настройка автоматического обновления через «Редактор локальной групповой политики» подойдет для редакций Pro и Enterprise. Используя средство, можно включить загрузку и установку апдейтов без вмешательства пользователя:
- Через диалоговое окно «Выполнить» перейдите в приложение «Редактор локальной групповой политики», вставив команду
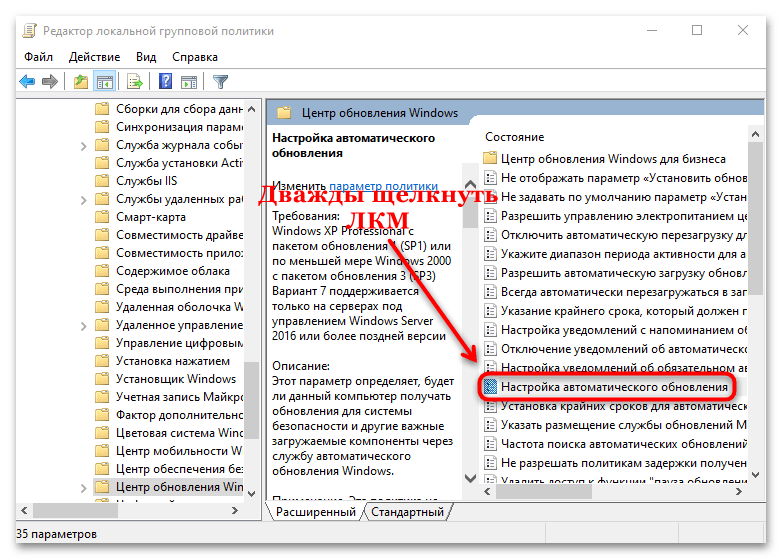
gpedit.msc. - На панели слева раскройте меню «Конфигурация компьютера», затем выберите «Административные шаблоны». В разделе «Компоненты Windows» найдите каталог «Центр обновления Windows». Нажмите на него.
- В главном окне отыщите функцию «Настройка автоматического обновления». Кликните по ней два раза левой кнопкой мыши.
- В новом окне поставьте отметку у пункта «Включено», затем нажмите на кнопку «ОК» для подтверждения действия.


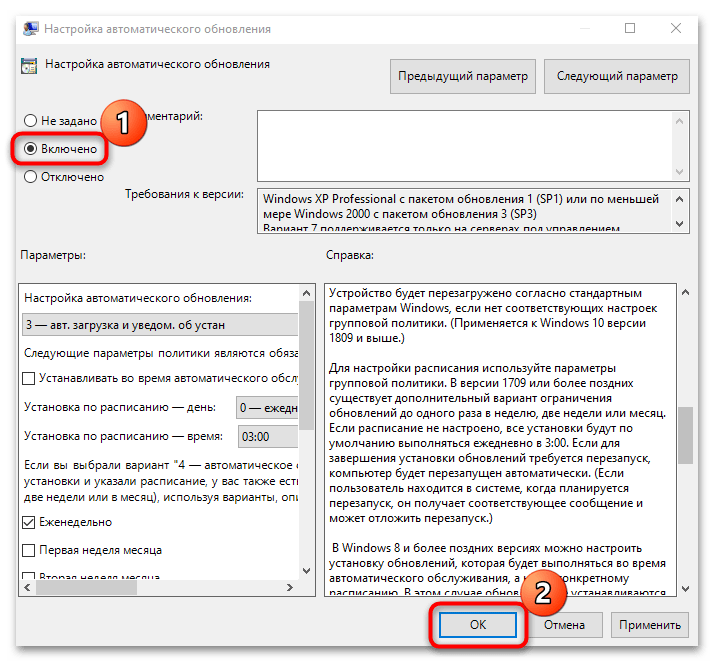
Помимо активации автоматического обновления операционной системы, в окне с настройками можно задать период и время для загрузки апдейтов, определить подходящий вариант обновлений, откладывать процедуру на определенное время.
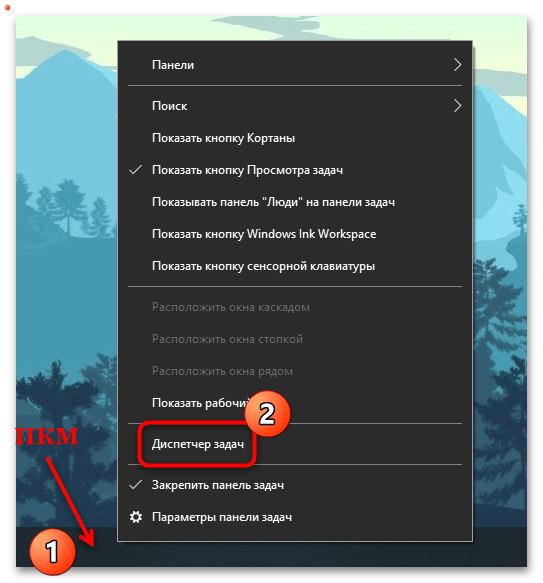
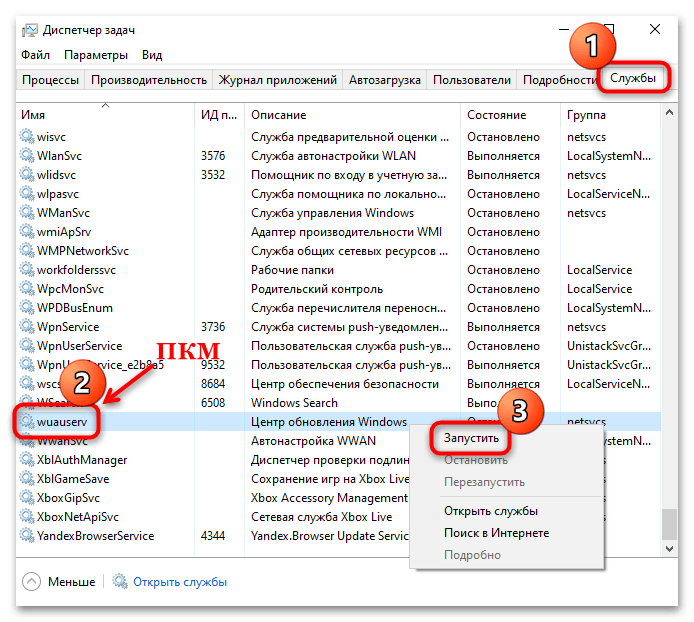
Способ 5: «Диспетчер задач»
Можно попробовать активировать службу автообновления в Windows 10 через средство «Диспетчер задач», где пользователь может контролировать процессы и управлять ими:
- Запустите «Диспетчер задач». Обычно достаточно щелкнуть правой кнопкой мыши по нижней рабочей панели и выбрать нужное средство в меню.
- Откройте вкладку «Службы» и найдите «wuauserv», отвечающую за «Центр обновления Windows». Работает ли служба, можно посмотреть в столбике «Состояние». Чтобы включить ее, кликните по названию правой кнопкой мыши и выберите пункт «Запустить».
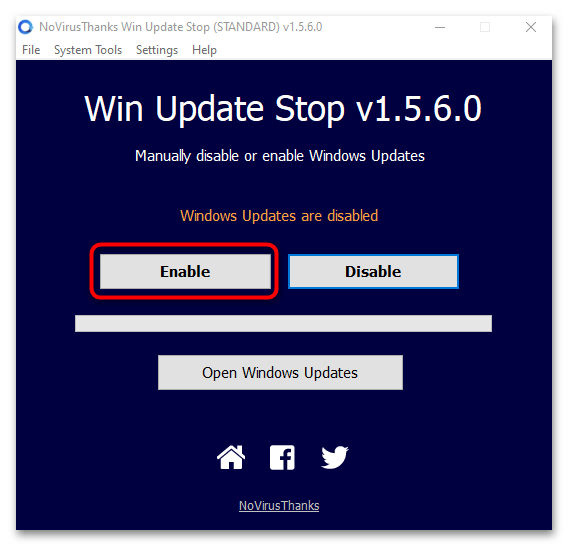
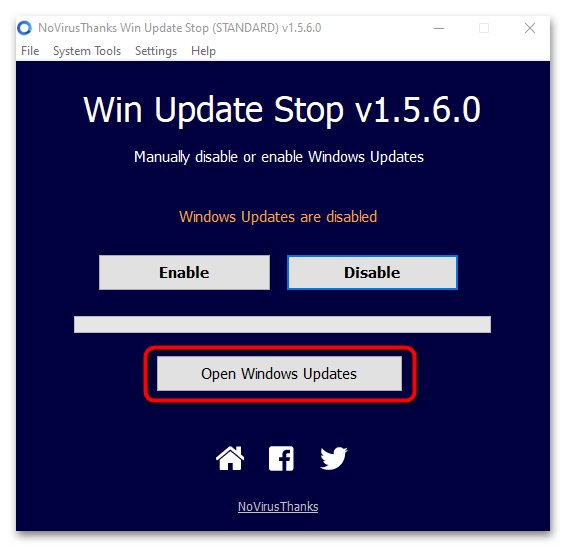
Способ 6: Сторонний софт
Для управления обновлениями используются сторонние утилиты, с помощью которых можно быстро, без ручного редактирования реестра или использования команд, как приостановить, так и включить автообновления в Windows 10. Одним из таких инструментов является бесплатная программа Win Update Stop с простым интерфейсом.
Скачать Win Update Stop с официального сайта
- Скачайте и установите утилиту. После запуска в интерфейсе можно увидеть две кнопки, где «Enable» обозначает включение обновлений операционной системы.
- Принцип работы программы заключается в изменении параметров «Центра обновления Windows». Перейти в раздел «Параметров» можно, нажав на кнопку «Open Windows Updates».
Возобновление обновлений
Через приложение «Параметры» можно не только посмотреть наличие апдейтов, но и настроить автоматическое обновление операционной системы. Если загрузка и установка новых программных компонентов временно отключена, то ее можно возобновить в несколько кликов:
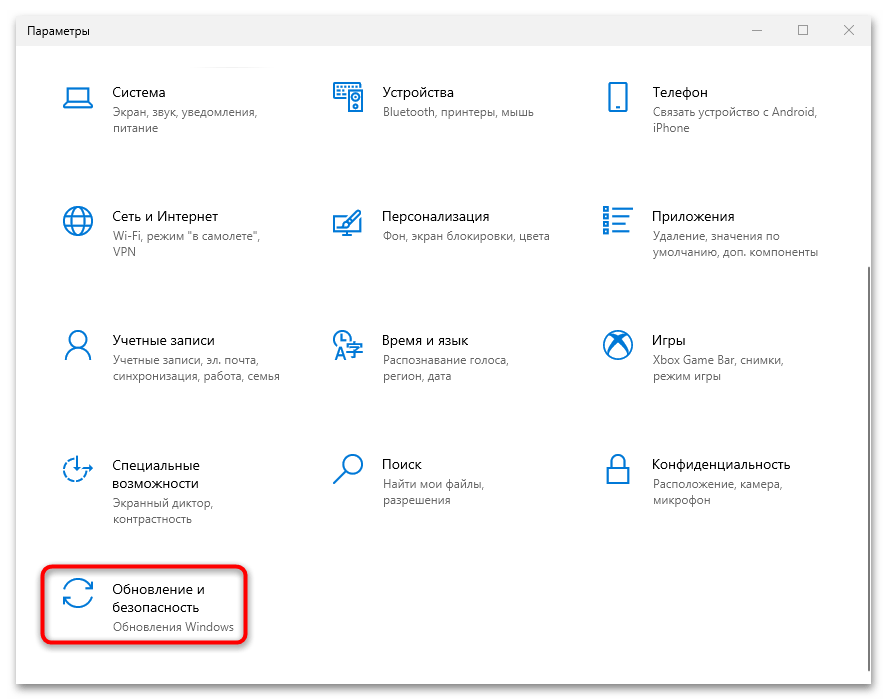
- Щелкните по значку Windows на нижней рабочей панели, затем в меню выберите пункт в виде шестеренки – «Параметры».
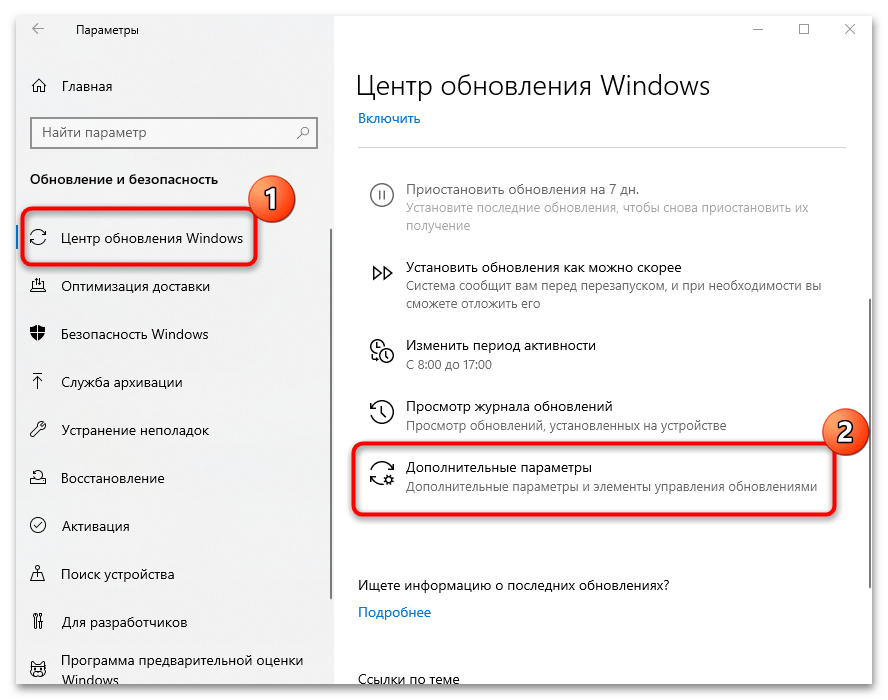
- В новом окне перейдите в раздел «Обновление и безопасность».
- На вкладке «Центр обновления Windows» выберите функцию возобновления автообновлений. Также можно настроить автоматические обновления, убрав лимитное подключение или изменив другие настройки. Для этого кликните по строке «Дополнительные параметры».
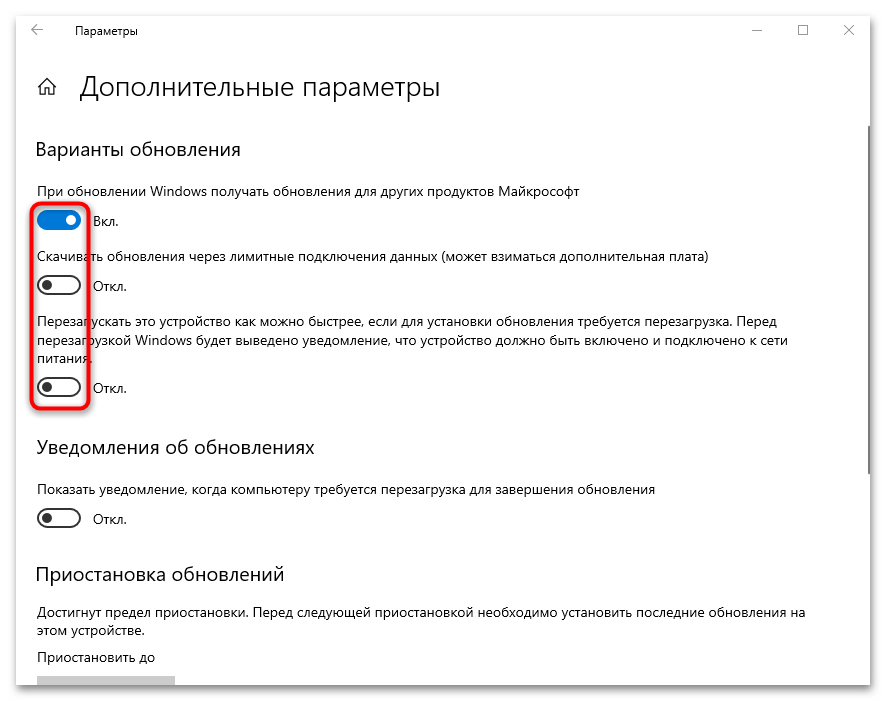
- Если на компьютере установлены другие продукты компании Microsoft, например Word, то для автоматического обновления программ отметьте соответствующую опцию. Если используется интернет с ограниченным трафиком, то лучше отключить скачивание обновлений через лимитные подключения.
Читайте также: Решение проблем с работоспособностью Центра обновлений Windows 10
Наша группа в TelegramПолезные советы и помощь
ПоделитьсяНашли опечатку?Пожалуйста, сообщите об этом — просто выделите ошибочное слово или фразу и нажмите Shift Enter.
|
Добавить комментарий |