
This article shows how to install Windows Server 2008 R2 on VirtualBox. Windows 2008 R2 server is available in 64-bit version only, so your computer processor and motherboard should support 64-Bit architecture and VT (Virtualization Technology) to carry out this installation.
Even if you are using the 32-bit version of Operating Systems such as Windows 7, Vista and XP on the host computer, still it’s possible to use 64 Bit operating systems as a guest on VirtualBox. To make sure your computer processor and motherboard support this feature read this post where you will find relevant tools for AMD and Intel processors. Once the result confirms that your PC is 64-bit ready then you can proceed with the installation of Windows Server 2008 R2 on VirtualBox.
Follow the steps to Install Windows Server 2008 R2 on VirtualBox.
1) Create New Machine.
2) Select Windows 2008 R2 as the guest OS version.

3) Set memory size to 1024MB, and create a new hard disk with 20GB space. You can increase the RAM and hard disk size if your physical computer has enough resources.

Select the Dynamically Expanding storage option. Set the disk size and location of the disk file on the next screen.

4) Press Finish to complete disk and virtual machine creation.
5) Click on the storage option in virtual machine configuration settings.

6) Press ‘Empty’ IDE controller as mentioned below to insert the installation DVD or ISO image. If you have an installation DVD, then insert it into the host DVD drive and select the ‘Host Drive- Drive letter’ mentioned below. So when you boot the Windows 2008 R2 virtual machine, it will read your host physical DVD drive. Since I have an ISO file, I’m mounting it by clicking on the Folder arrow button.

7) Make sure the following options are correct under system setting of the virtual machine. You can click on System to view the settings.

Processor – 1 and Enable PAE/NX enabled.

Hardware Virtualization Enable VT-x/AMD-V should be enabled.
 Now start the Windows 2008 R2 virtual machine in VirtualBox.
The installation will go smoothly if all settings are correct. No need to explain every installation step.

9) Here is the working Windows server 2008 R2 on VirtualBox below.

10) It is essential to install VirtualBox guest additions to get better mouse integration, display settings, folder share and improved network performance. You can mount the built-in guest additions ISO file inside the guest VM from the menu bar.
Restart the virtual machine after the installation to see the changes & improvements.
There you go, you have the working Windows 2008 R2 64-bit Server OS on your X86 host OS and VirtualBox. You can enable the seamless mode of the virtual machine to work on Windows 2008 R2 VM from the host OS desktop.
NOTE: Since Windows 2008 R2 is a pretty outdated server operating system currently, it is not recommended to use in the production environment. In case, you need to do some testing and development on this older server OS, you can use this guide to install it on a dedicated VirtualBox environment.
We highly recommend using the latest Windows Server Operating Systems, such as Windows 2022 or Windows 2019 servers.
To install VirtualBox on your PC, follow these steps:
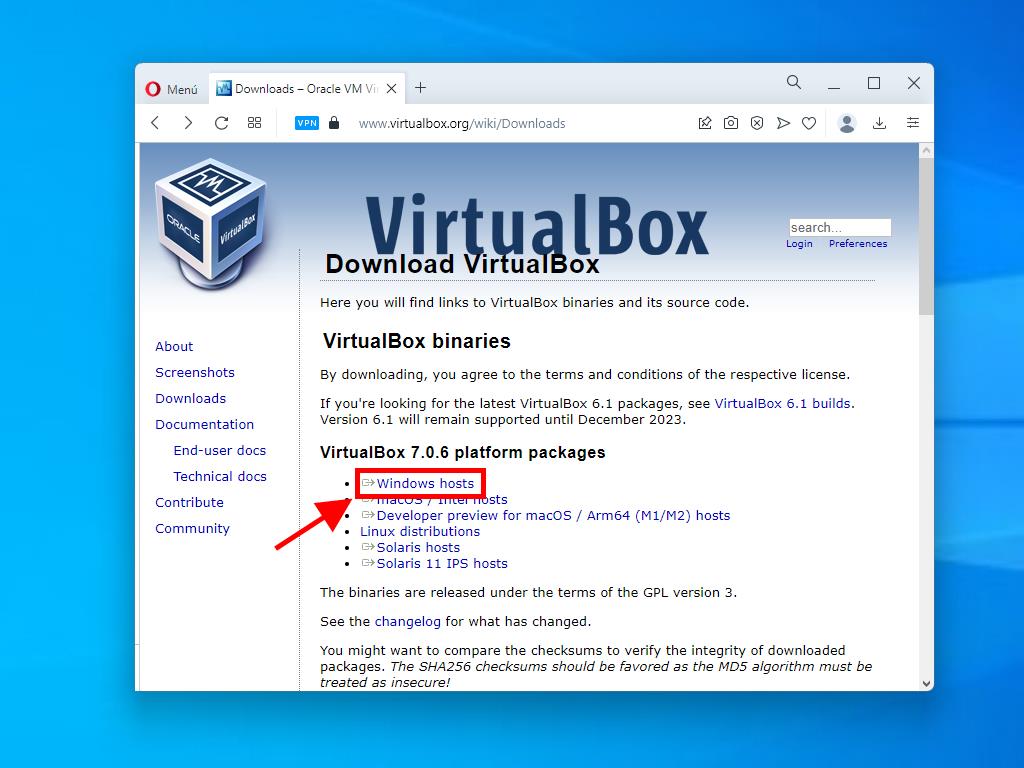
- Open this link and select the Windows Hosts option from the list.
- The VirtualBox file will start downloading to your PC.
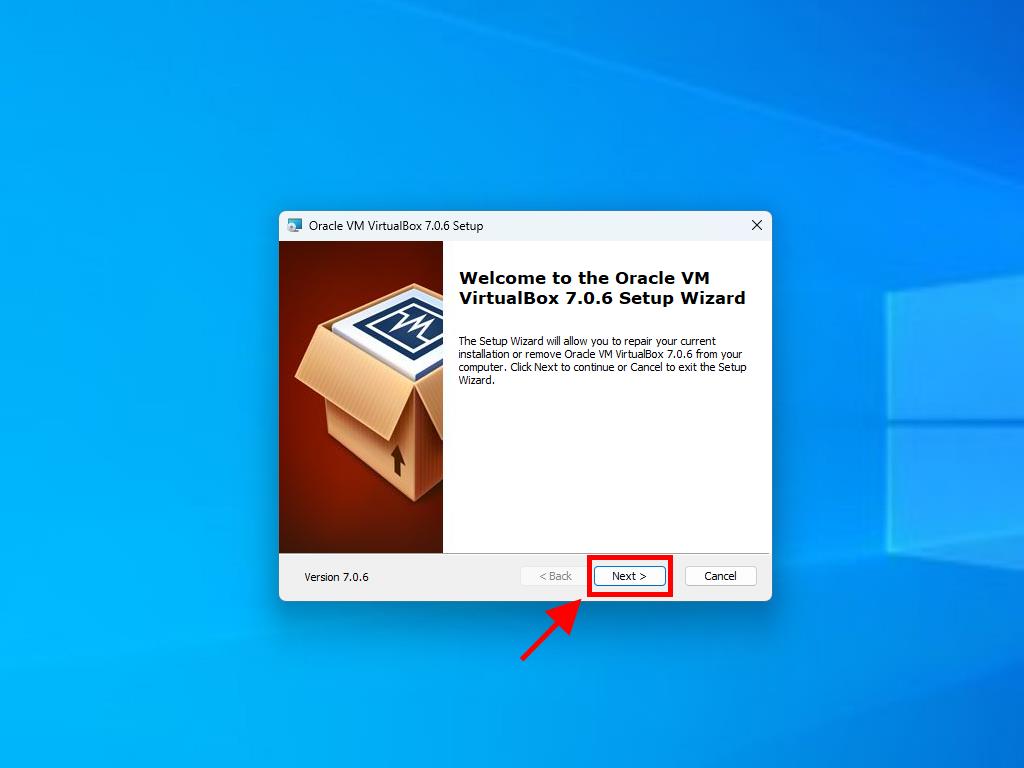
- Open the VirtualBox file and install it. Click Next.
Note: If you have problems installing VirtualBox, deselect the USB features in the installation wizard.
Here’s how to create a new virtual machine (VirtualBox):
- In the Machine section, click the New button.
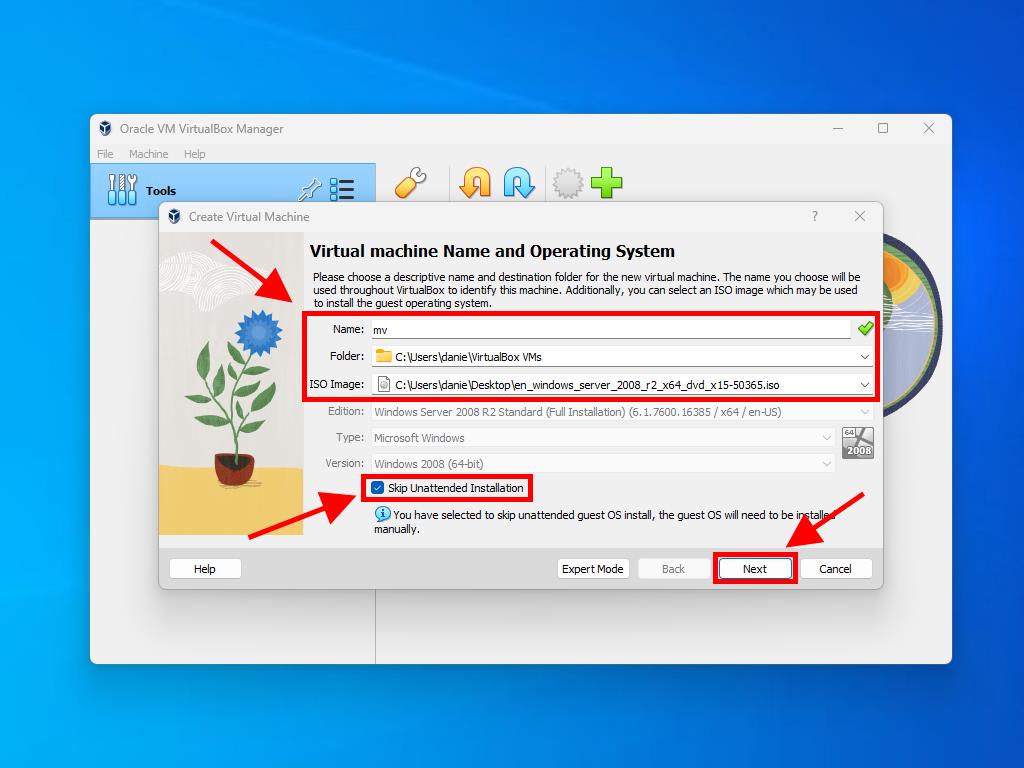
- Enter a name for the virtual machine, select the location of the Windows Server 2008 .iso file, and then click Next.
- Use at least 2 GB of RAM and click Next.
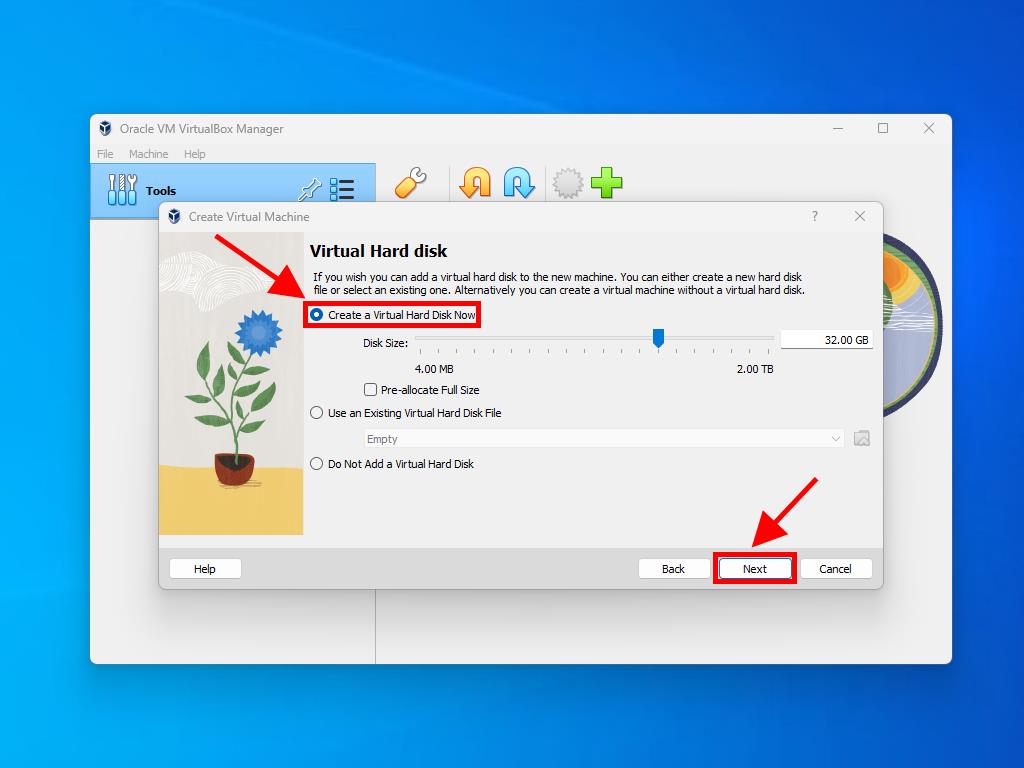
- Click on the option Create a Virtual Hard Disk Now (you should use a minimum of 30 GB for proper operation). Then click Next.
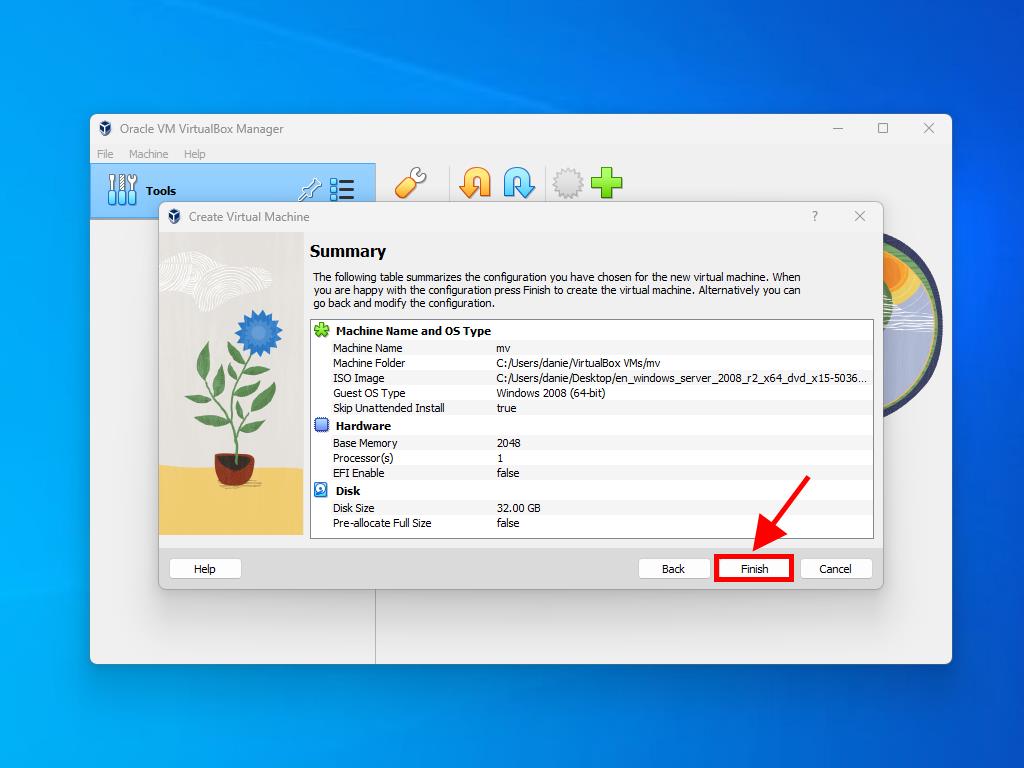
- In the following Summary window, click Finish.
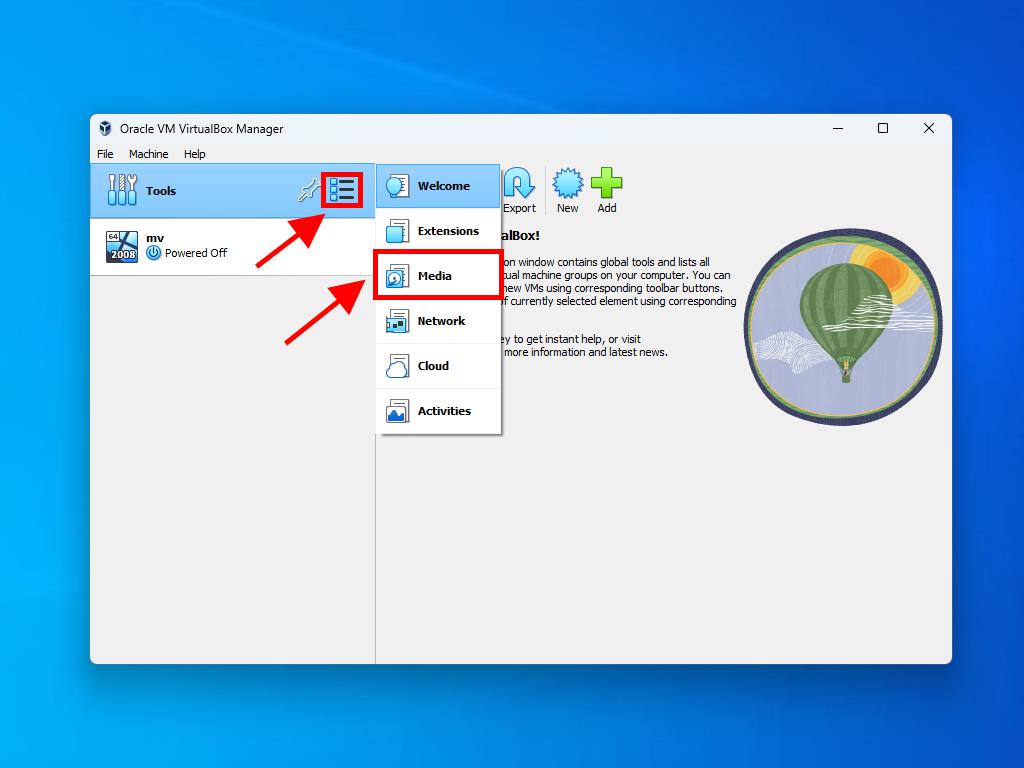
- In the Tools tab, select the Windows Server 2008 .iso file by clicking the button with the three dots. A drop-down menu will open, and click on Media.
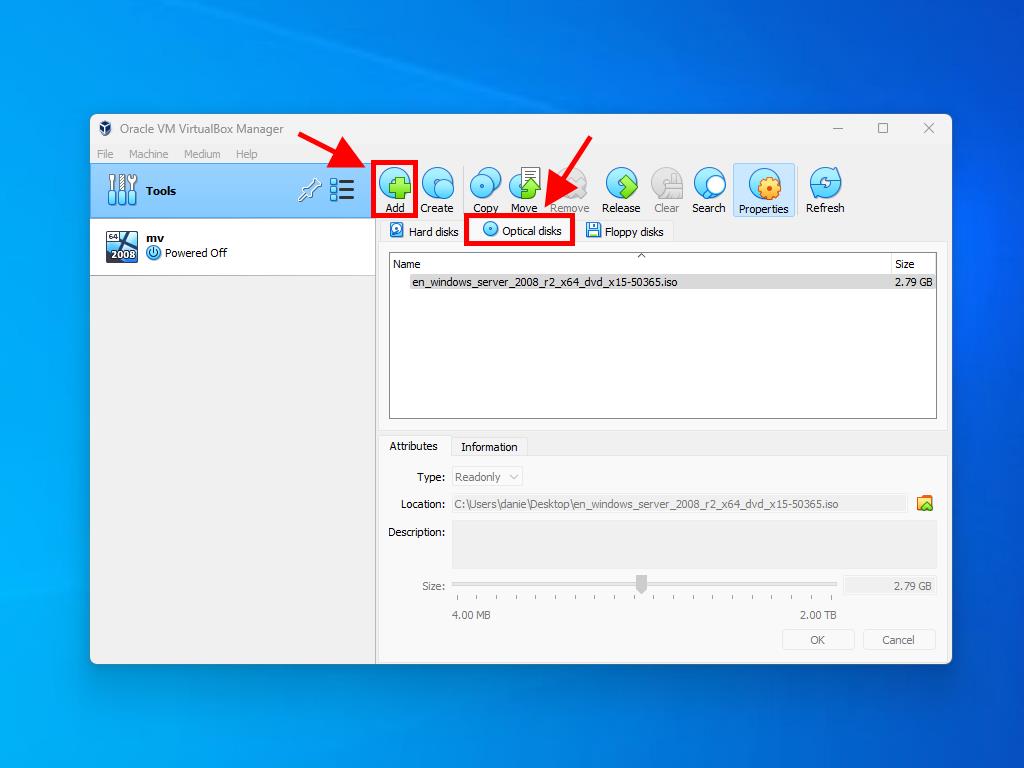
- Then, select the optical drives tab and click Add.
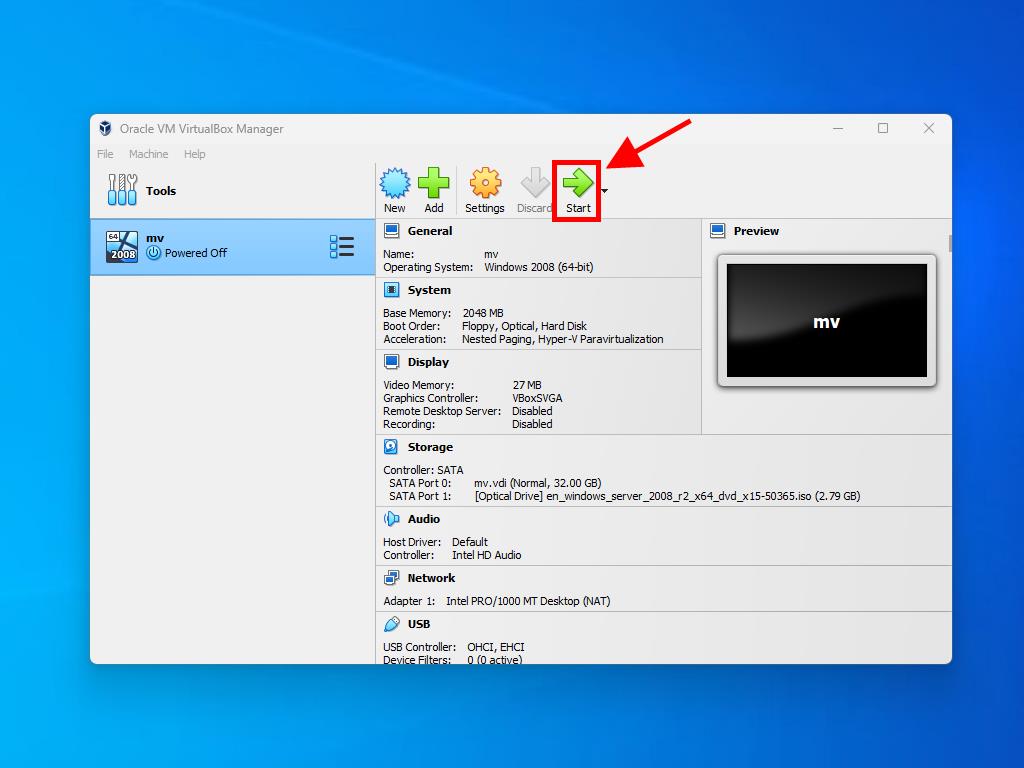
- Start the virtual machine by clicking Start.
- The installation of Windows Server 2008 will begin.

Note: Tick the box called Skip Unattended Installations.
Note: You can choose any other value according to your preferences as long as it meets the system requirements.

Preparation
1. Download the VirtualBox& Windows Server 2008 R2 (ISO) installation files.
VirtualBox Installation & Virtual Machine Configuration
1. Install the VirtualBox & configure the Virtual Machine. Below are settings for this installation,
General:
• Type: Microsoft Windows
• Version: Windows 2008 (64 bit)
System
• Base Memory: 1GB
• Processor: 1CPU
Storage
• HDD: 30GB
Network
• Enable Network Adapter (Bridged Adapter)
2. Mount the Windows Server 2008 R2 (ISO) file onto your Storage settings. Save and you can start the virtual machine.
3. Select the installation language.
4. Choose Install Now.
5. Select the operating system version. In this example, we have choose the Windows Server 2008 R2 Standard (Full Installation).
6. Next, you will be prompted with the Microsoft Software License Terms. Please read (huh!) and accept the license terms. Then, click Next.
7. Choose Custom (advanced) for fresh installation.
8. Define the installation location. Click Next.
9. The installation starting now.
10. Once the installation is completed, you may need to change the Administrator password for first time login.
11. Set the initial configuration tasks. Some of the configurations are,
• Windows Activation
• Set Time Zone
• Networking
• Computer Name & Domain
• Automatic Updates
• Windows Firewall
• Remote Desktop Connection
12. Once the configuration is done, you can access the Windows Server 2008 R2!
2008 r2 virtualbox
Prerequisite:
Have a working Oracle VM VirtualBox, enable virtualization in bios if it is not enabled and have an iso disk of windows server 2008 R2.
Ready?
Microsoft Hyper-V:
https://www.tutorialspoint.com/windows10/windows10_virtualization.htm
Oracle VM VirtualBox:
https://www.virtualbox.org/manual/ch01.html
Enable virtualization in win 10 if you need to. Restart pc and press F2 for bios. Under “Advanced” tab, find the last one “Intel Virtualization Technology”, change it to “Enabled”. Press F10 for save and exit.
You should now have several more options regarding OS to use, select Windows 2008 (64bit)
Create a virtual machine:
https://www.virtualbox.org/manual/ch01.html#idm485
Now configure your box, 2048 mb RAM, create a virtual hard disk now, VDI, dynamically allocated, file location and size, 25GB.
Start your virtualmachine and and point to the OS iso file.
Now “install windows” will launch:
Select version:

Select type:
Verify disk from virtualbox:
Almost there:
Set the password:
Ready:
And we are done:

Now it is time to start to develop and test…
The difference between these three options is crucial. They mean:
Save the machine state: With this option, VirtualBox “freezes” the virtual machine by completely saving its state to your local disk.
When you start the VM again later, you will find that the VM continues exactly where it was left off. All your programs will still be open, and your computer resumes operation. Saving the state of a virtual machine is thus in some ways similar to suspending a laptop computer (e.g. by closing its lid).
Send the shutdown signal. This will send an ACPI shutdown signal to the virtual machine, which has the same effect as if you had pressed the power button on a real computer. So long as the VM is running a fairly modern operating system, this should trigger a proper shutdown mechanism from within the VM.
Power off the machine: With this option, VirtualBox also stops running the virtual machine, but without saving its state.

VirtualBox — это программное обеспечение для виртуализации, которое позволяет создавать и запускать виртуальные компьютеры на физическом сервере. Оно позволяет максимально эффективно использовать вычислительные ресурсы и упрощает администрирование серверов.
В этой статье мы рассмотрим пошаговые инструкции по настройке VirtualBox в операционной системе Windows Server 2008 R2. Мы узнаем, как установить VirtualBox на сервер, настроить виртуальную машину и запустить ее.
Прежде чем начать, убедитесь, что ваш сервер соответствует минимальным требованиям для работы с VirtualBox. Вам потребуется достаточно оперативной памяти и свободного места на жестком диске для создания и запуска виртуальных машин. Также убедитесь, что виртуализация включена в настройках BIOS вашего сервера.
Теперь мы готовы к установке VirtualBox. Скачайте установочный файл с официального сайта VirtualBox и запустите его на вашем сервере. Следуйте инструкциям мастера установки, принимая все стандартные настройки. По завершении установки запустите VirtualBox и перейдите к настройке виртуальной машины.
Настройка VirtualBox в Windows Server 2008 R2
1. Скачайте и установите VirtualBox с официального сайта.
2. Запустите VirtualBox и создайте новую виртуальную машину. Для этого нажмите на кнопку «Создать» и следуйте инструкциям Мастера создания новой виртуальной машины.
3. Выберите тип и версию операционной системы, которую вы хотите установить в виртуальной машине. В нашем случае это будет Windows Server 2008 R2.
4. Настройте ресурсы для виртуальной машины, такие как объем оперативной памяти, размер жесткого диска и др. Убедитесь, что ваш компьютер имеет достаточно ресурсов для запуска виртуальной машины.
5. Скачайте образ операционной системы Windows Server 2008 R2 с официального сайта Microsoft.
6. Установите Windows Server 2008 R2 в виртуальную машину. Для этого выберите созданную виртуальную машину и нажмите на кнопку «Старт». Затем укажите путь к загружаемому образу операционной системы.
7. Следуйте инструкциям установщика для установки Windows Server 2008 R2 в виртуальную машину.
8. После установки Windows Server 2008 R2 в виртуальную машину, установите гостевые дополнения VirtualBox. Для этого выберите виртуальную машину и нажмите на кнопку «Устройства» в главном меню VirtualBox. Затем выберите «Установить гостевые дополнения».
9. После установки гостевых дополнений перезагрузите виртуальную машину.
10. Теперь вы можете настроить виртуальную машину под свои нужды, добавить дополнительные компоненты или программное обеспечение.
Теперь вы готовы использовать VirtualBox на Windows Server 2008 R2 и запускать виртуальные машины с различными операционными системами. Удачной работы!
Подготовка к установке и настройке VirtualBox
Перед установкой и настройкой VirtualBox на компьютере с операционной системой Windows Server 2008 R2 необходимо выполнить несколько предварительных шагов:
- Убедитесь, что ваш компьютер соответствует системным требованиям VirtualBox. Проверьте, что на компьютере установлен процессор, поддерживающий виртуализацию, и достаточный объем оперативной памяти.
- Перейдите на официальный сайт VirtualBox (https://www.virtualbox.org/) и загрузите установочный файл последней версии программы.
- Скачайте также расширение VirtualBox Extension Pack, которое позволяет использовать дополнительные функции и настройки.
- Запустите установщик VirtualBox и следуйте инструкциям мастера установки. При необходимости выберите дополнительные компоненты, такие как USB-поддержка или виртуализация сети.
- По завершении установки VirtualBox запустите программу и выполните настройку сети. Вы можете создать виртуальную сетевую карту или настроить мостовое подключение для доступа к локальной сети.
- Установите расширение VirtualBox Extension Pack, запустив скачанный файл. Следуйте инструкциям мастера установки.
После выполнения этих шагов вы будете готовы к использованию VirtualBox на компьютере с операционной системой Windows Server 2008 R2.
Пошаговая инструкция по установке и настройке VirtualBox в Windows Server 2008 R2
Шаг 1: Скачивание и установка VirtualBox
1. Перейдите на официальный сайт VirtualBox по адресу http://www.virtualbox.org.
2. Нажмите на кнопку «Downloads» в верхней части страницы.
3. В разделе «VirtualBox platform packages» выберите ссылку для скачивания VirtualBox для Windows х64.
4. Скачайте установочный файл VirtualBox.
5. Запустите установочный файл и следуйте инструкциям мастера установки.
Шаг 2: Создание виртуальной машины
1. Откройте VirtualBox после установки.
2. Нажмите на кнопку «New» в верхней части окна.
3. Введите имя виртуальной машины и выберите тип операционной системы, которую вы хотите установить.
4. Выберите количество оперативной памяти для виртуальной машины и нажмите «Next».
5. Создайте виртуальный жесткий диск для виртуальной машины и выберите его размер.
6. Нажмите «Create» и закройте окно создания виртуальной машины.
Шаг 3: Установка операционной системы в виртуальную машину
1. Выберите виртуальную машину в списке слева и нажмите на кнопку «Start» в верхней части окна.
2. Выберите установочный образ операционной системы и нажмите «Start».
3. Следуйте инструкциям по установке операционной системы в виртуальную машину.
Шаг 4: Настройка сетевого подключения виртуальной машины
1. Выберите виртуальную машину в списке слева и нажмите на кнопку «Settings» в верхней части окна.
2. Перейдите на вкладку «Network».
3. В разделе «Adapter 1» убедитесь, что тип адаптера установлен на «NAT».
4. В разделе «Adapter 2» выберите тип адаптера, который соответствует вашему сетевому подключению.
5. Нажмите «OK» для сохранения настроек.
Шаг 5: Запуск виртуальной машины
1. Выберите виртуальную машину в списке слева и нажмите на кнопку «Start» в верхней части окна.
2. Подождите, пока операционная система виртуальной машины загрузится.
3. Теперь вы можете использовать VirtualBox в Windows Server 2008 R2.