
В случае, если вы не хотите, чтобы кто-то мог использовать ваш компьютер, когда вы от него отлучились, в Windows есть возможность вручную настроить время до автоматической блокировки — по истечении этого времени вход в систему потребуется выполнить заново.
В этой инструкции для начинающих подробно о методах автоматической блокировки в Windows 11/10 и настройке времени до неё. Также может быть полезен дополнительный связанный с темой материал: Возможности настройки экрана блокировки Windows в реестре.
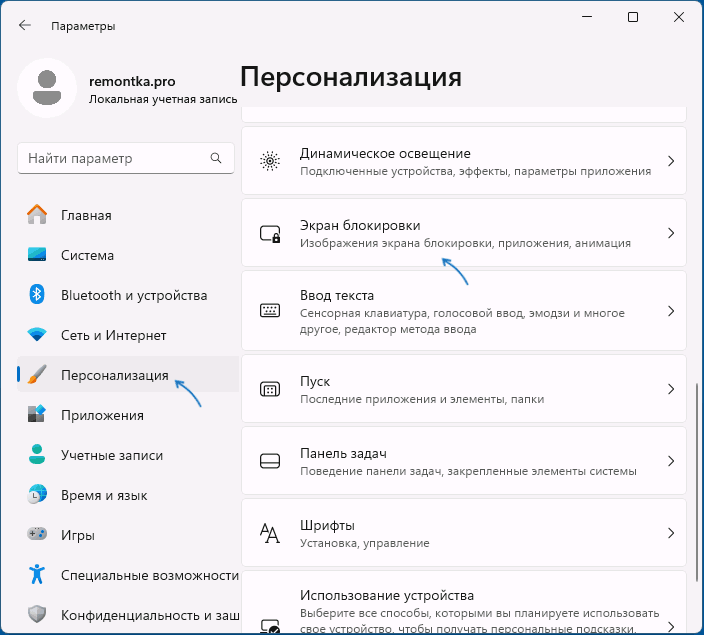
Параметры экрана блокировки
Основной метод настройки времени до блокировки компьютера (системы) — использование параметров экрана блокировки. В Windows 11 и 10 шаги будут почти идентичными:
- Откройте «Параметры» (например, через контекстное меню кнопки «Пуск») — Персонализация — Экран блокировки.

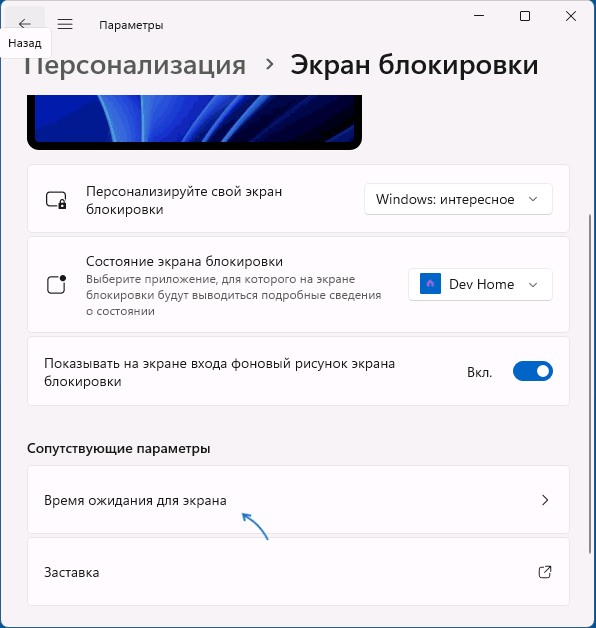
- В Windows 11 нажмите «Время ожидания для экрана» в разделе «Сопутствующие параметры», в Windows 10 — «Параметры времени ожидания для экрана».

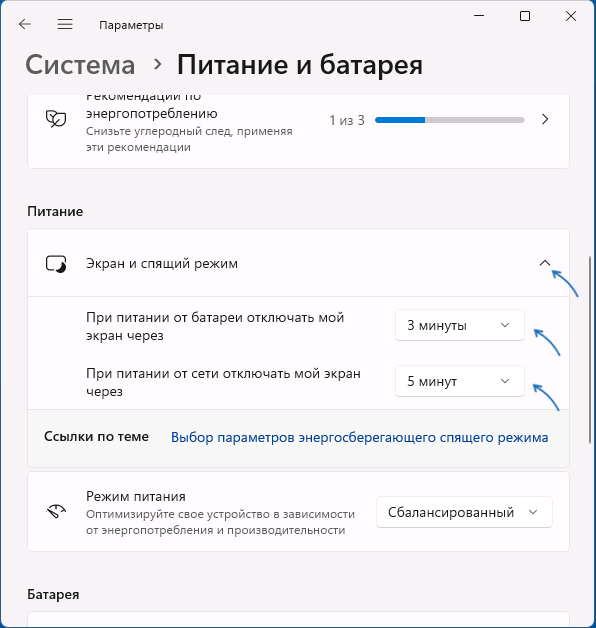
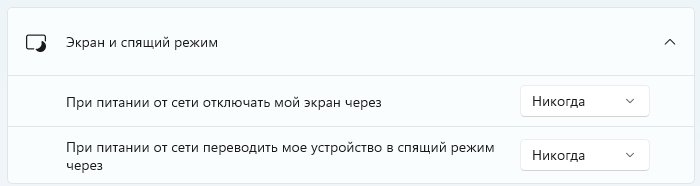
- В разделе «Экран и спящий режим» установите время отключения экрана.
После выполнения этих действий экран ПК или ноутбука будет выключен при бездействии в течение указанного времени, а при последующем его включении по нажатии клавиш или движению мыши пользователь попадет на экран блокировки для входа в систему.
Это основной метод, доступный в системе, однако имеет свои нюансы: например, при его использовании выключается экран, что не всегда является желаемым. В этом случае можно воспользоваться дополнительным вариантом: на 2-м шаге вместо «Время ожидания для экрана» нажмите «Параметры заставки».

Вы попадете в окно настроек экранной заставки (скринсейвера), где можно выбрать заставку, указать время до её включения при бездействии системы и установить отметку «Начинать с экрана входа в систему» — чтобы после заставки потребовалось выполнять вход в систему.
Дополнительная информация
В завершение — несколько дополнительных деталей, касающихся блокировки системы автоматически или вручную:
- Вы можете заблокировать компьютер вручную с помощью сочетания клавиш Win+L или нажав по имени пользователя в меню «Пуск» и выбрав пункт «Блокировка».
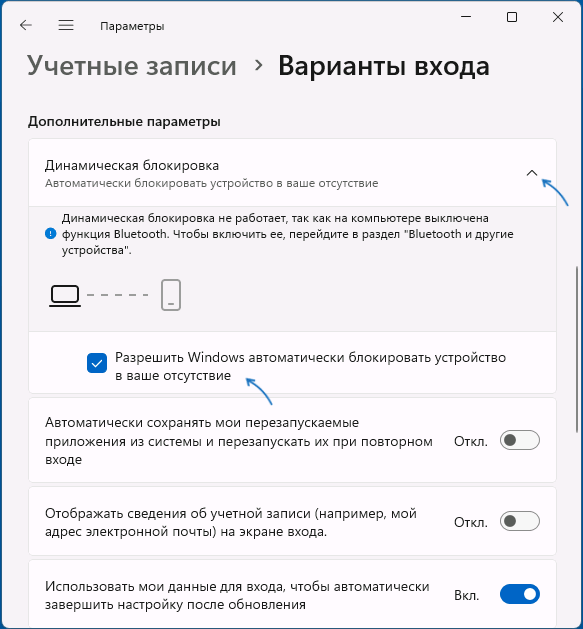
- Если ваш смартфон и компьютер связаны по Bluetooth, вы можете включить опцию «Динамическая блокировка» в разделе Параметров «Учетные записи» — «Варианты входа». В этом случае Windows будет блокироваться, когда связь с вашим мобильным устройством будет теряться.

- При необходимости можно отдельно настроить время выключения экрана на экране блокировки.
Если у вас остаются вопросы по рассмотренной теме, можно задать их в комментариях ниже, я постараюсь помочь.
Блокировка — отличный способ предотвратить доступ посторонних лиц к нашему компьютеру
Защита ПК имеет первостепенное значение, если мы работаем с конфиденциальными данными. В данной статье рассмотрим, как задать своё время блокировки экрана, когда наш компьютер не проявляет никакой активности. Итак, приступим.
Тайм-аут блокировки экрана можно легко настроить в приложении «Параметры». Более того, можно настроить различные режимы тайм-аута, когда наше устройство подключено к сети или когда оно работает от батареи (при использовании ноутбуков).
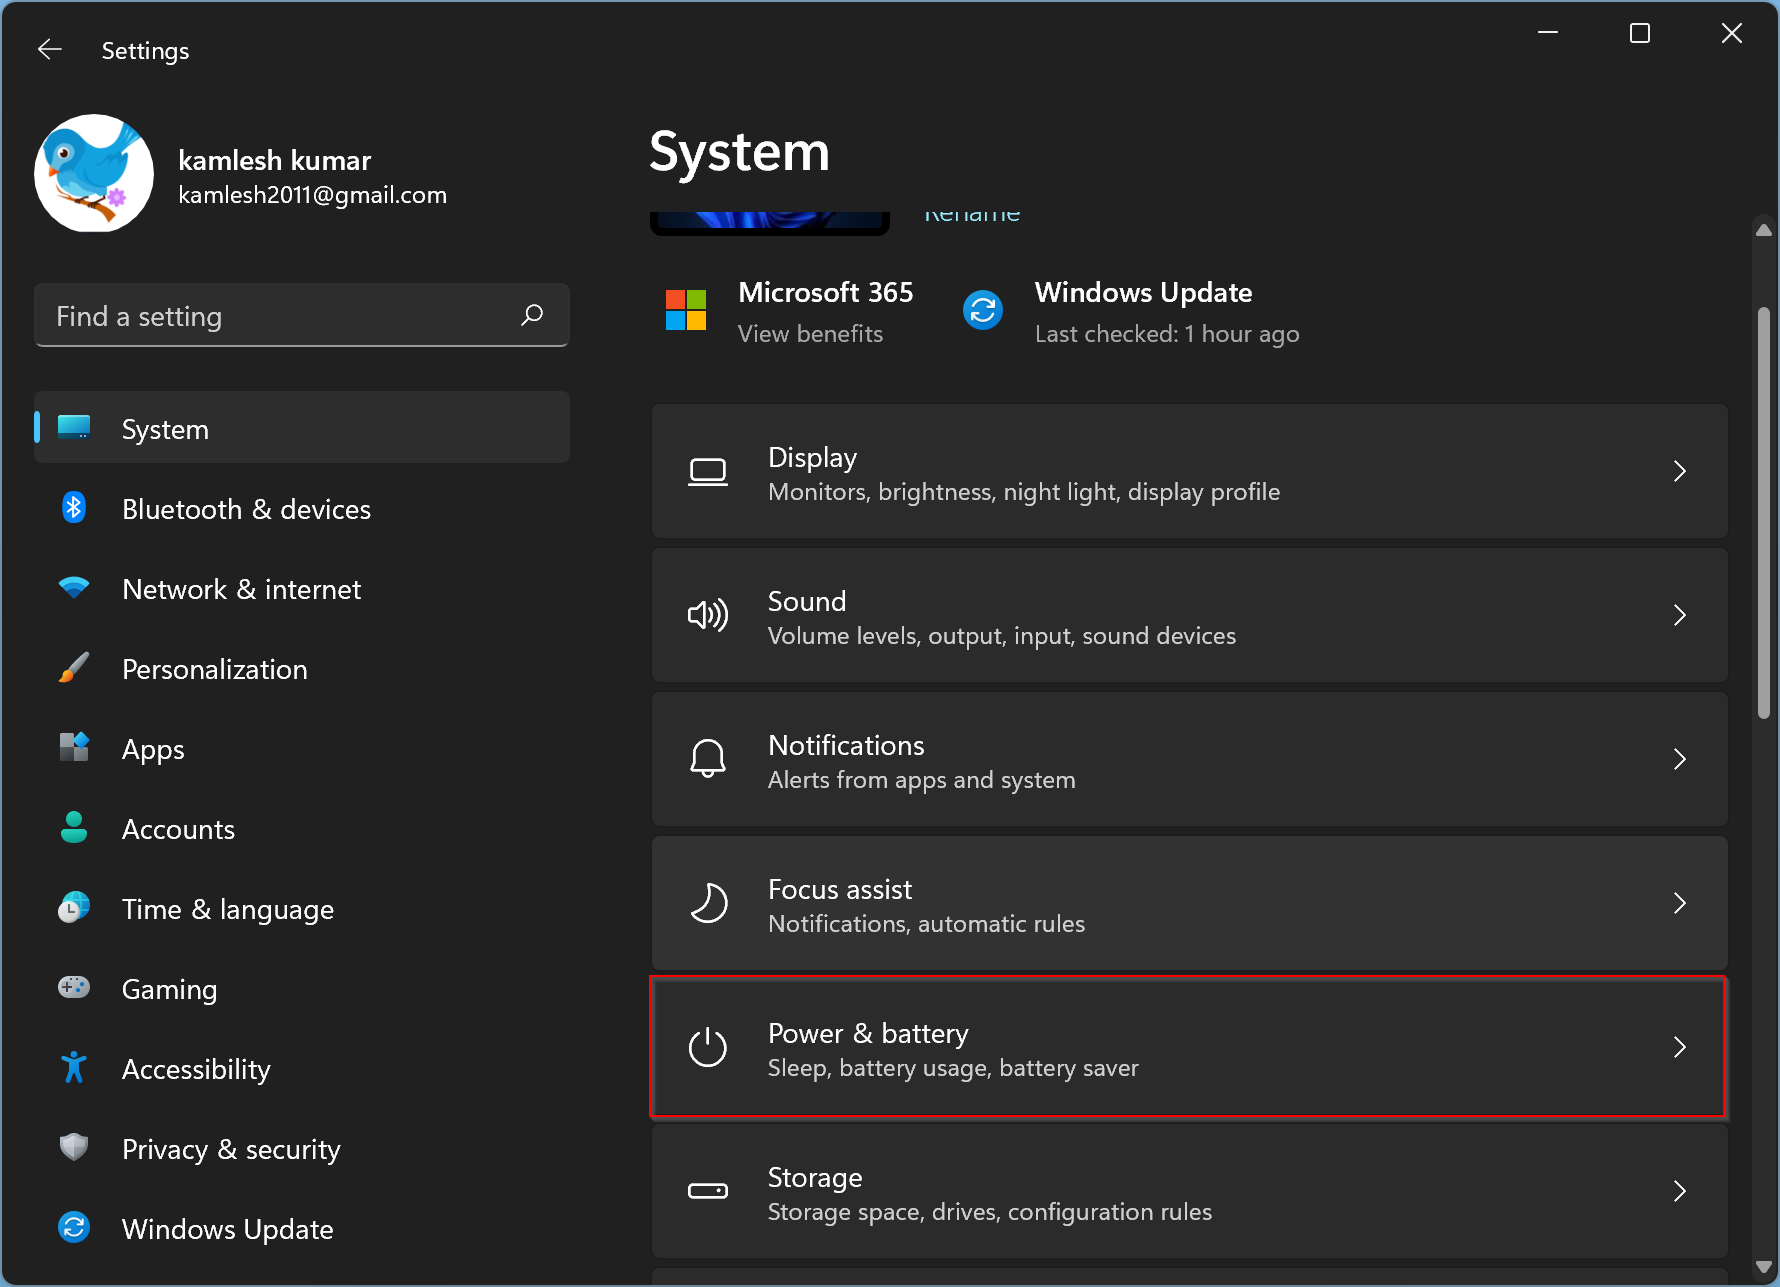
Сначала перейдем в приложение «Параметры» либо через закрепленный значок в меню «Пуск», либо выполнив поиск по нажатию клавиш «Win+S», либо используя быстрые клавиши для вызова окна параметров — «Win+I».
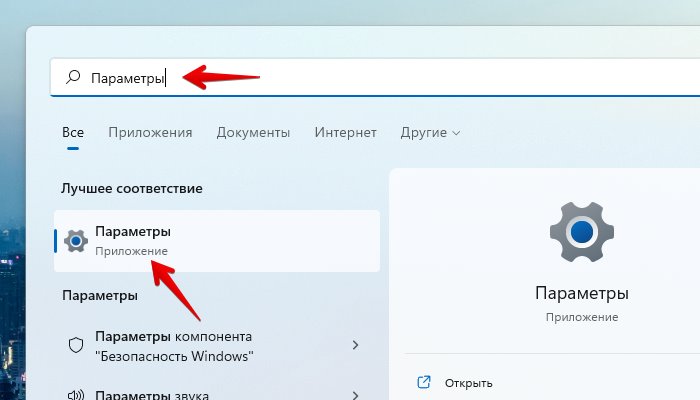
Затем выбираем вкладку «Система» на левой боковой панели окна параметров. После этого в правой части окна находим и щелкаем плитку «Питание», чтобы продолжить.
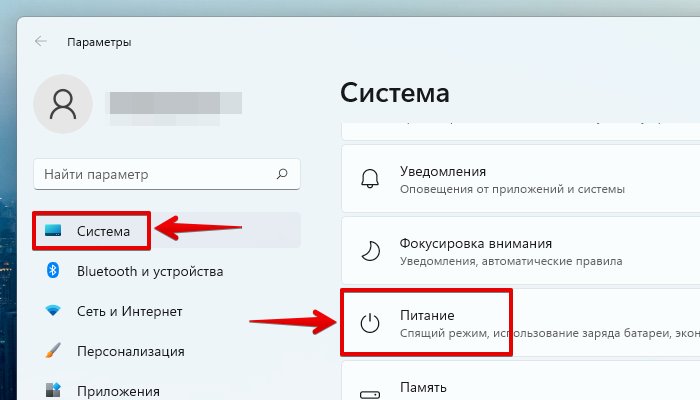
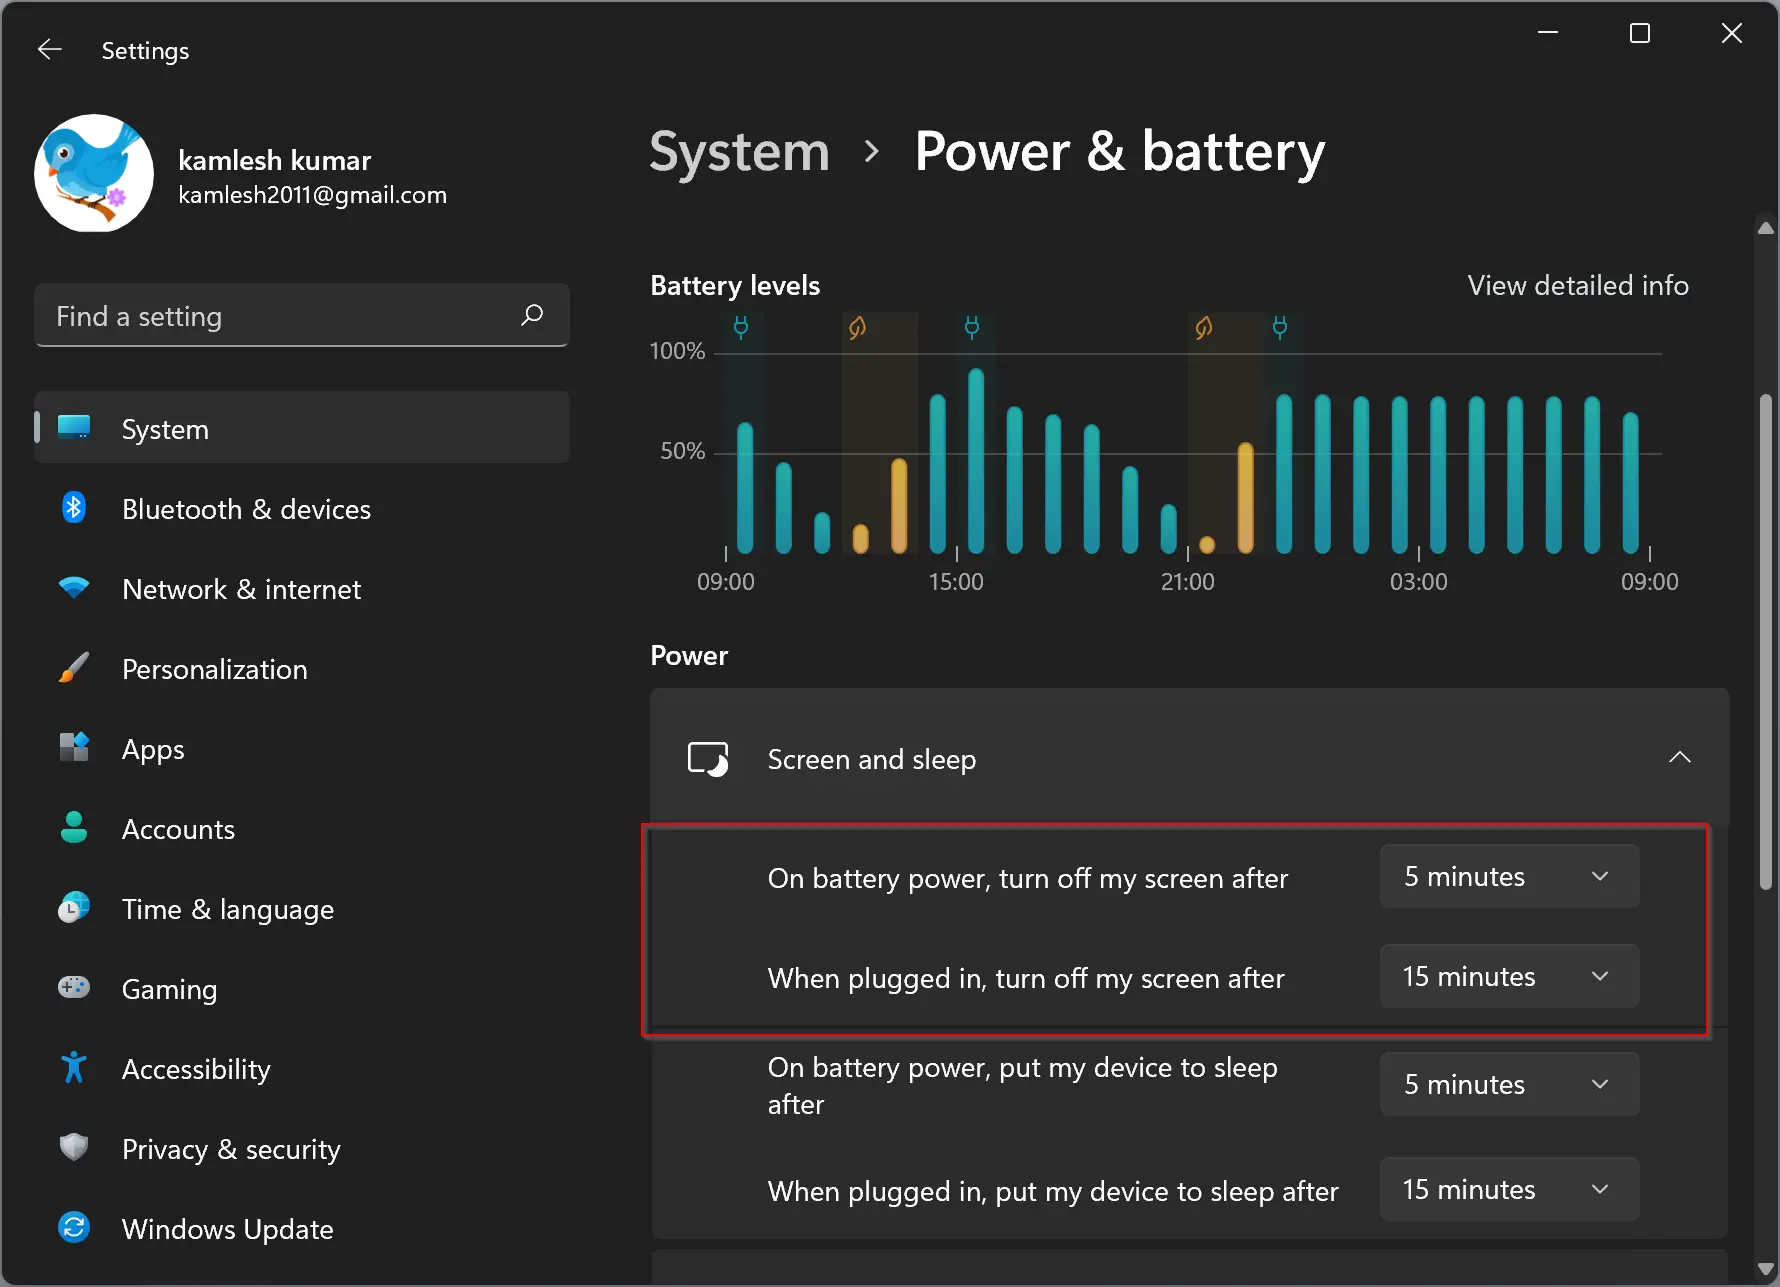
Затем на экране «Питание» щелкаем на плитку «Экран и спящий режим», чтобы развернуть дополнительные настройки.

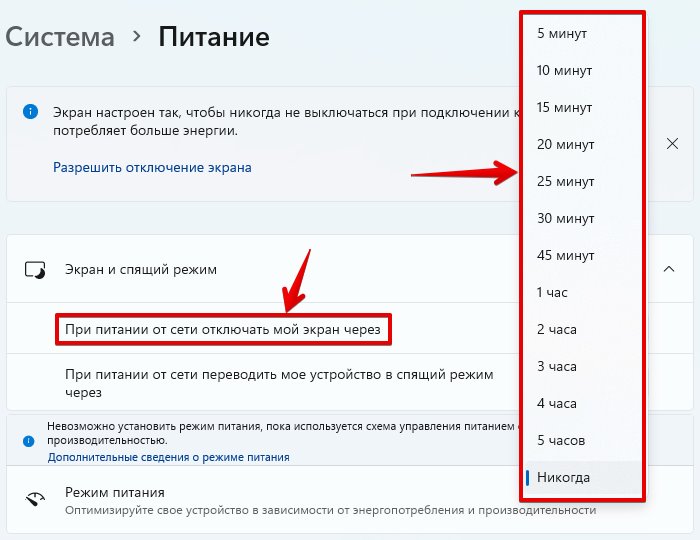
Затем щелкните раскрывающееся меню напротив параметра «При питании от сети отключать мой экран через».
И выбираем наиболее подходящее время из списка.
Устанавливаем своё время блокировки экрана через Панель управления
Если предустановленная продолжительность тайм-аута из предыдущего способа не подходит, то можно установить желаемое время при помощи панели управления.
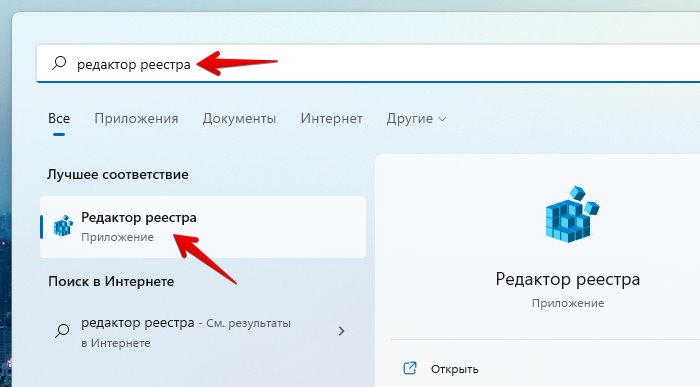
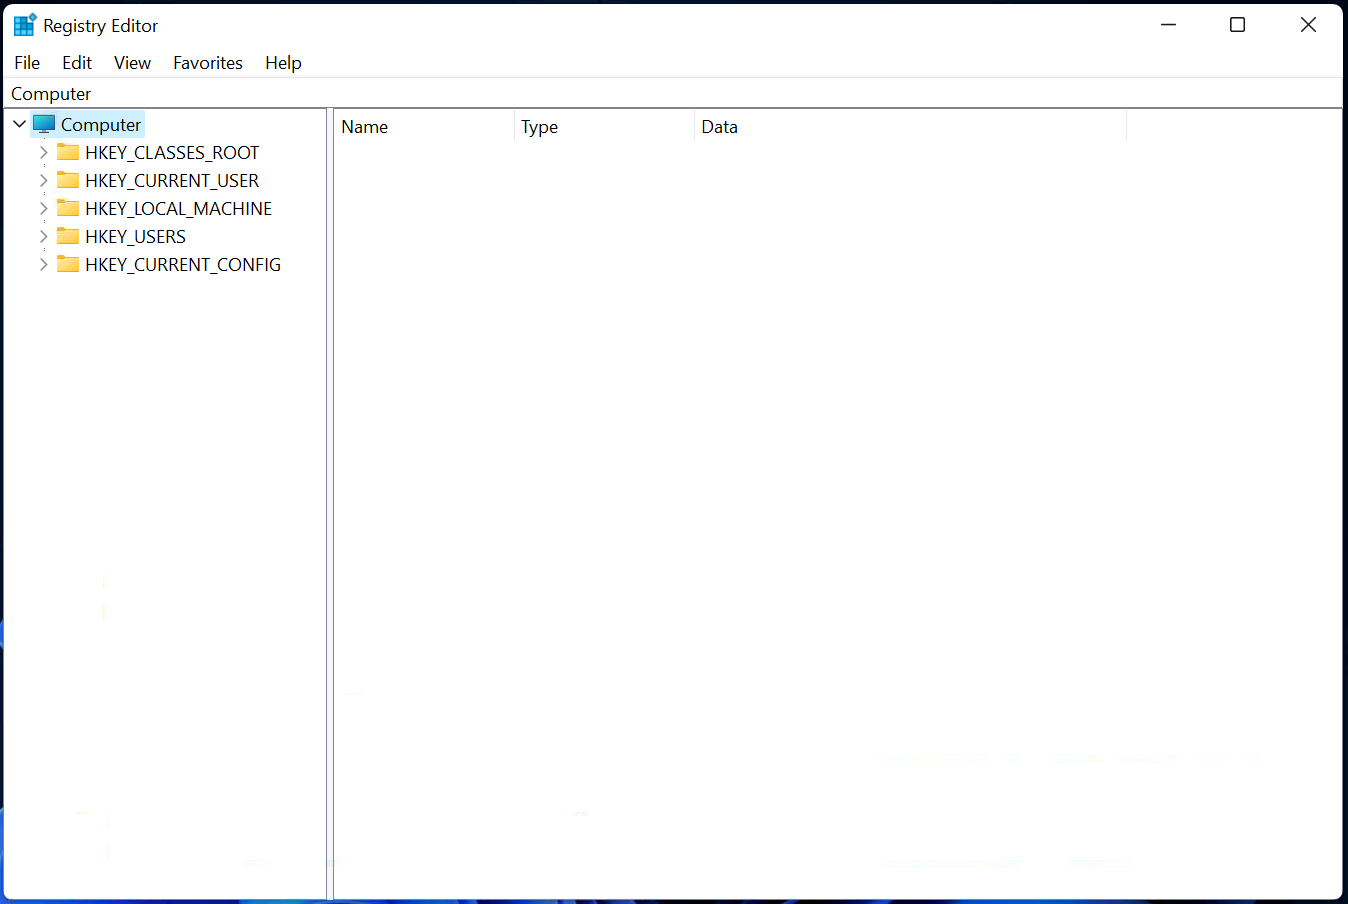
По умолчанию параметр для настройки выключения экрана скрыт, поэтому сначала необходимо включить его через редактор реестра Windows 11. Для этого перейдем в редактор реестра (можно найти через поиск в меню «Пуск»).
Перед открытием редактора реестра появится окно «Контроль учетных записей», в котором нажимаем кнопку «Да».

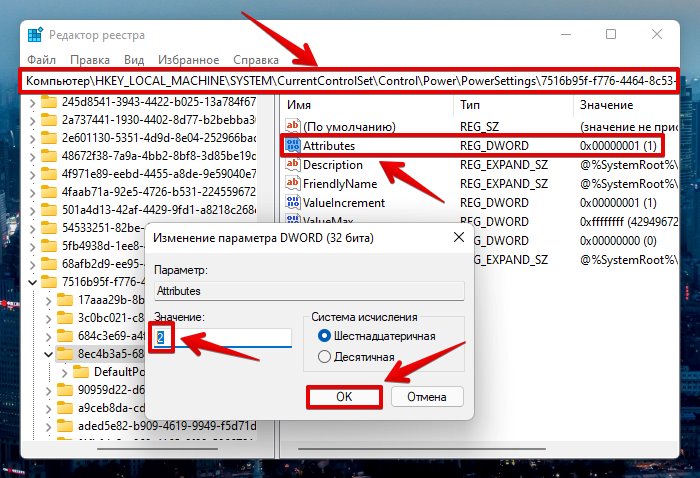
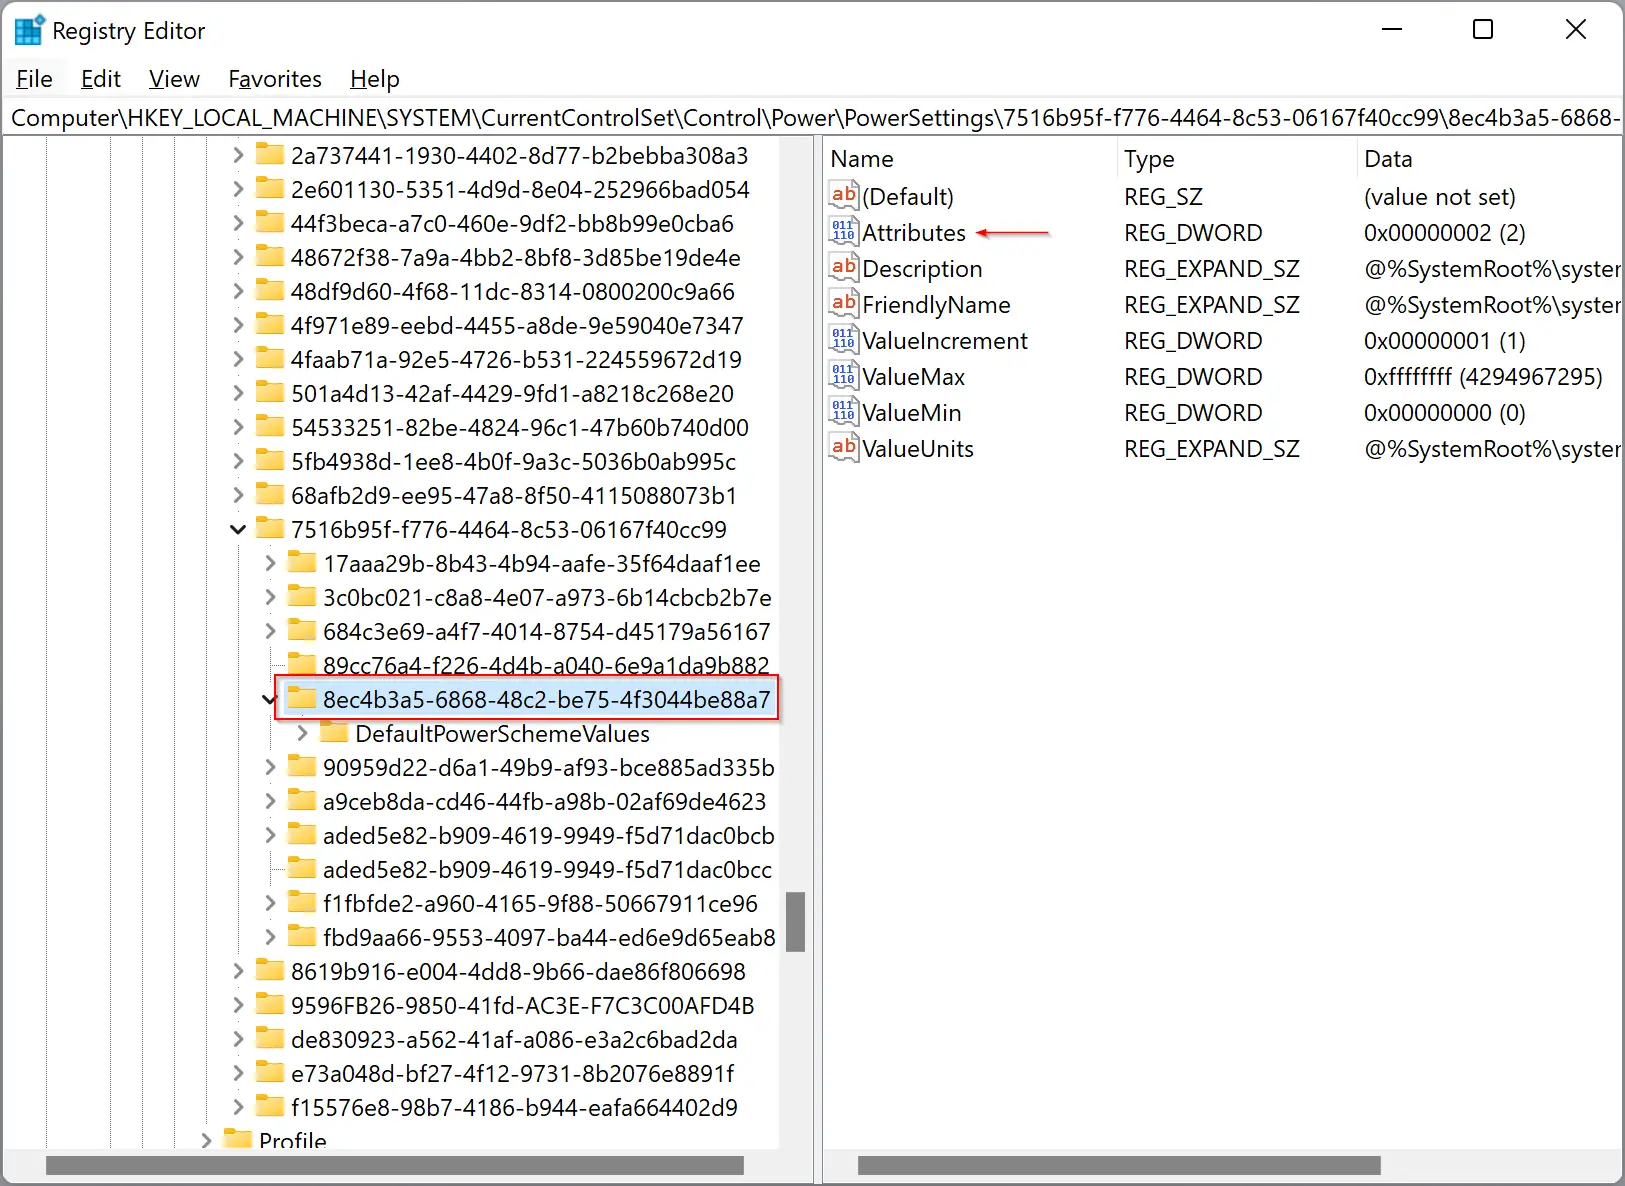
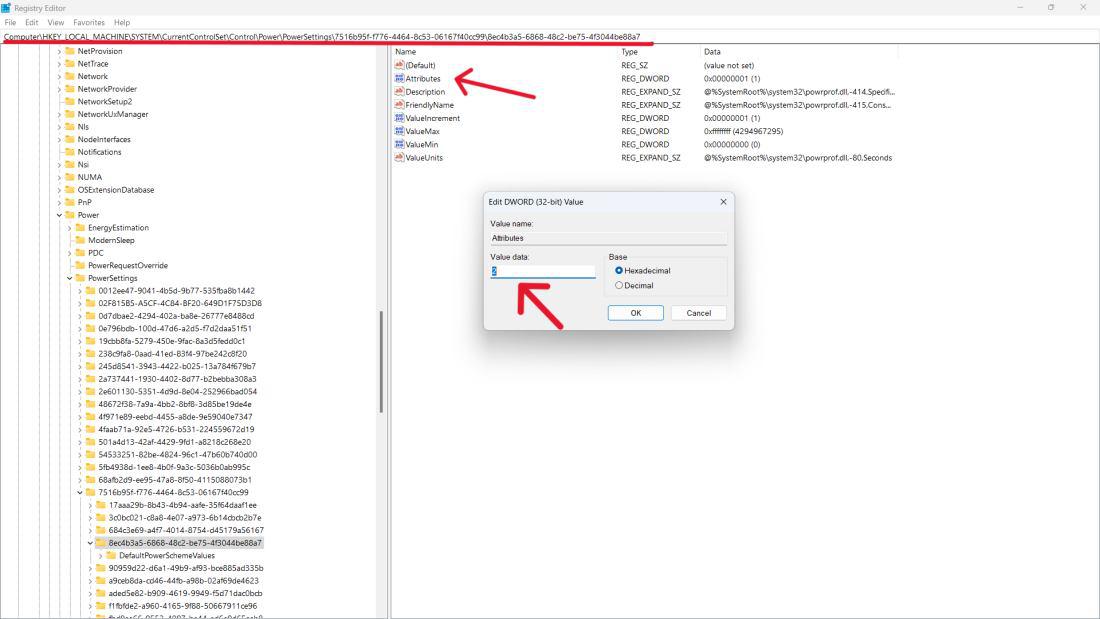
В окне редактора реестра переходим по следующему пути:
Компьютер\HKEY_LOCAL_MACHINE\SYSTEM\CurrentControlSet\Control\Power\PowerSettings\7516b95f-f776-4464-8c53-06167f40cc99\8ec4b3a5-6868-48c2-be75-4f3044be88a7
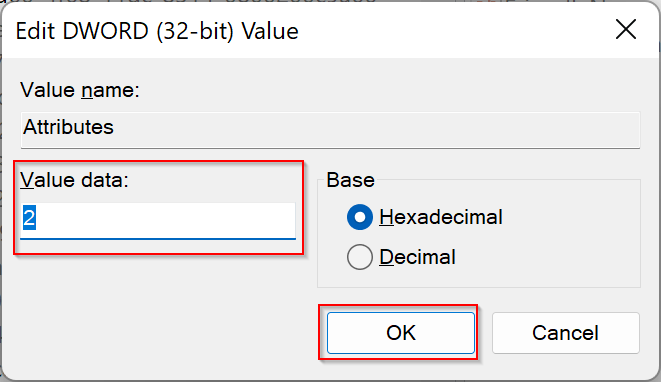
Затем дважды щелкаем по строковому параметру «Attributes» и меняем значение на «2», после чего нажимаем кнопку «ОК».
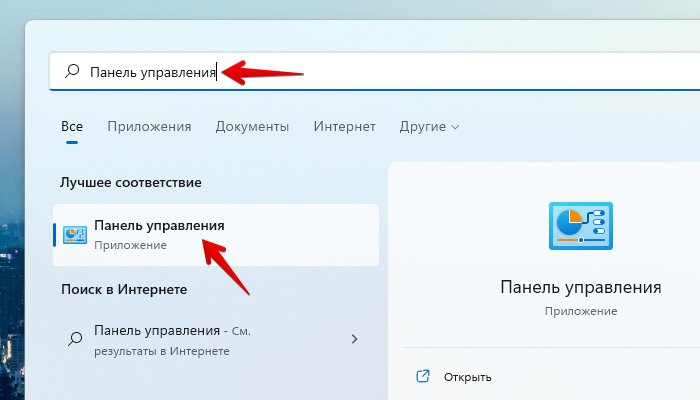
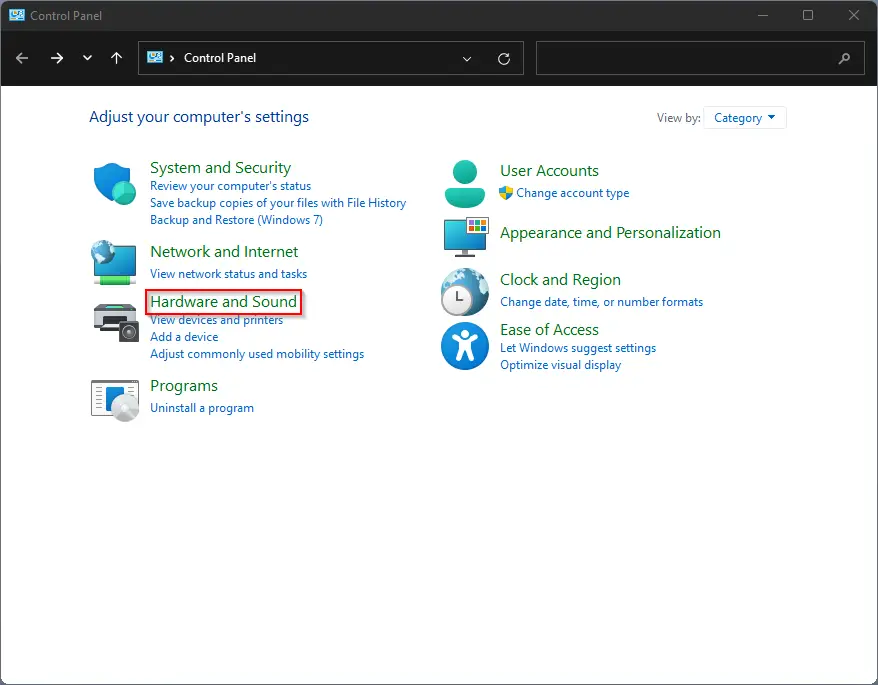
Теперь открываем «Панель управления», для этого воспользуемся поиском в меню «Пуск».
В окне панели управления нажимаем на значок «Электропитание».

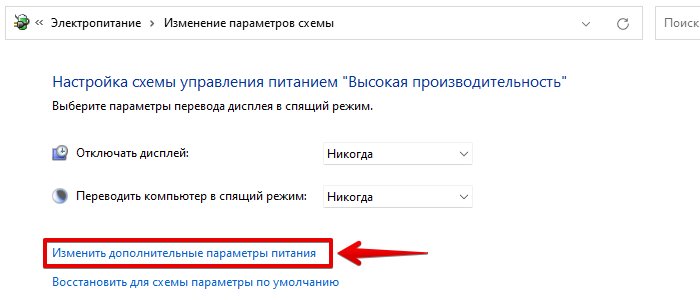
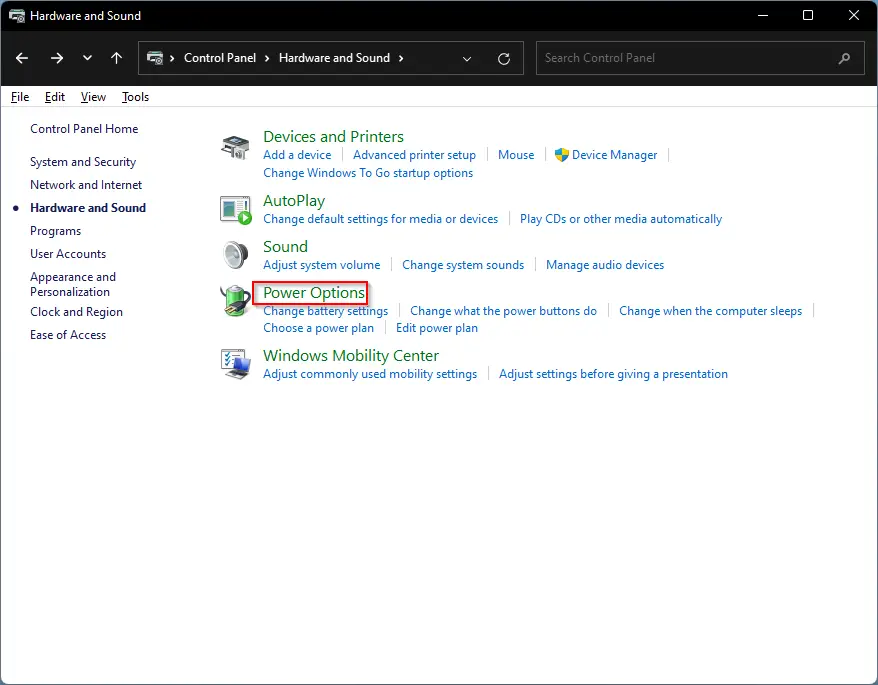
Теперь в разделе «Выбор или настройка схемы управления питанием» выбираем схему и щелкаем по ссылке «Настройка схемы электропитания».
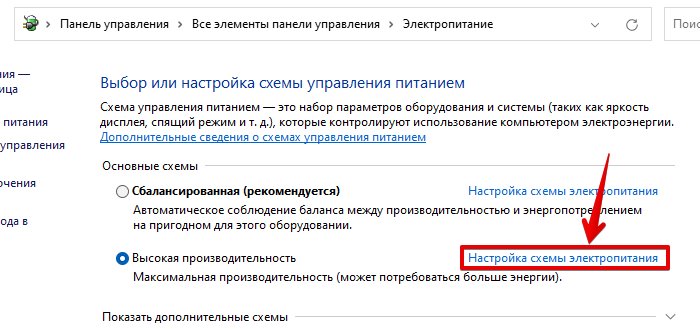
Далее, нажимаем на ссылку «Изменить дополнительные параметры питания».
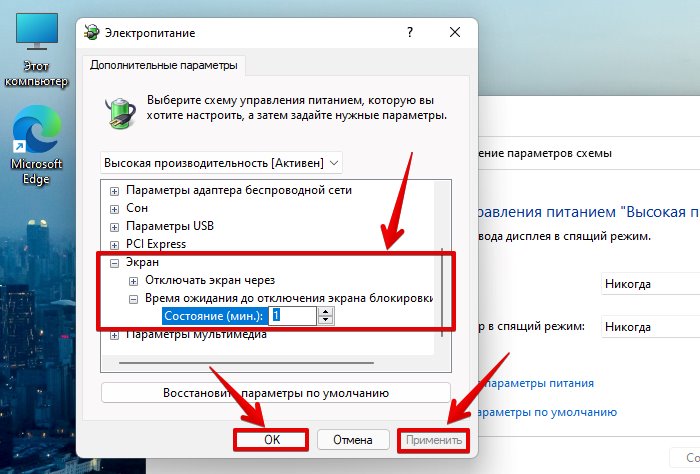
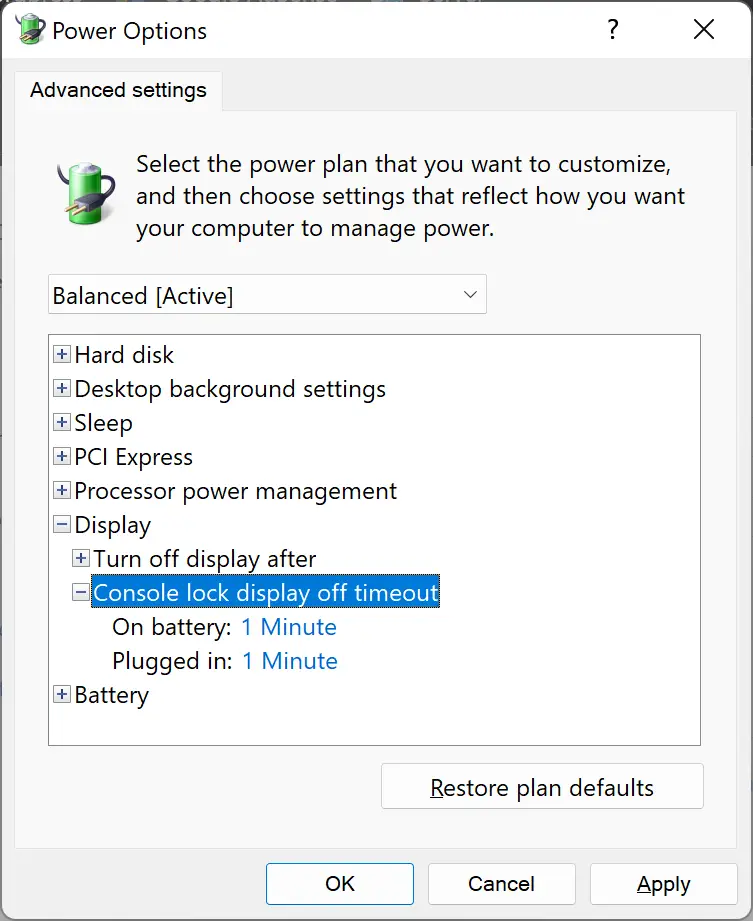
В появившемся окне «Электропитание» щелкаем по пунктам «Экран» — «Время ожидания до отключения экрана блокировки консоли». И изменяем значение «Состояние (мин)».
By default, Windows 11’s lock screen times out and switches off the monitor after just a minute. When you try to enter into your PC, you need to type in the user account password to access your desktop. It is very little time, and a lot of Windows users are not happy with this behavior. However, it is possible on Windows 11 to increase the screen time out. If you are one of those Windows users who are not happy with a one-minute screen lock, you can increase the time. In this gearupwindows article, we will guide you on increasing the Windows 11 lock screen timeout.
There are at least two ways through which you can change the lock screen timeout on Windows 11. Either use Control Panel or Settings app. Ultimately, both will do the same job.
The Control Panel does not allow you to change the lock screen timeout settings. So, you need to take the help of the Windows Registry to appear this setting under Control Panel. Then, you can increase the lock screen timeout according to your needs on your computer using Control Panel.
How do I Increase the Windows 11 Lock Screen Timeout using Control Panel?
Follow these steps to increase the Windows 11 Lock Screen Timeout through Control Panel:-
Step 1. Open Registry Editor.
Step 2. When Registry Editor opens, navigate to the following key from the left side pane:-
Computer\HKEY_LOCAL_MACHINE\SYSTEM\CurrentControlSet\Control\Power\PowerSettings\7516b95f-f776-4464-8c53-06167f40cc99\8ec4b3a5-6868-48c2-be75-4f3044be88a7
Step 3. On the right side pane, locate the Attributes DWORD (32-bit) Value and double-click to open its settings.
Step 4. Now enter 2 in the Value data field and then click the OK button.
That’s all. You can close the Registry Editor. Next, you need to increase the lock screen time on Control Panel.
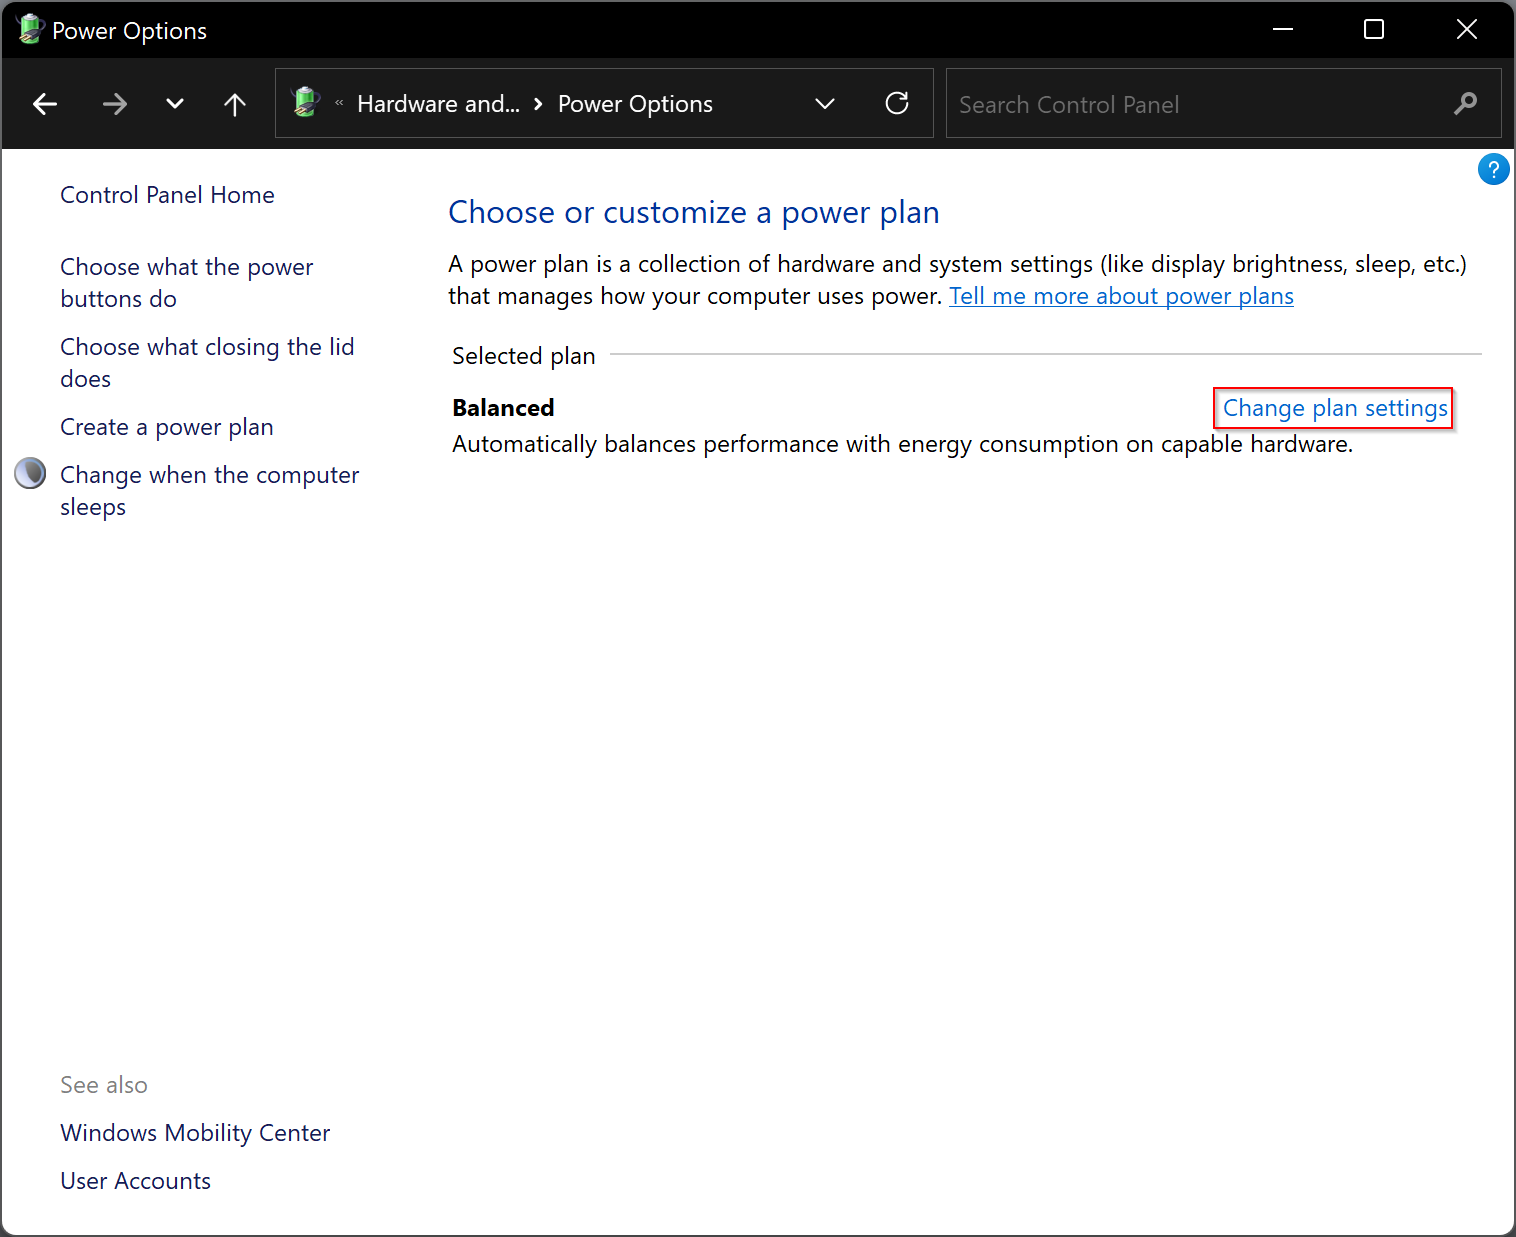
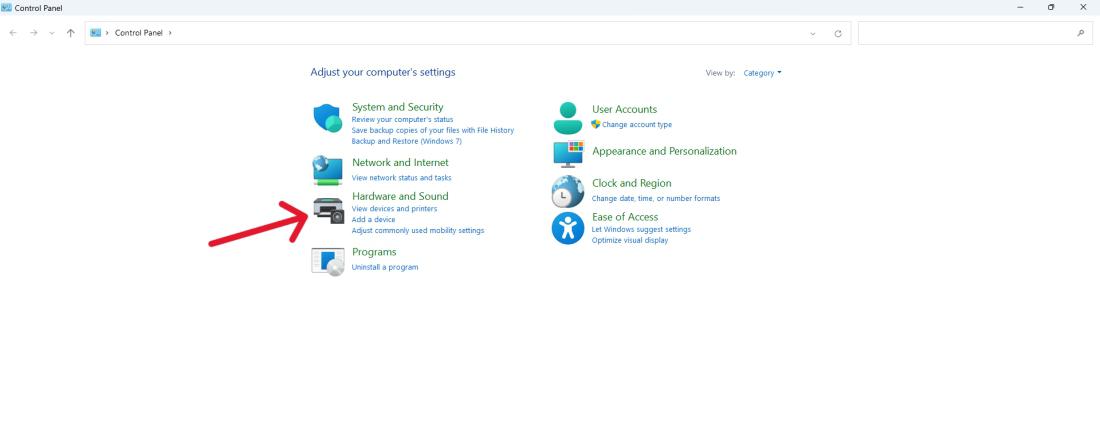
Step 5. Open Control Panel.
Step 6. When the Control Panel window opens, click the Hardware and Sound category.
Step 7. In the next window, click the Power Options.
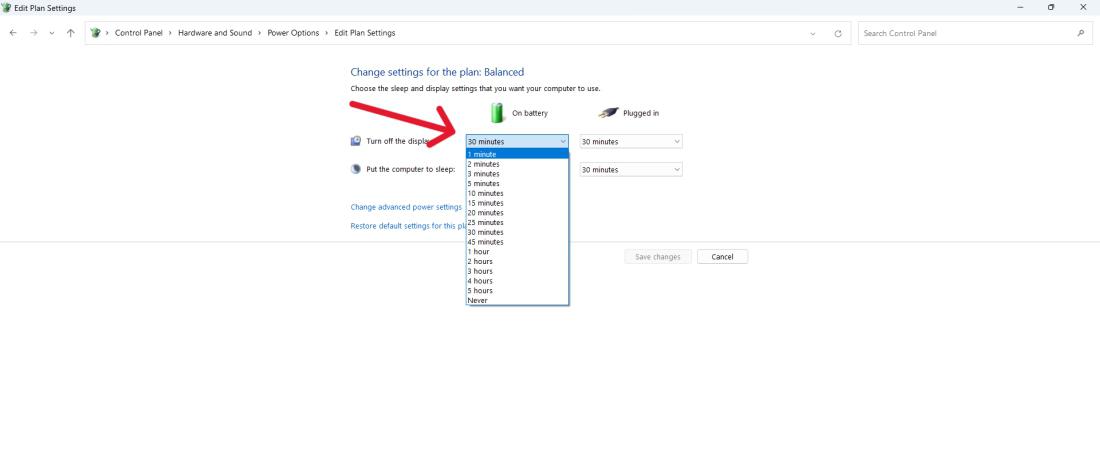
Step 8. Here, click the link labeled Change plan settings next to the Balanced option.
Step 9. Now, click the link Change advanced power settings.
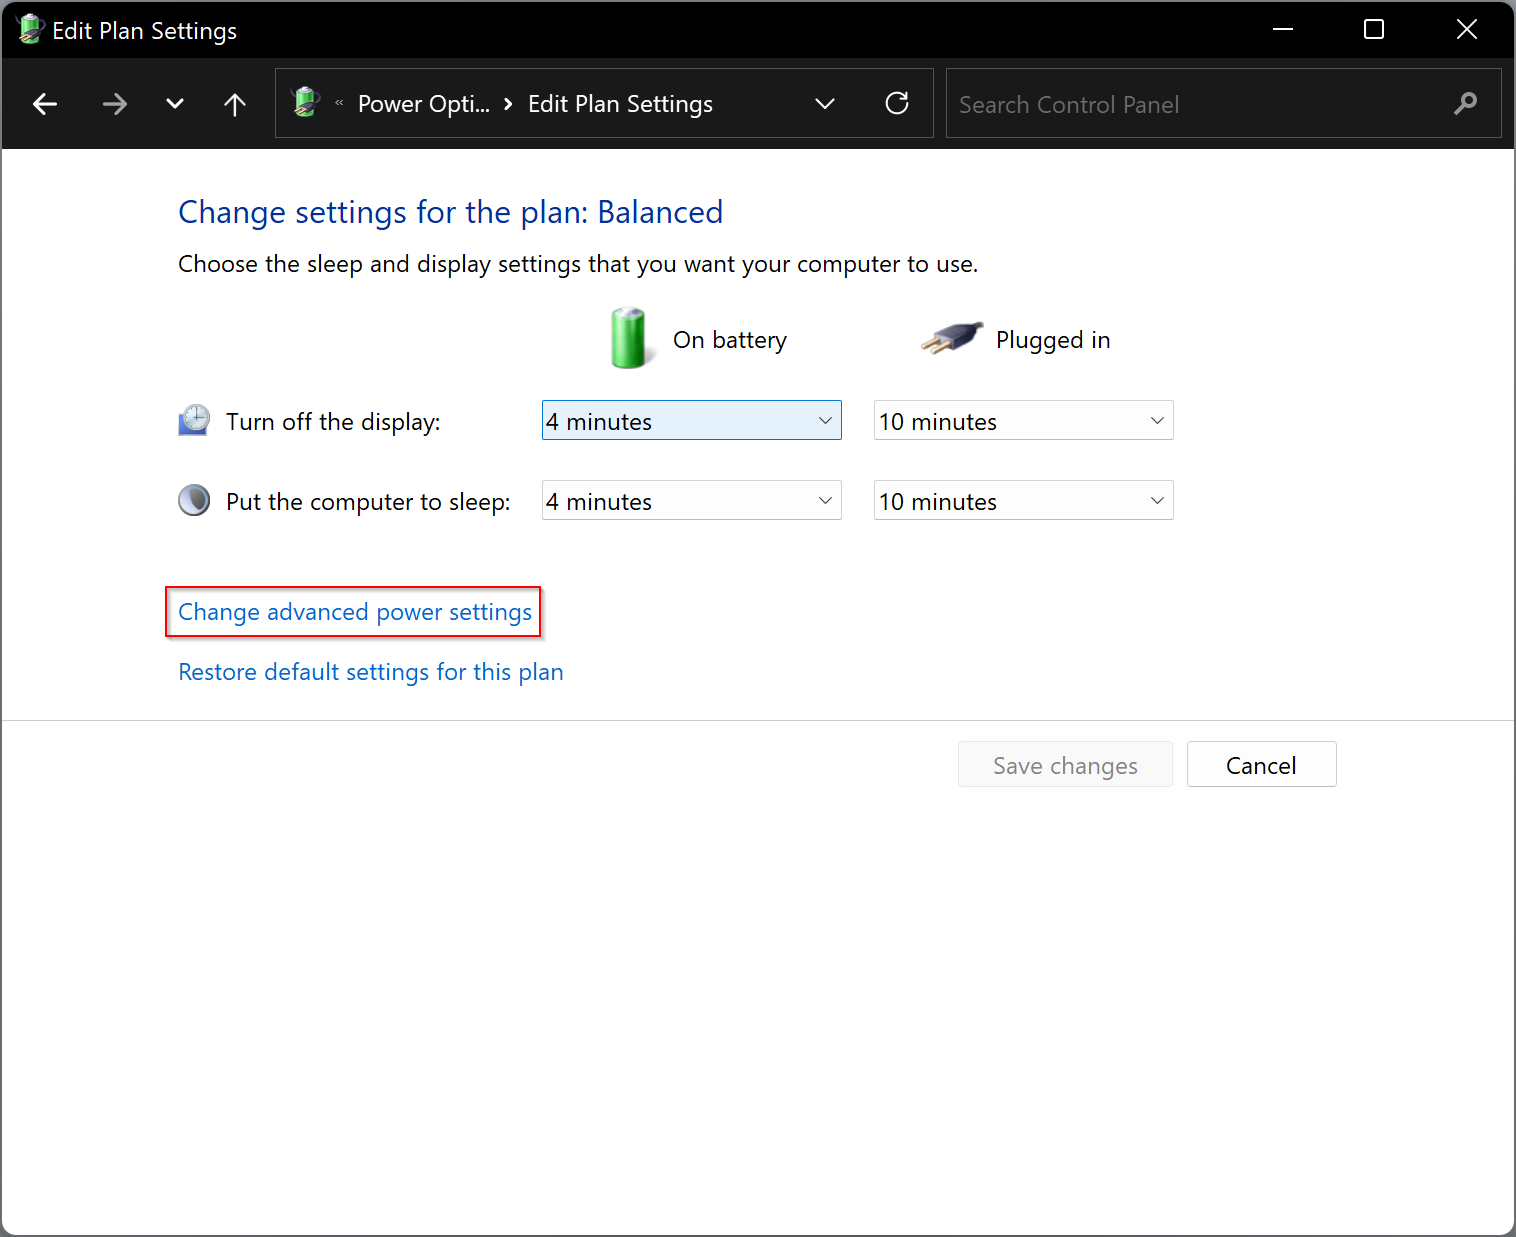
Step 10. A new pop-up window will appear. Expand the Display and then Console lock display off timeout setting.
Step 11. Now, set the timeout for how many minutes you want to lock the screen.
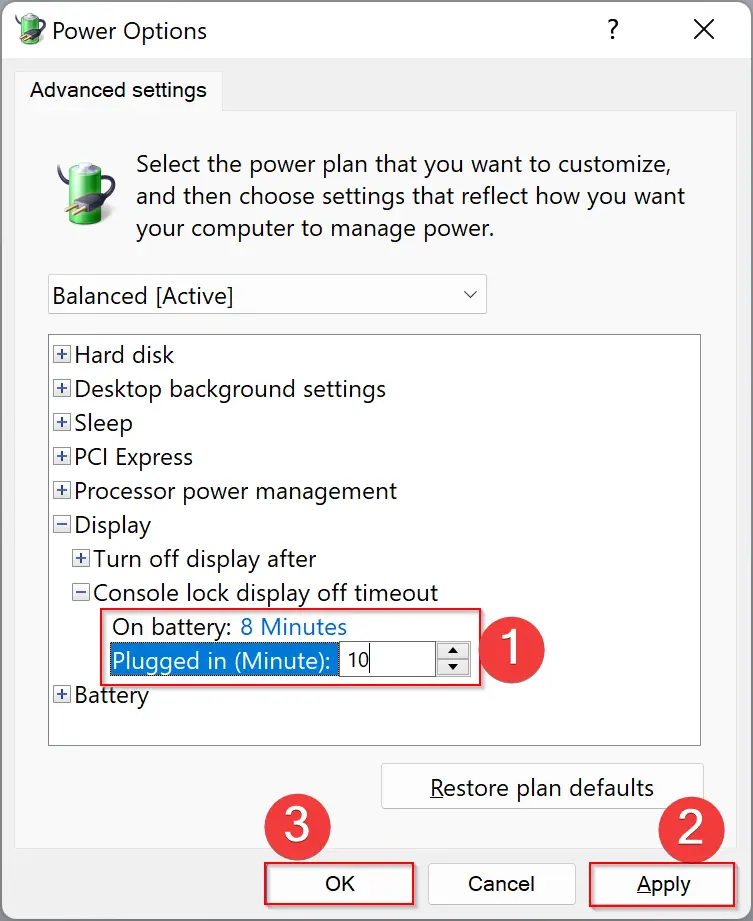
Step 12. Click Apply.
Step 13. Click OK.
Step 14. Restart your computer.
Now, the Windows 11 Lock Screen Timeout is set by you. Your PC’s screen will lock out after the time that you have specified in the above settings.
How do I Increase the Windows 11 Lock Screen Timeout via the Settings app?
Follow these steps to increase the Windows 11 Lock Screen Timeout using the Settings app:-
Step 1. Open the Settings app by pressing Windows + I keys from the keyboard or any other method that you use.
Step 2. Select the System category from the left sidebar when Windows Settings opens.

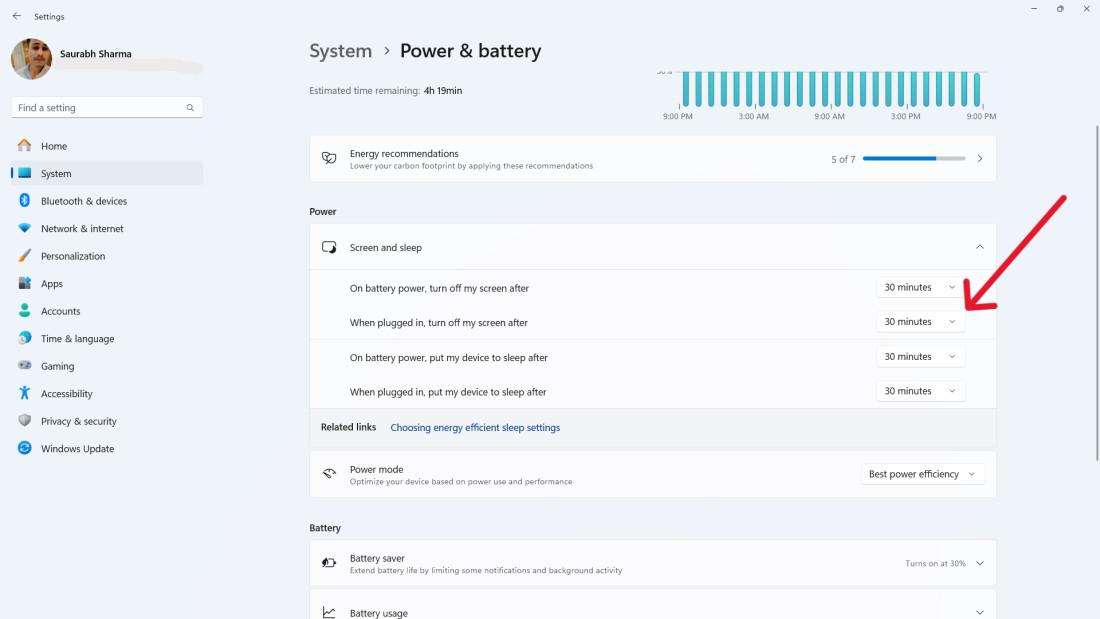
Step 3. On the right sidebar, click on the Power & battery option.
Step 4. Now, scroll down to the Power section and then click on Screen & sleep.
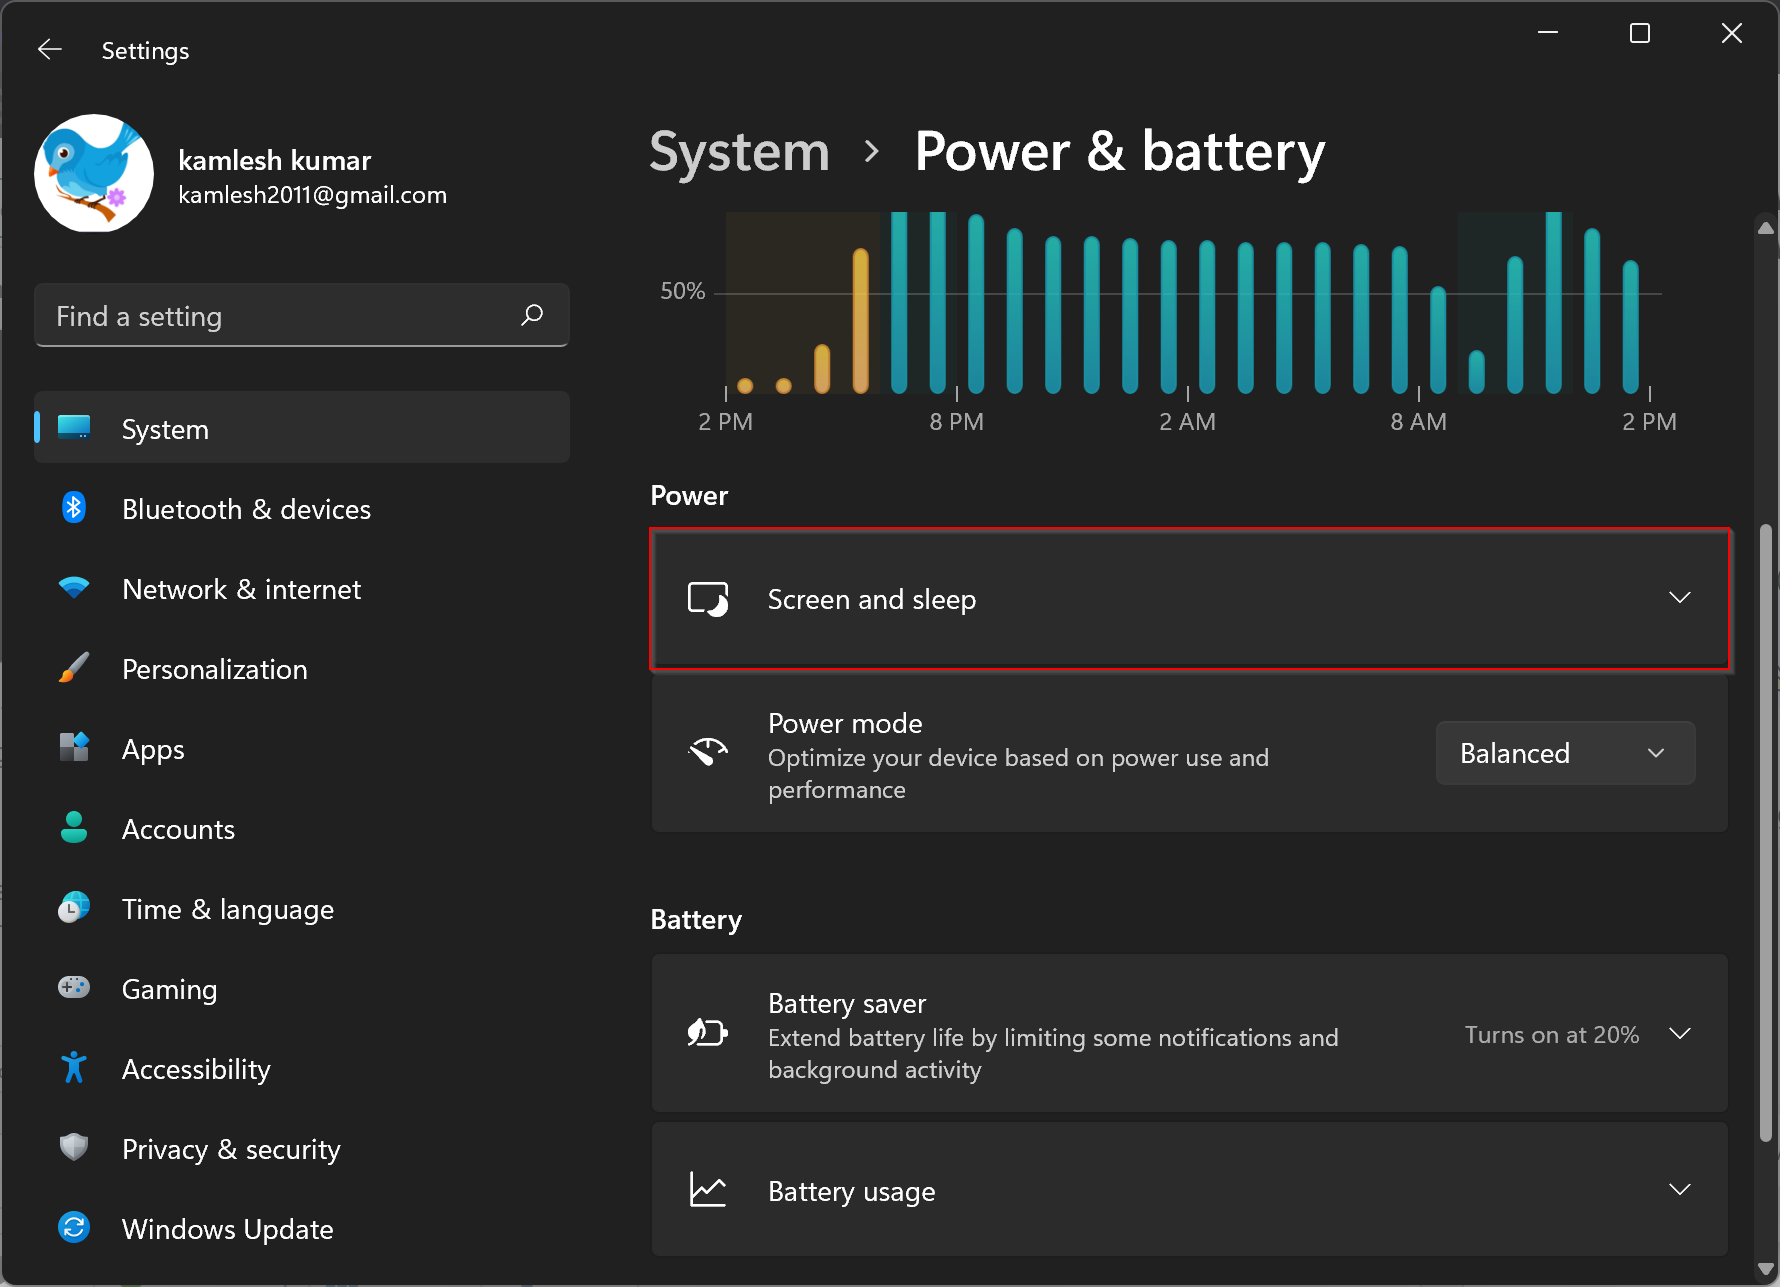
Step 5. Under Screen and sleep, select the turn-off-screen time from both drop-down menus marked in the below image.
That’s it. Now you can close the settings app safely.
Conclusion
In conclusion, Windows 11 has a default lock screen timeout of just one minute, which may not be convenient for some users. However, it is possible to increase the lock screen timeout using either the Control Panel or the Settings app. The Control Panel method requires modifying the Windows Registry, while the Settings app method is more straightforward. Users can choose the method that suits them best to set a lock screen timeout that meets their needs. By following the steps provided in this gearupwindows article, Windows 11 users can easily increase the lock screen timeout and improve their user experience.
Last Updated :
02 Apr, 2024
Are you wondering how to change the screen timeout in Windows 11? The screen will turn off after a specified period of inactivity on Windows 11 by the default settings. The device features an adjustable setting that turns off the screen whenever the gadget is idle, to conserve battery power, and adjust the screen timeout duration period. These involve anything from a minute up to over five hours.
To learn How to Change the display Timeout in Windows 11? keep reading! This article explains different ways to adjust the screen timeout to your preference, avoiding any inconvenience caused by the default setting.
Methods to Change the Screen Timeout in Windows 11
- Method 1: Change Windows Screen Timeout Using Settings
- Method 2: Change Windows Screen Timeout Using Control Panel
- Method 3: Change Windows Screen Timeout Using Advanced Power Options
- Method 4: Change Windows Screen Timeout Using Command Prompt
- Method 5: Change Windows Screen Timeout Using PowerShell Command
- Method 6: Change Windows Screen Timeout Using Registry Editor
How to Change the Windows 11 Lock Screen Timeout?
To change the screen timeout in Windows 11, you’ll need to edit the registry to enable the timeout settings. Here’s a step-by-step guide:
Method 1: Change Windows Screen Timeout Using Settings
This method allows you to customize and change the display timeout to suit your needs, helping to conserve power and optimize your PC’s performance.
Step 1: Press the Win + I keys to open the Settings app.
Step 2: Click on «System» and select «Power & sleep» from the left sidebar.
Step 3: In the “screen and sleep” section of settings, select the drop-down menu and set it to your preferred timeout period.
Method 2: Change Windows Screen Timeout Using Control Panel
If you want to adjust how long it takes for your screen to turn off automatically, you can do it through the Control Panel. This method allows you to easily change the display timeout according to your preferences.
Step 1: Click the Start button and then select «Control Panel.»
Step 2: Select «Hardware and Sound» and then «Power Options.»
Step 3: Click on «Change plan settings» next to your selected power plan.
Step 4: Adjust the dropdown menu to your desired timeout duration.
Method 3: Change Windows Screen Timeout Using Advanced Power Options
This method allows you to adjust the timeout settings to your preference, allowing you to customize how long your screen remains active before turning off automatically.
Step 1: Open the run dialog by pressing Win + R
Step 2: Then, Type the following command
control.exe powercfg.cpl,,3
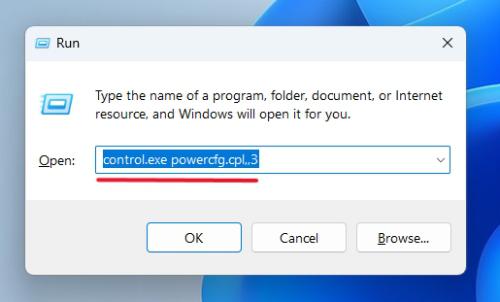
Step 3: Extend Sleep > Sleep after clicking the “On battery” OR “Plugged in” and define the required screen timeout length.

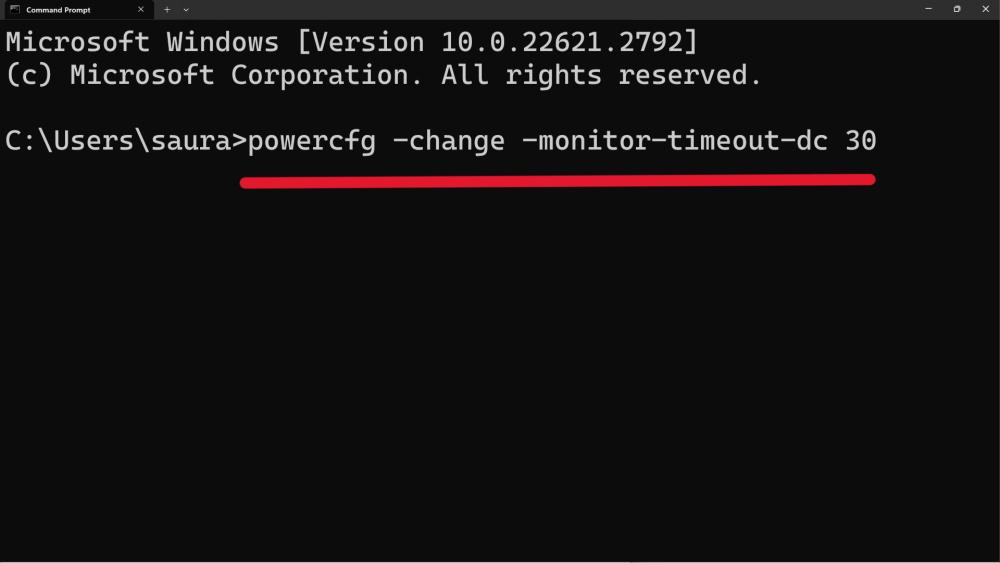
Method 4: Change Windows Screen Timeout Using Command Prompt
This method provides a straightforward way to customize your display timeout settings in Windows 11.
Step 1: Go to the start menu, click run, type CMD, then press Enter to launch the command prompt. The search bar can be opened by pressing Win + S.
Step 2: Type this command :
powercfg -change -monitor-timeout-dc xwhere X will be the time duration in seconds
Method 5: Change Windows Screen Timeout Using PowerShell Command
This method gives you more control over changing the display timeout to better suit your preferences.
Step 1: Open PowerShell as an administrator.
Step 2: Use the following command to set the screen timeout:
powercfg -change -monitor-timeout-ac 60
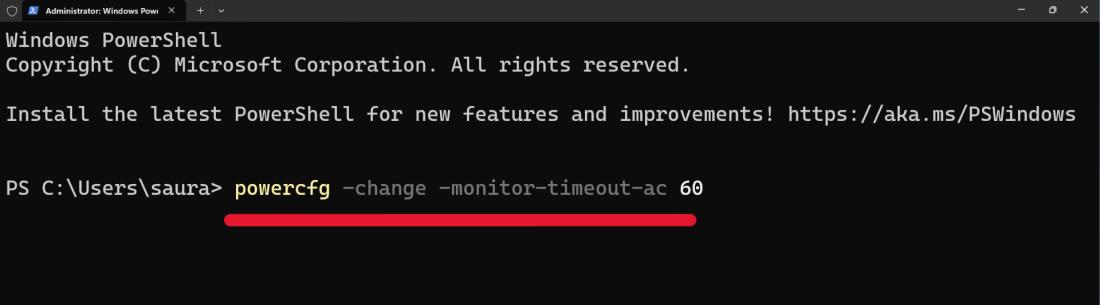
Step 3: Replace ‘X‘ with the desired timeout value in seconds.
Method 6: Change Windows Screen Timeout Using Registry Editor
This method allows you to change the display timeout according to your preference. Follow these steps carefully to ensure you make the adjustments correctly.
Step 1: Press Win + R to open the Run dialog, type regedit, and press Enter.
Step 2: Navigate to
HKEY_LOCAL_MACHINE\SYSTEM\CurrentControlSet\Control\Power\PowerSettings\7516b95f-f776-4464-8c53-06167f40cc99\8EC4B3A5-6868-48c2-BE75-4F3044BE88A7.Right-click on «Attributes» then click on «Modify» Now several on input change the value to «2«.
Step 4: Click on OK
Conclusion
In conclusion, changing the screen timeout in Windows 11 is rather simple and gives us several ways to personalize that important part of battery saving. However, the Windows 11 interface satisfies multiple types of users, as it provides the modern Settings app, the traditional Control Panel, and the command-line power of PowerShell and Command Prompt. More sophisticated users can also dig deeper into the registry editor and make more accurate adjustments with display timeout settings.
Lock Screen timeout in Windows 11 is set to 60 seconds following the built-in configuration in Windows 11 so the display goes to sleep after the time frame ends. This is really a very short span so the screen soon extinguishes automatically if you step away from the workstation. Moreover, you have to enter the login credentials at the lock screen in order to turn the system active. Some users have found it really difficult to access Windows within this short time period. This write-up is basically for the beginners who opt to change Windows 11 Lock screen timeout so that it may not go to sleep or lock so quickly when staying idle.
Windows 11 users can change lock screen timeout and increase the interval. There are a couple of ways to do so from the Settings app, Control Panel, and tweaking the registry. All methods are described in the below segment.
Change Windows 11 Lock screen timeout
Here are 4 Ways to change Windows 11 lock screen timeout –
Way-1: Increase Screen timeout from Settings app
The settings app in Windows 11 is the best place to modify any existing system without making abnormal changes to the system. To change your computer’s lock screen timeout, access the Settings app initially. Here is how to do that –
- Press – Windows key and I.
- When the Settings app opens up, click Personalization from the left pane.
- Choose Lock screen on the right side.
- Scroll down to the Related settings area.
- Click – Screen timeout from there.
- From the following window, head towards the Power section.
- Click and expand Screen and sleep.
- Adjust the areas cited here and change the screen timeout as you want.
Note: Choose Never if you don’t want to lock the screen when the PC is plugged into the power. You can choose 5 minutes when the computer is On battery and you have to conserve battery life. All the adjustments should be carried out as per the need and keep a track of the laptop battery life.
Way-2: Tweak Windows Registry
Another easiest way to Change Windows 11 Lock screen timeout you need to make a tricky change in Windows Registry. This is a professional workaround and needs expert’s hands to accomplish. Any mistake in doing so will cause damage to the system which is irrecoverable. If you are confident enough, follow the below guidelines precisely to carry out this task –
- Press – Windows + R together.
- In the Run dialog box, type – regedit. You can see How to open Registry Editor in Windows 11 (Best Ways.
- Press – Enter key and Registry Editor will be opened.
- From the left side pane of following window, navigate to below path –
“Computer\HKEY_LOCAL_MACHINE\SYSTEM\CurrentControlSet\Control\Power\PowerSettings\7516b95f-f776-4464-8c53-06167f40cc99\8EC4B3A5-6868-48c2-BE75-4F3044BE88A7”
- Once reached, move on to the right side and double-click – Attributes.
- Set the value data to 2.
- Click – OK to make the changes.
All these settings will enable an option in Windows 11, that is called “Console lock display off timeout.” Having done the previous task, you have to customize this option to change screen timeout settings. Follow the next few steps now from Control Panel –
- Press the Windows key and type – control panel.
- Select the app from the best-matched results.
- When the app homepage is upfront, click – Power Options.
- Reach to your preferred power plan options and hit – Change plan settings.
- Click – Change advanced power settings from here.
- In this window, scroll down and expand – Display.
- When you will see Console lock display off timeout option, double-click the same to expand.
- Adjust the default time of 1 minute to any interval of screen timeout you want, in minutes.
- Click Apply and then OK.
Way-3: Adjust Lock Screen timeout – cmd commands
Windows Command Prompt is a bit advanced utility to make changes to the system using suitable commands. Before applying an appropriate command line, you need to access the Elevated Command Prompt (with Admin Privileges). You can also Change Windows 11 Lock screen timeout by executing a command too. For that, follow the way –
- Press – Windows + S.
- Type – cmd using keyboard.
- When Command Prompt appears in the best match result, right-click it.
- Select – Run as Administrator.
- To allow User Account Control, click – Yes.
- After being guided to the black window, enter the below command –
powercfg.exe /SETACVALUEINDEX SCHEME_CURRENT SUB_VIDEO VIDEOCONLOCK 60
- Press – Enter.
Note – In the above command, we have used 60 seconds. Change this time as per demand such as for 5 minutes, type 300 at the end of the command.
- After that, insert the following command and press Enter key –
powercfg.exe /SETACTIVE SCHEME_CURRENT
- You can press Windows + L keys in order to check the newly adjusted settings.
Important: In the second step, we have used the command line tool for using the machine with AC power plugged in. If you opt to change the timeout for tablet or laptop running on Battery, replace /SETACVALUEINDEX by /SETDCVALUEINDEX and execute.
Way-4: Using Control Panel
Control Panel holds almost advanced options to make significant changes to the system. Rather than the Settings app, you can access Control Panel as well to make adjustments to default set up if you feel it easy. To modify Windows 11 Lock screen timeout from Control Panel, follow the below guidelines –
- Click search icon from the taskbar.
- Type – control panel.
- Hit – Enter key.
- When the app shows up, make sure the View by type is set to either Small icons or Large icons.
- Click – Power Options.
- In the following window, head over to Balanced (recommended) power plan.
- Click on – Change power plan settings link.
- Change Turn off the display and Put the computer to sleep options by clicking dropdown menu.
- Select – Never while Plugged in and choose 5 minutes when on Battery to save the battery life.
- Finally, click – Save changes button.
Methods list:
Way-1: Increase Screen timeout from Settings app
Way-2: Tweak Windows Registry
Way-3: Adjust Lock Screen timeout using commands
Way-4: Using Control Panel
That’s all!!