
n this tutorial, we are going to install VNC server on Windows 10, which can enable you to connect to your Windows 10 PC from a remote computer. The VNC (Virtual Network Computing) is a great choice if you need a free alternative to the Windows Remote Desktop (RDP).
Installing TightVNC Server On Windows 10
There are several free VNC servers available for Windows 10, we are going to use TightVNC software.
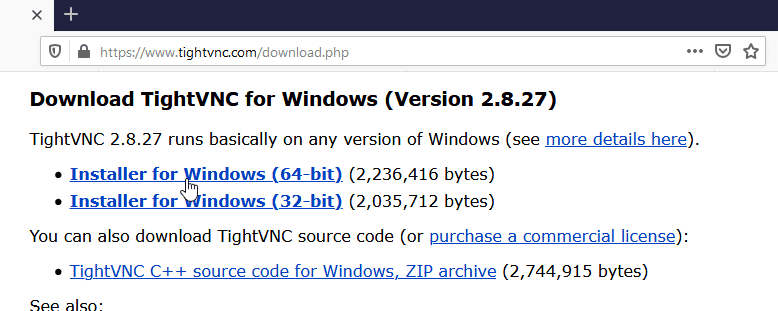
First, Download TightVNC Server from http://tightvnc.com/download.php.
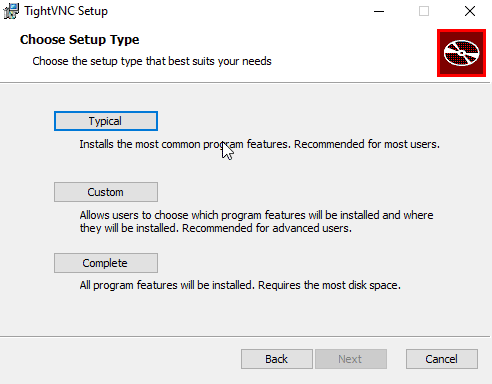
Run the setup file and continue with the Typical install option.
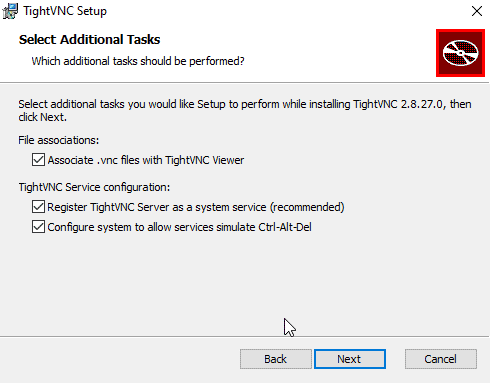
TightVNC should be set to run as a system service.
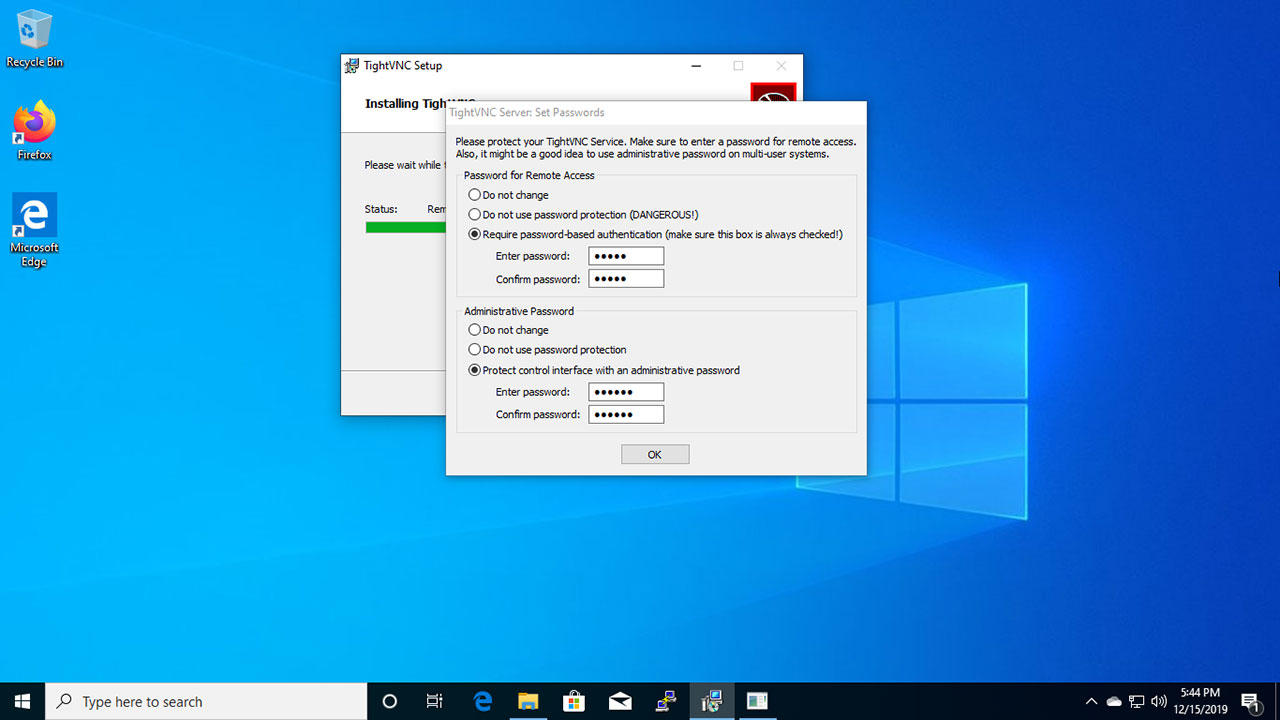
Set Passwords for Remote Access and control interface.
That’s all we need to do. VNC Server on Windows 10 listen on port 5900. The TightVNC server automatically configures Windows Firewall to allow incoming connections, so you don’t need to worry about Windows firewall.
Connecting to the desktop remotely
On the remote computer, a VNC viewer should be installed. There are several VNC viewers available, you can use the TightVNC viewer which is available for Windows, Linux and macOS.
Enter your Windows 10 computer’s IP address to connect.
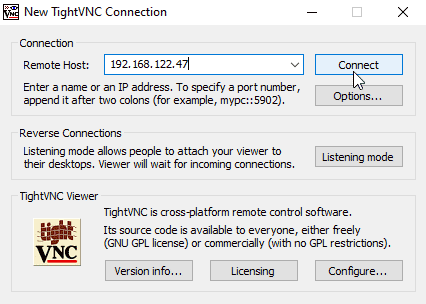
The user will then be prompted for their remote access password.
We can reset Remote Access password from the Control interface. Double click the VNC Tray icon to open the Control interface.
Starting and Stopping VNC Server
To Stop VNC Server, right click the VNC icon on the Windows tray bar and click «Shutdown TightVNC Server».
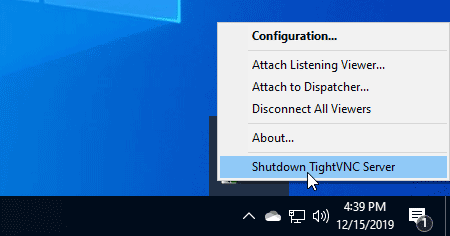
To Start VNC, Go to Start Menu and click «Start TightVNC Service».
Время на прочтение5 мин
Количество просмотров150K
Это руководство о том, как настроить noVNC для удалённого доступа к компьютерам на Windows.
Почему noVNC?
— У Windows есть «родное» средство для удалённого доступа — Remote Desktop Connection. Но оно есть не во всех версиях Windows — например нет в Home edition.
— Также существует множество VNC серверов и клиентов для любой версии Windows. Но для их использования нужно ставить VNC клиент. А бывают случаи, когда ставить ничего нельзя (ограничение прав), или нежелательно, чтобы не оставлять следов на чужом компьютере.
— Ещё есть Chrome Remote Desktop, которому на стороне клиента нужно только расширение в браузере. Но у меня был случай, когда протокол Хрома был заблокирован организацией (там почто всё было заблокировано), а noVNC использует обычный HTTP и поэтому работал.
Насколько я знаю, noVNC — единственное средство, которое позволяет подключиться к удалённому компьютеру без установки какого-либо клиента — используется лишь браузер.
Ещё есть SPICE, но для него я не нашёл сервера под Windows.
В результате этого руководства, мы сможем просто открыть линк в браузере, ввести пароль и пользоваться удалённой системой.
Необходимым условием является проброс портов, или белый IP удалённого компьютера. Также можно воспользоваться VNC repeater. Но это уже выходит за рамки этой статьи.
Общая схема

Сначала мы поставим обычный VNC сервер на порт 5900.
Затем поставим noVNC и WebSockify на порт 5901.
WebSockify — это своего рода прокси, который с одной стороны умеет разговаривать с VNC, который у нас на порту 5900, а с другой — умеет транслировать это браузеру через вебсокет, который у нас будет на порту 5901.
noVNC — это просто html-приложение, или как сегодня это называют Single Page Application, которое и будет работать в клиентском браузере и «говорить» с WebSockify на сервере.
Вообще-то в природе существуют VNC серверы, которые умееют сразу соединяться через вебсокеты:
— MobileVNC, но он платный (10 Евро за устройство)
— Есть библиотека LibVNCServer, которая поддерживает вебсокеты, и теоретически работает под Windows, но я не нашёл ни одного готового сервера под Windows с этой библиотекой.
В этом случае WebSockify уже не будет нужен.
Ставим VNC
Сам VNC протокол стандартизован, поэтому теоретически можно использовать любой VNC сервер.
Сначала я попробовал поставить TightVNC, но у noVNC были с ним какие-то проблемы с аутентификацией. Думаю, что можно было разобраться, но я поставил UltraVNC (осторожно, у них там тонны рекламы, реальные ссылки — внизу страницы) и всё заработало.
Скорее всего будут работать большинство VNC серверов, которые поддерживают Windows.
VNC сервер я поставил на порт 5900. Не забудьте установить пароль на VNC соединение. UltraVNC не даст подсоединиться до тех пор, пока вы не установите пароль.
Проверьте, что VNC сервер работает, подключившись к нему с помощью VNC клиента с другого компьютера или смартфона.
noVNC и WebSockify
Создаём папку в удобном для себя месте, и загружаем туда:
— распаковываем zip архив noVNC
— распаковываем zip архив WebSockify
Цель, чтобы получилось приблизительно вот так:

Теперь запускаем command prompt с администраторскими правами:
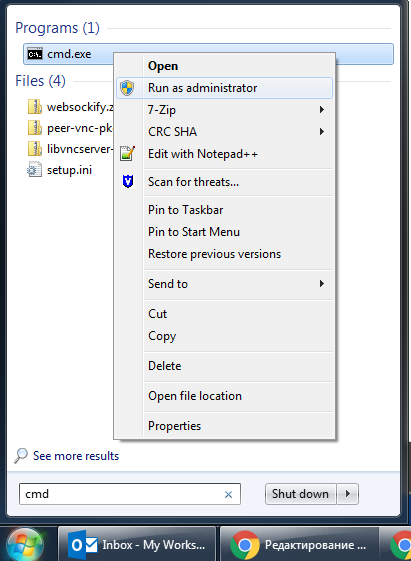
Запускаем WebSockify:
c:\> cd c:\noVNC\websockify
c:\noVNC\websockify> websockify.exe 5901 127.0.0.1:5900 --web c:\noVNC\noVNC-master
WARNING: no 'resource' module, daemonizing support disabled
WebSocket server settings:
  - Listen on :5901
  - Flash security policy server
  - Web server. Web root: c:\noVNC\noVNC-master
  - No SSL/TLS support (no cert file)
  - proxying from :5901 to 127.0.0.1:5900
Первый параметр выше — порт на котором noVNC будет слушать: 5901. Этот порт нужно сделать доступным для клиентов.
Второй параметр — IP и порт, где стоит VNC сервер: 127.0.0.1:5900
Третий параметр —web инструктирует noVNC, чтобы он отдавал содержимое директории c:\noVNC\noVNC-master по HTTP(s). По умолчанию noVNC отдаёт только VNC вебсокет, но этот параметр позволяет иметь и HTTP сервер на этом же порту.
В директории c:\noVNC\noVNC-master переименуйте файл vnc.html в index.html, чтобы он отдавался по умолчанию.
Теперь noVNC клиент должен быть доступен на порту 5901:
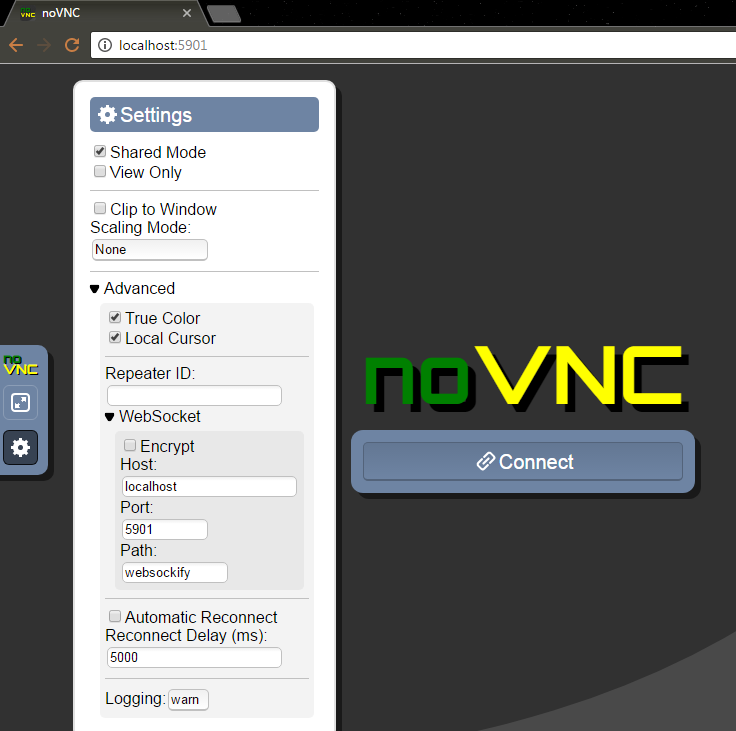
Попробуйте также открыть noVNC страницу с другого компьютера/смартфона, чтобы удостовериться, что она доступна снаружи. Если нет — то проверьте:
— что у вас Windows Firewall не блокирует внешние подключения на этот порт,
— что ваш роутер правильно перенаправляет запросы на этот порт на нужный компьютер; если надо гуглите «проброс портов».
Соединяемся (Connect), вводим VNC пароль и видим рабочий стол удалённого компьютера!
Если что-то пошло не так, то ошибки должны показаться в нашей консоли.
Остановить noVNC сервер можно нажав Ctrl-C в консоли. Описанная выше конфигурация работает по HTTP (и по WS).
Добавляем SSL с самоподписанным сертификатом
Добавлять SSL — необязательно. Создать самоподписанный сертификат можно вот так:
openssl req -new -x509 -days 365 -nodes -out self.pem -keyout self.pemДля Windows openssl можно взять здесь.
В результате получаем файл self.pem, на который надо указать при старте noVNC:
c:\noVNC\websockify> websockify.exe 5901 127.0.0.1:5900 --web c:\noVNC\noVNC-master --cert=c:\noVNC\self.pemТеперь у нас работает HTTPS и WSS (WebSocket Secure). Для WSS в настройках (Settings) нужно указать Encrypt. Интересно, что noVNC использует один и тот же порт для HTTP и HTTPS — он «умеет» различать запросы и правильно отвечать.
Так как сертификат самоподписанный, то в браузере нужно будет принять этот сертификат.
Let’s Encrypt
У меня нет инструкций о том, как настроить систему, чтобы Let’s Encrypt автоматически генерировал сертификат специально для нашей системы. Для этого потребовалось бы, чтобы noVNC работал на порту 80, что конечно же возможно, но может быть неудобно, и найти способ интегрировать certbot, чтобы эти файлы публиковались в нужную директорию. Думаю, что это возможно, но я этого не сделал. Если вы допилите — поделитесь в комментариях.
В моём случае, у меня уже есть домашний сервачок с NGINX и DDNS именем, который настроен автоматически получать сертификат от Lets Encrypt.
Вы можете запустить что-то похожее у себя. Здесь есть инструкции о настройке Let’s Encrypt для Linux и Windows.
Поэтому для noVNC я просто использую уже существующие pem-файлы, сгенерированные для nginx.
Let’s Encrypt создаёт следующие файлы:
cert.pem: Your domain's certificate
chain.pem: The Let's Encrypt chain certificate
fullchain.pem: cert.pem and chain.pem combined
privkey.pem: Your certificate's private key
На Ubuntu их можно найте по вот такому пути: /etc/letsencrypt/live/your_domain_name
Нужно скопировать (объединить) fullchain.pem и privkey.pem в один файл, например назовём его encrypt.pem, и этот файл мы будем использовать для noVNC.
Конечно, работать это будет только если nginx сервер и noVNC — на одном домене. Порты могут быть разными.
И нужно не забывать, что сертификаты годны только несколько месяцев, а потом надо копировать обновлённые файлы.
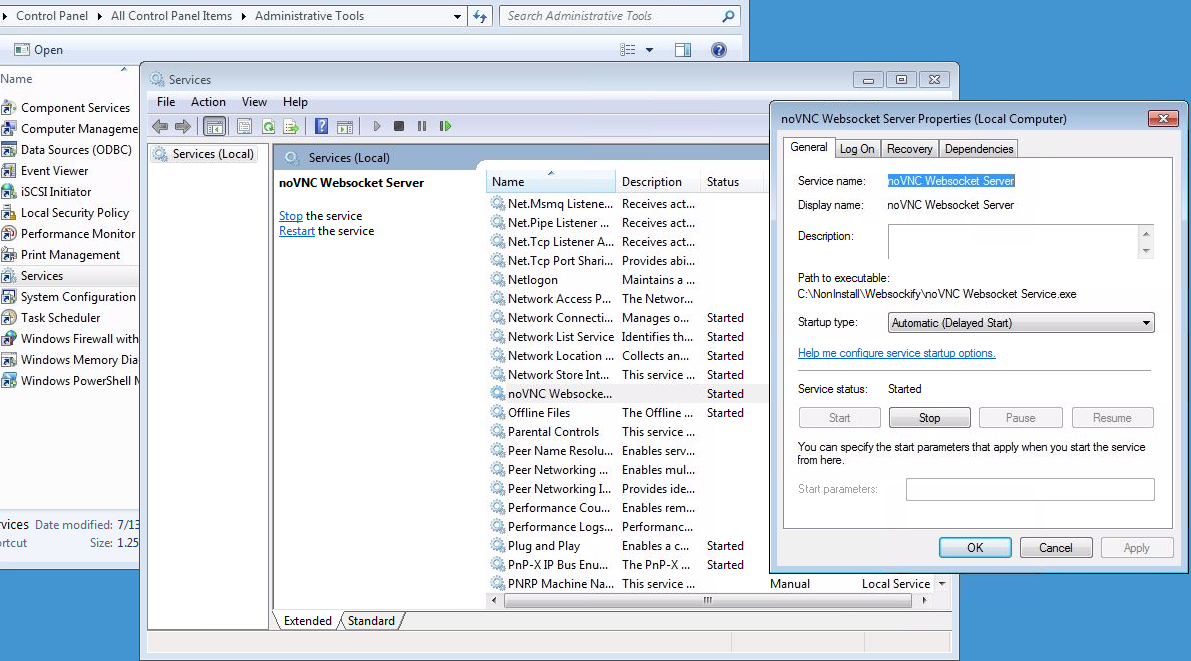
Добавляем noVNC, как Windows-сервис
Загружаем zip-архив, и распаковываем файлы оттуда так, чтобы они лежали в той же папке, где и файл websockify.exe, то есть в нашем случае в c:\noVNC\websockify.
При запуске, сервис будет использовать параметры из файла noVNCConfig.ini. Вот пример моего конфига:
5901 127.0.0.1:5900 --web C:\noVNC\noVNC-master --cert=c:\noVNC\encrypt.pemВ консоли, запущенной с администраторскими привилегиями создаём новый сервис:
sc create "noVNC Websocket Server" binPath= "c:\noVNC\websockify\noVNC Websocket Service.exe" DisplayName= "noVNC Websocket Server"Если нужно будет удалить сервис, то вот так:
sc delete "noVNC Websocket Server"Открываем сервисы (Control Panel → Administrative Tools → Services) и запускаем noVNC Websocket Server. Также здесь можно настроить, чтобы сервис стартовал каждый раз вместе с Windows:
Известные недоработки
Раскладка клавиатуры
Я обнаружил, что русская раскладка клавиатуры работает довольно необычным образом:
Если у клиента выбран русский язык, то на удалённый компьютер нажатия клавиш не передаются вообще.
Поэтому, чтобы печатать по русски на удалённом компьютере:
— на клиенте должна быть выбрана английская раскладка
— на удалённой системе должна быть выбрана русская раскладка
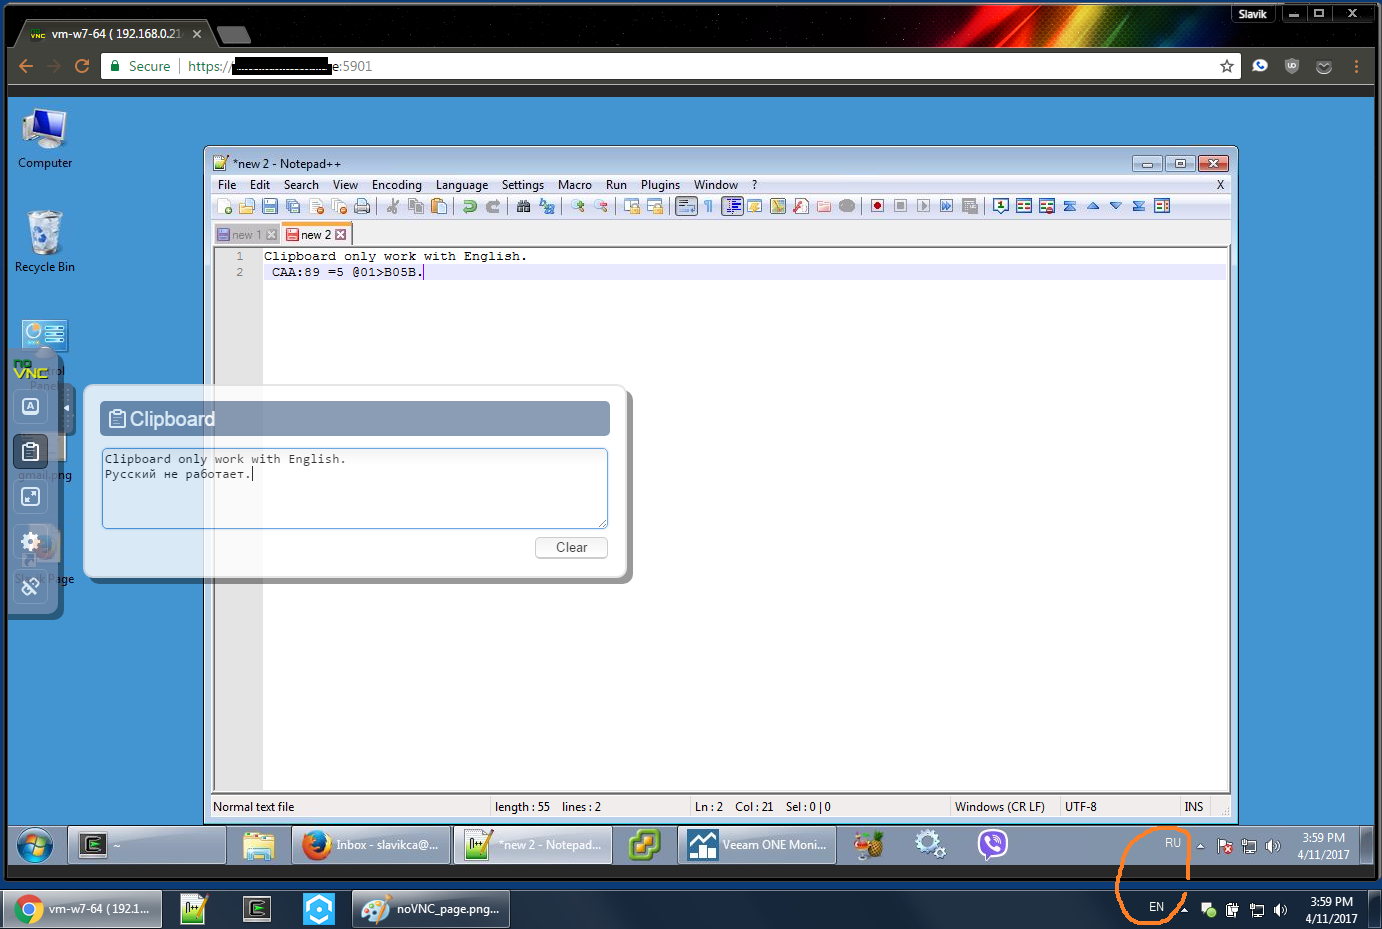
Буфер обмена
Буфер обмена (клипборд) работает через кнопку в браузере (на скриншоте выше), то есть вы можете туда что-то положить и забрать на удалённой системе, или наоборот. И оно (у меня) не умеет работать с русскими буквами.
Настройка резервного доступа к серверу с операционной системой Windows через VNC
Для установки и дальнейшего подключения резервного доступа через протокол VNC необходимо выполнить установку:
программу UltraVNC Server — на ваш выделенный сервер;
программу UltraVNC Client — на ваш домашний (не удаленный) компьютер.
Скачиваем программу с официального сайта разработчика UltraVNC на ваш выделенный сервер:
https://uvnc.com/downloads/ultravnc.html
На момент написания статьи актуальная версия программы UltraVNC 1.4.3.6.
Выбираем для загрузки программу ultravnc 1436 X64 setup
Для выделенных серверов устанавливается операционная система Windows 10 / Windows Server 64bit.
Запускаем установщик программы и проходим стандартную процедуру установки, за исключением установки автоматических задач (Select Additional Task):
На экране выбора дополнительных задач НЕ выбирайте установку заданий “Register UltraVNC Server as a system service” И “Start or restart UltraVNC service”.
Выбираем только 3 последних дополнения:
На Следующем шаге установщика не изменяем никаких параметров и устанавливаем все 3 пакета (Full Installation):
Завершаем установку программы.
Переходим к настройке программы
Внимание, на этом шаге мы генерируем пароль для доступа к VNC серверу из локальной директории, в обход установочного каталога UltraVNC!
Переходим по пути:
C:\Program Files\uvnc bvba\UltraVNC
Копируем файл winvnc.exe в папку в любой общедоступный каталог (который будет иметь доступ для записи), например в каталог Загрузки и запускаем программу winvnc.exe
Устанавливаем пароли, которые будут содержать символы: ! @ ?
В данном примере мы указали пароли:
VNC Password: 3eSe2!Uf@hE?br
View-Only Password: 34HTN!YBF@SER?A
VNC Password — пароль для доступа к VNC с правами администратора
View Only Password — пароль для пользователя, который сможет только наблюдать за рабочим столом — и не сможет управлять системой.
Нажимаем Aplly, ожидаем подтверждения для записи файла с правами администратора и нажимаем “Да” для подтверждения действия.
Далее нажимаем ОК, ожидаем подтверждения для записи файла с правами администратора и нажимаем “Да” для подтверждения действия.
На этом мы создали файл с нужными нами паролями, которые будут сохранены в системе.
На следующем шаге в каталоге Загрузки (куда ранее мы поместили файл winvnc.exe, появился новый файл конфигурации ultravnc.ini, копируем его (Ctrl + C), возвращаемся в наш каталог, где установлена программа C:\Program Files\uvnc bvba\UltraVNC и вставляем скопированный файл (Ctrl + V). При запросе перезаписи файла, соглашаемся.
В меню пуск, программы, находим каталог UltraVNC, раскрываем список, находим UltraVNC Server Settings
Устанавливаем все параметры как на скриншотах ниже:
На этом этапе сначала произведем установку сервиса, нажатием на кнопку Install Service
После успешной установки (займет 10-15 секунд) нажимаем Start Service. При успешном запуске увидим:
И нажимаем “Ok”.
На этом конфигурирование VNC сервера закончено.
Переходим к подключению с вашего компьютера до сервера на который был установлен UltraVNC Server.
На нашем ПК устанавливаем UltraVNC Client, который также скачиваем по ссылке:
https://uvnc.com/downloads/ultravnc.html
На домашнем ПК устанавливаем только VNC клиент. Установка дополнения VNC Server не требуется.
Далее запускаем VNC клиент и вводим данные нашего сервера
IP адрес сервера:5900.
Например: 127.0.0.1:5900
Метод подключения Direct.
Далее вводим пароль, который был указан в настройке вкладки Security при запуске winvnc.exe. В нашем примере это пароль 3eSe2!Uf@hE?br. И нажимаем Connect.
Происходит удаленное подключение к серверу через протокол VNC.
При работе с VNC вы всегда будете иметь доступ к системе, даже в случае недоступности RDP подключения и зависания сессии.
В примере ниже полностью отключен доступ по RDP, но подключение по VNC работает как резервная консоль.
If you’re wondering how to run VNC on Windows 10, you’ve come to the right place. There are several ways to get started, but first, you need to ensure that your system has the required permissions. You need incoming port 5900 or 22 for SSH. Port numbers 0 to 1023 are reserved for system processes. If you’re using your system for business purposes, you’ll want to make sure that you allow incoming connections to your network.
First, you’ll need to enable the “Encrypt all network data” checkbox in the Remote Desktop settings. Otherwise, it won’t be able to open an SSH tunnel and will warn you to enter a password before accepting the connection. When adding a remote computer, use the IP address of the client computer to find the corresponding VNC password. If you’ve forgotten this password, you can use a view-only password to connect to the remote machine.
How Do I Start VNC Server on Windows?
To start a VNC server on Windows 10, you’ll need the software VNC. Normally, a VNC server starts on port 5900. The actual system port is 5924. If you want to use a different port, you can type in a higher one – vnc-server uses port 5901, for instance. If you want to use TightVNC, type localhost:1 into the connection details dialog of your client software.
To allow other people to connect to your VNC server, you’ll need to grant them access to the appropriate port. You can choose to allow local connections so only users from your computer can connect. Alternatively, you can set up your VNC server to require a password to prevent unauthorized access. Once you’ve installed the software, the VNC server will automatically restart if its processes are stopped. To avoid any problems or complications, make sure that the server is running and configured properly.
You can set a different display resolution if necessary. By default, the VNC Server sets the window size to 1024×768. You can change this by using the -nopw and -accept-popup-0 options. You can also set up VNC to automatically restart itself on reboot or when the server has been rebooted. You can also put it in view-only mode if you wish.
Is VNC Windows 10 Compatible?
Is VNC Windows 10 Compatible? You should find out by reading this article. If you’ve ever wanted to use virtual computer networking software on Windows 10, then you’ve come to the right place. VNC is the most popular method of remote desktop access. It allows you to share screen with other users, and is even available for Macs and iOS devices. But with all the features, how do you choose the best one for your needs?
VNC (Virtual Network Computing) is a cross-platform, free tool that enables you to control another computer via remote connections. The software works by tunneling data over VPN or SSH. There are SSH clients for both Windows and UNIX, and many freeware programs can also create instant VPN tunnels between two computers. The downside is that the remote computer may have to grant authorization to VNC, so be sure to check that before trying it.
How Do I Start VNC on Desktop?
To connect to another computer, you need to have an SSH connection to the host. Windows users can use a Putty client to connect to the host. Once the connection is established, the Putty client will save its configuration with a session and open a tunnel. This will allow Windows users to connect to the cluster desktop. Once the tunnel is open, the Windows user will be prompted to enter the VNC password.
To start the VNC server, open the command prompt, then type the command “vncserver”. The command will start up the X server as display1 on system “myhost”. It will also create a subdirectory called.vnc in the user’s home directory. The xvnc server process runs inside this directory. Xvnc is the actual VNC server process. The vncserver command starts up the X server before launching the Xvnc process.
Once the vnc server is up and running, it will start listening on port 5924. This is the same port as VNC’s X-display number, which is 24. Similarly, a VNC client will use the same port when connecting from a Mac. If you want to connect via the local network, you must enter the localhost address, followed by a colon (:).
To run VNC on Windows 10, you must have access to the incoming ports 5900 and 22 on your router. These ports are privileged. These are used by system processes. If you cannot open the ports on your router, you can try the dynamic DNS hostname. Once the server is running, you should see the desktop of the remote computer. This will allow you to see the desktop of the remote computer from your desktop.
To connect to the server, first you need to set the port number for the VNC server. The default port is 1234, but you can change this to any number. You can also use a fully qualified VNC port, which is 5900 plus the display ID. Then, type vncpasswd to change the password for the VNC server. Once you are connected, the host address will be displayed in the browser, followed by the port number.
How Do I Start VNC on Terminal?
In order to start VNC on the terminal on Windows 10, first you need to find out what kind of session you are trying to create. You can choose view-only or full access. In the latter case, you may need to create a password for the session. To make it more secure, enter a view-only password, otherwise you should create a full-access one. The vncserver command has an optional -kill option, where you will specify the number of the server. Once you’ve done this, the VNC server will quit all windows and terminate any processes running in the current VNC session. Obviously, this command should be used if you’re running more than one VNC server.
The default port for the VNC server is 5900. The remote desktop port is equal to the sum of the default port and the number of displays. If you’re using firewalld, then you’ll need to open the appropriate ports to allow the connection. If your displays are larger than three, you’ll need to open up the ports to ‘/dev/vnc/’. This step should help you get started quickly on your Windows 10 terminal.
How Do I Connect to VNC Server?
In order to connect to a VNC server, you must first install the software. You must have the viewer installed on the computer that you want to connect to, and the VNC server software on the remote computer. In Windows 10, you can install the VNC server software by double-clicking the downloaded exe file. Once you have installed the software, you must open the RealVNC viewer application on the remote computer.
When you have installed the VNC server, you need to enter its IP address and name. You can also enable encryption of the connection. If you select the Always maximum option, your connection will be encrypted with 256-bit encryption. Otherwise, you should select the Always on option. Afterwards, you can enter the password and confirm the connection. Once you’re connected, you can view the remote desktop.
Once you’ve installed the software, it’s time to configure it. TightVNC runs as a system service, which means that it runs in the background when you’re not using it. It automatically allows itself in the Windows firewall; if you use another firewall, you’ll need to enable it manually. Make sure you select a strong password. Once the software is installed, you can access it by clicking the TightVNC Service – Control Interface option in the Start menu.
Does Windows Have a VNC Client?
There’s no native VNC client for Windows 10, so you need to install the Linux version in order to use VNC. Linux provides a variety of ways to view other computer displays. You can use the command line to open a VNC session with a Linux host. After opening the session, click the File menu, then Select Settings. Once you’ve found the correct settings for your Linux host, you can start using VNC.
Before using a VNC client, you need to have incoming port 5900 or 22. Port 22 is a privileged port. Port numbers 0 to 1023 are reserved for system processes. If the host is running an older version of Windows, you can use the VNC Connect client. Chrome Remote Desktop is a free option for a Windows 10 VNC server. Both VNC and Chrome Remote Desktop are secure out of the box.
If you’re using a VNC viewer, you can connect to a machine running a VNC server without installing the server. The VNC Viewer application is free and can be downloaded and installed on your Windows computer. However, you can only connect to a computer running the VNC Server software. The same applies for a VNC Server. If you’re not running VNC, you’ll need to install the VNC Viewer software on your computer.
Learn More Here:
1.) Android Help Center
2.) Android – Wikipedia
3.) Android Versions
4.) Android Guides