
Салимжанов Р.Д
Part 2 Basic Configuration of Windows Server 2019 (RDP, DHCP)
Salimzhanov R.D.
В первой части, мы рассмотрели, как настроить сетевые компоненты, а также рассмотрели создание учетных записей пользователей и настройку прав доступа.
Сейчас мы рассмотрим настройку удаленного доступа и установку необходимых служб (DHCP-сервер).
Воспользуемся протоколом Remote Desktop Protocol (RDP) — это протокол удаленного рабочего стола, который предоставляет возможность удаленного управления компьютером через сеть. Пользователь может подключаться к удаленному компьютеру и управлять им, как если бы он находился непосредственно перед ним. Протокол RDP обеспечивает безопасное и зашифрованное соединение, что позволяет защитить данные и предотвратить несанкционированный доступ к компьютеру.
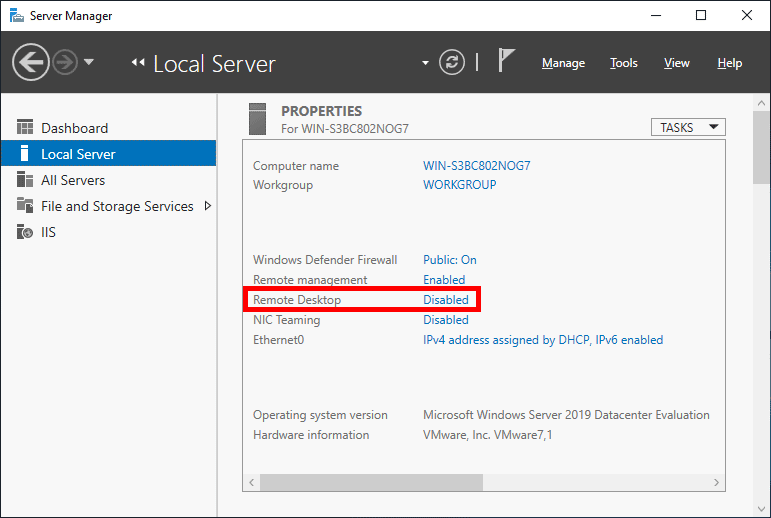
Для подключения удаленного стола, следует перейти “Диспетчер серверов” и найти там в локальном сервере пункт “Удаленный рабочий стол”:
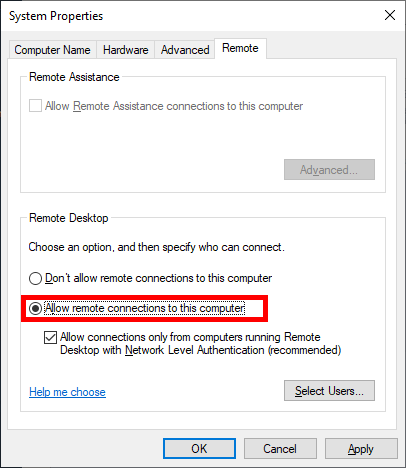
Нажимаем на него, и выбираем “Разрешить удаленные подключения к этому компьютеру”:
Далее выбираем пользователей, которым разрешим подключение:
Нажимаем “Добавить”:
Выбираем пользователя “USER_admin”:
Нажимаем “ok” и теперь этот пользователь может подключится к серверу, проверим подключение через основной ПК, заранее дав ему доступ:
Открываем основной ПК, пишем в поиске “Подключение к удалённому рабочему столу”:
Далее прописываем IP сервера:
Прописываем пользователя и пароль:
Нажимаем “да”:
Теперь мы подключились:
DHCP-сервер (Dynamic Host Configuration Protocol) — это сервис, который автоматически распр��деляет IP-адреса между устройствами в сети. Это позволяет упростить процесс настройки сетевых устройств и обеспечивает централизованное управление IP-адресами.
Установка и настройка DHCP-сервера на Windows Server может понадобиться в следующих случаях:
1. Автоматическое назначение IP-адресов: DHCP-сервер автоматически назначает IP-адреса устройствам в сети, что облегчает управление сетью. Это устраняет необходимость вручную настройки IP-адресов на каждом устройстве и помогает избежать конфликтов IP-адресов.
2. Управление адресами: DHCP-сервер управляет пулом доступных IP-адресов и может динамически выделять и освобождать их по мере не��бходимости. Это позволяет эффективно использовать доступные адреса и предотвращает избыточное расходование адресов.
3. Улучшенное контроль безопасности: DHCP-сервер обеспечивает возможность контроля доступа к сети через использование фильтра MAC-адресов и других методов аутентификации. Это помогает обеспечить безопасность сети и предотвратить несанкционированный доступ.
Для настройки и установки DHCP в диспетчере серверов нажимаем на “Управление” и “Добавить роли и компоненты”:
После следуем инструкции в скринах:
Далее уже выбраны нужные нам компоненты, но для определенных задач следует выбирать конкретно что вам нужно, оставляю ссылку на описание компонентов URL: https://info-comp.ru/softprodobes/572-components-in-windows-server-2016.html
Ждем установки:
После установки слева появился DHCP сервер:
Далее переходим в меню “Средства” и выбираем “DHCP”:
В разделе IPv4 создаем область:
Далее мы можем, добавить машину как отдельный DNS сервер, или создать на этой машине, просто нажав “Далее”.
Точно также, если надо мы можем добавить WINS серверы, если требуется:
Теперь появился пул адресов:
А да и еще, нажав на флажок, диспетчер попросит создать вас две новые группы:
(там нажимаем “Фиксировать” и они автоматически создаются)
Осталось теперь только протестировать:
В следующий части базовой настройки Windows Server 2019, разберем:Настройка DNS-сервера и Active Directory (AD)
1) Как включить и настроить удаленный рабочий стол (RDP) в Windows? // [электронный ресурс]. URL: https://winitpro.ru/index.php/2013/04/29/kak-vklyuchit-udalennyj-rabochij-stol-v-windows-8/ / (дата обращения 01.08.2024).
2) Помощник Админа // [канал]. URL: https://t.me/channel_adminwinru (дата обращения 01.08.2024).
XP/VS Terminal Server
A multi-user Remote Desktop access solution to turn any modern Windows system into a fully-featured RDP server.
Version 1.0.968 • Windows • 9.7 MB • Changelog
Written on 01 October 2023
On Windows Server 2019 the ability to enable Remote Desktop lets you access your device from another location using the Remote Desktop Protocol (RDP) to offer assistance or control a device without being physically present at the location.
By default, only two users can access your Windows Server 2019 remotely. With Thinstuff XP/VS Terminal Server, you can effortlessly overcome this limitation and connect with multiple users at the same time.
In this guide, you will learn the steps to enable Remote Desktop to manage or access files and apps with multiple users on Windows Server 2019 remotely.
In case you are using Windows Server 2019 Essentials edition, Remote Desktop is already enabled by default so you might want to continue with installing XP/VS Server directly.

Due to security reasons Remote Desktop is disabled by default on Windows Server 2019!
Step 1: Enable Remote Desktop on Windows Server 2019 using the Server Manager
To enable Remote Desktop on Windows Server 2019 with the Server Manager, use these steps:
Step 2: Install XP/VS Terminal Server
To grant remote access for multiple users on Windows Server 2019 download and install XP/VS Terminal Server as following:
- 1. Download XP/VS Terminal Server from here.
- 2. Open the installation package as local administrator.
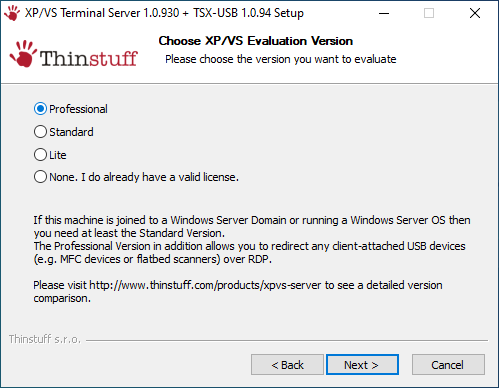
- 3. The installation package automatically includes a 14-day trial license. Please make sure to choose at least the Standard version for your trial.
- 4. After successful installation of XP/VS Server you have to reboot your machine.
- 5. You might also want to add additional Remote Desktop users as per default only Administrators can connect on server operating systems.
Once you have completed these steps, you can connect to your computer using any modern Remote Desktop app (recommended). You can also silently install XP/VS Server as described here.
Is my version of Windows supported?
Why can I only connect with my Administrator account?
Estimated reading: 3 minutes
997 views
RDP (Remote Desktop Protocol) is the protocol that allows a user to connect to a Windows Server through a graphical interface over any network.
In fact, there are several ways to enable Remote Desktop on Windows Server 2019 and 2022. So you can choose one of them that is suitable for you to enable RDP on Server 2019. After RDP is enabled, you can access the remote server from your local device
Method 1. Enable Server 2019 RDP from Server Manager
- Step 1. Click on the Start button and you can see Server Manager.

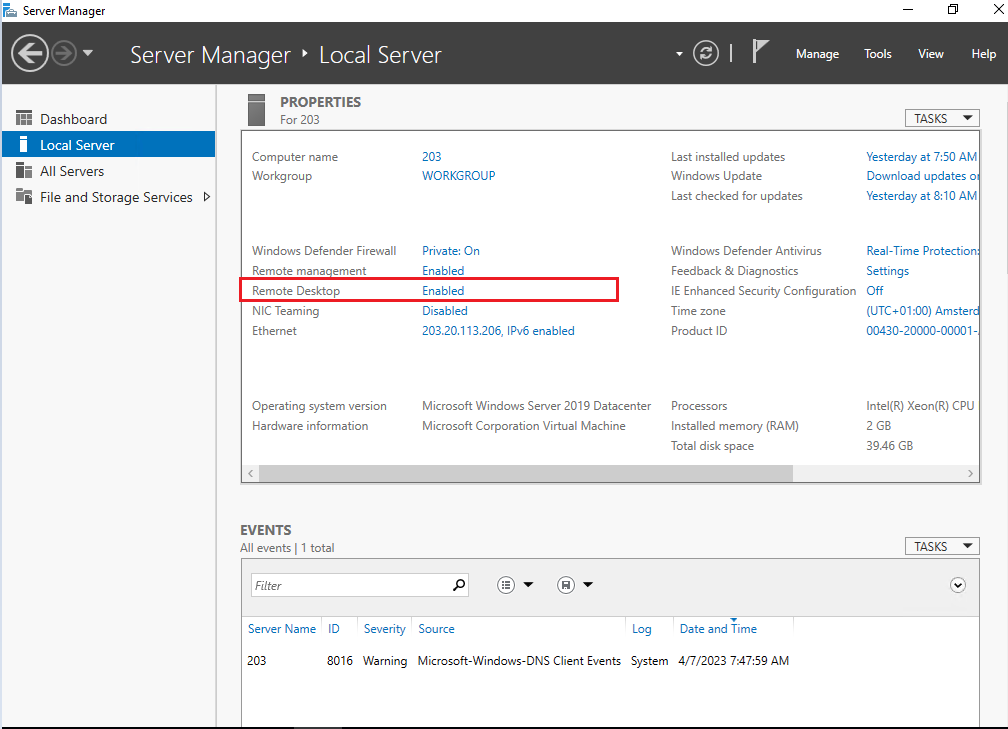
- Step 2. Click on “Local Server” on the left in Server Manager window. We can see that Remote Desktop is “Disabled”.

- Step 3. Click on the “Disabled” text to open the “System Properties” window, and then locate on the “Remote” tab.

NOTE: The System Properties window can also be accessed from Control Panel option by clicking on System and then on Remote settings in the left panel or from the Windows command prompt by executing the below command.
SystemPropertiesRemote


- Step 4. Tick “Allow remote connections to this computer” in the “Remote Desktop” tab.

- Step 5. You’ll receive a warning message after the above step, click on “OK”

Now, Remote Desktop may still show as “Disabled”; you can refresh or press Control + F5 to refresh to “Enabled”.
Method 2: Using the Command Prompt
- Step 1. Search cmd in the search box to open Command Prompt.
- Step 2.In the Command Prompt window, type the following command and press the enter key: net start termservice

Method 3. Allow Remote Desktop on Win Server 2019 from Powershell
If you can’t enable RDP from Server Manager, you can try to enable Remote Desktop in Windows Server 2019 with Powershell.
- Step 1. Search “PowerShell” in the Search box and then select Run as Administrator.

- Step 2. The registry value that enables/disables Remote Desktop can be modified using the Set-ItemProperty cmdlet
Set-ItemProperty -Path 'HKLM:\System\CurrentControlSet\Control\Terminal Server' -name "fDenyTSConnections" -value 0
- Step 3. Once this is completed, the
Enable-NetFirewallRulecmdlet can be used to set the Windows firewall to allow remote desktop connections.
Enable-NetFirewallRule -DisplayGroup "Remote Desktop"Note:With this method if you want to disable Remote Desktop connection you can change the value 0 to 1
Set-ItemProperty -Path 'HKLM:\System\CurrentControlSet\Control\Terminal Server' -name "fDenyTSConnections" -value 1
Method 4. Using Windows Firewall
- Step1: Press Start and enter firewall.cpl in the text box and press the enter key.
- Step 2.On the Windows Defender Firewall page, click on the Allow an app or feature through the Windows Defender Firewall option.

- Step 3. Click on the Change settings button. Scroll down and tick the Remote Desktop and Remote Desktop (WebSocket) option in the list.

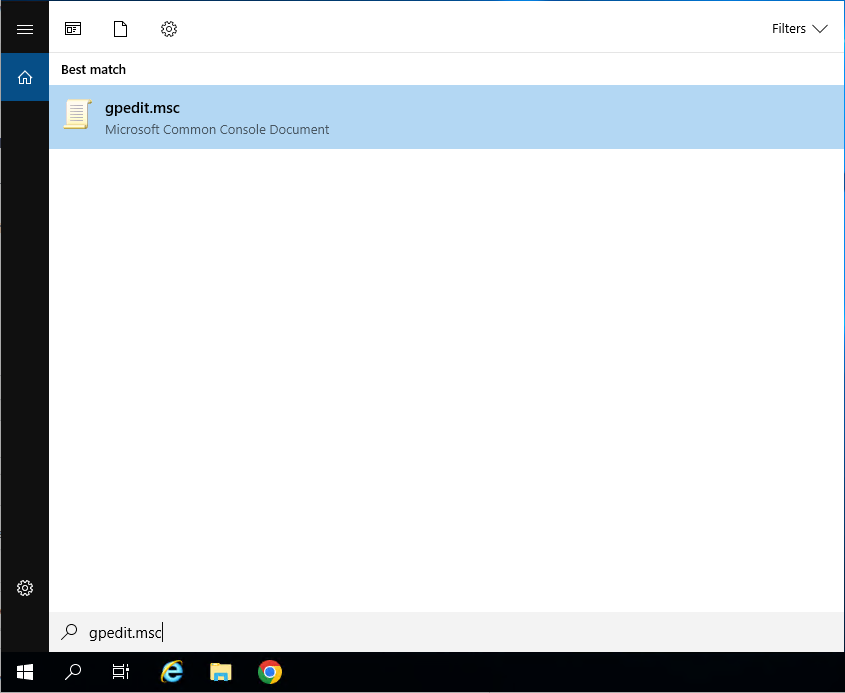
Method 5.Using Group Policy
In addition, Remote Desktop can also be enabled by using Group Policy.
- Step 1. Press Start and enter “gpedit.msc” to open Group Policy .
- Step 2. Navigation:
Computer Configuration -> Administrative Templates -> Windows Components -> Remote Desktop Services -> Remote Desktop Session Host\Connections
- Step 3. In the right pane, double click on “ Allow users to connect remotely by using Remote Desktop Services.”

- Step 4. Select “Enabled” and click on “OK”.

There you have it. Once you’ve completed these steps, you’ll be able to use Remote Desktop on Windows Server. You can now enjoy wider connectivity and access to your files, data, and apps.

A step by step guide to build a Windows Server 2019 Remote Desktop Services deployment.
I posted this before based on Windows Server 2012 R2 RDS and thought it was high time to update this post to a more modern OS version.
I will provide all the steps necessary for deploying a single server solution using the GUI tools.
Although it is called a single server installation, we will need 2 servers as shown below.
Software used in this guide:
Windows Server 2019 ISO (evaluation can be downloaded here: https://www.microsoft.com/en-us/evalcenter/evaluate-windows-server-2019).
SQL Server 2017 Express x64 (free version can be downloaded here: https://www.microsoft.com/en-us/download/details.aspx?id=55994).
SQL Server 2016 Native Client (free version can be downloaded here: https://www.microsoft.com/en-us/download/details.aspx?id=52676. After clicking the download button select ENU\x64\sqlncli.msi). Although I’m installing SQL Express 2017, there are no newer client tools available.
SQL Server Management Studio (free, and can be downloaded here: https://docs.microsoft.com/en-us/sql/ssms/download-sql-server-management-studio-ssms).
And a certificate. I got mine for free from https://www.sslforfree.com/. This certificate needs to contain the FQDN you will use as the RD Web Access URL (mine is rds.it-worxx.nl in this guide). It needs to be in .pfx format and you need to have the private key in it.
This guide will not focus on building a domain using a single domain controller and adding the second server as a member server to this domain.
Also some basic knowledge is assumed in this guide. I will not detail how to create a Security Group and adding a computer account to it. I will also not detail how to install SQL Express, or adding logins to a SQL Server Instance security context. If you need extra help with this, Bing it or drop me a mail with details, and I will provide steps to continue.
I will be using Hyper-V on my Windows 10 1809 laptop and I have prepared 2 servers:
ITWDC (1 vCPU, 1024MB memory, dynamic, 60GB Harddisk)
Installed Windows
IPv4 192.168.0.4/24
Added .NET Framework 3.5 as a feature
Added Active Directory Domain Services as a role
Configured this server as a Domain Controller in a new forest: it-worxx.lab
ITWRDS (1 vCPU, 1024MB memory, dynamic, 60GB Harddisk)
Installed Windows
Added .NET Framework 3.5 as a feature
IPv4 192.168.0.10/24, DNS server 192.168.0.4
Configured it as a member server in the it-worxx.lab domain
Installing the Remote Desktop Services Roles
Log on to the Domain Controller, and in Server Manager right-click the All Servers node and add the second server using the Add Servers command (or select the All Servers node, click Manage and click Add Servers).

Now that all servers needed in this deployment scenario are present, click Manage, and click Add Roles & Features.
Before you begin

Click Next.
Select Installation Type

Select Remote Desktop Services installation.
Click Next.
Select Deployment Type

Although Quick Start might be a valid option for a single server deployment, leave the default selected. This will explain the steps necessary to install Remote Desktop Services in greater detail.
Click Next.
Select Deployment Scenario

Select Session-based desktop deployment.
Click Next.
Review Role Services

Review the services that will be installed.
Click Next.
Specify RD Connection Broker server

Click the member server and click the Add button.
Click Next.
Specify RD Web Access server

Check Install the RD Web Access role on the RD Connection Broker server.
Click Next.
Specify RD Session Host server

Click the member server and click the Add button.
Click Next.
Confirm selections

Check Restart the destination server automatically if required.
Click Deploy.
View progress

Wait until all role services are deployed and the member server has restarted.
Click Close.
In Server Manager click Remote Desktop Services and scroll down to the overview.

As you can see the deployment is missing a RD Gateway server and a RD Licensing server.

Click the Add RD Licensing server button.
Select a server

Click the domain controller and click the Add button.
Click Next.
Confirm selections

Click Add.
View progress

Wait until the role service is deployed. No restart is needed.
Click Close.

Click the Add RD Gateway server button.
Select a server

Click the member server and click the Add button.
Click Next.
Name the self-signed SSL certificate

The wizard creates a self-signed certificate. We will deal with certificates in this deployment in a little bit. We will replace the self-signed certificate.
Enter the external Fully Qualified Domain Name which you will also use for the Web Access URL. In my case, for lack of a better name, I used “rds.it-worxx.nl”. I didn’t want to use “remote.it-worxx.nl” or “desktop.it-worxx.nl” or anything else.
Click Next.
Confirm selections

Click Add.
View progress

Wait until the role service is deployed. Again, no restart is needed.
Notice that “rds.it-worxx.nl” was configured for the deployment.
Also notice that even more certificate configuring is needed, but we’ll get to that later. Pay no attention to it for now. The same goes for the RD Gateway properties for the deployment. We’ll get to that later.
Click Close.
Review role installation and setting License Mode
Let’s have a quick look at the configuration we have so far.

In Server Manager, Remote Desktop Services, Overview, click Tasks and click Edit Deployment Properties.
Configure the deployment

Review the RD Gateway settings and notice what settings are available.
Click RD Licensing.
Configure the deployment

Notice that an RD License server is available, but no license type is selected yet.
I selected Per User, but since this is just a guide setup, it really doesn’t matter.
Click RD Web Access.
Configure the deployment

By default the RD Web Access IIS application is installed in /RdWeb.
If you want to know how to change this, check another post: https://msfreaks.wordpress.com/2013/12/07/redirect-to-the-remote-web-access-pages-rdweb/
This is for Windows Server 2012 R2 RDS, but it also works for Windows Server 2019 RDS.
Click Certificates.
Configure the deployment

Notice that the certificate level currently has a status of Not Configured.
As you can see, certificates are used for different goals within the deployment.
The RD Gateway certificate is used for Client to gateway communication and needs to be trusted by the clients. Either install the self-signed certificate on all clients, or use a certificate for which the complete certificate chain is already trusted by all clients. As it said in the wizard, the external FQDN should be on the certificate.
The RD Web Access certificate is used by IIS to provide a server identity to the browser clients.
The RD Connection Broker actually has two goals for which it needs certificates. To enable single sign on (server to server authentication), and for publishing (signing RDP files). If you look in the deployment you’ll see that the Connection Broker is now configured to use “itwrds.it-worxx.lab”, so we have to change it to use an external FQDN as well.
If we use the same FQDN for all goals described above, we need only 1 certificate, and only 1 external IP address.
We’ll come back to this wizard later to assign the certificate. First order of business is to change the internal FQDN for the Connection Broker to an external FQDN.
Click OK (no reason why we shouldn’t commit the change we made on the licensing tab, remember?)
Changing the Connection Broker FQDN to an externally resolvable FQDN
Open DNS Manager on the domain controller and browse to Forward Lookup Zones.

Right click Forward Lookup Zones and click New Zone… Go through this wizard accepting the defaults until you have to enter a Zone Name.

Enter the external FQDN which will also be used by the Connection Broker.
Finish the rest of the wizard accepting the defaults.
Browse to the newly created zone.

Right click the newly created zone and click New Host (A or AAAA)…
New Host
Leave the Name field blank, but enter the member server’s (holding the RD Connection Broker role) IPv4 address.
Click Add Host.
Now the configuration will be able to resolve “rds.it-worxx.nl” to the server holding the Connection Broker role, and this will work because “rds.it-worxx.nl” is also on the certificate that we will configure later.
Create a new Global Security Group called “RD Connection Brokers” and add the computer account for the member server to it as a group member.
We need this group to be able to convert the RD Connection Broker to a highly available RD Connection Broker. You’ll see why we need to do this in a few steps.
Reboot the member server to let it know it’s a member of the RDS Connection Brokers security group.
The next steps in re-configuring the RD Connection Broker depend on an SQL database shared by all Connection Brokers in the deployment. Without this configuration the RD Connection Broker will rely on the Windows Internal Database that was created during the initial deployment of the roles.
Install SQL Express on the Domain Controller (or use an existing SQL Server if you already have one).
It’s not best practice to install SQL onto a Domain Controller, but it’ll do for this guide.
Here’s a list of needed features:


Use the Default Instance (so click Default, and do not leave the wizard’s selection on Named instance: SQLEXPRESS).

Set the SQL Service to start using SYSTEM because the default account of SQLSERVER cannot be used on a Domain Controller.
When the installation is done open SQL Configuration manager and browse to Client Protocols under SQL Native Client 11.0 Configuration.

Check if TCP/IP is enabled under Client Protocols. SQL Express install enables this by default, but check it just to be sure, especially if you use an existing SQL Server.
Browse to Protocols for MSSQLSERVER under SQL Server Network Configuration.

Enable TCP/IP. If this is a new SQL installation, this will be disabled by default.
Restart the SQL Server service if you changed this setting.
On the SQL Server, make sure port 1433 is not being blocked by Windows Firewall.

I added the SQL Server executable to the exception list to allow all inbound traffic, but TCP 1433 inbound should suffice.
If you installed SQL Server using the default folder locations, the sqlservr.exe executable is found in “C:\Program Files\Microsoft SQL Server\MSSQL14.MSSQLSERVER\MSSQL\Binn”.
Open SQL Server Management Studio, connect to the default instance on the Domain Controller and browse to Logins under Security.

Remember the Management Studio is no longer available with the SQL Server download, but is a different download.
Right click Logins and click New Login…
Login – New

Click Search…
Select User, Service Account, or Group

Click Object Types… and select Group.
Type the RDS Connection Brokers security group name and click Check Names.
Click OK.
Login – New

Click Server Roles and select dbcreator.
Click OK.
We have just effectively granted the RDS Connection Broker server the right to create databases.
We need this because the RDS Connection Broker service will try to migrate from WID (Windows Internal Database to a (high available) SQL Server instance when we convert the Broker to a high available broker.
Install the SQL Native Client on the member server (Client Components only). If you used the member server in this setup to install the SQL Management Studio, you can skip this step because the Native Client was installed with installing the Management Studio.
Everything we need is in place to convert the RD Connection Broker, so let’s do just that.
In Server Manager click Remote Desktop Services and scroll down to the overview.

Right click RD Connection Broker and click Configure High Availability.
Before you begin

So we’re building a single node cluster here 
Look at the pre-requisites.
If you have more than one RD Connection Broker they need to be configured using DNS Round Robin.
Click Next.
Configure RD Connection Broker for High Availability

Since we just installed an SQL Server for this, leave the default selected. You’d use the other option for instance if you’d like to use Azure SQL for this deployment.
Click Next.
Configure RD Connection Broker for High Availability

DNS name for the RD Connection Broker cluster:
The DNS Zone name we configured in DNS earlier: rds.it-worxx.nl
Connection string:
DRIVER=SQL Server Native Client 11.0;SERVER=ITWDC;Trusted_Connection=Yes;APP=Remote Desktop Services Connection Broker;DATABASE=ITWRDCB
Folder to store database files:
C:\Program Files\Microsoft SQL Server\MSSQL14.MSSQLSERVER\MSSQL\DATA
I used the instance default folder.
Click Next.
Confirmation

If you get an error before this page:
- Check if TCP/IP is enabled in client protocols and for your instance
- Check if you can reach port 1433 on the SQL Server from the member server
Click Configure.
Progress

If you get an error on this page:
- Check SQL permissions for the security group
- Check if the database path you entered is correct
Click Close.

The RD Connection Broker is now in High Availability Mode, and configured as “rds.it-worxx.nl” and we are finally ready to complete the configuration.
Configuring Certificates

In Server Manager, Remote Desktop Services, Overview, click Tasks and click Edit Deployment Properties, then click Certificates.
Configure the deployment

Click RD Connection Broker – Enable Single Sign On and click Select Existing certificate.

Browse to the .pfx file, enter its password, and check Allow the certificate..
Click OK.

So click Apply. This takes a little while, be patient.
Configure the deployment

Click RD Connection Broker – Publishing and click Select Existing certificate.
Browse to the .pfx file, enter its password, and check Allow the certificate..
Click OK.
Click Apply. This again takes a little while, be a little more patient.
Configure the deployment

Click RD Web Access and click Select Existing certificate.

Note: Did you notice the warning when you select RD Web Access?
Browse to the .pfx file, enter its password, and check Allow the certificate..
Click OK.
Click Apply again. This takes another little while longer, be slightly more patient.
Configure the deployment

Last one. Click RD Gateway and click Select Existing certificate.
Browse to the .pfx file, enter its password, and check Allow the certificate..
Click OK.
Click OK to apply the final certificate step.
Configured all servers, configured certificates..
One thing left to do: Tell our RDS environment exactly what to publish.
Publishing resources to your users
In fact you can use this setup to either provide full desktop sessions on the Session Host, or you can choose to publish only applications on the Session Host.
Let’s publish full desktop sessions.

In Server Manager, Remote Desktop Services, Session Collections, click Tasks and click Create Session Collection.
Before you begin

Review the requirements. This won’t be an issue in this setup, but you could restrict access to this collection by selecting a select group of people.
Click Next.
Name the collection

Enter a descriptive name. This name will be displayed under its icon in the Web Access interface.
Click Next.
Specify RD Session Host servers

Click the member server and click the Add button.
Click Next.
Specify user groups

You can limit access to the resource here if you want. Add one or more groups to restrict access to these groups only. In this setup the default selection of Domain Users will do fine. Groups you specify here will be added to the list of groups of users that are allowed to connect using RDP to the Session Host server(s).
Click Next.
Specify user profile disks

User profile disks are not in focus in this guide. Since I have no file shares configured in this setup, uncheck Enable user profile disks for now.
Click Next.
Confirm selections

Review the information and click Create.
View Progress

Wait until the collection is created and the server is added to the collection.
Click Close.
Time to test the setup!
Testing the setup
On a machine that has access to your test setup (you may have to add the external FQDN to your hosts file if you didn’t publish it to the internet) open https://rds.it-worxx.nl/rdweb

Hey! At least the RD Web Access application works 
Enter a valid username and password (IT-WORXX\username or username@it-worxx.lab).
Create a user for this, or simply use the domain admin account.
Click Sign in.

After logging in you are presented with the full desktop session collection we created.

After clicking the Full Desktop icon you get the warning that devices are going to be redirected.

And when you click Connect, you connect
Enjoy.
Arjan
Posted by
on December 20, 2018
By default in Windows Server 2019 remote desktop is disabled. This post will cover how to turn on and enable Remote Desktop Protocol (RDP) in Windows Server 2019, using either PowerShell or the GUI.
Note: In Windows Server 2019 Essentials edition, remote desktop is already enabled by default so you will not need to manually do this.
Remote desktop can be enabled through the graphical user interface (GUI) with the following easy steps.
Allowing Remote Desktop With The GUI
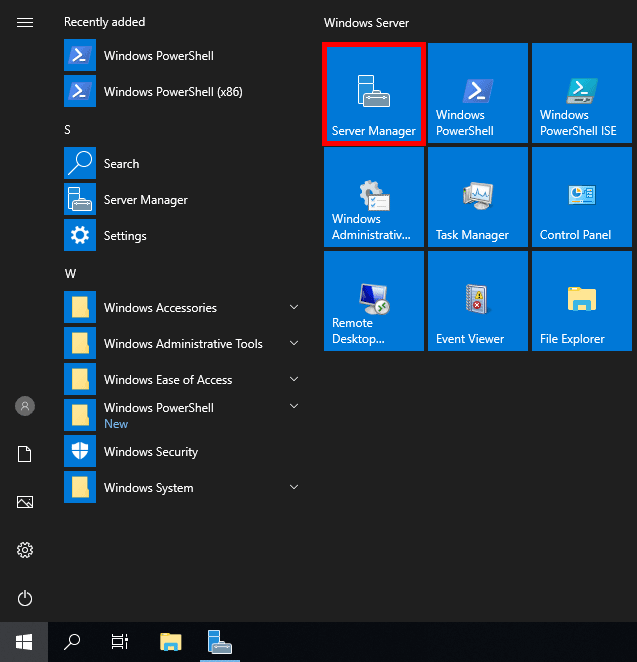
- Open Server Manager. This can be found by opening the start menu, as shown below.

If Server Manager does not show here, simply type “Server Manager” into the start menu to search for it. By default Server Manager will open when you log in to the GUI, otherwise you can select it from the task bar.
- Within the Server Manager window, select Local Server from the left hand side. You may need to wait a little for it to detect the current state of your system. You should see that Remote Desktop is listed as Disabled as shown below.

- Click on the Disabled text which will open the System Properties window in the Remote tab.
- From the System Properties window, select “Allow remote connections to this Computer” as shown below.

Tip: You can also open the System Properties window shown above by entering “SystemPropertiesRemote” into a Command Prompt or PowerShell terminal.
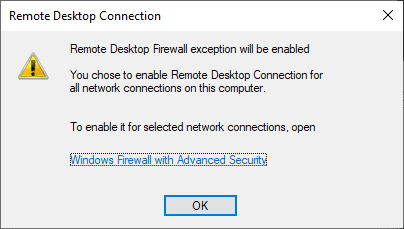
- Once you select “Allow remote connections to this computer” the below warning message will appear, advising that this will create the required firewall rules in Windows firewall to allow remote desktop traffic in from any source address, select OK to proceed.

- At this point you can optionally click the “Select Users…” button to define specific users or groups that have permission to connect via remote desktop. Select the OK button to close out of the System Properties window and enable remote desktop.
- Back in Server Manager, Remote Desktop may still show as Disabled until you refresh the view. After clicking the refresh button as highlighted below (or pressing F5 on the keyboard), the status should update to Enabled.
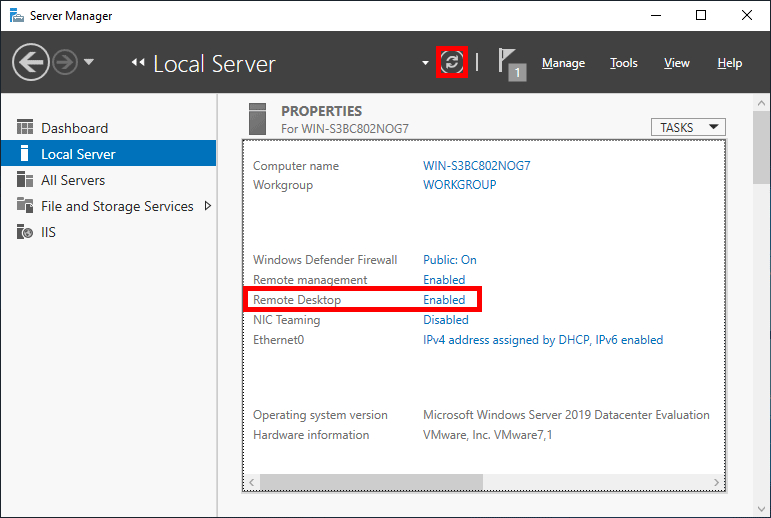
That’s it, remote desktop should now be ready to use!
Allowing Remote Desktop With PowerShell
While there isn’t currently an explicit PowerShell cmdlet used for enabling remote desktop, we can use the Set-ItemPropery cmdlet to modify the registry value that enables or disables Remote Desktop:
Set-ItemProperty -Path 'HKLM:\System\CurrentControlSet\Control\Terminal Server' -name "fDenyTSConnections" -value 0
Once complete we can use the ‘Enable-NetFirewallRule’ to configure Windows Firewall to allow remote desktop connections in:
Enable-NetFirewallRule -DisplayGroup "Remote Desktop"
Remote Desktop should now be accessible in Windows Server 2019.
By default this will allow all connections in, the same as if we had just enabled it using the GUI steps shown above. It is highly recommended that you configure more specific firewall rules where possible to only allow inbound traffic from known hosts.
Summary
By default Windows Server 2019 sets external remote desktop access to disabled as a security measure, we can easily optionally enable it from within the server console or via PowerShell to allow everyone or a specific set of users or groups.