
После подключения компьютера с Windows 11 к внешним дисплеям вы можете настроить параметры для каждого из них.
Перед началом работы
Перед изменением параметров внешних мониторов обеспечьте правильное подключение. Вот что можно сделать:
-
Правильно подключите кабели к компьютеру или док-станции.
-
Проверьте наличие обновлений Windows. Чтобы проверить наличие обновлений, выберите Пуск , затем найдите параметры. Выберите Параметры > Центр обновления Windows > Проверить наличие обновлений.
Совет: Если вы используете адаптер беспроводного дисплея, подключите адаптер к порту HDMI на новых телевизорах, а затем подключите к нему компьютер по беспроводной сети. После подключения адаптера беспроводного дисплея к телевизору перейдите на Windows 11 компьютер, нажмите клавишу с логотипом Windows+ K, чтобы открыть приведение, а затем выберите адаптер беспроводного дисплея.
Изменение порядка мониторов
Этот параметр отображается, если Windows обнаруживает несколько мониторов. Каждый монитор будет пронумерован для упрощения идентификации.
Идентификация монитора
Чтобы узнать, какой номер соответствует дисплею, выберите Пуск , а затем найдите параметры. Выберите Параметры > Система > Дисплей > Идентифицировать. На экране монитора появится номер, который ему назначен.
Обнаружение монитора
Если вы подключили другой дисплей и он не отображается в настройках, выберите Пуск > Параметры > Система > Дисплей > Несколько дисплеев > Обнаружить.
Подключение беспроводного дисплея
Если вы подключили беспроводной дисплей и он не отображается в разделе Параметры, выберите Пуск > Параметры > Система > Дисплей > Несколько дисплеев > Подключиться.
Упорядочение мониторов
Если у вас несколько мониторов, вы можете изменить их порядок. Это удобно, если вы хотите, чтобы ваши мониторы соответствовали их настройке у вас дома или в офисе. В разделе параметров «Дисплей» выберите и перетащите монитор, куда хотите. Проделайте это для всех мониторов, которые нужно переместить. После получения нужного расположения нажмите Применить. Протестируйте свое новое расположение, перемещая указатель мыши на разных мониторах, чтобы убедиться в их правильной работе.
Совет: Используйте параметр Определить при упорядочении дисплеев, чтобы увидеть номер дисплея на экране.
Несколько параметров отображения
При отстыковке компьютера окна на внешнем мониторе сворачиваться. При повторной закреплении компьютера к монитору Windows помещает все точно так же, как раньше.
Чтобы настроить это поведение, выполните следующие действия:
-
Выберите Пуск > Параметры > Отображение системных >.
-
Прокрутите вниз и выберите Несколько дисплеев , чтобы развернуть этот раздел.
-
Установите флажки в соответствии со своими предпочтениями:
-
Запоминать расположения окон на основе подключения монитора
-
Свертывание окон при отключении монитора.
-
Изменение параметров мониторов
-
Изменение яркости и цвета дисплея
-
Изменение разрешения, масштабирования и макета дисплея
-
Изменение частоты обновления отображения
Выбор варианта отображения
Чтобы изменить то, что отображается на дисплеях, нажмите клавишу с логотипом Windows+ P. Вот параметры, которые можно выбрать.
|
Если необходимо: |
Выберите |
|
Просматривать элементы только на одном мониторе. |
Только экран компьютера |
|
Просматривать одинаковые элементы на всех мониторах. |
Повторяющийся |
|
Просматривать рабочий стол на нескольких экранах. При расширении мониторов вы можете перемещать элементы между двумя экранами. |
Расширить |
|
Просматривать все только на втором мониторе. |
Только второй экран |
Windows 10 can support multiple monitors and, depending on the number of ports on the system, you can connect quite a few monitors to a system. The OS will be able to detect them easily since monitors are plug & play.
Most users opt for two monitors but Windows 10 can support more than two screens.
If you’re looking to use three monitors with a Windows 10 system, you need a few things in terms of hardware. You also need to check if your system has the right number of ports.
- Check ports on the monitor you will be using. Most have a VGA, DVI, and HDMI port.
- Check if you have ports on your system for each monitor to connect.
- You will need cables to connect each monitor.
- If you don’t have enough ports, you may be able to use the USB-C port on your system with an adapter.
Check graphics card specifications
Your graphics card plays a major role in whether or not you can use three monitors. You can have the right number of ports but your graphics chip has the last say.
- Right-click the taskbar and select Task manager from the context menu.
- Go to the Performance tab.
- Select GPU 0 from the column on the left.
- In the pane on the right, look at the top right for the model number of the chip.
- Repeat for GPU 1 (if it’s listed).
- Google the specs for the graphics chip and see how many monitors it can support.
Connecting the 3 monitor setup
If you’ve got the right number of ports, cables, and a graphics card that can support your three monitors, you’re ready to get started.
- Connect the cables to the monitors.
- Connect the other end of each cable to the port on your computer.
- On your desktop, tap the Win+P keyboard shortcut.
- From the panel on the right, select Extend.
Windows 10 Multiple Monitors (Settings)
Windows 10 allows users to customize how multiple monitors work on the system. The options are limited but worth taking a look.
Arrange monitors
You now need to arrange how Windows 10 sees your monitors.
- Open the Settings app (Win+I keyboard shortcut).
- Go to System>Display.
- Click Identify and a number will appear on each screen.
- On the Display tab, click and drag one monitor (identified by its name) and place it to the right or left of another. The layout is up to you.
Taskbar for multiple monitors
- Open the Settings app (Win+I keyboard shortcut).
- Go to Personalization>Taskbar.
- Open the ‘Show taskbar buttons on’ dropdown and select which monitors the taskbar should appear on.
Wallpapers for multiple monitors
You can set the same or different wallpapers for each monitor.
- Open the Settings app (Win+I keyboard shortcut).
- Go to Personalization>Background.
- Click Browse and select a wallpaper.
- Right-click it in the drawer and select which monitor you want to set it for.
- Repeat for each monitor.
Triple Monitor Setup – Conclusion
A 3 monitor setup is as easy as setting up a 2 monitor setup. Many users install additional third-party apps to help manage their monitors and you can try some out yourself. They aren’t necessary unless your overwhelmed by apps and windows.

Fatima Wahab
Fatima has been writing for AddictiveTips for six years. She began as a junior writer and has been working as the Editor in Chief since 2014.
Fatima gets an adrenaline rush from figuring out how technology works, and how to manipulate it. A well-designed app, something that solves a common everyday problem and looks
(Image credit: Dell)
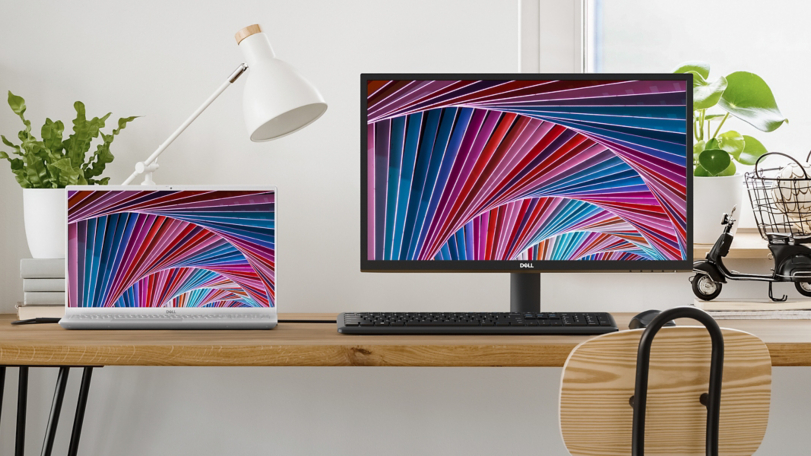
If you’re a content creator, programmer, data analyst, or gamer, a system with multiple monitors not only looks great but can significantly improve productivity when multitasking with more than one app. However, a multi-monitor setup is only practical if you configure it correctly.
Windows 10 has several features and settings to support one, two, three, four, and even more monitors without needing third-party software for the best experience.
In this how-to guide, I’ll provide tips on configuring and using a multi-monitor setup, whether you’re connecting an external display to your laptop or two, three, or more monitors to your workstation.
Before configuring a multi-monitor setup
Before configuring multiple monitors on your computer, ensure the required cables are connected to the monitors and the computer. This includes connecting power and video signals using VGA, DVI, HDMI, or DisplayPort (recommended) cables.
If you’re unsure, confirm the monitor’s make and model (usually from a sticker on the back) and search online for the manufacturer’s manual to understand better how to connect the display.
How to rearrange multiple displays on Windows 10
While you can connect a monitor to any of the available video ports on the graphics card, it’s easy to plug them in the wrong order when setting up a dual-monitor or triple-monitor setup. Although they will still work, you may run into issues using the mouse and running applications until you rearrange them correctly.
To rearrange monitors on Windows 10, use these steps:
All the latest news, reviews, and guides for Windows and Xbox diehards.
- Open Settings.
- Click on System.
- Click on Display.
- Drag and drop each display to rearrange them according to their physical layout on your desktop under the «Rearrange your displays» section.

- Quick tip: When rearranging monitors in the «Display» settings page, ensure all monitors align at the top perfectly. Otherwise, you’ll have problems moving the mouse cursor between monitors from the corners.
- Click the Apply button.
Once you complete the steps, Windows 10 will save the physical layout, and you can work across each display and run apps without issues.
If you’re unsure which monitor you’re selecting, click the «Identify» button. If one of the monitors isn’t showing up, ensure it’s receiving power and connected correctly, and click the «Detect» button. If you still have problems, reset the connections (or restart the computer) and try the «Detect» button again.
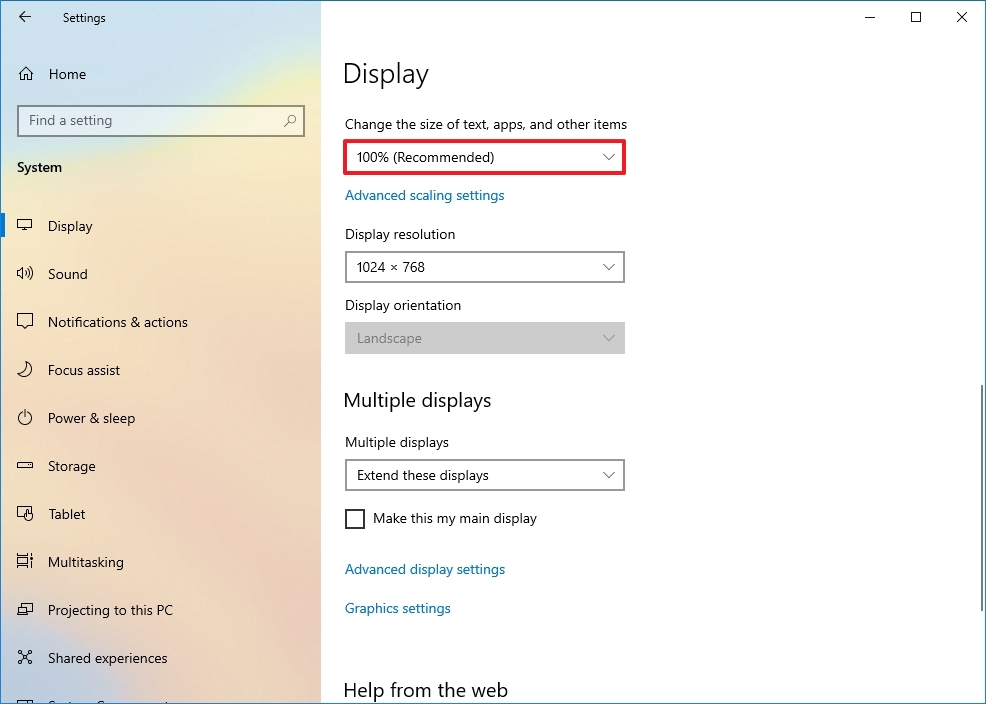
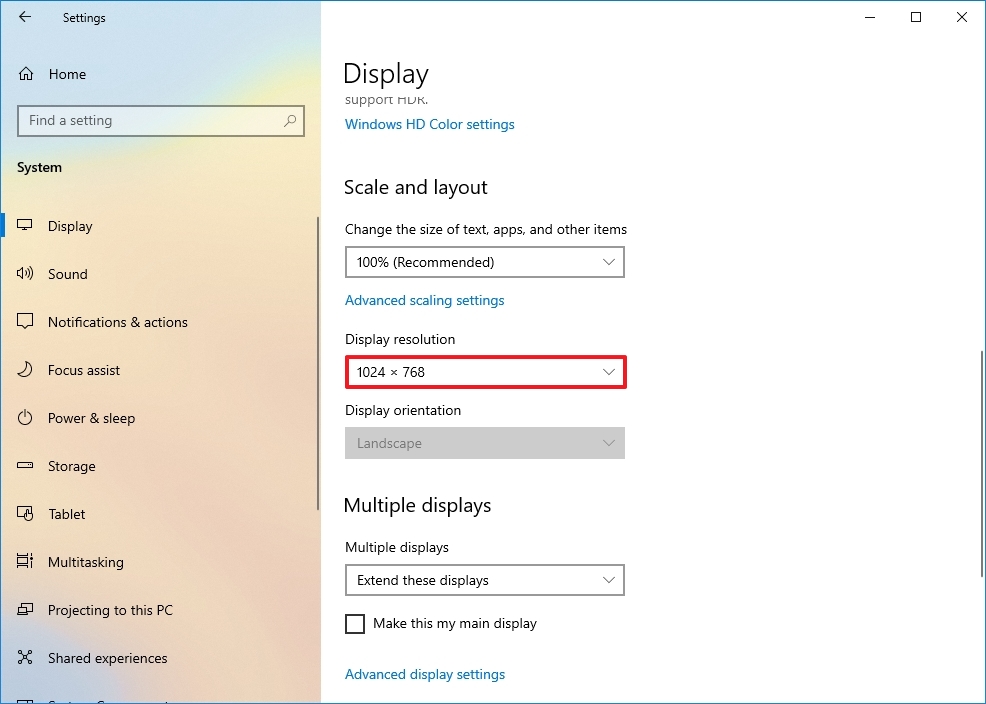
How to adjust displays scale and layout on Windows 10
Windows 10 does a pretty good job detecting and configuring the most optimal settings when connecting one or multiple displays to a computer. However, depending on your requirements, you may need to adjust each monitor’s scaling, resolution, and orientation.
Select correct scale
Windows 10 includes settings to adjust scaling, which is useful when setting up various monitors of different sizes and screen resolutions to make text, apps, and other items look the same size across the displays. For example, if you have a 4K display, adjusting the scale settings can help make items bigger and more readable.
To select the correct scale setting that suits your requirements, use these steps:
- Open Settings.
- Click on System.
- Click on Display.
- Select the monitor to adjust under the «Rearrange your displays» section.
- Select the appropriate scale option from the «Change the size of text, apps, and other items» drop-down menu.
After you complete the steps, you may need to repeat steps 4 and 5 to change the scaling settings on the other monitors and then click the Sign-out option to apply the changes.
While you can adjust the scaling settings per monitor, it’s always best to use the same make and model of monitors with the same configuration when possible. Otherwise, you may run into issues, and the operating system may have problems scaling elements.
Custom scaling
To specify a custom scaling value, use these steps:
- Open Settings.
- Click on System.
- Click on Display.
- Select the monitor to adjust under the «Rearrange your displays» section.
- Click the «Advanced scaling settings» option under the «Scale and layout» section.

- Specify the scaling size between 100 and 500 percent under the «Custom scaling» section.

- Click the Apply button.
After completing the steps, sign out of your account and back in to test the new settings. If the new scaling configuration doesn’t look right, repeat the same steps and try a different value until you find a comfortable setting.
If you want to switch to the predefined scale settings, you must first turn off custom scaling and sign out. Otherwise, the option will be grayed out.
Select correct resolution
Usually, after connecting a monitor, Windows 10 will set the recommended pixel resolution automatically, but you can also change the resolution manually with these steps:
- Open Settings.
- Click on System.
- Click on Display.
- Select the monitor that you want to adjust under the «Rearrange your displays» section.
- Use the Resolution drop-down menu to select the correct pixel resolution under the «Scale and layout» section.
Once you complete the steps, repeat steps 4 and 5 to change the resolution on the remaining monitors.
If you want to make text and other items bigger on the screen, you should change the scaling settings, not the display resolution.
Select correct orientation
Windows 10 also allows you to rotate the screen horizontally or vertically, which is particularly useful when you have monitors with stands that rotate, and you want to use them with a different orientation for reading or coding.
To change the orientation per-monitor, use these steps:
- Open Settings.
- Click on System.
- Click on Display.
- Select the monitor that you want to adjust under the «Rearrange your displays» section.
- Use the Orientation drop-down menu to select the mode under the «Scale and layout» section:
- Landscape.
- Portrait.
- Landscape (flipped).
- Portrait (flipped).
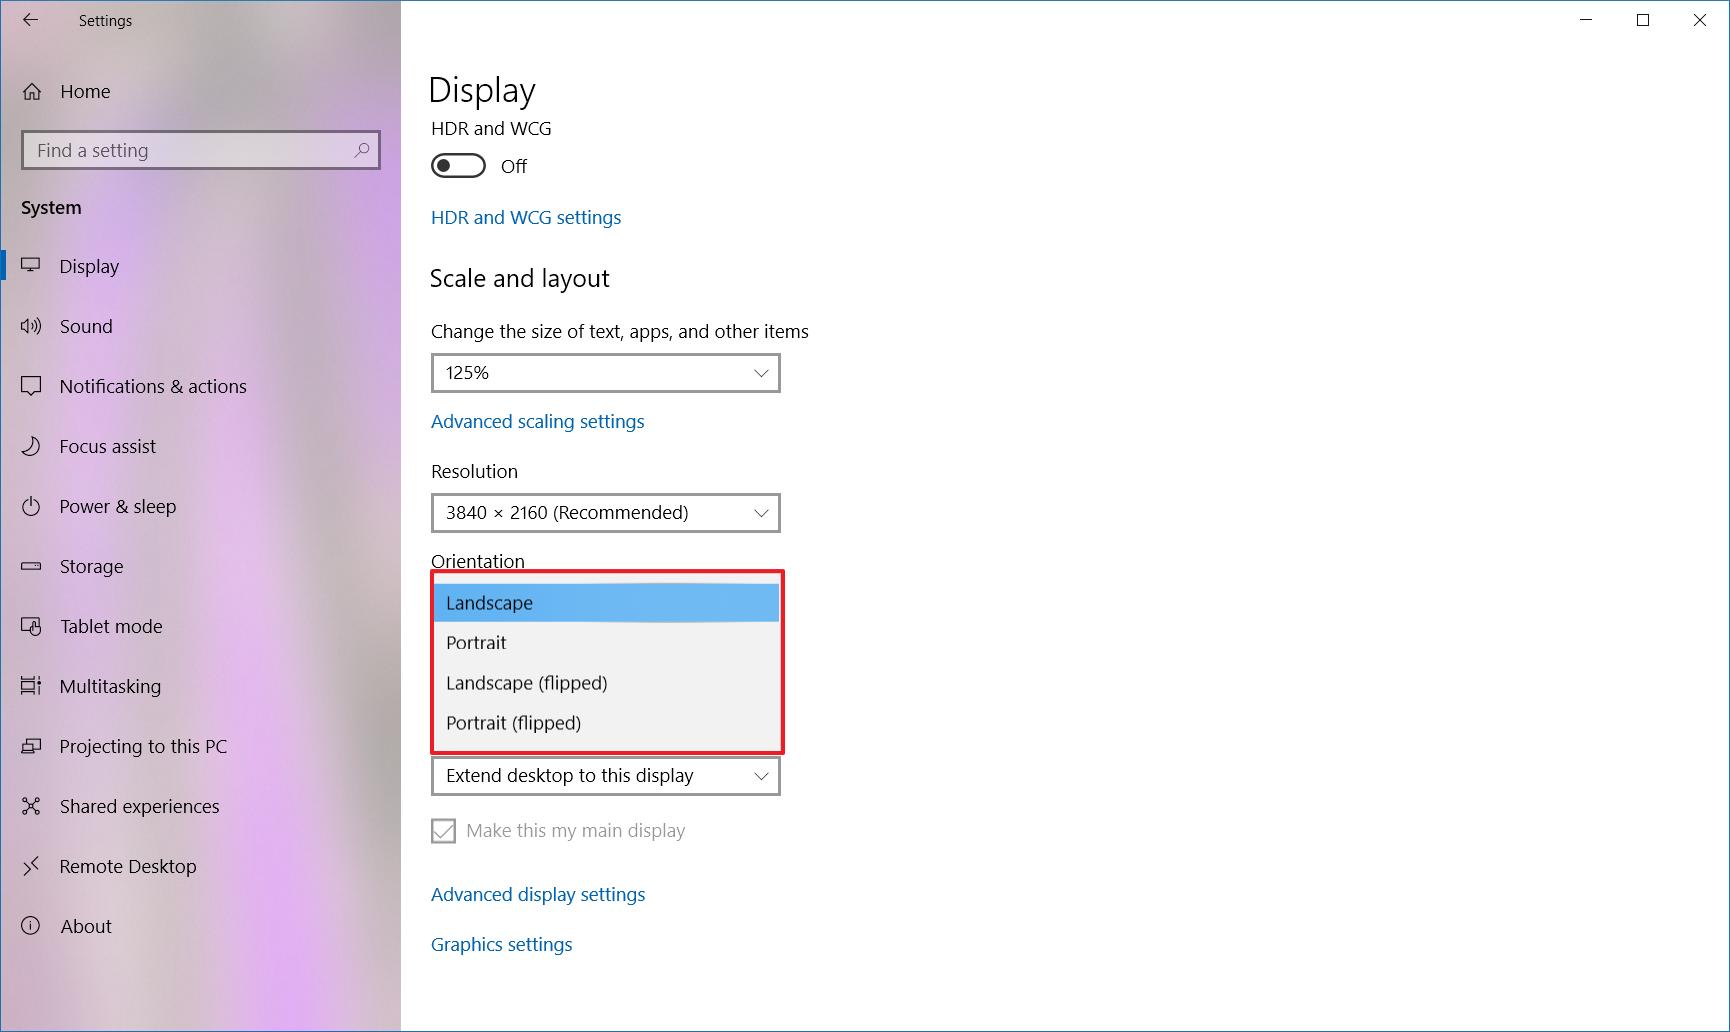
Once you complete the steps, the display will shift to the orientation you selected.
How to select multiple displays viewing mode on Windows 10
You can also choose the viewing mode for your displays using the available settings. For example, if you’re using a second monitor, you can expand the main screen to the new display, or you can mirror both monitors, which is ideal when showing a presentation. If you’re using a laptop with an external monitor, you can even disable the main display and only use the second monitor as your primary.
To change the viewing mode on Windows 10, use these steps:
- Open Settings.
- Click on System.
- Click on Display.
- Select the monitor that you want to adjust under the «Rearrange your displays» section.
- Use the drop-down menu to set the appropriate viewing mode under the «Multiple displays» section:
- Duplicate desktop — Shows the same desktop on both displays.
- Extend — Expands the primary desktop to the secondary display.
- Disconnect this display — Turn off the selected monitor.
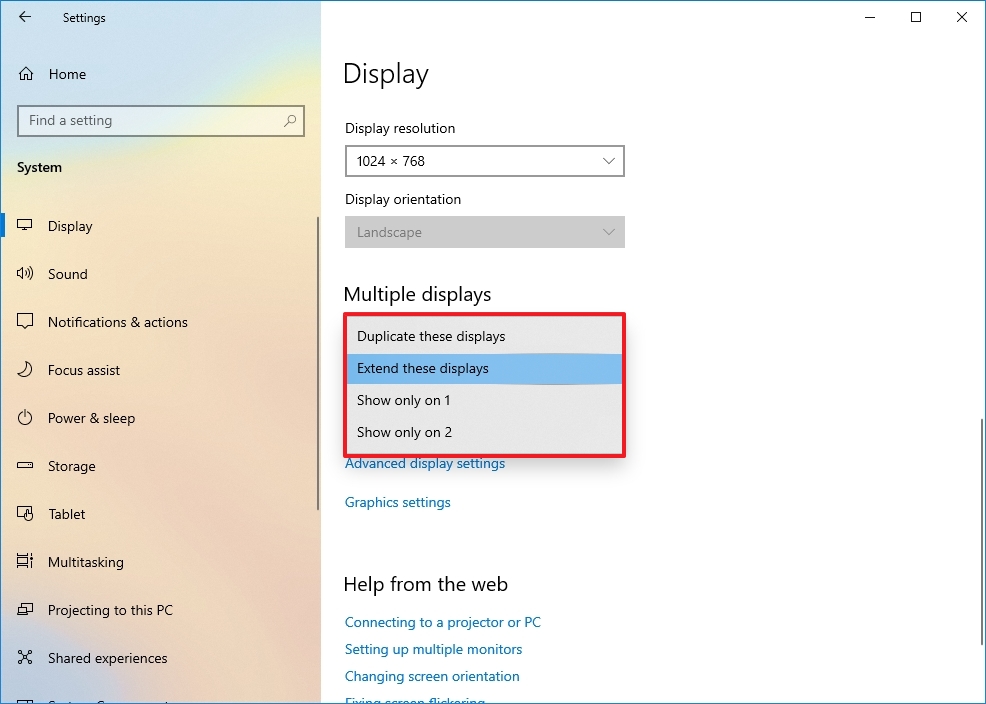
After you complete the steps, you may need to repeat steps 4 and 5 to set the display mode on the remaining monitors. Also, note that using these settings, you can make any of the monitors your primary display.
Switch display modes with shortcut
In addition to using the Settings app, Windows 10 allows you to switch display modes on the fly using the «Project» feature, which you can access with the «Windows key + P» keyboard shortcut.

Once you invoke the shortcut, a flyout will open from the right side with four options, including:
- PC screen only — Only the primary display is used.
- Duplicate — Secondary displays will mirror the primary monitor.
- Extend — Both screens are combined to offer an extended desktop.
- Second screen only — Only the secondary displays are used.
Typically, when using a multi-monitor setup on a desktop or laptop, you want to use the «Extend» option. This allows you to use the primary and secondary monitors normally at their native resolution, creating a single large canvas.
«Duplicate» is a good option when using a second monitor or projector to show a presentation. In contrast, the «Second screen only» option is great when you want to close the lid on a laptop and work only with the external monitor.
How to manage advanced display settings on Windows 10
Although it’s not always recommended to modify your advanced display settings because not all monitors are created equal, sometimes, you may need to make a few adjustments to improve color accuracy and remove screen flickering.
Important: I recommend adjusting the advanced settings only if you have a rough idea of what you want to do. Typically, you should be fine with the default display settings.
Set a custom color profile
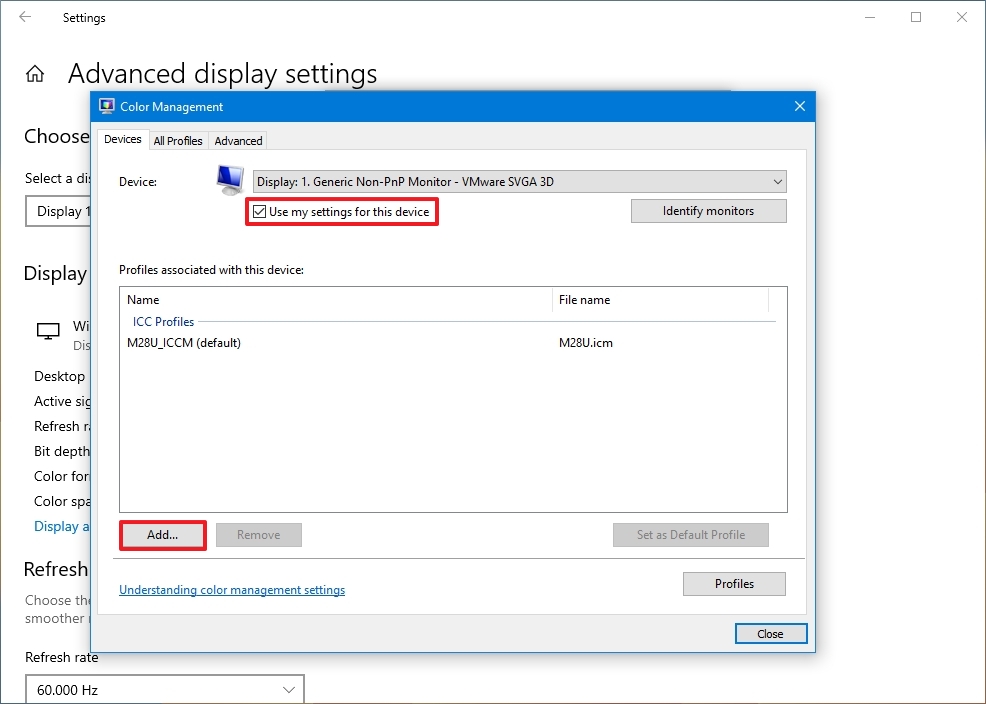
If your monitors aren’t rendering the colors accurately, you can use a custom color profile to improve color accuracy using these steps:
- Open Settings.
- Click on System.
- Click on Display.
- Click the «Advanced display settings» option.
- Click the «Display adapter properties» option for the display you want to set a custom color profile.

- Click the Color Management tab.
- Click the Color Management button.
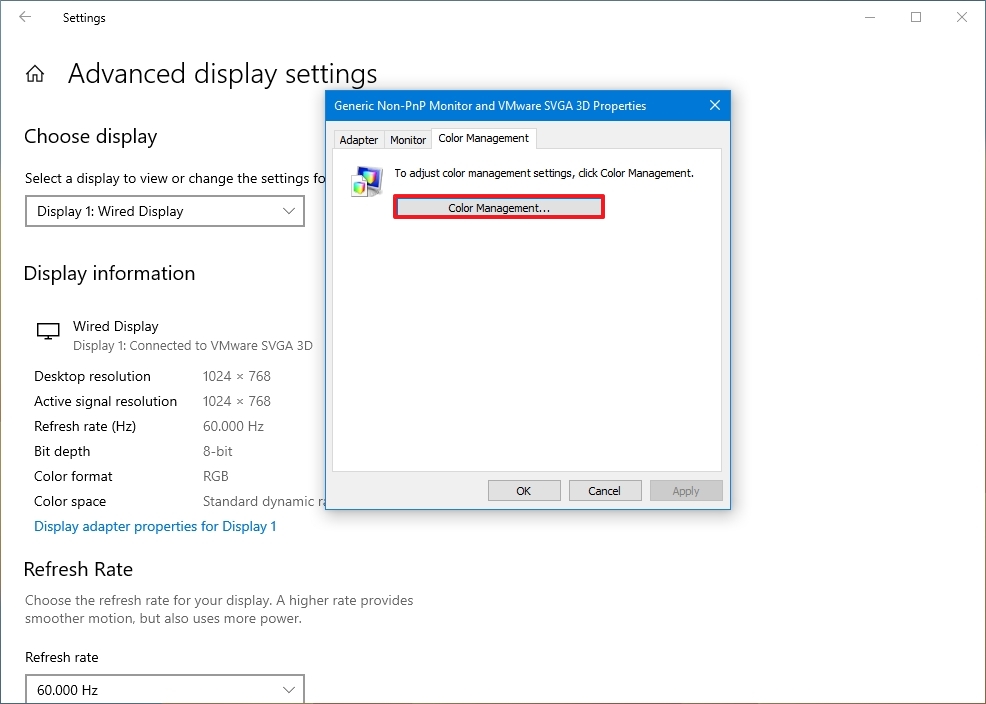
- Click the Devices tab.
- Select a display from the list.
- Check the «Use my settings for this display» option.
- Click the Add button.
- On the «Associate Color Profile» page, click the Browse button and locate the new color profile.
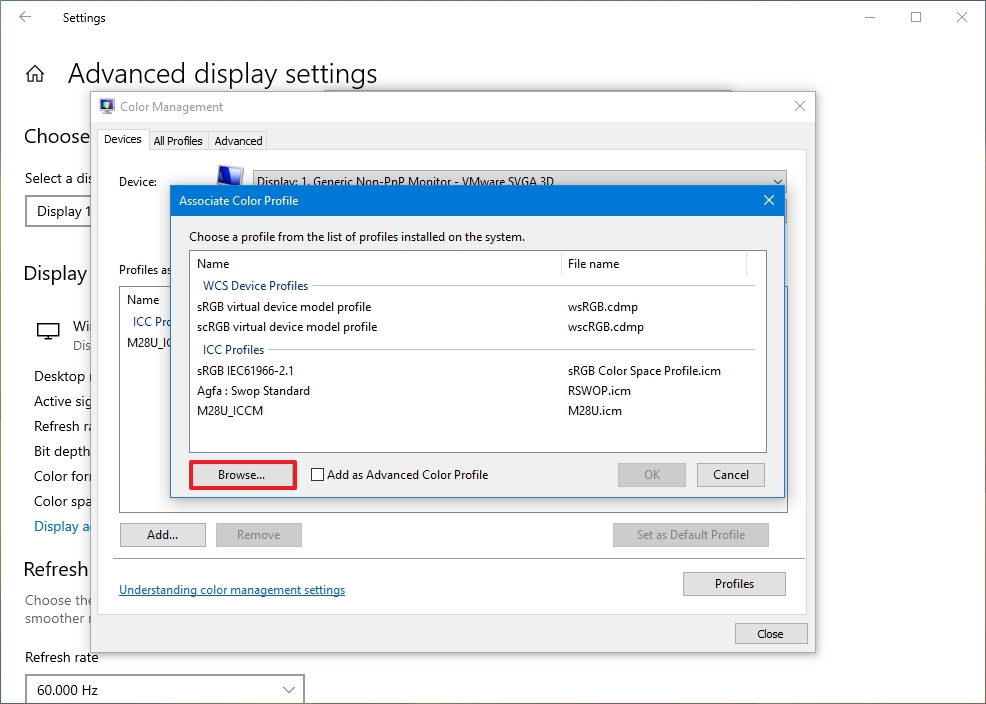
- Double-click the «.icm» file to install the new profile.
- Click the Close button.
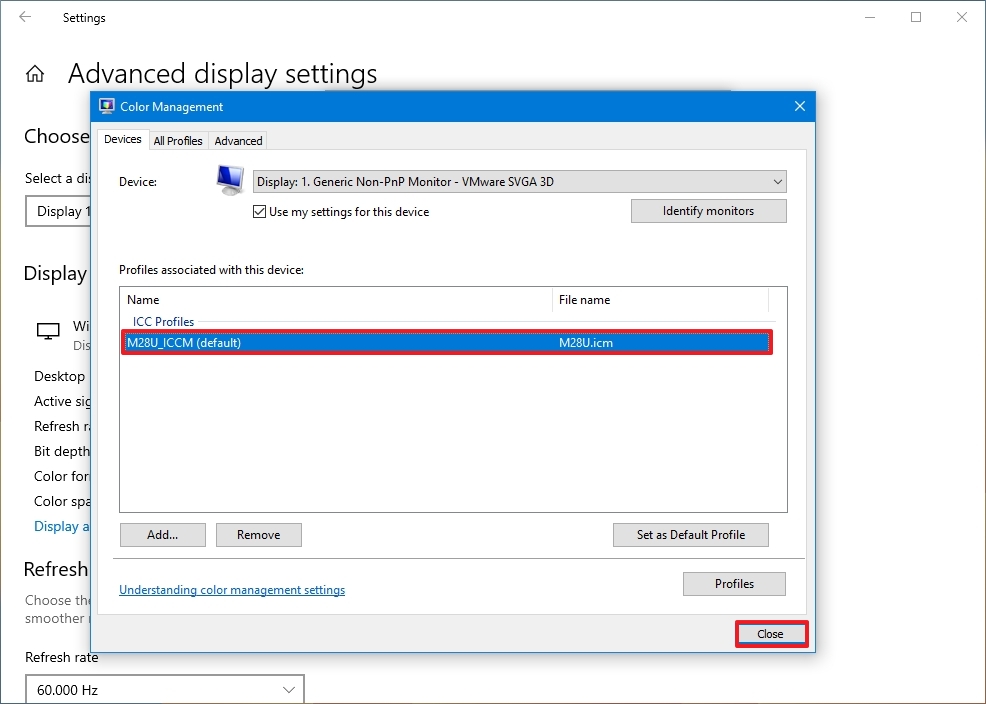
Once you complete the steps, you may need to repeat steps 9 through 13 to set a custom profile for the other monitors.
When configuring a custom color profile, use those created by your display manufacturer or from a trusted source. If you’re not sure, you can use these steps to download the correct color profile for your monitors.
Change the refresh rate
Usually, a refresh rate (frames per second) of 59Hz or 60Hz is more than enough to operate a computer, though you’ll want to look at the best monitors for Xbox Series X and Series S if you plan to game at higher framerates. However, if you’re noticing screen flickering or if you have monitors that support a higher refresh rate, bumping the settings can provide a better and smoother viewing experience — especially for gamers.
To adjust the refresh rate of a monitor, use these steps:
- Open Settings.
- Click on System.
- Click on Display.
- Click the «Advanced display settings» option.
- Use the drop-down menu to set the correct refresh rate under the «Refresh Rate» section.

After you complete the steps, you may need to repeat them to change the refresh rate on the remaining monitors.
How to show taskbar across multiple displays on Windows 10
On a multi-monitor setup, the taskbar by default will appear only in the main display, but you can change the settings to show it across all the displays using these steps:
- Open Settings.
- Click on Personalization
- Click on Taskbar.
- Turn on the «Show taskbar on all displays» toggle switch under the «Multiple display» section.

If you want to control in which Taskbar the buttons for running apps should appear, then use the «Show taskbar button on» the drop-down menu and select one of the available options:
- All taskbars.
- Main taskbar and taskbar where window is open.
- Taskbar where window is open.
You can also use this guide to optimize the space on the Taskbar to pin even more apps or to keep it as minimal as possible.
How to change background on multiple displays on Windows 10
Windows 10 offers many settings to adjust the look and feel of the desktop, but when using multiple monitors, setting up different background images on each display is one of the most significant customizations you can make to personalize your experience.
To show different wallpapers on a multi-monitor setup using a slideshow, use these steps:
- Open Settings.
- Click on Personalization.
- Click on Background.
- Use the «Background» drop-down menu and select the Slideshow option.

- Click the Browse button.
- Select a folder with a collection of images that you’d like to display on the monitors.
- Click the Choose this folder button.
- Select the rotation frequency using the «Change picture every» drop-down menu.
- Turn on the Shuffle toggle switch.
- (Optional) If you’re using images with different sizes, use the Choose a fit drop-down menu and select the Fill option.
Once you complete the steps, the images will rotate on the desktop background using your selected rotation frequency.
Customize each monitor with a different background
If you want to set a different background image for each monitor, use these steps:
- Open Settings.
- Click on Personalization.
- Click on Background.
- Use the «Background» drop-down menu and select the Picture option.

- Click the Browse button.
- Select the wallpaper and click the Choose picture option.
- Right-click the image and select the monitor you want the wallpaper to show.
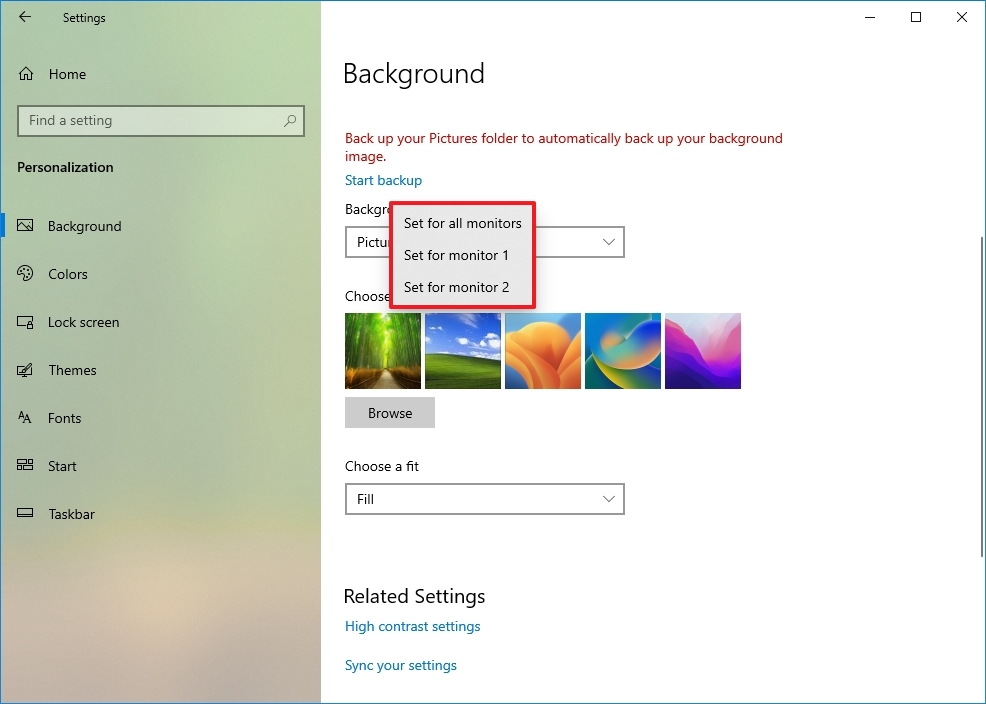
- Repeat steps 5, 6, and 7 to set a custom background for another monitor.
After you complete the steps, each monitor will display a custom wallpaper.
In addition to the instructions outlined above, here are a few additional tips to remember when setting up a computer with multiple monitors. For example, unless it’s a laptop, you shouldn’t try to adjust the brightness or color using Windows 10 or another application. Instead, you should use the controls built into the monitor.
If the second monitor isn’t detected in Windows 10 or Windows 11, check its connections and use the «Detect» button in the Settings app. If you still have issues, use our guide linked above to troubleshoot and fix common problems.
Finally, when using one or multiple monitors, you may encounter a black screen, typically a video driver-related problem. If you’re not sure how to fix this issue, follow these steps to resolve it.
It’s worth noting that recent updates to the operating system also added the ability to show dynamic wallpapers with the «Windows Spotlight» feature.
More resources
For more helpful articles, coverage, and answers to common questions about Windows 10 and Windows 11, visit the following resources:
- Windows 11 on Windows Central — All you need to know
- Windows 10 on Windows Central — All you need to know
Mauro Huculak has been a Windows How-To Expert contributor for WindowsCentral.com for nearly a decade and has over 15 years of experience writing comprehensive guides. He also has an IT background and has achieved different professional certifications from Microsoft, Cisco, VMware, and CompTIA. He has been recognized as a Microsoft MVP for many years.
Do you want to improve your gaming or multitasking experience on Windows with a triple-monitor setup? If yes, then you have arrived at the correct location! It is sometimes, just not feasible to multitask on a single screen. Luckily, Windows 10 supports multiple displays. When you need to examine a lot of data at once, juggle between spreadsheets or, write articles while conducting research, and so on, having three monitors proves to be quite useful. If you are wondering how to set up multiple monitors with laptop, then do not worry! Follow this step-by-step guide which will teach you exactly how to setup 3 monitors on a laptop in Windows 10. That too, without using any third-party applications.

Table of Contents
How to Set Up 3 Monitors on a Windows 10 Laptop
Depending on the number of ports on your system, you may attach a number of monitors to it. Because monitors are plug-and-play, the operating system will have no trouble detecting them. It can greatly boost productivity as well. A multi-monitor system will prove to be beneficial only when it is configured correctly. Hence, we suggest that you implement the steps detailed below to do the same.
Pro Tip: While you may alter settings per monitor, it is better to utilize the same brand and model of monitors with the same setup, wherever feasible. Otherwise, you could have difficulties, and Windows 10 might have difficulty scaling & customizing various components.
Step 1: Connect Ports & Cables Correctly
1. Before installing multiple displays on your device, ensure all connections, including power and video signals through VGA, DVI, HDMI, or Display Ports & cables, are linked to the monitors and the laptop.
Note: If you are not sure about the said connections, cross-check the brand and model of the monitor with the manufacturer website, for instance, Intel here.
2. Use the ports of graphics card or motherboard to connect numerous displays. However, you will need to purchase an additional graphics card, if your graphics card does not support three monitors.
Note: Even if there are multiple ports, it does not mean you can use them all, at once. To verify this, enter the model number of your graphics card in manufacturer website and check for it.
3. If your display supports DisplayPort multi-streaming, you can connect several monitors with DisplayPort cables.
Note: In this situation, make sure that your computer has adequate space and slots.
Step 2: Configure Multiple Monitors
While you may connect a monitor to any available video port on the graphics card, it is possible to connect them in the wrong sequence. They will still operate, but you could have trouble using the mouse or launching programs until you reorganize them properly. Here’s how to setup and configure 3 monitors on a laptop:
1. Press Windows + P keys simultaneously to open the Display Project menu.
2. Select a new Display mode from the given list:
- PC screen only – It just uses the primary monitor.
- Duplicate -Windows will show the identical image on all monitors.
- Extend – Multiple monitors work together to create a larger desktop.
- Second screen only – The only monitor that will be used is the second one.

3. Choose Extend option, as highlighted below, and set up your displays on Windows 10.

Also Read: How to Fix Computer Monitor Display Problems
Step 3: Rearrange Monitors in Display Settings
Follow the given steps to arrange how these monitors should function:
1. Press Windows + I keys together to open Windows Settings.
2. Here, select System Settings, as shown.

3. If there is no option to Customize your display then, click on Detect button under the Multiple displays section to detect other monitors.
Note: If one of the monitors does not appear, make sure it is powered up and connected properly before pressing the Detect button.

4. Rearrange the displays on your desktop, drag and drop the rectangle boxes under Customize your desktop section.
Note: You can use the Identify button to figure out which monitor to pick. Then, check the box marked Make this my main display to make one of the connected monitors your primary display screen.

5. Click Apply to save these changes.
Now, Windows 10 will preserve the physical arrangement allowing you to work across several displays and run programs. This is how to set up multiple monitors with laptop. Next, we shall learn how to customize the various displays.
Step 4: Customize Taskbar & Desktop Wallpaper
Windows 10 does an excellent job of identifying and establishing the best settings when connecting one or more monitors to a single PC. However, depending on your needs, you may need to modify your taskbar, desktop, and wallpaper. Read below to do so.
Step 4A: Personalize Taskbar for Each Monitor
1. Go to Desktop by pressing Windows + D keys simultaneously.
2. Then, right-click on any empty space on the Desktop and click on Personalize, as shown.
3. Here, select Taskbar in the left pane.
4. Under Multiple displays section, and toggle On the Show taskbar on all displays option.

Step 4B: Customize Wallpaper for Each Monitor
1. Navigate to Desktop > Personalize, as earlier.
2. Click on Background from the left pane and choose Slideshow under Background drop-down menu.

3. Click on Browse under Choose albums for your slideshows.

4. Set the Change picture every option to the time period after which a new image is to be displayed from the selected album. For example, 30 minutes.

5. Toggle On Shuffle option, as depicted below.

6. Under Choose a fit, Choose Fill.
This is how to setup 3 monitors on a laptop & customize taskbar as well as wallpaper.
Also Read: How to Calibrate your Monitor Display Color in Windows 10
Step 5: Adjust Display Scale & Layout
Despite the fact that Windows 10 configures the most optimal settings, you may need to adjust scale, resolution, and orientation for each monitor.
Step 5A: Set System Scale
1. Launch Settings > System as mentioned in Step 3.
2. Select the appropriate Scale option from Change the size of text, apps, and other items drop-down menu.

3. Repeat the above steps to adjust the scale settings on the additional displays as well.
Step 5B: Custom Scaling
1. Select the Display monitor and go to Settings > System as shown in Step 3.
2. Select Advanced scaling settings from the Scale and layout section.

3. Set the scaling size between 100%- 500% in the Custom scaling section shown highlighted.

4. Click on Apply to apply the said changes.

5. Sign out of your account and back in to test the updated settings after you have completed the above steps.
6. If the new scaling configuration doesn’t seem right, repeat the process with a different number until you discover one that works for you.
Step 5C: Set Correct Resolution
Normally, Windows 10 will establish the suggested pixel resolution automatically, when attaching a new monitor. But, you may adjust it manually by following these steps:
1. Select the Display screen you wish to change and navigate to Settings > System as illustrated in Method 3.
2. Use the Display resolution drop-down menu in the Scale and layout section to choose the right pixel resolution.

3. Repeat the above steps to adjust the resolution on the remaining displays.
Step 5D: Set Correct Orientation
1. Select the Display & navigate to Settings > System as earlier.
2. Select the mode from the Display orientation drop-down menu under Scale and layout section.

When you have finished all of the steps, the display will change to the orientation you chose viz Landscape, Portrait, Landscape (flipped), or Portrait (flipped).
Step 6: Select Multiple Displays Viewing Mode
You may select the viewing mode for your displays. If you utilize a second monitor, you may choose to:
- either stretch the main screen to accommodate the additional display
- or mirror both displays, which is a wonderful option for presentations.
You may even, deactivate the main display and utilize the second monitor as your primary if you are using a laptop with an external monitor. Follow the given steps on how to set up multiple monitors with laptop and set viewing mode:
1. Navigate to Settings > System as shown below.
2. Choose the desired Display monitor under Display section.
3. Then, use the drop-down option under Multiple displays to select the appropriate viewing mode:
- Duplicate desktop – The identical desktop is displayed on both displays.
- Extend – The primary desktop is expanded on the secondary display.
- Disconnect this display –Switch off the monitor you have selected.

4. Repeat the above-mentioned steps to adjust the display mode on the remaining displays too.
Also Read: How to Connect two or more Computers to one Monitor
Step 7: Manage Advanced Display Settings
Although changing your advanced display settings is not always a good idea because not all monitors might be equal in size, you may need to do it to enhance color accuracy and eliminate screen flickering as explained in this section.
Step 7A: Set Custom Color Profile
1. Launch System Settings by following steps 1-2 of Method 3.
2. Here, click on Advanced display settings.

3. Click the Display adapter properties for Display 1.

4. Click on Color Management… button under Color Management tab, as depicted below.

5. Under Devices tab, select your Display from the Device drop-down list.

6. Check the box titled Use my settings for this device.

7. Click Add… button, as shown.

8. Click the Browse..button on the Associate Color Profile screen to find the new color profile.

9. Navigate to the directory where ICC Profile, Device Color Profile, or Device Model Profile is stored. then, click on Add, shown highlighted below.

10. Click on OK then, Close to exit all screens.
11. Repeat steps 6– 11 to create a custom profile for additional monitors too.
Step 8: Change Screen Refresh Rate
To run a computer, a refresh rate of 59Hz or 60Hz would suffice. If you are experiencing screen flickering or using displays that allow a higher refresh rate, changing these settings would provide a better and smoother viewing experience, especially for gamers. Here is how to setup 3 monitors on a laptop with different refresh rates:
1. Go to Settings > System > Advanced display settings > Display Adapter Properties for display 1 as shown in Step 7A.
2. This time, switch to the Monitor tab.

3. Use the drop-down menu under Monitor Settings to select the desired screen refresh rate.

4. Click on Apply > OK to save the changes.
5. Implement the same steps to adjust the refresh rate on the remaining displays, if needed.
Also Read: How to Change the Primary & Secondary Monitor on Windows
Step 9: Show Taskbar Across Multiple Displays
Now that your know how to set up multiple monitors with laptop; Then it is worth noting that on a multi-monitor system, the Taskbar will appear only on the primary display, by default. Fortunately, you can modify settings to display it across all screens. Here’s how to setup 3 monitors on a laptop with a Taskbar displayed on each:
1. Go to Desktop > Personalize as depicted.
2. Select Taskbar from the left pane.

3. Turn on the Show taskbar on all displays toggle switch under Multiple displays section.
4. Use the Show taskbar buttons on drop-down box to choose where the buttons for running programs should show in the Taskbar. The listed options will be:
- All taskbars
- Main taskbar and taskbar where the window is open.
- Taskbar where the window is open.

This is how to set up multiple monitors with laptop with a Taskbar displayed on each. You can also customize the taskbar by pinning additional programs or keeping it as simple as possible.
Recommended:
- How to Disable WiFi Direct in Windows 10
- How to Change Startup Programs in Windows 10
- How to Mute Microphone in Windows 10
- 7 Ways to Fix Computer Keeps Crashing
We hope you found this article useful and learned how to setup 3 monitors on a Windows 10 laptop. Please let us know if you were able to customize multiple monitors with your laptop or desktop. And, feel free to leave any questions or recommendations in the comment box below.