
Эта большая инструкция посвящена особенностям установки, настройки и эксплуатации фермы терминальных серверов на базе роли Remote Desktop Services (RDS) в Windows Server. Статья поможет вам развернуть службы удаленных столов на Windows Server 2022, 2019 и 2016 в домене Active Directory.
Содержание:
- Компоненты Remote Desktop Services в Windows Server 2022/2016/2016/2012R2
- Создаем новую конфигурацию Remote Desktop Services в Windows Server
- Создаем коллекции Remote Desktop Services в Windows Server
- Публикация RemoteApp в Remote Desktop Services
- Настройка фермы Remote Desktop services с помощью PowerShell
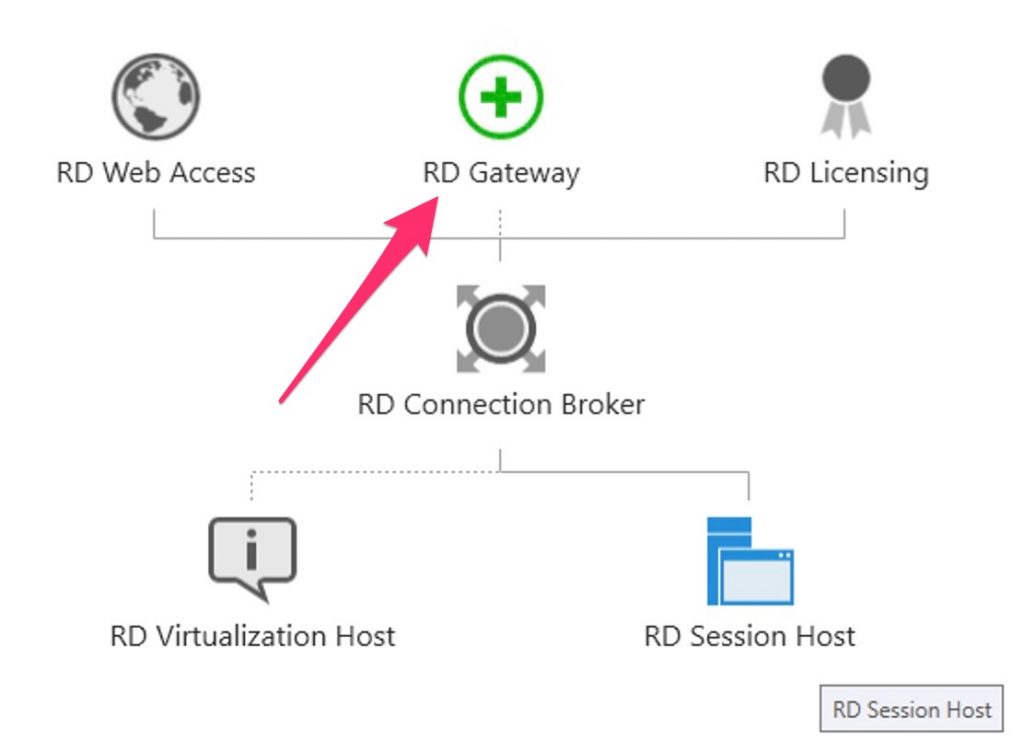
Компоненты Remote Desktop Services в Windows Server 2022/2016/2016/2012R2
В состав роли RDS в Windows Server входя следующие компоненты:
- Remote Desktop Session Host (RDSH) – узлы сеансов RDS. Основные рабочие лошадки фермы RDS, на которых работают приложения пользователей;
- Remote Desktop Connection Broker (RDCB) – посредник RDS подключений. Используется для управления фермой RDS, распределения нагрузки, обеспечивает переподключение пользователей к своим сеансам, хранит коллекции RDS и опубликованные приложения RemoteApps;
- Remote Desktop Gateway (RDGW) – обеспечивает безопасный доступ к сервисам RDS из Интернета;
- RD Web Access (RDWA) – веб интерфейс для доступа к рабочим столам, программам RemoteApp;
- Remote Desktop Licensing (RD Licensing) — служба лицензирования, управляет RDS лицензиями (CAL) пользователей.
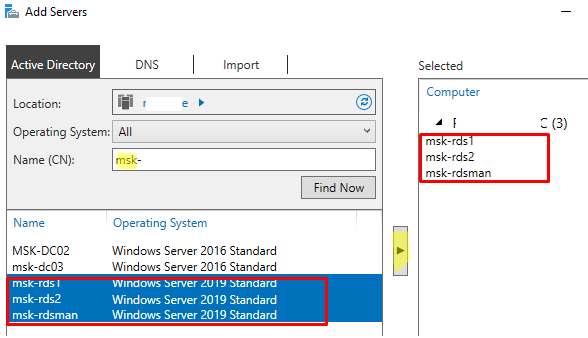
В нашем небольшом стенде будут всего три сервера со следующим распределением ролей
-
msk-rds1.winitpro.ru
— RDSH -
msk-rds2.winitpro.ru
– RDSH -
msk-rdsman.winitpro.ru
– RDSH, RDWA, RDCB, RD License
Предварительные требования, которые нужно выполнить перед созданием RDS фермы:
- Установите одинаковую версию Windows Server на все сервера, настроить их, и добавить в один домен AD;
- Откройте консоль ADUC (
dsa.msc
) и переместите все хосты с ролью RDSH в одну OU в AD. Так будет удобнее применять единые настройки через GPO; - Создайте в домене группу для RDSH серверов (например,
msk-rdsh
) и добавьте в нее все хосты; - Если вы хотите использовать диски User Profile Disk (UPD) для хранения профилей пользователей RDS (или перемещаемые профили), нужно создать на файловом сервере сетевой каталог, в котором они будут хранится (желательно расположить этот каталог на отказоустойчивом файловом кластере Windows Server). Предоставьте права Full Control на этот сетевой каталог для группы
msk-rdsh
.
Создаем новую конфигурацию Remote Desktop Services в Windows Server
Рассмотрим, как создать и настроить RDS конфигурацию с помощью графического интерфейса Server Manager.
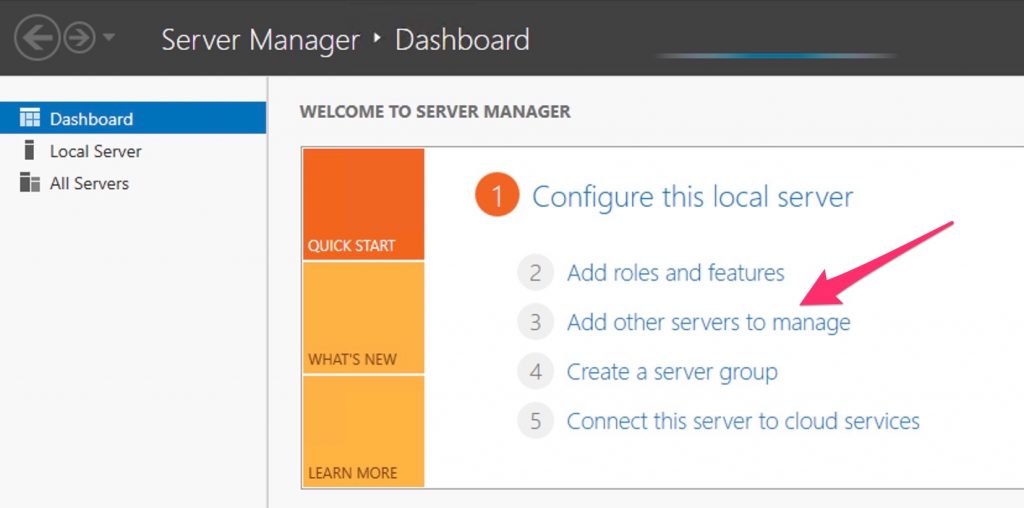
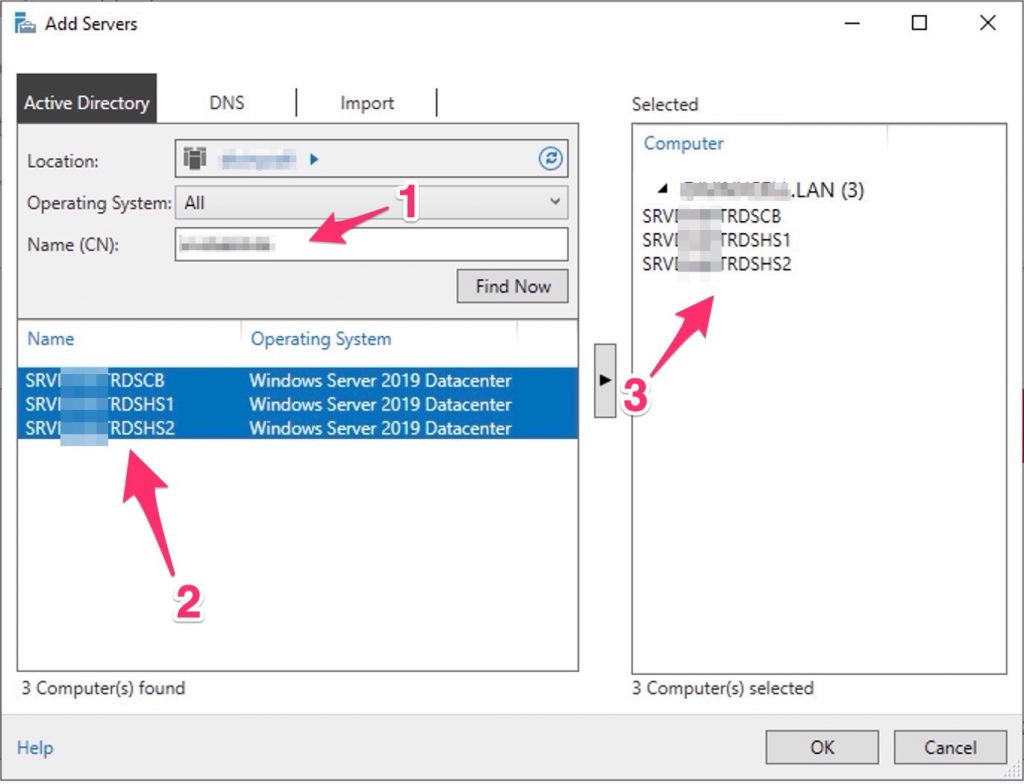
Откройте Server Manager и добавьте все планируемые RDS сервера в консоль. Щелкните All Server -> Add servers.
Теперь в меню Server Manager выберите Add Roles and Features -> Remote Desktop Services installation -> Standard deployment –> Session-based deployment.
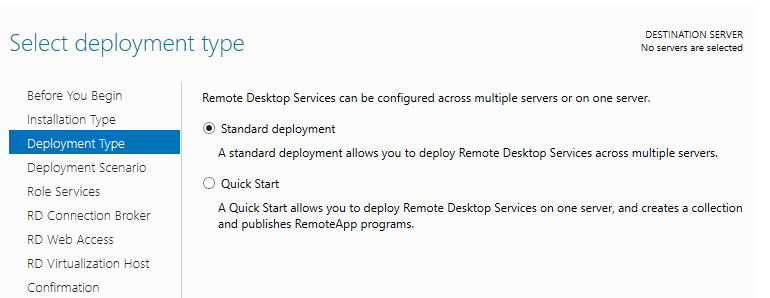
Режим Quick Start используется для развертывания всех компонентов RDS на одном сервере. В RDS ферме минимум может быть один сервер, который совмещает все роли RDS (RD Session Host, RD Web Access и RD Connection broker). Но такая конфигурация не обеспечивает отказоустойчивость и балансировку нагрузки в службах удаленных рабочей столов Windows Server.
Далее нужно указать, как вы хотите распределить роли RDS по вашим серверам. В мастере построения фермы RDS нужно выбрать сервера для соответствующих ролей. В моем случае я хочу построить такую конфигурацию:
- RD Connection Broker –
msk-rdsman - RD Web Access —
msk-rdsman - RD Session hosts —
msk-rdsman, msk-rds1, msk-rds2
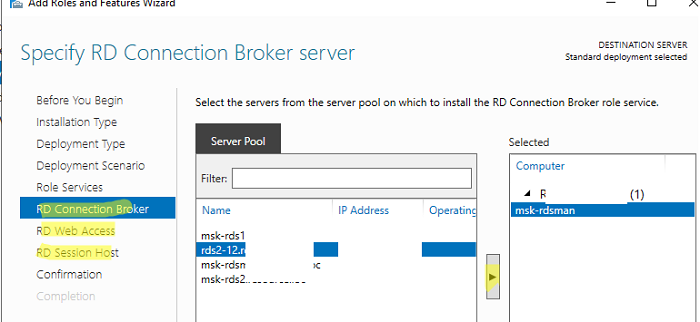
Вы можете распределить RDS роли по серверам в любой другой конфигурации.
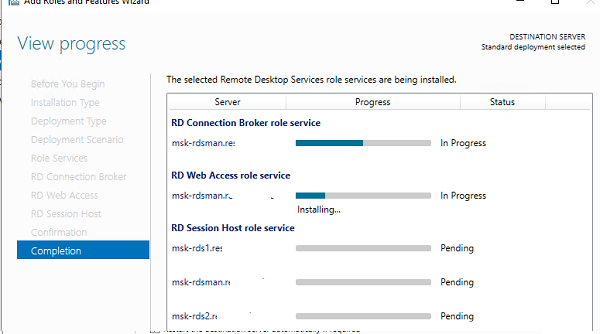
Поставьте галку Restart destination server automatically if required и нажмите кнопку Deploy. Дождитесь установки ролей RDS на всех серверах.
Итак, ваша ферма RDS создана.
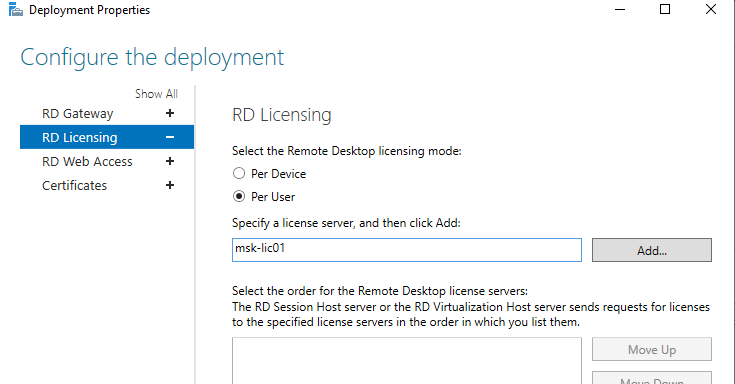
Следующий этап установка и настройка сервера лицензирования RDS. Вы можете установить роль RD Licensing на один из серверов в вашей ферме или использовать существующий в домене сервер лицензирования RDS. Подробная инструкция по установке, настройке и активации роли RD Licensing доступа по ссылке.
Для управления вашим развертыванием RDS нужно перейти в раздел Server Manager -> Remote Desktop Services. На вкладке Overview показана текущая конфигурация RDS фермы.
Чтобы изменить настройки RDS фермы выберите Tasks -> Edit Deployment Properties в разделе Deployment Overview.
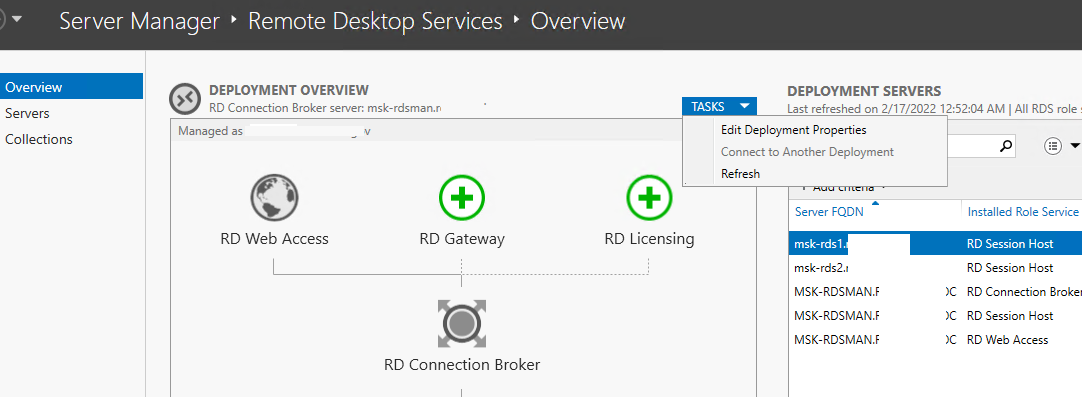
Здесь можно изменить:
- Параметры RD Gateway;
- Адрес сервер сервера лицензирования и тип пользовательских лицензий RDS CAL (per user/per device);
- Посмотреть URL адреса RD Web Access;
- Добавить SSL сертификаты для служб RDS (в инструкции мы пропустим этот пункт).
Для построения отказоустойчивой фермы Remote Desktop Services нужно обеспечить высокую доступность роли RD Connection Broker. Это достигается за счет запуска нескольких экземпляров RDCB (Active/Active) на разных серверах с общей базой данных SQL, в которой хранится конфигурация брокера подключений. Для обеспечения высокой доступности SQL базы RDCB ее можно размесить в группе высокой доступности SQL Server Always On. Ранее мы публиковали подробный гайд по настройке RDS Connection Broker с высокой доступностью.
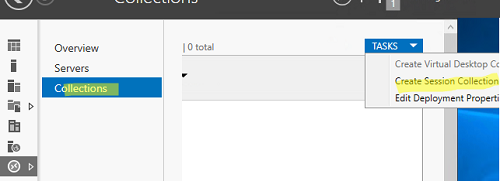
Создаем коллекции Remote Desktop Services в Windows Server
Следующий этап настройки – создание коллекций сеансов RDS. Коллекции Remote Desktop позволяют разделить хосты в ферме RDSH на отдельные группы или создать разный набор настроек и доступных приложений Remote App для разных групп пользователей.
Перейдите в раздел Collections, выберите Edit -> Create Session Collection.
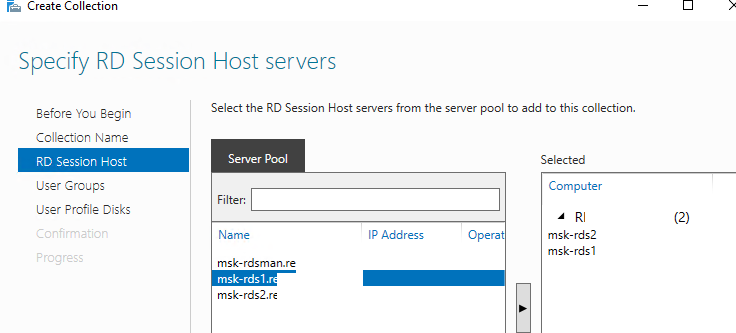
Здесь нужно задать:
- Имя коллекции RDS:
rds-Msk-Managers - Выберите какие хосты RDSH будут обслуживать пользователей коллекции (один RDSH хост может находиться в одной коллекций; не рекомендуется объединять в одну коллекцию сервера с разными версиями Windows Server);

- На вкладке User Groups указываются группы пользователей, которым разрешено подключаться к коллекции. Уберите из групп Domain users и добавьте вашу группу (msk-Managers);
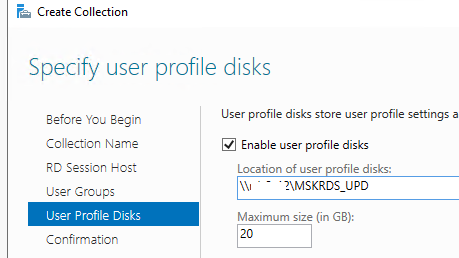
- На вкладке User Profile Disk нужно указать, хотите ли вы использовать формат UPD для хранения профилей пользователей (Enable user profile disks). В поле Location of user profile disks укажите UNC путь к сетевому каталогу(например,
\\msk-fs01\mskrds_upd
), в котором будут хранится профили пользователей в форматер UPD виртуальных дисков (в этом случае при входе на любой сервер коллекции RDS, пользователь будет всегда загружать свой профиль) и максимальный размер диска (20 Гб по умолчанию);
- Нажмите Create чтобы создать новую RDS коллекцию;
- Убедитесь, что в указанном каталоге создался UPD файл с шаблоном профиля пользователя UVHD-template.vhdx.
Чтобы задать параметры коллекции RDS, выберите ее и нажмите Tasks -> Edit Properties.
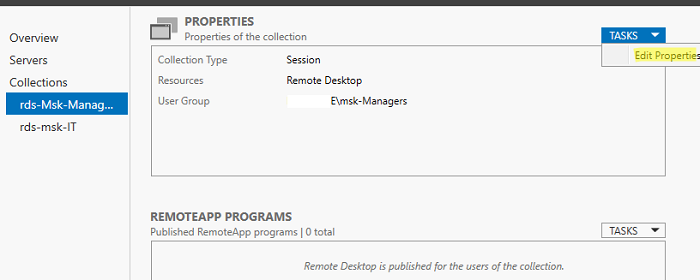
Здесь можно изменить базовые параметры коллекции (имя, описание, группы доступа) и ряд других важных настроек.
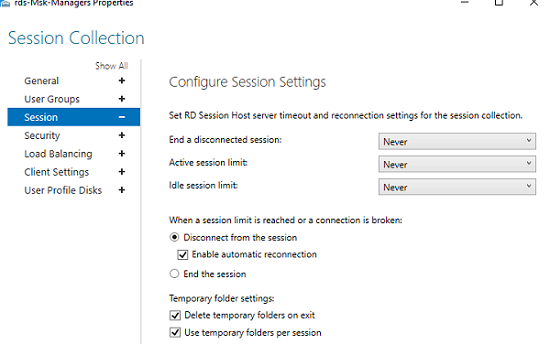
В разделе Session можно задать параметры переподключения/ автоматического отключения простаивающих RDP сессий (подробнее рассматривалось в статье Настройка таймаутов для RDP сессий).
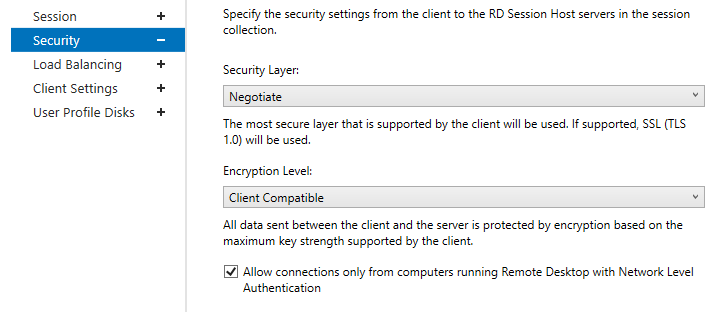
На вкладке Security можно выбрать настройки безопасности (Negotiate, RDP Security level или SSL/TLS) и шифрования (Low, High, Client compatible или FIPS compliant) для сессий RDP. Здесь также можно включить/отключить Network Level Authentication для RDP.
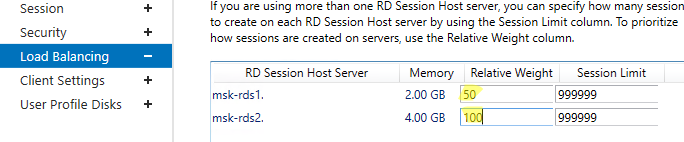
В секции Load Balancing можно изменить веса (
Relative Weight
) RDSH хостов в вашей ферме. Если характеристики серверов (RAM, CPU) в коллекции сильно отличаются, нужно задать меньший вес для менее производительных серверов. В этом случае RDCB будет распределять сессии пользователей по серверам в зависимости от их веса.
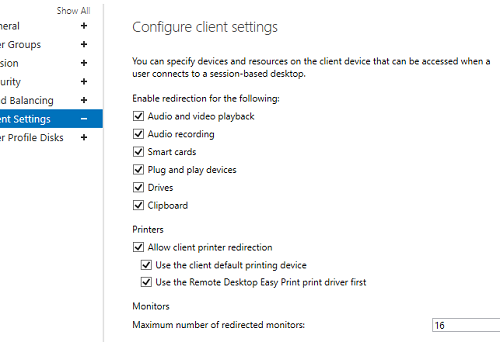
На вкладке Client Settings можно указать, какие устройства пользователям разрешено пробрасывать в RDP сессию. Например, вы можете разрешить/запретить пробрасывать с локального компьютера пользователя в RDS сеанс принтера, сетевые диски, аудио устройства, буфер обмена.
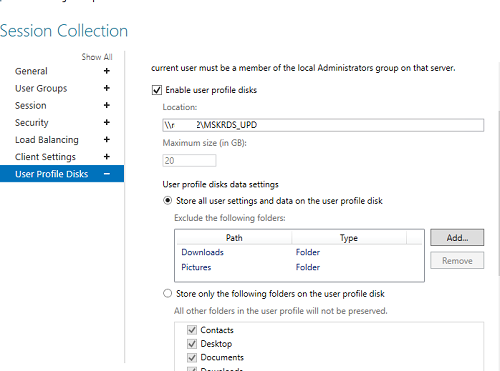
В разделе User Profile Disks можно более тонко настроить параметры UPD профилей пользователей. Можно исключить из синхронизации определенные папки или файлы. Это позволит уменьшить размер профиля UPD в сетевом каталоге и увеличить скорость загрузки профиля (не забывайте, что он загружается по сети из сетевой папки при входе пользователя).
Настройка и эксплуатация UPD обычно гораздо проще, чем использование перемещаемых профилей или folder redirection. Один UPD профиль не может использоваться в разных коллекциях RDS.
Для уменьшения размера UPD диска пользователя можно использовать стандартный PowerShell командлет
Resize-VHD
, используемый для изменения размеров виртуальных VHDX дисков Hyper-V.
В секции HOST SERVERS коллекции RDS можно перевести любой сервер фермы в режим обслуживания RDSH (Drain Mode). Для этого щелкните по нему и выберите Do not allow new connection. В результате Connection Broker не будет отправлять новые подключения пользователей на этот сервер. В таком режиме вы можете спокойно установить обновления Windows или обновлять на сервере приложения, не затрагивая пользователей.
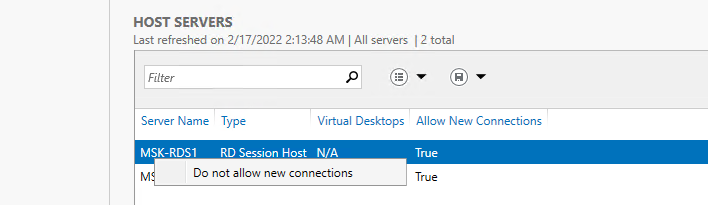
Здесь же можно добавить/удалить RDS Host из коллекции.
Если RDSH хост вышел из строя и не доступен, его можно корректно удалить из фермы Remote Desktop Services по этой инструкции.
Публикация RemoteApp в Remote Desktop Services
RemoteApps – это опубликованные для пользователей приложения на RDS серверах. Благодаря RemoteApp можно использовать приложения, установленные на терминальном RDSH сервере так, как будто оно запущено непосредственно на компьютере пользователя. Пользователь не видит всего рабочего стола Windows Server RDS и работает только с теми программами, которые опубликовал для него администратор. На компьютере пользователя будет отображаться только окно запущенной на RDS программы.
Если вы не создаете RemoteApp, пользователи будут работать непосредственно на собственных рабочих столах на Windows Server. Поэтому не забудьте скопировать все необходимые пользователю ярлыки приложений в папку C:\Users\Public\Desktop. Файлы из этой папки будут отображаться на рабочем столе всех пользователей. Если вы устанавливаете на RDSH пакет MS Office 365, обратите внимание что Office нужно разворачивать в режиме SharedComputerLicensing.
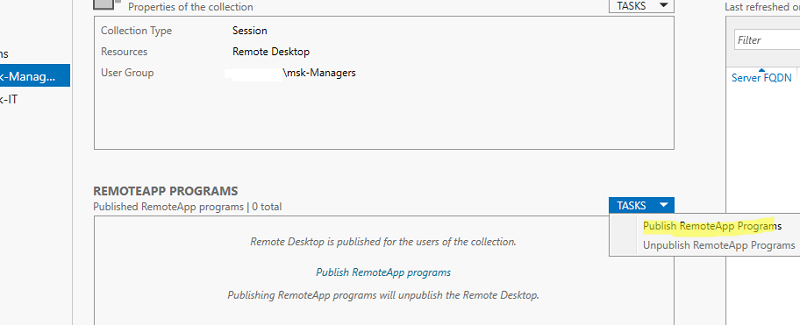
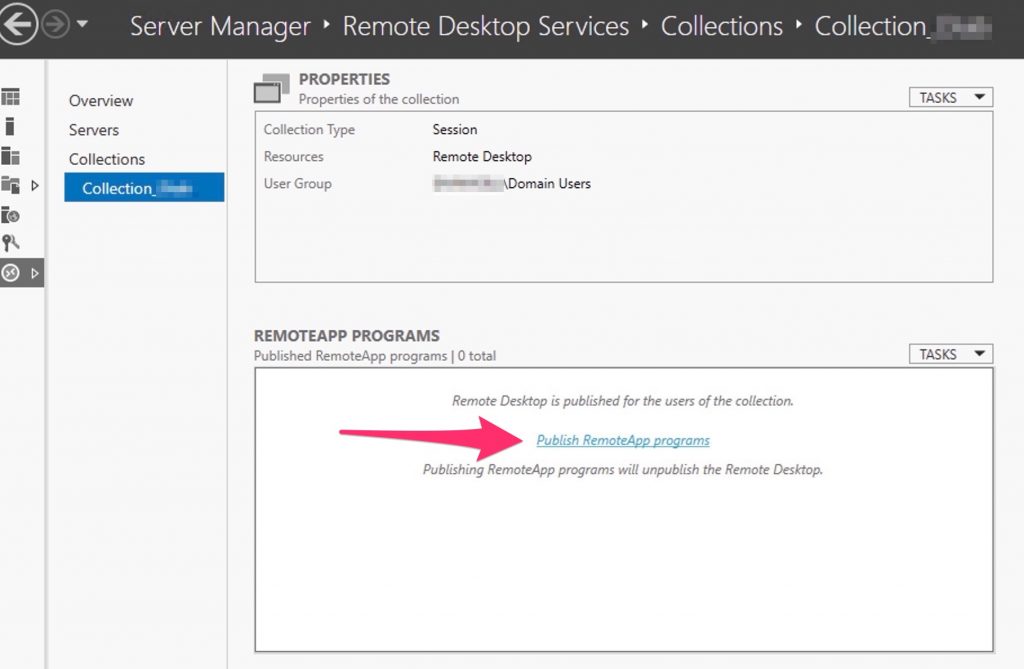
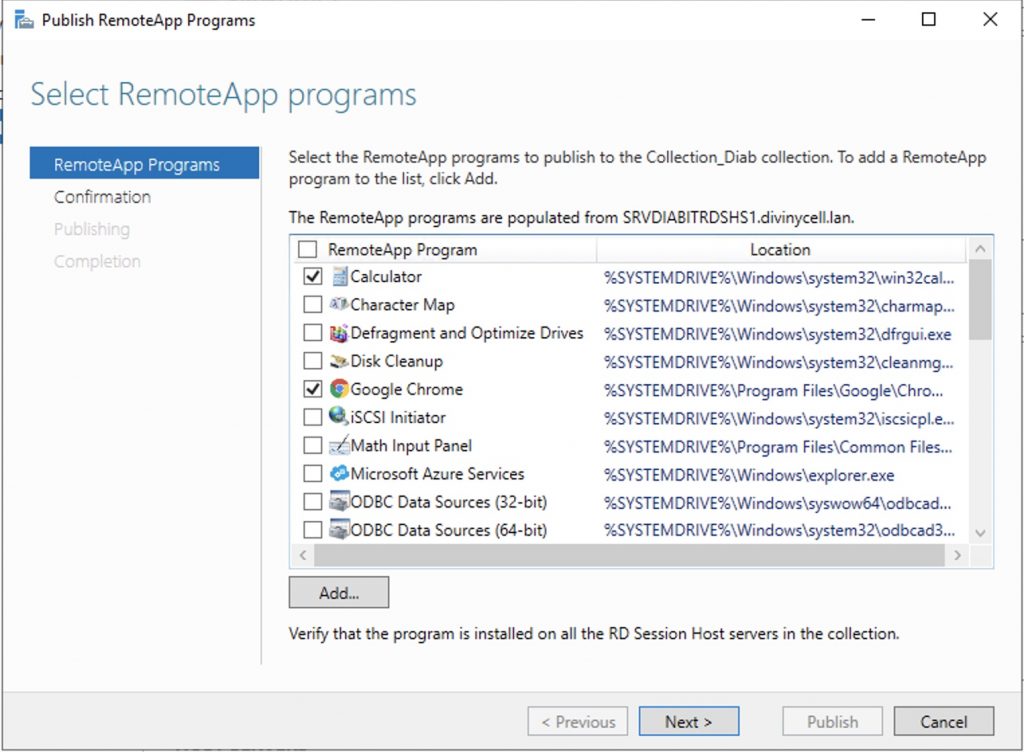
RemoteApp приложения создаются в настройках коллекций RDS. Выберите пункт Tasks -> Publish RemoteApp Programs в секции REMOTEAPP PROGRAMS.
Windows отобразит все приложения, установленные на текущем сервере. Можете выбрать одно из них. Если вашего приложения нет в списке, но оно установлено на других хостах RDS, нажмите кнопку Add и укажите полный путь к исполняемому файлу приложения (exe, bat, cmd и т.д.).
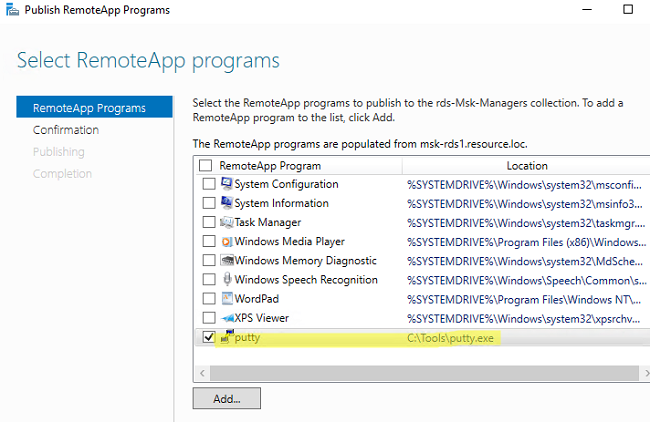
Опубликуйте приложение RemoteApp.
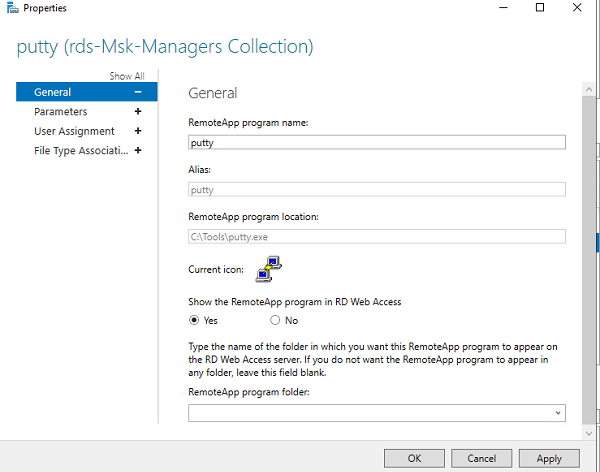
Затем в настройках RemoteApp можно указать дополнительные параметры приложения.
- Нужно ли показывать опубликованное RemoteApp приложение в веб интерфейсе RD Web Access;
- Задать параметры запуска (аргументы) приложения (Command-line Parameters -> Always use the following command-line parameters);
- На вкладке User Assignment можно дополнительно ограничить каким группам пользователей разрешено запускать приложение.
Если вы хотите изменить иконку опубликованного RemoteApp, нужно открыть следующую папку на сервере с ролью RDS Connection Broker:
C:\Windows\RemotePackages\CPubFarms\rds-Msk-Managers\CPubRemoteApps
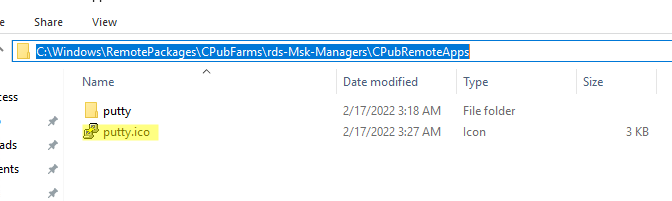
Замените иконку приложения другим ico файлом.
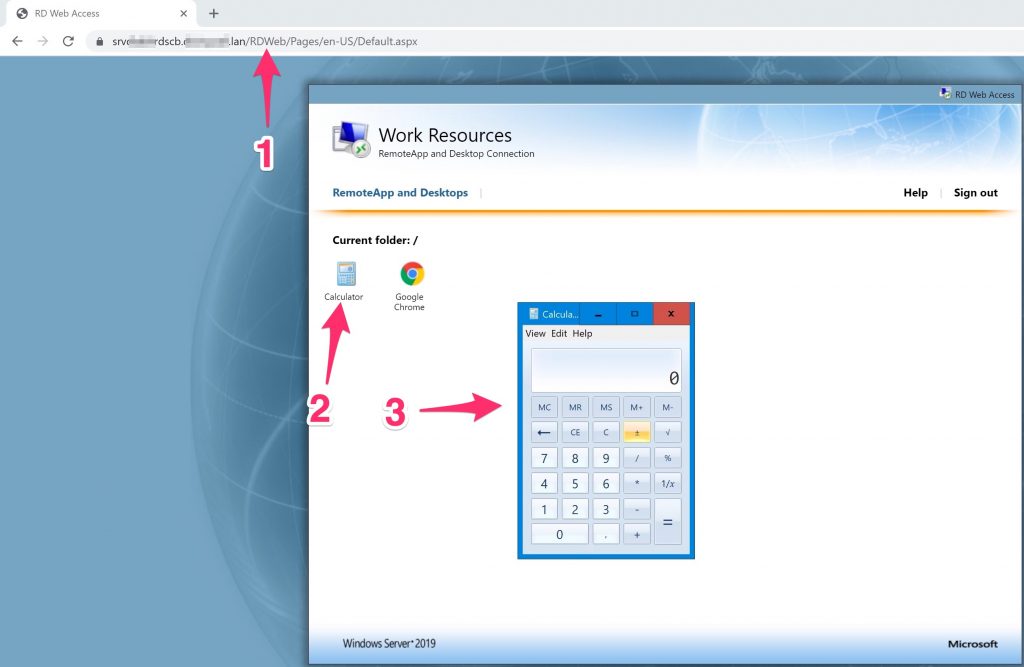
Теперь пользователь может запустить RemoteApp приложение из RD Web Access (
https://msk-rdsman.wintpro.ru/RDWeb
) или с помощью специального RDP файла.
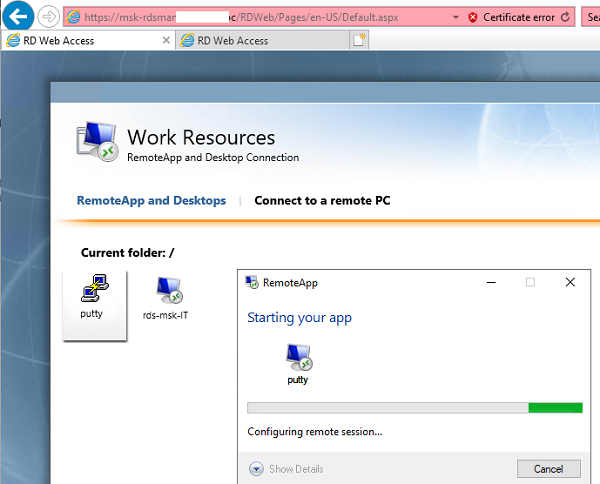
Для запуска опубликованного приложения RemoteApp, нужно добавить в RDP файл такие строки:
remoteapplicationmode:i:1
remoteapplicationname:s:putty
remoteapplicationprogram:s:"C:\Tools\putty.exe"
disableremoteappcapscheck:i:1
alternate shell:s:rdpinit.exe
Несколько полезных мелочей для удобной эксплуатации фермы RDS:
- Для роли RDWeb можно настроить поддержку HTML5, это позволит пользователям подключаться к RDS серверам из любого браузера и ОС даже без клиента RDP;
- На веб сервере RD Web Access можно опубликовать ссылку на смену истекшего пароля пользователя (по умолчанию при включенном NLA вы не сможете аутентифицироваться на RDSH с истекшим паролем пользователя Active Directory);
- Инструкция для пользователей по смене пароля в RDP сессии;
- Администратор может использовать теневые подключения RD Session Shadow для подключения/просмотра рабочего стола сеанса пользователя на сервере RDS;
- Чтобы быстро найти, на каких RDS серверах есть сессии определенного пользователя, можно использовать PowerShell:
Import-Module RemoteDesktop
Get-RDUserSession -ConnectionBroker msk-rdsman.winitpro.ru | where {$_.UserName -eq "a.ivanov"} | Select HostServer - Вы можете использовать PowerShell скрипты для просмотра и анализа логов RDP подключений пользователей к серверам RDS;
- Для дополнительной защиты можно настроить двухфакторную аутентификацию (2FA) пользователей на RDS серверах Windows с помощью сторонних средств.
Настройка фермы Remote Desktop services с помощью PowerShell
Если вы четко представляете себе концепцию RDS фермы, вы можете быстро разворачивать RDS конфигурацию с помощью PowerShell.
Следующие PowerShell команды для создания RDS фермы лучше запускать с другого на другом сервера, т.к. управляемые RDS хосты придется перезагружать.
Задайте имена серверов в вашей ферме RDS. В этом примере я установлю роли RDCB и RDS Licensing на отдельный сервер (в дальнейшем рекомендуется настроить отказоустойчивую конфигурацию RDCB).
$RDSH1 = "msk-rds1.winitpro.ru"
$RDSH2 = "msk-rds2.winitpro.ru"
$RDSCB = "msk-rdcb.winitpro.ru"
$RDSGW = "msk-rdsgw.winitpro.ru"
Import-Module RemoteDesktop
Установите RDS роли на сервера:
Add-WindowsFeature –ComputerName $RDSH1, $RDSH2 -Name RDS-RD-Server –IncludeManagementTools
Add-WindowsFeature –ComputerName $RDSCB -Name RDS-Connection-Broker -IncludeManagementTools
Add-WindowsFeature –ComputerName $RDSGW -Name RDS-Web-Access, RDS-Gateway –IncludeManagementTools
Перезагрузите все хосты:
Restart-Computer -ComputerName $RDSH1,$RDSH2,$RDSCB,$RDSGW
Создайте новый инстанс RDSessionDeployment:
New-RDSessionDeployment -ConnectionBroker $RDSCB -SessionHost $RDSH1,$RDSH2 –Verbose
Добавить в ферму сервера RDWA и RDGW:
Add-RDServer -Server $RDSGW -Role RDS-WEB-ACCESS -ConnectionBroker $RDSCB
Add-RDServer -Server $RDSGW -Role RDS-GATEWAY -ConnectionBroker $RDSCB -GatewayExternalFqdn "rds.winitpro.ru"
Текущее распределение RDS ролей по серверам фермы можно вывести так:
Get-RDServer -ConnectionBroker $RDSGW
Установка роли лицензирования RDS:
Add-WindowsFeature –ComputerName $RDSCB -Name RDS-Licensing, RDS-Licensing-UI
Задайте режим лицензирования PerUser:
Invoke-Command -ComputerName $RDSCB -ScriptBlock {Set-RDLicenseConfiguration -Mode PerUser -LicenseServer $RDSCB -ConnectionBroker $RDSCB}
Add-RDServer -Server $RDSCB -Role RDS-LICENSING -ConnectionBroker $RDSCB
Добавить сервер лицензирования в доменную группу с помощью Add-ADGroupMember:
Add-ADGroupMember "Terminal Server License Servers" -Members "msk-rdcb$"
Если у вас есть сертификат для RDS можно его добавить в конфигурацию фермы (можно использовать бесплатный SSL сертификат Let’s Encrypt для вашего RDS хоста):
Path = "C:\ps\RDSCert.pfx"
$Password = ConvertTo-SecureString -String "CertPAssddr0w11-" -AsPlainText -Force
Set-RDCertificate -Role RDGateway -ImportPath $Path -Password $Password -ConnectionBroker $RDSCB -Force
Set-RDCertificate -Role RDWebAccess -ImportPath $Path -Password $Password -ConnectionBroker $RDSCB -Force
Set-RDCertificate -Role RDPublishing -ImportPath $Path -Password $Password -ConnectionBroker $RDSCB -Force
Set-RDCertificate -Role RDRedirector -ImportPath $Path -Password $Password -ConnectionBroker $RDSCB -Force
Информацию об установленных SSL сертификатах можно получить так:
Get-RDCertificate
Теперь можно создать коллекции RDS:
$CollectionName = "DEVdept"
New-RDSessionCollection –CollectionName $CollectionName –SessionHost $RDSH1,$RDSH2 –ConnectionBroker $RDSCB –CollectionDescription “Develovers”
Разрешить доступ к RDS серверам для групп:
$UserGroup =@("WINITPRO\msk-developers","WINITPRO\msk_devops")
Set-RDSessionCollectionConfiguration -CollectionName $CollectionName -UserGroup $UserGroup
Опубликовать приложение RemoteAPP:
New-RDRemoteapp -Alias GoogleChrome -DisplayName GoogleChrome -FilePath "C:\Program Files (x86)\Google\Chrome\Application\chrome.exe" -ShowInWebAccess 1 -CollectionName $CollectionName -ConnectionBroker $RDSCB
В статье мы рассмотрели, как установить и настроить ферму Remote Desktop Services на базе Windows Server 2019/2022 с помощью графического интерфейса Server Manager и с помощью PowerShell. За рамками статьи осталось более подробное описание ролей RD Web Access и RD Gateway. Мы рассмотрим настройку этих ролей отдельно в следующих статьях.
A step by step guide to build a Windows Server 2019 Remote Desktop Services deployment.
I posted this before based on Windows Server 2012 R2 RDS and thought it was high time to update this post to a more modern OS version.
I will provide all the steps necessary for deploying a single server solution using the GUI tools.
Although it is called a single server installation, we will need 2 servers as shown below.
Software used in this guide:
Windows Server 2019 ISO (evaluation can be downloaded here: https://www.microsoft.com/en-us/evalcenter/evaluate-windows-server-2019).
SQL Server 2017 Express x64 (free version can be downloaded here: https://www.microsoft.com/en-us/download/details.aspx?id=55994).
SQL Server 2016 Native Client (free version can be downloaded here: https://www.microsoft.com/en-us/download/details.aspx?id=52676. After clicking the download button select ENU\x64\sqlncli.msi). Although I’m installing SQL Express 2017, there are no newer client tools available.
SQL Server Management Studio (free, and can be downloaded here: https://docs.microsoft.com/en-us/sql/ssms/download-sql-server-management-studio-ssms).
And a certificate. I got mine for free from https://www.sslforfree.com/. This certificate needs to contain the FQDN you will use as the RD Web Access URL (mine is rds.it-worxx.nl in this guide). It needs to be in .pfx format and you need to have the private key in it.
This guide will not focus on building a domain using a single domain controller and adding the second server as a member server to this domain.
Also some basic knowledge is assumed in this guide. I will not detail how to create a Security Group and adding a computer account to it. I will also not detail how to install SQL Express, or adding logins to a SQL Server Instance security context. If you need extra help with this, Bing it or drop me a mail with details, and I will provide steps to continue.
I will be using Hyper-V on my Windows 10 1809 laptop and I have prepared 2 servers:
ITWDC (1 vCPU, 1024MB memory, dynamic, 60GB Harddisk)
Installed Windows
IPv4 192.168.0.4/24
Added .NET Framework 3.5 as a feature
Added Active Directory Domain Services as a role
Configured this server as a Domain Controller in a new forest: it-worxx.lab
ITWRDS (1 vCPU, 1024MB memory, dynamic, 60GB Harddisk)
Installed Windows
Added .NET Framework 3.5 as a feature
IPv4 192.168.0.10/24, DNS server 192.168.0.4
Configured it as a member server in the it-worxx.lab domain
Installing the Remote Desktop Services Roles
Log on to the Domain Controller, and in Server Manager right-click the All Servers node and add the second server using the Add Servers command (or select the All Servers node, click Manage and click Add Servers).

Now that all servers needed in this deployment scenario are present, click Manage, and click Add Roles & Features.
Before you begin

Click Next.
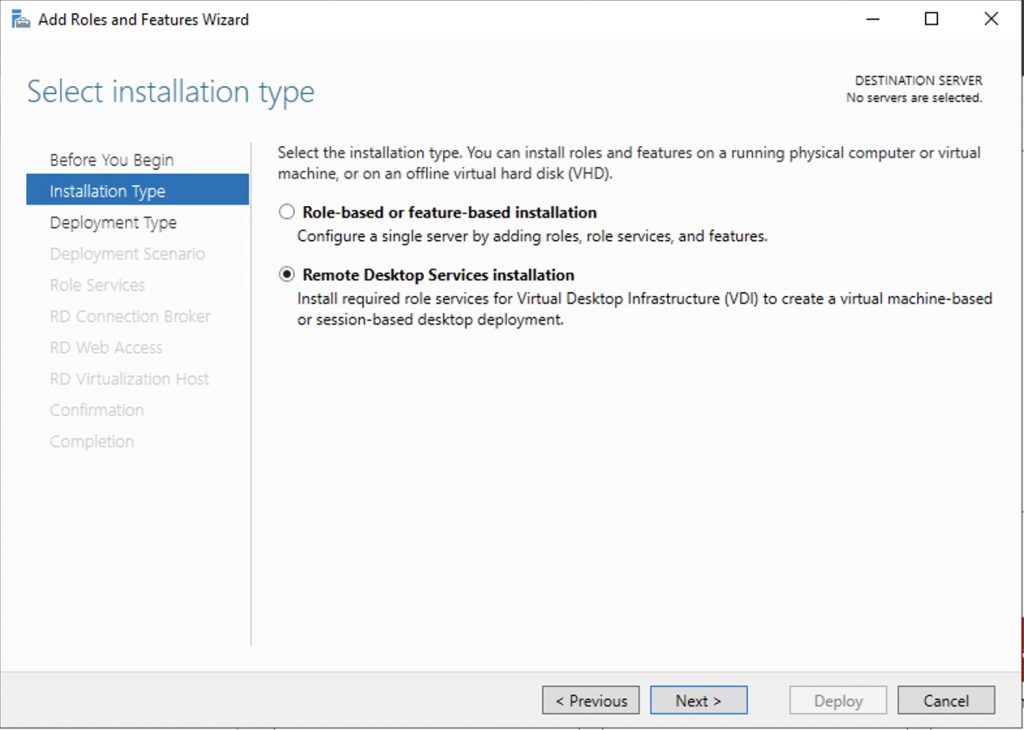
Select Installation Type

Select Remote Desktop Services installation.
Click Next.
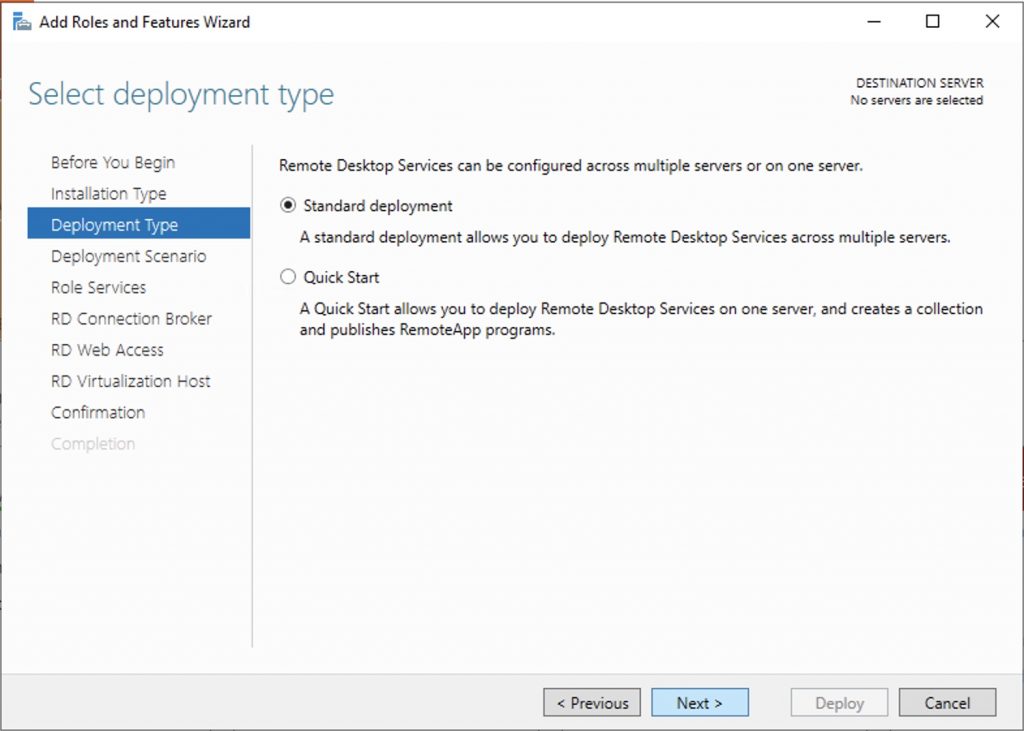
Select Deployment Type

Although Quick Start might be a valid option for a single server deployment, leave the default selected. This will explain the steps necessary to install Remote Desktop Services in greater detail.
Click Next.
Select Deployment Scenario

Select Session-based desktop deployment.
Click Next.
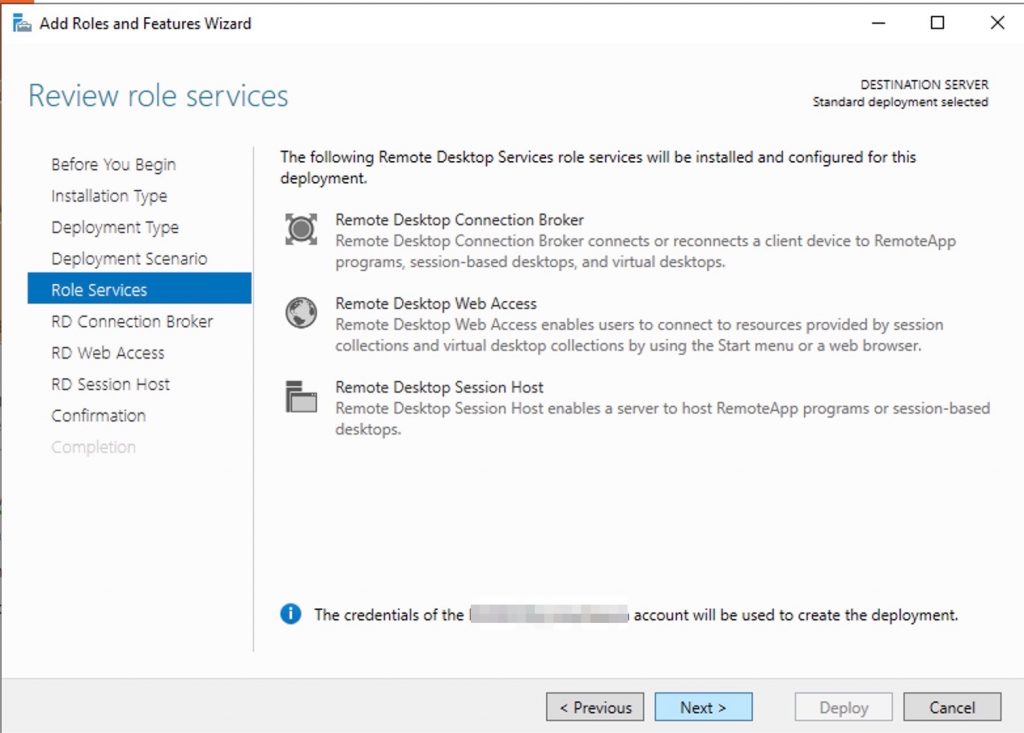
Review Role Services

Review the services that will be installed.
Click Next.
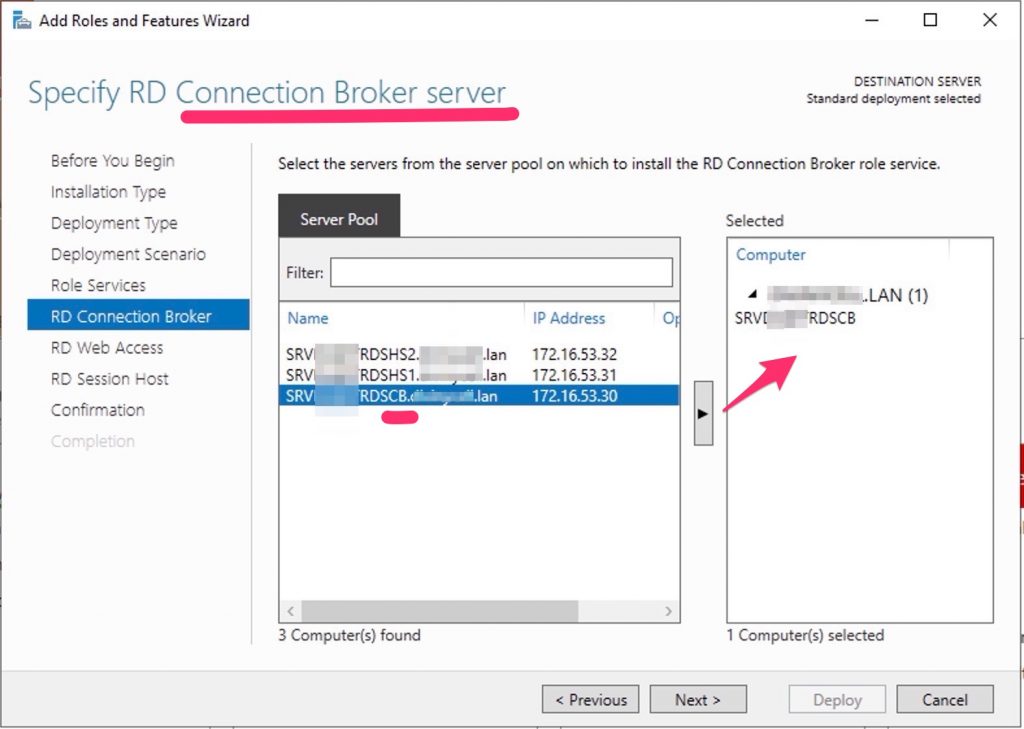
Specify RD Connection Broker server

Click the member server and click the Add button.
Click Next.
Specify RD Web Access server

Check Install the RD Web Access role on the RD Connection Broker server.
Click Next.
Specify RD Session Host server

Click the member server and click the Add button.
Click Next.
Confirm selections

Check Restart the destination server automatically if required.
Click Deploy.
View progress

Wait until all role services are deployed and the member server has restarted.
Click Close.
In Server Manager click Remote Desktop Services and scroll down to the overview.

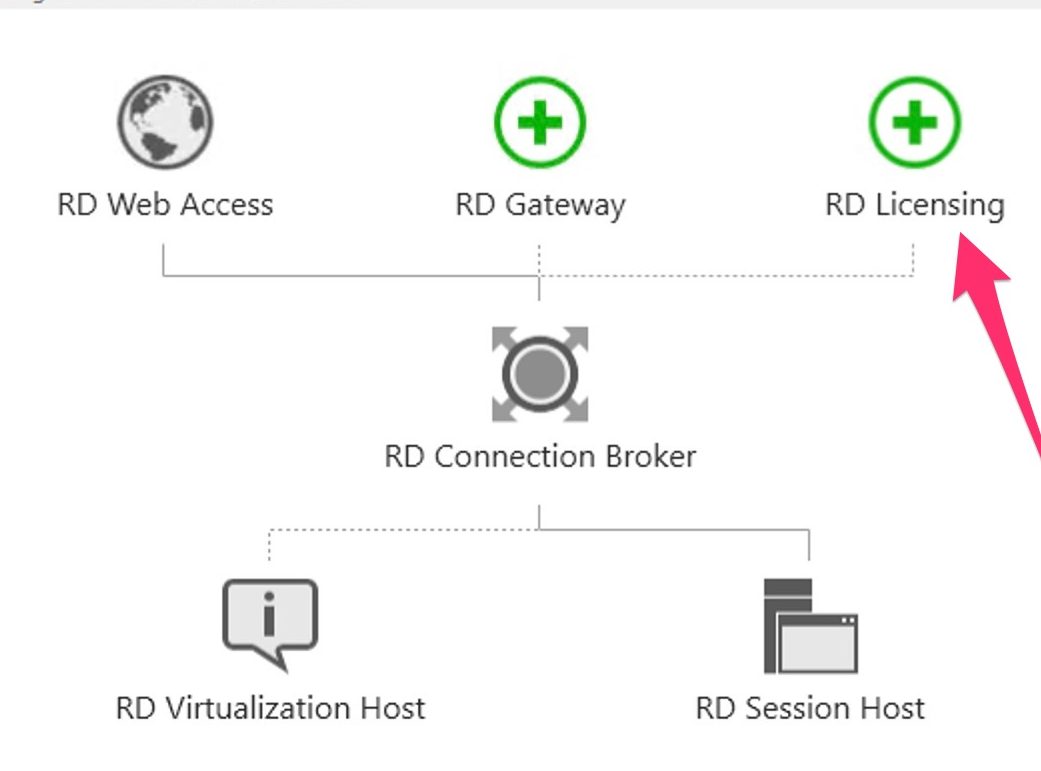
As you can see the deployment is missing a RD Gateway server and a RD Licensing server.

Click the Add RD Licensing server button.
Select a server

Click the domain controller and click the Add button.
Click Next.
Confirm selections

Click Add.
View progress

Wait until the role service is deployed. No restart is needed.
Click Close.

Click the Add RD Gateway server button.
Select a server

Click the member server and click the Add button.
Click Next.
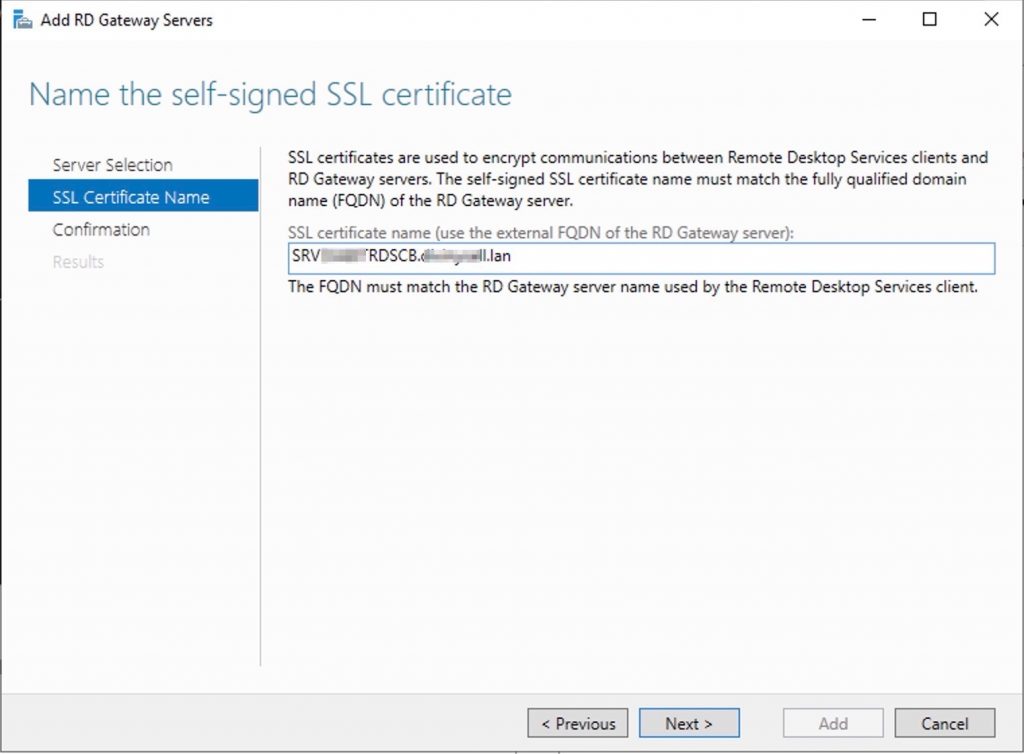
Name the self-signed SSL certificate

The wizard creates a self-signed certificate. We will deal with certificates in this deployment in a little bit. We will replace the self-signed certificate.
Enter the external Fully Qualified Domain Name which you will also use for the Web Access URL. In my case, for lack of a better name, I used “rds.it-worxx.nl”. I didn’t want to use “remote.it-worxx.nl” or “desktop.it-worxx.nl” or anything else.
Click Next.
Confirm selections

Click Add.
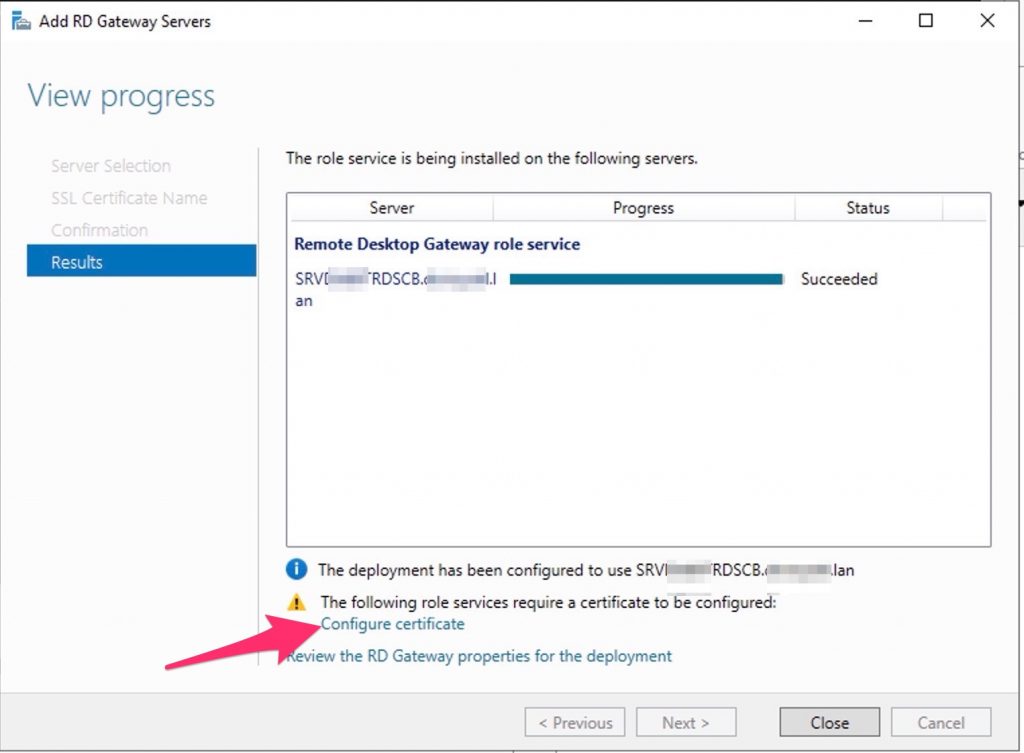
View progress

Wait until the role service is deployed. Again, no restart is needed.
Notice that “rds.it-worxx.nl” was configured for the deployment.
Also notice that even more certificate configuring is needed, but we’ll get to that later. Pay no attention to it for now. The same goes for the RD Gateway properties for the deployment. We’ll get to that later.
Click Close.
Review role installation and setting License Mode
Let’s have a quick look at the configuration we have so far.

In Server Manager, Remote Desktop Services, Overview, click Tasks and click Edit Deployment Properties.
Configure the deployment

Review the RD Gateway settings and notice what settings are available.
Click RD Licensing.
Configure the deployment

Notice that an RD License server is available, but no license type is selected yet.
I selected Per User, but since this is just a guide setup, it really doesn’t matter.
Click RD Web Access.
Configure the deployment

By default the RD Web Access IIS application is installed in /RdWeb.
If you want to know how to change this, check another post: https://msfreaks.wordpress.com/2013/12/07/redirect-to-the-remote-web-access-pages-rdweb/
This is for Windows Server 2012 R2 RDS, but it also works for Windows Server 2019 RDS.
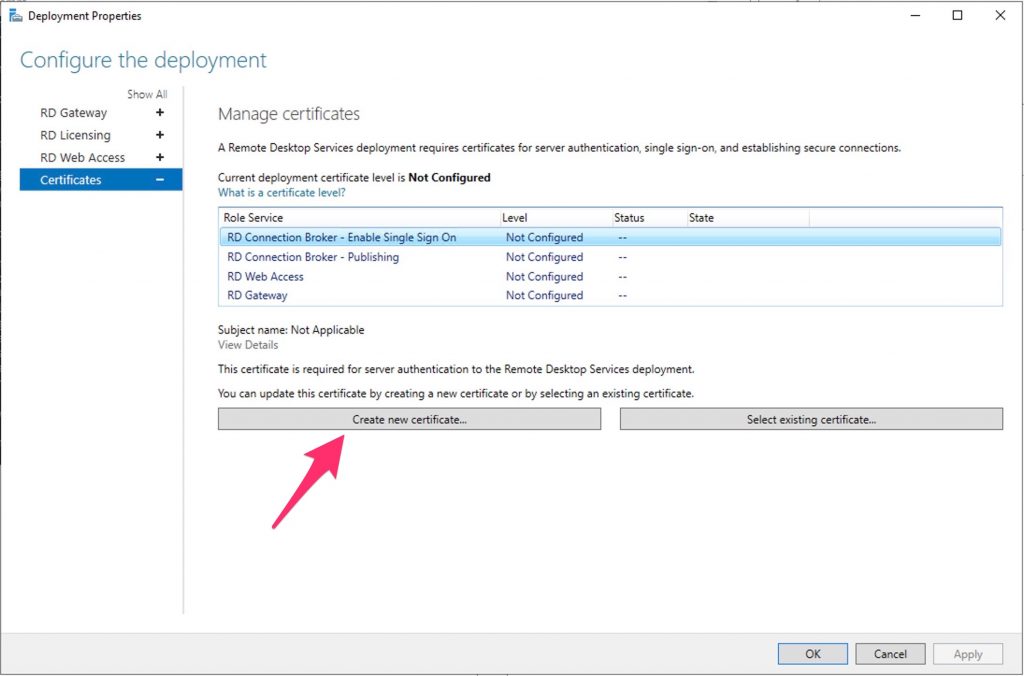
Click Certificates.
Configure the deployment

Notice that the certificate level currently has a status of Not Configured.
As you can see, certificates are used for different goals within the deployment.
The RD Gateway certificate is used for Client to gateway communication and needs to be trusted by the clients. Either install the self-signed certificate on all clients, or use a certificate for which the complete certificate chain is already trusted by all clients. As it said in the wizard, the external FQDN should be on the certificate.
The RD Web Access certificate is used by IIS to provide a server identity to the browser clients.
The RD Connection Broker actually has two goals for which it needs certificates. To enable single sign on (server to server authentication), and for publishing (signing RDP files). If you look in the deployment you’ll see that the Connection Broker is now configured to use “itwrds.it-worxx.lab”, so we have to change it to use an external FQDN as well.
If we use the same FQDN for all goals described above, we need only 1 certificate, and only 1 external IP address.
We’ll come back to this wizard later to assign the certificate. First order of business is to change the internal FQDN for the Connection Broker to an external FQDN.
Click OK (no reason why we shouldn’t commit the change we made on the licensing tab, remember?)
Changing the Connection Broker FQDN to an externally resolvable FQDN
Open DNS Manager on the domain controller and browse to Forward Lookup Zones.

Right click Forward Lookup Zones and click New Zone… Go through this wizard accepting the defaults until you have to enter a Zone Name.

Enter the external FQDN which will also be used by the Connection Broker.
Finish the rest of the wizard accepting the defaults.
Browse to the newly created zone.

Right click the newly created zone and click New Host (A or AAAA)…
New Host
Leave the Name field blank, but enter the member server’s (holding the RD Connection Broker role) IPv4 address.
Click Add Host.
Now the configuration will be able to resolve “rds.it-worxx.nl” to the server holding the Connection Broker role, and this will work because “rds.it-worxx.nl” is also on the certificate that we will configure later.
Create a new Global Security Group called “RD Connection Brokers” and add the computer account for the member server to it as a group member.
We need this group to be able to convert the RD Connection Broker to a highly available RD Connection Broker. You’ll see why we need to do this in a few steps.
Reboot the member server to let it know it’s a member of the RDS Connection Brokers security group.
The next steps in re-configuring the RD Connection Broker depend on an SQL database shared by all Connection Brokers in the deployment. Without this configuration the RD Connection Broker will rely on the Windows Internal Database that was created during the initial deployment of the roles.
Install SQL Express on the Domain Controller (or use an existing SQL Server if you already have one).
It’s not best practice to install SQL onto a Domain Controller, but it’ll do for this guide.
Here’s a list of needed features:


Use the Default Instance (so click Default, and do not leave the wizard’s selection on Named instance: SQLEXPRESS).

Set the SQL Service to start using SYSTEM because the default account of SQLSERVER cannot be used on a Domain Controller.
When the installation is done open SQL Configuration manager and browse to Client Protocols under SQL Native Client 11.0 Configuration.

Check if TCP/IP is enabled under Client Protocols. SQL Express install enables this by default, but check it just to be sure, especially if you use an existing SQL Server.
Browse to Protocols for MSSQLSERVER under SQL Server Network Configuration.

Enable TCP/IP. If this is a new SQL installation, this will be disabled by default.
Restart the SQL Server service if you changed this setting.
On the SQL Server, make sure port 1433 is not being blocked by Windows Firewall.

I added the SQL Server executable to the exception list to allow all inbound traffic, but TCP 1433 inbound should suffice.
If you installed SQL Server using the default folder locations, the sqlservr.exe executable is found in “C:\Program Files\Microsoft SQL Server\MSSQL14.MSSQLSERVER\MSSQL\Binn”.
Open SQL Server Management Studio, connect to the default instance on the Domain Controller and browse to Logins under Security.

Remember the Management Studio is no longer available with the SQL Server download, but is a different download.
Right click Logins and click New Login…
Login – New

Click Search…
Select User, Service Account, or Group

Click Object Types… and select Group.
Type the RDS Connection Brokers security group name and click Check Names.
Click OK.
Login – New

Click Server Roles and select dbcreator.
Click OK.
We have just effectively granted the RDS Connection Broker server the right to create databases.
We need this because the RDS Connection Broker service will try to migrate from WID (Windows Internal Database to a (high available) SQL Server instance when we convert the Broker to a high available broker.
Install the SQL Native Client on the member server (Client Components only). If you used the member server in this setup to install the SQL Management Studio, you can skip this step because the Native Client was installed with installing the Management Studio.
Everything we need is in place to convert the RD Connection Broker, so let’s do just that.
In Server Manager click Remote Desktop Services and scroll down to the overview.

Right click RD Connection Broker and click Configure High Availability.
Before you begin

So we’re building a single node cluster here 
Look at the pre-requisites.
If you have more than one RD Connection Broker they need to be configured using DNS Round Robin.
Click Next.
Configure RD Connection Broker for High Availability

Since we just installed an SQL Server for this, leave the default selected. You’d use the other option for instance if you’d like to use Azure SQL for this deployment.
Click Next.
Configure RD Connection Broker for High Availability

DNS name for the RD Connection Broker cluster:
The DNS Zone name we configured in DNS earlier: rds.it-worxx.nl
Connection string:
DRIVER=SQL Server Native Client 11.0;SERVER=ITWDC;Trusted_Connection=Yes;APP=Remote Desktop Services Connection Broker;DATABASE=ITWRDCB
Folder to store database files:
C:\Program Files\Microsoft SQL Server\MSSQL14.MSSQLSERVER\MSSQL\DATA
I used the instance default folder.
Click Next.
Confirmation

If you get an error before this page:
- Check if TCP/IP is enabled in client protocols and for your instance
- Check if you can reach port 1433 on the SQL Server from the member server
Click Configure.
Progress

If you get an error on this page:
- Check SQL permissions for the security group
- Check if the database path you entered is correct
Click Close.

The RD Connection Broker is now in High Availability Mode, and configured as “rds.it-worxx.nl” and we are finally ready to complete the configuration.
Configuring Certificates

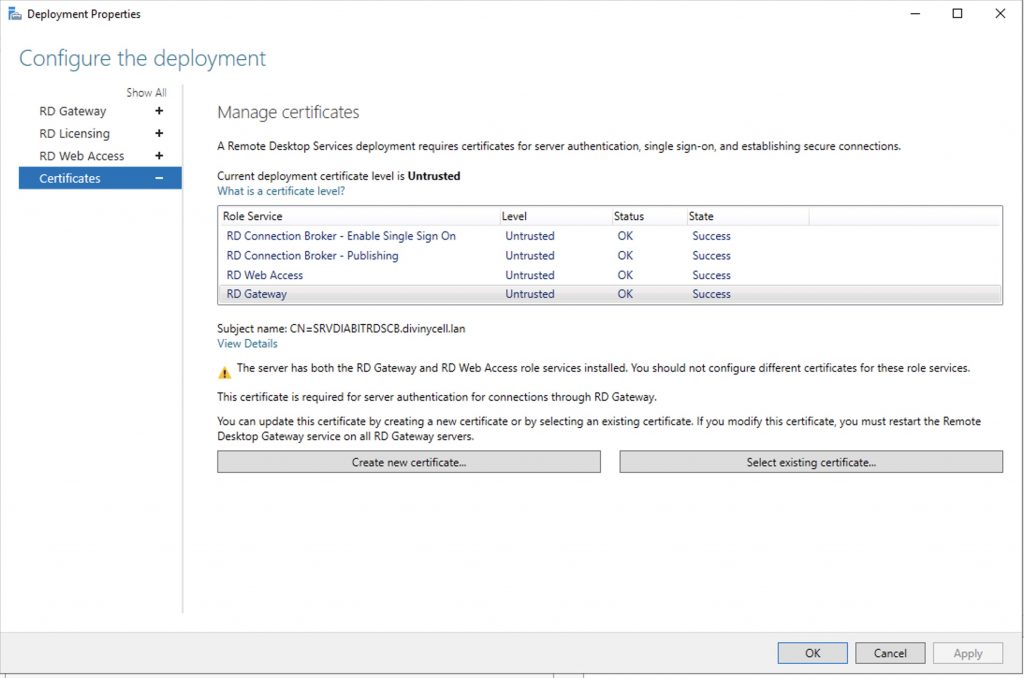
In Server Manager, Remote Desktop Services, Overview, click Tasks and click Edit Deployment Properties, then click Certificates.
Configure the deployment

Click RD Connection Broker – Enable Single Sign On and click Select Existing certificate.

Browse to the .pfx file, enter its password, and check Allow the certificate..
Click OK.

So click Apply. This takes a little while, be patient.
Configure the deployment

Click RD Connection Broker – Publishing and click Select Existing certificate.
Browse to the .pfx file, enter its password, and check Allow the certificate..
Click OK.
Click Apply. This again takes a little while, be a little more patient.
Configure the deployment

Click RD Web Access and click Select Existing certificate.

Note: Did you notice the warning when you select RD Web Access?
Browse to the .pfx file, enter its password, and check Allow the certificate..
Click OK.
Click Apply again. This takes another little while longer, be slightly more patient.
Configure the deployment

Last one. Click RD Gateway and click Select Existing certificate.
Browse to the .pfx file, enter its password, and check Allow the certificate..
Click OK.
Click OK to apply the final certificate step.
Configured all servers, configured certificates..
One thing left to do: Tell our RDS environment exactly what to publish.
Publishing resources to your users
In fact you can use this setup to either provide full desktop sessions on the Session Host, or you can choose to publish only applications on the Session Host.
Let’s publish full desktop sessions.

In Server Manager, Remote Desktop Services, Session Collections, click Tasks and click Create Session Collection.
Before you begin

Review the requirements. This won’t be an issue in this setup, but you could restrict access to this collection by selecting a select group of people.
Click Next.
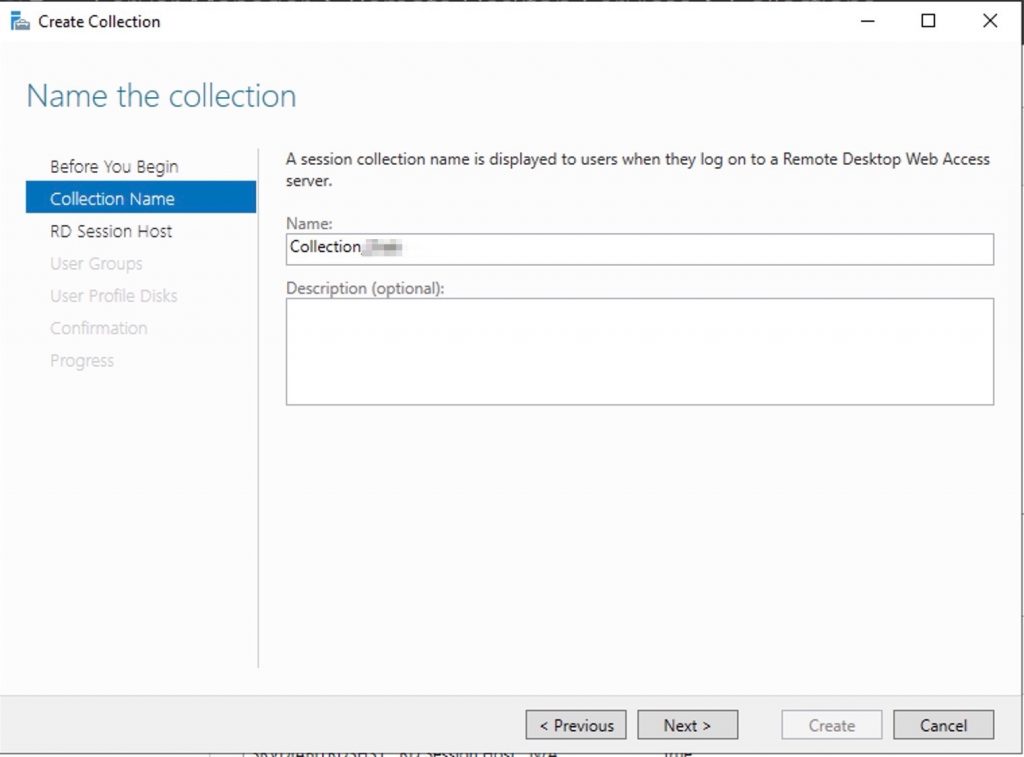
Name the collection

Enter a descriptive name. This name will be displayed under its icon in the Web Access interface.
Click Next.
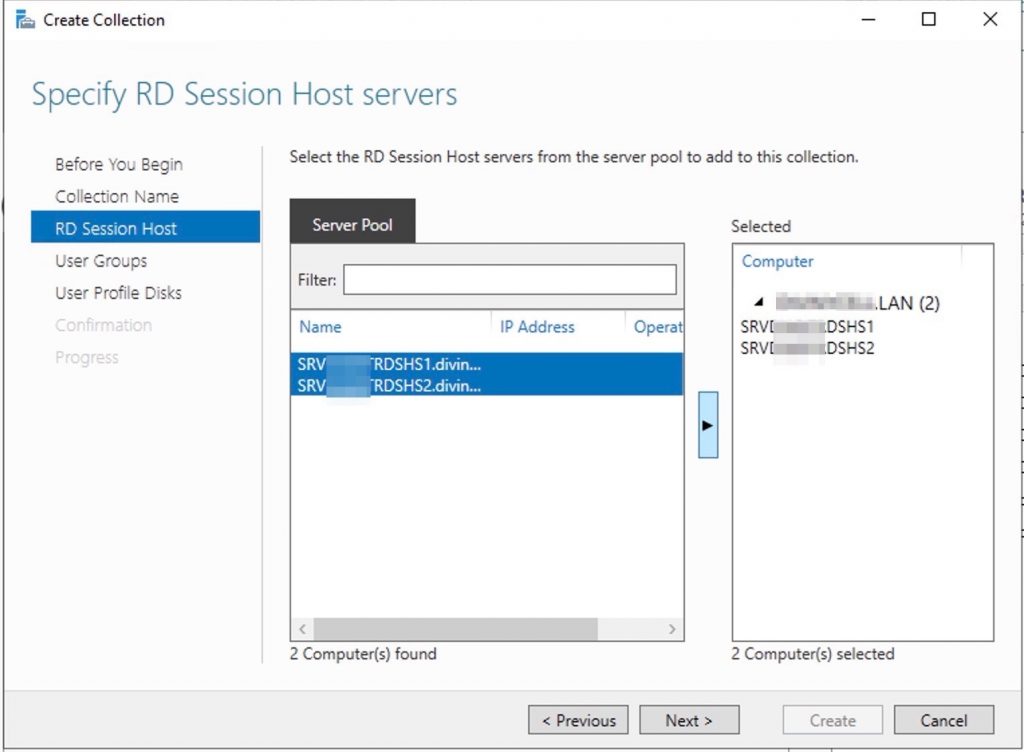
Specify RD Session Host servers

Click the member server and click the Add button.
Click Next.
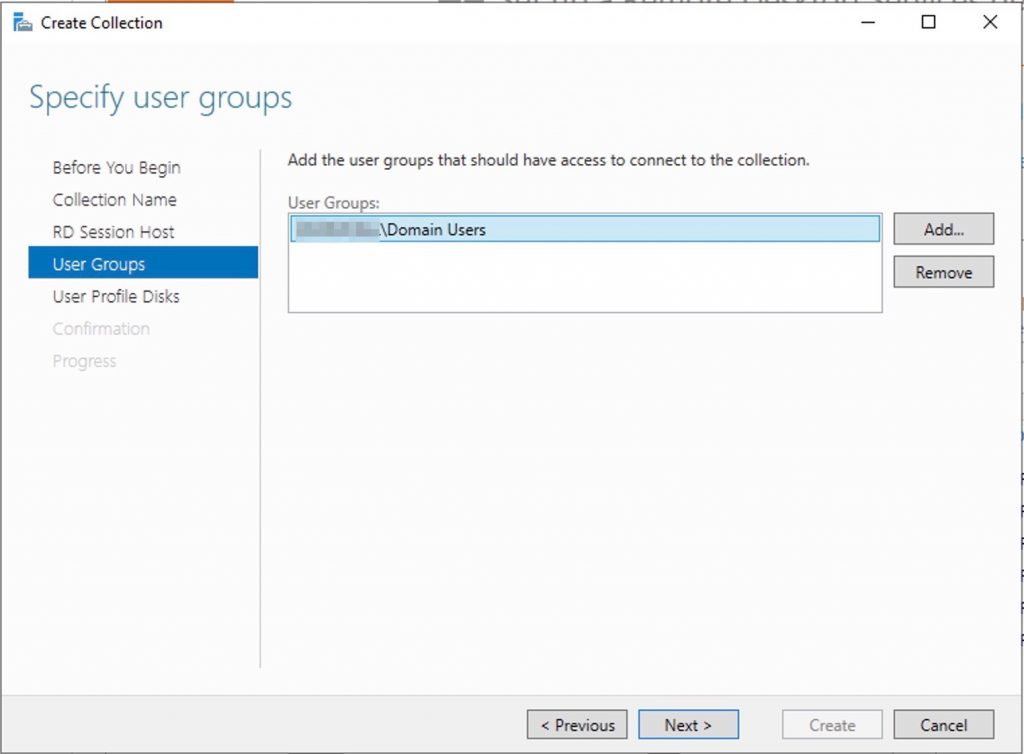
Specify user groups

You can limit access to the resource here if you want. Add one or more groups to restrict access to these groups only. In this setup the default selection of Domain Users will do fine. Groups you specify here will be added to the list of groups of users that are allowed to connect using RDP to the Session Host server(s).
Click Next.
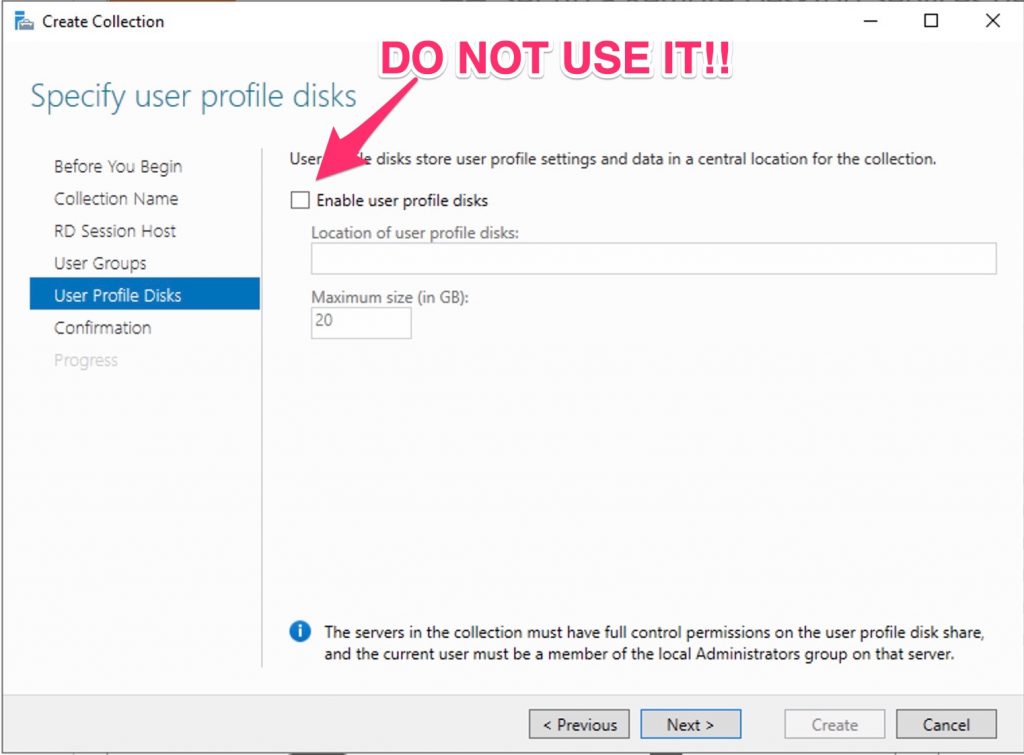
Specify user profile disks

User profile disks are not in focus in this guide. Since I have no file shares configured in this setup, uncheck Enable user profile disks for now.
Click Next.
Confirm selections

Review the information and click Create.
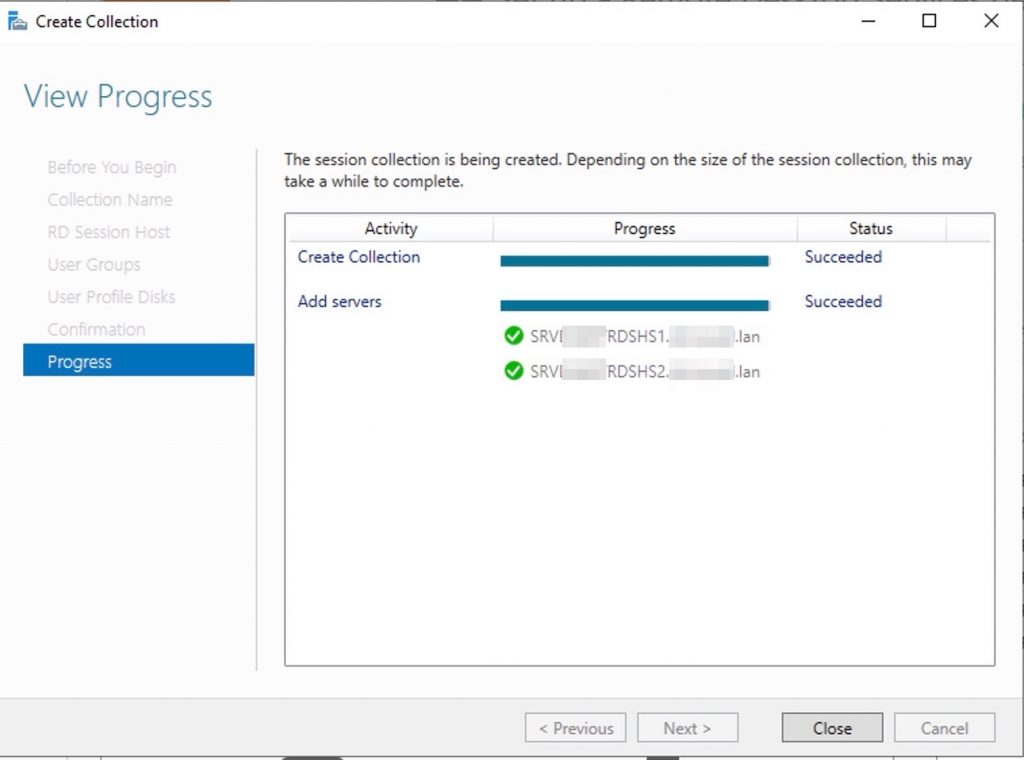
View Progress

Wait until the collection is created and the server is added to the collection.
Click Close.
Time to test the setup!
Testing the setup
On a machine that has access to your test setup (you may have to add the external FQDN to your hosts file if you didn’t publish it to the internet) open https://rds.it-worxx.nl/rdweb

Hey! At least the RD Web Access application works 
Enter a valid username and password (IT-WORXX\username or username@it-worxx.lab).
Create a user for this, or simply use the domain admin account.
Click Sign in.

After logging in you are presented with the full desktop session collection we created.

After clicking the Full Desktop icon you get the warning that devices are going to be redirected.

And when you click Connect, you connect
Enjoy.
Arjan
Минимальная установка
Ресурсы:
- Один сервер RDS01
- Домена нет
Задача
- Обеспечить терминальный доступ к приложениям
Решение
- Установка RDSH и RD Licensing на RDS01
Установка
'RDS-RD-Server','RDS-Licensing' | Install-WindowsFeature -IncludeManagementTools
Настройка
Минимальная установка с отказоустойчивостью
Ресурсы:
- Два сервера RDS01, RDS02
- Домена нет
Задача
- Обеспечить терминальный доступ к приложениям
- Распределять нагрузку между серверами
- Обеспечить доступность приложений в случае выхода из строя одного сервера
Решение
- Установка RDCB, RDSH и RD Licensing на RDS01
- Установка RDCB, RDSH и RD Licensing на RDS02
- Настройка терминальной фермы и
Полноценная ферма
Ресурсы:
- Имеется домен
- 18 серверов RDL1, RDL2, FS1, FS2, RDCB1, RDCB2, RDG1, RDG2, RDWA1, RDWA2, RDS01, RDS02, RDS03, RDS04, RDHV01, RDHV02, RDHV03, RDHV04
Задача
- Обеспечить терминальный доступ к приложениям
- Обеспечить пользователей персональными виртуальными рабочими станциями
- Обеспечить доступ из интернет
- Обеспечить распределение нагрузки
- Обеспечить отказоустойчивость
Решение
RD Licensing: RDL1,RDL2                    Windows Server 2019
Profiles:     FS1,FS2                      Windows Server 2019
RDCB:         RDCB1,RDCB2                  Windows Server 2019 (Desktop Experiense)
RDG:          RDG1,RDG2                    Windows Server 2019 (Desktop Experiense)
RDWA:         RDWA1,RDWA2                  Windows Server 2019 (Desktop Experiense)
RDSH:         RDS01,RDS02,RDS03,RDS04      Windows Server 2019 (Desktop Experiense)
RDHV:         RDHV01,RDHV02,RDHV03,RDHV04  Windows Server 2019 (Desktop Experiense)
The following is a simple guide to implement a Windows 2019 terminal server cluster. In addition to this, I also deal with the activation of the same through the License Service and the setup of a simple Collection.
I hope this guide, even if brief, can be of help to other colleagues!
Let’s start!
1)Setting up a Windows 2019 Remote Desktop Cluster
2)Some Tips
3)Activate the Terminal Services Licensing
1) Setting up a Windows 2019 RDS Cluster
In our environment we have 3 servers :
| Server | Function |
| SRVRDSCB | RD Licensing RD Web Access RD Gateway RD Connection Broker SQL Server Profile Server |
| SRVRDSHS1 | RD Session Host |
| SRVRDSHS2 | RD Session Host |
Before start, add all the servers
Now we proceed installing the RDS roles..
Select the “remote desktop services”…
The standard deployment…
In this guide we will set up a session-based environment…

This is a summary…
Select the server that will be the Connection Broker
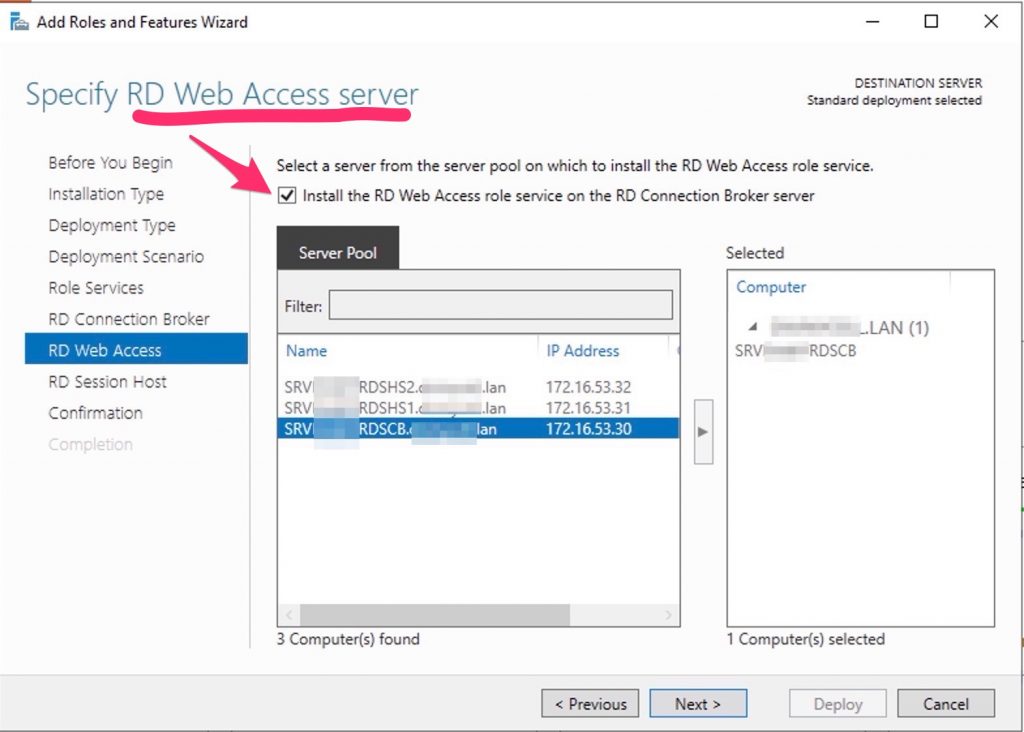
Select the tick to install the RDS Web Gateway in the same server (Connection Broker)
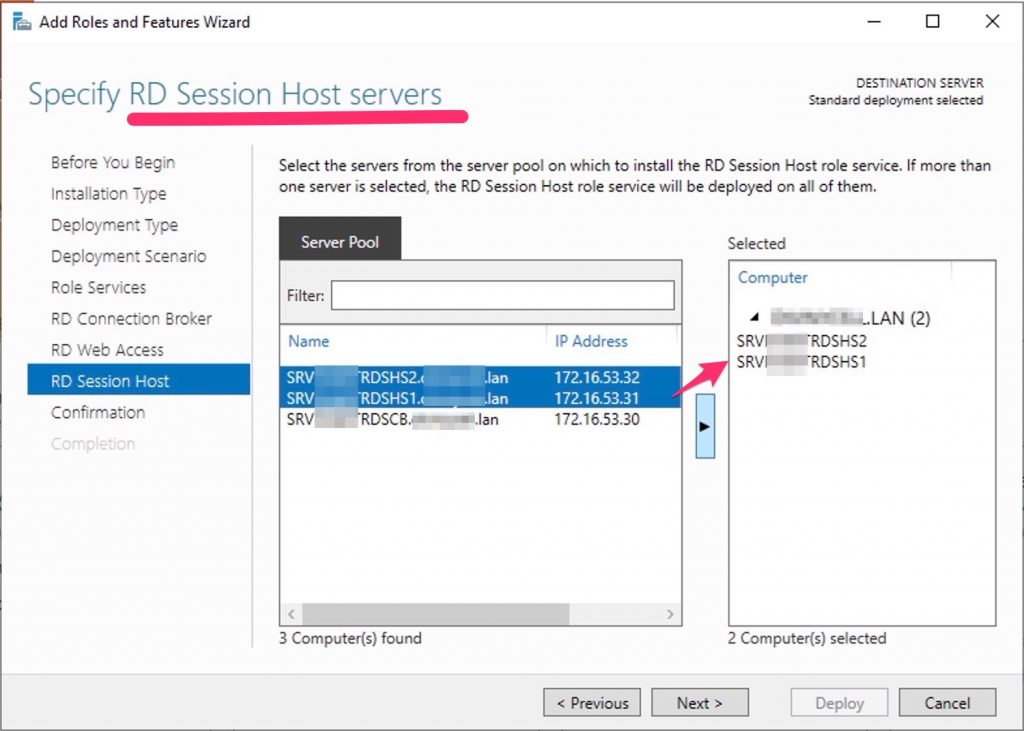
Now, select the server that will act as Host Servers.
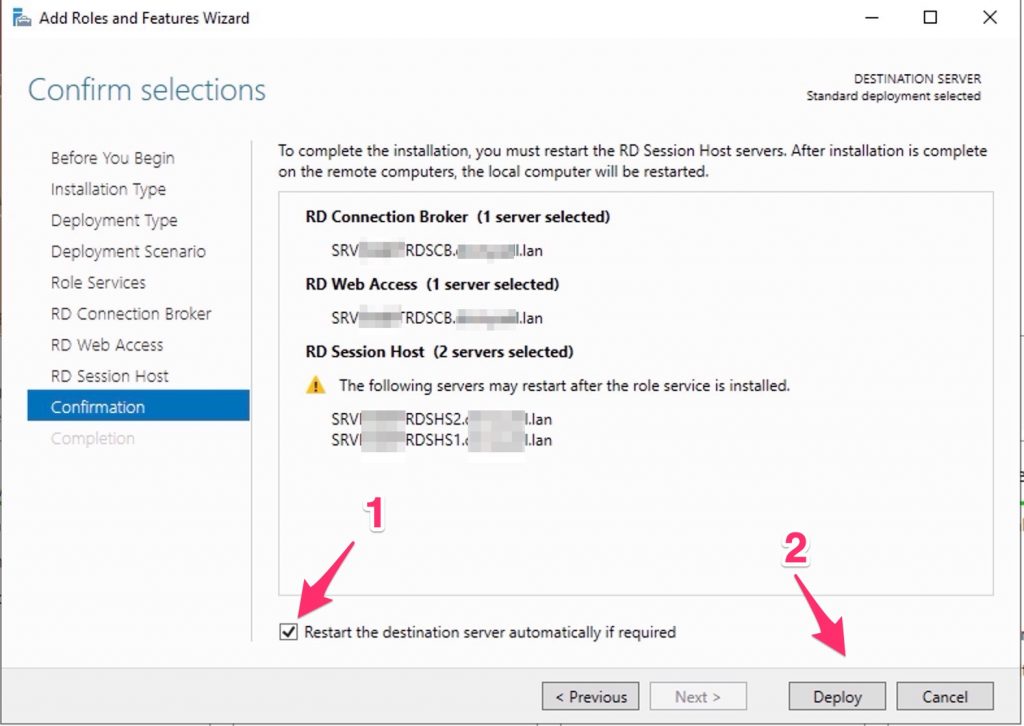
Deploy all and restarts the servers….
Configure the RD Licensing…
Now Configure/enable the RDS Gateway….
Write down your FQDN
Select “configure certificate” to deploy a self sign..
Create the cert.., write down the password…

Now, assign it to the RDS Gateway..

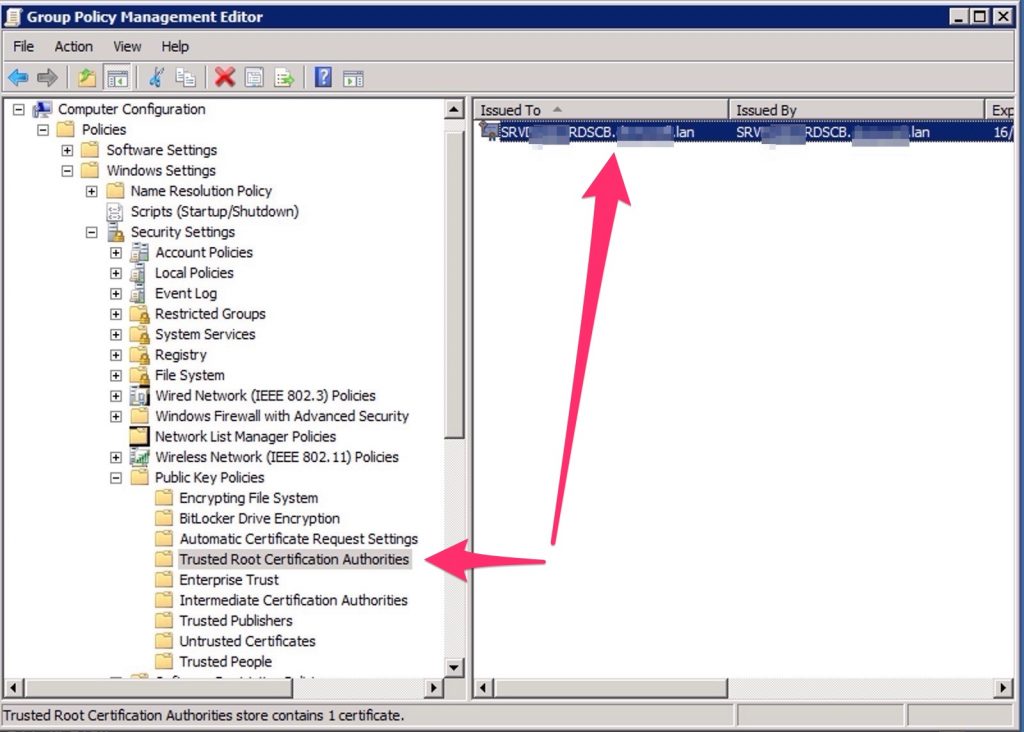
Don’t forget to distribute the selfsign certificate into your domain trought a GPO
Now we need to setup the FXLogic profile container.
Download it on the Host Session Hosts (SRVRDSHS1 and SRVRDSHS2), install it .
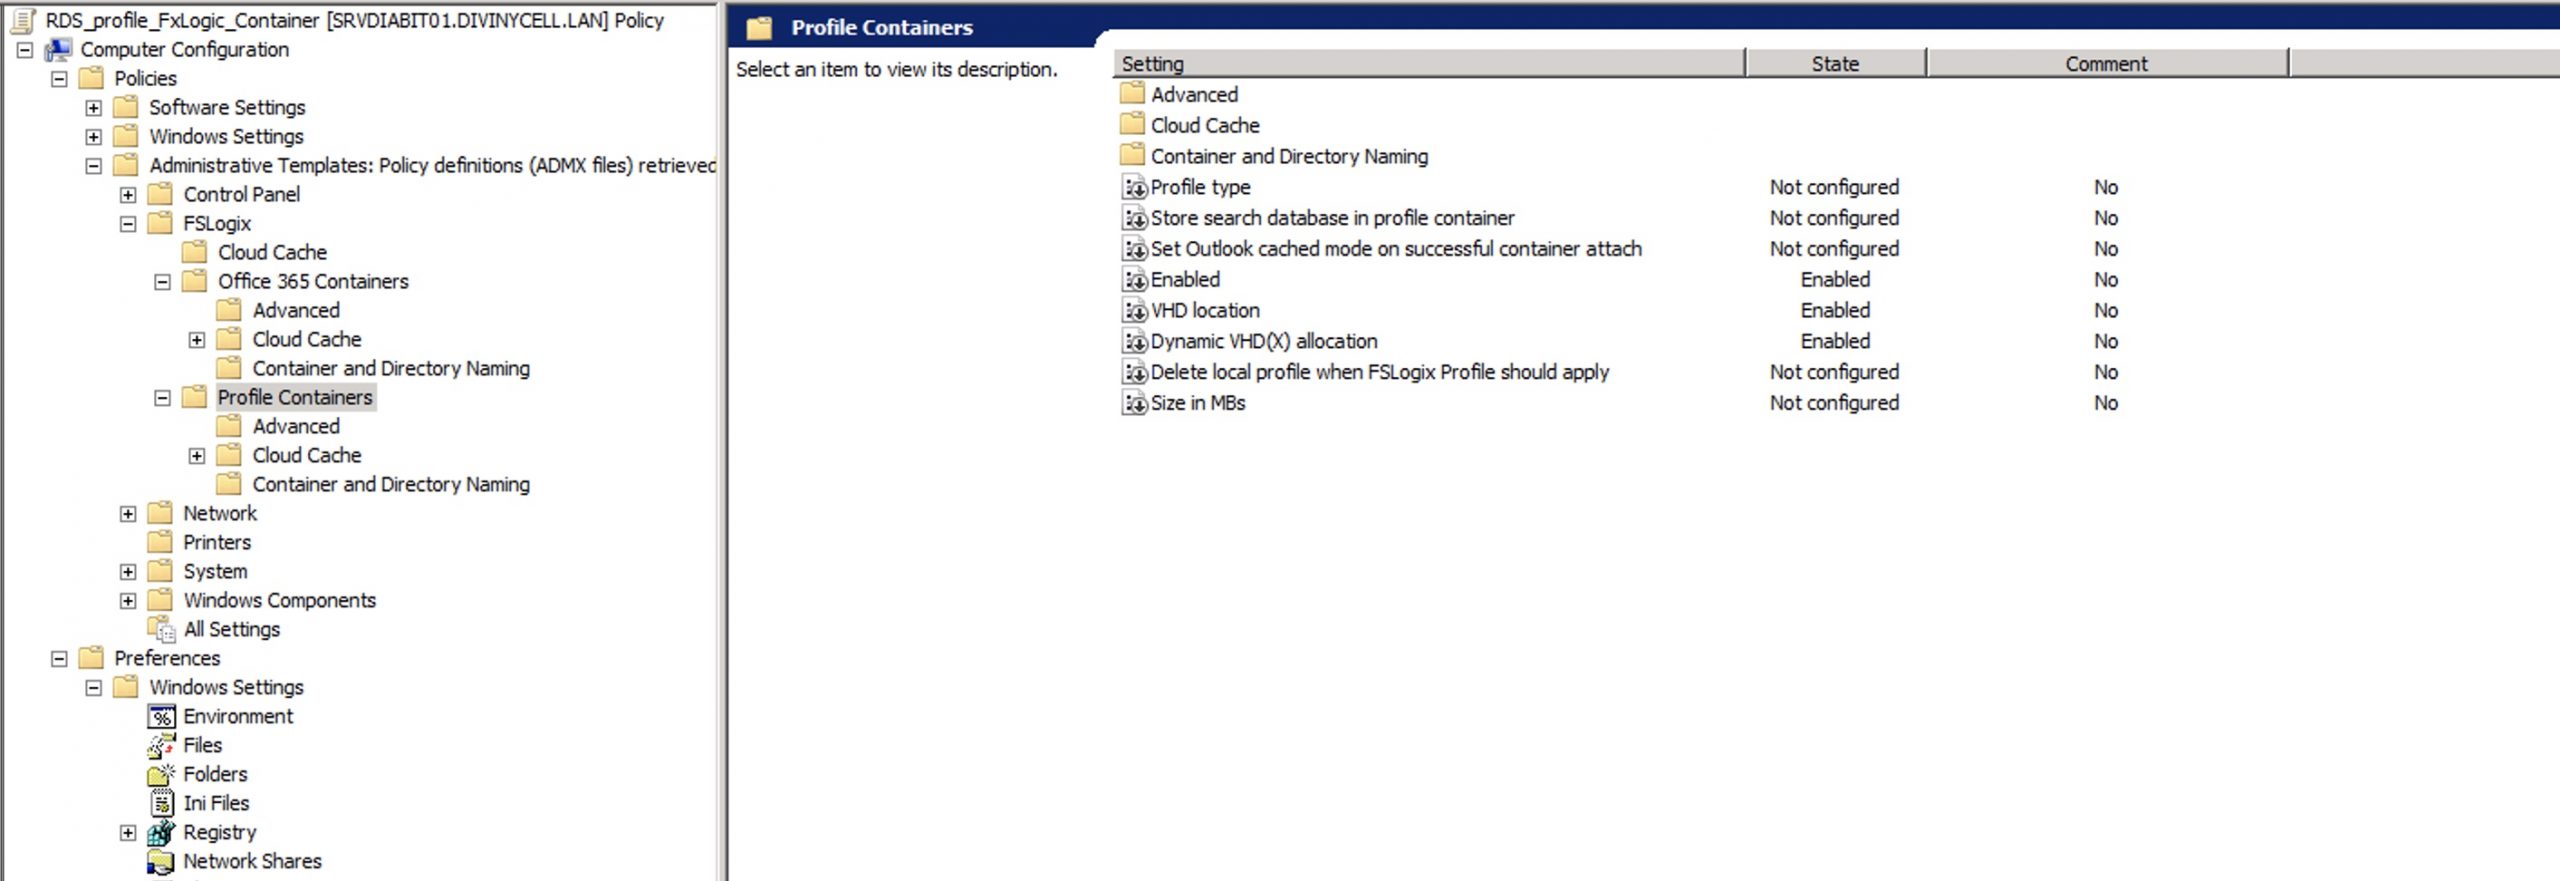
At this point you could set up FXLogic with registry or a GPO. We will import the ADML/ADMX to create the GPO for the Host Session Hosts.
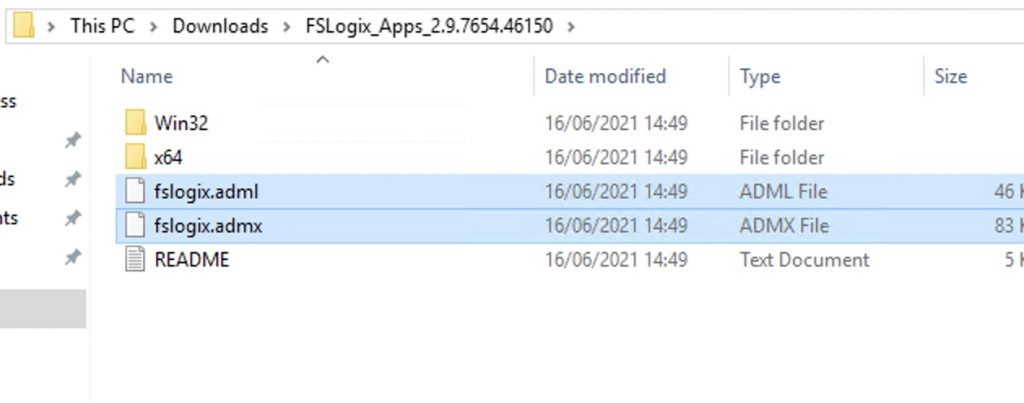
Import them to the folder C:\Windows\PolicyDefinitions of a DC.
C:\Windows\PolicyDefinitions\en-US => the ADML
C:\Windows\PolicyDefinitions\ => the ADMX
On my Connection Broker, where i decided to place the user profile, these are the permission required :
| User | Account | Folder Permissions |
| Users | This Folder | Modify |
| Creator / Owner | Subfolders and Files | Modify |
| Administrator | This Folder, Subfolders, and Files | Full Control |
Create a policy and attach it to the OU where resides your Host Session Host
So now, we are almost done…
At this point we need to create a “Collection” to publish and RDP access trought the RD Connection broker

Set the name of the App/Session
Add the hosts to hold this collection
Select who can access to this collection
Deselect the option “Enable user profile disks” because we are using FSLogix.
At this point we can add some apps to publish….
Select the app you want to do the test…
Now we could connect to the Connection Brocker Web interface and we can see the Collection just created.
To to RDWEB (https://ip-of-connection-brockerserver/RDWEB)
2) Some Tips
Normally you can’t connect to your session Hosts trought the Connection Brocker from the RDP client , but you need to connect to the Web interface and fallow this process.
If you need to use the normal RDP client ( MSTSC.exe) you have to modify the fallowing registry key of the Connection Broker
Computer\HKEY_LOCAL_MACHINE\SYSTEM\CurrentControlSet\Control\Terminal Server\ClusterSettings
Add the fallowing :
reg_sz DefaultTsvUrl plus the value tsv://MS Terminal Services Plugin.1.COLLECION

So, you really need to write “MS Terminal Services Plugin.1.” plus your collection‘s name
Doing this, you can connect to your host session hosts, trought the Connection Broker with MSTSC.exe !!
Moreover, if you want to connect to you Connection Brocker, now you need to pass the /admin switch.
e.g : MSTSC.exe serverconnectionbroker.yourdomain.com /admin
3) Activate the Terminal Services Licensing
Connect to the server where you installed the Licensing Manager and proceed with the activation
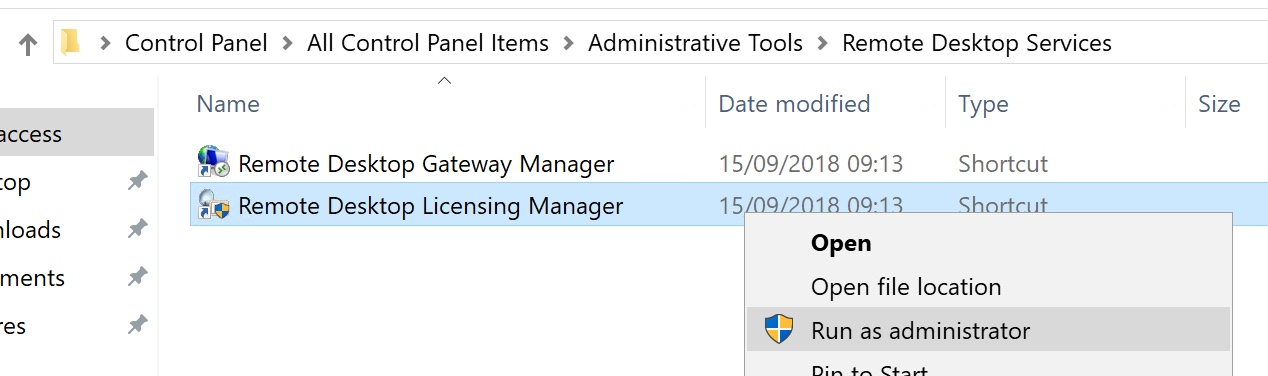
Right click on your server and select “activate” in my case is grey out because I’ve just did it.
The Wizard starts, fill all your data ..
After that, verity the “Review Configuration” (right click on License Server Name) and add your server into “License Servers Group”… In my case, the SCP is just ok.
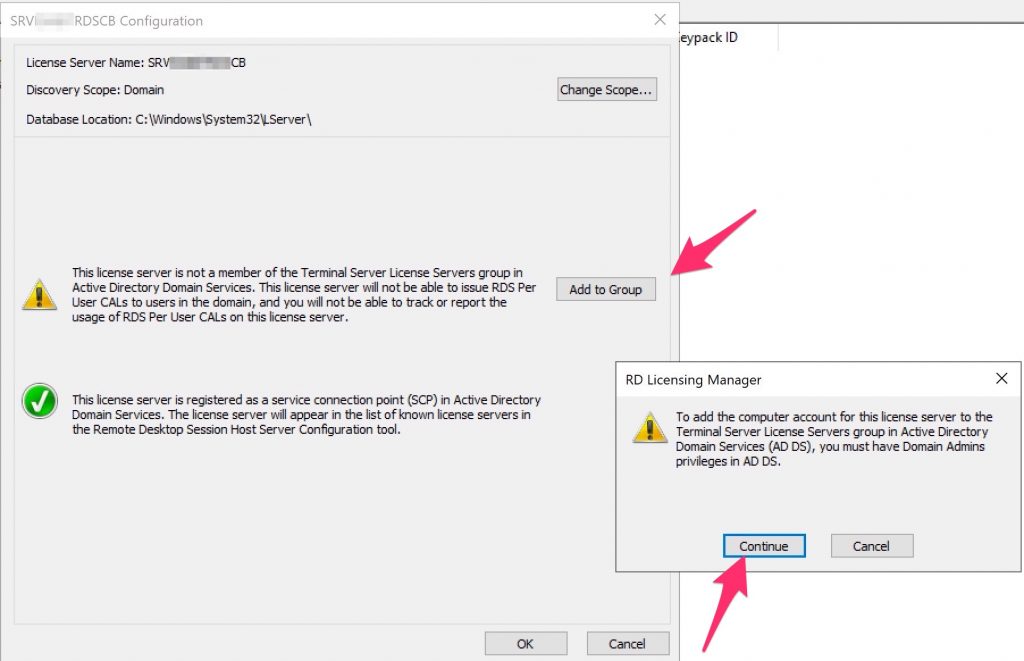
Ok and , as we can see , the license server is up
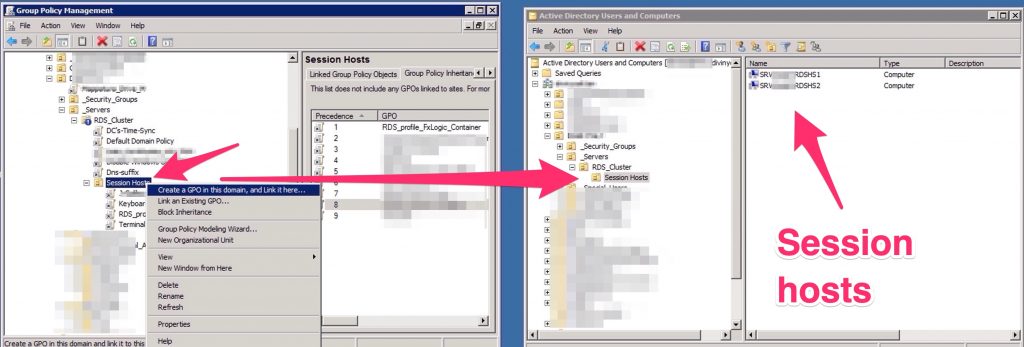
At this point we need to inform our Session Host servers which is our license server.. To do this we’ll use GPOs..
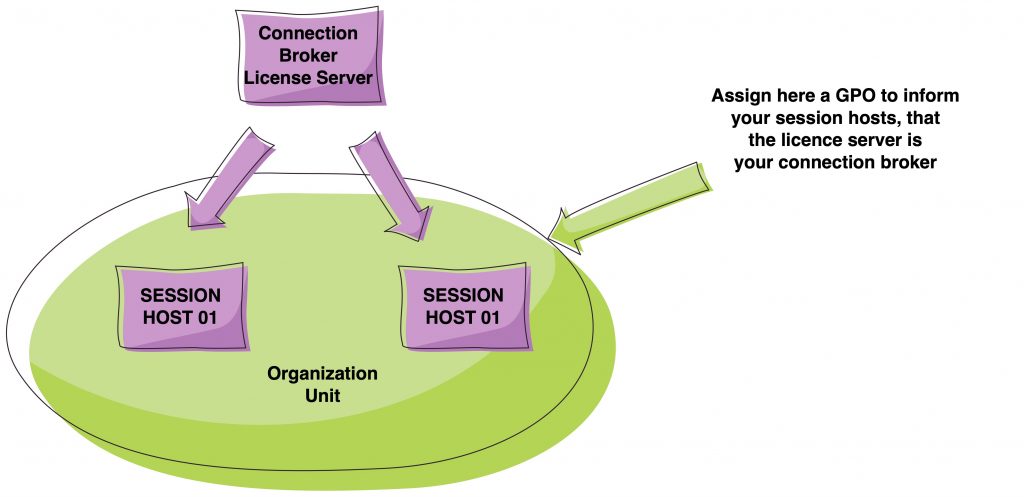
We need to create a GPO (Computer) that has these informations.
Fill this parameter “Use the specified RD license servers” with the FQDN of your CB/License server.
Assign, also, the type of license schema (User/Device)..
Now, connect to both Session Hosts servers,open the “Remote Desktop Licensing Diagnoser” and run a GPUPDATE /Force from cli…

Our Hosts is now correctly registered to our license server.
That’s it.
В данной инструкции у нас уже установлена операционная система Windows Server 2019 на виртуальной машине.
Минимальные требования:
- 64-разрядный процессор с тактовой частотой 1,4 ГГц;
- ОЗУ 512 МБ (2 ГБ для варианта установки “Сервер с рабочим столом”);
- диск 32 ГБ;
- доступ к интернету.
Бесплатный сервер 1С для подписчиков нашего telegram-канала !
Для того чтобы подключить сертификат с помощью Let’s Encrypt требуется прямые пробросы портов TCP 443, 80 до машины, а также доменное имя, на которое будет вешаться сертификат.
Активация Windows Server 2019 проходит тоже на этом этапе.
Установка ролей на Windows Server 2019
После подготовки Windows Server 2019, мы приступаем к установке ролей для настройки терминального сервера и шлюза удаленных рабочих столов.
Заходим в Диспетчер серверов – Управление – Добавить роли и компоненты.
Открывается “Мастер добавления ролей и компонентов”:

Рисунок 1 – Мастер добавления ролей и компонентов
Добавление ролей на сервере:
- Тип установки – Установка ролей или компонентов.
- Выбор сервера – Выбираем наш текущий сервер.
- Роли сервера – Службы удаленных рабочих столов.
- Службы ролей – Лицензирование удаленных рабочих столов, шлюз удаленных.
Подтверждаем установку компонентов и проводим установку. После установки всех нужных нам ролей – перезагружаем сервер.
У нас вы можете взять готовый терминальный сервер 1С в аренду.
Настройка сервера лицензирования
Заходим в Диспетчер серверов – Средства – Remote Desktop Services – Диспетчер лицензирования удаленных рабочих столов.
В диспетчере нажимаем ПКМ на наш сервер и выбираем “Активировать сервер”.
Попадаем в “Мастер активации сервера”, вводим свои данные и нажимаем “Далее”.

Рисунок 2 – Мастер активации сервера
В следующем пункте вводим “Сведения об организации” и нажимаем “Далее”.
Завершение работы мастера активации сервера выполняется с поставленной галочкой “Запустить мастер установки лицензий” чтобы попасть в оснастку установки лицензий.

Рисунок 3 – Завершение работы мастера активации сервера
В мастере установки лицензий мы видим параметры сервера лицензирования и нажимаем “Далее”.
В следующем окне мы выбираем лицензию в зависимости от приобретенной вами лицензии.
Имеется несколько типов лицензии:
- Пакет лицензий (в розницу).
- Соглашение “Open License”.
- Соглашение “Select License”.
- Соглашение “Enterprise Agreement”.
- Соглашение “Campus Agreement”.
- Соглашение “School Agreement”.
- Лицензионное соглашение постановщика услуг.
- Другое соглашение.
- Лицензия Select Plus.
В нашем случае мы выбираем “Соглашение “Enterprise Agreement”” и нажимаем “Далее”.
- Версию продукта ставим “Windows Server 2019”.
- Тип лицензии “Клиентская лицензия служб удаленных рабочих столов “на устройство”.
- Количество в зависимости от приобретенной вами. В нашем случае мы активируем на 10 устройств.
Завершаем работу мастера установки лицензий.
Для завершение установки лицензий осталось выполнить пункт по добавление групповых политик, для этого нажимаем ПКМ по меню “Пуск” и выбираем “Выполнить”.
В окне “Выполнить” вводим gpedit.msc и нажимаем “ОК”.
Попадаем в “Редактор локальной групповой политики”
В данной настройке требуется править две записи. Для того чтобы указать сервер лицензирования мы переходим в пункт:
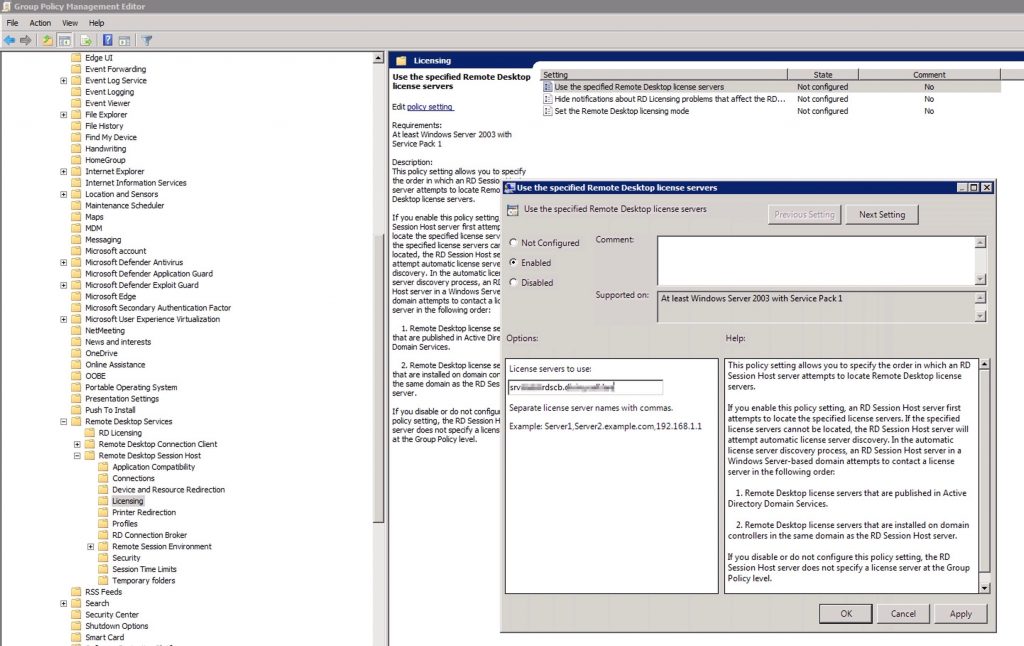
Конфигурация компьютера – Административные шаблоны – Компоненты Windows – Служба удаленных рабочих столов – Узел сеансов удаленных рабочих столов – Лицензирование – Использовать указанные серверы лицензирования удаленных рабочих столов.
Включаем данную политику и вводим требуемый сервер лицензирования. В нашем случае мы будем ссылаться на свой локальный сервер “localhost” и применяем настройку.

Рисунок 4 – Использование серверов лицензирования
Для второго пункта мы переходи по следующему пути:
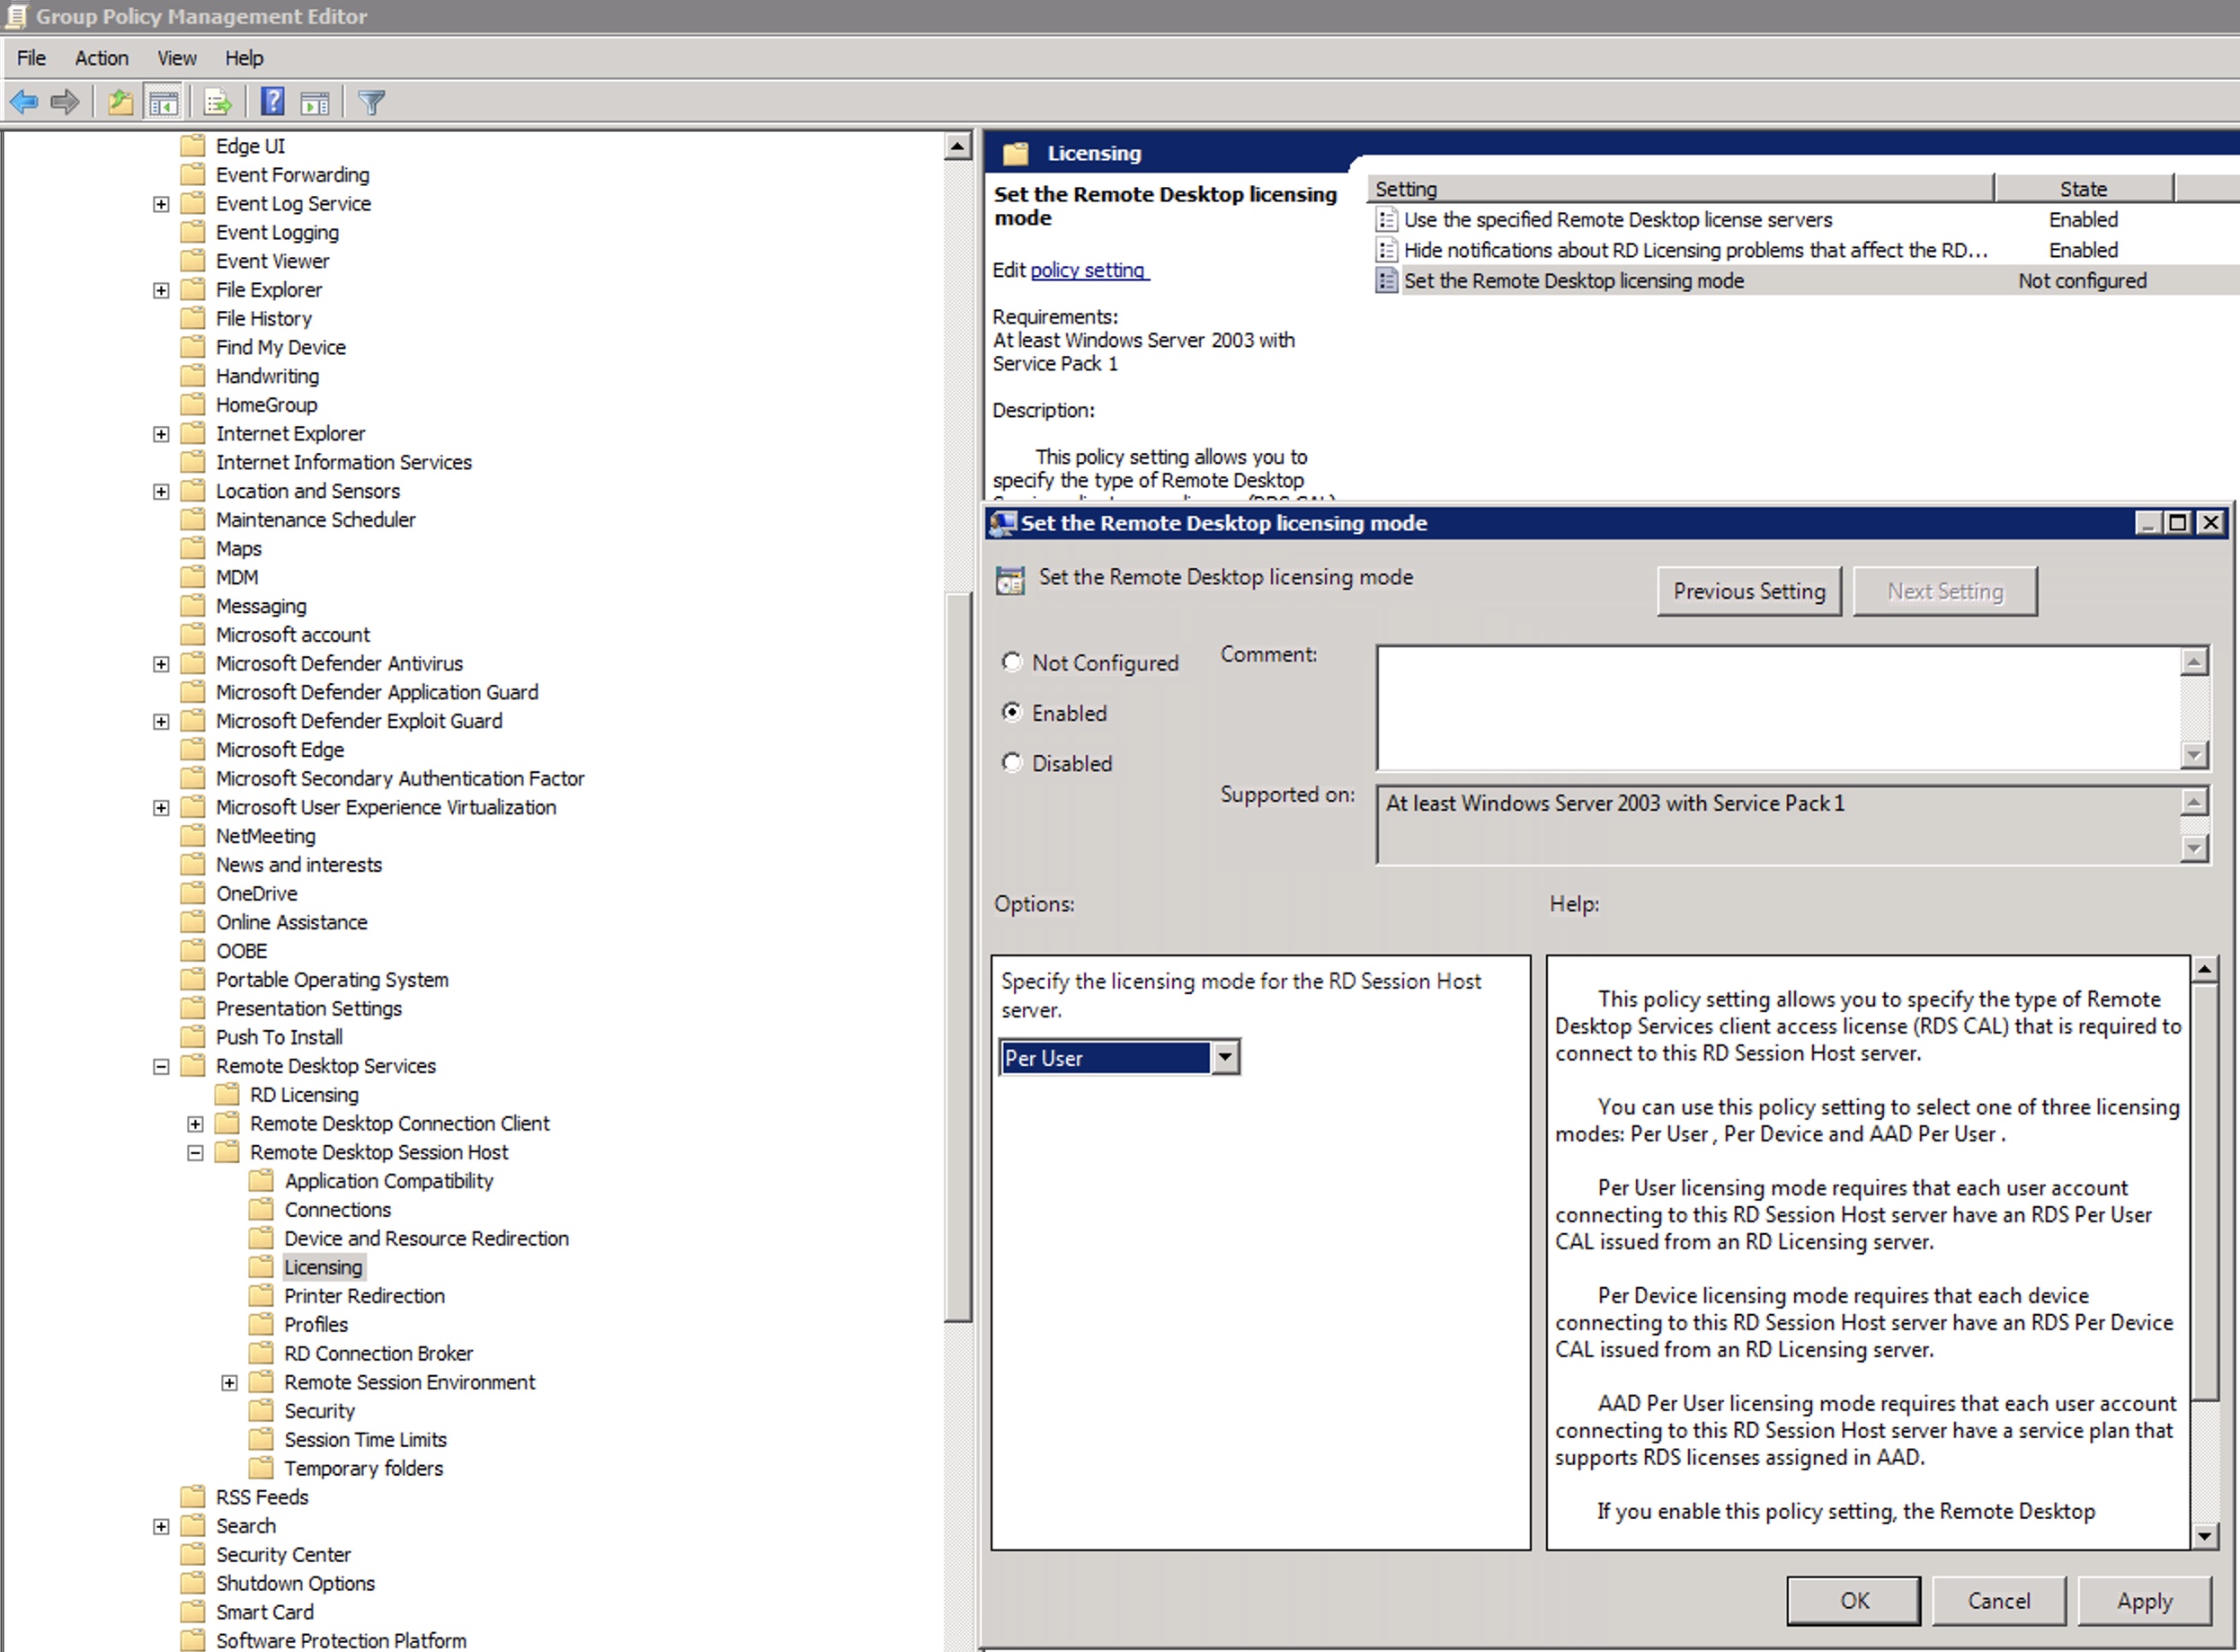
Конфигурация компьютера – Административные шаблоны – Компоненты Windows – Служба удаленных рабочих столов – Узел сеансов удаленных рабочих столов – Лицензирование – Задать режим лицензирования удаленных рабочих столов.
Включаем политику и указываем режим лицензирования, в нашем случае мы активируем “на устройство” и применяем настройку.

Рисунок 5 – Задаем режим лицензирования
Настройка по установки лицензий прошла успешно, далее мы настраиваем шлюз удаленных рабочих столов.
Настройка шлюза удаленных рабочих столов
Шлюз удаленных рабочих столов является сервисом посредником между клиентами из внешней сети и сеансов внутренней сети, обеспечивает безопасный обмен данными между ними.
Заходим в Диспетчер серверов – Средства – Remote Desktop Services – Диспетчер шлюза удаленных рабочих столов.
Нажимаем ПКМ по папке “Политики” и выбираем “Создание новых политик авторизации”.
Мы попадаем в “Мастер создания новых политик авторизации”.

Рисунок 6 – Создание политик авторизации для шлюза удаленных рабочих столов
По пунктам выбираем следующее:
- Политики авторизации – Создать политику авторизации подключений к удаленным рабочим столам и авторизации ресурсов удаленных рабочих столов.
- Политика авторизации подключений – пишем наименование политики (в нашем случае Users).
- Требования – выбираем членство в группе для пользователей или компьютеров, которые смогут подключаться к серверу (в нашем случае, мы добавили группу пользователей “Пользователи удаленного рабочего стола” и “Администраторы”).
- Перенаправление устройств – выбираем, что требуется перенаправить (мы выбрали “Включить перенаправление устройств для всех клиентских устройств”).
- Время ожидания сеанса – по умолчанию.
- Сводка по политике авторизации подключений к RD – параметры которые будут созданы в данной политике.
- Политика авторизации ресурсов – пишем наименование политики (в нашем случае TS).
- Группы пользователей – выбираем членство в группе для пользователей или компьютеров, которые смогут подключаться к серверу (в нашем случае, мы добавили группу пользователей “Пользователи удаленного рабочего стола” и “Администраторы”).
- Сетевой ресурс – можем настроить группу терминальных серверов, куда можно подключиться, выберем “Разрешить подключение пользователей к любому ресурсу (компьютеру)”.
- Разрешенные порты – если настроен нестандартный порт, то в этом пункте можно это указать, выбираем “Разрешить подключение только к порту 3389”.
- Сводка по политике авторизации ресурсов RD – параметры которые будут созданы в данной политике.
На данном этапе мы завершили настройку шлюза удаленных рабочих столов, за исключением установки сертификата.

Рисунок 7 – Оснастка диспетчера шлюза удаленных рабочих столов без сертификата
Для того, чтобы установить сертификат на шлюз удаленных рабочих столов, мы воспользуемся утилитой win-acme.
Установка сертификата на шлюз удаленных рабочих столов через Let’s Encrypt
Скачиваем программу по ссылке:
https://github.com/win-acme/win-acme/releases/download/v2.1.14.1/win-acme.v2.1.14.996.x64.trimmed.zip
Копируем в папку C:Scriptswin-acme
Создаем 3 bat-файла:
- Файл “C:Scriptswin-acmeRegister.bat”
Файл “C:Scriptswin-acmeRegister.bat”
@echo off

rem powershell.exe

:: Ввод данных:
set /p commonname_Data="Enter Domain name(exampe : v0162.esit.info) : "
powershell -ExecutionPolicy Bypass -NoLogo -NoProfile -Command "Get-WebBinding |  Remove-WebBinding"
powershell -ExecutionPolicy Bypass -NoLogo -NoProfile -Command "New-WebBinding -Name 'Default Web Site' -Port 443 -Protocol https   -SslFlags 0 -IPAddress "*" -HostHeader "*" "
powershell -ExecutionPolicy Bypass -NoLogo -NoProfile -Command "New-WebBinding -Name 'Default Web Site' -Port 80 -Protocol http   -IPAddress "*" -HostHeader "*" "
powershell -ExecutionPolicy Bypass -NoLogo -NoProfile -Command "Set-WebBinding -Name 'Default Web Site' -BindingInformation "*:443:*" -PropertyName  HostHeader  -Value '%commonname_Data%'"
powershell -ExecutionPolicy Bypass -NoLogo -NoProfile -Command "Set-WebBinding -Name 'Default Web Site' -BindingInformation "*:80:*" -PropertyName  HostHeader  -Value '%commonname_Data%'"
@echo on
"C:Scriptswin-acmewacs.exe" --installation script --target iissite --siteid 1 --commonname %commonname_Data% --emailaddress admin@admin --accepttos --script "./scripts/PSScript.bat" --scriptparameters "./scripts/ImportRDGateway.ps1 {5}"
- Файл “C:Scriptswin-acmeScriptsPSScript.bat”
Листинг:
powershell.exe -ExecutionPolicy RemoteSigned -File %*
- После этого запускаем “C:Scriptswin-acmeRegister.bat”.
- Вводим домен на котором находится наш шлюз удаленных рабочих столов.
- Если всё получилось, то в оснастке шлюза удаленных рабочих столов должен появится созданный сертификат, а в консоли – готовый результат.
- Элемент маркированного списка

Рисунок 8 – Сертификат успешно установлен
Подключение пользователей
Следующем этапом мы создаем пользователей для подключение к удаленному рабочему столу через шлюз удаленных рабочих столов.
- В окне “Выполнить” вводим команду “control userpasswords2”.
- Нажимаем “Дополнительно”.
- Выбираем папку “Пользователи” переходим в “Дополнительные действия” и нажимаем “Новый пользователь”.
- Вводим требуемые поля.

Рисунок 9 – Добавление нового пользователя
Создаем нового пользователя и добавляем его в группу “Пользователи удаленного рабочего стола”, для этого заходим в Панель управления – Система – Настройка удаленного рабочего стола – Выбрать пользователей – Добавить.
Добавляем созданных пользователей, после чего подключаемся к серверу.
Подключение к серверу терминалов
На машине, с которой будем подключаться к серверу, ищем утилиту “Подключение к удаленному рабочему столу” на Windows 10 она находится по следующему расположению: Пуск – Стандартные – Windows – Подключение к удаленному рабочему столу.
В открытом окне вводим имя нашего сервера или локальный ip-адрес. В нашему случае имя сервера “EFSOL-TS”
Пользователя указываем, которого создали (EFSOL-TSefsol_it).
Далее, чтобы указать адрес шлюза удаленных рабочих столов, переходим во вкладку “Дополнительно” нажимаем “Параметры” вводим в окне Имя сервера наше доменное – “gorbach.esit.info”.

Рисунок 10 – Подключение к шлюзу удаленных рабочих столов
Нажимаем “ОК” и “Подключить”.
При подключении к удаленному рабочему столу – может появится сообщение о сертификате, мы на него соглашаемся.
Установка терминального сервера произведена и шлюз удаленных рабочих столов успешно настроен.
Также мы готовы предложить готовый терминальный сервер в аренду. Конфигурации подобраны для комфортной работы в 1С, офисных приложениях и другом ПО.