
Все способы:
- Способ 1: «Командная строка»
- Способ 2: Редактирование реестра
- Способ 3: Включение службы
- Решение возможных проблем
- Причина 1: Адаптер Microsoft Teredo
- Причина 2: Отсутствие прав администратора
- Причина 3: Проблемы с сетевыми настройками
- Причина 4: Повреждение системных файлов
- Причина 5: Блокировка UDP-порта
- Причина 6: Отсутствие поддержки интернет-провайдером
- Вопросы и ответы: 2
Способ 1: «Командная строка»
Teredo – это протокол IPv6, который служит для корректного назначения веб-адресов и обеспечения автоматического туннелирования между узлами для трафика между компьютерами, которые подключены к разным типам сетей. Если вкратце, данная технология позволяет установить IPv6-подключение через протокол IPv4. Как правило, по умолчанию она отключена, но с помощью консоли «Командная строка» ее можно активировать:
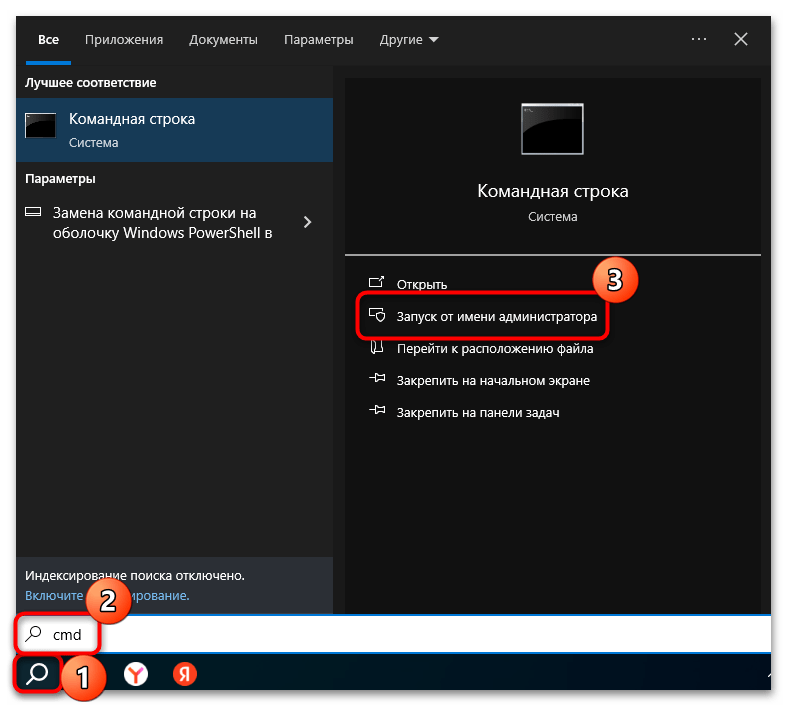
- Запустите консоль от имени администратора, например через системный поиск. Введите соответствующий запрос («cmd» или «командная строка») и выберите нужный тип запуска.
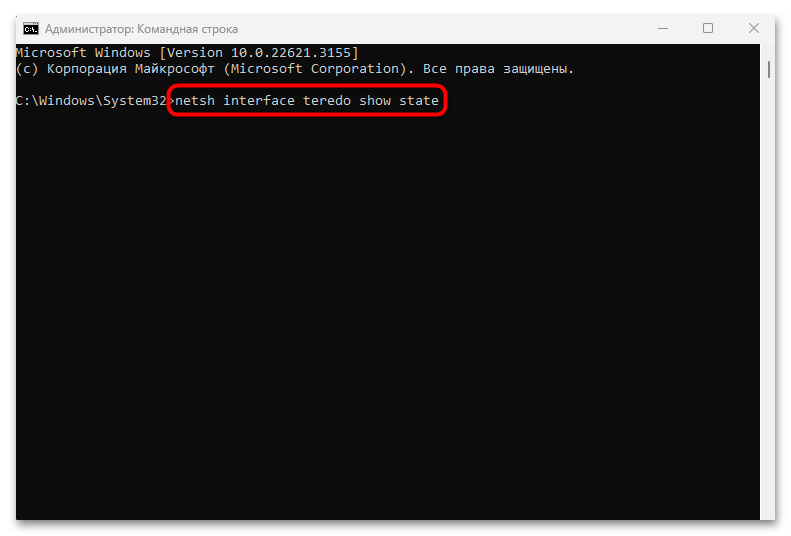
- Для начала стоит проверить доступность использования технологии. Для этого скопируйте и вставьте команду
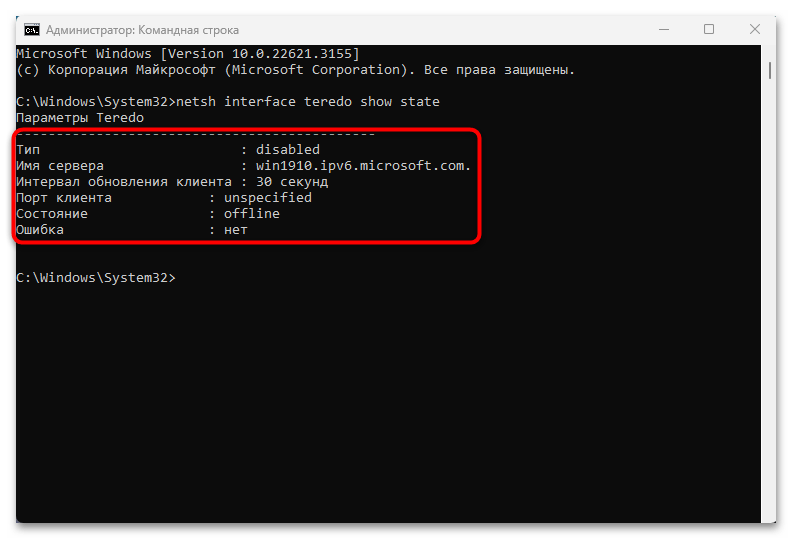
netsh interface teredo show state, а затем выполните ее, нажав на клавишу «Enter». - Отобразится состояние Teredo. Если она отключена, переходите к следующим шагам инструкции. В противном случае (включена, но не работает) могла возникнуть проблема или поддержки протокола у интернет-провайдера вовсе нет. Тогда перейдите к разделу «Возможные проблемы» данной статьи и ознакомьтесь с приведенными рекомендациями.
- Чтобы включить Teredo, достаточно использовать команду
netsh interface teredo set state type=default(вставьте его в консоль и нажмите на клавишу ввода).
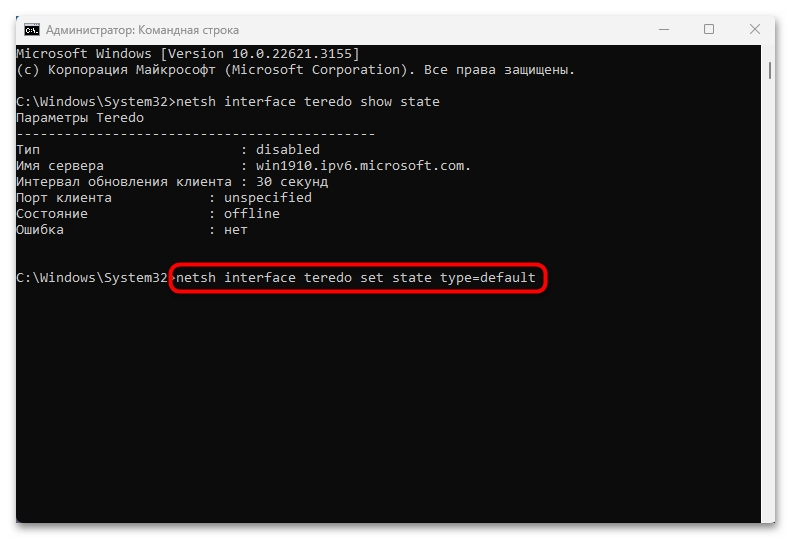
В результате должно отобразиться уведомление, что изменения сохранены, означающее активацию протокола Teredo. Повторите Шаг 2, чтобы снова можно проверить его состояние и убедиться в рабочем состоянии технологии.
Способ 2: Редактирование реестра
Данный метод является скорее решением проблемы в том случае, если при попытке активации возникла проблема с адаптером Teredo Tunneling. Для включения протокола могут потребоваться дополнительные действия, а точнее ручное изменение значения у параметра TCPIP6 в системном реестре.
Прежде чем вносить правки в свойства реестровых ключей, рекомендуем создать точку восстановления системы, чтобы вернуть состояние Windows 10, если что-то пойдет не так.
Подробнее: Инструкция по созданию точки восстановления Windows 10
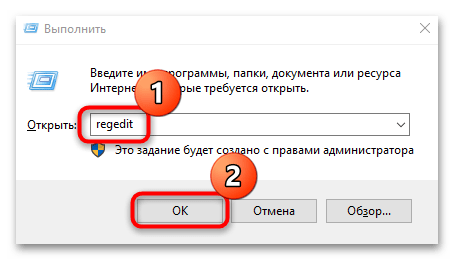
- Запустите встроенное средство «Редактор реестра»: вызовите окно «Выполнить», одновременно нажав на клавиши «Win + R», затем введите
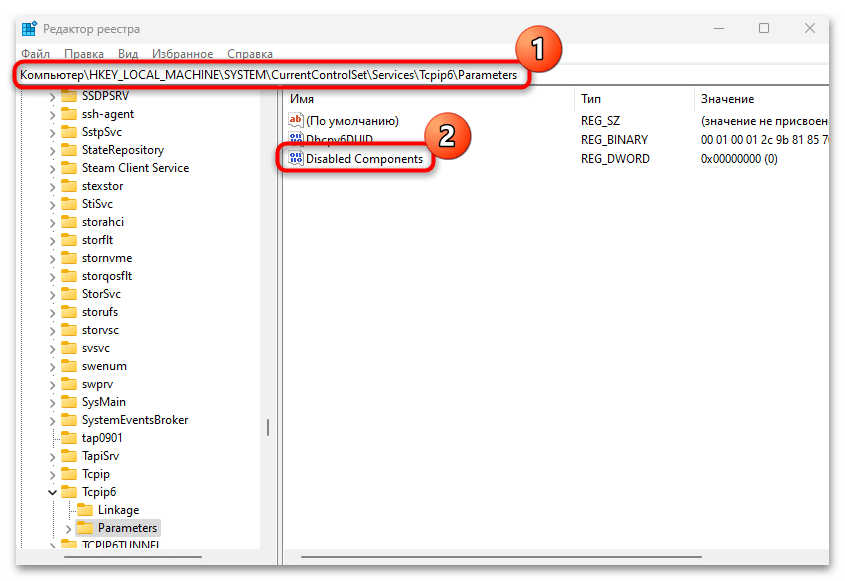
regeditи нажмите кнопку «ОК». - Перейдите по пути
HKEY_LOCAL_MACHINE\SYSTEM\CurrentControlSet\Services\Tcpip6\Parametersчерез панель слева или адресную строку, затем в центральной части окна найдите параметр под названием «Disabled Components» и дважды кликните по нему левой кнопкой мыши. - Если потребуется, измените его значение на «0», сохраните настройки, нажав кнопку «ОК».
После внесения правок в системный реестр перезагрузите компьютер, чтобы применить изменение, после чего можно попробовать снова включить Teredo в Windows 10, используя «Командную строку» (Способ 1).
Способ 3: Включение службы
Когда при попытке включить протокол напрямую появляется ошибка о том, что служба была отключена локально, значит, требуется самостоятельно изменить параметр локальной групповой политики. Такой метод подойдет для пользователей Windows 10 Professional и Enterprise, а в домашней редакции попросту не предусматривается такой инструмент.
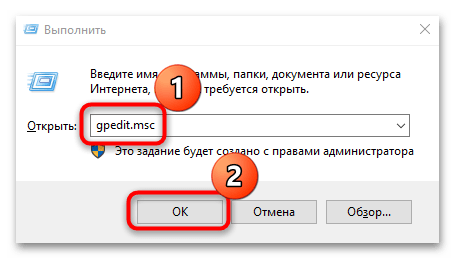
- Через диалоговое окно «Выполнить» («Win + R») запустите «Редактор локальной групповой политики», выполнив команду
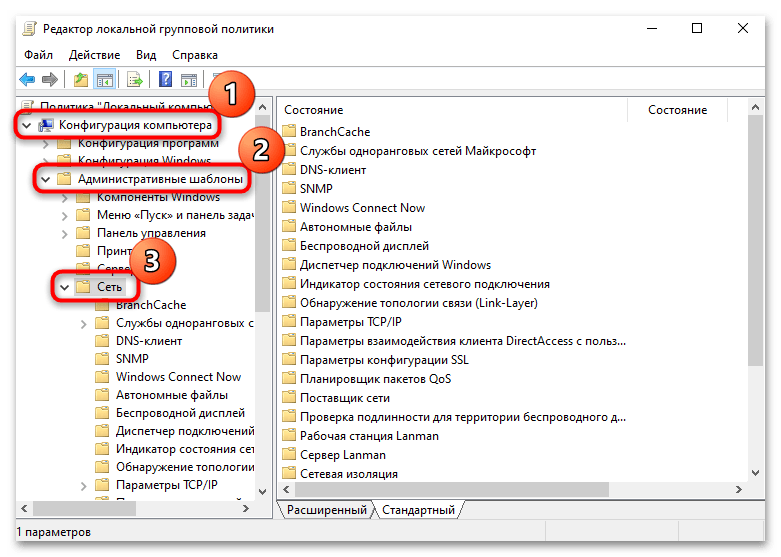
gpedit.msc. - На левой панели разверните раздел «Конфигурация компьютера», затем «Административные шаблоны» и «Сеть».
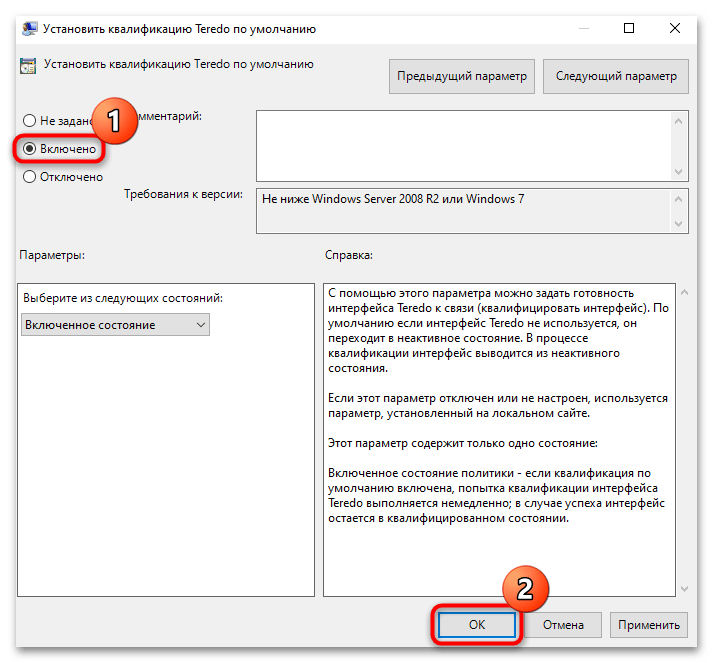
- Далее разверните ветку «Параметры TCP/IP» и выберите «Технологии туннелирования для IP версии 6». Для начала в центральной части окна кликните два раза левой кнопкой мыши по пункту «Установить квалификацию Teredo по умолчанию».
- В появившемся окне отметьте пункт «Включено» и сохраните настройки.
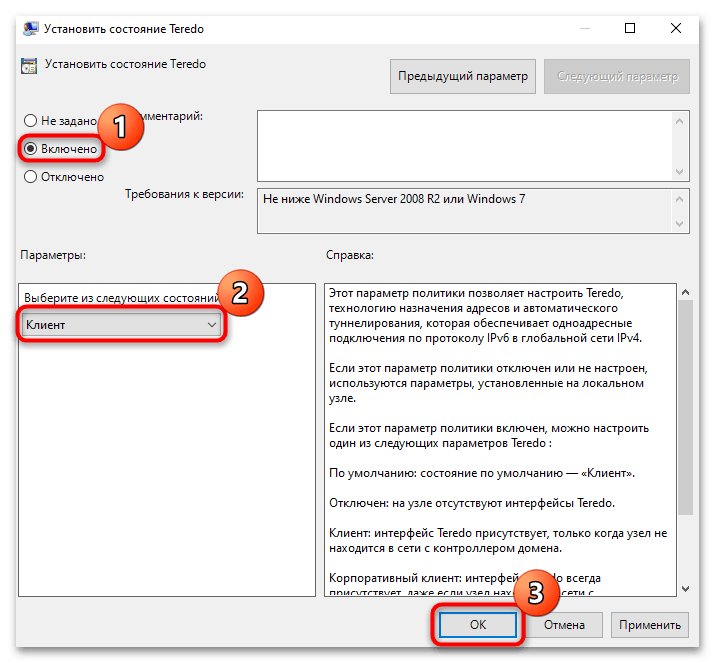
- Далее выберите строку «Установить состояние Teredo».
- Так же активируйте функцию, но в блоке «Параметры» из выпадающего меню выберите «Клиент» и нажмите на «ОК».
- Откройте окно со свойствами параметра «Установить имя сервера Teredo».
- Включите параметр и задайте адрес сервера в специальном поле ниже, сохраните настройки.
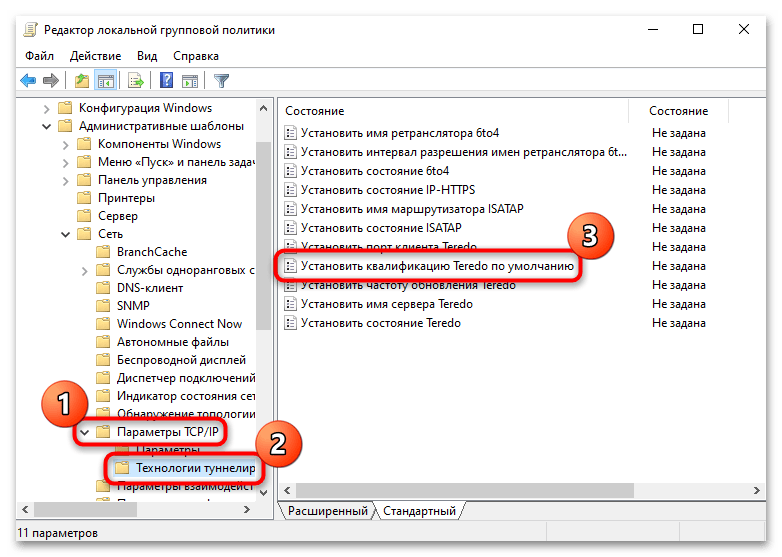

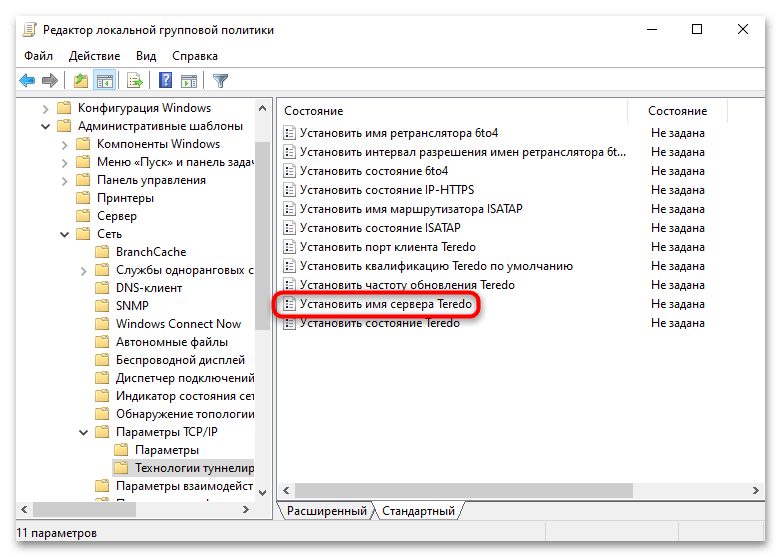
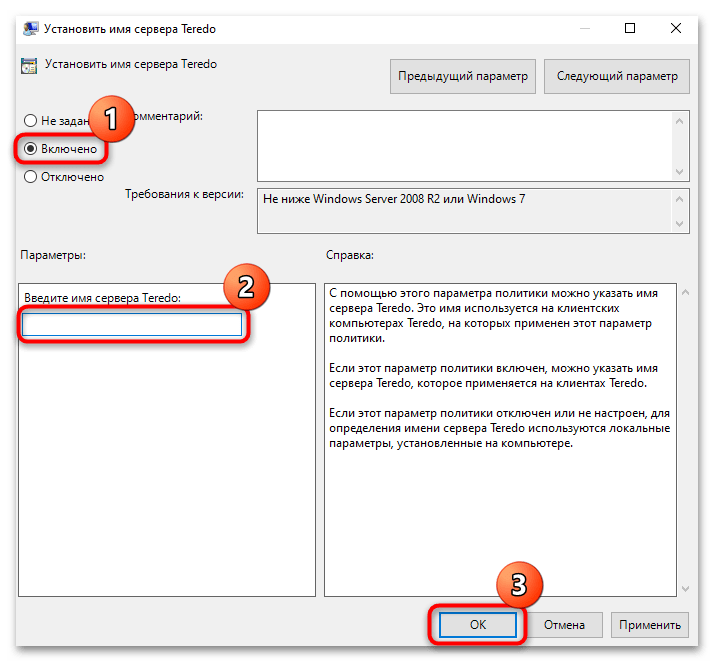
Следует отметить, что порт Teredo не задан, поэтому если в строке «Состояние» у параметра «Установить порт клиента Teredo» иное значение (например, «Включено»), тогда откройте его и выберите пункт «Не задано».
Как только все службы были правильно настроены, можно переходить к непосредственной активации Teredo в Windows 10. Чтобы это сделать, возвращайтесь к Способу 1.
Решение возможных проблем
Иногда с работой технологии Teredo возникают неполадки, которые не связаны со службами или реестровыми записями, разобранными выше. В некоторых ситуациях потребуются иные решения, например те, что восстанавливают работу драйверов сетевого адаптера или целостность файлов системы. Рассмотрим несколько наиболее распространенных причин возникновения проблем с включением Teredo.
Причина 1: Адаптер Microsoft Teredo
В первую очередь проверьте работоспособность туннельного адаптера Microsoft Teredo. Если проблема в нем, можно попытаться переустановить программное обеспечение, предварительно удалив старую версию драйвера.
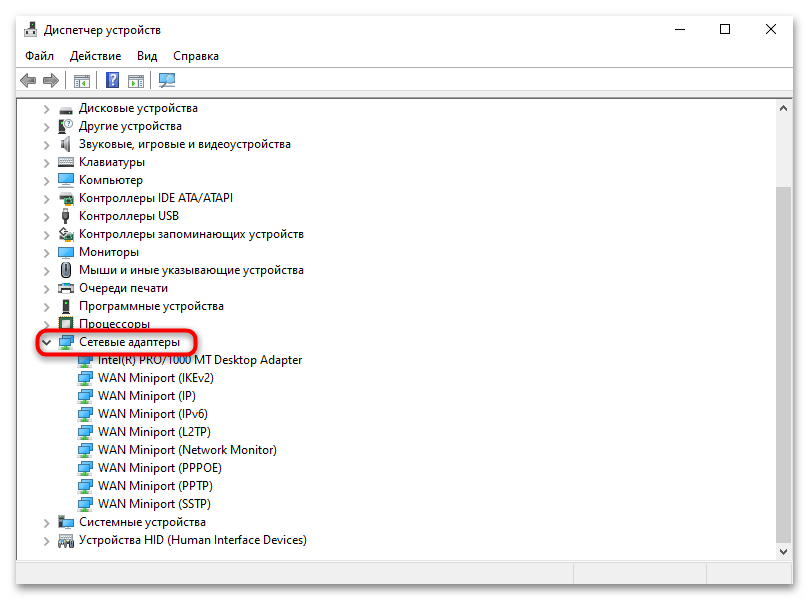
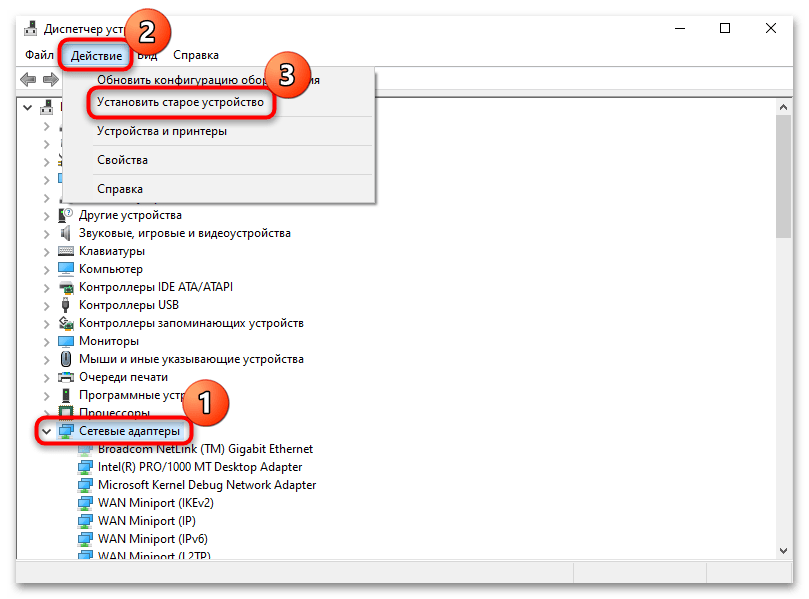
- Запустите «Диспетчер устройств», кликнув правой кнопкой мыши по «Пуску» и выбрав соответствующий пункт.
- Разверните раздел «Сетевые адаптеры» и проверьте, если ли в списке такое устройство, как «Microsoft Teredo Tunneling Adapter». Его название может несколько отличаться, но в имени должно быть название технологии.

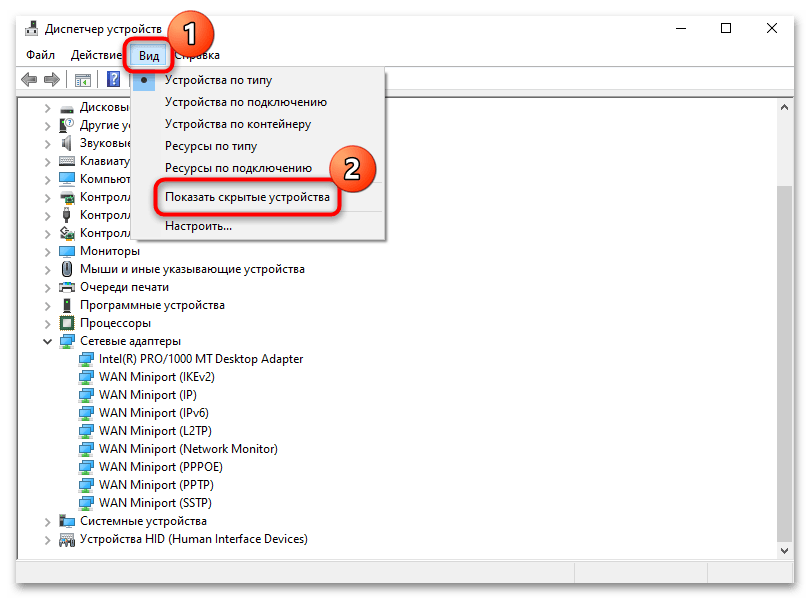
При отсутствии нужной строки нажмите на вкладку «Вид» и отметьте пункт «Показать скрытые устройства».
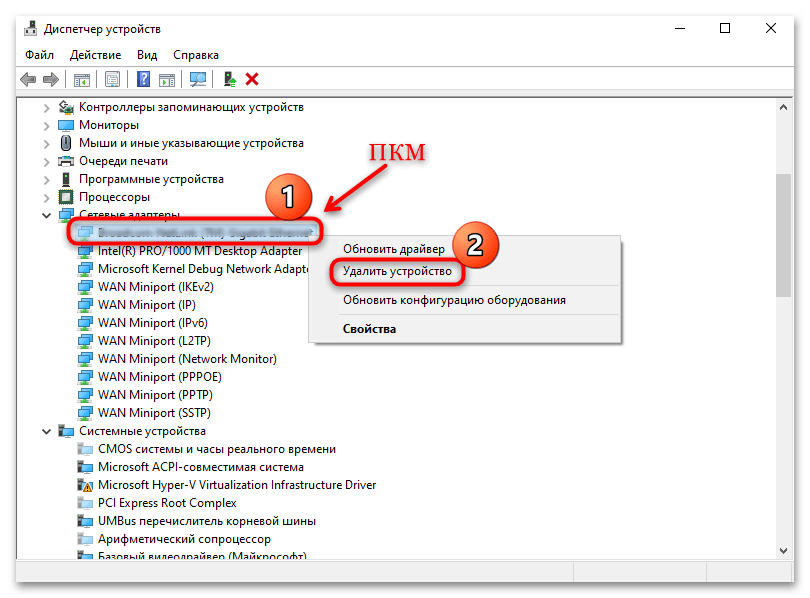
- Кликните правой кнопкой мыши по названию оборудования и выберите пункт «Удалить устройство», затем подтвердите действие.
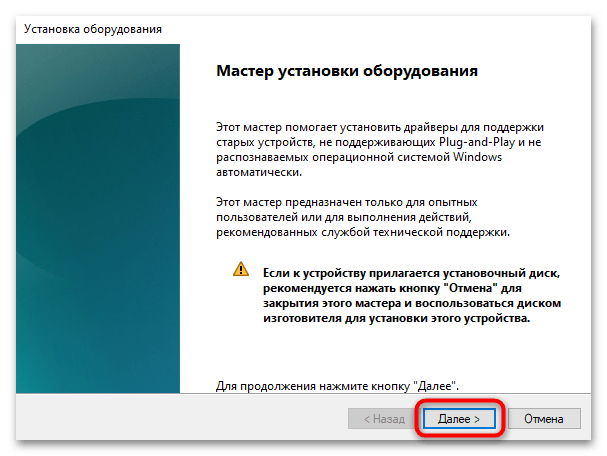
- Далее потребуется установить старое программное обеспечение для сетевых адаптеров. Выделите раздел нажатием левой кнопкой мыши и вверху нажмите на вкладку «Действие», где из меню нужно выбрать «Установить старое устройство».
- В появившемся приветственном окне мастера установки кликните по кнопке продолжения.
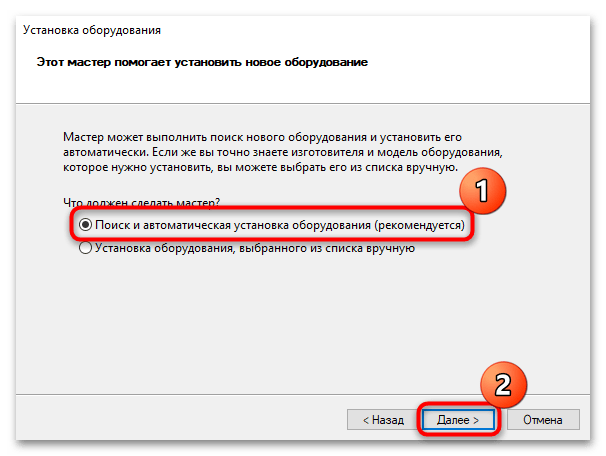
- Оставьте активным пункт «Поиск и автоматическая установка оборудования» и продолжите процедуру.
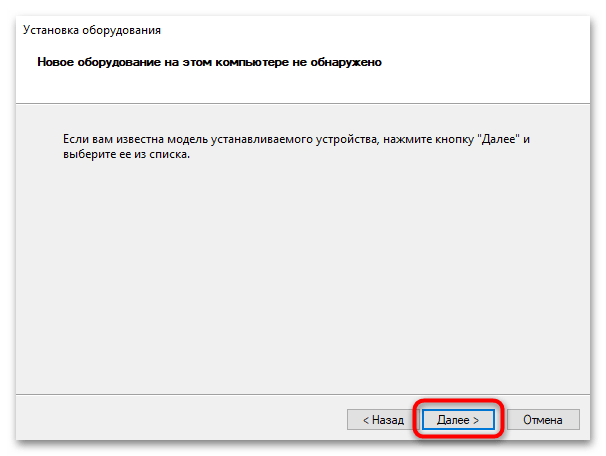
- Снова нажмите на «Далее».
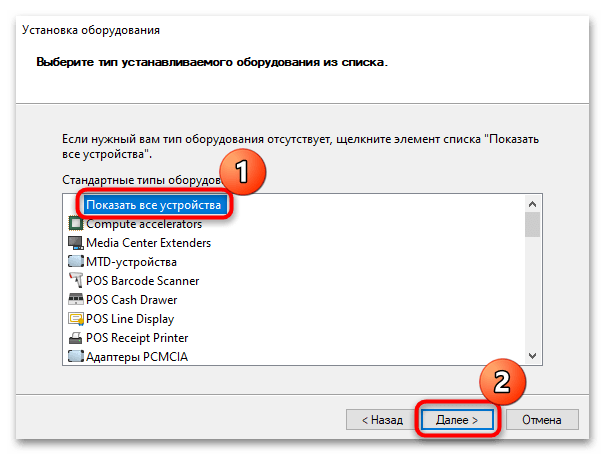
- Выделите строку «Показать все устройства», затем нажмите на кнопку продолжения.
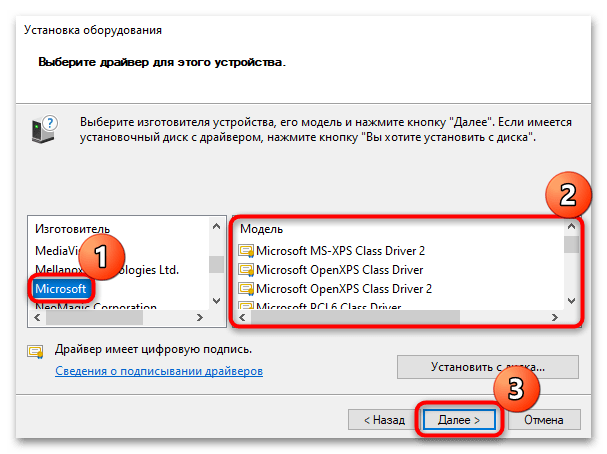
- В блоке слева выберите «Microsoft», а в области правее найдите пункт «Microsoft Teredo Tunneling Adapter», после чего щелкните по «Далее».
Останется следовать инструкциям пошагового мастера установки устаревшего оборудования. Вероятно, это позволит наладить работу сетевого адаптера и его компонентов.
Если ни в списке устройств из раздела «Сетевые адаптеры», ни в перечне доступного оборудования для установки старой версии туннельного адаптера Teredo нет, значит, этот вариант вам не подходит. Закрывайте «Диспетчер устройств» и пробуйте отыскать другую причину проблемы.
Причина 2: Отсутствие прав администратора
Включить Teredo и использовать возможности протокола в Windows 10 нет возможности без прав администратора. Если компьютер не находится в локальной сети или рабочей группе, то, скорее всего, он является единственным или основным устройством, но без расширенных прав. В таком случае есть смысл попробовать получить права администратора, и в этом может помочь наш отдельный материал на сайте.
Подробнее: Получение прав Администратора на компьютере с Windows 10
Если в сети уже есть администратор, следует попросить его включить Teredo.
Причина 3: Проблемы с сетевыми настройками
Проблемы настроек сети также могут препятствовать корректной работе Teredo в Windows 10. Иногда проверить правильность параметров довольно проблематично, поэтому в таких ситуациях может помочь сброс сетевых настроек, что очистит большинство ошибок и стабилизирует подключение к сети. Можно выполнить принудительный сброс настроек на аппаратном уровне на маршрутизаторе (для этого есть специальная кнопка на корпусе), либо воспользоваться средствами операционной системы, о которых наш автор ранее писал более развернуто.
Подробнее: Способы сброса сетевых параметров в Windows 10

Причина 4: Повреждение системных файлов
Не исключено и то, что протокол «отказывается» работать из-за поврежденных системных файлов. Их целостность может быть нарушена по многим причинам, в том числе и после системных сбоев или вирусных атак. Искать конкретную чаще всего нет смысла, а вот восстановить их состояние можно с помощью предустановленной в «десятке» утилиты SFC, которая запускается выполнением специальной команды в «Командной строке». О том, как правильно ее применить, мы писали в статье по ссылке ниже. В ней же еще разобран принцип действия и использование утилиты DISM, предназначенной для проверки и восстановления работы SFC, если нарушенным оказывается и ее функционирование.
Подробнее: Как проверить целостность системных файлов в Windows 10
К слову, после восстановления можно просканировать систему на наличие вредоносного ПО, если знаете или предполагаете, что повреждение файлов системы произошло именно по этой причине.
Подробнее: Как проверить Windows 10 на вирусы и другие угрозы
Причина 5: Блокировка UDP-порта
Технология использует порт 3544, работающий через UDP (транспортный протокол датаграмм для передачи данных в сетях IP), и случается так, что встроенный брандмауэр, маршрутизатор или сторонний антивирус блокирует его, препятствуя корректной работе Teredo.
Читайте также: Просмотр открытых портов в Windows 10
Проверьте, не закрыт ли данный порт, и при необходимости разблокируйте его, после чего вполне может получиться включить Teredo. В отдельных руководствах, доступных по ссылке ниже, мы подробным образом разбирали алгоритм действий по открытию портов в брандмауэре посредством создания правила, а также описывали данную процедуру на маршрутизаторах от наиболее популярных производителей.
Подробнее: Открываем порты в брандмауэре Windows 10 / на роутере
Причина 6: Отсутствие поддержки интернет-провайдером
Как правило, понять, что маршрутизатор не поддерживает технологию Teredo, можно из «Командной строки» после выполнения команды об отображении состояния функции (Способ 1). Тогда в окне консоли отобразится сообщение, что интерфейс отключен из-за некорректного адреса.
Также некоторые интернет-провайдеры попросту блокируют использование Teredo, и если у вас есть подозрение, что дело именно в этом, следует обратиться в службу поддержки для выяснения более детальной информации и возможности поддержки технологии.
Наша группа в TelegramПолезные советы и помощь

Настройка Teredo в Windows XP
blog.cherepovets.ru/serovds/2013/07/30/teredo-winxp/
IPv6/Teredo – Windows 7,8
1. Вы понятия не имеете что такое IPv6/Teredo.
То советую вам пройти по данным ссылкам:
http://ru.wikipedia.org/wiki/NAT
http://ru.wikipedia.org/wiki/IPv6
http://ru.wikipedia.org/wiki/Teredo
Вкратце, если вы используете BitTorrent на постоянной основе, и хотите получить максимум возможностей от p2p, но на вашем пути может встать NAT провайдера, и никакой проброс портов вам не поможет, то использование Teredo, может добавить вам как новых сидов, так и повысить уровень раздачи (для трекеров с учетом статистики).
т.к. поддержка ipv6 BitTorrent Tracker’ами в данный момент только в зачаточном состоянии, как и поддержка IPv6 остальным интернетом, то настройка Teredo не является панацеей для использования всеми пользователями.
Рекомендую использовать Teredo, в том случае, если его использование будет направленно только для торрентов и сёрфинга по IPv6-сайтам.
В случаях, если вы хотите использовать полноценный IPv6, рекомендую погуглить: “туннельные брокеры“, но будьте готовы к тому, что весь ваш трафик будет летать через пол земного шара. Либо обращайтесь в тех.поддержку вашего провайдера, с просьбами предоставить вам настоящий(нативный, родной, полноценный) IPv6!
По крайней мере существуют такие трекеры
http://version6.ru/torrent-trackers
Из мною рекомендованных:
С регистрацией http://ipv6.nnm-club.ru/
Открытый http://ipv6.rutor.org/
И публичный (в качестве РеТрекера) http://www.ipv6tracker.org/
2. Вы пытались настроить но ничего у вас не вышло
У меня нет желания нудно и скрупулезно описывать все принципы IPv6 и Teredo.
Тут как говориться Google в помощь!
UPD 08.09.2015: GOOGLE CHROME IPv6
При использовании браузера на основе кода chromium (google chrome, Opera15 и выше и т.п), в ярлыке запуска указать параметр
--enable-ipv6
"C:\{бла-бла-бла}\chrome.exe" --enable-ipv6
Начиная с версии 45.0.xxxx этот параметр удалён, соответственно удалена поддержка Teredo.
Пользуйтесь другим браузером, не основанным на коде Chromium, либо воспользуйтесь данной инструкцией:
Настройка IPv6/Teredo для браузеров на основе кода Chromium.
.
.
— — — — — — — — — — — — — — — — — —
1′ый способ:
Воспользоваться готовым пакетным файлом – TEREDO-WIN7.bat (zip)(запускать от имени Администратора!), написаный под рядового пользователя русской версии Windows7/8, после чего проверить работоспособность на test-ipv6.com
Содержание TEREDO-ON.bat (кодировка OEM 866)
Pause

reg add HKEY_LOCAL_MACHINE\SYSTEM\CurrentControlSet\services\Dnscache\Parameters /v AddrConfigControl /t REG_DWORD /d 0

timeout /T 3

sc config iphlpsvc start= auto

net start iphlpsvc

timeout /T 10

netsh interface ipv6 reset

timeout /T 3

netsh interface ipv6 set dns "Подключение по локальной сети" static 2001:4860:4860::8888 primary validate= no

netsh interface isatap set state disabled

netsh interface 6to4 set state disabled

netsh interface teredo set state type=enterpriseclient servername=teredo.trex.fi refreshinterval=default clientport=default

timeout /T 3

netsh int ipv6 delete route ::/0 Teredo

netsh int ipv6 add route ::/0 Teredo

timeout /T 3

ipconfig /flushdns

Pause
По необходимости, исправить “Подключение по локальной сети” на нужное
(кодировка OEM 866).— — — — — — — — — — — — — — — — — —
2′ой способ:
Самостоятельно, поэтапно произвести необходимые шаги настройки:
Шаг I. Настройка службы
Сперва нам необходимо включить службу «Вспомогательная служба IP» (если она выключена)
Мой компьютер (контекстное меню) –> Управление -> Службы
Ищем «Вспомогательная служба IP», вызываем свойства, ставим тип запуска «Автоматически», и включаем:
Шаг II. Настройка реестра
В реестре по адресу
HKEY_LOCAL_MACHINE\SYSTEM\CurrentControlSet\services\Dnscache\Parameters
Создайте ключ DWORD – AddrConfigControl, равный нулю.
Для этого необходимо, запустить редактор реестра regedit
(от имени администратора, WIN+R -> regedit)
Шаг III. Назначение DNSv6
Для этого я могу посоветовать использовать Google DNS IPv6
2001:4860:4860::8888
2001:4860:4860::8844
Без настройки DNSv6, вы не сможете открывать сайты в браузере по их доменному имени.
Настройки IPv4 не трогаем.

Шаг IV. Установка и Настройка Teredo
Запускаем «Редактор локальной групповой политики»
Пуск – Выполнить – gpedit.msc (Редакции: Профессиональная, Корпоративная, Максимальная)
(Установка gpedit.msc в редакции Windows 7 Начальная, Домашняя)
Конфигурация компьютера –> Административные шаблоны –> Сеть –> Параметры TCP/IP –> Технологии Тунилирования IPv6
Классификация Teredo по умолчанию -> Включить -> Включенное стостояние
Частота обновления Teredo –> Включить –> 10
Состояние Teredo –> Включить –> Корпоративный клиент
Порт клиента Teredo -> Не задано
Имя сервера Teredo –> Включить –> Выбираем из списка:
• teredo.remlab.net (France)
• teredo.trex.fi (Finland)
• teredo.ipv6.microsoft.com (United Kingdom / USA ) default for windows
• teredo.ngix.ne.kr (South Korea)
• teredo.managemydedi.com (USA, Chicago)
• teredo.autotrans.consulintel.com (Spain)
Для надежной и быстрой работы советую: teredo.remlab.net или teredo.trex.fi
Но лучше сами проверьте доступность всех серверов, через ping teredo.remlab.net
Сервера от microsoft работают и расположены в разных точках планеты, какой выпадет вам – чистая случайность!

Идем далее. Для более продуктивной работы IPv6, отключаем на корню другие технологии тунелирования:
Имя ретранслятора 6to4 -> Отключить
Интервал разрешения имен ретранслятора 6to4 -> Отключить
Состояние 6to4 -> ВКЛЮЧИТЬ -> Отключенное состояние
Состояние IP-HTTPS -> Отключить
Имя маршрутизатора ISATAP -> Отключить
Состояние ISATAP -> ВКЛЮЧИТЬ -> Отключенное состояние
Шаг V. Настройка интерфейса/маршрутов
Пуск – Выполнить – cmd (или сочетание клавиш WIN+R)
Осталось выполнить последние 2 команды
netsh int ipv6 delete route ::/0 Teredo
netsh int ipv6 add route ::/0 Teredo
подождать несколько секунд и проверить работоспособность IPv6:
ping ipv6.nnm-club.me
По сути проделанные операции могут вам и не дать 100% гарантии работоспособности Teredo, это может связанно из-за симметричного NAT (очень редкий случай)…
При смене вашего IPv4 адреса, не паникуйте если пропадет IPv6.
Teredo обновится в течении 1-5 минут.
При настройке Teredo или 6to4, максимальный балл на test-ipv6.com 7/10 – это нормально.
При правильном выполнении данной инструкции, настройка Teredo/IPv6 будет выполнена на раз, без последующего участия пользователя.
Удачи
UPD 16.01.12:
Несколько полезных ссылок.
1. http://test-ipv6.com/
Сервис создан специально для тех, кто мучается с настройкой IPv6, расскажет о всех проблемах, проводит достаточное кол-во тестов, а заодно покажет ваш IPv6 адрес.


2. http://speedtest6.tele2.net и ftp://speedtest6.tele2.net
Проверка скорости IPv6, на выбор файлы от 100Мб до 1000Гб, скорость измеряем либо спец утилитой мониторинга интернет (BWMeter, либо через меню закачек, в самом браузере)
3. http://ipv6-test.com/
Еще один сервис проверка доступности IPv6, но не богат своим функционалом. Если в первом пункте у вас пишет IPv4, это значит, что ваш браузер сначала пытается достучаться до адресата по v4, а после по v6. По сути данный подход более правильный.
4. http://dj-x.info/index.php?topic=331.0
Статья в которой собрано все полезное, что может пригодиться, в одну кучу.
5. [EN] technet.microsoft.com -Teredo Overview
Основная статья, углубленно рассказывающая принципы работы Teredo.
UPD 15.06.12: Отключаем Teredo/6to4/ISATAP на корню.
1. Запускаем «Редактор локальной групповой политики»
Пуск – Выполнить – gpedit.msc
2. Конфигурация компьютера -Административные шаблоны – Сеть – Параметры TCP/IP – Технологии Тунилирования IPv6
Вызываем свойства каждого пункта “Установить состояние XYZ” – включено – отключенное состояние.
“включить отключенное состояние” – бред, но это так
У IP-HTTPS состояние – не задано!
Microsoft Teredo Tunneling Adapter is a virtual device acting as a network translator between IPv4 and IPv6. Without direct (native) access to IPv6 networks, most PCs are now linked to the Internet via IPv4 connections. This difficulty might be solved using this adapter technology, which allows an IPv4 network to communicate with an IPv6 network and vice versa.

Table of Contents
To comprehend what a Teredo adapter is, you must first understand what IPv4 and IPv6 are. IPv4 is an Internet Protocol that assigns each of our computers a unique address that you use to communicate with the rest of the world. IPv4 is still extensively used, but now that there are two, a person speaking in one will be understood by the other, not by those speaking in the other. As a result, making networks communicate with one another will be difficult since the Internet is all about connecting and interacting with one another. As a result, we require an interpreter to convert IPv4 to IPv6 and vice versa, which is what Teredo Tunneling provides.
Method 1: Through Device Manager
This section will show you how to install the Microsoft Teredo Tunneling Adapter on Windows 10. The adapter is available for download on the Internet. Follow the below steps:
Note: Ensure that your Internet connection is operational.
1. Press the Windows Key, type Device Manager and hit the Enter key.

2. Double-click on Network adapters to expand it.
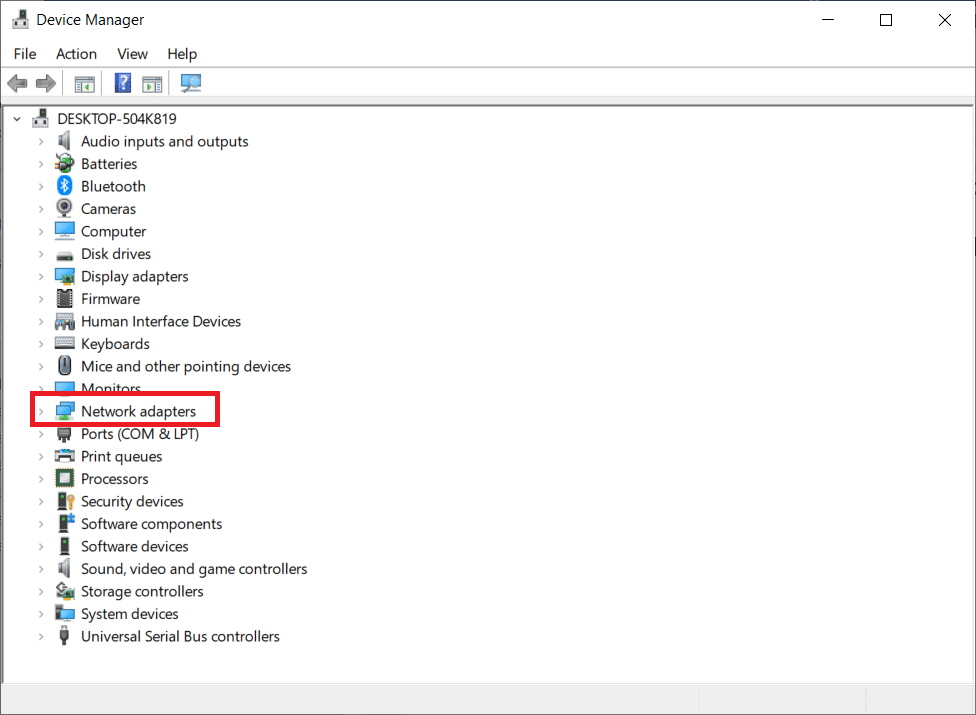
3. Next, click on Add Legacy Hardware from the Actions tab at the top.

4. Click on Next.

5. Again, click on Next.

6. Click on Next in the following window.

7. Scroll down and double-click on Network adapters in Common hardware types.

8. Select Microsoft from the Manufacturer tab, then Microsoft Teredo Tunneling Adapter from the Network Adapter tab, and click on Next.
9. Click on Next again, then click on the Finish button.
Also Read: How to Turn On Network Discovery in Windows 10
Method 2: Use Command Prompt
You may do a few things if you can’t find this Adapter in the Network adapter tab or the list of Legacy drivers. Here’s one method that seems to work for a number of people:
1. Press the Windows key, type cmd, and click on Run as Administrator.

2. Click on Yes in the User Account Control prompt.
3. To disable the Teredo interface, type the following command and hit Enter key.
netsh interface Teredo set state disable

4. Close the Command Prompt and restart your PC after the interface has been disabled.
5. Open another Command Prompt window using step 1.
6. Type the following command and then hit Enter key at the next startup:
netsh interface Teredo set state type=default

Method 3: Interrogate Teredo State
If the preceding technique doesn’t work, try the steps below to check Teredo status and activate it if necessary:
1. Launch Command Prompt as Administrator.

2. To check your Teredo status, type the following command and hit the Enter key.
netsh interface teredo show state

3A. If the returned state is Client or Dormant, it indicates that Teredo operates normally.
3B. If the reported state is offline, type the following command and press the Enter key to re-enable Teredo on your specific machine:
netsh interface teredo set state type=enterpriseclient

Also Read: What Is Microsoft Virtual WiFi Miniport Adapter & How To Enable It?
How to Fix Issues with Teredo Adapter on Windows 10
After installing Microsoft Teredo Tunneling Adapter, you might face a few issues later. You can follow any of the below methods to resolve any problem in such a case.
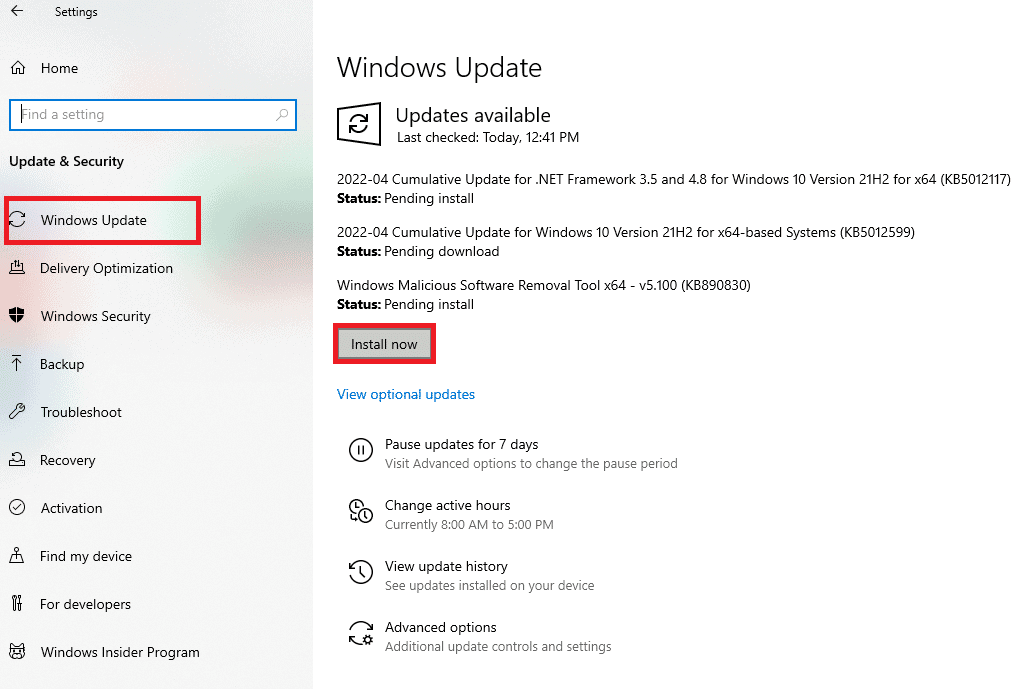
Option 1: Update Windows
Maybe it’s a Windows 10 update issue. It’s possible that you’re using an older version of the software. So, before you do anything else, check for and install any available updates. Read our guide on How to Download and Install Windows 10 Latest Update to do so.
Option 2: Modify Registry Editor
If you see a yellow exclamation mark, proceed as follows:
1. Press the Windows + R keys simultaneously to launch the Run dialog box.
2. Type regedit and hit the Enter key to open the Registry Editor window.

3. Click on Yes in the User Account Control prompt.
4. Navigate to the following path in Registry Editor.
HKEY_LOCAL_MACHINE\SYSTEM\CURRENTCONTROLSET\SERVICES\TCPIP6\PARAMETERS

5. Right-click on Disabled Components in the right pane and choose the Modify… option.

6. Set the Value data to 0 and click on OK.

Also Read: Fix The Registry editor has stopped working
Option 3: Troubleshoot Xbox Networking
Microsoft decided to remove the Teredo Adapter starting with Windows 10 version 1803 since it is now a legacy component. If you get an error that says you need to enable the Teredo Adapter in Windows 10, but your version is newer than 1803, here’s what you should do instead:
1. Press the Windows + R keys simultaneously to launch the Run dialog box.
2. Type ms-settings:gaming-xboxnetworking and press the Enter key to open Xbox Networking.

3. Allow the program to perform the tests after gaining access.
Note: If the scan doesn’t begin immediately, click on the Check again option.

4. Click on the Fix it button if the Server connectivity is blocked.

Option 4: Through Windows PowerShell
If the above method did not help you, follow the below steps:
Note: Make sure the Windows Firewall is turned on. Otherwise, Windows will automatically stop the server connection.
1. Press the Windows key, type PowerShell, and click on Run as Administrator.

2. Type the following commands in the elevated Windows PowerShell window and press the Enter key after each command.
netsh
int teredo
set state servername=win1711.ipv6.microsoft.com

Also Read: Install Group Policy Editor (gpedit.msc) on Windows 10 Home
Option 5: Modify Group Policy Editor
If the steps above don’t work, try the next technique, which involves using the Group Policy Editor to alter a port that may be causing the problem:
Note: The Local Group Policy Editor is only accessible on a few different Windows 10 versions, such as Windows 10 Pro, Enterprise, and Education editions.
1. Press the Windows + R keys together to launch the Run dialog box.
2. Type gpedit.msc and press Enter to launch the Local Group Policy Editor.

3. Navigate to Computer Configuration.
4. Go to Administrative Templates and then Network.

5. Click on TCPIP Settings and then click on IPv6 Transition Technologies in the left pane of the Local Group Policy Editor.
6. Double-click on Set Teredo Client Port on the right-hand side to edit this policy.
7. Enable the policy and change the port number to 3544.
Note 1: Keep in mind that the port must be open and routed through your router for this to work. If you’re not sure how to do it, search for instructions from your router manufacturer.
Note 2: You may encounter Error Code 10 after installing the Microsoft Tunneling Adapter.
Recommended:
- Fix Sedlauncher.exe High Disk Usage in Windows 10
- Fix Device Requires Further Installation on Windows 10
- Fix Stuck on Diagnosing your PC in Windows 10
- How to Install NumPy on Windows 10
We hope you found this information useful and that you have learned how to install Microsoft Teredo Tunneling Adapter. Please let us know which technique was the most beneficial for you. Please use the form below if you have any queries or comments. Also, let us know what you want to learn next.
Enable Teredo in Windows 10 and 11
Windows 10 version 1803 and later disable Teredo by default, so we need to enable it in order to get IPv6 behind NAT using Teredo.
- Choose Teredo server here.
- Open an elevated command prompt.
- Type
netsh interface teredo show stateto show the status of Teredo tunnel. - Type
netsh interface teredo set state client example.comreplacing example.com with your chosen Teredo server. - Type
netsh interface teredo show stateto show the status of Teredo tunnel.- If state says offline and error says “client is in a managed network”, type
netsh interface teredo set state enterpriseclient. - If state says dormant, Teredo has been enabled.
- If state says offline and error says “client is in a managed network”, type
- Try to ping an IPv6 server or use test-ipv6.com.
- Type
netsh interface teredo show stateto show the status of Teredo tunnel. If state says qualified, then your Teredo tunnel is working.
This video will look at how to configure Teredo on Windows. If your Windows computer does not have a native IPv6 connection, Teredo can be configured, which will allow Windows to access the IPv6 network using its IPv4 connection.
Network Setup
00:16 Depending on the environment you are using, the way you configure Teredo may change. This is because Teredo works differently if it is configured on a computer that is in a domain and a computer that is standalone. In this video, a domain computer that is on a home network will be configured. This will demonstrate all the problems that you may encounter configuring Teredo on your network. In this example, the home network will only have IPv4 support and thus a transition protocol will be required in order to access the IPv6 internet.
Demonstration
00:58 Teredo has been available in Windows since Windows XP. The procedure for enabling it or disabling is the same regardless of which version of windows you are using. On the client version of Windows after Windows Vista it is enabled by default. Before Windows Vista, Teredo was disabled and had to be enabled. Currently, in Windows 10 it is enabled by default, however, as the internet becomes more IPv6 ready, in future versions of windows it may be disabled by default. In the case of Windows Server, Teredo is disabled by default.
01:16 To view the current network configuration, right click on the start menu and select the option “Network Connections”.
01:27 To see the network connection of a network adapter, right click the adapter and select Properties. In this example there is only one network adapter which is Network 2.
01:35 Scrolling through the protocol list, “Internet Protocol Version 6 (TCP/IPv6)” is ticked. In order for Teredo to work, IPv6 needs to be ticked and thus enabled. Also “Internet Protocol Version 4 (TCP/IPV4)” needs to be ticked. Other protocols like ISATAP do not require the IPv6 protocol, however as we will see later in the video, Teredo requires the IPv6 protocol in order to operate.
01:51 To see the properties of IPv6, make sure the “Internet Protocol Version 6 (TCP/IPv6)” is ticked and press the Properties button.
01:55 By default, IPv6 will be configured to “Obtain an IPv6 address automatically” and “Obtain DNS server address automatically”. If IPv6 becomes available, the administrator may decide to configure a static IPv6 address. If this is to occur, Teredo will automatically be disabled. The same will occur if the computer obtains an IPv6 address via DHCP or through Stateless Auto Configuration. Essentially Teredo is designed to be used when no IPv6 network is available, thus if the device is configured with a valid IPv6 address then Teredo is disabled as it is no longer required.
02:27 To configure Teredo, right click the start menu and select “Command Prompt”. If there are any open windows from the previous step, close these windows before opening the command prompt.
02:45 In the output of IPConfig, most likely at the bottom, is a section called “Tunnel adapter Teredo Tunneling Pseudo-Interface”. This section contains the configuration for Teredo. This will show the current IP Address being used by Teredo, Link-local address and gateway. If Teredo has not been configured “Media State” will be shown as “Media Disconnected”. If the computer is configured with an IPv6 address, Teredo will automatically be disabled and thus may not appear.
03:08 In Windows 10, Teredo is enabled by default and an IPv6 address will be shown. This IPv6 address contains the Teredo server IPv4 address, Teredo Client IPv4 address and other Teredo configuration options. Later in the video the Teredo address will be looked at in more detail.
03:25 To test the Teredo connection, run the command “Ping -6 google.com” or another address of your choosing. In this case, Teredo is enabled, however, the command returns “Destination host unreachable”. Teredo is configured by default, however, the default configuration points to a Microsoft Teredo server that is no longer in use.
03:45 To configure a new Teredo server or change to another Teredo configuration, run the command “NetSH”. NetSH or Network Shell is a command line utility that allows configuration of local or remote Windows computers Once NetSH is running, the command line will change to “netsh”.
04:00 From the netsh prompt, run the command “Interface Teredo”. Once the command has run, the command prompt will change to “netsh Interface Teredo>”. Future commands run under this prompt will affect the Teredo interface only.
04:14 To show the current configuration of Teredo, run the command “Show State”.
04:19 In the state output for the Teredo client is a parameter called Type. If Teredo is enabled this will be shown as “client”. If Teredo is disabled it will be shown as “disabled”.
04:25 To disable Teredo, run the command “Set State Disabled”. Once this command is run, if “Show State” is run again the type will have changed to “disabled”.
04:46 By default, Windows may be configured to use the server “win10.ipv6.microsoft.com”. This server has been shut down by Microsoft and must be changed to a working server before Teredo will work. To check which server Teredo is currently configured to be used, run the command “Show State”. Microsoft shut down the Teredo server as they originally deployed it to prompt the use of the IPv6 protocol. With estimates as high as 20% usage of the IPv6 protocol, this have been achieved.
05:32 To enable Teredo, run the command “Set State Client”. On some versions of Windows, Teredo will be disabled by default and this command will need to be run.
05:35 To enable Teredo and configure a server, run the command “Set State Client” followed by a Teredo server. In this example the command run was “Set State Client teredo.trex.fi”. In order to find a working Teredo server, you may need to perform a Google search. Your ISP may also have a Teredo server running that you can use. This command can also be used to configure ports and other flags that Teredo will use.
05:50 To exit out of NetSH, run the command “Quit”.
05:56 To test Teredo, run the command “Ping -6 Google.com”. If Teredo does not work, try disabling and enabling the network adapter or restarting the computer.
06:18 To disable and enable the network card, right click on the start menu and select the option “Network Connections”. Once network connections is open, right click on the network connection and select the option “Disable”. This will disable the network connection. Once disabled, right click on the network adapter again and select the option “Enable”. This will enable the network connection and force Teredo to restart.
06:38 To test Teredo, run “Ping -6 google.com” from the command prompt. A response from Google should be received. If not, restart the computer and try again.
06:50 To have a look at the Teredo configuration, run the command IPConfig.
Teredo Address
07:05 A Teredo address contains a lot of information. This information is used to assist routing the Teredo traffic. In this case the Teredo address will be divided into five parts as follows:
Prefix: The first 32 bits of Teredo addresses always start with 2001:0000. When traveling over an IPv6 network, this allows IPv6 to determine that it is a Teredo address.
Teredo IPv4 server: The second part of the Teredo address is the IPv4 Teredo server that is being used. This is 32bits long which is the same length as an IPv4 address. The address is obfuscated which in this case means 1 bits are changed to 0 bits and 0 bits are changed to 1 bits. This makes it hard for humans to read the 32bits, however, computers do not have any problems. The Teredo server that was set earlier using NetSH is the address that will be seen here. In this example, c38c:c38C when the bits are inverted gives 3c73:3c73. Each pair of hexadecimal values is converted into decimal. So 3c becomes 60. 73 becomes 115. In this case the address repeats itself so the next 3c becomes 60 and the last 73 becomes 115 giving an IP Address 60.155.60.115.
Flags: These are flags used by Teredo. For example, one of the flags is if NAT is being used or not. The administrator generally does not need to worry about these options as the operating system will configure them.
UDP Port: The UDP port is the external port used by the NAT device to access the internet. By having the port inside the address, this is what allows the traffic to be delivered back to the original device. A NAT device allows multiple devices to share the same IP Address. By knowing the port that was used, this allows Teredo to be used by many devices behind NAT. This is what makes Teredo different from other IPv6 transition technologies. In this case, the UDP port is 24b8. The port is obfuscated and needs to be inverted giving the hexadecimal value DB47. If the value is changed to decimal this would be 56,135. Thus the UDP port is 56,135.
Client Public IPv4: This is the IPv4 address used to access the internet. If a NAT device is being used, the IPv4 address will be the public IPv4 address of the NAT device. In this example, the address is 276f:134d. The address needs to be inverted which gives d890:ecb2. Converting each part to decimals gives the following: D8 = 216, 90 = 144, ec = 236 and b2 = 178. This results in an IP Address of 216.144.236.178.
Demonstration Group Policy
08:30 To modify local Group Policy, you need to run GPEdit.msc. This can be run from the command prompt or from the start menu.
08:38 Once Group Policy editor has opened, expand down to “Computer Configuration\Administrative Templates\Network\TCPIP Settings\IPv6 Transition Technologies”.
08:52 There are five Group Policy settings that can be configured. These are as follows:
Set Teredo Client Port: By default, Teredo will choose a random port. The administrator is able to configure only one port. If this option is used and the port is already in use by another device, Teredo will fail to initialize.
Set Teredo Default Qualified: By default, the Teredo client will enter a dormant state when not in use. This Group Policy setting allows this to be changed so that the Teredo client is always active and ready to go.
Set Teredo Refresh Rate: This configures how often an IPv6 solicitation message is sent from the Teredo client to the Teredo server. By default, this will be every 30 seconds.
Set Teredo Server Name: This is the Teredo server that will be used.
Set Teredo State: The Teredo State once enabled can be configured to four different options. 1) “Default State” will configure Teredo State to the default for Windows. For example, for Windows 10 and Vista it will be enabled but for Windows XP it will be disabled. 2) “Disabled State” will disable Teredo so it cannot be used. 3) “Client” will enable Teredo, however, if the computer is in a domain and a domain controller is contactable, the Teredo client will not work. 4) “Enterprise Client”. If this option is selected, if the computer is in a domain and a domain controller is contactable, Teredo will still be used.
References
“Teredo Components” https://msdn.microsoft.com/en-us/library/windows/desktop/bb968770(v=vs.85).aspx
Credits
Trainer: Austin Mason http://ITFreeTraining.com
Voice Talent: HP Lewis http://hplewis.com
Companion Document: Phillip Guld https://philguld.com
Video Production: Kevin Luttman http://www.KevinLuttman.com
Quality Assurance: Brett Batson http://www.pbb-proofreading.uk