
“The touchpad on my Lenovo Yoga 3 laptop is not working on Windows 10. I tried to restart the laptop, but the touchpad still doesn’t work. Is there any easy but effective way to fix the problem?”
Lenovo Yoga is one of the most popular Lenovo laptops. And after searching on the Internet, we find that some Lenovo Yoga users have the problem that their Lenovo Yoga touchpads don’t work on Windows 10. To help these users out of the trouble, we summed up 4 useful ways to fix the problem “Lenovo Yoga touchpad not working on Windows 10” here. If you have the same trouble, just try the following ways to make your Lenovo Yoga touchpad be workable now!
Overview:
- Unlock the Windows 10 Lenovo Yoga Touchpad with Hot Keys
- Enable the Windows 10 Lenovo Yoga Touchpad via the Settings window
- Reinstall the driver of the Windows 10 Lenovo Yoga Touchpad
- Detect the Windows 10 Lenovo Yoga Touchpad with the Windows Function
1. Unlock the Windows 10 Lenovo Yoga Touchpad with Hot Keys
Sometimes, an unavailable touchpad may be caused by accidentally locking the touchpad. Therefore, if the Windows 10 Lenovo Yoga touchpad still can’t be used after restarting the Lenovo laptop, you can check if the touchpad is in unlocked status firstly. To unlock the Windows 10 Lenovo Yoga touchpad, you need to find the function key for the touchpad. You could find the key from the laptop’s user guide or directly seek it (the key with touchpad icon) among F1-F12 keys. And usually, the F6 key is the function key for the Lenovo Yoga touchpad. Then, press “Fn + Function key for touchpad” to unlock the locked Lenovo Yoga touchpad.
Tips: You need to use the Lenovo Yoga touchscreen or connect a mouse to your Lenovo laptop to perform the next three ways.
2. Enable the Windows 10 Lenovo Yoga Touchpad via the Settings window
If the touchpad can’t be unlocked with the way 1 above, you can attempt to enable the Windows 10 Lenovo Yoga touchpad with the steps as follows.
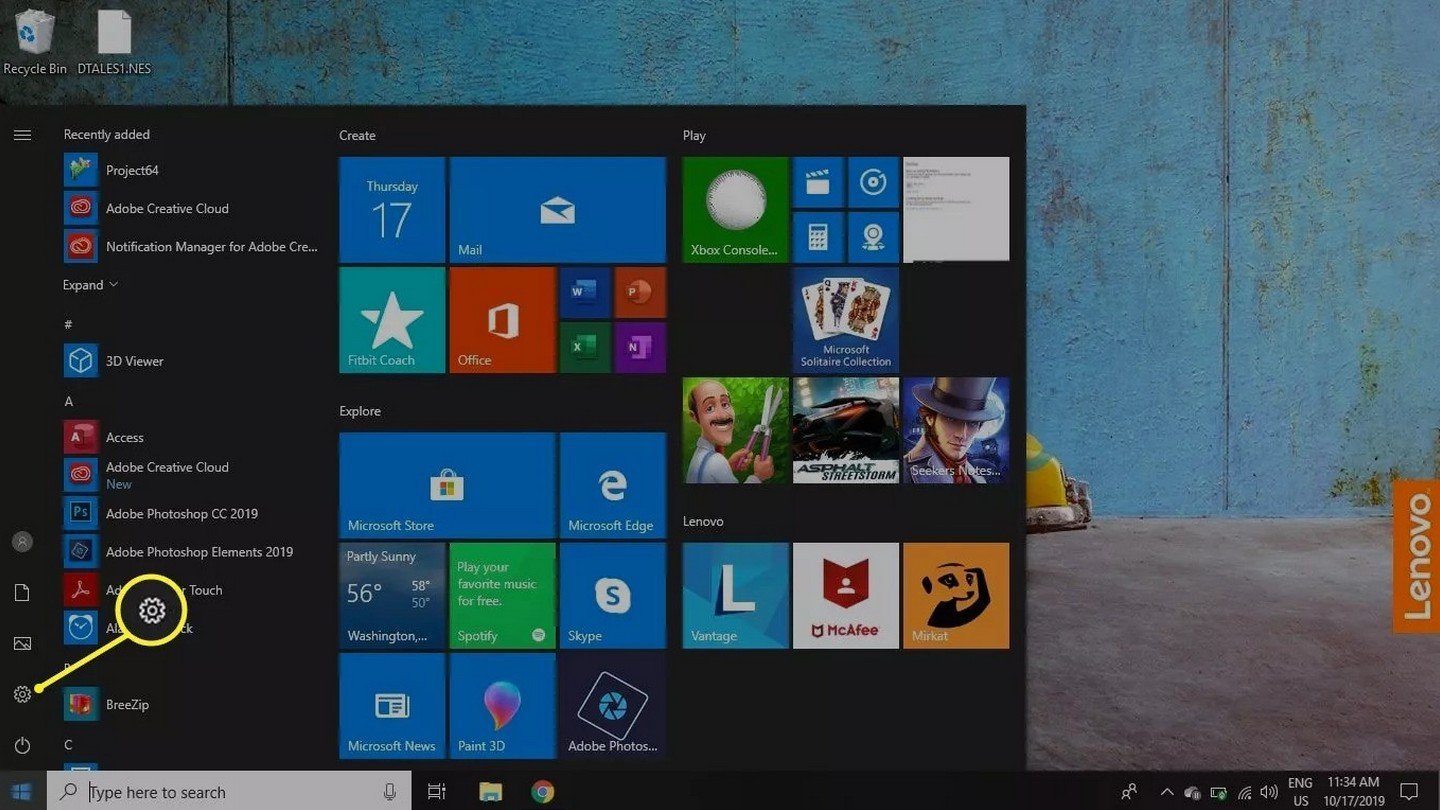
Step 1: Click the Settings option in the Start Menu.
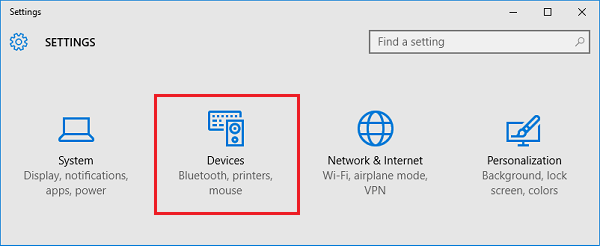
Step 2: Choose the Devices option in the open Settings window.
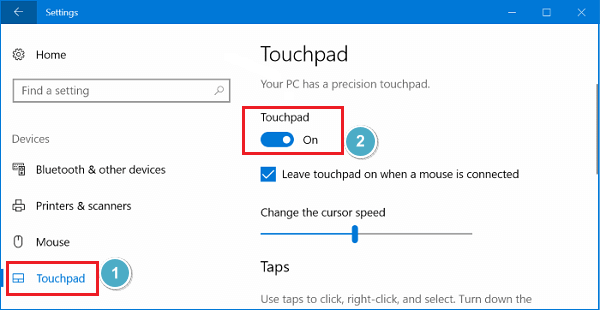
Step 3: In the left pane, select Touchpad and then slide the touchpad button from off to on.
3. Reinstall the driver of the Windows 10 Lenovo Yoga Touchpad
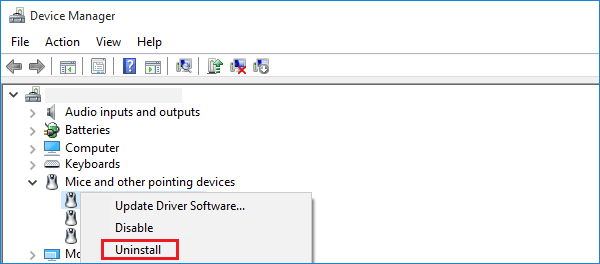
Locate to the Lenovo official website and search the suitable or latest touchpad driver for your Windows 10 Lenovo Yoga laptop. After that, uninstall the original touchpad driver and install the new one.
4. Detect the Windows 10 Lenovo Yoga Touchpad with the Windows Function
Step 1: Search Troubleshooting in the Start menu. Then, under the Troubleshoot computer problems option, click Hardware and Sound.
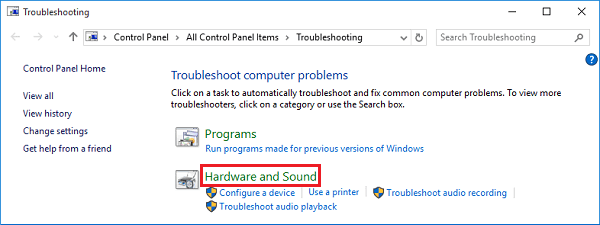
Step 2: Choose the Hardware and Devices option.
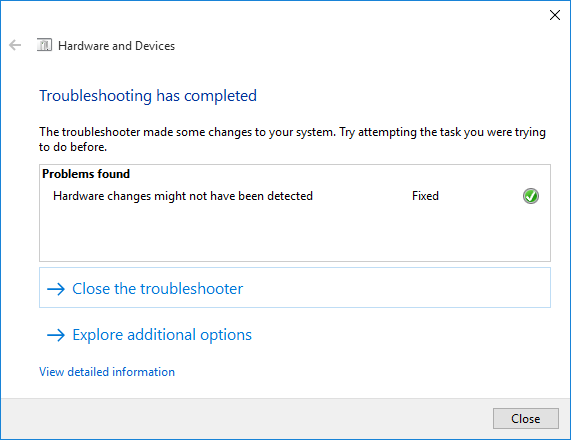
Step 3: In the pop-out wizard, click Next and then the Troubleshooter will detect and fix the Lenovo Yoga touchpad for you.
If the 4 ways above can’t fix the problem “Lenovo Yoga touchpad not working on Windows 10” for you, maybe your Windows 10 Lenovo Yoga laptop has the hardware problem and you have to take it to the Lenovo maintenance center for repair.
Related Articles:
-
3 Ways to Unlock the Locked TouchPad on Windows 10 HP EliteBook
- How to Unlock Function Keys on Your Dell Laptop without Setting in BIOS/UEFI
-
[No Tools Needed] How to Unlock Keyboard on Windows 10 Dell Laptop
- How to Unlock Keyboard on HP Laptop Windows 10: 2 Steps
Laptops are portable devices with many problems when they get old; the primary reason is their compactness. They have significantly less room to breathe and work efficiently; the same goes for touchpad/trackpad issues on laptops manufactured by different OEMs like HP, Lenovo, Dell, etc. In this article, we will talk in more detail about how to resolve the Lenovo touchpad not working issue and offer the best solutions to resolve this issue. Catch us after the jump!
- The touchpad on laptops is an alternative to the full-size mouse we use on desktop PCs or other hardware.
- The functioning of a touchpad is vital as it is the main component of such a portable device to access anything or to make changes to any file.
- There are alternatives available to manage stuff around, but we need to find a way to fix this problem permanently.
- The easiest way to resolve this problem is by using the Fn or Function key on the Keyboard in combination with F8 or F4 ( the key combination will depend upon the Lenovo laptop model number).
If holding Fn+F8 or Fn+F4 resolves the problem, then you are all set to go else; we have a few basic to advanced-level step-by-step guides to help solve the problem.
Please be informed to perform the below touchpad troubleshooting step; having an external mouse connected would be nice, as it will help the user navigate various options much more quickly and easily.
How to Fix the Lenovo Touchpad Not Working Issue in Windows 10/11?
You can try the below 8 steps when encountering the issue of the Lenovo ThinkPad touchpad not working on your Windows 10 or 11 laptop/IdeaPad, as it is most likely related to the driver.
1) Windows Troubleshooter
In Windows 10 and Windows 11 PC, an inbuilt troubleshooter finds and fixes problems as and when they arise. To fix the Lenovo touchpad not working issue, we can use a keyboard troubleshooter to find and fix the touchpad malfunctioning.
To start the Windows troubleshooter, users are requested to follow the below steps:
- Go to start -> type -> control panel -> enter; this will open the control panel window on the screen
- In the second step, go to the System and Security settings option
- Under System and Security -> Security and Maintenance option, select Troubleshoot common computer problems; this step will open Troubleshoot window.
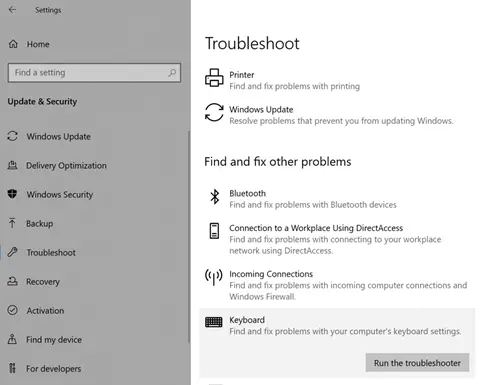
- In the Troubleshoot window, scroll down. Under Find and Fix other problems -> select Keyboard -> click on Run the troubleshooter.
- After clicking on the keyboard option, it will open the keyboard troubleshooter and try to find and fix the problem with the touchpad.
If the inbuilt troubleshooter cannot fix the problem, move to the next troubleshooting step.
2) Enable the Touchpad from the Control Panel
One common issue that users may encounter is the Lenovo ThinkPad touchpad not working due to a disabled touchpad/trackpad in the control panel. Due to any system updates or third-party application installation process, there are instances where it disables the touchpad feature altogether from Windows.
In Windows 10/11, there is an easier way to enable this option under the control panel.
- To enable the touchpad from the control panel, go to Start -> type “touchpad settings” -> enter
- In the touchpad window, toggle the touchpad option to enable and test the touchpad
3) Restore Default Touchpad settings
The third option to resolve the Lenovo touchpad not working issue is restoring the touchpad settings to default. Restoring the touchpad will remove any presets for the touchpad/trackpad configured.

To restore the default touchpad, kindly follow the below steps:
- Go to Start and type “touchpad settings” and hit enter
- It will open the touchpad settings window
- In the touchpad settings Window, scroll down, and at the end, there is an option to reset the touchpad under “Reset your touchpad.”
- Click on the Reset button, which will wipe out any preset for the touchpad and remove any blockages impacting the touchpad’s functioning.
Related: Best laptop for white hacking and IT Security
This step solved the Lenovo touchpad not working issue in most cases where I worked.
4) Update Touchpad drivers
There are instances where Windows 10/11 is updated to the latest version; however, the touchpad driver version is not updated on time and may start creating problems. In such a scenario, it is essential to get the newest version of drivers for the touchpad and install them for compatible Windows versions.
To update touchpad drivers, please follow the below steps:
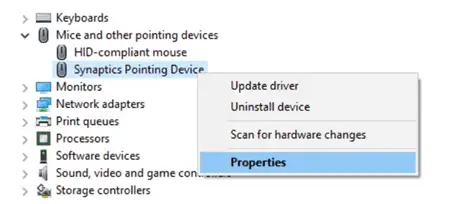
- Go to start -> type “device manager” ->enter
- In the Device Manager window, go to Mice and other pointing device option
- Select “Synaptic Pointing Device” -> right-click -> update drivers
- In the next window, select “Browse my computer for driver software” -> “Let me pick from a list of device drivers on my computer” -> select the latest driver from the list -> next.
- Wait for Windows to perform a driver update; once the update process is completed, it will show “device updated successfully” and ask to restart
- Please restart the laptop and check for any possible issues
- Also, in case the issue is not resolved after installing the latest compatible driver, it is always recommended to install the generic drivers after the “Let me pick from a list of device drivers on my computer” window -> install and test
Also, visiting the Lenovo support page is recommended to download the correct touchpad driver for your Lenovo laptop/Ideapad. Installing the drivers from the manufacturer’s website fixes the issues better than updating drivers from the Windows device manager.
5) Rollback Device Drivers
There are instances when, after installing the latest driver or even trying the generic drivers, the touchpad still does not work. In that case, we need to remove the driver we installed and restore it to its previous state.
- To start this process, go to start -> type “device manager” ->enter
- In the Device Manager window, go to Mice and other pointing devices option
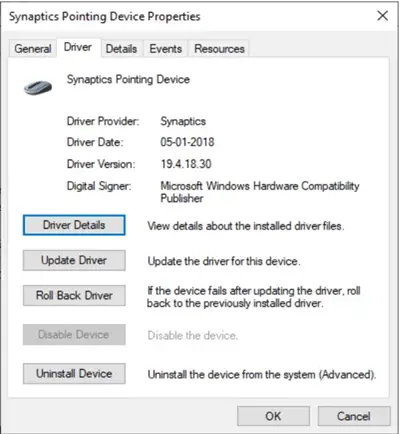
- Select “Synaptic Pointing Device” -> right-click -> properties
- Select the “Driver” tab and “Roll Back Drivers.”
- Once done, restart the laptop and check
6) Rollback Windows Update
If a complete patch of Windows update caused the Lenovo touchpad not to work, then we have to roll back the latest Windows update from the control panel.
- To roll back Windows update, go to start -> Update and Security -> enter
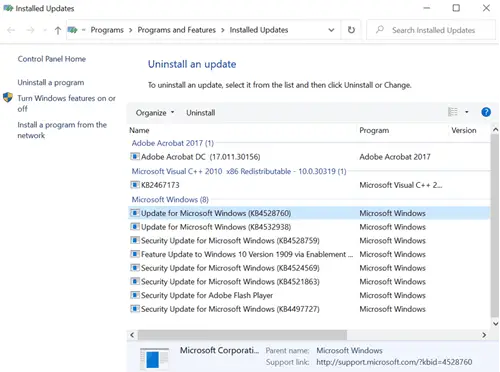
- In the next window, click View update history -> and select “uninstall updates.”
- A new window will pop up with a list of recent Windows updates with a date stamp.
- Select recently installed updates and uninstall them one by one.
- Once the process is complete, restart the computer and check the touchpad performance.
Read Also: How to charge laptop battery externally
7) Change Power Management settings
There are instances where certain specific power management settings have also caused the touchpad to stop working.
- To fix this problem, go to start -> type “device manager” ->enter
- In the Device Manager window, go to Mice and other pointing devices option
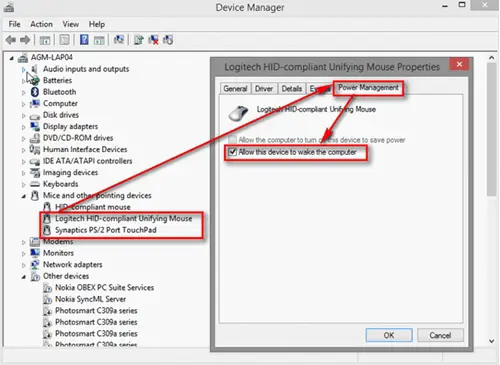
- Select “Synaptic Pointing Device” -> right-click -> properties
- Go to the “Power Management” tab -> uncheck the option for “Allow the computer to turn off this device to save power” -> ok
- Close the device manager window and restart the computer
 Disconnect External Connected Devices
 Disconnect External Connected Devices
Externally connected peripherals also sometimes cause such issues. To resolve this problem, unplug all connected devices to the laptop, restart the computer to clear the cache, and check the touchpad performance.
These are all the options for the Lenovo trackpad not working issue that can be resolved on Windows 10. Try the steps mentioned above and let us know if you have any problems in your comment section below.
Владельцы ноутбуков, у которых появилась задача настроить работу тачпада, могут столкнуться с тем, что необходимые настройки отсутствуют в «Параметрах» — либо нет самого раздела «Сенсорная панель», либо он присутствует, но не содержит нужных настроек или, в некоторых случаях — все настройки не активны.
В этой инструкции подробно о том, чем может быть вызвана такая ситуация и вариантах решения проблемы.
Драйверы устройства

Первое, на что следует обратить внимание, если вы столкнулись с отсутствием настроек сенсорной панели — драйверы тачпада, причём независимо от того, работает он или нет. Для этого:
- Используя поиск в Интернете, найдите страницу поддержки вашей модели ноутбука, используя запросы вида «МОДЕЛЬ поддержка» или «МОДЕЛЬ support».
- Перейдите в раздел загрузок и драйверов, найдите драйвер тачпада (TouchPad, Pointing Device), скачайте и установите его.

- Дополнительно рекомендую установить оригинальные драйверы из раздела «Чипсет», это также может влиять на работу тачпада.

После установки необходимых драйверов перезагрузите ноутбук и проверьте, была ли решена проблема. Примечание: даже если диспетчер устройств сообщает, что наиболее подходящий драйвер уже установлен, это не обязательно так — это сообщение говорит лишь о том, что у самой Windows нет более подходящих.
Дополнительно рекомендую проверить, нет ли устройств с ошибками (с желтым восклицательным знаком) или отключенных устройств (со стрелкой) в диспетчере устройств, зайти в который можно, нажав правой кнопкой мыши по кнопке «Пуск» и выбрав пункт «Диспетчер устройств».
В первую очередь следует обратить внимание на устройства в разделе «Мыши и иные указывающие устройства» и «Устройства HID (Human Interface Devices)» (в последнем случае особое внимание на наличие и состояние пункта «HID-совместимая сенсорная панель»), но потенциально наличие любых устройств с ошибками может влиять и на работу тачпада.

Если такие устройства есть, то следует разобраться с ошибками (открыть свойства устройства, уточнить код ошибки, найти варианты решения), а если устройство отключено — включить его.
Другие варианты решения
В большинстве случаев установка оригинальных драйверов производителя вместо тех, что Windows установила автоматически, решает проблему и необходимые настройки появляются. Если этого не произошло, несколько дополнительных пунктов:
- Если помимо отсутствия настроек сенсорной панели у вас она не работает в принципе, изучите инструкцию Что делать, если не работает тачпад на ноутбуке.
- Если до недавнего времени проблем не наблюдалось, а какие-либо переустановки ОС не производились, попробуйте использовать точки восстановления системы.
- Для некоторых очень старых ноутбуков сенсорная панель с точки зрения ОС может либо считаться обычной мышью, либо иметь лишь базовые настройки, например, только настройки чувствительности.
- При наличии какого-то фирменного ПО от производителя ноутбука с возможностью управления устройствами, внимательно изучите его настройки: возможно, что-то полезное в контексте рассматриваемой темы найдётся там.
- Если настройки появляются после простой перезагрузки ноутбука (именно через опцию «Перезагрузка»), но исчезают после использования завершения работы, спящего режима или гибернации, попробуйте отключить быстрый запуск Windows, а также установить все оригинальные драйверы чипсета и, при наличии — управления электропитанием.
Возможно, ваша ситуация с настройками сенсорной панели отличается, в этом случае опишите ситуацию в деталях: возможно, какие-то закономерности и наблюдения, постараемся разобраться вместе.
Тачпад — неотъемлемая часть большинства ноутбуков, предназначенная для управления курсором без мышки. В Windows 10 предусмотрены разнообразные настройки, позволяющие адаптировать сенсорную панель под индивидуальные предпочтения. Рассказываем о том, как настроить тачпад для максимально комфортной и эффективной работы.
Доступ к настройкам тачпада
Под тачпад отведен отдельный раздел в параметрах Windows 10. Для доступа к нему выполните следующие действия:
- Кликните по меню «Пуск» левой кнопкой мыши и нажмите на значок в виде шестеренки — это раздел «Параметры»;
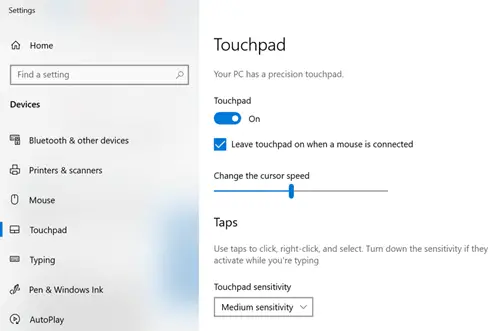
- Далее выберите раздел «Устройства» и найдите там пункт «Тачпад».
Источник: Lifewire / настройки тачпада
Теперь можно приступить к настройке тачпада в соответствии со своими предпочтениями.
Включение и отключение тачпада
Начнем с банального — отключения сенсорной панели. По умолчанию она активна и может мешать при наборе текста. Также тачпад явно будет лишним в ситуации, когда пользователь отдал предпочтение мышке.
Для отключения выполните следующие действия:
- Отключение тачпада: в разделе настроек найдите переключатель «Включить тачпад» и переведите его в положение «Выкл»;
- Автоматическое отключение при подключении мыши: установите флажок рядом с опцией «Оставлять тачпад включенным при подключенной мыши», чтобы он автоматически отключался при использовании внешней мыши.
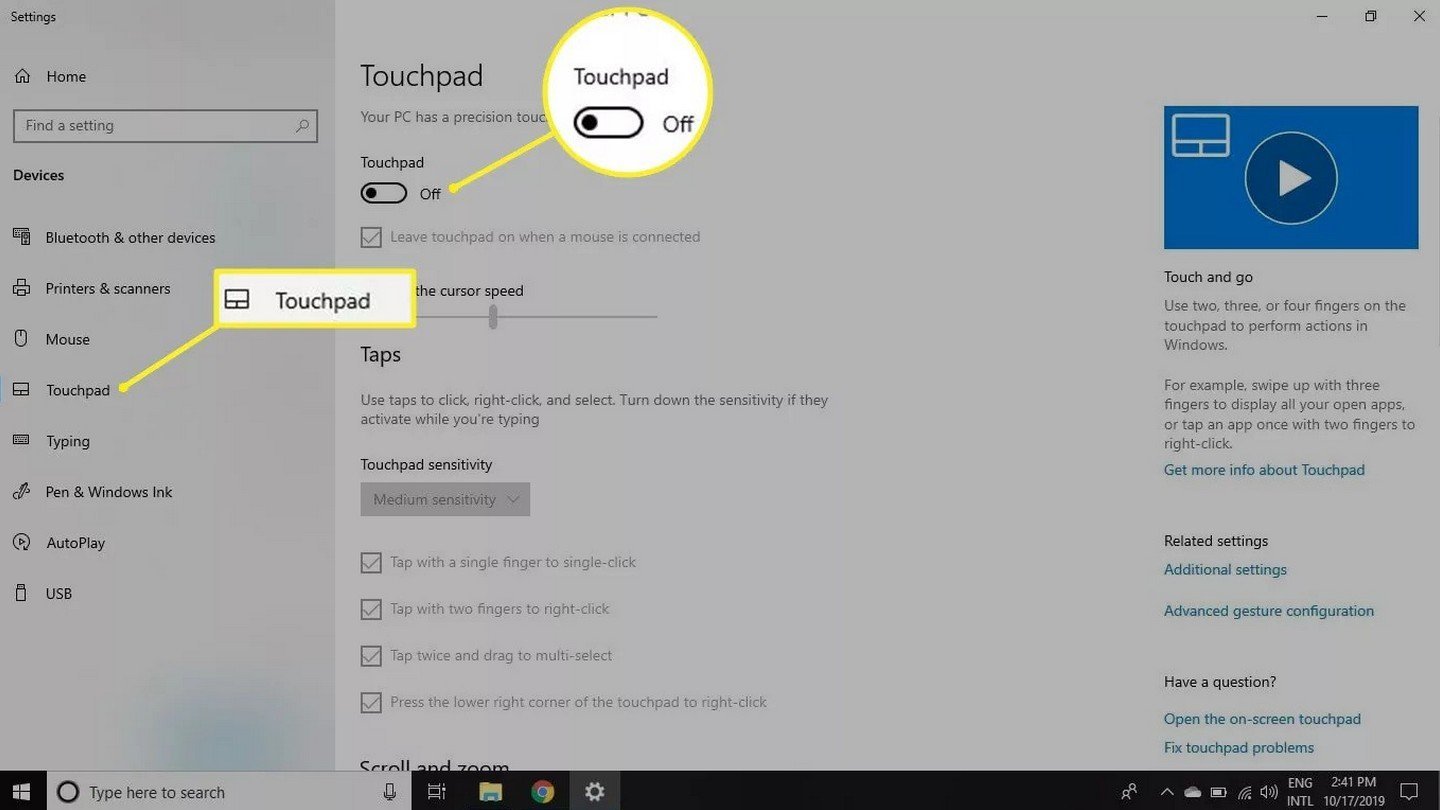
Источник: Lifewire / Выключение тачпада
Настройка чувствительности тачпада
Чувствительность тачпада влияет на скорость реагирования курсора на движения пальцев:
- Найдите раздел «Чувствительность тачпада»;
- Выберите уровень чувствительности: доступны варианты от «Низкая чувствительность» до «Очень высокая чувствительность»;
- Протестируйте настройки: после выбора уровня переместите курсор и оцените, насколько комфортно вам работать.
Источник изображения: Lifewire / Настройка чувствительности
Настройка жестов и касаний
Windows 10 поддерживает различные жесты, упрощающие работу с системой.
Настройка одиночных и двойных касаний
- Одиночное касание: позволяет выполнять щелчок мыши одним нажатием на тачпад;
- Двойное касание: позволяет выполнять двойной щелчок.
Чтобы настроить эти функции:
- Прокрутите вниз до раздела «Жесты с помощью одного пальца»;
- Установите флажки для необходимых опций.
Прокрутка и масштабирование
- Прокрутка двумя пальцами: позволяет перемещаться по странице, проводя двумя пальцами вверх или вниз;
- Масштабирование: жест «щипок» для увеличения или уменьшения масштаба.
Настройка:
- В разделе «Прокрутка и масштабирование» установите флажки для желаемых функций;
- Выбор направления прокрутки: опция «Направление прокрутки».
Жесты тремя и четырьмя пальцами
Эти жесты позволяют быстро переключаться между приложениями, рабочими столами и многое другое.
Жесты тремя пальцами:
- Свайп вверх: просмотр всех открытых окон (аналог Alt + Tab);
- Свайп вниз: сворачивание всех окон и показ рабочего стола;
- Свайп влево/вправо: переключение между приложениями.
Жесты четырьмя пальцами:
- Аналогичные функции, но с использованием четырех пальцев.
Настройка:
- Прокрутите до раздела «Жесты с помощью трех пальцев» или «Жесты с помощью четырех пальцев»;
- Выберите действия для свайпов и касаний из выпадающего меню.
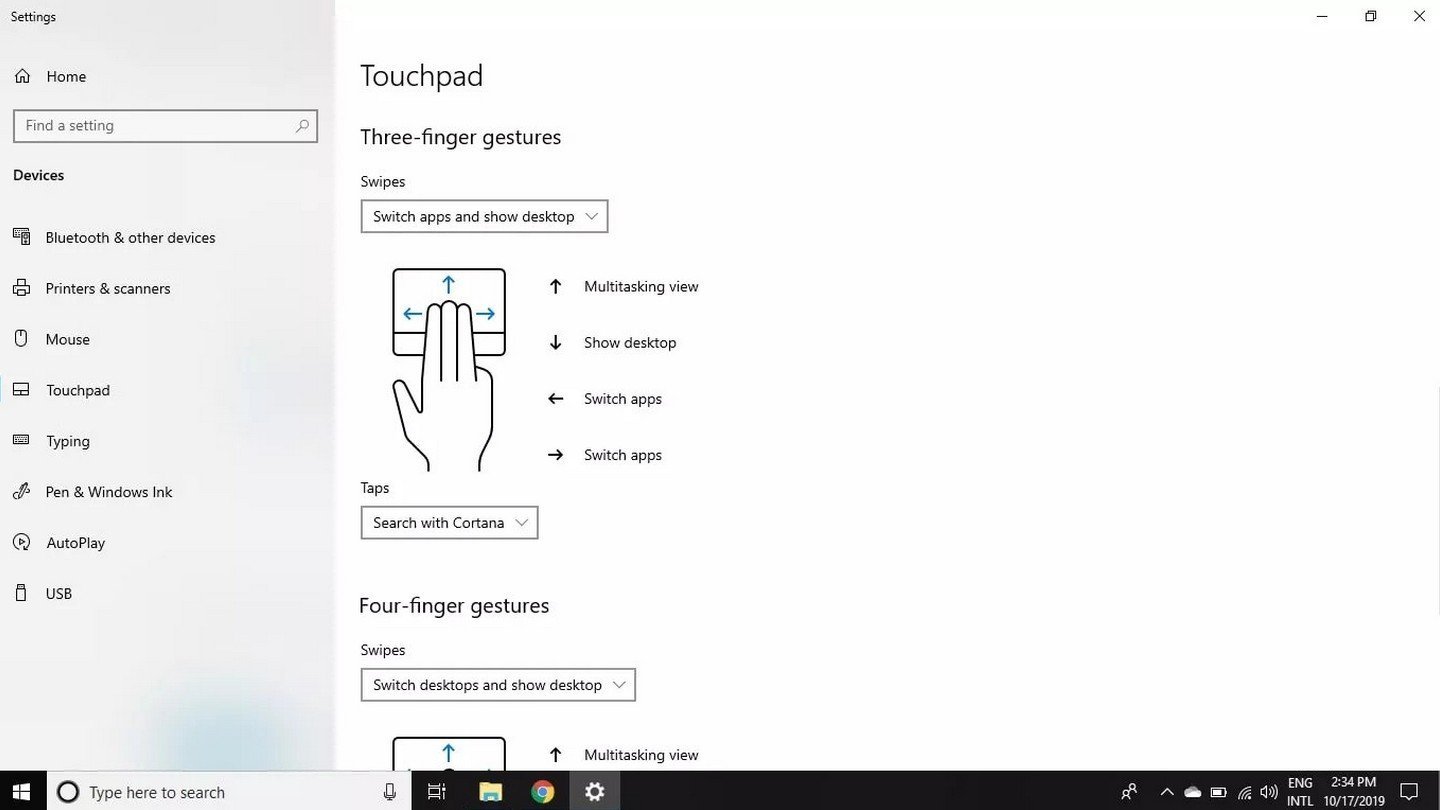
Источник изображения: Lifewire / Настройки касаний
Дополнительные настройки
Элементы управления щелчком
- Левая и правая кнопки: настройте области тачпада, отвечающие за левый и правый щелчки;
- Задержка отклика: позволяет избежать случайных нажатий при наборе текста.
Настройка:
- В разделе «Касания» выберите нужные опции;
- Установите задержку отклика: рекомендуемая опция «Нет задержки».
Обновление драйверов тачпада
Обновление драйверов может улучшить работу тачпада и добавить новые функции.
- Откройте «Диспетчер устройств»: нажмите правой кнопкой мыши на «Пуск» и выберите соответствующий пункт;
- Найдите раздел «Мыши и иные указывающие устройства»;
- Правый клик на вашем тачпаде и выберите «Обновить драйвер»;
- Следуйте инструкциям мастера обновления.
Решение распространенных проблем
Тачпад не работает
- Проверьте, не отключен ли тачпад в настройках;
- Обновите или переустановите драйверы;
- Проверьте функциональные клавиши: на некоторых ноутбуках есть комбинации клавиш для отключения тачпада (например, Fn + F7).
Жесты не функционируют
- Убедитесь, что жесты включены в настройках;
- Проверьте совместимость: некоторые тачпады не поддерживают определенные жесты;
- Обновите драйверы до последней версии.
Использование программного обеспечения производителя
Некоторые производители ноутбуков предоставляют собственные приложения для расширенной настройки тачпада (например, Synaptics или ELAN):
- Откройте панель управления и найдите соответствующее приложение;
- Настройте дополнительные параметры, недоступные в стандартных настройках Windows.
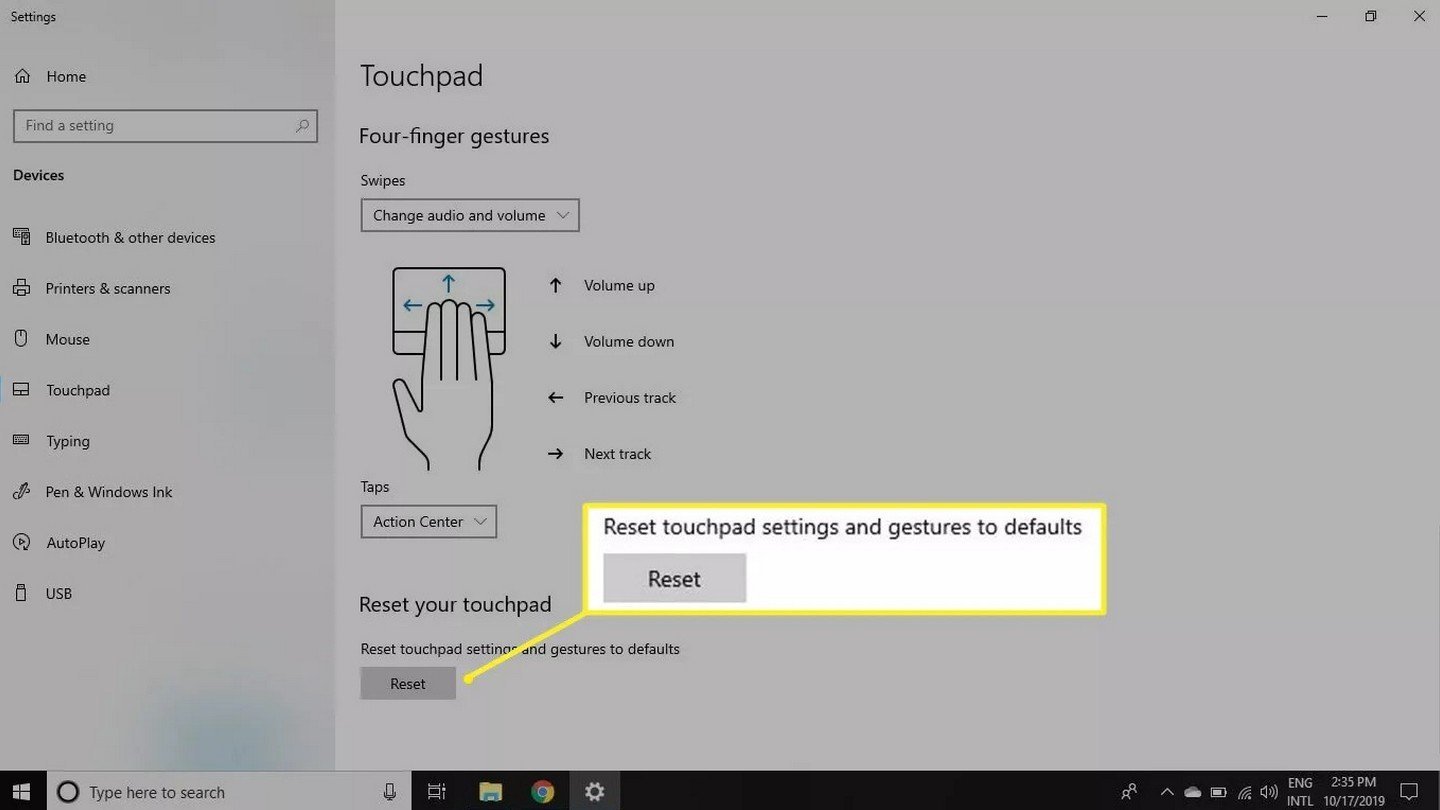
Источник изображения: Lifewire / Сброс настроек тачпада
Заключение
Настройка тачпада в Windows 10 позволяет сделать работу на ноутбуке более удобной и продуктивной. Благодаря широкому набору опций и возможностей персонализации каждый пользователь может адаптировать тачпад под свои нужды. Не забывайте регулярно обновлять драйверы и обращаться к руководствам производителя для получения максимальной отдачи от вашего устройства.
Помните, что правильно настроенный тачпад — залог комфортной работы и удовольствия от использования вашего ноутбука.
Заглавное фото: MakeUseOf
Читайте также:
- Как настроить клавиатуру на Windows 10
- Как подключить беспроводную клавиатуру к компьютеру
- Почему не работает клавиатура на ПК или ноутбуке
- Как отключить тачпад на ноутбуке
- Как включить тачпад на ноутбуке
The touchpad is an essential component of any laptop, offering a convenient way to navigate your system without the need for an external mouse. However, there are times when you might want to enable or disable the touchpad on your Lenovo laptop. Whether you’re experiencing unintentional cursor movements, prefer using an external mouse, or need to troubleshoot touchpad issues, knowing how to control this feature across different Lenovo series—ThinkPad, Yoga, and IdeaPad—is invaluable. This guide provides step-by-step instructions to help you manage your touchpad settings effectively.
Reasons to Enable or Disable the Touchpad
Before diving into the how-to, it’s important to understand why you might need to enable or disable your touchpad:
- Prevent Accidental Touches: Disabling the touchpad while typing can prevent accidental cursor movements.
- Use an External Mouse: If you prefer using a mouse, disabling the touchpad can reduce clutter and interference.
- Troubleshooting: Enabling or disabling the touchpad can help diagnose hardware or software issues.
- Power Management: Turning off the touchpad can save battery life, especially when it’s not in use.
Enabling and Disabling the Touchpad on Lenovo ThinkPad Laptops
ThinkPad laptops are renowned for their reliability and robust build quality. Managing the touchpad on these devices can be done through hardware shortcuts, Windows settings, or Lenovo-specific software.
Method 1: Using the Function Key
- Locate the Function Key:
- On most ThinkPad models, the touchpad toggle is assigned to the F8 key. Look for an icon resembling a touchpad with a diagonal line through it.
- Toggle the Touchpad:
- Press Fn + F8 simultaneously. This keyboard shortcut will enable or disable the touchpad.
Method 2: Through Windows Settings
- Open Settings:
- Press Windows + I to open the Settings app.
- Navigate to Devices:
- Click on Devices and then select Touchpad from the left sidebar.
- Toggle the Touchpad:
- Use the switch to turn the touchpad On or Off as desired.
Method 3: Using Lenovo Vantage
Lenovo Vantage is a utility that provides various system settings and updates.
- Open Lenovo Vantage:
- Search for Lenovo Vantage in the Start menu and open the application.
- Access Input Settings:
- Navigate to the Device section and select Input & Accessories.
- Manage Touchpad:
- Here, you can enable or disable the touchpad and adjust its sensitivity and other settings.
Enabling and Disabling the Touchpad on Lenovo Yoga Laptops
Lenovo Yoga laptops, known for their versatility and 2-in-1 functionality, offer multiple ways to control the touchpad.
Method 1: Using the Function Key
- Identify the Function Key:
- On Yoga models, the touchpad toggle is typically found on the F6 or F8 key. Look for the touchpad icon.
- Toggle the Touchpad:
- Press Fn + F6 or Fn + F8 to enable or disable the touchpad.
Method 2: Through Windows Settings
- Open Settings:
- Press Windows + I to launch the Settings app.
- Navigate to Devices:
- Click on Devices, then select Touchpad.
- Toggle the Touchpad:
- Switch the touchpad On or Off using the provided toggle.
Method 3: Using the Quick Settings Panel
- Access Quick Settings:
- Click on the network, sound, or battery icon in the taskbar to open the Quick Settings panel.
- Adjust Touchpad Settings:
- Look for the touchpad icon and click on it to toggle the touchpad on or off.
Enabling and Disabling the Touchpad on Lenovo IdeaPad Laptops
Lenovo IdeaPad laptops cater to a wide range of users, offering straightforward methods to manage the touchpad.
Method 1: Using the Function Key
- Locate the Function Key:
- On IdeaPad models, the touchpad toggle is often assigned to the F6 or F8 key.
- Toggle the Touchpad:
- Press Fn + F6 or Fn + F8 to enable or disable the touchpad.
Method 2: Through Windows Settings
- Open Settings:
- Press Windows + I to open the Settings app.
- Navigate to Devices:
- Select Devices and then Touchpad from the sidebar.
- Toggle the Touchpad:
- Use the switch to turn the touchpad On or Off.
Method 3: Using Lenovo Settings or Lenovo Vantage
- Open Lenovo Settings or Lenovo Vantage:
- Search for Lenovo Settings or Lenovo Vantage in the Start menu and open the application.
- Access Input Settings:
- Navigate to the Input section.
- Manage Touchpad:
- Enable or disable the touchpad and adjust related settings as needed.
Troubleshooting Touchpad Issues
If you’re unable to enable or disable the touchpad using the methods above, consider the following troubleshooting steps:
1. Update or Reinstall Touchpad Drivers
- Open Device Manager:
- Press Windows + X and select Device Manager.
- Locate Touchpad Device:
- Expand the Mice and other pointing devices section.
- Update Driver:
- Right-click on your touchpad device (e.g., Synaptics, ELAN) and select Update driver.
- Choose Search automatically for updated driver software.
- Reinstall Driver (If Necessary):
- If updating doesn’t work, right-click the touchpad device and select Uninstall device.
- Restart your laptop, and Windows should reinstall the driver automatically.
2. Check BIOS/UEFI Settings
Sometimes, the touchpad can be disabled from the BIOS/UEFI.
- Access BIOS/UEFI:
- Restart your laptop and press the F2 or Delete key repeatedly during startup to enter BIOS/UEFI settings.
- Navigate to Input Settings:
- Look for sections like Configuration, Device, or Input.
- Enable Touchpad:
- Ensure that the touchpad is set to Enabled.
- Save and Exit:
- Save your changes and exit BIOS/UEFI. Your laptop will restart with the new settings.
3. Perform a System Restore
If the touchpad was working previously but stopped after a recent change, a system restore might help.
- Open System Restore:
- Press Windows + S, type System Restore, and select Create a restore point.
- Initiate Restore:
- Click on System Restore and follow the on-screen instructions to choose a restore point before the touchpad issue began.
- Complete the Restore:
- Allow your system to restore to the selected point and restart your laptop.
Additional Tips
- Use an External Mouse: If the touchpad is malfunctioning, connecting an external mouse can provide temporary navigation.
- Enable Tap-to-Click: In touchpad settings, enabling tap-to-click can enhance usability.
- Adjust Sensitivity: Fine-tune the touchpad sensitivity in Windows settings or Lenovo software to suit your preference.
- Keep Drivers Updated: Regularly update your touchpad drivers to ensure optimal performance and compatibility.
Conclusion
Managing the touchpad on your Lenovo laptop—whether it’s a ThinkPad, Yoga, or IdeaPad—can significantly enhance your user experience. By knowing how to enable or disable the touchpad through various methods, you can customize your device to better fit your workflow and preferences. Whether you’re preventing accidental touches while typing, troubleshooting hardware issues, or optimizing your setup for external peripherals, these steps provide a comprehensive approach to controlling your touchpad functionality. Regular maintenance and staying informed about your device’s settings will ensure that your Lenovo laptop remains efficient and user-friendly.