
Software defined storage today is one of the hottest and most desired technology solutions in the enterprise datacenter. Most organizations are looking very seriously at software defined storage solutions as opposed to refreshing SAN storage devices in the next refresh cycle. Why is this? Software defined storage provides exceptional features and functionality that generally allow businesses today to not be tied to a specific hardware vendor for features and functionality as has traditionally been the case. With the release of Windows Server 2019 (in a state of non release due to retraction from Microsoft with reported issues), the latest version of Storage Spaces Direct is now available. Storage Spaces Direct or S2D is Microsoft’s software-defined stoage solution that allows using commodity directly attached storage to be used as production storage for Hyper-V and other infrastructure technologies. In this post, we will take a look at Configuring Windows Server 2019 Storage Spaces Direct S2D in VMware vSphere to see how S2D is configured and how this can be done inside of VMware virtual machines for lab purposes.
To begin with, let me give you an overview of the VMware vSphere lab itself that is being used as well as the Windows Server 2019 variant used in testing. In the home lab, I am running VMware vSphere 6.7 (waiting on U1). Windows Server 2019 has been installed in three VMware virtual machines each with (3) 10 gig disks for provisioning to use in the S2D configuration. Prior to the recall of sorts on the current Windows Server 2019 binaries, I had downloaded the ISO and had built a 3-node Hyper-V cluster using the GA release. However, I received the following error when attempting to enable S2D on the cluster.
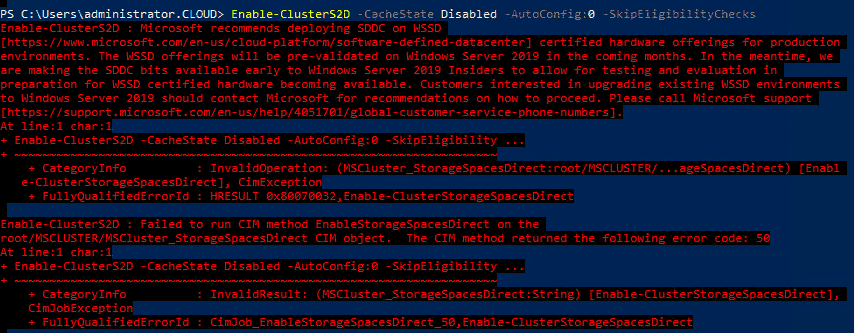
Microsoft supposedly has a registry key that will allow storage spaces direct to be installed regardless of the compatibility with the product. At the time of this writing however, I do not have my hands on the registry key to allow the installation to move forward. Microsoft however, plainly states the Insider versions of the Server OS do allow installing S2D on non-supported hardware. I did find this to be true as backing back down to the 17744 build release on each of the three cluster nodes of the Insider preview did allow me to run the Enable-Clusters2d command.
Highlights:
- vSphere 6.7 virtual machines
- 80 GB OS drive, (3) 50 GB drives for use with S2D
- Windows Server 2019 – Version 1809, Build 17744
Configuring Windows Server 2019 Storage Spaces Direct S2D in VMware vSphere
Below, I will run through the steps to get Storage Spaces Direct up and running and in a configured state so you are ready to begin carving out storage for your virtual machines running on top of your S2D cluster. As a disclaimer here, I closely followed the steps found on Virtualtothecore blog with a few little changes for my environment. I am continuing to play with the commands to see what is needed in Windows Server 2019 and what may not be needed for this to work in a VMware virtual machine.
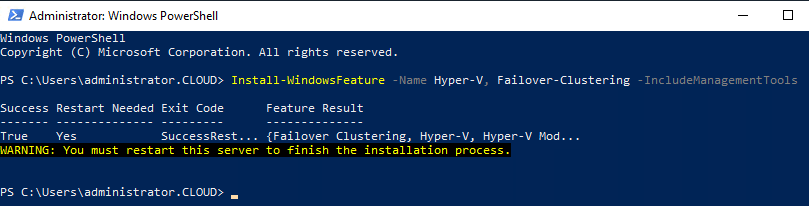
The first thing we need to do is install the Windows features needed for Failover Clustering and Hyper-V, since our cluster will be intended for use as a Hyper-V cluster running on top of Storage Spaces Direct.
After rebooting the hosts after installing the Windows features/roles we need, we can now create the cluster itself. From PowerShell, this is as simple as running the New-Cluster command, naming the cluster, and then providing the hosts that will be members. Also, we provide the IP address assigned to the Cluster name.
New-Cluster -Name S2Dcluster -Node hyper19-01.cloud.local, hyper19-02.cloud.local, hyper19-03.cloud.local -NoStorage -StaticAddress 10.1.149.190

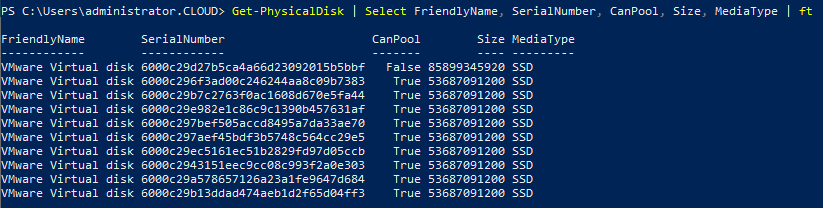
To check and see whether the disks we have provisioned to the servers are available to pool, we can run the Get-Physicaldisk cmdlet to check the status of the disks.
To actually enable the Storage Spaces Direct functionality on the cluster, we run the following command:
Enable-Clusters2d -cachestate disabled -autoconfig:0 -skipeligibilitychecks

The configuration process begins on the cluster.

You should see the command finish without error. There is a log file that gets created covering the process found at C:WindowsClusterReportsEnableClusterS2D.

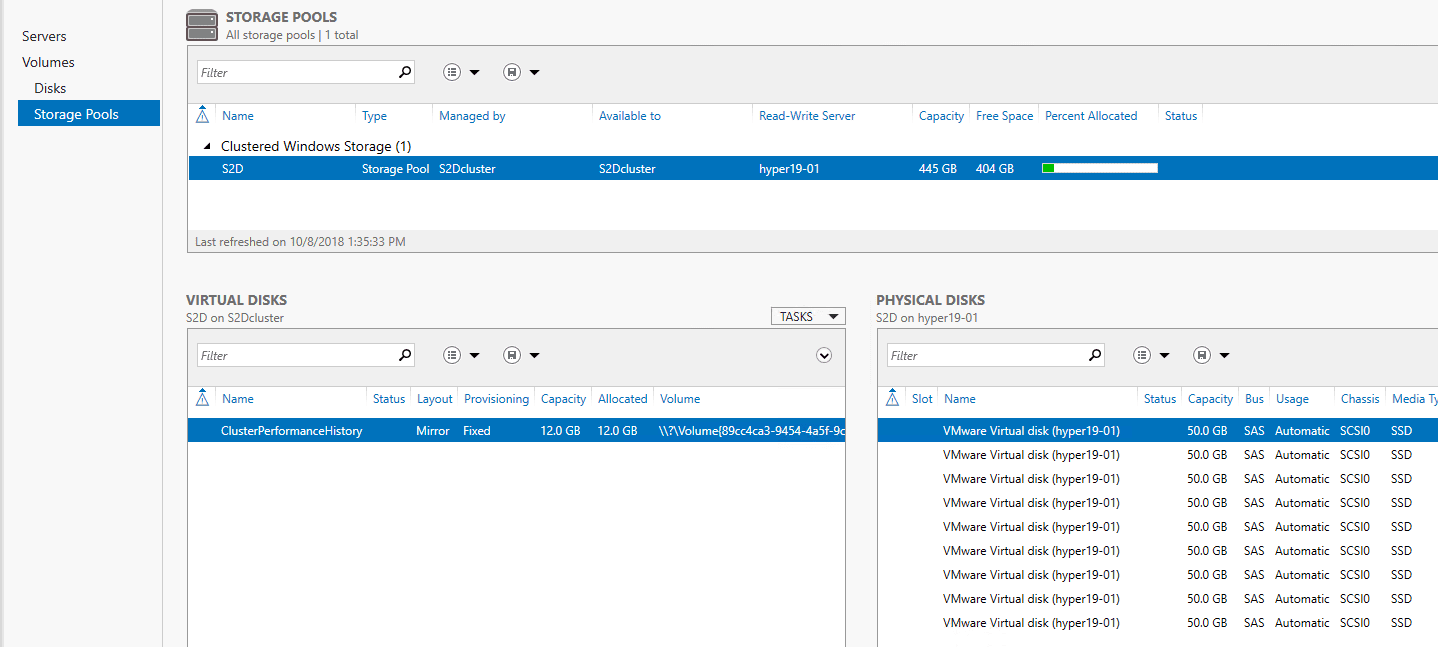
The next step is to create the Storage Pool. The Storage Pool is the raw storage that we can create virtual disks from.
New-StoragePool -StorageSubSystemFriendlyName *Cluster* -FriendlyName S2D -ProvisioningTypeDefault Fixed -PhysicalDisk (Get-PhysicalDisk | ? CanPool -eq $true)

To visually manage the new Storage Pool, you can launch Server Manager, click the Cluster name, navigate to Storage Pools and you should see the Storage Pool created in the step above.
Takeaways
The process of Configuring Windows Server 2019 Storage Spaces Direct S2D in VMware vSphere was simpler that I thought it would be as I expected to see errors or other unexplained behavior. I had tried this once before in Windows Server 2016 cluster hosts and ran into a few odditites that I was never able to get around with the time I had to play around with it. It looks like however, in Windows Server 2019, these issues are no longer present. One thing to emphasize again, this is the Insiders Preview release build 17744 that was used in the post. Hopefully the registry key that will allow using the GA release will be published so we can hack away with the GA release, once it is re-released. Stay tuned for more Storage Spaces Direct information, configuration, and labbing.
Brandon Lee is the Senior Writer, Engineer and owner at Virtualizationhowto.com, and a 7-time VMware vExpert, with over two decades of experience in Information Technology. Having worked for numerous Fortune 500 companies as well as in various industries, He has extensive experience in various IT segments and is a strong advocate for open source technologies. Brandon holds many industry certifications, loves the outdoors and spending time with family. Also, he goes through the effort of testing and troubleshooting issues, so you don’t have to.
This blog is about creating a new SQL cluster with a Failover instance based on a storage space direct configuration. There are a lot off opinions on do’s and don’t for on prem and in Azure with S2D. This is not the blog post on this discussion. This is just a post on SQL 2019 on Windows server 2019 storage space direct because I can!
And in a later blog post we are extending this to Azure. Still it always depends on running a Full SQL server or use a managed instance in Azure. But for now the new SQL server 2019 is the basic of our cluster running on a Windows Server 2019 cluster. As this time the installation will be GUI based as I got often the question on the screens. normally I run some PowerShell or a command line script that will do the job in several minutes
What are the new features in SQL Server 2019, the list below is just a short list for a full updated list go to the link below.
OR if you want to run a managed SQL server in Azure : https://azure.microsoft.com/en-us/pricing/details/sql-database/managed/
The Database Engine is the core service for storing, processing, and securing data. The Database Engine provides controlled access and rapid transaction processing to meet the requirements of the most demanding data consuming applications within your enterprise. The Database Engine also provides rich support for sustaining high availability.
https://docs.microsoft.com/en-us/sql/sql-server/sql-server-technical-documentation?view=sql-server-ver15
What’s new in SQL Server 2019
- Installation of SQL Server is supported on x64 processors only. It is no longer supported on x86 processors.
- SysPrep is supported for all installations of SQL Server. SysPrep now supports failover cluster installations
- Always On Availability Groups – secondary replica connection redirection
- SQL Server Machine Learning Services failover clusters
- the operating system requirements for the principal editions of SQL Server
- SQL Server Management Studio (SSMS) 18.0 (preview)
- Azure Data Studio
- Azure Data Studio
Always On Availability Groups – more synchronous replicas (CTP 2.0)
-
Up to five synchronous replicas: SQL Server 2019 preview increases the maximum number of synchronous replicas to 5, up from 3 in SQL Server 2017 (14.x) . You can configure this group of 5 replicas to have automatic failover within the group. There is 1 primary replica, plus 4 synchronous secondary replicas.
-
Secondary-to-primary replica connection redirection: Allows client application connections to be directed to the primary replica regardless of the target server specified in the connection string. This capability allows connection redirection without a listener. Use secondary-to-primary replica connection redirection in the following cases:
- The cluster technology does not offer a listener capability.
- A multi subnet configuration where redirection becomes complex.
- Read scale-out or disaster recovery scenarios where cluster type is
NONE.
SQL Server Enterprise /SQL Server Standard :
- Windows Server 2019
- Windows Server 2016
- Windows Server 2012 R2
- Windows Server 2012
The supported storage types for data files are:
-
Local Disk
-
Shared Storage
-
Storage Spaces Direct (S2D)
-
SMB File Share
As the SQL server 2019 is still in preview I download the evaluation version. Get your SQL server here

Pick the version you want, in our case I select the download media.

Pick the ISO format do download this.

The SQL installation is done on my cluster. described in the blog post below
step by step Windows Server 2019 File Server clustering With powershell or GUI
In this Windows server 2019 cluster I created a S2D formatted with ReFS. There is plenty of info to find on my blog how to create the S2D in the cluster.
Using Windows Storage Spaces direct with hyper converged in Microsoft Azure with Windows Server 2016
#Azure Storage Spaces direct #S2D Standard Storage vs Premium Storage
We have a Windows server 2019 Cluster in place with the Storagespace direct configuration.
The specific cluster configuration is debatable, in a typical SQL configuration you would have multiple disks.

Our Cluster with storage spaces. In storage spaces all disks come from the same disk pool if you create things default. then multiple disk has a different purpose. As you want to manage the SQL different than others.

Our SQL Installation is done this time by the GUI, show you the screens and options. you can always use the one liner to install the SQL server unattended.

And no I do not use the normal cluster installation but I use the advanced Cluster prep and completion. these two steps gives me a bit more freedom and flexibility it the installation fails.

The choice is developer but can also be the one with a product key.


Just do the updates direct as it is a new version and on a new OS, just to make sure that I run the latest bits.

I got a warning on the Firewall as I turned this off during the installation. This is configured by a GPO when I place the Cluster in the Right AD OU

Selecting the features and the installation folders.

Do I go for a default instance or a named instance. I always go for a named instance. Its easy and better management. In the old days some applications just want to run on a default instance.

My service account that has JEA Just enough Access

C:\Program Files\Microsoft SQL Server\150\Setup Bootstrap\Log\20181217_034408\ConfigurationFile.ini
If you want to use a unattended install you can use this ini file to get the same or adjusted values during the install

Ini file content.


Now that the first step is completed we can do the completion step.
Now the second step is needed to finish the SQL 2019 installation on the first node

But running the wizard if failed on me, as the error said the Cluster is not verified!

I just need to run the Cluster validation.
Now with the Passed Cluster validation we try again.

Now this looks good lets stat the installation of the SQL 2019

With the Named instance and usage of an Alias, I can easy change this or move the SQL to another cluster.

The installation will show me what cluster groups I can use and which are used at the moment.

Selecting the right disks for the installation remember These are the Storage space direct disks that are created with the cluster installation. See my other blog post about creating S2D on Windows Server 2019

A fixed IP is needed unless you use the DHCP checkbox.

Some applications needs special Collation, when changing this it is an Instance setting and can’t be changed again.

Normally you will place the SQL admins or some groups. this is a demo cluster so admin access only

Select the right disks and change this in the location fields.


Selecting multiple files for the Temp DB and the DB location

Also in this step we get a Ini file as output this can be reused if needed.


Now that the installation on one node is ready you can see the SQL resources in the cluster. As I did only the install on one node we need to do the Add node installation to get the installation done for a full FCI.

The Step to add an extra cluster node with the SQL installation is an easy step.

Follow the Wizard and use the Same account that you used before.

As the SQL studio is no longer a default installation you need to download the bits from Microsoft.

SSMS 18.0 Public Preview 6 is now available, and is the latest generation of SQL Server Management Studio that provides support for SQL Server 2019 preview!
SSMS 17.9.1 is the current General Availability (GA) version of SSMS
Download SQL Server Management Studio 17.9.1
Download SQL Server Management Studio 17.9.1 Upgrade Package (upgrades 17.x to 17.9.1)
Version Information
- Release number: 17.9.1
- Build number: 14.0.17289.0
- Release date: November 21, 2018

As we are using the 2019 We need to have the latest version


Now we have the studio ready and can access the SQL instance.

In the next blogs I’ll show you how to extend the SQL to Azure.

Below is an overview of the SQL disks based on storage spaces direct.

With All these steps I hope you can build your own cluster and play with this. As for production never use a next next Finish installation there is always some custom tweaks needed to get the best performance.
Follow Me on Twitter @ClusterMVP
Follow My blog https://robertsmit.wordpress.com
Linkedin Profile Robert Smit MVP Linkedin profile
Google : Robert Smit MVP profile
Robert Smit is Senior Technical Evangelist and is a current Microsoft MVP in Clustering as of 2009.
Robert has over 20 years experience in IT with experience in the educational, health-care and finance industries.
Robert’s past IT experience in the trenches of IT gives him the knowledge and insight that allows him to communicate effectively with IT professionals
who are trying to address real concerns around business continuity, disaster recovery and regulatory compliance issues. Robert holds the following certifications:
MCT — Microsoft Certified Trainer, MCTS — Windows Server Virtualization, MCSE, MCSA and MCPS. He is an active participant in the Microsoft newsgroup community and is currently focused on Hyper-V, Failover Clustering, SQL Server, Azure and all things related to Cloud Computing and Infrastructure Optimalization.
Follow Robert on Twitter @ClusterMVP
Or follow his blog https://robertsmit.wordpress.com
Linkedin Profile Http://nl.linkedin.com/in/robertsmit
Robert is also capable of transferring his knowledge to others which is a rare feature in the field of IT. He makes a point of not only solving issues but also of giving on the job training of his colleagues.
A customer says » Robert has been a big influence on our technical staff and I have to come to know him as a brilliant specialist concerning Microsoft Products. He was Capable with his in-depth knowledge of Microsoft products to troubleshoot problems and develop our infrastructure to a higher level. I would certainly hire him again in the future. »
Details of the Recommendation: «I have been coordinating with Robert implementing a very complex system. Although he was primarily a Microsoft infrastructure specialist; he was able to understand and debug .Net based complext Windows applications and websites. His input to improve performance of applications proved very helpful for the success of our project
View all posts by Robert Smit [MVP]
Windows Server 2016 and 2019 Storage Sapces Direct (S2D) allows building HA storage systems using storage nodes with local storage, such as SATA or SSD disks.
In this blogpost, I’ll deploy a two node S2D cluster based on Windows Server 2019 build 17744. The main machine is a HP ProBook 450 G5 with Windows 10, 16 GB memory, 512 GB SSD disk, and Hyper-V enabled.

First of all, I’ve deployed the following virtual machines:
- S2D-W2019-DC01 (Domain Controller, DNS, Group Policies)
IP address: 172.16.0.100 - S2D-W2019-HV01 (Hyper-V host, S2D node)
IP address: 172.16.0.101 (LAN)
IP address: 10.10.0.101 (Live Migration) - S2D-W2019-HV02 (Hyper-V host, S2D node)
- IP address: 172.16.0.102 (LAN)
IP address: 10.10.0.102 (Live Migration)
All the servers are installed with Windows Server 2019 build 17744. The first server I’ve configured is the domain controller. My internal domain is s2dlab.local.
For both S2D nodes (S2D-W2019-HV01 and S2D-W2019-HV02), you’ve to configure some additional settings, because this servers are virtual. So we’re going to run Hyper-V in Hyper-V and on that Hyper-V host there’re some guest virtual machines (nested virtualization) 😀 Cool stuff!!!
$S2DHOST1 = 'S2D-W2019-HV01'
$S2DHOST2 = 'S2D-W2019-HV02'

# List all virtual machines
Get-VM

# Enable nested virtualization on virtual machines
Set-VMProcessor -VMName $S2DHOST1 -ExposeVirtualizationExtensions $true
Set-VMProcessor -VMName $S2DHOST2 -ExposeVirtualizationExtensions $true
Next, you’ve to Configure the following settings within the VM configuration:
- Disable dynamic memory;
- Set the number of virtual processors to 2 or 4;
- Turn on MAC address spoofing on your network interface(s);
Now the domain controller is up and running and both S2D nodes are installed and configured with Windows Server 2019, it’s time to add some storage. Both servers have 3 x 50 GB virtual disks attached! Note!! this is only for testing and demo!!
So we’ve 300 GB storage available for our S2D cluster. After this is done, you can install the following roles and features within Windows Server:
- (Role) File and Storage Services;
- (Role) Hyper-V;
- (Feature) Failover Clustering;
Now all the components are ready to build the cluster. It’s recommended to run the cluster validation before building your cluster! The name of my cluster is ‘S2D-CL01’ with IP address 172.16.0.200/16. Note!! Uncheck the option ‘Add all eligible storage to the cluster’!!
The cluster is up and running. As you can see within your Active Directory and DNS configuration, there’re three computer objects (two cluster nodes and one Failover Cluster object).
The last step before enabling ‘S2D’ on our cluster is checking the disk configuration.
# List all available disks within the cluster nodes
Get-PhysicalDisk

# Enable Storage Spaces Direct on the cluster
Enable-ClusterS2D

# List all Storage Pools within the S2D cluster
Get-Storagepool S2D*
Now our cluster is Storage Spaces Direct (S2D) enabled. The last step is to create a virtual disk within our Storage Pool and add it as a Cluster Shared Volume (CSV) to the cluster, wo we can store workloads on it! Bacause we’ve a two node cluster, the only Resiliency type is Two-Way Mirror.
Wrap Up:
In this blogpost we’ve builded a two nodes virtual Storage Spaces Direct cluster in Hyper-V (Windows 10). The S2D nodes are running Windows Server 2019. It’s really a nice opportunity to run this configuration virtual on your laptop or desktop, while nested virtualization is supported and it works great!!
In the next blogpost I’ll show you to install and configure a virtual machine within our S2D cluster. Also performing some live migrations to show the high availability and resiliency of our setup!
HPE ProLiant DL380 Gen9 Server
HPE Smart Array P840 Controller
4 x 15K 600GB SAS HDD
I would prefer to install the OS on a RAID array, but since the controller doesn’t do mixed mode I had to use HBA mode.
For Gen10 storage controllers, HBA mode is enabled by default.
- S2D drives may only reside on a storage controller configured exclusively in HBA nide.
- S2D drives cannot reside on a storage controller configured in either RAID or mixed-mode (RAID logical drives and HBA physical drives simultaneously).
For Gen9 storage controllers, enable HBA mode on the storage controllers as follows;
- Power on the server and press F10 during POST to enter the intelligent provisioning utility.
- On the next screen, select HPE Smart Storage Administrator.
- From the main HPE Smart Storage Administrator screen, select HPE P840 controller.
- Under Actions, click the Configure button.
- If the controller is already in HBA mode, you will see the Enable RAID Mode button.
In this case, skip to Step 7. - If the controller is in RAID mode, select Enable HBA Mode, then click OK and Finish.
- Click the X button in the upper right-hand corner followed by OK to exit the application.
- Click the green power icon in the upper right-hand corner followed by Reboot.
Boot the server from a bootable Windows 2019 USB Drive
Install Windows 2019 Datacenter edition
Server 1
S2D-ND01
IP: 192.168.158.221
Storage1: 10.10.10.221
Storage1: 20.20.20.221
Server 2
S2D-ND02
IP: 192.168.158.222
Storage1: 10.10.10.222
Storage1: 20.20.20.222
Cluster IP: 192.168.158.220
Join the Nodes to an Active Directory Domain.
Please note installing Active Directory Services on the cluster node is not supported and it will stop from installing Cluster Storage Spaces Direct
Use PowerShell to install the required Windows features:
PS C:> Install-WindowsFeature -Name File-Services, Failover-Clustering, Hyper-V, Data-Center-Bridging –IncludeManagementTools -Restart
Create Cluster
PS C:> New-Cluster –Name S2D -Node S2D-ND01, S2D-ND02 –NoStorage –StaticAddress 192.168.158.220

Assign the file share witness as follows:
PS C:> Set-ClusterQuorum –FileShareWitness \{Witness Server Name}{Share Name}
Or this can be done via Azure
Connect Servers to Switches
Source Device Source Port Destination Device Destination Port
Node1 pNIC1-Port1 Switch 1 Port 1
Node1 pNIC1-Port2 Switch 2 Port 1
Node2 pNIC1-Port1 Switch 1 Port 2
Node2 pNIC1-Port2 Switch 2 Port 2
Enable Storage Spaces Direct
You need to make sure you have completed Cluster Validation before enabling ClusterStorageSpacesDirect.
Set the storage system to Storage Spaces Direct mode with the following PowerShell command.
PS C:> Enable-ClusterStorageSpacesDirect
WARNING: 2021/01/29-15:39:45.776 Node S2D-ND01: No disks with supported bus types found to be used for S2D
WARNING: 2021/01/29-15:39:45.779 Node S2D-ND02: No disks with supported bus types found to be used for S2D
In my case it was showing RAID as Bus Type
The following PowerShell command displays the bus type of the hard disks:
Get-PhysicalDisk | Sort-Object FriendlyName | ft FriendlyName,HealthStatus,Size,BusType,MediaType

Upgraded the Smart Array P840 firmware from version 4.02 (ND01) and version 1.34 (ND02) to Version 7.0
Also installed the latest driver for Windows 2019

I have executed the Enable-ClusterStorageSpacesDirect command again, and this time no error about disk type. But getting a warning message about cache

Ran the below command.
Disable-ClusterS2D
Enable-ClusterS2D -Cachestate Disabled -SkipEligibilityChecks
As the Storage Spaces Direct is built, all the available disks on each server node will be discovered and claimed into the Storage Spaces Direct pool created.
If we run Get-PhysicalDisks disk on Node 1, we will see all the disks in the cluster.

Now we have 7 disks in the Get-PhysicalDisks list, 6 data drives, and one OS drive. This is correct as the lab has 2 nodes with 4 drives each.
If we display the Storage Pool, we see the new pool created automatically by Enable-ClusterS2D
Get-StoragePool S2D* | FT FriendlyName, FaultDomainAwarenessDefault, OperationalStatus, HealthStatus -autosize

When we get the Storage Tiers created by Enable-ClusterS2D
Get-StorageTier | FT FriendlyName, ResiliencySettingName, MediaType, PhysicalDiskRedundancy -autosize

Create Mirrored Volumes
The following commands will create two-way mirrored volumes.
New-Volume -FriendlyName “Mirror-2-Vol1” -FileSystem CSVFS_ReFS -StoragePoolFriendlyName ‘S2D on S2D’ -Size 50GB -ResiliencySettingName Mirror
If you have more than two nodes the following commands will create three-way mirrored volumes.
New-Volume -FriendlyName “Mirror-3-Vol1” -FileSystem CSVFS_ReFS -StoragePoolFriendlyName ‘S2D on S2D’ -Size 50GB -ResiliencySettingName Mirror -PhysicalDiskRedundancy 3
Create Parity Volumes
The following commands will create both Single Parity and Dual Parity volumes. For this you need morethan 2 nodes
New-Volume -FriendlyName “Parity-1-Vol1” -FileSystem CSVFS_ReFS -StoragePoolFriendlyName ‘S2D on S2D’ -Size 50GB -ResiliencySettingName Parity
New-Volume -FriendlyName “Parity-2-Vol1” -FileSystem CSVFS_ReFS -StoragePoolFriendlyName ‘S2D on S2D’ -Size 50GB -ResiliencySettingName Parity -PhysicalDiskRedundancy 2
Incase, if you need to delete the Virtual Disk
List the existing Virtual Disks
Get-VirtualDisk
Remove the Virtual Disk
Remove-VirtualDisk -FriendlyName
Storage Networking
Configure Storage Network Adapters
Logon to each cluster node and rename the correct port number with the relevant naming convention.
Configure the IP address for storage LAN.

Choose the correct Network Adapter for Network Live Migration
Skip to content
Managing Windows Server 2019 Storage Spaces Direct with Windows Admin Center
Windows Admin Center is one of the pivotal technologies integrated with Windows Server 2019. Microsoft has purpose-built Windows Admin Center to be a new platform for management that allows administrators to aggregately manage hosts, Failover Clusters, Hyper-V hosts, and HCI solutions. When managing Windows server environments moving forward, there is no doubt that Microsoft is moving towards Windows Admin Center as the de facto standard moving forward for server management.
Table of Contents
- What is Windows Server 2019 Storage Spaces Direct
- Managing Windows Server 2019 Storage Spaces Direct with Windows Admin Center
- Concluding Thoughts
Most Windows administrators will readily agree there are too many tools that are required for server management. This is one of the challenges in adopting Windows Server Core as well since there are many different tools required for effective management of the platform. Windows Admin Center looks to help solve this long-standing issue with management tools. When it comes to hyper-converged infrastructure moving forward with Storage Spaces Direct, Microsoft has provided effective management of the HCI solution inside of Windows Admin Center. Prior to Windows Server 2019 and Windows Admin Center, PowerShell was the primary means of management and visibility into the S2D environment.
Protect Your Data with BDRSuite
In this post, we will take a look at Managing Windows Server 2019 Storage Spaces Direct with Windows Admin Center and features and functionality found in the tool for managing S2D.
What is Windows Server 2019 Storage Spaces Direct
Storage Spaces Direct is an introduction by Microsoft into the world of hyper-converged storage. Storage Spaces Direct was introduced with Windows Server 2016 and has only been around since then. Storage Spaces Direct or S2D has quickly matured from the Windows Server 2016 platform and into Windows Server 2019 as adoption has quickly ramped up and many environments are now running production workloads on top of S2D. This is a testament to a couple of different things including the fact that Storage Spaces Direct is a technology that works well and that customers are ready and willing to consider software-defined storage as a strong option for upcoming storage refreshes with virtualization projects.
The data shows that customers are no longer afraid of software-driven technology such as Storage Spaces Direct. VMware has had massive success with the vSAN solution and customer adoption is steadily growing. The conclusion is certain that software-defined technologies and solutions are only going to continue to grow in popularity and demand. Windows Server 2019 Storage Spaces Direct is certain to offer what customers running the Windows platform are looking for. However, part of what makes any solution either successful or not is the ability to manage, configure, and troubleshoot the technology quickly and effectively.

To do that, you need to have a management interface that allows easily having visibility into the environment itself, easily seeing the performance, any issues, and being able to troubleshoot the solution effectively if there are problems. One of the things that Microsoft has learned from Windows Server 2016 Storage Spaces Direct is that customers needed a better way to manage Storage Spaces Direct instead of only being able to do this from PowerShell. With Windows Admin Center, this was certainly an objective to allow effective management of the Storage Spaces Direct HCI solution and a high level of visibility into the S2D environment.
Managing Windows Server 2019 Storage Spaces Direct with Windows Admin Center
Windows Admin Center is positioned as the next generation management tool used by Windows Server administrators. However, it is not quite to that point as of yet. When you launch Server Manager in Windows Server 2019, you are quickly prompted to download and install the Windows Admin Center for management instead. With all the progress of Windows Admin Center, however, it is still a work in progress. Microsoft has made massive improvements and additions to the Windows Admin platform, but, they are quick to point out that it does not replace the RSAT tools used for management of Active Directory and other business-critical Microsoft infrastructure components. It will no doubt be able to replace these in the future; however, the platform is not quite there yet.
While not suited as of yet for those management tasks, Microsoft has been working steadily on Windows Admin Center as the management tool of Windows Server 2019 Storage Spaces Direct. With Windows Server 2019, the Windows Admin Center provides a GUI management tool that allows administrators to see several key aspects of the Storage Spaces Direct environment including:
- Hosts and health
- Storage and Health
- Performance of storage
- Alerts and issues
Additionally, Windows Admin Center allows configuration of the Storage Spaces Direct environment at least at this point, from a volume perspective. To manage your Storage Spaces Direct infrastructure with Windows Admin Center you need to add the S2D cluster to the Hyper-Converged Cluster Manager in Windows Admin Center. Once added, you can drill into the cluster and find the default HCI dashboard detailing S2D cluster information.
Below you will see the global dashboard view when you navigate to the HCI dashboard. Any alerts will be presented at the top of the dashboard for easy visibility. Below, there is an alert on memory usage in the cluster.
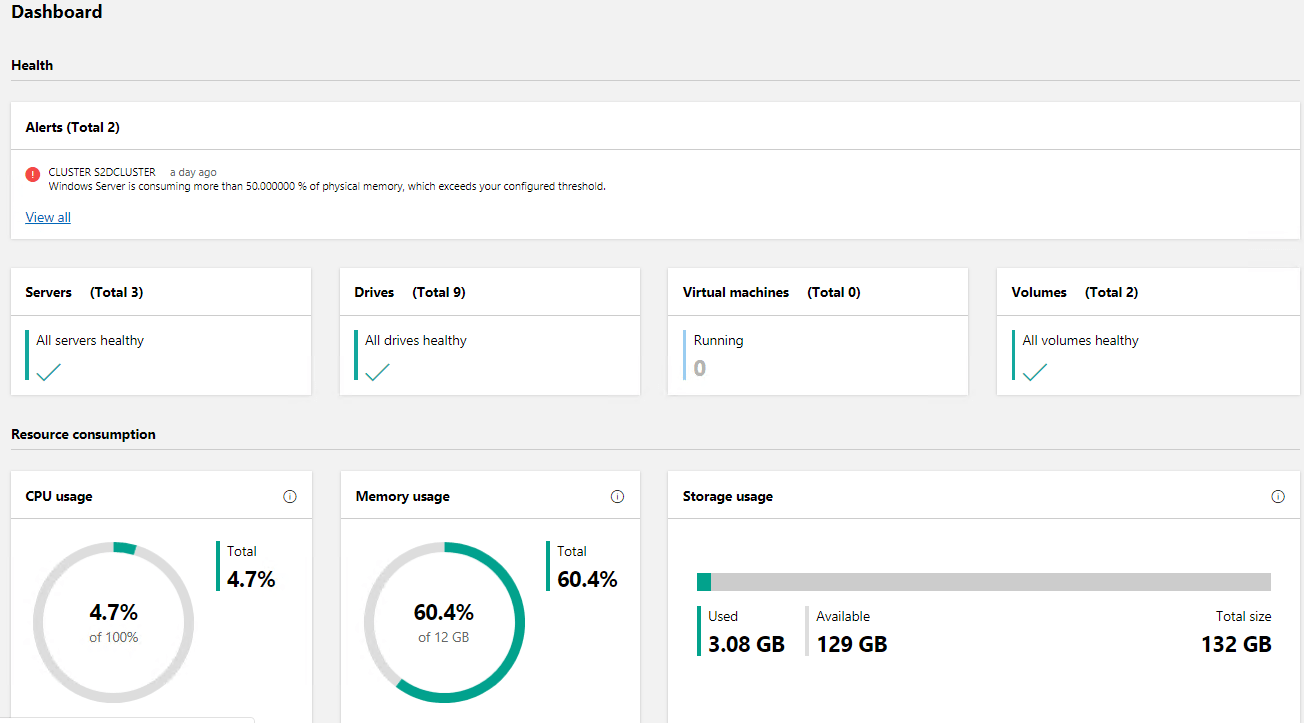
The Windows Admin Center Storage Spaces Direct HCI dashboard detailing health metrics for the cluster
Performance metrics are found in the same dashboard except at the bottom of the view. You will notice you can choose various slices of time for measuring performance including hour, day, week, month, and year. This allows administrators to have a great deal of information at their disposal for seeing historic performance information and for troubleshooting.
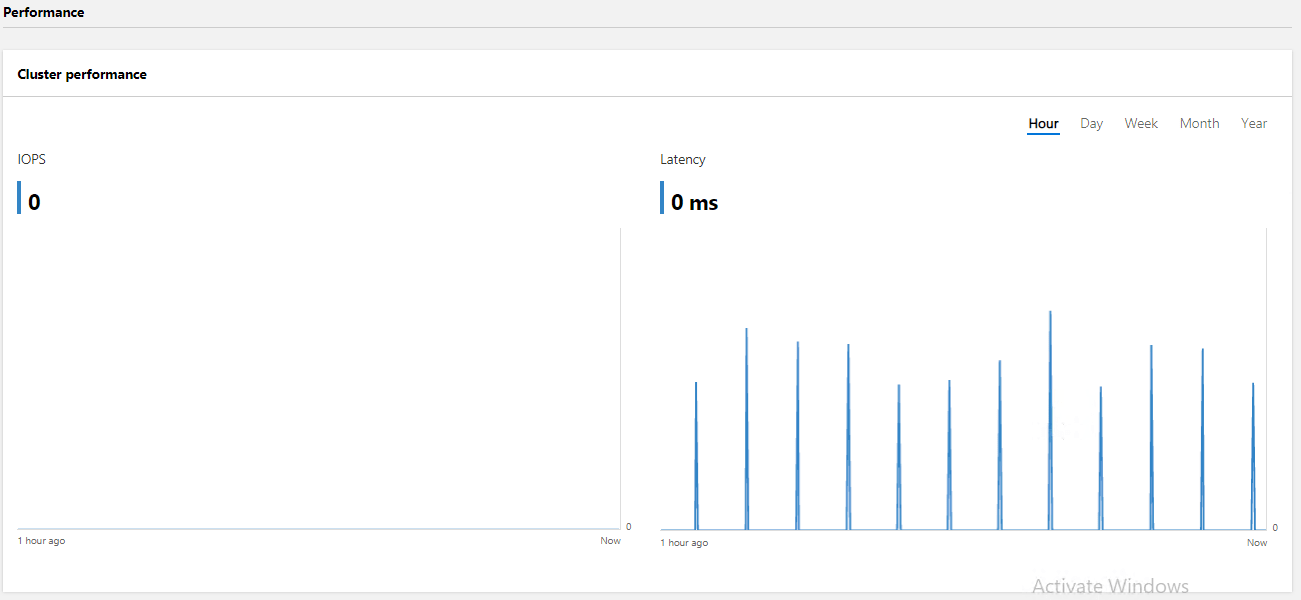
Displaying Performance metrics for the S2D cluster
You can manage your Storage Spaces Direct volumes using the Windows Admin Center, including creating new volumes.
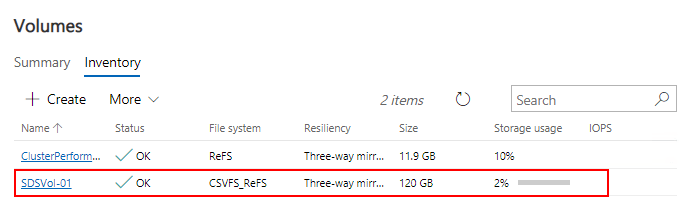
Windows Admin Center Storage Spaces Direct volume management
If you want to see more detailed information of a particular Storage Spaces Direct volume, you can click on the volume and view the more detailed information about the volume, including the status, size, file system, used size, path, resiliency configuration, fault-domain awareness, and footprint. Additionally, you can alter settings for deduplication and compression and integrity checksums.
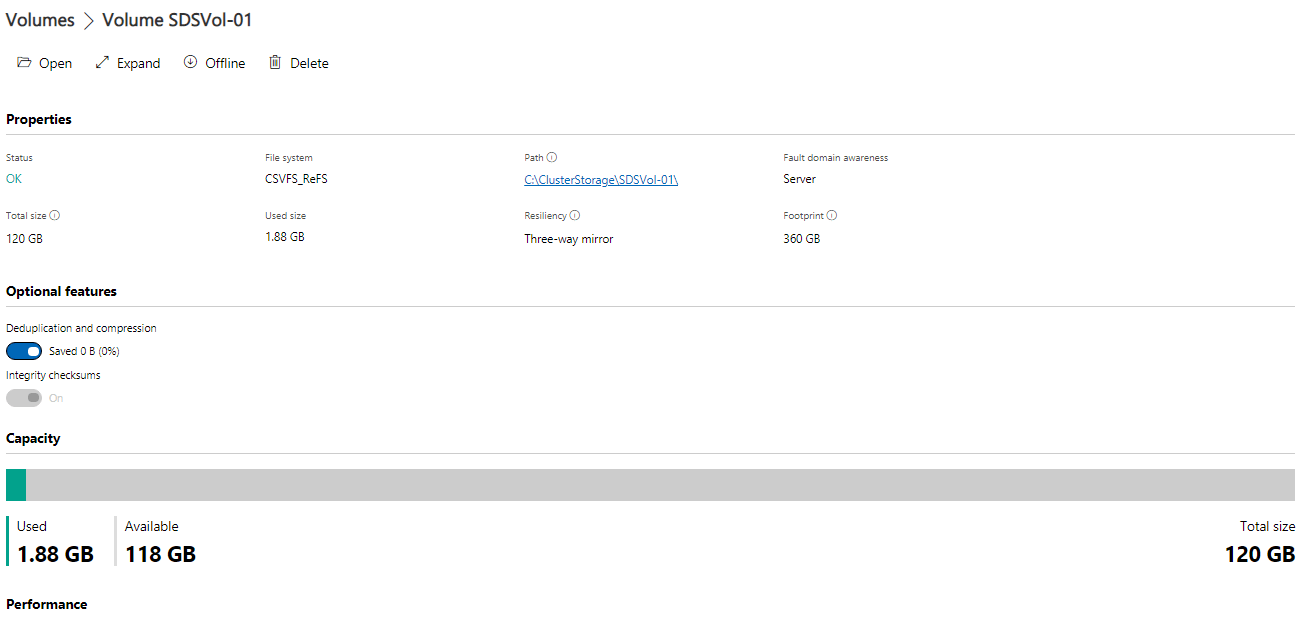
More detailed volume information in Windows Admin Center of S2D Volumes
Additionally, Windows Admin Center provides a very detailed view of the individual drives that make up the storage pools/volumes. This is a great way to see if a particular drive is failing or is having issues.
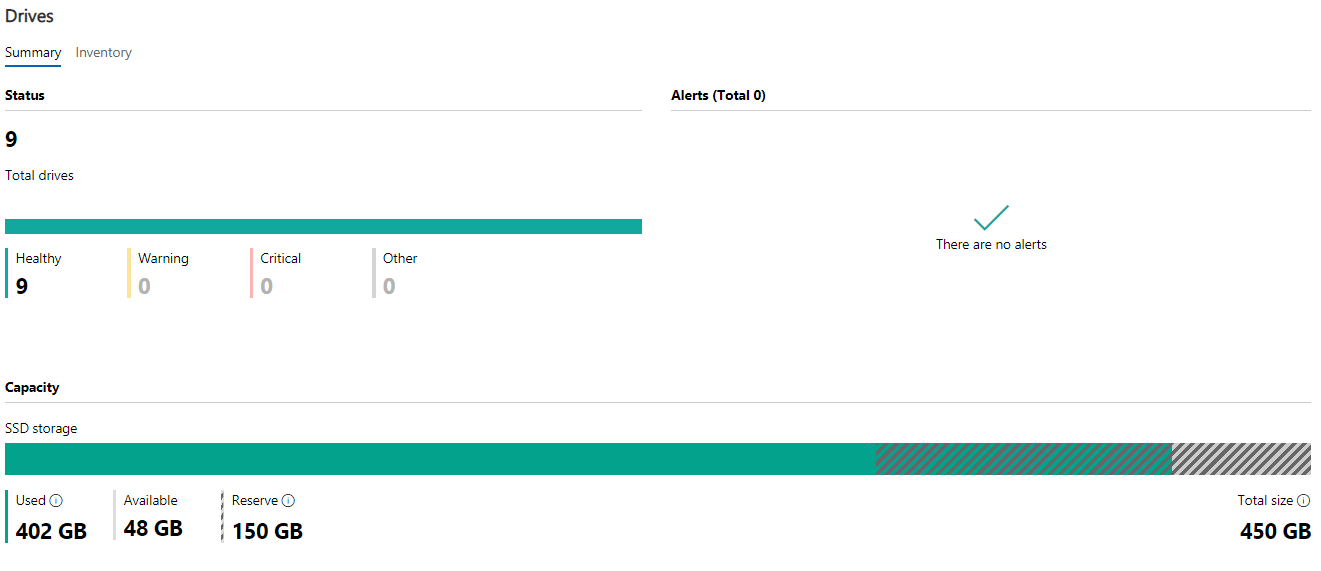
The Windows Admin Center Storage Spaces Direct drives overview
The detailed inventory view of the drives allows taking a deeper, more detailed look at the individual hard drives in the Storage Spaces Direct pool. This allows having a very granular view of the disks themselves, which provides a great look at drive health.
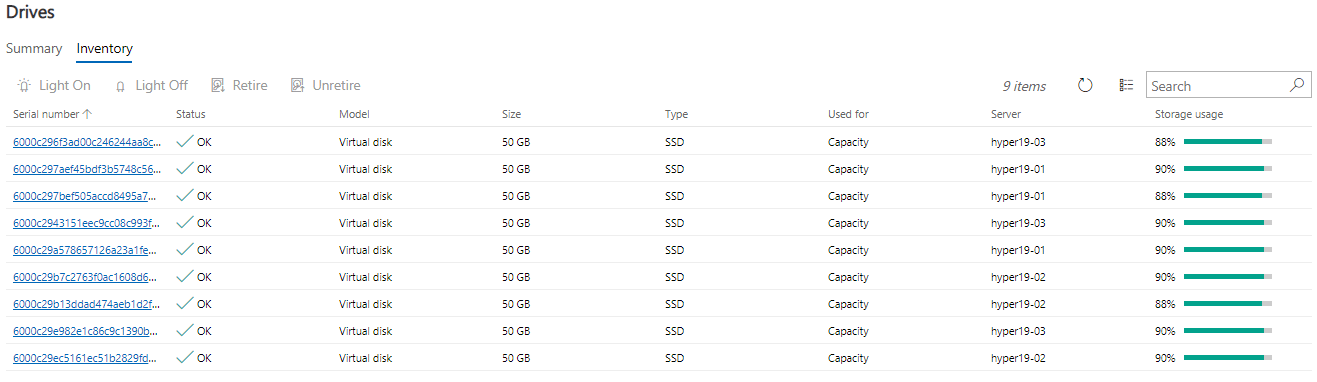
Detailed view of individual hard drives making up the Storage Spaces Direct infrastructure
Drilling down even further, you can see even more detailed information about each hard drive including the status, capacity, firmware version, location, manufacturer, storage pool, model, type, and serial number.
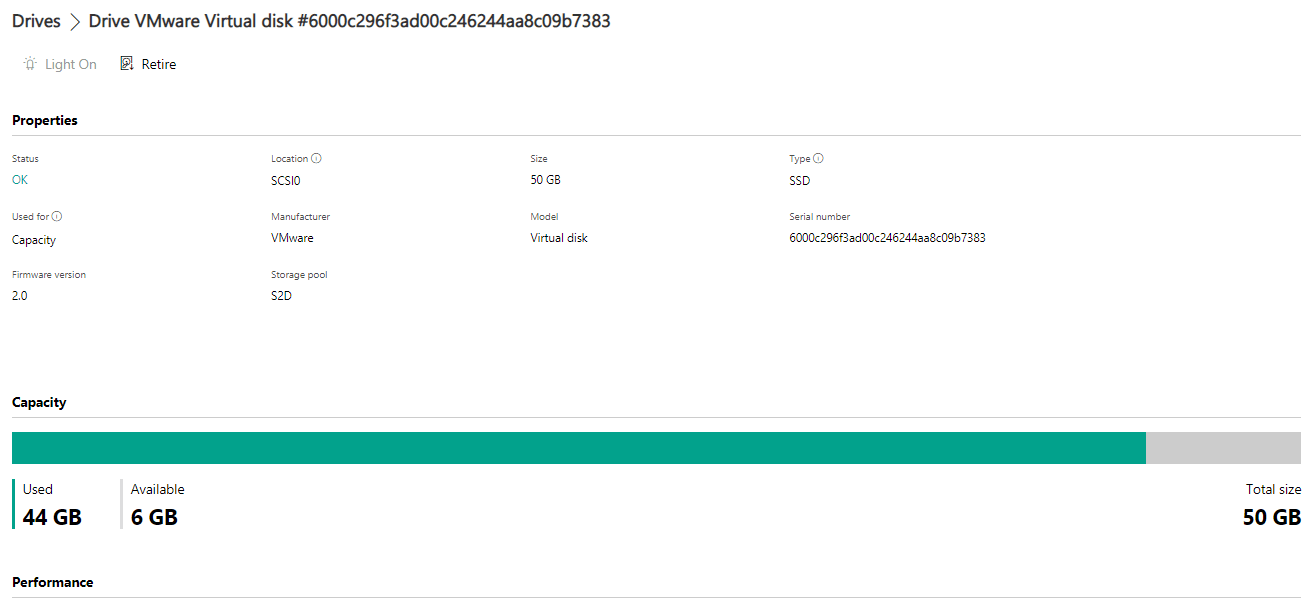
Even more detailed drive information in Windows Admin Center
Concluding Thoughts
Windows Admin Center provides a powerful tool to manage Windows Server 2019 Storage Spaces Direct environments. With the new dashboard, Windows administrators have great visibility into both the health and performance of the Storage Spaces Direct environment. With the very granular storage features, you can see details about the volumes themselves as well as the individual hard drives and their health and performance. This allows tremendous visibility into troubleshooting issues that may be related to a particular hard drive failing or having issues. The alerts are easily seen in the dashboard and allow administrators to have valuable information about the environment readily and easily accessible. Managing Windows Server 2019 Storage Spaces Direct with Windows Admin Center is certainly a great way to easily manage and configure S2D in Windows Server 2019. Windows Admin Center provides the tool of the future for not just Storage Spaces Direct but all Windows Server management.
Related Posts:
Configuring Storage Spaces Direct and Resilient File System (ReFS)
Windows Server 2019 Storage Spaces Direct Best Practices
Follow our Twitter and Facebook feeds for new releases, updates, insightful posts and more.
Try BDRSuite for Free!
Schedule a live demo with one of our product experts
Start your full-featured 30-day free trial
Explore detailed pricing, editions & features