
Ваш SSD-накопитель не видится в диспетчере устройств? Не паникуйте! Если ваш новый твердотельный накопитель не отображается в вашей системе. К вашему удивлению, существует 6 способов исправить Windows, не видит SSD, и вы можете сделать это даже самостоятельно. Независимо от того, новый у вас твердотельный накопитель или старый, в этой статье описываются все проблемы, которые могут возникнуть, и их пошаговые решения, а также иллюстрируются картинками. Есть несколько причин, из-за которых вы можете столкнуться с этой проблемой. Соответствующие решения для не видит ssd Windows 10/11, приведены ниже, вы можете любезно просмотреть все части, чтобы определить и устранить проблему.
Часть 1: Почему не видит SSD?
Ниже приведены основные причины, по которым Windows не распознает SSD.
- Новый SSD, который еще не инициализирован.
- Драйвер не обновлен.
- Отсутствует буква диска раздела SSD.
- Прерванное подключение кабеля передачи данных.
- SSD не вставлен и не подключен должным образом.
- Драйверы материнской платы SATA загружены неправильно.
- Привод не включен в BIOS.
- SSD скорее всего сломался.
Часть 2: Как исправить не видит SSD в Windows 10/11?
Сейчас, когда мы узнали причину, давайте перейдем к исправлениям проблем, связанных с тем, что SSD не видит в Windows 10/11.
Исправление 1: Исправьте неисправное оборудование
Вы должны проверить соединение, чтобы убедиться, что вы правильно подключили USB-кабель SSD. Убедитесь, что кабель правильно вставлен и вставлен в порт. Проверьте, плотно ли он прилегает, а также проверьте кабель, чтобы убедиться, что он не поврежден. Если вы сделали это, но компьютер по-прежнему не видит SSD, попробуйте исправить неисправное оборудование, которое может быть повреждено.
Используйте интеллектуальную командную строку для ремонта оборудования. SMART — это встроенный инструмент в Windows 10/11, который проверяет и контролирует параметры вашего SSD-накопителя. Быстро просматривайте ошибки. Что они отражают?
-
Нажмите Windows и букву S одновременно.
-
Введите командную строку.
-
Щелкните правой кнопкой мыши на окне командной строки.
-
Выберите Запуск от имени администратора.
-
Введите wmic diskdrive get status в командной строке.
Если вы видите, что результаты выглядят как на рисунке ниже, переходите к следующему шагу. -
Снова запустите «командную строку».
-
Введите: CHKDSK [volume [[path] filename]] [/F] [/V] [/R] [/X] [/C] [: size]] и введите.
-
Одновременно нажмите клавиши «Windows» + буква E.
-
Перейдите к своему твердотельному накопителю и щелкните по нему правой кнопкой мыши. Выберите «Свойства» > «Инструменты» > «Проверить».
-
Перезагрузите компьютер по завершении.
Неужели ничего не случилось? Хорошо! Последнее прибежище:
Исправление 2: Настройка параметров BIOS
Чтобы исправить ошибку, при которой SSD не видит в BIOS Windows 10/11, настройте параметры SSD в BIOS следующим образом:
-
Перезагрузите свой компьютер.
-
Нажмите клавишу F2.
-
Нажмите клавишу Enter.
-
Выберите Serial ATA.
-
Нажмите Enter.
-
Сохраните внесенные изменения в параметр режима контроллера SATA.
-
Перезагрузите компьютер, чтобы войти в BIOS.
Исправление 3: Обновление драйверов SSD
Ещё одним допустимым условием отсутствия SSD-накопителя является то, что он работает с устаревшими драйверами. Попробуйте обновить драйвер SSD, чтобы проверить, помогает ли это устранить проблему.
-
Введите «Диспетчер устройств» в поле поиска меню «Пуск».
-
Нажмите на «Ввод», чтобы запустить его.
-
Перейдите к дисководам.
-
Щелкните правой кнопкой мыши на каждом элементе под ним.
-
Нажмите на кнопку «Обновить драйвер».
-
Перезагрузите свой компьютер.
Исправление 4: Инициализация нового SSD-накопителя
Выполните следующие действия, чтобы инициализировать SSD, который не видит в Windows 10/11, с помощью команд Diskpart,
-
Удерживайте нажатой клавишу «WIN +R.»
-
Введите «cmd».
-
Введите слово «diskpart» в открывшемся приглашении.
-
Нажмите клавишу Enter.
-
Перечислите все диски в вашей Windows 10.
-
Выберите диск, который вы хотите инициализировать.
-
Очистите атрибуты, чтобы перейти к следующему шагу.
-
Включите диск, выполнив команду, если он отображается в автономном режиме.
-
Конвертируйте формат MBR или GPT в зависимости от ваших требований.
Исправление 5: Восстановление с помощью управления дисками
Выполните следующие действия, чтобы восстановить SSD, который не видит в Windows 10 с помощью управления дисками
-
Перейдите в раздел «Управление дисками».
-
Проверьте, является ли объем вашего SSD необработанным или свободным.
-
Отформатируйте диск, если это так.
Исправление 6: Назначьте или измените букву SSD-диска
Обычно Windows 10/11 не может распознать твердотельный накопитель, поскольку буква диска твердотельного накопителя отсутствует или конфликтует с другим диском. Выполните следующие действия, чтобы назначить твердотельному накопителю новую букву диска:
-
Щелкните правой кнопкой мыши на «Этом компьютере».
-
Выберите «Управление».
-
В разделе «Хранилище» нажмите «Управление дисками».
-
Щелкните правой кнопкой мыши на разделе SSD.
-
Выберите «Изменить букву диска и пути к нему.
-
Нажмите кнопку «Изменить».
-
Выберите букву диска из списка.
-
Нажмите кнопку ОК.
Часть 3: Как восстановить данные с SSD не видит?
Если вышеуказанные решения не могут исправить не видит SSD-накопителя в Windows, необходимо извлечь из него данные. Возможно ли восстановить данные с необнаруженной SD-карты? Конечно! 4DDiG может восстанавливать данные с SSD-накопителя, которые не видит в Windows 10/11, или извлекать данные даже после их форматирования. Это бесплатно, быстро и удобно для пользователя. Установите, чтобы запустить инструмент 4DDiG Data Recovery в любое время, когда вам это понадобится.
-
Выберите местоположение
После загрузки и установки 4DDiG на свой компьютер и подключения устройства выберите SSD не видит Windows, и нажмите «Начать», чтобы продолжить.
-
Просканируйте диск на наличие файлов
4DDiG выполнит сканирование, чтобы проверить потерянные данные. Существует индикатор выполнения, с помощью которого вы можете приостановить или остановить сканирование в любое время. Вы увидите потерянные файлы, показанные на рисунке ниже.
-
Восстановление данных с нераспознанного SSD
Выберите целевые файлы и нажмите «Восстановить«, чтобы сохранить их в определенном месте.
Часть 4: Как избежать того, чтобы не видит SSD в будущем?
Проблема с тем, что SSD-карта не работает или не видится, возникает время от времени, и нам полезно знать советы о том, как избежать того, чтобы SSD-карта не обнаруживалась в будущем.
- Будьте внимательны, чтобы избежать экстремальных температур. Разместите свой компьютер с твердотельным накопителем там, где он не должен подвергаться сильной жаре или холоду.
- Перебои в подаче электроэнергии — это тихие убийцы аппаратного обеспечения. Подключите свой компьютер к более надежному источнику питания.
- Всегда оставляйте немного свободного места на вашем твердотельном накопителе. Старайтесь не заполнять более 75% вашего SSD.
- Ограничьте частоту записи SSD. Чем меньше вы его форматируете или стираете с него данные, тем дольше он сохраняется.
- Дефрагментация может сократить срок службы SSD.
Часть 5: Часто задаваемые вопросы о SSD
1. Как я могу исправить не видит SSD в BIOS?
Вам нужно нажать F2 сразу после перезагрузки системы и следовать подсказкам, пока не появится опция режима контроллера SATA.
2. Как будет видить мой новый SSD-накопитель?
Скорее всего, вы не инициализировали его в Windows Disk Management. Немедленно инициализируйте его, процедура приведена выше в исправлениях.
3. Как мне исправить не видит SSD при установке Windows?
Вам необходимо переустановить драйвер SSD во время установки windows, если SSD обнаружен, но не отображается на моем компьютере.
Заключение:
Твердотельный накопитель — это самое тонкое и долговечное устройство, которое будет использоваться в Windows 10. Однако, поскольку это гаджет и он уязвим для многих опасностей, иногда он может не отображаться. Независимо от того, не видит ли SSD SanDisk или не видит SSD Samsung, процедура их исправления будет одинаковой. Все исправления, приведенные выше, могут помочь вам устранить проблемы, связанные с тем, что SSD не видит в Windows 10. Если твердотельный накопитель поврежден, и вам нужно извлечь потерянные данные. Это поможет, если у вас есть надежный инструмент восстановления данных для этого. Программное обеспечение для восстановления данных Tenorshare 4DDiG — лучшее для этого. Он быстро восстановит данные на твердотельном накопителе, которые не будут обнаружены, даже если вы отформатировали их ранее. Установите его сегодня и снова распрощайтесь с потерей данных.
Александр Кокин (старший редактор)
Александр Кокин, главный редактор 4DDiG, занимается предоставлением наилучших решений для проблем, связанных с Windows и Mac, включая восстановление данных, ремонт, исправление ошибок.
Is SSD not showing up in My Computer or Disk Management on Windows 10/8/7 when it is plugged into your PC? Here we will tell you the specific reasons, as well as the corresponding solutions to help you out. Try them out to access your SSD and data when it doesn’t show up.
SSD Not Showing up Windows 7/8/10
Compared to the traditional Hard Disk Drive (HDD), many users prefer the Solid State Drive (SSD) as data storage device due to its many advantages such as fast read-write speed, low power consumption, and lack of noise.
Tip: How to tell whether a hard drive is SSD in Windows 10? Click What Hard Drive Do I Have Windows 10? Find Out in 5 Ways to learn more.
However, an SSD could sometimes not be recognized in Windows 10/8/7 when it is plugged in. That’s to say, you may find the plugged SSD like a SATA SSD not showing up in locations like My Computer, File Explorer or Disk Management.
Since this issue is very common, many users have been trying to find solutions to it on the Internet.
Tip: This issue is not solely limited to SSD but HHD as well. External hard drive not showing up, USB drive not showing up, or just a general hard drive not showing up in My Computer or Disk Management could all happen to any computer. For demonstration purposes, we will use SSD here as an example.
When an SSD cannot be recognized by the computer, none of its data could be accessed. So why is SSD not showing up in Windows 10? How do you deal with this problem? Is it possible to get the data back? Don’t worry, this post will answer all of those questions.
Here is a video on some methods for you:
Tip: The following methods are appliable for this case – m.2 SSD not showing up.
Why Is SSD Not Showing up and How to Fix It
Generally, the SSD like SATA SSD not showing up issue could be caused by several reasons. For example:
- The SSD is new and has not been initialized
- SSD partitions are lost and unallocated
- File system of partitions can’t be recognized
- Drive letters of SSD partitions are missing
- Partitions are hidden
- Windows doesn’t detect SSD
- Driver issues
- Etc.
Here we will provide the specific solutions according to the different cases to fix the issue of SSD not showing up.
Tip: What if it is the HDD that is unknown or not initialized? We recommend you to first recover files from the disk in case of permanent data loss.
Reason 1: New SSD Is Not Initialized
Sometimes, a brand new SSD is not initialized before being plugged into the computer. This will cause the issue of new SSD not showing up Windows 10. How do you solve this issue in order to use the SSD in Windows 10/8/7?
Solution: Initialize this SSD
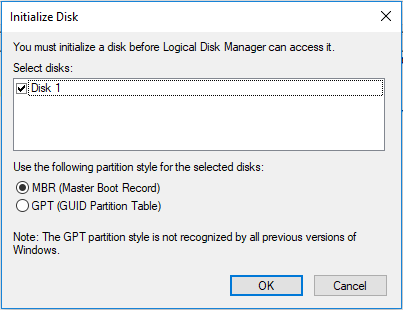
You need to first find Disk Management in Windows 10/8/7 for SSD initialization. Press Win + R and input compmgmt.msc in the Run dialogue to open this tool. Then, there will be a pop-up window saying “You must initialize a disk before Logical Disk Manager can access it” to suggest you initialize the SSD.
How to initialize SSD to fix the issue of new SSD not showing up Windows 10/8/7? Please choose MBR (Master Boot Record) or GPT (GUID Partition Table) according to your motherboard, and then click OK.
After initialization is finished, the “SSD not showing up in Disk Management” issue may disappear and you can create a new volume with Disk Management. Then this new partition should show up in Windows Explorer.
Reason 2: SSD Partitions Are Missing
Even though the SSD isn’t new and contains a lot of data, it might randomly not show up in Windows Explorer when you try to access its files.
In Disk Management, the message “disk unknown not initialized” might show up due to virus infection, system file corruption, MBR damage, improper operation, etc. Windows also prompts you to initialize it to MBR or GPT SSD.
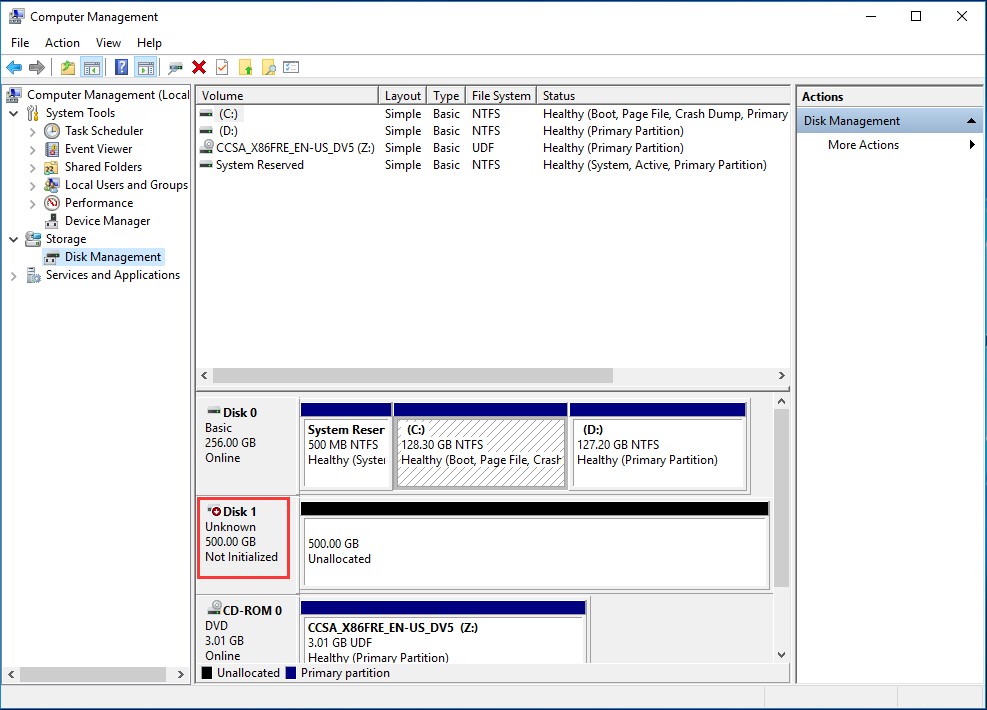
In this case, it is not wise to initialize this SSD immediately in Windows 10 because all the data on this SSD could be lost. Another situation is that the SSD would appear as online, but the entire disk is “unallocated”.
In these two situations, Disk Management will not show all the partitions on the SSD and only the unallocated space shows. What should you do to fix unallocated SSD in Windows 10/8/7? The first thing you do should be retrieving the lost partitions and data so the SSD is no longer unallocated.
Solution: Make a Partition Recovery
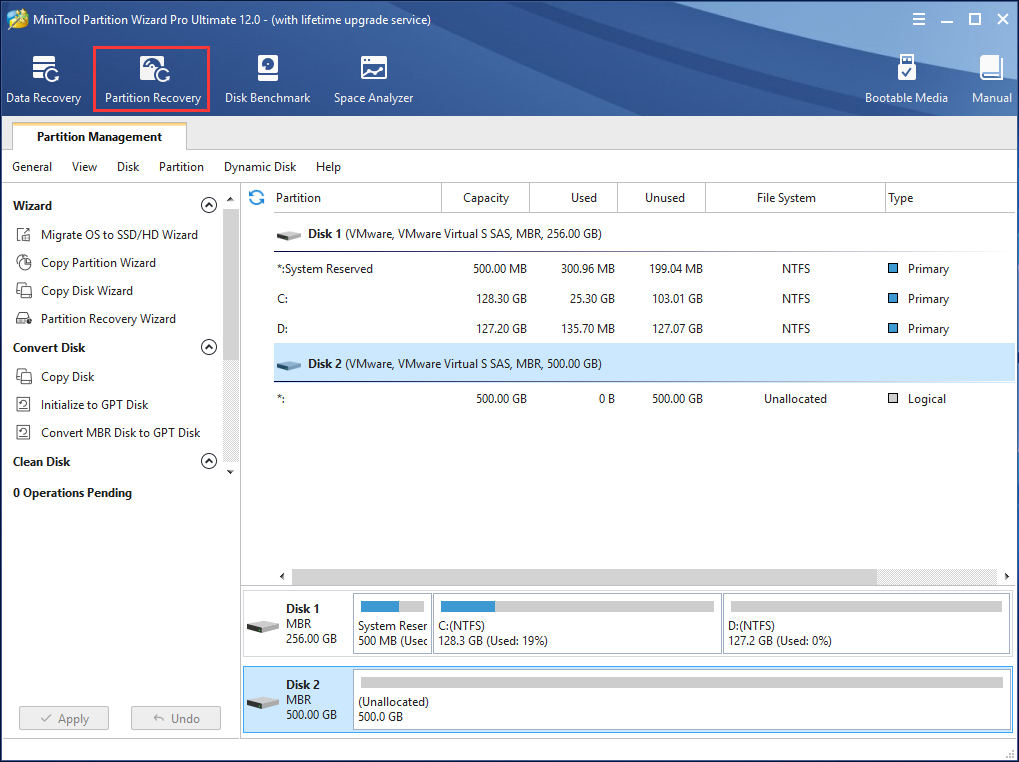
In order to recover lost partition and data in case of SSD not showing up in Disk Management, you can adopt a professional and reliable program. Fortunately, we have MiniTool Partition Wizard to help you out.
This tool is designed to manage your disk and partition well in areas like partition resizing, disk copy, MBR repair, disk conversion, etc. Among so many features, it owns a core function which is called Partition Recovery. This feature allows the recovering of lost partition and lost data effectively in Windows 10/8/7.
Partition Recovery is a paid feature, so unfortunately you can’t recover lost partitions using the Free Edition. However, the Free Edition can still be used to check whether the lost partitions can be scanned; if they can be scanned, you should purchase the Ultimate Edition to recover them.
MiniTool Partition Wizard FreeClick to Download100%Clean & Safe
Warning: Before you begin partition recovery, don’t do anything to your SSD (e.g, create a new partition with the unallocated space). Otherwise, the possibility of a successful partition and data recovery on SSD will be slim.
How to perform this operation to fix SSD not showing up in Windows 7/8/10? Here is the step-by-step guide to recover your partitions.
Step 1: Launch MiniTool Partition Wizard and click Partition Recovery.
Step 2: Choose a target disk for partition recovery.
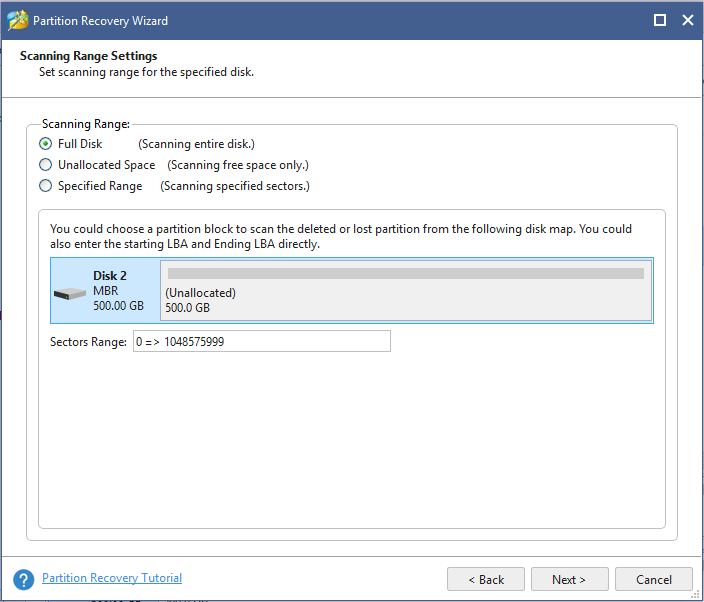
Step 3: Choose a scanning range for SSD partition recovery. There are three modes; Full Disk should be chosen to scan the entire SSD. Click Next to continue.
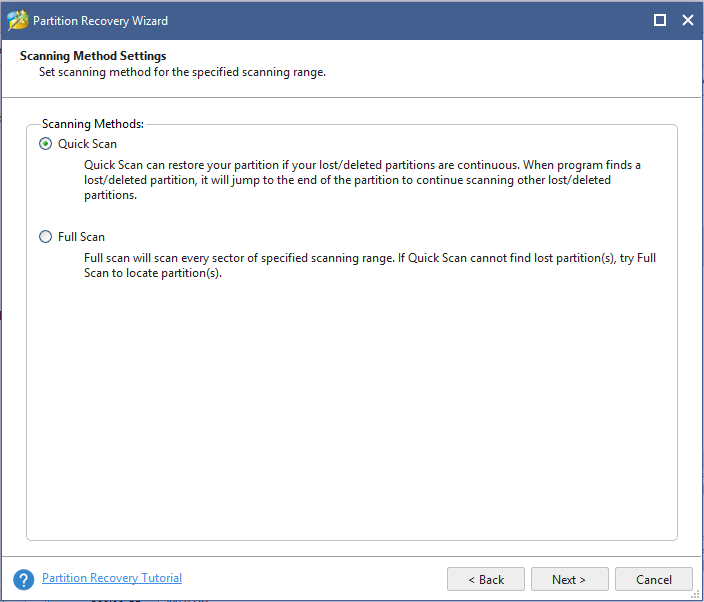
Step 4: Then MiniTool Partition Wizard has two scanning methods, Quick Scan and Full Scan. The former can restore your lost or deleted partitions which are continuous; the latter can scan each sector of the specified scanning range on your SSD. If Quick Scan doesn’t work well enough, try Full Scan.
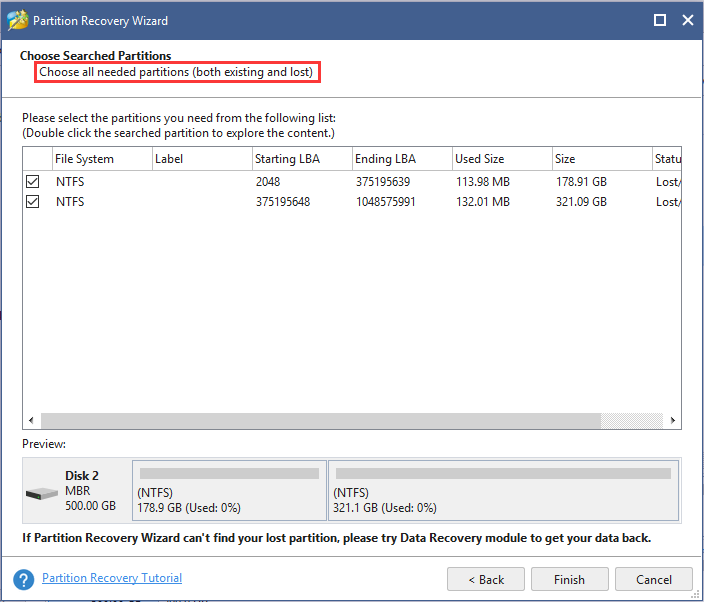
Step 5: After SSD scanning is finished, all your lost or deleted partitions will be listed as shown in the following screenshot. Please choose all the partitions you need.
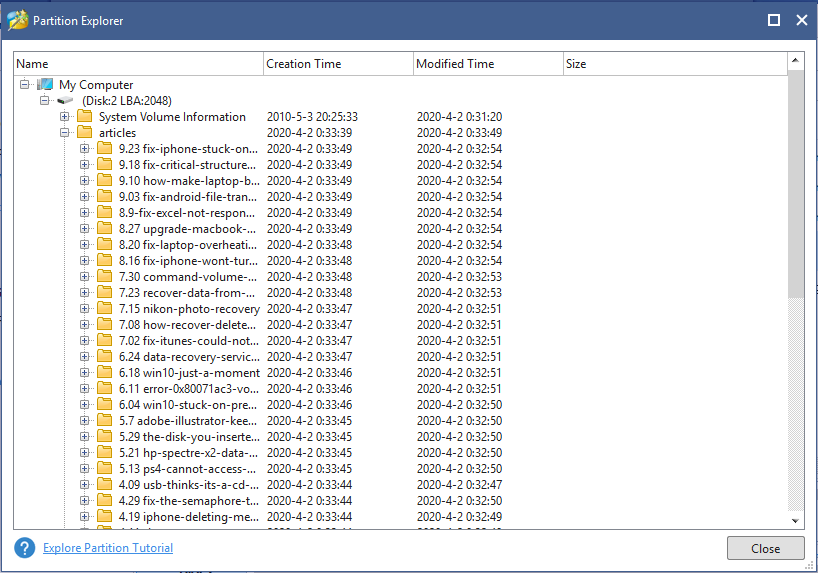
Let’s take partition 1 on the SSD as an example. You can review all the files on your computer by double-clicking the partition. The pop-up window shows you the folder structure, so you can just click them to view the files inside. After you finish reviewing, close this window and click Finish to go back to the main interface of MiniTool Partition Wizard.
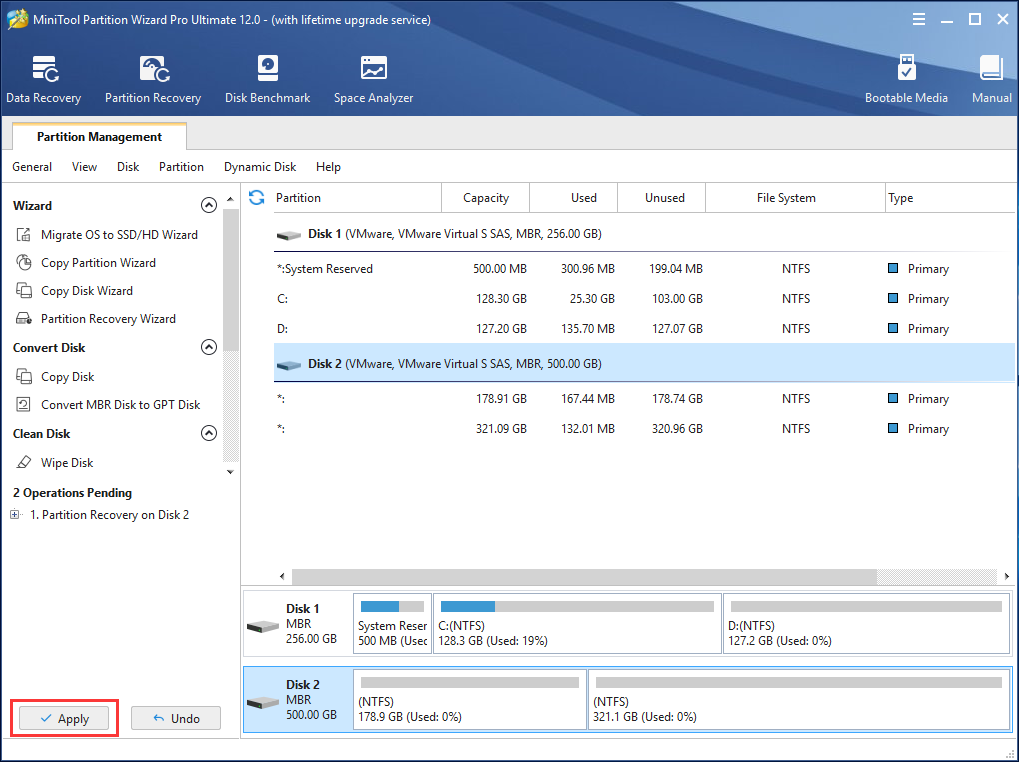
Step 6: Finally, click Apply to perform the SSD partition recovery operation. Then all partitions on SSD will appear in Windows Explorer.
After partition recovery, you might find that your SSD does not have a drive letter. In this case, if you open your File Explorer or Windows Explorer, none of the partitions in the SSD shows up. Therefore, it is necessary to assign a drive letter for all partitions with MiniTool Partition Wizard.
If you are experiencing partition loss issue, MiniTool Partition Wizard is your best assistant; get the Ultimate Edition now to scan your lost SSD partitions and recover them.
Tip: In addition to partition recovery on SSD with MiniTool Partition Wizard, you can also use its Data Recovery feature in Professional Ultimate to recover SSD data. Or use another program – MiniTool Power Data Recovery to recover data from unallocated space. However, MiniTool Power Data Recovery can only retrieve the data on SSD but not the partitions.
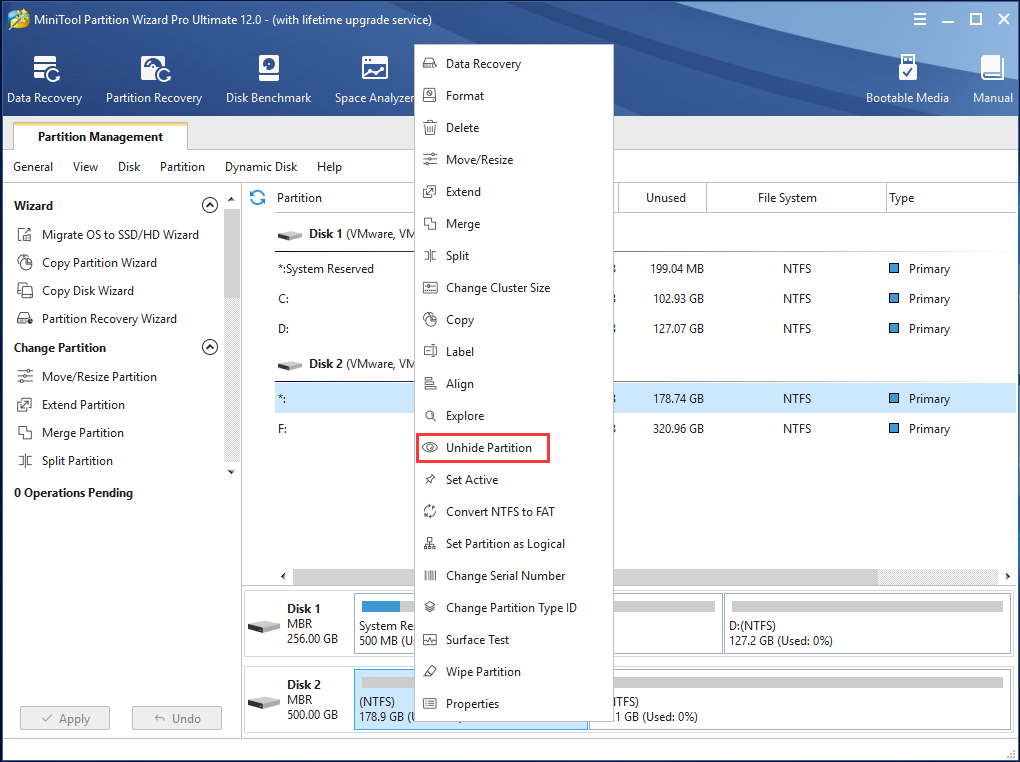
Reason 3: Partition Is Hidden by Third-party Software
Sometimes, the SSD partition could be hidden by a third-party software in order to prevent access. Consequently, it will be not showing up in Windows Explorer or File Explorer.
Solution: Unhide Partition
Disk Management does not have an option to unhide a partition or show hidden partitions. In this case, you will again need to use MiniTool Partition Wizard. Fortunately, using the Free Edition will suffice this operation.
MiniTool Partition Wizard FreeClick to Download100%Clean & Safe
Step 1: Right-click on the target drive and click Unhide Partition. Alternatively, select the target partition and click Unhide Partition under the Partition Management menu.
Step 2: Assign a drive letter for this partition.
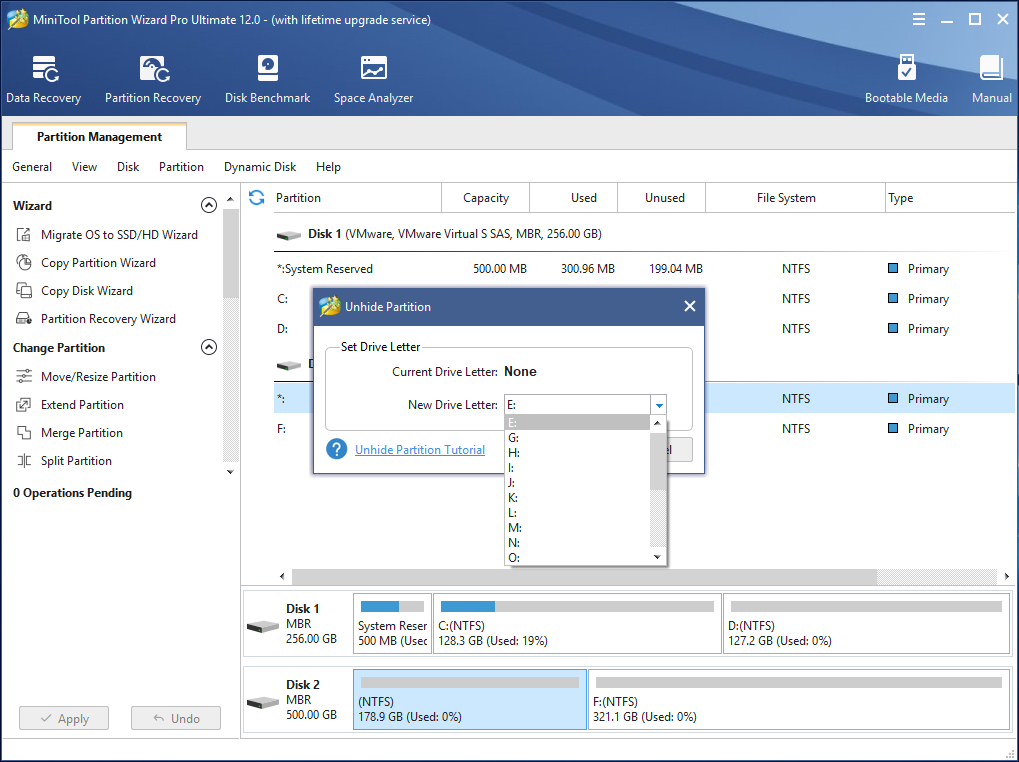
Step 3: Click Apply to apply these changes.
Reason 4: Drive Letter Is Missing
Sometimes your SSD is properly connected to your PC, showing up in Device Manager, but not showing up in My Computer. In this case, perhaps the drive letter is missing on the SSD partition due to some reasons, so you can’t access it in Windows Explorer.
Solution: Assign a Drive Letter
It should be a priority now to change the drive letter for the partition on SSD. How to assign a drive letter to fix the issue of SATA SSD not showing up in My Computer? Here is what you need to do:
Step 1. Launch Disk Management utility. Right-click on This PC or My Computer in Windows 10/8/7, select Manage and then in Storage menu, click Disk Management.
Step 2. Here you can see all the SSD partitions. Now select the partition that is missing a drive letter, right-click it and select Change Drive Letter and Paths.
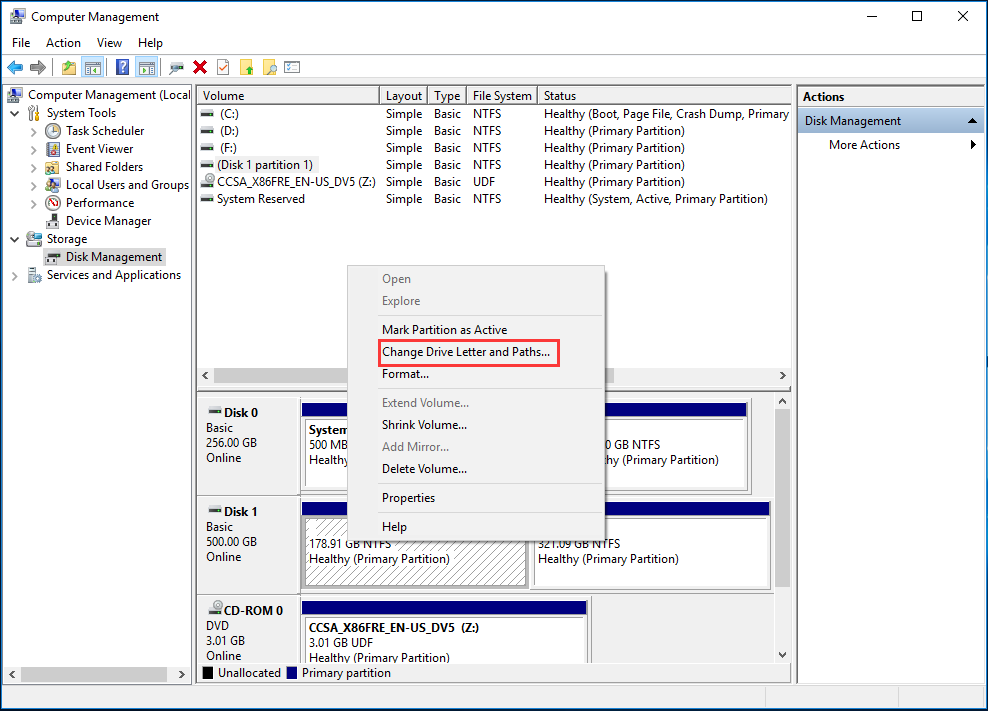
Step 3: Click Add, then select a drive letter from the list. Click OK to finish this change.
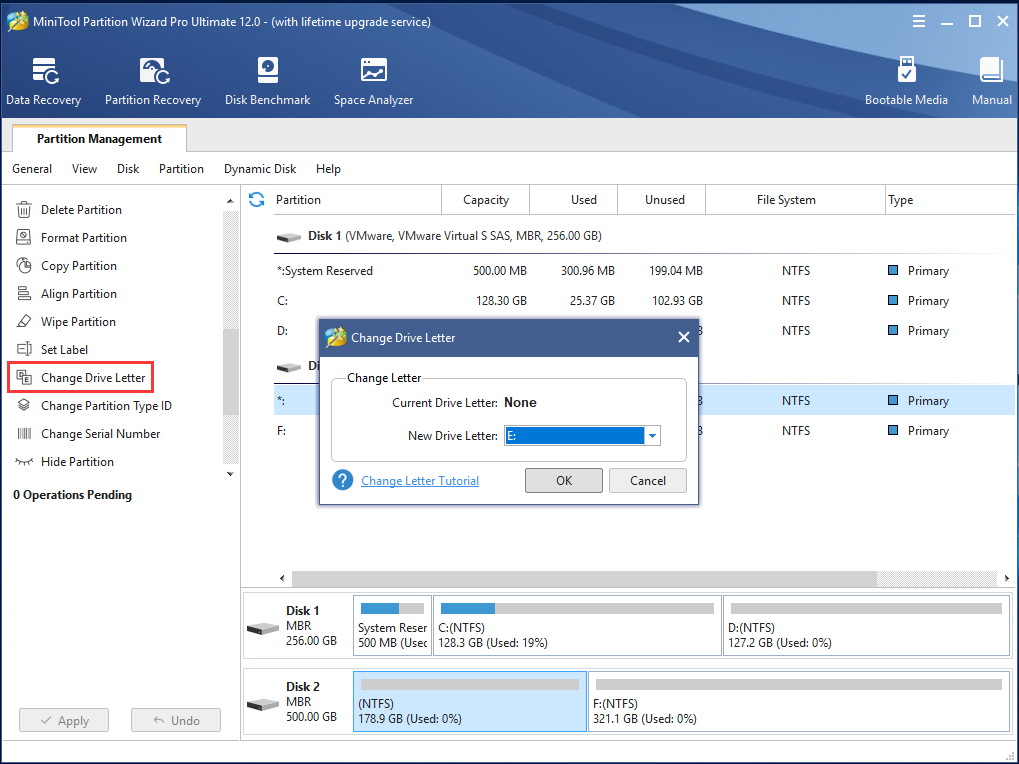
Alternatively, you can also assign a drive letter in MiniTool Partition Wizard. Here is how to do:
Step 1: Select the target partition on your SSD, and click Change Drive Letter in the left pane.
Step 2: Choose one drive letter.
Step 3: Click Apply.
After performing this procedure, SSD will show up again in Windows 10/8/7.
Reason 5: SSD Adopts an Unsupported File System
If the “SSD not recognized” issue persists in Windows 10 after trying the methods above, you should consider whether the file system is compatible with Windows. If the file system is neither FAT32 nor NTFS, SSD won’t show up.
Solution: Delete Drive and Create FAT32/NTFS Partition
You can also use MiniTool Partition Wizard to delete the SSD partition in Windows 10/8/7 and then create a new NTFS/FAT32 partition. Here, take an Ext3 partition as an example.
Step 1: Right-click the partition to select Delete. Alternatively, directly click Delete Partition in the left panel.
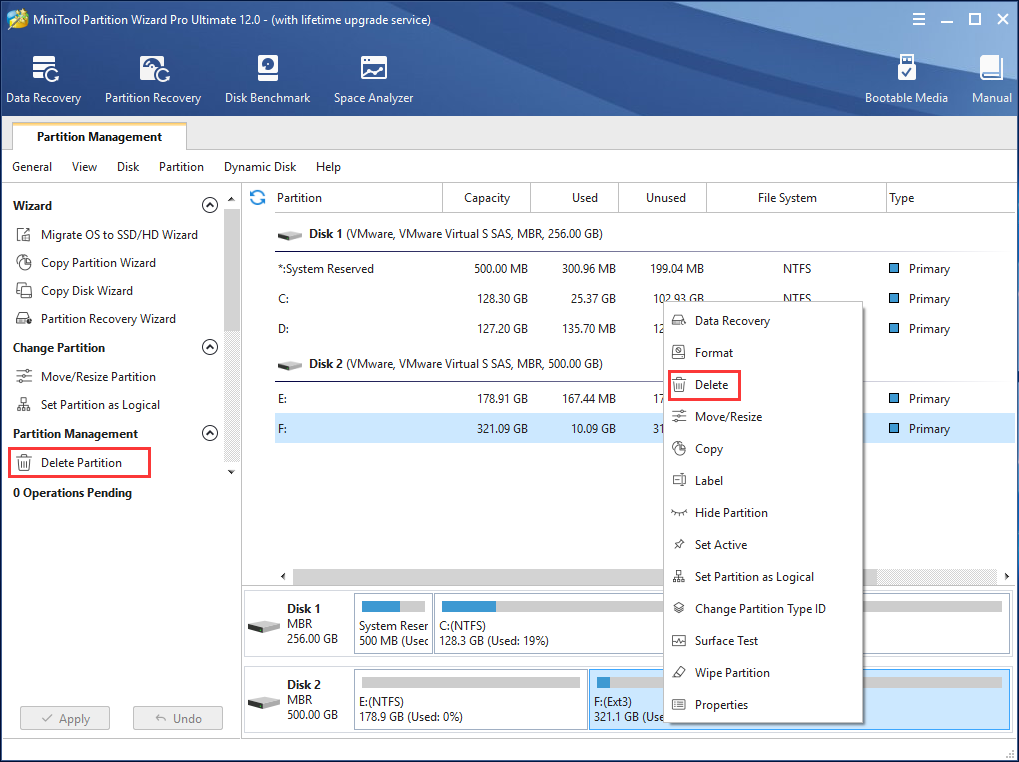
Note: Partition Deletion will lead to data loss. If this partition contains important data, please recover deleted files at once with the Data Recovery feature in MiniTool Partition Wizard Ultimate or more advanced editions after deletion.
Step 2: After finishing the deletion, click Create Partition. During the process, please choose NTFS or FAT32 as the file system.
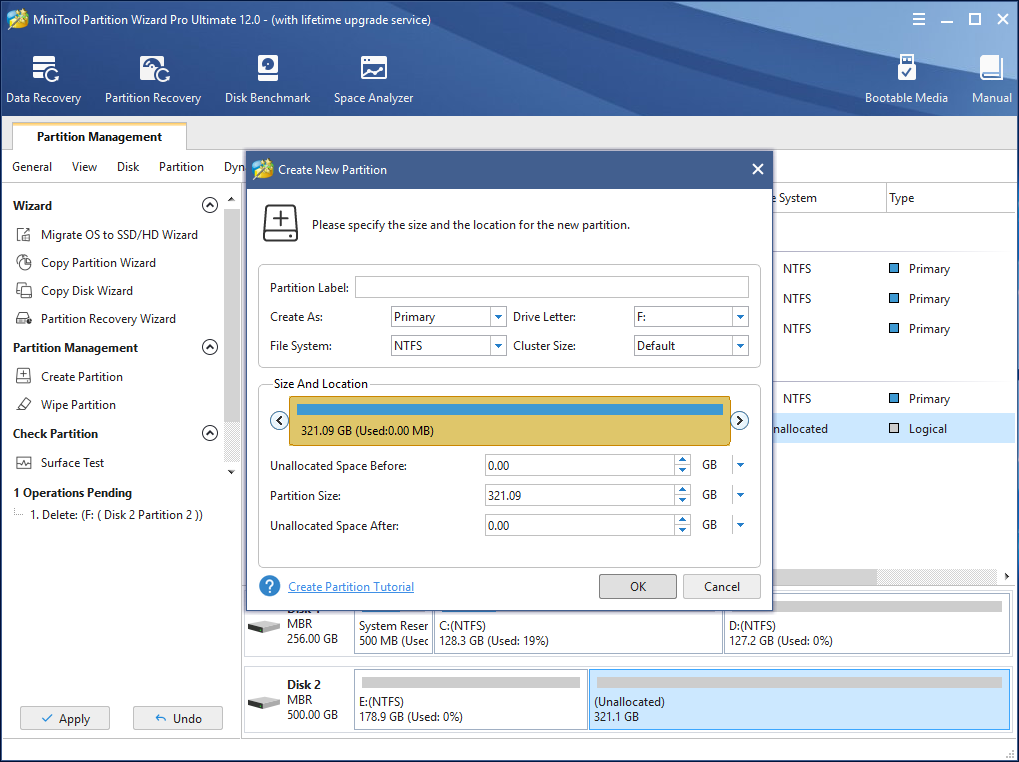
Step 3: Execute these changes by clicking Apply.
Tip: You can also choose to format an SSD in Windows 10/8/7 if it is not showing up due to the unsupported file system.
Reason 6: SSD Not Showing up in BIOS
Another possibility is that the SSD is not connected correctly, causing Windows to not be able to recognize it. This could be shown in BIOS where you can see the computer fails to detect your SSD.
In case of SSD not recognized, what should you do? Please refer to this post The BIOS does not detect or recognize the Solid State Drive to get solutions to the “SSD not showing up in BIOS” issue.
“Windows does not see my hard drive: SSD. Fortunately, this post gives me many solutions to fix the issue of SSD not showing up or recognized.”Click to Tweet
However, if none of the solutions here could remove the issue of SSD not showing up, the SSD is probably damaged and should be replaced. Here are the best sellers in the SSD market:
| Product Name | Intel 660p Series (1TB) SSD | Corsair MP500 (480GB) SSD | Samsung 860 EVO (250G) SSD | Samsung 970 EVO NVMe (500GB) SSD | Adata SU800 SATA (1TB) SSD |
| Brand | Intel | Corsair | Samsung | Samsung | Adata |
| Capacity | 1TB | 480GB | 250GB | 500GB | 1TB |
| I/O Speed | Up to 1,800MB/s | Up to 3,000MB/s | Up to 550MB/s | Up to 3500MB/s | Up to 560MB/s |
| Pros |
Very good NVMe performance most of the time. Extremely affordable. 5-year warranty. |
Black printed circuit board. Copper strip technology. High-Performance. NVMe-Enabled. |
Good overall performance. Outstanding endurance rating. Samsung Magician software. Hardware-Based encryption. Package with DRAM cache and cloning. 5-year warranty. |
Affordable (relatively) NVMe drive. Excellent sequential reads Available in up to 2TB capacity. Almost 50% shorter file transfer times. 5-year warranty. |
Adata SSD Toolbox. Acronis Data Migration. Fair pricing. |
| Cons | Slows to 100MBps writing during very long transfers. |
High initial pricing. Low warranty terms. Lack of progress for the E7 controller. |
Expensive. |
Slows to just over 600MBps after cache is exceeded. Occasionally trails 960 Pro. Lower capacities could be cheaper. |
Micron 384Gbit 3D TLC NAND. Low throughput. High latency. Low notebook battery life. |
| Rating Star |
Bottom Line
In this post, we talk about the issue of SSD not showing up in Windows 10/8/7, why this issue appears, and how to fix it. MiniTool Partition Wizard helps a lot in solving issues regarding SSD and hard drives in general. If you encounter this problem while managing SSD partition data, you can try using the methods mentioned in this post.
MiniTool Partition Wizard FreeClick to Download100%Clean & Safe
Finally, if you have any suggestion or doubt, please don’t hesitate to leave a comment below or send an email directly to [email protected]. Your feedback is much appreciated.
SSD Not Showing up FAQ
How do I get my new SSD to show up?
- Initialize your SSD
- Perform a partition recovery
- Unhide your partition
- Assign a drive letter
- Delete the partition with an unsupported file system
Why is my SATA SSD not showing up?
Your SATA SSD may not be initialized, partitions are missing or hidden, driver letter is missing, SSD adopts an unsupported file system or it is not showing up in BIOS. As a result, the SATA SSD doesn’t show up.
How do I fix SSD not detected in BIOS?
- Troubleshoot hardware faulty
- Configure the SSD settings in BIOS
- Update available drivers
How do I fix SSD not detected in BIOS?
It is easy to know if your laptop has an SSD. Just press Win + R, input dfrgui and click OK. Then, you can find out if your hard drive is SSD or HDD from the Media type column.
Также, как и с обычными жесткими дисками, после установки нового M.2 или SATA SSD на компьютере или ноутбуке, а иногда и в других случаях: после переноса системы на другой диск, обновления или переустановки Windows 10, пользователь может столкнуться с тем, что SSD не виден в системе. Обычно, при отсутствии аппаратных неисправностей, решение проблемы оказывается сравнительно простым.
В этой инструкции подробно о том, почему Windows 10 может не видеть SSD подключенный в разъёме M.2 (NVMe PCI-e и SATA) или SATA и о действиях, которые можно предпринять, чтобы исправить проблему. Схожий материал, преимущественно на тему HDD и без привязки к версии ОС — Что делать, если Windows не видит второй диск.
- Проверьте, виден ли SSD в диспетчере устройств и БИОС
- SSD есть в БИОС/UEFI, но не виден в Windows 10
- Видео инструкция
Проверка наличия диска SSD в БИОС (UEFI) и диспетчере устройств
Прежде чем приступать к каким-либо действиям по решению проблемы, рекомендую следующий порядок действий:
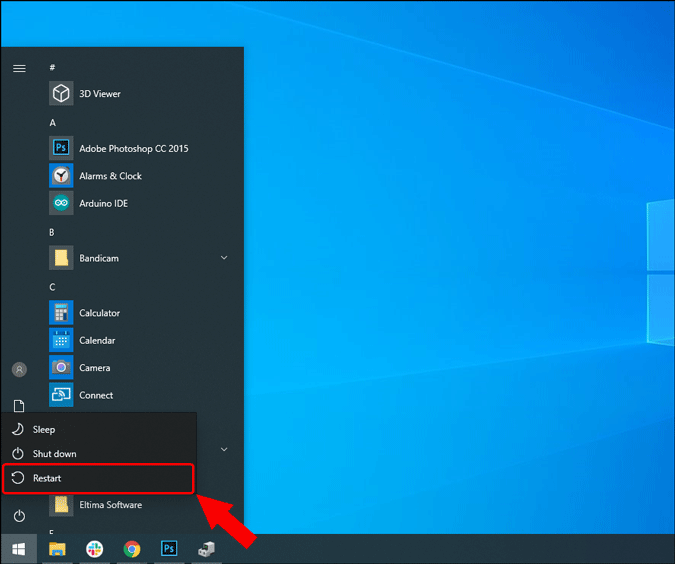
- Перезагрузить ваш компьютер или ноутбук. Важно: выполнить именно перезагрузку (с помощью одноименного пункта в разделе «Выключение» меню Пуск), а не завершение работы с последующим включением, возможно уже это решит проблему.
- Зайти в диспетчер устройств (можно нажать правой кнопкой мыши по кнопке «Пуск» и выбрать соответствующий пункт контекстного меню), открыть раздел «Дисковые устройства» и посмотреть, виден ли диск там. Если диск в наличии, шаг 2 выполнять не нужно и все действия для решения проблемы, вероятнее всего, достаточно будет выполнить в запущенной Windows 10, как описано в следующем разделе статьи.
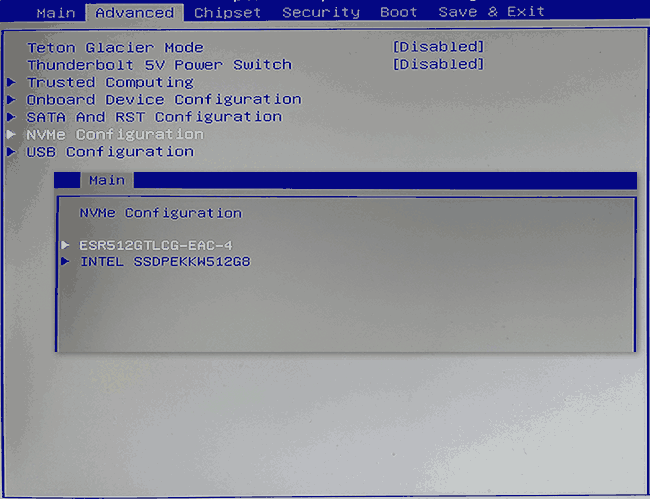
- Заглянуть в БИОС (UEFI) вашего компьютера или ноутбука и, убедиться, что проблемный диск отображается в списке подключённых накопителей. Сам раздел, где требуется искать информацию может отличаться в зависимости от конкретного производителя вашей материнской платы или ноутбука: это может быть раздел Storage, NVMe Configuration (например, в разделе Advanced), SATA Configuration для дисков SATA, в том числе подключенных к M.2 разъёму, Chipset и другие. Иногда информация о подключённых накопителях отображается на главной странице БИОС.

- В случае, если диск виден в БИОС, но не виден при установке Windows 10, загрузите на установочную флешку официальные драйверы SSD для вашей модели от производителя: обычно на официальном сайте присутствуют драйверы не только в виде установщика, но и как ZIP-архив с набором файлов — распаковываем их на флешку, а при установке на этапе выбора разделов нажимаем кнопку «Загрузить» для установки драйверов.
Если диск не отображается в БИОС, возможно, у нас проблемы. Распространённые варианты:
- Для дисков SATA — проблема с кабелем SATA, его плохое подключение, в том числе со стороны материнской платы. Не подключён кабель питания к диску.
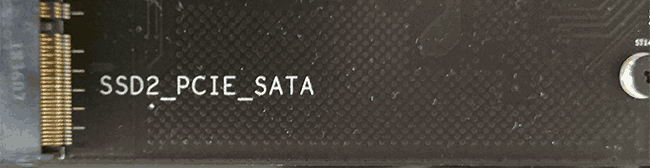
- Для дисков M.2 — плохое подключение (неплотно подключен в разъёме) или несоответствие поддерживаемому разъему типу интерфейса. По последнему пункту: к разъему M.2 могут подключаться диски, работающие по интерфейсу PCI-e NVMe и/или SATA. При этом в зависимости от конкретного устройства, разъём может поддерживать только PCI-e/NVMe диски, только SATA или и те и другие, а при несоответствии диска и поддерживаемых интерфейсов диск может быть не виден. Также учитывайте, что при наличии нескольких разъёмов M.2 на ноутбуке или материнской плате, поддерживаемые ими типы интерфейсов могут отличаться: следует прочитать официальную документацию и внимательно приглядеться к самим разъёмам — иногда на них присутствует соответствующая подпись, на изображении ниже — пример разъёма, поддерживающего и PCIe и SATA диски с разъёмом M.2.

- В редких случаях — неисправность разъёма или самого накопителя.
Для второго рассмотренного случая следует убедиться, что ваш SSD и разъём «подходят» друг к другу, например, диск PCI-e и разъём поддерживает подключение таких дисков. Если это так, а диск всё равно не виден в БИОС, попробуйте:
- Проверить, нет ли раздела БИОС/UEFI, отвечающего за настройку интерфейса слотов M.2 (например, в Advanced\Onboard Devices Configuration или похожем), где можно было бы выбрать режим работы PCIe (NVMe) или SATA и, при его наличии — указать правильный, сохранить настройки БИОС и перезагрузить компьютер.
- Если в БИОС присутствует пункт выбора типа ОС (например: OS Type с выбором между Windows 10 и Other OS), попробуйте выбрать Windows 10, сохранить настройки и выполнить перезагрузку.
- При наличии нескольких разъемов M.2 — попробовать подключить накопитель к другому.
- Полностью обесточить ваш компьютер на некоторое время (в случае с ПК после того, как выключили его из розетки, нажмите и подержите кнопку включения), а затем снова включить — иногда это решает проблему.
- С осторожностью и выполняя рекомендации производителя (потенциально опасная процедура): обновить БИОС вашей материнской платы или ноутбука.
SSD есть в БИОС/UEFI, но не виден в Windows 10
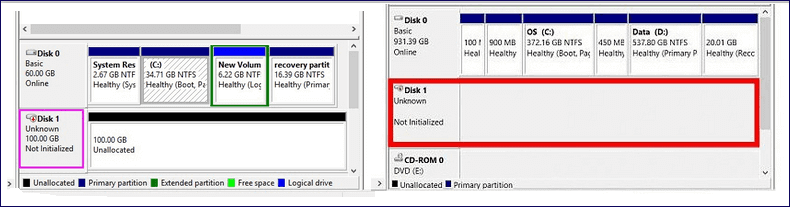
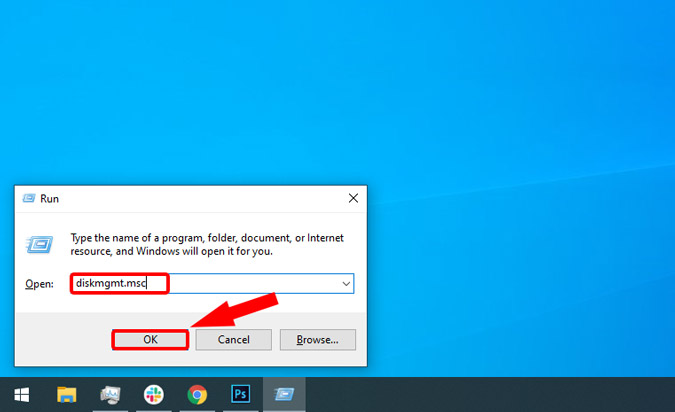
Самый простой вариант — если SSD есть в БИОС и присутствует в диспетчере устройств, в этом случае решением будет нажать правой кнопкой мыши по кнопке «Пуск» и выбрать «Управление дисками» (или нажать Win+R и ввести diskmgmt.msc), после чего возможны следующие 4 варианта:
- Вам сразу будет предложено инициализировать новый диск, как на изображении ниже. Выполните инициализацию, при необходимости — форматирование и назначение буквы (также обычно предлагается автоматически). Иногда после инициализации и форматирования буква автоматически не назначается и диск не появляется в проводнике, в этом случае обратите внимание на пункт 3.

- Окно «Инициализация диска» не появится, но в нижней части окна «Управление дисками» вы увидите диск с красной стрелкой, нажав по которому правой кнопкой мыши вы сможете инициализировать диск, как в первом варианте.
- Диск отображается без красной стрелки, уже инициализирован. В этом случае, если на диске есть разделы (будут видны в графическом виде в нижней части) — назначить им буквы: нажать правой кнопкой мыши по разделу, выбрать пункт «Изменить букву диска или путь к диску» и добавить букву. Если разделов нет — правое нажатие по нераспределенному пространству — «Создать простой том» и следование указаниям мастера создания разделов.
- SSD нет в управлении дисками. Но, как уже было отмечено выше — диск есть в диспетчере устройств. Несколько раз приходилось с таким сталкиваться для дисков M.2, несмотря на то, что в Windows 10 все необходимые драйверы для работы уже присутствуют. Обычно помогает решение: на официальном сайте производителя SSD скачать драйвер для этого диска (даже если точно такой же уже установила ОС), установить его, перезагрузить компьютер, снова запустить управление дисками.

В случае, если SSD показывается в БИОС, но его нет не только в управлении дисками, но и в диспетчере устройств, зайдите на официальный сайт производителя вашего накопителя и в разделе поддержки вашей модели диска попробуйте скачать драйвер и установить его. После установки — перезагрузить компьютер и проверить, изменилась ли ситуация.
Видео инструкция
Если какой-то из предложенных вариантов решил проблему, буду рад вашему комментарию, он может оказаться полезным и для других читателей. Возможно, вы можете предложить собственные методы исправить рассматриваемую ситуацию — тоже будет отлично.
Don’t panic if your SSD not showing up on your computer. There are four common cases, and check the corresponding solution below to get rid of the issue with ease.
Are your hard drives, new or old, internal or external, not showing up in File Explorer or Disk Management? Follow along to learn how to fix the hard drive not showing up in Windows 11/10/8/7 without losing data.
| Solutions | Editor’s Review |
|
👩⚕️Data Recovery Sevices |
This method is not free, but you can solve most SSD issues with a professional data recovery and hard drive repair team. |
|
🔡Change Drive Letter |
The drive letter conflict can cause SSD to not be detected or show up in Disk Management. Assigning a new drive letter can quickly solve the issue. |
|
🔖Initialize SSD |
Sometimes, the new SSD not showing up may be caused by disk initialization. |
|
📃Format SSD |
Formatting the SSD to a supported file system can make Windows detect the SSD again. This method may cause data loss. |
|
✅Update SSD Driver |
An outdated SSD drive can make the Windows operating system unable to recognize the SSD successfully. |
|
⛑️Run Troubleshooter |
Windows has a built-in utility that can automatically repair hardware issues. |
|
🖥️Change BIOS Settings |
Wrong BIOS settings can cause this issue. Changing the Storage Configuration settings can quickly solve the issue. |
«I recently installed a Samsung SSD on my Windows 10 computer, but I find it not showing up under My Computer where the other hard drive is present. Is there any way to display the SSD?»
«I got a new M.2 SSD from Intel. When I connected it to my PC, it did not show up in the File Explorer or Disk Management. I don’t know where goes wrong. Please help.»
The above user stories tell the same thing that happens to a Solid State Drive (SSD) — your drive does not show up as other connected hard drives. In Windows 10 and earlier Windows operating systems, an external storage device not detected issue would throw people into frustrating situations. They can’t add files and content to the SSD, nor can they access its existing data. Therefore, the biggest concern is how to fix the ‘SSD not showing up’ problem quickly and easily.
Get Data Off Your SSD with Data Recovery Software
We will introduce all seven methods to fix SSD not showing in Windows 10 or 11, and you can try to fix the issue accordingly. Some solutions may cause data loss, and you’d better download EaseUS Data Recovery Wizard Pro when necessary to recover SSD data from an inaccessible/formatted Solid State Drive.
SSD data recovery is necessary when the SSD stores important files and folders of your work or family. EaseUS professional SSD recovery tool can help you recover deleted photos from hard disks, and you can also restore lost documents, emails, audio, and videos from SSD.
You Can Trust EaseUS Data Recovery Software
EaseUS Data Recovery Wizard has acquired an extensive technical base in data recovery and trusted by billions of users since 2005. Check out reviews on Trustpilot.
You can easily get data off your SSD with the following tutorial. If your SSD is an external one, remember to connect it to your computer in advance:
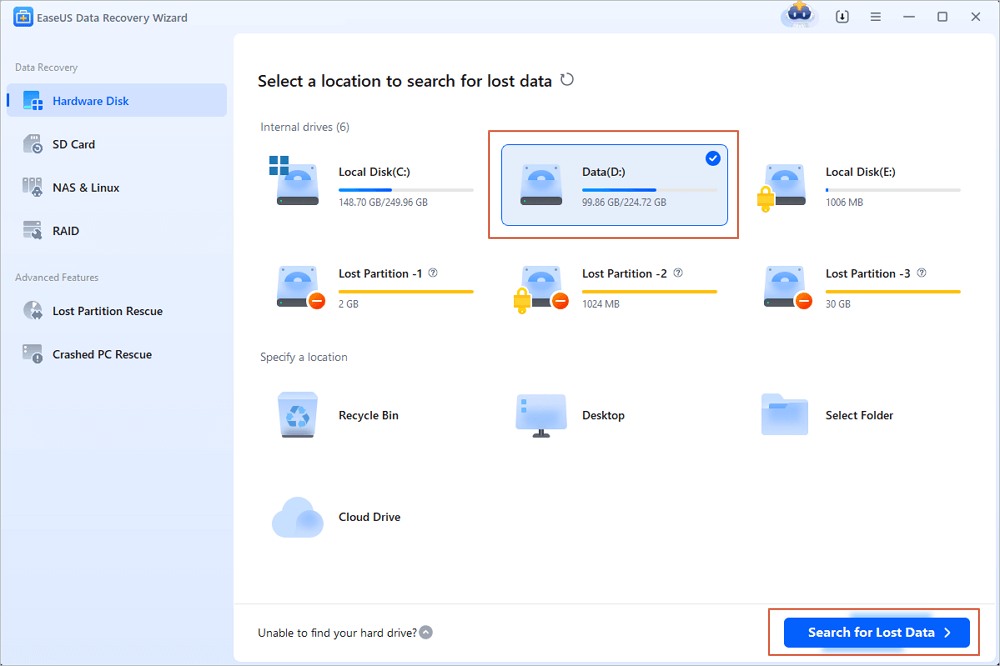
Step 1. Launch EaseUS SSD recovery software on the PC, select the internal SSD or external SSD, and scan the disk.
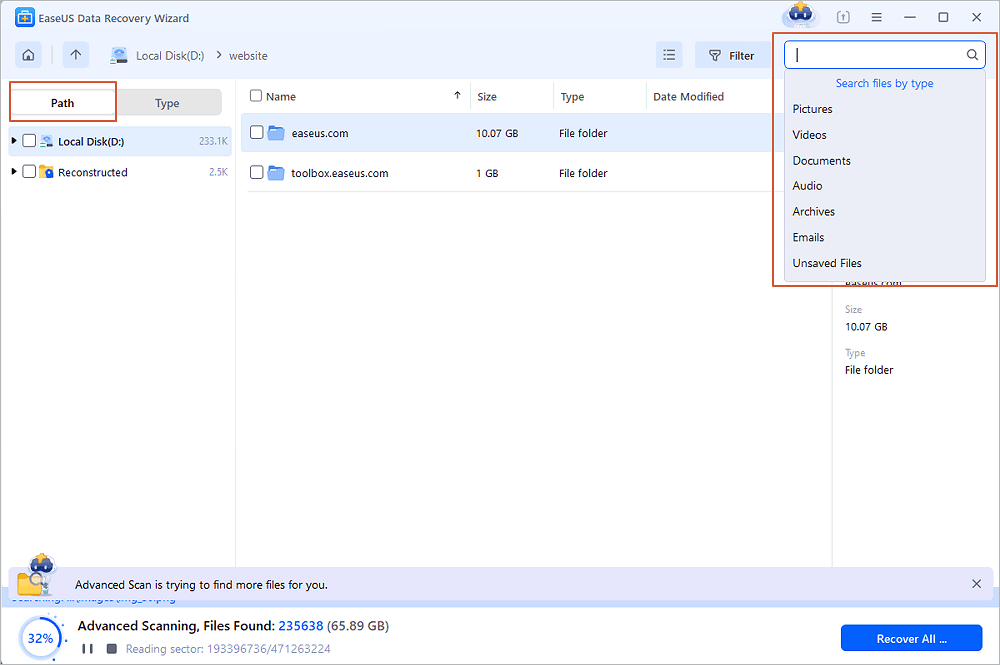
Step 2. During the scanning, you can also filter the SSD data. Choose the file type you want to recover; finding target files will be easier with the Filter option.
Step 3. You can preview the videos, pictures, or documents before recovering them. Click «Recover» and save these recovered SSD files to another disk.

Do you think the EaseUS data recovery tool is helpful? Please share this passage on social media to help more SSD users!
Case 1. Solve All SSD Issues with Data Recovery Services
You can choose to fix NVME/M.2 SSD not showing up or other SSD issues with a professional disk repair service. We provide you with an effective manual disk repair service. You can repair your SSD errors with simple clicks. Contact EaseUS data recovery services and get help as soon as possible.
Consult with EaseUS’ data recovery experts for one-on-one manual recovery service. We could offer the following services after a FREE diagnosis
- Support hard disk repair, including HDD, SSD, external hard drive, USB flash drive, and pen drive issues
- Fix disks that cannot be read or accessed because of bad sectors
- Fix disks that become GPT-protected partitions
- Repair damaged RAW drive that needs to be reformatted (BitLocker encrypted drive is also supported)
- Wipe data, unformat hard drive, Install/uninstall software or driver, etc.
If you want to solve not showing issue by yourself, we’ll offer more solutions and written tutorials. If you prefer a video tutorial to fix SSD not showing in Windows 11/10/8/7, you can watch this video to fix SSD, hard drive, and USB drive not showing up.
⌛Time Stamps:
- 00:15 Method 1. Assign Drive Letter
- 01:05 Method 2. Initialize Disk
- 01:35 Method 3. Corrupted File System
- 02:38 Method 4. Windows Driver Issue
Case 2. SSD Not Showing Up Because the Drive Letter Is Missing
Sometimes, your SSD does not show up because the drive letter of the SSD is missing or conflicting with another disk, and the Windows OS cannot recognize it. You can solve this problem by manually assigning the SSD a new drive letter in Windows Disk Management.
To assign the SSD a new drive letter, follow these steps:
Step 1. Right-click on «This PC» and select «Manage». Under the Storage section, click «Disk Management».
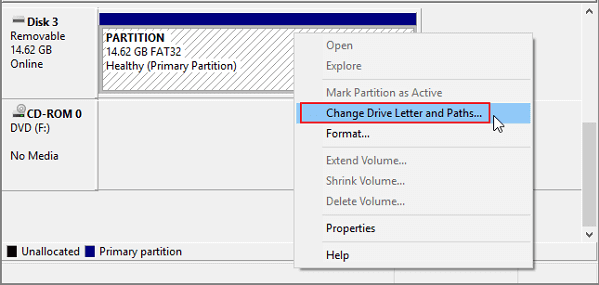
Step 2. Right-click on the SSD partition and select «Change Drive Letter and Paths…».
Step 3. Among Add, Change, and Remove, click the «Change» button, and then select a drive letter from the list. Click «OK» to confirm.
Case 3. SSD Not Showing Up Because It is Not Initialized
If you get a new SSD and it won’t show up in Windows Explorer, it’s likely in the «uninitialized» state. You must initialize a disk before Logical Disk Manager can access it.
Also, if an old SSD shows the «disk unknown not initialized» error, the reason is the same. In these two situations, to fix the problem, you can try to connect the SSD to another working computer to check if it reports the same error. Otherwise, you will need to initialize the SSD in Windows 10.
To initialize an SSD, follow these steps.
Step 1. Open Disk Management on your computer.
Step 2. Find and right-click the SSD you want to initialize, and then click «Initialize Disk».
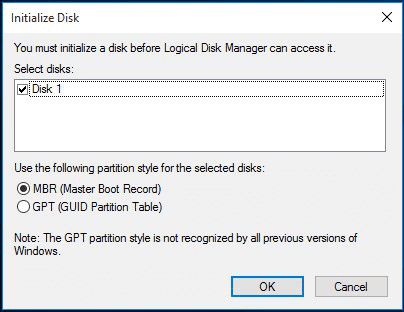
Step 3. In the Initialize Disk dialog box, select the disk(s) to initialize. You can select whether to use the master boot record (MBR) or GUID partition table (GPT) partition style.
You may also want to know if initialize the SSD erases data or not. Check this passage to learn more:
Does Initializing a Disk Erase Data, Yes or No?
Does initializing a disk erase data? Here, you will learn what happens when you initialize a disk. Read more >>
Case 4. SSD Not Showing Up Because the File System Is Not Supported
You need to think further if the above three methods do not work. One assumption is that the file system has corrupted or Windows does not support the current file system.
As investigated, the relevant file system issues are mainly displayed as «RAW», «Free space», or «Unallocated space». Reformatting the disk would be enough to fix the file system issues or RAW drive.
Step 1. Right-click the Windows icon to bring up the tool menu, and click «Disk Management».

Step 2. Right-click the target SSD and choose «Format», then you can perform a quick format.
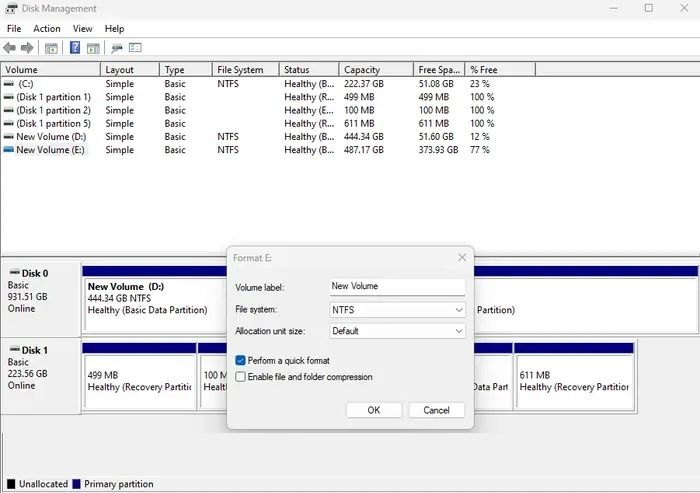
- Notice:
- Note: Disk formatting will completely erase data on the disk. If you haven’t created a data backup before, download EaseUS Data Recovery Wizard to recover formatted SSD.
Case 5. SSD Not Showing Up Because of Disk Driver Issues
Another possible situation is that the SSD is detected but not displayed in «My Computer». This is because the disk drive is not installed correctly. So, you can try to reinstall the SSD driver to check if this helps fix the SSD not detected issue.
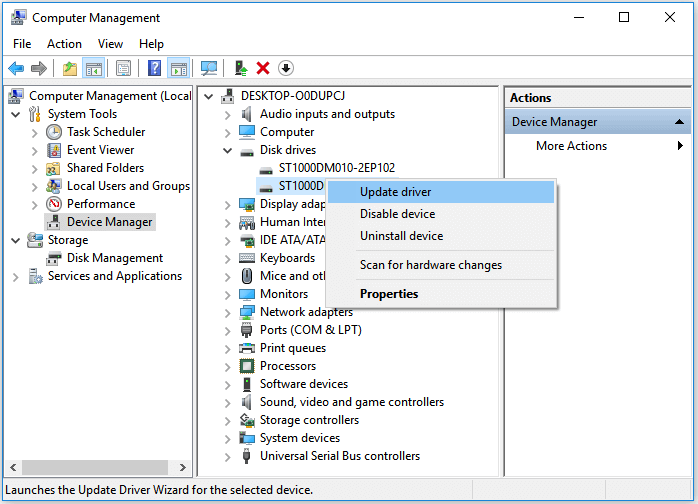
Step 1. Right-click on «This PC» and select «Manage». Under the System Tools section, click «Device Manager».
Step 2. Go to Disk drives. It should list the storage devices that you have connected to your PC.
Step 3. Right-click the SSD and choose «Uninstall device».
Step 4. Remove the SSD and restart your system. Try to connect the SSD again to check if Windows 10 detects the SSD as normal.
Case 6. SSD Not Showing Because Of Disk Issues
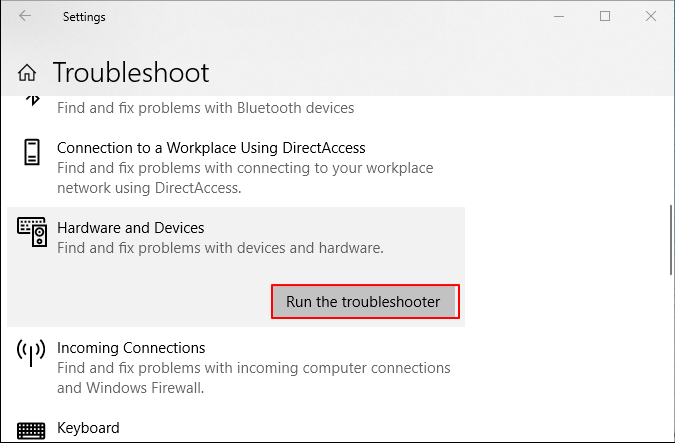
Sometimes, the unknown disk issues can cause many unexpected problems and even cause your SSD not to show on your computer. If you don’t want to go to the local store to repair the SSD, you can try Windows’s built-in repair utility first.
Step 1. Open the Windows Settings window by pressing the Windows and I keys.
Step 2. You can search for the Troubleshoot settings in the search box. Find «Hardware and Devices» and click «Run the troubleshooter».
After learning six methods, you may have solved your SSD problem already. Don’t forget to share these methods with your friends!
Case 7. SSD Not Detected Because Of Wrong BIOS Settings
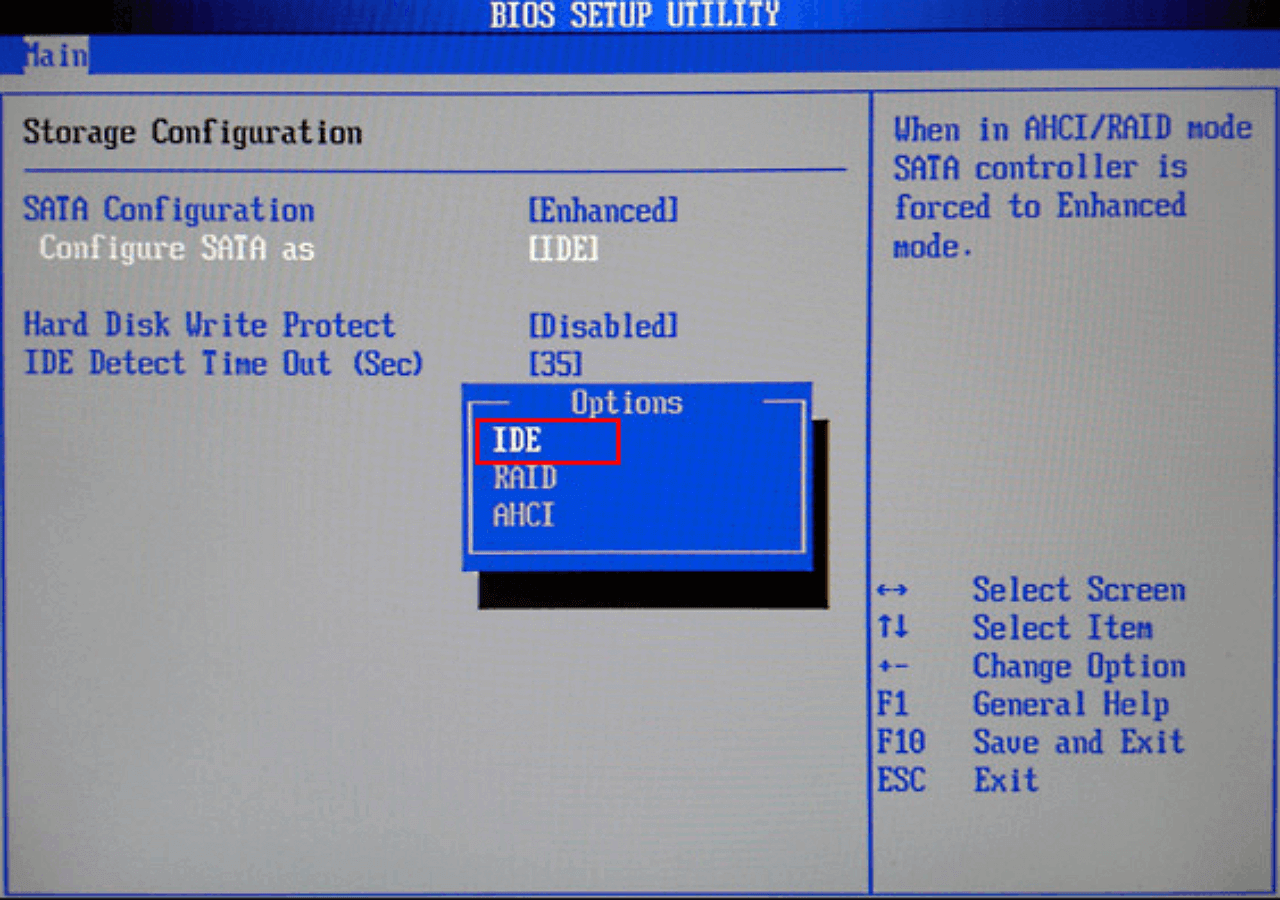
Sometimes, it’s nothing happens to your SSD when it is not showing up on your computer, just the wrong BIOS settings. You can change the BIOS settings to make your SSD detected by the Windows operating system again.
Step 1. To access the BIOS setup, restart your computer and press the specified key (F2) or other keys like F10 or Del. During startup, click the Enter key.
Step 2. Next, open the BIOS settings and find the «Storage Configuration» section.
Step 3. Find the SATA controller mode setting and adjust it to IDE.
After learning all the possible methods, you may also be interested in the following passage to fix the Crucial SSD not detected issue:
Crucial SSD Not Detected [Fixes in Windows]
Crucial SSD not detected on your PC? Then here is what you can do to detect the SSD again. Read this passage can help you solve the problem. Read more >>
Conclusion
SSD and any other form of storage media are prone to mechanical failure and physical damage. You need to make advanced plans to safeguard the data on these storage drives. Making a backup is always a wise decision. It’s never too late to take action to save a copy of hard drive data to another safe location, like a backup drive, cloud, or network drive.
To summarize, we offered appropriate fixes regarding SSD not showing up in Windows 10 or 11. We recommended the assistive tool — EaseUS Data Recovery Wizard to recover lost data from inaccessible and formatted hard drive/partition.
SSD Not Showing FAQs
To conclude the guide, we have selected some of the most asked questions about SSD not showing up problems in Windows. These questions and their answers are.
1. Why is my SSD not showing up?
Driver issues are one of the major reasons. Like a hard drive, the SSD is often detected but not showing up in My Computer because the disk driver is not installed properly. So, you can try to reinstall the SSD driver to check if it helps fix the issue.
2. How do I get my new SSD to show up?
If you get a new SSD and it won’t show up in Windows Disk Management, it’s likely in an uninitialized state. You must initialize a disk before the Logical Disk Manager can access it.
3. How do I fix SSD not detected in BIOS?
To get BIOS to detect the SSD, you need to configure the SSD settings in BIOS as follows.
- Restart your computer, and press the F2 key after the first screen.
- Press the Enter key to enter Config.
- Select Serial ATA and press Enter.
- Then you’ll see the SATA Controller Mode Option.
- Save your changes and restart your computer to enter BIOS.
If you have just got an SSD for your Windows 10 system and sadly, it doesn’t work, don’t worry, it’s not the SSD’s fault. At times, I have been in the same shoes and there could be numerous reasons as to why your Windows 10 system cannot detect the SSD. It might be the wrong file format, bad storage drivers, etc. So, with that said, let’s troubleshoot the issue step-by-step and see how to fix SSD not detected in Windows 10 error.
SSD Not Detected in Windows 10
1. Disk Management Menu
The thing with a brand new SSD is that it won’t automatically show up in the File Explorer. You need to format it first. Similarly, if you share the SSD with different operating systems, chances are that the SSD might have been formatted in the wrong file format. It could be ext4 or exFAT which Windows 10 cannot understand.
In order to make your SSD visible in File Explorer and in turn compatible with Windows 10, we would have to format the SSD. To do that, disconnect all the flash drives or SD cards connected to your Windows system in order to avoid confusion and accidental data loss.
Next, press Win+R key to trigger the Run menu and type diskmgmt.msc and hit Enter.
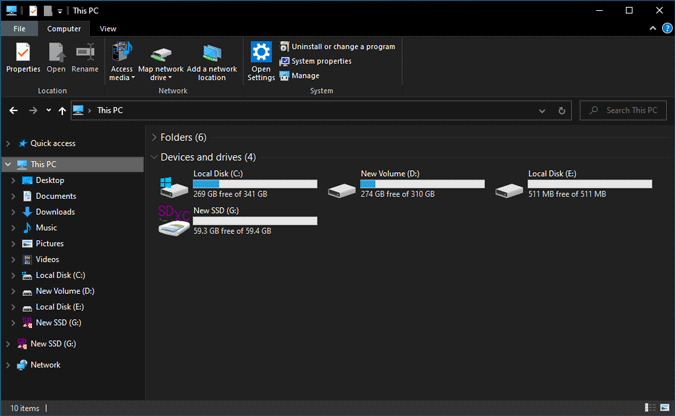
On the Disk Management menu, at the bottom, you should see the storage devices connected to your laptop. The first device would be your system’s internal HDD or storage. The next device most probably should be your SSD. The name would be Disk 1 and it should be unallocated.
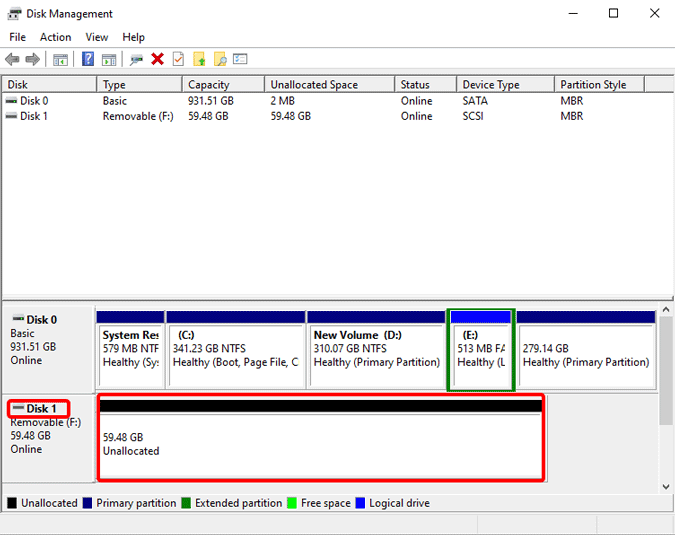
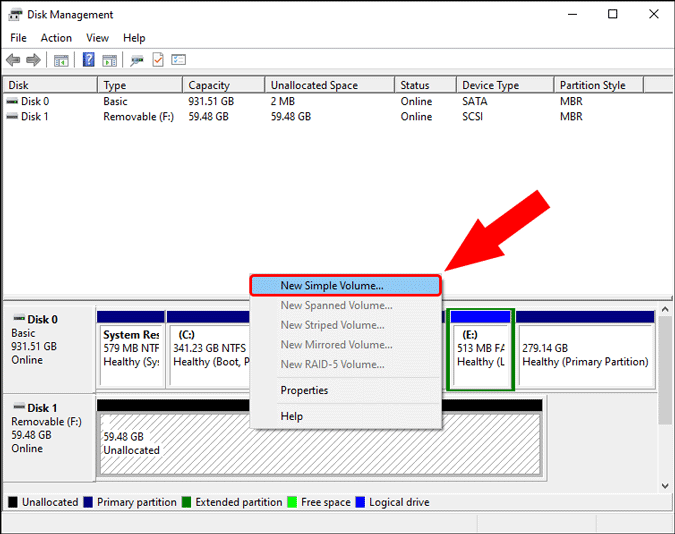
Once you identify the disk, right-click on the Unallocated part and click on New Simple Volume.
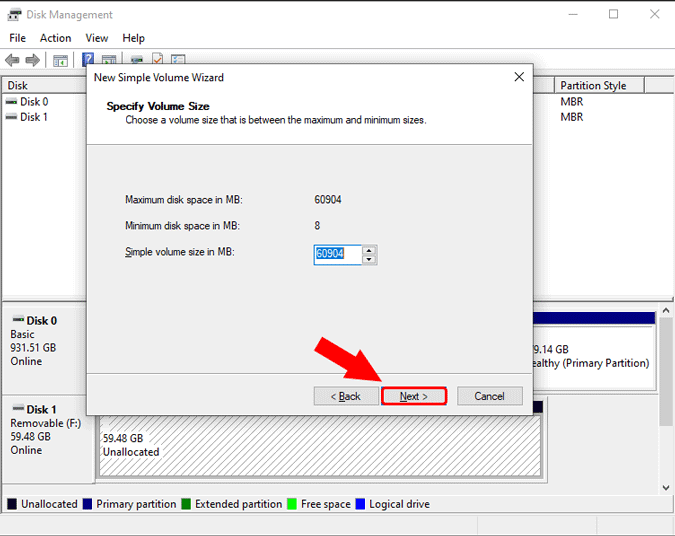
On the New Simple Volume Wizard, click Next to begin creating a new volume.

Next, you have the option to choose storage of the available volume. We’ll keep it to default which is the maximum storage option and click on Next.
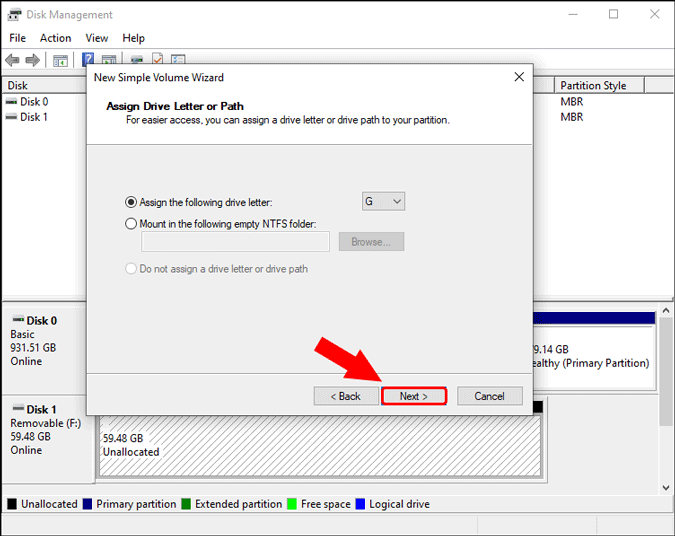
You will have the option to choose the drive letter. Just click on Next.
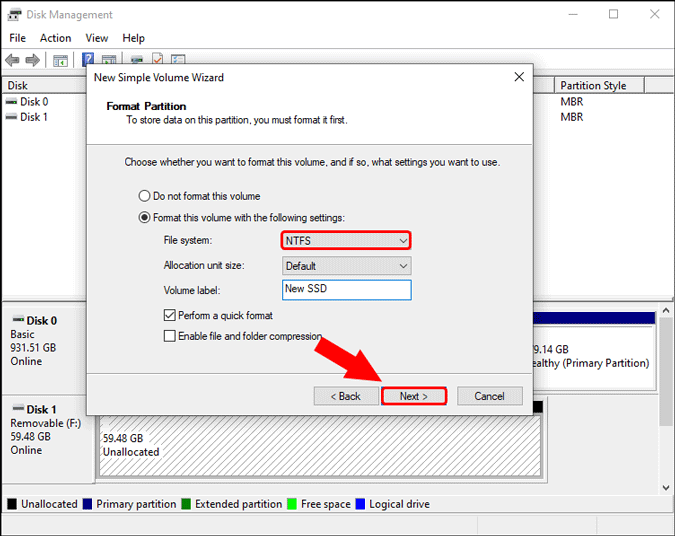
This is the most important step where you have to decide the file system type. By default, the file system is NTFS. In case you will use the SSD only with the Windows system, leave it at NTFS. If you are going to use it with other OS like macOS, select the file system as exFAT from the dropdown.
Leave all the other options as default and click on Next.
Finally, we have the summary page. You can go through the settings once and then click on Finish to start formatting the SSD.

Once you have the SSD formatted, you will find it under File Explorer. It’s now usable and you can copy your files.
2. Force Scan for New SSD
If the SSD doesn’t even show up in the Disk Management window, the problem is with old or bad drivers. So, in the following case, we need to check our system’s device manager.
To do that, head over to the Start menu, type Device Manager, and hit Enter

On the Device Manager page, there are a lot of sections. All the internal and external SSDs show up under Disk drives. Click on the arrow beside to expand the Disk drives section.
In my case, I have a Toshiba HDD and Samsung SSD. As you can see from the below screenshot, they both show up under Disk drives.
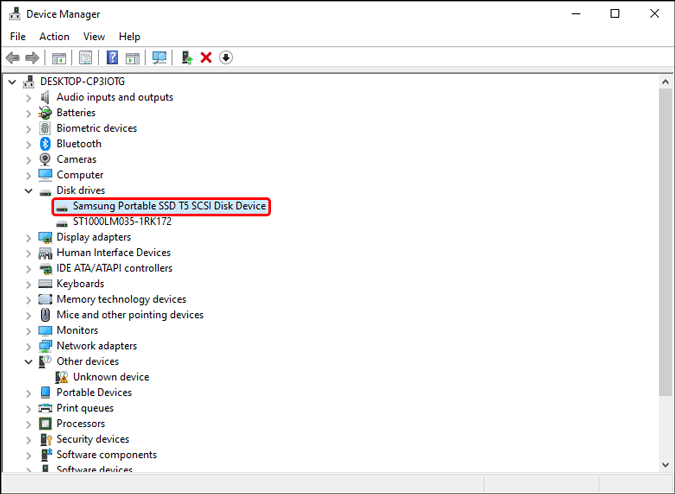
If you see your SSD under Device Manager, there’s no issue with the SSD itself. It’s just a file format or driver issue. Just unplug the SSD and plug it back in to let it reinstall the drivers. Further, it’ll show up in Disk Management. Alternatively, you can also try it in another system and format it to use.
If you still don’t see your SSD under Disk drives, click on the Storage Controllers to expand it. You should see your internal storage controller here. Right-click on it and click on “Scan for hardware changes”.
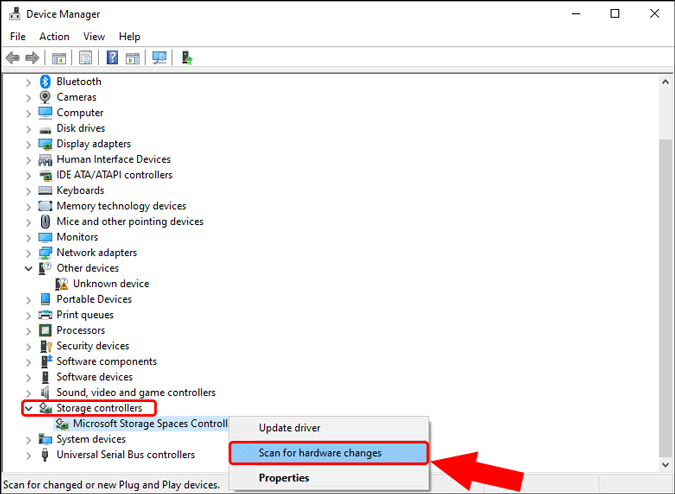
Now, check back again under Disk drives. You should find your SSD under it.
3. Update Drivers
Even after forcing a scan, if the SSD is not detected on Windows 10, we need to update the Storage controller driver. Right-click on the Storage controller and click on Update driver.

On the next page, click on Search automatically for updated driver software.

Now, Windows will look for the drivers online and let you know after the update.

Next, do the same steps for IDE ATA/ATAPI controllers as well and reboot your Windows 10 system. Post that, check if you can now find the SSD under Disk Management or Device Manager.
If you can’t, move ahead to the next step.
4. Windows BIOS system
If you can’t find the SSD anywhere within the operating system, we can move to check it in the BIOS. It’s the last place where you should find your SSD.
To go to BIOS, click on the Start menu and click on the Power icon at the bottom-left corner. Next, hold down the Shift key and click on Restart.
On the advanced restart menu, click on Troubleshoot.
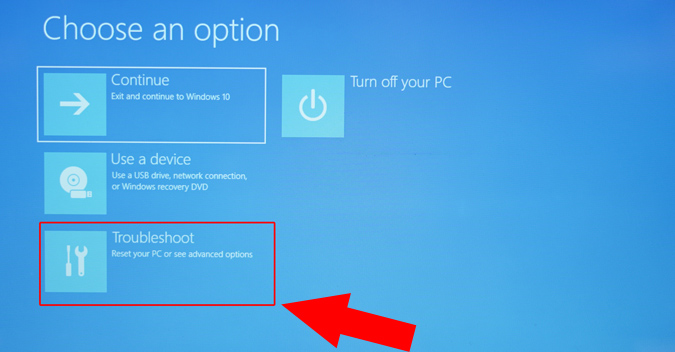
Next, click on UEFI Firmware Settings to boot into BIOS.

Now, depending on the laptop you are using, the BIOS screen might be a little different. For instance, I am using an Acer laptop and found the Hard Disk information under the Information tab. If you are using a Lenovo or Asus machine, the storage information may be in a different tab.
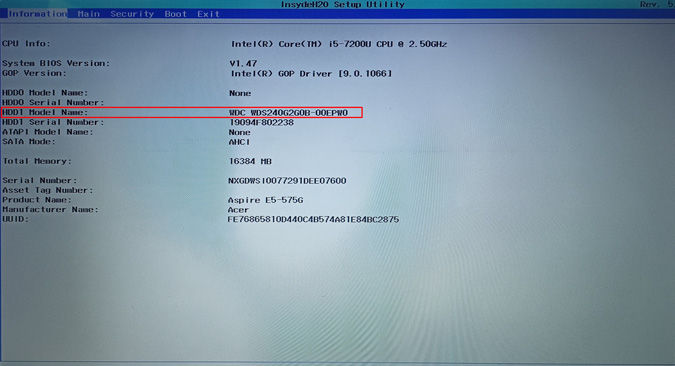
If you have found the SSD, congratulations, it works. Now, we know that at least the drive is being powered and detected on your Windows 10 system. Further, we just have to format the SSD to make it usable. For that, move on to the next step.
5. Windows Installation Method
The last method is to try and format the SSD during Windows installation. Don’t worry, we wouldn’t be installing Windows 10 again. We are just checking for the SSD to be detected during the installation process and then format it.
For Windows 10 installation, we would need a bootable Windows 10 USB. You can make it using Microsoft’s media creation tool or a third-party bootable USB software.
Once we have the Windows bootable USB, restart your PC to boot through the USB. On the Windows Setup page, click on the Install button.

You can quickly jump to the next steps and stop on the Windows Setup screen. Out of the 2 options, click on Custom: Install Windows only (advanced) option.

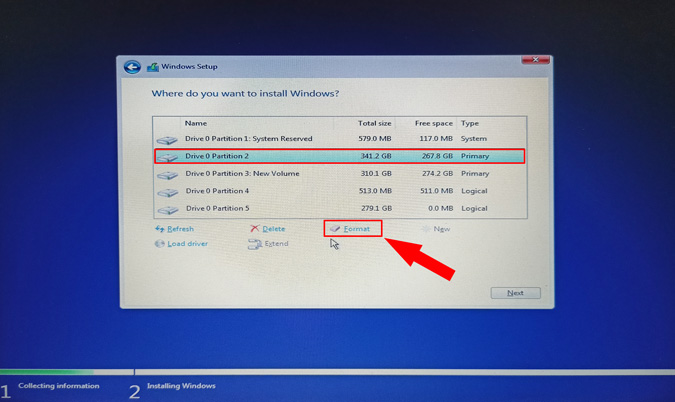
On the next screen, you will see the drives connected to your Windows 10 system. Drive 0 is the drive where Windows 10 is installed. Anything that starts with Drive 1 should be your SSD. Do note that Windows 10 wouldn’t show external SSDs or flash drives in this step.
Once you have zeroed down on your SSD, click on the Format button to format the drive in NTFS file format.
6. Try a Different System
If none of the above methods work, you can try connecting the SSD to a different system. If it works on the other system, it means your laptop has a bad USB port or SATA/M.2 slot.
In case it doesn’t, try using a different operating system like Linux or macOS to ensure that the SSD doesn’t have a bad file system. If It’s an external SSD, you can try switching the USB cable as well.
7. Return the SSD
Unfortunately, if none of the above methods work, the SSD is faulty. If it’s still under warranty, you should consider returning it to the seller.
If it’s out of warranty, you can try getting it repaired from a local shop nearby. However, the chances of getting a bad SSD repaired are slim.
Closing Words: SSD Not Detected on Windows 10
So, these were the ways to fix SSD not detected on Windows 10 error. Mostly, the issue with an SSD not being detected is a bad format or wrong file system.
Also Read: How to Transfer Windows 10 License To New Computer, Hard Drive, or SSD
Pratik
Pratik works as an In-house writer and video host at TechWiser. Former Programmer, Current writer. Loves tech in any form, quite optimistic about AI, data science and IoT. Talks extremely less but you betcha can geek out over anything on Twitter.