
В этой статье описано, как установить и настроить роль терминального сервера Remote Desktop Session Host на отдельностоящем Windows Server 2022/2019 в рабочей группе (без домена Active Directory) и без всех дополнительных ролей (Connection Broker, Remote Desktop Web Access, RDS Gateway).
Возможности отдельного RDS сервера в рабочей группе ограничены по сравнению с функционалом, доступном в домене AD. Вы не сможете масштабировать RDSH до полноценной RDS фермы Windows Server, нельзя создавать отдельные коллекции сессии или публиковать RemoteApp, отсутствует брокер подключений (RD Connection Broker), нельзя использовать User Profile Disks для хранения профилей пользователей, а при проведении операций обслуживания хоста RDP сервис будет полностью недоступен для пользователей.
Содержание:
- Установка роли Remote Desktop Services Host в Windows Server
- Установка Remote Desktop Licensing и RDS лицензий (CAL)
- Настройка роли Remote Desktop Session Host в рабочей группе
- Публикация приложения RemoteApp на RDS в рабочей группе (без домена)
- Настройка шлюза RD Gateway в рабочей группе
Установка роли Remote Desktop Services Host в Windows Server
Предполагаем, что вы уже установили сервер с Windows Server (2022, 2019 или 2016) и задали первоначальные настройки (задали сетевые параметры и статический IP адрес, имя сервера (hostname), время/дату/часовой пояс, установили последние обновления и т.д.). Теперь можно установить службу RDS через консоль Server Manager или из PowerShell:
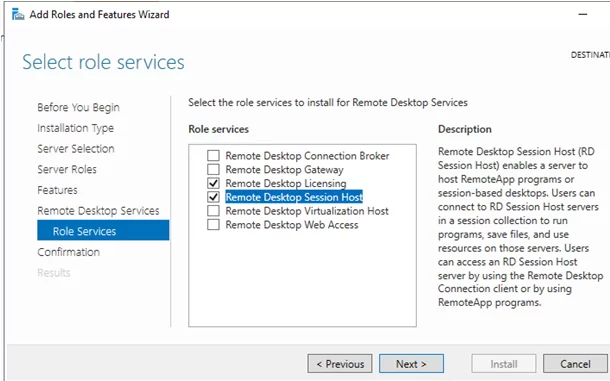
При установке службы RDS через Server Manager нужно выбрать Role-based or feature-based installation -> Server roles -> Remote Desktop Services -> в компонентах RDS выберите службы Remote Desktop Session Host и Remote Desktop Licensing (согласитесь с установкой компонентов RSAT для управления ролями).
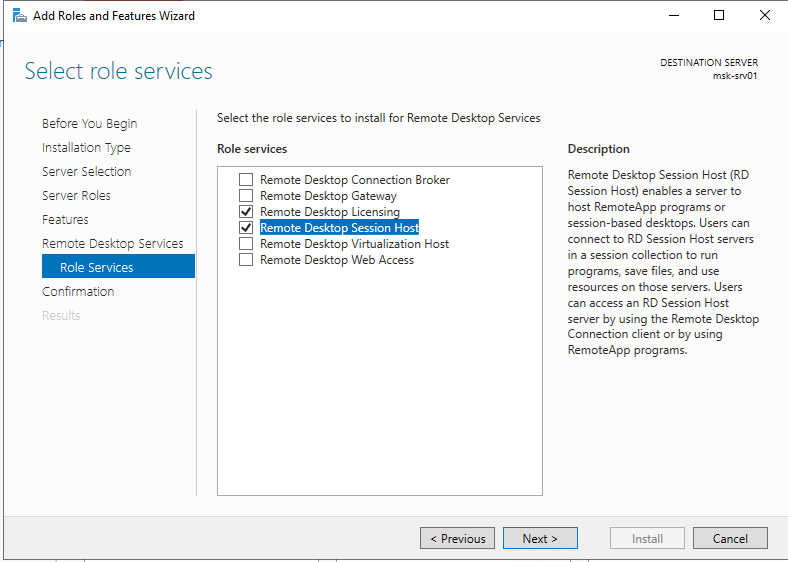
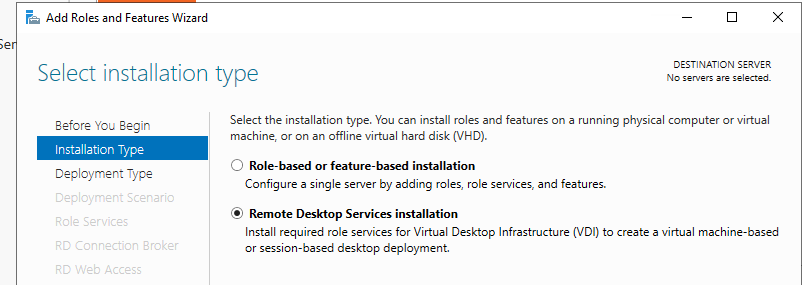
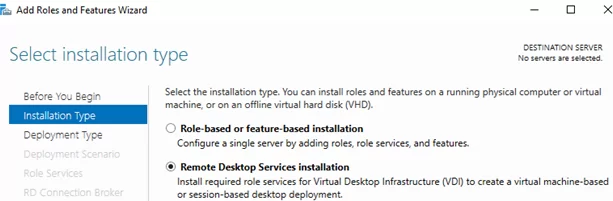
Если вы выбрали в Server Manager тип установки Remote Desktop Services installation, то в режиме Standard deployment и Quick Start установщик дополнительно установит роли RD Connection Broker и RD Web Access. В нашем случае все эти роли излишни, т.к. мы ставим стендалон RDS сервер.
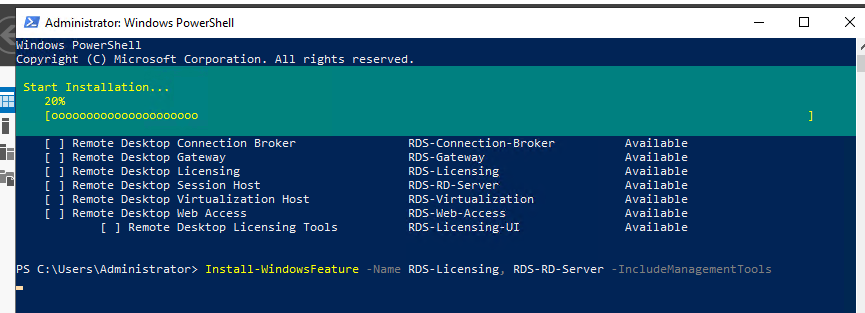
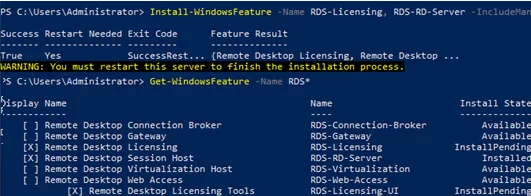
Также вы можете установить указанные роли Windows Server с помощью PowerShell:
Install-WindowsFeature -Name RDS-Licensing, RDS-RD-Server –IncludeManagementTools
Проверьте, какие RDS роли установлены на сервере:
Get-WindowsFeature -Name RDS* | Where installed
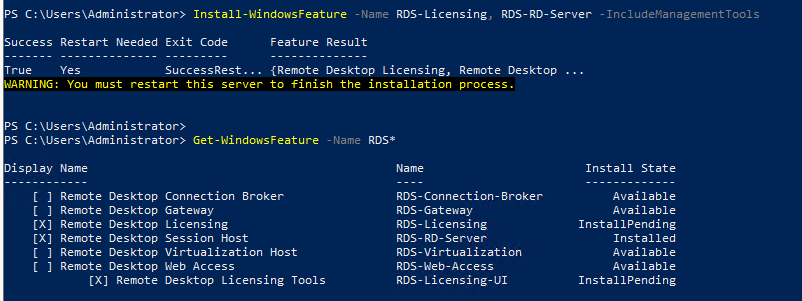
Перезагрузите Windows командой:
Restart-Computer
Установка Remote Desktop Licensing и RDS лицензий (CAL)
Теперь нужно настроить роль Remote Desktop Licensing, которая обеспечивает лицензирование подключений пользователей к вашему RDS хосту. Допустимо установить и активировать роль Remote Desktop Licensing на этом же сервере (если он у вас один), либо можете разместить роль RDLicensing на отдельном сервере. Один сервер RDS Licensing можете выдавать лицензии неограниченному количеству RDSH хостов.
Если вы решили использовать локальный сервер RDLicensing, активируйте сервер лицензий RDS и установите клиентские лицензии (RDS CAL) согласно гайду по ссылке.
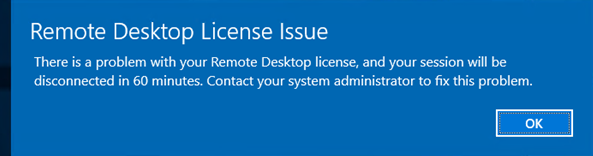
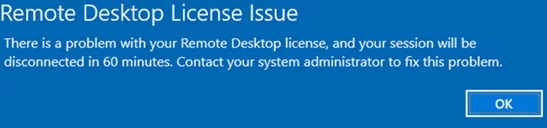
В рабочей группе можно использовать только RDS CAL типа Per Device. Если ваш сервер лицензирования выдает только Per User лицензии, то RDSH сервер будет каждые 60 минут принудительно завершать сеанс пользователей:
Remote Desktop License Issue
There is a problem with your Remote Desktop license, and your session will be disconnected in 60 minutes.
Настройка роли Remote Desktop Session Host в рабочей группе
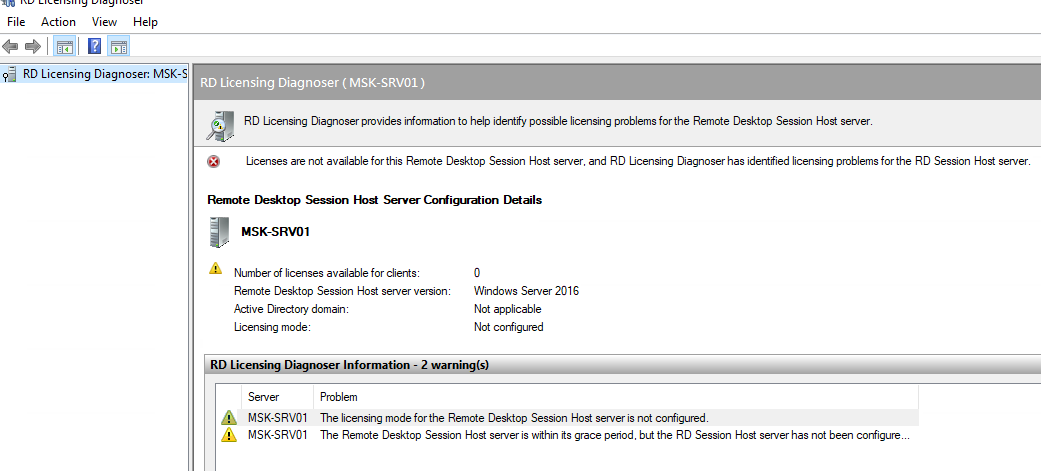
Откройте консоль управления Remote Desktop Licensing Diagnoser (
lsdiag.msc
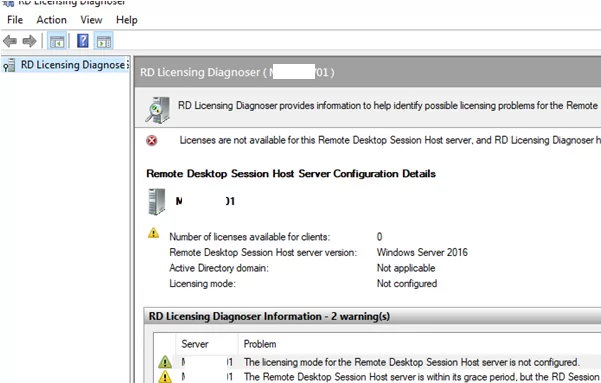
). В данном случае сервер RDSH еще не настроен на получение RDS CAL лицензий с сервера лицензирования. Об этом свидетельствуют надписи:
- The licensing mode for the Remote Desktop Session Host server is not configured
- Number of licenses available for clients:
0
Если вы не нацелите ваш RDSH сервер на сервер лицензирования, ваш сервер будет находится в триальном grace режиме. Пользователи могут использовать его в течении 120 дней (при каждом подключении в трее будет появляться сообщение “
Служба удаленных рабочих столов перестанет работать через xxx дней
”). После окончания grace периода ваши пользователи не смогут подключится к RDS с ошибкой:
Remote session was disconnected because there are no Remote Desktop client access licenses available for this computer.
Чтобы задать адрес сервера лицензирования RDS и тип лицензии, воспользуйтесь консолью редактора локальной групповой политики Windows (
gpedit.msc
).
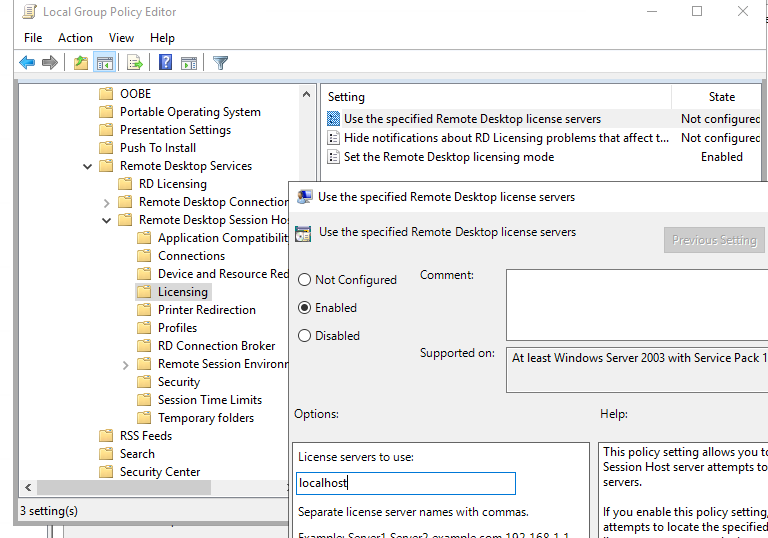
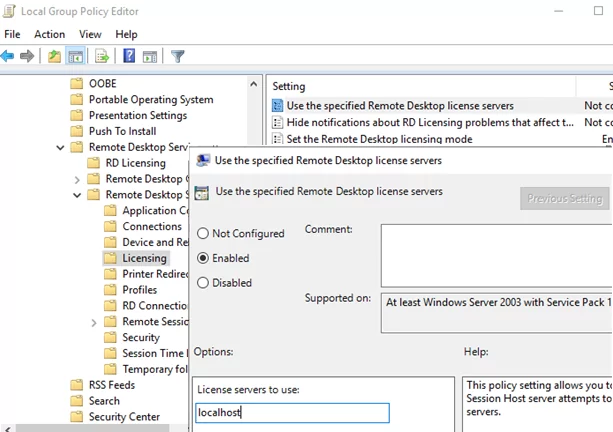
- Перейдите в раздел GPO Computer Configuration -> Administrative Templates -> Windows Components -> Remote Desktop Services -> Remote Desktop Session Host -> Licensing;
- Установите параметр Set the Remote Desktop licensing mode = Per Device;
- В Use the specified Remote Desktop license servers укажите адрес сервера, на котором установлен сервер RDLicensing. Если сервер лицензий установлен на этом же хосте, укажите
localhost
или
127.0.0.1
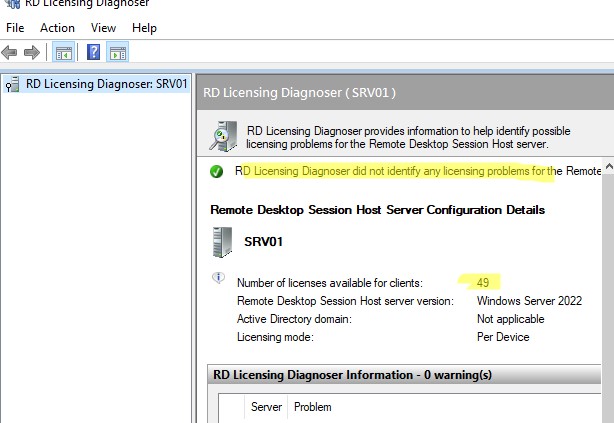
- Обновите локальные политики, и запустите RDesktop Licensing Diagnoser. Убедитесь, что он видит ваши RDS CAL.

Дополнительно в локальных GPO вы можете настроить лимиты (таймауты) на длительность RDP сессий и правила отключения пользователей при неактивности.
Если вам нужно создать отдельные групповые политики с настройками для локальных пользователей и администраторов, воспользуйтесь функционалом множественных GPO (MLGPO).
Теперь создайте для локальные учетные записи пользователей, который они будут использовать для входа на RDS. Можно создать пользователей с помощью оснастки
lusrmgr.msc
или через PowerShell:
$UserPassword = ConvertTo-SecureString "Pa$$dr0w!!" -AsPlainText -Force
New-LocalUser "AIvanov" -Password $UserPassword -FullName "Andrey Ivanov"
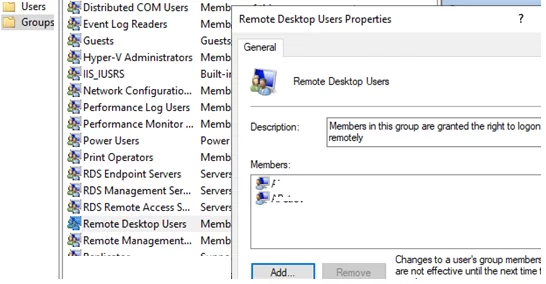
Чтобы разрешить пользователю подключаться к серверу через службы Remote Desktop Services, нужно добавить его учетную запись в локальную группу Remote Desktop Users. Добавьте пользователей вручную через консоль управления группами или через PowerShell:
Add-LocalGroupMember -Group "Remote Desktop Users" -Member AIvanov
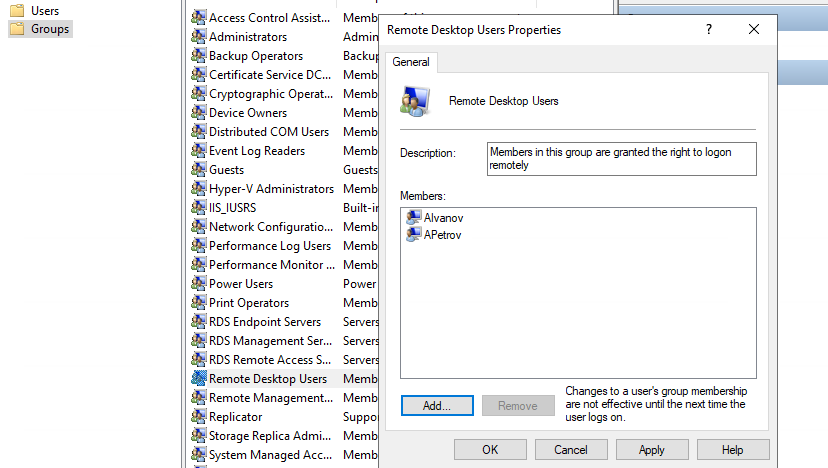
Для данной группы пользователей разрешен вход в локальной политикие Allow logon through Remote Desktop Services (Computer Configuration -> Windows Settings -> Security Settings -> Local Policies -> User Rights Assignment). Эта же политика позволяет обеспечить RDP вход пользователям даже на контроллер домена.
Теперь пользователи могут попробовать со своих компьютеров подключится к вашему RDS хосту с помощью клиента mstsc.exe (или любого другого RDS клиента). Проверьте, что к серверу одновременно может подключится более двух активных RDP сессий.
При подключении к RDSH серверу в рабочей группы нужно указывать имя в формате
srv1\username
(где srv1 – имя компьютера/hostname вашего RDS). Если указать имя пользователя с префиксам
.\
или без префикса, подразумевается что подключение выполняется под вашим локальным пользователем.
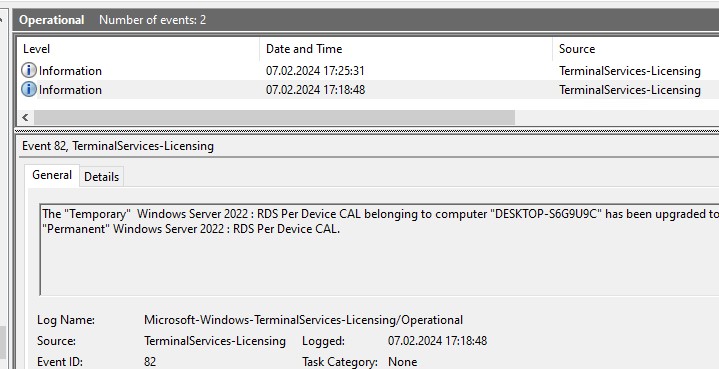
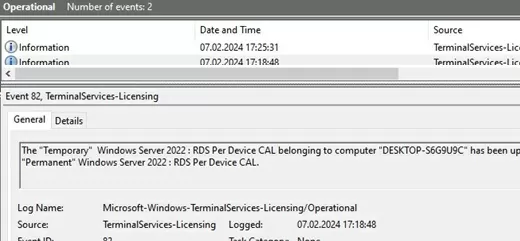
При первом входе устройству пользователя выдается временная лицензия (особенности RDS Per Device лицензирования). При втором входе выдается постоянная лицензия, которая появится в консоли Remote Desktop Licensing Manager. Лицензия выдается на срок от 52 до 89 дней (случайное число).
Информация об успешной выдаче лицензии есть в следующем событие Event Viewer (Applications and Services Logs -> Microsoft -> Windows -> TerminalServices—Licensing -> Operational).
Event ID: 82
 The "Temporary"  Windows Server 2022 : RDS Per Device CAL belonging to computer "ComputerName" has been upgraded to "Permanent" Windows Server 2022 : RDS Per Device CAL.
Если вам нужно подключиться в RDP сессию пользователя, вы можете воспользоваться режимом теневого подключения RDS (он работает и на RDSH в рабочей группе).
Публикация приложения RemoteApp на RDS в рабочей группе (без домена)
На RDS в рабочей группе недоступна консоль управления сеансами, и поэтому отсутствуют инструменты для публикации приложений RemoteApp. Но есть обходное решение позволяющее через реестр опубликовать любое приложение в RemoteApp без домена Active Directory.
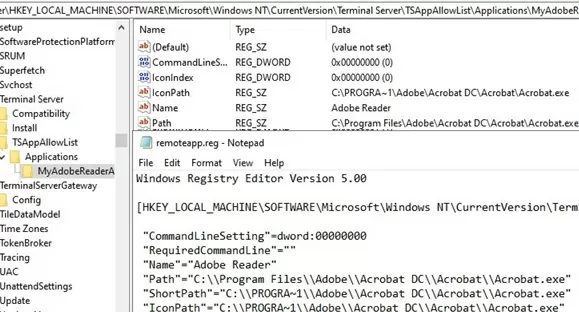
Пример REG файла для публикации на RDS сервере AdobeReader в качестве RemoteApp:
Windows Registry Editor Version 5.00
[HKEY_LOCAL_MACHINE\SOFTWARE\Microsoft\Windows NT\CurrentVersion\Terminal Server\TSAppAllowList\Applications\MyAdobeReaderApp]
"CommandLineSetting"=dword:00000000
"RequiredCommandLine"=""
"Name"="Adobe Reader"
"Path"="C:\\Program Files\\Adobe\\Acrobat DC\\Acrobat\\Acrobat.exe"
"ShortPath"="C:\\PROGRA~1\\Adobe\\Acrobat DC\\Acrobat\\Acrobat.exe"
"IconPath"="C:\\PROGRA~1\\Adobe\\Acrobat DC\\Acrobat\\Acrobat.exe"
"IconIndex"=dword:00000000
"ShowInTSWA"=dword:00000001
"SecurityDescriptor"=""
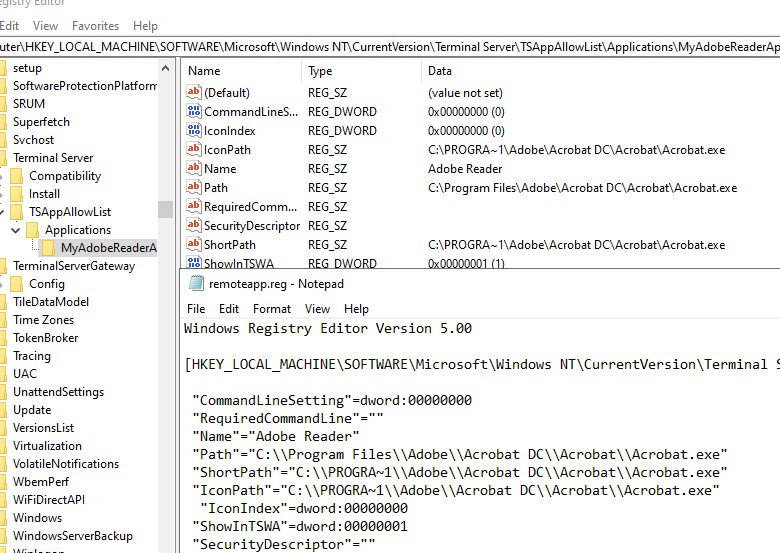
Замените имена и пути в REG файле на ваши и импортируйте его в реестр RDSH.
Теперь вручную отредактируйте файл *.RDP ярлыка, чтобы при его запуске автоматически запускалось опубликованное приложение. Добавьте в RDP файл следующие строки:
remoteapplicationmode:i:1
alternate shell:s:||MyAdobeReaderApp
remoteapplicationname:s:MyAdobeReaderApp
remoteapplicationprogram:s:||MyAdobeReaderApp
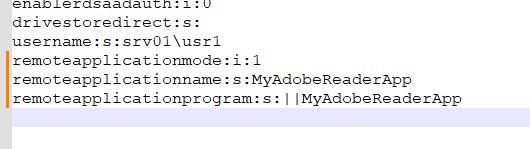
Попробуйте запустить RemoteApp приложение на RDS с поммощью вашего RDP файла. Опубликованное на RDSH приложение должно успешно запуститься на вашем рабочем столе.
Решение проблемы с медленной работой RemoteApp в Windows Server 2019/2016 описано здесь.
Настройка шлюза RD Gateway в рабочей группе
Если вам нужно организовать безопасный доступ к вашему RDS северу через интернет, рекомендуется разместить его за VPN или опубликовать через шлюз RD Gateway.
Remote Desktop Gateway позволит открыть безопасный доступ из Интернета к RDS серверу интернета по защищенному SSL/TLS подключение по порту TCP:443 (вместо того, чтобы открывать стандартный RDP порт 3389, на котором будут постоянно фиксироваться попытки перебора паролей по RDP).
Вопреки распространённому заблуждению, RD Gateway можно развернуть без домена Active Directory. Подробная инструкция по настройке шлюза RD Gateway без домена доступна в статье Настройка шлюза Remote Desktop Gateway на Windows Server.
What is RemoteApps?
Specify individual applications that are hosted/run on the virtualized machine but appear as if they’re running on the user’s desktop like local applications. The apps have their own taskbar entry and can be resized and moved across monitors. Ideal for deploying and managing key applications in the secure, remote environment while allowing users to work from and customize their own desktops.
RemoteApp programs are programs that are accessed remotely through a special type of Remote Desktop Connection, and appear as if they are running on the end user’s local computer. Instead of being presented to the user in the desktop of the server, as with a traditional Remote Desktop Connection, the RemoteApp programs are integrated with the client computer’s desktop, running in their own resizable window, with their own entry in the taskbar. If the programs use notification area icons, the icons appear in the client computer’s notification area. Any popup windows are redirected to the local desktop, and local drives and printers can be redirected to appear within the RemoteApp programs. Many users might not be aware that a RemoteApp program is any different than a local program.
For this demo, Infrastructure Requirement:
- 1 DC SERVER (DC-CLOUD.Sifad.ae)
- 1 Client PC running Windows 10 (CLIENT-10)
01 – open Server Manager Click Add roles and features.

02 – Click Next to proceed

03 – Choose Remote Desktop Services installation button and click next to proceed.

04 – on the Select deployment type box, click Quick Start (I choose this because I only have One Server for RDS and Remote Apps)

05 – Next, on the Select deployment scenario box, choose Session-based desktop deployment.

06 – On the Select a Server box, verify your RDS server and the IP address (in my case, my RDS server is DC-CLODU.Sifad.ae / 172.16.1.254).

07 – On the Confirm selections box, verify the roles to be installed and click Restart the destination. box and then click Deploy.

08 – wait till the process completed. your server will restart after the RDS roles installed.


09 – once you log in to the server, on the Server Manager, click Remote Desktop Services. and then click QuickSessionCollection to proceed with next configuration.

10 – On the RemoteApp Programs column, Click TASKS and click Publish RemoteApps Programs.

11 – Next, on the Select RemoteApps programs box, choose any software that you want to publish to our users. for my case.. I going to use Server Manager to publish to Administrator. so I Select Server Manager.


12 – Next, on the confirmation box, verify the program that you want to publish and click Publish button then Close.


13 – Next, on the Windows 10. open Internet Explorer and type your full server link such as in my case https://DC-CLOUD.Sifad.ae/rdweb. this is to log in to your RDWEB website.

14 – Next, click on the More information then Click on Go on to the webpage (not recommended).

15 – on the Work Resources page, enter your Domain user name & password.

16 – Finally, you should have your Server Manager on the RDWEB page. in my case, is my Server Manager for Administrator Purpose only.

17 – to verify the functionality of the program, double click on the Server Manager and click on the Connect button.


18 – And see on… my Server Manager is now open.

that’s all for now.., any Doubts type a commend.. 🙂
- Заметки
- Windows
29.07.2020
Что такое служба удалённых приложений RemoteApp?
RemoteApp — это часть роли служб терминального сервера Windows Server 2016 и эта служба даёт доступ к приложениям, работающих на терминальном сервере, таким образом, что как будто вы
их запускаете у себя на локальном компьютере. Служба терминального сервера, которая берёт на себя все вычислительные ресурсы приложения, а пользователю отправляет только результат. Ещё и называют удалённым приложением RemoteApp.
Установка ролей и служб RemoteApp
Для установки RemoteApp запускаем Мастер добавления ролей и компонентов и выбираем Тип установки Установка служб удалённых рабочих столов как на скриншоте ниже
Далее выбираем Стандартное обёртывание xD. И после выбираем Развёртывание рабочих столов на основе сеансов.
На пункте Посредник подключения выбираем наш сервер из пула серверов и добавляем его в правое поле.
На следующем пункте, обратите внимание, необходимо отметить чекбксом Установить службу роли веб-доступа к удалённым рабочим столам на сервере посредника подключений к удалённому рабочему столу
Так же выбираем наш сервер из пула серверов и прожимаем Далее / Развернуть
Процесс развёртывания будет отображаться на экране, а по окончанию мы с вами выходим из мастера по нажатию кнопки Закрыть
Настройка коллекции и добавление удалённых приложений
Далее в Диспетчере серверов переходим в Службы удалённых рабочих столов и добавляем коллекцию, присваиваем имя и заполняем описание. Далее
Выбираем сервер из пула. Далее
На данном шаге нам необходимо Добавить Группы пользователей, которые будут иметь доступ к данному приложению remoteapp.
Теперь переходим к завершению настройки удалённого приложения remoteapp, нам нужно зайти в только что созданную нами коллекцию и через Задачи
выбрать из выпадающего меню выбрать пункт Опубликовать удалённые приложения RemoteApp
Добавляем нужные нам приложения и финализируем Закрыть
Натсройка подключения к RemoteApp приложению
Тут всё ещё проще! Переходим по ссылке http://IP_ADDRES/RDWeb, где указываем имя или ip адрес вашего сервера, логинимся под вашей учётной записью.
Открывается меню Удалённые приложения RemoteApp и рабочие столы, где нам буду доступны только те приложения к которым у нас есть доступ (настраивали ранее). Нажимая на значок приложения
начнётся процесс скачивания. После того как вы запустите его вам будет предложено авторизоваться, а уже после чего перед вами откроется уже само приложение 1С RemoteApp или Outlook 2016 RemoteApp.
Приложение RemoteApp будет помечено соответствующим значком
Вот и всё, друзья! Надеюсь я вам смог помочь) Всем спасибо!
Автору на кофе ☕ или просто поднять мотивацию писать больше статей для вас 😉 !
Отдельное спасибо всем, кто отправляет донатики 😀! Очень приятно и неожиданно. Благодаря вам сайт может и в дальнейшем обходиться без рекламных баннеров.
This article explains how to install and configure the Remote Desktop Session Host terminal server role on a standalone Windows Server 2022/2019 in a workgroup (without an Active Directory domain) and without any other additional roles (Connection Broker, Remote Desktop Web Access, RDS Gateway).
Compared to the functionality available in an AD domain, the capabilities of a single RDS server deployment in a workgroup are limited. It cannot be scaled to a full-featured RDS farm, you cannot create separate session collections or publish RemoteApps, there is no Connection Broker, you cannot use User Profile Disks, the RDS service won’t be available to users during maintenance operations when the host is in the drain mode.
Contents:
- How to Install the RD Session Host Role on Windows Server
- Install the RD Licensing Role and RDS Licenses (CALs)
- Configure the Remote Desktop Session Host in a Workgroup
- Publish RemoteApp on RDS Without Domain
- Configure the RD Gateway without a Domain (in a Workgroup)
How to Install the RD Session Host Role on Windows Server
It is assumed that you already have a host with Windows Server (2022, 2019, or 2016) in place and have configured the basic settings (set network parameters and static IP address, server name (hostname), time/date and time zone, install the latest updates, etc.). You can now install the RDS role from the Server Manager console or PowerShell
To install the RDS using Server Manager, select Remote Desktop Session Host and Remote Desktop Licensing in Role-based or Feature-based installation -> Server roles -> Remote Desktop Services in RDS components (agree to install RSAT features to manage the roles).
Note that if you have selected the Remote Desktop Services installation in the Server Manager, the wizard will automatically install the RD Connection Broker and Web Access roles in the Standard deployment or Quick Start modes. In our case, there is no need for all of these roles, as we are installing a standalone RDS host.
You can also install Windows Server roles using PowerShell:
Install-WindowsFeature -Name RDS-Licensing, RDS-RD-Server –IncludeManagementTools
Check which RDS roles are installed on your server:
Get-WindowsFeature -Name RDS* | Where installed
Restart Windows with the command:
Restart-Computer
Install the RD Licensing Role and RDS Licenses (CALs)
The next step is to configure the Remote Desktop Licensing role, which provides licensing for users’ RDP connections. You can install and activate Remote Desktop Licensing and RDS CALs on the same host (if you have only one host in your network) or can place the RD Licensing role on a different server. A server with the RDS Licensing role can issue licenses to any number of RDS Hosts.
In a workgroup, you should use only Per-Device RDS CALs. If your licensing server only issues per-user licenses, the RDSH server will force users to log out every 60 minutes:
Remote Desktop License Issue
There is a problem with your Remote Desktop license, and your session will be disconnected in 60 minutes.
Configure the Remote Desktop Session Host in a Workgroup
Open the Remote Desktop Licensing Diagnoser console (lsdiag.msc). Note that your server is not yet configured to receive RDS CALs from the licensing server.
- The licensing mode for the Remote Desktop Session Host server is not configured
- Number of licenses available for clients: 0
If you do not point your RDSH to the licensing server, your server will be in trial grace mode. Users can only use it for 120 days ( a message will appear in the tray each time you connect: The Remote Desktop service will stop working in xxx days). Once the grace period has expired, your users will no longer be able to connect to the RDS with the error message:
Remote session was disconnected because there are no Remote Desktop client access licenses available for this computer.
Use the local Group Policy Editor console (gpedit.msc) to set the RDS licensing server address and license type.
- Expand to Computer Configuration -> Administrative Templates -> Windows Components -> Remote Desktop Services -> Remote Desktop Session Host -> Licensing;
- Enable the option Set the Remote Desktop licensing mode and change to Per Device;
- In Use the specified Remote Desktop license servers option, specify the IP address of the host on which the RD Licensing server is installed. If the RD licensing server is installed locally, enter
localhostor127.0.0.1;
- Update local Group Policy settings and run the Remote Desktop Licensing Diagnoser. Make sure that it sees your RDS CALs.
In addition, you can use local GPO settings to set limits (timeouts) on the duration of RDP sessions and rules for disconnecting users when they are inactive.
Use the Multiple GPO (MLGPO)feature if you need to set different Group Policy settings for local non-admin users and administrator groups.
Then create local user accounts on your RDS host. You can create users in lusrmgr.msc or with PowerShell:
$UserPassword = ConvertTo-SecureString "PaSS123!" -AsPlainText -Force
 New-LocalUser a.brown -Password $UserPassword -FullName "Andi Brown"
To allow a user to connect through Remote Desktop Services, add the user account to the local Remote Desktop Users group. Add users manually using the computer management console or with PowerShell:
Add-LocalGroupMember -Group "Remote Desktop Users" -Member a.brown
This user group is allowed to log on remotely through the Allow logon through Remote Desktop Services GPO option (Computer Configuration -> Windows Settings -> Security Settings -> Local Policies -> User Rights Assignment). This policy can also be used to allow non-admin users to access the domain controllers via RDP.
Now users can try to connect to your RDS host from their computers using the mstsc.exe client (or any other RDP client). Ensure that more than two active users can connect to the server simultaneously.
When connecting to a workgroup RDSH server, specify a name in the format rdssrv1\username where rdssrv1 is the computer name (hostname) of your RDS). If you specify a user name with or without the .\ prefix, it is assumed that you are connecting as your local user.
At the first login, a temporary license is issued for a user device (an RDS Per-Device licensing feature). The second time you log in, a permanent license is issued, which appears in the Remote Desktop Licensing Manager. Licenses are issued for 52-89 days (random number).
The following Event Viewer event provides information on the successful issuance of an RDS CAL (Applications and Services Logs -> Microsoft -> Windows -> TerminalServices—Licensing -> Operational).
Event ID: 82 The "Temporary" Windows Server 2022 : RDS Per Device CAL belonging to computer "ComputerName" has been upgraded to "Permanent" Windows Server 2022 : RDS Per Device CAL.
If you need to connect to a user’s RDP session, you can use the RDS shadow connection mode (it also works on an RDSH in a workgroup).
Publish RemoteApp on RDS Without Domain
On an RDS host in a workgroup, the session management console is not available, so there are no tools to publish RemoteApp. There is a workaround that allows you to publish any application as an RDS RemoteApp without an Active Directory domain.
Example REG file for publishing AdobeReader as a RemoteApp on the RDS session host:
Windows Registry Editor Version 5.00
[HKEY_LOCAL_MACHINE\SOFTWARE\Microsoft\Windows NT\CurrentVersion\Terminal Server\TSAppAllowList\Applications\MyAdobeReaderApp]
"CommandLineSetting"=dword:00000000
"RequiredCommandLine"=""
"Name"="Adobe Reader"
"Path"="C:\\Program Files\\Adobe\\Acrobat DC\\Acrobat\\Acrobat.exe"
"ShortPath"="C:\\PROGRA~1\\Adobe\\Acrobat DC\\Acrobat\\Acrobat.exe"
"IconPath"="C:\\PROGRA~1\\Adobe\\Acrobat DC\\Acrobat\\Acrobat.exe"
"IconIndex"=dword:00000000
"ShowInTSWA"=dword:00000001
"SecurityDescriptor"=""
Replace the app name and paths in the REG file with yours and import it into the RDSH registry.
To automatically launch the published RemtoteApp, manually edit the *.RDP file. Add the following lines to the RDP file:
remoteapplicationmode:i:1
alternate shell:s:||MyAdobeReaderApp
remoteapplicationname:s:MyAdobeReaderApp
remoteapplicationprogram:s:||MyAdobeReaderApp
Try to run a RemoteApp application on the RDS by using your RDP file. The application published on RDSH should launch successfully on your desktop.
Configure the RD Gateway without a Domain (in a Workgroup)
If you need to provide secure access to your RDS host over the Internet, it is recommended that you place it behind a VPN or publish it through the RD Gateway.
The Remote Desktop Gateway allows you to securely access an RDS from the Internet using a secure SSL/TLS connection on port TCP:443 (rather than opening default RDP port 3389, which constantly logs attempts to brute-force passwords over RDP)
Contrary to popular belief, RD Gateway can be deployed in a workgroup environment (without an Active Directory domain). Refer to this guide for detailed instructions on how to set up an RD Gateway without a domain.
Microsoft made a lot of improvement on Terminal Services compared to the previous versions. They also made it more complete and complex than just for single servers.
Therefore, you might be in a situation where you do not need all the bells and whistles it provides, if you just want to increase the number of concurrent Remote Desktop simultaneous users.
Unfortunately, you cannot just use the Server Manager and use the regular configuration panels as it won’t let you do so unless your server is joined to an Active Directory domain.
Here is the manual procedure to perform a standalone configuration :
1. Set server name and domain (FQDN) :
a. System > Computer name, domain and workgroup settings > Change settings
b. “To rename this computer or change its domain or workgroup, clickChange” > Change…
c. Make sure to enter the right name for the server in “Computer name” and click “More…” to enter the domain name at “Primary DNS suffix of this computer”
d. NOTE : Server name cannot be changed once the setup is completed, this would result of unlicensing the server if changed
2. Install the required Remote Desktop Services :
a. Server Manager > Manage > Add Roles and Features
b. Role-based or feature-based installation (Do NOT select Remote Desktop Services installation!)
c. In Roles, check the boxes for “Remote Desktop Licensing” and “Remote Desktop Session Host”
d. Once completed, reboot the server
NOTE : The next step (#3) will show how to install the licenses if you own a Microsoft SPLA (Service Provider License Agreement), however you might likely have “Retail Package” type licenses, so simply select the appropriate that match your case in the drop down menu instead.
3. Install the SPLA licences :
a. Administrative Tools > Remote Desktop Services > Remote Desktop Licensing Manager
b. Right click on the server name on the left pane and click Install Licences
c. At License Program drop down menu, select “Service Provider License Agreement”
d. Enter the Agreement number
e. Select the right product version
f. Select the right license type (likely RDS Per User CAL)
g. Enter the right amount of CALs in the “Quantity” field that you or the customer is paying for
4. Configure the Licensing Mode in the Group Policy Editor
a. Open the Group Policy Editor (gpedit.msc)
b. Computer Configuration > Windows Components > Remote Desktop Services :
b.a. Remote Desktop Session Host > Licensing :
b.a.i. Use the specified Remote Desktop license servers > Enter the server name
b.a.ii. Set the Remote Desktop licensing mode > Enabled > Per User
c. You may now reboot the server, setup completed.