
Порой у пользователей Windows возникает потребность в смене региона. Например, для доступа к контенту, который не продается в вашей стране. О том, как сменить регион в Windows, вы узнаете из нашего гайда.
Зачем менять регион на ПК?
Есть несколько причин, по которым пользователь может задуматься о смене региона в Windows на ПК. Рассмотрим основные:
- Некоторые программы, веб-сайты или онлайн-сервисы недоступны в определенных странах;
- Регион влияет на формат даты, времени, чисел и валюты. Кому-то это может пригодиться;
- Некоторые обновления Windows или приложений выходят раньше в определенных странах;
- Смена региона позволяет установить соответствующий язык интерфейса по умолчанию. Это может быть полезно при смене дислокации.
Также добавим, что зачастую геймеры меняют регион в Windows ради подписки Game Pass. Некоторые игры недоступны на территории РФ. Например, проекты EA.
Плюсы и минусы смены региона
Изменение региона на ПК не всегда является плюсом. Рассмотрим как положительные, так и отрицательные стороны этого действия.
Как поменять регион на ПК
Рассмотрим три самых популярных способа поменять регион во всех актуальных версиях Windows.
Смена региона через настройки Windows
Самый простой способ изменить регион — через интерфейс Windows.
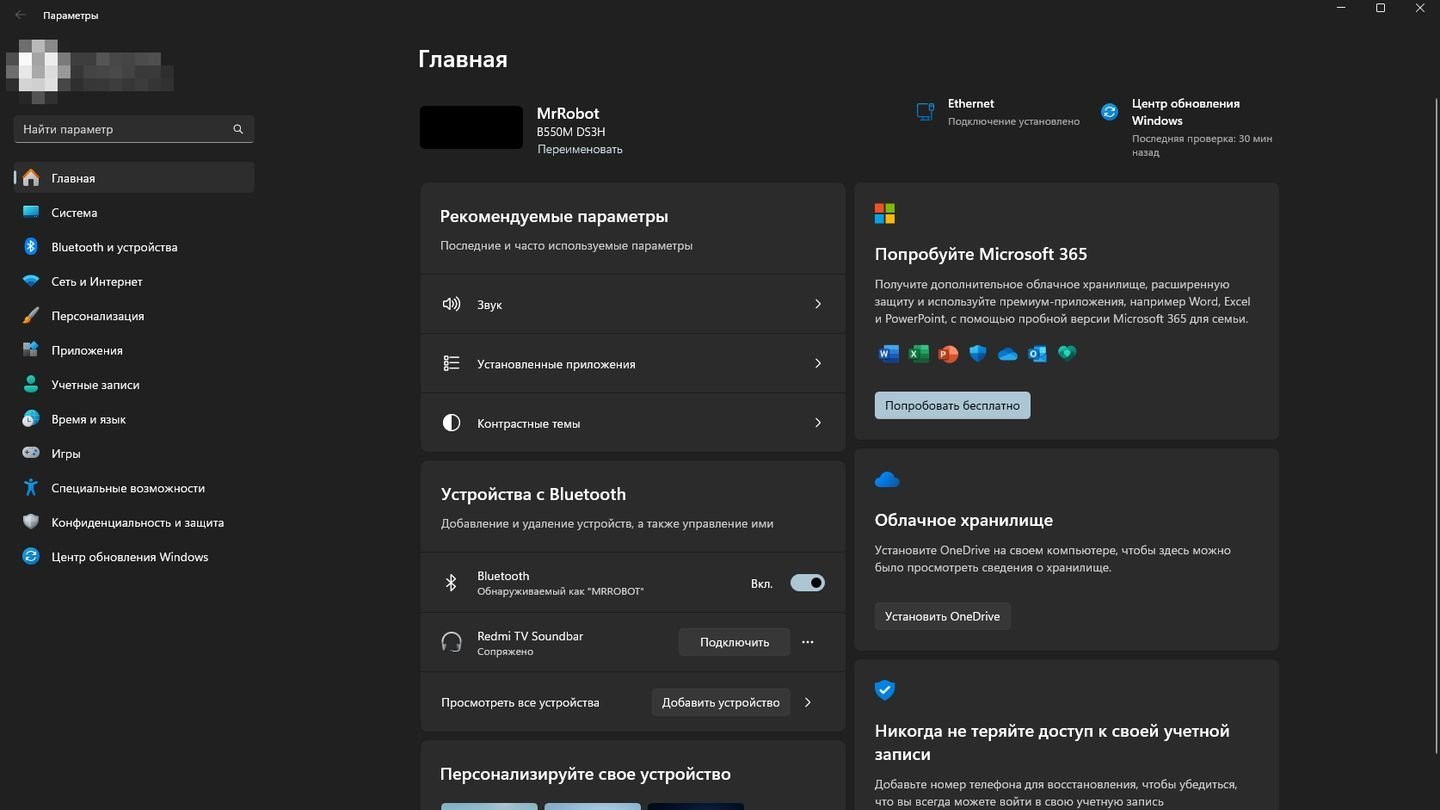
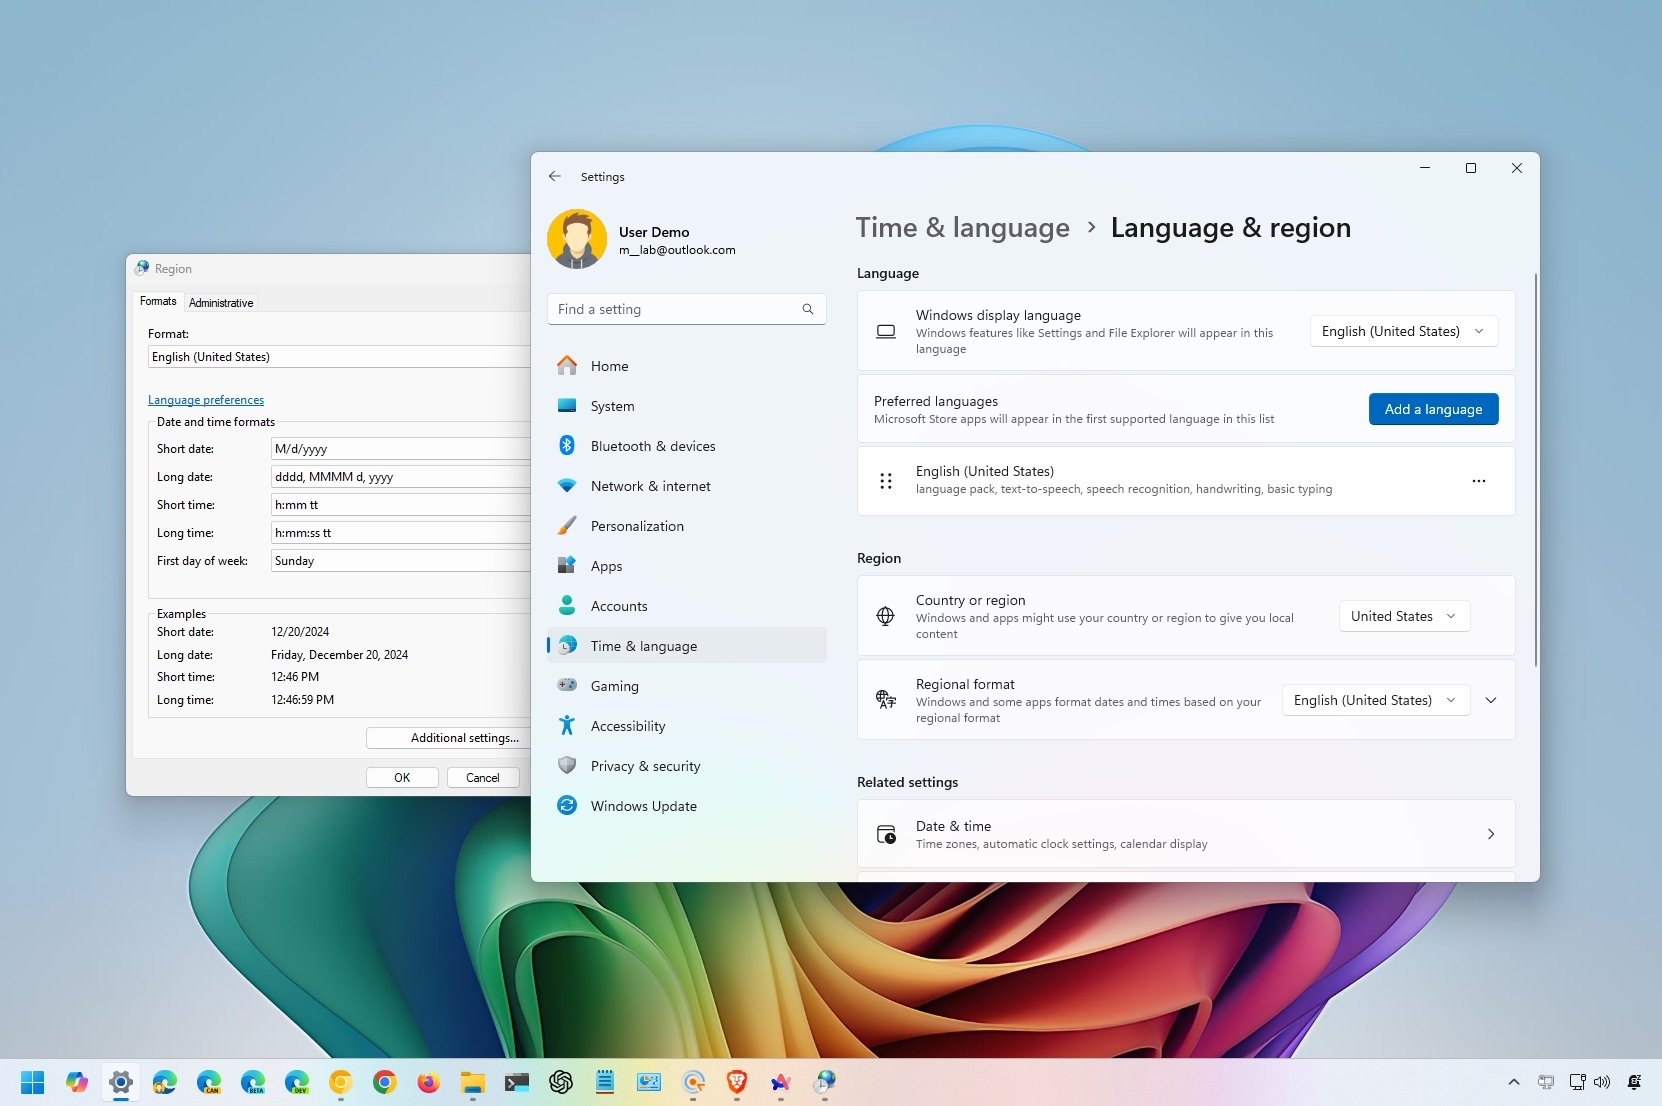
Источник: CQ / Настройки Windows 11
- Нажмите сочетание клавиш Win + I, чтобы открыть меню настроек;
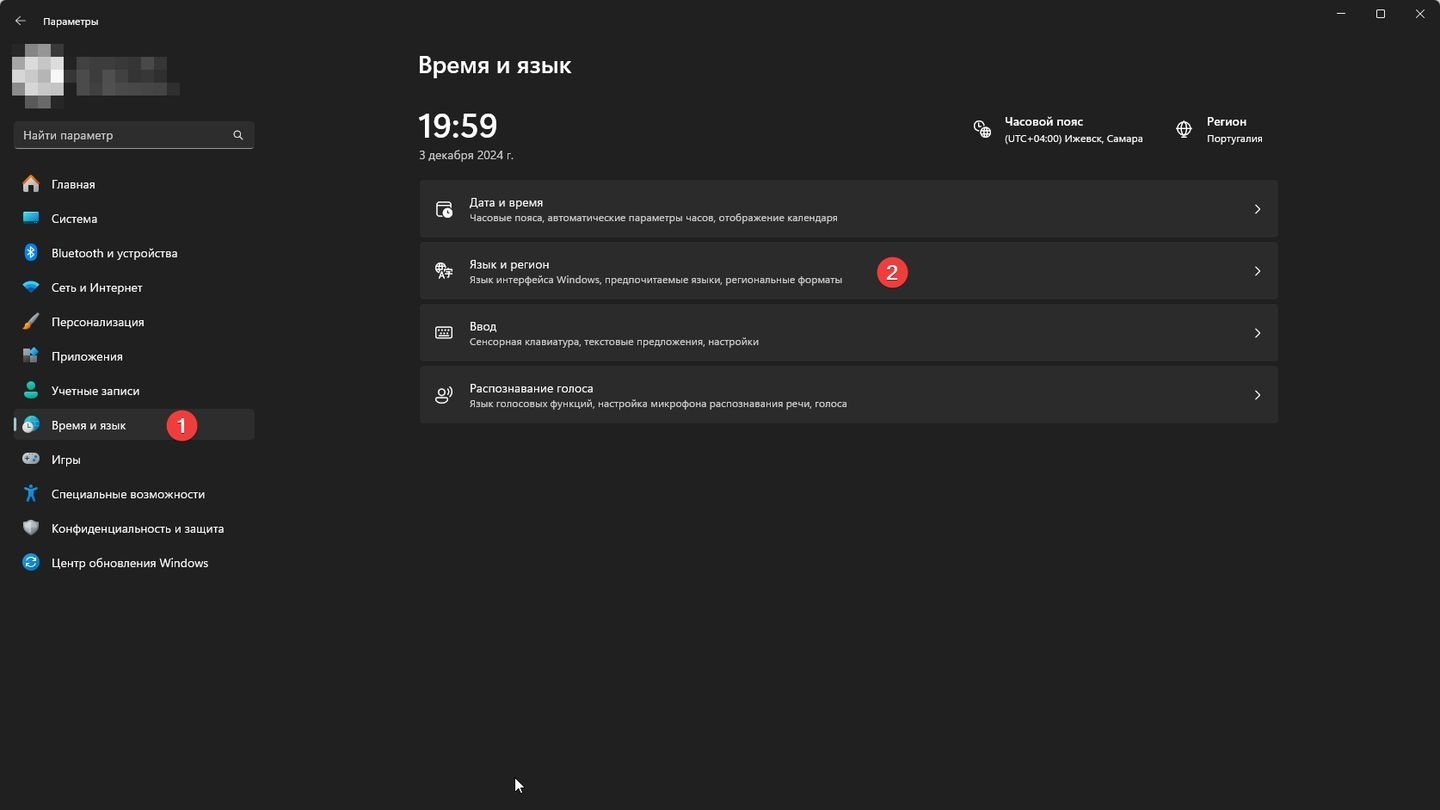
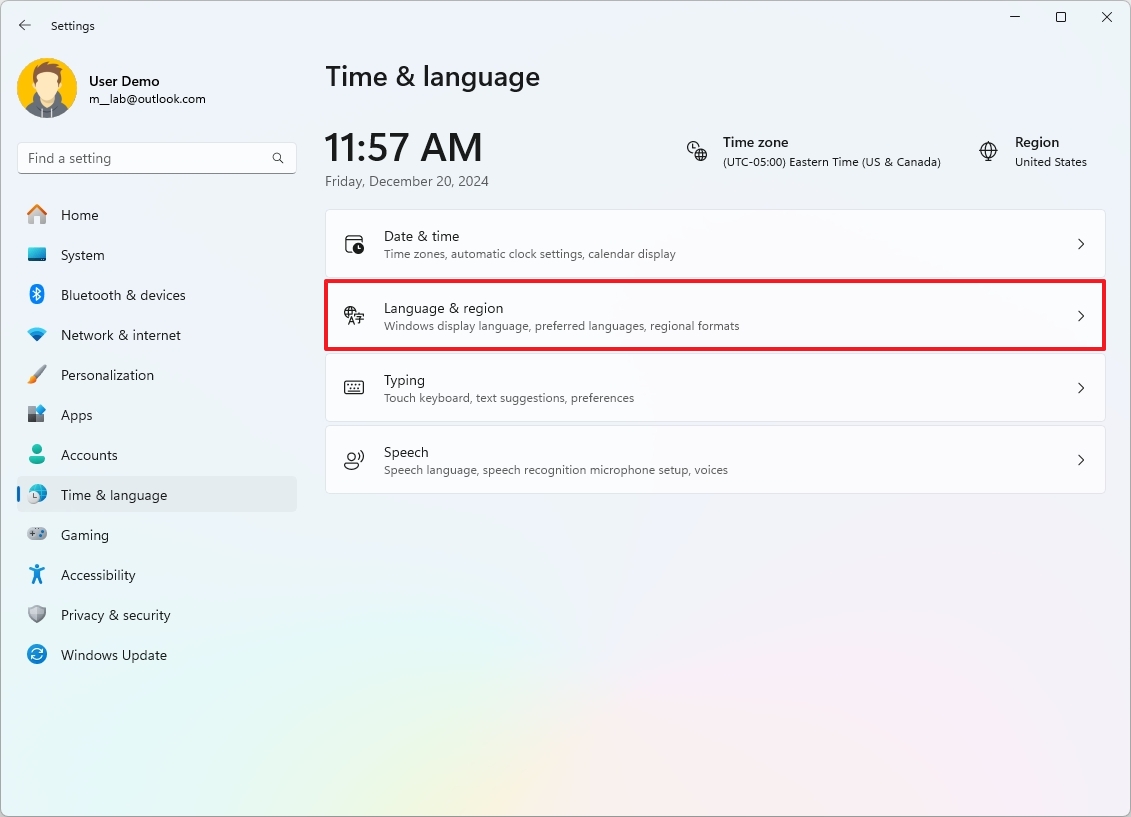
Источник: CQ / Windows 11
- Перейдите в раздел «Время и язык», выберите «Регион»;
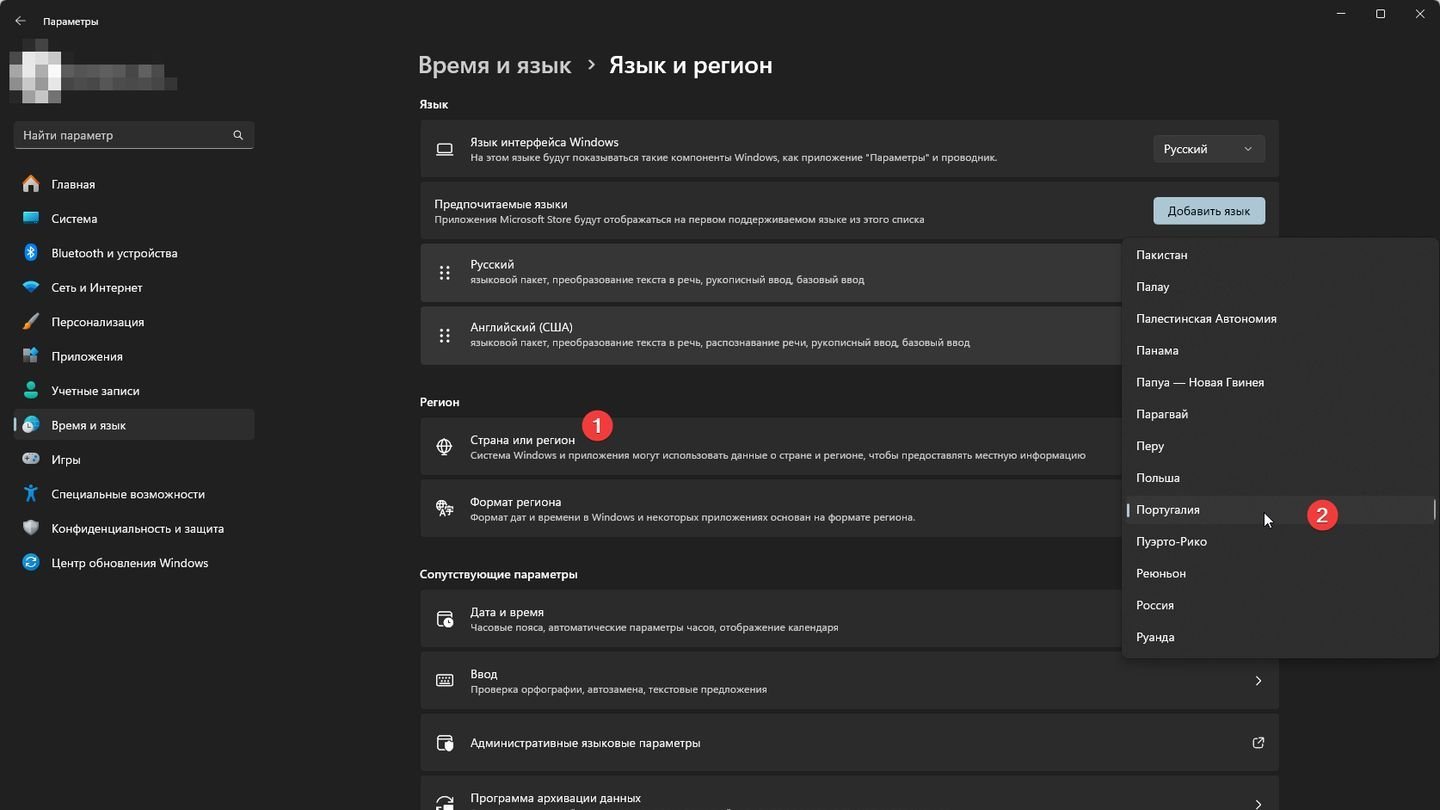
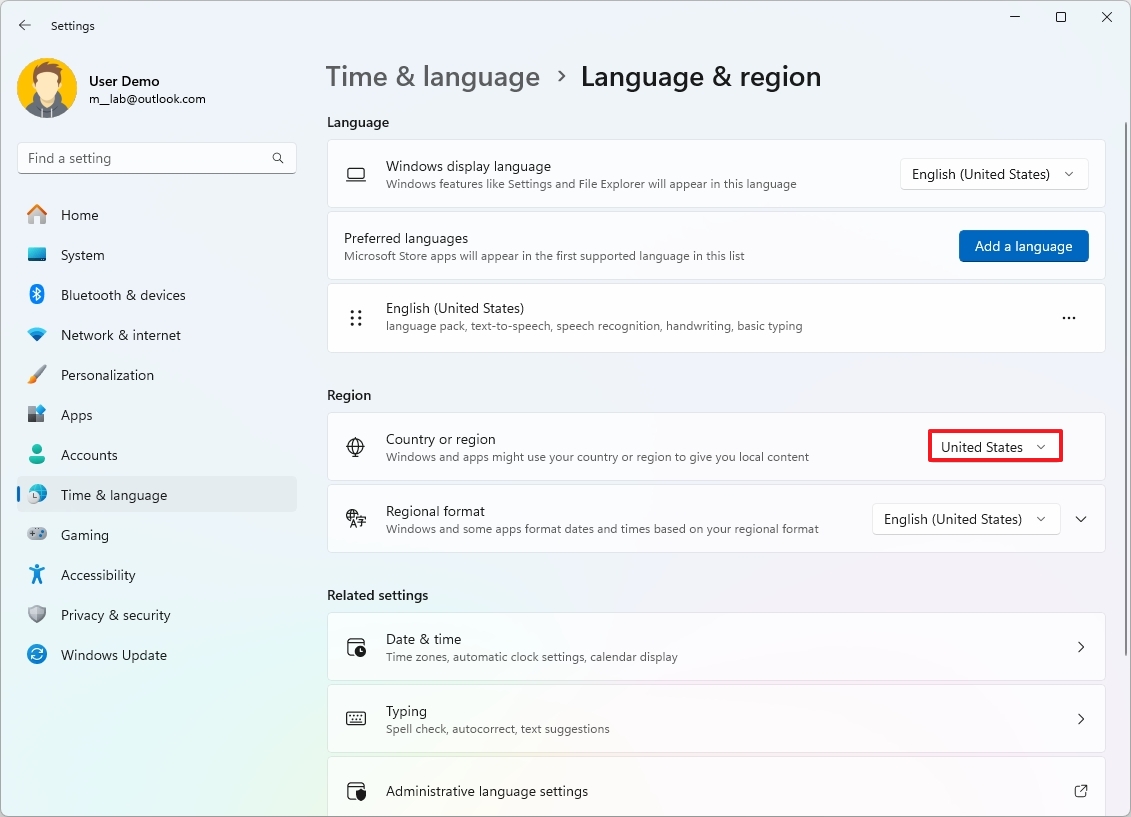
Источник: CQ / Windows 11
- В разделе «Страна или регион» выберите из выпадающего списка нужное местоположение.
Изменения вступят в силу сразу после применения.
Смена региона через редактор реестра
Этот способ требует осторожности, так как неправильное изменение реестра может привести к нестабильной работе системы. В некоторых случаях — к ее неработоспособности.
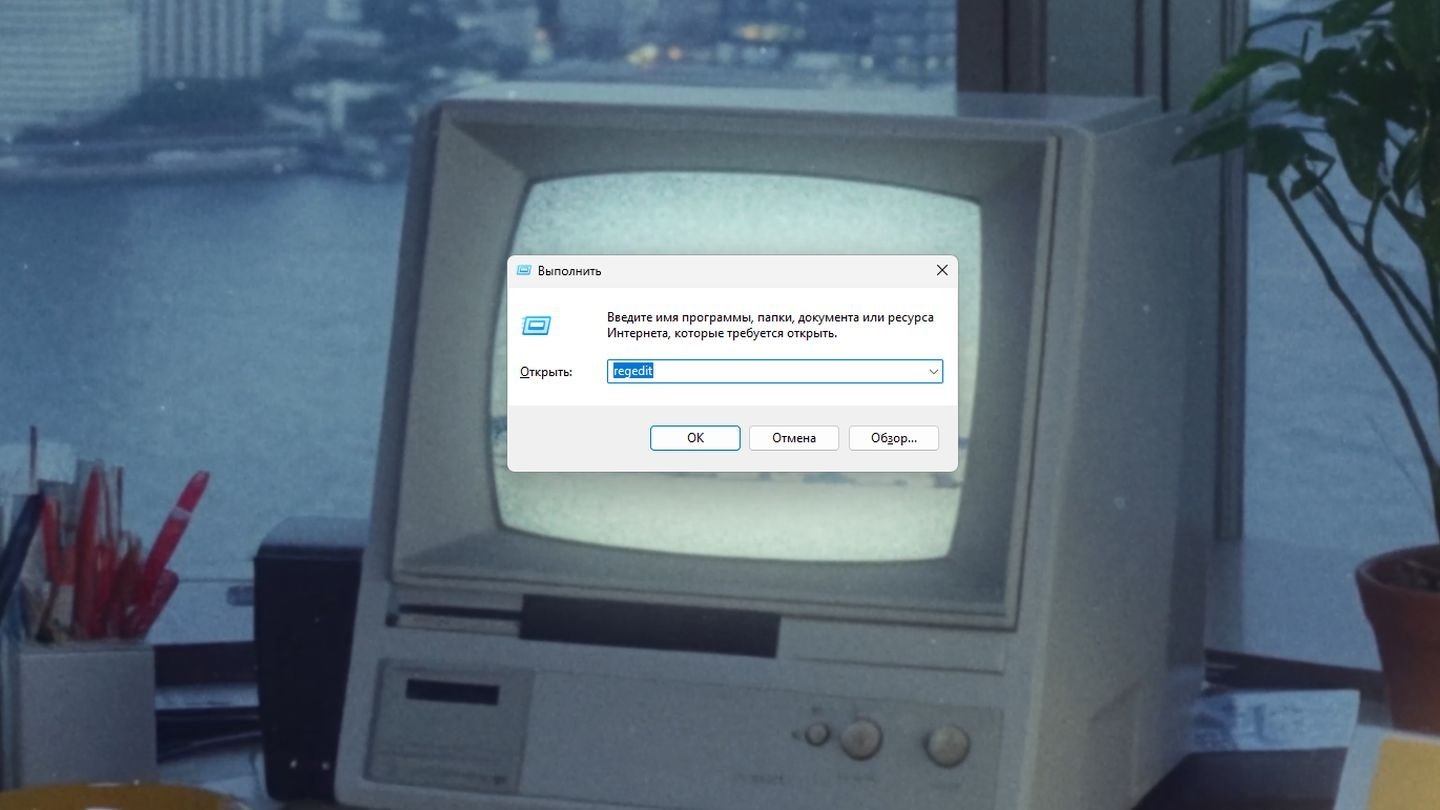
Источник: CQ / Windows 11
- Нажмите Win + R, введите regedit и нажмите Enter, чтобы открыть редактор реестра;
Источник: CQ / Windows 11
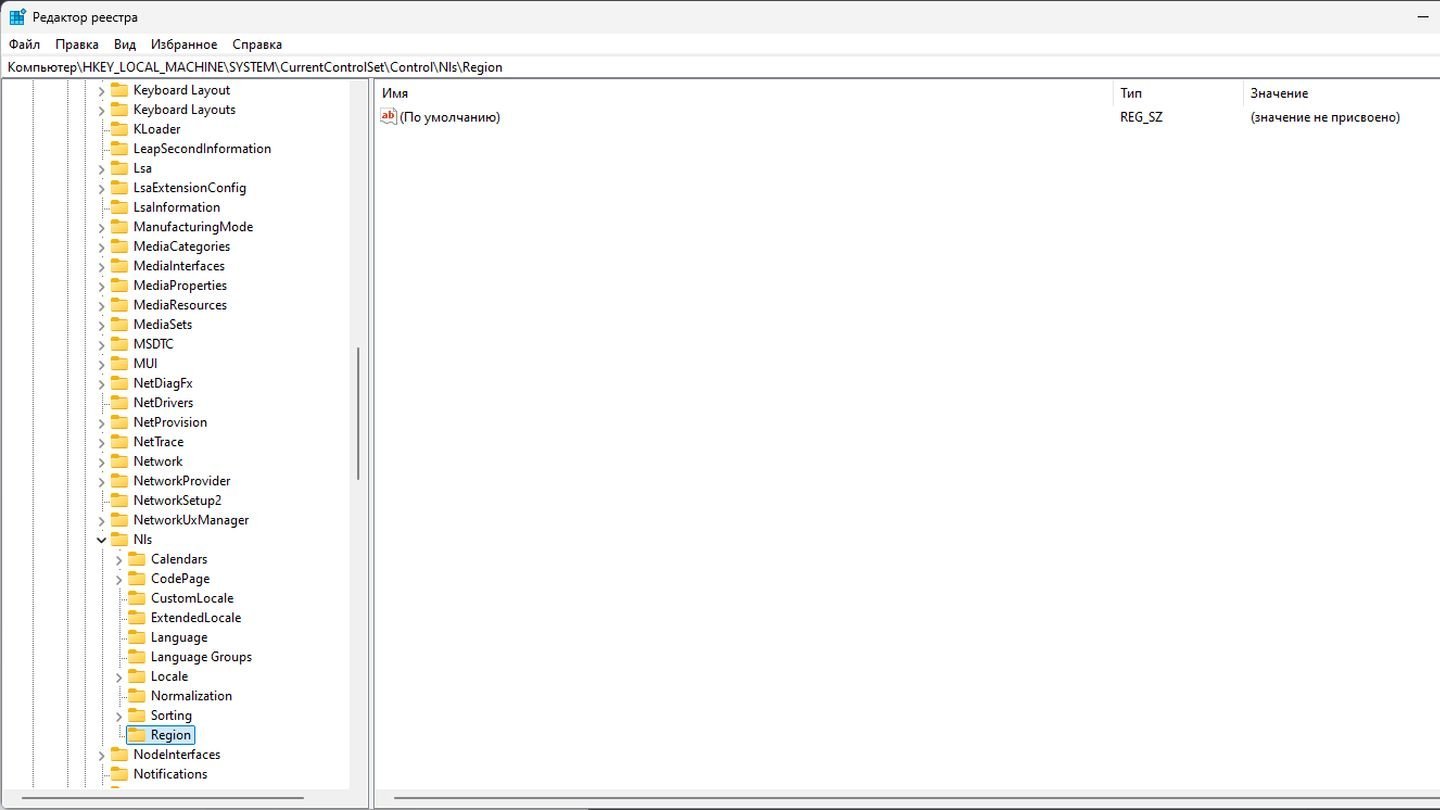
- Перейдите к ключу по пути: HKEY_LOCAL_MACHINE\SYSTEM\CurrentControlSet\Control\Nls\Region;
Источник: CQ / Windows 11
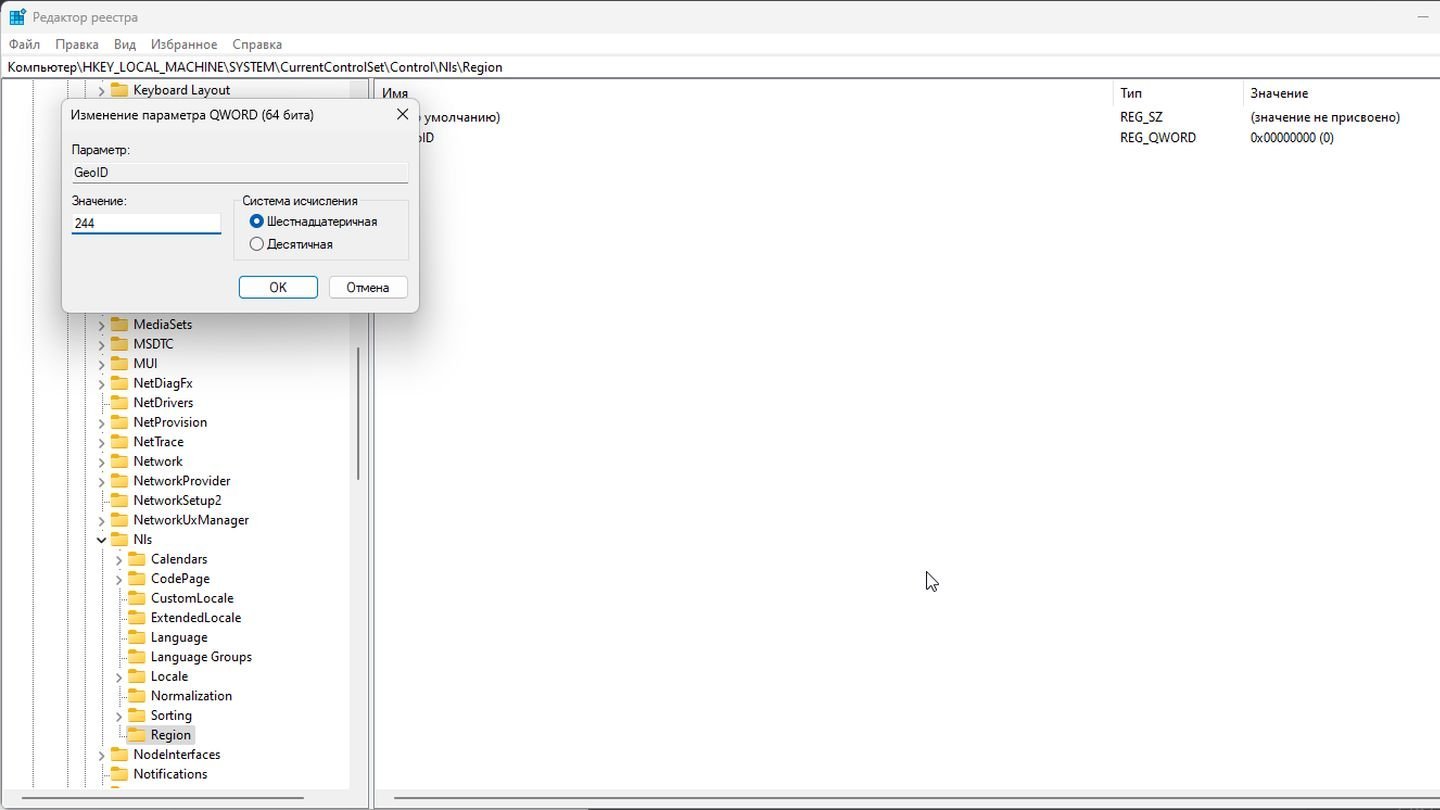
- Найдите параметр GeoID и дважды щелкните по нему;
- Введите код региона (например, 244 для США, 7 для России). Список кодов можно найти на сайте Microsoft.
Закройте редактор реестра и перезагрузите компьютер для применения изменений.
Смена региона через «Терминал»
Вариант для тех, кто предпочитает пользоваться командной строкой.

Источник: CQ / Windows 11
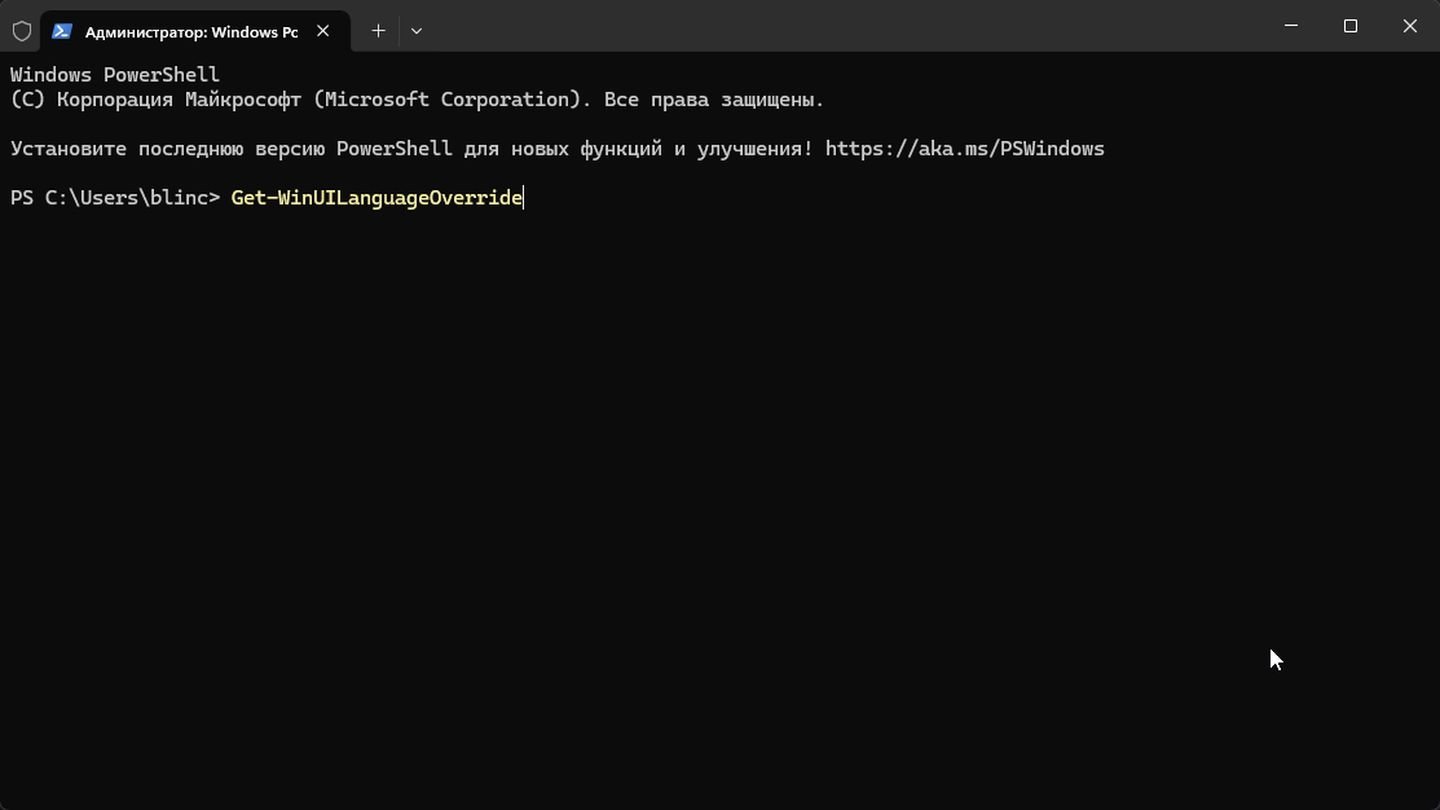
- Нажмите Win + X и выберите «Терминал (администратор)»;
Источник: CQ / Windows 11
- Проверьте текущий регион через команду Get-WinUILanguageOverride;
Источник: CQ / Windows 11
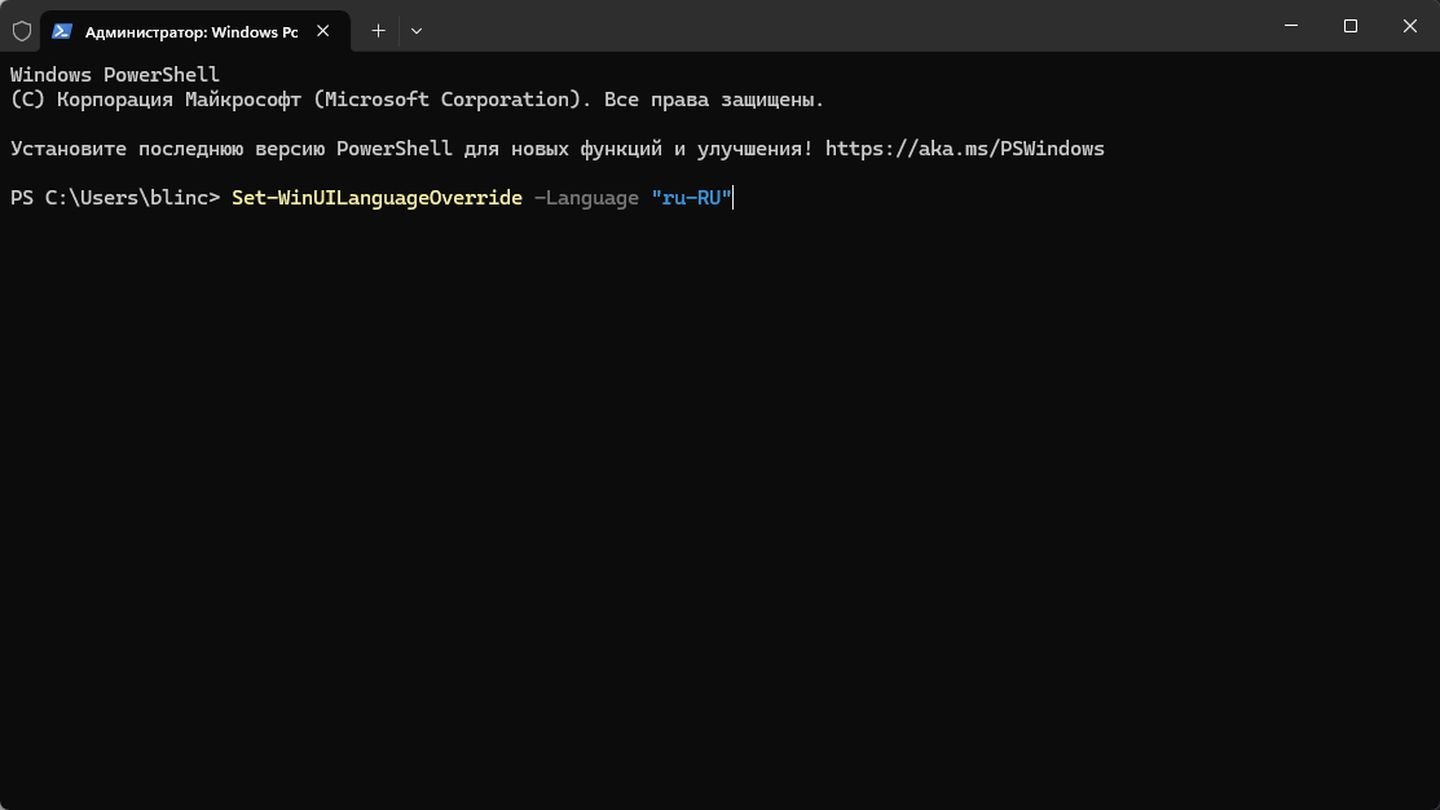
- Установите новый регион: Set-WinUILanguageOverride -Language «ru-RU». Здесь ru-RU — это код языка и региона (например, en-US для США).
После перезагрузки изменения вступят в силу.
Заглавное фото: WinFuture.de
Читайте также:
- Как удалить Windows 11
- Как удалить администратора в Windows 10
- Как настроить и отключить контроль учетных записей в Windows 10
- Как удалить Internet Explorer в Windows
- Как включить и настроить родительский контроль в Windows 10
On Windows 11, the region settings make it easy to ensure that the system and apps can show content based on your location. For example, the Microsoft Store uses the region information to display the apps, games, and videos available in your territory.
In addition, you can adjust regional format settings to show date, time, numbers, or currency in a different format across the desktop and apps.
Whether you made a mistake during the initial setup, want to try a Microsoft Store app or feature only available in another region, or need to show the date, time, numbers, or currency in a different format, Windows 11 provides an easy way to change region settings with the Settings app.
In this how-to guide, I’ll walk you through the steps to personalize your computer’s region settings.
Recent updates
These instructions has been updated to ensure accuracy and reflect changes to the process in the operating system.
How to change region settings on Windows 11
To change the system region settings on Windows 11, use these steps:
- Open Settings.
- Click on Time & language.
- Click the Language & region page on the right side.
- Under the «Region» section, choose the new location in the «Country or region» setting – for example, United States.
- (Optional) Select the regional format to use on Windows 11 in the «Regional format» settings.
- Quick tip: Usually, the «Recommended» option offers the optional configuration.
Once you complete the steps, the system will apply the new region settings affecting the operating system and apps, including the Microsoft Store.
Sometimes, when a software company (or Microsoft itself) announces a new application limited to a specific region, users can change region settings to make the app available for download through the Microsoft Store.
All the latest news, reviews, and guides for Windows and Xbox diehards.
How to change regional format settings on Windows 11
To change the regional format settings, use these steps:
- Open Settings.
- Click on Time & language.
- Click the Language & region page on the right side.
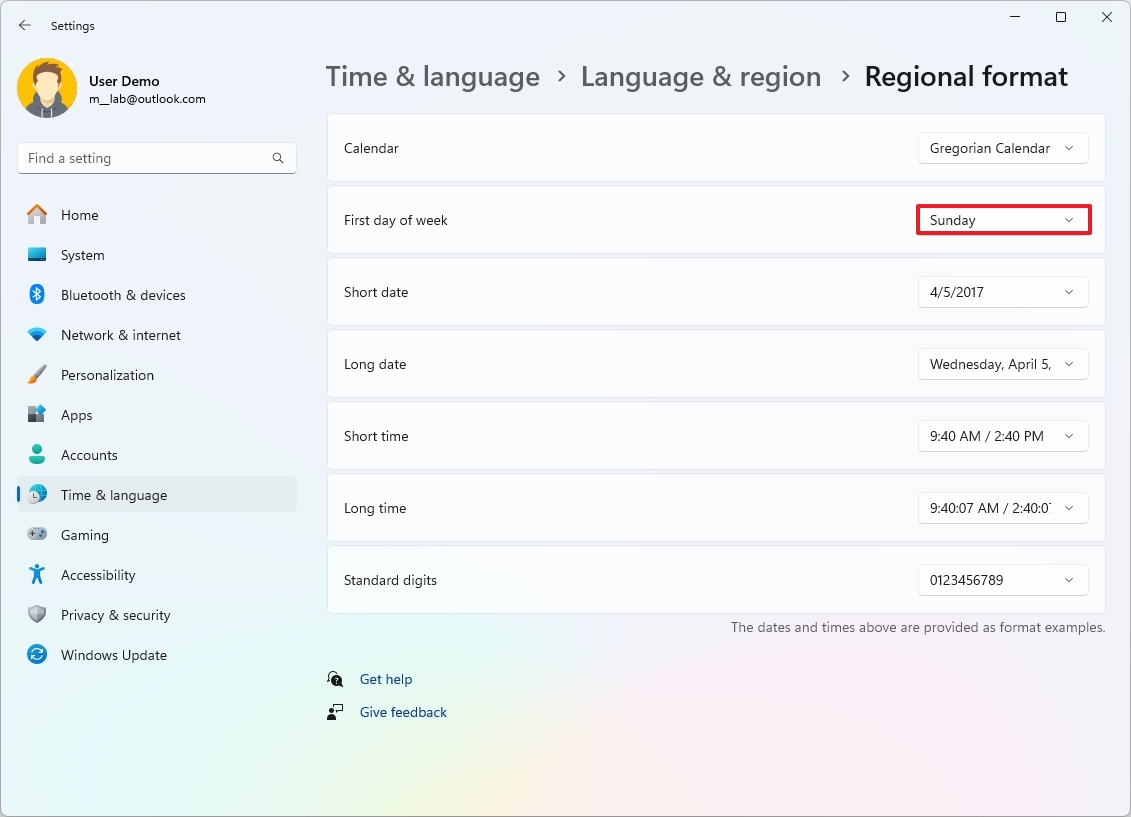
- Select the Regional format setting.
- Click the Change formats button.

- Select when your week starts in the «First day of week» setting.
- Choose the date format in the «Short date» setting.
- Choose the date format in the «Long date» setting.
- Select the time format in the «Short time» setting.
- Select the time format in the «Long date» setting.
After you complete the steps, the updated format settings will be reflected across the desktop and apps.
How to change advanced region settings on Windows 11
To customize how numbers, currency, time, and date should appear on Windows 11, use these steps:
- Open Settings.
- Click on Time & language.
- Click the Language & region page on the right side.
- Click the «Administrative language settings» option under the «Related settings» section.

- Click the Formats tab.
- Click the Additional settings button.
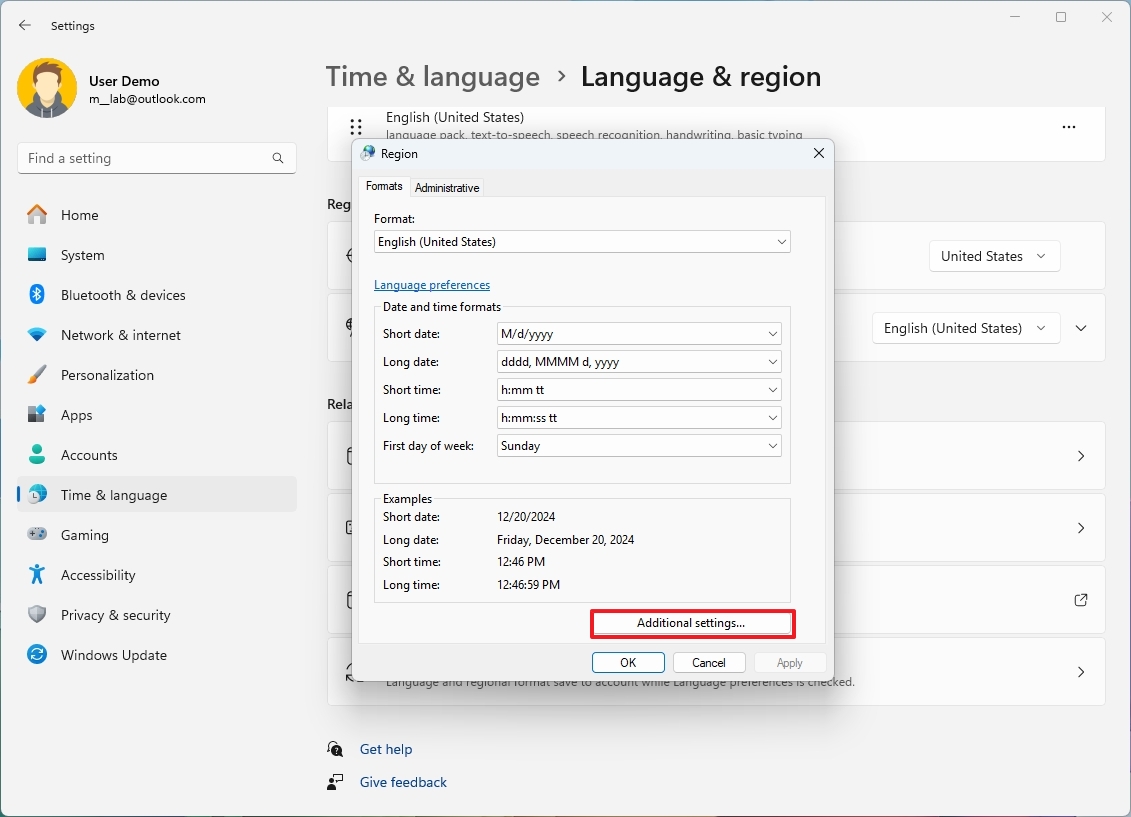
- Click the Numbers tab.
- Customize the regional formats for numbers and symbols.
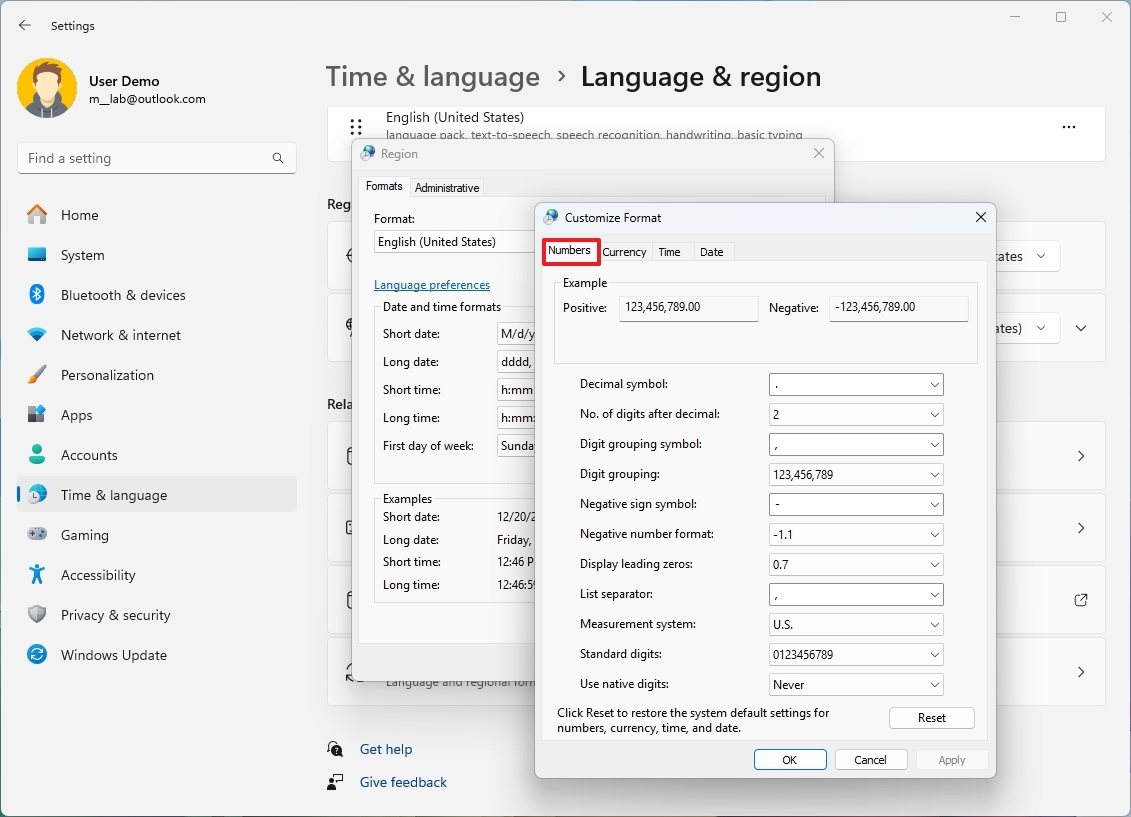
- Click the Currency tab.
- Customize the currency formats on Windows 11.
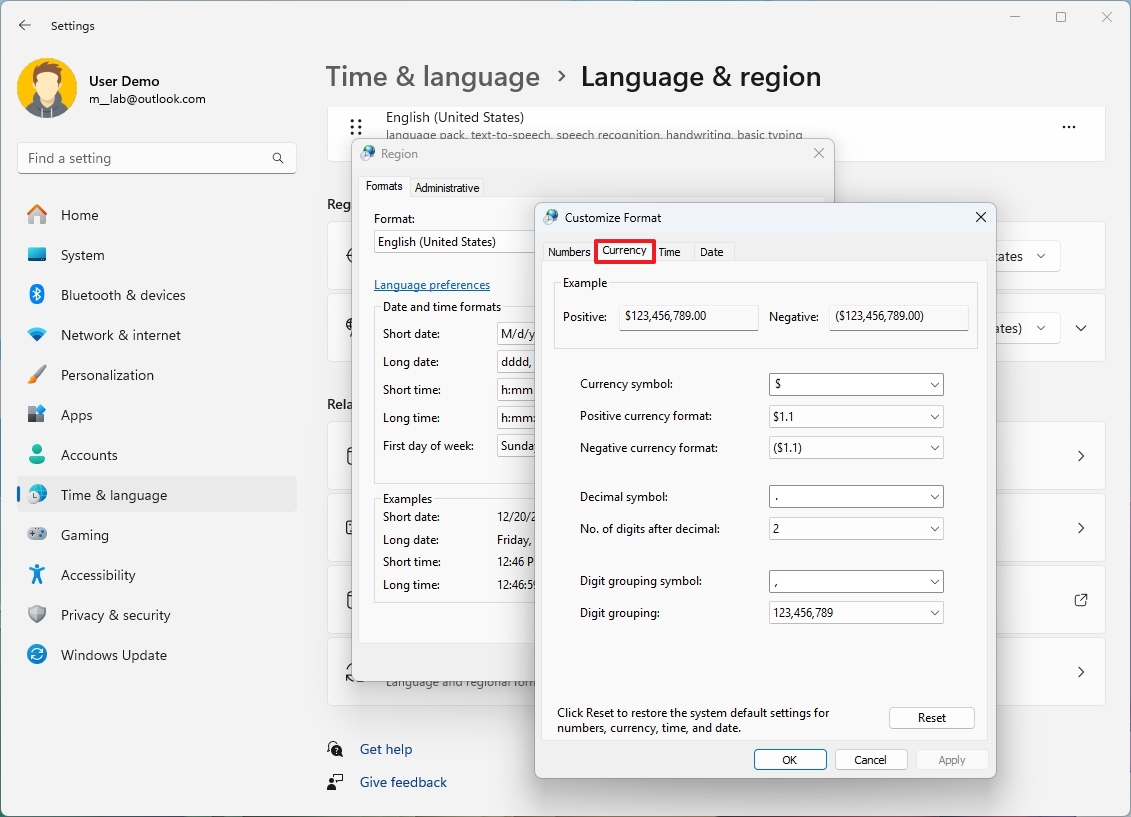
- Click the Time tab.
- Customize the time format more granularly.
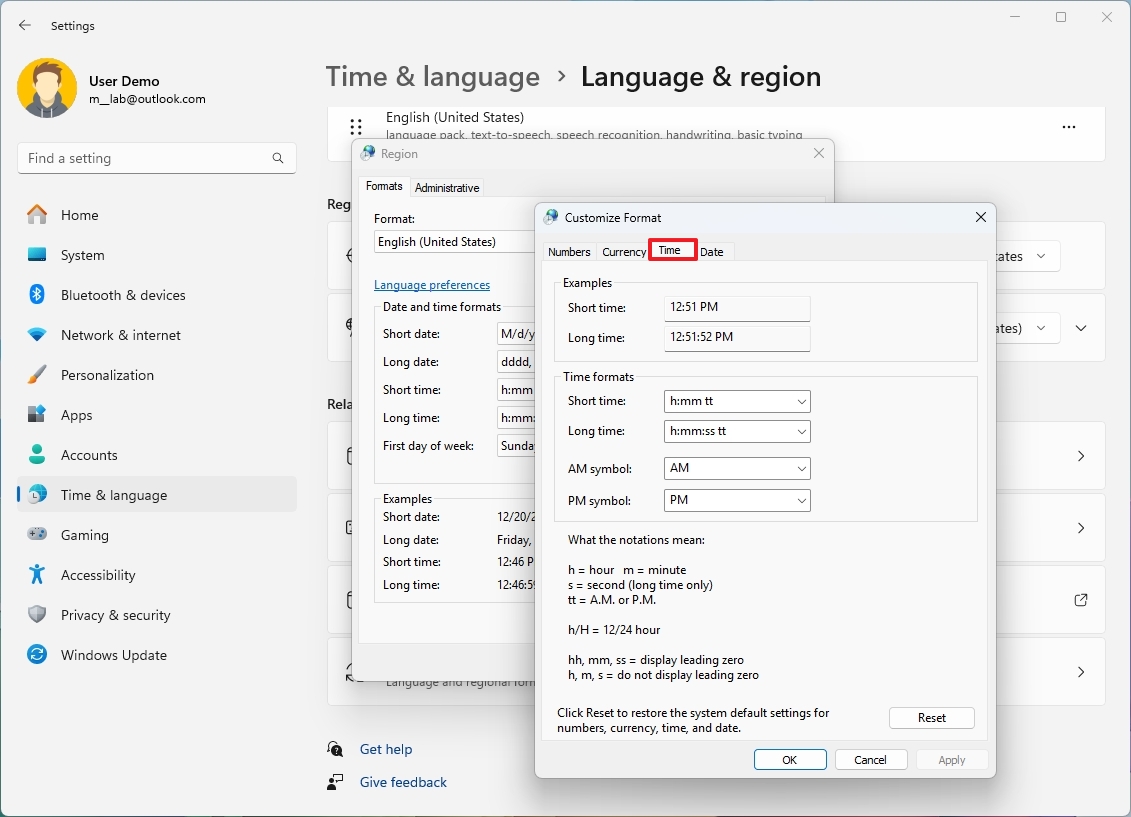
- Click the Date tab.
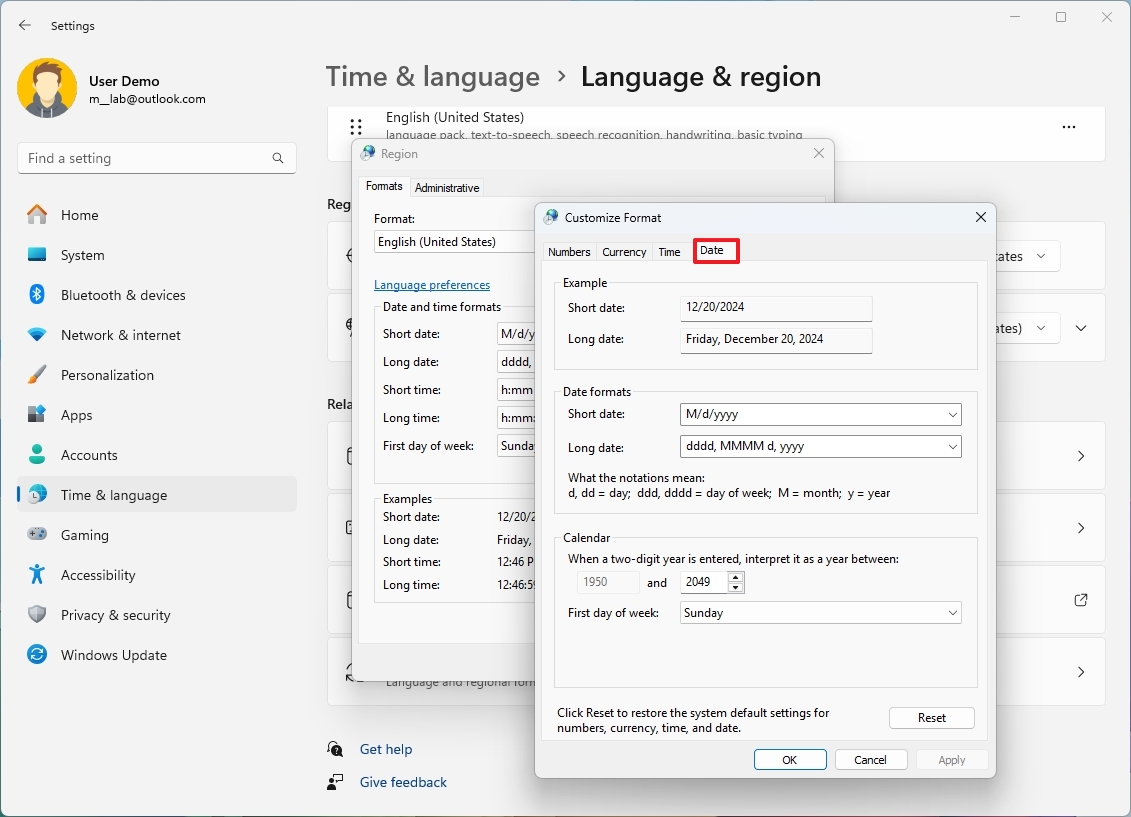
- Customize the date format more granularly.
Once you complete the steps, the new format for numbers, currency, time, and date will be reflected across the desktop and apps.
More resources
For more in-depth insights, troubleshooting tips, and the latest updates on Windows 11 and 10, be sure to explore these resources:
- Windows 11 on Windows Central — All you need to know
- Windows 10 on Windows Central — All you need to know
Mauro Huculak has been a Windows How-To Expert contributor for WindowsCentral.com for nearly a decade and has over 15 years of experience writing comprehensive guides. He also has an IT background and has achieved different professional certifications from Microsoft, Cisco, VMware, and CompTIA. He has been recognized as a Microsoft MVP for many years.
How to Change Country or Region in Windows 10: The Country or Region (Home) location in Windows 10 is important because it allows the Windows Store to display apps and their prices for the selected location or country. The country or region location is referred to as Geographic location (GeoID) in Windows 10. For some reason, if you want to change your default country or region in Windows 10 then it’s entirely possible using Settings app.

Also, when you install Windows 10, you are asked to select a region or country based on where you are located but don’t worry this can easily be changed once you boot to Windows 10. The main problem only occurs with Windows Store because for example if you live in India and you selected the United States as your country then the apps in Windows store will be available for purchase in dollars ($) and payment gateway will be available for the selected country.
So if you are facing a problem with Windows 10 Store or app prices are in a different currency or if you want to install an app which is not available for your country or region then you can easily change your location based on your requirements. Anyway, without wasting any time let’s see How to Change Country or Region in Windows 10 with the help of the below-listed tutorial.
Table of Contents
Make sure to create a restore point just in case something goes wrong.
Method 1: Change Country or Region in Windows 10 Settings
1.Press Windows Key + I to open Settings then click on Time & language.
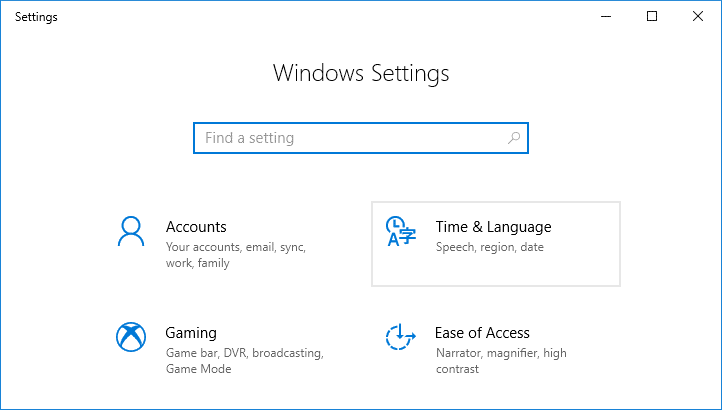
2.From the left-hand menu make sure to select “Region & language“.
3.Now in the right-hand side menu under the “Country or region” drop-down select your country (ex: India).

4.Close Settings then reboot your PC to save changes.
Method 2: Change Country or Region in Control Panel
1.Type control in Windows Search then click on Control Panel from the search results.
2.Make sure you are in “Category” View then click on Clock, Language, and Region.

3.Now click on “Region” and switch to Location tab.

4.From the “Home location” drop-down select your desired country (ex: India) and click Apply followed by OK.

5.Close everything then restart your PC to save changes.
This is How to Change Country or Region in Windows 10 but if the settings are greyed out then follow the next method.
Method 3: Change Country or Region in Registry Editor
1.Press Windows Key + R then type regedit and hit Enter.
2.Navigate to the following registry location:
HKEY_CURRENT_USER\Control Panel\International\Geo

3.Make sure to select Geo then in right window pane double-click on “Nation” string to modify its value.
4.Now under “Value data” field use the following value (Geographical location identifier) according to your preferred country and click OK:
Go here to access the list: Table of Geographical Locations

5.Close everything then Reboot your PC.
Recommended:
- Add Copy To Folder and Move To Folder in the Context Menu in Windows 10
- Enable or Disable Cortana on Windows 10 Lock Screen
- How to Enable or Disable Cortana in Windows 10
- Show Control Panel in WinX Menu in Windows 10
That’s it you have successfully learned How to Change Country or Region in Windows 10 but if you still have any queries regarding this tutorial then feel free to ask them in the comment’s section.
Readers help support Windows Report. We may get a commission if you buy through our links.
Read our disclosure page to find out how can you help Windows Report sustain the editorial team. Read more
Radu Tyrsina
Radu Tyrsina has been a Windows fan ever since he got his first PC, a Pentium III (a monster at that time).
For most of the kids of his age, the Internet was an amazing way to play and communicate with others, but he was deeply impressed by the flow of information and how easily you can find anything on the web.
Prior to founding Windows Report, this particular curiosity about digital content enabled him to grow a number of sites that helped hundreds of millions reach faster the answer they’re looking for.
Configuring Regional Settings and Windows locales with Group Policy is about managing user location settings such as region, currency and time. A locale is a unique combination of language, country/region, and code page. Part of these settings are user-specific, others are system-specific (local machine) and thus apply to all logged-on users.
Table of Contents
-
- Introduction
- Quick list of the main registry values mentioned in this article
- Configuring regional settings using Group Policy
- Configuring the 24/12 hour clock and AM/PM using Group Policy
- Configure the clock using a Regional Settings Group Policy Preference
- Configure the clock using a Group Policy Preference registry item
- Configuring the (home) location setting using Group Policy
- Configuring the code page (separate article)
Introduction
This article applies to all operating systems starting from Windows Server 2008/Windows 7 all the way up to the latest versions and builds (currently Windows 10 version 1809 and Windows Server 2019)!
I know, I know, this topic is a bit of a “golden oldie”, but still very relevant today. In my lab environment, I recently found myself struggling with this old topic again. Once again I faced the problem of incorrect regional settings, incorrect time format, incorrect code page and incorrect time zone. And mind you, my lab environment exists of Windows 2016 servers only (OK, I have one 2012 R2 server). Having solved such issues before, I knew I could configure all settings centrally using Group Policy. This blog post is for all of you fellow administrators out there who struggle with the same issues.
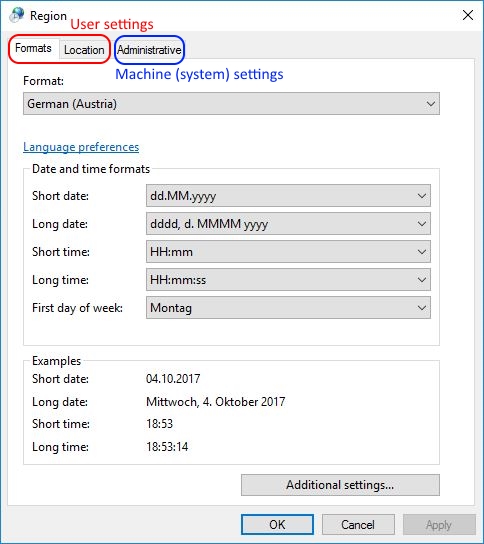
I am sure that you are familiar with the Regional Settings Control Panel item. Before you continue with the various sections below, I would like to remind you of the fact that the tabs Formats and Location contain user-specific settings and that settings on the tab Administrative are system-specific.
These system-specific settings concern the international settings for the welcome screen and system accounts as well as the local system’s code page for programs that do not support Unicode. For detailed information how to configure the code page please see the article Configuring the time zone and code page with Group Policy on this website.
The rest of this article deals with the user-specific settings (= the first two tabs) only.
One last thing. All configurations described in this article are stored in the Windows registry. If you are unsure of the exact value of a setting, for example concerning country codes, I recommend you to first configure the setting using the graphical interface. You than go to the registry and read the configured value, which you can than use in your script or Group Policy setting.
Quick list of the main registry values mentioned in this article
In case you are not in the mood for any blabla, I have listed all relevant registry keys and values in this section. If you know your way around Group Policy Preferences, you do not need to read further. Here it goes.
Regional settings:
Registry key: HKEY_CURRENT_USER\Control Panel\International
Registry value: multiple values in the aforementioned key
You can configure Regional Settings with the Regional Settings Group Policy Preference (User Configuration \ Preferences \ Control Panel Settings \ Regional Options).
24/12 hour clock and AM/PM time settings:
Registry key: HKEY_CURRENT_USER\Control Panel\International
Registry value: sShortTime (REG_SZ)
You can configure the time settings with the Regional Settings Group Policy Preference or with a Group Policy Preference registry item.
(Home) location:
Registry key: HKEY_CURRENT_USER\Control Panel\International\Geo
Registry value: Nation (REG_SZ)
You can configure the (home) location with a Group Policy Preference registry item.
Configuring regional settings using Group Policy
This section deals with the settings configured on the first tab, Formats, of the Regional Settings Control Panel item.
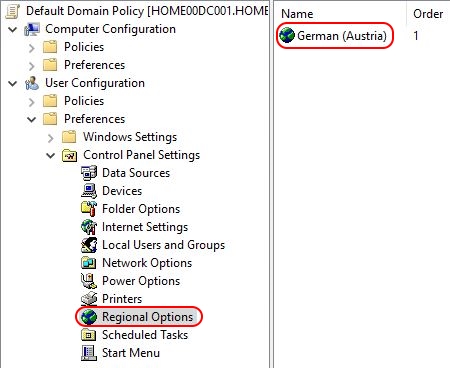
Ever since the introduction of Group Policy Preferences with Item-Level Targeting (first introduced with Windows Server 2008), managing regional settings has been a breeze. Open your Group Policy Management Console (GPMC.msc) and navigate to User Configuration \ Preferences \ Control Panel Settings \ Regional Options. With a right-mouse click on Regional Options select New.
Now you can configure your settings the same way as on a local Regional Settings pane.

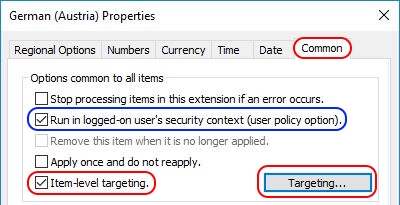
Note: please be aware that this policy item requires you to first enable underlined settings by pressing the F5 or F6 key before you can modify and save them! See the Microsoft article Enable and Disable Settings in a Preference Item for more information.
I recommend to execute this policy in the user’s security context (tick the Run in logged-on […] box on the Common tab).
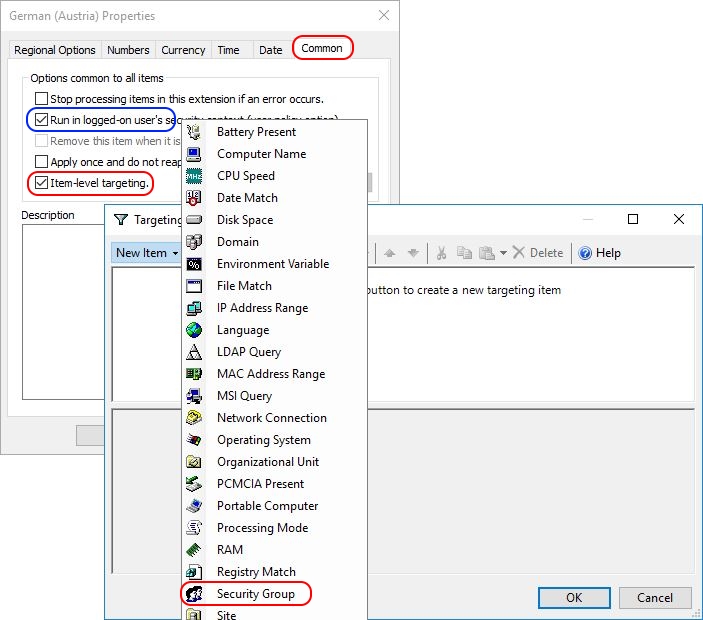
In case you require multiple Regional Settings configurations within the same Group Policy, use an Item-Level Targeting filter.

One way to distinguish users is to filter based on Active Directory security group membership, for example:
- German (Austria): filtered on the Active Directory Group usrsAustria
- French (France): filtered on the Active Directory Group usrsFrance
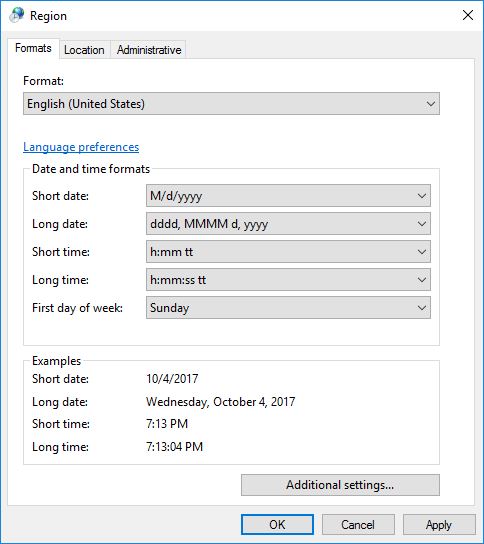
- English (United States): filtered on the Active Directory Group usrsEnglish
In the end, all regional settings are configured in the registry in the HKEY_CURRENT_USER hive. The regional settings consist of multiple values. You find all settings in the following registry key:
Control Panel\International
Configuring the 24/12 hour clock and AM/PM using Group Policy
It may happen that after configuring the regional settings for a user, the time in the system tray is not shown in the correct format. You can correct the time format on the Time tab in the Regional Settings Group Policy Preference (see also the previous paragraph) or directly in the registry (using either a script or a Group Policy Preference).
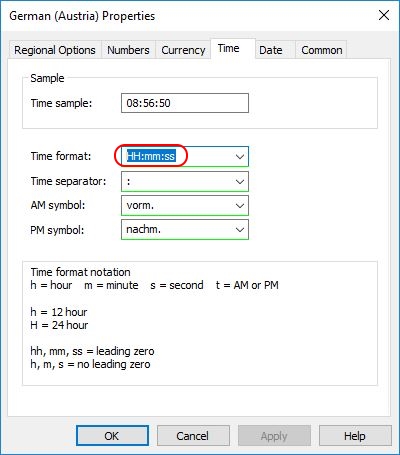
Please take a look at the screenshot below. The regional settings have been modified from English (United States) to German (Austria). In most countries in Europe, a 24-hour clock is used without AM / PM at the end. In the example below, the time is not displayed as it should be. In our example, a 12-hour clock is displayed as well as AM / PM (nachm. stands for PM in German). What the clock should display is a 24-hour time notation without AM / PM at the end.
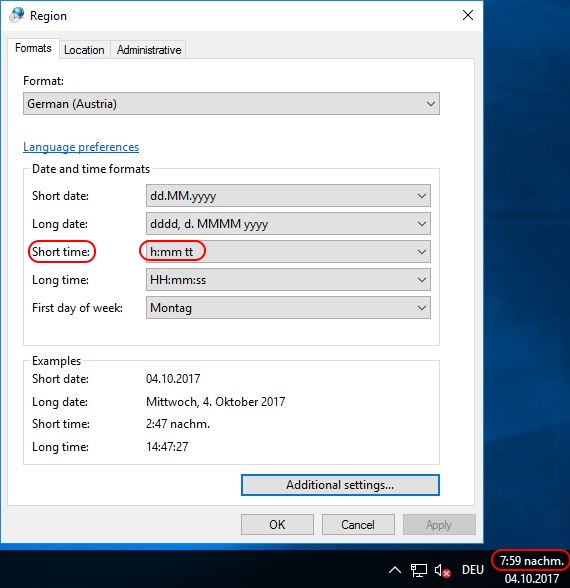
The short time value determines how the time in the system tray is displayed; a 24 or 12-hour clock (with or without leading zeros) and with or without AM / PM. This value is written in the registry in the HKEY_CURRENT_USER hive. The exact registry key and value are:
Control Panel\International -> sShortTime (REG_SZ)
The following possible values exist:
- h:mm = 12-hour clock without leading zeros and without AM / PM
- hh:mm = 12-hour clock with leading zeros and without AM / PM
- h:mm tt = 12-hour clock without leading zeros and with AM / PM
- hh:mm tt = 12-hour clock with leading zeros and with AM / PM
- H:mm = 24-hour clock without leading zeros and without AM / PM
- HH:mm = 24-hour clock with leading zeros and without AM / PM
- H:mm tt = 24-hour clock without leading zeros and with AM / PM
- HH:mm tt = 24-hour clock with leading zeros and with AM / PM
A capital H sets the clock to a 24-hour format; a small h sets the clock to a 12-hour format. A double hh or HH adds a leading zero (when the hour is one digit only). If tt is present at the end than AM / PM is displayed. Also, note the space between the clock settings and the tt value.
Here are some examples:
- h:mm = 7:30 or 10:42
- hh:mm = 07:30 or 10:42
- h:mm tt = 7:30 AM or 10:42 PM
- hh:mm tt = 07:30 AM or 10:42 PM
- H:mm = 7:30 or 23:42
- HH:mm = 07:30 or 23:42
- H:mm tt = 7:30 AM or 23:42 PM
- HH:mm tt = 07:30 AM or 23:42 PM
The last two examples in the previous list will not be used much in practice: a 24-hour clock with AM / PM at the end. The drop down menu in the Regional Settings does not allow you configure this, but you can configure this on the Time tab of the Regional Settings Group Policy Preference and by directly configuring the registry (using a Group Policy Preference registry item for example). Adding the prefix AM / PM to a 24-hour clock notation looks a bit weird, but it is technically possible:
Now we have all the information we need to set the correct time configuration for all users. There are two easy ways how to accomplish this:
- Configure the clock using a Regional Settings Group Policy Preference
- Configure the clock using a Group Policy Preference registry item
Configure the clock using a Regional Settings Group Policy Preference
Please read the section Configuring regional settings using Group Policy in this article to understand how to configure the user’s regional settings. After you have configured at least one regional setting configuration, modify this configuration and go to the Time tab.
On this tab you can modify the time format to anything you want. Before you can modify anything, first make sure to press the F5 button to turn all the red lines to green lines. Green lines indicate that anything you change will be saved after clicking the Apply or OK button. At the bottom of the tab a detailed description of the various configuration options is provided. In the example below I changed the format HH:mm:ss to h:mm:ss tt, changing the clock from a 24-hour to a 12-hour clock and adding AM / PM.

Configure the clock using a Group Policy Preference registry item
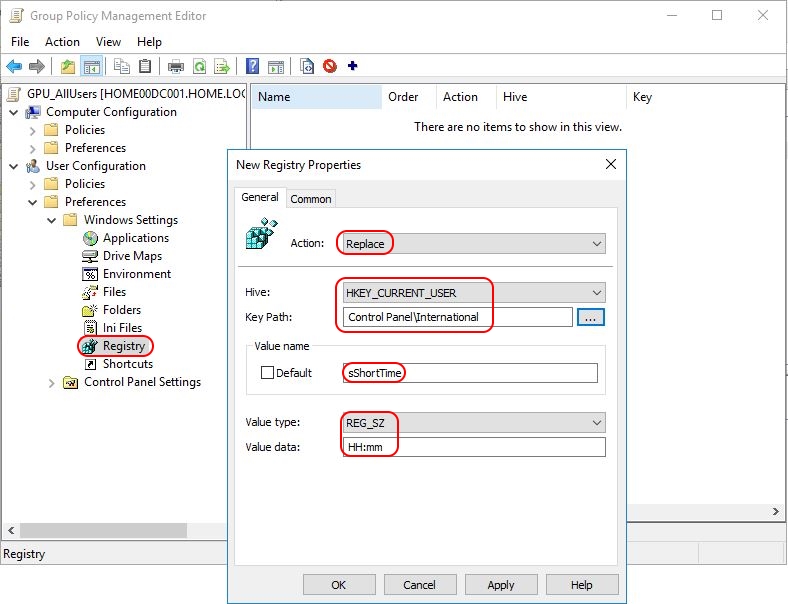
Open your Group Policy Management Console (GPMC.msc) and navigate to User Configuration \ Preferences \ Windows Settings \ Registry. With a right-mouse click on Registry select New \ Registry Item. Configure the registry item as follows:
- Action: replace
- Hive: HKEY_CURRENT_USER
- Key path: Control Panel\International
- Value name: sShortTime
- Value data: <your value>, e.g. HH:mm
I recommend to execute this policy in the user’s security context (tick the Run in logged-on […] box on the Common tab).
In case you require multiple locations for a variety of scenarios within the same Group Policy, use an Item-Level Targeting filter. This is explained in the section Configuring regional settings using Group Policy.
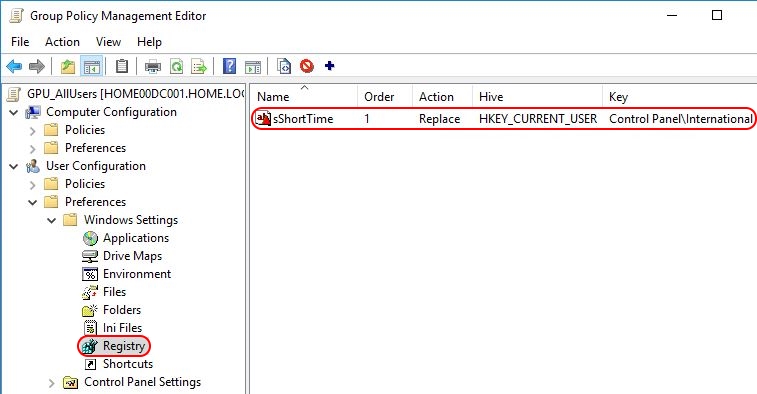
The registry item is now created and will be deployed to all users to whom the particular Group Policy applies.
It is possible to rename the registry item afterwards:
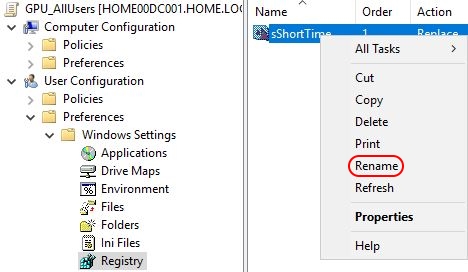
Just remember that modifying the item resets it to its original name (=the value name) and you will have to rename it again.
Configuring the (home) location setting using Group Policy
This section deals with the Home Location setting configured on the second tab, Location, of the Regional Settings Control Panel item.
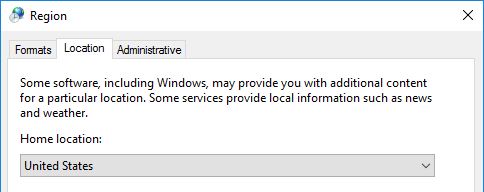
The location cannot be changed using the Regional Settings Group Policy Preference. Instead, a Group Policy Preference registry item needs to be used.
The location is stored in the Windows registry in the HKEY_CURRENT_USER hive. The exact registry key and value are:
Control Panel\International\Geo -> Nation (REG_SZ)
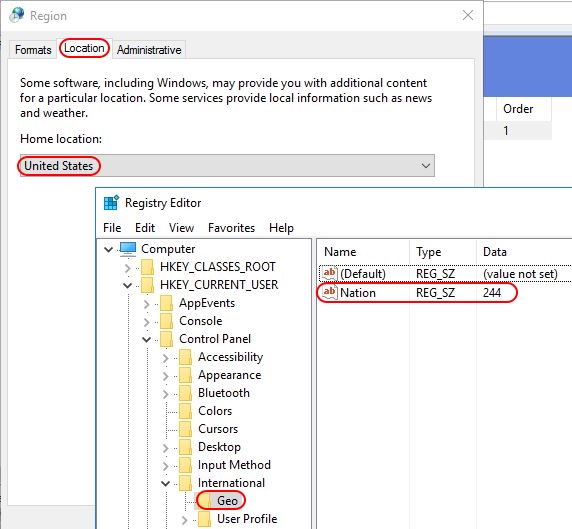
To determine the country ID, change the location manually on the second tab of the Control Panel item Regional Settings and than check the aforementioned registry value. For example, when I select Austria as my location, the value Nation is set to 14. Before it was 244, which is the country ID for the United States.
Now we have all the information we need to set the correct location for all users. The easiest way to accomplish this is by using a Group Policy Preference.
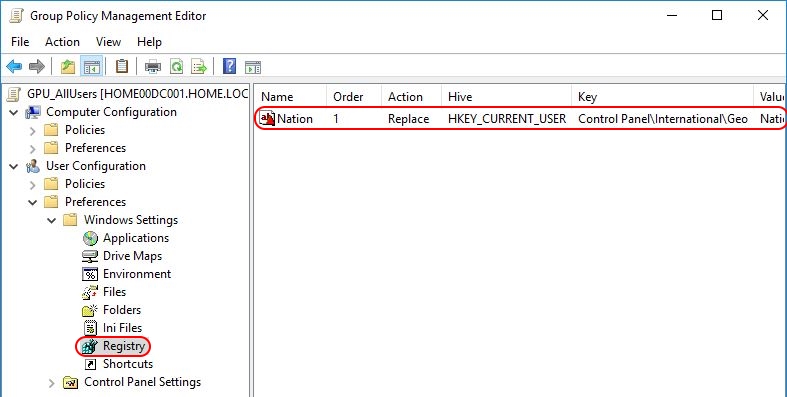
Open your Group Policy Management Console (GPMC.msc) and navigate to User Configuration \ Preferences \ Windows Settings \ Registry. With a right-mouse click on Registry select New \ Registry Item. Configure the registry item as follows:
- Action: replace
- Hive: HKEY_CURRENT_USER
- Key path: Control Panel\International\Geo
- Value name: Nation
- Value data: <your value>, e.g. 14

I recommend to execute this policy in the user’s security context (tick the Run in logged-on […] box on the Common tab).
In case you require multiple locations for a variety of scenarios within the same Group Policy, use an Item-Level Targeting filter. This is explained in the section Configuring regional settings using Group Policy.
The registry item is now created and will be deployed to all users to whom the particular Group Policy applies.
It is possible to rename the registry item afterwards:
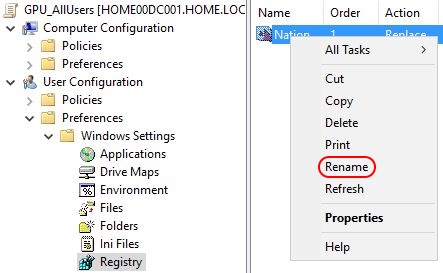
Just remember that modifying the item resets it to its original name (=the value name) and you will have to rename it again.
I hope this article was of some help to you.
Dennis Span works as a Lead Account Technology Strategist at Cloud Software Group in Vienna, Austria. He holds multiple Citrix certifications (CCE-V). Dennis has been a Citrix Technology Advocate (CTA) since 2017 (+ one year as Citrix Technology Professional, CTP). Besides his interest in virtualization technologies and blogging, he loves spending time with his family as well as snowboarding, playing basketball and rowing. He is fluent in Dutch, English, German and Slovak and speaks some Spanish.