
Last Updated :
22 Jun, 2022
Setting up an IP address using the ipconfig command is a simple process that can be performed from any computer with an internet connection. This article aims to provide a step-by-step guide on setting up an IP address using the default gateway and the DNS server. This can be useful if you cannot access the internet or need to change your IP address. It is also useful if you are unsure of what your current IP address is.
Steps to Configure IP address in devices using ipconfig command in Cisco packet tracer:
Step 1: Open the Cisco packet tracer desktop and create a network topology peer-to-peer connection between two PCs as shown below:
| S.NO | Device | IPv4 address | Subnet Mask | Default Gateway |
|---|---|---|---|---|
| 1. | PC0 | 192.168.0.2 | 255.255.255.0 | 192.168.0.1 |
| 2. | PC1 | 192.168.0.3 | 255.255.255.0 | 192.168.0.1 |

Step 2: Configure PC0 and PC1 using the ipconfig command:
command : ipconfig <ip address> <subnet mask> <default gateway>
- First, click on PC0 and go to the command prompt terminal.
- Then, type the ipconfig command and configure the PC0 as shown below the image.
- and verify the IP address by again typing only ipconfig in the terminal.
Command: ipconfig 192.168.0.2 255.255.255.0 192.168.0.1

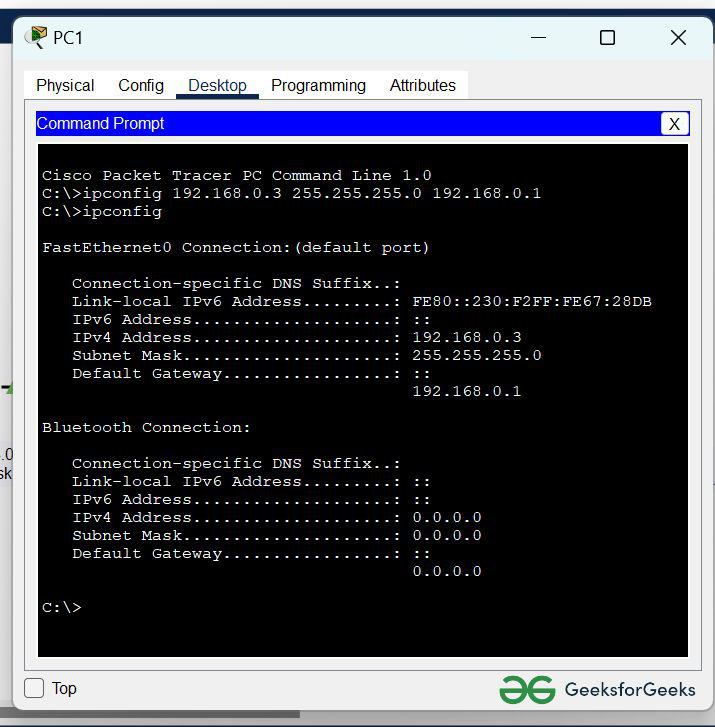
Similarly with PC1:
- First, click on PC1 and go to the command prompt terminal.
- Then, type the ipconfig command and configure the PC0 as shown below the image.
- and verify the IP address by again typing only ipconfig in the terminal.
Command: ipconfig 192.168.0.3 255.255.255.0 192.168.0.1
Step 3: Verifying connection by pinging the IP address of PC1 in the PC0 terminal:
command : ping 192.168.0.3

Output:

Whether your workforce is in an office, working from home, or a mixture of both, you need a reliable network to ensure seamless digital collaboration. Network administrators need many tools in their toolbox to keep that network operating consistently.
Among the most versatile are command-line tools. They give network administrators the flexibility, speed, and precision needed to configure, monitor, troubleshoot, and secure network infrastructure effectively.
The versatile ipconfig command is one of the most used command-line tools. IPconfig is used to diagnose problems and optimize performance by helping you diagnose network connectivity issues and gather information about your computer’s configuration. With this guide to ipconfig commands, you’ll learn the most useful commands, what they do, and when to use them to streamline network administration.
What is ipconfig command used for?
The ipconfig command, short for Internet Protocol Configuration, is a command-line utility that provides detailed information about your computer’s network settings. By entering specific ipconfig commands, you can retrieve useful data such as:
Your computer’s IP address: Helps identify your device on a network, whether it’s a local area network (LAN) or the Internet.
- The date and time your computer got its IP address: Shows when your IP was assigned and when it will expire. This is useful when troubleshooting Dynamic Host Configuration Protocol (DHCP).
- The network adapter’s physical address: A unique identifier for your device, often needed for network security or device-specific configurations.
- The router your network is connected to: Identifies the device your computer uses to connect to the Internet or other networks.
- The DNS server: Shows which DNS server your computer uses to resolve website names into IP addresses.
You can also perform several actions to resolve certain network issues such as conflicts, misconfigurations, or connectivity failures. Let’s look at some of them:
Common use cases for ipconfig
- Diagnosing network connectivity issues: When your computer cannot connect to the Internet or another device, ipconfig helps determine the root cause.
- Resolving IP conflicts: In networks where devices use dynamic IP addresses, conflicts can arise if two devices are assigned the same address.
- Refreshing DNS settings: Outdated DNS settings may make it difficult (or impossible) for you to access certain websites. Running ipconfig can clear your DNS cache and ensure your system fetches the latest records.
- Configuring static IPs: ipconfig can help you identify existing network ranges, allowing you to easily set up devices like printers or servers that require a fixed IP.
- Monitoring VPN connections: For users working with VPNs, ipconfig provides details about VPN-assigned IP addresses and can assist in diagnosing connection drops.
- Network setup and testing: During initial network setups, ipconfig ensures devices have proper IP configurations and confirms that gateways and DNS servers are reachable.
As you can see, the ipconfig command is both reliable and versatile for beginners and IT professionals. Its versatility makes it indispensable for effectively maintaining and managing network performance.
How to use the ipconfig command
- To use ipconfig, you need to open Command Prompt. You can do this by simultaneously pressing the Windows key + R, typing “cmd”, and pressing Enter. Alternatively, you can type “Command Prompt” in the Start Menu search bar. For administrative tasks, make sure that you are running Command Prompt as an administrator.
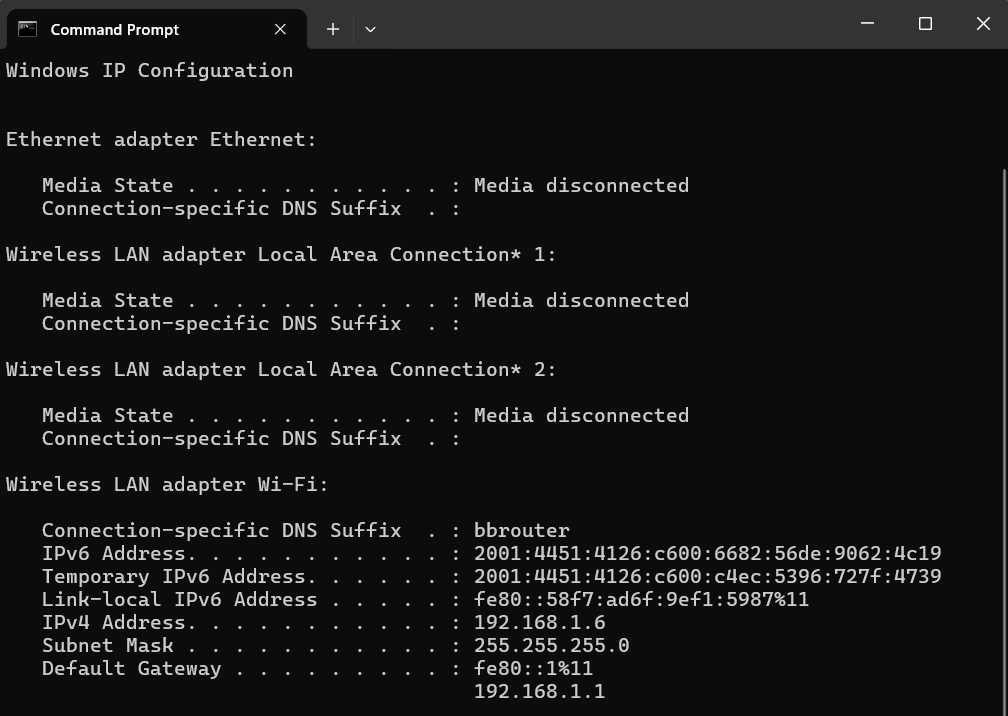
- Once in Command Prompt, type “ipconfig” and press Enter. This displays basic information about your network interfaces, including the device’s IPv4 address, subnet mask, and default gateway for each active network adapter. These details are crucial for understanding how your computer communicates within a network and with the Internet. Here’s an example:
Advantages of ipconfig and command line arguments
One of the main advantages of using ipconfig commands is the ability to quickly retrieve network configuration information without relying on graphical user interfaces (GUI). Using the command line gives you quick and efficient access to information, especially in situations where a GUI may not be available or practical.
The ipconfig command displays the full system configuration, speeding up troubleshooting. This makes it easy to spot connectivity problems or IP address conflicts and correct them.
Furthermore, ipconfig commands offer a wide range of command line arguments that allow you to customize and fine-tune your network configuration. Understanding command line arguments helps you effectively manage your network configuration and easily resolve connectivity problems.
Commonly used ipconfig commands
Let’s explore what ipconfig can do, go over some of the common parameters used with ipconfig commands, and review some of the information you can access with these commands.
What does just ipconfig do?
Executing ipconfig without parameters allows you to see the basic network information from your network adaptors. To run the command, follow these steps:
- Press the Windows key or right click on the start menu.
- Open Command Prompt or PowerShell.
- Type ipconfig and press enter.
Your screen will display information about all of your network adaptors, including ethernet, wireless, and VPN if you’re using one.
What does the ipconfig /all command do?
The ipconfig /all command is a powerful command that provides comprehensive information about all network interfaces on your computer. Follow the same steps as above to get to the Command Prompt, then type:
ipconfig /all and press enter.
Here’s an example:
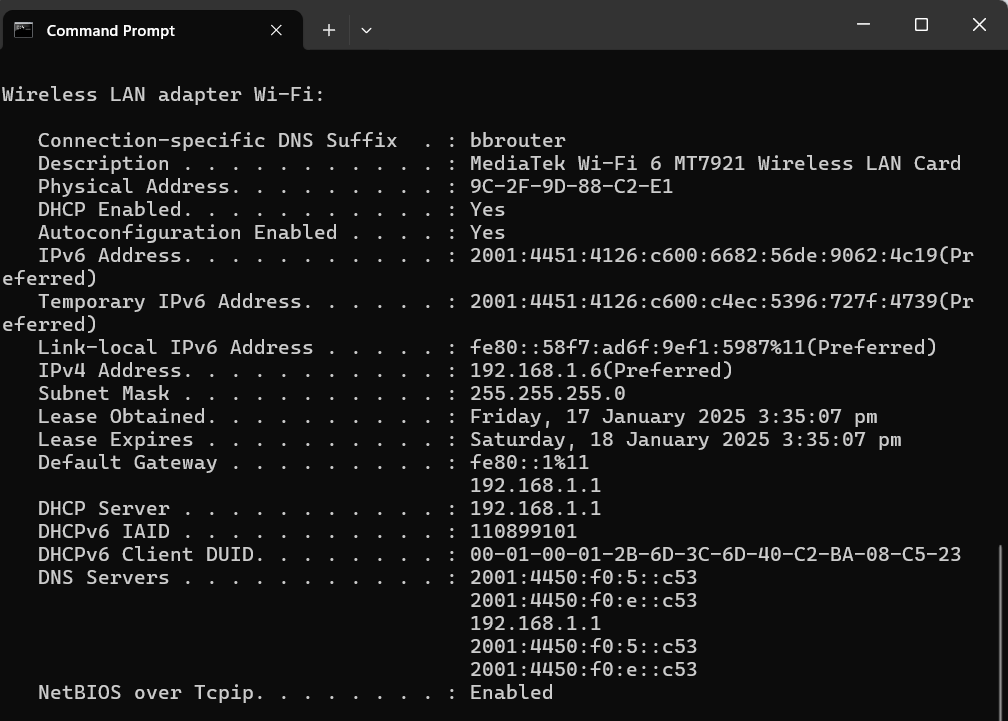
This command returns a detailed list of network adapters and their respective configurations, including:
- Physical address (MAC address) of your adaptor
- IP Address of your computer
- Default gateway: the router your computer is connected to
- DNS server: the server that translates domain names to IP addresses
- DHCP Server: the router or server that hands out IP addresses
- Lease Obtained: the date and time your computer received its IP address
Examining the output of the ipconfig /all command tells you if there are any misconfigurations or potential issues that may be affecting your network connectivity.
Using ipconfig commands to release and renew your IP address
ipconfig/ release
To release the currently assigned IP address of a specific network interface, follow the steps above for the Command Prompt and type:
ipconfig /release followed by enter.
Executing the ipconfig /release command releases the IP address and makes it available for reassignment. This is useful when obtaining a new IP address due to issues like network conflicts.
ipconfig/ renew
To request a new IP address for a specific network interface, go to Command Prompt and type:
ipconfig /renew followed by enter.
This command makes your computer send a DHCP request to the network’s DHCP server, asking for a new IP address assignment.
Using these ipconfig commands in conjunction with each other can often resolve connectivity issues and ensure that your network interface is configured properly.
ipconfig /flushdns
The ipconfig /flushdns command clears the DNS resolver cache on your computer. This helps resolve caused by outdated or corrupted DNS entries, such as when a website’s IP address has changed but your system still references the old address.
What does the ipconfig displaydns command do?
To view the contents of the DNS resolver cache on your computer, type the following command in Command Prompt:
ipconfig displaydns and press enter.
The DNS resolver cache stores information about previously resolved DNS queries, such as the IP address of visited websites. The ipconfig displaydns command provides you with a list of all the DNS records stored in the cache. This is useful for troubleshooting DNS-related issues and allows you to check if the DNS resolver cache is holding outdated or incorrect information.
What is the impact of ipconfig registerdns?
To manually refresh and update the DNS resolver cache on your computer, go to Command Prompt and type:
ipconfig registerdns followed by enter.
This command directs your computer to send a registration request to the DNS server, updating the DNS records associated with your computer. The ipconfig registerdns command comes in handy when you need to troubleshoot DNS-related issues or when you want to ensure that your computer’s DNS records are up to date. Executing ipconfig registerdns lets you resolve DNS conflicts, update outdated records, and improve the overall efficiency of your DNS resolution process.
Other common commands
ipconfig /showclassaid
The ipconfig /showclassaid command displays all DHCP class IDs available for a specific adapter. DHCP class IDs are used to specify additional settings or configurations for devices on a network.
ipconfig /setclassaid
The ipconfig /setclassaid command allows you to assign a specific DHCP class ID to your network adapter. This is helpful when troubleshooting or testing specific network configurations.
ipconfig /allcompartments
The ipconfig /allcompartments command provides detailed configuration information for all network compartments. This is useful for advanced troubleshooting systems with multiple virtual or physical network environments.
ipconfig /release6
The ipconfig /release6 command releases the IPv6 address assigned to your computer. It’s the IPv6 counterpart to ipconfig /release and is essential for networks using IPv6.
ipconfig /renew6
The ipconfig /renew6 command requests a new IPv6 address from the DHCP server. This is particularly useful for troubleshooting IPv6-related connectivity issues.
ipconfig /?
The ipconfig /? command displays a complete list of all available parameters and their descriptions. It’s a quick reference for anyone learning the ipconfig command.
Watch our video on IPConfig and why it matters.
Gain insight with ipconfig
IPConfig commands are widely used, for good reason: They provide insight into network connectivity issues, allowing you to manage and troubleshoot them. When combined with a wide range of command-line arguments, config commands provide valuable information about your network configuration.
These commands also allow you to customize and fine-tune your settings, diagnose network problems, release and renew IP addresses, view DNS cache contents, and update DNS records, among other operations.
Along with ipconfig commands, other command-line arguments can also save time and automate processes. Having all of these tools in your toolbox can give you an edge in managing your network.
To maximize your computing resourced further, consider NinjaOne’s endpoint management software. It supports command-line arguments and provides features such as monitoring and alerting, software deployment, and patch management. Sign up for a free trial today.
Способ 1: Штатные «Параметры»
В Windows 10 можно настроить IP-адрес как вручную, так и использовать данные, которые предоставляются провайдером по умолчанию. Причем делается это и в обновленном интерфейсе системных «Параметров», и через классическую «Панель управления». В первом случае действовать нужно следующим образом:
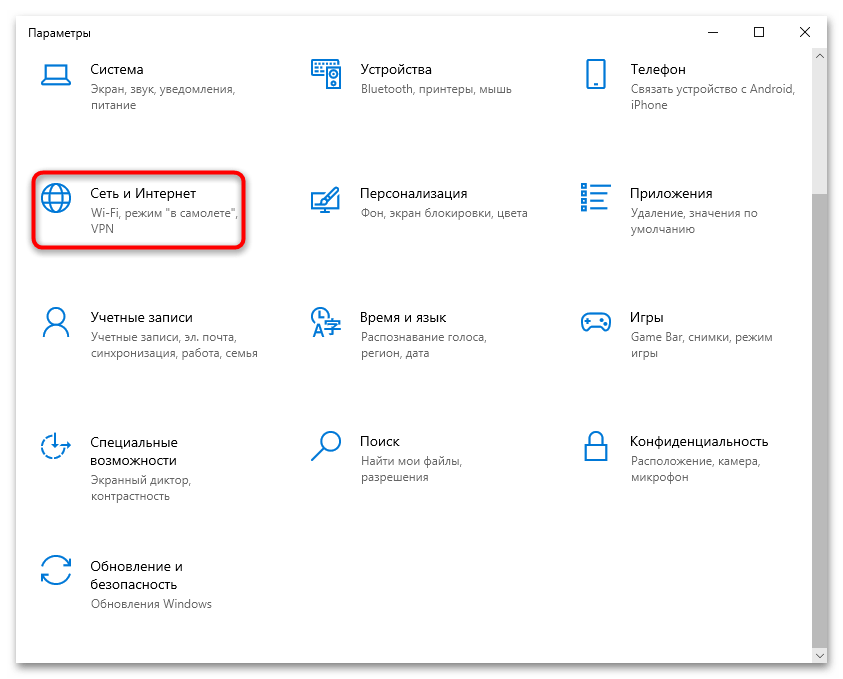
- Кликните по кнопке «Пуск», затем выберите запуск системных «Параметров», нажав на иконку, стилизованную под шестерню.
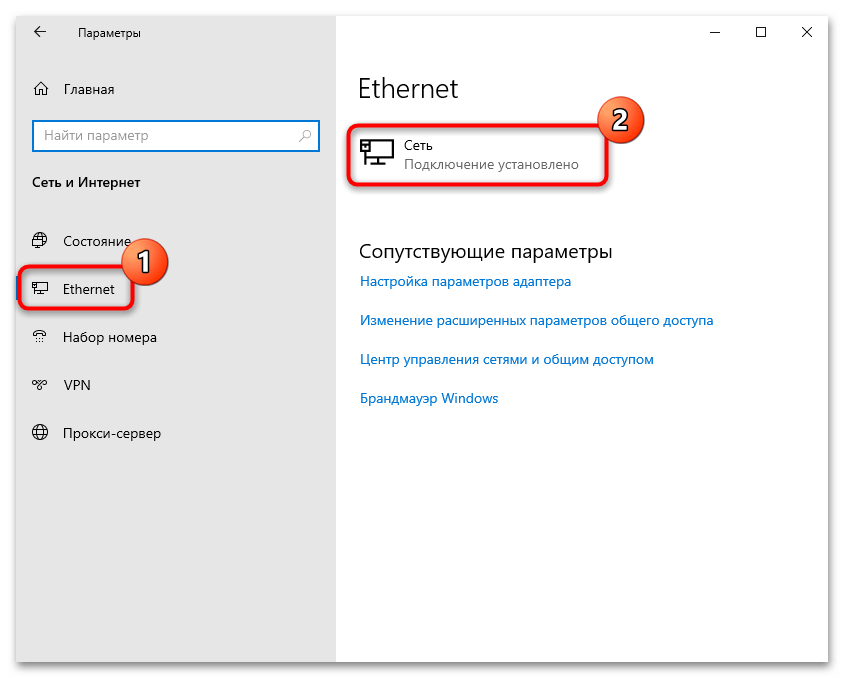
- Из появившегося окна выберите раздел «Сеть и Интернет».
- Далее через панель слева переключитесь на вкладку «Ethernet», а в центральной части окна выберите активное соединение.
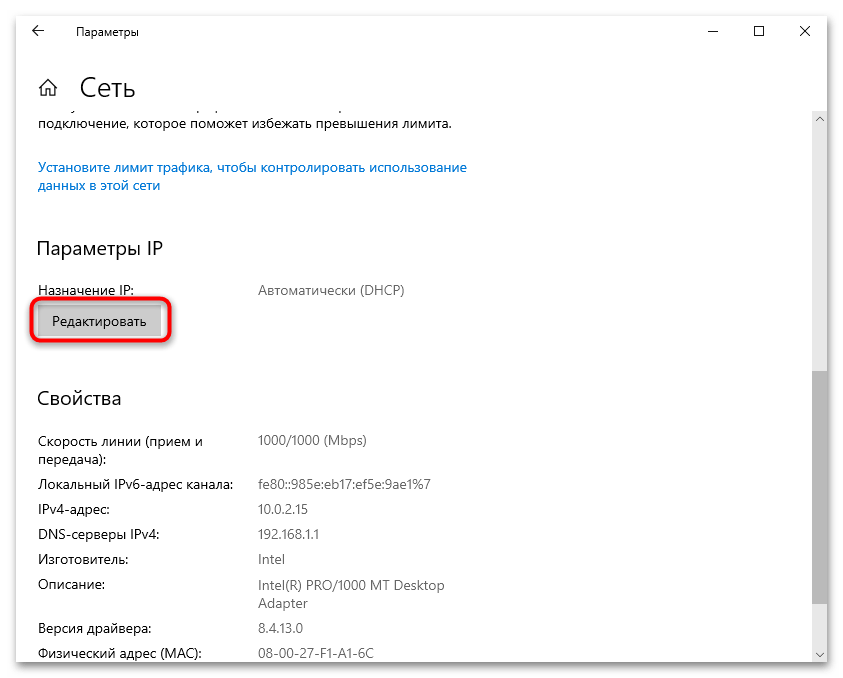
- Откроется новое окно, где в блоке «Параметры IP» кликните по кнопке «Редактировать».
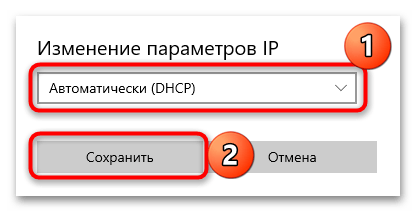
- Если нужна автоматическая настройка, то выберите соответствующий пункт из выпадающего списка – «Автоматически (DHCP)», затем нажмите на кнопку «Сохранить». Как правило, именно автоматические параметры IP-адреса являются наиболее предпочтительными, поскольку обычно провайдеры все данные предоставляют по протоколу DCHP, что избавляет от ручной настройки IP.
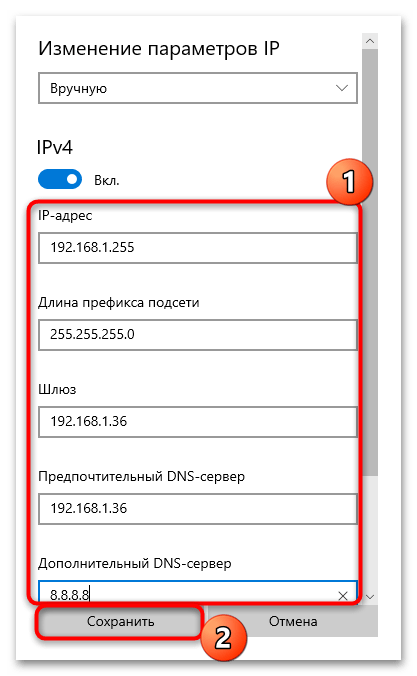
- Если же надо самостоятельно ввести данные, тогда вместо «Автоматически (DCHP)» выберите пункт «Вручную». Станут активны два протокола: IPv4 и IPv6. Активируйте один из них (для большинства пользователей это первый вариант) с помощью переключателя, чтобы внести правки.
- Далее потребуется ввести некоторые данные самостоятельно, а именно: IP-адрес, длину префикса подсети, шлюз, DNS-адреса.

Параметры у каждого пользователя уникальные, поэтому универсальной инструкции в этой ситуации нет. Провайдер обязан предоставить их для ручной настройки сетевых протоколов, и обычно эти данные идут в комплекте с договором о подключении. Либо вы можете связаться с технической поддержкой по телефону и запросить эти сведения.
Способ 2: «Панель управления»
Изменить сетевые протоколы, в частности IP-адрес, в Windows 10 можно и через классическую «Панель управления», которая привычна для пользователей более ранних выпусков этой операционной системы.
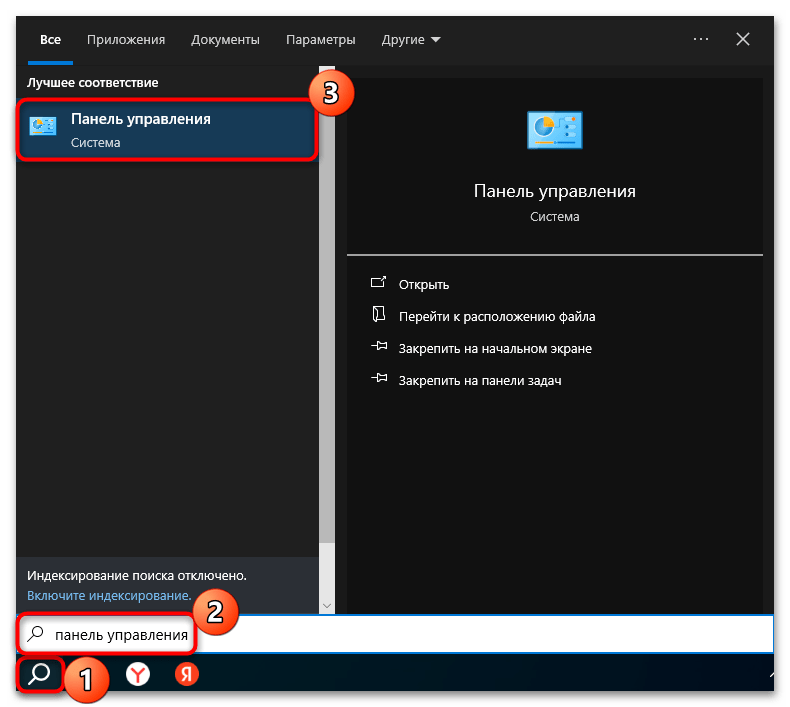
- Запустите «Панель управления». Чтобы отыскать средство, можно воспользоваться строкой системного поиска.
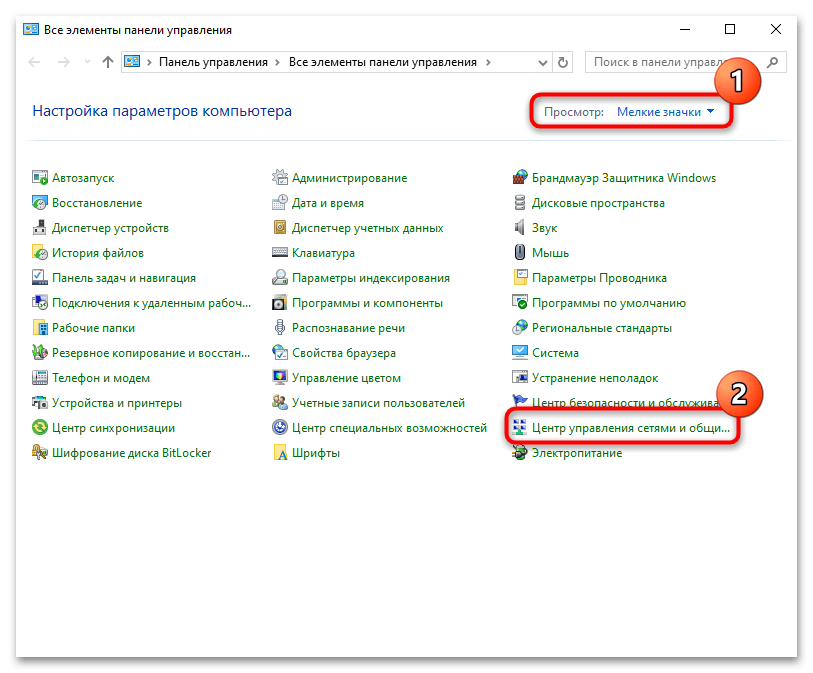
- У опции «Просмотр» выставьте крупные или мелкие значки для удобства, после чего кликните по разделу «Центр управления сетями и общим доступом».
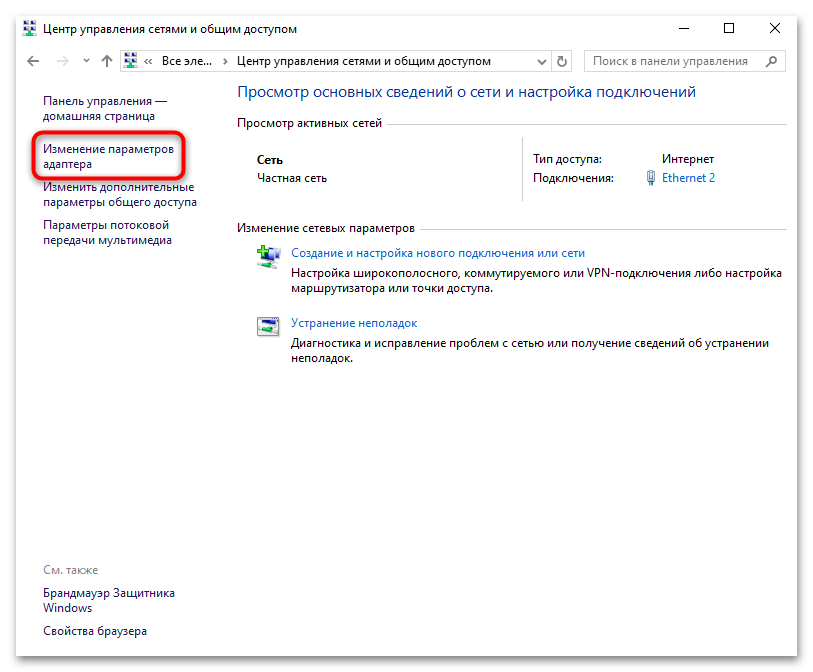
- В открывшемся окне кликните по строке «Изменение параметров адаптера».
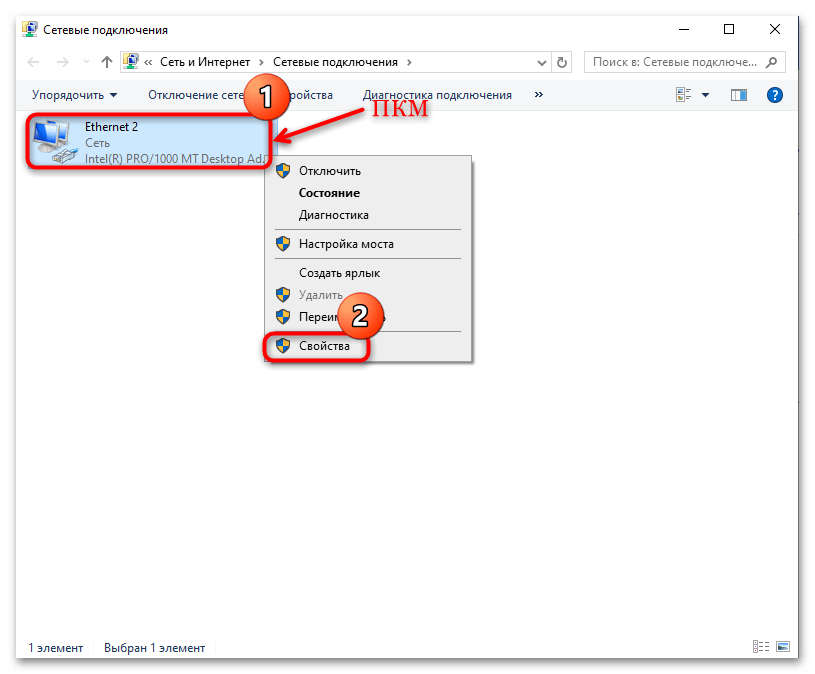
- Далее в списке доступных соединений найдите активное и кликните по нему правой кнопкой мыши, затем из контекстного меню выберите пункт «Свойства».
- В списке компонентов выделите строку «IP версии 4 (TCP/IPv4)» и щелкните по кнопке «Свойства».
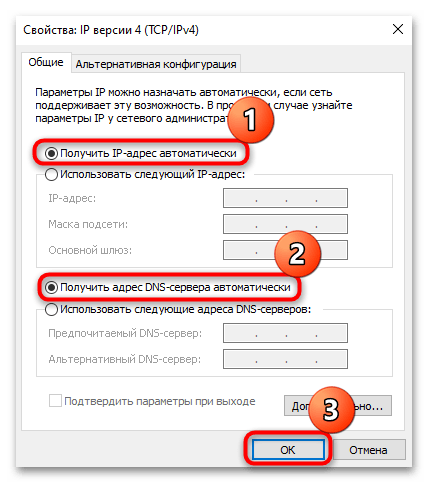
- Чтобы получить все сетевые данные автоматически, отметьте соответствующие пункты для IP-адреса и DNS-сервиса, затем сохраните настройки.
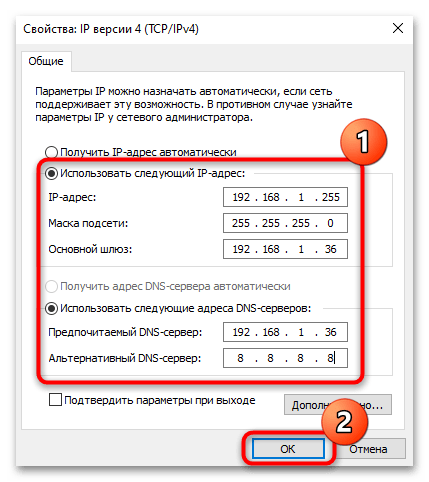
- Если требуется ручная настройка, выберите опцию «Использовать следующий IP-адрес», после чего поля ниже станут активными. Останется прописать необходимые данные: IP, маску подсети, основной шлюз. То же самое можно проделать и с DNS-серверами. Если изменения были внесены, не забудьте сохранить настройки.
Если надо настроить сетевой протокол IPv6, проделайте с ним то же самое: в окне со свойствами подключения выделите его, нажмите на кнопку «Свойства» и действуйте аналогичным с инструкцией выше образом.
Способ 3: «Командная строка»
Вручную изменить статический IP-адрес, зная его данные, можно и более простым способом – с помощью специальной команды.
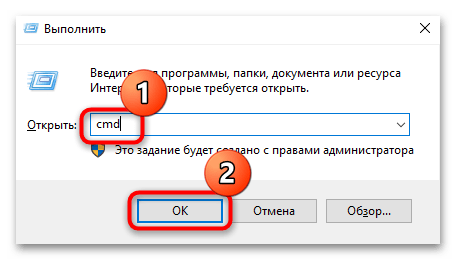
- Запустите «Командную строку» от имени администратора. Для этого можете использовать строку системного поиска или диалоговое окно «Выполнить» (нажатие на клавиши «Win + R») и команду
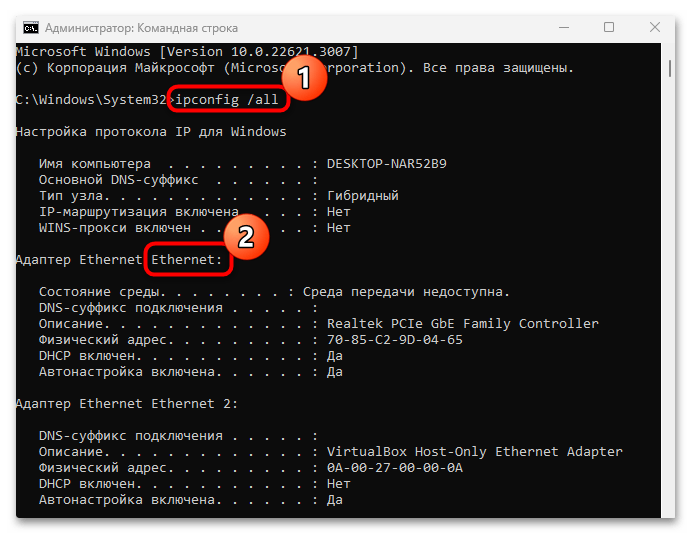
cmd, после чего нажмите на кнопку «ОК» или клавишу «Enter». - Далее нужно узнать конфигурации сетевых адаптеров: введите команду
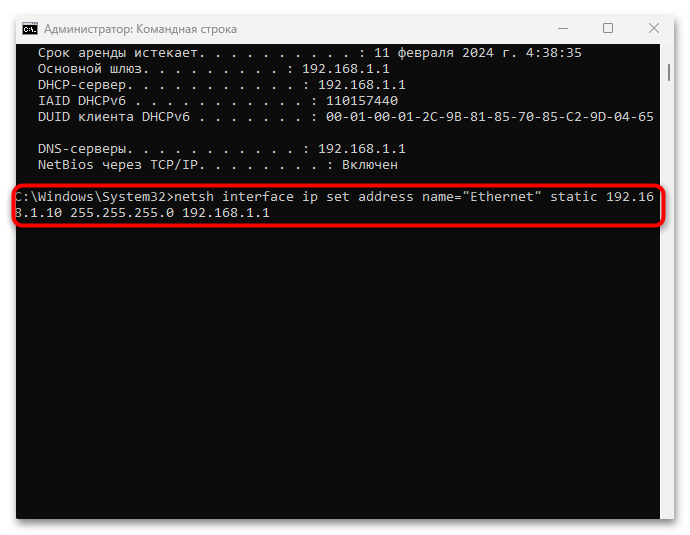
ipconfig /allи выполните ее, нажав на клавишу «Enter». В отобразившемся списке найдите тот адаптер, для которого надо настроить IP. - Вставьте команду, задающую новые параметры для IP-адреса, где под «Ethernet» следует использовать название вашего адаптера, а дальше – уникальные пользовательские данные IP. Нажмите на клавишу ввода, чтобы выполнить ее.
netsh interface ip set address name="Ethernet" static 192.168.1.10 255.255.255.0 192.168.1.1
Таким образом, с помощью одной лишь команды получится быстро изменить и настроить статический IP-адрес. Все же стоит упомянуть и команды, с помощью которых меняются и DNS для предпочтительного и дополнительного адреса, где вместо «Ethernet» прописывается название вашего сетевого адаптера и цифры, свойственные серверам:
netsh interface ip set dns name="Ethernet" source="static" address="адрес_DNS-сервера" и
netsh interface ip add dns name="Ethernet" address="адрес_DNS-сервера" index=2.
Наша группа в TelegramПолезные советы и помощь
Я уже писал, о том, что такое IP-адреса и как проверить, под каким адресом вас видит внешний мир.
Однако часто этой информации недостаточно для того, чтобы понять, какой все-таки адрес присвоен вашей сетевой карте, а также провести диагностику проблем подключения. Приведу список команд, которые можно использовать. (также у меня на сайте можно прочитать про визуальную настройку сетевых подключений)
Для начала необходимо открыть командную строку. Делается это так: нажимаете кнопку пуск, выбираете пункт «выполнить».
Альтернативные способ — нужно нажать клавишу Win (между Ctrl и Alt) и R одновременно, этот способ работает также и на Висте
Появляется окошко, в которое нужно вписать cmd и нажать ОК

Появляется та самая командная строка
В ней можно набирать и «вводить» команды, нажимая Enter. Результаты можно копировать — если нажать правую кнопку можно выделить нужный кусок, далее нужно еще раз нажать правую кнопку мыши.
Команда ping
Первая команда, с которой нужно познакомиться — это ping, проверяющую доступность заданного адреса. Введите команду ping 127.0.0.1. Должно получиться что-то такое (если команда не ping не работает, то, возможно, решить проблему поможет инструкция по исправлению ошибки cmd no command):
C:\Documents and Settings\Администратор>ping 127.0.0.1
Обмен пакетами с 127.0.0.1 по 32 байт:
Ответ от 127.0.0.1: число байт=32 время<1мс TTL=128
Ответ от 127.0.0.1: число байт=32 время<1мс TTL=128
Ответ от 127.0.0.1: число байт=32 время<1мс TTL=128
Ответ от 127.0.0.1: число байт=32 время<1мс TTL=128
Статистика Ping для 127.0.0.1:
Пакетов: отправлено = 4, получено = 4, потеряно = 0 (0% потерь),
Приблизительное время приема-передачи в мс:
Минимальное = 0мсек, Максимальное = 0 мсек, Среднее = 0 мсек
C:\Documents and Settings\Администратор>
Как мы видим, на адрес 127.0.0.1 было отправлено 4 пакета, и они все достигли цели. Что же это был за адрес и почему я был уверен, что пакеты дойдут? Ответ прост — пакеты никуда не отправлялись, а оставались на вашем компьютере. Этот адрес специфичен и используется для loopback — пакетов, не уходящих никуда вовне. Отлично, можем теперь «пропинговать» адрес этого сайта: 212.193.236.38
C:\Documents and Settings\Администратор>ping 212.193.236.38
Обмен пакетами с 212.193.236.38 по 32 байт:
Ответ от 212.193.236.38: число байт=32 время=3мс TTL=55
Ответ от 212.193.236.38: число байт=32 время=3мс TTL=55
Ответ от 212.193.236.38: число байт=32 время=3мс TTL=55
Ответ от 212.193.236.38: число байт=32 время=3мс TTL=55
Статистика Ping для 212.193.236.38:
Пакетов: отправлено = 4, получено = 4, потеряно = 0 (0% потерь),
Приблизительное время приема-передачи в мс:
Минимальное = 3мсек, Максимальное = 3 мсек, Среднее = 3 мсек
C:\Documents and Settings\Администратор>
Можно заметить только одно отличие — пакеты доходили не мгновенно, а за 3 миллисекунды. Надеюсь, у вас тоже не было никакой задержки при доставке пакетов, а главное — вы не увидели строчки типа
Превышен интервал ожидания для запроса.
Появление таких строчек означает, что часть пакетов теряется. Это свидетельствует о проблемах на линии или не сервере, к которомы вы обращаетесь.
Команда ipconfig
Следующая важная команда — ipconfig. Введите ее. У меня получилось вот так:
Настройка протокола IP для Windows
Ethernet — Ethernet адаптер:
DNS-суффикс этого подключения . . : srcc.msu.ru
IP-адрес . . . . . . . . . . . . : 192.168.17.139
Маска подсети . . . . . . . . . . : 255.255.255.0
Основной шлюз . . . . . . . . . . : 192.168.17.240
C:\Documents and Settings\Администратор>
В данном случае получился адрес 192.168.17.139. Можно этот адрес тоже пропинговать (вы пингуйте свой) — пакеты должны доходить мгновенно. Основной шлюз — это адрес, на который компьютер отправляет пакеты, не найдя подходящего адреса в своей сети. Так, в моем случае все пакеты, кроме пакетов на 192.168.17.* будут отправлены на 192.168.17.240, а тот компьюьтер уже должен решить, что с ними делать и куда их переправлять дальше. Примечание: локальная сеть, то есть те адреса, пакеты на которые не отправляются на шлюз, определяется при помощи маски — нолик на последнем месте и 255 на всех предыдующих как раз и означает, что может буть произвольным последнее число в IP-адресе.
Одно из стандартных действий при поиске проблем подключения — пропинговать свой шлюз. Если пакеты до него не доходят, то, видимо, проблема где-то рядом, например, поврежден или плохо воткнут сетевой шнур. Также стоит знать, где физически находится компьютер с вашим основным шлюзом — у провайдера, где-то в доме, а, может, это — можем в вашей квартире. Примечание: некоторые компьютеры настроены не откликаться на запросы команды ping. Поэтому отсутствие пинга — не стопроцентная гарантия отсутствия связи с адресом.
Более подробную информацию можно получить командой ipconfig /all. У меня получилось:
C:\Documents and Settings\Администратор>ipconfig /all
Настройка протокола IP для Windows
Имя компьютера . . . . . . . . . : sander
Основной DNS-суффикс . . . . . . : MSHOME
Тип узла. . . . . . . . . . . . . : смешанный
IP-маршрутизация включена . . . . : нет
WINS-прокси включен . . . . . . . : нет
Порядок просмотра суффиксов DNS . : MSHOME
srcc.msu.ru
Ethernet — Ethernet адаптер:
DNS-суффикс этого подключения . . : srcc.msu.ru
Описание . . . . . . . . . . . . : Broadcom 440x 10/100 Integrated Controller
Физический адрес. . . . . . . . . : 00-16-D4-63-03-65
Dhcp включен. . . . . . . . . . . : да
Автонастройка включена . . . . . : да
IP-адрес . . . . . . . . . . . . : 192.168.17.139
Маска подсети . . . . . . . . . . : 255.255.255.0
Основной шлюз . . . . . . . . . . : 192.168.17.240
DHCP-сервер . . . . . . . . . . . : 192.168.17.240
DNS-серверы . . . . . . . . . . . : 212.192.244.2
212.192.244.3
Аренда получена . . . . . . . . . : 2 февраля 2009 г. 11:00:28
Аренда истекает . . . . . . . . . : 9 февраля 2009 г. 11:00:28
C:\Documents and Settings\Администратор>
Самую полезную информацию я выделил жирным. DHCP-сервер выделил мне динамиеский адрес на основе моего MAC-адреса или физического адреса. Мои DNS-сервера — это 212.192.244.2 и 212.192.244.3.
Другие команды
Команда tracert позволяет проследить путь пакетов от вашего компьютера до цели. Попробуйте, например протрассировать путь до этого сайта: tracert it.sander.su. Строки в выводе трассировки есть точки, через которые проходит пакет на своем пути. Первой точкой будет ваш шлюз. Использование команды tracert позволяет найти источник проблем при связи с каким-либо адресом. Пакеты, посылаемые командой tracert, имеют показатель TTL — time to live — целое положительное число. Каждый маршрутизатор на пути уменьшает этот показатель на 1, если TTL падает до нуля, то трассировка заканчивается. По умолчанию используется начальный TTL равный 30, задать другое значение можно опцией -h.
Посмотреть таблицу маршрутизации можно командой route print, однако я не буду подробно останавливаться на ней — это тема отдельной статьи.
Команда netstat позволяет просмотреть список установленных соединений. В режиме по умолчанию команда пытается преобразовывать все IP-адреса в доманные имена (при помощи службы DNS), что может работать медленно. Если вас устраивает числовой вывод, вызывайте команду netstat -n. Если вас также интересуют открытые порты на вашем компьютере (что означает, что он готов принимать соединения по этим портам), то вызовите команду с ключом -a: например, netstat -na. Можно также вызвать команду netstat -nb, чтобы посмотреть, какие процессы установили соединения. Команда netstat -r эквивалентна команде route print.
Команда netsh позволяет изменить настройки сети через командную строку. Введите команду netsh interface ip show address. У меня получилось:
C:\Documents and Settings\Администратор>ipconfig /all
Настройка интерфейса «Ethernet»
DHCP разрешен: да
Метрика интерфейса: 0
Запоминаем название (Ethernet) и теперь командой netsh interface ip set address name=»Ethernet» source=static addr=192.168.0.33 mask=255.255.255.0 gateway=192.168.0.1 gwmetric=30 задаем IP-адрес. Для динамического подключения: netsh interface ip set address name=»Ethernet» source=dhcp. На этом сайте также можно прочитать об интерактивной настройке параметров сети
comments powered by
The ipconfig command is used in Windows to display information about a computer’s network interfaces.
Basic Use
To execute the ipconfig command open the Windows Command Prompt (cmd) and type ipconfig. The command will display information about each of the network interfaces (NICs) on the computer. Here is the output for a single network interface:
C:\>ipconfig

Windows IP Configuration

Wireless LAN adapter Wi-Fi:

   Connection-specific DNS Suffix  . : xyz.st.provider.net.
   IPv6 Address. . . . . . . . . . . : 2601:0:4501:0:f064:0:d977:505f
   Temporary IPv6 Address. . . . . . : 2601:0:4501:0:648b:0:1531:fae6
   Temporary IPv6 Address. . . . . . : 2601:0:4501:0:8916:0:f988:98d
   Link-local IPv6 Address . . . . . : fe80::f064:4a1a:0:0f%5
   IPv4 Address. . . . . . . . . . . : 192.168.0.11
   Subnet Mask . . . . . . . . . . . : 255.255.255.0
   Default Gateway . . . . . . . . . : fe80::0:7eff:0:0%5
                                       192.168.0.1
The default output includes information on the interface’s IP addresses, subnet mask, and default gateway (router). To obtain additional information such as DHCP and DNS settings use the /all option. It will also display information about the physical interface such as the MAC address and device description:
C:\>ipconfig /all

Windows IP Configuration

Wireless LAN adapter Wi-Fi:

   Connection-specific DNS Suffix  . : xys.st.provider.net.
   Description . . . . . . . . . . . : Intel(R) Dual Band
   Physical Address. . . . . . . . . : 01-02-03-04-05-06
   DHCP Enabled. . . . . . . . . . . : Yes
   Autoconfiguration Enabled . . . . : Yes
   IPv6 Address. . . . . . . . . . . : 2601:0:0:9630:f064:0:0:505f
   Temporary IPv6 Address. . . . . . : 2601:0:0:9630:0:f520:0:fae6
   Temporary IPv6 Address. . . . . . : 2601:0:0:9630:0:ab2b:0:98d
   Link-local IPv6 Address . . . . . : fe80::0:4a1a:0:505f%5
   IPv4 Address. . . . . . . . . . . : 192.168.0.11(Preferred)
   Subnet Mask . . . . . . . . . . . : 255.255.255.0
   Lease Obtained. . . . . . . . . . : Friday, April 16, 2021 10:14 AM
   Lease Expires . . . . . . . . . . : Sunday, April 18, 2021 1:16 PM
   Default Gateway . . . . . . . . . : 0::0:0:0:0%5
                                       192.168.0.1
   DHCP Server . . . . . . . . . . . : 192.168.0.1
   DHCPv6 IAID . . . . . . . . . . . : 75800000
   DHCPv6 Client DUID. . . . . . . . : 01-00-00-61-00-00-00-00-00-00-13
   DNS Servers . . . . . . . . . . . : 0:0:0::1
                                       0:0:0::2
                                       8.8.8.8
                                       1.1.1.1
   NetBIOS over Tcpip. . . . . . . . : Enabled
Common Ipconfig Options
The following table lists common options for the ipconfig command.
Using Ipconfig to Reset Your DHCP IP Address
If your network adapter is configured to obtain an IP address automatically using DHCP you can reset it by using the /release and /renew parameters for ipconfig.
C:\>ipconfig /release

C:\>ipconfig /renew
This will reset the IP address on all network interfaces on the computer. To reset the IP address of just one interface, provide its name as an argument. If the interface name contains spaces be sure to enclose it in quotes.
C:\>ipconfig /release "Wi-Fi"
One thing to note is that the interface name displayed by ipconfig is not necessarily the actual name of the interface. For example, if you try to use the name «Wireless LAN adapter Wi-Fi» to release the interface from the example above you will receive the following error:
C:>ipconfig /release "Wireless LAN adapter Wi-Fi"

Windows IP Configuration

The operation failed as no adapter is in the state permissible for
this operation.
To obtain a true list of the network interface names use the wmic command:
C:\>wmic nic get NetConnectionID
NetConnectionID

Ethernet
Wi-Fi
Bluetooth Network Connection
Note that the interface is actually called «Wi-Fi». That is the name you will need to use in ipconfig to release or renew the DHCP address for the interface.
Using Ipconfig to Display Your DNS Cache
In order to increase speed and efficiency computers often cache DNS information, at least for a short time period. You can use the /displaydns option for ipconfig to display your current DNS cache.
C:\>ipconfig /displaydns

Windows IP Configuration

forcesafesearch.google.com
    ----------------------------------------
    Record Name . . . . . : forcesafesearch.google.com
    Record Type . . . . . : 1
    Time To Live  . . . . : 56066
    Data Length . . . . . : 4
    Section . . . . . . . : Answer
    A (Host) Record . . . : 216.239.38.120
To delete all of your DNS cache entries (flush) you can use ipconfig’s /flushdns option.
C:>ipconfig /flushdns

Windows IP Configuration

Successfully flushed the DNS Resolver Cache.
Setting a Network Interface’s IP Address
While ipconfig lets you display information, it cannot be used to change an interface’s IP address. For that you can use the netsh command, however, the command is being deprecated by Microsoft, so you are better of using PowerShell.
First open PowerShell and type Get-NetIPConfiguration. Below is an example of the output for a single interface. Note the interfaces InterfaceIndex.
PS C:\> get-netipconfiguration

InterfaceAlias       : Wi-Fi
InterfaceIndex       : 5
InterfaceDescription : Intel(R) Dual Band
NetProfile.Name      : wifissid 3
IPv6Address          : 2601:0:0:9630:0:4a1a:0:505f
IPv4Address          : 192.168.0.11
IPv6DefaultGateway   : fe80::0:0:0:d58e
IPv4DefaultGateway   : 192.168.0.1
DNSServer            : 8.8.8.8
                       1.1.1.1
Next set the IP address, subnet mask, and default gateway for the interface using the New-NetIPAddress cmdlet:
PS C:\>New-NetIPAddress -InterfaceIndex 5 -IPAddress 192.168.0.100 -PrefixLength 24 -DefaultGateway 192.168.0.1
Here is a breakdown of the parameters used:
-InterfaceIndex: The index of the interface you want to update
-IPAddress: The IP address you want to assign to the interface
-PrefexLength: The number of bits used by the subnet mask
-DefaultGateway: The IP address of the computer’s default gateway (router)
Next you can use the Set-DnsClientServerAddress cmdlet to specify the DNS servers for the interface to use:
PS C:\>Set-DNSClientServerAddress -InterfaceIndex 5 -ServerAddresses ("8.8.8.8", "1.1.1.1")
Here is a breakdown of the parameters used:
-InterfaceIndex: The index of the interface you want to update
-ServerAddresses: A list of the DNS servers to assign to the interface
Links and Resources
-
Ipconfig documentation
-
Netsh documentation
-
Get-NetIPConfiguration documentation
-
New-NetIPAddress
-
Set-DNSClientServerAddress