
Applies ToWindows 11
Dynamic Lighting is a feature that allows you to control LED-powered devices such as keyboards, mice, and other illuminated accessories. This feature enables you to coordinate the colors of LEDs, creating a unified lighting experience both within Windows and across all your devices.
Use Cases
Gaming: Sync your RGB peripherals to create a stunning light show that reacts to in-game events, making your gaming sessions more immersive than ever.
Productivity: Set up lighting profiles that help reduce eye strain during long work hours or highlight important notifications.
Entertainment: Create a dynamic ambiance that matches your music, movies, or any other media, turning your room into a personal theater.
Cool Factor! The coolest part? Dynamic Lighting brings all your devices together under one roof. No more juggling multiple software applications for different brands. With Windows’ native support, you can manage all your lighting devices seamlessly from the Settings app. Plus, the feature supports the open HID LampArray standard, ensuring compatibility with a wide range of devices.
Access Dynamic Lighting
In the Settings app on your Windows device, select Personalization> Dynamic Lighting or use the following link:
Dynamic Lighting
Devices can be controlled either globally or individually, providing flexibility in managing your setup. When configured globally, settings apply uniformly across all connected devices, ensuring a consistent experience. Conversely, individual control allows for customization of each device’s settings to meet specific needs. Despite these different scopes, the configuration process for both global and individual settings is quite similar. You can adjust parameters such as brightness, color effects, and synchronization options.

Configure individual devices
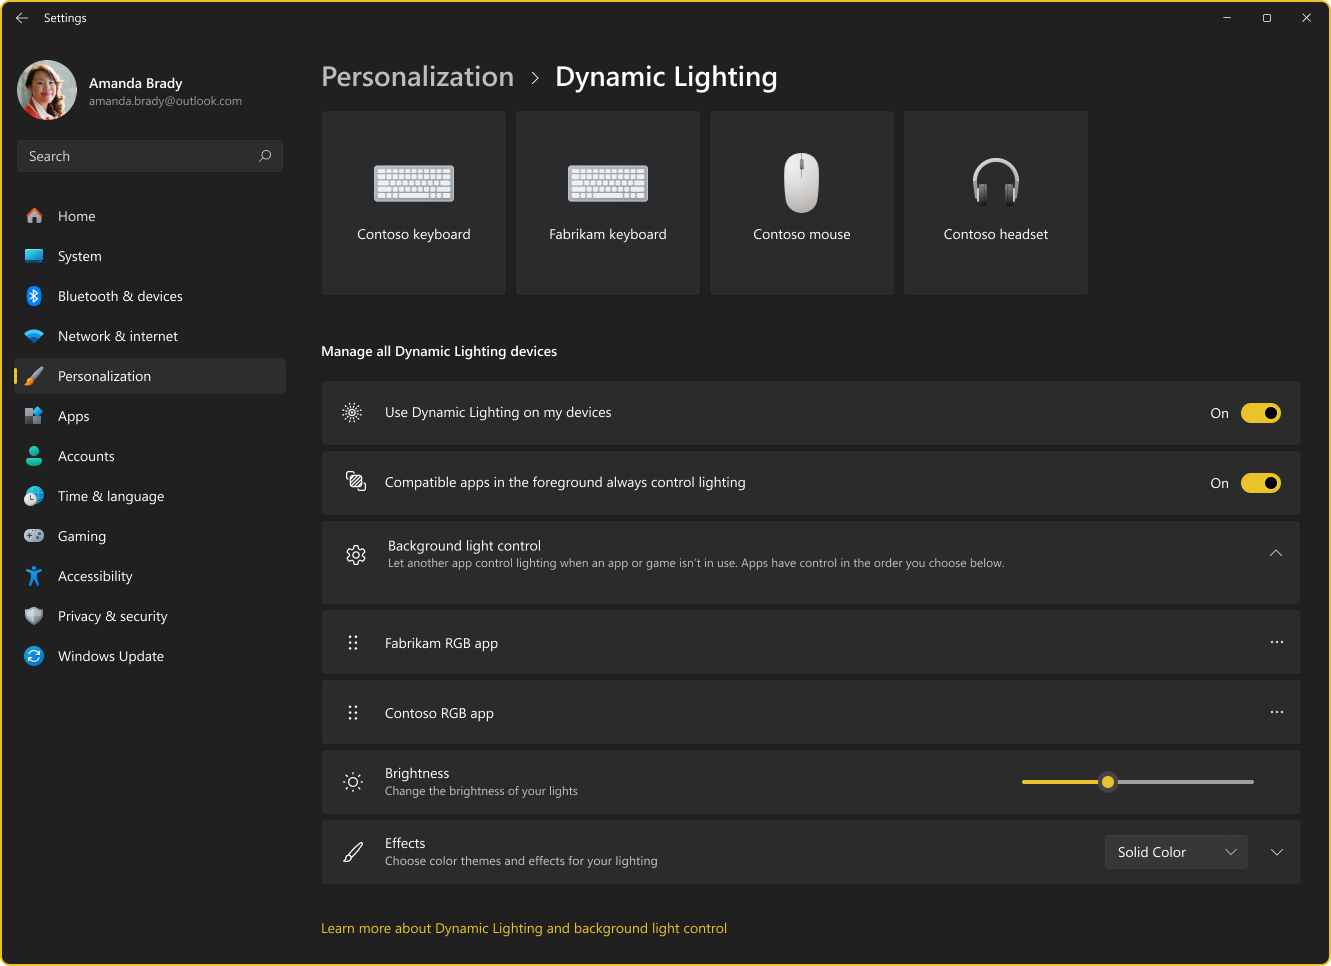
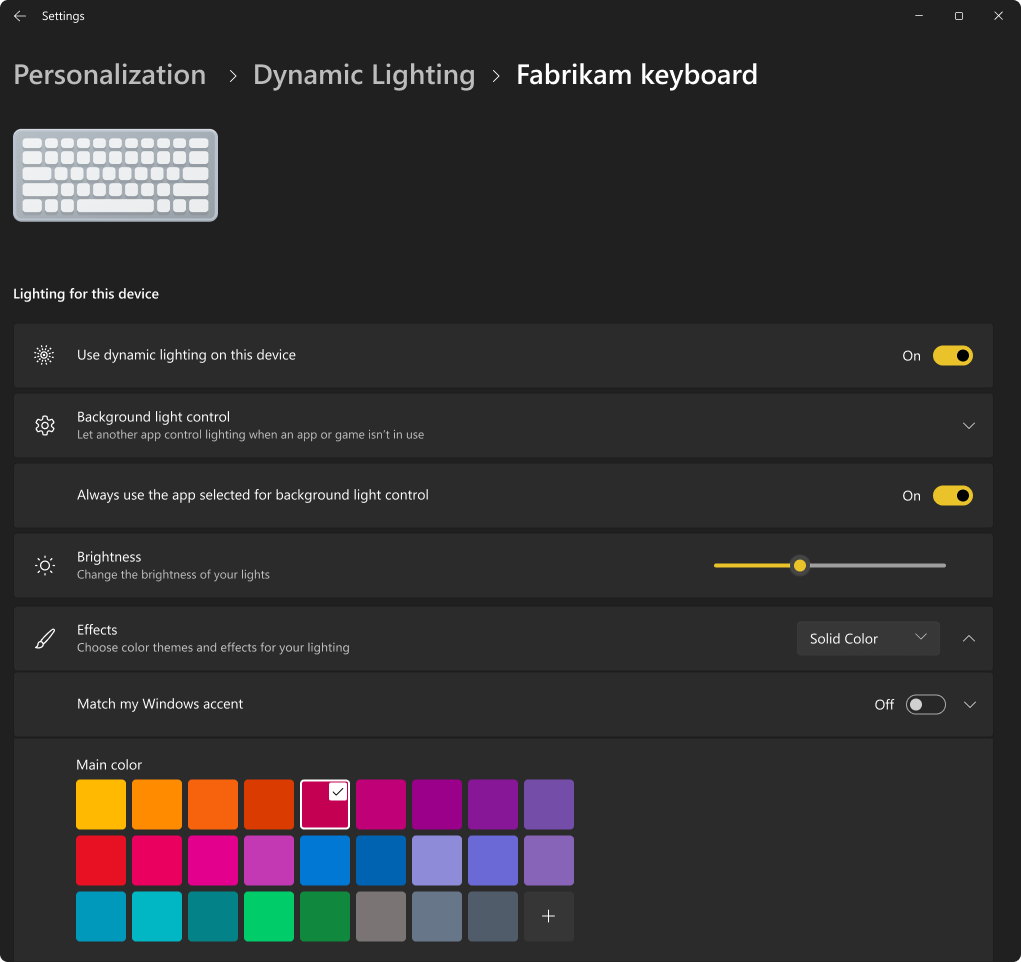
When connected, compatible devices show up as cards along the top of the page. Select a card to configure the specific settings for that device.
When you configure individual settings for a device, those settings override the global settings for that specific device. This allows for more granular control and customization, ensuring that specific devices can have unique configurations while still maintaining a consistent overall setup through global settings.
Configure global settings
After the device’s cards, you can configure global settings, where changes affect all connected devices.
Dynamic Lighting settings
Expand each section to learn more about each setting:
Turns Dynamic Lighting On or Off. When Dynamic Lighting is off, devices function with their default non-Dynamic Lighting behavior.
When set to On, an active application can take control of your device’s lighting. For example, if you’re playing a game, the game’s lighting effects can override any background applications, ensuring an immersive experience. Once you minimize or close the game, the background application’s lighting effects resumes control.
This section lets you prioritize installed apps that have registered themselves as ambient background controllers. Dragging an app to the top of the list will prioritize it, ensuring that it can control devices before other apps in the list.
Ambient background settings are tied to a device and the port it’s connected on. If you unplug and then plug the device into a different (USB) port, it will appear as a different device.
Set the LED brightness on your devices. Selecting Reset for all devices will reset the brightness to a default value.
Select colors and effects for your devices. Selecting Reset for all devices will reset effects to the devices’ default behaviors.

My Brightness and Effects sliders aren’t changing the behavior on my device. How do I fix this?
It’s likely that you have a background RGB controller app running that’s higher priority than the Dynamic Lighting Background Controller. Expand the Background light control section in Dynamic Lighting Settings to check, and if needed drag that controller to the top of the list.
Need more help?
Want more options?
Explore subscription benefits, browse training courses, learn how to secure your device, and more.
How to Set Backlit Keyboard to Always On
Most modern laptops come with backlit keyboards that simplify typing in low-light conditions. These keyboards have backlight illumination and glowing letters, but sometimes, this neat feature may not work. If that’s the case with your laptop, the problem is usually not with the keyboard.
If you’re a Windows 10 user, the backlit keyboard feature is likely turned off in the Settings app. You just need to know where the keyboard backlight settings are and adjust them. Keep reading and learn how to manage your backlit keyboard in Windows 10.
Windows 10 Backlit Keyboard Adjustments
There are several ways to enable keyboard backlights and change their brightness in Windows 10. These options vary depending on the make and model of your Windows laptop.
One is via the Windows Mobility Center, and another is through the native app that comes with your laptop. Let’s see how they work.

Method 1—Use the Windows Mobility Center
The first method requires you to open the Control Panel and navigate to the Windows Mobility Center to get the backlight working on your laptop. Here is what you have to do:
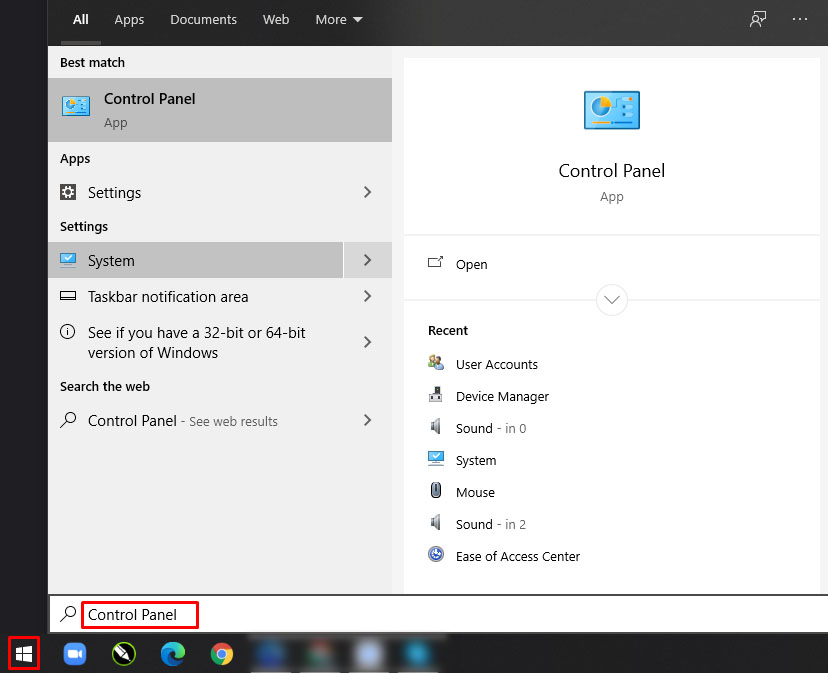
- Click the Start button and type Control Panel in the search bar.

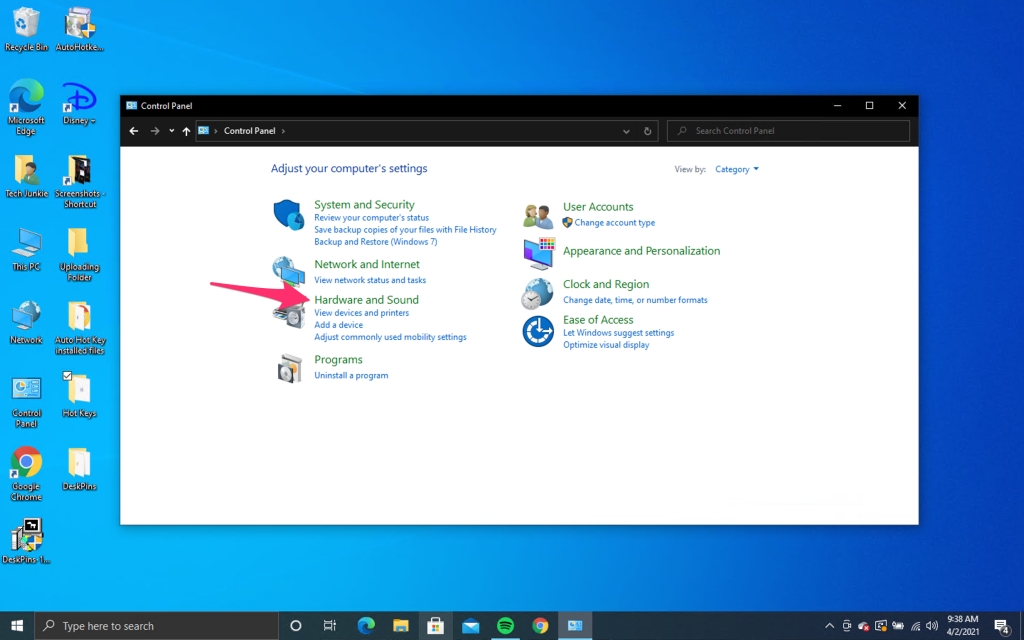
- Open the Hardware and Sound section.

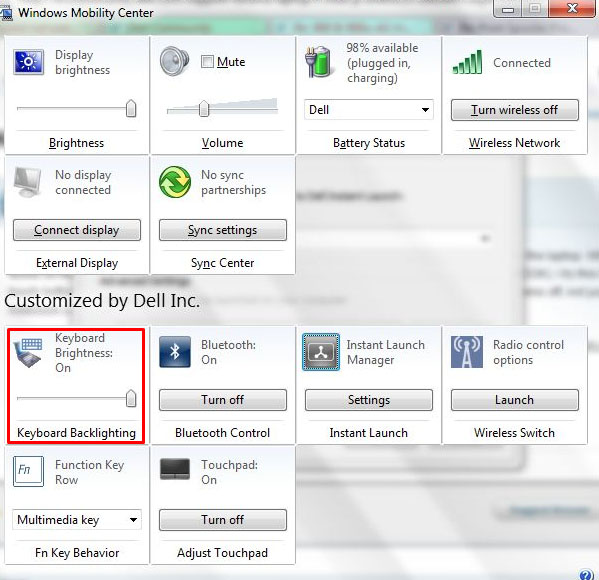
- Select Windows Mobility Center, and you will see a few options. Move the slider under the Keyboard backlight tab to the right to enable the backlight.

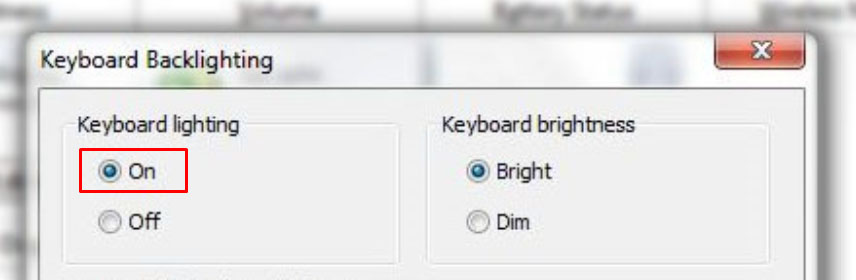
- Click on the tab to access additional options. Enable Keyboard lighting and select the brightness you want.

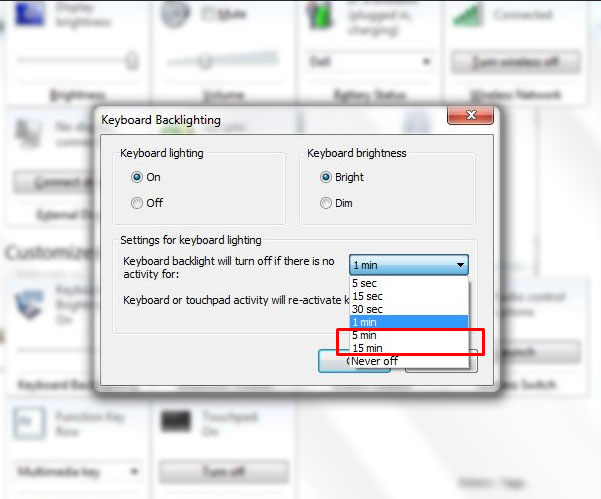
- Next, choose the time for the keyboard backlight’s auto shutdown. You can select options between five seconds and 15 minutes and Never off if you don’t want the backlight to turn off automatically when your laptop is inactive.

- Select OK once you are happy with the changes you made.
Method 2—Use the Native App
Most laptops come with native apps for managing keyboard backlight brightness. If you are not sure if you have such an app, you can always check the system.
Connect to the internet and type in the name of your laptop in your browser’s search bar. Add the phrase Enable Keyboard Backlight Windows 10, and you should be able to find the settings immediately.

Method 3—Using Your Computer’s Keyboard
Depending on the model, your computer probably has a keyboard function to turn on the backlight.
Dell
Again, depending on your Dell model, the keyboard function key that activates your keyboard’s backlight may vary.
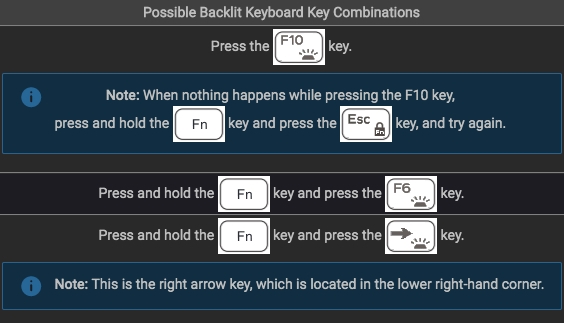
Alt+F10
- Dell 14 Inspiron 7000, 15, 2016, 15, 17 5000 Series.
Fn+F10
- Inspiron 15 5000, Latitude E5550, Latitude E7450/E7470
F10
- Dell XPS 2016 and 13
Fn+F6
- Dell Studio 15
HP
Fn+F5
- Some models may be Fn+11 or Fn+9
- Some models will work with a simple Fn+Space

Asus
Fn+F4 or F5
- Asus users will be able to tell the functions based on the symbols on the keys. If there are no light symbols anywhere on the keyboard, the laptop is not equipped with this function.
Method 4—Update Keyboard Drivers
An outdated keyboard driver could be another possible reason why your keyboard’s backlight isn’t working. After all, drivers help the operating system and your hardware communicate with each other. Thus, updating your keyboard’s Windows 10 driver should fix the backlight issue.
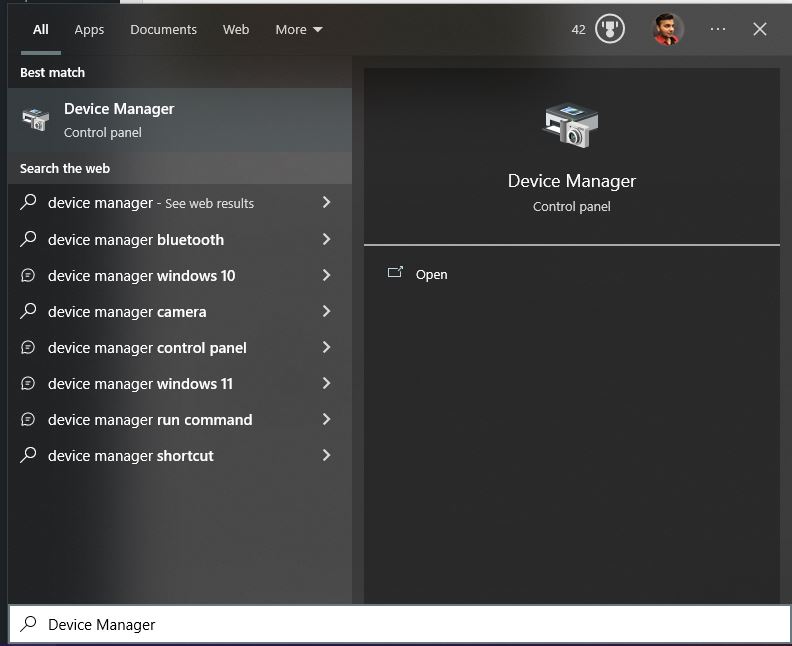
- Click on the Search icon on your taskbar and type Device Manager in the search bar.

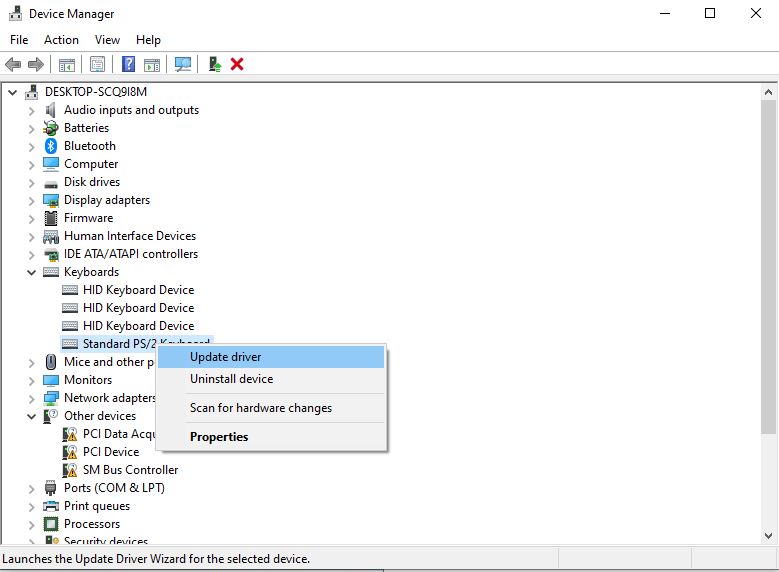
- Select Keyboards and right-click on your keyboard’s name.
- Click on Update driver.

After this, you can either let Windows search for drivers or download the latest version of the driver and select the Browse my computer for drivers option to install the driver manually. And if your PC is running low on storage, check out how to free up disk space on Windows 10.
How to Fix Keyboard Backlight Not Working on Windows 10
Some Windows 10 users reported that the keyboard backlight settings don’t work. It’s not clear what causes the issue, but if you’re one of the unlucky users who have that problem, you can always troubleshoot for possible solutions. Here is what you have to do:
- Open the Search window from your taskbar and type Troubleshooting in the search bar.

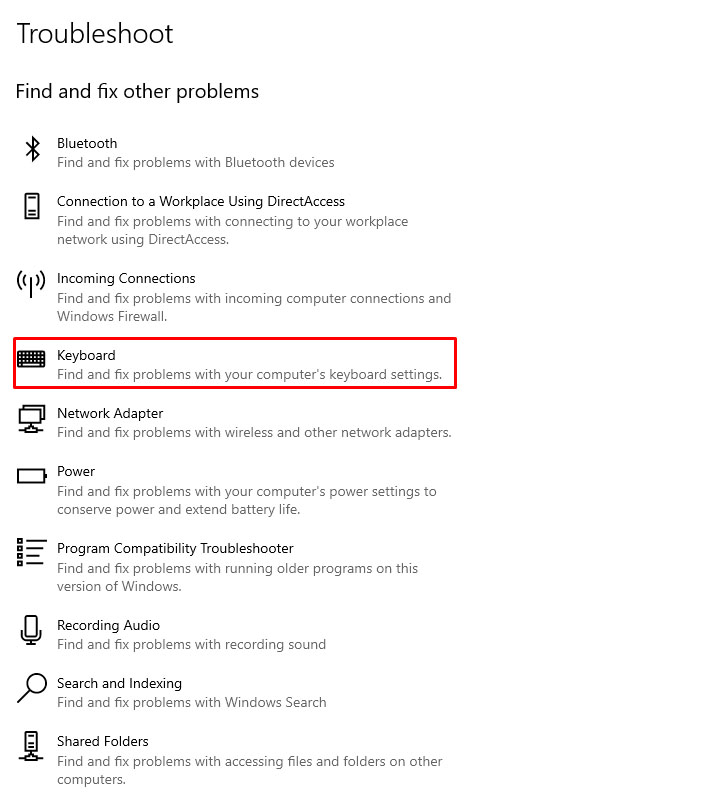
- Select the Keyboard option from the menu.

- When the troubleshooter pops up, select Run the troubleshooter.
- The system will then check for possible issues with your laptop’s keyboard. The keyboard backlight option should appear. Follow the instructions to enable it.

Other causes of your keyboard backlight woes can be attributed to hardware issues or even software updates. If your backlight no longer works after a drop, it may be as simple as a loose cable. However, if you’ve performed an update recently, power cycle your computer to see if it will turn back on.
In case the dark theme is not working on your PC, check out our troubleshooting guide about Dark Mode not working in Windows 10.
Type in the Dark Like a Pro
Windows 10 blocks the keyboard backlight feature on some laptops automatically. It’s unclear why that happens, but with the simple methods described above, you will be able to turn it on and choose the brightness level you want at any time.
The process is simple and takes only a minute or two to complete. You can finally type like a pro in the dark.
What method do you use to change the brightness of your keyboard’s backlight? How bright are your keyboard lights, and how long is the auto shutdown period on your laptop? Share your methods in the comment section below.
FAQs
Q. How can I tell if my laptop has a keyboard backlight?

A. One of the easiest ways to know whether or not your laptop has a keyboard backlight is to look at the keyboard itself. If you see any of the symbols by the manufacturer in the screenshots above, then you can enable the backlight.
Q. Can I use an external keyboard on a laptop?
A. Absolutely, most wireless keyboards can connect to most laptops using Bluetooth or a USB port.
Q. How do I turn on my keyboard light without the Fn key?
A. If your keyboard doesn’t have the Fn key, you can use the Windows Mobility Center to enable this feature. Control Panel > Hardware and Sound > Windows Mobility Center > Keyboard Backlighting > Turn On.
Q. Does keyboard backlighting drain the battery?
A. Yes, your keyboard draws power from your laptop’s battery to keep the lights on. Therefore, turning it off or lowering the brightness of your keyboard’s backlight will help you save battery.
Q. How do I change the color of my keyboard’s backlighting?
A. You first need to check if your keyboard supports RGB backlighting. If yes, check the user manual to find which keys let you change the keyboard backlighting color, or look it up on the internet if you don’t have the keyboard manual.
Moreover, some keyboards come with a native app that allows you to manage its backlight brightness and change colors.
Q. Can I install backlit keyboard?
A. No. Unfortunately, you can’t install backlighting on a non-backlit keyboard.
Q. Do all laptops have backlit keyboard?
A. No, not all laptops have a backlit keyboard.
Guide and Steps to Enable Keyboard Backlight Windows 10. – Computers from few brands have a specific type of keyboard which illuminates through characters and gaps between keys. The keyboard continuously glows due to this LED illumination feature. For certain users, the feature is not working because the keyboard backlight is disabled.
A built-in light sensor helps the Backlit KB work automatically. It automatically turns on in low light and turns off in More brightness. But on few Windows 10 computers, Keyboard Backlight Settings doesn’t perform up to mark. In this case, users need to manually activate the feature. So you will see here Disable and Enable Keyboard Backlight Windows 10. You find further 2 ways for this.
Enable Keyboard Backlight Windows 10
You can follow two ways to do the same – first through Windows mobility center and the last through the default application which controls the keyboard settings.
Way 1 –
Step 1 – Click the Start button, type cp, and then press Enter.
Step 2 – Control panel will be visible on the screen, locate Windows mobility center. Once you find this application click and open.
Step 3 – Locate a tile Keyboard backlight on Windows mobility center. Click the icon of keyboard backlighting.
Step 4 – Keyboard backlit pop-up will appear, select On under Keyboard lighting. If you adjust the keyboard brightness, select the option either Bright or Dim. A few more Keyboard backlight options are available here so customize on your own preferences.
Step 5 – At last, click OK to implement the changed settings.
Way 2 –
Many Companies manage Keyboard backlight settings through an inbuilt application. So you can check whether the application exists or not.
Step 1 – Press the start button and type Keyboard backlit. You will find the setting of the concerned options.
Step 2 – Every brand gives its own type of controlling application for the keyboard setting. So you need to research something here to Enable Keyboard Backlight Windows 10.
If you find issue when you enable Keyboard Backlight
Many times, Keyboard Backlight does not work properly with Windows 10. In this case, you need to troubleshoot the keyboard.
Step 1 – Open the start menu and write troubleshooting. Once you see the same troubleshooting under Best match, press Enter key.
Step 2 – Select View all option in the right pane and allow the list of various troubleshooters to appear on the screen. Now search Keyboard in the list.
Step 3 – Click on Keyboard from the troubleshooter’s list.
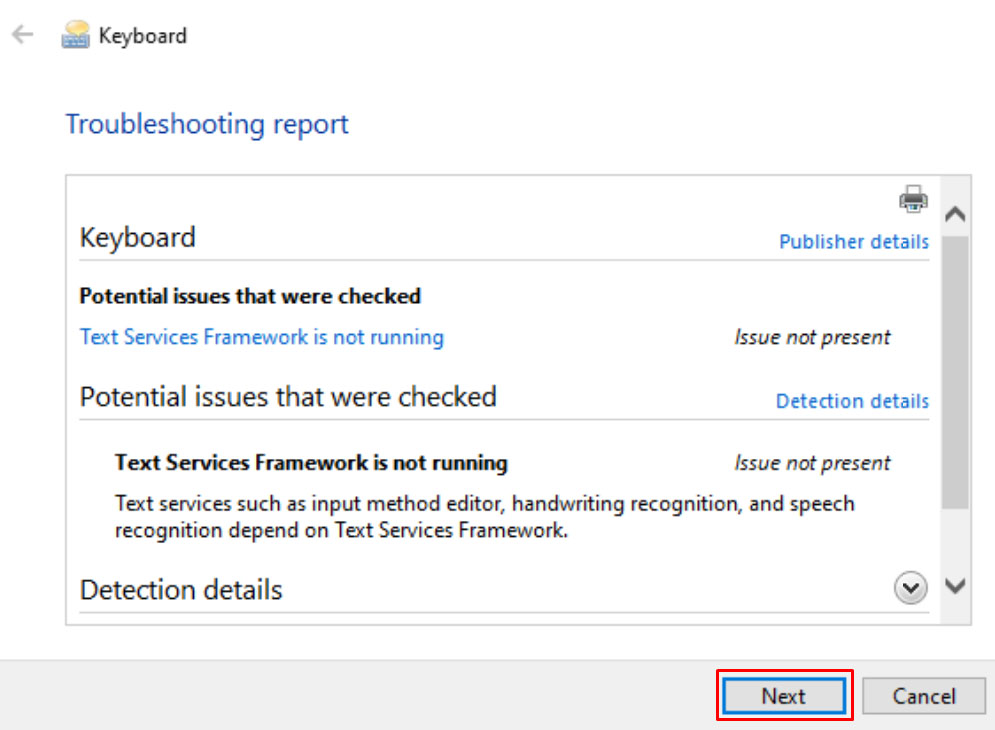
Step 4 – Soon the Keyboard Troubleshooter comes out on the screen. Click Next.
Step 5 – It will scan the system for trouble and then displays the found problem in the list. Follow the on-screen instructions and this will fix Keyboard Backlight enabling or disabling issue.
Conclusion
So these are the methods for how to Enable Keyboard Backlight Windows 10. Moreover, if you find any problem in activating the tool troubleshooter will all set. If you meet with another issue or tip in Keyboard Backlight kindly do write below.
Как включить подсветку на ноутбуке: простое объяснение
В этой статье рассказывается, как включить подсветку клавиатуры на компьютерах с такой возможностью — в частности, на компьютерах с Windows и macOS.
GettyImages
Как подсветить клавиатуру?
Если ваш ноутбук или клавиатура поддерживают эту функцию, для включения подсветки клавиатуры обычно достаточно просто найти нужную кнопку. В некоторых случаях вы можете обнаружить, что подсветка клавиатуры отключена в настройках вашей операционной системы или в приложении, предоставленном производителем вашего компьютера. Кнопка или кнопки, которые обычно управляют подсветкой клавиатуры, в этом случае могут не работать. Если это так, вам нужно включить подсветку клавиатуры в настройках операционной системы или в приложении, предоставленном производителем вашего компьютера, вручную.
РЕКЛАМА – ПРОДОЛЖЕНИЕ НИЖЕ
Не все клавиатуры подсвечиваются. Некоторые производители не предлагают такую функцию на своих недорогих ноутбуках или включают ее только за дополнительную плату. Если вы не можете заставить свою клавиатуру светиться, обратитесь к производителю, чтобы убедиться, что в этой клавиатуре есть подсветка.
Как включить подсветку клавиатуры на компьютерах с Windows?
В компьютерах Windows обычно выбирают одну из функциональных клавиш для управления подсветкой клавиатуры, но это не одна и та же клавиша на всех компах. Каждый производитель устанавливает клавишу независимо от других своих коллег. Следовательно, вам нужно посмотреть на функциональные клавиши, поэкспериментировать с ними или связаться с производителем, чтобы понять, какую кнопку нажимать.
РЕКЛАМА – ПРОДОЛЖЕНИЕ НИЖЕ
Точный принцип работы световой клавиши клавиатуры тоже отличается от одного производителя к другому. Некоторые производители позволяют вам только включать или выключать свет, некоторые предоставляют пару уровней яркости, а у других есть аж несколько ступеней яркости.
Наиболее распространенными клавишами, управляющими подсветкой клавиатуры на компьютерах с Windows, являются F5, F9 и F11.
Вот как включить подсветку клавиатуры на компьютерах с Windows с помощью клавиатуры:
РЕКЛАМА – ПРОДОЛЖЕНИЕ НИЖЕ
РЕКЛАМА – ПРОДОЛЖЕНИЕ НИЖЕ
Что делать, если подсветка клавиатуры Windows не загорается?
Если нажатие правильной клавиши на клавиатуре не включает или не регулирует подсветку клавиатуры, вам необходимо изменить ее в настройках или в приложении, предоставленном вашим производителем. Однако этот параметр не всегда доступен в настройках, и если вы не видите эту опцию в настройках Windows Mobility, обратитесь к производителю за дополнительной информацией об их приложении.
РЕКЛАМА – ПРОДОЛЖЕНИЕ НИЖЕ
Вот как включить или настроить подсветку клавиатуры Windows с помощью настроек мобильности:
- Нажмите клавишу Windows + X и щелкните на пункт «Центр мобильности».
- Найдите настройку яркости клавиатуры. (Если у вас нет настройки яркости клавиатуры или вообще нет раздела для конкретного производителя, это означает, что эта опция недоступна на вашем компьютере. Свяжитесь с производителем для получения дополнительной информации.)
- Захватите ползунок и перетащите его вправо.
Как включить подсветку клавиатуры на Mac?
Две кнопки управляют подсветкой клавиатуры на компьютерах Mac и MacBook. Одна кнопка снижает яркость, а другая повышает. Если подсветка клавиатуры сейчас выключена, то нажатие клавиши увеличения яркости включит ее. Кнопка «Уменьшить яркость» находится на клавише F5, а кнопка «Увеличить яркость» — на клавише F6 на большинстве компьютеров Mac. Исключение составляет сенсорная панель вместо функциональных клавиш Mac — в этом случае именно сенсорная панель управляет подсветкой клавиатуры.
РЕКЛАМА – ПРОДОЛЖЕНИЕ НИЖЕ
РЕКЛАМА – ПРОДОЛЖЕНИЕ НИЖЕ
Если у вас сенсорная панель, коснитесь «Показать все», а затем коснитесь значка <, чтобы отобразить кнопку «Увеличить яркость».
Вот как включить подсветку клавиатуры на Mac:
- Найдите кнопку «Увеличить яркость». (Она выглядит как значок восходящего солнца с длинными световыми лучами и находится на клавише F6 или сенсорной панели.)
- Нажмите кнопку «Увеличить яркость».
- Если этого недостаточно, нажмите кнопку «Увеличить яркость» столько раз, сколько необходимо для достижения желаемого уровня яркости.
Что делать, если подсветка клавиатуры Mac не включается?
Хотя компьютеры Mac позволяют управлять подсветкой клавиатуры с помощью клавиш «Увеличить яркость» и «Уменьшить яркость» на клавиатуре, эта функция может быть отключена в системных настройках. Если вы не можете включить подсветку клавиатуры, вам необходимо проверить настройки системы.

— важнейший аспект работы на компьютере. Правильно настроенная клавиатура может значительно повысить производительность и комфорт работы. В этой статье мы рассмотрим основные параметры настройки клавиатуры Windows 10, такие как изменение раскладки клавиатуры, настройка скорости повторения клавиш и другие. Вы узнаете, как настроить клавиатуру под свои нужды и привычки, чтобы работать более эффективно и комфортно.
Клавиатура Windows 10: Настройка
Настройка клавиатуры в Windows 10 является важным аспектом для пользователей, которые хотят оптимизировать свою работу и повысить производительность. С помощью настроек клавиатуры можно изменить поведение клавиш, MACRO-функции и другие параметры, чтобы они соответствовали индивидуальным потребностям.
Изменение раскладки клавиатуры
Изменение раскладки клавиатуры в Windows 10 является простой процедурой. Для этого необходимо:
- Открыть Панель управления и перейти в раздел Язык и регион.
- Нажать на Добавить язык и выбрать необходимый язык.
- Установить флажок Установить как основной язык и нажать ОК.
Настройкаrepeat и задержки клавиш
Настройкаrepeat и задержки клавиш в Windows 10 позволяет регулировать чувствительность клавиатуры. Для этого необходимо:
- Открыть Панель управления и перейти в раздел Энергосбережение.
- Нажать на Изменить план параметров и выбрать Изменить дополнительные параметры.
- Установить необходимые значения repeat и задержки и нажать ОК.
Создание MACRO-функций
Создание MACRO-функций в Windows 10 позволяет автоматизировать часто используемые действия. Для этого необходимо:
- Открыть Панель управления и перейти в раздел Устройства.
- Нажать на Клавиатура и выбрать MACRO.
- Создать новую MACRO-функцию, указав необходимые действия и нажать ОК.
Настройка подсветки клавиатуры
Настройка подсветки клавиатуры в Windows 10 позволяет изменить цвет и интенсивность подсветки. Для этого необходимо:
- Открыть Панель управления и перейти в раздел Устройства.
- Нажать на Клавиатура и выбрать Подсветка.
- Установить необходимые значения цвета и интенсивности и нажать ОК.
Решение проблем с клавиатурой
Решение проблем с клавиатурой в Windows 10 является важным аспектом для пользователей, которые сталкиваются с проблемами при работе с клавиатурой. Для этого необходимо:
- Открыть Панель управления и перейти в раздел Устройства.
- Нажать на Клавиатура и выбрать Т trouble.
- Следовать инструкциям мастера устранения неполадок и нажать ОК.
Часто задаваемые вопросы
Как настроить клавиши на клавиатуре Windows 10?
Для настройки клавиш на клавиатуре Windows 10 необходимо выполнить несколько простых действий. Во-первых, необходимо открыть Панель управления и перейти в раздел Этот компьютер, затем выбрать Свойства системы. Далее, нужно кликнуть на Дополнительные параметры системы и в открывшемся окне выбрать Управление оборудованием. Здесь можно найти раздел Клавиатура и отрегулировать настройки клавиш, такие как скорость повторения и задержка повторения. Кроме того, можно использовать Программу настройки клавиатуры, которая позволяет назначать сочетания клавиш для выполнения определенных действий.
Как включить режим набора текста на клавиатуре Windows 10?
Чтобы включить режим набора текста на клавиатуре Windows 10, необходимо выполнить несколько шагов. Сначала нужно перейти в Панель управления и выбрать раздел Этот компьютер, затем кликнуть на Свойства системы. Далее, необходимо выбрать Дополнительные параметры системы и в открывшемся окне перейти в раздел Язык и регион. Здесь можно найти настройки языка и клавиатуры и включить режим набора текста. Кроме того, можно использовать комбинацию клавиш, такую как Win + Space, чтобы переключиться между языками и раскладками клавиатуры. Также можно настроить свойства клавиатуры, такие как скорость набора текста и задержка между нажатиями клавиш.
Как настроить подсветку клавиатуры в Windows 10?
Для настройки подсветки клавиатуры в Windows 10 необходимо выполнить несколько простых действий. Во-первых, необходимо открыть Панель управления и перейти в раздел Этот компьютер, затем выбрать Свойства системы. Далее, нужно кликнуть на Дополнительные параметры системы и в открывшемся окне выбрать Управление оборудованием. Здесь можно найти раздел Клавиатура и отрегулировать настройки подсветки, такие как яркость и цвет. Кроме того, можно использовать специальную программу для настройки подсветки клавиатуры, которая позволяет создавать индивидуальные настройки и эффекты. Также можно настроить автоматическое включение и выключение подсветки клавиатуры.
Как исправить проблемы с клавиатурой в Windows 10?
Для исправления проблем с клавиатурой в Windows 10 необходимо выполнить несколько шагов. Сначала нужно проверить соединение клавиатуры с компьютером и убедиться, что она правильно подключена. Далее, необходимо обновить драйвера клавиатуры, для чего можно использовать Диспетчер устройств. Кроме того, можно использовать встроенную утилиту для диагностики и исправления проблем с клавиатурой, которая позволяет обнаруживать и исправлять ошибки. Также можно попробовать перезагрузить компьютер и отключить и включить клавиатуру, чтобы решить проблему. Если проблема не решена, можно обратиться к специалисту за помощью.