
In this Python OpenCV article iam going to show you Working with Keyboards. also we will learn how you can write or save an image in OpenCV, so first of all let’s talk about OpenCV.
What is Python OpenCV ?
Python OpenCV (Open Source Computer Vision) is a library for computer vision and image processing tasks. it is an open source computer vision and machine learning software library written in C++ with bindings for Python, Java and C#. it provides different functions and algorithms for image and video analysis, object detection, face recognition and machine learning.
OpenCV was originally developed by Intel and later supported by Willow Garage and Itseez. this library has large community of developers and users, and it is widely used in industry, academia and research.
Python OpenCV provides comprehensive set of tools for working with images and video streams, including reading and writing image files, manipulating images, applying filters and transformations, performing feature detection and matching and many more. it also provides support for real time video processing and camera control.
Key Features of Python OpenCV ?
OpenCV (Open Source Computer Vision) is popular computer vision and machine learning library that has extensive support for Python. these are some key features of Python OpenCV:
- Image and Video Processing: Python OpenCV provides different functions and algorithms to manipulate images and videos, including basic image operations, filtering, feature detection and object recognition.
- Object Detection: OpenCV has several pre trained classifiers for object detection tasks such as face detection, eye detection and pedestrian detection. these classifiers are based on machine learning algorithms like Haar cascades and deep neural networks.
- Machine Learning: OpenCV provides set of tools and libraries for machine learning tasks such as classification, clustering and regression. it also includes support for popular machine learning frameworks like TensorFlow and PyTorch.
- Real-time Processing: OpenCV has support for real time processing of video streams, making it useful for applications like surveillance, robotics and video analysis.
- Cross-platform Support: Python OpenCV is cross platform and can be used on different operating systems like Windows, Linux and macOS. it also supports different programming languages such as Python, C++ and Java.
- Integration with Other Libraries: OpenCV can be integrated with other popular libraries such as NumPy and Matplotlib to perform advanced image processing and visualization tasks.
In result we can say that Python OpenCV is powerful library for computer vision and machine learning tasks. it has rich set of features and it is easy of use.
Also you can check Python GUI Development Tutorials in the below link.
- PyQt5 GUI Development Tutorials
- TKinter GUI Development Tutorials
- Pyside2 GUI Development Tutorials
- Kivy GUI Development Tutorials
So this is the complete source code for this article
|
import cv2 # Creating A Simple Application img = cv2.imread(«lena.tif») cv2.imshow(«Lena Image», img) k= cv2.waitKey(0) if k == 27: # wait for esckey to exit cv2.destroyAllWindows() elif k == ord(‘s’): # wait for s key to save and exit cv2.imwrite(«JPGNewImage.jpg», img) cv2.destroyAllWindows() |
in the first we have imported OpenCV, after that read the image and show the image. in the if statements we are going to check some conditions the first condition if k==27 it means that we are waiting for the escape key to exit and in elif == ord(‘s’) it means that wait for s key to save and exit.
This is the code that we are checking for the keyboard input, if it was escape key we are going to destroy the window. and if it was the ‘s’ key we are saving our image, you can see that in the cv2.imwrite() we are giving the image name with our image.
|
if k == 27: # wait for esckey to exit cv2.destroyAllWindows() elif k == ord(‘s’): # wait for s key to save and exit cv2.imwrite(«JPGNewImage.jpg», img) cv2.destroyAllWindows() |
Run the complete code and this will be the result.
User Interface Design for OpenCV with TKinter
Now let’s add a user interface to our Python OpenCV, and we want to use Python TKinter GUI library, using TKinter you can build GUI applications with Python, TKiner is already installed with Python, and you don’t need to install it.
Let’s create a simple example of an OpenCV application with a user-friendly interface that incorporates keyboard interaction using the Tkinter library for GUI development.
|
1 2 3 4 5 6 7 8 9 10 11 12 13 14 15 16 17 18 19 20 21 22 23 24 25 26 27 28 29 30 31 32 33 34 35 36 37 38 39 |
import cv2 import tkinter as tk from PIL import Image, ImageTk class OpenCVApp: def __init__(self, master): self.master = master self.master.title(«Codeloop.org — OpenCV App») self.image = cv2.imread(«lena.tif») # Load an example image self.display_image = cv2.cvtColor(self.image, cv2.COLOR_BGR2RGB) self.photo = ImageTk.PhotoImage(image=Image.fromarray(self.display_image)) self.canvas = tk.Canvas(self.master, width=self.display_image.shape[1], height=self.display_image.shape[0]) self.canvas.pack() self.canvas.create_image(0, 0, anchor=tk.NW, image=self.photo) self.master.bind(‘<Escape>’, self.exit_application) self.master.bind(‘s’, self.save_image) def exit_application(self, event): self.master.quit() def save_image(self, event): cv2.imwrite(«JPGNewImage.jpg», self.image) print(«Image saved as ‘JPGNewImage.jpg'») def main(): root = tk.Tk() app = OpenCVApp(root) root.mainloop() if __name__ == «__main__»: main() |
In the above example:
- We have created OpenCVApp class that initializes a Tkinter window (master) with a canvas for displaying the OpenCV image.
- The example image “lena.tif” is loaded using OpenCV.
- Keyboard bindings are set up: pressing ‘s’ will save the current image, and pressing ‘Escape’ will exit the application.
- We’ve used PIL (Python Imaging Library) alongside ImageTk to correctly load the image and display it within the Tkinter canvas.
- The image is loaded using cv2.imread() as before, converted to RGB format using cv2.cvtColor(), after that converted to PIL image using Image.fromarray().
- Finally, the PIL image is converted to a Tkinter-compatible image using ImageTk.PhotoImage() and displayed on the canvas.
Run the complete code and this will be the result

FAQs:
Which is better, PyTorch or OpenCV?
PyTorch and OpenCV serve different purposes and are not directly comparable in terms of better” or worse. PyTorch is a deep learning framework , and it is used for building and training neural networks, particularly in the field of artificial intelligence and machine learning. On the other hand OpenCV is a library for computer vision and image processing tasks. It provides different functions and algorithms for image and video analysis, object detection, feature extraction and more.
Is OpenCV good for machine learning?
OpenCV is primarily a computer vision library, but it also includes support for machine learning tasks. even tough OpenCV is not a dedicated library for machine learning like TensorFlow or PyTorch, but it provides tools and libraries for basic machine learning tasks such as classification, clustering and regression. You can use OpenCV with other machine learning libraries and frameworks to build computer vision and machine learning pipelines.
What programming language does OpenCV use?
OpenCV (Open Source Computer Vision Library) is primarily written in C++. But it provides bindings for different programming languages including Python, Java and C#. This allows developers to use OpenCV functionalities in their preferred programming language.
How does OpenCV work?
OpenCV provides a collection of algorithms and functions for different computer vision and image processing tasks. It works by using these algorithms to analyze and manipulate images or video streams. OpenCV can perform tasks such as image filtering, edge detection, object detection, feature extraction, image stitching and many more.
Subscribe and Get Free Video Courses & Articles in your Email
The prebuilt OpenCV releases does not contain the tracker module, which lives in
the contrib code repository. Here is how to build OpenCV with contributions
and with python bindings and java bindings.
Prerequisite
- Download and install Visual Studio 2017 Community Edition
- Download and install cmake
- Download and install Git
- Download and install Python 3.7.2 — Windows x86-64 executable installer. Add Python it to the path when asked.
You can verify the success calling python --version from a command shell and
getting back Python 3.7.2.
Common steps
From a Git bash console, go to a freshly created working directory and run the
following command to download OpenCV sources:
git clone -b 4.0.1 https://github.com/opencv/opencv.git
git clone -b 4.0.1 https://github.com/opencv/opencv_contrib.git
Build with python binding
Go to a freshly created working directory and create a virtual python
environment where to install the python dependencies.
This should have created a subdirectory named venv, that contains packages
and scripts. Now activate the virtual environment with:
Download and install numpy in the environment:
Now numpy lives in ./venv/Lib/site-packages/numpy
It is time to generate Visual Studio project for the build definition. Create
a build directory:
mkdir build
cd build

cmake \
  -G "Visual Studio 15 2017 Win64" \
  -DBUILD_opencv_python3=ON \
  -DINSTALL_CREATE_DISTRIB=ON \
  -DPYTHON3_NUMPY_INCLUDE_DIRS=$PWD/../venv/lib/site-packages/numpy/core/include \
  -DOPENCV_EXTRA_MODULES_PATH=../opencv_contrib/modules ../opencv
-G "Visual Studio 15 2017 Win64"specifies which version of visual studio project to generate.-DBUILD_opencv_python3=ONrequires to generate python module files.-DPYTHON3_NUMPY_INCLUDE_DIRS=[...]indicates where to find NumPy headers-DOPENCV_EXTRA_MODULES_PATH=[...]specifies to build OpenCV with the contribution repository
Finally build the binaries:
cmake --build . --config Release -- -maxcpucount:2
cmake --build . --config Release --target install
Note that Python release does not contain debug binaries, and consequently it is
not possible to build OpenCV with debug symbols. Once the build is over
ls python_loader/cv2 should return
__init__.py config.py load_config_py2.py load_config_py3.py.
Build java bindings
Clear the build directory, and install java jdk (e.g. jdk-11.0.2) from Oracle.
Select the jdk you intent to use for you project with the following command:
export JAVA_HOME='C:\Program Files\Java\jdk-11.0.2
Generate Visual Studio project files:
cmake \
  -G "Visual Studio 15 2017 Win64" \
  -DOPENCV_EXTRA_MODULES_PATH=../opencv_contrib/modules \
  -DBUILD_SHARED_LIBS=OFF \
  -DBUILD_FAT_JAVA_LIB=ON \
  -DBUILD_opencv_java=ON \
  -DANT_EXECUTABLE=$PWD/../apache-ant-1.10.5/bin/ant.bat \
  -DJNI_INCLUDE_DIRS='C:\Program Files\Java\jdk-11.0.2\include' \
  ../opencv
Verify that java and java_bindings_generator can be found on the line
` To be built: `. Finally run the build command:
cmake --build . --config Release -- -maxcpucount:2
cmake --build . --config Release --target install
Build C++
Even though the Java version is convenient to build a GUI thanks to Swing, and
Python is very nice to transform lists thanks to comprehension, I had to C++
to debug OpenCV. Indeed, I wasn’t able to use my GPU with OpenCL and I needed
to step into OpenCV code & profile it. Here is how to build OpenCV for C++, with
TBB enabled:
Download TBB from https://www.threadingbuildingblocks.org/download and unzip in
you working directory. It creates a subdirectory with the release name (e.g.
tbb2019_20190206oss)
Set the environment variable calling the script:
tbb2019_20190206oss\bin\tbbvars.bat
Now generate the projects:
mkdir build
cd build
cmake \
  -G "Visual Studio 15 2017 Win64" \
  -DINSTALL_CREATE_DISTRIB=ON \
  -DBUILD_SHARED_LIBS=ON \
  -DOPENCV_EXTRA_MODULES_PATH=../opencv_contrib/modules \
  -DWITH_TBB=ON \
  ../opencv
Finally run the build command:
cmake --build . --config Release -- -maxcpucount:2
cmake --build . --config Release --target install
cmake --build . --config Debug -- -maxcpucount:2
cmake --build . --config Debug --target install
In Visual Studio is created a solution directory next to tbb2019_20190206oss,
and build. Edit the project properties to add the following:
Configuration PropertiesDebuggingEnvironment:PATH=$(ProjectDir)\..\..\tbb2019_20190206oss\bin\intel64\vc14;$(ProjectDir)\..\..\build\bin\Debug;%PATH%
C/C++Additional Include Directories:..\..\opencv_build_release\install\include
LinkerGeneralAdditional Library Directories:..\..\opencv_build_release\lib\Debugfor debug and..\..\opencv_build_release\lib\Releasefor Release
InputAdditionalDependencies:opencv_world401d.libfor Debug andopencv_world401.libfor Release
How to build the OpenCV 3.4 library with contribution modules on windows. It is easy to make own build of opencv library. I will go step by step through this process supported by screenshot of concrete configuration in cmake and visual studio. Lets get started. I am doing my own Opencv builds almost yearly :). I did it last weak which mean: here is a tutorial. Better, easier to understand and follow than previous one.

What we need to build opencv under windows
What is cmake? It is an open-source tool that helps you to manage your build process. Configuration tool that manages for you some hard dependencies described in CMakeList.txt configuration files and produces standard makefiles or in our case Microsoft Visual Studio project.
The version that you are looking for is a simple Latest Release or the release recommended by opencv. I will perform all the simple magic in Latest Release (3.12.4) and more concrete cmake-3.12.4-win64-x64.msi. Install CMAKE and let him do the rest.
Download latest opencv
Just go to OpenCV repository and hit the clone/download button of OpenCV. Hopefully, you will download from the first page the latest master branch. https://github.com/opencv/opencv.
Download opencv contrib library
What you have now are 2 zip files.
Prepare folders for opencv build
I have prepared 3 folders in my setup for installation. The first opencv-3.4 is where the zip from opencv repository is extracted. The second one is opencv_contrib-3.4, where the opencv_contrib zip file is extracted, and finally oc34b for the result. There will be assembled the opencv from the source. For a better overview, they are all in one folder opencv34.
opencv34-opencv-3.4
-opencv_contrib-3.4
-oc34b
Configure cmake for opencv
This step is easy. The above folders are set as in the following picture. Additionally, hit the configure button. You will be probably asked to select the compiler. I used one from the Visual Studio 2017 community edition. The CXX compiler identification is MSVC 19.15.26732.1 and The C compiler identification is MSVC 19.15.26732.1. Sometimes you need to set up the path to the compiler. Mine is located here. Do not copy this path and find your own.
C:/ProgramFiles(x86)/MicrosoftVisualStudio/2017/Community/VC/Tools/MSVC/14.15.26726/bin/Hostx86/x64/cl.exe

|
| Cmake set-up for OpenCV 3.4 |
OK. Previous steps were configure, select the compiler, and now hit the finish button. The cmake now prepares and detects configuration for the build. Now the window of cmake looks like a huge list of checkboxes. You can change some of the configuration and some not.

This configuration depends on many factors like hardware configuration, software library configuration, compiler configuration and cmake find or even perform the download of some of the available options for you. The details about cmake are out of the scope of this tutorial. More information about cmake can be found under this link. It is not necessary to read for our purpose. Lets continue. After configure hit generate button in cmake.
Opencv Visual Studio project
The results of cmake actions are located in oc34b folder. You are interested in configuration for the whole opencv project. The name is OpenCV.sln. Just open the project and see what is inside.

The result under the Opencv solution is a tree that looks like this one. Yes, the options depend on the configuration that you select in CMAKE.
What you can see on the picture above. The last item in the modules is the opencv_world project. I personally prefer the build one lib and dll and lib opencv_world343.lib instead of opencv_highgui opencv_core opencv_video etc.
Build opencv solution
There is nothing to set just hit the build solution. Everything is already prepared by cmake.
This process will take some time. Hopefully, the build will end with 0. The results are mess of folders and files. There are some important ones.
The result of opencv build solution
I build opencv process to assemble the library and the utility. I have results located unter path: oc34b/install/x64/vc15/bin. You can see the annotation utility for datasets, create samples utility, train cascade utility and dlls opencv_world343.dll library.

|
| opencv install directory |
oc34b/install/x64/vc15/lib include lib files.

oc34b/install/include folder contains header files.

Configure Visual Studio to run test opencv library
I created a console C++ project and configured just the Release configuration in x64 mode.
1)Under C/C++ General/Set Additional include Directories as in the picture.

2)In Linker-General set the Additional Library Directories as on the following picture.

3) In linker-Input- Additional Dependencies set the opencv_world343.lib

4) Write some code, compile and run.
#include "pch.h"

#include <iostream>

#include <opencv2/core/core.hpp>

#include <opencv2/highgui/highgui.hpp>

#include <opencv2/imgproc/imgproc.hpp>
using namespace cv;
int main()
{
std::cout << "Hello World!\n";
Mat image;
image = imread("C:/Users/Vlada/Pictures/MIT.jpg");
namedWindow("Display window", WINDOW_AUTOSIZE);// Create a window for display.
imshow("Display window", image); // Show our image inside it.
waitKey(0);
}
You will probably fail to find DLL by your compiled program. Just copy opencv_world343.dll just next to your exe as on the following image. Now everything should be fine and works. Right?
Thanks for sharing
-
Star
(19)
You must be signed in to star a gist -
Fork
(7)
You must be signed in to fork a gist
-
Clone this repository at <script src="https://gist.github.com/demid5111/6faa590e4fc5813550dd95cc1c538893.js"></script>
- Save demid5111/6faa590e4fc5813550dd95cc1c538893 to your computer and use it in GitHub Desktop.
Clone this repository at <script src="https://gist.github.com/demid5111/6faa590e4fc5813550dd95cc1c538893.js"></script>
Instructions for installing opencv on Windows 10
Install OpenCV 4.5 on Windows 10
Pre-configured OpenCV for Python from PyPi
- open the terminal (Ctrl+R + cmd)
- check Python3 installation:
py --version - go to official website to learn details: https://pypi.org/project/opencv-python/
- choose the most complete package and run:
py -m pip install opencv-contrib-python - check installation by entering the Python REPL:
py - import tha library:
import cv2
Pre-configured OpenCV for Python and C++ from GitHub releases
- Download opencv-4.5.1-vc14_vc15.exe from latest release:
https://github.com/opencv/opencv/releases/tag/4.5.1 - unpack to
C:\opencv - edit environment variables. Win search «Environment variables»
- append to Path the path to opencv:
C:\opencv\bin - restart computer
- open cmd
echo %Path%output should contain new path
Build OpenCV for Python and C++ from sources
- Install cmake. To check:
cmake --version - Download Source code (zip) from latest release:
https://github.com/opencv/opencv/releases/tag/4.5.1 - Download Source code (zip) from latest release of opencv-contrib sources:
https://github.com/opencv/opencv_contrib/releases/tag/4.5.1 - Unzip both archives
Run cmake-gui - choose the directory with opencv sources
- specify the directory for storing building binaries and Visual Studio project.
it would better if you create a new one and specify it here - press ‘Configure’
- use standard settings and proceed with Finish button
- once project is prepared, review all the flags suggested
- check
BUILD_WITH_DEBUG_INFO - important to specify:
OPENCV_EXTRA_MODULES_PATH. We need to specify path to
contrib folder we extracted earlier - change
CMAKE_INSTALL_PREFIX
to a directory you want opencv to install to. for exampleC:/opencv-custom - when you are ready, press
Generate. - go to build directory
- double click on
OpenCV.sln - build
BUILD_ALLby right click on the corresponding project in Release configuration - Then build
INSTALLby right click on the corresponding project to finally install in Release configuration - edit environment variables. Win search «Environment variables»
- append to Path the path to opencv:
C:\opencv-custom\bin - restart computer
- open cmd
echo %Path%output should contain new path
Configure Visual Studio project to work with opencv
Go to the Visual Studio and create the new empty C++ project.
- We will call it «HelloOpenCV».
- Set the target to
Debugandx64. This is very important to configure it for x64. - Paste the
main.cppcode to themain.cpp
As we can see there is unknown include statement of the opencv package. We need to fix that.
-
For that we need to configure a project so that compiler could know where to take headers
and library from. Open the Project->HelloOpenCV Properties and go toVC++ Directories. -
Change the
Include Directoriesto contain corresponding include folder in the opencv
installation. Insert it to the beginning of the value:C:\opencv\opencv\build\include; -
Change the
Library directoriesto includeC:\opencv\opencv\build\x64\vc15\lib -
Change the
Linker->Input->Additional dependenciesto- include
opencv_world451d.libif we are talking about pre-configured package installation - include
opencv_core451d.lib;opencv_highgui451d.lib;opencv_videoio451d.lib;opencv_imgcodecs451d.lib;
if we are talking about building from sources. In future, this list might be bigger
containing all the libraries and extensions that you use from opencv and opencv-contrib.
- include
-
Apply and close the window
To name the few more available libraries that can be included with the following linker flags
(for Windows remove-land add451d.libto the end if the version of opencv is 4.5.1:-lopencv_gapi -lopencv_stitching -lopencv_alphamat \ -lopencv_aruco -lopencv_bgsegm -lopencv_bioinspired \ -lopencv_ccalib -lopencv_dnn_objdetect -lopencv_dnn_superres \ -lopencv_dpm -lopencv_face -lopencv_freetype \ -lopencv_fuzzy -lopencv_hfs -lopencv_img_hash \ -lopencv_intensity_transform -lopencv_line_descriptor -lopencv_mcc \ -lopencv_quality -lopencv_rapid -lopencv_reg \ -lopencv_rgbd -lopencv_saliency -lopencv_sfm \ -lopencv_stereo -lopencv_structured_light -lopencv_phase_unwrapping \ -lopencv_superres -lopencv_optflow -lopencv_surface_matching \ -lopencv_tracking -lopencv_highgui -lopencv_datasets \ -lopencv_text -lopencv_plot -lopencv_videostab \ -lopencv_videoio -lopencv_viz -lopencv_xfeatures2d \ -lopencv_shape -lopencv_ml -lopencv_ximgproc \ -lopencv_video -lopencv_dnn -lopencv_xobjdetect \ -lopencv_objdetect -lopencv_calib3d -lopencv_imgcodecs \ -lopencv_features2d -lopencv_flann -lopencv_xphoto \ -lopencv_photo -lopencv_imgproc -lopencv_core
This file contains hidden or bidirectional Unicode text that may be interpreted or compiled differently than what appears below. To review, open the file in an editor that reveals hidden Unicode characters.
Learn more about bidirectional Unicode characters
| #include «opencv2/opencv.hpp« | |
| #include <opencv2/highgui/highgui.hpp> | |
| #include «iostream« | |
| int showImage() { | |
| std::string path = «img/test.jpeg«; | |
| cv::Mat img = cv::imread(path); | |
| imshow(«Portrait«, img); | |
| cv::waitKey(0); | |
| return 0; | |
| } | |
| int showWebCameraContent() { | |
| // open the first webcam plugged in the computer | |
| cv::VideoCapture camera(0); | |
| if (!camera.isOpened()) { | |
| std::cerr << «ERROR: Could not open camera« << std::endl; | |
| return 1; | |
| } | |
| // create a window to display the images from the webcam | |
| cv::namedWindow(«Webcam«); | |
| // this will contain the image from the webcam | |
| cv::Mat frame; | |
| // display the frame until you press a key | |
| while (1) { | |
| // capture the next frame from the webcam | |
| camera >> frame; | |
| // show the image on the window | |
| cv::imshow(«Webcam«, frame); | |
| // wait (10ms) for a key to be pressed | |
| if (cv::waitKey(10) >= 0) { | |
| break; | |
| } | |
| } | |
| return 0; | |
| } | |
| int main(int, char**) { | |
| showImage(); | |
| // showWebCameraContent(); | |
| } |
Все способы:
- Смена языковой раскладки в Виндовс 10
- Windows 10 (версия 1809)
- Windows 10 (версия 1803)
- Windows 10 (до версии 1803)
- Дополнительно
- Заключение
- Вопросы и ответы: 15
«Десятка», будучи последней версией Windows, обновляется довольно активно, и у этого есть как достоинства, так и недостатки. Говоря о последних, нельзя не отметить тот факт, что в попытке привести операционную систему к единому стилю, разработчики из Microsoft часто меняют не только внешний вид некоторых ее компонентов и элементов управления, но и просто перемещают их в другое место (например, из «Панели управления» в «Параметры»). Подобные изменения, причем уже в третий раз менее чем за год, затронули и средство переключения раскладки, отыскать которое сейчас не так-то просто. Мы же расскажем не только о том, где его найти, но и как настроить под свои нужды.
Смена языковой раскладки в Виндовс 10
На момент написания данной статьи, на компьютерах большинства пользователей «десятки» установлена одна из двух ее версий – 1809 или 1803. Обе они вышли в 2018 году, с разницей буквально в полгода, поэтому назначение комбинации клавиш для переключения раскладки в них осуществляется по схожему алгоритму, но все же не без нюансов. А вот в прошлогодних версиях ОС, то есть до 1803, все делается совсем иначе. Далее мы рассмотрим, какие действия требуется выполнить отдельно в двух актуальных версиях Windows 10, а затем и во всех предшествующих им.
Читайте также: Как узнать версию Виндовс 10
Windows 10 (версия 1809)
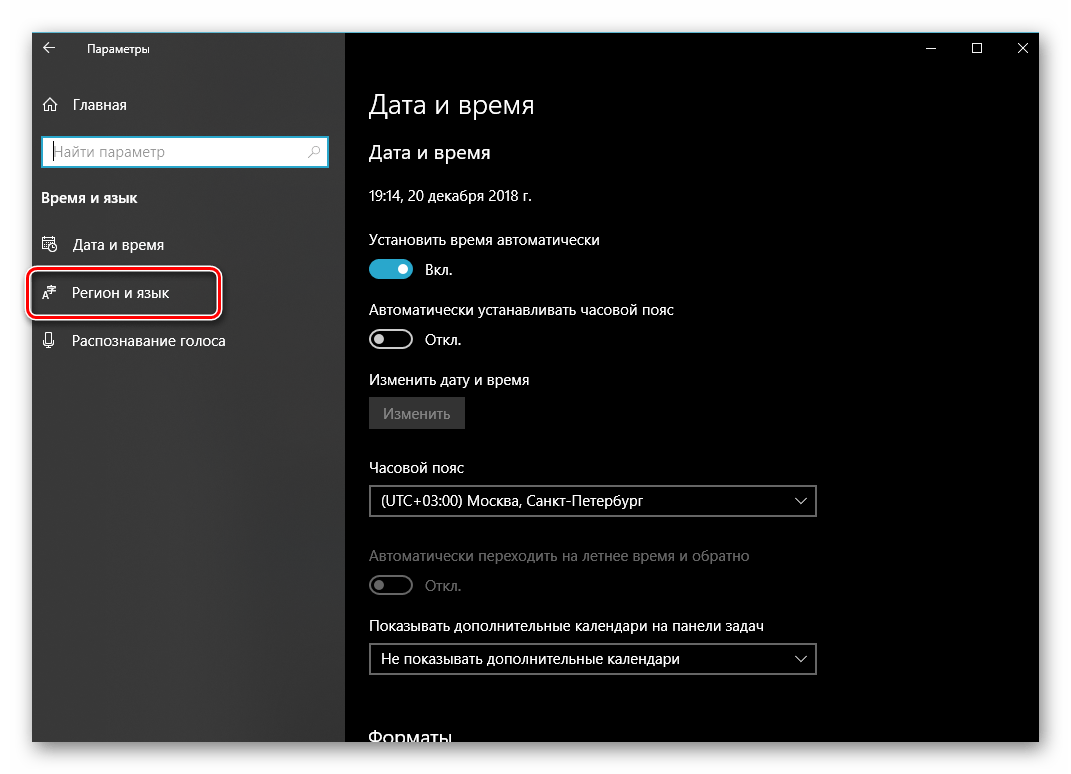
С выходом масштабного октябрьского обновления операционная система от Майкрософт стала не только более функциональной, но и куда более целостной в плане внешнего вида. Управление большинством ее возможностей осуществляется в «Параметрах», и для настройки переключения раскладки нам потребуется обратиться именно к ним.
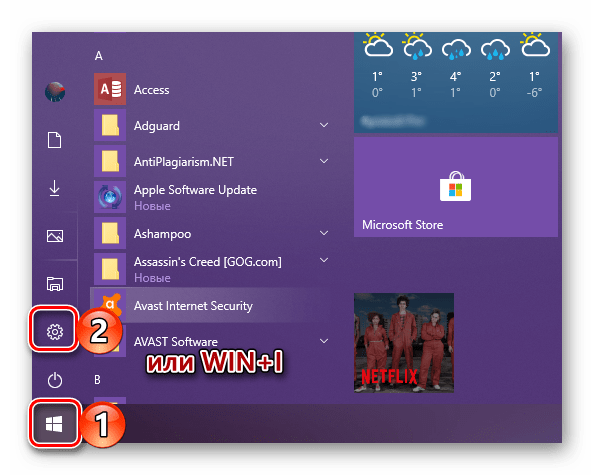
- Откройте «Параметры» через меню «Пуск» или нажмите «WIN+I» на клавиатуре.
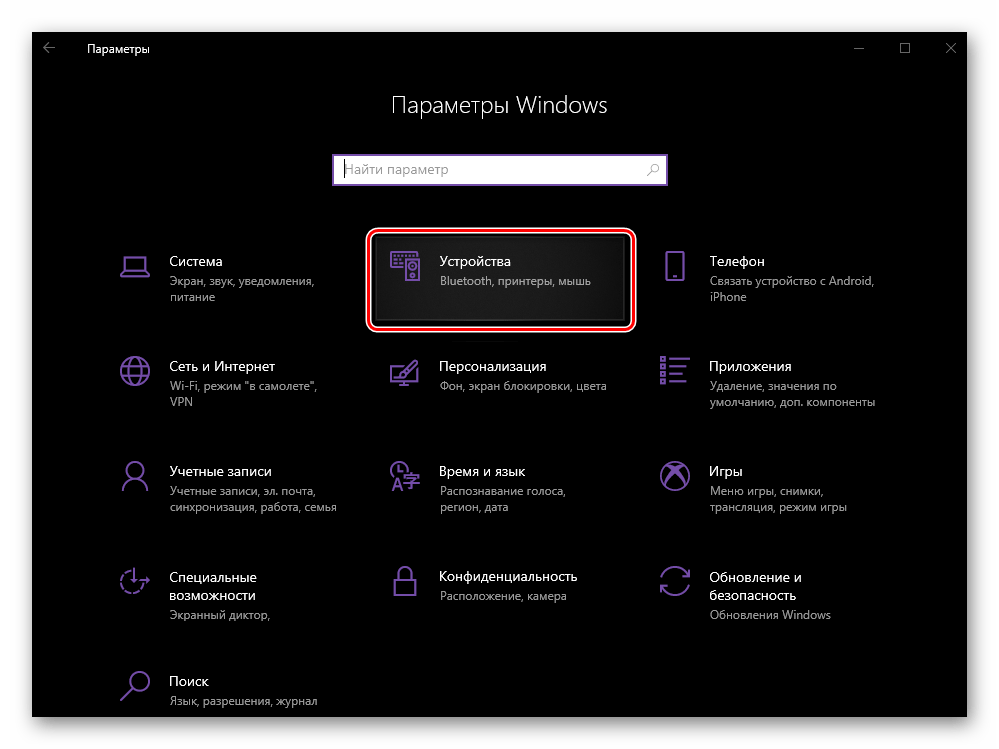
- Из списка представленных в окне разделов выберите «Устройства».
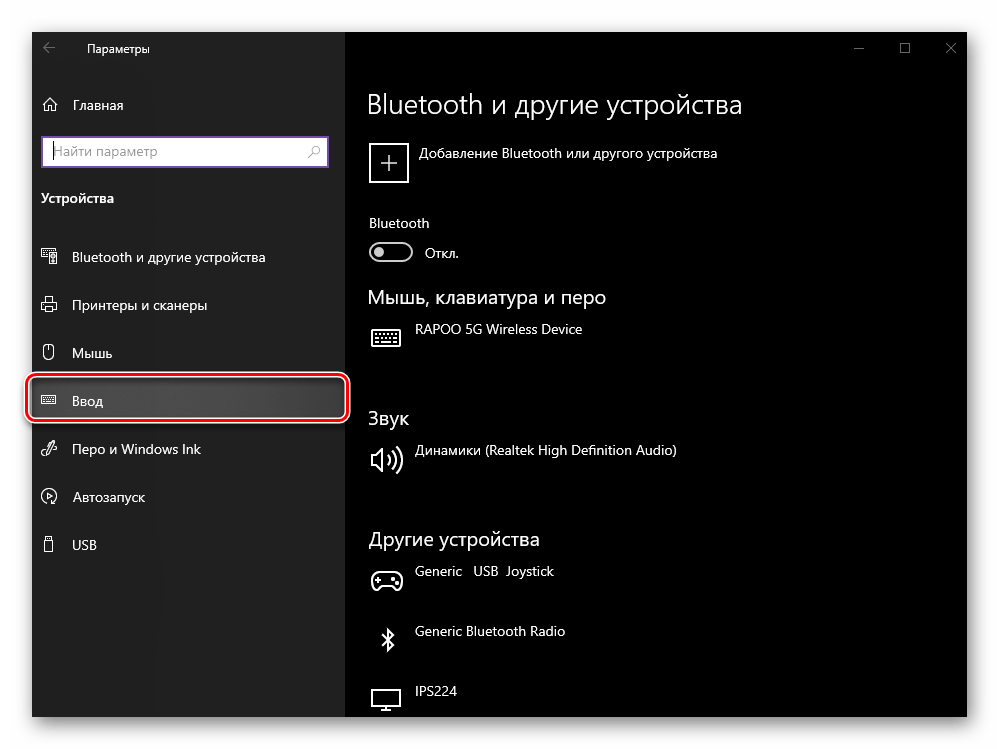
- В боковом меню перейдите во вкладку «Ввод».
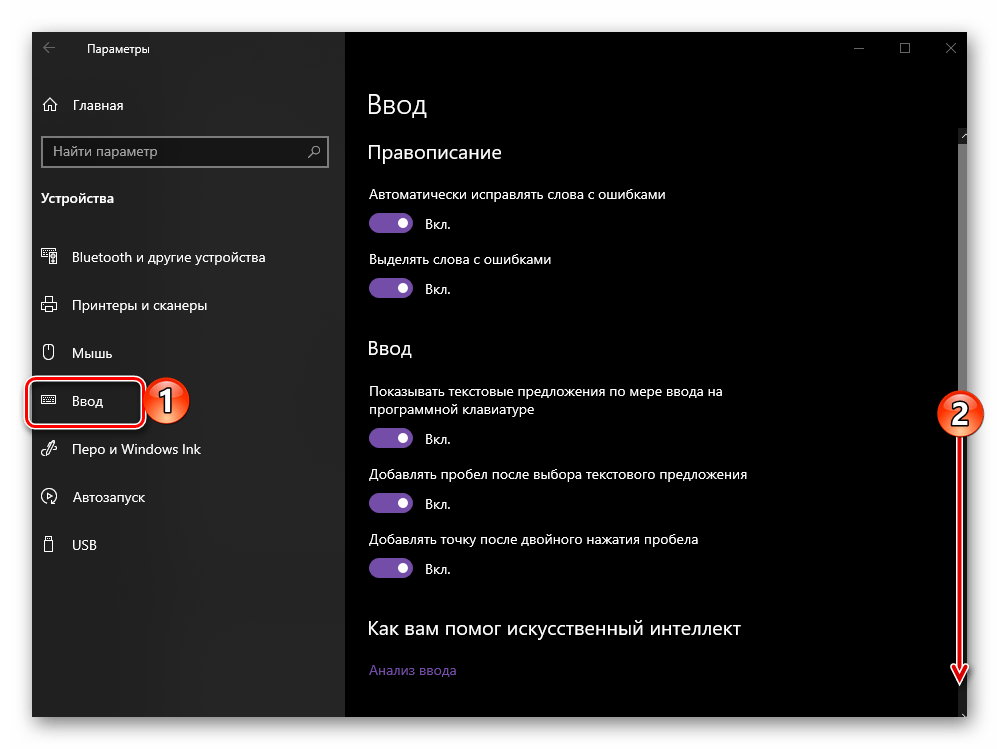
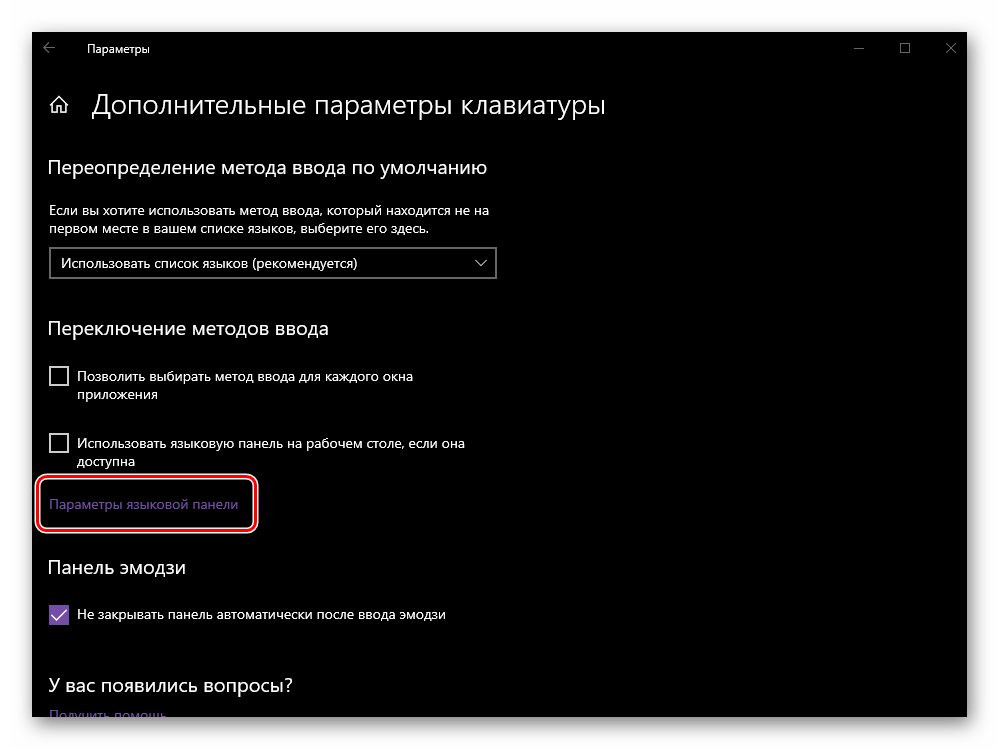
- Пролистайте вниз перечень представленных здесь опций

и перейдите по ссылке «Дополнительные параметры клавиатуры».
- Далее выберите пункт «Параметры языковой панели».
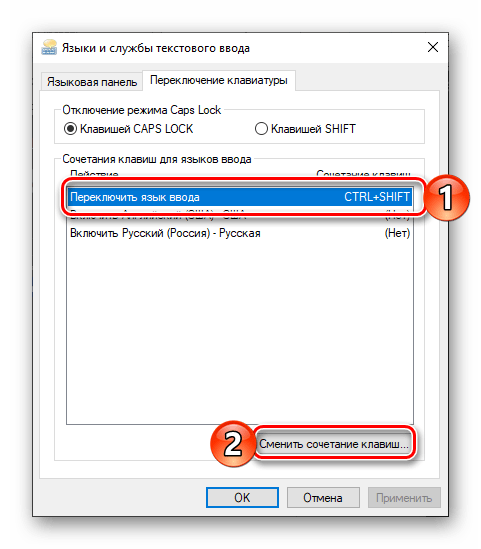
- В открывшемся окне, в списке «Действие», нажмите сначала по пункту «Переключить язык ввода» (если до этого он не был выделен), а затем по кнопке «Сменить сочетание клавиш».
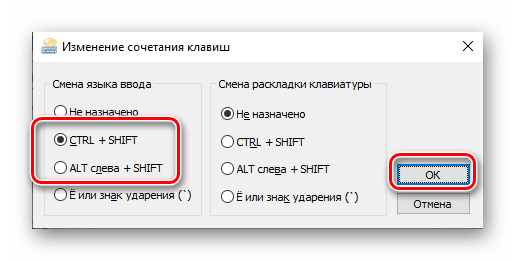
- Оказавшись в окне «Изменение сочетания клавиш», в блоке «Смена языка ввода» выберите одну из двух доступных и хорошо всем знакомых комбинаций, после чего нажмите «ОК».
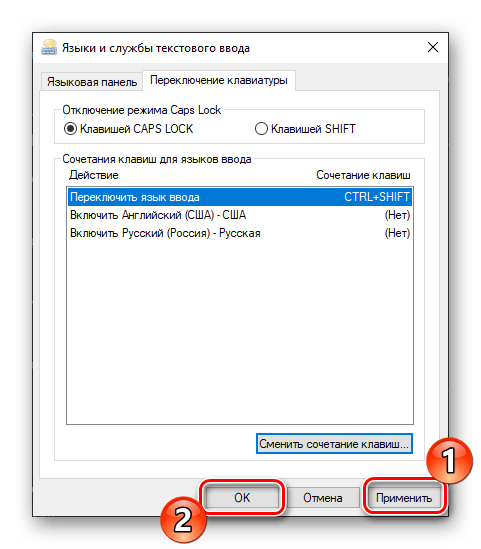
- В предыдущем окне поочередно кликните по кнопкам «Применить» и «ОК», чтобы закрыть его и сохранить заданные вами параметры.
- Внесенные изменения сразу же вступят в силу, после чего вы сможете переключать языковую раскладку посредством установленной комбинации клавиш.

Вот так легко, хотя и отнюдь не интуитивно понятно, настраивается смена раскладки в последней на сегодняшний день (конец 2018 года) версии Виндовс 10. В предшествующих ей все делается более очевидно, о чем и расскажем далее.
Windows 10 (версия 1803)
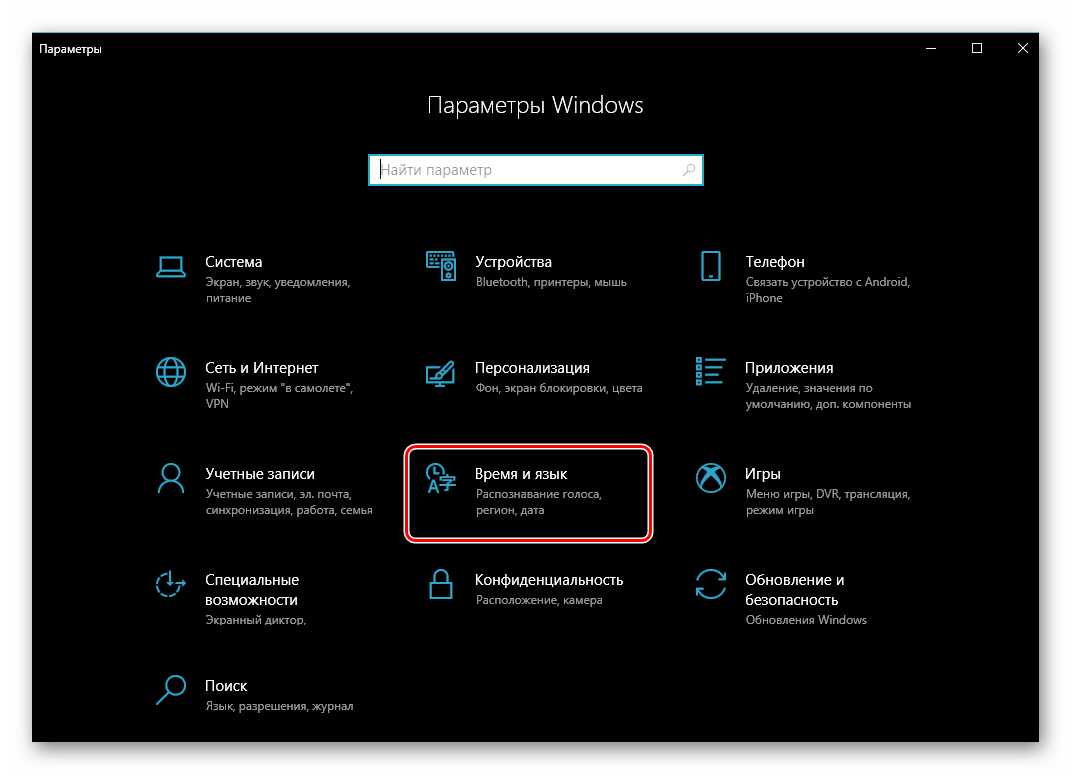
Решение озвученной в теме нашей сегодняшней задачи в данной версии Виндовс тоже осуществляется в ее «Параметрах», правда, в другом разделе этого компонента ОС.
- Нажмите «WIN+I», чтобы открыть «Параметры», и перейдите к разделу «Время и язык».
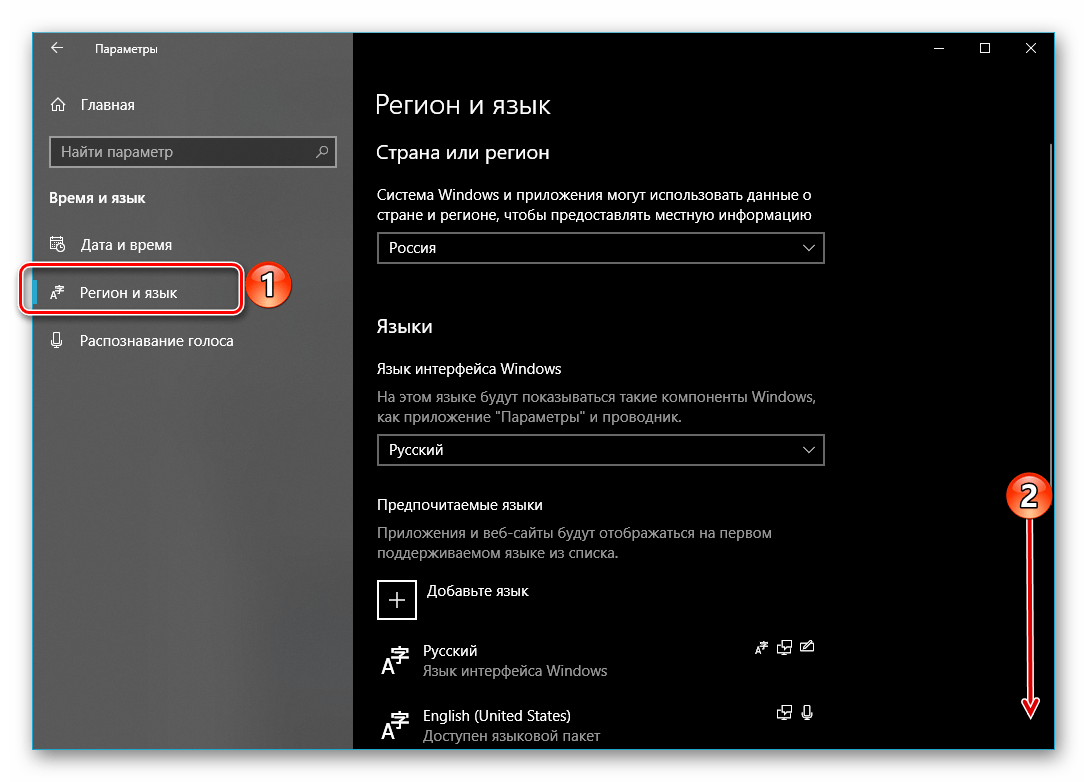
- Далее перейдите во вкладку «Регион и язык», расположенную в боковом меню.
- Пролистайте в самый низ перечень доступных в данном окне опций

и перейдите по ссылке «Дополнительные параметры клавиатуры».
- Выполните действия, описанные в пунктах №5-9 предыдущей части статьи.

Если сравнивать с версией 1809, можно смело сказать, что в 1803 расположение раздела, предоставляющего возможность настройки переключения языковой раскладки, было более логичным и понятным. К сожалению, с обновлением об этом можно забыть.
Windows 10 (до версии 1803)
В отличие от актуальных «десяток» (по крайней мере, на 2018 год), настройка и управление большинством элементов в версиях до 1803 осуществлялось в «Панели управления». Там же мы с вами можем задать свою комбинацию клавиш для смены языка ввода.
Читайте также: Как открыть «Панель управления» в Виндовс 10
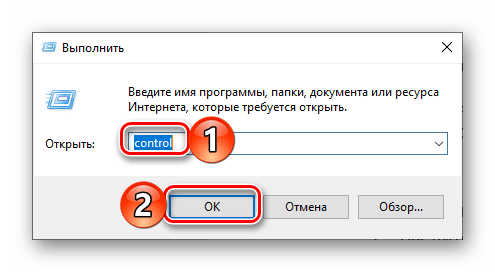
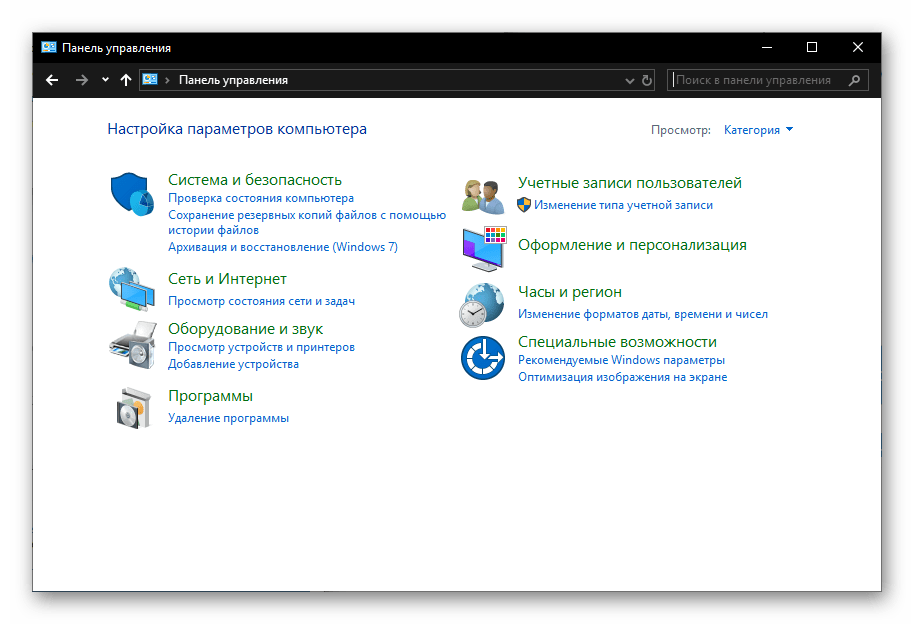
- Откройте «Панель управления». Проще всего это сделать через окно «Выполнить» — нажмите «WIN+R» на клавиатуре, введите команду
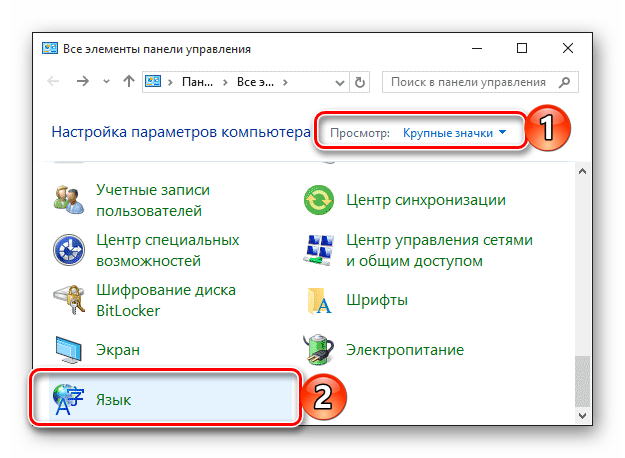
«control»без кавычек и нажмите кнопку «ОК» или клавишу «Enter». - Переключитесь на режим просмотра «Значки» и выберите пункт «Язык», либо, если установлен режим просмотра «Категория», перейдите к разделу «Изменение способа ввода».
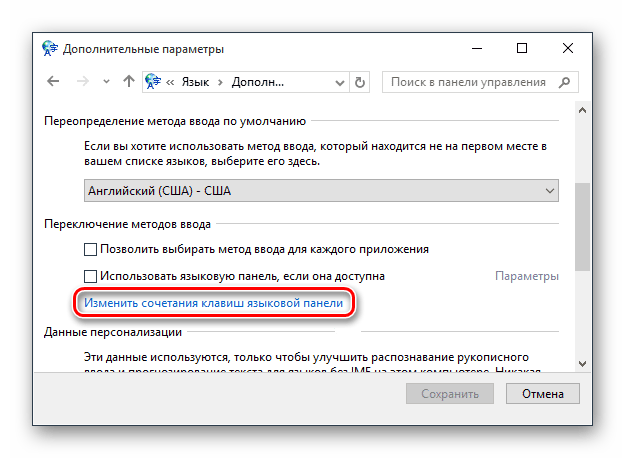
- Далее, в блоке «Переключение методов ввода» кликните по ссылке «Изменить сочетание клавиш языковой панели».
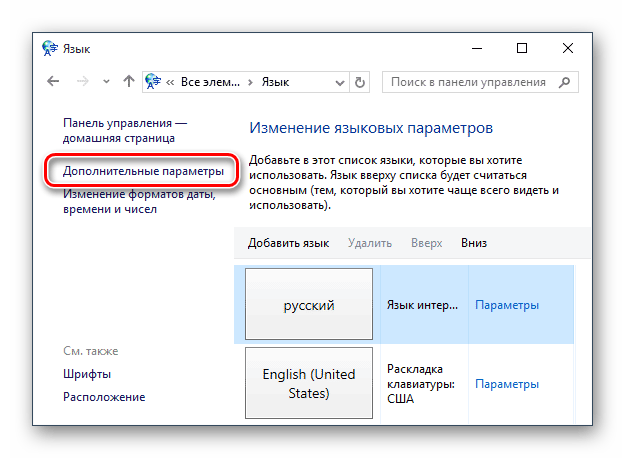
- В боковой (левой) панели открывшегося окна нажмите по пункту «Дополнительные параметры».
- Выполните действия, описанные в шагах №6-9 части данной статьи «Windows 10 (версия 1809)», рассмотренной нами в первую очередь.
Рассказав о том, как настраивается сочетание клавиш для смены раскладки в старых версиях Виндовс 10 (как бы странно это не звучало), мы все же возьмем на себя смелость порекомендовать вам обновиться, в первую очередь, из соображений безопасности.
Читайте также: Как обновить Windows 10 до последней версии
Дополнительно
К сожалению, заданные нами настройки переключения раскладки в «Параметрах» или «Панели управления» применяются только ко «внутренней» среде операционной системы. На экране блокировки, где для входа в Windows вводится пароль или пин-код, по-прежнему будет использоваться стандартная комбинация клавиш, она же будет установлена для других пользователей ПК, если таковые есть. Изменить такое положение дел можно следующим образом:
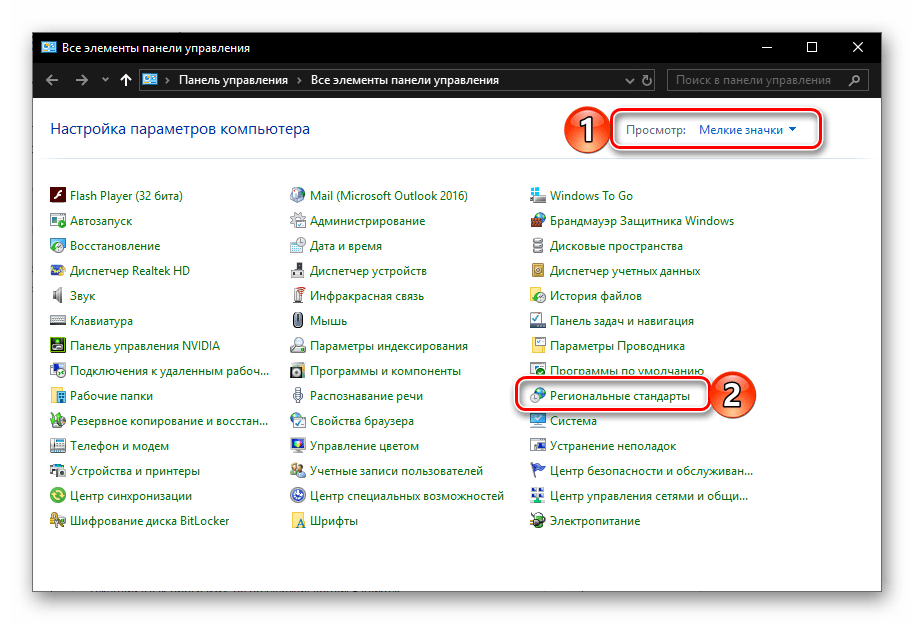
- Любым удобным способом откройте «Панель управления».
- Активировав режим просмотра «Мелкие значки», перейдите к разделу «Региональные стандарты».
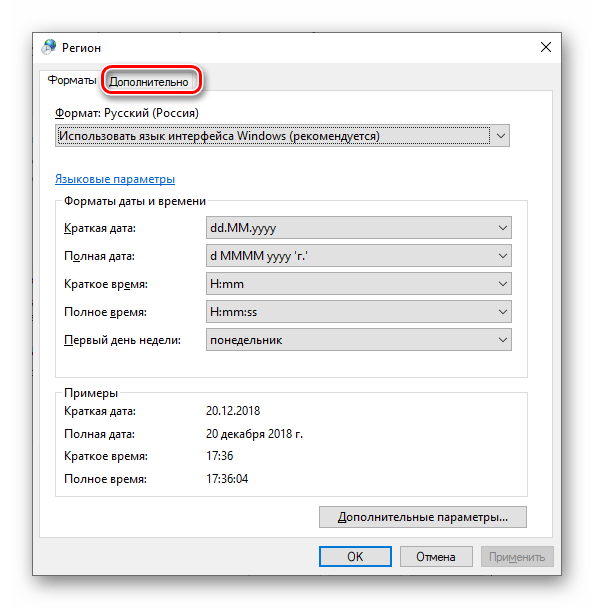
- В открывшемся окне откройте вкладку «Дополнительно».
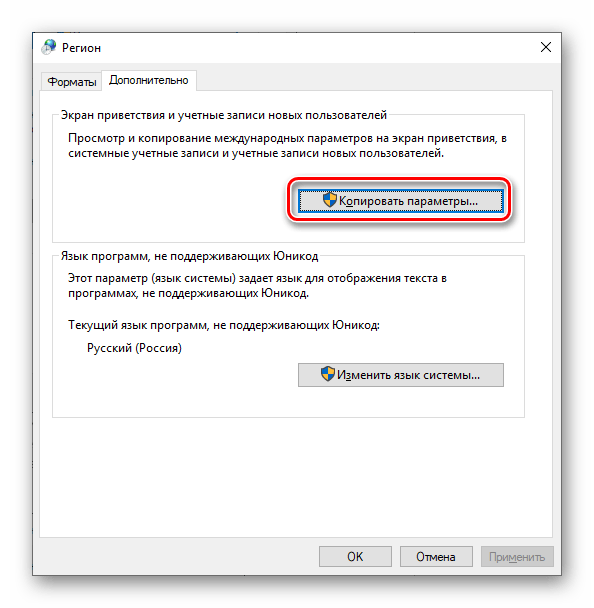
- Важно:
Для выполнения дальнейших действий необходимо обладать правами администратора, ниже представлена ссылка на наш материал о том, как их получить в Виндовс 10.
Подробнее: Как получить права администратора в Windows 10
Нажмите по кнопке «Копировать параметры».
- В нижней области окна «Параметры экрана…», которое будет открыто, установите галочки напротив только первого или сразу двух пунктов, расположенных под надписью «Копировать текущие параметры в», после чего нажмите «ОК».

Для закрытия предыдущего окна тоже нажмите «ОК».
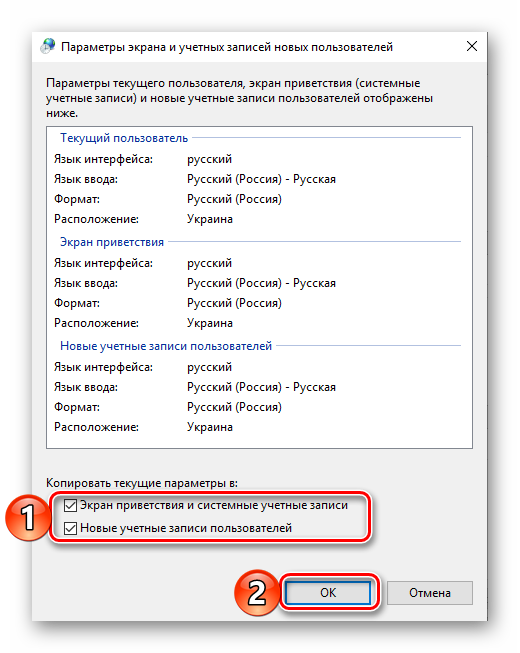
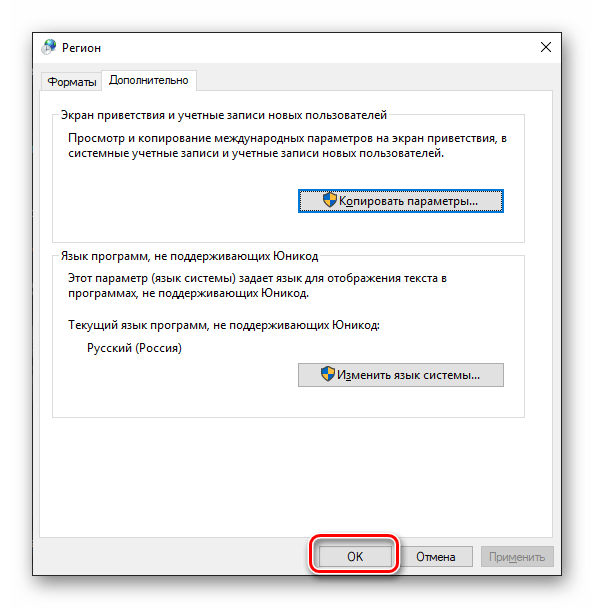
Выполнив вышеописанные действия, вы сделаете так, что комбинация клавиш для переключения раскладки, настроенная на предыдущем этапе, будет работать в том числе на экране приветствия (блокировки) и в других учетных записях, если таковые имеются в операционной системе, а также в тех, которые вы будете создать в будущем (при условии, что был отмечен и второй пункт).
Заключение
Теперь вы знаете, как настроить переключение языковой раскладки в Windows 10, независимо от того, установлена ли на вашем компьютере последняя ее версия или одна из предыдущих. Надеемся, эта статья была полезна для вас. Если же по рассмотренной нами теме остались вопросы, смело задавайте их в комментариях ниже.
Наша группа в TelegramПолезные советы и помощь