Настройка панели задач windows 10 gpo

В домене Active Directory вы можете централизованно управлять макетом начального экрана (Start Layout) меню Пуск и панели задач на компьютерах пользователей Windows 10 с помощью групповых политик. Это позволяет назначить одинаковые настройки, вид и местоположение значков и ярлыков в меню Пуск и панели задач пользователям различных подразделений компании в зависимости от используемых програм и убедиться, что все рабочие места настроены одинаково.

Содержание:

  • Экспорт/импорт макета меню Пуск в Windows 10 с помощью PowerShell
  • Распространение макета начального экрана пользователям с помощью GPO
  • Partial Lockdown – частичная блокировка макета начального экрана Windows
  • Управление закрепленными ярлыкам в панели задач с помощью GPO

Экспорт/импорт макета меню Пуск в Windows 10 с помощью PowerShell

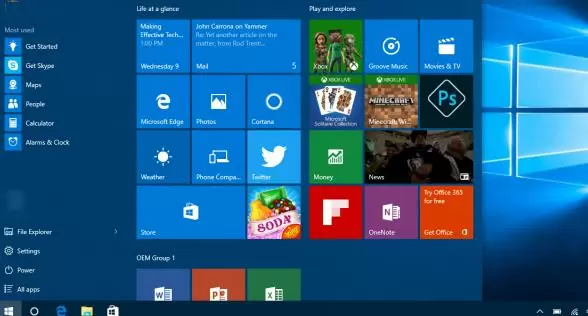
Самый простой способ получить макет стартового меню Пуск в Windows 10 — вручную настроить внешний вид и элементы рабочего стола на эталонном ПК. Создайте ярлыки (плитки) для необходимых приложений, закрепите и сгруппируйте их, удалите ненужные элементы. Затем вы можете экспортировать текущее описание элементов стартового меню в xml файл.

Шаблон начального экрана Windows 10

Экспортировать текущие настройки можно с помощью PowerShell командлета Export-StartLayout:

Export-StartLayout –path c:\ps\StartLayoutW10.xml

Export-StartLayout PowerShell

Вы можете вручную импортировать данный шаблон стартового меню на другом компьютере Windows 10 с помощью командлета Import-StartLayout:

Import-StartLayout –LayoutPath c:\ps\StartLayoutW10.xml  –MountPath c:\

Примечание. Параметр MountPath указывает на путь, куда смонтирован .wim файл образа системы.

Основной недостаток командлета ImportStartLayout – он импортирует макет начального экрана не к профилю текущего пользователя, а к профилю пользователя по умолчанию (в каталоге C:\Users\Default\AppData\Local\Microsoft\Windows\Shell\ появляется файл Layoutmodification.xml). Данный XML макет начального экрана применится только к новым пользователя при первом входе в систему

Распространение макета начального экрана пользователям с помощью GPO

Чтобы распространить файл с макетом меню Пуск на компьютеры домена с помощью групповых политик (GPO), нужно скопировать полученный XML файл в каталог Netlogon на котроллере домена. Затем откройте консоль управления доменными групповыми политиками Group Policy Management Console (GPMC.msc) и создайте новую или отредактируйте существующую политику и назначьте ее на OU с пользователями.

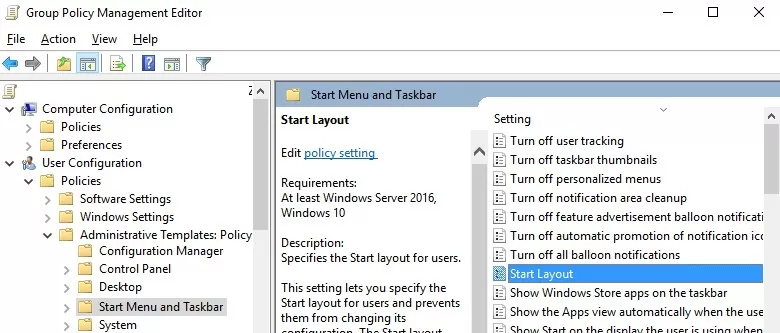
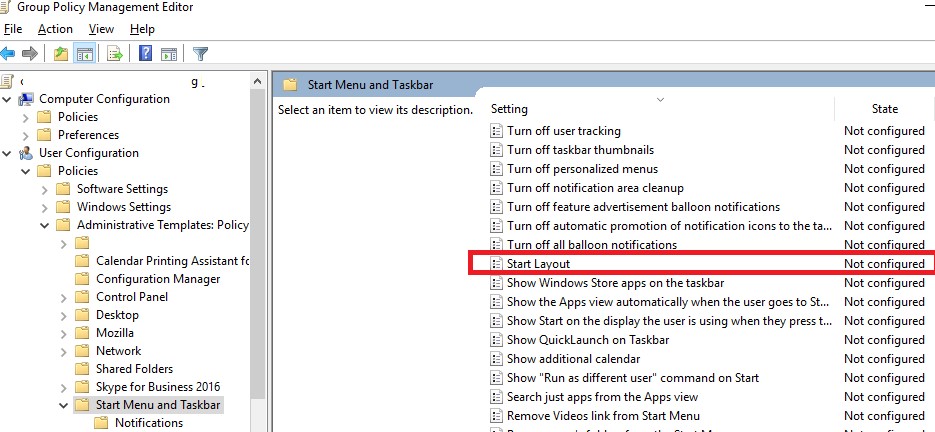
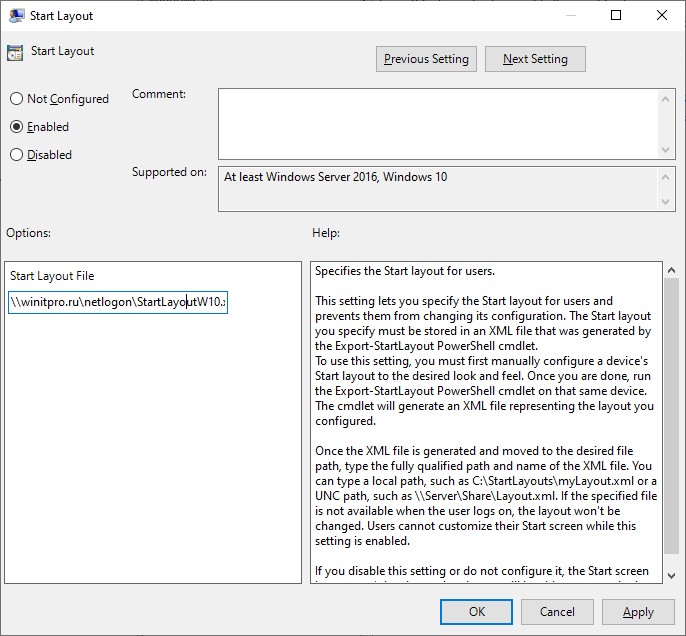
В редакторе GPO найдите политику с именем Start Layout (Макет начального экрана) в секции User Configuration -> Policies -> Administrative Templates -> Start Menu and Taskbar (также вы можете привязать макет меню Пуск к компьютеру, для этого нужно настроить политику в секции Computer Configuration).

Политика XML макет начального экрана в windows 10

Примечание. Эту политику можно настроить с любого компьютера при наличие следующих файлов административных шаблонов: StartMenu.admx и StartMenu.adml (в Windows 10 / Windows Server 2016 они уже имеются).

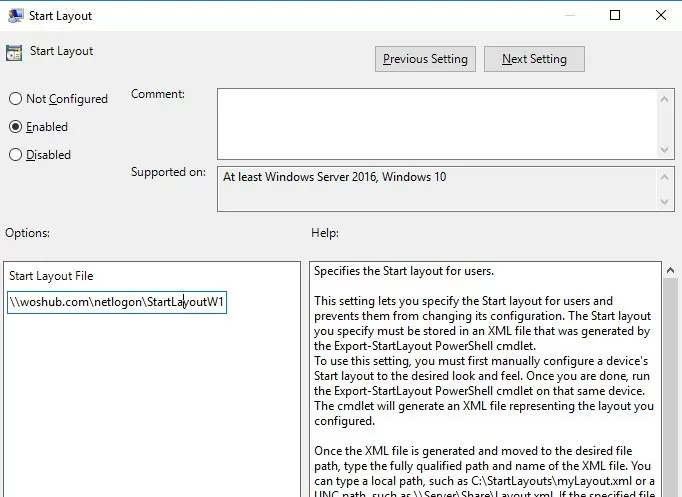
Откройте политику, включите ее (Enabled) и в поле Start layout file укажите UNC путь к xml файлу, содержащему макет стартового экрана Windows 10 на контроллере домена (например, \\domain.ru\netlogon\StartLayoutW10.xml).

start lyayout file: указать xml файл с макетом в GPO

Если вы хотите применить политику Start Layout, только к определенным группам пользователям или компьютерам, вы можете использовать Security Filtering или WMI фильтры GPO.

Важно. По умолчанию при задании параметров стартового меню и таскбара пользователей с помощью GPO, пользователи не могу изменять его элементы (удалять ярлыки, добавлять собственные). Чтобы разрешить пользователю менять элементы макета, нужно воспользоваться возможность частичной блокировки макета начального экрана (Partial Lockdown), описанной в секции ниже.

Partial Lockdown – частичная блокировка макета начального экрана Windows

Режим Partial Lockdown, появился в Windows 10 версии 1511, и позволяет указать группы плиток стартового меню, которые пользователи не могут изменить. Т.е. вы можете разрешить пользователяи изменять любые ярлыки, значки и плитки кроме определенной группы ярлыков корпоративных приложений.

Чтобы указать заблокированные группы начального экрана, нужно отредактировать XML файл с макетом с помощью любого текстового редактора (для редактирования XML файла удобно использовать Notepad++).

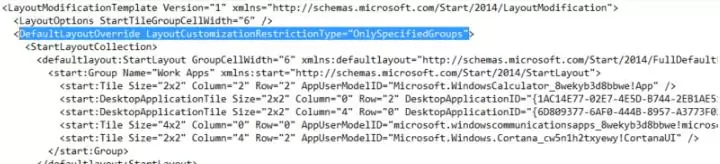
Откройте ваш файл StartLayoutW10.xml и найдите в нем секцию <DefaultLayoutOverride>. Чтобы заблокировать определенную группу ярлыков, нужно в атрибуты данной секции изменить на <DefaultLayoutOverride LayoutCustomizationRestrictionType=”OnlySpecifiedGroups”>.

DefaultLayoutOverride LayoutCustomizationRestrictionType=”OnlySpecifiedGroups” data-lazy-src=

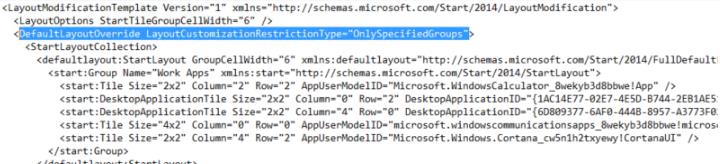
Сохраните изменения в xml файле и распространите его на пользователей. Таким образом, будут заблокированы для редактирования пользователями только группы плиток (ярлыков), указанные в XML файле.

Partial Lockdown работает как в Windows 10 Enterprise так и в Pro (начиная с 1703).

В Windows 10 есть небольшой глюк, когда назначенный ярлык Internet Explorer не появляется после применения XML файла макета через GPO.

Для решения проблемы нужно отредактировать XML файл и исправить строку для ярлыка IE следующим образом:

<start:DesktopApplicationTile Size="2x2" Column="2" Row="2" DesktopApplicationLinkPath="%ALLUSERSPROFILE%\Microsoft\Windows\Start Menu\Programs\Internet Explorer.lnk" />

И затем через GPO нужно скопировать ярлык “Internet Explorer.lnk” в каталог %ALLUSERSPROFILE%\Microsoft\Windows\Start Menu\Programs\.

Управление закрепленными ярлыкам в панели задач с помощью GPO

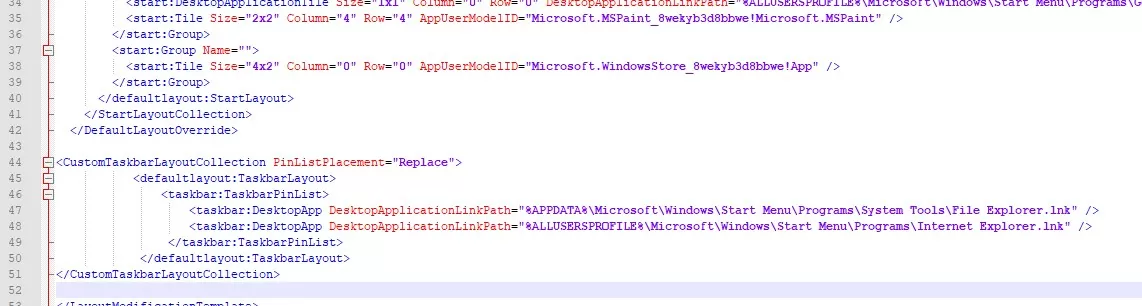
Начиная с Windows 10 1607 вы можете управлять закрепленными ярлыками в панели задач через тот же самый XML файл с макетом начального экрана. Чтобы добавить собственные закрепленные ярлыки в XML макет, который распространяется через GPO, отредактируйте XML файл. После тега </DefaultLayoutOverride> нужно добавить следующий код:

<CustomTaskbarLayoutCollection PinListPlacement="Replace"
xmlns:taskbar="http://schemas.microsoft.com/Start/2014/TaskbarLayout">
<defaultlayout:TaskbarLayout>
<taskbar:TaskbarPinList>
<taskbar:DesktopApp DesktopApplicationLinkPath="%APPDATA%\Microsoft\Windows\Start Menu\Programs\System Tools\File Explorer.lnk" />
<taskbar:DesktopApp DesktopApplicationLinkPath="%ALLUSERSPROFILE%\Microsoft\Windows\Start Menu\Programs\Internet Explorer.lnk" />
</taskbar:TaskbarPinList>
</defaultlayout:TaskbarLayout>
</CustomTaskbarLayoutCollection>

CustomTaskbarLayoutCollection настройка закрепленных ярлыков в таскбаре через xml файл

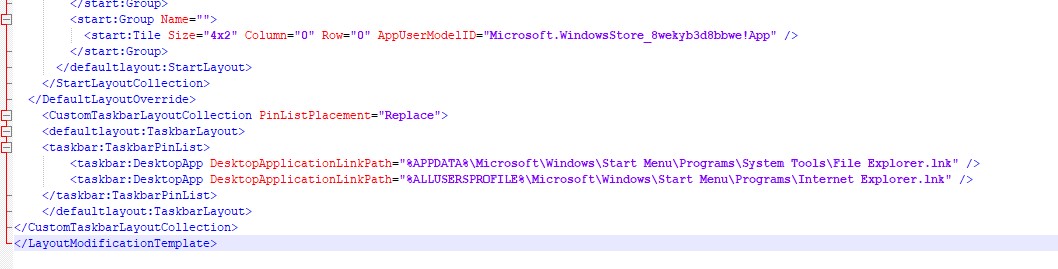
В данном примере мы добавим в панель задач два ярлыка: File Explorer и Internet Explorer. После применения политики на компьютере пользователя, в таскбаре появятся два закрепленных ярлыка.

В старых версия Windows 10 (до 1607) ярлыки приложений в панели задач настраивается по другому. Попробуем разобраться как.

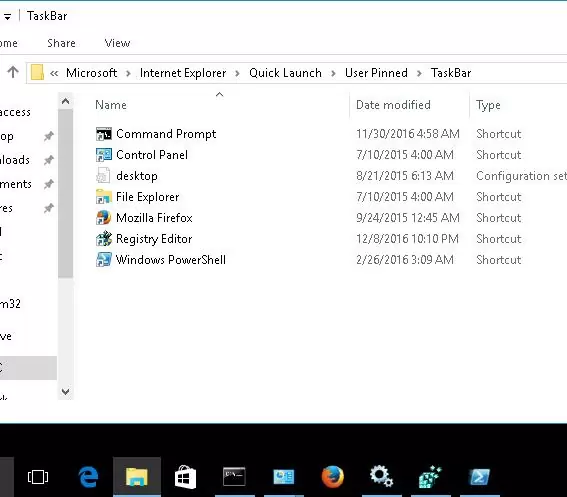
Список закрепленных в панели задач ярлыков хранится в Windows 10 в каталоге %APPDATA%\Microsoft\Internet Explorer\Quick Launch\User Pinned\TaskBar.

Управление закрепленными значками в таскбаре

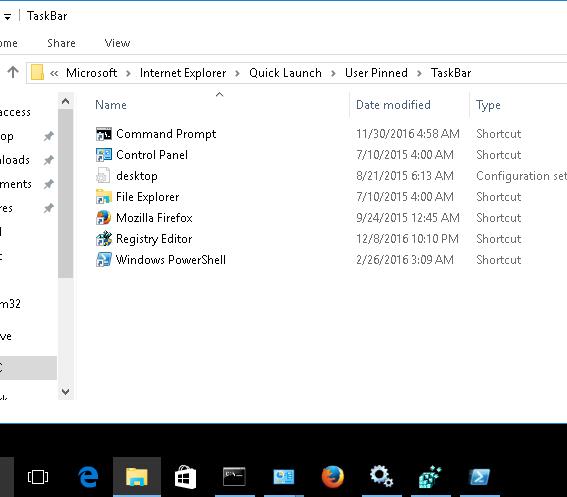
При этом параметры закрепленных в панели задач приложений хранятся в закодированном виде в ветке реестра HKEY_CURRENT_USER\Software\Microsoft\Windows\CurrentVersion\Explorer\Taskband.

Для распространения настроек таскбара на компьютеры компании, нужно экспортировать содержимое данной ветки в reg файл:

reg export HKCU\Software\Microsoft\Windows\CurrentVersion\Explorer\Taskband c:\ps\PinnedItem.reg

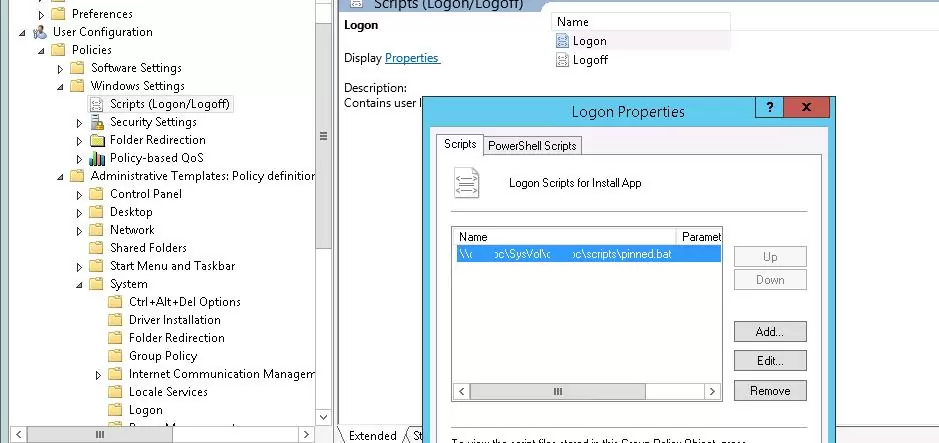
Этот reg файл и каталог с ярлыками (%APPDATA%\Microsoft\Internet Explorer\Quick Launch\User Pinned\TaskBar) нужно скопировать в общедоступную сетевую папку (например в Netlogon). И в редакторе доменной групповой политики (User Configuration- > Policies -> Windows Settings -> Scripts (Logon/Logoff) -> Logon) добавить логон скрипт с кодом:

@echo off
set Logfile=%AppData%\pinned.log

if not exist "%Logfile% (
IF EXIST "%APPDATA%\Microsoft\Internet Explorer\Quick Launch\User Pinned\TaskBar" GOTO NOTASKDIR
del "%APPDATA%\Microsoft\Internet Explorer\Quick Launch\User Pinned\TaskBar\*" /S /Q
:NOTASKDIR
xcopy /E /Y "\\domain.ru\netlogon\PinnedItem " "%APPDATA%\Microsoft\Internet Explorer\Quick Launch\User Pinned"
regedit.exe /s "\\domain.ru\netlogon\PinnedItem.reg "

echo PinnedItemImported on %date% at %time% >> %LogFile%
taskkill /IM explorer.exe /f
start explorer.exe
}

Примечание. В скрипт добавлена проверка наличия файла %AppData%\pinned.log. Если файл имеется, значит данный скрипт уже выполнялся на этом компьютере и второй раз его применять не нужно, чтобы пользователь мог удалить или добавить собственные ярлыки в таскбаре.

Логон срипт

Теперь при входе пользователя в систему ему будет применен “корпоративный” набор закрепленных иконок приложений в панели задач.

In release 1607 of Windows 10, Microsoft has now introduced a way to configured the Windows 10 taskbar using Group Policy. This feature allows Group Policy administrator to now add or replace the application that appear on the taskbar. This actually is the first time since Windows Vista that a Group Policy administrator has been able to configure the taskbar for a user. Before this you could only configure it by modifying the default users profile, but user would then be able to remove and reconfigured the taskbar however they wanted.

To implement this feature you need to first create an XML file that has the required configuration information. This is actually just an addition to the same XML file you might already have deployed to configure your start menu. In fact the policy setting to apply the taskbar settings is the exact same “Start Layout” policy setting under “Users\Administrator Templates\Start Menu and Taskbar” that was introduced in Windows 8.1.

image

Once you have configured the XML then save it to a network share that has “Authenticated Users” read permission and then point the policy setting to use the XML file you saved at this location.

Below is an example XML that will apply Paint, Microsoft Mail and Command Prompt to the taskbar.

<?xml version=”1.0″ encoding=”utf-8″?>
<LayoutModificationTemplate
xmlns=”http://schemas.microsoft.com/Start/2014/LayoutModification”
xmlns:defaultlayout=”http://schemas.microsoft.com/Start/2014/FullDefaultLayout”
xmlns:start=”http://schemas.microsoft.com/Start/2014/StartLayout”
xmlns:taskbar=”http://schemas.microsoft.com/Start/2014/TaskbarLayout”
Version=”1″>
<CustomTaskbarLayoutCollection>
<defaultlayout:TaskbarLayout>
<taskbar:TaskbarPinList>
<taskbar:DesktopApp DesktopApplicationLinkPath=”%ALLUSERSPROFILE%\Microsoft\Windows\Start Menu\Programs\Accessories\Paint.lnk” />
<taskbar:UWA AppUserModelID=”microsoft.windowscommunicationsapps_8wekyb3d8bbwe!microsoft.windowslive.mail” />
<taskbar:DesktopApp DesktopApplicationLinkPath=”%appdata%\Microsoft\Windows\Start Menu\Programs\System Tools\Command Prompt.lnk” />
</taskbar:TaskbarPinList>
</defaultlayout:TaskbarLayout>
</CustomTaskbarLayoutCollection>
</LayoutModificationTemplate>

As you can see the Microsoft Windows Live Mail is a Universal Windows Application, if you want to pin another UWA like this you can pin it to your start menu and then use the “Export-StartLayout” PowerShell command to get the exact AppUserModelID value for the app you want to pin.

So now you have the XML you want to use and you want to apply it simply configured and apply the “Start Layout” policy (as per above) to the user and they will now get the apps pin’d to the taskbar next time they logon.

image

Note that even though you have added the pinned items to the taskbar you should be aware that they can still un-pin these items. Unlike other policy settings however, they will not come back after the next Group Policy refresh. Instead they will only come back once the XML modification date is changed. The easiest way to do this is to simple open then XML configuration file on the central server and then just save the un-modified file. Note: This feature does not allow you to remove the “Cortana” and “Task View” items using this feature.

For more information about this feature including a complete breakdown of the XML schema check out https://technet.microsoft.com/en-us/itpro/windows/manage/configure-windows-10-taskbar

In the Active Directory domain, you can centrally manage and customize Start Menu and Taskbar Layout on Windows 10 users’ computers using Group Policy. This allows you to assign the same settings for icons and pinned app shortcuts in the Start Menu and Taskbar pane for users of various departments. You can set the custom layout for different user groups and make sure that all workstations are configured in the same way.

Contents:

  • How to Export and Import Start Menu Layout in Windows 10 With PowerShell?
  • Deploying Windows 10 Start Menu Layout using GPO
  • Using Partial Lockdown to Lock Certain Items in Start Menu
  • How to Manage Pinned Taskbar Items Using GPO?

How to Export and Import Start Menu Layout in Windows 10 With PowerShell?

The easiest way to get Start Menu Layout template on Windows 10 (Windows Server 2016) is to manually customize desktop appearance and elements on a reference user profile. Create shortcuts (tiles) for the necessary applications, pin and group them, delete unnecessary elements. Then you can export the current Start Menu layout to an XML file.

Windows 10 manage Start Layout via GPO

You can export the current Start Menu settings using PowerShell cmdlet Export-StartLayout:

Export-StartLayout –path c:\ps\StartLayoutW10.xml

Later you can manually import this Start Menu layout on another Windows 10 computer using the Import-StartLayout cmdlet as follows:

Import-StartLayout –LayoutPath c:\ps\StartLayoutW10.xml  –MountPath c:\

Note. MountPath specifies the path where .wim file of the system image is mounted.

The main drawback of the Import-StartLayout cmdlet is that it doesn’t import the Start layout to the current user profile, but to the default user profile (the file Layoutmodification.xml appears in C:\Users\Default\AppData\Local\Microsoft\Windows\Shell\ directory). This XML Start Screen layout will only apply to the new user profiles when they log in for the first time.

Deploying Windows 10 Start Menu Layout using GPO

To deploy your Windows 10 Start Menu layout on domain computers using Group Policy (GPO), you need to copy your layout XML file to the NETLOGON directory on the domain controller. Then run Group Policy Management Console (GPMC.msc) and create a new policy or edit the existing one and link it to the users OU.

In the Group Policy Management Editor, find the policy with the name Start Layout in the section User Configuration -> Policies -> Administrative Templates -> Start Menu and Taskbar. You can also assign the Start Menu layout to the computer objects. In this case you need to configure the same policy in the Computer Configuration section.

Windows 10 Start Menu and Taskbar policy - Start Layout

Note. You can configure this policy from any computer if you have the following administrative template files: StartMenu.admx and StartMenu.adml (they already exist in Windows 10 / Windows Server 2016).

Open the policy, enable it and in Start Layout File field specify the UNC path to the XML file containing Windows 10 Start Menu layout settings (for example, \\woshub.com\netlogon\StartLayoutW10.xml).

set windows10 start menu layout xml file via gpo

If you want to apply the Start Layout policy only to specific user groups or computers, you can use Security Filtering or WMI GPO filters.

Important. By default, when configuring Start Menu and Taskbar settings for user computers using the Group Policy, users cannot change its elements (delete shortcuts, pin their own items). To allow the user to change the layout elements, use the Partial Lockdown feature described in the following section.

Using Partial Lockdown to Lock Certain Items in Start Menu

Partial Lockdown mode, that appeared in Windows 10 1511, allows you to specify groups of Start Menu tiles that users cannot change. Those you can allow the user to change any shortcuts, icons and tiles except for a certain group of corporate app shortcuts.

To set the locked Start Layout groups, you need to manually edit the XML layout file using any text editor (it is convenient to use Notepad ++ to edit the XML file).

Open your file StartLayoutW10.xml and find the following section in it: <DefaultLayoutOverride>. To lock the specific shortcut group, you need to change the attribute of this section to <DefaultLayoutOverride LayoutCustomizationRestrictionType=”OnlySpecifiedGroups”>

LayoutCustomizationRestrictionType

Save the changes to the XML file and deploy it on users’ computers using GPO. Thus, only groups of tiles (shortcuts) specified in the XML file will be locked. All other groups, their contents, and element settings can be changed by users.

Partial Lockdown works both in Windows 10 Enterprise and Pro (starting from 1703 build).

Windows 10 has a small bug when the assigned Internet Explorer shortcut doesn’t appear after applying the XML layout file via GPO. To solve the problem, you need to edit the XML file and change the line for the IE shortcut as follows:

<start:DesktopApplicationTile Size="2x2" Column="2" Row="2" DesktopApplicationLinkPath="%ALLUSERSPROFILE%\Microsoft\Windows\Start Menu\Programs\Internet Explorer.lnk" />

And then through the GPO you need to copy the shortcut file “Internet Explorer.lnk” to the %ALLUSERSPROFILE%\Microsoft\Windows\Start Menu\Programs\.

How to Manage Pinned Taskbar Items Using GPO?

Starting from Windows 10 1607, you can manage pinned shortcuts in the taskbar via the same XML file with the Start Menu layout. To add your own pinned shortcuts to the XML layout, which is distributed through the GPO, edit the XML file. After the </DefaultLayoutOverride> tag, add the following code:

<CustomTaskbarLayoutCollection PinListPlacement="Replace"><defaultlayout:TaskbarLayout><taskbar:TaskbarPinList><taskbar:DesktopApp DesktopApplicationLinkPath="%APPDATA%\Microsoft\Windows\Start Menu\Programs\System Tools\File Explorer.lnk" /><taskbar:DesktopApp DesktopApplicationLinkPath="%ALLUSERSPROFILE%\Microsoft\Windows\Start Menu\Programs\Internet Explorer.lnk" /></taskbar:TaskbarPinList></defaultlayout:TaskbarLayout></CustomTaskbarLayoutCollection>

CustomTaskbarLayoutCollection TaskbarPinList

In this example, we will add two pinned shortcuts to the taskbar: File Explorer and Internet Explorer. After applying the policy on the user’s computer, two pinned shortcuts will appear in the Windows 10 taskbar.

In older Windows builds (pre 1607), pinned app shortcuts in the taskbar are configured differently. Let’s try to figure out how.

The list of pinned taskbar shortcuts in Windows 10 is stored in the user profile folder %APPDATA%\Microsoft\Internet Explorer\Quick Launch\User Pinned\TaskBar.

setting pinned taskbar apps using gpo

And the settings of the pinned apps are stored encoded in the following registry key HKEY_CURRENT_USER\Software\Microsoft\Windows\CurrentVersion\Explorer\Taskband.

To distribute these Taskbar settings to domain computers, you need to export the contents of this registry key on a reference computer to a REG file:

reg export HKCU\Software\Microsoft\Windows\CurrentVersion\Explorer\Taskband c:\script\PinnedItem.reg

Copy this REG file and the directory containing icons (%APPDATA%\Microsoft\Internet Explorer\Quick Launch\User Pinned\TaskBar) to a shared network folder (for example, you can use NETLOGON). In the Domain Group Policy Editor (User Configuration -> Policies -> Windows Settings -> Scripts (Logon/Logoff) -> Logon), add a logon script (deploy_taskbar.bat) with the following code:

@echo off
set Logfile=%AppData%\pinned.log
if not exist "%Logfile% (
IF EXIST "%APPDATA%\Microsoft\Internet Explorer\Quick Launch\User Pinned\TaskBar" GOTO NOTASKDIR
del "%APPDATA%\Microsoft\Internet Explorer\Quick Launch\User Pinned\TaskBar\*" /S /Q
:NOTASKDIR
xcopy /E /Y "\\woshub.com\netlogon\PinnedItem " "%APPDATA%\Microsoft\Internet Explorer\Quick Launch\User Pinned"
regedit.exe /s "\\woshub.com\netlogon\PinnedItem.reg "
echo PinnedItemImported on %date% at %time% >> %LogFile%
taskkill /IM explorer.exe /f
start explorer.exe
)

Note. The check if the file %AppData%\pinned.log exists is included in this script. If the file exists, this script has already been run on this computer and it doesn’t have to be reapplied so that a user could delete or add its own icons in the Taskbar.

gpo: logon script

You can deploy this Reg file to domain computers not through a batch file, but through a GPO.

A user at logon will see the corporate set of pinned app icons in the Windows 10 Taskbar.

If you run Windows 10 in a corporate settings you will likely want to set a few default entries in the START menu and TASKBAR.  If nothing else you will likely want to remove the default junk that Microsoft clutters the START menu with.  Fortunately after a few hours of playing with this we have found it can be done without too much effort.

Note this only works on Windows 10 Enterprise and Education although this has been some talk of it working on Pro

  1. On a any Windows 10 PC, setup the START menu as you would like
  2. Open a PowerShell as an Admin and export the Start menu configuration using this command:

    export-startlayout –path <UNC path><file name>.xml

  3. If you want to allow users to add their own shortcuts, open up your .XML file and change

    <DefaultLayoutOverride>
    to
    <DefaultLayoutOverride LayoutCustomizationRestrictionType="OnlySpecifiedGroups">

  4. Create or Edit a Group Policy
  5. Expand COMPUTER CONFIGURATION (or USER CONFIGURATION) > POLICIES > ADMINISTRATIVE TEMPLATES > START MENU AND TASKBAR
  6. Set START LAYOUT to ENABLED and point it the .XML file you created in step 2

To customize the Taskbar:

  1. Open the .XML file you created in step 2
  2. At the end of the first line insert the following before the ‘>’

     xmlns:taskbar="http://schemas.microsoft.com/Start/2014/TaskbarLayout"

  3. Scroll to the bottom the .XML file and insert the following between:

    </DefaultLayoutOverride> and </LayoutModificationTemplate><CustomTaskbarLayoutCollection PinListPlacement="Replace">
    <defaultlayout:TaskbarLayout>
    <taskbar:TaskbarPinList>
    <taskbar:DesktopApp DesktopApplicationLinkPath="%APPDATA%\Microsoft\Windows\Start Menu\Programs\System Tools\File Explorer.lnk" />
    </taskbar:TaskbarPinList>
    </defaultlayout:TaskbarLayout>
    </CustomTaskbarLayoutCollection>

Add as many <taskbar:DesktopApp DesktopApplicationLinkPath=  entries as you want.

To Add INTERNET EXPLORER to the START Menu or Taskbar:

IE is an oddity in Windows 11 and Microsoft is going out of their way to make it hard to use.  If you add Internet Explorer to the Start Menu or Taskbar using the process above, it will only work for the single user you tested with.  It will not show up for everyone else.  The reason for this is because MS put the IE shortcut into the USERS folder and not into ALLUSERS.

The solution is to simply create a new IE shortcut and put it into the ALL USERS menu ( %ALLUSERSPROFILE%\Microsoft\Windows\Start Menu ) and then point the Start Menu and Taskbar shortcut to that shortcut.  Yes, this is a bit silly, but that is the dance you have to do.

You can then simply modify the XML file from

...%USERPROFILE%\APPDATA\ROAMING...\Internet Explorer.lnk" />
to
...%ALLUSERSPROFILE%\Microsoft\Windows\Start Menu\Programs\Internet Explorer.lnk" />

_______________________________

FREQUENTLY ASKED QUESTIONS:

I found these FAQ’s in a TechNet article and I think they are very useful so I thought you might like to read them too:

  • Q: What happens if a user deletes an item we pinned to the Taskbar using the .xml file and Group Policy?
     A: Users can delete an item we pinned to the Taskbar. However, the icon will be added back the next time that we modify the .xml file. If you don’t modify the .xml file, the user’s configuration won’t change.
  • Q:What if I add a shortcut that the user has already pinned to the Taskbar?
     A: Nothing happens. Windows won’t add a second icon.
  • Q:What if we pin an item the end user has already pinned to the Taskbar, and then we remove the icon through our .xml file?
     A: The icon won’t be removed.
  • Q:What if we remove a pinned app in the.xml file that we deployed with Group Policy?
     A: The pinned item will be removed from the Taskbar as soon the Group Policy is applied when the user logs on again.
  • Q:What if a user changes the order of the pinned items in the Taskbar?
     A: The user’s order configuration will be maintained when we add or remove items.
  • Q:What happens to the Taskbar if the computer is no longer targeted by a Group Policy?
     A: The Taskbar will keep the configuration that we previously deployed via Group Policy.
  • Q:What happens if I add Taskbar shortcuts to an .xml that is applied to Windows 10 1511 machines?
     A: Older version of Windows 10 can’t read this .xml file and will ignore it altogether.

REFERENCES:

If you have more questions you will find these useful:

https://technet.microsoft.com/en-us/itpro/windows/configure/customize-windows-10-start-screens-by-using-group-policy

https://social.technet.microsoft.com/Forums/en-US/d2a5d021-b5d9-4ce2-ba2c-d5bf0baf2345/exportimport-startlayout-doesnt-retain-ie-11-pin?forum=win10itprosetup

https://technet.microsoft.com/en-us/itpro/windows/configure/start-layout-xml-desktop

One of the most annoying things on a new Windows 10 installation are the advertising and bloatware live tiles. Instead of deleting every single tile manually every time you install a  new computer, we can simply Customize Windows 10 Start Layout with Group Policy and disable the live tiles completely or partly – It’s up to you.

Dealing with new client installations almost daily and having no deployment system in place (yet), there is a chance you are equally annoyed as me by those Windows Live Tiles.

Gladly, if you have a Domain in place, there is a fix for that.

You can simply create a Start Menu to your liking on a freshly installed computer and create a GPO to distribute this start menu to every user this GPO is applied to.

I will guide you through the steps real quick, it’s relatively easy, just follow along.

Step 1: Create a Start Menu Layout on a freshly installed computer

It is recommended that you use a freshly installed computer as a template, although not necessary. You can already pre-install software and add icons for Chrome or Firefox or whatever else software you use to your Start Menu and organize everything in groups.

Now let me get one thing straight first, there are 2 ways on how to do this:

  1. You pre-set the live tiles and the user can not change anything on it later, he can’t delete groups, symbols or icons by himself. This is mostly not desired.
  2. You pre-set the live tiles and the user can change things, he can add new groups and icons himself, although he can not change the groups and icons that you already pre-set, as indicated with the lock symbol.
    Pre-set tiles

I will get to how to choose between option 1 and 2 later.

After you set the start menu as you want to look like, continue with step 2.

Step 2: Exporting the Start Menu Layout as a .xml file

Now we need to do some PowerShell magic.

2.1 Export the Start Menu Layout as a .xml file

2.2 - Click on Start and type: PowerShell
2.3 - Right click the PowerShell icon and select Run as Administrator
2.4 - Type: Export-StartLayout -path C:\Users\YourUserName\Desktop\StartMenuLayout.xml and hit Enter
Run Powershell as Administrator
Type the Syntax

You find the StartMenuLayout.xml on your Desktop.

Step 3: Create a share on your server and transfer the StartMenuLayout.xml

Now it’s up to you, the easiest way is to simply create a share on your server and transfer the StartMenuLayout.xml from your client to your server. You should be familiar how to do this when you want to implement a GPO anyway 🙂

Step 4: Create a new GPO or edit a existing GPO

This is entirely up to you, either you create a new GPO (I prefer having everything well organized so I create a new one.) Or edit a existing GPO.

4.1 Create a new GPO or edit a exisiting GPO

4.2 - Right click on your GPO and click on Edit
4.3 - Navigate to: User Configuration / Policies / Administrative Templates / Start Menu and Taskbar
4.4 - Find the entry: Start Layout
4.5 - Right click and click on Edit
Edit your GPO
4.6 - Check: Enabled
4.7 - Enter the Path to your StartMenuLayout.xml
4.8 - Hit OK
Edit the Start Layout

Step 5: Deciding between Option 1 and Option 2

As mentioned above, you can choose between Option 1 (User can’t change anything) and Option 2 (User can change the non-pre-set stuff).

If you choose Option one, continue with Step 6.

If you choose Option two, right-click on the StartMenuLayout.xml and click on edit.

6.1 - Changeing the StartMenuLayout.xml

6.2 - Find the line <DefaultLayoutOverride>
6.3 - Change the line to: <DefaultLayoutOverride Layout­CustomizationRestrictionType="OnlySpecifiedGroups">
6.4 - Save the file

Your file should then look like this:

DISCLAIMER: This option only worked for me on one specific system and windows build, it did not work on the newest build of Windows 10 (12.05.2017 Date of writing the article).

This is the official way how to do it from Microsoft. You can read on this here. It’s called partial Start Screen Layout.

Step 6: Linking the GPO to an Organizational Unit and running gp update /force

This is the last step for whichever option you chose.

Now link the GPO to an Organizational Unit that you want the GPO applied to.

6.1 - Run GPUPDATE

6.2 - Click on Start on your Server and type: cmd
6.3 - Enter: gpupdate /force
Run gpupdate /force on the server

That’s it! You are done and now free of annoying Live Tiles or at least you only get the tiles you choose for.

Hope this helps.

If you like this content please also check out my YouTube channel and leave a comment below, consider buying stuff over my Amazon Affiliate links to help me keep content coming for free.

See you soon

Понравилась статья? Поделить с друзьями:
0 0 голоса
Рейтинг статьи
Подписаться
Уведомить о
guest

0 комментариев
Старые
Новые Популярные
Межтекстовые Отзывы
Посмотреть все комментарии
  • Windows nt shell scripting
  • Авито для windows phone
  • Установка windows 10 arm на surface rt
  • Vkmusic приложение для windows
  • Windows 7 maximal key