
В современных версия Outlook (начиная с Outlook 2016) отсутствует возможность ручной настройки почтового профиля пользователя для подключения к ящику на Exchange Server или Exchange Online (Microsoft 365). Разработчики считают, что Outlook должен всегда использоваться механизм Autodiscover для автоматического обнаружения параметров подключения к ящику Exchange.
Однако в некоторых случаях автообнаружение не может быть выполнено (не правильно настроен Autodiscover, проблемы с доступом к файлу Autodiscover.xml и т.п.) и пользователю нужно настроить подключение к Exchange серверу вручную. Разберемся, как это сделать.
В этой статье мы рассмотрим, как в Outlook 2019/2016 и Outlook 365 вручную настроить подключение к почтовому ящику на on-premises Exchange Server или в Microsoft 365 (Exchange Online) с помощью локального XML файла, который содержит необходимую информацию для подключения. Этот метод поможет вам настроить подключение к ящику, если автообнаружение не может быть выполнено (не правильно настроен Autodiscover, проблемы с доступом к файлу Autodiscover.xml, ограничен доступ в интернет, используется прокси, подключение ко внутреннему Exchange через VPN и т.п.).
Совет. Конечно, в первую очередь мы рекомендуем корректно настроить Autodiscover для вашего почтового домена. К ручной настройке подключения в Outlook нужно переходить только в случаях, если не удается настроить автообнаружение.
Содержание:
- Метод 1. Локальный XML редирект файл для Outlook
- Метод 2. Локальный Autodiscover.XML файл с настройками подключения к Exchange
- Метод 2.1. Пример Autodiscover.XML для Microsoft 365 (Exchange Online)
Метод 1. Локальный XML редирект файл для Outlook
- Если у вас есть URL для доступа к вашему Exchange через OWA, проверьте, доступен ли следующий URL адрес _https://mail.winitpro.ru/autodiscover/autodiscover.xml (для доступа к xml файлу вам придется выполнить аутентификацию). Если файл доступен, перейдите к следующему шагу. Если нет – переходите ко второму методу настройки;

- Создайте на локальном диске компьютера собственный XML файл, который будет перенаправлять Outlook на данный URL адрес с файлом autodiscover.xml. Создайте текстовый файл autodiscover.xml со следующим текстом и сохраните его в локальный каталог на компьютере (например, C:\Autodiscover\autodiscover.xml)
<?xml version="1.0" encoding="utf-8" ?>
<Autodiscover xmlns="http://schemas.microsoft.com/exchange/autodiscover/responseschema/2006">
<Response xmlns="http://schemas.microsoft.com/exchange/autodiscover/outlook/responseschema/2006a">
<Account>
<AccountType>email</AccountType>
<Action>redirectUrl</Action>
<RedirectUrl>_https://mail.winitpro.ru/autodiscover/autodiscover.xml</RedirectUrl>

</Account>
</Response>
</Autodiscover>Примечание. Замените значение в параметре RedirectUrl на URL адрес Autodiscover для вашего домена.
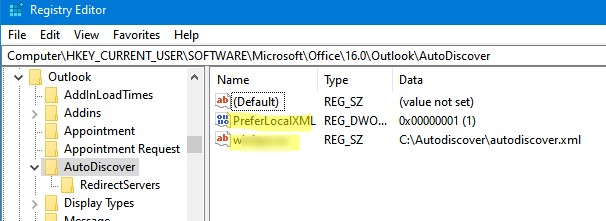
- Откройте редактор реестра, перейдите в ветку HKEY_CURRENT_USER\SOFTWARE\Microsoft\Office\16.0\Outlook\AutoDiscover и создайте ключ типа REG_SZ с именем вашего домена и значением, указывающим на созданный ранее XML файл.Например,
- Имя параметра: winitpo.ru
- Значение: C:\Autodiscover\autodiscover.xml
Затем создайте в этой же ветке REG_DWORD параметр PreferLocalXML со значением 1. После этого, Outlook при выполнении автообнаружения всегда в первую очередь будет обращаться к вашему локальному файлу autodiscover.xml;

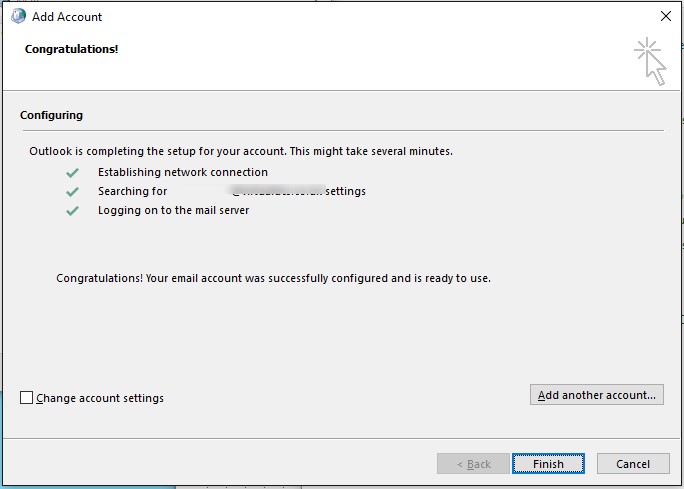
- Откройте Outlook, запустить мастер добавления новой учетной записи. Укажите свое имя, email адрес и пароль. Если вы все сделали верно, Outlook должен настроить подключение к ящику Exchange автоматически.


Метод 2. Локальный Autodiscover.XML файл с настройками подключения к Exchange
Если с вашего компьютера недоступен URL с файлом autodiscover.xml, придется вручную создать локальный XML файл с полными настройками пользователя для подключения к яшику Exchange или Microsoft. Пример параметров, которые нужно указывать в этом файле можно получить с уже настроенного клиента Outlook. Для этого, перейдите в папку C:\Users\%username%\AppData\Local\Microsoft\Outlook, где вы найдете файл с именем [длинныйGUID]-Autodiscover.xml.

Скопируйте этот файл, измените, если нужно параметры учетной записи и поместите его в папку C:\Autodiscover\autodiscover.xml. Затем выполните 3 и 4 шаг из первого метода.
Если получить такой файл не удаётся, можно попробовать создать его вручную. Формат файла должен быть таким.
При использовании Outlook Anywhere (RPC/HTTP)
<?xml version="1.0" encoding="utf-8"?>
 <Autodiscover xmlns="http://schemas.microsoft.com/exchange/autodiscover/responseschema/2006">
<Response xmlns="http://schemas.microsoft.com/exchange/autodiscover/outlook/responseschema/2006a">
<User>
<AutoDiscoverSMTPAddress>[SMTP_ADDRESS]</AutoDiscoverSMTPAddress>
<LegacyDN>[USER_LEGACYDN]</LegacyDN>
</User>
<Account>
<AccountType>email</AccountType>
<Action>settings</Action>
<Protocol>
<Type>EXCH</Type>
<Server>[SERVER_NAME]</Server>
<ServerDN>[SERVER_DN]</ServerDN>
<AuthPackage>[RPC_AUTH_PACKAGE]</AuthPackage>
</Protocol>
<Protocol>
<Type>EXPR</Type>
<Server>[OUTLOOK_ANYWHERE_SERVER]</Server>
<SSL>On</SSL>
<AuthPackage>[HTTP_AUTH_PACKAGE]</AuthPackage>
<ServerExclusiveConnect>on</ServerExclusiveConnect>
<CertPrincipalName>[CERTIFICATE_PRINCIPAL_NAME]</CertPrincipalName>
 <ServerExclusiveConnect>off</ServerExclusiveConnect>
</Protocol>
</Account>
</Response>
</Autodiscover>
При подключении без Outlook Anywhere:
<?xml version="1.0" encoding="utf-8"?>
<Autodiscover xmlns="http://schemas.microsoft.com/exchange/autodiscover/responseschema/2006">
<Response xmlns="http://schemas.microsoft.com/exchange/autodiscover/outlook/responseschema/2006a">
<User>
<AutoDiscoverSMTPAddress>[SMTP_ADDRESS]</AutoDiscoverSMTPAddress>
<LegacyDN>[USER_LEGACYDN]</LegacyDN>
</User>
<Account>
<AccountType>email</AccountType>
<Action>settings</Action>
<Protocol>
<Type>EXCH</Type>
<Server>[SERVER_NAME]</Server>
<ServerDN>[SERVER_DN]</ServerDN>
<AuthPackage>[RPC_AUTH_PACKAGE]</AuthPackage>
</Protocol>
</Account>
</Response>
</Autodiscover>
В данных XML файлах нужно изменить данные в квадратных скобках на информацию, соответствующую вашему домену (ее может выдать администратор Exchange Server или AD).
Метод 2.1. Пример Autodiscover.XML для Microsoft 365 (Exchange Online)
Если вы хотите вручную подключить в Outlook 365/2019/2016 ящик из Microsoft 365 (Exchange Online), вы можете получить все необходимые параметры файла autodiscover.xml для подключения к ящику с помощью PowerShell.
Подключитесь к своему тенанту EOL с помощью PowerShell модуля Exchange Online v2:
Connect-ExchangeOnline -UserPrincipalName [email protected] -ShowProgress $true
Получите параметры ящика пользователя с помощью команды:
Get-Mailbox -Identity kbuldogov | select DisplayName,LegacyExchangeDN,PrimarySmtpAddress,ExchangeGuid|fl

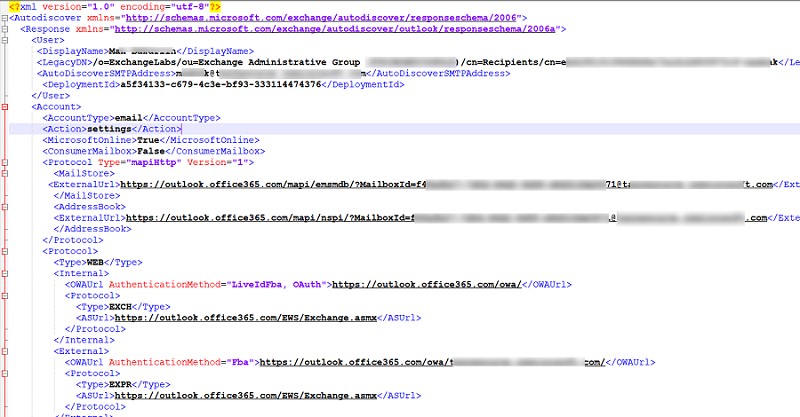
Ниже представлен пример файла Autodiscover.xml для подключения к почтовому ящику в Microsoft 365 (Exchange Online)
Ниже представлен пример готового файла Autodiscover.xml для Exchnage Online. Замените выделенные параметры на значения атрибутов, которые вы получили выше:
<?xml version="1.0" encoding="utf-8"?>
<Autodiscover xmlns="http://schemas.microsoft.com/exchange/autodiscover/responseschema/2006">
<Response xmlns="http://schemas.microsoft.com/exchange/autodiscover/outlook/responseschema/2006a">
<User>
<DisplayName> [DisplayName] </DisplayName>
<LegacyDN>[LegacyExchangeDN] </LegacyDN>
<AutoDiscoverSMTPAddress>[PrimarySmtpAddress] </AutoDiscoverSMTPAddress>
<DeploymentId>1234</DeploymentId>
</User>
<Account>
<AccountType>email</AccountType>
<Action>settings</Action>
<MicrosoftOnline>True</MicrosoftOnline>
<ConsumerMailbox>False</ConsumerMailbox>
<Protocol Type="mapiHttp" Version="1">
<MailStore>
<ExternalUrl>https://outlook.office365.com/mapi/emsmdb/?MailboxId=[ExchangeGuid]@winitpro.ru</ExternalUrl>
</MailStore>
<AddressBook>
<ExternalUrl>https://outlook.office365.com/mapi/nspi/?MailboxId=[ExchangeGuid]@winitpro.ru</ExternalUrl>
</AddressBook>
</Protocol>
<Protocol>
<Type>WEB</Type>
<Internal>
<OWAUrl AuthenticationMethod="LiveIdFba, OAuth">https://outlook.office365.com/owa/</OWAUrl>
<Protocol>
<Type>EXCH</Type>
<ASUrl>https://outlook.office365.com/EWS/Exchange.asmx</ASUrl>
</Protocol>
</Internal>
<External>
<OWAUrl AuthenticationMethod="Fba">https://outlook.office365.com/owa/winitpro.ru/</OWAUrl>
<Protocol>
<Type>EXPR</Type>
<ASUrl>https://outlook.office365.com/EWS/Exchange.asmx</ASUrl>
</Protocol>
</External>
</Protocol>
<Protocol>
<Type>EXHTTP</Type>
<Server>outlook.office365.com</Server>
<SSL>On</SSL>
<AuthPackage>Basic</AuthPackage>
<ServerExclusiveConnect>On</ServerExclusiveConnect>
</Protocol>
</Account>
</Response>
</Autodiscover>
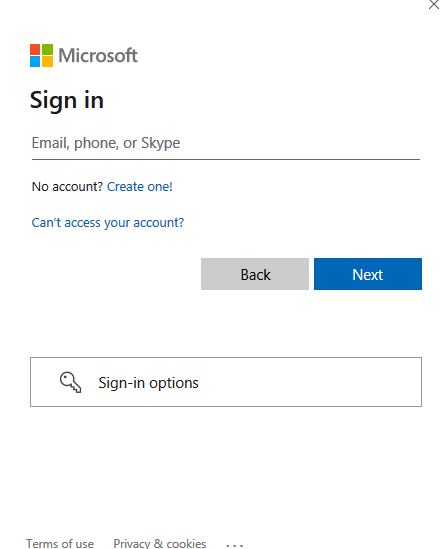
Перезапустите Outlook после настройки учетной записи. При первом запуске должно появиться современное окно проверки подлинности (Modern Authentication) Microsoft 365
Microsoft 365. Введите имя пользователя и пароль. Если для пользователя включен MFA в Microsoft 365, подтвердите вход вторым фактором.
Если при запуске Outlook появляется пустое окно аутентификации Office 365, вы можете исправить эту проблему по этой инструкции.
После этого Outlook подключится к ящику, и вы увидите список почтовых папок и писем
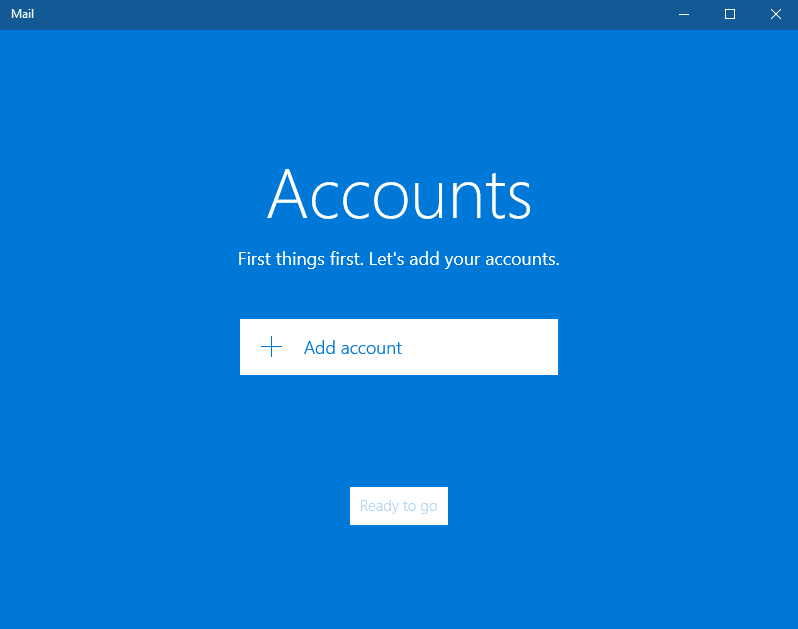
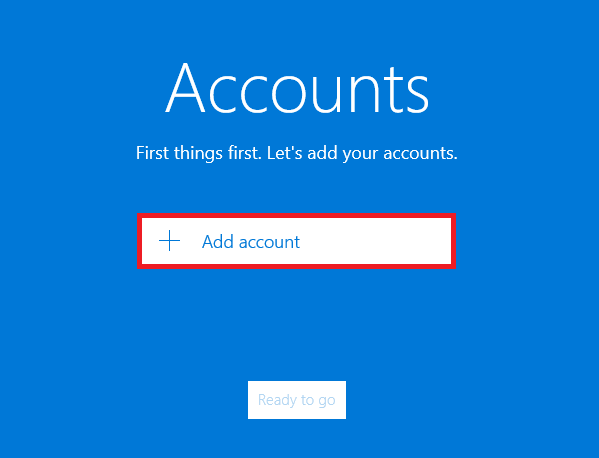
В этом примере мы настроим работу почтовой программы Windows 10 с почтовым ящиком по протоколу Exchange. Для возможности использования Exchange протокола Ваш почтовый ящик должен иметь тарифный план «Рабочий». Если у Вас почтовый ящик по тарифу «Домашний», то предварительно потребуется изменить тарифный план ящика на «Рабочий». Откройте приложение «Почта» и добавьте новую учетную запись.
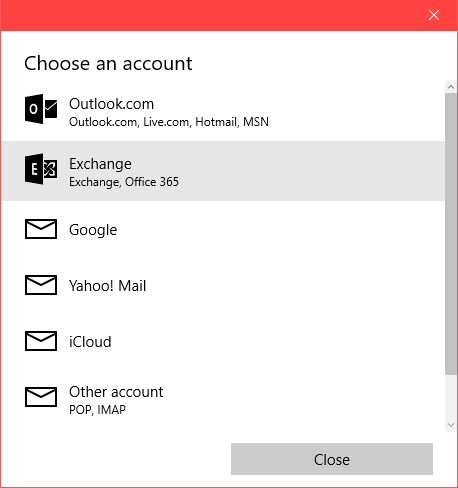
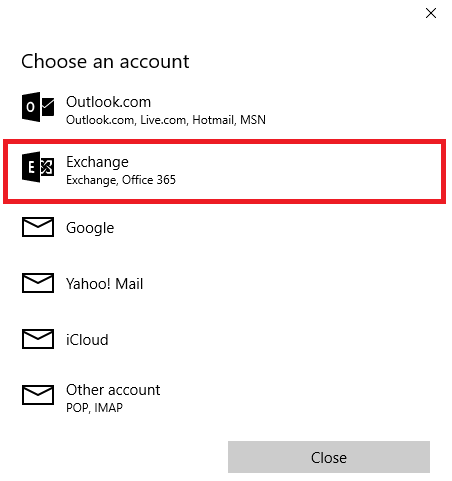
Выберите пункт «Exchange».
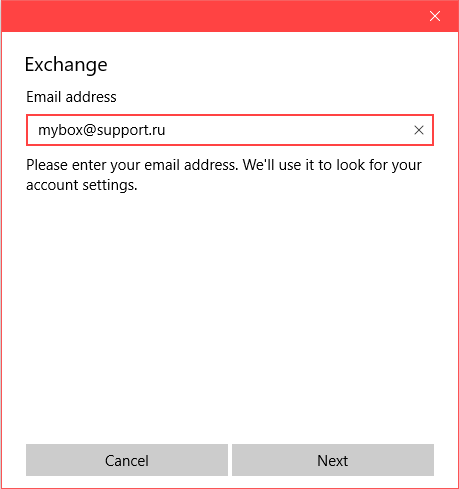
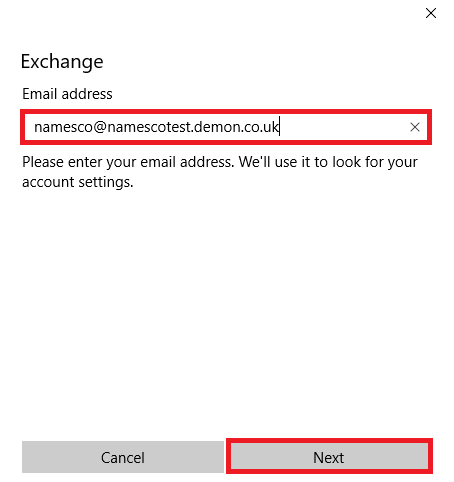
Если DNS-зона домена делегирована нашим NS серверам (ns.masterhost.ru, ns1.masterhost.ru, ns2.masterhost.ru) значит запись Autodiscover уже настроена и Вам достаточно ввести адрес почтового ящика и его пароль. Остальные настройки будут добавлены автоматически.
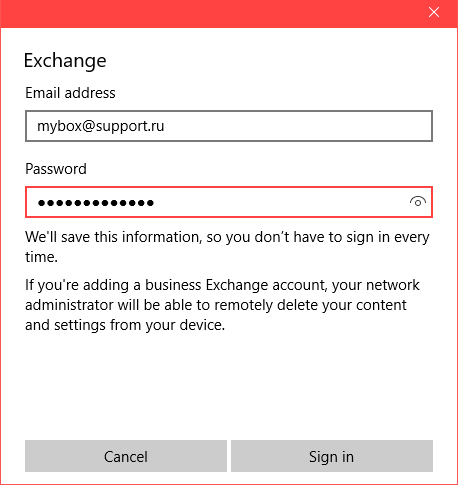
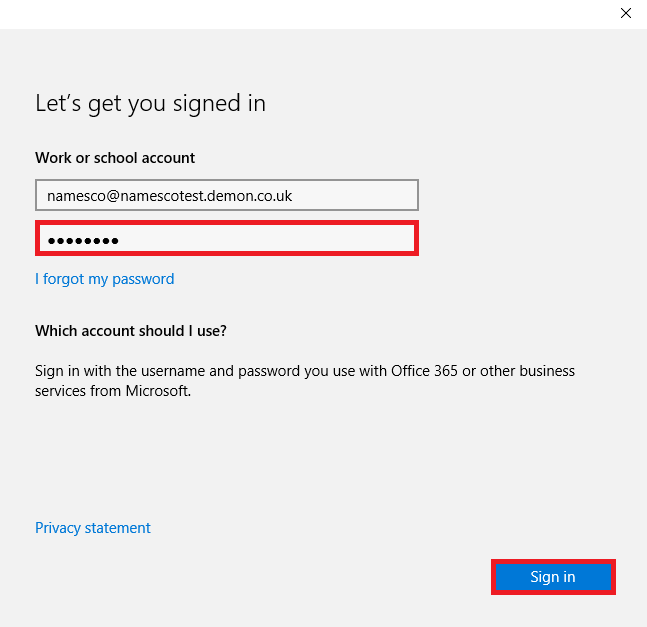
Укажите действующий пароль почтового ящика.
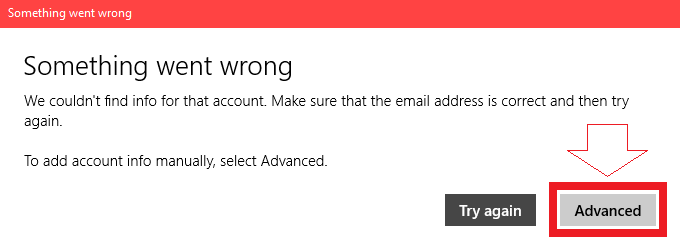
Если запись Autodiscover не настроена Вы увидите диалоговое окно об ошибке в котором нужно нажать на кнопку «Дополнительно» и ввести параметры сервера самостоятельно.
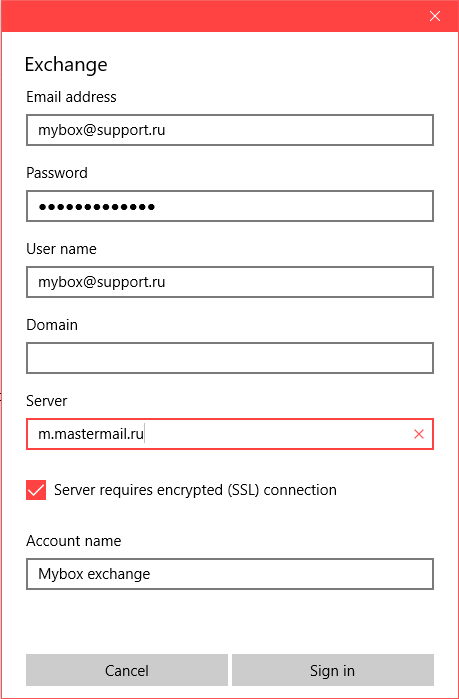
Укажите адрес m.mastermail.ru в поле «Сервер» и нажмите «Вход».
This article will guide you through configuring your email in Mail on Windows 10
Note: names.co.uk does not support third-party software or devices. For more information on Windows Mail, please visit https://support.microsoft.com
The first step is to go to your Windows Start menu and type Mail. Select the Mail option as shown below.
There are two ways in which you can add an account in Mail. They will be listed here as 1a and 1b.
1a – If this is the first time you have loaded up Mail you will need to click on Get Started.
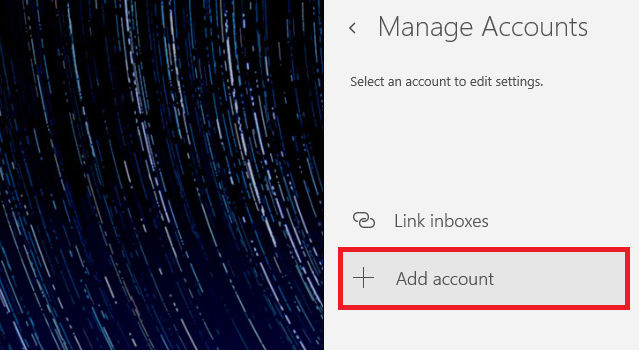
You will then need to click on Add Account.
If this is what you see, please scroll down to Section 2.
If you have already setup an account in Mail before, then you will need to do the following:
Click on the Accounts option at the top left corner.
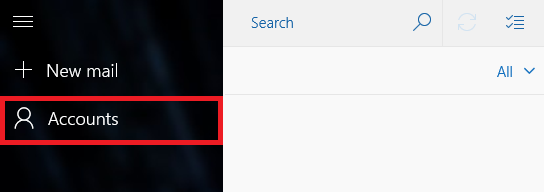
The Manage Accounts option will open up on the right-hand side. Click on Add Account.
Section 2
You will then have the option to select the account type.
Click on the option for Exchange.
Type in your Email Address, and click Next.
Enter your Password for your email account, and click Sign In.
Next you will be asked if you want to link your email account to Windows.
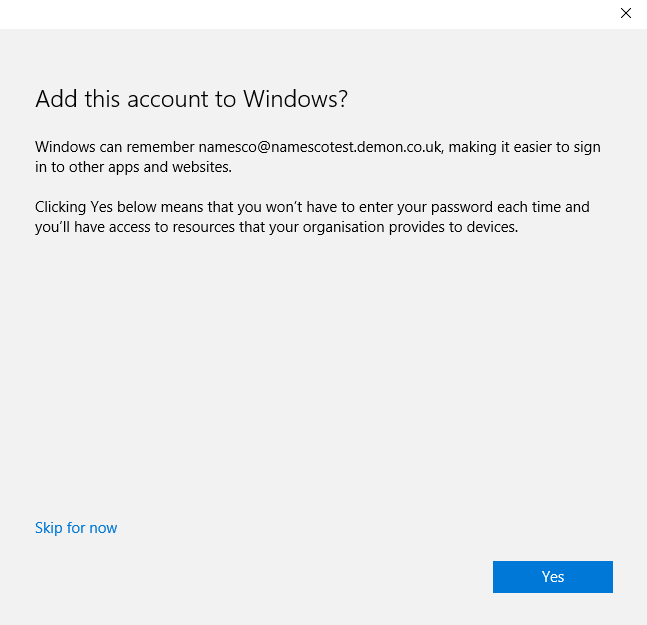
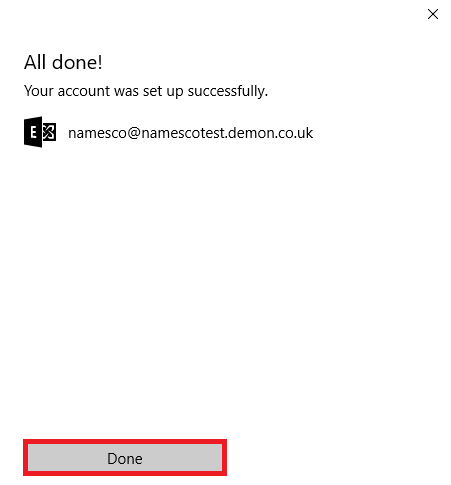
Once you have selected Yes or Skip for now, you will need to click Done to complete your setup.
Applies ToOutlook для Microsoft 365 Outlook 2024 Outlook 2021 Outlook 2019 Outlook 2016
Если вы не можете настроить учетную запись личного домена электронной почты в качестве учетной записи Exchange в Outlook, это решение может помочь.
Решение проблемы
-
Добавьте запись CNAME в настройки DNS у своего регистратора доменных имен. Запись CNAME требуется приложению Outlook для настройки учетной записи с помощью функции автообнаружения. Необходимо добавить только одну запись для автообнаружения хоста.
Record Type (Тип записи)
Host (Узел)
Points to (Указывает на)
TTL (Срок жизни)
CNAME (Alias)
autodiscover
autodiscover.outlook.com
1 час
-
Убедитесь, что запись MX по-прежнему настроена для Hotmail. Запись MX обеспечивает возможность получения электронной почты от других людей.
При первоначальной настройке параметров домена для Outlook.com в параметры DNS была добавлена запись MX. Эта запись содержит некоторые уникальные цифры или буквы, за которыми следует *.pamx1.hotmail.com, и ее необходимо сохранить. Вы можете убедиться, что запись MX по-прежнему настроена правильно, найдите свой домен на https://mxtoolbox.com. Эта запись должна быть первой в списке записей MX для данного домена. Например, на https://mxtoolbox.com должно выглядеть следующее:
Pref (Предпочтение)
Hostname (Имя узла)
IP-адрес
TTL (Срок жизни)
10
123456789.pamx1.hotmail.com
65.54.188.109
60 мин.
Проверка списка назад
Тест SMTP
Нужна дополнительная помощь?
Нужны дополнительные параметры?
Изучите преимущества подписки, просмотрите учебные курсы, узнайте, как защитить свое устройство и т. д.
Updated On — October 25, 2024 by |
Reading Time:
6 minutes
In today’s fast-paced digital landscape, effective communication and collaboration are at the heart of successful businesses. Microsoft Outlook and Exchange Server have long been trusted tools for professionals seeking to streamline their email management and enhance productivity. Connecting MS Outlook to an Exchange Server is a fundamental step towards achieving a seamless and organized workflow, ensuring that your emails, calendars, and contacts are always in sync.
This comprehensive guide will walk you through the process of setting up this essential connection, whether you’re an IT administrator tasked with configuring Exchange Server for your organization or an individual user looking to optimize your email experience. By the end of this blog, you’ll have a clear understanding of the steps involved, troubleshooting tips, and the benefits of integrating these two powerful Microsoft applications.
Before beginning the main topic, being aware of Microsoft Outlook and Exchange Server is essential.
Do you know about Microsoft Outlook?
Microsoft Outlook is the email client that comes with the Microsoft Office suite. It’s intended to be a stand-alone personal information manager, as an Internet email application, or in conjunction with Microsoft Exchange Server for group scheduling emails, group scheduling, and task management.
It helps organize calendars, email projects, contacts, to-do lists, and documents on hard disks. Outlook assists in communication via telephone assistance, email, and group-based scheduling. Outlook lets you share information using public directories, forms, and Web access.
Do you know what Microsoft Exchange Server is?
Microsoft Exchange Server can be described as an email-related technology that allows scheduling, contact managing, and collaboration created by Microsoft. It is utilized to serve commercial needs and is a part of Microsoft’s Windows Server operating system. Microsoft Exchange Server was developed to let users use the messaging services via mobile phones, desktop computers, and internet-connected systems. Voice mails are supported through Exchange Server’s features for telephony.
Things you need to connect MS Outlook to Exchange Server
The user must meet the below requirements to set up MS Outlook in Exchange Server.
- Set up Microsoft Outlook on the device where the setup will occur.
- Make sure that the majority of Exchange services are functioning.
- Have an email and password account for your Exchange mailbox on hand.
How to Connect Outlook to Exchange Server?
This method for setting up the MS Outlook in Exchange user account to all versions of Exchange Server 2010 and above that, includes Exchange 2013 and Exchange 2016, as well as Exchange 2019.
To set up an Outlook account in the Exchange Server, follow all steps in sequence:
In the end, you’ve created an Outlook account in Exchange Server. There could be occasions when connectivity is not working because of network issues or the wrong settings. In the Auto Account Setup dialogue box, users can select the second option, Manual Configuration, or other types of servers by indicating connections, server, and proxy choices.
Users who are not able to access their mailboxes using Outlook when the Exchange database becomes corrupted or destroyed. Many people use ESEUTIL to repair EDB files; however, this method requires much technical knowledge and tolerance.
If the EDB files become corrupted, then the best option that you can take is to utilize the Microsoft Exchange Recovery application.
Reasons why Outlook fails to connect to the Exchange Server
If you’ve completed the steps above correctly, you can connect Outlook to MS Exchange. However, there is a chance that you’re unable to access Exchange Server. In this regard, you can contact the Microsoft help desk, which has offered several solutions and issues. Continue reading to discover the problems and answers below.
Outlook is currently down
There are times when MS Outlook shows that it’s offline. We’ve found that this isn’t a major issue in the support centre. Just make sure that your Outlook is working. First, visit Outlook’s menu and check that “Work Offline” isn’t selected.
Outlook is not linked to the Microsoft Exchange Server
You must verify connections to the Microsoft Exchange server to fix the additional issues.
- Choose accounts on the Tools menu.
- Look for the left sidebar and check the Exchange account in the left sidebar. An alert symbol will change to orange to indicate a problem in the connection.
If you’ve previously linked to the account correctly. Try connecting it with alternative Exchange applications.
Conclusion
In today’s interconnected world, efficient communication and collaboration are paramount for personal and professional success. Microsoft Outlook and Exchange Server are invaluable tools designed to help individuals and organizations achieve just that. This guide has taken you through the essential steps of connecting MS Outlook to Exchange Server, whether you’re an IT administrator managing a network of users or an individual looking to enhance your email experience.
By following the outlined steps, you can ensure that your emails, calendars, and contacts remain seamlessly synchronized, helping you stay organized and productive. The combination of Outlook and Exchange Server empowers you with powerful features for scheduling, task management, and communication, all at your fingertips.
Frequently Asked Questions:
Q1. Can I connect MS Outlook to Exchange Server on a Mac?
Ans. Yes, you can connect MS Outlook to Exchange Server on a Mac using the Outlook for Mac application. The setup process is similar to the one outlined in this guide for Windows, with minor differences in the user interface.
Q2. Is it possible to connect MS Outlook to multiple Exchange Server accounts?
Ans. Yes, MS Outlook allows you to connect to and manage multiple Exchange Server accounts simultaneously. You can add additional accounts through the Account Settings in Outlook.
Q3. What should I do if I forget my Exchange mailbox password?
Ans. If you forget your Exchange mailbox password, contact your organization’s IT support or Exchange administrator. They can assist you in resetting or recovering your password.
Q4. Can I configure MS Outlook to access Exchange Server remotely, such as from home or while traveling?
Ans. Yes, you can configure MS Outlook to access the Exchange Server remotely using Outlook Anywhere (also known as RPC over HTTP or MAPI over HTTP). This allows you to access your Exchange account securely from anywhere with an internet connection.
Q5. What is Autodiscover, and how does it impact the Outlook-Exchange connection?
Ans. Autodiscover is a feature in Exchange Server that simplifies the configuration of email clients like MS Outlook. It automatically discovers the server settings required for email setup, making the process smoother for users. Outlook typically uses Autodiscover to configure Exchange connections.
Q6. Are there any security considerations when connecting MS Outlook to Exchange Server?
Ans. Yes, it’s essential to ensure that your Exchange Server and Outlook configurations adhere to security best practices. This includes using encryption, enabling multi-factor authentication (MFA), and regularly updating both Exchange Server and Outlook to protect against security vulnerabilities.

Author: Henry Bray
Henry Bray is a young technologist and content a Content Writer at Regain Software, loves to write about MS Outlook, MS Exchange Server, Office 365, Mozilla Thunderbird and many more email applications.
View all posts by Henry Bray