
OpenVPN – это набор open source программ, который заслуженно является одним из самых популярных и легких решений для реализации защищенной VPN сети. OpenVPN позволяет объединить в единую сеть сервер и клиентов (даже находящиеся за NAT или файерволами), или объединить сети удаленных офисов. Серверную часть OpenVPN можно развернуть практически на всех доступных операционных системах (пример настройки OpenVPN на Linux). Вы можете установить OpenVPN сервер даже на обычный компьютер с десктопной редакцией Windows 10.
В этой статье, мы покажем, как установить OpenVPN сервер на компьютер с Windows 10, настроить OpenVPN клиент на другом Windows хосте и установить защищенное VPN подключение.
Содержание:
- Установка службы OpenVPN сервера в Windows
- Создаем ключи шифрования и сертификаты для OpenVPN
- Конфигурационный файл OpenVPN сервера в Windows
- Настройка OpenVPN клиента в Windows
Установка службы OpenVPN сервера в Windows
Скачайте MSI установщик OpenVPN для вашей версии Windows с официального сайта (https://openvpn.net/community-downloads/). В нашем случае это OpenVPN-2.5.5-I602-amd64.msi (https://swupdate.openvpn.org/community/releases/OpenVPN-2.5.5-I602-amd64.msi).
Запустите установку.
Если вы планируете, OpenVPN сервер работал в автоматическом режиме, можно не устанавливать OpenVPN GUI. Обязательно установите OpenVPN Services.
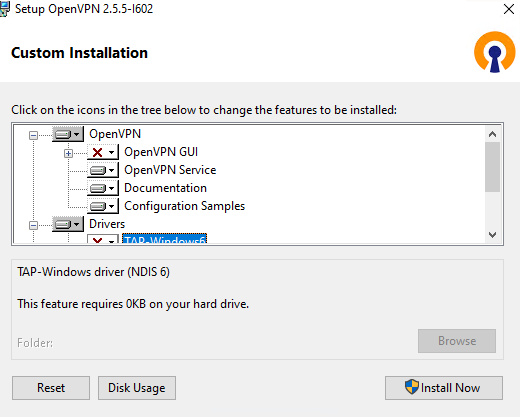
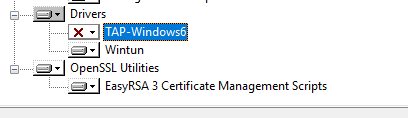
Начиная с версии OpenVPN 2.5, поддерживается драйвер WinTun от разработчиков WireGuard. Считается, что этот драйвер работает быстрее чем классический OpenVPN драйвер TAP. Установите драйвер Wintun, откажитесь от установки TAP-Windows6.
Установите OpenSSL утилиту EasyRSA Certificate Management Scripts.
Запустите установку.
По умолчанию OpenVPN устаналивается в каталог C:\Program Files\OpenVPN.
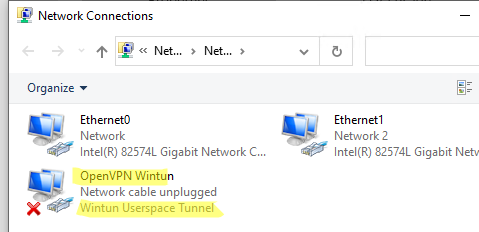
После окончания установки появится новый сетевой адаптер типа Wintun Userspace Tunnel. Этот адаптер отключен, если служба OpenVPN не запущена.
Создаем ключи шифрования и сертификаты для OpenVPN
OpenVPN основан на шифровании OpenSSL. Это означает, что для обмена трафиком между клиентом и серверов VPN нужно сгенерировать ключи и сертификаты с использованием RSA3.
Откройте командную строку и перейдите в каталог easy-rsa:
cd C:\Program Files\OpenVPN\easy-rsa
Создайте копию файла:
copy vars.example vars
Откройте файл vars с помощью любого текстового редактора. Проверьте пути к рабочим директориям.
Обязательно поправьте переменную EASYRSA_TEMP_DIR следующим образом:
set_var EASYRSA_TEMP_DIR "$EASYRSA_PKI/temp"

Можете заполнить поля для сертификатов (опционально)
set_var EASYRSA_REQ_COUNTRY "RU"
set_var EASYRSA_REQ_PROVINCE "MSK"
set_var EASYRSA_REQ_CITY "MSK"
set_var EASYRSA_REQ_ORG "IT-Company"
set_var EASYRSA_REQ_EMAIL " [email protected] "
set_var EASYRSA_REQ_OU " IT department "

Срок действия сертификатов задается с помощью:
#set_var EASYRSA_CA_EXPIRE 3650
#set_var EASYRSA_CERT_EXPIRE 825
Сохраните файл и выполните команду:
EasyRSA-Start.bat
Следующие команды выполняются в среде EasyRSA Shell:
Инициализация PKI:
./easyrsa init-pki
Должна появится надпись:
init-pki complete; you may now create a CA or requests.
Your newly created PKI dir is: C:/Program Files/OpenVPN/easy-rsa/pki
Теперь нужно сгенерировать корневой CA:
./easyrsa build-ca
Задайте дважды пароль для CA:
CA creation complete and you may now import and sign cert requests.
Данная команда сформировала:
- Корневой сертификат центра сертификации: «C:\Program Files\OpenVPN\easy-rsa\pki\ca.crt»
- Ключ центра сертификации «C:\Program Files\OpenVPN\easy-rsa\pki\private\ca.key»
Теперь нужно сгенерировать запрос сертификата и ключ для вашего сервера OpenVPN:
./easyrsa gen-req server nopass
Утилита сгенерирует два файла:
req: C:/Program Files/OpenVPN/easy-rsa/pki/reqs/server.req
key: C:/Program Files/OpenVPN/easy-rsa/pki/private/server.key
Подпишем запрос на выпуск сертификата сервера с помощью нашего CA:
./easyrsa sign-req server server
Подтвердите правильность данных, набрав yes.
Затем введите пароль CA от корневого CA.
В каталоге issued появится сертификат сервера («C:\Program Files\OpenVPN\easy-rsa\pki\issued\server.crt»)

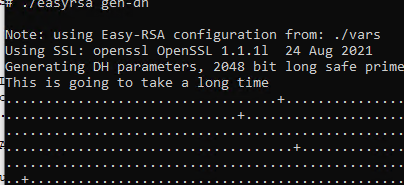
Теперь можно создать ключи Диффи-Хеллмана (займет длительное время):
./easyrsa gen-dh
Для дополнительной защиты VPN сервера желательно включить tls-auth. Данная технология позволяет использовать подписи HMAC к handshake-пакетам SSL/TLS, инициируя дополнительную проверку целостности. Пакеты без такой подписи будут отбрасываться VPN сервером. Это защитит вас от сканирования порта VPN сервера, DoS атак, переполнения буфера SSL/TLS.
Сгенерируйте ключ tls-auth:
cd C:\Program Files\OpenVPN\bin
openvpn --genkey secret ta.key
Должен появиться файл «C:\Program Files\OpenVPN\bin\ta.key». Переместите его в каталог C:\Program Files\OpenVPN\easy-rsa\pki
Теперь можно сформировать ключи для клиентов OpenVPN. Для каждого клиента, который будет подключаться к вашему серверу нужно создать собственные ключи.
Есть несколько способов генерации ключей и передачи их клиентам. В следующем примере, мы создадим на сервере ключ клиента и защитим его паролем:
./easyrsa gen-req kbuldogov
./easyrsa sign-req client kbuldogov
Данный ключ («C:\Program Files\OpenVPN\easy-rsa\pki\private\kbuldogov.key») нужно передать клиенту и сообщить пароль. Клиент может снять защиту паролем для ключа:
openssl rsa -in "C:\Program Files\OpenVPN\easy-rsa\pki\private\kbuldogov.key"-out "C:\Program Files\OpenVPN\easy-rsa\pki\private\kbuldogov_use.key"

Если вы хотите сгенерировать ключ, не защищенный паролем, нужно выполнить команду:
./easyrsa gen-req имяклиента nopass
На сервере с OpenVPN вы можете создать неограниченное количество ключей и сертификатов для пользователей. Аналогичным образом сформируйте ключи и сертфикаты для других клиентов.
Вы можете отохвать скомпрометированные сертификаты клиентов:
cd C:\Program Files\OpenVPN\easy-rsa
EasyRSA-Start.bat
./easyrsa revoke kbuldogov
Итак, мы сгенерировали набор ключей и сертификатов для OpenVPN сервера. Теперь можно настроить и запустить службу OpenVPN.
Конфигурационный файл OpenVPN сервера в Windows
Скопируйте типовой конфигурационный файл OpenVPN сервера:
copy "C:\Program Files\OpenVPN\sample-config\server.ovpn" "C:\Program Files\OpenVPN\config-auto\server.ovpn"
Откройте файл server.ovpn в любом текстовом редакторе и внесите свои настройки. Я использую следующий конфиг для OpenVPN:
# Указываем порт, протокол и устройство
port 1194
proto udp
dev tun
# Указываем пути к сертификатам сервера
ca "C:\\Program Files\\OpenVPN\\easy-rsa\\pki\\ca.crt"
cert "C:\\Program Files\\OpenVPN\\easy-rsa\\pki\\issued\\server.crt"
key "C:\\Program Files\\OpenVPN\\easy-rsa\\pki\\private\\server.key"
dh "C:\\Program Files\\OpenVPN\\easy-rsa\\pki\\dh.pem"
# Указываем настройки IP сети, адреса из которой будет будут получать VPN клиенты
server 10.24.1.0 255.255.255.0
#если нужно разрешить клиентам подключаться под одним ключом, нужвно включить опцию duplicate-cn (не рекомендуется)
#duplicate-cn
# TLS защита
tls-auth "C:\\Program Files\\OpenVPN\\easy-rsa\\pki\\ta.key" 0
cipher AES-256-GCM
# Другая параметры
keepalive 20 60
persist-key
persist-tun
status "C:\\Program Files\\OpenVPN\\log\\status.log"
log "C:\\Program Files\\OpenVPN\\log\\openvpn.log"
verb 3
mute 20
windows-driver wintun
Сохраните файл.
OpenVPN позволяет использовать как TCP, так и UDP для подключения. В этом примере я запустил OpenVPN на 1194 UDP. Рекомендуется использовать протокол UDP, это оптимально как с точки зрения производительности, так и безопасности.
Не забудьте открыть на файерволе порты для указанного вами порта OpenVPN на клиенте и на сервере. Можно открыть порты в Windows Defender с помощью PowerShell.
Правило для сервера:
New-NetFirewallRule -DisplayName "AllowOpenVPN-In" -Direction Inbound -Protocol UDP –LocalPort 1194 -Action Allow
Правило для клиента:
New-NetFirewallRule -DisplayName "AllowOpenVPN-Out" -Direction Outbound -Protocol UDP –LocalPort 1194 -Action Allow
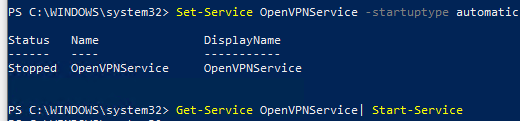
Теперь нужно запустить службу OpenVPN и изменить тип ее запуска на автоматический. Воспользуйтесь таким командами PowerShell, чтобы включить службу:
Set-Service OpenVPNService –startuptype automatic –passthru
Get-Service OpenVPNService| Start-Service
Откройте панель управления, и убедитесь, что виртуальный сетевой адаптер OpenVPN Wintun теперь активен. Если нет, смотрите лог «C:\Program Files\OpenVPN\log\server.log»
Если при запуске OpenVPN вы видите в логе ошибку:
Options error: In C:\Program Files\OpenVPN\config-auto\server.ovpn:1: Maximum option line length (256) exceeded, line starts with..
Смените в файле server.ovpn символы переноса строки на Windows CRLF (в notepad++ нужно выбрать Edit -> EOL Conversion -> Windows CR LF). Сохраните файл, перезапустите службу OpevVPNService.
Данный конфиг позволит удаленным клиентам получить доступ только к серверу, но другие компьютеры и сервисы в локальной сети сервера для них недоступны. Чтобы разрешить клиентам OpenVPN получить доступ к внутренней сети нужно:
Включить опцию IPEnableRouter в реестре (включает IP маршрутизацию в Windows, в том числе включает маршрутизацию меду сетями Hyper-V): reg add «HKLM\SYSTEM\CurrentControlSet\Services\Tcpip\Parameters» /v IPEnableRouter /t REG_DWORD /d 1 /f
Добавьте в конфгурационный файл сервера OpenVPN маршруты до внутренней IP сети:
push "route 10.24.1.0 255.255.255.0"
push "route 192.168.100.0 255.255.255.0"
Если нужно, назначьте клиенту адреса DNS серверов:
push "dhcp-option DNS 192.168.100.11"
push "dhcp-option DNS 192.168.100.12"
Если нужно завернуть все запросы клиента (в том числе Интернет трафик) на ваш OpenVPN сервер, добавьте опцию:
push "redirect-gateway def1"
Настройка OpenVPN клиента в Windows
Создайте на сервере шаблонный конфигурационный файла для клиента VPN (на базе iшаблона client.ovpn) со следующими параметрами (имя файла kbuldovov.ovpn)
client
dev tun
proto udp
remote your_vpn_server_address 1194
resolv-retry infinite
nobind
persist-key
persist-tun
ca ca.crt
cert kbuldogov.crt
key kbuldogov.key
remote-cert-tls server
tls-auth ta.key 1
cipher AES-256-GCM
connect-retry-max 25
verb 3
В директиве remote указывается публичный IP адрес или DNS имя вашего сервера OpenVPN.
Скачайте и установите клиент OpenVPN Connect для Windows (https://openvpn.net/downloads/openvpn-connect-v3-windows.msi).
Теперь на компьютер с клиентом OpenVPN нужно с сервера скопировать файлы:
- ca.crt
- kbuldogov.crt
- kbuldogov.key
- dh.pem
- ta.key
- kbuldogov.ovpn
Теперь импортируйте файл с профилем *.ovpn и попробуйте подключиться к вашему VPN серверу.
Если все настроено правильно, появится такая картинка.
Проверьте теперь лог OpenVPN на клиенте «C:\Program Files\OpenVPN Connect\agent.log»
Mon Dec 27 08:09:30 2021 proxy_auto_config_url
Mon Dec 27 08:09:31 2021 TUN SETUP
TAP ADAPTERS:
guid='{25EE4A55-BE90-45A0-88A1-8FA8FEF24C42}' index=22 name='Local Area Connection'
Open TAP device "Local Area Connection" PATH="\\.\Global\{25EE4A55-BE90-45A0-88A1-8FA8FEF24C42}.tap" SUCCEEDED
TAP-Windows Driver Version 9.24
ActionDeleteAllRoutesOnInterface iface_index=22
netsh interface ip set interface 22 metric=1
Ok.
netsh interface ip set address 22 static 10.24.1.6 255.255.255.252 gateway=10.24.1.5 store=active
IPHelper: add route 10.24.1.1/32 22 10.24.1.5 metric=-1
Клиент успешно подключится к OpenVPN серверу и получил IP адрес 10.24.1.6.
Проверьте теперь лог на сервере («C:\Program Files\OpenVPN\log\openvpn.log»). Здесь также видно, что клиент с сертификатом kbuldogov успешно подключится к вашему серверу.
2021-12-27 08:09:35 192.168.13.202:55648 [kbuldogov] Peer Connection Initiated with [AF_INET6]::ffff:192.168.13.202:55648
2021-12-27 08:09:35 kbuldogov/192.168.13.202:55648 MULTI_sva: pool returned IPv4=10.24.1.6, IPv6=(Not enabled)
2021-12-27 08:09:35 kbuldogov/192.168.13.202:55648 MULTI: Learn: 10.24.1.6 -> kbuldogov/192.168.13.202:55648
2021-12-27 08:09:35 kbuldogov/192.168.13.202:55648 MULTI: primary virtual IP for kbuldogov/192.168.13.202:55648: 10.24.1.6
If you want to protect your online privacy or encrypt your information on the web so that it does not fall into the hands of hackers; you should use a VPN. The main element of any VPN is the VPN protocol used by it. In this article, we will teach you how to install OpenVpn on Windows Server 2019. Most VPNs support several protocols such as IKEv2, L2TP, and SSTP, but the OpenVPN protocol is known as the most popular and best VPN protocol in the world. In this article, we will teach you How to Setup OpenVPN On Windows Server 2019. If you want to purchase your own RDP, you can check out the packages offered on the Eldernode website.
Table of Contents
What is OpenVPN?
Openvpn is currently the most popular and widely used protocol as a VPN. Unlike other IPSec-based tunneling protocols (such as L2tp), Openvpn relies on SSL / TLS for authentication and data encryption. This standard security technology is for making secure, remote connections from one place to another or from one point to another. The use of SSL to protect financial transactions, data transfers, emails, and other things is very popular.
OpenVPN is compatible with all major operating systems such as Windows, Android, iOS, Mac, and Linux. It is open source and supports up to 256-bit encryption.
Available OpenVPNs is as follows:
–> OpenVPN Community Edition: It is an open-source and free version and doesn’t have user limitations.
–> OpenVPN Access Server: It is based on the Community Edition but provides additional paid and proprietary features such as Easy Management Admin Portal, LDAP integration and etc.
–> OpenVPN-as-a-Service: It is a solution that eliminates the need for VPN server installation. You can connect to your hosted service with regions around the world simply by purchasing OpenVPN Cloud.
In this step from the Windows training tag, you will learn how to install OpenVPN on Windows Server 2019.
Prerequisites
– Access to port 1194 to connect to the same network
– Windows Server 2019
You can do this by allowing UDP traffic on port 1194 by adding a rule to your Firewall.
How to Install OpenVPN on Windows Server 2019
Go to the official OpenVPN Website to download the latest Windows 64-bit MSI installer for the OpenVPN Community edition:
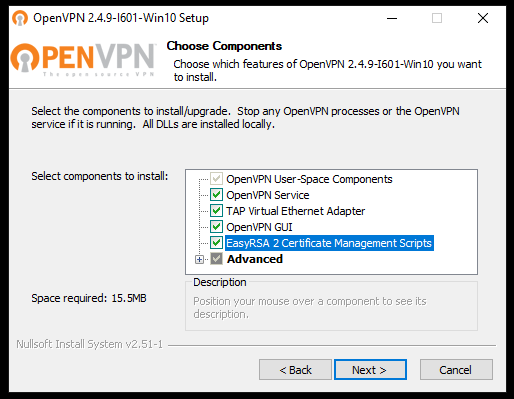
After the download is completed, go to the downloaded file and double-click on it. Click on the icon next to desired features to choose them. Check the ”EasyRSA 2 Certificate Management Scripts” and click on Next:
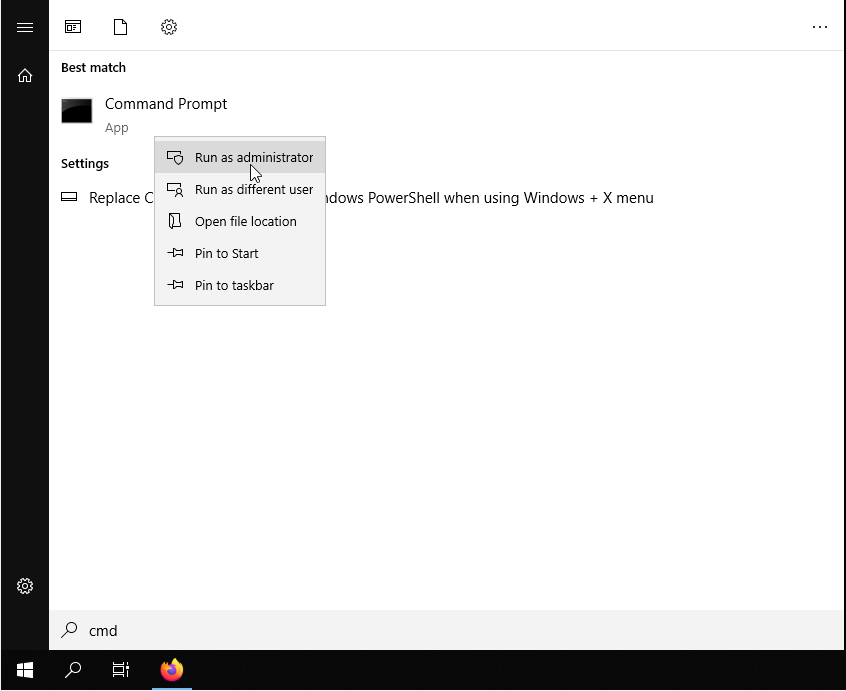
Once the installation is completed, you should generate the certificates and keys to access the VPN. To do this, open the terminal by typing cmd on the Start menu and right-click on the Command Prompt icon. Choose ”Run as Administrator”:
Go to the following path:
C:\Program Files\OpenVPN\easy-rsaNow you can start configuring OpenVPN:
init-configIn this step, you need to open the vars.bat file in the text editor:
notepad vars.batEdit the subsequent lines by switching The ”US”, ”CA” etc with your business’s data:
set KEY_COUNTRY=US set KEY_PROVINCE=CA set KEY_CITY=SanFrancisco set KEY_ORG=OpenVPN set [email protected]–> KEY_CN and KEY_NAME: They will be unique for each build request and refer to the common name field and the name of the certificate.
–> KEY_OU: They refer to an ”Organizational Unit” and can be set to whatever if there isn’t a requirement for it.
–> PKCS11_values: They refer to settings used for Hardware Security Modules and Smart Cards if you use them.
Save the text editor file and exit it.
To apply the changes, enter the following command:
varsclean allBuilding Certificates and Keys
In order to create the Certificate Authority (CA) certificate and key, we need to run the following command:
build-caThis will prompt you to enter your country, state, and city. These options will also have default values, which appear within brackets:
Certificate Authority "OpenVPN-CA": Country Name (2 letter code) [US]: State or Province Name (full name) [CA]: Locality Name (eg, city) [SanFrancisco]: Organization Name (eg, company) [OpenVPN]: Organizational Unit Name (eg, section) []: Common Name (eg, your name or your server's hostname) []:OpenVPN-CA Email Address [[email protected]]:Using the following command, we initiate the server’s certificate and key:
build-key-server serverWhen prompted to sign the certificate and commit, enter ”y” and enter the ”Common Name” as a server.
Server Certificates and Keys
C:\Program Files\OpenVPN\easy-rsa>build-key-server.bat Generating a RSA private key ..............................................................................................................................................................................................................................................++++ ................................++++ writing new private key to 'keys\.key' ----- You are about to be asked to enter information that will be incorporated into your certificate request. What you are about to enter is what is called a Distinguished Name or a DN. There are quite a few fields but you can leave some blank For some fields there will be a default value, If you enter '.', the field will be left blank. ----- Country Name (2 letter code) [US]:US State or Province Name (full name) [MI]: Locality Name (eg, city) [Lansing]: Organization Name (eg, company) [OpenVPN]: Organizational Unit Name (eg, section) [changeme]: Common Name (eg, your name or your server's hostname) [changeme]:Server Name [changeme]: Email Address [[email protected]]: Please enter the following 'extra' attributes to be sent with your certificate request A challenge password []:XXXXXXXXXXXXXXXX An optional company name []: Using configuration from openssl-1.0.0.cnf Can't open keys/index.txt.attr for reading, No such file or directory 1832:error:02001002:system library:fopen:No such file or directory:crypto/bio/bss_file.c:74:fopen('keys/index.txt.attr','r') 1832:error:2006D080:BIO routines:BIO_new_file:no such file:crypto/bio/bss_file.c:81: Check that the request matches the signature Signature ok The Subject's Distinguished Name is as follows countryName :PRINTABLE:'US' stateOrProvinceName :PRINTABLE:'MI' localityName :PRINTABLE:'Lansing' organizationName :PRINTABLE:'OpenVPN' organizationalUnitName:PRINTABLE:'changeme' commonName :PRINTABLE:'Server' name :PRINTABLE:'changeme' emailAddress :IA5STRING:'[email protected]' Certificate is to be certified until Dec 24 19:01:08 2029 GMT (3650 days) Sign the certificate? [y/n]:y 1 out of 1 certificate requests certified, commit? [y/n]y Write out database with 1 new entries Data Base Updated C:\Program Files\OpenVPN\easy-rsa>Client Certificates and Keys
For each client that will be connecting to the server, you should choose a unique name to identify that user’s computer, such as ”Michael-PC” in the following example.
When prompted, enter the Common Name as the name you have chosen for the client’s cert/key. You will repeat this step for every client computer that is going to connect to the VPN.
C:\Program Files\OpenVPN\easy-rsa>build-key Michael-PC Generating a RSA private key .............................................................................................................................................................................++++ ..............................................................................++++ writing new private key to 'keys\Michael-PC.key' ----- You are about to be asked to enter information that will be incorporated into your certificate request. What you are about to enter is what is called a Distinguished Name or a DN. There are quite a few fields but you can leave some blank For some fields there will be a default value, If you enter '.', the field will be left blank. ----- Country Name (2 letter code) [US]: State or Province Name (full name) [MI]: Locality Name (eg, city) [Lansing]: Organization Name (eg, company) [OpenVPN]: Organizational Unit Name (eg, section) [changeme]: Common Name (eg, your name or your server's hostname) [changeme]:Michael-PC Name [changeme]: Michael Jordan Email Address [[email protected]]: Please enter the following 'extra' attributes to be sent with your certificate request A challenge password []:XXXXXXXXXXXXXXXX An optional company name []: Using configuration from openssl-1.0.0.cnf Check that the request matches the signature Signature ok The Subject's Distinguished Name is as follows countryName :PRINTABLE:'US' stateOrProvinceName :PRINTABLE:'MI' localityName :PRINTABLE:'Lansing' organizationName :PRINTABLE:'OpenVPN' organizationalUnitName:PRINTABLE:'changeme' commonName :PRINTABLE:'Michael-PC' name :PRINTABLE:'Michael Jordan' emailAddress :IA5STRING:'[email protected]' Certificate is to be certified until Dec 24 19:06:10 2029 GMT (3650 days) Sign the certificate? [y/n]:y 1 out of 1 certificate requests certified, commit? [y/n]y Write out database with 1 new entries Data Base Updated C:\Program Files\OpenVPN\easy-rsa>In this part, you need to generate the ”Diffie Hellman” parameters using thebuild-dh command. This step is necessary in order to set up the encryption model.
C:\Program Files\OpenVPN\easy-rsa>build-dh.bat Generating DH parameters, 2048 bit long safe prime, generator 2 This is going to take a long time .................................+......................................................................................................+.............................................................................................+..................................................................................+......................................................... .............................................................................+............................+..........+........+............................................+..............................................+....++*++*++*++* C:\Program Files\OpenVPN\easy-rsa>Generate a shared secret key (which is required when using tls-auth):
"C:\Program Files\OpenVPN\bin\openvpn.exe" --genkey --secret "C:\Program Files\OpenVPN\easy-rsa\keys\ta.key"Configuration Files
OpenVPN provides sample configuration data which can easily be found using the start menu.
Open the Start menu, and click on All Programs. Then select OpenVPN Sample Configuration Files from the OpenVPN options.
Server Config File
Copy the sample ”server configuration” file over to the easy-rsa folder. This command and its output are as follows:
copy "C:\Program Files\OpenVPN\sample-config\server.ovpn" "C:\Program Files\OpenVPN\easy-rsa\keys\server.ovpn" C:\Program Files\OpenVPN\easy-rsa>"C:\Program Files\OpenVPN\bin\openvpn.exe" --genkey --secret "C:\Program Files\OpenVPN\easy-rsa\keys\ta.key" C:\Program Files\OpenVPN\easy-rsa>copy "C:\Program Files\OpenVPN\sample-config\server.ovpn" "C:\Program Files\OpenVPN\easy-rsa\keys\server.ovpn" 1 file(s) copied. C:\Program Files\OpenVPN\easy-rsa>Now edit the server.ovpn file:
notepad "C:\Program Files\OpenVPN\easy-rsa\keys\server.ovpn"Locate the following lines within the file:
ca ca.crt cert server.crt key server.key dh dh2048.pemThen edit them as follows:
ca "C:\\Program Files\\OpenVPN\\config\\ca.crt" cert "C:\\Program Files\\OpenVPN\\config\\server.crt" key "C:\\Program Files\\OpenVPN\\config\\server.key" dh "C:\\Program Files\\OpenVPN\\config\\dh2048.pem"Finally, save and close the file.
Client Config Files
The client file modification is very similar to the server configuration changes.
Copy the sample server configuration file to the easy-rsa folder with the client’s Common Name as the file name.
Remember: Each client will need to have a unique filename.
copy "C:\Program Files\OpenVPN\sample-config\client.ovpn" "C:\Program Files\OpenVPN\easy-rsa\keys\Michael-PC.ovpn" C:\Program Files\OpenVPN\easy-rsa>copy "C:\Program Files\OpenVPN\sample-config\client.ovpn" "C:\Program Files\OpenVPN\easy-rsa\keys\Michael-PC.ovpn" 1 file(s) copied. C:\Program Files\OpenVPN\easy-rsa> Edit the client’s config file.
notepad "C:\Program Files\OpenVPN\easy-rsa\keys\Michael-PC.ovpn" Locate the following settings in the file and edit them as follows:
ca ca.crt cert client.crt key client.key to ca "C:\\Program Files\\OpenVPN\\config\\ca.crt" cert "C:\\Program Files\\OpenVPN\\config\\Michael-PC.crt" key "C:\\Program Files\\OpenVPN\\config\\Michael-PC.key" Next, we will edit the line “my-server-1“, replacing it with the server’s public IP Address or Domain Name.
remote my-server-1 1194 # The hostname/IP and port of the server. # You can have multiple remote entries # to load balance between the servers. remote my-server-1 69.16.236.167 ;remote my-server-2 1194 Save and close the file.
Copying the Client and Server Files to Their Pertinent Directories
Now you can copy these files from C:\Program Files\OpenVPN\easy-rsa\keys\ to C:\Program Files\OpenVPN\config\ on the server using the robocopy command:
- ca.crt
- ta.key
- dh2048.pem
- server.crt
- server.key
- server.ovpn
robocopy "C:\Program Files\OpenVPN\easy-rsa\keys\ " "C:\Program Files\OpenVPN\config\ " ca.crt ta.key dh2048.pem server.crt server.key server.ovpn C:\Program Files\OpenVPN\easy-rsa>robocopy "C:\Program Files\OpenVPN\easy-rsa\keys\ " "C:\Program Files\OpenVPN\config\ " ca.crt ta.key dh2048.pem server.crt server.key server.ovpn ------------------------------------------------------------------------------- ROBOCOPY :: Robust File Copy for Windows ------------------------------------------------------------------------------- Started : Friday, December 27, 2019 12:16:02 PM Source : C:\Program Files\OpenVPN\easy-rsa\keys\ Dest : C:\Program Files\OpenVPN\config\ Files : ca.crt ta.key dh2048.pem server.crt server.key server.ovpn Options : /DCOPY:DA /COPY:DAT /R:1000000 /W:30 ------------------------------------------------------------------------------ 4 C:\Program Files\OpenVPN\easy-rsa\keys\ 100% New File 2482 ca.crt 100% New File 432 dh2048.pem 100% New File 10901 server.ovpn 100% New File 657 ta.key ------------------------------------------------------------------------------ Total Copied Skipped Mismatch FAILED Extras Dirs : 1 0 1 0 0 0 Files : 4 4 0 0 0 0 Bytes : 14.1 k 14.1 k 0 0 0 0 Times : 0:00:00 0:00:00 0:00:00 0:00:00 Speed : 452250 Bytes/sec. Speed : 25.877 MegaBytes/min. Ended : Thursday, July 16, 2020 12:16:02 PM C:\Program Files\OpenVPN\easy-rsa> You can copy the following files from C:\Program Files\OpenVPN\easy-rsa\keys\ on the server to C:\Program Files\OpenVPN\config\ for each client that will be using the VPN (e.g., Michael-PC, in this example)
- ca.crt
- ta.key
- Michael-PC.crt
- Michael-PC.key
- Michael-PC.ovpn
Firewall Settings
If you have any connection difficulties, ensure you set up a rule on the server’s firewall allowing incoming UDP traffic on port 1194. (Win+R “wf.msc”)
Conclusion
We hope you would enjoy this tutorial, you can ask questions about this training in the comments section, or to solve other problems in the field of Eldernode training, refer to the Ask page section and raise your problem in it as soon as possible. In this article, we taught you how to install OpenVPN on Windows Server 2019.
Introduction
A VPN (Virtual Private Network) is a virtual private network that allows you to securely connect to the Internet to remotely access your company’s IT network. Through a VPN it is therefore possible to access company services and resources, even from an untrusted network, as if you were physically present on site.
VPNs can be implemented through common operating systems, including Windows, and a service like OpenVPN. It is an open source software that allows you to create an encrypted virtual tunnel based on the TLS / SSL (Transport Layer Security / Secure Sockets Layer) protocols, using certificates to allow traffic to securely pass between the server and one or more clients.
In this tutorial you will learn how to implement a VPN on your Cloud Server by installing and configuring OpenVPN connect client software on Windows Server 2019.
Prerequisites
In order to connect to the same network, the two or more devices (client and server) connected to the VPN must have access to port 1194.
This can be done by allowing UDP traffic on that port by adding a rule to your firewall.
Installing OpenVPN
The first step is to download the OpenVPN installer for Windows Server 2019 directly from the official website .
Once the file is downloaded, open it and start the installation procedure. Make sure you put the check mark under «EasyRSA 2 Certificate Management Scripts» and then click on «Next».
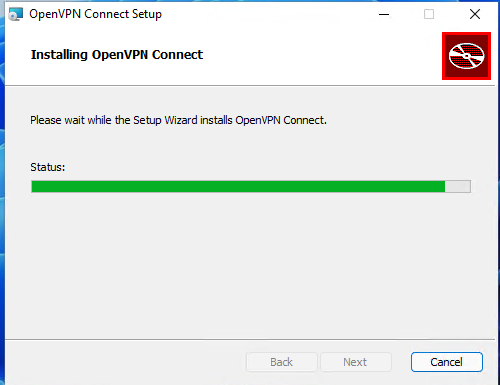
Continue with the installation, by going on every time you are required to do so .
Generating Certificates and Keys for the Server
Once the preliminary installation phase of OpenVPN is completed, generate the certificates and keys for accessing the VPN .
First, open the terminal of your Windows Server. To do so, click on Start, type «cmd» and right-click on the Command Prompt icon, then, select «Run as administrator».
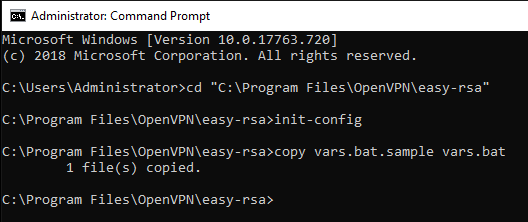
Go to the folder where OpenVPN was installed and start the «init-config» script.
cd "C:\Program Files\OpenVPN\easy-rsa"init-configAn output similar to that in the figure below should be shown.
At this point, apply the changes to the «vars.bat» file in the «C: \ Program Files \ OpenVPN \ easy-rsa» folder:
notepad vars.batAlmost at the end of the document there will be a series of items beginning with «set» and used to set some information between the environment variables. Edit these fields with your information to generate the certificate.
This step is not essential as you will be required to enter this information later on as well. However, by setting the values in this file now, these values will be used as default parameters later.
Once this information has been entered, save the file and close the text editor. Then, type the following commands to apply these changes :
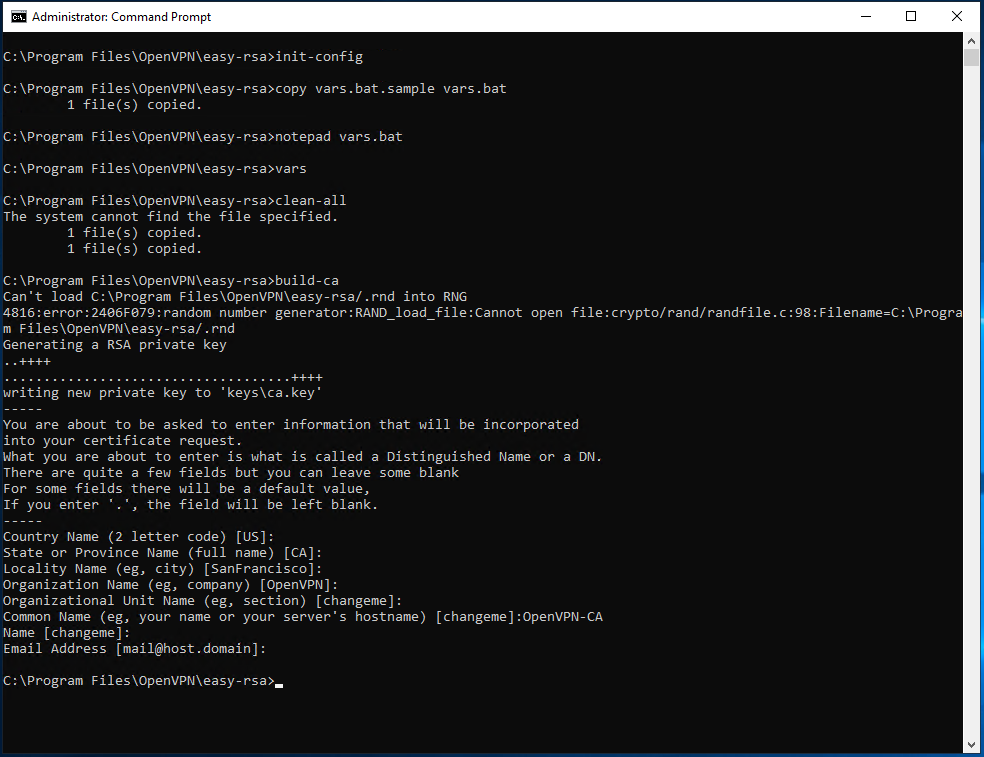
varsclean-allThen, start creating the Certificate. From the terminal (started as administrator and always in the «C: \ Program Files \ OpenVPN \ easy-rsa» folder) type:
build-caIf the «vars» file was already edited with your information, this will already be present in the square brackets of each required field. In this case, just press «Enter» to select this value as the default parameter.
On the other hand, the item «Common name» has to be given an easy- to- remember name r: in this case «OpenVPN-CA» will be used.
To verify that the operation of certificate generation was successful, the two files «ca.crt» and «ca.key» will be created in the «easy-rsa \ keys» folder.
At this point, create the server keys. To start the procedure use the command:
build-key-server server_nameIn this case, assign to the server the generic name by specifying it under «Common Name». As shown in the following image, the name «server» was here used.
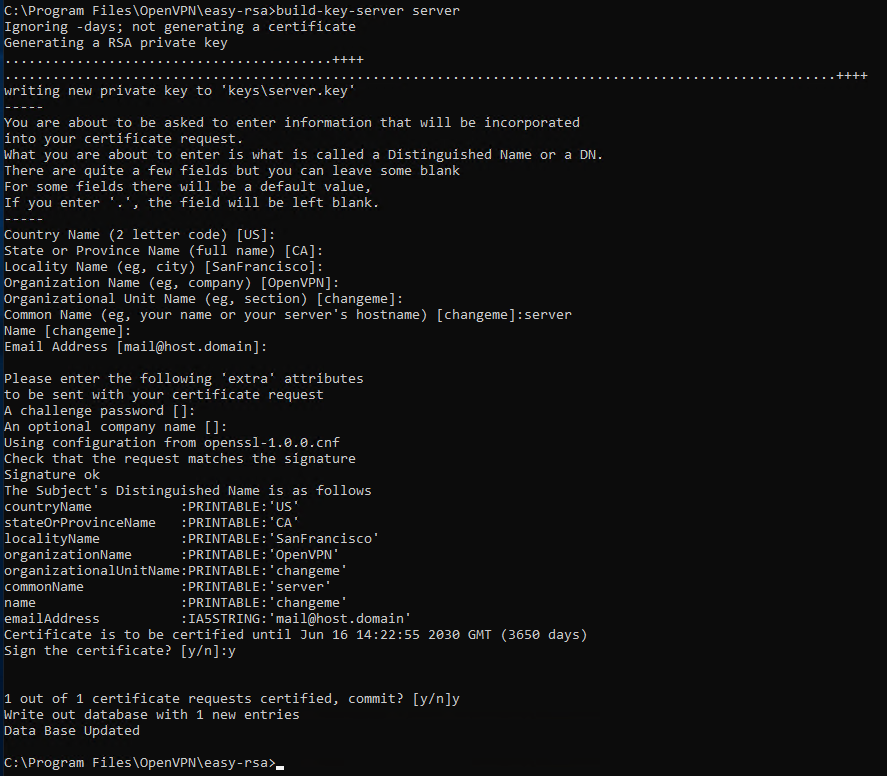
Towards the end of the procedure you will be requested to confirm the saving of the data set twice. In both cases, type y and press «Enter».
Generating Key for the Client
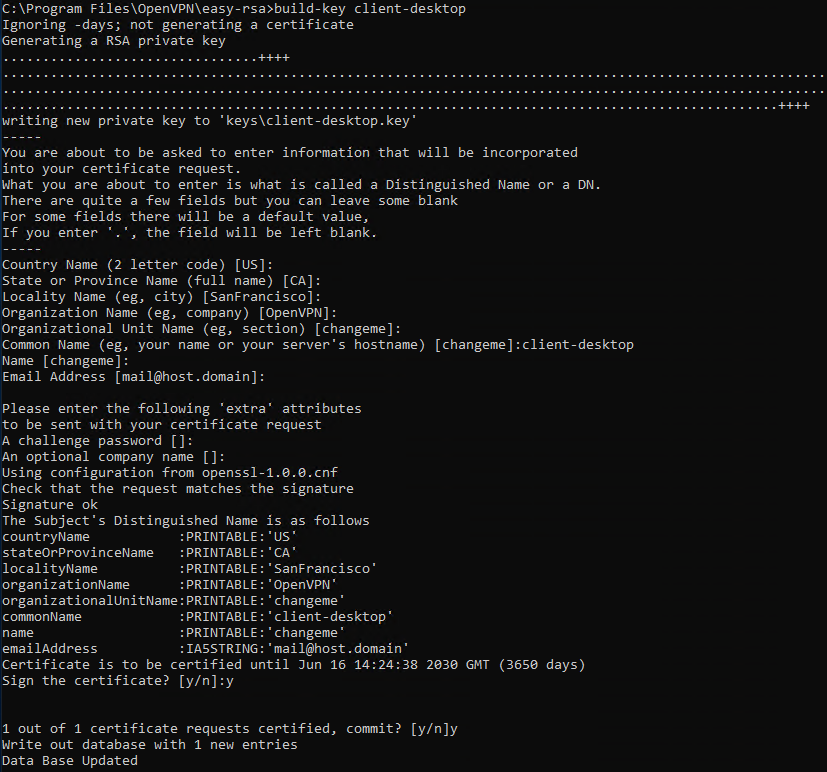
Since in a VPN all connected devices must be recognizable, Clients also need a pair of keys for communicating. Still inside your Server, from the terminal and in the folder «C: \ Program Files \ OpenVPN \ easy-rsa») type:
build-key client_nameIn this case, specify the generic name to assign to the Client (as in the image, in this case «client-desktop» was used) under the «Common Name» item .
Now it is necessary to start the Diffie-Hellman cryptographic protocol allowing the two interlocutors (Server and Client) to agree on which «common» key they will use as an authentication key to identify each other. Then, type:
build-dhThis operation may take long, depending on the hardware the server has, and requires no user interaction.

Finally, generate the «ta.key» key, to further increase the VPN security. More precisely, define a TLS authentication that verifies the integrity of the packets moving through the network. Then, type:
"C:\Program Files\OpenVPN\bin\openvpn.exe" --genkey --secret "C:\Program Files\OpenVPN\easy-rsa\keys\ta.key"Server configuration file
OpenVPN already provides sample configuration files that can be used to generate the configuration needed for the correct functioning of the VPN.
Open Start -> All Programs -> OpenVPN -> OpenVPN Sample Configuration Files and copy the file «server.ovpn» to the folder «» C: \ Program Files \ OpenVPN \ easy-rsa \ keys «. Once copied, open it with the Notepad:
notepad "C:\Program Files\OpenVPN\easy-rsa\keys\server.ovpn"Then identify the items:
- approx .crt
- cert server.crt
- key server.key
- dh dh2048.pem
and replace them with:
- ca «C: \\ Program Files \\ OpenVPN \\ config \\ ca.crt»
- cert «C: \\ Program Files \\ OpenVPN \\ config \\ server.crt»
- key «C: \\ Program Files \\ OpenVPN \\ config \\ server.key»
- dh «C: \\ Program Files \\ OpenVPN \\ config \\ dh2048.pem»
Apply these changes, save and close the file.
Client Configuration File
The changes to be made to the Client configuration file are very similar to those made for the Server.
Open Start -> All Programs -> OpenVPN -> OpenVPN Sample Configuration Files and copy the file «client.ovpn» to the folder «» C: \ Program Files \ OpenVPN \ easy-rsa \ keys «. Once copied, rename it giving it the same «Common Name» name used in the key generation phase (in this case «client-desktop») and open it with the Notepad.
notepad "C:\Program Files\OpenVPN\easy-rsa\keys\client-desktop.ovpn"Then identify the items:
- approx .crt
- cert server.crt
- key server.key
and replace them with:
- ca «C: \\ Program Files \\ OpenVPN \\ config \\ ca.crt»
- cert «C: \\ Program Files \\ OpenVPN \\ config \\ client-desktop.crt»
- key «C: \\ Program Files \\ OpenVPN \\ config \\ client-desktop.key»
Also identify the remote entry my-server-1 1194 and replace “my-server-1” with the IP address of your Server. Apply these changes, save and close the file.
At this point, copy the following files:
- ca.crt
- ta.key
- dh2048.pem
- server.crt
- server.key
- server.ovpn
Inside the folder «C: \ Program Files \ OpenVPN \ config», an operation that can be performed directly with the robocopy tool .
robocopy "C:\Program Files\OpenVPN\easy-rsa\keys\ " "C:\Program Files\OpenVPN\config\ " ca.crt ta.key dh2048.pem server.crt server.key server.ovpnJust copy the following files:
- ca.crt
- ta.key
- client-desktop.crt
- client-desktop.key
- client-desktop.ovpn
Within your Client in the folder «C: \ Program Files \ OpenVPN \ config \».
NB the OpenVPN GUI must have already been installed on the Client as well, as explained at the beginning of the tutorial for the Server.
At this point, click on Start -> All Programs -> OpenVPN -> OpenVPN GUI both on the Server and on the Client.
The graphical interface of OpenVPN will open in the tray system, at the bottom right. Right click on the respective OpenVPN icon, then click «Connect».
When the icon turns green, the connection to the virtual private network has been correctly established and, therefore, the two devices, client and server, will be communicating through the newly created VPN.
So i’ve been considering starting a business installing security cameras that are actually secure and i was thinking my solution would be running an. First, install the “ remote access ” via server manager or powershell.
List Of How To Setup Openvpn Server On Windows Server 2019 References, Now add the following line to your client configuration: Open network settings and click on vpn and add a vpn connection.
Setting Up OpenVPN Server On Windows Server 2012/2016/2019 From supporthost.in
So i’ve been considering starting a business installing security cameras that are actually secure and i was thinking my solution would be running an. Check “vpn access” and “nat” options and press next: Open network settings and click on vpn and add a vpn connection. Configure lan routing on windows server 2016.
Setting Up OpenVPN Server On Windows Server 2012/2016/2019 First, open the terminal of your windows server.
You want to build a vpn server on windows operating sys. First, open the terminal of your windows server. Select the remote access role and click next. Open a command prompt :
Source: tidalmediainc.com
This means that rsa3 keys and certificates must be used to establish a network connection between the client and the vpn server. Right click on your server and select properties. The open education conference is an annual convening for sharing and learning about open. Guide How To Start SoftEther VPN Server Free VPN for Windows 2019.
Source: supporthost.in
The openvpn service must be restarted for the configuration file to be taken into account. Click on “manage optional features” under apps and features menu. Due to the company�s vpn hardware equipment is old,recent survey vpn solutions,i want to start with open source solutions first,at the beginning, i thought of openvpn, which was. Setting Up OpenVPN Server On Windows Server 2012/2016/2019.
Source: supporthost.in
The open education conference is an annual convening for sharing and learning about open. Finish the wizard and start the service: Open the command prompt and go to easy. Setting Up OpenVPN Server On Windows Server 2012/2016/2019.
Source: supporthost.in
Open your favorite browser and navigate to the openvpn download page. In this video guide, we are learning the steps for setting up openvpn on windows server 2019. Next, provide relevant details in the fields shown in the screen below. Setting Up OpenVPN Server On Windows Server 2012/2016/2019.
Source: tidalmediainc.com
Go to ipv4 tab and select “static. Right click openvpnservice then restart : Set mailbox posthow set post dispenseralpha.diatblodtryk.websitehow setup openvpn windows server 2019how setup openvpn windows server 2019how setup openvpn windows. Guide How To Start Advanced SoftEther VPN Server for Windows 2019.
Source: supporthost.in
Go to ipv4 tab and select “static. Here we will set up a pki to be able to create our server and clients certificates. Check “vpn access” and “nat” options and press next: Setting Up OpenVPN Server On Windows Server 2012/2016/2019.
Source: supporthost.in
From server manager choose remote access >> right click the server name >> choose remote access management. Check “vpn access” and “nat” options and press next: Right click on your server and select properties. Setting Up OpenVPN Server On Windows Server 2012/2016/2019.
Source: brandichannel.blogspot.com
Openvpn uses osi layer 2. Here are the steps to enable sftp on windows server 2019: The vpn connection will now begin to. How To Use Vpn Key / Guide Creating A Vpn With Openvpn Connect Client.
Source: supporthost.in
First, install the “ remote access ” via server manager or powershell. From server manager choose remote access >> right click the server name >> choose remote access management. And type the following commands to enter inside easyrsa shell :. Setting Up OpenVPN Server On Windows Server 2012/2016/2019.
Source: supporthost.in
In this video guide, we are learning the steps for setting up openvpn on windows server 2019. Configure lan routing on windows server 2016. Here we will set up a pki to be able to create our server and clients certificates. Setting Up OpenVPN Server On Windows Server 2012/2016/2019.
Source: supporthost.in
And type the following commands to enter inside easyrsa shell :. First, open the terminal of your windows server. This completes the basic configuration of the virtual private network server. Setting Up OpenVPN Server On Windows Server 2012/2016/2019.
Source: supporthost.in
From, services management console : Check “vpn access” and “nat” options and press next: Click on “manage optional features” under apps and features menu. Setting Up OpenVPN Server On Windows Server 2012/2016/2019.
Source: supporthost.in
Select the remote access role and click next. Open a command prompt : Now add the following line to your client configuration: Setting Up OpenVPN Server On Windows Server 2012/2016/2019.
Source: tidalmediainc.com
Set mailbox posthow set post dispenseralpha.diatblodtryk.websitehow setup openvpn windows server 2019how setup openvpn windows server 2019how setup openvpn windows. On the configuration page, select. The vpn connection will now begin to. Guide How To Start SoftEther VPN Server Free VPN for Windows 2019.
Source: supporthost.in
On the configuration page, select. Right click openvpnservice then restart : Open a command prompt : Setting Up OpenVPN Server On Windows Server 2012/2016/2019.
Source: supporthost.in
Click on “manage optional features” under apps and features menu. Go to ipv4 tab and select “static. On the configuration page, select. Setting Up OpenVPN Server On Windows Server 2012/2016/2019.
Source: supporthost.in
The open education conference is an annual convening for sharing and learning about open. Log on to windows server 2019 using the administrator account or an account with administrative. Open a command prompt : Setting Up OpenVPN Server On Windows Server 2012/2016/2019.
Source: tidalmediainc.com
First we login to the device and change the hostname, edit /etc/hostname and make it looks like the following: Right click on your server and select properties. Under “direct access and vpn” click “run the remote. Guide How To Start SoftEther VPN Server Free VPN for Windows 2019.
Source: tidalmediainc.com
Set mailbox posthow set post dispenseralpha.diatblodtryk.websitehow setup openvpn windows server 2019how setup openvpn windows server 2019how setup openvpn windows. The vpn connection will now begin to. First, open the terminal of your windows server. Guide How To Start Advanced SoftEther VPN Server for Windows 2019.
Source: supporthost.in
Click on “manage optional features” under apps and features menu. First we login to the device and change the hostname, edit /etc/hostname and make it looks like the following: You want to build a vpn server on windows operating sys. Setting Up OpenVPN Server On Windows Server 2012/2016/2019.
Source: youtube.com
The openvpn service must be restarted for the configuration file to be taken into account. Right click on your server and select properties. Click on “manage optional features” under apps and features menu. 26. How to configure SSTP VPN on Windows Server 2019 YouTube.
Source: blog.eldernode.com
Steps to install vpn server role on windows server 2019. The vpn connection will now begin to. Set mailbox posthow set post dispenseralpha.diatblodtryk.websitehow setup openvpn windows server 2019how setup openvpn windows server 2019how setup openvpn windows. How to Setup OpenVPN On Windows Server 2019 Eldernode.
Source: webilicious.xyz
The openvpn service must be restarted for the configuration file to be taken into account. This means that rsa3 keys and certificates must be used to establish a network connection between the client and the vpn server. Open server manager and select add roles and features. How To Set Up an OpenVPN Server on Ubuntu 18.04 Webilicious.
Source: supporthost.in
From server manager, click tools, and select routing and remote access; Check “vpn access” and “nat” options and press next: Under “direct access and vpn” click “run the remote. Setting Up OpenVPN Server On Windows Server 2012/2016/2019.
Source: vpnbook.com
Here we will set up a pki to be able to create our server and clients certificates. Select the remote access role and click next. Click on “manage optional features” under apps and features menu. How To Set Up OpenVPN on Windows 7.
Check “Vpn Access” And “Nat” Options And Press Next:
First, install the “ remote access ” via server manager or powershell. On welcome screen, click next. Configure lan routing on windows server 2016. Open a command prompt :
Open Network Settings And Click On Vpn And Add A Vpn Connection.
You want to build a vpn server on windows operating sys. In this video guide, we are learning the steps for setting up openvpn on windows server 2019. Under “direct access and vpn” click “run the remote. Log on to windows server 2019 using the administrator account or an account with administrative.
Open Server Manager And Select Add Roles And Features.
Next, provide relevant details in the fields shown in the screen below. And type the following commands to enter inside easyrsa shell :. Open your favorite browser and navigate to the openvpn download page. From, services management console :
From Server Manager Choose Remote Access >> Right Click The Server Name >> Choose Remote Access Management.
Open the command prompt and go to easy. Openvpn uses osi layer 2. The openvpn service must be restarted for the configuration file to be taken into account. First we login to the device and change the hostname, edit /etc/hostname and make it looks like the following:
Для защиты Windows сервера лучше всего «спрятать» его за OpenVpn и заблокировать все входящие подключения к серверу из внешней сети.
Это полезно в случаях:
1. Brute Force атак (метод подбора пароля, заключающийся в переборе всех возможных комбинаций символов, пока не будет найдена верная комбинация).
2. Защита Windows сервера от взлома, когда атакующий использует новые обнаруженные уязвимости в часто используемых службах, например в RDP (специальный протокол, разработанный компанией Microsoft для удаленного управления ОС Windows), FTP и других.
3. Администратор Windows сервера не устанавливает обязательные обновления системы тем самым увеличивая шансы на взлом системы с помощью эксплоитов.
Для настройки шлюза нам понадобится Linux сервер (достаточно сервера с минимальным тарифом camp и ОС Ubuntu 18) а так же Windows сервер (в примере это сервер с ОС Windows 2019).
1. Установка OpenVPN на Linux VPS и создание пользователей.
Для настройки OpenVPN лучше всего воспользоваться инструкцией — Настройка OpenVPN сервера на Debian, Ubuntu, CentOS за пару минут
В процессе настройки сделаем двух пользователей, например Server и Client. В итоге у нас должно быть два конфигурационных файла OpenVPN, один для Windows сервера другой для подключения клиентов к OpenVPN серверу.

2. Настраиваем статический IP для Windows сервера.
mkdir /etc/openvpn/ccd && echo "ifconfig-push 10.8.0.200 255.255.255.0" > /etc/openvpn/ccd/windowsВ результате будет создана директория для конфигурационных файлов пользователей, конфигурационный файл для пользователя windows и выдан ему статический ip 10.8.0.200
В конфигурационный файл /etc/openvpn/server/server.conf OpenVPN сервера добавляем:
client-config-dir /etc/openvpn/ccd
push "dhcp-option DNS 1.1.1.1"
Можно указать любой другой DNS сервер в строке push «dhcp-option DNS 1.1.1.1»
В результате конфигурационный файл /etc/openvpn/server/server.conf должен выглядеть так:
port 1194
proto udp
dev tun
sndbuf 0
rcvbuf 0
ca ca.crt
cert server.crt
key server.key
dh dh.pem
auth SHA512
tls-auth ta.key 0
topology subnet
server 10.8.0.0 255.255.255.0
ifconfig-pool-persist ipp.txt
client-config-dir /etc/openvpn/ccd
push "dhcp-option DNS 1.1.1.1"
keepalive 10 120
cipher AES-256-CBC
user nobody
group nogroup
persist-key
persist-tun
status openvpn-status.log
verb 3
crl-verify crl.pem
Запускаем OpenVPN сервер командой
/etc/init.d/openvpn start3. Настройка OpenVPN на Windows сервере.
Скачиваем и устанавливаем OpenVPN клиент по ссылке.
Копируем конфигурационный файл server.ovpn на Windows сервер и подключаемся к VPN.
После подключения Windows сервер получит статический ip 10.8.0.200, если мы хотим использовать openvpn сервер в качестве шлюза для выхода во внешнюю сеть то в конфигурационный файл клиента windows.ovpn нужно добавить параметр redirect-gateway
4. Настройка OpenVPN на пользовательском ПК.
Настройка на пользовательском ПК проводится аналогично пункту 3, после подключения по конфигурационному файлу client.ovpn ПК получит динамический ip, после чего можно будет выполнить ping тест openvpn и windows сервера.

На этом этапе можно проверить наш сервер на открытые порты, они должны быть уже закрыты, сервер будет полностью доступен (в том числе и по RDP) в сети VPN по адресу 10.8.0.200

5. Настройка брандмауэра Windows.
Может быть ситуация когда OpenVPN шлюз не запущен на Windows сервере и тогда сервер будет доступен из внешней сети.
Для этого нужно заблокировать все внешние подключения на основной ip Windows сервера.
Сканируем открытые порты пакетом nmap.
Устанавливаем его на OpenVPN сервере (Ubuntu 18)
apt install nmap -yЗапускаем сканирование и получаем результат

По результатам сканирования видно что открыт один порт 3389 (Служба удаленных рабочих столов) когда Windows сервер не подключен к шлюзу OpenVPN. Исправим это.
В брандмауэре Windows создаем правило для входящих подключений и блокируем порт 3389

В свойствах созданного правила на вкладке Область добавляем внешний ip сервера. После этого этапа наш сервер перестанет принимать входящие подключения на порт 3389 и внешний IP. Получить доступ к серверу по RDP можно будет только запустив OpenVPN подключение и используя адрес локальной сети 10.8.0.200

P.S. Более простой, быстрый и менее надежный вариант защиты RDP Защита RDP от BruteForce атак. Автоматическая блокировка атакующего IP