- Configure SSH Server and SSH Client on Windows Server 2019
- How to install DNS Server on Windows Server 2019
Configure NTP Server in Windows Server 2019
If the computer is an Active Directory Domain Controller, the NTP Server feature is enabled automatically. So, the following example is for a computer that needs to enable NTP Server in a WorkGroup environment.
Step 1. Run PowerShell with admin rights and configure the following:
Windows PowerShell Copyright (C) Microsoft Corporation. All rights reserved. # confirm current setting (follows are default settings) PS C:UsersAdministrator> Get-ItemProperty -Path "HKLM:SYSTEMCurrentControlSetServicesw32timeTimeProvidersNtpServer" InputProvider : 0 AllowNonstandardModeCombinations : 1 EventLogFlags : 0 ChainEntryTimeout : 16 ChainMaxEntries : 128 ChainMaxHostEntries : 4 ChainDisable : 0 ChainLoggingRate : 30 RequireSecureTimeSyncRequests : 0 DllName : C:WindowsSYSTEM32w32time.DLL Enabled : 0 PSPath : Microsoft.PowerShell.CoreRegistry::HKEY_LOCAL_MACHINESYSTEMCurrentControlSetServ icesw32timeTimeProvidersNtpServer PSParentPath : Microsoft.PowerShell.CoreRegistry::HKEY_LOCAL_MACHINESYSTEMCurrentControlSetServ icesw32timeTimeProviders PSChildName : NtpServer PSDrive : HKLM PSProvider : Microsoft.PowerShell.CoreRegistry # enable NTP Server feature PS C:UsersAdministrator> Set-ItemProperty -Path "HKLM:SYSTEMCurrentControlSetServicesw32timeTimeProvidersNtpServer" -Name "Enabled" -Value 1 # set [AnnounceFlags] to 5 # number means # 0x00 : Not a time server # 0x01 : Always time server # 0x02 : Automatic time server # 0x04 : Always reliable time server # 0x08 : Automatic reliable time server PS C:UsersAdministrator> Set-ItemProperty -Path "HKLM:SYSTEMCurrentControlSetservicesW32TimeConfig" -Name "AnnounceFlags" -Value 5 # restart Windows Time service PS C:UsersAdministrator> Restart-Service w32Time # if Windows Firewall is running, allow NTP port PS C:UsersAdministrator> New-NetFirewallRule ` -Name "NTP Server Port" ` -DisplayName "NTP Server Port" ` -Description 'Allow NTP Server Port' ` -Profile Any ` -Direction Inbound ` -Action Allow ` -Protocol UDP ` -Program Any ` -LocalAddress Any ` -LocalPort 123 Step 2. NTP Server Host also needs time synchronization with other Hosts as the NTP Client.
Configure NTP Client in Windows Server 2019
NTP Client settings are configured with NTP Server [time.windows.com] by default Windows, so if the computer is connected to the Internet, the date and time will be synchronized.
Furthermore, if the computer is in Active Directory Domain, the NTP Client settings are also configured as follows, so generally there is no need to change the settings:
- Domain Controller synchronizes time with PDC in the domain.
- The PDCs in a domain time synchronize with the PDCs in the Parent Domain (primary domain) or with other Domain Controllers.
- The client computers synchronize the time with the Domain Controller on which the client is currently logged on.
In the WorkGroup environment, you can change the default NTP server to other servers as follows.
Step 1. Run PowerShell with admin rights and configure the following:
Windows PowerShell Copyright (C) Microsoft Corporation. All rights reserved. # confirm current synchronization NTP Server PS C:UsersAdministrator> w32tm /query /source time.windows.com,0x8 # change target NTP Server (replace to your timezone server) # number means # 0x01 : SpecialInterval # 0x02 : UseAsFallbackOnly # 0x04 : SymmetricActive # 0x08 : NTP request in Client mode PS C:UsersAdministrator> Set-ItemProperty -Path "HKLM:SYSTEMCurrentControlSetServicesw32timeParameters" -Name "NtpServer" -Value "ntp.nict.jp,0x8" # restart Windows Time service PS C:UsersAdministrator> Restart-Service w32Time # re-sync manually PS C:UsersAdministrator> w32tm /resync Sending resync command to local computer The command completed successfully. # verify status PS C:UsersAdministrator> w32tm /query /status Leap Indicator: 0(no warning) Stratum: 4 (secondary reference - syncd by (S)NTP) Precision: -23 (119.209ns per tick) Root Delay: 0.0252246s Root Dispersion: 0.0824040s ReferenceId: 0x85F3EEF3 (source IP: 133.243.238.243) Last Successful Sync Time: 9/23/2019 10:15:33 PM Source: ntp.nict.jp,0x8 Poll Interval: 8 (256s)Step 2. If a computer is in an Active Directory domain environment and is a Forest Root, the synchronization target is usually configured to [Local CMOS Clock] (Hardware Clock). Then, if you want to change the setting from [Local CMOS Clock] to NTP server network, please set as follows:
Windows PowerShell Copyright (C) Microsoft Corporation. All rights reserved. # in AD Domain Environment, [Type] is set to [NT5DS] PS C:UsersAdministrator> (Get-Item -Path "HKLM:SYSTEMCurrentControlSetServicesw32timeParameters").GetValue("Type") NT5DS # if target is [Local CMOS Clock] but you'd like to change it, change [Type] to [NTP] first # next, change to NTP server with the same way in [1] section PS C:UsersAdministrator> Set-ItemProperty -Path "HKLM:SYSTEMCurrentControlSetServicesw32timeParameters" -Name "Type" -Value "NTP" 5 stars4 stars3 stars2 stars1 star4 ★ | 218 Vote
You should read it
- How to Install, Configure, and Test Windows Server 2012 R2 Single Subnet DHCP Server
- Install Windows Server 2003 and create a backup server
- KMS activation deployment for Windows 10, Windows 8.1, Windows Server 2012 R2, Windows Server 2016
- Deploy KMS activation on Windows Server 2008
- HOW TO INSTALL ISA SERVER ENTERPRISE 2000 — Part III
- Balance downloading Web-Proxy Client with ISA Server 2004 Standard Edition (Part 2)
- Install the client (Client) for ISA
- How to Enable Cross Origin Resource Sharing (CORS) for Sharing Resource Using Apache Servers, PHP and Jquery
May be interested
- How to initial setup Windows Server 2019

after downloading and installing windows server 2019, you will go to the initial setup process. let’s find out details through the following article!
- 4 best tips for server protection
today cybercriminals are more aggressive than ever. let’s set up server protection with the following basic steps to prevent attackers!
- Download XAMPP 8.0.2: Free local Web server
xampp was created by apache friends. it stands for cross-platform (x), apache, mariadb (mysql), php and perl.
- How to set up Minecraft server with Hamachi
minecraft server makes it possible to play minecraft — the most popular game in the world — with others. if you want to play minecraft as a multiplayer game, you need to create or connect to servers. in this article, tipsmake will talk about how to set up a minecraft server with hamachi.
- How to install and set up Mumble server
mumble is a free, secure, and high-quality voice chat app. anyone who is willing to set up server space can host a mumble server.
- How to add a bot to the Discord server
discord is a great way to chat with others. if you run your own discord server, you’ll most likely want to install the bot at some point. the bot can help you automate censorship, add points and leaderboards, listen to music with others, and more.


Home » OS’s » Windows » Set NTP Server Windows 2016 or Windows 2019
There is no question about it, having accurate time in your environment set in critical infrastructure systems is a must. Many business-critical applications and infrastructure systems rely on accurate time synchronized between them to ensure the system functions as expected. Time skew can cause all kinds of weirdness when it is misconfigured or out of sync between different servers/systems. This is especially true in a Windows Server Active Directory domain. Having accurate time between a client computer and domain controllers is essential. Let’s take a look at how to set ntp server Windows 2016 or Windows 2019 to see how this can be easily carried out.
What is NTP?
Wen it comes to synchronizing time in most enviornments, Network Time Protocol (NTP) is the protocol that is used to ensure accurate time across your environent. In most environments, NTP servers, special time servers, are configured that provide an external time source for which your internal servers can synchronize with.
There are several widely known NTP IP addresses on the Internet that provide reliable time sources for your network. The NTP.org servers are one such set of time servers that provide an NTP source for configuration.
There are a few NTP values to be aware of:
- NTP Server – This is a specialized server that is able to detremine the precise time from an external timing reference such as GPS and passes these precise time values on to your network
- Offset – This is the difference in time between the external time server and the time on a local client computer. The larger the offset, the more inaccurate the timing source is.
- Delay – This is the value of the round-trip time (latency) of the timing message between the client to the server and back again.
How Time is synchronized in a Windows Server domain
In a Windows domain, Microsoft has default configuration in place that takes care of a good portion of the NTP configuration. Starting with Windows 2000 Server, Windows clients are configured as NTP Clients. When configured as an NTP client, Windows computers only attempt to contact the domain controller for NTP synchronization or a manually specified NTP server.
Microsoft has made the domain controller the default in a Windows domain since it makes sense that clients already have a secure channel established with DCs for other types of communications. Additionally, accurate and synchronized time between domain controllers and clients is especially important for all kinds of things such as logins, group policy synchronization and other tasks/operations.
The order of operations or hierarchy in a Windows domain is as follows:
- Domain members attempt to synchronize time with any domain controller located in the domain
- Domain controllers synchronize with a more authoritative domain controller
- The first domain controller that is installed in the environment is automatically configured to be a reliable time source.
- Other than the first domain controller installed, the PDC emulator (if role has been moved from the first DC installed) generally holds the position of best time source.
An important point to consider and that comes into play when thinking about why we set ntp server in Windows 2016 or Windows 2019 is the authoritative domain controller must have a reliable source to synchronize with as well. This is generally an external time server outside of the domain hierarchy.
Now that we know how the domain hierarchy for time is configured, how is the external time source configured on your domain controller that is configured as the reliable source of time?
Configuring Windows Time Service with W32tm.exe
When it comes to Windows Server environments like Windows Server 2016 or Windows Server 2019, there is a special Windows service that controls the time synchronization of your Windows hosts. This is the Windows Time Service.
Microsoft provides a command line tool to interact with the Windows Time Service called W32tm.exe. This has been included in Windows operating systems since Windows XP/Windows 2003 and later. It can be used to configure Windows Time service parameters as well as diagnose time service problems. This is generally the tool of choice when it comes to configuring, monitoring, and administering Windows Time.
Using the W32tm.exe utility is fairly straightforward. It can be used from a normal command prompt as well as from a PowerShell prompt. There are several command parameters included that allow not only configuring the NTP servers you want to query, but also parameters that allow viewing the low level registry configuration as well as the synchronization status.
You can read the official Microsoft KB on the Windows Time service and the W32tm.exe utility here:
- https://docs.microsoft.com/en-us/windows-server/networking/windows-time-service/windows-time-service-tools-and-settings
However, there are a few commands I would like to show you for the purposes of configuring your Domain controller that is to be the reliable time source (PDC Emulator) for your domain.
The first command is the command line entry to specify your NTP servers, which in this case I am using the NTP.org servers to set as the source of my NTP synchronization.
w32tm /config /syncfromflags:manual /manualpeerlist:"0.us.pool.ntp.org 1.us.pool.ntp.org 2.us.pool.ntp.org 3.us.pool.ntp.org" /update

Stop-Service w32time
Start-Service w32time
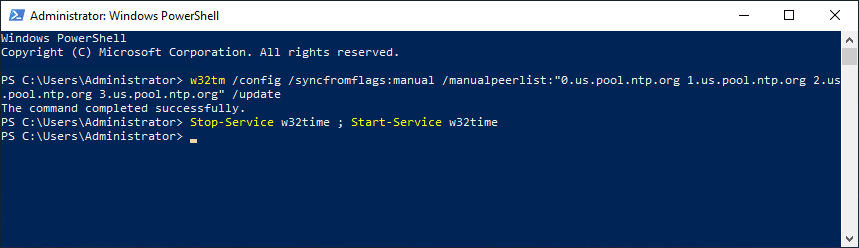
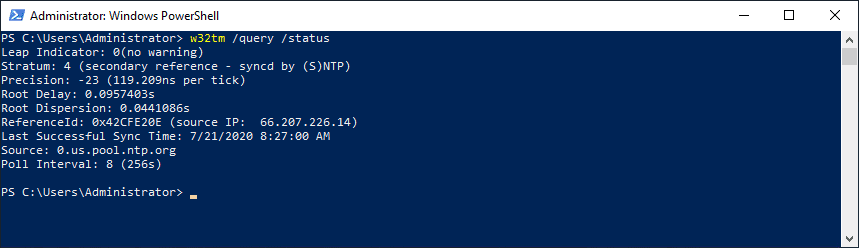
If you want to view the status of the NTP synchronization on your server after you have configured the values and restarted the w32time service, you can use the following command:
w32tm /query /status
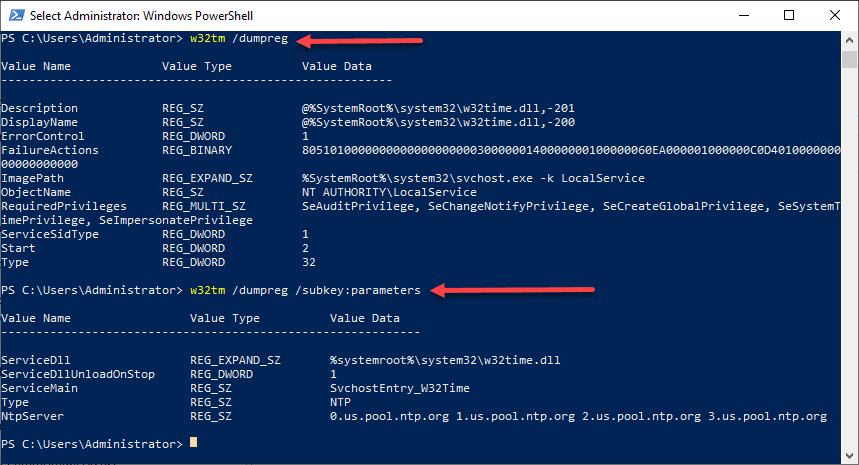
You can also check the values configured in your registry key hkey local machine system currentcontrolset services w32time config using the commands below. You can drill into the configuration parameters using the /dumpreg /subkey command.
w32tm /dumpreg

w32tm /dumpreg /subkey:parameters
Final Thoughts
As shown, you can easily set NTP Server Windows 2016 or Windows 2019 using the w32tm command utility that allows interacting with the time service in Windows Server.
In a Windows domain, you want to configure your authoritative time source domain controller, which by default is the PDC Emulator, to pull time information from an authoritative source like NTP.org or some other reliable NTP time server.
After configuring the time source, the other domain controllers will synchronize with this server and then the Windows clients joined to the domain will synchronize with the domain controllers that have the corrected time from the authoritative server.
Brandon Lee is the Senior Writer, Engineer and owner at Virtualizationhowto.com, and a 7-time VMware vExpert, with over two decades of experience in Information Technology. Having worked for numerous Fortune 500 companies as well as in various industries, He has extensive experience in various IT segments and is a strong advocate for open source technologies. Brandon holds many industry certifications, loves the outdoors and spending time with family. Also, he goes through the effort of testing and troubleshooting issues, so you don’t have to.

What is NTP?
NTP stands for Network Time Protocol, and it is an Internet protocol used to synchronize the clocks of computers to some time reference. NTP is an Internet protocol that’s used to synchronise the clocks on computer networks to within a few milliseconds of universal coordinated time. It belongs to and is one of the oldest parts of the TCP/IP suite. NTP is designed to be highly fault-tolerant and scalable, while supporting time synchronization.
In an Active Directory (AD) domain, time synchronization works by using the Windows Time service (also known as W32Time) to synchronize the clocks of all domain-joined computers with the clock of a designated time source. The designated time source is typically the primary domain controller (PDC) emulator, which is the domain controller that acts as the authoritative time source for the domain.
The Windows Time service uses the Network Time Protocol (NTP) to synchronize the clocks of domain-joined computers with the PDC emulator. When a computer joins the domain, it automatically configures the Windows Time service to synchronize with the PDC emulator. The PDC emulator, in turn, synchronizes its clock with an external time source, such as an atomic clock or GPS, to ensure that the time is accurate.
All other domain controller and clients synchronize their clock with PDC emulator, this way all the computers in the domain have the same time which is important for Kerberos authentication, event logging and other network services.
It is also possible to configure a domain to use an external time source or multiple time sources. Additionally, you can configure different time sources for different parts of the domain, or create a hierarchy of time sources to ensure that the time is accurate throughout the entire domain.
How to configure NTP on Windows Server 2019
Windows Server 2019 provides an option to configure an NTP (Network Time Protocol) server on a domain controller. NTP is a protocol used to synchronize the time on network devices and ensure accurate timekeeping. By configuring your domain controller as an NTP server, you can ensure that all devices within your network have synchronized time. This tutorial will guide you through the steps of configuring an NTP server on a Windows 2019 domain controller.
Step 1: Open the Command Prompt as an Administrator.
To begin, open the Command Prompt with administrator rights. You can do this by right-clicking on the Start button and selecting «Command Prompt (Admin)» from the context menu.
Step 2: Check the current time settings.
Before configuring the NTP server, it’s important to check the current time settings on your domain controller. To do this, type the following command in the Command Prompt and press Enter:
«`
w32tm /query /status
«`
This command will display the current time settings, including the time source.
Step 3: Configure the NTP server.
Next, you need to configure your domain controller as an NTP server. In the Command Prompt, enter the following command, replacing `time.windows.com` with the NTP server of your choice:
«`
w32tm /config /syncfromflags:manual /manualpeerlist:«time.windows.com«
«`
This command tells the domain controller to synchronize time from the specified NTP server.
Step 4: Restart the time service.
To apply the changes made in the previous step, you need to restart the time service. Enter the following command in the Command Prompt and press Enter:
«`
net stop w32time && net start w32time
«`
This command stops and starts the time service, ensuring that the changes take effect.
Step 5: Verify the NTP server configuration.
Finally, you can verify that the NTP server configuration was successful. Run the following command in the Command Prompt:
«`
w32tm /query /status
«`
Check the output to ensure that the «Source» field displays the NTP server you configured.
| Pros | Cons |
|---|---|
| 1. Provides accurate time synchronization for all devices within your network. | 1. Requires administrative privileges to configure the NTP server. |
| 2. Improves network security by ensuring consistent time timestamps. | 2. Relies on the availability and reliability of the chosen NTP server. |
| 3. Helps prevent issues with authentication, auditing, and file replication across network devices. | 3. Incorrectly configuring the NTP server may cause time synchronization problems. |
By following these steps, you can easily configure an NTP server on a Windows 2019 domain controller. Having synchronized time across your network devices is crucial for various operations, including authentication, auditing, and file replication. Take advantage of this feature to ensure accurate timekeeping in your IT infrastructure.
Video Tutorial:Does Active Directory use NTP?
How to set NTP time on domain controller?
Setting NTP (Network Time Protocol) time on a domain controller is an essential task to ensure accurate time synchronization across the network. Follow these steps to set NTP time on a domain controller:
1. Log in to the domain controller with administrative privileges.
2. Open the Command Prompt with administrative rights. Right-click on the Command Prompt icon and choose «Run as administrator.«
3. Type the following command to set the NTP server:
`w32tm /config /syncfromflags:manual /manualpeerlist:«pool.ntp.org«`
This command specifies that the time synchronization will be manually configured using the NTP server pool.ntp.org. You can replace pool.ntp.org with any other reliable NTP server address.
4. Press Enter to execute the command.
5. Next, type the following command to update the configuration:
`w32tm /config /reliable:yes`
This command ensures that the time service will start automatically and remain reliable.
6. Press Enter to execute the command.
7. Now, restart the Windows Time service to apply the changes. Use the following command:
`net stop w32time && net start w32time`
This command stops and starts the Windows Time service.
8. Finally, check if the time synchronization is working correctly. Open the Command Prompt and enter:
`w32tm /query /status`
This command displays the detailed status of the Windows Time service.
Look for the «Source:» field, which should show the NTP server address you configured previously.
That’s it! You have successfully set NTP time on the domain controller. Ensure that the NTP server you choose is reliable and widely used for accurate time synchronization.
How do I know if my domain controller is NTP?
To determine if your domain controller is configured as a Network Time Protocol (NTP) server, you can follow these steps:
1. Open the command prompt on your domain controller. You can do this by pressing Windows Key + R, typing «cmd,» and pressing Enter.
2. In the command prompt, type the following command and press Enter:
«`
w32tm /query /configuration
«`
This command will display the configuration settings of the Windows Time service.
3. Look for the line that starts with «NtpServer.» If it includes the domain controller’s IP address or a valid NTP time server address, it means your domain controller is configured to synchronize time using NTP.
4. Check the «Type» field in the output. If it shows «NT5DS» or «NTP«, it indicates that the domain controller is using NTP as the time source.
5. Additionally, you can use the following command to check the NTP peers that your domain controller is synchronized with:
«`
w32tm /query /peers
«`
This command will display a list of NTP peers along with their status. If you see valid NTP server addresses in the output, it confirms that your domain controller is configured to synchronize time using NTP.
Remember, NTP synchronization is crucial for maintaining accurate time across your network and domain controllers. Ensuring proper time synchronization helps with security, authentication, and overall system integrity.
Configuring Network Time Protocol (NTP) in Windows Server 2019 is important for ensuring accurate time synchronization across domain-joined computers. Here are the steps to configure NTP in Windows Server 2019:
1. Open the command prompt with administrative privileges by right-clicking on the Start button and selecting «Command Prompt (Admin)«.
2. Start by checking the current time synchronization settings by running the command: `w32tm /query /status`
3. Identify the existing time source(s) listed under «Source» and note them down. If there are no time sources listed, it means the server is not configured for time synchronization.
4. Configure the NTP server by specifying the reliable time source(s) you want to use. For example, if you want to use «pool.ntp.org» as the time source, run the command: `w32tm /config /syncfromflags:manual /manualpeerlist:«pool.ntp.org» /reliable:yes`
5. Restart the Windows Time Service by running the command: `net stop w32time && net start w32time`
6. Finally, synchronize the time immediately by running the command: `w32tm /resync`
7. To verify the new configuration, run the command: `w32tm /query /status` again and check if the «Source» reflects the newly configured time source(s).
By following these steps, you can successfully configure NTP in Windows Server 2019 and ensure accurate time synchronization within your network.
How do I know if my domain controller is NTP server?
Determining if a domain controller is functioning as an NTP server involves checking various settings and configurations. Here’s a step-by-step guide to help you identify if your domain controller is serving as an NTP server:
1. Log in to your domain controller using administrative credentials.
2. Open the Command Prompt or PowerShell as an administrator.
3. Use the following command to check the NTP settings on your domain controller:
«`
w32tm /query /configuration
«`
This command will display the current configuration of the Windows Time service, including the NTP server settings.
4. Look for the «NtpServer» parameter in the command output. If the NtpServer parameter is present and configured, it means your domain controller is acting as an NTP server. The NtpServer value will indicate the NTP server address.
5. Optionally, you can use the following command to verify the time synchronization status between your domain controller and the configured NTP server:
«`
w32tm /stripchart /computer: /samples:
«`
Replace « with the NTP server address obtained in the previous step, and « with the desired number of time samples to be obtained.
By following these steps, you can determine if your domain controller is functioning as an NTP server and verify the time synchronization status.
Can you use domain controller as NTP server?
Yes, you can use a domain controller as an NTP (Network Time Protocol) server. The NTP is used to synchronize clocks on a network to a reference time source, ensuring that devices maintain accurate time and coordinate activities effectively.
Here are the steps to set up a domain controller as an NTP server:
1. Verify the domain controller’s time synchronization source: Before configuring the domain controller as an NTP server, it’s important to ensure that it is already synchronizing time with a reliable external time source. This could be an external NTP server or an authoritative time server on the internet.
2. Configure the domain controller as an NTP server: Once the domain controller has a reliable time source, you can configure it to serve as an NTP server for other devices on the network. This can be done through the Group Policy Management Editor by creating a new Group Policy Object (GPO) or by modifying an existing one.
a. Open the Group Policy Management Editor.
b. Navigate to the desired GPO or create a new one.
c. Go to Computer Configuration > Policies > Administrative Templates > System > Windows Time Service > Time Providers.
d. Enable the «Enable Windows NTP Server» policy and specify the desired NTP server as either a DNS name or an IP address.
e. Apply the GPO to the targeted domain controllers or organizational units.
3. Configure NTP client devices to use the domain controller: Once the domain controller is set up as an NTP server, you need to configure the client devices on the network to use it for time synchronization. This can be done through Group Policy or manually on individual devices.
a. Use Group Policy: Follow a similar process as in Step 2 to configure the «NTP Client» policy under the same GPO, specifying the domain controller’s DNS name or IP address as the NTP server. Apply the GPO to the desired client devices or organizational units.
b. Manual configuration: On individual devices, modify the NTP client settings through the operating system’s control panel or settings menu. Set the domain controller’s DNS name or IP address as the preferred NTP server.
By following these steps, you can effectively use a domain controller as an NTP server, ensuring accurate time synchronization across your network.
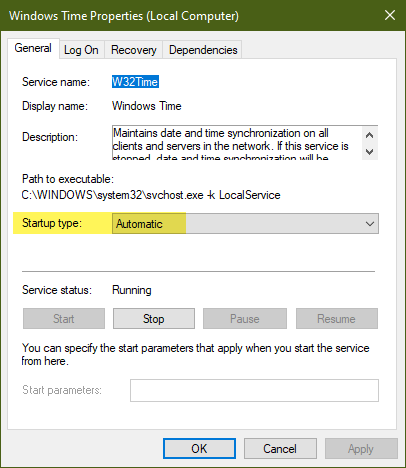
The steps are the same to configure a Windows client or server as an NTP server. These steps will work on current and previous versions of windows.
First make sure the NTP service is set to Automatic. If it is disabled or set to manual, change it to automatic and start the service.
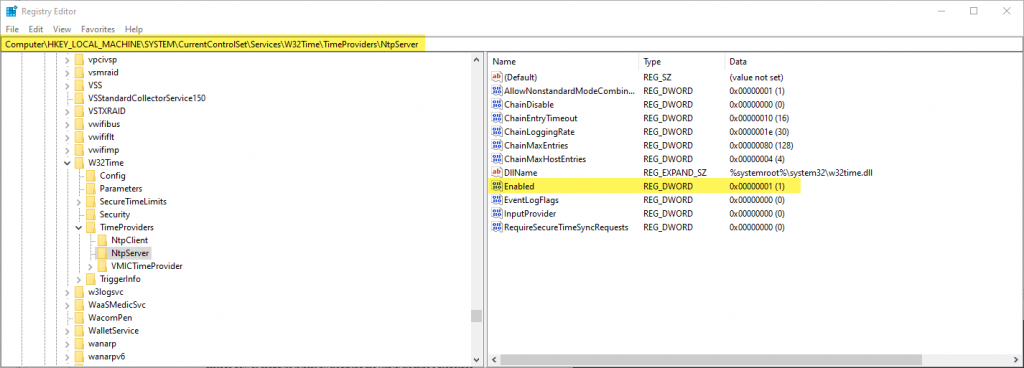
Check the registry and verify the server is enabled.
Computer\HKEY_LOCAL_MACHINE\SYSTEM\CurrentControlSet\Services\W32Time\TimeProviders\NtpServer: Enabled should be set to 1
Now that you’ve updated the registry, you need windows to read your update. You can do that any one of the following 3 ways:
- Restart the time service
- Reboot your machine
- Open an administrator command prompt and run this command to have it reread the windows time portion of the registry:
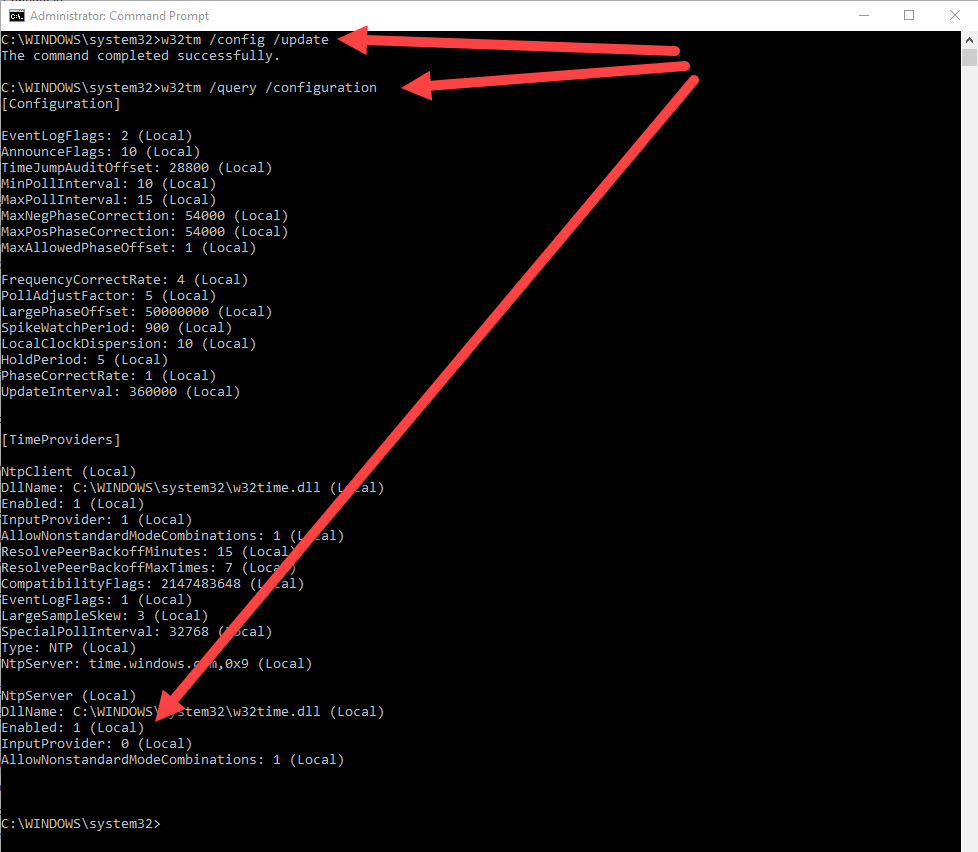
w32tm /config /update
You should see “The command completed successfully”
You can run this command at an administrator command prompt to verify your NTP server is running: w32tm /query /configuration. You should see 3rd line from the last line Enabled: 1 (Local). This is under NtpServer in the [TimeProviders] section of the results.
If you get the error “The service has not been started” go back and verify you set the Windows Time service to automatic.