
A router is a device that manages the flow of data between network segments subnets. A router directs packets based on the information it has in its own routing table. In most cases, you would implement a dedicated hardware router.
However, you may decide that a software-based router is an appropriate solution. Generally, dedicated hardware routers handle heavier routing demands much better than software based routers.
Microsoft provides as part of the server operating system, a fully functional software-based routing solution. Not only does Windows Server provide a routing solution, but also provides other remote access services within the Routing and Remote Access role.
Installing Routing and Remote Access Service
You install the Routing and Remote Access service by using the Add Roles Wizard. Membership in the local Administrators group, or equivalent, is the minimum required to complete this procedure. Follow the steps outline.
- Launch Server Manager from the Administrative Tools Folder.
- In the Server Manager console, under Roles Summary, click Add roles.
- In the Add Roles Wizard, click Next.
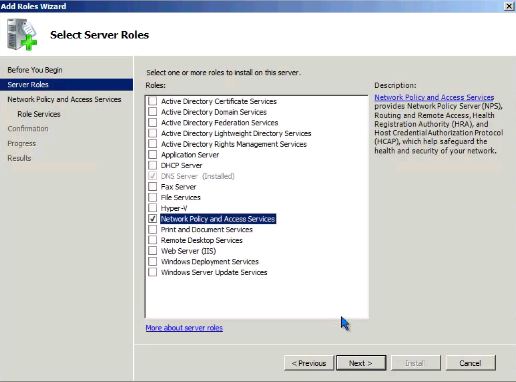
- In the list of server roles, select Network Policy and Access Services. Click Next twice.

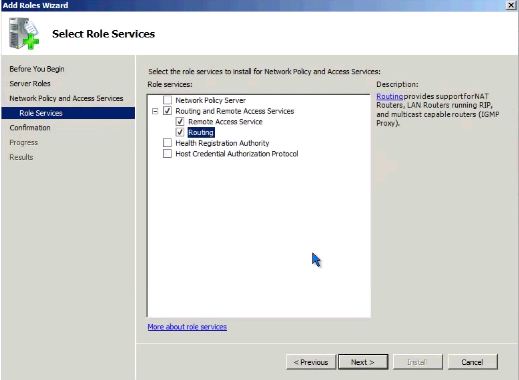
- In the list of role services, select Routing and Remote Access Services to select all of the role services.

- Proceed through the steps in the Add Roles Wizard to complete the installation.
After you add the Network Policy and Access Services Role and complete the installation, the Routing and Remote Access service is installed in a disabled state. To enable and configure the remote access server, you must be logged on as a member of the Administrators group.
The next step is to enable the Routing and Remote Access service (RRAS). If the RRAS server is a member of the domain, you need to add the computer account of this server to the RAS and IAS Servers security group in the domain of which this server is a member.
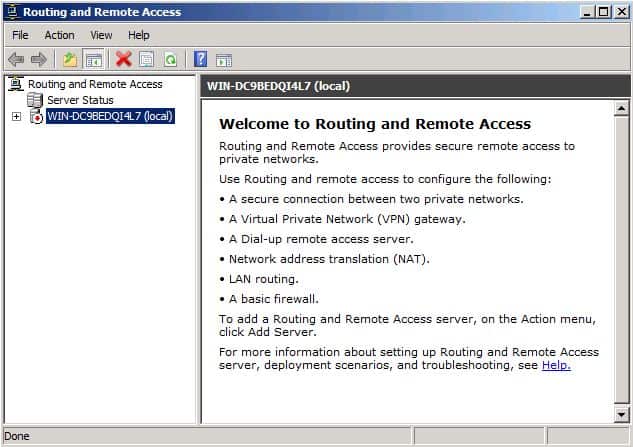
- Start the Routing and Remote Access console in the Administrative Tools Folder.
- Right-click the server object, and then click Configure and Enable Routing and Remote Access.

- Follow through the steps in the wizard to complete the configuration of RRAS.


После проведения изменения в Windows Server 2008 в отличии от Windows Server 2003, OSPF уже не входит в Windows Server 2008, в связи с этим у нас осталась либо статическая, либо динамическая маршрутизация(RIPV2). Что же лучше? В принцыпе это зависит лишь от нравов самого администратора. Но всё-таки давайте разберёмся поглубже.
При статической маршрутизации вы должны сделать запись на вашем сервере Windows для каждой сети,
которая маршрутизируется вашим сервером. Таким образом, для простой
сети с одним сервером при маршрутизируемом трафике между двумя сетями
статическая маршрутизация не представляет особой сложности. Вы можете
ее настроить всего двумя командами route add.
С другой стороны, если вы хотите, чтобы система Windows Server 2008
занималась маршрутизацией 25 сетей или обменивалась маршрутами с сетью
Cisco, использующей RIP, вам нужно было бы выбрать динамическую
маршрутизацию. Конечно, вам ведь не захочется вручную настраивать
работу 25 сетей, да и вы не смогли бы реализовать все действительно
динамические возможности, обеспечиваемые RIP. Приемущества:
- Возможность автоматического добавления сетей, получая данные о них от других маршрутизаторов RIP
- Возможность автоматически удалять записи из таблицы маршрутизации, когда другие маршрутизаторы RIP удаляют их
- Возможность выбора наилучшего маршрута на основе особой метрики
- Упрощать
конфигурацию маршрутизаторных систем Windows Server, имеющих более
некоторого количества статических маршрутов, которые необходимо добавить
Статическая маршрутизация в Windows Server 2008
Статическая маршрутизация в Windows Server не представляет ничего нового. Мы годами использовали команду route.
Вы можете настраивать статическую маршрутизацию в Windows 2008 Server
либо с помощью командной строки, либо через GUI. Однако если вы
используете интерфейс Windows GUI, эти маршруты не будут указываться в
списке интерфейса CLI, когда вы набираете route print. Поэтому при использовании статической маршрутизации в Windows 2008 работайте только с командой route из командной строки.
Давайте посмотрим на примеры того, как можно настраивать статическую маршрутизацию с помощью команду route:
Просмотр таблицы маршрутизации
Просмотреть таблицу маршрутизации очень просто, достаточно использовать команду route print, как вы видите на Рисунке 1 ниже.

Рисунок 1: Просмотр таблицы IP-маршрутизации в Windows Server 2008
При
выводе таблицы маршрутизации первое, на что важно обратить внимание,
это список интерфейсов. IP-интерфейсы Windows Server обозначены с
номером интерфейса. Номера интерфейсов на Рисунке 1 – 16, 14, 1, 15, 20
и 12. Эти номера интерфейсов используются всегда, когда вы добавляете
или удаляете номера маршрутов из таблицы.
Вторая по важности –
таблица маршрутизации IPv4. Тут указывается адрес сети, маска сети,
шлюз по умолчанию, интерфейс и метрика. Эта таблица указывается серверу
Windows, куда направлять трафик.
Ниже находится таблица маршрутизации IPv6. Подробно про IPv6 можно почитать статьи Брайана Пози (Brien Posey) Crash Course in IPv6 (Part One) & Crash Course in IPv6 (Part Two) and Mitch Tulloch’s article IPv6 Support in Microsoft Windows.
Добавление статического маршрута
Как
же вам добавить статический маршрут через командную строку? Ответ прост
– используйте команду добавления маршрута следующим образом:
route add 1.1.1.0 mask 255.255.255.0 10.0.1.1 if 1Как вы видите на Рисунке 2, результат добавления маршрута был положительный: «ОК!»

Рисунок 2: Использование команды добавления маршрута в Windows 2008
Важным
в команде добавления маршрута является указание сети, которую мы хотим
добавить, подсети, адреса/шлюза, а также интерфейса для данного
маршрута.
Удаление статического маршрута
Удаление маршрута происходит еще проще. Все, что вам нужно сделать – ввести команду route delete и сеть, которую вы хотите удалить, как это показано на Рисунке 3.

Рисунок 3: Команда удаления маршрута в Windows 2008
Это
и есть основы настройки статических маршрутов с помощью командной
строки. Теперь давайте узнаем про настройку динамической маршрутизации.
Динамическая маршрутизация в Windows Server 2008 с использованием RIPV2
Выше
в этой статье я говорил о преимуществах работы с динамической
маршрутизацией. Теперь позвольте мне рассказать вам о шагах по
настройке RIPv2 в Windows 2008:
- Сначала нужно установить
роль Routing and Remote Access (RRAS) в Windows 2008 Server. Если вы
воспользуетесь мастером Add Roles, роль RRAS будет трудно найти, так
как вам в действительности нужно добавить сначала роль Network Policy and Access Services, а уже после этого – роль RRAS (см. Рисунок 4 и Рисунок 5).

Рисунок 4: Добавление роли RRAS через Network Policy and Access Services

Рисунок 5: Role Services в Win 2008 является частью роли Network Policy and Access Services
После установки вы можете настроить RRAS из приложения Server Manager, но лучше из приложение Routing and Remove Access.
- Следующим шагом является настройка Routing and Remote Access. Откройте RRAS MMC, щелкните правой кнопкой мыши на имени сервера, и щелкните на Configure and Enable Routing and Remote Access. Вот пример:

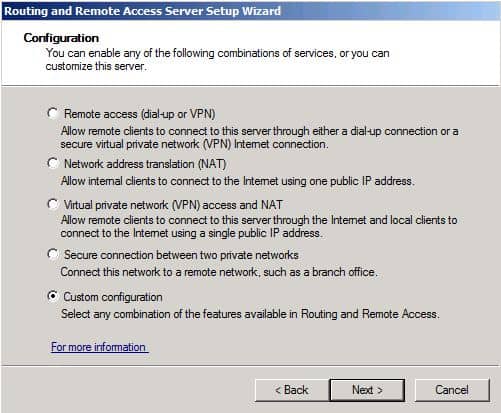
Рисунок 6: Настройка и включение RRAS
Убедитесь, что вы осуществляете настройку Custom Configuration при вопросе, какой протокол RRAS устанавливать. Затем выберите установку LAN ROUTING и запустите службу.
Теперь вы видите, что сетевые интерфейсы управляются RRAS, и особые настройки для IPv4 и IPv6.
Теперь вы можете расширить IPV4, перейти к General, а затем – к New Routing Protocol.

Увеличить
Рисунок 7: Добавление нового протокола маршрутизации
Теперь выберите установку RIPV2 в качестве протокола маршрутизации.
Рисунок 8: Добавление RIP V2
- Теперь,
когда у вас установлен RIPv2, вы можете его настроить. Настройка его
так же проста, как и добавление интерфейсов, которые вы захотите
использовать для обмена маршрутами RIP. Для этого перейдите в секцию
RIP, щелкните правой кнопкой, щелкните на New Interface, выберите интерфейс, который собираетесь добавить под RIP (Рисунок 9).
Рисунок 9: Добавление нового интерфейса RIP
- После
выбора интерфейса у вас появляется возможность огромное количество
свойств соединения RIP (Рисунок 10).

Рисунок 10: Настройка нового интерфейса RIP
- После
добавления интерфейсов RIP вы можете проверить, отправляются и
принимаются ли запросы и ответы на вашем интерфейсе RIP (это стоит
сделать). Вы также можете проверить, есть ли у вас соседи по RIP,
щелкнув правой кнопкой мыши на протоколе RIP, а после этого выбрав Show Neighbors.
Ресурсы данной статьи:
- Видео Эда Либермана Train Signal Windows 2008 Network Infrastructure.
В этом видео, кроме объяснения маршрутизации и различий между
статической и динамической маршрутизацией, Эд показывает, как, шаг за
шагом, настроить RIPv2 в Windows 2008. Вот скриншот такой настройки у Эда:

Рисунок 11: Видео Train Signal’s Windows 2008 на тему установки и настройки RIPV2
- В
базе знаний Petri IT Knowledgebase написано статью о настройке Windows
2003, затем другую статью об обмене маршрутами между маршрутизатором
Cisco и сервером Windows. Если говорить о Win 2008, процесс настройки
RIP на Win 2003 аналогичен, и настройка обмена маршрутами с
маршрутизатором Cisco очень похожа: Configuring a Windows 2003 Server to exchange RIP routes with a Cisco router — Part 1 Configuring a Cisco router to exchange RIP routes with a Windows 2003 Server — Part 2
источник: http://www.netdocs.ru
David Davis
Network Administration — With Windows Server 2008, there are a number of network connectivity changes as well as Routing and Remote Access. There are already network services removed in Windows Server 2008 and others you have to use instead. OSPF did not exist in Windows Server 2008 although in our opinion this may be the best dynamic routing protocol created. However, we need to understand Microsoft’s decision to remove it because it can take up to 99% of Windows server administrators to use it. So what do we have?
With the removal of OSPF, we only have 1) static routing or 2) dynamic routing with RIPV2. Let’s find out how they work.
Should I use dynamic or static routing?
The question is whether you should use dynamic routing or static routing, which is really a question for administrators. How to route it, the end result is still intended to properly route network traffic.
With static routing, you must create an entry on a Windows Server server for each network, each of which will be routed by that server. Thus, for a simple network with a Windows Server, routing traffic between two networks using static routing is a ‘no brainer’ method. You can configure it just by using two simple commands route add.
In other cases, on a network where you want the Windows Server 2008 system to route to 25 networks or exchange routes with a Cisco network that uses RIP, the way to do this is to choose a dynamic routing method.
But what are the features of dynamic routing here? Let’s list their features.
- The ability to automatically add networks by learning them from other RIP routers
- The ability to automatically remove routes from the routing table when another adjacent RIP deletes them
- The ability to choose the best route based on routing metrics
- Reducing the configuration of Windows Server routing systems with multiple static routes needs to be added.
So how to configure static and dynamic routing in Windows Server 2008?
Static routing in Windows Server 2008
Static routing in Windows Server is not new. We have used the route command for many years. You can configure static routing in Windows 2008 Server by using the route command or using the user administration interface. However, if you use the GUI interface, these routes will not be listed in the GUI interface when you type route print . Therefore, I recommend that if you use static routing in Windows 2008, use the route command at the Windows command prompt.
Let’s take a look at some examples of how to configure static routing using the route command :
Display static routing tables
Displaying static routing tables is quite easy, just use the route print command, see Figure 1 below:

Figure 1: Displaying the IP routing table in Windows Server 2008
In the route print output, the most important thing you’ll see here is the interface list. Windows Server IP interfaces are labeled with the interface number. The interface number in Figure 1 is 16, 14, 1, 15, 20, and 12. These interface numbers are used whenever you add or delete routes in the routing table.
The second important thing in the output of this command is IPv4 Route Table. This table shows us the network destinations, network mask, default gateway, interface, and metric. It tells’ Windows Server to know where to route the traffic.
Below it is an IPv6 routing table
Add a static route
So how can we add a static route using the command? The answer is simple, just use the route add command as follows:
route add 1.1.1.0 mask 255.255.255.0 10.0.1.1 if 1
As you can see in Figure 2, the results for our route addition have been confirmed ‘OK!’

Figure 2: Using the route add command in Windows 2008
The important thing in the route add command is the network we want to add, its subnet, destination / gateway, and interface for that route.
Delete a static route
Deleting a static route is easier than adding a static route. All we need to do is use the route delete command for the network you want to delete, as shown in Figure 3 below.

Figure 3: Use the route delete command in Windows 2008
Above, you have grasped the basics of configuring static routes using the command. Let’s learn more about dynamic configuration.
Dynamic routing in Windows Server 2008 using RIPV2
As in the first part of the article, we talked about the advantages of configuring dynamic routing. So now we will give you the steps to configure RIPv2 in Windows 2008:
- The first step is to install the Routing and Remote Access (RRAS) role in Windows 2008 Server. If you go to the Add Roles Wizard, the RRAS role can be a bit difficult to find because what you really need to add is the Network Policy and Access Services role then the Routing and Remote Access Services Role (as you see in Figure 4 and 5. ).

Figure 4: Adding the RRAS Role through the Network Policy and Access Services
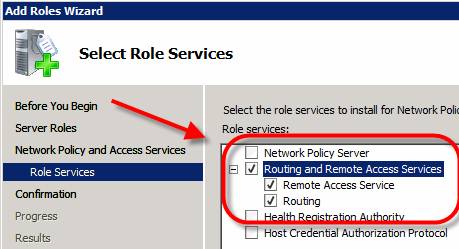
Figure 5: Win 2008 Role Services is part of the Network Policy and Access Services role
Once installed, you can configure RRAS from the Server Manager application, but in this tutorial we use the Routing and Remove Access application.
- The second part of this implementation is Configure Routing and Remote Access by opening the RRAS MMC, right-clicking on the server name, clicking Configure and Enable Routing and Remote Access as shown in the figure below:

Figure 6: Configuring and enabling RRAS
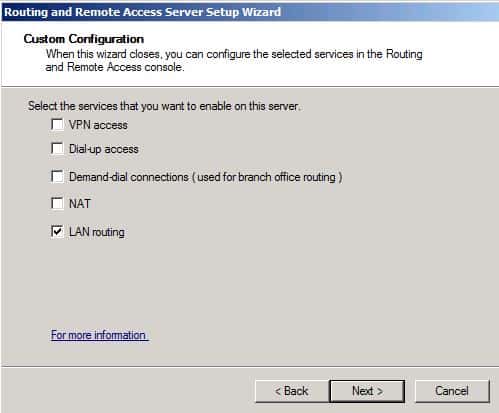
Make sure that you make a configuration of what the Custom Configuration options related to RRAS protocol install. Then choose to install LAN ROUTING , then choose to launch the service.
You can see Network Interfaces controlled by RRAS and specific configurations for IPV4 and IPV6.
Here, you can expand the IPV4 section, go to General , then go to New Routing Protocol.

Figure 7: Adding a new Routing Protocol
Next, select RIPV2 as your routing protocol.
Figure 8: Adding RIP V2
- Now you have RIPv2 installed and it is possible to configure it. Configuring RIPv2 is really as simple as adding the interfaces you want to use to exchange RIP routes. To do so, go to RIP, right-click it, select New Interface , and then select the interface you want to add in RIP as shown in Figure 9.
Figure 9: Add the RIP interface
- After selecting the interface, you will have the option to configure a variety of RIP connection properties (as shown in Figure 10).

Figure 10: Configuring the RIP interface
- When you have added RIP interfaces, check to see if you are sending and receiving responses on RIP interfaces. You can also check if you have any neighboring RIPs by right-clicking on the RIP protocol, then clicking Show Neighbors.
Conclude
Windows Server 2008 has a hard static routing option and a highly flexible dynamic routing option — RIPV2. In this article, I have explained how OSPF has been removed from Windows 2008 and what we have personally felt about it. Besides, we also show you why you should use static routing more than routing. Finally, show you how to configure static routing with route commands and dynamic routing by installing RIPV2 in Windows 2008 Routing and Remote Access .
Do you want to connect multiple LANs using Windows 2008 R2 Routing and Remote Access Service (RRAS)? This is the step by step tutorial.
First of all, you have to have multiple NICs connected to the different LANs. NICs should have an IP addresses of the LAN it is connected to. This IP address is the Default Gateway of that LAN.
On the server, go Server Manager. Right Click on Roles and select Add Roles.
Review the information and click Next.
Select check box next to Network Policy and Access Services and click Next.
Click Next on Introduction Network Policy and Access Services.
Select checkbox next to Routing and Remote Access Services. It will automatically select necessary services. Click Next.
Click Install on Confirm Installation Selection.
Click Close on Installation Results.
Go to Start, Administrative Tools, Routing and Remote Access.
Right click on your server and select Configure and Enable Routing and Remote Access.
Click Next on the Welcome screen.
Select Custom Configuration and click Next.
Select LAN Routing and click Next.
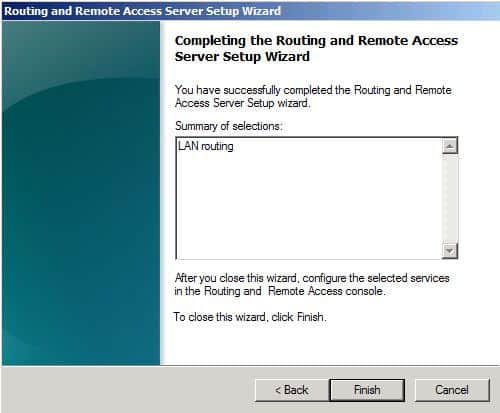
Click Finish to Complete Routing and Remote Access Setup Wizard.
Click Start Service.
Your Routing and Remote Access Server is ready. Your Private Networks should communicate now.
Related posts
Введение
В Windows 2008 Server есть несколько изменений в работе сети, маршрутизации и работе удаленного доступа. Я уже упомянул, что OSPF уже не является частью Windows Server 2008. Я считаю это неудачным решением, так как мне кажется, что OSPF – лучший динамический протокол маршрутизации. И все-таки я могу частично понять это решение Microsoft, поскольку, рискну предположить, 99.9% администраторов Windows Server никогда не использовали этот протокол. Итак, что же мы потеряли?
С удалением OSPF мы остались либо с 1) статической маршрутизацией и 2) с динамической маршрутизацией с RIPV2. Давайте выясним, как каждая из них работает.
Что лучше – статическая или динамическая маршрутизация?
Вопрос, что следует ли использовать статическую или динамическую маршрутизацию, — это личное дело администратора. В конце концов, результирующий сетевой трафик, направляемый в определенную сеть, должен быть одинаковым, вне зависимости от используемого метода.
При статической маршрутизации вы должны сделать запись на вашем сервере Windows для каждой сети, которая маршрутизируется вашим сервером. Таким образом, для простой сети с одним сервером при маршрутизируемом трафике между двумя сетями статическая маршрутизация не представляет особой сложности. Вы можете ее настроить всего двумя командами route add.
С другой стороны, если вы хотите, чтобы система Windows Server 2008 занималась маршрутизацией 25 сетей или обменивалась маршрутами с сетью Cisco, использующей RIP, вам нужно было бы выбрать динамическую маршрутизацию. Конечно, вам ведь не захочется вручную настраивать работу 25 сетей, да и вы не смогли бы реализовать все действительно динамические возможности, обеспечиваемые RIP.