
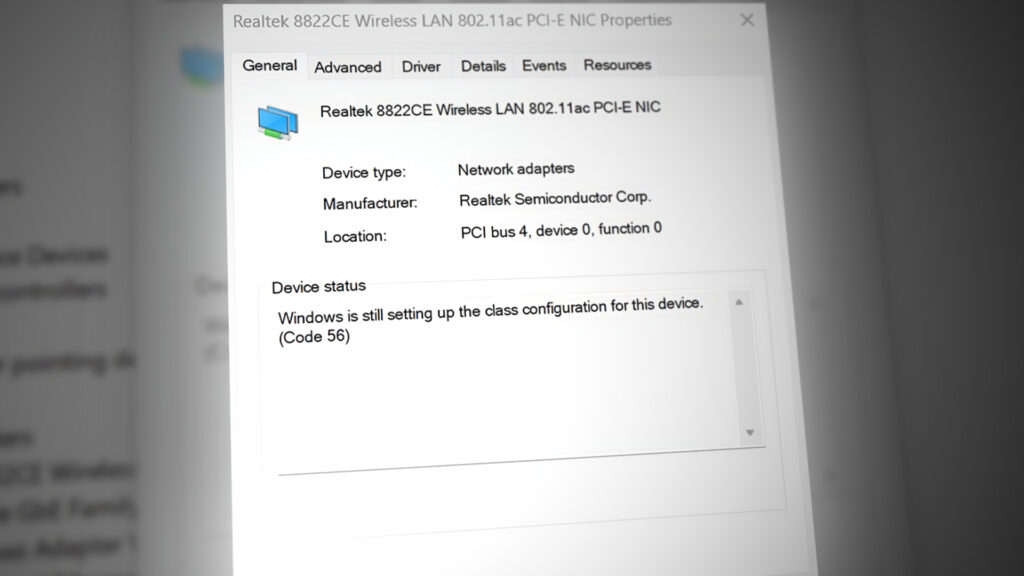
The “Windows is still setting up the class configuration for this device (Code 56)” error stops network devices from working and can cut off internet access. This error happens because Windows can’t set up the device correctly, usually due to problems from third-party VPN software or a recent Windows update affecting driver compatibility.
Other causes can be damaged drivers or conflicts in network settings.
Now that you know the causes, lets discuss the solutions.
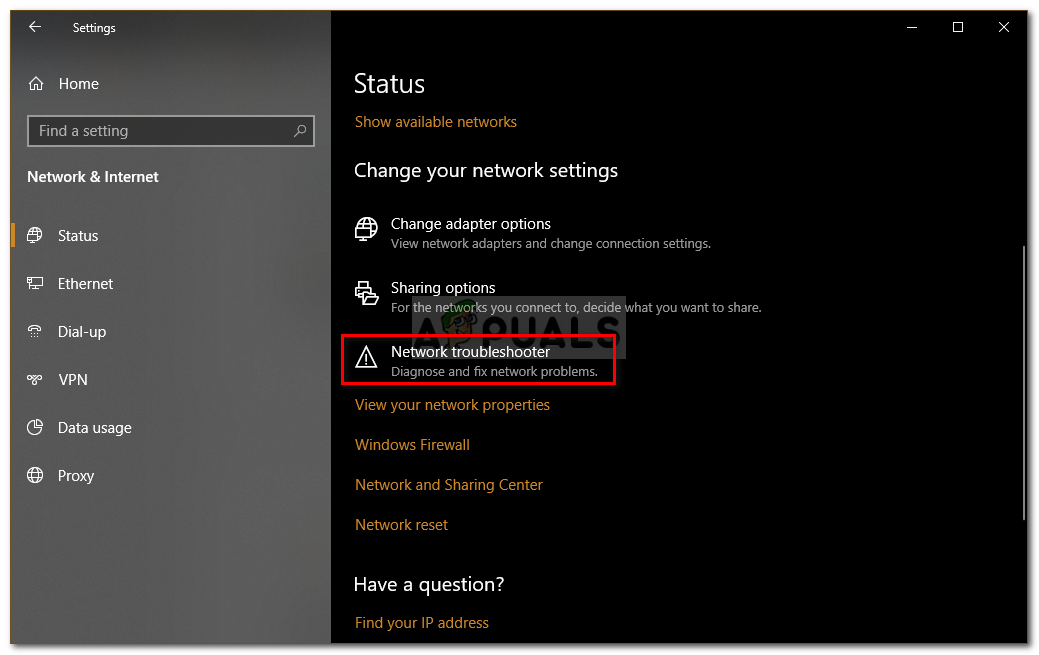
1. Run Network Troubleshooter
The network troubleshooter checks for misconfigurations and connection errors, ensuring necessary services run and restoring connectivity automatically. It resolves common network issues that prevent Windows from setting up devices correctly.
- Press Windows Key + I to open Settings.
- Go to Network and Internet.
- Click Network troubleshooter to run it.

Network Troubleshooter – Windows Network Settings - See if it resolves your issue.
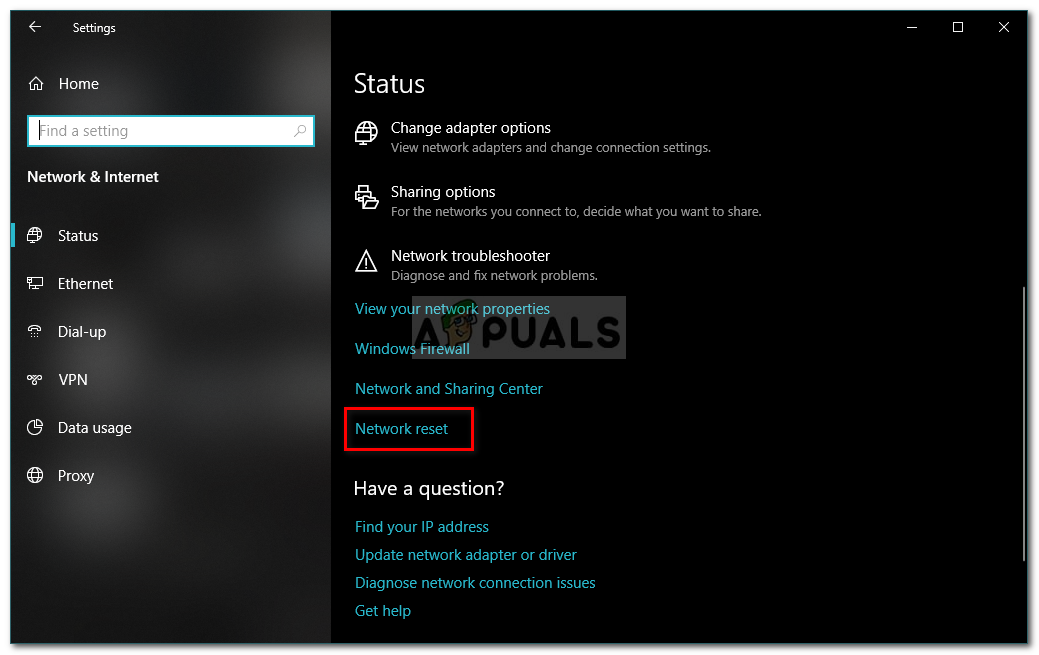
2. Network Reset
A network reset clears all network settings, fixing problems that stop device setup. It returns adapters, protocols, and settings to their original state, allowing Windows to set up the network from scratch. This removes issues caused by old drivers, VPN settings, or incomplete setups.
- Press Windows Key + I to open Settings.
- Go to Network and Internet.
- In the Status panel, scroll down and click Network reset.
Network Reset – Windows 10 Network Settings - Click ‘Reset now‘ and wait for it to complete.
3. Disable VPN
Disabling VPN software can restore proper network configuration by removing any additional filtering or routing layers it introduces. VPNs frequently modify network settings and create virtual adapters, which can interfere with Windows’ ability to recognize or configure your primary network device correctly. By uninstalling the VPN, you’re clearing these added layers, allowing Windows to re-establish a direct, stable connection with your network adapter and resume normal setup operations.
- Press Windows + I to open Settings.
- Navigate to Network & Internet > VPN.

- Disconnect any active VPN connections.

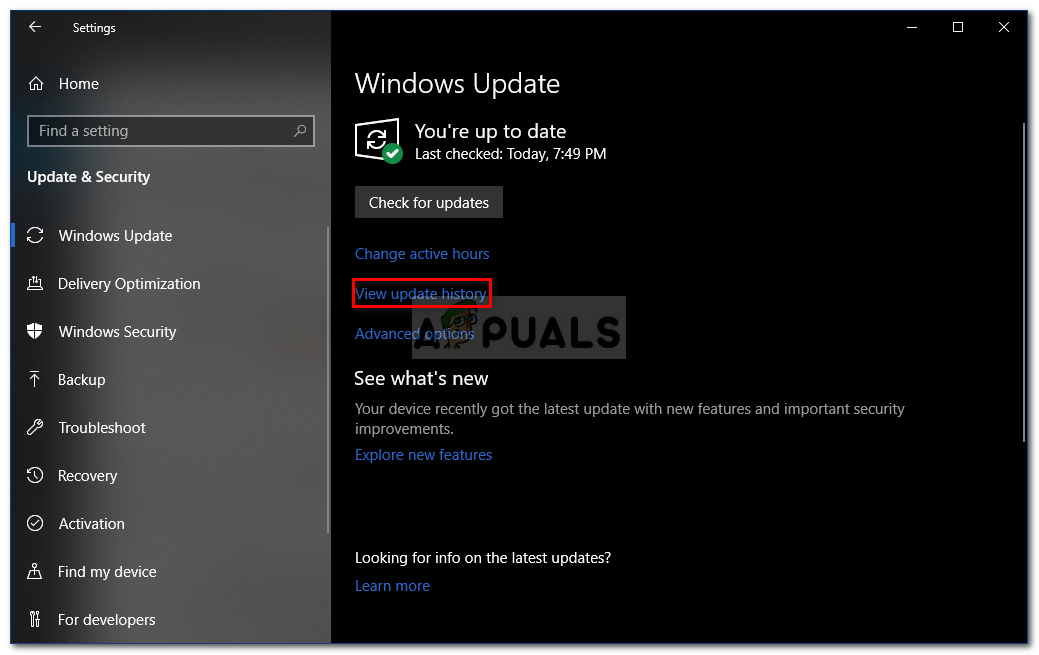
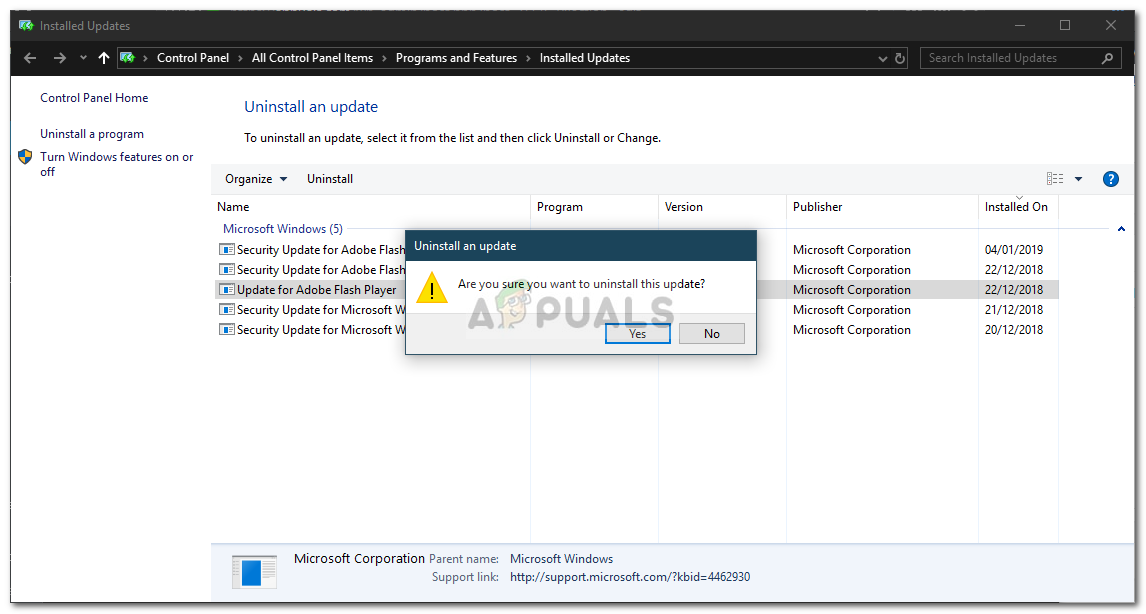
4. Uninstall Windows Update
Sometimes, uninstalling a recent Windows Update can help by restoring driver and system compatibility. Updates can change network settings and cause problems. Removing the update can restore stable operation for network devices.
- Press Windows Key + I to open Settings.
- Go to Update and Security.
- Click View update history, then select ‘Uninstall updates‘.
Windows Update Settings - Locate and double-click the update you wish to uninstall.

Uninstalling a Windows Update - Allow the process to complete.
5. Clean Install
If other solutions don’t work, a “Clean Install” can completely reset your system. This reinstalls Windows from scratch, removing all previous settings, including problem drivers or errors. It clears any interfering software or bad network settings, giving the best chance to fix issues.
You can check our article on how to Clean Install Windows.
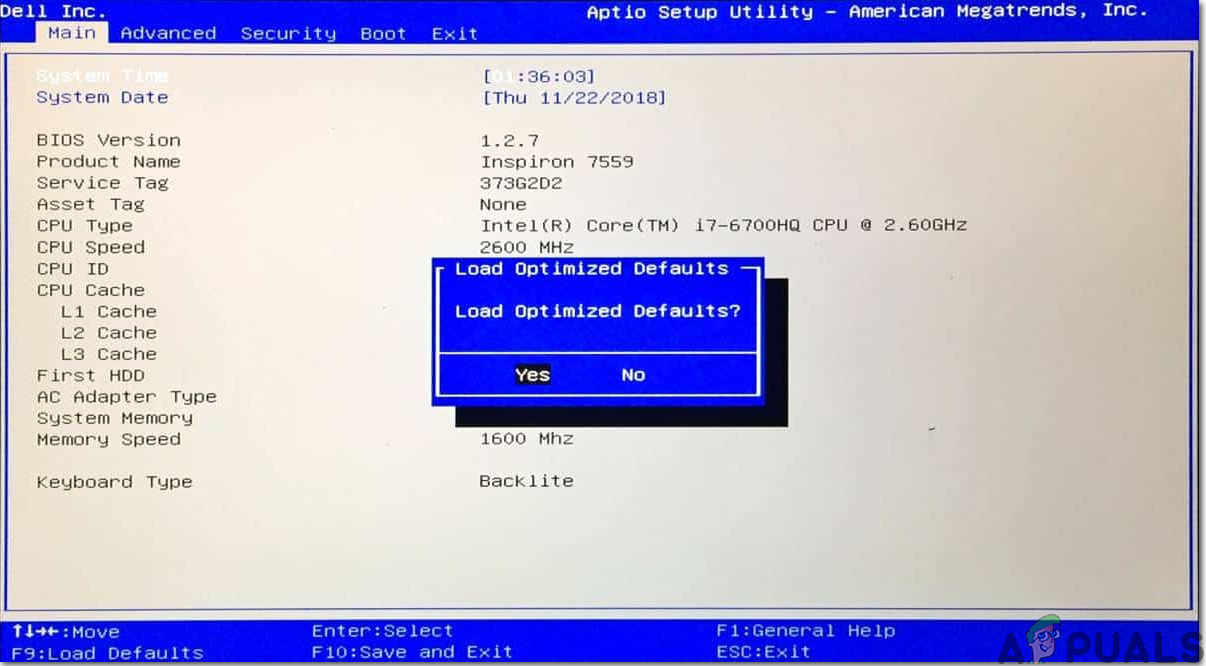
6. Reset BIOS
If reinstalling Windows doesn’t fix the issue, resetting the BIOS can help by clearing conflicting hardware settings. This returns the BIOS to default, allowing the system to reload devices correctly, helping Windows recognize and set them up.
- Restart your computer and press the “F12”, “F9”, or “Del” key to enter the BIOS.
- Find the option on the screen to reset the BIOS (usually “F9”). Press it and confirm.

Load Optimized Defaults - Check if the issue persists.
Kevin Arrows
Kevin Arrows is a highly experienced and knowledgeable technology specialist with over a decade of industry experience. He holds a Microsoft Certified Technology Specialist (MCTS) certification and has a deep passion for staying up-to-date on the latest tech developments. Kevin has written extensively on a wide range of tech-related topics, showcasing his expertise and knowledge in areas such as software development, cybersecurity, and cloud computing. His contributions to the tech field have been widely recognized and respected by his peers, and he is highly regarded for his ability to explain complex technical concepts in a clear and concise manner.
If your internet suddenly stops working on your Windows 10 computer and you get an error message saying, “Windows is still setting up the class configuration for this device (Code 56)”, then read on as this post will show you what you can do to resolve it. This kind of issue has something to do with the Network Adapter and you can see this error message in the Properties menu of the corresponding Network Adapter under the Device Manager.
This kind of issue could be caused by many things. For one, it could be caused by your VPN connection if you are using one or it could also be due to an outdated driver. Whatever the cause may be, here are some suggestions you have to check out to fix the error.
Option 1 – Check your VPN
When you install a virtual machine or VPN software on your computer, a new setup will be added in the Network Connection settings and helps your computer in using that adapter setting each time the VPN is turned on. Assuming that you are using an Ethernet connection but your system is trying to use another adapter or settings, that’s when issues occur and one of them is the “Windows is still setting up the class configuration for this device” error. To fix it, you can try to disable your VPN temporarily and see if the error is resolved or not and if turns out that your VPN is the culprit, you have to uninstall it and install a new one or its latest version. To uninstall it, follow the steps below.
- Tap the Win + R keys to open the Run dialog box
- Then type “appwiz.cpl” in the field and hit Enter to open the Programs and Features in Control Panel.
- From there, look for the VPN service you are using, select it and then click on Uninstall to remove it.
- After that, restart your computer and try to install the latest version of the program again. It should work now. If not, proceed to the next available option below.
Option 2 – Try to update or rollback or uninstall the Network Adapter drivers
You might also want to update, roll back or disable your Network drivers to fix the “This operation failed as no adapter is in the state permissible for this operation” error.
- Tap the Win + R keys to launch the Run window and then type in the “devmgmt.msc” command and hit Enter to open the Device Manager window.
- Under the Device Manager, you will see a list of drivers. From there, look for the Network Adapters and expand it.
- Then right-click on each one of the Network drivers and depending on your preference, you can either select “Update driver”, “Disable device” or “Uninstall device”.
- After that, restart your PC and see if it helped in fixing the netio.sys Blue Screen error.
Option 3 – Try to run the Network Adapter troubleshooter
To run the Network Troubleshooter, refer to these steps:
- Open the Search bar on your computer and type in “troubleshoot” to open the Troubleshoot settings.
- Next, scroll down and select the “Network Adapter” option from the right pane.
- Then click on the Run Troubleshooter” button.
- After that, your computer will check for any possible errors and will pinpoint the root cause of the problem if possible.
- Restart your computer.
Option 4 – Try to reset the Network
You might perform a Network Reset to resolve the problem if none of the three given options above worked. This will reset the entire network configuration including your IP address. To perform Network Reset, follow these steps:
- Tap the Win + I keys to open Settings.
- From there, go to the Network and Internet section.
- Next, scroll down and look for “Network Reset” under the status pane.
- After that, click on Network Reset and then on Reset now to start resetting the network configuration. Once done, check if it is able to fix the error or not.
Do You Need Help with Your Device?
Our Team of Experts May Help
Troubleshoot.Tech Experts are There for You!
GET HELP
Troubleshoot.Tech experts work with all versions of Microsoft Windows including Windows 11, with Android, Mac, and more.
Share this article:
You might also like
As you know, Windows 10 supports a variety of peripherals which includes a long list of printers. However, a number of users reported that they encountered a glitch on their Windows 10 computers where they receive Can’t print a file and a prompt to save the Word, PDF file, and so on each time they try to print the file. This kind of issue is not common and could be due to various reasons like the malfunctioning of device drivers, misconfiguration of the printer’s settings, and so on.
There are several options you can check out to resolve the problem. You can try to run the built-in troubleshooter or check the configuration of the printer, as well as update or reinstall the driver for printers or reset the printer. For more details, refer to each one of the options provided below and make sure to follow them carefully.
Option 1 – Run the Printer Troubleshooter
One of the first basic troubleshooting you can perform to resolve the printer issue is running the Printer Troubleshooter. This built-in troubleshooter can detect and automatically fix the problem for you. To use it, follow these steps:
- Tap the Win + R keys to open the Run dialog box.
- Next, type “exe /id PrinterDiagnostic” in the field and click OK or hit Enter to open the Printer Troubleshooter.
- Then click the Next button and follow the next on-screen instructions to fix the issue with the printer.
Option 2 – Try checking the printer’s configuration
The next thing you can do to fix the problem is to check the configuration of the printer since there are instances when there could be some misconfiguration with the settings of the printer that may result in several issues like this one.
- First, you need to open Control Panel and from there, look for the option Devices and printers and open it.
- After that, right-click on the entry of your printer that you want to use in printing documents and select the Set as a default printer option.
- You could also try to open PDF and then go to the Print dialog box and uncheck the Print to file option.
Option 3 – Try to update or reinstall the printer driver
The problem with your printer might also be caused by corrupted or outdated drivers. Thus, you can try to either update or reinstall it. How? Follow the steps below.
- First, click the Start button and type “device manager”.
- Then click on the “Device Manager” from the search results to open it.
- From there, look for the USB Composite Device option and right-click on it, and select the Update Driver from the options.
- Restart your PC and then click the “Search automatically for updated driver software” option.
- Now uninstall and remove the printer driver software and reinstall it then refresh.
Option 4 – Try to reset the settings of the Printer or reinstall it
If none of the three options given above worked, you can try to either reset the printer settings or reinstall the printer so that it can go back to its default state. However, if it doesn’t work, you can try to uninstall the printer as well as its related drivers. To do so, follow these steps:
- First, go to Settings > Devices > Printer and Scanners.
- After that, select the printer and select the Remove Device option.
- Once done, restart your computer and check again and see if the error is now fixed.
Read More
Rapid Media Converter is a Potentially Unwanted Program that usually comes bundled with other unwanted software. Many users reported being unaware they had installed the application. It also generates additional advertising, and for this reason, it is classified as Adware and flagged for optional removal by several AVs.
From the Author: Howard Software / Applon runs off an ad-supported platform. During general internet usage on sites where Applon Support operates, users may see advertisements in form of shopping results and new tabs. The type of ad is dependent on the content of the page as you generally browse the internet. Applon is not related to or endorsed by the underlying website. These advertisements will be identified with the Applon Name or Logo.
About Browser Hijackers
Adware is programs created to show advertisements on users’ PCs with or without their consent. A kind of malware, it comes bundled up with the software application that a person either installs or accesses. Shareware or free software programs are generally packaged with adware. When adware penetrates your computer without you knowing and transfers information about you or your PC to 3rd parties, then it happens to be spyware. Other sorts of adware might take control of your internet browser and redirects you to websites that you don’t really want to check out.
Adware is a common problem in most computer systems and these are really detrimental to your device. Adware/Spyware is usually downloaded and/or installed accidentally by users while exploring the net and people face lots of difficulties at the same time when it comes to removing adware from their computers.
Adware could be dangerous for computer users in numerous ways. It could cause advertisements (popups, ad banners, and in-text) to show up constantly when you’re online or perhaps disrupt your computer experience when not connected to the net. When infected with adware for a long time, your computer will perform at slow processing speed, take a longer time to start up and shut down, easily get frozen up while loading websites, and even get the blue screen of death (BSOD). More often than not, adware is a legitimate revenue source for many companies that offer software to customers at zero cost. But adware generated advertisements tends to be more aggressive than normal ads which can greatly impair system performance or possibly result in a total crash.
The adware will damage your PC should you allow it on your personal computer for a long period. A sensible way to block adware from corrupting your PC is to employ a reliable antimalware program such as Safebytes Anti-Malware on your computer. This software will give complete all-around protection to make sure that your laptop or computer doesn’t get infected again with spyware and adware.
Take the following measures to prevent adware from overtaking your system: Downloading software online should come from trustworthy websites and also be selective about what you install on your computer; Always read the end-user license agreement (EULA) of any application you plan to install; Beware of clickable ads particularly those that advertise special deals, coupons, or any other suspicious deals.; Avoid installing toolbars, because toolbars from less reputable websites always contain adware, which might slow your PC and in some cases infect your computer outright.
What to Do if Malware Stops You From Downloading Antivirus?
Every malware is bad and the extent of the damage will vary greatly with regards to the type of infection. Certain malware goes to great lengths to prevent you from installing anything on your computer system, especially antivirus software. So what you should do when malware prevents you from downloading or installing Anti-Malware? There are a few fixes you could try to get around with this particular obstacle.
Start Windows in Safe ModeIf any virus is set to load immediately when Windows starts, getting into Safe Mode may block the attempt. Since just the minimum programs and services launch in Safe Mode, there are hardly any reasons for conflicts to happen. Listed here are the steps you have to follow to start into the Safe Mode of your Windows XP, Vista, or 7 computers (visit Microsoft website for instructions on Windows 8 and 10 PCs).
1) At power-on/startup, tap the F8 key in one-second intervals. This should bring up the Advanced Boot Options menu.
2) Use the arrow keys to select Safe Mode with Networking and hit ENTER.
3) As soon as this mode loads, you should have the internet. Now, make use of your web browser normally and go to https://safebytes.com/products/anti-malware/ to download and install Safebytes Anti-Malware.
4) Following installation, do a complete scan and allow the software program to delete the threats it detects.
Obtain the anti-malware software using an alternate browser
Some malware only targets specific web browsers. If this is your situation, utilize another browser as it could circumvent the computer virus. If you appear to have a trojan attached to Internet Explorer, then switch to an alternate web browser with built-in security features, such as Firefox or Chrome, to download your preferred anti-malware program – Safebytes.
Create a bootable USB anti-virus drive
Here’s another solution which is using a portable USB antivirus software that can scan your computer for malware without the need for installation. Adopt these measures to run the anti-virus on the affected computer system.
1) On a clean computer, download and install Safebytes Anti-Malware.
2) Connect the USB flash drive to a USB slot on the clean computer.
3) Double-click on the downloaded file to run the installation wizard.
4) Choose the USB flash drive as the destination for saving the software file. Follow the on-screen instructions to finish the installation.
5) Transfer the USB drive from the uninfected computer to the infected computer.
6) Double-click the EXE file to open the Safebytes program from the thumb drive.
7) Click on the “Scan Now” button to begin the malware scan.
SafeBytes AntiMalware Overview
Are you looking to download the best anti-malware software program for your laptop or computer? You can find many applications in the market which come in paid and free versions for Microsoft Windows systems. A few of them do a great job in eliminating malware threats while some will harm your PC by themselves. You must be careful not to choose the wrong application, especially if you buy premium software. While considering the trustworthy programs, Safebytes Anti-Malware is certainly the highly recommended one.
Safebytes is among the well-established computer solutions firms, which provide this all-inclusive anti-malware application. With its most advanced virus detection and repair technology, this software will help you protect your PC against infections brought on by different kinds of malware and similar internet threats, including adware, spyware, computer viruses, worms, trojan horses, keyloggers, ransomware, and potentially unwanted program (PUPs).
SafeBytes has fantastic features when compared with various other anti-malware programs. The following are some of the good ones:
Robust, Anti-malware Protection: Built on a highly acclaimed anti-virus engine, this malware removal application has the capacity to find and remove several stubborn malware threats like browser hijackers, PUPs, and ransomware that other common antivirus software will miss.
Live Protection: SafeBytes provides totally hands-free live protection and is set to observe, prevent and eliminate all threats at its first encounter. It’ll regularly monitor your pc for hacker activity and also provides end-users with sophisticated firewall protection.
High-Speed Malware Scanning Engine: SafeBytes Anti-Malware has a multi-thread scan algorithm that works up to 5x faster than any other anti-malware software.
Safe Web Browsing: SafeBytes checks the links present on a webpage for possible threats and informs you whether the website is safe to check out or not, through its unique safety ranking system.
Light-weight: This program is light-weight and can work quietly in the background, and that does not have an effect on your PC efficiency.
24/7 Customer Support: For any technical queries or product support, you can obtain 24/7 expert assistance through chat and email.
To sum it up, SafeBytes Anti-Malware is really great for securing your computer against all sorts of malware threats. There is no doubt that your computer will be protected in real-time as soon as you put this software program to use. For top protection and the best value for your money, you can’t get better than SafeBytes Anti-Malware.
Technical Details and Manual Removal (Advanced Users)
If you don’t want to use malware removal software and prefer to get rid of Rapid Media Converter manually, you might do so by going to the Add/Remove Programs menu in the control panel and removing the offending software; in cases of web browser extensions, you can remove it by going to the browser’s Add-on/Extension manager. You will definitely also want to reset your web browser.
To be certain of complete removal, find the following Windows registry entries on your system and delete it or reset the values appropriately. Please keep in mind that this is for advanced users only and could be difficult, with incorrect file removal causing additional system errors. Additionally, certain malicious programs have the capability to defend against its removal. Doing this in Safe Mode is advised.
Files:
Search and Delete:
RapidMediaConverter.exe
ffmpeg.exe
unins000.exe
SQLite.Interop.dll
RFolders:
C:\Program Files\RapidMediaConverter\
Read More
Mapping network drive has many benefits in terms of speed and ease of access of files via network. It lets you access the hard drive over the whole network like it was the hard drive inside your PC case. In order to easily and quickly map a folder as a network drive follow the guide below.
- Open File Explorer
- Click on the three dots icon in the Toolbar
- Select Map Network Drive
- Click the Drive drop-down menu
- Select a driver letter that you wish to assign as a network drive
- In the folder field enter network device and share name (click on browse to see all devices on local network)
- Check the box beside Reconnect at sign-in if you wish to automatically connect to a network drive on Windows startup
- Check Connect Using Different Credentials if you wish to connect to a network drive using different credentials that one used to login into Windows.
- Click Finish
After finishing setting Windows 11 will try to connect to the network drive and if successful drive icon will appear inside File Explorer and the drive will open up to see its content.
If for any reason it cannot connect try checking user credentials, cables, network adapters, etc.
Read More
Windows 11 has been officially presented during Microsoft’s virtual event on June 24th.
Since presentation internet has been pretty live and busy with a discussion about it, some discussions are positive, some not so much but that is expected and it happens always when a new product is presented.
One of information that we have about Windows 11 is tied to the home edition of this OS,
Windows 11 home edition will require an internet connection at setup, and a Microsoft account in order to be installed and used. Previous versions of Windows could be installed and used with local accounts but it seems Microsoft has abandoned that idea for its new OS.
OS will be delivered mostly as updates or via internet download so internet and online requirement make sense but why it cannot use the local account and must have a Microsoft one is beyond me.
Read More
TelevisionFanatic is a potentially unwanted browser hijacking extension developed by Mindspark Interactive Network. It is marketed to enjoy one-click access to local TV listings, watch recently-aired episodes of your favorite shows and viral web videos, plus TV news and show recaps. However, all of these services require registration and sensitive personal data, that is later sold/forwarded to serve ads.
Upon installation, this extension adds registry entries that allow it to run each time the computer is started. It also changed your default search engine to MyWebSearch and hijacks your default new tab behavior opening MyWebSearch instead. These search results display unwanted ads, and clutter pages with sponsored links that negatively affect your browsing experience. Multiple anti-virus scanners have detected TelevisionFanatic as a browser hijacker, and therefore it is flagged for optional removal.
About Browser Hijackers
Browser hijacking is amongst the web’s constant problems that target browsers. It’s a kind of malware program that alters your web browser’s configuration settings and redirects you to sites or pages that you had no intention of visiting. Browser hijackers could do a variety of things on your PC. It redirects you to the sponsored internet sites and injects ads on the web browser that helps its creator generate income. While it might appear naive, all browser hijackers are damaging and thus always regarded as security risks. Some browser hijackers are designed to make certain modifications beyond the browsers, like altering entries on the computer registry and letting other types of malware further damage your PC.
Browser hijacking signs and symptoms
When your browser is hijacked, the following could happen:
1. home-page is changed
2. new bookmarks pointing to porn sites have been added to your favorite pages
3. the default online search engine and/or the default browser settings are modified
4. you see unwanted new toolbars added
5. you may see many pop-up ads on your computer screen
6. your internet browser starts running slowly or displays frequent glitches
7. you are blocked to access those sites of antivirus solution providers.
Exactly how browser hijacker finds its way to your computer
Browser hijackers may use drive-by downloads or file-sharing websites or an e-mail attachment to reach a targeted PC. Many internet browser hijackings come from add-on software, i.e., browser helper objects (BHO), toolbars, or plug-ins added to web browsers to provide the extra features. Browser hijackers sneak into your pc in addition to free software application downloads that you unwittingly install alongside the original. Common examples of browser hijackers include Conduit, CoolWebSearch, Coupon Server, OneWebSearch, RocketTab, Snap.do, Delta Search, and Searchult.com.
Browser hijackers can record user keystrokes to collect potentially important information leading to privacy concerns, cause instability on systems, severely disrupt user’s browsing experience, and finally slow down the system to a stage where it will become unusable.
Removing browser hijackers
Some hijackers can be removed by uninstalling the freeware they came with or by deleting any extension you’ve recently added to your browser. However, most hijackers are hard to get rid of manually. Irrespective of how much you try to remove it, it might return over and over again. And there is no denying the very fact that manual repairs and removal can certainly be a difficult job for an inexperienced PC user. Besides, there are various risks connected with tinkering around with the system registry files.
What To Do When You Cannot Download Safebytes Anti-Malware?
Viruses can cause plenty of damage to your personal computer. Some malware sits in between your computer and your internet connection and blocks a few or all sites that you would like to visit. It might also block you from the installation of anything on your system, particularly antivirus applications. So what you should do if malicious software prevents you from downloading or installing Anti-Malware? There are some steps you can take to get around this issue.
Make use of Safe Mode to fix the issue
In Safe Mode, you may modify Windows settings, uninstall or install some software, and remove hard-to-delete viruses. In the event the malware is obstructing internet connection and affecting the computer, launching it in Safe Mode allows you to download anti-malware and run a diagnostic scan whilst limiting potential damage. To start the computer into Safe Mode, hit the “F8” key on the keyboard right before the Windows boot screen comes up; Or right after normal Windows boot up, run MSCONFIG, check the Safe Boot under Boot tab, and click Apply. Once you are in safe mode, you can attempt to download and install your anti-malware program without the hindrance of malicious software. Following installation, run the malware scanner to eliminate standard infections.
Switch over to an alternate web browser
Malicious program code could exploit vulnerabilities on a specific web browser and block access to all antivirus software websites. If you suspect that your Internet Explorer has been hijacked by malware or otherwise compromised by online hackers, the most effective thing to do would be to switch to an alternate web browser such as Firefox, Chrome, or Safari to download your favorite computer security program – Safebytes Anti-Malware.
Run anti-malware from your USB drive
Here’s another solution which is utilizing a portable USB anti-virus software that can check your system for malware without the need for installation. To run anti-virus using a thumb drive, follow these simple steps:
1) Download Safebytes Anti-Malware or Windows Defender Offline onto a clean PC.
2) Plug the USB drive into the clean PC.
3) Double-click the Setup icon of the antivirus software to run the Installation Wizard.
4) Select the drive letter of the flash drive as the location when the wizard asks you where you want to install the antivirus. Do as instructed on the screen to finish off the installation process.
5) Disconnect the flash drive. Now you can utilize this portable anti-virus on the infected computer system.
6) Double-click the anti-malware software EXE file on the pen drive.
7) Press the “Scan” button to run a full system scan and remove malware automatically.
A Look at the Best Anti-Malware Program
Do you want to download the best anti-malware program for your laptop or computer? There are many applications in the market that comes in free and paid versions for Microsoft Windows computers. A few of them are good and some are scamware applications that pretend as genuine anti-malware software waiting around to wreak havoc on your PC. You need to select one that is dependable, practical, and has a strong reputation for its malware source protection. One of the highly recommended software programs is SafeBytes Anti-Malware. SafeBytes carries a superb reputation for top-quality service, and customers seem to be happy with it.
SafeBytes anti-malware is a trustworthy tool that not only secures your computer completely but is also very user-friendly for people of all skill levels. With its outstanding protection system, this software will automatically detect and get rid of the majority of the security threats, which include adware, viruses, browser hijackers, ransomware, PUPs, and trojans.
SafeBytes anti-malware provides a plethora of enhanced features which sets it aside from all others. Let’s check out some of them below:
Anti-Malware Protection: Safebytes is built on the best virus engine within the industry. These engines will identify and remove threats even during the early stages of a malware outbreak.
Real-time Active Protection: Malware programs looking to get into the computer are discovered and stopped as and when detected by the SafeBytes active protection shields. This utility will continuously monitor your PC for suspicious activity and updates itself regularly to keep abreast of the constantly changing threat situation.
Internet Security: SafeBytes gives an instant safety rating on the pages you are about to visit, automatically blocking dangerous sites and ensuring that you are certain of your safety while browsing the web.
High-Speed Malware Scanning Engine: SafeBytes Anti-Malware has got a multi-thread scan algorithm that works up to 5 times faster than any other antivirus software.
Minimal CPU and Memory Usage: SafeBytes is well-known for its low influence on processing power and great detection rate of numerous threats. It works quietly and efficiently in the background so you’re free to use your computer or laptop at full power all of the time.
24/7 Guidance: SafeBytes provides you with 24/7 technical support, automatic maintenance, and updates for the best user experience.
Technical Details and Manual Removal (Advanced Users)
If you wish to manually remove TelevisionFanatic without the use of an automated tool, it may be possible to do so by removing the program from the Windows Add/Remove Programs menu, or in cases of browser extensions, going to the browsers AddOn/Extension manager and removing it. You will likely also want to reset your browser.
To ensure the complete removal, manually check your hard drive and registry for all of the following and remove or reset the values accordingly. Please note that this is for advanced users only and may be difficult, with incorrect file removal causing additional PC errors. In addition, some malware is capable of replicating or preventing deletion. Doing this in Safe Mode is advised.
The following files, folders, and registry entries are created or modified by TelevisionFanatic
Files:
%APPDATA%TelevisionFanatic
%PROGRAMFILES%TelevisionFanatic
%PROGRAMFILES%TelevisionFanaticEI
%PROGRAMFILES%TelevisionFanaticEITelevisionFanaticauxstb.dll
%PROGRAMFILES%TelevisionFanaticEITelevisionFanaticbar.dll
%PROGRAMFILES%TelevisionFanaticEITelevisionFanaticbarsvc.exe
%PROGRAMFILES%TelevisionFanaticEITelevisionFanaticbprtct.dll
%PROGRAMFILES%TelevisionFanaticEITelevisionFanaticbrmon.exe
%PROGRAMFILES%TelevisionFanaticEITelevisionFanaticbrstub.dll
%PROGRAMFILES%TelevisionFanaticEITelevisionFanaticdatact.dll
%PROGRAMFILES%TelevisionFanaticEITelevisionFanaticdlghk.dll
%PROGRAMFILES%TelevisionFanaticEITelevisionFanaticdyn.dll
%PROGRAMFILES%TelevisionFanaticEITelevisionFanaticfeedmg.dll
%PROGRAMFILES%TelevisionFanaticEITelevisionFanatichighin.exe
%PROGRAMFILES%TelevisionFanaticEITelevisionFanatichkstub.dll
%PROGRAMFILES%TelevisionFanaticEITelevisionFanatichtmlmu.dll
%PROGRAMFILES%TelevisionFanaticEITelevisionFanatichttpct.dll
%PROGRAMFILES%TelevisionFanaticEITelevisionFanaticidle.dll
%PROGRAMFILES%TelevisionFanaticEITelevisionFanaticieovr.dll
%PROGRAMFILES%TelevisionFanaticEITelevisionFanaticimpipe.exe
%PROGRAMFILES%TelevisionFanaticEITelevisionFanaticmedint.exe
%PROGRAMFILES%TelevisionFanaticEITelevisionFanaticmlbtn.dll
%PROGRAMFILES%TelevisionFanaticEITelevisionFanaticmsg.dll
%PROGRAMFILES%TelevisionFanaticEITelevisionFanaticPlugin.dll
%PROGRAMFILES%TelevisionFanaticEITelevisionFanaticradio.dll
%PROGRAMFILES%TelevisionFanaticEITelevisionFanaticregfft.dll
%PROGRAMFILES%TelevisionFanaticEITelevisionFanaticreghk.dll
%PROGRAMFILES%TelevisionFanaticEITelevisionFanaticregiet.dll
%PROGRAMFILES%TelevisionFanaticEITelevisionFanaticscript.dll
%PROGRAMFILES%TelevisionFanaticEITelevisionFanaticskin.dll
%PROGRAMFILES%TelevisionFanaticEITelevisionFanaticsknlcr.dll
%PROGRAMFILES%TelevisionFanaticEITelevisionFanaticskplay.exe
%PROGRAMFILES%TelevisionFanaticEITelevisionFanaticSrcAs.dll
%PROGRAMFILES%TelevisionFanaticEITelevisionFanaticSrchMn.exe
%PROGRAMFILES%TelevisionFanaticEITelevisionFanatictpinst.dll
%PROGRAMFILES%TelevisionFanaticEITelevisionFanaticuabtn.dll
%PROGRAMFILES%TelevisionFanaticEITelevisionFanaticAppIntegrator64.exe
%PROGRAMFILES%TelevisionFanaticEITelevisionFanaticAppIntegratorStub64.dll
%PROGRAMFILES%TelevisionFanaticEITelevisionFanaticBOOTSTRAP.JS
%PROGRAMFILES%TelevisionFanaticEITelevisionFanaticffxtbr.jar
%PROGRAMFILES%TelevisionFanaticEITelevisionFanaticCHROME.MANIFEST
%PROGRAMFILES%TelevisionFanaticEITelevisionFanaticCREXT.DLL
%PROGRAMFILES%TelevisionFanaticEITelevisionFanaticCrExtP64.exe
%PROGRAMFILES%TelevisionFanaticEITelevisionFanaticDPNMNGR.DLL
%PROGRAMFILES%TelevisionFanaticEITelevisionFanaticEXEMANAGER.DLL
%PROGRAMFILES%TelevisionFanaticEITelevisionFanaticHpg64.dll
%PROGRAMFILES%TelevisionFanaticEITelevisionFanaticINSTALL.RDF
%PROGRAMFILES%TelevisionFanaticEITelevisionFanaticinstallKeys.js
%PROGRAMFILES%TelevisionFanaticEITelevisionFanaticLOGO.BMP
%PROGRAMFILES%TelevisionFanaticEITelevisionFanaticNP64Stub.dll
%PROGRAMFILES%TelevisionFanaticEITelevisionFanaticT8EXTEX.DLL
%PROGRAMFILES%TelevisionFanaticEITelevisionFanaticT8EXTPEX.DLL
%PROGRAMFILES%TelevisionFanaticEITelevisionFanaticT8HTML.DLL
%PROGRAMFILES%TelevisionFanaticEITelevisionFanaticT8RES.DLL
%PROGRAMFILES%TelevisionFanaticEITelevisionFanaticT8TICKER.DLL
%PROGRAMFILES%TelevisionFanaticEITelevisionFanaticVERIFY.DLL
%PROGRAMFILES%TelevisionFanaticEITelevisionFanaticEIPlug.dll
%PROGRAMFILES%TelevisionFanaticEITelevisionFanaticEZSETP.dll
%PROGRAMFILES%TelevisionFanaticEITelevisionFanaticNP64EISb.dll
%PROGRAMFILES%TelevisionFanaticEITelevisionFanatic%APPDATA%TelevisionFanatic
%PROGRAMFILES%TelevisionFanatic
%PROGRAMFILES%TelevisionFanaticEI
%PROGRAMFILES%TelevisionFanaticEITelevisionFanaticauxstb.dll
%PROGRAMFILES%TelevisionFanaticEITelevisionFanaticbar.dll
%PROGRAMFILES%TelevisionFanaticEITelevisionFanaticbarsvc.exe
%PROGRAMFILES%TelevisionFanaticEITelevisionFanaticbprtct.dll
%PROGRAMFILES%TelevisionFanaticEITelevisionFanaticbrmon.exe
%PROGRAMFILES%TelevisionFanaticEITelevisionFanaticbrstub.dll
%PROGRAMFILES%TelevisionFanaticEITelevisionFanaticdatact.dll
%PROGRAMFILES%TelevisionFanaticEITelevisionFanaticdlghk.dll
%PROGRAMFILES%TelevisionFanaticEITelevisionFanaticdyn.dll
%PROGRAMFILES%TelevisionFanaticEITelevisionFanaticfeedmg.dll
%PROGRAMFILES%TelevisionFanaticEITelevisionFanatichighin.exe
%PROGRAMFILES%TelevisionFanaticEITelevisionFanatichkstub.dll
%PROGRAMFILES%TelevisionFanaticEITelevisionFanatichtmlmu.dll
%PROGRAMFILES%TelevisionFanaticEITelevisionFanatichttpct.dll
%PROGRAMFILES%TelevisionFanaticEITelevisionFanaticidle.dll
%PROGRAMFILES%TelevisionFanaticEITelevisionFanaticieovr.dll
%PROGRAMFILES%TelevisionFanaticEITelevisionFanaticimpipe.exe
%PROGRAMFILES%TelevisionFanaticEITelevisionFanaticmedint.exe
%PROGRAMFILES%TelevisionFanaticEITelevisionFanaticmlbtn.dll
%PROGRAMFILES%TelevisionFanaticEITelevisionFanaticmsg.dll
%PROGRAMFILES%TelevisionFanaticEITelevisionFanaticPlugin.dll
%PROGRAMFILES%TelevisionFanaticEITelevisionFanaticradio.dll
%PROGRAMFILES%TelevisionFanaticEITelevisionFanaticregfft.dll
%PROGRAMFILES%TelevisionFanaticEITelevisionFanaticreghk.dll
%PROGRAMFILES%TelevisionFanaticEITelevisionFanaticregiet.dll
%PROGRAMFILES%TelevisionFanaticEITelevisionFanaticscript.dll
%PROGRAMFILES%TelevisionFanaticEITelevisionFanaticskin.dll
%PROGRAMFILES%TelevisionFanaticEITelevisionFanaticsknlcr.dll
%PROGRAMFILES%TelevisionFanaticEITelevisionFanaticskplay.exe
%PROGRAMFILES%TelevisionFanaticEITelevisionFanaticSrcAs.dll
%PROGRAMFILES%TelevisionFanaticEITelevisionFanaticSrchMn.exe
%PROGRAMFILES%TelevisionFanaticEITelevisionFanatictpinst.dll
%PROGRAMFILES%TelevisionFanaticEITelevisionFanaticuabtn.dll
%PROGRAMFILES%TelevisionFanaticEITelevisionFanaticAppIntegrator64.exe
%PROGRAMFILES%TelevisionFanaticEITelevisionFanaticAppIntegratorStub64.dll
%PROGRAMFILES%TelevisionFanaticEITelevisionFanaticBOOTSTRAP.JS
%PROGRAMFILES%TelevisionFanaticEITelevisionFanaticffxtbr.jar
%PROGRAMFILES%TelevisionFanaticEITelevisionFanaticCHROME.MANIFEST
%PROGRAMFILES%TelevisionFanaticEITelevisionFanaticCREXT.DLL
%PROGRAMFILES%TelevisionFanaticEITelevisionFanaticCrExtP64.exe
%PROGRAMFILES%TelevisionFanaticEITelevisionFanaticDPNMNGR.DLL
%PROGRAMFILES%TelevisionFanaticEITelevisionFanaticEXEMANAGER.DLL
%PROGRAMFILES%TelevisionFanaticEITelevisionFanaticHpg64.dll
%PROGRAMFILES%TelevisionFanaticEITelevisionFanaticINSTALL.RDF
%PROGRAMFILES%TelevisionFanaticEITelevisionFanaticinstallKeys.js
%PROGRAMFILES%TelevisionFanaticEITelevisionFanaticLOGO.BMP
%PROGRAMFILES%TelevisionFanaticEITelevisionFanaticNP64Stub.dll
%PROGRAMFILES%TelevisionFanaticEITelevisionFanaticT8EXTEX.DLL
%PROGRAMFILES%TelevisionFanaticEITelevisionFanaticT8EXTPEX.DLL
%PROGRAMFILES%TelevisionFanaticEITelevisionFanaticT8HTML.DLL
%PROGRAMFILES%TelevisionFanaticEITelevisionFanaticT8RES.DLL
%PROGRAMFILES%TelevisionFanaticEITelevisionFanaticT8TICKER.DLL
%PROGRAMFILES%TelevisionFanaticEITelevisionFanaticVERIFY.DLL
%PROGRAMFILES%TelevisionFanaticEITelevisionFanaticEIPlug.dll
%PROGRAMFILES%TelevisionFanaticEITelevisionFanaticEZSETP.dll
%PROGRAMFILES%TelevisionFanaticEITelevisionFanaticNP64EISb.dll
%PROGRAMFILES%TelevisionFanaticEITelevisionFanatic%#MANIFEST#%18369B.exe
%PROGRAMFILES%TelevisionFanaticauxstb.dll
%PROGRAMFILES%TelevisionFanaticbar.dll
%PROGRAMFILES%TelevisionFanaticbarsvc.exe
%PROGRAMFILES%TelevisionFanaticbprtct.dll
%PROGRAMFILES%TelevisionFanaticbrmon.exe
%PROGRAMFILES%TelevisionFanaticbrstub.dll
%PROGRAMFILES%TelevisionFanaticdatact.dll
%PROGRAMFILES%TelevisionFanaticdlghk.dll
%PROGRAMFILES%TelevisionFanaticdyn.dll
%PROGRAMFILES%TelevisionFanaticfeedmg.dll
%PROGRAMFILES%TelevisionFanatichighin.exe
%PROGRAMFILES%TelevisionFanatichkstub.dll
%PROGRAMFILES%TelevisionFanatichtmlmu.dll
%PROGRAMFILES%TelevisionFanatichttpct.dll
%PROGRAMFILES%TelevisionFanaticidle.dll
%PROGRAMFILES%TelevisionFanaticieovr.dll
%PROGRAMFILES%TelevisionFanaticimpipe.exe
%PROGRAMFILES%TelevisionFanaticmedint.exe
%PROGRAMFILES%TelevisionFanaticmlbtn.dll
%PROGRAMFILES%TelevisionFanaticmsg.dll
%PROGRAMFILES%TelevisionFanaticPlugin.dll
%PROGRAMFILES%TelevisionFanaticradio.dll
%PROGRAMFILES%TelevisionFanaticregfft.dll
%PROGRAMFILES%TelevisionFanaticreghk.dll
%PROGRAMFILES%TelevisionFanaticregiet.dll
%PROGRAMFILES%TelevisionFanaticscript.dll
%PROGRAMFILES%TelevisionFanaticskin.dll
%PROGRAMFILES%TelevisionFanaticsknlcr.dll
%PROGRAMFILES%TelevisionFanaticskplay.exe
%PROGRAMFILES%TelevisionFanaticSrcAs.dll
%PROGRAMFILES%TelevisionFanaticSrchMn.exe
%PROGRAMFILES%TelevisionFanatictpinst.dll
%PROGRAMFILES%TelevisionFanaticuabtn.dll
%PROGRAMFILES%TelevisionFanaticAppIntegrator64.exe
%PROGRAMFILES%TelevisionFanaticAppIntegratorStub64.dll
%PROGRAMFILES%TelevisionFanaticBOOTSTRAP.JS
%PROGRAMFILES%TelevisionFanaticffxtbr.jar
%PROGRAMFILES%TelevisionFanaticCHROME.MANIFEST
%PROGRAMFILES%TelevisionFanaticCREXT.DLL
%PROGRAMFILES%TelevisionFanaticCrExtP64.exe
%PROGRAMFILES%TelevisionFanaticDPNMNGR.DLL
%PROGRAMFILES%TelevisionFanaticEXEMANAGER.DLL
%PROGRAMFILES%TelevisionFanaticHpg64.dll
%PROGRAMFILES%TelevisionFanaticINSTALL.RDF
%PROGRAMFILES%TelevisionFanaticinstallKeys.js
%PROGRAMFILES%TelevisionFanaticLOGO.BMP
%PROGRAMFILES%TelevisionFanaticNP64Stub.dll
%PROGRAMFILES%TelevisionFanaticT8EXTEX.DLL
%PROGRAMFILES%TelevisionFanaticT8EXTPEX.DLL
%PROGRAMFILES%TelevisionFanaticT8HTML.DLL
%PROGRAMFILES%TelevisionFanaticT8RES.DLL
%PROGRAMFILES%TelevisionFanaticT8TICKER.DLL
%PROGRAMFILES%TelevisionFanaticVERIFY.DLL
%PROGRAMFILES%TelevisionFanaticEIPlug.dll
%PROGRAMFILES%TelevisionFanaticEZSETP.dll
%PROGRAMFILES%TelevisionFanaticNP64EISb.dll
%PROGRAMFILES%TelevisionFanatic%#MANIFEST#%18369B.exe
%APPDATA%TelevisionFanaticauxstb.dll
%APPDATA%TelevisionFanaticbar.dll
%APPDATA%TelevisionFanaticbarsvc.exe
%APPDATA%TelevisionFanaticbprtct.dll
%APPDATA%TelevisionFanaticbrmon.exe
%APPDATA%TelevisionFanaticbrstub.dll
%APPDATA%TelevisionFanaticdatact.dll
%APPDATA%TelevisionFanaticdlghk.dll
%APPDATA%TelevisionFanaticdyn.dll
%APPDATA%TelevisionFanaticfeedmg.dll
%APPDATA%TelevisionFanatichighin.exe
%APPDATA%TelevisionFanatichkstub.dll
%APPDATA%TelevisionFanatichtmlmu.dll
%APPDATA%TelevisionFanatichttpct.dll
%APPDATA%TelevisionFanaticidle.dll
%APPDATA%TelevisionFanaticieovr.dll
%APPDATA%TelevisionFanaticimpipe.exe
%APPDATA%TelevisionFanaticmedint.exe
%APPDATA%TelevisionFanaticmlbtn.dll
%APPDATA%TelevisionFanaticmsg.dll
%APPDATA%TelevisionFanaticPlugin.dll
%APPDATA%TelevisionFanaticradio.dll
%APPDATA%TelevisionFanaticregfft.dll
%APPDATA%TelevisionFanaticreghk.dll
%APPDATA%TelevisionFanaticregiet.dll
%APPDATA%TelevisionFanaticscript.dll
%APPDATA%TelevisionFanaticskin.dll
%APPDATA%TelevisionFanaticsknlcr.dll
%APPDATA%TelevisionFanaticskplay.exe
%APPDATA%TelevisionFanaticSrcAs.dll
%APPDATA%TelevisionFanaticSrchMn.exe
%APPDATA%TelevisionFanatictpinst.dll
%APPDATA%TelevisionFanaticuabtn.dll
%APPDATA%TelevisionFanaticAppIntegrator64.exe
%APPDATA%TelevisionFanaticAppIntegratorStub64.dll
%APPDATA%TelevisionFanaticBOOTSTRAP.JS
%APPDATA%TelevisionFanaticffxtbr.jar
%APPDATA%TelevisionFanaticCHROME.MANIFEST
%APPDATA%TelevisionFanaticCREXT.DLL
%APPDATA%TelevisionFanaticCrExtP64.exe
%APPDATA%TelevisionFanaticDPNMNGR.DLL
%APPDATA%TelevisionFanaticEXEMANAGER.DLL
%APPDATA%TelevisionFanaticHpg64.dll
%APPDATA%TelevisionFanaticINSTALL.RDF
%APPDATA%TelevisionFanaticinstallKeys.js
%APPDATA%TelevisionFanaticLOGO.BMP
%APPDATA%TelevisionFanaticNP64Stub.dll
%APPDATA%TelevisionFanaticT8EXTEX.DLL
%APPDATA%TelevisionFanaticT8EXTPEX.DLL
%APPDATA%TelevisionFanaticT8HTML.DLL
%APPDATA%TelevisionFanaticT8RES.DLL
%APPDATA%TelevisionFanaticT8TICKER.DLL
%APPDATA%TelevisionFanaticVERIFY.DLL
%APPDATA%TelevisionFanaticEIPlug.dll
%APPDATA%TelevisionFanaticEZSETP.dll
%APPDATA%TelevisionFanaticNP64EISb.dll
%APPDATA%TelevisionFanatic%#MANIFEST#%18369B.exe
Registry:
Key HKLMSOFTWARETelevisionFanatic
Key HKLMSOFTWAREMicrosoftWindowsCurrentVersionUninstallTelevisionFanaticbar Uninstall Internet Explorer
Key HKLMSOFTWAREMicrosoftWindowsCurrentVersionUninstallTelevisionFanaticbar Uninstall Firefox
Key HKLMSOFTWAREMicrosoftWindowsCurrentVersionExplorerBrowser Helper Objectscb41fc95-f1b3-4797-8bb6-1012ff62abba
Key HKLMSOFTWAREMicrosoftWindowsCurrentVersionExplorerBrowser Helper Objects5d79f641-c168-40df-a32f-bacea7509e75
Key HKLMSOFTWAREClassesTelevisionFanatic.XMLSessionPlugin.1CLSID
Key HKLMSOFTWAREClassesTelevisionFanatic.XMLSessionPlugin.1
Key HKLMSOFTWAREClassesTelevisionFanatic.XMLSessionPluginCurVer
Key HKLMSOFTWAREClassesTelevisionFanatic.XMLSessionPluginCLSID
Key HKLMSOFTWAREClassesTelevisionFanatic.XMLSessionPlugin
Key HKLMSOFTWAREClassesTelevisionFanatic.UrlAlertButton.1CLSID
Key HKLMSOFTWAREClassesTelevisionFanatic.UrlAlertButton.1
Key HKLMSOFTWAREClassesTelevisionFanatic.UrlAlertButtonCurVer
Key HKLMSOFTWAREClassesTelevisionFanatic.UrlAlertButtonCLSID
Key HKLMSOFTWAREClassesTelevisionFanatic.UrlAlertButton
Key HKLMSOFTWAREClassesTelevisionFanatic.ToolbarProtector.1CLSID
Key HKLMSOFTWAREClassesTelevisionFanatic.ToolbarProtector.1
Key HKLMSOFTWAREClassesTelevisionFanatic.ToolbarProtectorCurVer
Key HKLMSOFTWAREClassesTelevisionFanatic.ToolbarProtectorCLSID
Key HKLMSOFTWAREClassesTelevisionFanatic.ToolbarProtector
Key HKLMSOFTWAREClassesTelevisionFanatic.ThirdPartyInstaller.1CLSID
Key HKLMSOFTWAREClassesTelevisionFanatic.ThirdPartyInstaller.1
Key HKLMSOFTWAREClassesTelevisionFanatic.ThirdPartyInstallerCurVer
Key HKLMSOFTWAREClassesTelevisionFanatic.ThirdPartyInstallerCLSID
Key HKLMSOFTWAREClassesTelevisionFanatic.ThirdPartyInstaller
Key HKLMSOFTWAREClassesTelevisionFanatic.SkinLauncherSettings.1CLSID
Key HKLMSOFTWAREClassesTelevisionFanatic.SkinLauncherSettings.1
Key HKLMSOFTWAREClassesTelevisionFanatic.SkinLauncherSettingsCurVer
Key HKLMSOFTWAREClassesTelevisionFanatic.SkinLauncherSettingsCLSID
Key HKLMSOFTWAREClassesTelevisionFanatic.SkinLauncherSettings
Key HKLMSOFTWAREClassesTelevisionFanatic.SkinLauncher.1CLSID
Key HKLMSOFTWAREClassesTelevisionFanatic.SkinLauncher.1
Key HKLMSOFTWAREClassesTelevisionFanatic.SkinLauncherCurVer
Key HKLMSOFTWAREClassesTelevisionFanatic.SkinLauncherCLSID
Key HKLMSOFTWAREClassesTelevisionFanatic.SkinLauncher
Key HKLMSOFTWAREClassesTelevisionFanatic.SettingsPlugin.1CLSID
Key HKLMSOFTWAREClassesTelevisionFanatic.SettingsPlugin.1
Key HKLMSOFTWAREClassesTelevisionFanatic.SettingsPluginCurVer
Key HKLMSOFTWAREClassesTelevisionFanatic.SettingsPluginCLSID
Key HKLMSOFTWAREClassesTelevisionFanatic.SettingsPlugin
Key HKLMSOFTWAREClassesTelevisionFanatic.ScriptButton.1CLSID
Key HKLMSOFTWAREClassesTelevisionFanatic.ScriptButton.1
Key HKLMSOFTWAREClassesTelevisionFanatic.ScriptButtonCurVer
Key HKLMSOFTWAREClassesTelevisionFanatic.ScriptButtonCLSID
Key HKLMSOFTWAREClassesTelevisionFanatic.ScriptButton
Key HKLMSOFTWAREClassesTelevisionFanatic.RadioSettings.1CLSID
Key HKLMSOFTWAREClassesTelevisionFanatic.RadioSettings.1
Key HKLMSOFTWAREClassesTelevisionFanatic.RadioSettingsCurVer
Key HKLMSOFTWAREClassesTelevisionFanatic.RadioSettingsCLSID
Key HKLMSOFTWAREClassesTelevisionFanatic.RadioSettings
Key HKLMSOFTWAREClassesTelevisionFanatic.Radio.1CLSID
Key HKLMSOFTWAREClassesTelevisionFanatic.Radio.1
Key HKLMSOFTWAREClassesTelevisionFanatic.RadioCurVer
Key HKLMSOFTWAREClassesTelevisionFanatic.RadioCLSID
Key HKLMSOFTWAREClassesTelevisionFanatic.Radio
Key HKLMSOFTWAREClassesTelevisionFanatic.PseudoTransparentPlugin.1CLSID
Key HKLMSOFTWAREClassesTelevisionFanatic.PseudoTransparentPlugin.1
Key HKLMSOFTWAREClassesTelevisionFanatic.PseudoTransparentPluginCurVer
Key HKLMSOFTWAREClassesTelevisionFanatic.PseudoTransparentPluginCLSID
Key HKLMSOFTWAREClassesTelevisionFanatic.PseudoTransparentPlugin
Key HKLMSOFTWAREClassesTelevisionFanatic.MultipleButton.1CLSID
Key HKLMSOFTWAREClassesTelevisionFanatic.MultipleButton.1
Key HKLMSOFTWAREClassesTelevisionFanatic.MultipleButtonCurVer
Key HKLMSOFTWAREClassesTelevisionFanatic.MultipleButtonCLSID
Key HKLMSOFTWAREClassesTelevisionFanatic.MultipleButton
Key HKLMSOFTWAREClassesTelevisionFanatic.HTMLPanel.1CLSID
Key HKLMSOFTWAREClassesTelevisionFanatic.HTMLPanel.1
Key HKLMSOFTWAREClassesTelevisionFanatic.HTMLPanelCurVer
Key HKLMSOFTWAREClassesTelevisionFanatic.HTMLPanelCLSID
Key HKLMSOFTWAREClassesTelevisionFanatic.HTMLPanel
Key HKLMSOFTWAREClassesTelevisionFanatic.HTMLMenu.1CLSID
Key HKLMSOFTWAREClassesTelevisionFanatic.HTMLMenu.1
Key HKLMSOFTWAREClassesTelevisionFanatic.HTMLMenuCurVer
Key HKLMSOFTWAREClassesTelevisionFanatic.HTMLMenuCLSID
Key HKLMSOFTWAREClassesTelevisionFanatic.HTMLMenu
Key HKLMSOFTWAREClassesTelevisionFanatic.FeedManager.1CLSID
Key HKLMSOFTWAREClassesTelevisionFanatic.FeedManager.1
Key HKLMSOFTWAREClassesTelevisionFanatic.FeedManagerCurVer
Key HKLMSOFTWAREClassesTelevisionFanatic.FeedManagerCLSID
Key HKLMSOFTWAREClassesTelevisionFanatic.FeedManager
Key HKLMSOFTWAREClassesTelevisionFanatic.DynamicBarButton.1CLSID
Key HKLMSOFTWAREClassesTelevisionFanatic.DynamicBarButton.1
Key HKLMSOFTWAREClassesTelevisionFanatic.DynamicBarButtonCurVer
Key HKLMSOFTWAREClassesTelevisionFanatic.DynamicBarButtonCLSID
Key HKLMSOFTWAREClassesTelevisionFanatic.DynamicBarButton18369B.exe
%PROGRAMFILES%TelevisionFanaticauxstb.dll
%PROGRAMFILES%TelevisionFanaticbar.dll
%PROGRAMFILES%TelevisionFanaticbarsvc.exe
%PROGRAMFILES%TelevisionFanaticbprtct.dll
%PROGRAMFILES%TelevisionFanaticbrmon.exe
%PROGRAMFILES%TelevisionFanaticbrstub.dll
%PROGRAMFILES%TelevisionFanaticdatact.dll
%PROGRAMFILES%TelevisionFanaticdlghk.dll
%PROGRAMFILES%TelevisionFanaticdyn.dll
%PROGRAMFILES%TelevisionFanaticfeedmg.dll
%PROGRAMFILES%TelevisionFanatichighin.exe
%PROGRAMFILES%TelevisionFanatichkstub.dll
%PROGRAMFILES%TelevisionFanatichtmlmu.dll
%PROGRAMFILES%TelevisionFanatichttpct.dll
%PROGRAMFILES%TelevisionFanaticidle.dll
%PROGRAMFILES%TelevisionFanaticieovr.dll
%PROGRAMFILES%TelevisionFanaticimpipe.exe
%PROGRAMFILES%TelevisionFanaticmedint.exe
%PROGRAMFILES%TelevisionFanaticmlbtn.dll
%PROGRAMFILES%TelevisionFanaticmsg.dll
%PROGRAMFILES%TelevisionFanaticPlugin.dll
%PROGRAMFILES%TelevisionFanaticradio.dll
%PROGRAMFILES%TelevisionFanaticregfft.dll
%PROGRAMFILES%TelevisionFanaticreghk.dll
%PROGRAMFILES%TelevisionFanaticregiet.dll
%PROGRAMFILES%TelevisionFanaticscript.dll
%PROGRAMFILES%TelevisionFanaticskin.dll
%PROGRAMFILES%TelevisionFanaticsknlcr.dll
%PROGRAMFILES%TelevisionFanaticskplay.exe
%PROGRAMFILES%TelevisionFanaticSrcAs.dll
%PROGRAMFILES%TelevisionFanaticSrchMn.exe
%PROGRAMFILES%TelevisionFanatictpinst.dll
%PROGRAMFILES%TelevisionFanaticuabtn.dll
%PROGRAMFILES%TelevisionFanaticAppIntegrator64.exe
%PROGRAMFILES%TelevisionFanaticAppIntegratorStub64.dll
%PROGRAMFILES%TelevisionFanaticBOOTSTRAP.JS
%PROGRAMFILES%TelevisionFanaticffxtbr.jar
%PROGRAMFILES%TelevisionFanaticCHROME.MANIFEST
%PROGRAMFILES%TelevisionFanaticCREXT.DLL
%PROGRAMFILES%TelevisionFanaticCrExtP64.exe
%PROGRAMFILES%TelevisionFanaticDPNMNGR.DLL
%PROGRAMFILES%TelevisionFanaticEXEMANAGER.DLL
%PROGRAMFILES%TelevisionFanaticHpg64.dll
%PROGRAMFILES%TelevisionFanaticINSTALL.RDF
%PROGRAMFILES%TelevisionFanaticinstallKeys.js
%PROGRAMFILES%TelevisionFanaticLOGO.BMP
%PROGRAMFILES%TelevisionFanaticNP64Stub.dll
%PROGRAMFILES%TelevisionFanaticT8EXTEX.DLL
%PROGRAMFILES%TelevisionFanaticT8EXTPEX.DLL
%PROGRAMFILES%TelevisionFanaticT8HTML.DLL
%PROGRAMFILES%TelevisionFanaticT8RES.DLL
%PROGRAMFILES%TelevisionFanaticT8TICKER.DLL
%PROGRAMFILES%TelevisionFanaticVERIFY.DLL
%PROGRAMFILES%TelevisionFanaticEIPlug.dll
%PROGRAMFILES%TelevisionFanaticEZSETP.dll
%PROGRAMFILES%TelevisionFanaticNP64EISb.dll
%PROGRAMFILES%TelevisionFanatic%APPDATA%TelevisionFanatic
%PROGRAMFILES%TelevisionFanatic
%PROGRAMFILES%TelevisionFanaticEI
%PROGRAMFILES%TelevisionFanaticEITelevisionFanaticauxstb.dll
%PROGRAMFILES%TelevisionFanaticEITelevisionFanaticbar.dll
%PROGRAMFILES%TelevisionFanaticEITelevisionFanaticbarsvc.exe
%PROGRAMFILES%TelevisionFanaticEITelevisionFanaticbprtct.dll
%PROGRAMFILES%TelevisionFanaticEITelevisionFanaticbrmon.exe
%PROGRAMFILES%TelevisionFanaticEITelevisionFanaticbrstub.dll
%PROGRAMFILES%TelevisionFanaticEITelevisionFanaticdatact.dll
%PROGRAMFILES%TelevisionFanaticEITelevisionFanaticdlghk.dll
%PROGRAMFILES%TelevisionFanaticEITelevisionFanaticdyn.dll
%PROGRAMFILES%TelevisionFanaticEITelevisionFanaticfeedmg.dll
%PROGRAMFILES%TelevisionFanaticEITelevisionFanatichighin.exe
%PROGRAMFILES%TelevisionFanaticEITelevisionFanatichkstub.dll
%PROGRAMFILES%TelevisionFanaticEITelevisionFanatichtmlmu.dll
%PROGRAMFILES%TelevisionFanaticEITelevisionFanatichttpct.dll
%PROGRAMFILES%TelevisionFanaticEITelevisionFanaticidle.dll
%PROGRAMFILES%TelevisionFanaticEITelevisionFanaticieovr.dll
%PROGRAMFILES%TelevisionFanaticEITelevisionFanaticimpipe.exe
%PROGRAMFILES%TelevisionFanaticEITelevisionFanaticmedint.exe
%PROGRAMFILES%TelevisionFanaticEITelevisionFanaticmlbtn.dll
%PROGRAMFILES%TelevisionFanaticEITelevisionFanaticmsg.dll
%PROGRAMFILES%TelevisionFanaticEITelevisionFanaticPlugin.dll
%PROGRAMFILES%TelevisionFanaticEITelevisionFanaticradio.dll
%PROGRAMFILES%TelevisionFanaticEITelevisionFanaticregfft.dll
%PROGRAMFILES%TelevisionFanaticEITelevisionFanaticreghk.dll
%PROGRAMFILES%TelevisionFanaticEITelevisionFanaticregiet.dll
%PROGRAMFILES%TelevisionFanaticEITelevisionFanaticscript.dll
%PROGRAMFILES%TelevisionFanaticEITelevisionFanaticskin.dll
%PROGRAMFILES%TelevisionFanaticEITelevisionFanaticsknlcr.dll
%PROGRAMFILES%TelevisionFanaticEITelevisionFanaticskplay.exe
%PROGRAMFILES%TelevisionFanaticEITelevisionFanaticSrcAs.dll
%PROGRAMFILES%TelevisionFanaticEITelevisionFanaticSrchMn.exe
%PROGRAMFILES%TelevisionFanaticEITelevisionFanatictpinst.dll
%PROGRAMFILES%TelevisionFanaticEITelevisionFanaticuabtn.dll
%PROGRAMFILES%TelevisionFanaticEITelevisionFanaticAppIntegrator64.exe
%PROGRAMFILES%TelevisionFanaticEITelevisionFanaticAppIntegratorStub64.dll
%PROGRAMFILES%TelevisionFanaticEITelevisionFanaticBOOTSTRAP.JS
%PROGRAMFILES%TelevisionFanaticEITelevisionFanaticffxtbr.jar
%PROGRAMFILES%TelevisionFanaticEITelevisionFanaticCHROME.MANIFEST
%PROGRAMFILES%TelevisionFanaticEITelevisionFanaticCREXT.DLL
%PROGRAMFILES%TelevisionFanaticEITelevisionFanaticCrExtP64.exe
%PROGRAMFILES%TelevisionFanaticEITelevisionFanaticDPNMNGR.DLL
%PROGRAMFILES%TelevisionFanaticEITelevisionFanaticEXEMANAGER.DLL
%PROGRAMFILES%TelevisionFanaticEITelevisionFanaticHpg64.dll
%PROGRAMFILES%TelevisionFanaticEITelevisionFanaticINSTALL.RDF
%PROGRAMFILES%TelevisionFanaticEITelevisionFanaticinstallKeys.js
%PROGRAMFILES%TelevisionFanaticEITelevisionFanaticLOGO.BMP
%PROGRAMFILES%TelevisionFanaticEITelevisionFanaticNP64Stub.dll
%PROGRAMFILES%TelevisionFanaticEITelevisionFanaticT8EXTEX.DLL
%PROGRAMFILES%TelevisionFanaticEITelevisionFanaticT8EXTPEX.DLL
%PROGRAMFILES%TelevisionFanaticEITelevisionFanaticT8HTML.DLL
%PROGRAMFILES%TelevisionFanaticEITelevisionFanaticT8RES.DLL
%PROGRAMFILES%TelevisionFanaticEITelevisionFanaticT8TICKER.DLL
%PROGRAMFILES%TelevisionFanaticEITelevisionFanaticVERIFY.DLL
%PROGRAMFILES%TelevisionFanaticEITelevisionFanaticEIPlug.dll
%PROGRAMFILES%TelevisionFanaticEITelevisionFanaticEZSETP.dll
%PROGRAMFILES%TelevisionFanaticEITelevisionFanaticNP64EISb.dll
%PROGRAMFILES%TelevisionFanaticEITelevisionFanatic%#MANIFEST#%18369B.exe
%PROGRAMFILES%TelevisionFanaticauxstb.dll
%PROGRAMFILES%TelevisionFanaticbar.dll
%PROGRAMFILES%TelevisionFanaticbarsvc.exe
%PROGRAMFILES%TelevisionFanaticbprtct.dll
%PROGRAMFILES%TelevisionFanaticbrmon.exe
%PROGRAMFILES%TelevisionFanaticbrstub.dll
%PROGRAMFILES%TelevisionFanaticdatact.dll
%PROGRAMFILES%TelevisionFanaticdlghk.dll
%PROGRAMFILES%TelevisionFanaticdyn.dll
%PROGRAMFILES%TelevisionFanaticfeedmg.dll
%PROGRAMFILES%TelevisionFanatichighin.exe
%PROGRAMFILES%TelevisionFanatichkstub.dll
%PROGRAMFILES%TelevisionFanatichtmlmu.dll
%PROGRAMFILES%TelevisionFanatichttpct.dll
%PROGRAMFILES%TelevisionFanaticidle.dll
%PROGRAMFILES%TelevisionFanaticieovr.dll
%PROGRAMFILES%TelevisionFanaticimpipe.exe
%PROGRAMFILES%TelevisionFanaticmedint.exe
%PROGRAMFILES%TelevisionFanaticmlbtn.dll
%PROGRAMFILES%TelevisionFanaticmsg.dll
%PROGRAMFILES%TelevisionFanaticPlugin.dll
%PROGRAMFILES%TelevisionFanaticradio.dll
%PROGRAMFILES%TelevisionFanaticregfft.dll
%PROGRAMFILES%TelevisionFanaticreghk.dll
%PROGRAMFILES%TelevisionFanaticregiet.dll
%PROGRAMFILES%TelevisionFanaticscript.dll
%PROGRAMFILES%TelevisionFanaticskin.dll
%PROGRAMFILES%TelevisionFanaticsknlcr.dll
%PROGRAMFILES%TelevisionFanaticskplay.exe
%PROGRAMFILES%TelevisionFanaticSrcAs.dll
%PROGRAMFILES%TelevisionFanaticSrchMn.exe
%PROGRAMFILES%TelevisionFanatictpinst.dll
%PROGRAMFILES%TelevisionFanaticuabtn.dll
%PROGRAMFILES%TelevisionFanaticAppIntegrator64.exe
%PROGRAMFILES%TelevisionFanaticAppIntegratorStub64.dll
%PROGRAMFILES%TelevisionFanaticBOOTSTRAP.JS
%PROGRAMFILES%TelevisionFanaticffxtbr.jar
%PROGRAMFILES%TelevisionFanaticCHROME.MANIFEST
%PROGRAMFILES%TelevisionFanaticCREXT.DLL
%PROGRAMFILES%TelevisionFanaticCrExtP64.exe
%PROGRAMFILES%TelevisionFanaticDPNMNGR.DLL
%PROGRAMFILES%TelevisionFanaticEXEMANAGER.DLL
%PROGRAMFILES%TelevisionFanaticHpg64.dll
%PROGRAMFILES%TelevisionFanaticINSTALL.RDF
%PROGRAMFILES%TelevisionFanaticinstallKeys.js
%PROGRAMFILES%TelevisionFanaticLOGO.BMP
%PROGRAMFILES%TelevisionFanaticNP64Stub.dll
%PROGRAMFILES%TelevisionFanaticT8EXTEX.DLL
%PROGRAMFILES%TelevisionFanaticT8EXTPEX.DLL
%PROGRAMFILES%TelevisionFanaticT8HTML.DLL
%PROGRAMFILES%TelevisionFanaticT8RES.DLL
%PROGRAMFILES%TelevisionFanaticT8TICKER.DLL
%PROGRAMFILES%TelevisionFanaticVERIFY.DLL
%PROGRAMFILES%TelevisionFanaticEIPlug.dll
%PROGRAMFILES%TelevisionFanaticEZSETP.dll
%PROGRAMFILES%TelevisionFanaticNP64EISb.dll
%PROGRAMFILES%TelevisionFanatic%#MANIFEST#%18369B.exe
%APPDATA%TelevisionFanaticauxstb.dll
%APPDATA%TelevisionFanaticbar.dll
%APPDATA%TelevisionFanaticbarsvc.exe
%APPDATA%TelevisionFanaticbprtct.dll
%APPDATA%TelevisionFanaticbrmon.exe
%APPDATA%TelevisionFanaticbrstub.dll
%APPDATA%TelevisionFanaticdatact.dll
%APPDATA%TelevisionFanaticdlghk.dll
%APPDATA%TelevisionFanaticdyn.dll
%APPDATA%TelevisionFanaticfeedmg.dll
%APPDATA%TelevisionFanatichighin.exe
%APPDATA%TelevisionFanatichkstub.dll
%APPDATA%TelevisionFanatichtmlmu.dll
%APPDATA%TelevisionFanatichttpct.dll
%APPDATA%TelevisionFanaticidle.dll
%APPDATA%TelevisionFanaticieovr.dll
%APPDATA%TelevisionFanaticimpipe.exe
%APPDATA%TelevisionFanaticmedint.exe
%APPDATA%TelevisionFanaticmlbtn.dll
%APPDATA%TelevisionFanaticmsg.dll
%APPDATA%TelevisionFanaticPlugin.dll
%APPDATA%TelevisionFanaticradio.dll
%APPDATA%TelevisionFanaticregfft.dll
%APPDATA%TelevisionFanaticreghk.dll
%APPDATA%TelevisionFanaticregiet.dll
%APPDATA%TelevisionFanaticscript.dll
%APPDATA%TelevisionFanaticskin.dll
%APPDATA%TelevisionFanaticsknlcr.dll
%APPDATA%TelevisionFanaticskplay.exe
%APPDATA%TelevisionFanaticSrcAs.dll
%APPDATA%TelevisionFanaticSrchMn.exe
%APPDATA%TelevisionFanatictpinst.dll
%APPDATA%TelevisionFanaticuabtn.dll
%APPDATA%TelevisionFanaticAppIntegrator64.exe
%APPDATA%TelevisionFanaticAppIntegratorStub64.dll
%APPDATA%TelevisionFanaticBOOTSTRAP.JS
%APPDATA%TelevisionFanaticffxtbr.jar
%APPDATA%TelevisionFanaticCHROME.MANIFEST
%APPDATA%TelevisionFanaticCREXT.DLL
%APPDATA%TelevisionFanaticCrExtP64.exe
%APPDATA%TelevisionFanaticDPNMNGR.DLL
%APPDATA%TelevisionFanaticEXEMANAGER.DLL
%APPDATA%TelevisionFanaticHpg64.dll
%APPDATA%TelevisionFanaticINSTALL.RDF
%APPDATA%TelevisionFanaticinstallKeys.js
%APPDATA%TelevisionFanaticLOGO.BMP
%APPDATA%TelevisionFanaticNP64Stub.dll
%APPDATA%TelevisionFanaticT8EXTEX.DLL
%APPDATA%TelevisionFanaticT8EXTPEX.DLL
%APPDATA%TelevisionFanaticT8HTML.DLL
%APPDATA%TelevisionFanaticT8RES.DLL
%APPDATA%TelevisionFanaticT8TICKER.DLL
%APPDATA%TelevisionFanaticVERIFY.DLL
%APPDATA%TelevisionFanaticEIPlug.dll
%APPDATA%TelevisionFanaticEZSETP.dll
%APPDATA%TelevisionFanaticNP64EISb.dll
%APPDATA%TelevisionFanatic%#MANIFEST#%18369B.exe
Key HKLMSOFTWARETelevisionFanatic
Key HKLMSOFTWAREMicrosoftWindowsCurrentVersionUninstallTelevisionFanaticbar Uninstall Internet Explorer
Key HKLMSOFTWAREMicrosoftWindowsCurrentVersionUninstallTelevisionFanaticbar Uninstall Firefox
Key HKLMSOFTWAREMicrosoftWindowsCurrentVersionExplorerBrowser Helper Objectscb41fc95-f1b3-4797-8bb6-1012ff62abba
Key HKLMSOFTWAREMicrosoftWindowsCurrentVersionExplorerBrowser Helper Objects5d79f641-c168-40df-a32f-bacea7509e75
Key HKLMSOFTWAREClassesTelevisionFanatic.XMLSessionPlugin.1CLSID
Key HKLMSOFTWAREClassesTelevisionFanatic.XMLSessionPlugin.1
Key HKLMSOFTWAREClassesTelevisionFanatic.XMLSessionPluginCurVer
Key HKLMSOFTWAREClassesTelevisionFanatic.XMLSessionPluginCLSID
Key HKLMSOFTWAREClassesTelevisionFanatic.XMLSessionPlugin
Key HKLMSOFTWAREClassesTelevisionFanatic.UrlAlertButton.1CLSID
Key HKLMSOFTWAREClassesTelevisionFanatic.UrlAlertButton.1
Key HKLMSOFTWAREClassesTelevisionFanatic.UrlAlertButtonCurVer
Key HKLMSOFTWAREClassesTelevisionFanatic.UrlAlertButtonCLSID
Key HKLMSOFTWAREClassesTelevisionFanatic.UrlAlertButton
Key HKLMSOFTWAREClassesTelevisionFanatic.ToolbarProtector.1CLSID
Key HKLMSOFTWAREClassesTelevisionFanatic.ToolbarProtector.1
Key HKLMSOFTWAREClassesTelevisionFanatic.ToolbarProtectorCurVer
Key HKLMSOFTWAREClassesTelevisionFanatic.ToolbarProtectorCLSID
Key HKLMSOFTWAREClassesTelevisionFanatic.ToolbarProtector
Key HKLMSOFTWAREClassesTelevisionFanatic.ThirdPartyInstaller.1CLSID
Key HKLMSOFTWAREClassesTelevisionFanatic.ThirdPartyInstaller.1
Key HKLMSOFTWAREClassesTelevisionFanatic.ThirdPartyInstallerCurVer
Key HKLMSOFTWAREClassesTelevisionFanatic.ThirdPartyInstallerCLSID
Key HKLMSOFTWAREClassesTelevisionFanatic.ThirdPartyInstaller
Key HKLMSOFTWAREClassesTelevisionFanatic.SkinLauncherSettings.1CLSID
Key HKLMSOFTWAREClassesTelevisionFanatic.SkinLauncherSettings.1
Key HKLMSOFTWAREClassesTelevisionFanatic.SkinLauncherSettingsCurVer
Key HKLMSOFTWAREClassesTelevisionFanatic.SkinLauncherSettingsCLSID
Key HKLMSOFTWAREClassesTelevisionFanatic.SkinLauncherSettings
Key HKLMSOFTWAREClassesTelevisionFanatic.SkinLauncher.1CLSID
Key HKLMSOFTWAREClassesTelevisionFanatic.SkinLauncher.1
Key HKLMSOFTWAREClassesTelevisionFanatic.SkinLauncherCurVer
Key HKLMSOFTWAREClassesTelevisionFanatic.SkinLauncherCLSID
Key HKLMSOFTWAREClassesTelevisionFanatic.SkinLauncher
Key HKLMSOFTWAREClassesTelevisionFanatic.SettingsPlugin.1CLSID
Key HKLMSOFTWAREClassesTelevisionFanatic.SettingsPlugin.1
Key HKLMSOFTWAREClassesTelevisionFanatic.SettingsPluginCurVer
Key HKLMSOFTWAREClassesTelevisionFanatic.SettingsPluginCLSID
Key HKLMSOFTWAREClassesTelevisionFanatic.SettingsPlugin
Key HKLMSOFTWAREClassesTelevisionFanatic.ScriptButton.1CLSID
Key HKLMSOFTWAREClassesTelevisionFanatic.ScriptButton.1
Key HKLMSOFTWAREClassesTelevisionFanatic.ScriptButtonCurVer
Key HKLMSOFTWAREClassesTelevisionFanatic.ScriptButtonCLSID
Key HKLMSOFTWAREClassesTelevisionFanatic.ScriptButton
Key HKLMSOFTWAREClassesTelevisionFanatic.RadioSettings.1CLSID
Key HKLMSOFTWAREClassesTelevisionFanatic.RadioSettings.1
Key HKLMSOFTWAREClassesTelevisionFanatic.RadioSettingsCurVer
Key HKLMSOFTWAREClassesTelevisionFanatic.RadioSettingsCLSID
Key HKLMSOFTWAREClassesTelevisionFanatic.RadioSettings
Key HKLMSOFTWAREClassesTelevisionFanatic.Radio.1CLSID
Key HKLMSOFTWAREClassesTelevisionFanatic.Radio.1
Key HKLMSOFTWAREClassesTelevisionFanatic.RadioCurVer
Key HKLMSOFTWAREClassesTelevisionFanatic.RadioCLSID
Key HKLMSOFTWAREClassesTelevisionFanatic.Radio
Key HKLMSOFTWAREClassesTelevisionFanatic.PseudoTransparentPlugin.1CLSID
Key HKLMSOFTWAREClassesTelevisionFanatic.PseudoTransparentPlugin.1
Key HKLMSOFTWAREClassesTelevisionFanatic.PseudoTransparentPluginCurVer
Key HKLMSOFTWAREClassesTelevisionFanatic.PseudoTransparentPluginCLSID
Key HKLMSOFTWAREClassesTelevisionFanatic.PseudoTransparentPlugin
Key HKLMSOFTWAREClassesTelevisionFanatic.MultipleButton.1CLSID
Key HKLMSOFTWAREClassesTelevisionFanatic.MultipleButton.1
Key HKLMSOFTWAREClassesTelevisionFanatic.MultipleButtonCurVer
Key HKLMSOFTWAREClassesTelevisionFanatic.MultipleButtonCLSID
Key HKLMSOFTWAREClassesTelevisionFanatic.MultipleButton
Key HKLMSOFTWAREClassesTelevisionFanatic.HTMLPanel.1CLSID
Key HKLMSOFTWAREClassesTelevisionFanatic.HTMLPanel.1
Key HKLMSOFTWAREClassesTelevisionFanatic.HTMLPanelCurVer
Key HKLMSOFTWAREClassesTelevisionFanatic.HTMLPanelCLSID
Key HKLMSOFTWAREClassesTelevisionFanatic.HTMLPanel
Key HKLMSOFTWAREClassesTelevisionFanatic.HTMLMenu.1CLSID
Key HKLMSOFTWAREClassesTelevisionFanatic.HTMLMenu.1
Key HKLMSOFTWAREClassesTelevisionFanatic.HTMLMenuCurVer
Key HKLMSOFTWAREClassesTelevisionFanatic.HTMLMenuCLSID
Key HKLMSOFTWAREClassesTelevisionFanatic.HTMLMenu
Key HKLMSOFTWAREClassesTelevisionFanatic.FeedManager.1CLSID
Key HKLMSOFTWAREClassesTelevisionFanatic.FeedManager.1
Key HKLMSOFTWAREClassesTelevisionFanatic.FeedManagerCurVer
Key HKLMSOFTWAREClassesTelevisionFanatic.FeedManagerCLSID
Key HKLMSOFTWAREClassesTelevisionFanatic.FeedManager
Key HKLMSOFTWAREClassesTelevisionFanatic.DynamicBarButton.1CLSID
Key HKLMSOFTWAREClassesTelevisionFanatic.DynamicBarButton.1
Key HKLMSOFTWAREClassesTelevisionFanatic.DynamicBarButtonCurVer
Key HKLMSOFTWAREClassesTelevisionFanatic.DynamicBarButtonCLSID
Key HKLMSOFTWAREClassesTelevisionFanatic.DynamicBarButton18369B.exe
%APPDATA%TelevisionFanaticauxstb.dll
%APPDATA%TelevisionFanaticbar.dll
%APPDATA%TelevisionFanaticbarsvc.exe
%APPDATA%TelevisionFanaticbprtct.dll
%APPDATA%TelevisionFanaticbrmon.exe
%APPDATA%TelevisionFanaticbrstub.dll
%APPDATA%TelevisionFanaticdatact.dll
%APPDATA%TelevisionFanaticdlghk.dll
%APPDATA%TelevisionFanaticdyn.dll
%APPDATA%TelevisionFanaticfeedmg.dll
%APPDATA%TelevisionFanatichighin.exe
%APPDATA%TelevisionFanatichkstub.dll
%APPDATA%TelevisionFanatichtmlmu.dll
%APPDATA%TelevisionFanatichttpct.dll
%APPDATA%TelevisionFanaticidle.dll
%APPDATA%TelevisionFanaticieovr.dll
%APPDATA%TelevisionFanaticimpipe.exe
%APPDATA%TelevisionFanaticmedint.exe
%APPDATA%TelevisionFanaticmlbtn.dll
%APPDATA%TelevisionFanaticmsg.dll
%APPDATA%TelevisionFanaticPlugin.dll
%APPDATA%TelevisionFanaticradio.dll
%APPDATA%TelevisionFanaticregfft.dll
%APPDATA%TelevisionFanaticreghk.dll
%APPDATA%TelevisionFanaticregiet.dll
%APPDATA%TelevisionFanaticscript.dll
%APPDATA%TelevisionFanaticskin.dll
%APPDATA%TelevisionFanaticsknlcr.dll
%APPDATA%TelevisionFanaticskplay.exe
%APPDATA%TelevisionFanaticSrcAs.dll
%APPDATA%TelevisionFanaticSrchMn.exe
%APPDATA%TelevisionFanatictpinst.dll
%APPDATA%TelevisionFanaticuabtn.dll
%APPDATA%TelevisionFanaticAppIntegrator64.exe
%APPDATA%TelevisionFanaticAppIntegratorStub64.dll
%APPDATA%TelevisionFanaticBOOTSTRAP.JS
%APPDATA%TelevisionFanaticffxtbr.jar
%APPDATA%TelevisionFanaticCHROME.MANIFEST
%APPDATA%TelevisionFanaticCREXT.DLL
%APPDATA%TelevisionFanaticCrExtP64.exe
%APPDATA%TelevisionFanaticDPNMNGR.DLL
%APPDATA%TelevisionFanaticEXEMANAGER.DLL
%APPDATA%TelevisionFanaticHpg64.dll
%APPDATA%TelevisionFanaticINSTALL.RDF
%APPDATA%TelevisionFanaticinstallKeys.js
%APPDATA%TelevisionFanaticLOGO.BMP
%APPDATA%TelevisionFanaticNP64Stub.dll
%APPDATA%TelevisionFanaticT8EXTEX.DLL
%APPDATA%TelevisionFanaticT8EXTPEX.DLL
%APPDATA%TelevisionFanaticT8HTML.DLL
%APPDATA%TelevisionFanaticT8RES.DLL
%APPDATA%TelevisionFanaticT8TICKER.DLL
%APPDATA%TelevisionFanaticVERIFY.DLL
%APPDATA%TelevisionFanaticEIPlug.dll
%APPDATA%TelevisionFanaticEZSETP.dll
%APPDATA%TelevisionFanaticNP64EISb.dll
%APPDATA%TelevisionFanatic%APPDATA%TelevisionFanatic
%PROGRAMFILES%TelevisionFanatic
%PROGRAMFILES%TelevisionFanaticEI
%PROGRAMFILES%TelevisionFanaticEITelevisionFanaticauxstb.dll
%PROGRAMFILES%TelevisionFanaticEITelevisionFanaticbar.dll
%PROGRAMFILES%TelevisionFanaticEITelevisionFanaticbarsvc.exe
%PROGRAMFILES%TelevisionFanaticEITelevisionFanaticbprtct.dll
%PROGRAMFILES%TelevisionFanaticEITelevisionFanaticbrmon.exe
%PROGRAMFILES%TelevisionFanaticEITelevisionFanaticbrstub.dll
%PROGRAMFILES%TelevisionFanaticEITelevisionFanaticdatact.dll
%PROGRAMFILES%TelevisionFanaticEITelevisionFanaticdlghk.dll
%PROGRAMFILES%TelevisionFanaticEITelevisionFanaticdyn.dll
%PROGRAMFILES%TelevisionFanaticEITelevisionFanaticfeedmg.dll
%PROGRAMFILES%TelevisionFanaticEITelevisionFanatichighin.exe
%PROGRAMFILES%TelevisionFanaticEITelevisionFanatichkstub.dll
%PROGRAMFILES%TelevisionFanaticEITelevisionFanatichtmlmu.dll
%PROGRAMFILES%TelevisionFanaticEITelevisionFanatichttpct.dll
%PROGRAMFILES%TelevisionFanaticEITelevisionFanaticidle.dll
%PROGRAMFILES%TelevisionFanaticEITelevisionFanaticieovr.dll
%PROGRAMFILES%TelevisionFanaticEITelevisionFanaticimpipe.exe
%PROGRAMFILES%TelevisionFanaticEITelevisionFanaticmedint.exe
%PROGRAMFILES%TelevisionFanaticEITelevisionFanaticmlbtn.dll
%PROGRAMFILES%TelevisionFanaticEITelevisionFanaticmsg.dll
%PROGRAMFILES%TelevisionFanaticEITelevisionFanaticPlugin.dll
%PROGRAMFILES%TelevisionFanaticEITelevisionFanaticradio.dll
%PROGRAMFILES%TelevisionFanaticEITelevisionFanaticregfft.dll
%PROGRAMFILES%TelevisionFanaticEITelevisionFanaticreghk.dll
%PROGRAMFILES%TelevisionFanaticEITelevisionFanaticregiet.dll
%PROGRAMFILES%TelevisionFanaticEITelevisionFanaticscript.dll
%PROGRAMFILES%TelevisionFanaticEITelevisionFanaticskin.dll
%PROGRAMFILES%TelevisionFanaticEITelevisionFanaticsknlcr.dll
%PROGRAMFILES%TelevisionFanaticEITelevisionFanaticskplay.exe
%PROGRAMFILES%TelevisionFanaticEITelevisionFanaticSrcAs.dll
%PROGRAMFILES%TelevisionFanaticEITelevisionFanaticSrchMn.exe
%PROGRAMFILES%TelevisionFanaticEITelevisionFanatictpinst.dll
%PROGRAMFILES%TelevisionFanaticEITelevisionFanaticuabtn.dll
%PROGRAMFILES%TelevisionFanaticEITelevisionFanaticAppIntegrator64.exe
%PROGRAMFILES%TelevisionFanaticEITelevisionFanaticAppIntegratorStub64.dll
%PROGRAMFILES%TelevisionFanaticEITelevisionFanaticBOOTSTRAP.JS
%PROGRAMFILES%TelevisionFanaticEITelevisionFanaticffxtbr.jar
%PROGRAMFILES%TelevisionFanaticEITelevisionFanaticCHROME.MANIFEST
%PROGRAMFILES%TelevisionFanaticEITelevisionFanaticCREXT.DLL
%PROGRAMFILES%TelevisionFanaticEITelevisionFanaticCrExtP64.exe
%PROGRAMFILES%TelevisionFanaticEITelevisionFanaticDPNMNGR.DLL
%PROGRAMFILES%TelevisionFanaticEITelevisionFanaticEXEMANAGER.DLL
%PROGRAMFILES%TelevisionFanaticEITelevisionFanaticHpg64.dll
%PROGRAMFILES%TelevisionFanaticEITelevisionFanaticINSTALL.RDF
%PROGRAMFILES%TelevisionFanaticEITelevisionFanaticinstallKeys.js
%PROGRAMFILES%TelevisionFanaticEITelevisionFanaticLOGO.BMP
%PROGRAMFILES%TelevisionFanaticEITelevisionFanaticNP64Stub.dll
%PROGRAMFILES%TelevisionFanaticEITelevisionFanaticT8EXTEX.DLL
%PROGRAMFILES%TelevisionFanaticEITelevisionFanaticT8EXTPEX.DLL
%PROGRAMFILES%TelevisionFanaticEITelevisionFanaticT8HTML.DLL
%PROGRAMFILES%TelevisionFanaticEITelevisionFanaticT8RES.DLL
%PROGRAMFILES%TelevisionFanaticEITelevisionFanaticT8TICKER.DLL
%PROGRAMFILES%TelevisionFanaticEITelevisionFanaticVERIFY.DLL
%PROGRAMFILES%TelevisionFanaticEITelevisionFanaticEIPlug.dll
%PROGRAMFILES%TelevisionFanaticEITelevisionFanaticEZSETP.dll
%PROGRAMFILES%TelevisionFanaticEITelevisionFanaticNP64EISb.dll
%PROGRAMFILES%TelevisionFanaticEITelevisionFanatic%#MANIFEST#%18369B.exe
%PROGRAMFILES%TelevisionFanaticauxstb.dll
%PROGRAMFILES%TelevisionFanaticbar.dll
%PROGRAMFILES%TelevisionFanaticbarsvc.exe
%PROGRAMFILES%TelevisionFanaticbprtct.dll
%PROGRAMFILES%TelevisionFanaticbrmon.exe
%PROGRAMFILES%TelevisionFanaticbrstub.dll
%PROGRAMFILES%TelevisionFanaticdatact.dll
%PROGRAMFILES%TelevisionFanaticdlghk.dll
%PROGRAMFILES%TelevisionFanaticdyn.dll
%PROGRAMFILES%TelevisionFanaticfeedmg.dll
%PROGRAMFILES%TelevisionFanatichighin.exe
%PROGRAMFILES%TelevisionFanatichkstub.dll
%PROGRAMFILES%TelevisionFanatichtmlmu.dll
%PROGRAMFILES%TelevisionFanatichttpct.dll
%PROGRAMFILES%TelevisionFanaticidle.dll
%PROGRAMFILES%TelevisionFanaticieovr.dll
%PROGRAMFILES%TelevisionFanaticimpipe.exe
%PROGRAMFILES%TelevisionFanaticmedint.exe
%PROGRAMFILES%TelevisionFanaticmlbtn.dll
%PROGRAMFILES%TelevisionFanaticmsg.dll
%PROGRAMFILES%TelevisionFanaticPlugin.dll
%PROGRAMFILES%TelevisionFanaticradio.dll
%PROGRAMFILES%TelevisionFanaticregfft.dll
%PROGRAMFILES%TelevisionFanaticreghk.dll
%PROGRAMFILES%TelevisionFanaticregiet.dll
%PROGRAMFILES%TelevisionFanaticscript.dll
%PROGRAMFILES%TelevisionFanaticskin.dll
%PROGRAMFILES%TelevisionFanaticsknlcr.dll
%PROGRAMFILES%TelevisionFanaticskplay.exe
%PROGRAMFILES%TelevisionFanaticSrcAs.dll
%PROGRAMFILES%TelevisionFanaticSrchMn.exe
%PROGRAMFILES%TelevisionFanatictpinst.dll
%PROGRAMFILES%TelevisionFanaticuabtn.dll
%PROGRAMFILES%TelevisionFanaticAppIntegrator64.exe
%PROGRAMFILES%TelevisionFanaticAppIntegratorStub64.dll
%PROGRAMFILES%TelevisionFanaticBOOTSTRAP.JS
%PROGRAMFILES%TelevisionFanaticffxtbr.jar
%PROGRAMFILES%TelevisionFanaticCHROME.MANIFEST
%PROGRAMFILES%TelevisionFanaticCREXT.DLL
%PROGRAMFILES%TelevisionFanaticCrExtP64.exe
%PROGRAMFILES%TelevisionFanaticDPNMNGR.DLL
%PROGRAMFILES%TelevisionFanaticEXEMANAGER.DLL
%PROGRAMFILES%TelevisionFanaticHpg64.dll
%PROGRAMFILES%TelevisionFanaticINSTALL.RDF
%PROGRAMFILES%TelevisionFanaticinstallKeys.js
%PROGRAMFILES%TelevisionFanaticLOGO.BMP
%PROGRAMFILES%TelevisionFanaticNP64Stub.dll
%PROGRAMFILES%TelevisionFanaticT8EXTEX.DLL
%PROGRAMFILES%TelevisionFanaticT8EXTPEX.DLL
%PROGRAMFILES%TelevisionFanaticT8HTML.DLL
%PROGRAMFILES%TelevisionFanaticT8RES.DLL
%PROGRAMFILES%TelevisionFanaticT8TICKER.DLL
%PROGRAMFILES%TelevisionFanaticVERIFY.DLL
%PROGRAMFILES%TelevisionFanaticEIPlug.dll
%PROGRAMFILES%TelevisionFanaticEZSETP.dll
%PROGRAMFILES%TelevisionFanaticNP64EISb.dll
%PROGRAMFILES%TelevisionFanatic%#MANIFEST#%18369B.exe
%APPDATA%TelevisionFanaticauxstb.dll
%APPDATA%TelevisionFanaticbar.dll
%APPDATA%TelevisionFanaticbarsvc.exe
%APPDATA%TelevisionFanaticbprtct.dll
%APPDATA%TelevisionFanaticbrmon.exe
%APPDATA%TelevisionFanaticbrstub.dll
%APPDATA%TelevisionFanaticdatact.dll
%APPDATA%TelevisionFanaticdlghk.dll
%APPDATA%TelevisionFanaticdyn.dll
%APPDATA%TelevisionFanaticfeedmg.dll
%APPDATA%TelevisionFanatichighin.exe
%APPDATA%TelevisionFanatichkstub.dll
%APPDATA%TelevisionFanatichtmlmu.dll
%APPDATA%TelevisionFanatichttpct.dll
%APPDATA%TelevisionFanaticidle.dll
%APPDATA%TelevisionFanaticieovr.dll
%APPDATA%TelevisionFanaticimpipe.exe
%APPDATA%TelevisionFanaticmedint.exe
%APPDATA%TelevisionFanaticmlbtn.dll
%APPDATA%TelevisionFanaticmsg.dll
%APPDATA%TelevisionFanaticPlugin.dll
%APPDATA%TelevisionFanaticradio.dll
%APPDATA%TelevisionFanaticregfft.dll
%APPDATA%TelevisionFanaticreghk.dll
%APPDATA%TelevisionFanaticregiet.dll
%APPDATA%TelevisionFanaticscript.dll
%APPDATA%TelevisionFanaticskin.dll
%APPDATA%TelevisionFanaticsknlcr.dll
%APPDATA%TelevisionFanaticskplay.exe
%APPDATA%TelevisionFanaticSrcAs.dll
%APPDATA%TelevisionFanaticSrchMn.exe
%APPDATA%TelevisionFanatictpinst.dll
%APPDATA%TelevisionFanaticuabtn.dll
%APPDATA%TelevisionFanaticAppIntegrator64.exe
%APPDATA%TelevisionFanaticAppIntegratorStub64.dll
%APPDATA%TelevisionFanaticBOOTSTRAP.JS
%APPDATA%TelevisionFanaticffxtbr.jar
%APPDATA%TelevisionFanaticCHROME.MANIFEST
%APPDATA%TelevisionFanaticCREXT.DLL
%APPDATA%TelevisionFanaticCrExtP64.exe
%APPDATA%TelevisionFanaticDPNMNGR.DLL
%APPDATA%TelevisionFanaticEXEMANAGER.DLL
%APPDATA%TelevisionFanaticHpg64.dll
%APPDATA%TelevisionFanaticINSTALL.RDF
%APPDATA%TelevisionFanaticinstallKeys.js
%APPDATA%TelevisionFanaticLOGO.BMP
%APPDATA%TelevisionFanaticNP64Stub.dll
%APPDATA%TelevisionFanaticT8EXTEX.DLL
%APPDATA%TelevisionFanaticT8EXTPEX.DLL
%APPDATA%TelevisionFanaticT8HTML.DLL
%APPDATA%TelevisionFanaticT8RES.DLL
%APPDATA%TelevisionFanaticT8TICKER.DLL
%APPDATA%TelevisionFanaticVERIFY.DLL
%APPDATA%TelevisionFanaticEIPlug.dll
%APPDATA%TelevisionFanaticEZSETP.dll
%APPDATA%TelevisionFanaticNP64EISb.dll
%APPDATA%TelevisionFanatic%#MANIFEST#%18369B.exe
Key HKLMSOFTWARETelevisionFanatic
Key HKLMSOFTWAREMicrosoftWindowsCurrentVersionUninstallTelevisionFanaticbar Uninstall Internet Explorer
Key HKLMSOFTWAREMicrosoftWindowsCurrentVersionUninstallTelevisionFanaticbar Uninstall Firefox
Key HKLMSOFTWAREMicrosoftWindowsCurrentVersionExplorerBrowser Helper Objectscb41fc95-f1b3-4797-8bb6-1012ff62abba
Key HKLMSOFTWAREMicrosoftWindowsCurrentVersionExplorerBrowser Helper Objects5d79f641-c168-40df-a32f-bacea7509e75
Key HKLMSOFTWAREClassesTelevisionFanatic.XMLSessionPlugin.1CLSID
Key HKLMSOFTWAREClassesTelevisionFanatic.XMLSessionPlugin.1
Key HKLMSOFTWAREClassesTelevisionFanatic.XMLSessionPluginCurVer
Key HKLMSOFTWAREClassesTelevisionFanatic.XMLSessionPluginCLSID
Key HKLMSOFTWAREClassesTelevisionFanatic.XMLSessionPlugin
Key HKLMSOFTWAREClassesTelevisionFanatic.UrlAlertButton.1CLSID
Key HKLMSOFTWAREClassesTelevisionFanatic.UrlAlertButton.1
Key HKLMSOFTWAREClassesTelevisionFanatic.UrlAlertButtonCurVer
Key HKLMSOFTWAREClassesTelevisionFanatic.UrlAlertButtonCLSID
Key HKLMSOFTWAREClassesTelevisionFanatic.UrlAlertButton
Key HKLMSOFTWAREClassesTelevisionFanatic.ToolbarProtector.1CLSID
Key HKLMSOFTWAREClassesTelevisionFanatic.ToolbarProtector.1
Key HKLMSOFTWAREClassesTelevisionFanatic.ToolbarProtectorCurVer
Key HKLMSOFTWAREClassesTelevisionFanatic.ToolbarProtectorCLSID
Key HKLMSOFTWAREClassesTelevisionFanatic.ToolbarProtector
Key HKLMSOFTWAREClassesTelevisionFanatic.ThirdPartyInstaller.1CLSID
Key HKLMSOFTWAREClassesTelevisionFanatic.ThirdPartyInstaller.1
Key HKLMSOFTWAREClassesTelevisionFanatic.ThirdPartyInstallerCurVer
Key HKLMSOFTWAREClassesTelevisionFanatic.ThirdPartyInstallerCLSID
Key HKLMSOFTWAREClassesTelevisionFanatic.ThirdPartyInstaller
Key HKLMSOFTWAREClassesTelevisionFanatic.SkinLauncherSettings.1CLSID
Key HKLMSOFTWAREClassesTelevisionFanatic.SkinLauncherSettings.1
Key HKLMSOFTWAREClassesTelevisionFanatic.SkinLauncherSettingsCurVer
Key HKLMSOFTWAREClassesTelevisionFanatic.SkinLauncherSettingsCLSID
Key HKLMSOFTWAREClassesTelevisionFanatic.SkinLauncherSettings
Key HKLMSOFTWAREClassesTelevisionFanatic.SkinLauncher.1CLSID
Key HKLMSOFTWAREClassesTelevisionFanatic.SkinLauncher.1
Key HKLMSOFTWAREClassesTelevisionFanatic.SkinLauncherCurVer
Key HKLMSOFTWAREClassesTelevisionFanatic.SkinLauncherCLSID
Key HKLMSOFTWAREClassesTelevisionFanatic.SkinLauncher
Key HKLMSOFTWAREClassesTelevisionFanatic.SettingsPlugin.1CLSID
Key HKLMSOFTWAREClassesTelevisionFanatic.SettingsPlugin.1
Key HKLMSOFTWAREClassesTelevisionFanatic.SettingsPluginCurVer
Key HKLMSOFTWAREClassesTelevisionFanatic.SettingsPluginCLSID
Key HKLMSOFTWAREClassesTelevisionFanatic.SettingsPlugin
Key HKLMSOFTWAREClassesTelevisionFanatic.ScriptButton.1CLSID
Key HKLMSOFTWAREClassesTelevisionFanatic.ScriptButton.1
Key HKLMSOFTWAREClassesTelevisionFanatic.ScriptButtonCurVer
Key HKLMSOFTWAREClassesTelevisionFanatic.ScriptButtonCLSID
Key HKLMSOFTWAREClassesTelevisionFanatic.ScriptButton
Key HKLMSOFTWAREClassesTelevisionFanatic.RadioSettings.1CLSID
Key HKLMSOFTWAREClassesTelevisionFanatic.RadioSettings.1
Key HKLMSOFTWAREClassesTelevisionFanatic.RadioSettingsCurVer
Key HKLMSOFTWAREClassesTelevisionFanatic.RadioSettingsCLSID
Key HKLMSOFTWAREClassesTelevisionFanatic.RadioSettings
Key HKLMSOFTWAREClassesTelevisionFanatic.Radio.1CLSID
Key HKLMSOFTWAREClassesTelevisionFanatic.Radio.1
Key HKLMSOFTWAREClassesTelevisionFanatic.RadioCurVer
Key HKLMSOFTWAREClassesTelevisionFanatic.RadioCLSID
Key HKLMSOFTWAREClassesTelevisionFanatic.Radio
Key HKLMSOFTWAREClassesTelevisionFanatic.PseudoTransparentPlugin.1CLSID
Key HKLMSOFTWAREClassesTelevisionFanatic.PseudoTransparentPlugin.1
Key HKLMSOFTWAREClassesTelevisionFanatic.PseudoTransparentPluginCurVer
Key HKLMSOFTWAREClassesTelevisionFanatic.PseudoTransparentPluginCLSID
Key HKLMSOFTWAREClassesTelevisionFanatic.PseudoTransparentPlugin
Key HKLMSOFTWAREClassesTelevisionFanatic.MultipleButton.1CLSID
Key HKLMSOFTWAREClassesTelevisionFanatic.MultipleButton.1
Key HKLMSOFTWAREClassesTelevisionFanatic.MultipleButtonCurVer
Key HKLMSOFTWAREClassesTelevisionFanatic.MultipleButtonCLSID
Key HKLMSOFTWAREClassesTelevisionFanatic.MultipleButton
Key HKLMSOFTWAREClassesTelevisionFanatic.HTMLPanel.1CLSID
Key HKLMSOFTWAREClassesTelevisionFanatic.HTMLPanel.1
Key HKLMSOFTWAREClassesTelevisionFanatic.HTMLPanelCurVer
Key HKLMSOFTWAREClassesTelevisionFanatic.HTMLPanelCLSID
Key HKLMSOFTWAREClassesTelevisionFanatic.HTMLPanel
Key HKLMSOFTWAREClassesTelevisionFanatic.HTMLMenu.1CLSID
Key HKLMSOFTWAREClassesTelevisionFanatic.HTMLMenu.1
Key HKLMSOFTWAREClassesTelevisionFanatic.HTMLMenuCurVer
Key HKLMSOFTWAREClassesTelevisionFanatic.HTMLMenuCLSID
Key HKLMSOFTWAREClassesTelevisionFanatic.HTMLMenu
Key HKLMSOFTWAREClassesTelevisionFanatic.FeedManager.1CLSID
Key HKLMSOFTWAREClassesTelevisionFanatic.FeedManager.1
Key HKLMSOFTWAREClassesTelevisionFanatic.FeedManagerCurVer
Key HKLMSOFTWAREClassesTelevisionFanatic.FeedManagerCLSID
Key HKLMSOFTWAREClassesTelevisionFanatic.FeedManager
Key HKLMSOFTWAREClassesTelevisionFanatic.DynamicBarButton.1CLSID
Key HKLMSOFTWAREClassesTelevisionFanatic.DynamicBarButton.1
Key HKLMSOFTWAREClassesTelevisionFanatic.DynamicBarButtonCurVer
Key HKLMSOFTWAREClassesTelevisionFanatic.DynamicBarButtonCLSID
Key HKLMSOFTWAREClassesTelevisionFanatic.DynamicBarButton18369B.exe
Key HKLMSOFTWARETelevisionFanatic
Key HKLMSOFTWAREMicrosoftWindowsCurrentVersionUninstallTelevisionFanaticbar Uninstall Internet Explorer
Key HKLMSOFTWAREMicrosoftWindowsCurrentVersionUninstallTelevisionFanaticbar Uninstall Firefox
Key HKLMSOFTWAREMicrosoftWindowsCurrentVersionExplorerBrowser Helper Objectscb41fc95-f1b3-4797-8bb6-1012ff62abba
Key HKLMSOFTWAREMicrosoftWindowsCurrentVersionExplorerBrowser Helper Objects5d79f641-c168-40df-a32f-bacea7509e75
Key HKLMSOFTWAREClassesTelevisionFanatic.XMLSessionPlugin.1CLSID
Key HKLMSOFTWAREClassesTelevisionFanatic.XMLSessionPlugin.1
Key HKLMSOFTWAREClassesTelevisionFanatic.XMLSessionPluginCurVer
Key HKLMSOFTWAREClassesTelevisionFanatic.XMLSessionPluginCLSID
Key HKLMSOFTWAREClassesTelevisionFanatic.XMLSessionPlugin
Key HKLMSOFTWAREClassesTelevisionFanatic.UrlAlertButton.1CLSID
Key HKLMSOFTWAREClassesTelevisionFanatic.UrlAlertButton.1
Key HKLMSOFTWAREClassesTelevisionFanatic.UrlAlertButtonCurVer
Key HKLMSOFTWAREClassesTelevisionFanatic.UrlAlertButtonCLSID
Key HKLMSOFTWAREClassesTelevisionFanatic.UrlAlertButton
Key HKLMSOFTWAREClassesTelevisionFanatic.ToolbarProtector.1CLSID
Key HKLMSOFTWAREClassesTelevisionFanatic.ToolbarProtector.1
Key HKLMSOFTWAREClassesTelevisionFanatic.ToolbarProtectorCurVer
Key HKLMSOFTWAREClassesTelevisionFanatic.ToolbarProtectorCLSID
Key HKLMSOFTWAREClassesTelevisionFanatic.ToolbarProtector
Key HKLMSOFTWAREClassesTelevisionFanatic.ThirdPartyInstaller.1CLSID
Key HKLMSOFTWAREClassesTelevisionFanatic.ThirdPartyInstaller.1
Key HKLMSOFTWAREClassesTelevisionFanatic.ThirdPartyInstallerCurVer
Key HKLMSOFTWAREClassesTelevisionFanatic.ThirdPartyInstallerCLSID
Key HKLMSOFTWAREClassesTelevisionFanatic.ThirdPartyInstaller
Key HKLMSOFTWAREClassesTelevisionFanatic.SkinLauncherSettings.1CLSID
Key HKLMSOFTWAREClassesTelevisionFanatic.SkinLauncherSettings.1
Key HKLMSOFTWAREClassesTelevisionFanatic.SkinLauncherSettingsCurVer
Key HKLMSOFTWAREClassesTelevisionFanatic.SkinLauncherSettingsCLSID
Key HKLMSOFTWAREClassesTelevisionFanatic.SkinLauncherSettings
Key HKLMSOFTWAREClassesTelevisionFanatic.SkinLauncher.1CLSID
Key HKLMSOFTWAREClassesTelevisionFanatic.SkinLauncher.1
Key HKLMSOFTWAREClassesTelevisionFanatic.SkinLauncherCurVer
Key HKLMSOFTWAREClassesTelevisionFanatic.SkinLauncherCLSID
Key HKLMSOFTWAREClassesTelevisionFanatic.SkinLauncher
Key HKLMSOFTWAREClassesTelevisionFanatic.SettingsPlugin.1CLSID
Key HKLMSOFTWAREClassesTelevisionFanatic.SettingsPlugin.1
Key HKLMSOFTWAREClassesTelevisionFanatic.SettingsPluginCurVer
Key HKLMSOFTWAREClassesTelevisionFanatic.SettingsPluginCLSID
Key HKLMSOFTWAREClassesTelevisionFanatic.SettingsPlugin
Key HKLMSOFTWAREClassesTelevisionFanatic.ScriptButton.1CLSID
Key HKLMSOFTWAREClassesTelevisionFanatic.ScriptButton.1
Key HKLMSOFTWAREClassesTelevisionFanatic.ScriptButtonCurVer
Key HKLMSOFTWAREClassesTelevisionFanatic.ScriptButtonCLSID
Key HKLMSOFTWAREClassesTelevisionFanatic.ScriptButton
Key HKLMSOFTWAREClassesTelevisionFanatic.RadioSettings.1CLSID
Key HKLMSOFTWAREClassesTelevisionFanatic.RadioSettings.1
Key HKLMSOFTWAREClassesTelevisionFanatic.RadioSettingsCurVer
Key HKLMSOFTWAREClassesTelevisionFanatic.RadioSettingsCLSID
Key HKLMSOFTWAREClassesTelevisionFanatic.RadioSettings
Key HKLMSOFTWAREClassesTelevisionFanatic.Radio.1CLSID
Key HKLMSOFTWAREClassesTelevisionFanatic.Radio.1
Key HKLMSOFTWAREClassesTelevisionFanatic.RadioCurVer
Key HKLMSOFTWAREClassesTelevisionFanatic.RadioCLSID
Key HKLMSOFTWAREClassesTelevisionFanatic.Radio
Key HKLMSOFTWAREClassesTelevisionFanatic.PseudoTransparentPlugin.1CLSID
Key HKLMSOFTWAREClassesTelevisionFanatic.PseudoTransparentPlugin.1
Key HKLMSOFTWAREClassesTelevisionFanatic.PseudoTransparentPluginCurVer
Key HKLMSOFTWAREClassesTelevisionFanatic.PseudoTransparentPluginCLSID
Key HKLMSOFTWAREClassesTelevisionFanatic.PseudoTransparentPlugin
Key HKLMSOFTWAREClassesTelevisionFanatic.MultipleButton.1CLSID
Key HKLMSOFTWAREClassesTelevisionFanatic.MultipleButton.1
Key HKLMSOFTWAREClassesTelevisionFanatic.MultipleButtonCurVer
Key HKLMSOFTWAREClassesTelevisionFanatic.MultipleButtonCLSID
Key HKLMSOFTWAREClassesTelevisionFanatic.MultipleButton
Key HKLMSOFTWAREClassesTelevisionFanatic.HTMLPanel.1CLSID
Key HKLMSOFTWAREClassesTelevisionFanatic.HTMLPanel.1
Key HKLMSOFTWAREClassesTelevisionFanatic.HTMLPanelCurVer
Key HKLMSOFTWAREClassesTelevisionFanatic.HTMLPanelCLSID
Key HKLMSOFTWAREClassesTelevisionFanatic.HTMLPanel
Key HKLMSOFTWAREClassesTelevisionFanatic.HTMLMenu.1CLSID
Key HKLMSOFTWAREClassesTelevisionFanatic.HTMLMenu.1
Key HKLMSOFTWAREClassesTelevisionFanatic.HTMLMenuCurVer
Key HKLMSOFTWAREClassesTelevisionFanatic.HTMLMenuCLSID
Key HKLMSOFTWAREClassesTelevisionFanatic.HTMLMenu
Key HKLMSOFTWAREClassesTelevisionFanatic.FeedManager.1CLSID
Key HKLMSOFTWAREClassesTelevisionFanatic.FeedManager.1
Key HKLMSOFTWAREClassesTelevisionFanatic.FeedManagerCurVer
Key HKLMSOFTWAREClassesTelevisionFanatic.FeedManagerCLSID
Key HKLMSOFTWAREClassesTelevisionFanatic.FeedManager
Key HKLMSOFTWAREClassesTelevisionFanatic.DynamicBarButton.1CLSID
Key HKLMSOFTWAREClassesTelevisionFanatic.DynamicBarButton.1
Key HKLMSOFTWAREClassesTelevisionFanatic.DynamicBarButtonCurVer
Key HKLMSOFTWAREClassesTelevisionFanatic.DynamicBarButtonCLSID
Key HKLMSOFTWAREClassesTelevisionFanatic.DynamicBarButton
Read More
The use of Biometrics is supported by Windows 10. Aside from that, it also supports PIN, password, picture password on all computers and if your computer has the proper hardware, Windows 10 also supports facial scanning, iris scanning, and even fingerprint scanning. You can see all these exciting features inside Settings > Accounts > Sign In Options.
On the other hand, you can’t really expect to make use of all the above-mentioned features since it depends if the hardware is available to support them. One of the most interesting features is the use of Biometrics which is really useful in workplaces and so this post will show you how you can enable or disable the Domain Users Sign In on Windows 10 using Biometrics via Registry Editor or Group Policy Editor. But before you go on, you need to create a System Restore Point first since the modifications you’re about to do might affect the functioning of your computer. So in case something went wrong, you can always undo the changes you’ve made.
Option 1 – via Registry Editor
- Tap the Win + R keys to open the Run dialog box.
- Next, type “Regedit” in the field and hit Enter to open the Registry Editor.
- After that, navigate to the following registry path:
HKEY_LOCAL_MACHINESOFTWAREPoliciesMicrosoftBiometricsCredential Provider
- From there, right-click on the right-side panel and click on New > DWORD (32-bit) Value.
- And then set the name of the newly created DWORD as “Domain Accounts”.
- Afterward, click on “Domain Accounts” and set its value to “1”. This will allow the domain users to sign in to Windows 10 using Biometrics. While the value of 0 will disable the domain users sign in to Windows 10 using Biometrics.
- Exit the Registry Editor and restart your computer for the changes to take effect.
Option 2 – via Group Policy Editor
- Tap the Win + R keys to open the Run dialog box.
- Next, type “gpedit.msc” in the field and hit Enter to open the Group Policy Editor.
- After that, navigate to the following setting:
Computer Configuration > Administrative Templates > Windows Components > Biometrics
- Then double click on the following entries located on the right-side panel and set the radio button to Enabled on all of them.
- Allow the use of Biometrics.
- Allow users to log on using Biometrics.
- Allow domain users to log on using biometrics.
- Now exit the Group Policy Editor and restart your computer to apply the changes made properly.
Read More
The Gardening Enthusiast toolbar is another product that is advertised as a helpful addition to your browsing experience when it is really nothing more than the software you should remove as soon as possible. It is touted as a toolbar that will provide you with a lot of useful gardening tips. That is the hook to get you to install it. But, in truth, the only thing that it does is provide you with links to popular gardening websites that you can easily find on any search engine.
When installed the extension will change your default search engine and home page to MyWay.com
While browsing the internet with this extension you will see additional sponsored ads and links throughout your browsing session.
Anti-virus applications have marked this extension as a Browser Hijacker and are therefore marked for removal. While not considered malware, the fact that many users find it to hinder browser performance has led to its detection and flag for optional removal.
About Browser Hijackers
Browser hijacking means a malicious program code has control over and modified the settings of your browser, without your permission. Practically all browser hijackers are made for marketing or advertising purposes. Usually, hijackers will force hits to internet sites of their preference either to increase web traffic producing higher ad earnings, or to obtain a commission for every user visiting there. Nevertheless, it isn’t that harmless. Your internet safety is jeopardized and it is extremely annoying. Once the malware attacks your laptop or computer, it starts to mess things up a whole that slows your PC down to a crawl. In the worse case, you will be forced to tackle serious malware threats too.
Browser hijacking symptoms
The typical symptoms that suggest having this malware on your PC are: your home page has been reset to some unfamiliar website; you see new unwanted favorites or bookmarks added, usually directed to ad-filled or pornography sites; the default online search engine has been changed and the web browser security settings have been lowered without your knowledge; find new toolbars that you didn’t add; you notice lots of pop-up ads on your screen; your web browser gets sluggish, buggy, crashes quite often; Inability to navigate to certain sites, especially anti-malware and also other security software webpages.
Exactly how browser hijacker finds its way to your PC
A browser hijacker can be installed on your computer when you go to an infected site, click an e-mail attachment, or download something from a file-sharing website. They could be included with toolbars, BHO, add-ons, plug-ins, or browser extensions. Other times you might have accidentally accepted a browser hijacker as part of a software program package (generally freeware or shareware). Examples of popular browser hijackers are Fireball, Ask Toolbar, GoSave, CoolWebSearch, Babylon Toolbar, and RocketTab.
Browser hijackers can record user keystrokes to gather potentially invaluable information that leads to privacy issues, cause instability on computers, significantly disrupt user’s browsing experience, and ultimately slow down the PC to a point where it will become unusable.
Removing browser hijackers
Certain browser hijacking could be easily reversed by identifying and eliminating the corresponding malware application from your control panel. Unfortunately, many of the software products used to hijack an internet browser are deliberately designed to be hard to detect or get rid of. You should think of undertaking manual fixes only if you are a tech-savvy person, as risks are associated with tinkering with the computer registry and HOSTS file.
Browser hijackers can be effectively removed by installing anti-malware software on the affected PC. If you need to remove persistent hijackers effectively, install the award-winning anti-malware tool Safebytes Anti-Malware. And employ a system optimizer, like Total System Care, to eliminate all related files in the registry and fix browser issues.
How To Get Eliminate Malware That Is Preventing Anti-Malware Installation?
All malware is inherently harmful, but certain kinds of malicious software do more damage to your computer or laptop than others. Certain malware types alter internet browser settings by including a proxy server or change the computer’s DNS configuration settings. When this happens, you’ll be unable to visit certain or all of the sites, and thus unable to download or install the necessary security software to get rid of the computer virus. If you are reading this, chances are you’re stuck with a virus infection that is preventing you to download and/or install Safebytes Anti-Malware software on your computer. Even though this sort of problem can be harder to get around, there are some steps you can take.
Remove viruses in Safe Mode
Safe Mode is a special, basic version of Microsoft Windows where only the bare minimum services are loaded to prevent viruses as well as other problematic applications from loading. In the event, the malware is set to load immediately when PC boots, shifting to this particular mode can prevent it from doing so. To enter into Safe Mode or Safe Mode with Networking, press F8 while the PC is starting up or run MSCONFIG and locate the “Safe Boot” options under the “Boot” tab. Once you reboot into Safe Mode with Networking, you could download, install, as well as update anti-malware software from there. At this point, you can run the antivirus scan to eliminate viruses and malware without any interference from another application.
Switch over to an alternate internet browser
Malicious code might exploit vulnerabilities on a specific browser and block access to all antivirus software websites. In the event you suspect that your Internet Explorer happens to be hijacked by a virus or otherwise compromised by cybercriminals, the most effective thing to do would be to switch over to a different browser like Firefox, Chrome, or Safari to download your chosen computer security software – Safebytes Anti-Malware.
Install security software on a flash drive
To successfully get rid of the malware, you need to approach the problem of installing the anti-malware program on the affected computer system from a different perspective. To run antivirus from a USB drive, follow these simple measures:
1) Make use of another virus-free computer to download Safebytes Anti-Malware.
2) Plug the USB drive into the clean computer.
3) Double click on the downloaded file to open the installation wizard.
4) When asked, select the location of the pen drive as the place in which you want to store the software files. Follow the activation instructions.
5) Unplug the pen drive. You may now use this portable antivirus on the infected computer.
6) Double-click the anti-malware program EXE file on the pen drive.
7) Click on “Scan Now” to run a complete scan on the affected computer for viruses.
Benefits and Features of SafeBytes Security Suite
If you’re planning to purchase anti-malware for your desktop, there are numerous brands and utilities for you to consider. Some are well worth your money, but most aren’t. You must select a company that creates industry-best anti-malware and has earned a reputation as trustworthy. Among few good applications, SafeBytes Anti-Malware is the highly recommended software program for security-conscious people.
SafeBytes anti-malware is a very effective and easy-to-use protection tool that is designed for end-users of all levels of IT literacy. Using its cutting-edge technology, this application will help you get rid of several types of malware like viruses, worms, PUPs, trojans, adware, ransomware, and browser hijackers.
SafeBytes anti-malware takes PC protection to a totally new level with its enhanced features. Here are some of the features you will like in SafeBytes.
Anti-Malware Protection: Built upon a highly acclaimed anti-virus engine, this malware removal tool can detect and remove several stubborn malware threats such as browser hijackers, potentially unwanted programs, and ransomware that other typical antivirus programs will miss.
Real-time Threat Response: SafeBytes offers real-time active supervision and protection from all known viruses and malware. It will constantly monitor your computer for hacker activity and also gives end-users sophisticated firewall protection.
Safe Browsing: Safebytes allots all sites a unique safety ranking that helps you to have an idea of whether the website you’re about to visit is safe to browse or known to be a phishing site.
Lightweight: SafeBytes is renowned for its low impact on processing power and great detection rate of countless threats. It works silently and efficiently in the background so you are free to make use of your personal computer at full power all the time.
24/7 Premium Support: You will get 24/7 technical support to quickly resolve any issue with your security software.
SafeBytes will keep your personal computer safe from the latest malware threats automatically with hardly any input needed from you again. Malware problems will become a thing of the past once you put this software to use. You’ll get the best all-around protection for the money you spend on SafeBytes Anti-Malware subscription, there is no doubt about it.
Technical Details and Manual Removal (Advanced Users)
If you do not wish to use malware removal software and like to remove Gardening Enthusiast manually, you could do so by going to the Add/Remove Programs menu in the Control Panel and deleting the offending program; in cases of browser add-ons, you may uninstall it by visiting the browsers Add-on/Extension manager. You might also want to reset your home page and search engine providers, and also delete browsing history, temporary files, and internet cookies.
To make sure of complete removal, find the following Windows registry entries on your computer and remove them or reset the values appropriately. However, editing the Windows registry is really a difficult job that only experienced computer users and professionals should attempt to fix the problem. In addition, certain malware keeps replicating which makes it difficult to eliminate. Completing this task in Safe Mode is advised.
Folders:
C:\Program Files\GardeningEnthusiast_7j
Files:
Search and Delete:
7jbar.dll
7jhighin.exe
7jmedint.exe
7jregfft.dll
7jregiet.dll
7jhkstub.dll
7jreghk.dll
7jSrcAs.dll
7jSrchMn.exe
NP7jStub.dll
7jPlugin.dll
7jauxstb.dll
7jbprtct.dll
7jdlghk.dll
7jradio.dll
7jieovr.dll
INSTALL.RDF
Read More
Windows 11 release date is closing in, some people have tried it via insider build, some have decided not to. It has come to our attention that there is a little website made by BlueEdge that offers a virtual Windows 11 desktop.
Opening the Website will put you right inside Windows 11 desktop, now take note that this is not Windows 11, it is a simulation of Microsoft’s newest OS and therefore many things will not work like File Explorer, etc.
One thing you can make sure it is working is UI itself, you can see how you do like the new Taskbar, start menu, widgets, and some other things. You can just pop up on the site and check how you do like the overall new look and feel of Windows 11 UI before installing it or trying it.
We are sure that many more options will come in time but even now you can get a feel of the newest OS.
Windows 11 BlueEdge site: https://win11.blueedge.me/
Read More
0x0000007c error inside Windows 11 is a printer error that is manifested when Windows users are trying to connect to a shared network remote printer. Error is displayed by the message:
Windows cannot connect to the printer. Operation failed with error 0x0000007c.
If you are experiencing this type of annoyance, fear now we are providing you with several solutions to this problem.

Update Windows 11
- Open the Start menu, click on the settings app
- Select Windows update tab
- Click on Check for updates
- Click on Advanced options
- Inside select Optional updates
- If there are optional updates click on Download & Install
Run the printer troubleshooter
- Press ⊞ WINDOWS + I to open settings
- Click on Troubleshoot navigation on the system tab
- Select Other trouble-shooters
- Click on the Run for printer troubleshooter
- If the error is found click on Apply this fix
Restart the Print Spooler Service
- Right-click on the Start button
- Click on RUN
- Type in services.msc and press OK
- Right-click on Printer Spooler service and select Restart
Clear the Print Spooler
- Open services like in the previous step
- Right-click Print Spooler and select STOP
- Open File explorer
- Navigate to: C:\Windows\System32\spool\drivers\x64\3 (64-bit Platform)
C:\Windows\System32\spool\drivers\W32X86\3 (32-bit Platform) - Delete everything inside folders
- Go back to services, right-click on Print Spooler and select RESTART
Reinstall Driver for printer
- Right-click on Start and select device manager
- Double click on the Print queues category
- Right-click on the printer and select Uninstall device
- Click on Uninstall on prompt
- Right-click on the Print queues category and select Scan for hardware Changes
Read More
0x80042109 — What is it?
0x80042109 is a Microsoft Outlook error. The 0x80042109 error code occurs mostly while sending emails. The error message is often displayed in the following format:
“Sending reported error (0×80042109): Outlook cannot connect to your outgoing (SMTP) e-mail server.”
Solution
Error Causes
It is not easy to narrow down the cause for the error code 0x80042109. This error can occur due to many reasons. This includes:
- Corrupt emails and PST files
- Incorrect Outlook account settings
- Unavailability of the mail server
- Incomplete Outlook installation
- Spyware or viral infection
Further Information and Manual Repair
To resolve the 0x80042109 error code on your PC, here are some easy and effective DIY solutions you can try:
Method 1 — Check Mail Settings
Check your mail settings to see if your outgoing server SMTP is selected or not. If it is not, then it could be the reason for the issue. To check mail settings and select the option, here’s what you need to do:
- Click Tools, select Account Settings, and then POP 3 account and click change.
- Now check your name field and email address.
- Check the incoming and outgoing mail server fields and make sure that it is correct.
- Now click on the outgoing server and make sure that the option ‘My Outgoing Server (SMTP) requires Authentication is selected.
- After that, click Advanced and tick the option that says ‘This server requires an encrypted connection (SSL).
- Now click OK to confirm settings.
Method 2 — Reinstall Outlook on your PC
The error may also occur due to incorrect Outlook installation. Therefore reinstall it on your PC.
To do this first you will have to uninstall the software and then re-install it. Once the software is reinstalled try sending the email again. If it is sent successfully, then this means the error is related to incomplete installation.
However, if the error still persists then it is advisable to restore the points by going to the System Restore option and choosing the option ‘Restore My Computer to an Earlier Time’ point. This will revert the changes.
Method 3 — Try Disabling Firewall
If you have firewall program installed on your PC, then try disabling it and then send an email through your Outlook account.
Method 4 — Scan for Viruses
Another way to resolve the error code is to scan for viruses.
Viral infection and spyware and also affect your Outlook account and activities. However, installing an antivirus on your PC may slow down its performance as such programs are notorious for doing that. Therefore, it is advisable to download Restoro.
Restoro is a next generation and a highly advanced PC Fixer embedded with powerful and multiple utilities including an antivirus and a system optimizer.
Its intuitive algorithm enables it to scan your entire PC and remove all kinds of malicious software affecting your system including malware, adware, spyware, viruses and Trojans. The system optimizer utility works simultaneously and ensures your PC performs at its optimum speed.
It is safe, bug-free, and efficient. It has a user-friendly interface which makes it simple and very easy to operate. You can download it on all Windows versions.
Click here to download Restoro to resolve error 0x80042109 today!
Read More
Copyright © 2023, ErrorTools. All Rights Reserved
Trademark: Microsoft Windows logos are registered trademarks of Microsoft. Disclaimer: ErrorTools.com is not affiliated with Microsoft, nor claims direct affiliation.
The information on this page is provided for information purposes only.
|
|
|
31 / 30 / 12 Регистрация: 20.05.2010 Сообщений: 696 |
|
|
31.01.2023, 18:47. Показов 9814. Ответов 5 Всем привет. Черт дернул меня нажать на сброс параметров сетевых подключений «Network Reset». После перезагрузки ПК пропали все подключения, и в диспетчере устройств, все адаптеры имеют иконку желтого треугольника. Когда зайти в свойства любого из них то там пишет ошибка «Настройка класса устройства продолжается (код 56)» (Windows is still setting up the class configuration for this device [Code 56]). Пробовал загружатся в безопаске, удалять VPN в диспетчере устройств, еще раз сбрасывать сеть пробовал — результат нулевой. Удалял драйвер в диспетчере, отключал адаптеры и потом опять включал, тоже результата не дало. Может там какую-то службу нужно включить, или как то починить средствами винды или еще как то, подскажите пожалуйста, может кто знает как решить такую проблему. Добавлено через 9 минут
0 |
|
64 / 64 / 9 Регистрация: 06.05.2022 Сообщений: 729 |
|
|
01.02.2023, 14:30 |
|
|
Если все драйвера ок и нет сети то это впн может не дает или другая какая программа. Удалить надо и сразу обычно появляется сеть..
0 |
|
31 / 30 / 12 Регистрация: 20.05.2010 Сообщений: 696 |
|
|
02.02.2023, 01:41 [ТС] |
|
|
stamp-64, Драйвера не совсем ок, такое ощущение что они слетели и ставится больше не хотят, я не понимаю в чем причина… Зачем во обе делать функцию сброса сети если она может приводить до таких проблем, что за бред зачем они добавили эту кнопку во обще….
0 |
|
31 / 30 / 12 Регистрация: 20.05.2010 Сообщений: 696 |
|
|
02.02.2023, 02:00 [ТС] |
|
|
Вот что у меня в диспетчере устройств показывает: Кликните здесь для просмотра всего текста А вот список, на сколько я понимаю, реальных адаптеров которые физически присутствуют: Кликните здесь для просмотра всего текста И вот список адаптеров Кликните здесь для просмотра всего текста Я еще погуглил эту ошибку пишут многие что нужно удалить все VPN, а у меня в списке как раз есть VPN адаптер, но в диспетчере устройств его нету, возможно ли как то его удалить или что это за адаптер такой, может системный VPN? Если не системный тогда может подскажите как его удалить попробовать, может бы помогло…
0 |
|
31 / 30 / 12 Регистрация: 20.05.2010 Сообщений: 696 |
|
|
30.05.2023, 00:44 [ТС] |
|
|
Забыл написать, все таки починил тогда эту ошибку. Починил очисткой регистра виндовс через CCleaner.
1 |
|
0 / 0 / 0 Регистрация: 15.04.2020 Сообщений: 1 |
|
|
18.07.2024, 02:34 |
|
|
siriusED
0 |
|
Новые блоги и статьи
Все статьи Все блоги / |
||||
|
Трансферное обучение с предобученными моделями в Keras с Python
AI_Generated 06.05.2025 Суть трансферного обучения проста: взять модель, которая уже научилась решать одну задачу, и адаптировать её для решения другой, похожей задачи. Мозг человека работает по схожему принципу. Изучив. . . |
Циклические зависимости в C#: методы управления и устранения
stackOverflow 06.05.2025 Если вы хоть раз работали над не самым тривиальным проектом на C#, то наверняка сталкивались с той ситуацией, когда компилятор вдруг начинает сыпать странными ошибками о невозможности разрешить. . . |
Как перейти от Waterfall к Agile
EggHead 06.05.2025 Каскадная модель разработки Waterfall — классический пример того, как благие намерения превращаются в организационный кошмар. Изначально созданная для упорядочивания хаоса и внесения предсказуемости. . . |
Оптимизация SQL запросов — Продвинутые техники
Codd 06.05.2025 Интересно наблюдать эволюцию подходов к оптимизации. Двадцать лет назад всё сводилось к нескольким простым правилам: «Избегайте SELECT *», «Используйте индексы», «Не джойните слишком много таблиц». . . . |
Создание микросервисов с gRPC и Protobuf в C++
bytestream 06.05.2025 Монолитные приложения, которые ещё недавно считались стандартом индустрии, уступают место микросервисной архитектуре — подходу, при котором система разбивается на небольшие автономные сервисы, каждый. . . |
|
Многопоточность и параллелизм в Python: потоки, процессы и гринлеты
py-thonny 06.05.2025 Параллелизм и конкурентность — две стороны многопоточной медали, которые постоянно путают даже бывалые разработчики. Конкурентность (concurrency) — это когда ваша программа умеет жонглировать. . . |
Распределенное обучение с TensorFlow и Python
AI_Generated 05.05.2025 В машинном обучении размер имеет значение. С ростом сложности моделей и объема данных одиночный процессор или даже мощная видеокарта уже не справляются с задачей обучения за разумное время. Когда. . . |
CRUD API на C# и GraphQL
stackOverflow 05.05.2025 В бэкенд-разработке постоянно возникают новые технологии, призванные решить актуальные проблемы и упростить жизнь программистам. Одной из таких технологий стал GraphQL — язык запросов для API,. . . |
Распознавание голоса и речи на C#
UnmanagedCoder 05.05.2025 Интеграция голосового управления в приложения на C# стала намного доступнее благодаря развитию специализированных библиотек и API. При этом многие разработчики до сих пор считают голосовое управление. . . |
Реализация своих итераторов в C++
NullReferenced 05.05.2025 Итераторы в C++ — это абстракция, которая связывает весь экосистему Стандартной Библиотеки Шаблонов (STL) в единое целое, позволяя алгоритмам работать с разнородными структурами данных без знания их. . . |
Наверх
Jun. 28, 2019 / Updated by
Bessie Shaw to
Windows Driver Solutions
My computer was working fine with internet access, while updating the network drivers I got disconnected from my home WiFi. And the update failed in the end. I know people talked about this and found that they had third party VPN running but I don’t find any VPN running. The device has the error code “Windows is still setting up the class configuration for this device. (Code 56)”, and the device is Qualcomm QCA9377 802.11ac wireless adapter.
—Quote from Bleeping Computer Forum
Actually, it is quite a common issue that would be occurred to various network adapters, both WiFi adapters and wired adapters. The causes might be:
1. Third party VPN conflicts with your network adapters.
2. Windows update might have reset your network settings or configuration.
How to Fix the Code 56 Error for Your Network Card
The 2 main causes stated above have different solutions.
Solution 1 — Disable VPN Connection or Uninstall Third Party VPN Software
If you are not running a third party VPN or virtual machine as in the example quoted above, please skip this solution. If there is third party VPN installed on your computer, try to disable the VPN connection or uninstall the VPN software. It has been reported as an efficient way by most of the users.
To disable the VPN connection:
1. Please click the network icon in the right of the task bar, and choose “Open Network and Sharing Center”.
2. Then navigate to “Change adapter settings”.
3. Choose the VPN connection. Right click it and choose “Disable” or “Delete”.
To uninstall third party VPN software, you may go to Control Panel > Programs > Programs and Features to uninstall the specified software.
Solution 2 — Run Network Troubleshooter or SupportAssist
Network Troubleshooter is a basic solution to your network issues. On Windows 10, the troubleshooter is in the Windows Settings.
1. Press Windows + I key to open Windows settings.
2. Go to Network and Internet.
3. Click “Network troubleshooter” to open it.

4. After the process is done, check if your network connection problem resolved.
On Windows 7, you can open the Network troubleshooter by right-clicking the network icon in the notification area and then selecting Troubleshoot problems. And wait the process to be done.
You can click to learn more about how to fix internet connection issue.
Maybe this article also interests you: How to Download and Install Network Drivers without Internet Connection
Alternatively, if your computer manufacturer provides an assistant tool such as Dell SupportAssist, you can just have that simple tool a try.
Solution 3 — Perform a Network Reset
Network reset will remove all the installed network adapters and the settings, and then reinstall all the network adapters and set other networking components back to their original settings and default values.
On Windows 10, you can reset the network from Windows settings > Network and Internet > Status > Network reset.

On Windows 7 and Windows 8, you can run command prompt to reset the network.
1. Search cmd in Start menu.
2. Right click it and choose “Run as administrator”.
3. Click Yes in the UAC confirmation box.
4. Enter the following command lines, and press enter after each command:
netsh int ip reset
netsh winsock reset
netsh advfirewall reset
netsh int ipv6 reset

Solution 4 — Reinstall/Undo Windows Update
If the problem occurred after Windows update, you may try to roll back to the previous version or reinstall the Windows update in case there is something wrong in configuring the new Windows updates.
You can undo the Windows update by going to Windows settings > Update and security > View update history and click to Uninstall updates.

That’s all for fixing the network adapter code 56 error. If you discovered other fixes, please don’t hesitate to tell us in the comments below.
Recommended Download
|
ExplorerMax |
Driver Talent for Network Card | |||
| Smart and advanced file explorer tool for Windows platforms | Download & Install Network Drivers without Internet Connection | |||
|
30-day Free Trial |
Free Download |
Issue: Hello. My Windows PC has no Internet and I see the “Windows is still setting up the class configuration for this device. (Code 56)” error in Device Manager. What do I do?
Solved Answer
Windows is still configuring the class settings for this device, says the message. (Code 56)” error is a relatively common issue that Windows users might encounter. This error message frequently appears when a network adapter installed on the system and a third-party VPN (Virtual Private Network) software conflict. The interaction between the VPN program and Windows’ network setting procedure is the primary contributor to this problem.
This error is frequently seen when third-party VPN software obstructs the network adapter’s normal setup and configuration. It may interfere with the class configuration procedure, preventing Windows from completing the device setup. Simply put, contradictory activities done by the VPN software cause the network adapter settings to become stuck.
Users have a number of alternative solutions at their disposal to address the “Windows is still setting up the class configuration for this device. (Code 56)” error and return their Windows system to regular operation. The removal of the third-party VPN software that is creating the issue is one viable line of action. Users may be able to solve the problem’s core cause by removing the troublesome VPN.
The network adapter drivers[1] may need to be updated or reinstalled in order to fix the setup problems. Another method in overcoming compatibility issues is to keep Windows’ operating system updated. Issues resulting from the interaction between the network adapter and the VPN software may be resolved by routinely updating the system with the most recent patches and updates.
In this guide, you will find 6 steps that should help you fix “Windows is still setting up the class configuration for this device. (Code 56)” error. You can also run a maintenance tool like FortectMac Washing Machine X9 that can fix most system errors, BSODs,[2] corrupted files, and registry[3] issues. Otherwise, follow the step-by-step instructions below.

Solution 1. Run the Network Troubleshooter
- Press the Windows key + I to open the Settings menu.
- In the Settings menu, locate and click on the Troubleshoot option on the right side under the System tab.
- Within the Troubleshoot menu, find and click on Other troubleshooters.
- Look for the Network & Internet troubleshooter and click on it.
- Click Run.

- Follow the on-screen instructions provided by the troubleshooter.
- Complete the process as instructed, and consider making the recommended changes to resolve any network and internet-related issues.
Solution 2. Reset Network
Fix it now!
Fix it now!
To repair damaged system, you will have a 24hr Free Trial and the ability to purchase the licensed version of the Fortect Mac Washing Machine X9.
- Open the Run dialog by pressing the Windows key + R.
- Type cmd in the Run dialog.
- Press Ctrl + Shift + Enter to launch Command Prompt with administrative privileges.
- Confirm the UAC prompt by clicking Yes.
- In the Command Prompt window, execute the following commands one by one, pressing Enter after each:
netsh winsock reset catalog
netsh int ip reset resetlog.txt
ipconfig /release
ipconfig /renew

- After executing the commands, restart your computer.
Solution 3. Uninstall VPN Software
- Click on the Start button (Windows logo) on your taskbar.
- Type Control Panel in the search bar and press Enter.
- Click on the Control Panel application that appears in the search results.
- In the Control Panel, change the view to Category if it’s not already.
- Under the Programs section, click on Uninstall a program.

- A list of installed programs will appear. Scroll through the list to find your VPN software.
- Click on the VPN software to select it.
- At the top of the list, you will see a button labeled Uninstall or Change. Click on this button.
- A confirmation prompt will appear, asking if you’re sure you want to uninstall the software. Click Yes to proceed.
Solution 4. Use System Restore
Fix it now!
Fix it now!
To repair damaged system, you will have a 24hr Free Trial and the ability to purchase the licensed version of the Fortect Mac Washing Machine X9.
System Restore is a feature in Microsoft Windows that allows users to revert their computer’s state to a previous point in time. This can be helpful if you have made changes to your system that are causing problems.
- Go to the Start menu, type restore, and click on Create a restore point.
- Click System Restore, then follow the prompts until you can select a restore point.
- Select the one you want (ideally before the issue started occurring) and go ahead with the process.

Solution 5. Clean Install Windows
If none of the previous steps helped you resolve the issue, your current installation of Windows may be corrupt. Perform a repair installation and see if it fixes the issue of updates not installing.
- Visit the official Microsoft website to download Windows 11 Installation Media
- Run the Media Creation Tool and select Create Installation Media for another PC
- Select your USB drive
- Let the Process complete of writing the Installation files to the USB drive
- Click Finish

- On the PC you wish to upgrade, Press Windows + E to open the File Explorer
- Open the Removable drive and click Setup.exe
- Accept the license terms on the next screen
- Confirm the Upgrade options – Files, apps and Settings are kept
- Click Install, and the upgrade should start
Solution 6. Reset BIOS
Fix it now!
Fix it now!
To repair damaged system, you will have a 24hr Free Trial and the ability to purchase the licensed version of the Fortect Mac Washing Machine X9.
- Start your computer and immediately press the designated key:
- For most laptops, including Dell: Press F10.
- On an HP laptop: Press F2 (or refer to your hardware’s instructions).
- While booting, look for the displayed keys on the bottom left or right corner of the screen.
- These keys indicate Boot Options or Setup access based on your hardware.
- Press the appropriate key to enter the BIOS setup when prompted.
- Once in the BIOS setup, locate the option to load setup defaults (often F9).
- Select the option to initiate the default settings restoration.
- A blue screen will appear with a prompt: Load Setup defaults?
- Click Yes to proceed with restoring the default BIOS settings.
- If required, navigate to the exit options or save changes menu within the BIOS setup.
- Reboot your computer and ensure it functions as expected with the default BIOS settings.
Repair your Errors automatically
ugetfix.com team is trying to do its best to help users find the best solutions for eliminating their errors. If you don’t want to struggle with manual repair techniques, please use the automatic software. All recommended products have been tested and approved by our professionals. Tools that you can use to fix your error are listed bellow:
do it now!
Download Fix
Happiness
Guarantee
do it now!
Download Fix
Happiness
Guarantee
Compatible with Microsoft Windows
Compatible with OS X
Still having problems?
If you failed to fix your error using FortectMac Washing Machine X9, reach our support team for help. Please, let us know all details that you think we should know about your problem.
Fortect will diagnose your damaged PC. It will scan all System Files that have been damaged by security threats. Mac Washing Machine X9 will diagnose your damaged computer. It will scan all System Files and Registry Keys that have been damaged by security threats. To repair damaged system, you will have a 24hr Free Trial and the ability to purchase the licensed version of the Fortect malware removal tool. To repair damaged system, you have to purchase the licensed version of Mac Washing Machine X9 malware removal tool.
Prevent websites, ISP, and other parties from tracking you
To stay completely anonymous and prevent the ISP and the government from spying on you, you should employ Private Internet Access VPN. It will allow you to connect to the internet while being completely anonymous by encrypting all information, prevent trackers, ads, as well as malicious content. Most importantly, you will stop the illegal surveillance activities that NSA and other governmental institutions are performing behind your back.
Recover your lost files quickly
Unforeseen circumstances can happen at any time while using the computer: it can turn off due to a power cut, a Blue Screen of Death (BSoD) can occur, or random Windows updates can the machine when you went away for a few minutes. As a result, your schoolwork, important documents, and other data might be lost. To recover lost files, you can use Data Recovery Pro – it searches through copies of files that are still available on your hard drive and retrieves them quickly.