
Integrated webcams on laptops may or may not come with a special companion app installed on the laptop to control it. You will probably find an app to control the integrated webcam if you have a Dell or HP device but these apps don’t offer much in terms of settings for the camera. These apps are normally tools for recording video or capturing photos. You’ll find that many third-party tools offer you far more control over the camera than the stock camera apps. Here’s how you can access advanced settings for the integrated webcam on Windows 10.
Install FFMPEG
In order to access advanced settings for the integrated webcam on Windows 10, you need FFMPEG. It’s a command-line tool for handling media files, streams, and interacting with media devices, among other things. It is exceptionally powerful, so much so that many advanced media editing programs like Audacity rely on it. Go ahead and download the tool and extract the zip file.
Find webcam name
Once you’ve extracted FFMPEG, you need to open a command prompt window in the bin folder where the EXE is located. To open the command prompt window, you can use either the cd command, or you can open the bin folder in File Explorer and enter ‘cmd’ in the location bar, and tap enter.
If you’d like to use the cd command, use it as follows.
Syntax
cd "complete path to bin folder"
Example
cd "C:\Users\fatiw\Desktop\ffmpeg-20191219-99f505d-win64-static\bin"
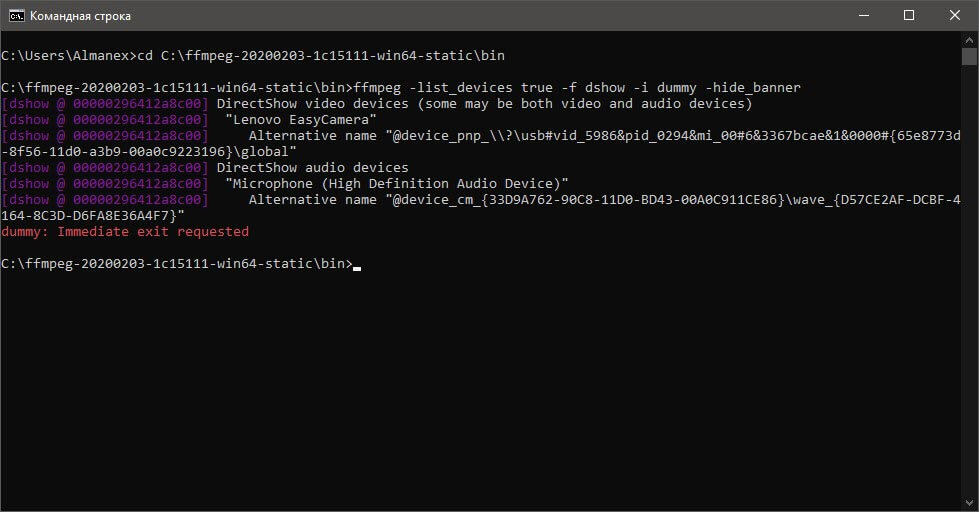
Once you’re in the bin folder, run the following command to find the name for your webcam.
ffmpeg -list_devices true -f dshow -i dummy -hide_banner
The command will return the name of several devices and you’ll need to read them all to determine which is your webcam.
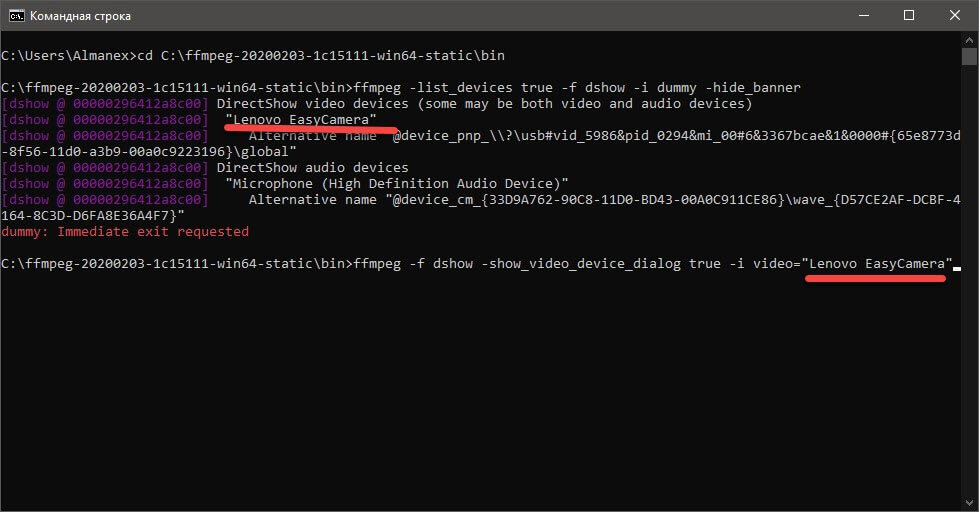
In the same command prompt window, run the following command but replace “Device Name” with the name of your integrated webcam.
Syntax
ffmpeg -f dshow -show_video_device_dialog true -i video="Device name"
Example
ffmpeg -f dshow -show_video_device_dialog true -i video="Integrated Webcam"
Tap enter and the advanced settings window for your webcam will open.
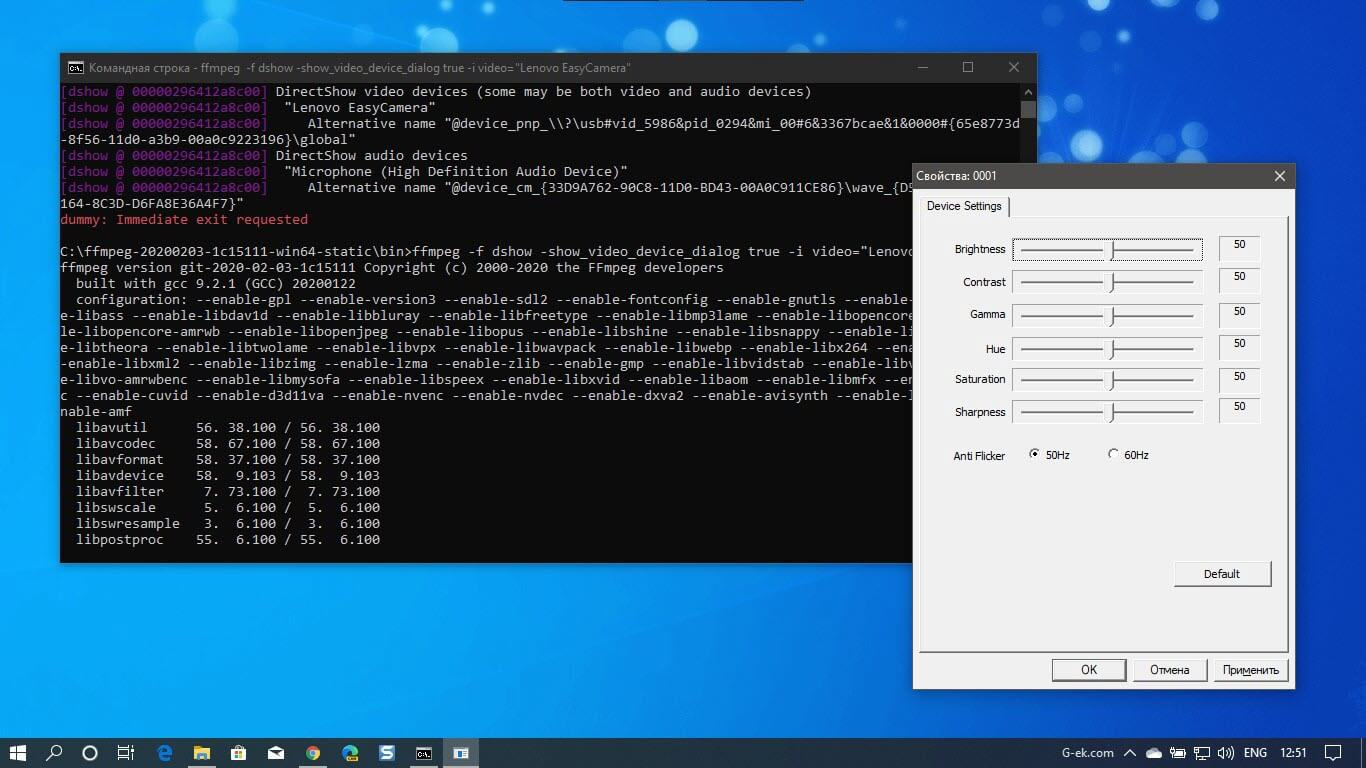
Changing webcam settings
The settings that you see in the window that opens will differ based on the webcam on your system. The options that are greyed out or inactive are settings that you cannot change for the camera you have on your laptop. Most settings will have a default value but you might have the option to allow them to change automatically based on what input the camera is getting. Click ‘Apply’ after making changes and the quality of the camera feed will change throughout all apps that access it on your Windows 10 PC. If you find your new settings are not as good as the default ones, you can click the ‘Default’ button and reset them to their default values. Don’t forget to click Apply afterward.

Fatima Wahab
Fatima has been writing for AddictiveTips for six years. She began as a junior writer and has been working as the Editor in Chief since 2014.
Fatima gets an adrenaline rush from figuring out how technology works, and how to manipulate it. A well-designed app, something that solves a common everyday problem and looks
Интегрированные веб-камеры на ноутбуках могут иметь специальное приложением-компаньон, для управления ими. Вероятно, вы найдете приложение для управления встроенной веб-камерой, если ваше устройство Dell или HP, но эти приложения не предлагают большое количество настроек камеры. Данные приложения обычно являются инструментами для записи видео или захвата фотографий. Иногда, сторонние инструменты предлагают вам гораздо больший контроль над камерой, чем приложения по умолчанию. Вот как вы можете получить доступ к расширенным настройкам встроенной веб-камеры в Windows 10.
Шаг 1: Установить FFMPEG
Чтобы получить доступ к расширенным настройкам встроенной веб-камеры в Windows 10, вам потребуется FFMPEG. Это инструмент командной строки для обработки мультимедийных файлов, и взаимодействия с мультимедийными устройствами. Он исключительно мощный, настолько, что на него полагаются многие передовые программы редактирования мультимедиа. И так, скачайте инструмент и распакуйте zip-файл.
Шаг 2: Найдите имя веб-камеры
После того, как вы распаковали архив с FFMPEG, вам нужно открыть окно командной строки в папке bin, где находится EXE. Чтобы открыть окно командной строки, вы можете использовать либо команду cd, либо вы открыть папку bin в проводнике, ввести «cmd» в адресной строке и нажать Enter, это откроет Командную строку в данной папке.
Если вы хотите использовать команду cd, используйте ее следующим образом.
Синтаксис:
cd "полный путь к папке bin"
Пример:
cd C:\ffmpeg-20200203-1c15111-win64-static\bin
Попав в папку bin, введите следующую команду, чтобы найти имя для своей веб-камеры.
ffmpeg -list_devices true -f dshow -i dummy -hide_banner
Команда вернет имя нескольких устройств, и вам необходимо просмотреть их, чтобы определить, какая веб-камера установлена в вашем устройстве.
Шаг 3: Открыть расширенные настройки
В том же окне командной строки выполните следующую команду, но замените «Имя устройства» на имя вашей встроенной веб-камеры.
Синтаксис:
ffmpeg -f dshow -show_video_device_dialog true -i video="Имя устройства"
Пример:
ffmpeg -f dshow -show_video_device_dialog true -i video="Lenovo EasyCamera"
Нажмите Enter, откроется окно расширенных настроек для вашей веб-камеры.
Шаг 4: Изменение настроек веб-камеры
Настройки, которые вы видите в открывшемся окне, будут отличаться в зависимости от вашей веб-камеры. Параметры, которые выделены серым цветом или неактивны, — это параметры, которые нельзя изменить для камеры, установленной на вашем ноутбуке. Большинство настроек будут иметь значение по умолчанию, но у вас есть возможность изменять их. Нажмите кнопку «Применить» после внесения изменений, и настройки камеры изменится во всех приложениях, которые обращаются к ней на ПК с Windows 10.
Если вы обнаружите, что ваши новые настройки не так хороши, как настройки по умолчанию, вы можете нажать кнопку «Default» и восстановить все значения по умолчанию. Не забудьте после этого нажать кнопку Применить.
Last Updated :
09 Apr, 2024
laptopsHow To Turn on Camera on Laptop Windows 10: Each Windows device comes with one dedicated Windows Camera. For Windows Laptops, the Camera is built within the monitor. For Windows Desktop, we have to attach an external camera device to utilize as a webcam as well as a normal one. The webcam feature is triggered by some online platforms whereas one application is used to Open Windows Camera for offline uses.
Table of Content
- Steps to Enable or Disable Camera in Windows
- Method 1: How to turn on camera on laptop windows 10 Using Camera Application
- Method 2: Open Windows Camera Using Command Prompt
Camera app for laptops for Windows 10 not only serves to record videos or capture images. Rather, the Camera in the Window is used to capture QR Codes also. With new updates, the camera App for laptop is becoming a more powerful tool. However, to utilize this effective tool, we should know the way to Start a Camera in Windows.
In this article, a few handful methods will be discussed to How to turn on camera on laptop windows 10, Launch the camera app for laptop in Windows in no time without any errors.
Quick Preview to Open Camera in Windows:
- Search for the Camera application on the Windows Search Bar.
- Execute the application coming as the result.
- Or execute the command start microsoft.windows.camera in Command Prompt.
Quick Highlights on Windows Camera Application:
- The Windows camera app for laptop has two Shooting Modes. One is a Picture & the other is a Video.
- It has the features of Time Lapse, Timer, HDR Pro, etc.
- The Camera can scan important documents by taking picture of it.
- Some of the Windows Cameras can perform Digital Zoom.
- As per the need, the Windows Camera can be enabled or disabled.
Steps to Enable or Disable Camera in Windows
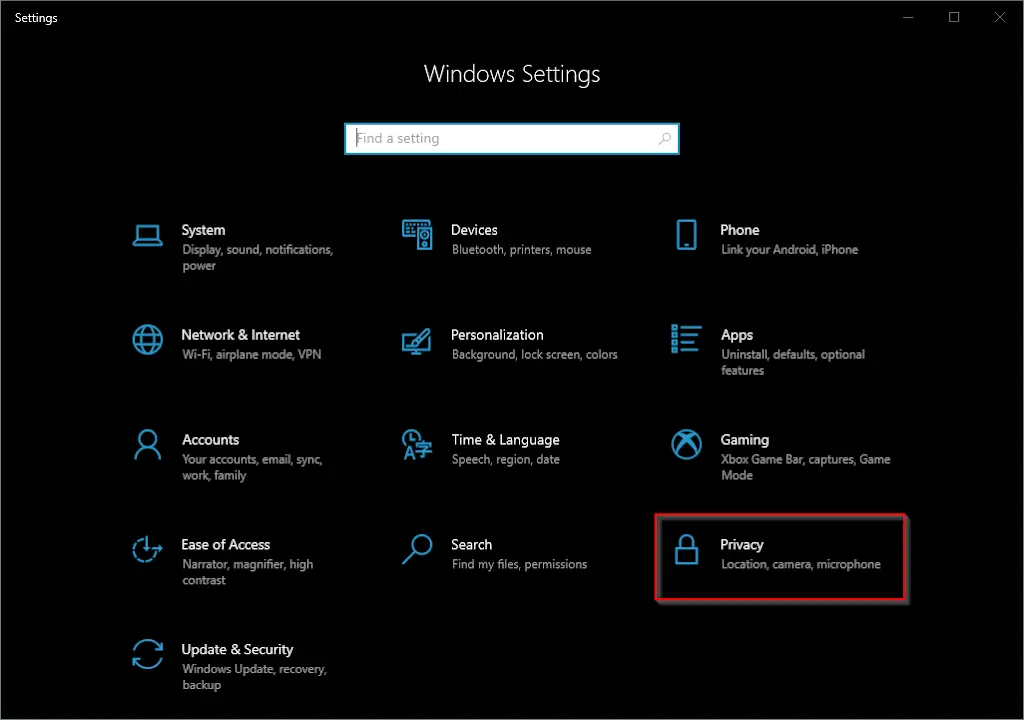
Step 1: Open Settings & Click on the Privacy option.
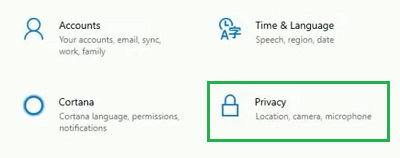
Step 2: From the left-hand side, click on the Camera option.
Step 3: Click on the Button to Enable or Disable the two simple cameras.
With these simple steps, we can easily enable or disable Camera Settings Windows 10 which is very necessary for using Camera App.
Methods to Open Camera in Windows
To Initiate windows 10 camera settings, the following methods should be executed one after another. We will start with the simple Camera Application methods which is too easy.
Method 1: How to turn on camera on laptop windows 10 Using Camera Application
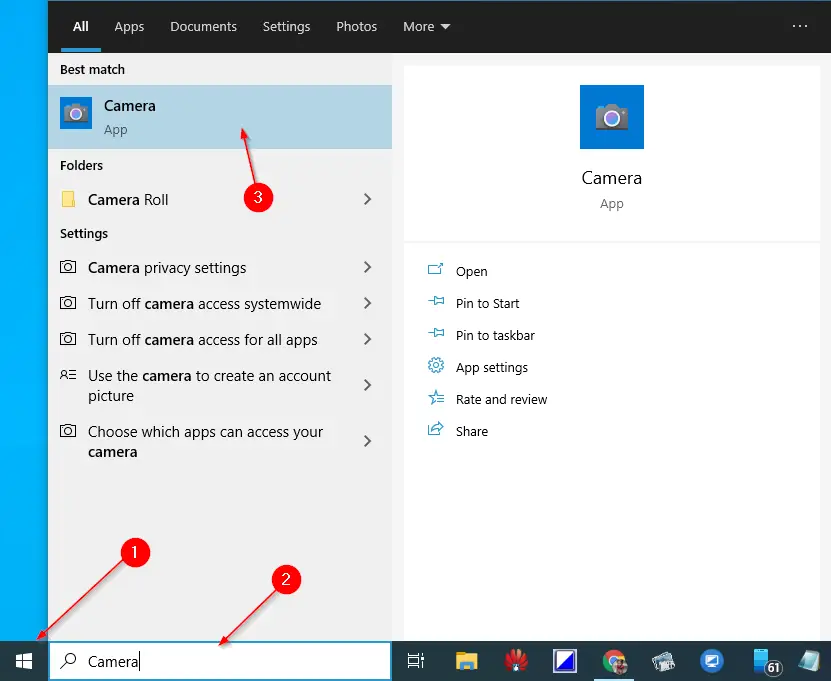
Step 1: On the Search Bar, search for the Camera application.
Step 2: Open the Camera application & click on the Capture Button to take a picture.
Congratulations! These two simple steps are enough to Launch Camera Service on Windows devices without consuming much time.
Method 2: Open Windows Camera Using Command Prompt
How to open camera in windows 10 command line: Open Command Prompt, and execute the following command. The Command will open the Camera Window on the device.
Command: start microsoft.windows.camera

Also Read
- How to Upgrade From Windows 10 to Windows 11 For Free?
- How To Increase the Internet Speed For Free?
- How to Improve Performance of PC/Laptop?
Conclusion
From the above discussion, we can conclude that two possible methods are present to how to turn on camera on laptop windows 10 with ease. However, we have to Enable Windows Camera Settings before going to utilize the Camera Application on Windows 10. Otherwise, the application will start malfunctioning.
If you are using a laptop or notebook, you can access its settings on Windows 10. The built-in camera for PC is mainly used for video calling. In contrast, a smartphone camera can be used for several purposes, for instance, capture photos, videos, video calling, QR code scanning, scanning of documents, and so on. The notebook camera is not limited to video calling, which means you can utilize the built-in camera of the PC for other purposes, such as capturing photos, creating videos, QR code scanning, scanning of documents, and so on. Even if your machine does not come with a built-in camera, you can use an external camera to create video or capture screenshots.
For any purpose, you are using an inbuilt webcam or an external camera; if you want to access the default settings on Windows 10, it is possible. You might want to access the built-in camera settings to adjust the brightness and contrast to improve the picture or video quality.
Note: If you are using an external camera on Windows 10 PC, it is recommended to use the manufacturer’s software to access that camera’s Settings as that may come with more functions.
In this gearupwindows post, we will earn the following:-
- How to view and manage Camera Settings via the Camera app?
- How to disable built-in WebCam on Windows 10?
- How to enable disabled WebCam on Windows 10?
- How to allow or disallow Camera access to a specific or all apps on Windows 10 using the Setting app?
- How to stop the access of Camera for all Windows 10 apps using Group Policy Editor?
How to view and manage Camera Settings via the Camera app?
Windows 10 comes with a built-in camera app that lets you change the few default settings of the webcam. For instance, you can change the picture resolution or photo quality, video quality, and brightness.
To access the Camera Settings using the Camera app, perform the following steps:-
Step 1. Click on the Start button and type Camera.
Step 2. From the available search results, click on the top entry Camera to open it.
Step 3. To access the Settings of Camera, click on the gear icon on the left top screen of the app.
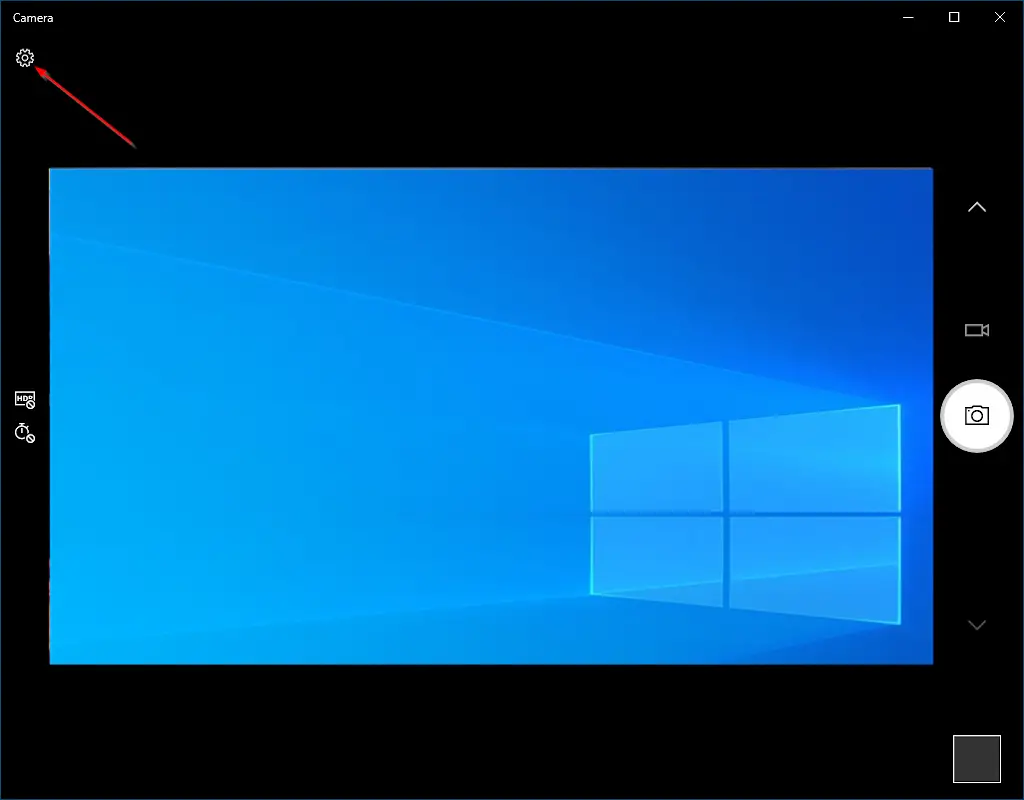
Step 4. Now, you can adjust the photos and video quality settings.
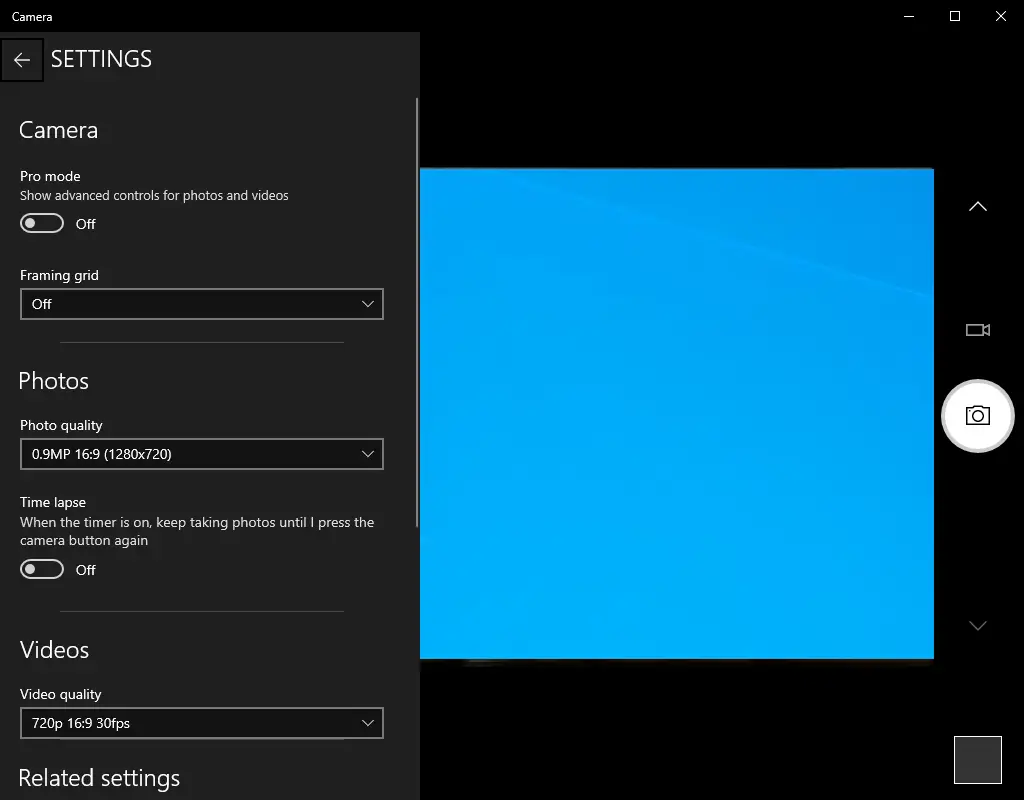
Once you complete the above steps, you should enter into the Camera app settings on Windows 10.
How to disable the built-in WebCam on Windows 10?
If you don’t often use a built-in camera on Windows 10 PC or laptop and want to disable it, perform the following steps:-
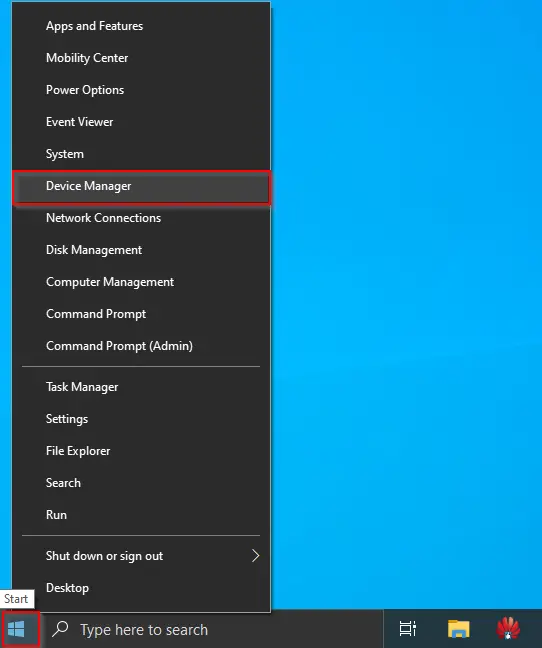
Step 1. Right-click on the Start menu or press Windows logo + X hotkey to access the Power User menu.
Step 2. On the available options, click on the Device Manager entry to open it.
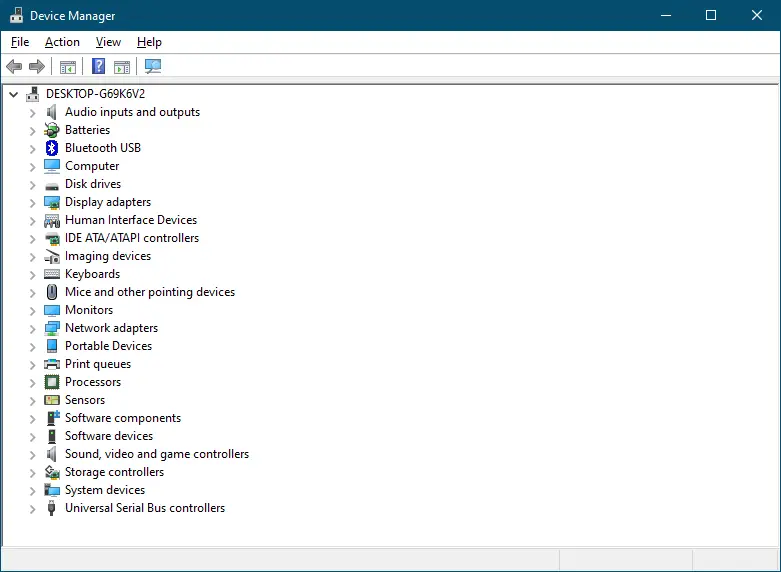
Step 3. Expand the Imaging devices by clicking on them.
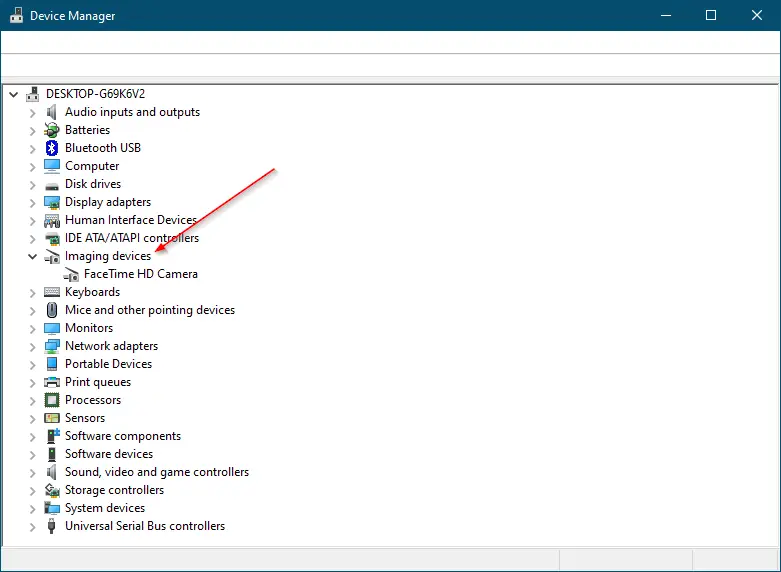
You will see a list of cameras that are attached or available on your PC or laptop.
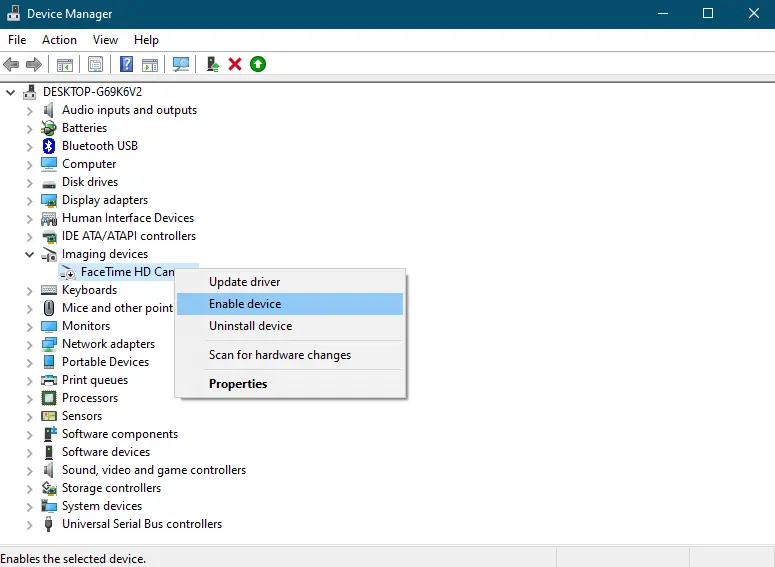
Step 4. Right-click on the camera name which you want to disable and select Disable device option.
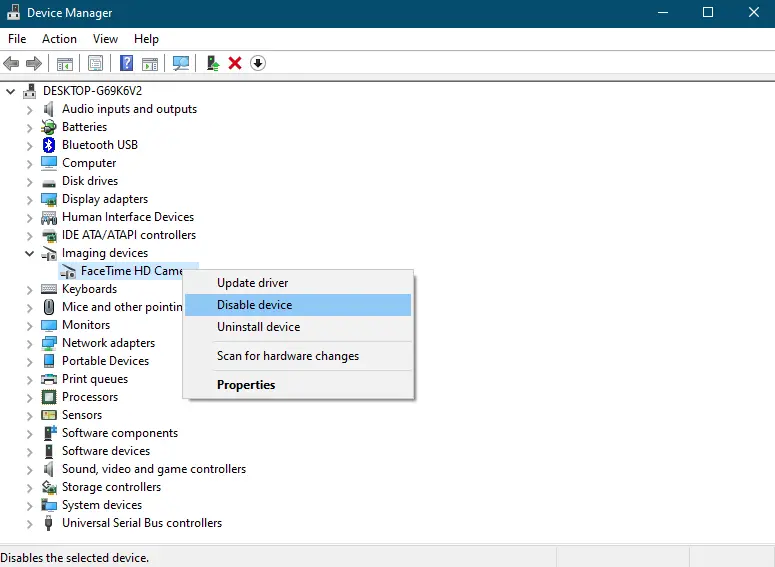
Step 5. You will see a popup message, “Disabling this device will cause it to stop functioning. Do you really want to disable it?” Click Yes to continue.
Once you complete the above steps, you should disable the Camera on your Windows 10 PC.
How to enable disabled WebCam on Windows 10?
To enable the disabled Camera or WebCam on Windows 10, perform the following steps:-
Step 1. Click on the Start button and type device manager.
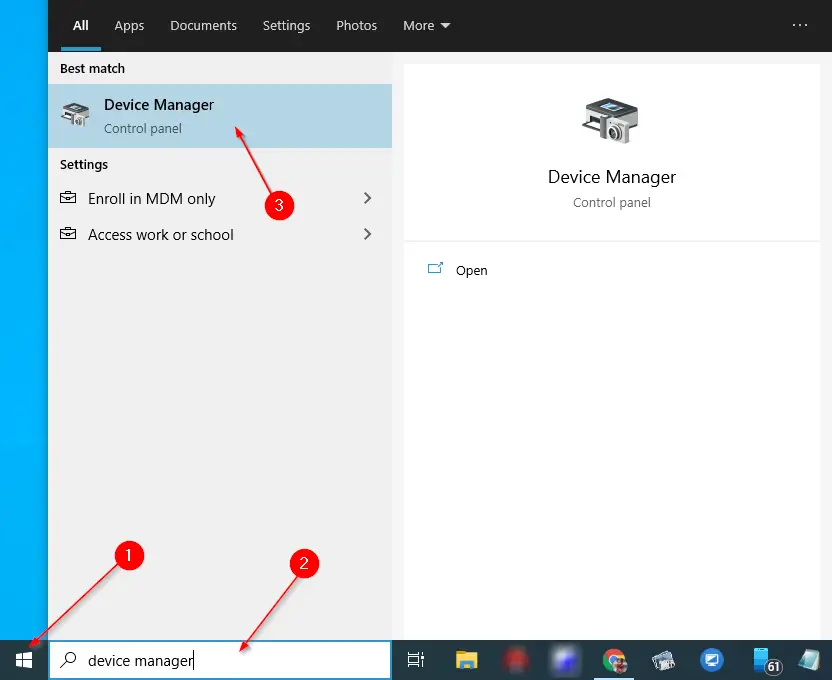
Step 2. From the available top search results, click on the Device Manager entry to launch it.
Step 3. In the Device Manager window that opens, expand the “Imaging Devices.”
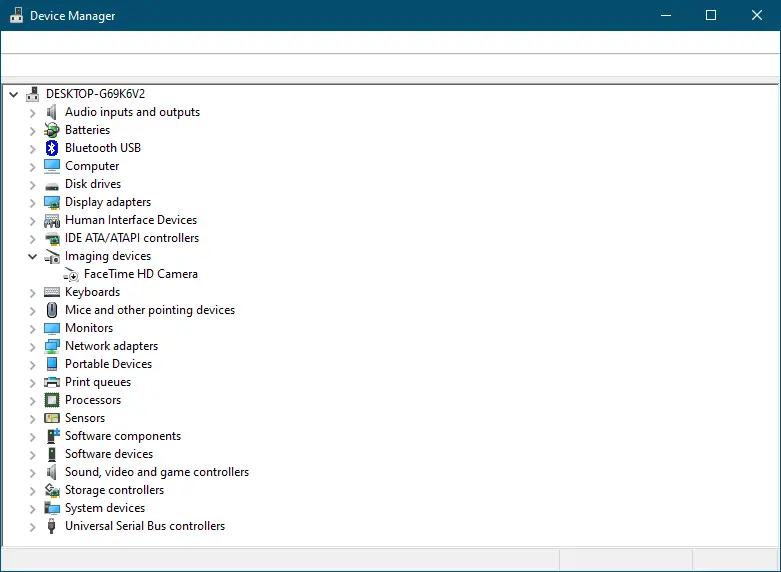
You will see a list of camera that is available on your PC. If any camera is disabled on your PC, you will see a down arrow on the icon of the webcam/camera.
Step 4. Right-click on the disabled camera which you want to enable and select Enable Device option.
Once you complete the above steps, the selected webcam will be enabled, and you can access it.
How to allow or disallow Camera access to a specific or all apps on Windows 10 using the Setting app?
If you want to keep control of the Camera on Windows 10, in other words, if you want to allow to disallow camera access to a specific or all apps on Windows 10, perform the following steps:-
Step 1. Open the Settings app by pressing Windows logo + I hotkeys from the keyboard.
Step 2. In the Settings window that opens, click on the Privacy category.
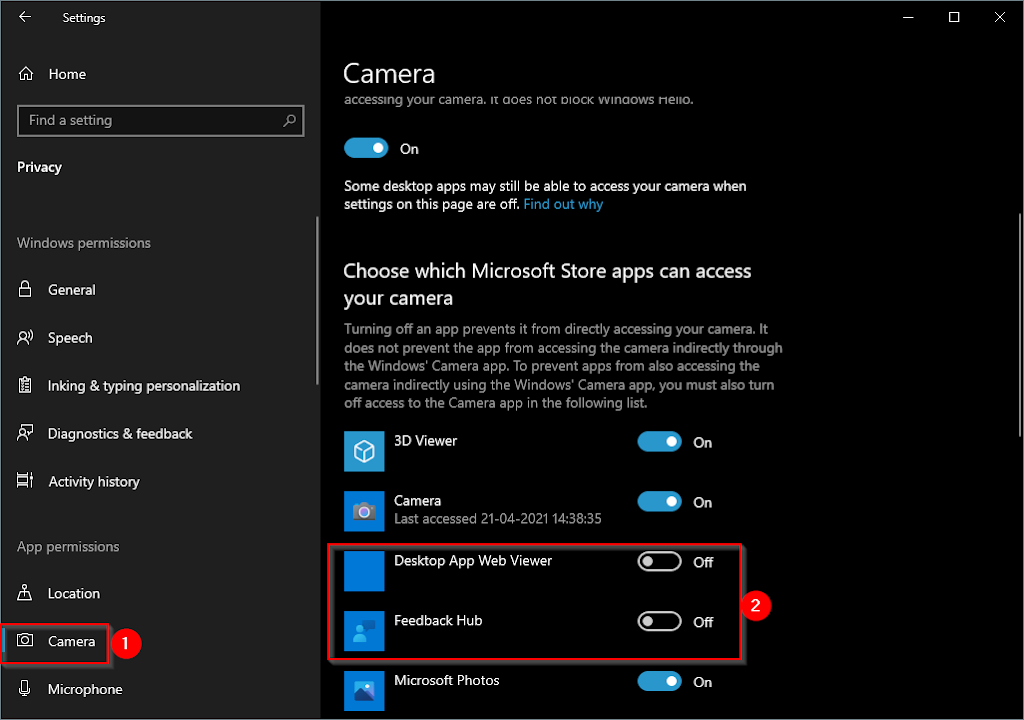
Step 3. Under Privacy, click on the Camera tab on the left side pane. On the right side of the Camera, in the “Choose which Microsoft Store apps can access your camera” section, you will see a list of all modern apps or UWP (Universal Windows Program) app that has access to your camera. Turn toggle Off next to any program for which you want to prevent access.
Scroll down more on the right side to see the “Allow desktop apps to access your camera” section. Turn the toggle to Off position to prevent access of the camera to all the traditional desktop apps at once.
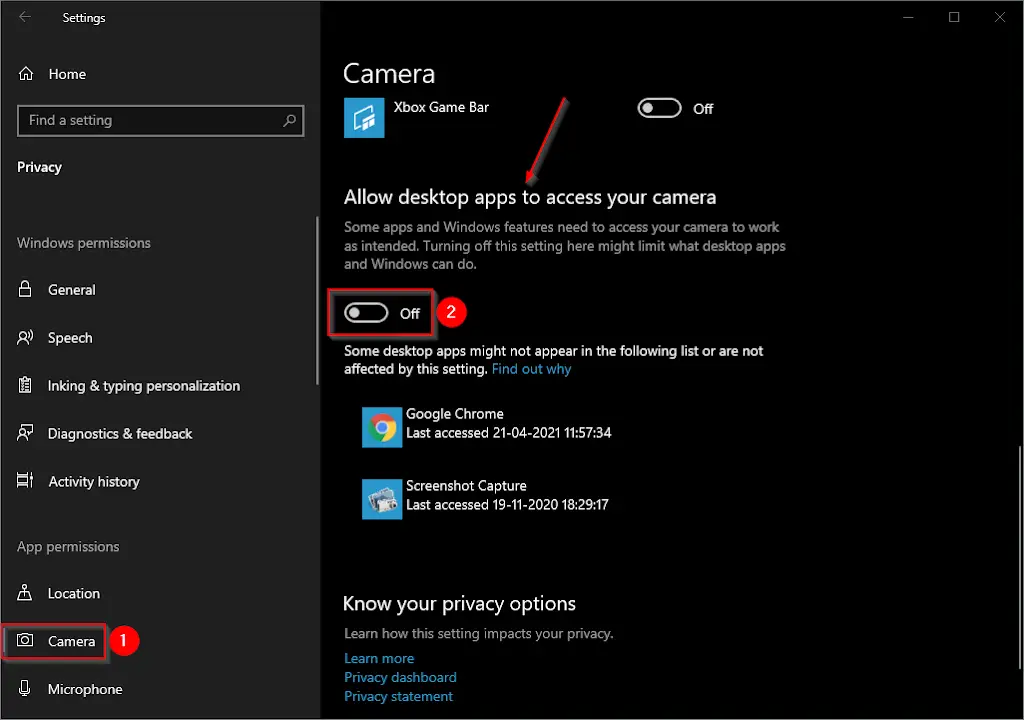
If you want to stop access to the camera for all UMP apps and desktop software with a single click of the mouse, under the section “Allow apps to access your camera,” turn the toggle to the off position.
Once you complete the above steps, you should disable access to the camera for a specific app or all apps on your Windows 10 PC.
How to stop the Camera’s access for all Windows 10 apps using Group Policy Editor?
Windows 10 let you disallow the Camera’s access for all UMP or modern apps using GPO. However, there is no policy available to date to disallow Camera access to classic desktop software.
Kind Note: Local Group Policy Editor is not a part of Windows 10 Home edition. First, to proceed with these steps, enable the gpedit.msc on your PC to proceed with further steps.
Step 1. Press and hold the Windows logo key and then press the R key from the keyboard to open the Run dialog box.
Step 2. In the Run command box that opens, type the following and click OK to open the Local Group Policy Editor window:-
gpedit.msc
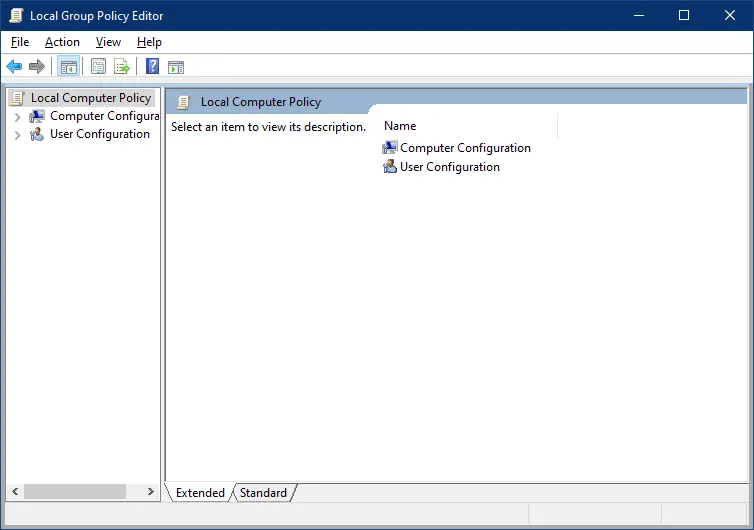
Step 3. In the Local Group Policy Editor window that opens after completing the above steps, navigate or browse for the following path from the left side pane:-
Computer Configuration > Administrative Templates > Windows Components > Camera
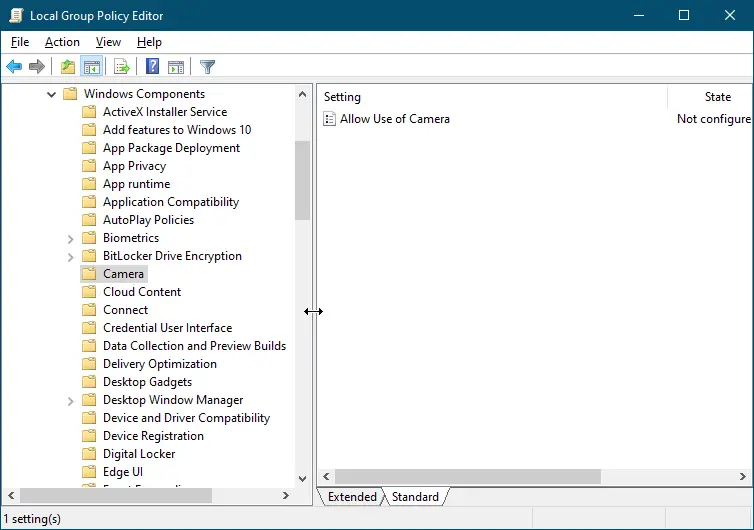
Step 4. On the right-side window of Camera, double click on the policy “Allow Use of Camera.”
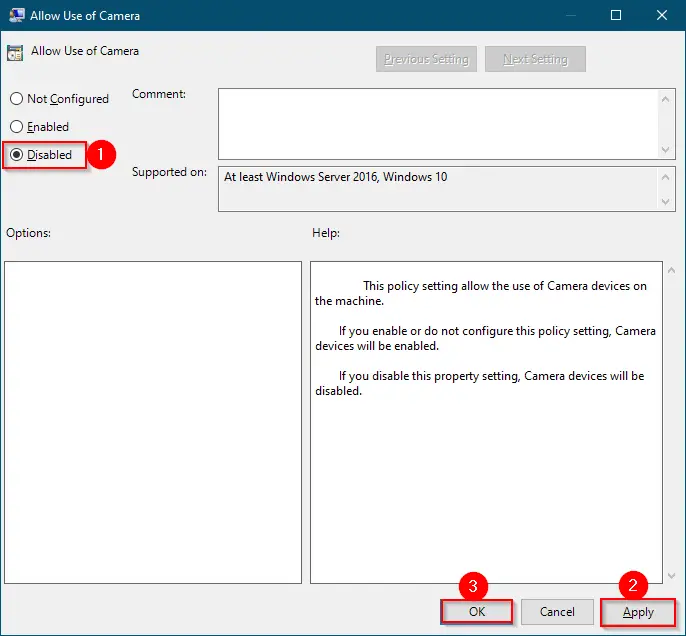
Step 5. Click Apply.
Step 6. Click OK.
Step 7. Now, navigate to the following path in GPO:-
Computer Configuration > Administrative Templates > Windows Components > App Privacy
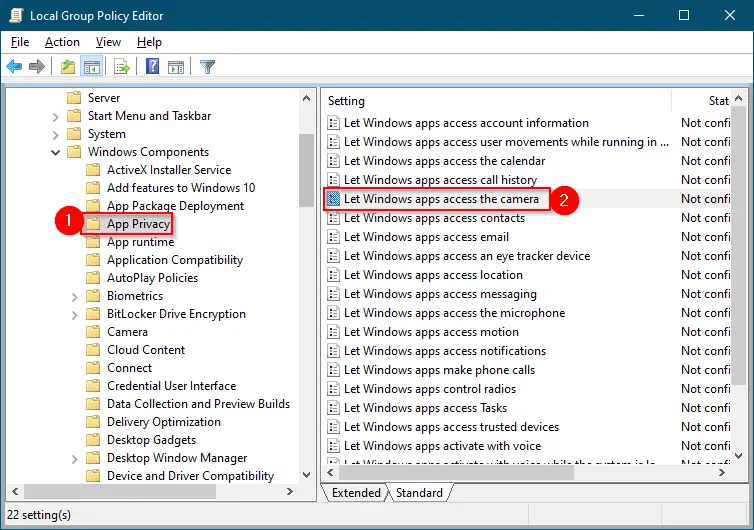
Step 8. On the right-pane of App Privacy, double click on the policy name “Let Windows apps access the camera.”
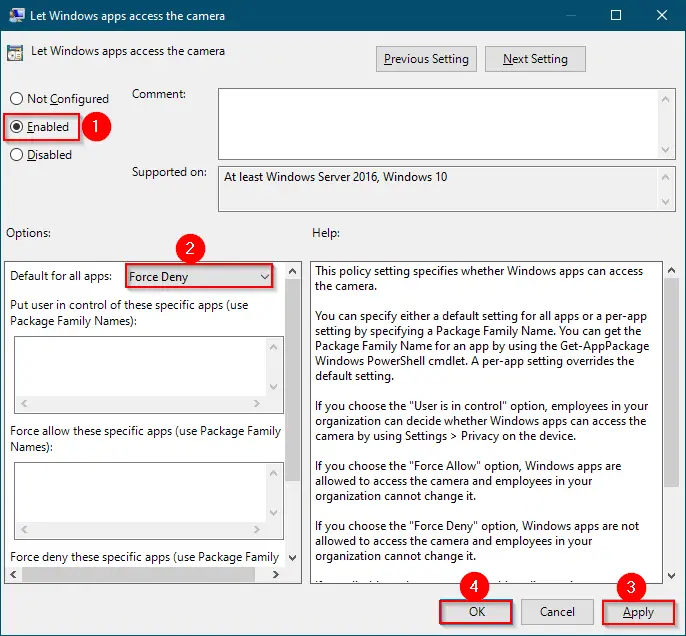
Step 9. Select Enabled.
Step 10. From the drop-down menu next to the “Default for all app,” select the “Force Deny” option.
Step 11. Click Apply.
Step 12. Click OK.
Once you complete the above steps, all the Windows apps will be denied access to Camera on your Windows 10 PC.
-
Home
-
News
- How to Open a File/Folder in Command Prompt (CMD) Windows 10
By Alisa |
Last Updated
Wonder how to open a file cmd or how to open a folder in Command Prompt on Windows 10? This tutorial provides a step-by-step guide. Also, if you can’t find some files or folders in Windows 10, or some files are unexpectedly lost in your Windows 10 computer, MiniTool free data recovery software for Windows 10/8/7 can help you easily recover lost files.
You can also open files from Command Prompt. Wonder how to open a file or folder in Command Prompt on Windows 10? Check the step-by-step guide in this tutorial.
How to Open a File CMD Windows 10 in 2 Steps
Step 1 – Open Command Prompt
You have several ways to open Command Prompt in Windows 10.
You can press Windows + R keys on the keyboard to open Windows Run dialog. Then type cmd in the Run box. If you want to run Command Prompt as Administrator, you need to press Ctrl + Shift + Enter keys at the same time.
Alternatively, you can also click Start or Search box in Windows 10, and type cmd or command prompt. Right-click the Command Prompt app in the list and choose Run as administrator.
Step 2 – Open Files from Command Prompt
Normally you have two ways to open a file using cmd. One is to move the folder that the file is in, the other is to open the files directly in Command Prompt.
Method 1. How to open a file with cmd by moving to the folder firstly
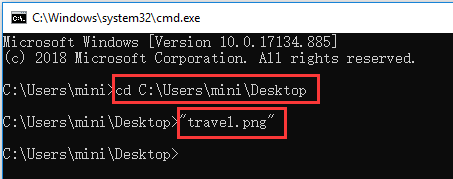
- You can use the cd command to move to the exact folder the file lies in. For instance, cd C:\Users\mini\Desktop.
- After you are in the correct folder path, you can type the name of the file with its extension, e.g. “travel.png”, and hit Enter button to open it.
Method 2. How to open a file using cmd directly
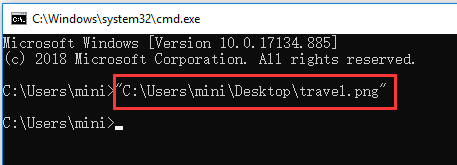
You can also choose to open files from Command Prompt on Windows 10 directly, instead of going to the folder path. You can input the full path, file name and its file extension to open the target file, e.g. “C:\Users\mini\Desktop\travel.png”.
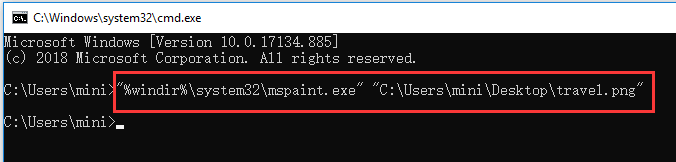
You can also freely specify an app to open the file. You need to type the whole path of the app ahead of the path of the file, for example, “%windir%\system32\mspaint.exe” “C:\Users\mini\Desktop\travel.png”. Press Enter to open the file using CMD.
How to Open a Folder in Command Prompt Windows 10
You can also open a folder from Command Prompt with the command line below.
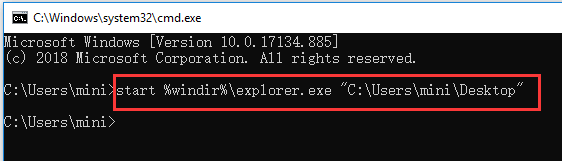
After you enter into Command Prompt window by following the operation above, you can open a folder in File Explorer in Command Prompt. The command line can be like this, start %windir%\explorer.exe “C:\Users\mini\Desktop”.
Tip: Need to mention that you need to enclose the path of a file or folder in double quotation marks, since some folder or files names have spaces in them.
>> Quick Video Guide:
To Recover Unexpectedly Lost Files or Folders in Windows 10
Sometimes you may suffer unexpected data loss in Windows 10 due to various reasons, e.g. system crash, Blue Screen error (e.g. Bad Pool Caller BSOD error), power outage, malware/virus infection, hard drive failure, etc. To easily recover lost data for free, you can choose the best free data recovery software to realize it.
MiniTool Power Data Recovery, a 100% clean and free data recovery software for Windows 10/8/7, enables you to easily recover mistakenly deleted files or lost files from computer local drive, external hard drive, SSD drive, USB drive (pen drive data recovery), SD card, and more.
MiniTool Power Data Recovery TrialClick to Download100%Clean & Safe
About The Author
Position: Columnist
Alisa is a professional English editor with 4-year experience. She loves writing and focuses on sharing detailed solutions and thoughts for computer problems, data recovery & backup, digital gadgets, tech news, etc. Through her articles, users can always easily get related problems solved and find what they want. In spare time, she likes basketball, badminton, tennis, cycling, running, and singing. She is very funny and energetic in life, and always brings friends lots of laughs.