
Неотъемлемой частью администрирования сетью является управление IP адресами. До выхода Windows Server 2012 системным администраторам для комплексного управления всем пространством IP адресов, а также службами DNS и DHCP, приходилось использовать таблицы, различные сторонние инструменты, писать пользовательские скрипты. С выходом Windows Server 2012 ситуация изменилась – появился IPAM (IP Address Management). Тому, что из себя представляет IPAM, а также о том, как настроить эту службу в вашей сети и будет эта статья.
Как уже отмечалось выше, до появления IPAM для управления IP –адресами в сети приходилось использовать подручные средства: от сторонних инструментов до списка адресов в таблице Excel. Как результат, продуктивность администрирования сетью падала, а затраты только возрастали. Более того, имеющиеся инструменты подходили для решения задачи управления адресами сети в краткосрочной перспективе. Но чем больше становилась сеть и чем дольше с ней работали, тем более трудоемкой становилась эта задача.
С выходом Windows Server 2012 появился внутренний инструмент для управления IP-адресами сети – IPAM. IPAM (IP Address Management) – служба управления IP адресами, впервые представленная в Windows Server 2012 и Windows Server 2012 R2. Кроме того, изменения-улучшения IPAM стоит ожидать и в Windows Server vNext. IPAM представляет собой платформу для обнаружения, мониторинга, управления и аудита для пространства IP адресов в сети организации.
Среди основных возможностей IPAM можно выделить следующие:
- Автоматическое обнаружение инфраструктуры IP-адресов
- Удобные и гибкие средства для отображения пространства IP-адресов, а также управления ими и составления отчетов
- Аудит изменений в конфигурациях служб DHCP и IPAM
- Наблюдение за службами DHCP и DNS, а также управление ими
- Отслеживание аренды IP-адресов
Основное преимущество IPAM заключается в том, что он предоставляет единую консоль, в которой представлена информация о конфигурациях всех служб DNS и DHCP в лесу. С помощью этой консоли можно изменять настройки, например, как одной, так и нескольких зон DHCP, что не требует от системного администратора написания дополнительных скриптов или ручной настройки каждого DHCP-сервера. Далее мы увидим такую настройку в примере.
Но сначала мы развернем службу IPAM, а также посмотрим, как ее можно использовать для наблюдения за службами DNS и DHCP.
Разворачиваем IPAM Server
Для того, что начать работать с IPAM Server его необходимо установить – IPAM не входит в набор служб, устанавливаемых по умолчанию. Выполнить установку можно двумя способами. Можно использовать следующую команду PowerShell:
Install-WindowsFeature IPAM –IncludeManagementTools
Также можно использовать мастер установки ролей и компонентов сервера:
После того, как процесс установки IPAM завершен, необходимо подготовить его к работе. Для этого в Server Manager необходимо выбрать IPAM и далее Provision the IPAM server:

Вы можете выбирать между двумя методами подготовки: вручную (manual) или на основе групповых политики (group policy based). В чем же разница между двумя этими методами?
Ручной метод подготовки IPAM сервера рекомендуется использовать в тех случаях, если количество управляемых серверов мало. Если вы выбираете этот метод подготовки, то должны быть готовы к тому, что придется вручную настроить условия доступа для каждого из управляемых серверов. Кроме того, удалять настройки также придется вручную, в том случае, если вам не нужно будет больше управлять тем или иным сервером. Можно использовать групповые политики для того, чтобы применять необходимые настройки к управляемым серверам, даже если вы выбрали ручной метод подготовки, но все объекты групповой политики должны применяться или удаляться вручную. В связи с тем, что ручной метод подготовки IPAM сервера более трудоемкий и сложный, предпочтительный использовать метод подготовки с помощью групповых политик.
Подготовка IPAM сервера с помощью групповых политик проще и имеет меньшую вероятность ошибок. При использовании этот метода объекты групповой политики применяются и удаляются автоматически на управляемых серверах. Именно этот метод предлагается использовать по умолчанию в Мастере подготовки IPAM. Вам необходимо ввести префикс для имени объектов групповых политик:

Стоит здесь отметить, если вы выбираете подготовку IPAM сервера с помощью групповых политик, вы не сможете изменить его на ручной метод подготовки. А вот в обратном случае вы можете изменить ручной метод подготовки на подготовку с помощью групповых политик, используя командлет Windows PowerShell:
Set-IpamConfiguration
Вернемся теперь к Мастеру подготовки. Выбрав метод подготовки с помощью групповых политик, мы получаем сообщение о том, что настройки будут применяться на управляемые сервера с использованием следующих объектов групповых политик:
- <GPO-prefix>_DHCP: этот объект групповой политики используется для применения настроек, с помощью которых IPAM сможет наблюдать, управлять и собирать информацию с управляемых DHCP серверов в сети
- <GPO-prefix>_DNS: этот объект групповой политики используется для применения настроек, с помощью которых IPAM сможет наблюдать и собирать информацию с управляемых DNS серверов в сети
- <GPO-prefix>_DC_NPS: этот объект групповой политики используется для применения настроек, с помощью которых IPAM сможет собирать информацию с управляемых контроллеров домена и с серверов политик сети (Network Policy Servers, NPS) в сети для DHCP сервера в сети для отслеживания IP адресов
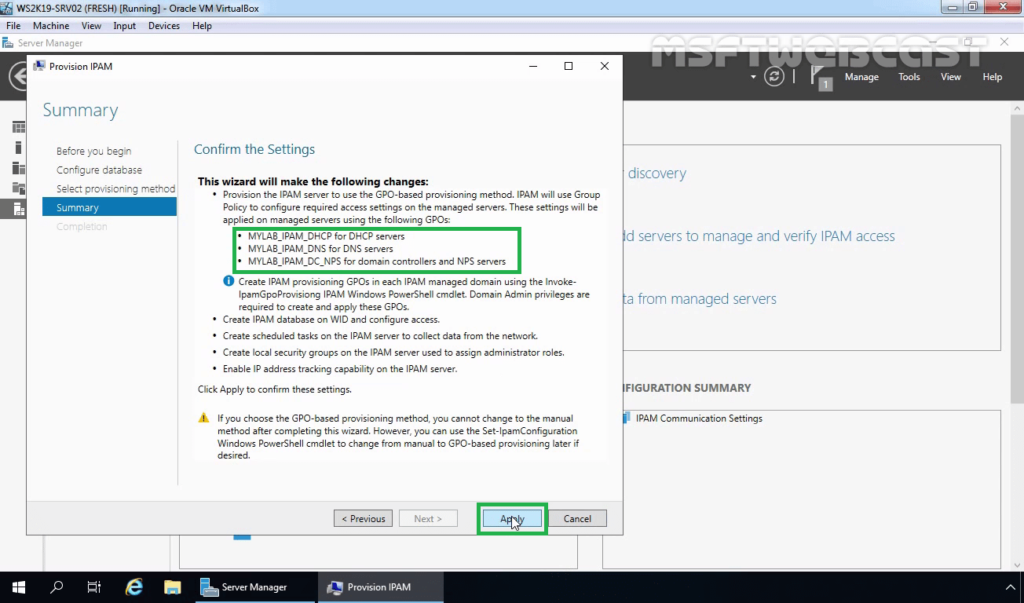
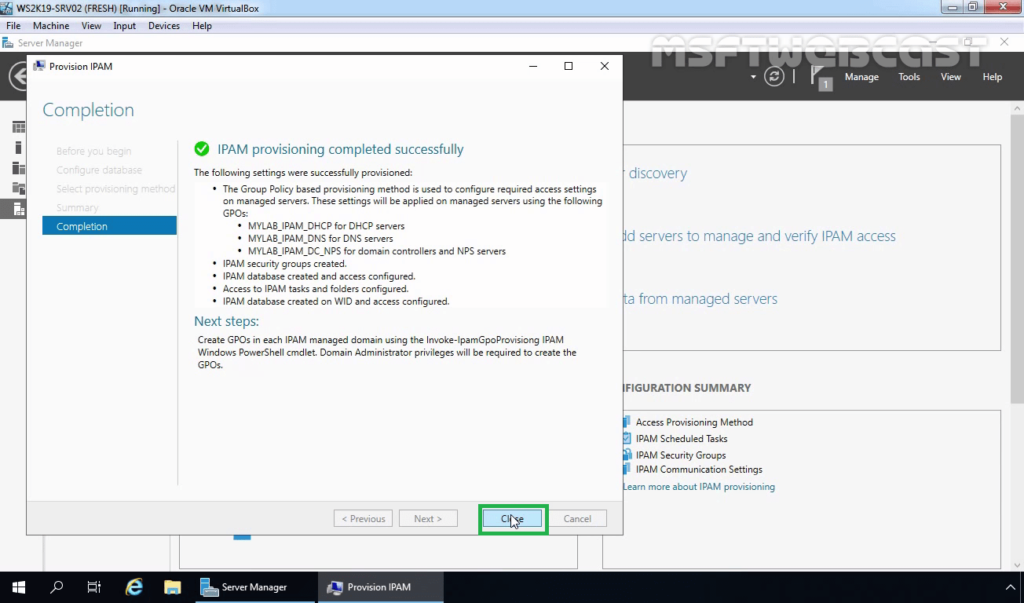
В нашем случае, объекты групповой политики будут носить имена IPAM_DHCP, IPAM_DNS и IPAM_DC_NPS соответственно. Для завершения подготовки IPAM проверьте, верно ли указана информация на вкладке Summary и нажмите Apply. Процесс подготовки займет некоторое время. В итоге вы увидите сообщение о том, что подготовка IPAM успешно выполнена:

Здесь важно сообщение о дальнейших шагах. Объекты групповой политики не были созданы, их нужно будет создать далее с помощью командлеты PowerShell:
Invoke-IpamGpoProvisioning
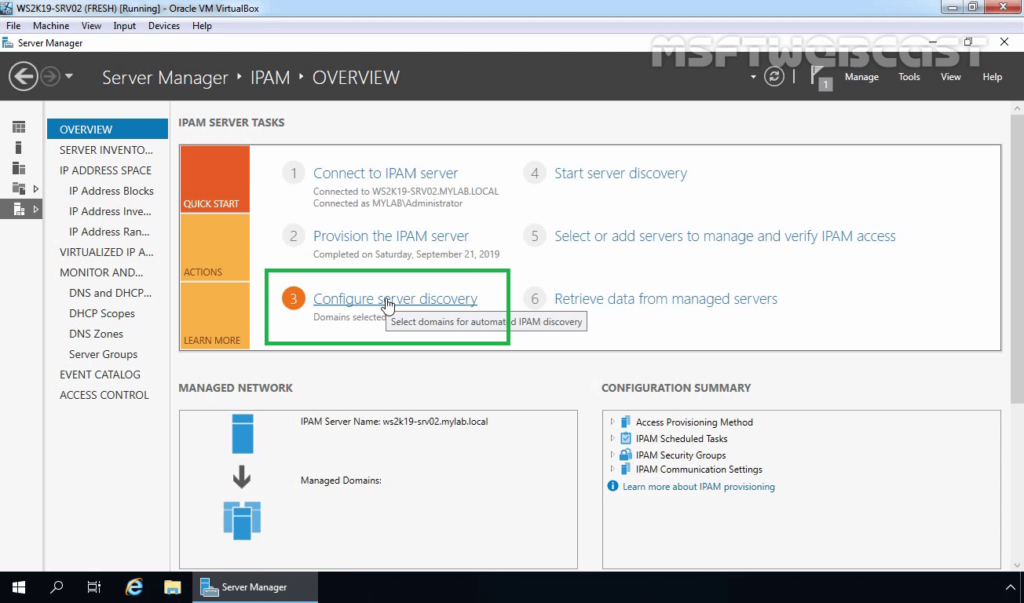
Это будет чуть позже. А пока перейдем к Server Manager и настроим обнаружение серверов:

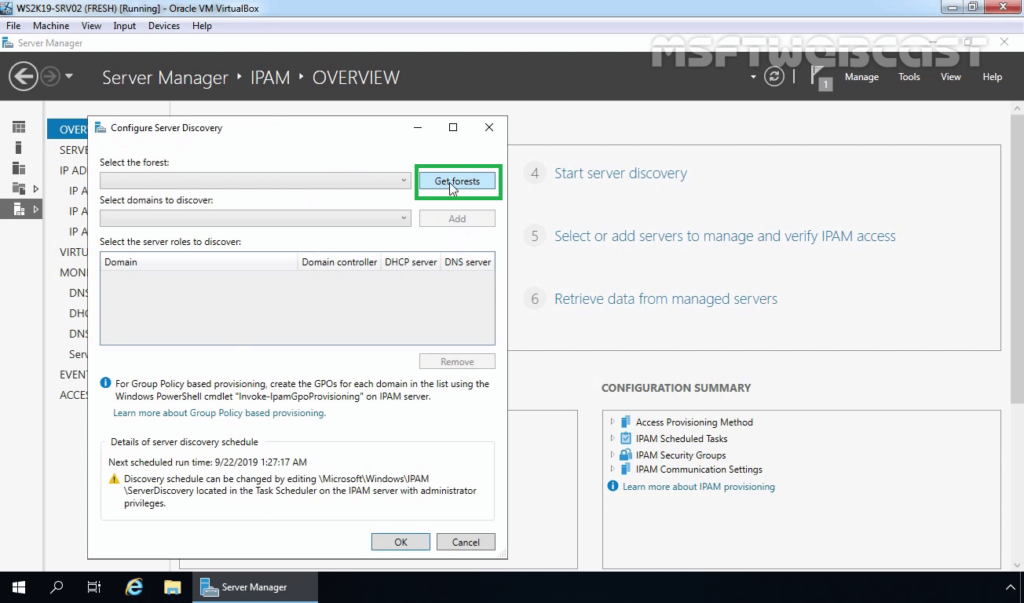
В появившемся окне нужно выбрать домен для обнаружения. В нашем случае это корневой домен mva.com. После добавления этого домена, необходимо убедиться, что среди ролей сервера есть контроллер домена, DHCP и DNS сервера. Нажимаем ОК.

Теперь начнем обнаружение серверов:

После завершения задачи. Перейдите в Server Manager на вкладку IPAM – SERVER INVERNTORY. Вы увидите, что для серверов dsc01 и DC в столбце «Состояние управления» будут отображаться состояние «Не определено», а в столбце «Состояние доступа» — «Заблокирован». Необходимо предоставить IPAM разрешение на управление этими серверам с помощью объектов групповой политики.

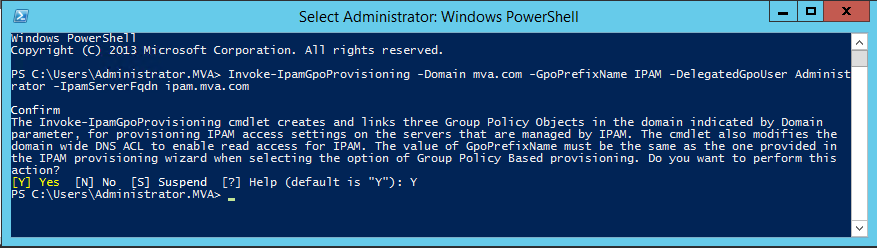
Теперь вспоминаем следующий шаг, который нам рекомендовали сделать после завершения подготовки IPAM. Нам необходимо запустить на сервере IPAM Windows PowerShell с правами администратора и использовать следующий командлет
Invoke-IpamGpoProvisioning –Domain mva.com –GpoPrefixName IPAM –DelegatedGpoUser Administrator –IpamServerFqdn ipam.mva.com
Теперь объекты групповой политики созданы, что можно увидеть в оснастке Group Policy Management:
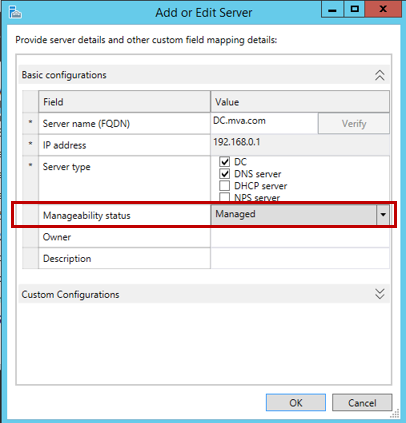
Вернемся к Server Manager. Во вкладке IPAM – SERVER INVENTORY щёлкните правой кнопкой мышки по одному из серверов и выберите Edit Server. В появившемся окне измените пункт «Состояние управления» на «Управляемый» и нажмите ОК. Повторите тоже самое для второго сервера.
Теперь нужно, чтобы на серверах DC и dsc01 вступили в силу изменения групповых политик. Самым быстрым способом будет на каждом из нужных нам серверов использовать следующий командлет PowerShell:
gpupdate /force
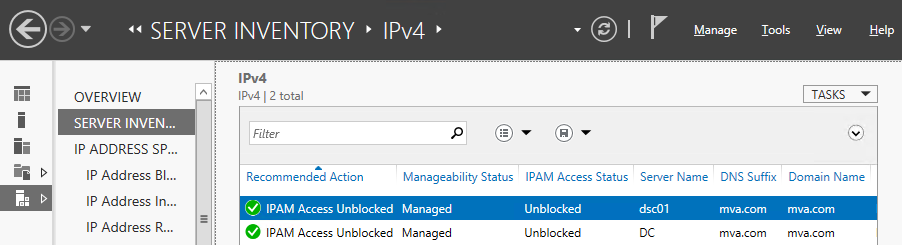
Дождемся завершения выполнения этой команды на каждом из серверов. Вернемся на сервер IPAM в Server Manager – IPAM – SERVER INVENTORY и обновим «IPv4», а также обновим статус доступа к серверу, щёлкнув правой кнопкой мыши по каждому и выбрав пункт «Refresh Server Access Status». В итоге мы должны получить для наших серверов статус «Разблокирован» в столбце «Состояние доступа IPAM».
Теперь вернемся в вкладке IPAM – OVERVIEW и выберем «Retrieve data from managed servers» и дождемся завершения выполнения этой задачи:

Автоматически будут запущены следующие задачи по сбору данных: AddressExpiry, AddressUtilication, Audit, ServerAvailability, ServiceMonitoring, ServerConfiguration.
На этом этапе мы завершили настройку IPAM сервера и далее посмотрим, как его можно использовать в работе. В качестве примера рассмотрим наблюдение за инфраструктурой и управление ею с помощью IPAM.
Наблюдение за инфраструктурой и управление ею
IPAM позволяет автоматизировать и настроить периодичность мониторинга DHCP- и DNS-серверов по всему лесу. Также есть возможность управления несколькими серверами на применение настроек автоматически и периодически мониторить сервера DHCP и DNS в лесу AD. Кроме того, есть возможность управления несколькими серверами DHCP и настройками областей для распределенных серверов буквально одним щелчком мыши.
В качестве примера рассмотрим, как можно осуществлять наблюдение за DHCP- и DNS-серверами, а также управление ими, используя IPAM.
Откроем Server Manager на вкладке IPAM – MONITOR AND MANAGE – DNS and DHCP Servers. Обратите внимание, что в поле «Тип сервера» (1) вы можете выбрать не только DNS и DHCP, но и отсортировать только DNS или только DHCP. Выбрав один из серверов, можно просмотреть свойства этого сервера, параметры и каталог событий (2):
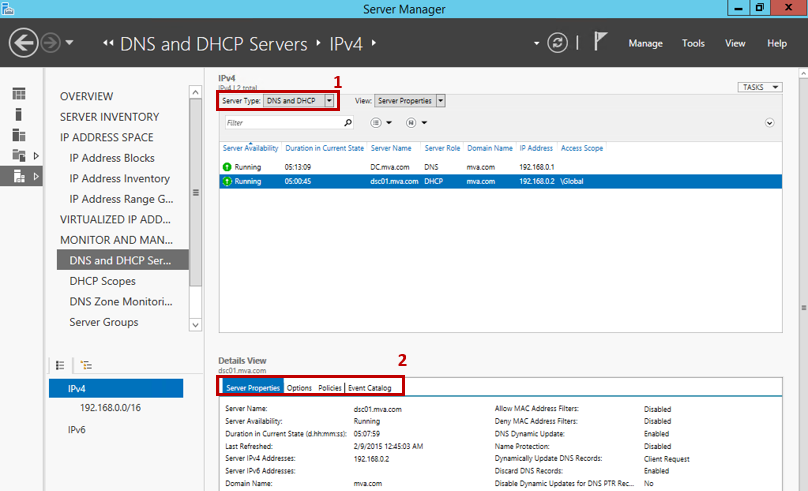
Теперь давайте выберем в поле «Тип сервера» DHCP, а в поле «Вид» — «Свойства области»:

Щелкните правой кнопкой мыши область DHCP MVA—scope1 и выберите «Дублировать область DHCP». В появившемся диалоговом окне «Дублирование области DHCP» измените значение поля «Имя области», а в разделе «Общие свойства» введите следующие значения:
- Начальный IP-адрес: 192.168.1.1
- Конечный IP-адрес: 192.168.1.254
- Маска подсети: 255.255.255.0
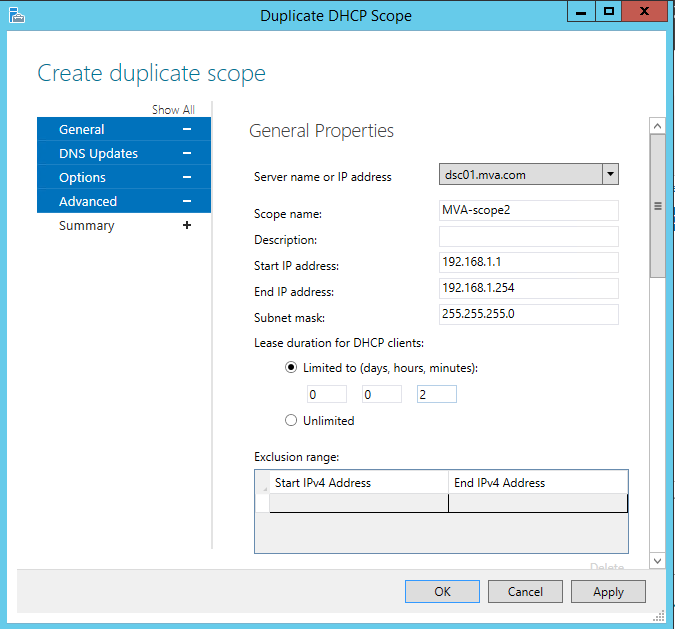
По мере необходимости, можно изменить и другие свойства области. После того, как все нужные изменения были внесены, нажмите ОК и убедитесь, что в списке теперь отображается еще одна область – MVA-scope2.

Та же область появится в консоли DHCP на нашем DHCP-сервере DSC01.
Если вы вернетесь на IPAM сервер и выберите обе области DHCP, щёлкните по ним правой кнопкой мыши, то сможете изменять параметры обеих областей.
Конечно же, с помощью IPAM можно отслеживать различные типы событий на DNS- и DHCP-серверах, включая данные как о самих серверах, так и о клиентах. Чтобы просмотреть журналы аудита и событие, в меню навигации IPAM нужно выбрать «Каталог событий» (EVENT CATALOG). По умолчанию в нижней области навигации выбрано «События настройки IPAM». Вы можете выбрать и другие события для просмотра, а также экспортировать их в файл для дальнейшего просмотра и анализа.
Надеюсь, информация в этой статье была вам полезна!
Полезные ссылки
- Попробовать Azure бесплатно на 30 дней!
- Изучить курсы виртуальной академии Microsoft
- Корпоративные устройства. Как обеспечить защиту данных и приложений
- Корпоративные устройства. Как управлять гибридными учетными данными
- Основы компьютерной безопасности
- Основы построения доменной сети
- Модернизация инфраструктуры организации с помощью Windows Server 2012 R2
- Лицензирование Windows Server 2012 R2
- Скачать пробную версию Windows Server 2012 R2
- Загрузить бесплатную или пробную Visual Studio
In this post, I will cover the steps to install and configure IPAM (IP Address Management) feature on Windows Server 2019.
What is IP Address Management (IPAM)?
IPAM provides highly customizable administrative and monitoring capabilities for the IP address infrastructure on a corporate network. You can monitor, audit, and manage servers running the Dynamic Host Configuration Protocol (DHCP) and Domain Name System (DNS).
Understanding Test Lab:
- WS2K19-DC01: Active Directory Domain Controller with DNS and DHCP server role.
- WS2K19-SRV02: Member Server for mylab.local domain.
Install IPAM Feature in Windows Server 2019:
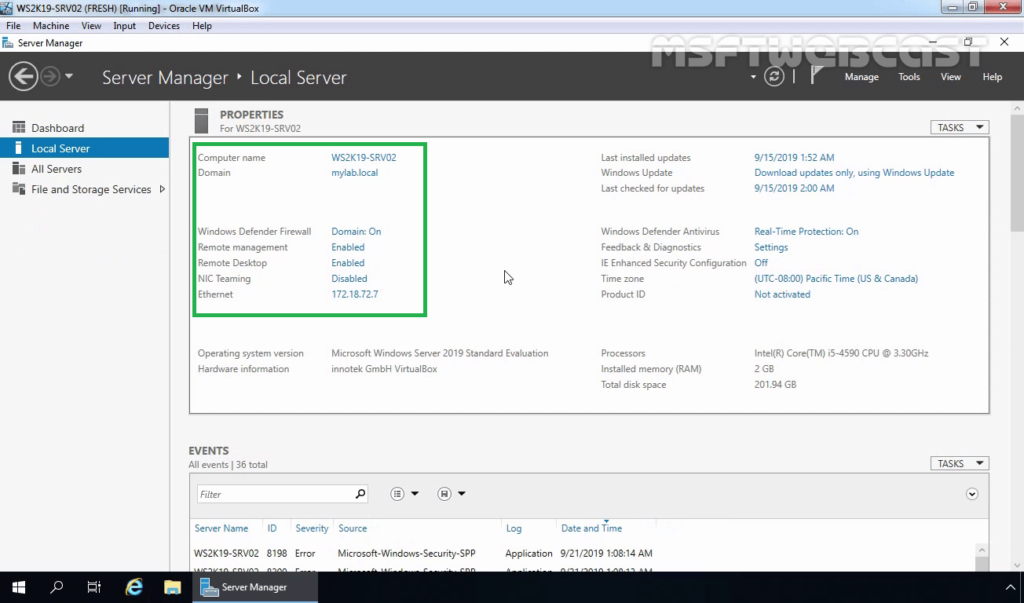
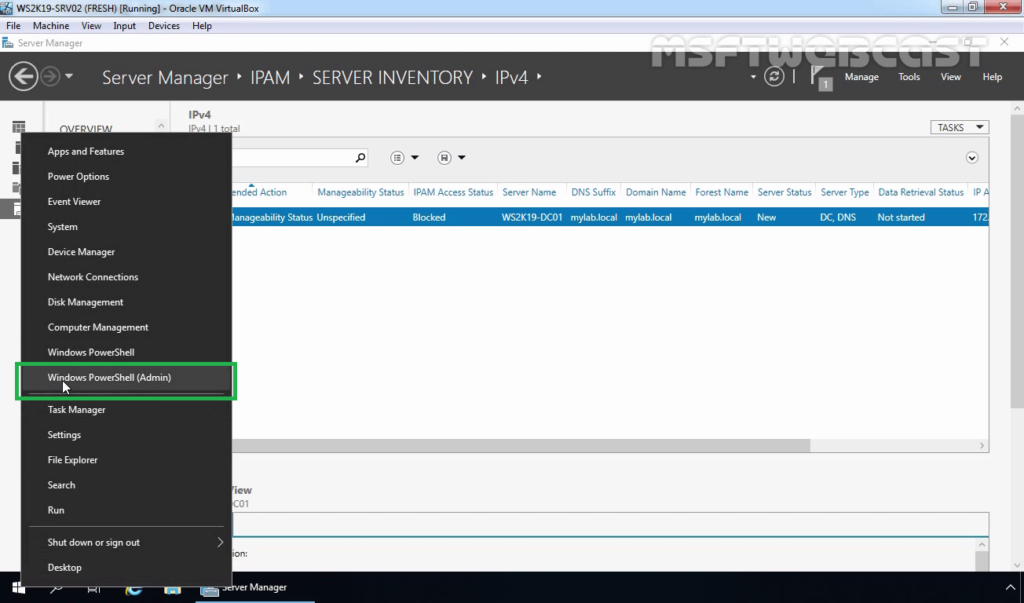
1. On WS2K19-SRV02, Open Server Manager Console.
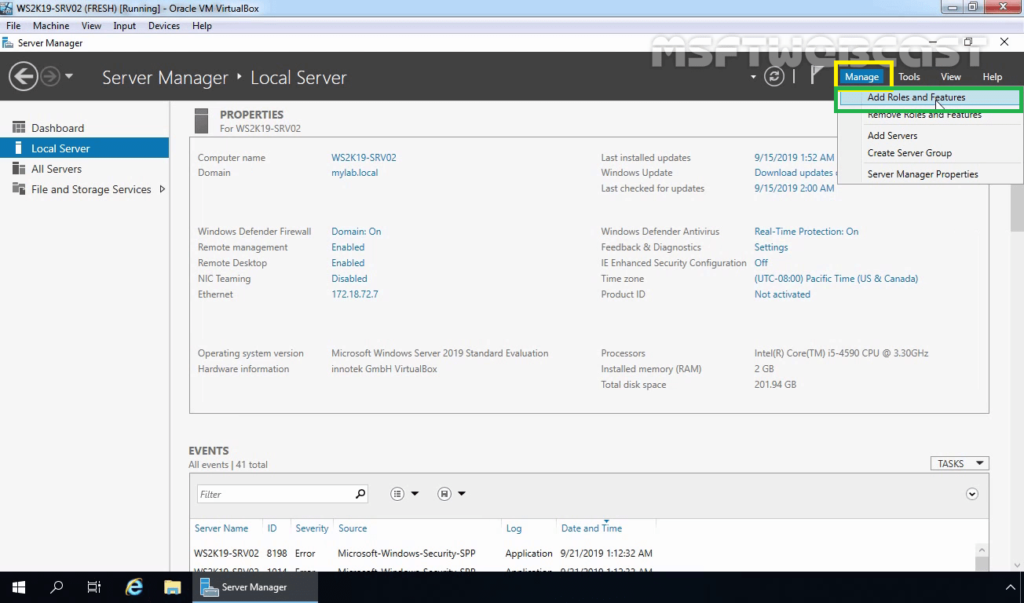
2. At the top of the Server Manager, click on Manage and select Add Roles and Features.
3. On the Before you begin page, click Next.
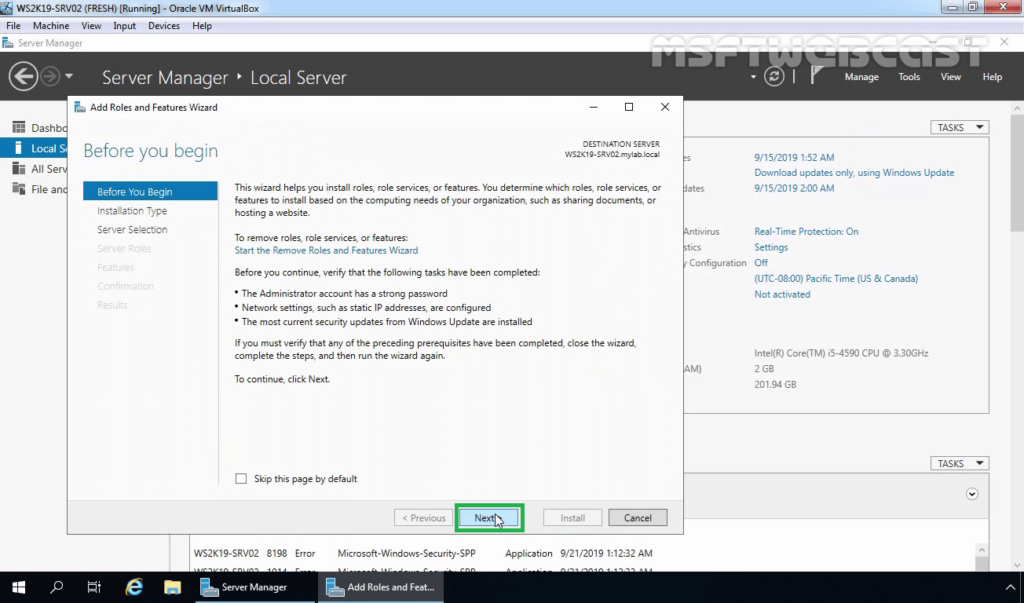
4. Select Role-based or feature-based installation and then click Next.

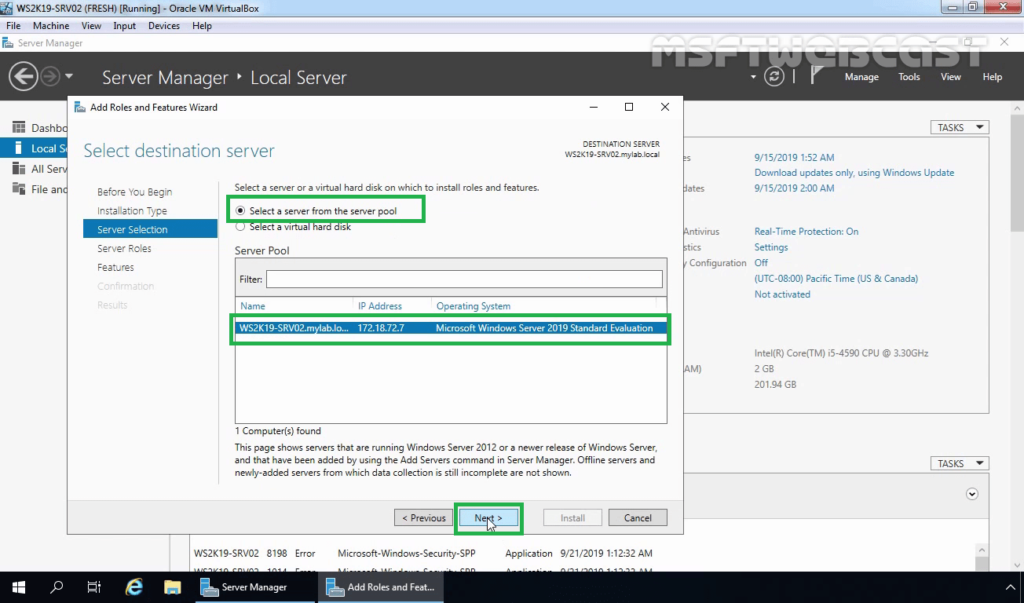
5. Select a server from the server pool on which you want to install the IPAM feature, click Next.
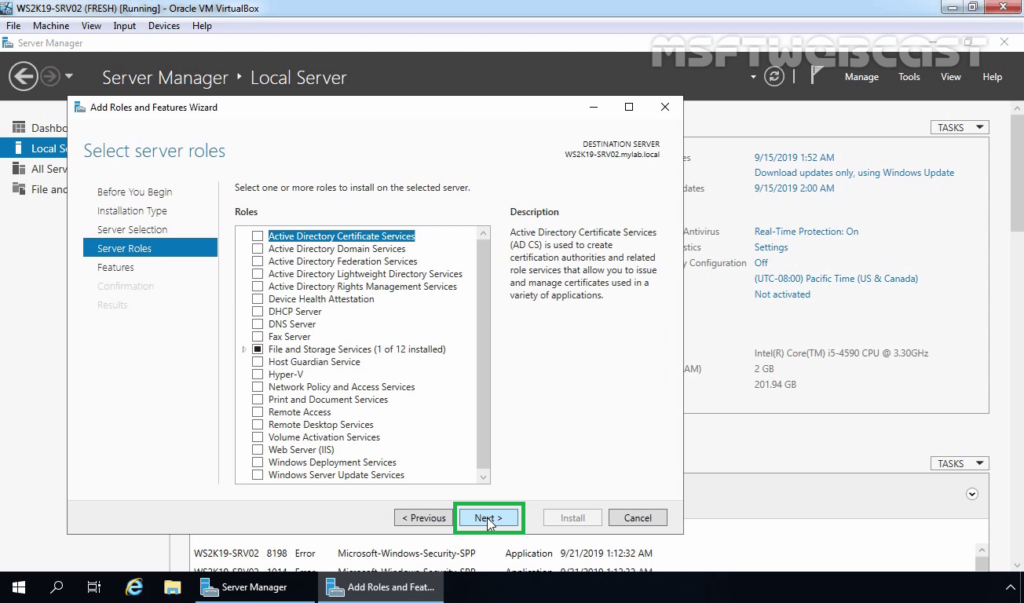
6. On select server roles page, click Next.
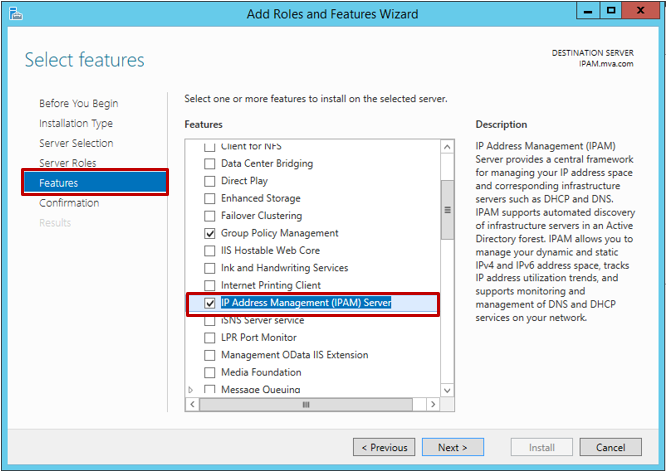
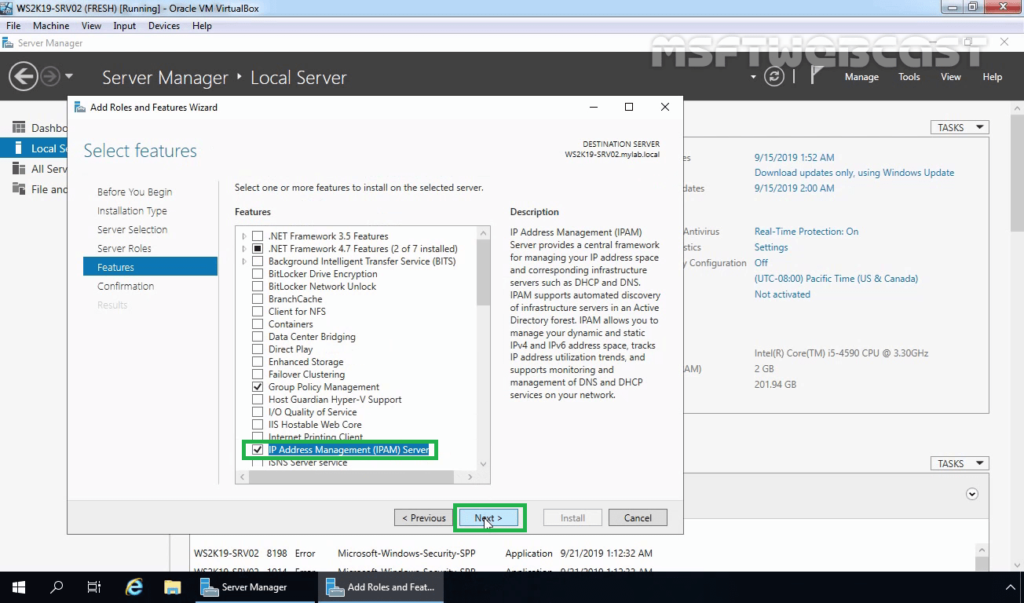
7. On select features page, scroll down and select IP Address Management (IPAM) Server feature.
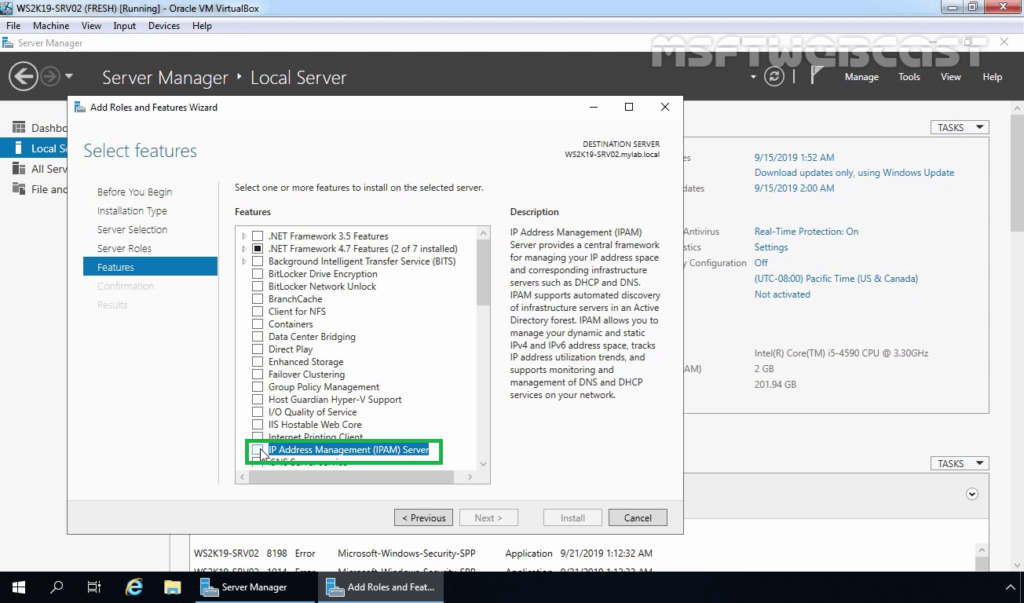
8. A new window will pop up, click on Add Features to include required features and management tools for IPAM.
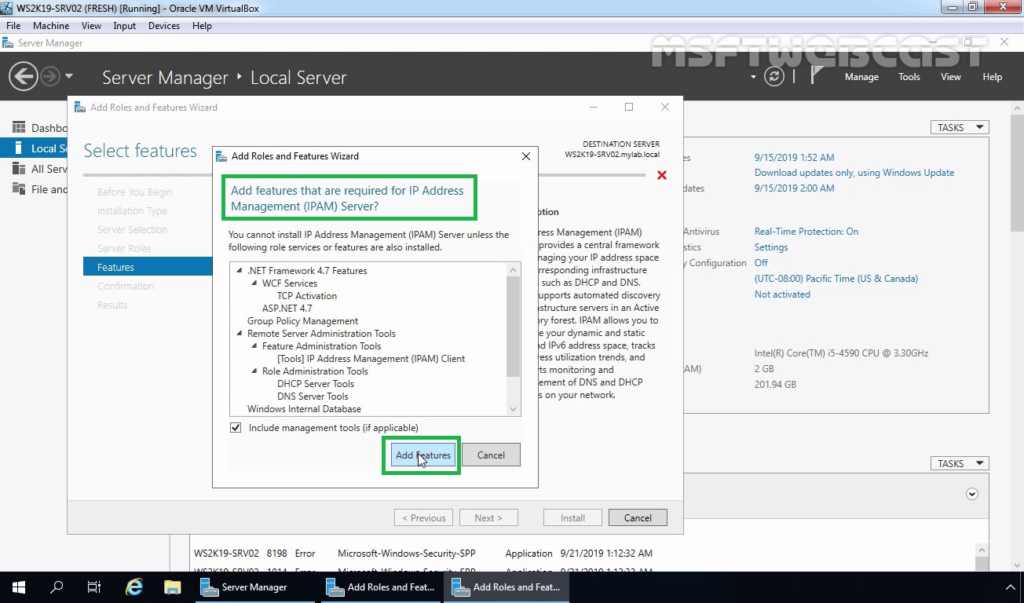
9. Make sure that the IPAM feature is selected. Click Next.
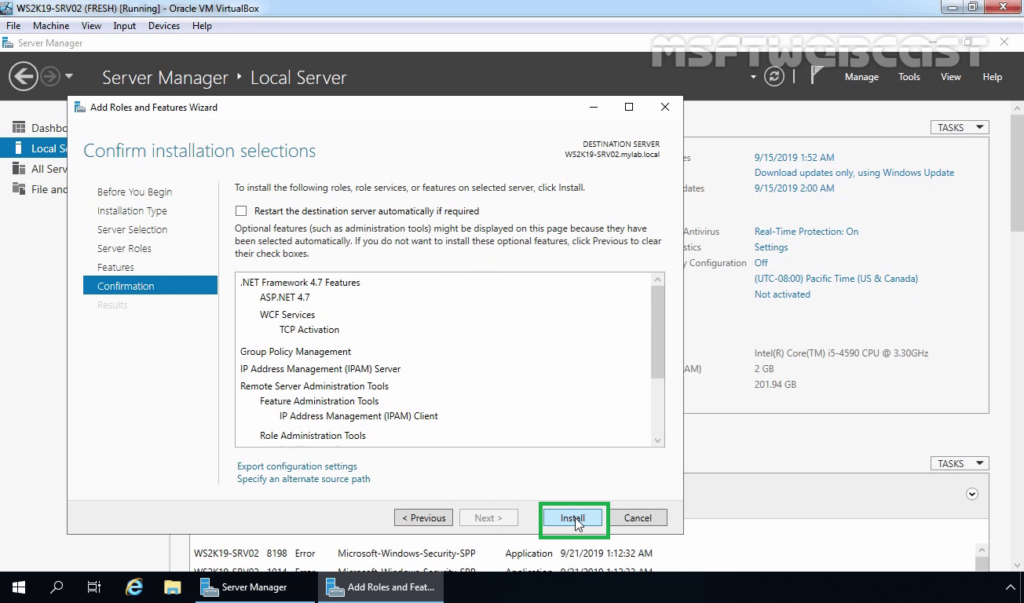
10. Click on the Install button to start the installation process.
11. When the installation is complete, click the Close button.

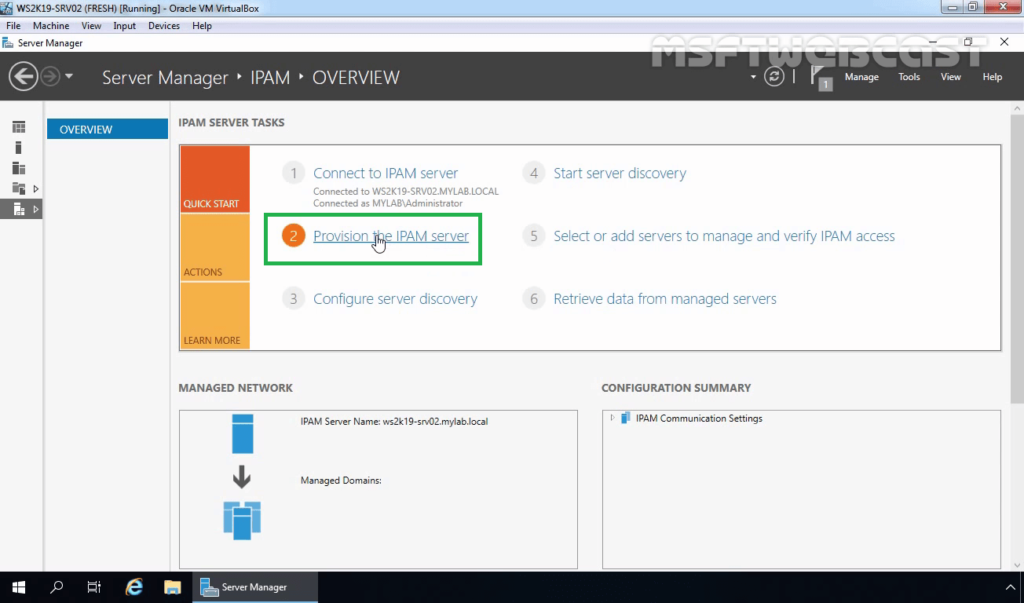
After installing the IPAM feature on windows server 2019, the next step is to configure the IPAM server. The IPAM server can manage DHCP, DNS, and Domain Controllers.
Configure IPAM Server in Windows Server 2019:
Step:1 Choose an IPAM Provisioning Method:
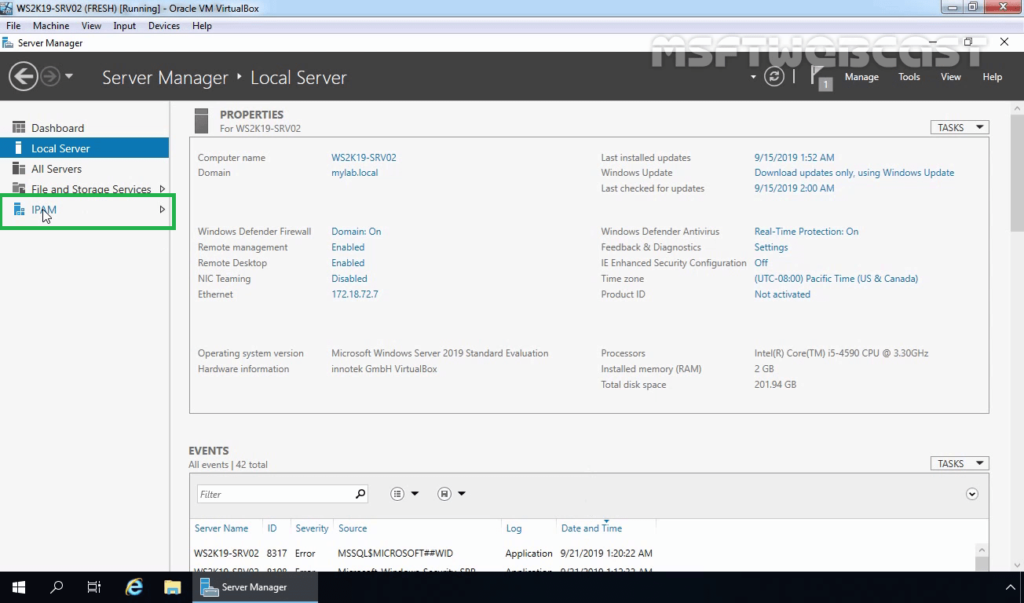
12. On the Server Manager Dashboard page, click on IPAM from the left pane.
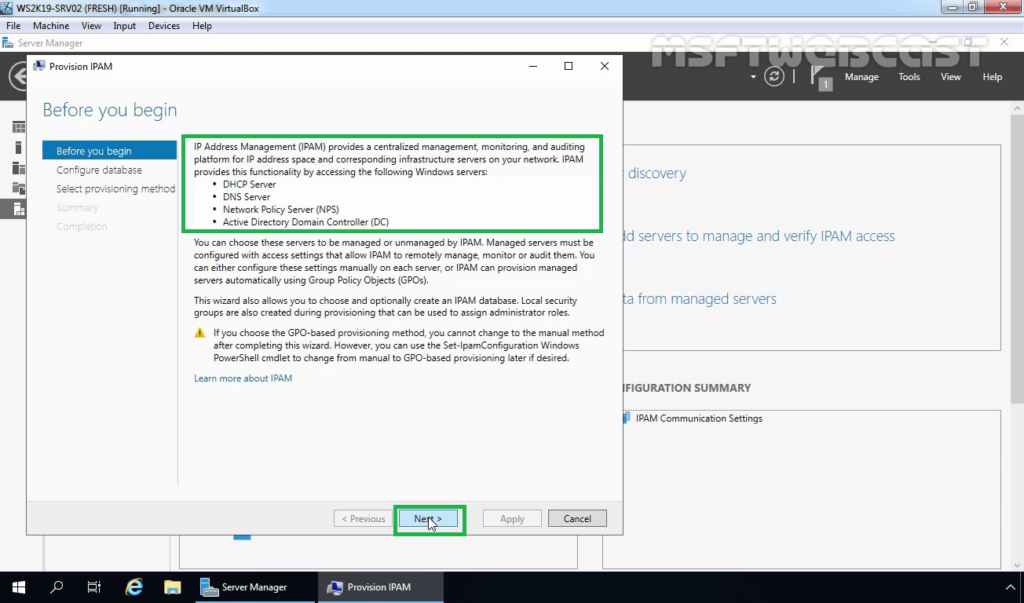
13. On the IPAM Overview page, click on Provision the IPAM server link to start the Provision IPAM wizard.
14. Read the information about IPAM server at the start of the Wizard and click Next.
15. Choose the database to store IPAM server data. You can use either the WID or SQL database. For testing purposes, I will go with the Windows Internal Database (WID). Click Next.
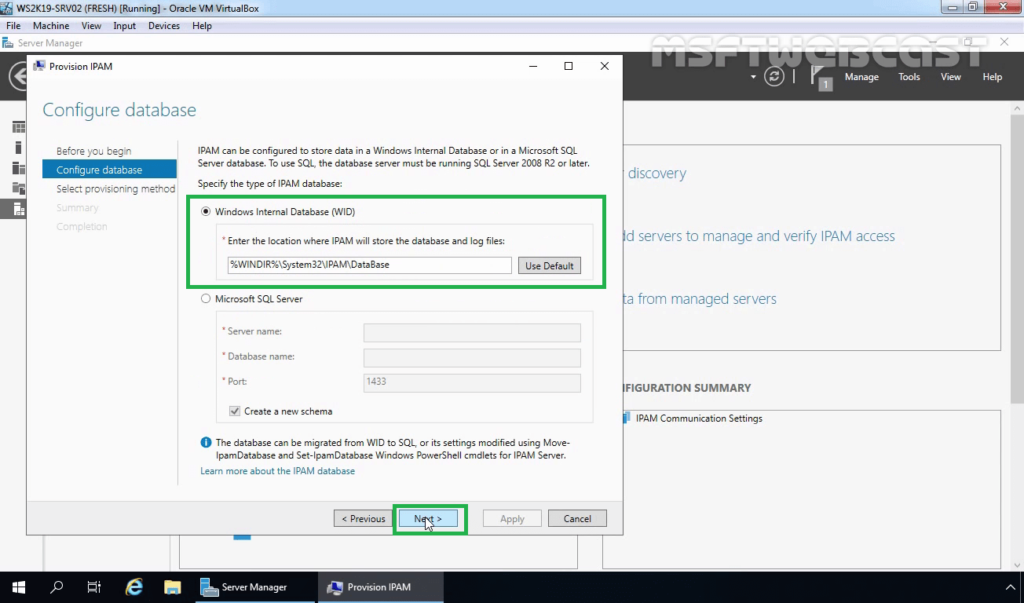
Note: The provisioning method is the process of enabling required permissions, files shares, and access settings on managed servers so that the IPAM server can communicate with them.
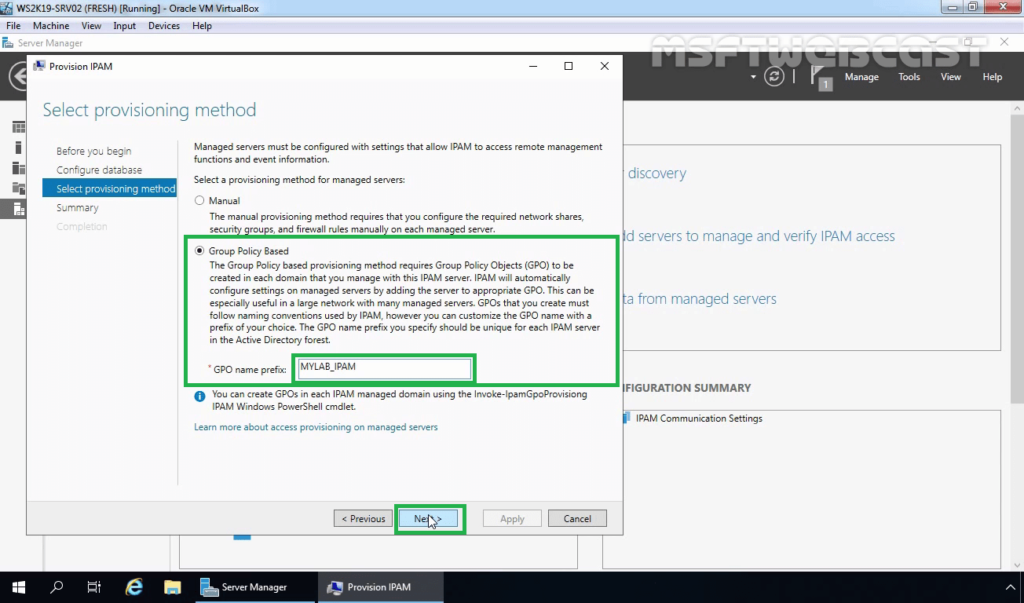
16. On select provisioning method page, choose either the Manual or Group Policy Based radio button. If you select Group Policy Based method, type a GPO prefix next to GPO name prefix to identify the GPOs. Click Next.
17. Review your selection. When you are ready, click on Apply.
18. Verify that IPAM provisioning completed successfully message is displayed, and then click Close.
Step:2 Configure Server Discovery
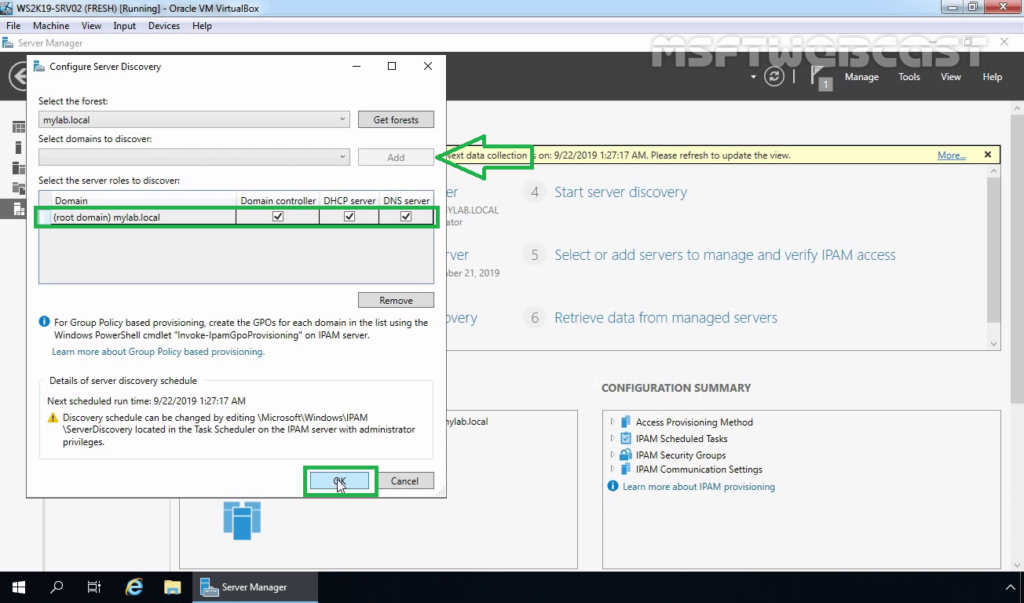
19. On the IPAM Overview page, click on Configure Server Discovery link to start server discovery wizard.
20. Click on the Get Forests button and wait for the background task to finish. A message will appear, click on OK to close it.
21. Choose each domain that you will manage with the current IPAM server by selecting it from the drop-down list and then click on the Add button to add it. Click on OK.
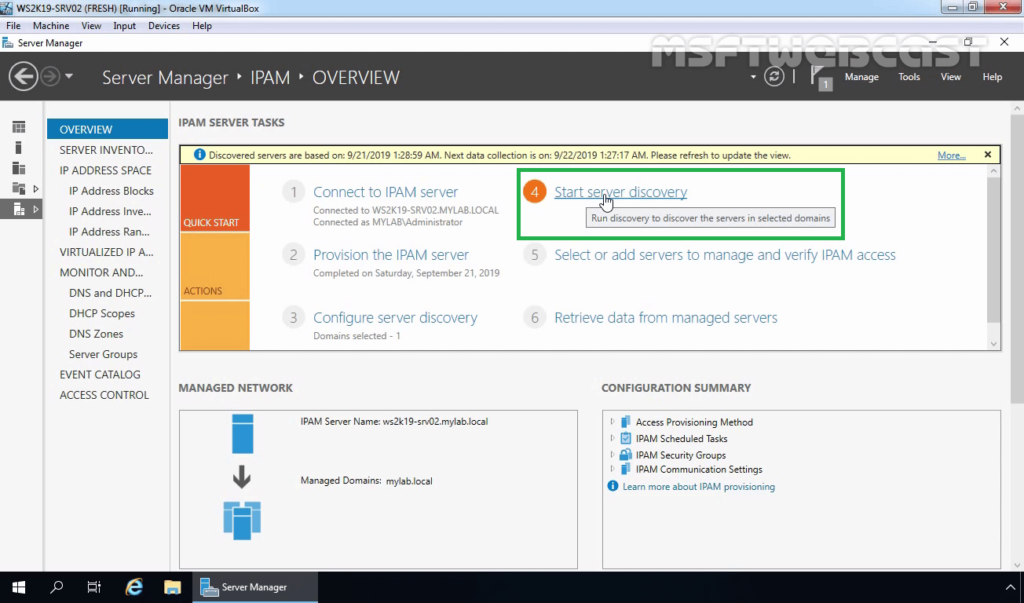
Step:3 Start Server Discovery
22. On the IPAM Overview page, click on the Start server discovery link to start the task to discover the server in the selected domain. It will take some time to finish.
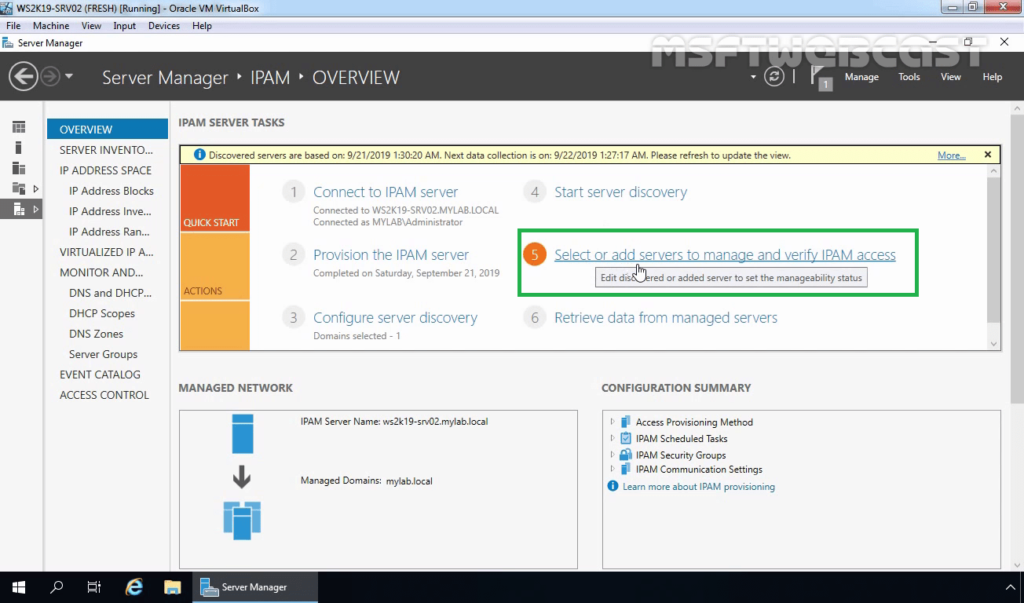
Step:4 Select or add servers to manage and verify the IPAM access
23. After the discovery process, click on the Select or add servers to manage and verify the IPAM access link to add servers that you want to manage using the IPAM.
24. Notice that IPAM Access Status is Blocked for the server.
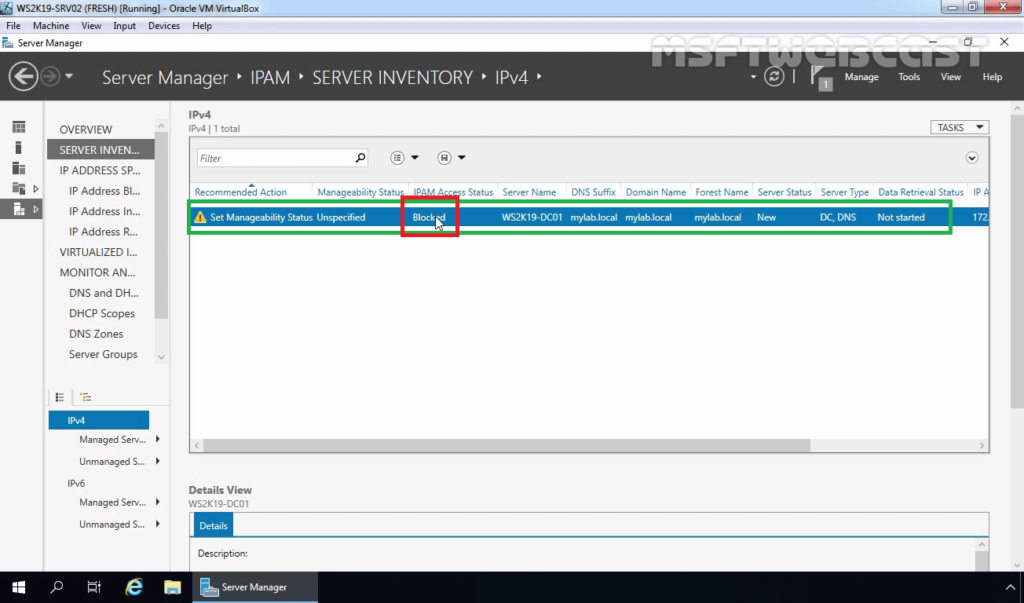
To fix this, we need to run the Invoke-IpamGpoProvisioning cmdlet at an elevated Windows PowerShell prompt.
25. On the IPAM server, open Windows PowerShell as administrator.
26. Run the below cmdlet at the PowerShell.
Invoke-IpamGpoProvisioning –Domain mylab.local –GpoPrefixName MYLAB_IPAM –IpamServerFqdn WS2K19-SRV02.mylab.local -DelegatedGpoUser Administrator@mylab.local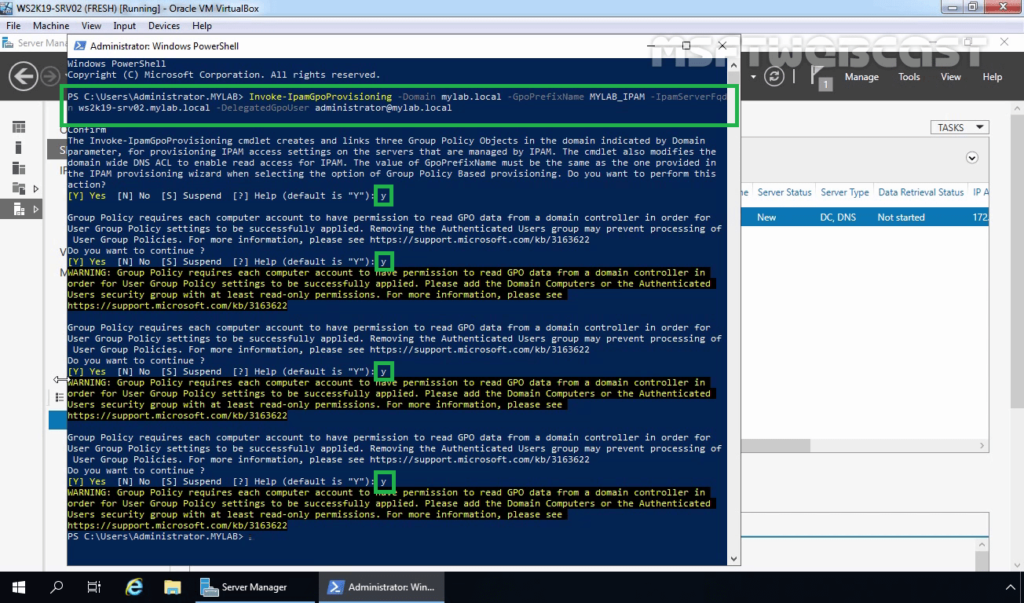
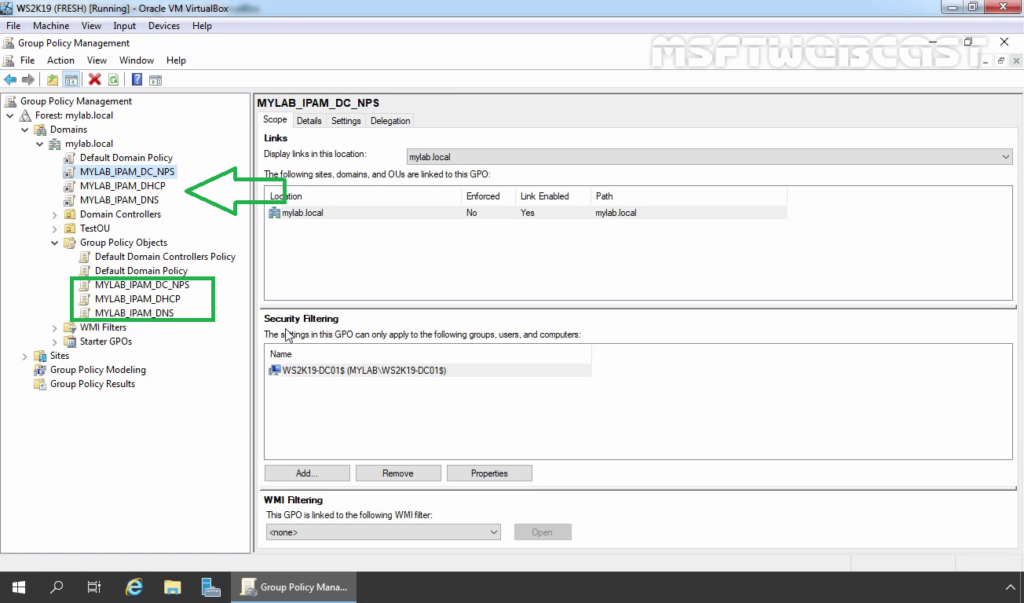
27. On Domain Controller, check the IPAM GPO’s.
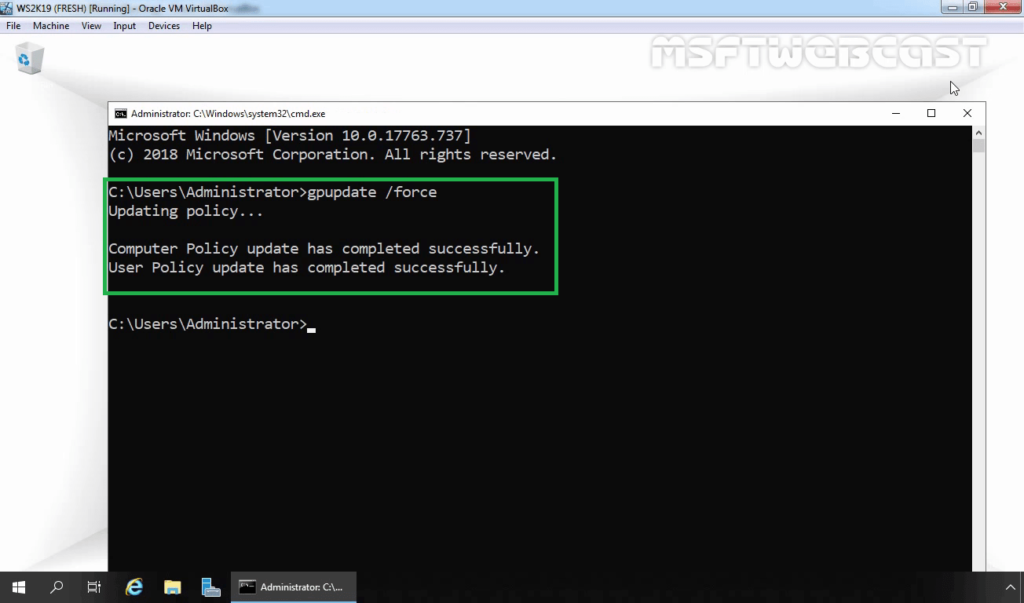
28. We need to update the group policy on our domain controller. Open a command prompt and run command gpupdate /force.
Step:5 Managed Server Access Settings:
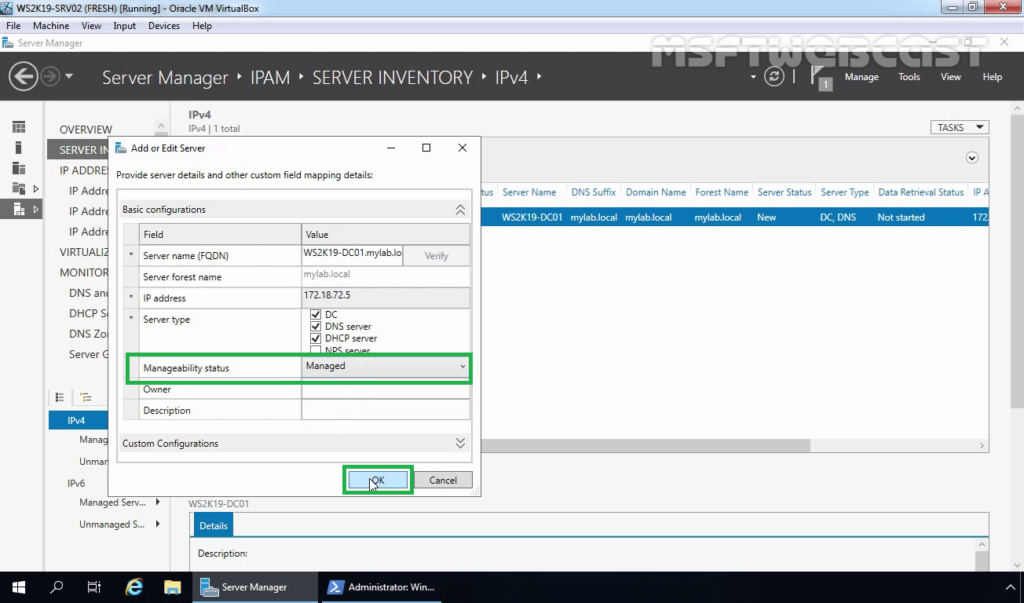
29. Right-click on the server and then click on Edit Server.
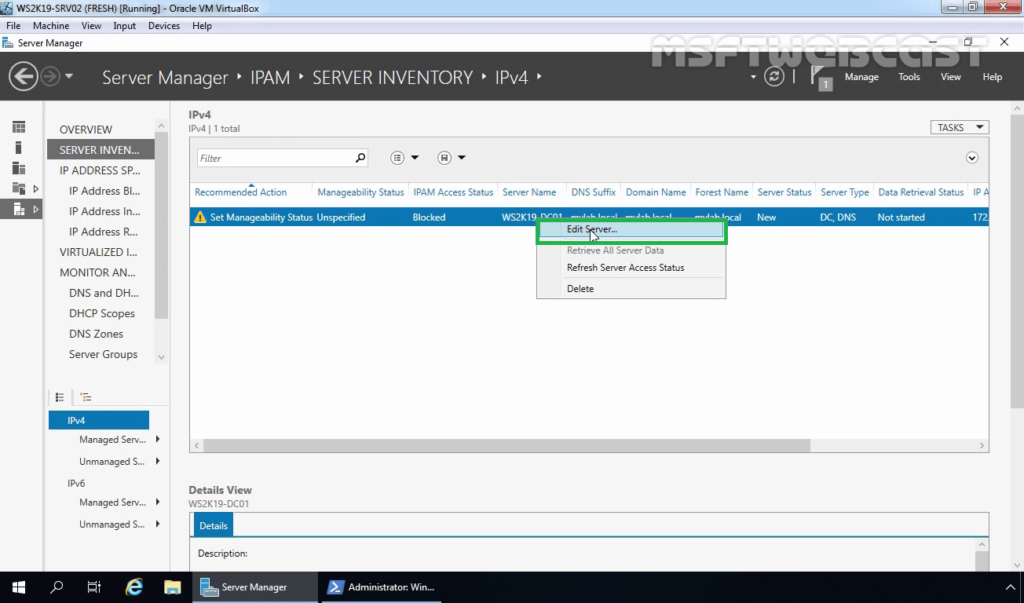
30. Select Managed from the drop-down list to manage the server by the IPAM server. Click on OK.
Step:6 Retrieve Data from Managed Servers
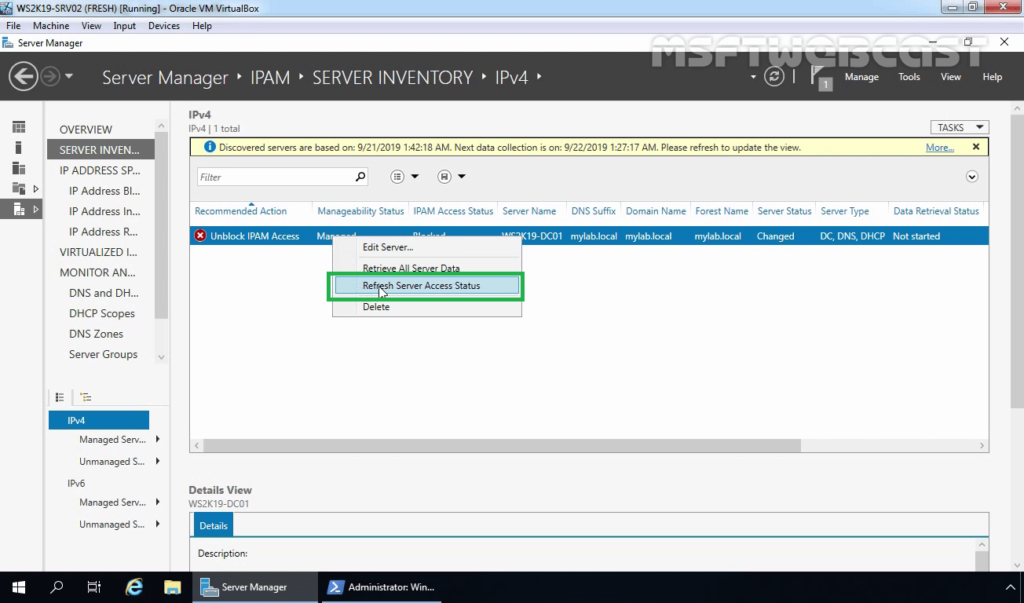
31. Right-click the servers that are selected, and then click Retrieve Server Access Status. This action also will take a few minutes to complete.
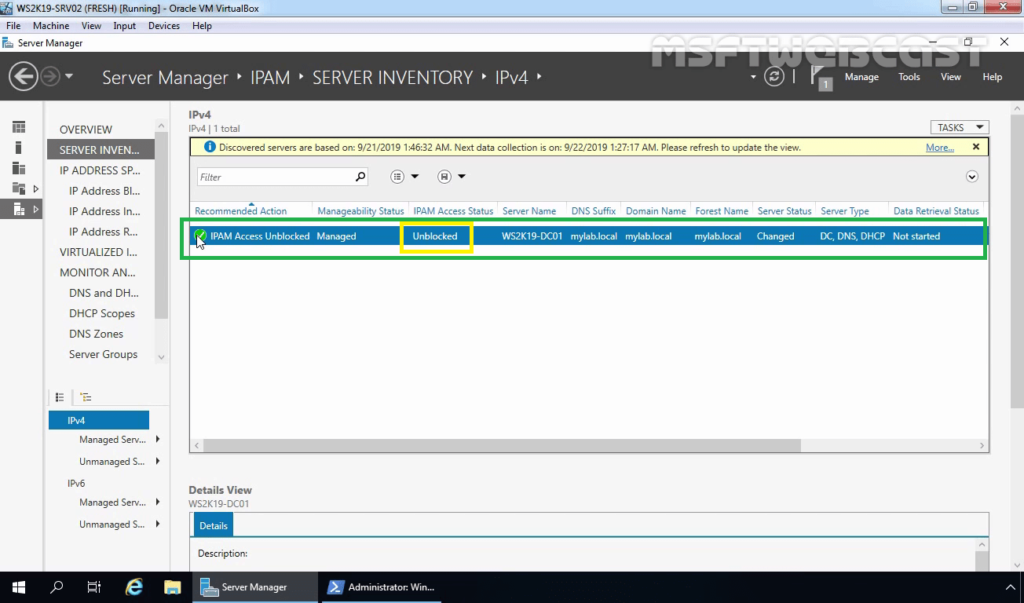
32. Verify the IPAM server access status to Unblocked.
33. Right-click the servers that are selected, and then click Retrieve All Server Data.
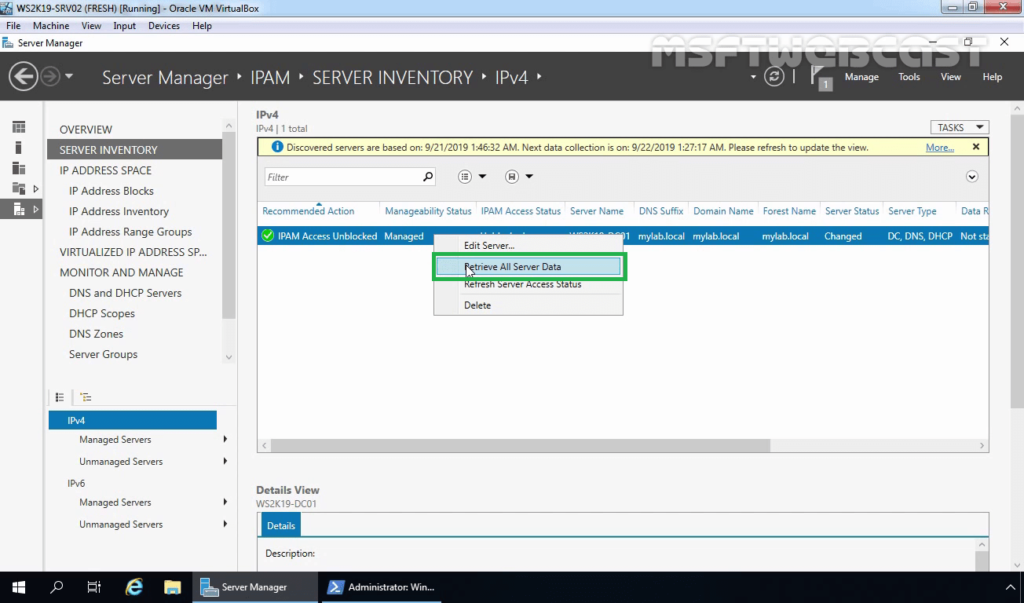
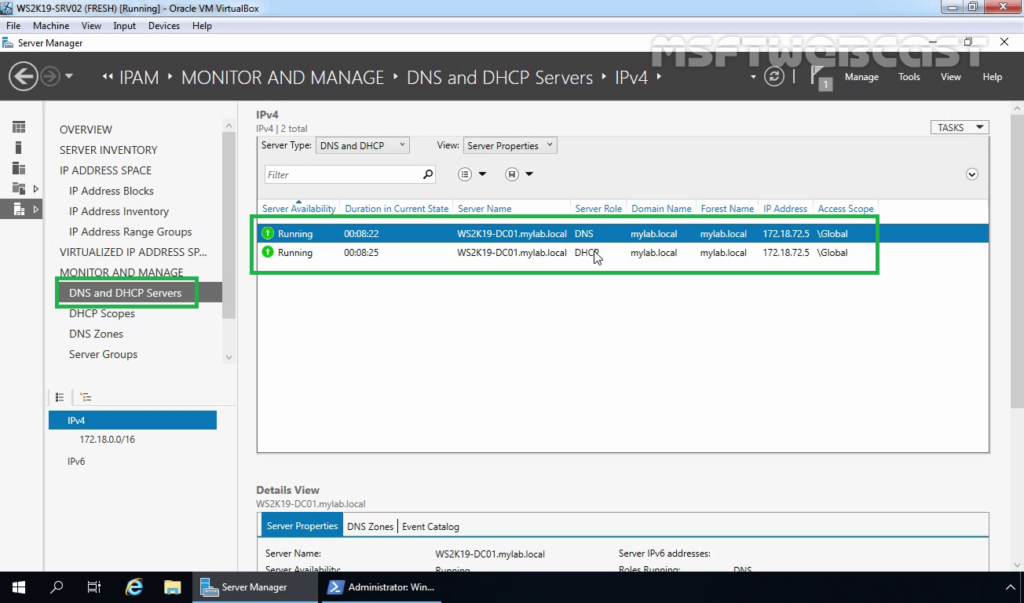
34. Wait for the data collection tasks to complete. Verify All the DHCP and DNS Data in IPAM Console.
In this post, we have learned the steps to install and configure IPAM (IP Address Management) server in Windows Server 2019.
Hope this will be helpful. Thank you for reading.
Related Articles:
- How to Install and Setup DNS Service on Windows Server 2019
- Install and configure DHCP in Windows Server 2019 Step By Step Guide Part-1
- Configure DHCP on Windows Server 2019 – (Part-2)
Post Views: 5,780
How to Set Up IPAM on Windows Server
In today’s digital landscape, where networks are both critical and complex, effective IP address management is essential. An IP Address Management (IPAM) tool provides a centralized platform for managing the IP address space, ensuring that resources are allocated efficiently and helping prevent conflicts and outages. This article will guide you through the process of setting up IPAM on Windows Server, offering detailed steps and best practices.
Understanding IPAM
IP Address Management (IPAM) is a feature available in Windows Server that provides administrators with the ability to plan, deploy, manage, and monitor their IP address infrastructure. This includes DHCP and DNS services. IPAM allows organizations to keep track of IP addresses and assists with IP address allocation, ensuring that the network runs smoothly without issues such as IP conflicts.
Prerequisites for IPAM Setup
Before diving into the installation process, it’s crucial to verify that your system meets the prerequisites:
-
Supported Operating System: You need a Windows Server version that supports IPAM. This includes Windows Server 2012, 2012 R2, 2016, 2019, and later versions.
-
Minimal Roles: IPAM can be deployed in different modes (standalone or as part of a domain) and requires specific roles, which include:
- Web Server (IIS) for managing the IPAM web interface.
- DHCP Server role if you are managing DHCP.
- DNS Server role if you are managing DNS.
-
Administrative Rights: Ensure that you have local administrative privileges on the Windows Server machine.
-
Network Configuration: Ensure that the server has a static IP address to avoid IP conflicts during the installation and deployment process.
-
Active Directory: If you intend to integrate IPAM into Active Directory, consider joining the server to the domain beforehand.
Installing the IPAM Feature
-
Open Server Manager: Begin by logging into your Windows Server and opening Server Manager from the Start menu.
-
Add Roles and Features: Click on «Add Roles and Features» in the Server Manager dashboard. This will launch the «Add Roles and Features Wizard.»
-
Role-Based or Feature-Based Installation: Select the «Role-based or feature-based installation» option and click «Next.»
-
Select Destination Server: Choose the server on which you would like to install the IPAM feature. Click «Next.»
-
Server Roles: In the «Server Roles» section, scroll down and expand the «Network Policy and Access Services» role. Since installing IPAM requires this role to be enabled, ensure you add it if it is not already installed. After that, find and check «IP Address Management (IPAM) Server». A dialog may pop up, asking if you want to add required features for IPAM; click «Add Features.» Click «Next.»
-
Features: You may skip the «Features» section if you don’t need additional features and click «Next.»
-
Confirmation: On the confirmation page, review your selections. Click «Install» to begin the installation process.
-
Installation Progress: Wait for the installation to complete. Once done, click «Close.»
Configuring IPAM
After successfully installing the IPAM feature, the next step is configuring it for use.
-
Open the IPAM Dashboard: Back in the Server Manager, locate the «IPAM» node under «Tools.» Click to open it.
-
IPAM Configuration Wizard: Upon first opening IPAM, the IPAM Configuration Wizard will launch. Click «Next» to continue.
-
Choose IPAM Deployment Method: You will be prompted to choose the deployment method:
- Standalone: For environments without Active Directory.
- Domain-managed: If you’re joining an Active Directory domain.
Depending on your choice, follow the respective steps. For this guide, we will proceed with the domain-managed option.
-
Confirm AD DS Access: Enter the credentials with sufficient permissions to manage the network’s DHCP and DNS services. Click «Next.»
-
Setting IPAM Services: You may also need to specify whether you want to manage DNS and DHCP directly through IPAM. By default, IPAM will perform polling from DNS and DHCP servers. Confirm, and click «Next.»
-
Select a Management Access Method: Choose whether to manage access through a Group Policy Object or through security groups. Configure as needed, focusing on which team members require access to the IPAM services.
-
Complete the Configuration: Click finish to complete the configuration. Be patient as IPAM will take some time to collect data from the DHCP and DNS servers.
Discovering DHCP and DNS Servers
Once you have configured the IPAM, you must discover the relevant DHCP and DNS servers in your network.
-
Navigating to IPAM: In the IPAM console, look for the «DHCP» node on the navigation pane.
-
Performing Server Discovery: You will see an option to perform server discovery. Click on it to start the process of discovering your DHCP and DNS servers.
-
Configure Server Discovery: Specify how you want to discover your DHCP servers. You can use manual or automatic discovery. For manual, provide the IP addresses of the DHCP servers that you want to manage.
-
Run the Discovery: After configuring the discovery options, initiate the process. IPAM will collect relevant data and display it in the dashboard.
-
Verify Discovery Results: Check if the DHCP and DNS servers were successfully discovered. Review the logs for any errors and resolve them as necessary.
Managing DHCP and DNS with IPAM
After setting up IPAM and discovering your DHCP and DNS servers, you can start to manage them from a central location.
-
Managing DHCP:
- Navigate to the «DHCP» section in the IPAM console.
- You will see the available DHCP scopes. From here, you can create new scopes, modify existing scopes, or delete them.
- For each scope, you can manage leases, reservations, and options.
-
Managing DNS:
- Switch to the «DNS» section where you can view all the DNS zones and records.
- You can add new records, delete records, or update existing entries, providing clear visibility and control over your DNS infrastructure.
Monitoring and Reporting
IPAM isn’t just about managing; it also provides monitoring tools. You can set alerts and generate reports to keep your network health in check.
-
Monitoring:
- IPAM allows you to monitor DHCP leases, reservations, and DNS records.
- Navigate to the «Monitoring» section to configure alerts that notify you of any potential IP address conflicts or lease expirations.
-
Reporting:
- You can generate detailed reports on the usage of IP addresses, DHCP lease statistics, and DNS query logs.
- Select «Reports» from the IPAM menu to run predefined reports or create custom reports based on your needs.
Best Practices for IPAM Management
While setting up and managing IPAM is straightforward, adhering to best practices can enhance its effectiveness:
-
Regular Updates: Keep your Windows Server and IPAM feature up to date with the latest patches and updates.
-
Backup Configuration: Regularly back up your IPAM configuration and database to prevent data loss due to server failures.
-
Access Control: Use role-based access control (RBAC) to grant permissions carefully. Only allow necessary personnel access to the IPAM console.
-
Document Changes: Maintain a log of all changes made to the IP address infrastructure to ensure transparency and facilitate troubleshooting.
-
Utilizing Alerts: Set up alerts to be immediately notified of any issues that may arise, such as IP address conflicts or DHCP lease expirations. This proactive approach can help mitigate problems before causing downtime.
-
Consistent Review: Conduct periodic reviews of your IP address scheme and DNS records to ensure they align with current organizational needs.
-
Educate Your Team: Ensure your IT team is well-versed in IPAM usage and capabilities. Regular training sessions about new features and best practices can enhance overall efficiency.
Troubleshooting IPAM Issues
No system is immune to issues. Familiarize yourself with common problems and their solutions:
-
Server Discovery Fails: If the IPAM server fails to discover DHCP/DNS servers:
- Verify that the servers are running and reachable on the network.
- Check for any connectivity issues between the IPAM server and the servers you are trying to discover.
-
Permission Issues: If certain features seem inaccessible:
- Review the permissions of the user account logged in to IPAM.
- Make sure that AD group memberships are correctly assigned.
-
Data Not Refreshing: If the data displayed in IPAM appears stale:
- Confirm that the polling schedule is set correctly.
- Manually refresh the data if necessary.
-
Installation Errors: If you face issues during installation:
- Examine the Windows Event Viewer for error logs that might provide insight into the problem.
- Ensure that you completed all prerequisite steps before attempting the installation.
-
Performance Issues: Should IPAM performance lag:
- Review system resources such as CPU and memory usage to identify bottlenecks.
- Consider increasing resources if the server is under heavy load.
Conclusion
Implementing an effective IP Address Management solution via Windows Server’s IPAM feature can drastically improve how an organization oversees its network addresses. By setting clear roles, ensuring compliance with best practices, and regularly monitoring the infrastructure, administrators can alleviate many common networking issues before they escalate.
Understanding and maintaining your IPAM infrastructure requires diligence, but with this comprehensive guide, you are well on your way to successfully deploying and utilizing IPAM in your organization. With its powerful features, Windows Server’s IPAM is more than just a tool; it’s an essential pillar in your network management strategy.
Introduction
The Microsoft IP Address Management (IPAM) is an integrated suite of tools to enable end-to-end planning, deploying, managing and monitoring of your IP address infrastructure, with a rich user experience. IPAM automatically discovers IP address infrastructure servers and Domain Name System (DNS) servers on your network and enables you to manage them from a central interface.
Maintaining an updated list of static IP addresses that have been issued has often been a manual task, which can lead to errors. To help organizations manage IP addresses, Windows Server 2016 provides the IP Address Management (IPAM) tool.
IPAM enables the administration and monitoring of DHCP and DNS and provides a comprehensive view of where IP addresses are used. IPAM collects information from domain controllers and Network Policy Servers (NPSs), and then stores that information in the Windows Internal Database.
Benefits of IPAM:
- IPv4 and IPv6 address space planning and allocation.
- IP address space utilization statistics and trend monitoring.
- Static IP inventory management, lifetime management, and DHCP and DNS record creation and deletion.
- Service and zone monitoring of DNS services.
- IP address lease and login event tracking.
- Role-based access control (RBAC).
- Remote administration support through RSAT.
- Reporting in the IPAM management console.
Updates in IPAM Server 2016
| Feature/Functionality | New or improved | Description |
|---|---|---|
| Enhanced IP address management | Improved | IPAM capabilities are improved for scenarios such as handling IPv4 /32 and IPv6 /128 subnets and finding free IP address subnets and ranges in an IP address block. |
| Enhanced DNS service management | New | IPAM supports DNS resource record, conditional forwarder, and DNS zone management for both domain-joined Active Directory-integrated and file-backed DNS servers. |
| Integrated DNS, DHCP, and IP address (DDI) management | Improved | Several new experiences and integrated lifecycle management operations are enabled, such as visualizing all DNS resource records that pertain to an IP address, automated inventory of IP addresses based on DNS resource records, and IP address lifecycle management for both DNS and DHCP operations. |
| Multiple Active Directory Forest support | New | You can use IPAM to manage the DNS and DHCP servers of multiple Active Directory forests when there is a two-way trust relationship between the forest where IPAM is installed and each of the remote forests. |
| Purge Utilization Data | New | You can now reduce the IPAM database size by purging the IP address utilization data that is older than a date that you specify. |
| Windows PowerShell support for Role Based Access Control | New | You can use Windows PowerShell to set access scopes on IPAM objects. |
For this demo, I will be using 02 Server. which is 01 Domain Server, 01 Member Server.
Let’s Get Started. 🙂
1 – Log in to your domain member Server (SUB-SERVER), open Server Manager, click add roles & features, proceed to Select features interface, and select the IP Address Management (IPAM) Server check box and proceed with Next


2 – On the Confirm installation selections interface, click Install


3 – Close the Installation progress interface when installation is complete

4 – In the Member server, on the Server Manager, click IPAM

5 – In the IPAM Overview interface, click Connect to IPAM server

6 – On the Connect to an IPAM Server interface, click SUBSERVER.NewHelpTech.lk, and then click OK

7 – Next, click Provision the IPAM server

8 – In the Provision IPAM Wizard interface, on the Before you begin page, click Next

9 – On the Configure database interface, click Next

10 – On the Select provisioning method interface, ensure that the Group Policy Based is selected then in the GPO name prefix box, type IPAM_NewHelpTech, and then click Next

11 – On the Confirm the Settings interface, click Apply
*_* Provisioning will take a few minutes to complete *_*

12 – Click Close once provisioning is complete

13 – On the IPAM Overview interface, click Configure server discovery

14 – In the Configure Server Discovery settings box, click Get Forest then click Add (verify that you add the correct domain)


15 – On the Configure Server Discovery box, confirm that Domain Controller, DHCP Server, and DNS Server is selected and then click OK

16 – In the IPAM Overview interface, click Start server discovery
*_* Discovery may take around 5 to 10 minutes to run *_*

17 – After a few minutes, the yellow bar will indicate that the discovery is completed

18 – In the IPAM Overview interface, click Select or add servers to manage and verify IPAM access

19 – Notice that the IPAM Access Status is blocked
*_* This also indicate that IPAM server has not yet been granted permission to manage the domain server via Group Policy *_*

20 – I will use Windows PowerShell for provisioning the IPAM GPO

21 – In the Windows PowerShell, type:
Invoke-IpamGpoProvisioning –Domain NewHelpTech.lk –GpoPrefixName IPAM_NewHelpTech –IpamServerFqdn SUBSERVER.NewHelpTech.lk –DelegatedGpoUser Administrator
*_* When you are prompted to confirm the action, type Y, and then press Enter
*_* The command will take a few minutes to complete *_*


22 – Next, in the SERVER INVENTORY ===> IPv4 pane, right-click DCSERVER, and then click Edit Server

23 – In the Add or Edit Server box, set the Manageability status to Managed, and then click OK

24 – Please switch to Domain Server and run gpudate /force command to update the IPAM GPO

25 – Next, in the IPAM console, right-click DCSERVER, and then click Refresh Server Access Status
*_* It may take up to 10 minutes for the status to change *_*

26 – Refresh tasks as needed until a green checkmark displays next to DCSERVER and the IPAM Access Status shows Unblocked for the server

Configure and verify a new DHCP scope with IPAM
27 – in the IPAM navigation interface, under MONITOR AND MANAGE, click DNS and DHCP Servers.
*_* then right-click the instance of DCSERVER.NewHelpTech.lk that contains the DHCP server role, and then click Create DHCP Scope.


28 – In the Create DHCP Scope box, in the Scope Name box, type NewHelp Tech Branch Scope
*_* In the Start IP address box, type 172.16.1.100
*_* In the End IP address box, type 172.16.1.150
*_* subnet mask is 255.255.0.0

29 – Verify the configuration, then click OK

30 – switch to Domain Server, and open DHCP console
*_* expand DCSERVER.NewHelpTech.lk, expand IPv4, and confirm that NewHelpTech Branch Scope exists

Good luck! Just give it try – I’m sure you’ll love it as well. If you have any comments or questions on feel free to contact me.
That’s all for now. 🙂
Некоторое время назад я писал, как можно автоматизировать процедуру выдачи статических IP адресов для ВМ, разворачиваемых из шаблонов vCenter.
Я довольно долго пользовался данным методом выдачи адресов для ВМ в своей лаборатории, однако при всей своей простоте он имеет ряд недостатков. Во-первых, выданные адреса хранятся в текстовом файле, что затрудняет отслеживание свободных адресов и удаление неиспользуемых. Во-вторых, Perl я совсем не знаю, из-за чего крайне затруднительно редактировать скрипт для добавления новых функций.
Поэтому недавно я решил переписать сценарий и интегрировать его со службой Windows IP Address Management, которая присутствует в Windows Server 2012 R2 и более поздних версиях.
Вкратце, выдача адресов работает следующим образом:
- При создании ВМ из шаблона, vCenter запускает скрипт на Perl и передает ему XML документ, который содержит информацию о ВМ (имя, расположение, количество сетевых адаптеров и группы портов, к которым они подключены).
- Скрипт Perl, в свою очередь, запускает сценарий на Powershell и передает ему XML документ.
- Сценарий Powershell подключается к серверу IPAM, запрашивает свободный IP адрес из диапазона, который соответствует группе портов виртуального коммутатора, и резервирует его за ВМ.
- Сценарий Powershell возвращает модифицированный XML документ с зарезервированными IP адресами скрипту Perl, который отдает его vCenter.
- vCenter использует полученные адреса при создании ВМ.
У данного метода тоже есть ряд недостатков. Скрипт генерирует только IP адрес, маска подсети, маршрутизатор по умолчанию и адрес DNS сервера должны быть прописаны в настройках Customization Specification. Скрипты работают только на vCenter под Windows, т.к. vCenter Server Appliance не поддерживает сценарии на Powershell. Возможно в будущем у меня дойдут руки, чтобы сделать обеспечить работу скрипта и под Appliance.
Ниже приведен пример настройки серверов IPAM и vCenter, а также скрипты на Perl и Powershell.
Настройка
Для начала установите роль IPAM сервера.

Настройте сервер IPAM (Provision the IPAM server). Для хранения конфигурации я использовал встроенную БД и ручной режим настройки политик (Manual).

Создайте новый блок адресов Add IPv4 Address Block. В поле Network ID укажите адрес подсети, задайте маску (Prefix length), начальный и конечный IP адрес блока. Оставьте остальные настройки по умолчанию.

Создайте новую подсеть Address Subnet. В поле Name укажите имя группы портов на виртуальном коммутаторе. В качестве Network ID укажите адрес подсети, укажите маску подсети. Оставьте остальные настройки в значении по умолчанию.

Создайте новый диапазон адресов (Add IP Address Range). В поле Network ID укажите адрес подсети, в поле Prefix length укажите длину маски. В полях Start IP address и End IP address укажите начальный и конечный адрес диапазона для выдачи. Оставьте остальные значения по умолчанию.

Создайте служебную доменную учетную запись, например, Company\IPAMUser.
Назначьте учетной записи роль IP Address Record Administrator Role. Для этого в консоли IPAM перейдите на вкладку ACCESS CONTROL > Access Policies и создайте новую политику (Add Access Policy). В политике в поле User alias укажите имя служебной учетной записи, а поле Access Settings укажите роль и область действия роли (\Global).

На сервере IPAM в консоли управления локальными пользователями и группами добавьте служебную учетную запись в группу «WinRMRemoteWMIUsers_».

На сервере vCenter установите консоль администрирования IPAM (Features > Remote Server Administration Tools > Feature Administration Tools > IP Address Management (IPAM) Client).
Если сервер IPAM и сервер vCenter не являются членами одного домена, и не используется Kerberos аутентификация, то на сервере vCenter вам потребуется добавить сервер IPAM в перечень доверенных серверов, например:
winrm set winrm/config/client @{TrustedHosts=»ipam02.company.local»}
или настроить подключение с использованием HTTPS, как описано в статье http://blog.vmpress.org/2009/11/winrm-windows-server-2008.html
На сервере vCenter установите Perl и добавьте параметры в Advanced Settings в настройках vCenter, как это описано в статье http://blog.vmpress.org/2015/06/ip-vmware-vcenter.html
Сохраните скрипт Perl на сервере vCenter, например, в файл «C:\Scripts\wrapper.pl».
use strict;
use warnings;
use MIME::Base64;
use Encode qw(encode);#Read XML document from STDIN
sub ReadFromSTDIN($) {
my ($fh) = @_;
my $line;
my $doc;
do {
$line = <$fh>;
$doc .= $line;
} while (defined($line) && $line !~ /<\/generator>/);
local $/ = undef;
return $doc;
}#Write modified XML document to STDOUT
sub WriteToSTDOUT($$) {
my ($fh, $doc) = @_;
print $fh $doc;
}#Encode XML document to Base64 format
sub EncodeXML($) {
my ($doc) = @_;
my $encoded = encode_base64(encode(«UTF-8», $doc));
$encoded =~ s/[\x0A\x0D]//g;
return $encoded;
}# Main
eval {
my $doc = ReadFromSTDIN(\*STDIN);
my $encoded = EncodeXML($doc);
my $result = `»powershell.exe -file C:\\scripts\\ipam.ps1 $encoded»`;
WriteToSTDOUT(\*STDOUT, $result);
exit(0);
}
При необходимости отредактируйте путь к сценарию Powershell, не забудьте про экранирование символа «\» в пути.
Сохраните сценарий Powershell на сервере vCenter, например, в файл «C:\scripts\ipam.ps1».
param (
[string]$InputString
)#Return credetials to connect to IPAM server
function generate-Credentials($Username, $Password) {
$Pass = ConvertTo-SecureString -String $Password -AsPlainText -Force
$Cred = New-Object -TypeName System.Management.Automation.PSCredential -ArgumentList $Username, $Pass
return $Cred
}#If hostname is empty, set hostname = VM name
function generate-VMName($xml) {
$LastIndexOf = $xml.generator.vm.LastIndexOf(«/»)
$VMName = $xml.generator.vm.Substring($LastIndexOf+1)
if($xml.generator.hostname -eq «») {
$xml.generator.hostname = $VMName
}
return $xml
}#Request free IP address from IPAM Subnet name equal to NIC’s virtual switch port group
function get-IPAddress ($CimSession, $SubnetName) {
$IPAddress = (get-ipamsubnet -addressfamily ipv4 -cimsession $CimSession | where {$_.Name -eq $SubnetName} | get-ipamrange -addressfamily ipv4 | find-ipamfreeaddress).ipaddress
return $IPAddress
}#Convert Base64 string to XML document
[xml]$xml = [System.Text.Encoding]::UTF8.GetString([System.Convert]::FromBase64String($InputString))#IPAM server address, username and password
$IpamServer = «ipam02.company.local«
$Username = «COMPANY\IPAMUser«
$Password = «P@ssw0rd«
$Credentials = generate-Credentials $Username $Password
$xml = generate-VMName $xml
$CimSession = New-CimSession -ComputerName $IpamServer -Credential $Credentials#Request and assign IP addresses for all NICs
foreach ($element in $xml.generator.nics) {
$SubnetName = $element.nic.Network
$ipaddress = get-IPAddress $CimSession $SubnetName
#Reserve IP address from IPAM and write it to XML document
if($ipaddress) {
Add-IpamAddress -IpAddress $ipaddress -AssignmentType auto -devicetype VM -devicename $xml.generator.hostname
-MacAddress $element.nic.macaddress -CimSession $CimSession
$element.nic.ipaddress = $ipaddress.ToString()
}
}
return $xml.InnerXml
В сценарии Powershell задайте адрес сервера IPAM и укажите имя и пароль служебной учетной записи.
Отредактируйте параметры в Advanced Settings в настройках vCenter, указав путь к исполняемому файлу Perl и скрипту.
В параметре config.guestcust.name-ip-generator.arg1 укажите путь к скрипту «C:\scripts\wrapper.pl».
В параметре config.guestcust.name-ip-generator.arg2 укажите путь к скрипту «C:\scripts\wrapper.pl».
В параметре config.guestcust.name-ip-generator.program укажите путь к исполняемому файлу «C:\Perl64\Bin\perl.exe».

Создайте или отредактируйте существующие настройки Customization Specification на сервере vCenter. На вкладке Configure Network выберите ручной вариант настройки адресации (Manually select custom settings) и отредактируйте настройки виртуального сетевого адаптера.

На вкладке IPv4 выберите вариант Use an application configure on the vCenter Server to generate an IP address, задайте маску подсети (Subnet Mask) и маршрутизатор по умолчанию (Default Gateway). На вкладке DNS укажите адрес DNS сервера.

На этом настройка завершена.
Проверка работы
Для проверки работы скрипта запустите его в ручном режиме из командной строки.
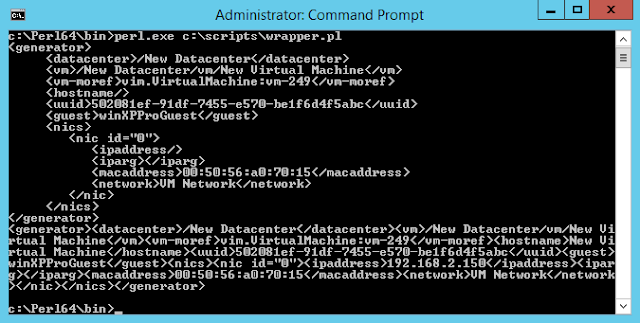
С:\Perl64\bin\perl.exe c:\scripts\wrapper.pl
и используйте тестовый XML документ, например:
<generator>
<datacenter>/New Datacenter</datacenter>
<vm>/New Datacenter/vm/New Virtual Machine</vm>
<vm-moref>vim.VirtualMachine:vm-249</vm-moref>
<hostname/>
<uuid>502081ef-91df-7455-e570-be1f6d4f5abc</uuid>
<guest>winXPProGuest</guest>
<nics>
<nic id=»0″>
<ipaddress/>
<iparg></iparg>
<macaddress>00:50:56:a0:70:15</macaddress>
<network>VM Network</network>
</nic>
</nics>
</generator>
Если все настроено корректно, то в результате работы скрипта вы увидите XML со сгенерированным IP адресом.
А на сервере IPAM появится информация о выданном IP адресе.

После проверки на тестовом XML можно попробовать создать ВМ из шаблона.
