
Доменом в Windows Server называют отдельную область безопасности компьютерной сети.
В домене может быть один или несколько серверов выполняющих различные роли. Разрешения, применяемые администратором, распространяются на все компьютеры в домене.
Пользователь, имеющий учетную запись в домене, может войти в систему на любом компьютере, иметь учетную запись на локальном компьютере не требуется.
В домене могут работать несколько тысяч пользователей, при этом компьютеры могут принадлежать к разным локальным сетям.
Несколько доменов имеющих одну и ту же конфигурацию и глобальный каталог называют деревом доменов. Несколько деревьев могут быть объединены в лес.
В домене есть такое понятие как групповая политика. Под групповой политикой понимают настройки системы, которые применяются к группе пользователей. Изменения групповой политики затрагивают всех пользователей входящих в эту политику.
Параметры групповой политики хранятся в виде объектов групповой политики (Group Policy Object, GPO). Эти объекты хранятся в каталоге подобно другим объектам. Различают два вида объектов групповой политики – объекты групповой политики, создаваемые в контексте службы каталога, и локальные объекты групповой политики.
Не будем подробно вдаваться в теорию и перейдем к практике.
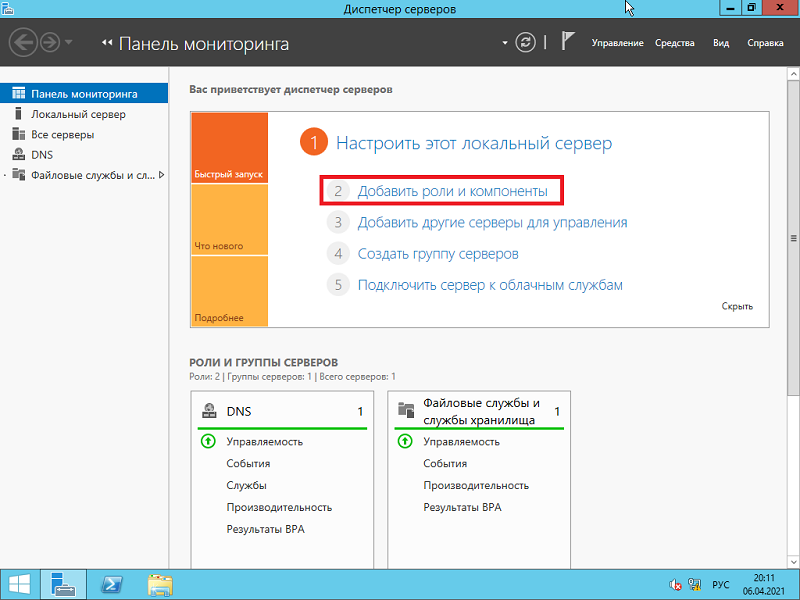
Запускаем Диспетчер серверов -> «Добавить роли и компоненты».
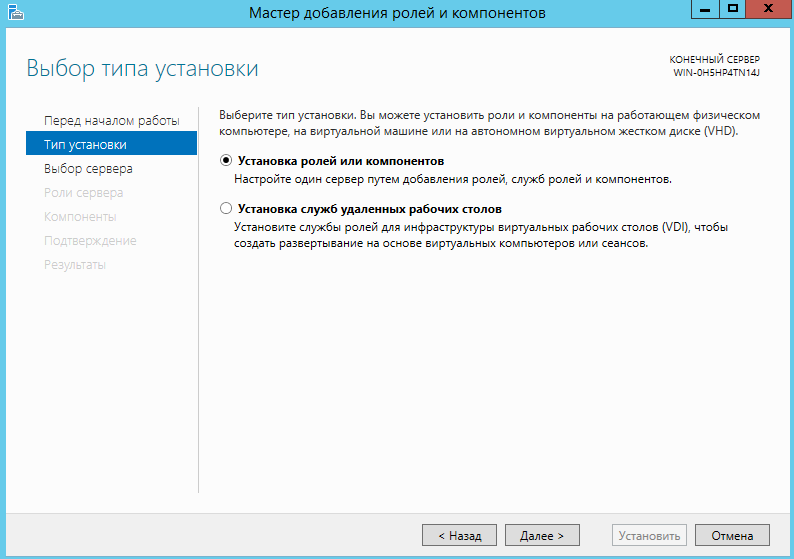
На первой странице мастер напоминает, что необходимо сделать перед началом добавления роли на сервер. Нажмите «Далее».
На втором шаге нужно выбрать «Установка ролей и компонентов» и нажать «Далее».
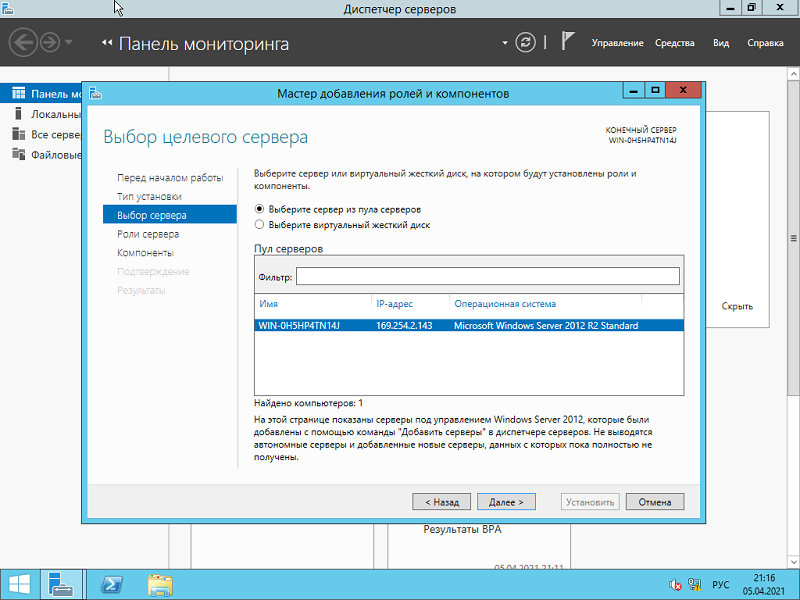
Выбираем сервер, на который нужно установить Active Directory (он у нас один), «Далее».
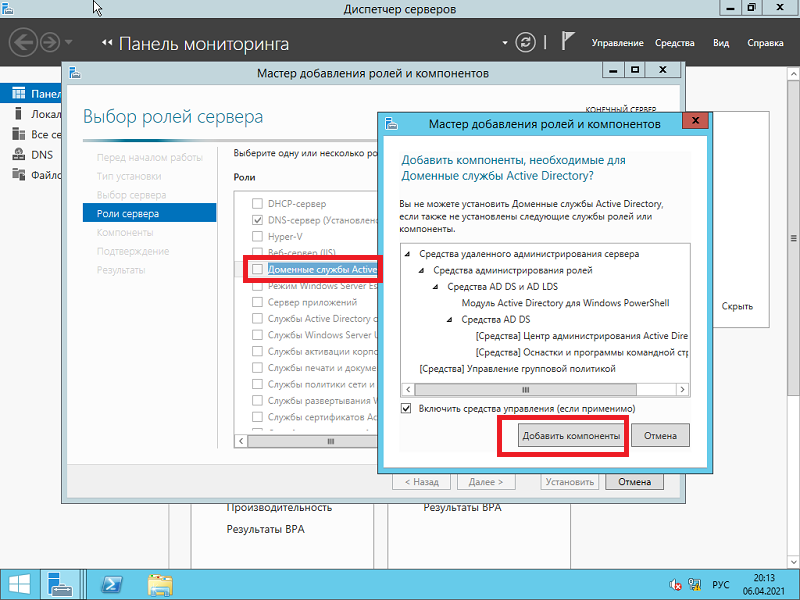
Теперь нужно выбрать роль, которую нужно добавить. Выбираем «Доменные службы Active Directory». После чего откроется окно, в котором будет предложено установить службы ролей или компоненты, необходимые для установки роли Active Directory, нажмите кнопку «Добавить компоненты», после чего кликните «Далее».
PЗатем нажимайте «Далее», «Далее» и «Установить».
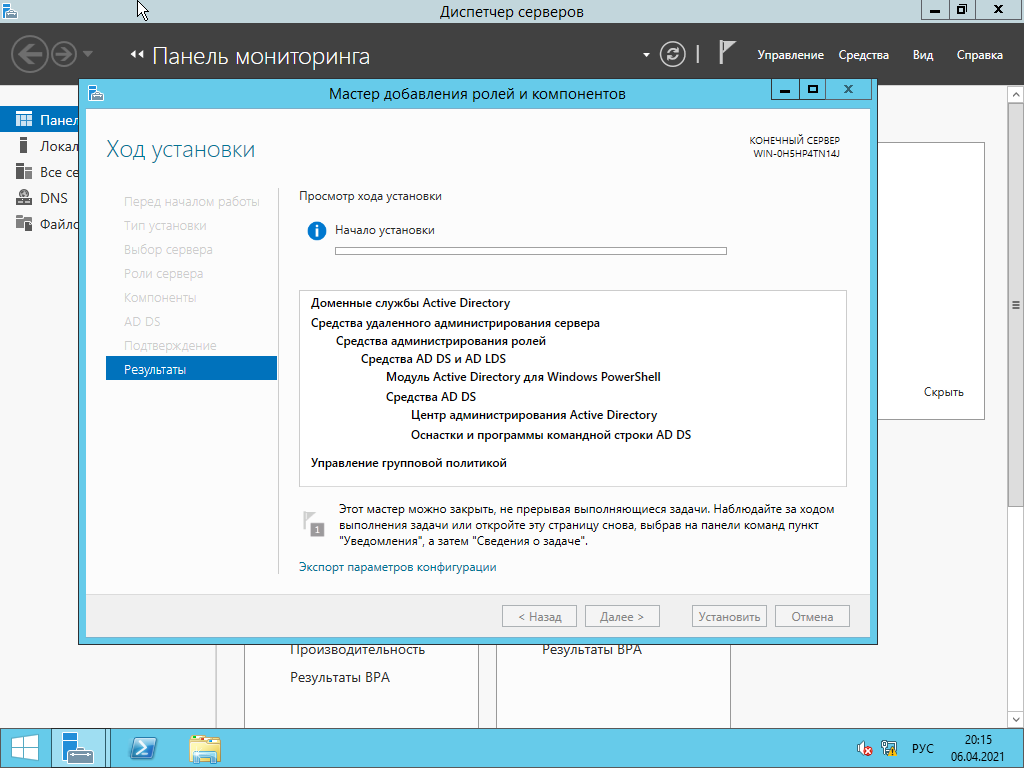
Перезапустите компьютер.
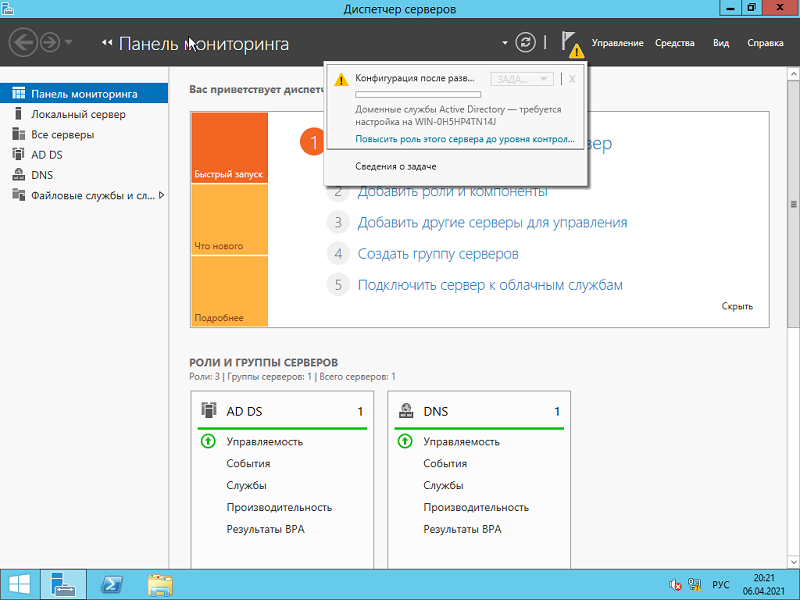
После того, как роль была добавлена на сервер, необходимо настроить доменную службу, то есть установить и настроить контроллер домена.
Настройка контроллера домена Windows Server
Запустите «Мастер настройки доменных служб Active Directory», для чего нажмите на иконку «Уведомления» в диспетчере сервера, затем нажмите «Повысить роль этого сервера до уровня контроллера домена».
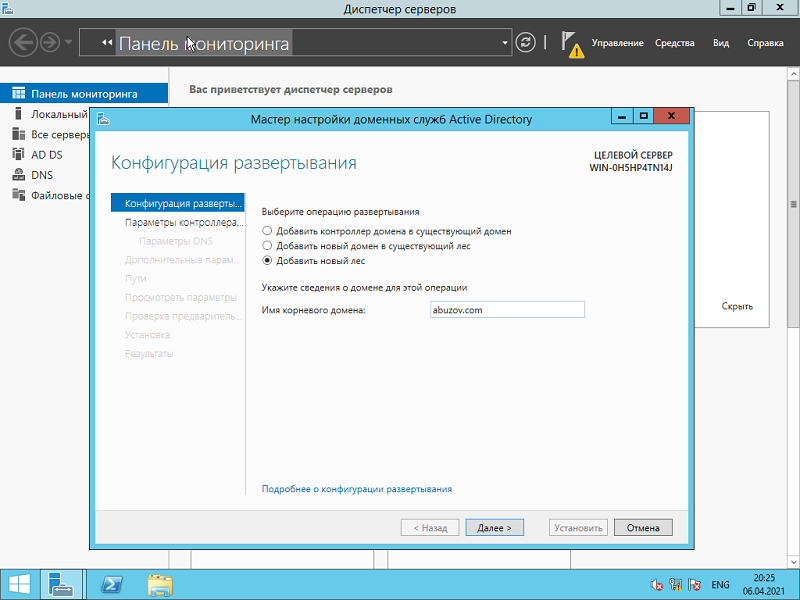
Выберите пункт «Добавить новый лес», затем введите имя домена в поле «Имя корневого домена». Домены в сети Windows имеют аналогичные названия с доменами в интернете. Я ввел имя домена buzov.com. Нажимаем «Далее».
На этом шаге можно изменить совместимость режима работы леса и корневого домена. Оставьте настройки по умолчанию. Задайте пароль для DSRM (Directory Service Restore Mode – режим восстановления службы каталога) и нажмите «Далее».
Затем нажимайте «Далее» несколько раз до процесса установки.
Когда контроллер домена установиться компьютер будет перезагружен.
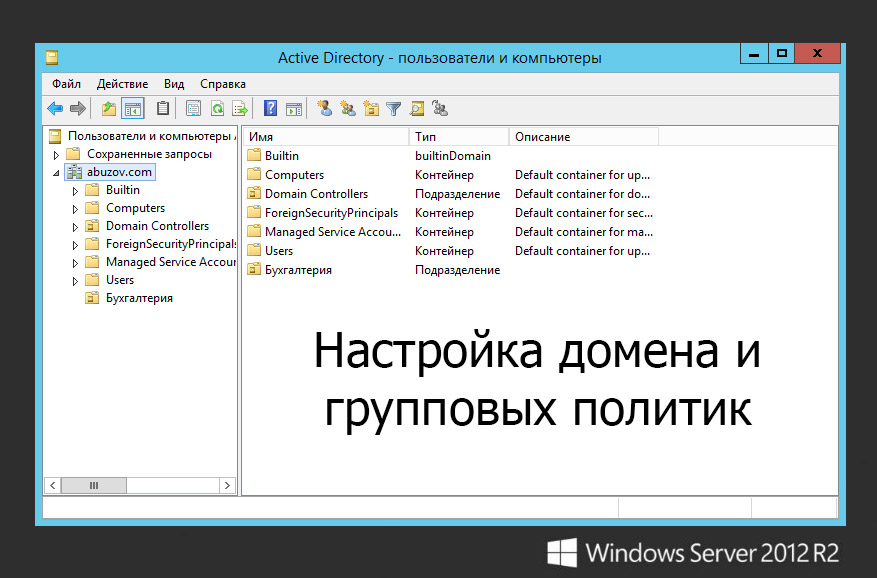
Добавление и настройка групп и пользователей в домене Windows Server
Теперь нужно добавить пользователей домена, что бы присоединить к сети рабочие места сотрудников.
Отроем «Пользователи и компьютеры Active Directory». Для этого перейдите в Пуск –> Панель управления –> Система и безопасность –> Администрирование –> Пользователи и компьютеры Active Directory.
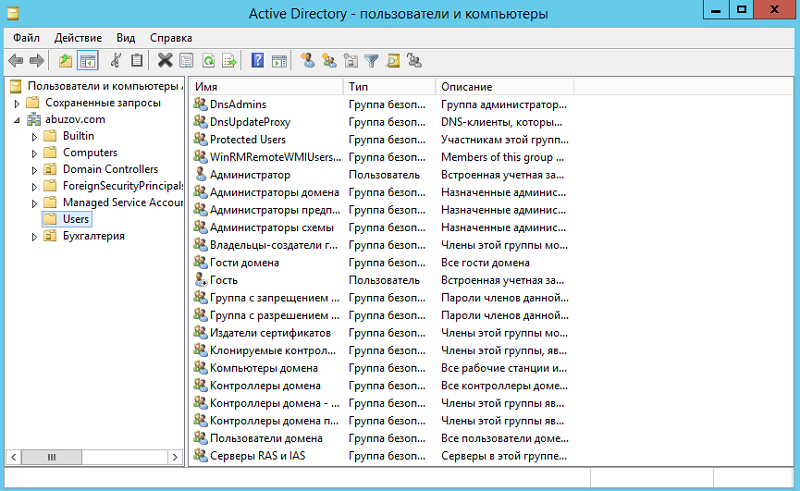
Создадим отдел «Бухгалтерия», для этого выделите название домена и вызовите контекстное меню, в котором выберите (Создать – Подразделение). Введите имя отдела (бухгалтерия) и нажмите «OK»
Подразделения служат для управления группами компьютеров пользователей. Как правило их именуют в соответствии с подразделениями организации.
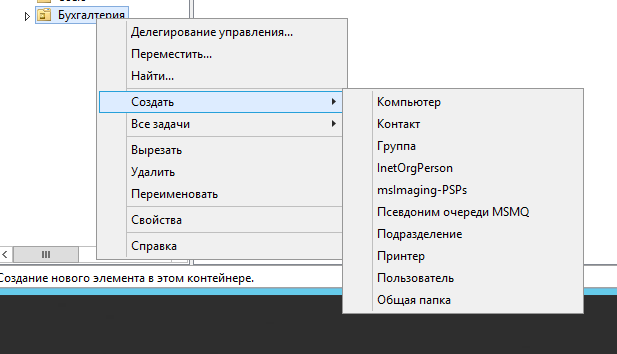
Создайте учетную запись пользователя в новом подразделении. Для этого в контекстном меню нового подразделения выберите пункт Создать –> Пользователь. Пусть первым пользователем будет Бухгалтер.
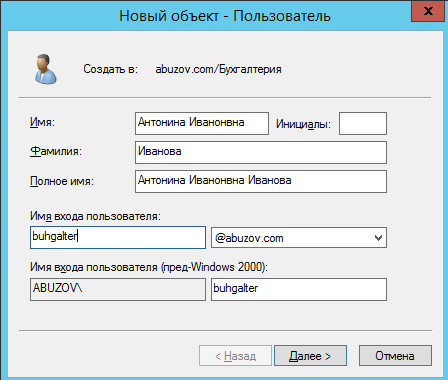
После ввода имени пользователя и учетной записи нажмите «Далее». Теперь нужно ввести пароль. По умолчанию пароль должен соответствовать требованиям сложности, то есть содержать три из четырех групп символов: заглавные буквы, строчные буквы, цифры, специальные знаки ( . , + – = ? № $ и так далее). Установите параметр «Требовать смену пароля при следующем входе в систему».
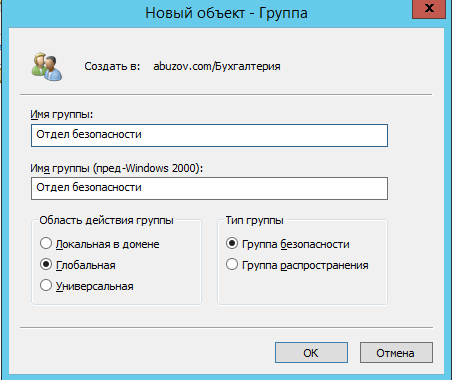
Создайте учетную запись группы безопасности. Для этого в контекстном меню нового подразделения (бухгалтерия) выберите пункт (Создать – Группа). При создании новой группы безопасности необходимо ввести имя, область действия и тип группы. Область действия определяет видимость данной группы в службе каталога. Глобальная группа видна в любом домене службы каталога и ей могут назначаться привилегии доступа к ресурсам других доменов. Локальная группа видна только в своем домене, то есть ей будут доступны ресурсы только ее домена. Группы безопасности позволяют
объединять пользователей и другие группы для назначения им одинаковых привилегий на различные объекты. Группы распространения используются для рассылки сообщений, они не участвуют в разграничении прав доступа.
Теперь нужно ввести компьютер в домен и зайти под новым пользователем. Для этого на клиентском компьютере нужно указать DNS-адрес. Для этого откройте «Свойства сетевого подключения» (Пуск –> Панель управления –> Сеть и Интернет – >Центр управления сетями и общим доступом – Изменение параметров адаптера), вызовите контекстное меню подключения и выберите «Свойства».
Выделите «Протокол Интернета версии 4 (TCP/IPv4)», нажмите кнопку «Свойства», выберите «Использовать следующие адреса DNS-серверов» и в поле «Предпочитаемый DNS-сервер» укажите адрес вашего DNS-сервера. Проверьте, что задан IP-адрес и маска той же подсети, в которой находится сервер.
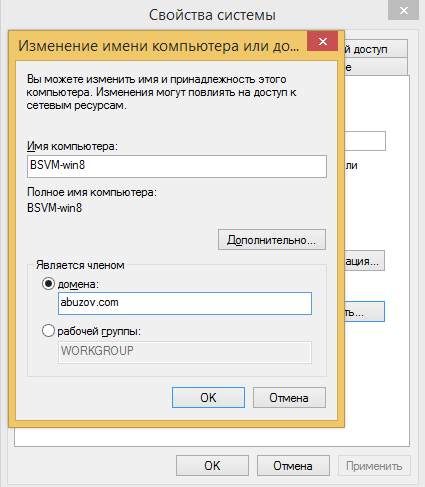
Присоединение компьютера к домену
Откройте свойства системы (Пуск –> Панель управления –> Система и безопасность –> Система –> Дополнительные параметры системы). Выберите вкладку «Имя компьютера» и нажмите «Изменить». Выберите «Компьютер является членом домена» и введите имя домена.
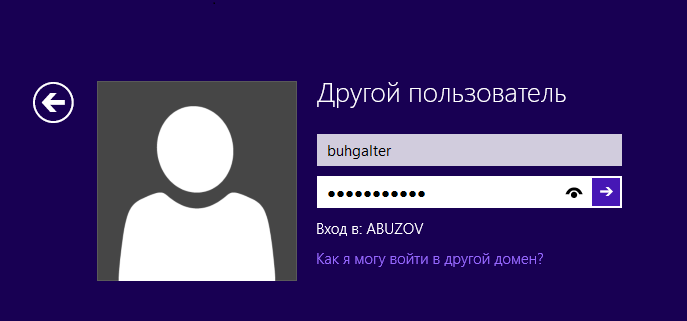
После этого необходимо ввести логин и пароль пользователя с правами присоединения к домену (обычно администратора домена). Если вы всё указали правильно, то появиться приветственное сообщение «Добро пожаловать в домен …».
Для того чтобы завершить присоединение, необходима перезагрузка.
После перезагрузки войдите в систему под доменной учётной записью пользователя, которая была создана ранее
После ввода пароля операционная система попросит вас сменить пароль.
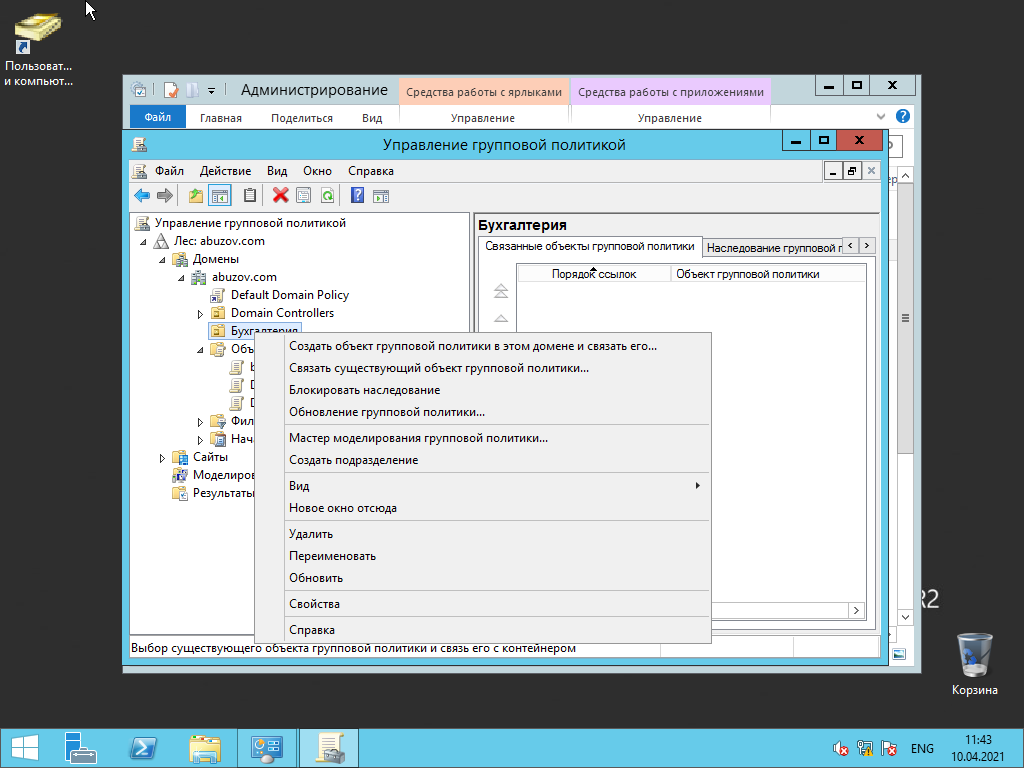
Вернемся на сервер. Нажмите «Пуск» -> Администрирование и перейдите в окно Управления групповой политикой. Выбираем наш лес, домен, Объекты групповой политики, щелкаем правой кнопкой мыши -> создать. Называем его buh (это объект групповой политики для группы Бухгалтерия).
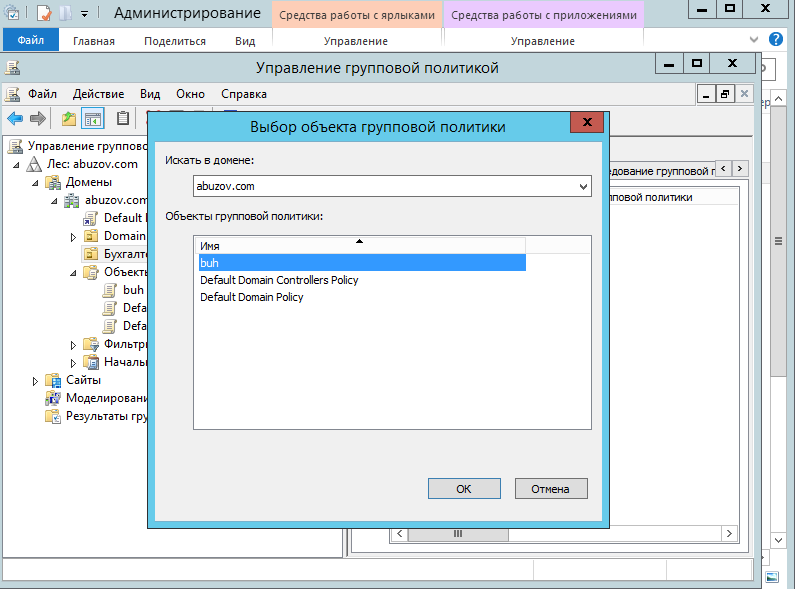
Теперь необходимо привязать данный объект групповой политики к созданной группе. Для этого нажмите правой кнопкой на созданное подразделение (Бухгалтерия) и выберите «Связать существующий объект групповой политики…», затем выберите созданный ранее объект в списке и нажмите «ОК».
Далее выбираем созданный объект.
Выбранный объект должен появиться в списке связанных объектов групповой политики. Для редактирования параметров, определяемых данным объектом, нажмите на него правой кнопкой и выберите «Изменить».
Установка параметров безопасности
Установка параметров безопасности — завершающий этап настройка домена и групповых политик в Windows Server.
Ограничения парольной защиты
Ограничение на параметры парольной системы защиты задаются в контексте «Конфигурация компьютера». Выберите Конфигурация Windows –> Параметры безопасности –> Политики учетных записей –> Политика паролей.
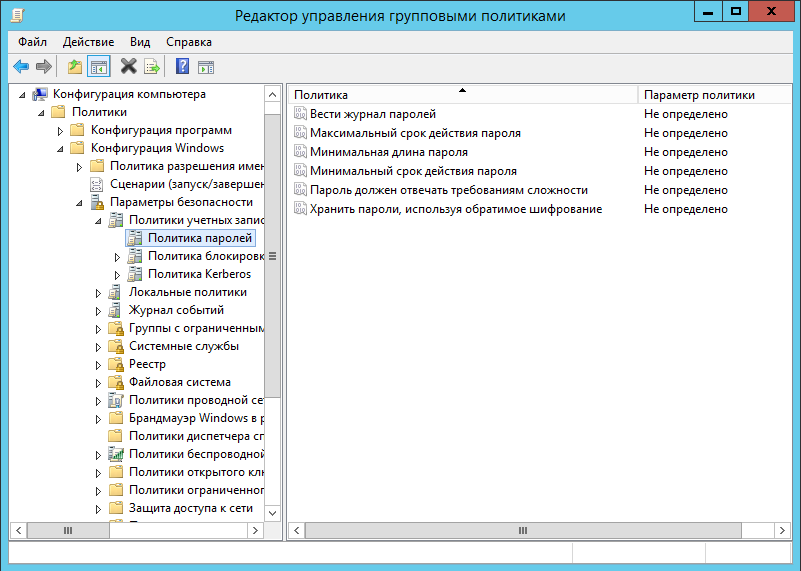
В данном разделе объекта групповой политики определяются следующие параметры:
- «Минимальный срок действия пароля» задает периодичность смены пароля.
- «Минимальная длина пароля» определяет минимальное количество знаков пароля.
- «Максимальный срок действия пароля» определяет интервал времени, через который разрешается менять пароль.
- «Пароль должен отвечать требованиям сложности» определяет требования к составу групп знаков, которые должен включать пароль.
- «Хранить пароли, используя обратимое шифрование» задает способ хранения пароля в базе данных учетных записей.
- «Вести журнал паролей» определяет количество хранимых устаревших паролей пользователя.
Тут нужно указать необходимые параметры (определите самостоятельно).
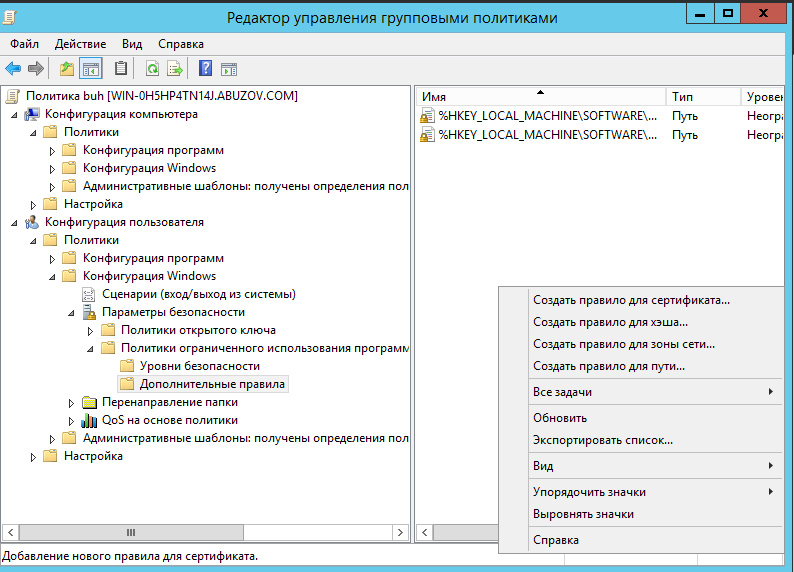
Политика ограниченного использования программ
Объекты групповой политики позволяют запретить запуск определенных программ на всех компьютерах, на которые распространяется действие политики. Для этого необходимо в объекте групповой политики создать политику ограниченного использования программ и создать необходимые правила. Как это сделать.
Выберите раздел Конфигурация пользователя –> Политики –> Конфигурация Windows –> Параметры безопасности –> Политики ограниченного использования программ. Нажмите правой кнопкой на «Политики ограниченного использования программ», далее заходим в «Дополнительные правила» и жмем правой кнопкой мыши, затем выбираем «Создать правило для пути».
После обновления объекта групповой политики на рабочей станции, политика ограниченного использования программ вступит в действие и запуск программ, соответствующих правилам, будет невозможен.
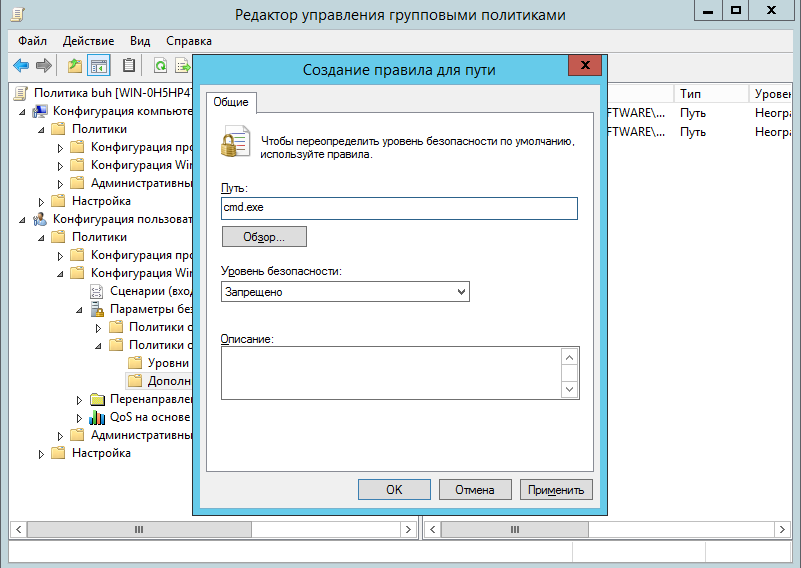
Давайте запретим использовать командную строку на клиентском компьютере.
Запрет запуска командной строки (cmd.exe).
На этом все. Если у вас остались вопросы, обязательно задайте их в комментариях.
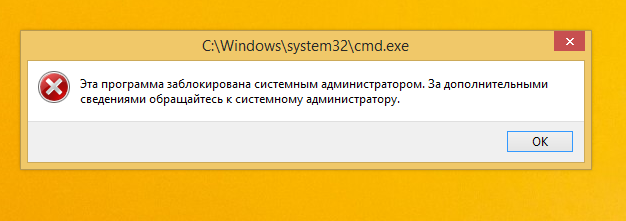
При попытке запустить командную строку на клиентской машине вы получите сообщение.
This article explains what Group Policies are and shows how to configure Windows Server 2012 Active Directory Group Policies. Our next article will cover how to properly enforce Group Policies (Group Policy Link Enforcement, Inheritance and Block Inheritance) on computers and users that a part of the company’s Active Directory.
FREE Hyper-V & VMware Backup: Easy to use — Powerful features — Just works, no hassle: It’s FREE for Firewall.cx readers! Download Now!
Before we dive into Group Policy configuration, let’s explain what exactly Group Policies are and how they can help an administrator control its users and computers.
A Group Policy is a computer or user setting that can be configured by administrators to apply various computer specific or user specific registry settings to computers that have joined the domain (active directory). A simple example of a group policy is the user password expiration policy which forces users to change their password on a regular basis. Another example of a group policy would be the enforcement of a specific desktop background picture on every workstation or restricting users from accessing their Local Network Connection properties so they cannot change their IP address.
A Group Policy Object (GPO) contains one or more group policy settings that can be applied to domain computers, users, or both. GPO objects are stored in active directory. You can open and configure GPO objects by using the GPMC (Group Policy Management Console) in Windows Server 2012:
Figure 1. GPO Objects
Group Policy Settings are the actual configuration settings that can be applied to a domain computer or user. Most of the settings have three states, Enabled, Disabled and Not Configured. Group Policy Management Editor provides access to hundreds of computer and user settings that can be applied to make many system changes to the desktop and server environment.
Group Policy Settings
Group Policy Settings are divided into Computer Settings and User Settings. Computer Settings are applied to computer when the system starts and this modifies the HKEY Local Machine hive of registry. User Settings are applied when the users log in to the computer and this modifies the HKEY Local Machine hive.

Figure 2. Group Policy Settings
Computer Settings and User Settings both have policies and preferences.
These policies are:
Software Settings: Software can be deployed to users or computer by the administrator. The software deployed to users will be available only to those specific users whereas software deployed to a computer will be available to any user that on the specific computer where the GPO is applied.
Windows Settings: Windows settings can be applied to a user or a computer in order to modify the windows environment. Examples are: password policies, firewall policy, account lockout policy, scripts and so on.
Administrative Templates: Contains a number of user and computer settings that can be applied to control the windows environment of users or computers. For example, specifying the desktop wallpaper, disabling access to non-essential areas of the computers (e.g Network desktop icon, control panel etc), folder redirection and many more.
Preferences are a group policy extension that does the work which would otherwise require scripts. Preferences are used for both users and computers. You can use preferences to map network drives for users, map printers, configure internet options and more.
Next, let’s take a look at how we can create and apply a Group Policy.
FREE Hyper-V & VMware Backup: Easy to use — Powerful features — Just works, no hassle: It’s FREE for Firewall.cx readers! Download Now!
Creating & Applying Group Policy Objects
By default, GPOs can be created and applied by Domain Admins, Enterprise Admins and Group Policy Creator Owner user groups. After creating the GPO, you can apply or link the GPOs to sites, domains or Organizational Units (OUs), however you cannot apply GPO to users, groups, or computers. GPOs are processed in following top to bottom order:
- Local Group Policy: Every windows operating system has local group policy installed by default. So this local group policy of the computer is applied at first.
- Site GPO: The GPOs linked to the Site is then processed. By default, there is no site level group policy configured.
- Domain GPO: Next, the GPO configured at domain level is processed. By default, GPO named default domain policy is applied at the domain level. This applies to all the objects of the domain. If there is policy conflict between domain and site level GPOs, then GPO applied to domain level takes the precedence.
- Organizational Unit GPO: — In the end, GPO configured at OU is applied. If there is any conflict between previously applied GPOs, the GPO applied to OU takes the most precedence over Domain, Site and Local Group Policy.
Let’s now take a look at a scenario to apply a group policy to domain joined computers to change the desktop background. We have a domain controller named FW-DC01 and two clients FW-CL1 and FW-CL2 as shown in the diagram below. The goal here is to set the desktop wallpaper for these two clients from a group policy:

Figure 3. GPO Scenario
In our earlier articles we showed how Windows 8 / Windows 8.1 join an Active Directory domain, FW-CL1 and FW-CL2 are workstations that have previously joined our domain – Active Directory. We have two users MJackson and PWall in the FW Users OU.
Open the Group Policy Management Console (GPMC) by going into Server Manager>Tools and select Group Policy Management as shown below:
Figure 4. Open GPMC
As the GPMC opens up, you will see the tree hierarchy of the domain. Now expand the domain, firewall.local in our case, and you will see the FW Users OU which is where our users reside. From here, right-click this OU and select the first option Create a GPO in this domain and Link it here:

Figure 5. Select FW Users and Create a GPO
Now type the Name for this GPO object and click the OK button. We selected WallPaper GPO:
Figure 6. Creating our Wallpaper Group Policy Object
Next, right-click the GPO object and click edit:

Figure 7. Editing a Group Policy Object
At this point we get to see and configure the policy that deals with the Desktop Wallpaper, however notice the number of different policies that allow us to configure and tweak various aspects of our domain users.
To find the Desktop Wallpaper, go to Expand User Configuration> Policies> Administrative Templates> Desktop> Desktop. At this point we should be able to see the setting in right window. Right-click the Desktop Wallpaper setting and select Edit:

Figure 8. Selecting and editing Desktop Wallpaper policy
The settings of Desktop Wallpaper will now open. First we need to activate the policy by selecting the Enabled option on the left. Next, type the UNC path of shared wallpaper. Remember that we must share the folder that contains the wallpaper \\FW-DC1\WallPaper\ and configure the share permission so that users can access it. Notice that we can even select to center our wallpaper (Wallpaper Style). When ready click Apply and then OK:

Figure 9. Configure Desktop Wallpaper
Now that we’ve configured our GPO, we need to apply it. To do so, we can simply log off and log back in the client computer or type following command in domain controller’s command prompt to apply the settings immediately:
C:\> gpupdate /force
Once our domain user logs in to their computer (FW-CL1), the new wallpaper policy will be applied and loaded on to the computer’s desktop.

Figure 10. User Login
As we can see below, our user’s desktop now has the background image configured in the group policy we created:

Figure 11. Computer Desktop Wallpaper Changed
This example shows how one small configuration setting can be applied to all computers inside an organization. The power and flexibility of Group Policy Objects is truly unbelievable and as we’ve shown, it’s even easier to configure and apply them with just a few clicks on the domain controller!
FREE Hyper-V & VMware Backup: Easy to use — Powerful features — Just works, no hassle: It’s FREE for Firewall.cx readers! Download Now!
This article explained what Group Policies Objects are and showed how to Configure Windows 2012 Active Directory Group Policies to control our Active Directory users and computers. We also highly recommend our article on Group Policy Enforcement, Inheritance throughout the Active Directory structure. More articles on Windows 2012 & Hyper-V can be found at our Windows 2012 Server section.
One of the most important things in every Windows based domains are updates. You`ll probably want to arrange updating via Domain Group Policy since people often forget/postpone Windows Updates.
This LAB assumes you already have domain configuration in place.
Here is how to do it on Windows Server 2012 R2:
On your domain controller open search (or run) and type in gpmc.msc | Click on gpmc
!!!! Little side note– In this case, I don`t want same Windows Update policy for my servers and clients. It would be inappropriate for production servers to update and restart let’s say at Monday 13 hours. But it would be very good time for clients since everybody is at lunch at that time.
Anyway, it is good practice to create different Organizational Units for different types of computers and users in your environment so you can fine tune your group policy and permissions also.
You can create new organization unit in Active Directory Users and Computers | right click on domain name | New – Organizational Unit
Let’s get on with the LAB
Expand forest |Domains | right click on your OU (organizational unit) that you want this policy to apply (in my case TestPCs OU) | Create a GPO in this domain, and Link it here
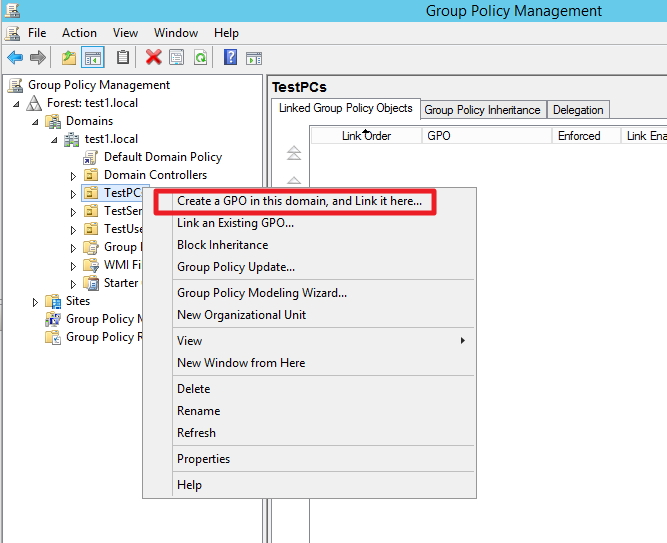
We need to name New GPO. I`ll name mine Windows_Update | Leave None under Source Starter GPO | OK
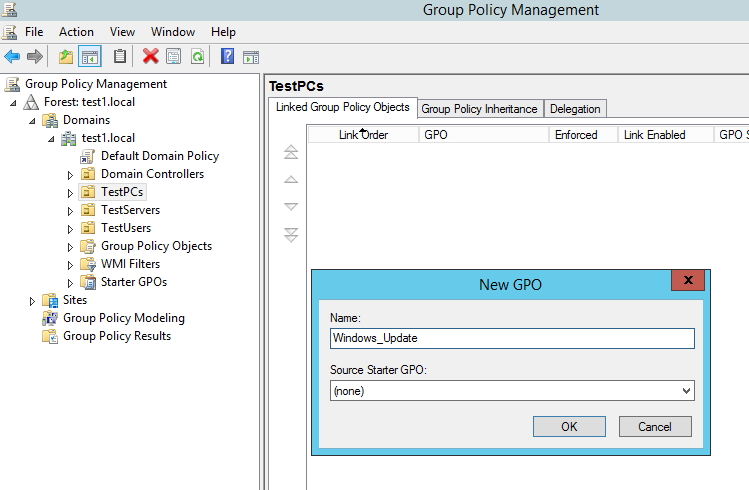
New Policy is created (in my case) under TestPCs OU and it will apply to all PCs that are part of TestPCs OU.
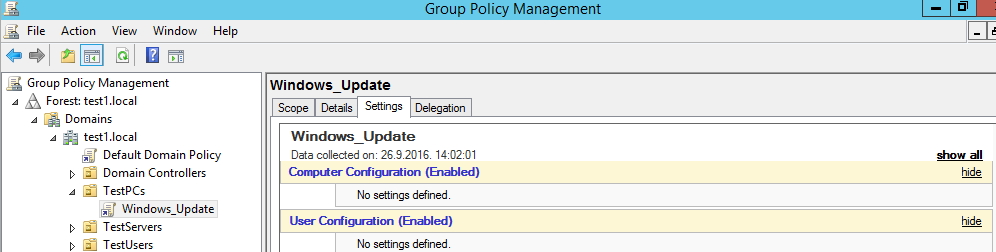
Select created Windows_Update GPO (group policy object) and click on Settings tab on the right part of the screen
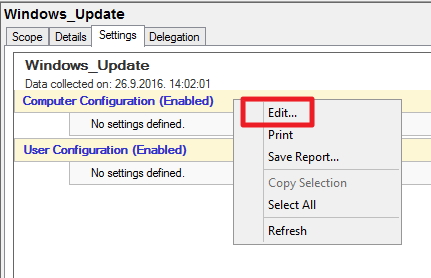
Right click on Computer Configuration |Edit
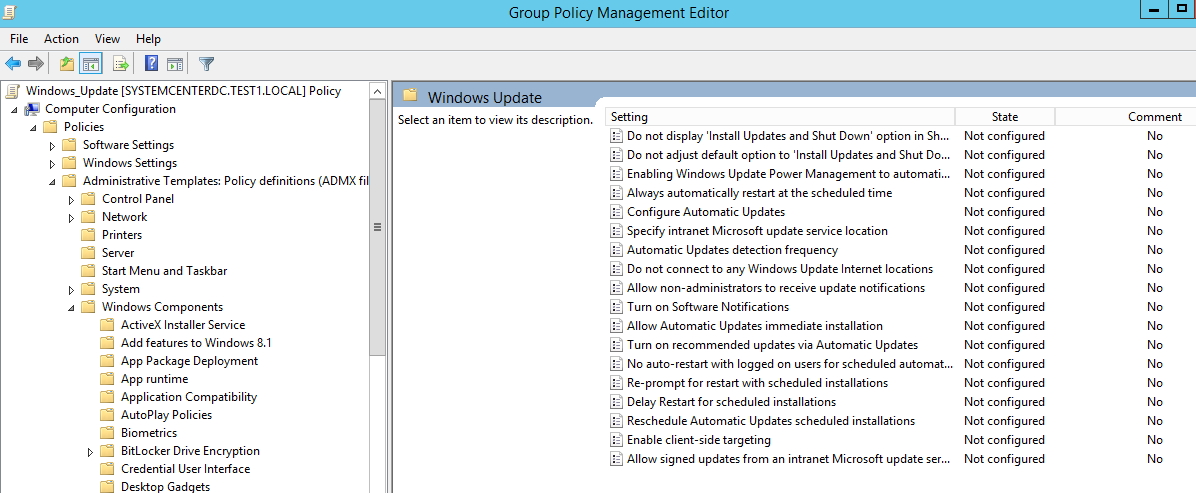
Click on Computer Configuration | Policies | Administrative Templates | Windows Components | Windows Update
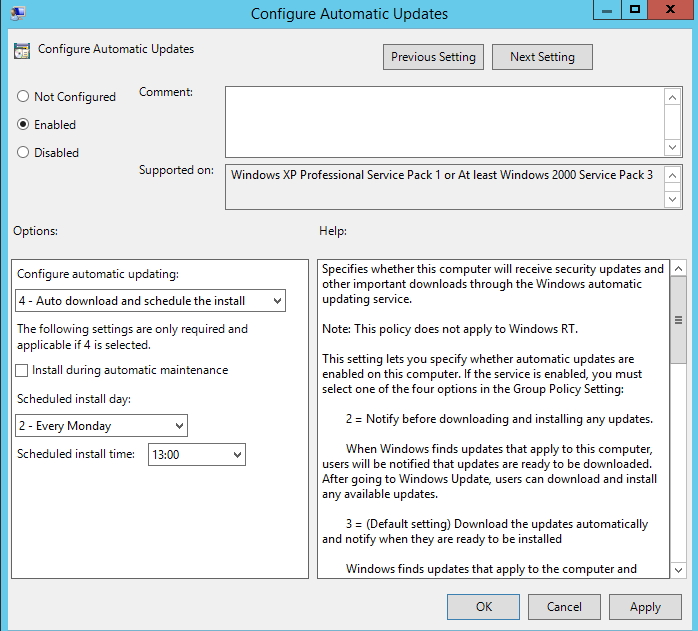
Double click on Configure Automatic Updates |Enabled | under Options define how you would like your updates to work. I choose following
Configure automatic updating: 4 – Auto download and schedule the install
Schedule install day: 2 – Every Monday at 13:00h
Apply |OK
In order to confirm that this setting is working we need to test on one of the PCs that are affected by this policy.
Log on onto the PC – command prompt with administrative privileges (run as administrator)
gpupdate /force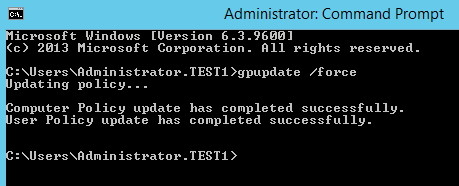
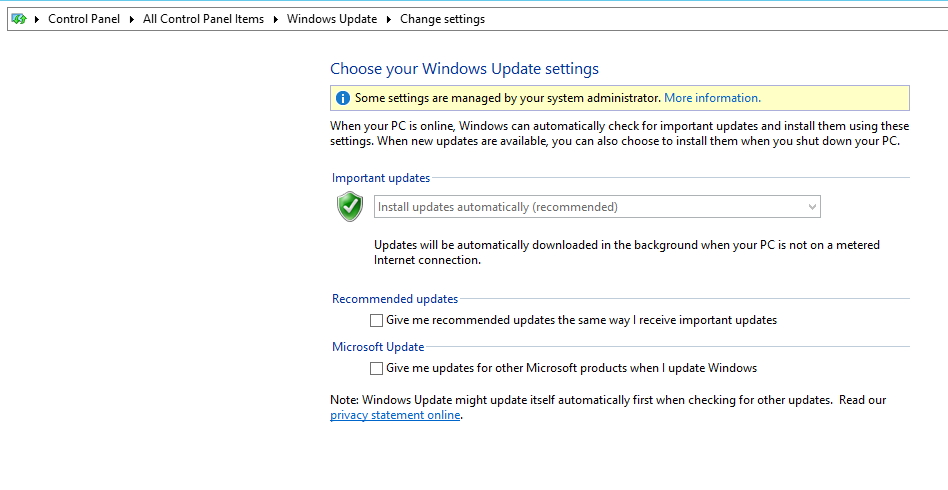
After that if we check under Control Panel | Windows Update | Change settings (right part of the screen) we see that update settings are changed
Other Windows Updates options worth mentioning:
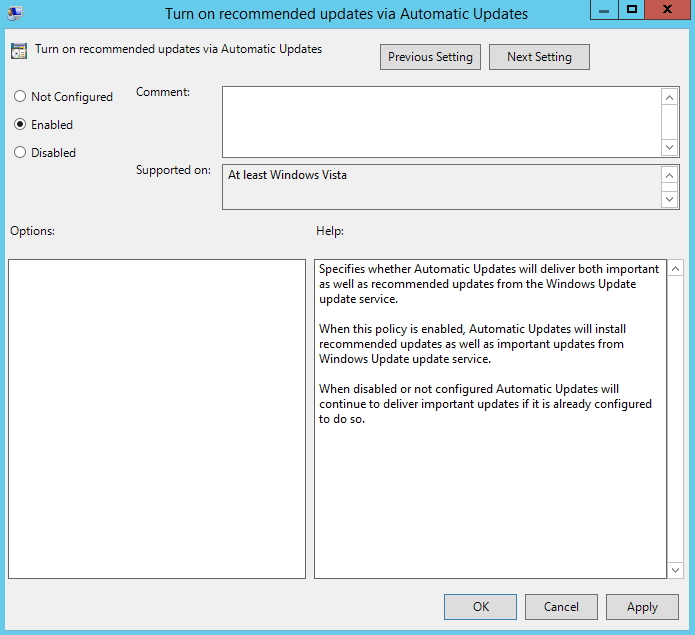
Turn on recommended updates via Automatic Updates
With this enabled you`ll get optional updates for windows components.
No auto-restart with logged on users for scheduled automatic updates installations is also good option.
Conclusion
We did some Group Policy and enabled automatic Windows Update for our domain PCs.
Disclaimer
Hi all,
Today I will show how to Implement Group Policy (GPO) in Windows Server 2012 R2…
For those who maintaining Server Infra you all know how challenging is the our task especially on the Group Policy, you as Administrators need a mechanism to configure and enforce user and computer settings and restrictions.
Group Policy can provide that consistency by enabling you as administrators to centrally manage and apply configuration settings.
For this demo, lets assume your IT Manager has asked you to create a central store for ADMX files to ensure that everyone can edit GPOs that have been created with customized ADMX files. You also need to create a starter GPO that includes Internet Explorer settings, and then configure a GPO that applies GPO settings for the Research department and the IT department.
For this demo also, I use my existing Domain Server which is DC01.comsys.local and my Windows 8 client which is Surface01.comsys.local.
1 – 1st, you need configure a Central Store on DC01 Server, but before that, go to your Group Policy Management on DC01.

2 – Next, on the Group Policy Management Console (GPMC), double cick Comsys.local, expand till you get Group Policy Objects folder. Right Click Default Domain Policy and click Edit…

3 – Next, on the Group Policy Management Editor, double click User Configuration, expand Policies, and then click Administrative Templates, if you check on that, you will see note saying Administrative Templates: Policy definitions (.admx files) retrieved from the local computer.

4 – Next, access to your Policies folder (c:\windows\SYSVOL\sysvol\comsys.local), here create a new folder name PolicyDefinitions.

5 – Next, access to your C:\windows\PolicyDefinitions folder, what you need to do here is to copy all .adml & .admx files...

6 – then, paste the .adml & .admx files that you copied just now into c:\windows\SYSVOL\sysvol\comsys.local\PolicyDefinitions folder.…

7 – Next, lets verify the administrative template location in GPMC.. open back your GPMC and then click on the Administrative Templates, you should see now it says Administrative Templates: Policy definitions (ADMX files) retrieved from the Central Store….


8 – Next step lets create Internet Explorer Restriction default starter GPO, on the GPMC, right click Starter GPOs and click New…

9 – In the New Starter GPO box, type ComSystem IE Restrictions, and in the Comment field, type This GPO created by Hamizi to disables the General page in IE Options, and then click OK…

10 – after you created the Started GPO, now we need to configure the IE Restriction starter GPO, to continue, right click ComSystem IE Restrictions and click Edit…

11 – Next, on the Group Policy Starter GPO Editor, go to User Configuration, Administrative Templates, and then right click All Settings, and then click Filter Options…

12 – then in the Filter Options box, click Enable Keyword Filters box and then in the Filter for word(s): field, type General page, then you choose Exact then click OK…

13 – Next, you need to double-click the Disable the General page setting, click Enabled, and then click OK..


14 – Our next step is to create an IE Restrictions GPO from the IE Restrictions starter GPO, to continue right click Comsys.local and click Create a GPO in this domain, and link it here…

15 – Next, in the New GPO box, type ComSystem IE Restrictions and then Under Source Starter GPO, select ComSystem IE Restrictions, and then click OK…

16 – so now lets test the GPO, see if it effected to our domain users or not…on the Windows 8 client, I log in as Alan.. Alan is from Research Department.

17 – once your user successfully log in, go to Control Panel and click Network and Internet, then click click Change your homepage..you should see a message box displays informing you that this feature has been disabled…

18 – you can click Internet Options and notice that in the Internet Properties dialog box the General tab does not display…

19 – so now for next step, lets use security filtering to exempt the IT Department from the Internet Explorer Restrictions policy.. on the GPMC, click ComSystem IE Restrictions GPO and click Delegation tab, then click Advanced button..

20 – Next, In the ComSystem IE Restrictions Security Settings box, click Add..

21 – then in the Select Users, Computers, Service Accounts, or Groups field, type IT Dept, and then click OK…

22 – next, In the ComSystem IE Restrictions Security Settings box, click the IT Dept (COMSYS\IT Dept) group, next to the Apply group policy permission, select the Deny check box, and then click OK.. then click Yes to acknowledge..


23 – Now lets test the GPO for our IT Department.. on my Windows 8 I log in as Candy (Candy is a IT Engineer in IT Dept)…

24 – once Cindy successfully log in to Windows 8, go to Control Panel and click Network and Internet then click Change your homepage, The Internet Properties box opens to the General tab, and all settings are available..

that’s all for now folks.. c ya next time for more Windows Server 2012 R2 configuration…
Group Policy Configuration on Windows Server 2012
This article explains how to setup and configure Group Policy on Microsoft Windows Server 2012. Free step by step guide for Group Policy configuration on Windows Server 2012
By default this feature enabled and installed automatically while installing Active directory Role on a server. You cannot remove this Role and cannot install this role individually on Windows 2012 Server.
1. Login to the Test Server
2. Now let’s start with login onto the server as shown below.

3. Give username & password (abc\administrator) & click on ok as shown below.

4. On the certificate verification window click on Yes button.

5. The Next windows will show the Server Desktop.

6. Open Server Manager from the Left down corner of server Desktop as shown below

7. Click on Group Policy Management from Tool Tab given in the Top right corner in Server Manager Dashboard.

8. The Group Policy Management window will open of ABC.com domain as shown.

9. Right Click on Group Policy Abject & click on New to create new group policy.

10. Give name to the Policy “Software Deployment policy” as shown below & click on ok button.

11. Right click on Software Deployment & click on Edit button as shown

12. Group Policy Management editor will open , Expand Policy Software Settings Software Installation Right Click & Select New Package

13. Before creating any package go to c drive & create a folder & copy the software installer file in to that folder as shown below

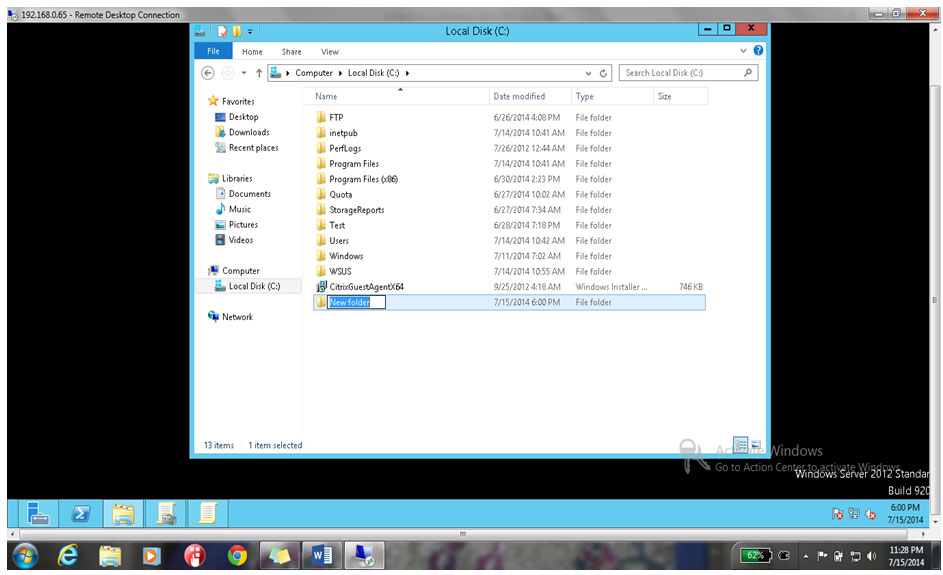
14. Rename it Software as shown below

15. Place software into the directory as shown below

16. Right click on Software & click on properties

17. Click on Sharing Tab & click on Share button as shown below

18. Select Everyone from the drop down menu as shown below

19. Click on Add button as shown below

20. Select Read & Write Rights for all users as shown below

21. Click on Share button to finish the Sharing configuration a shown below

22. Click on Done

23. Then click on Close button

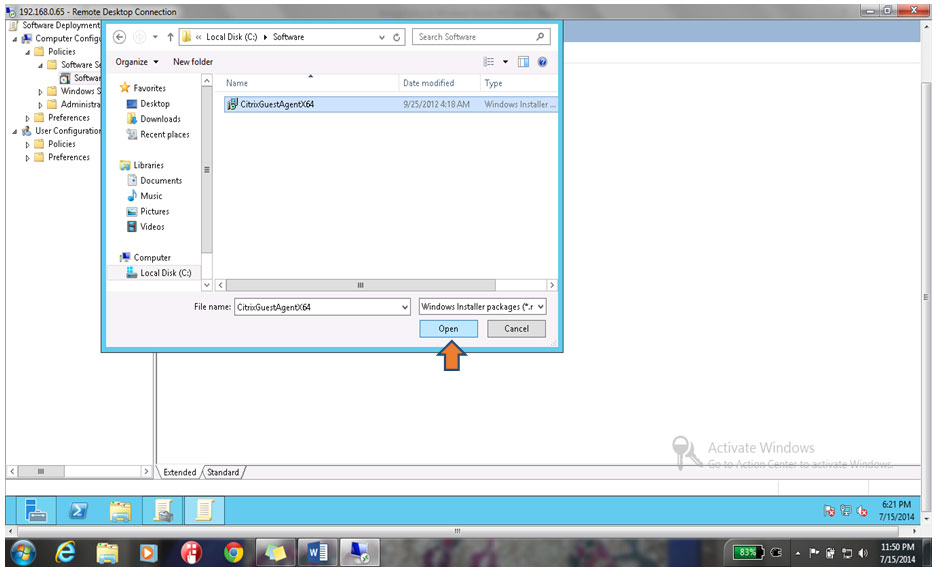
24. Come back to Group Policy Management Editor & select the Policy Right Click New Package

25. Select the Software by going to the location C:\ Software, Select the Software & Click on open button as shown below.
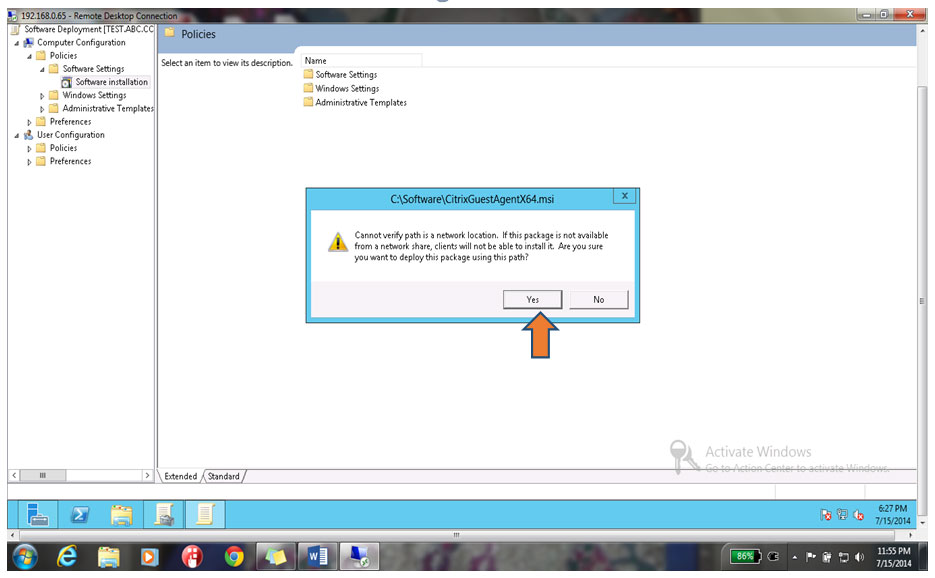
26. Click on Yes button on the Warning as shown below
27. Select Assigned & click on Ok button as shown

28. You can see Software Deployment Group policy has been configured on windows server 2012.

29. Close Group Policy Management editor & come back to Group Policy management Console.

30. Right Click on ABC.com & click on Linked in Exiting GPO

31. Select Software Deployment & click on ok as shown below

Now, close the Group policy management Console.
Read more
- Windows Server 2012 System Requirements
- Windows 2012 Server Versions
- Installing Windows Server 2012 on Virtual Cloud
- File server configuration on Windows Server 2012
- Installing Active Directory in Windows 2012 Server
- Installation and configuration of printer server and network printer on Windows 2012 Server
- How to join Computers to a Domain in Windows Server 2012
- User Creation in Active Directory Windows 2012 Server
- FTP Server Installation and Configuration on Windows Server 2012
- Disk Quota Management and Configuration on Windows Server 2012
- IIS Server Installation and Configuration on Windows Server 2012
- DHCP Server Configuration in Windows Server 2012
- VPN Server Installation and Configuration on Windows Server 2012
- DNS Server Installation and Configuration on Windows Server 2012
- Setup Shared Folder Permissions on Windows Server 2012
- WSUS Server Configuration on Windows Server 2012
Practice Exams
- MTA Practice Test
- MCSA, MCSE Practice Test
Tutorial
- MCSE Tutorial
Study Guide
- MCSE, MCSA Study Guide
Interview Questions
- MCSE and MCSA Interview Questions
- Networking Interview Questions
Resume
- MCSE Resume
- Network Administrator Resume